

Page 1
NS-BIPCD03_14-0822_QSG_V3_EN.ai 1 8/8/2014 10:52:57 AMNS-BIPCD03_14-0822_QSG_V3_EN.ai 1 8/8/2014 10:52:57 AM
V3
FINAL
FOR PRINT
Quick Setup Guide l NS-BIPCD03
CD Boombox with FM Radio
Congratulations on your purchase of a high-quality
Insignia product. Your CD Boombox with FM Radio is
designed for reliable and trouble-free performance.
Use this guide for initial setup.
PACKAGE CONTENTS
• Boombox
• AC power adapter
• User Guide
• Quick Setup Guide
“Made for iPod” and “Made for iPhone” mean that an electronic accessory
has been designed to connect specifically to iPod or iPhone, respectively,
and has been certified by the developer to meet Apple performance
standards. Apple is not responsible for the operation of this device or its
compliance with safety and regulatory standards. Please note that the use
of this accessory with iPod or iPhone may aect wireless performance.
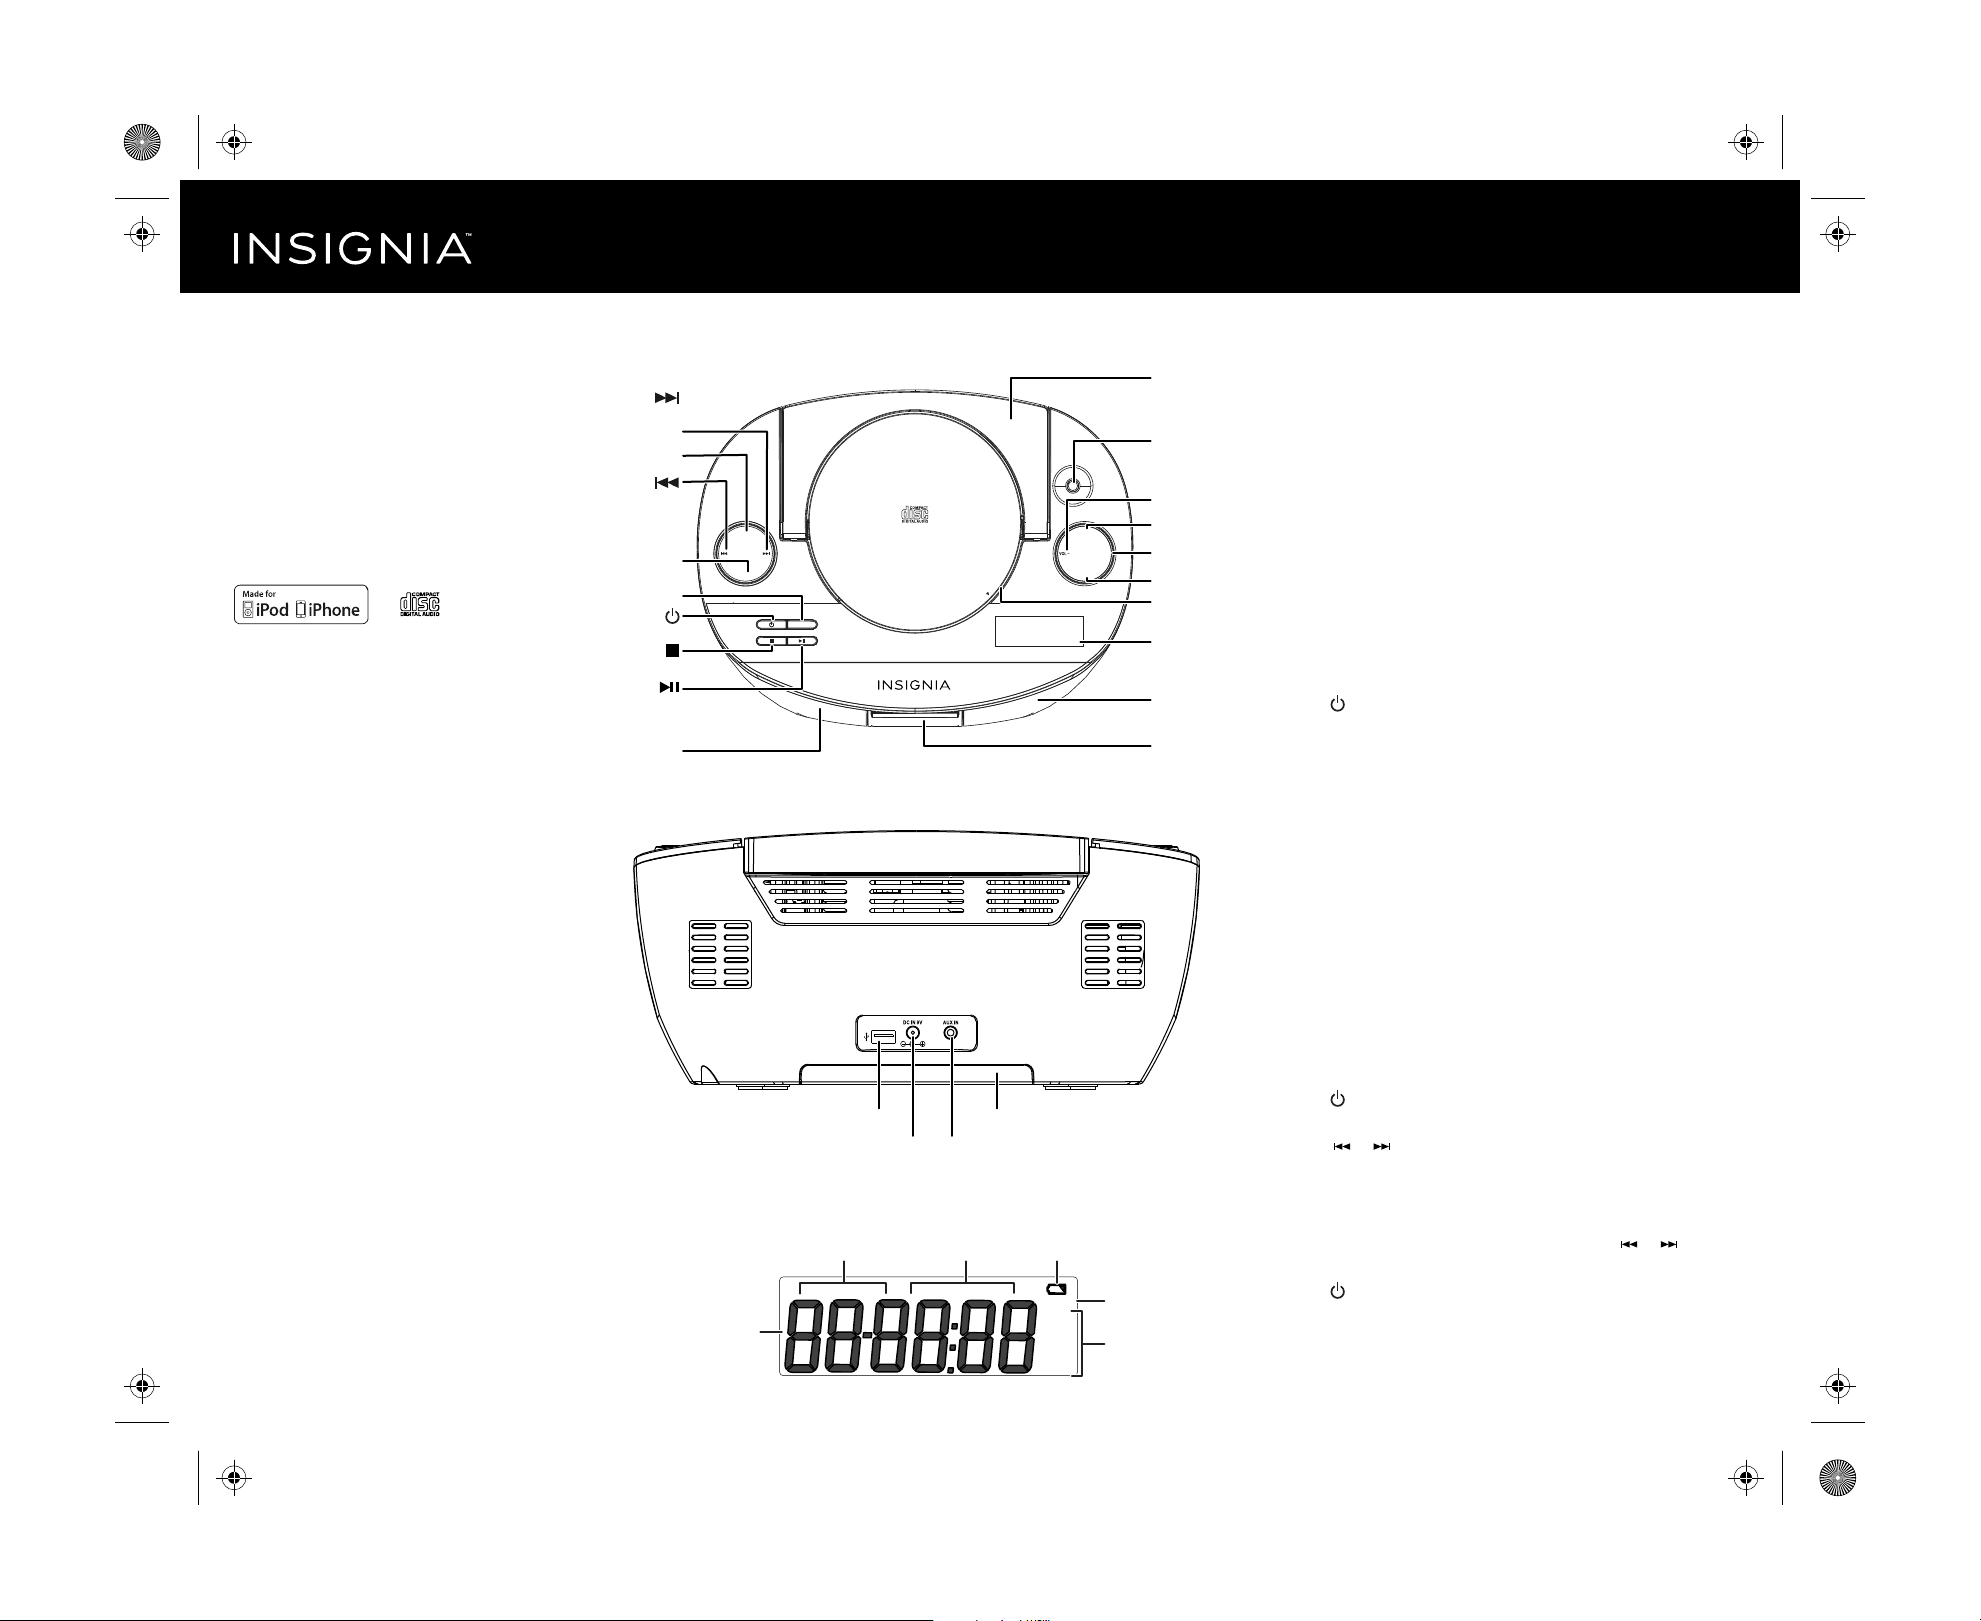
FEATURES
Top
(skip forward/
tune up) button
SOUND button
(skip back/tune
down) button
PLAY MODE
button
SOURCE button
(power) button
(stop) button
(play/pause)
button
Left speaker
Back
SOUND
PLAY MODE
SOURCE
POWERING YOUR BOOMBOX
Handle
FM antenna
VOL– button
VOL +
PRESET button
VOL+ button
MEMORY button
CD compartment
OPEN
LCD display
PRESET
n
e
p
o
h
s
u
P
MEMORY
This product can be powered by either the included AC power adapter (9V 2.2A)
or by six “C” size alkaline batteries (not included).
Installing the batteries
1 Open the battery compartment on the bottom of your boom box.
2 Insert 6 “C” size alkaline batteries (not supplied) into the battery compart-
ment. Make sure to match the + and - on each battery to the + and - signs
in the battery compartment.
3 Close the battery compartment until it clicks into place.
Connecting the AC adapter
1 Insert the small connector at the end of the AC power adapter cable into the
DC IN jack on the back of your boombox.
2 Plug the AC power adapter into a wall power outlet.
TURNING ON YOUR BOOMBOX
Right speaker
Lightning
connector dock
• Press (power) on the top of your boombox.
SELECTING THE MODE SOURCE
• Press SOURCE repeatedly on the top of your boombox to select FM, iPod
DOC, iPod USB, CD or AUX. The source you select appears on the display.
VOLUME CONTROL
• After you select the mode you want, press VOL+ or VOL– to set the volume
to a comfortable level.
Before using your new product, please read
these instructions to prevent any damage.
LCD display
Track or le number,
operating information
playing time, and
iPod/iPhone
iPod/iPhone USB jack
DC IN jack
FM AUX CD iPod REPEAT ALL RANDOM
AUX IN jack
Repeat mode
indicator
Battery compartment
Low battery indicatorSound source
STEREO
FLAT
JAZZ
POP
CLASSIC
ROCK
Stereo indicator
Sound mode
USING RADIO MODE
• Radio mode is the default the rst time you turn your boombox on.
Thereafter, it will turn on to the last mode selected.
Listening to the radio
1 Press the POWER button to turn the boombox ON. The LCD display turns on.
2 Repeatedly press SOURCE until “FM” lights on the display.
Tuning to a station
1 Press (power) on the top of your boombox.
2 Press SOURCE repeatedly to select the FM mode.
3 Press or to tune the radio up or down and select the station you
want. When a strong FM signal is received, Stereo appears on the display.
4 Adjust the volume to a comfortable level by pressing either the VOL+ or
VOL- button.
5 To scan to a higher or lower frequency, press and hold or for one
second. The radio automatically scans to the next station.
6 Press (power) to turn o the boombox.
Page 2
NS-BIPCD03_14-0822_QSG_V3_EN.ai 2 8/8/2014 10:53:02 AMNS-BIPCD03_14-0822_QSG_V3_EN.ai 2 8/8/2014 10:53:02 AM
To improve FM reception:
• For FM reception, raise and extended the FM antenna. You may have to
reposition the antenna for best reception.
To use presets:
1 Press (power) to turn on your boombox.
2 Press SOURCE repeatedly to select FM radio mode.
3 Press or to tune the radio up or down and select the station you want.
4 To save the station as a preset, press and hold MEMORY. “P01” blinks on the
display.
5 Press PRESET to select the preset number (P01-P10) you want.
6 Press MEMORY to store the preset.
7 Repeat Steps 3 to 6 to store as many as ten FM presets.
8 To select a preset station, briey press PRESET repeatedly until you reach the
station you want.
USING THE CD PLAYER
CAUTION: Do not attempt to play DVDs, VCDs, or data CDs in your boombox. You may damage your unit.
1 Press (power) to turn on your boombox.
2 Press SOURCE repeatedly to select the CD mode.
3 Press the OPEN area on the CD door to open the lid.
4 Insert a CD, label side up.
5 Press the OPEN area on the CD door to close it. The total number of tracks
appears on the display.
6 Press (play/pause) to begin playback. The current track appears on the
display. The CD stops when nished.
NOTE: If the door is opened during playback, playback stops immediately and any repeat mode
setting is reset.
7 Control CD playback as follows:
• Press (play/pause) to pause playback. Press again to resume playback.
• Press (stop) to stop playback.
• Press to skip the next track.
• If the current track has played more than two seconds, press to go to
the beginning of the currently playing track. If the current track has played
less than two seconds, press to go the the previous track.
• Press and hold to fast forward. Release to stop the search.
• Press and hold to fast reverse. Release to stop the search.
• Press PLAY MODE once to repeat the current track. “Repeat” appears on the
display.
• Press PLAY MODE twice to repeat the entire CD. “Repeat All” appears on the
display.
• Press PLAY MODE three times to randomly play the tracks on the CD.
“Random” appears on the display.
• To return to normal playback, press PLAY MODE until the play mode
indicators disappear from the display.
NOTES:
• If a CD is inserted incorrectly, is dirty or damaged, is not present, or is a non-compatible
format, “NO DISC” appears on the display.
• To prevent damage to the CD, never open the CD door while the CD is rotating and never
touch the lens.
• Do not use the carrying handle when playing a CD. The CD player should only be used on
a steady surface.
• Your CD boombox plays standard CDs and 3" CDs.
USING AN IPOD/IPHONE
To connect a newer iPod or iPhone to your boombox:
1 Insert an iPod Nano 7th, iPod Touch 5th, or iPhone 5, into the lightning
connector on the front of the boombox.
2 Press SOURCE until “iPod DOC” lights on the display, then press the play
button on either the iPod/iPhone or the boombox to begin playback.
NOTE: If the iPod/iPhone is playing when docked, it will play at the boombox automatically
without pressing the Play button. Control playback using the controls on the boombox.
To charge the iPod/iPhone battery:
• Insert the iPod by lightning connector or iPod/iPhone USB Jack. The battery
charging indicator appears on the iPod display.
NOTES:
• When your iPod/iPhone is docked using the lightning connector or USB, it will be charged only when
your boombox is connected to AC power.
• When there is more than one iPod/iPhone connected to the boombox via Lightning connector and
USB, both devices will be charged using AC power.
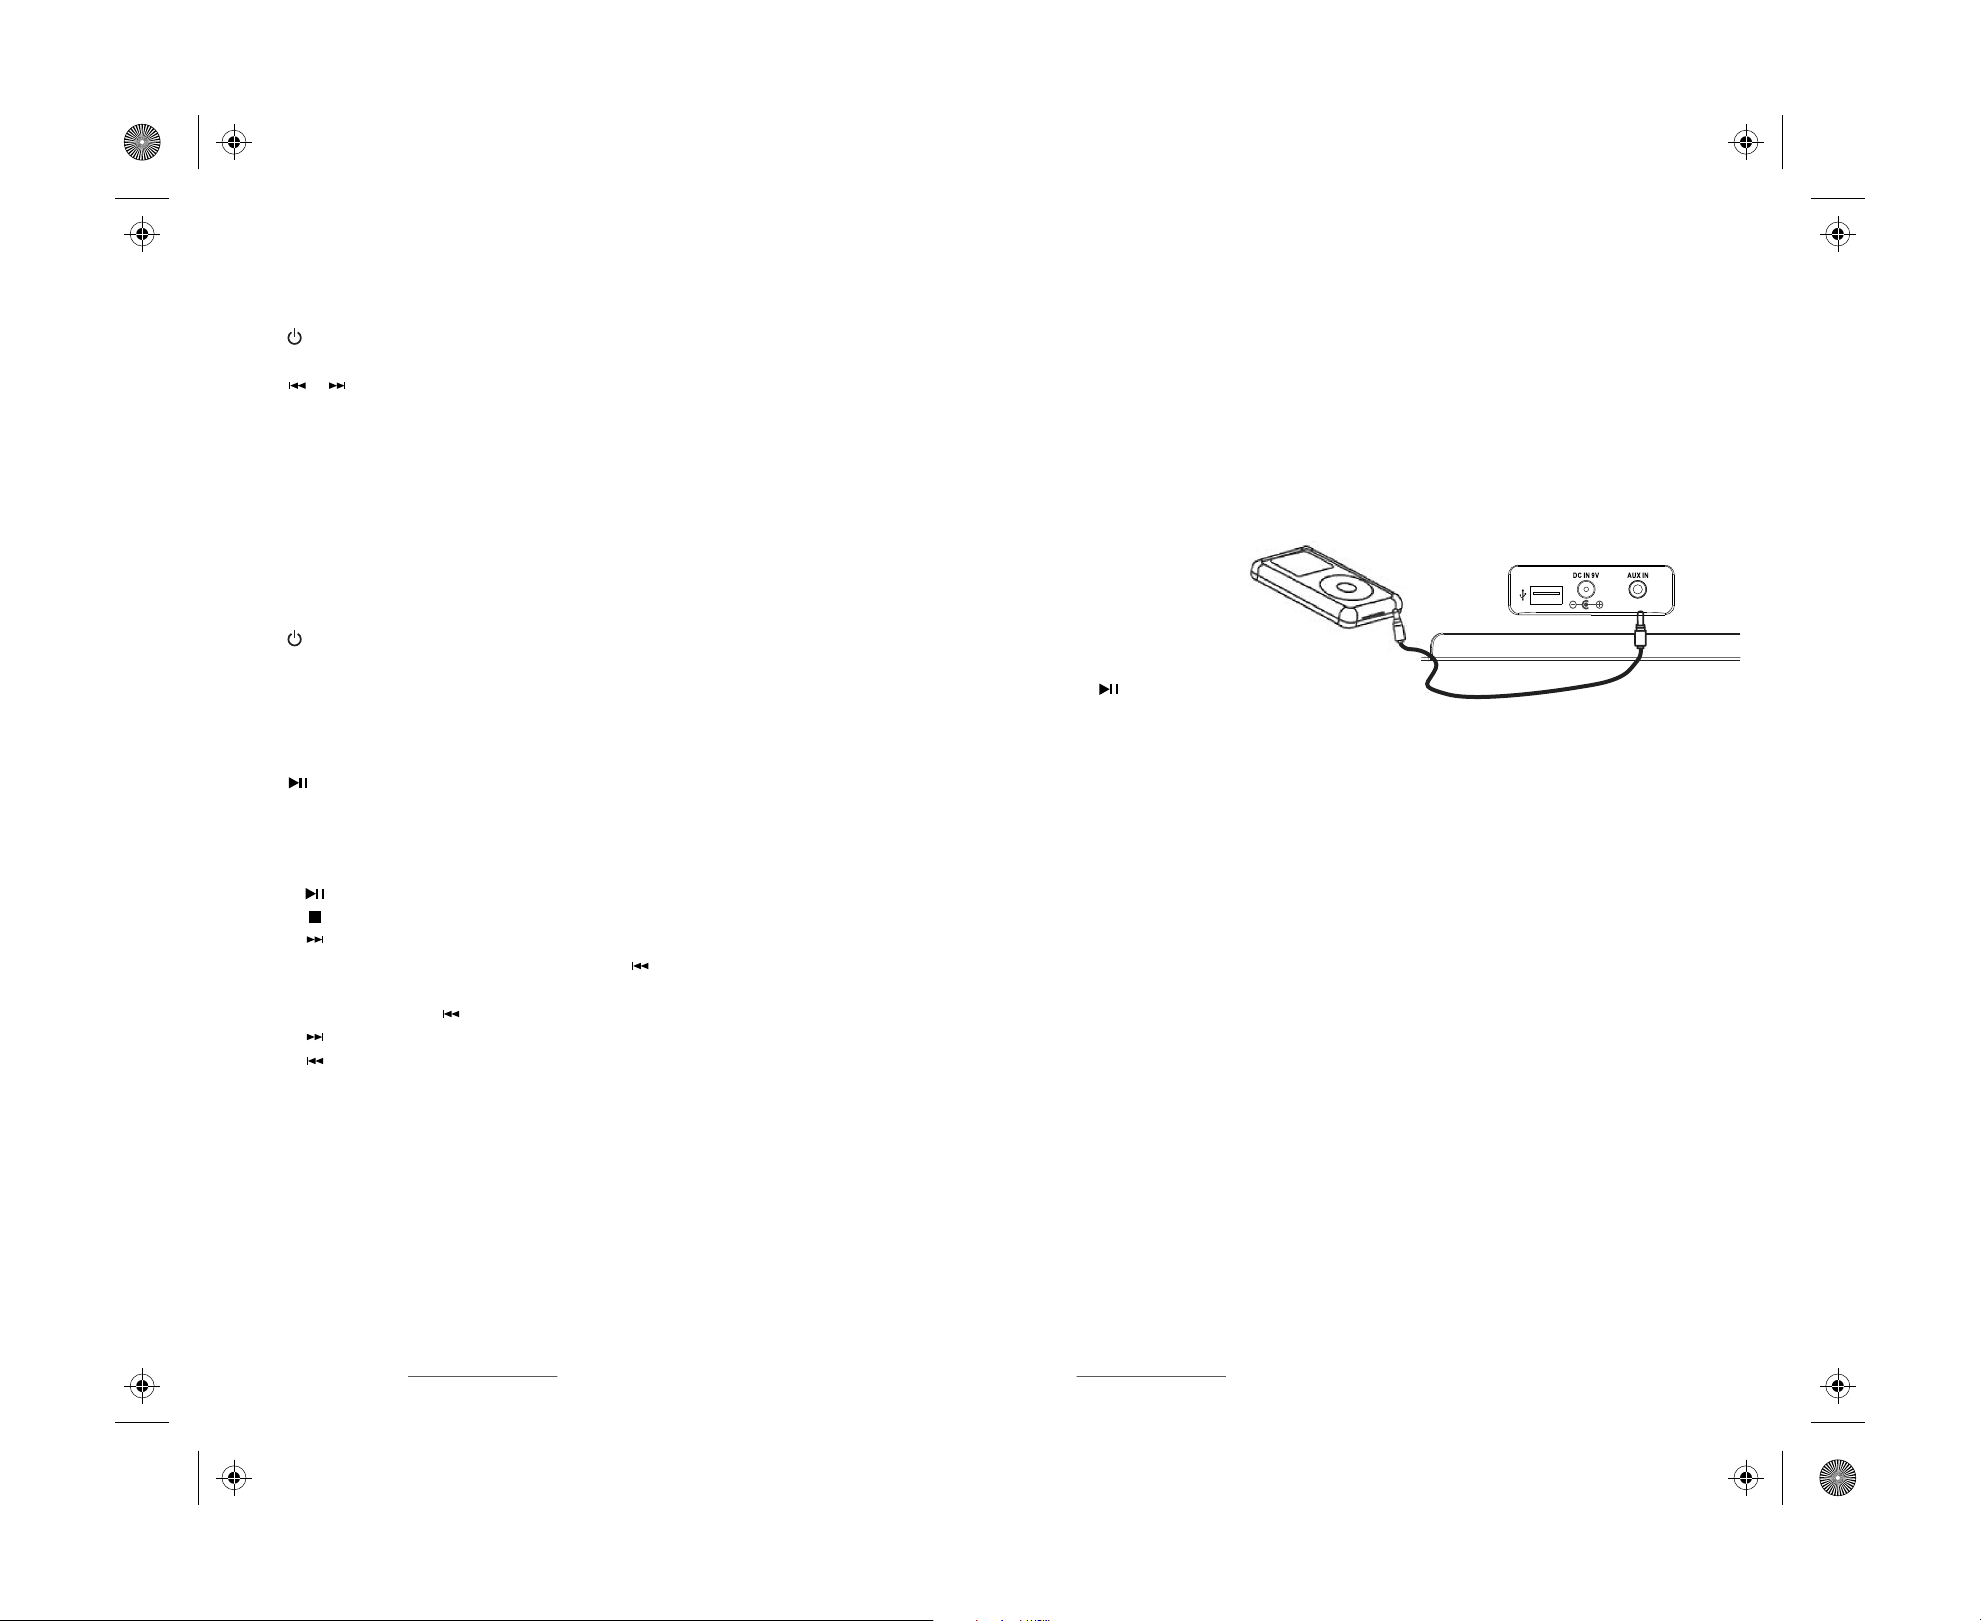
PLAYING MUSIC FROM AN EXTERNAL SOUND SOURCE
1 Make sure that your boombox is turned o.
2 Connect an external sound source, such as an MP3 player, by plugging one end of
an audio cable with a 3.5 mm plug (not included) into the AUX In jack on the back
of your boombox and the other end into your playback device.
iPod/iPhone
To connect an older iPod or iPhone to your boombox:
1 For an older iPod or iPhone, such as an iPhone 4, 4S, Touch 4th, Nano 6,
or earlier, use an iPod or iPhone USB cable to connect to the iPod/iPhone
USB jack on the back of your boombox.
2 Press SOURCE repeatedly until “iPod USB” lights. Press (play/pause)
to start playback.
3 Adjust the volume to a comfortable level by pressing either the VOL+ or
VOL- button.
4 Control playback using the controls on the boombox.
3 Press SOURCE repeatedly on the top of your boombox to select AUX In. “AUX”
lights up on the display.
4 Start playback on the external device.
5 Press VOL+ or VOL– to adjust the volume.
NOTE: You can also use the volume control on the device to adjust the volume, but the volume knob
on the boombox provides the best control.
6 Control playback using the controls on the external device.
FCC PART 15
This device complies with Part 15 of the FCC Rules. Operation of this product is subject to the following two conditions: (1) this device may not cause harmful interference, and (2) this device must accept any
interference received, including interference that may cause undesired operation.
This equipment has been tested and found to comply within the limits for a class B digital device, pursuant to Part 15 of the FCC Rules. These limits are designed to provide reasonable protection
against harmful interference in a residential installation. This equipment generates, uses, and can radiate radio frequency energy and, if not installed and used in accordance with the instructions, may cause
harmful interference to radio communications. However, there is no guarantee that interference will not occur in a particular installation. If this equipment does cause harmful interference to radio or television
reception, which can be determined by turning the equipment o and on, the user is encouraged to try to correct the interference by one or more of the following measures:
• Reorient or relocate the receiving antenna.
• Increase the separation between the equipment and receiver.
• Connect the equipment into an outlet on a circuit dierent from that to which the receiver is connected.
• Consult the dealer or an experienced technician for help.
FCC warning
Changes or modications not expressly approved by the party responsible for compliance with the FCC Rules could void the user’s authority to operate this equipment.
Canada ICES-003 statement
CAN ICES-3 (B)/NMB-3 (B)
One-year limited warranty. Visit www.insigniaproducts.com for details. For customer service, call: 877-467-4289 (U.S./Canada markets). We’re here for you at www.insigniaproducts.com.
INSIGNIA is a registered trademark of BBY Solutions, Inc. Registered in some countries. Distributed by Best Buy Purchasing, LLC, 7601 Penn Ave South, Richeld, MN 55423 U.S.A. ©2013 BBY Solutions, Inc. All Rights Reserved.
V3 ENGLISH 14-0822
 Loading...