

Page 1

NS-27LCD.fm Page 1 Wednesday, June 28, 2006 12:04 PM
27" LCD TV | TV ACL de 27 po | TV LCD de 27"
NS-27LCD
Page 2

NS-27LCD.fm Page 2 Wednesday, June 28, 2006 12:04 PM
Page 3
NS-27LCD.fm Page 3 Wednesday, June 28, 2006 12:04 PM
Insignia NS-27LCD
27” LCD TV
Contents
Safety information . . . . . . . . . . . . . . . . . . . . . . . . .3
Features. . . . . . . . . . . . . . . . . . . . . . . . . . . . . . . . .5
Setting up your TV . . . . . . . . . . . . . . . . . . . . . . . . .7
Using your TV . . . . . . . . . . . . . . . . . . . . . . . . . . .12
Programming the remote control . . . . . . . . . . . . .16
Maintaining. . . . . . . . . . . . . . . . . . . . . . . . . . . . . .18
Troubleshooting . . . . . . . . . . . . . . . . . . . . . . . . . .18
Specifications. . . . . . . . . . . . . . . . . . . . . . . . . . . .18
Appendix . . . . . . . . . . . . . . . . . . . . . . . . . . . . . . .19
Legal notices . . . . . . . . . . . . . . . . . . . . . . . . . . . .22
Français. . . . . . . . . . . . . . . . . . . . . . . . 23
Español . . . . . . . . . . . . . . . . . . . . . . . . 44
Safety information
Warning
T o reduce the risk of electric shock, do not remove the cover or
back. No user serviceable parts inside. Refer servicing to
qualified service personnel.
To reduce the risk of fire or electric shock, do not expose your
TV to rain or moisture.
Caution
To prevent electric shock, match the wide blade on the power
cord plug to the wide slot on an electric outlet. If the plug does
not fit, consult a licensed electrician to replace the obsolete
outlet. Do not modify the power cord plug, or you will defeat
this safety feature.
This symbol indicat es that dangerous voltage
constituting a risk of electri c shock is present
within your TV. This label is located on the back
of your TV.
This symbol indicates that there are important
operating and mainte nance instructions in the
literature accompanying your TV.
Warning
Your TV contains tin-lead solder and a fluorescent lamp
containing a small amount of mercury. Disposal of these
materials may be regulated for environmental reasons. For
disposal or recycling information, contact your local authorities
or the Electronic Industries Alliance at www.eia.org.
Read instructions
Read all of the safety and operating instructions
before you use your TV.
Retain instructions
Retain safety and operating instructio ns for
future reference.
Follow warnings and instructions
Follow all warnings on your TV and in the
operating instructions. Follow all operating and
use instructions.
Water and moisture
Do not use your TV near water. For example, do
not use it near a bath tub, wash bowl, kitchen
sink, or laundry tub, in a wet basement, or near a
swimming pool.
Cleaning
Unplug your TV before cleaning. Do not use
liquid or aerosol cleaners. Use only a damp cloth
to clean the exterior of your TV.
Ventilation
Slots and openings in the cabinet and the back
or bottom are provided for ventilation, reliable
operation, and protection from overheating.
These openings must not be blocked or covered.
Do not block the openings by placing your TV on
a bed, sofa, rug, or other similar surface. Do not
place your TV near or over a radiator or heat
register. Do not place your TV in a built-in
installation, such as a bookcase or rack, unless
you provide correct ventilation or follow the
manufacturer’s instructions.
Heat
Make sure that your TV is located away from
heat sources such as radiators, heat registers,
stoves, or other products (including amplifiers)
that produce heat.
Grounding or polarization
Do not defeat the safety purpose of the polarized
or grounding-type plug. A polarized plug has two
blades with one wider than the other. A
grounding type plug has two blades and a
grounding prong. The wide blade or grounding
prong are provided for your safety. If the plug
does not fit, contact an electrician to replace the
obsolete outlet.
Power cord protection
Route power cords so that they are not likely to
be walked on or pinched by items placed on or
against them. Pay particular attention to cords at
plugs, convenience receptacles, and the point
where they exit from your TV.
Attachments
Do not use attachments not recommended by
Insignia because they may cause hazards.
Stand
Do not place your TV on an unstable cart, stand,
tripod, bracket, or table. Your TV may fall,
causing serious personal injury and serious
damage to your TV. Use only with a cart, stand,
tripod, bracket, or table recommended by the
manufacturer, or sold with your TV. If you mount
your TV to the wall, follow the manufacturer’s
instructions and use a mounting accessory
recommended by the manufacturer. Your TV and
cart combination should be moved with care.
Quick stops, excessive force, and uneven
surfaces may cause your TV and cart
combination to overturn.
Lightning
For added protection for your TV’s receiver
during a lightning storm, or when it is left
unattended and unused for long periods of time,
unplug it from the power outlet and disconnect
the antenna or cable system. This helps prevent
damage to your TV from lightning and power line
surges.
www.insignia-products.com
3
Page 4
6
7
5
2
3
4
NS-27LCD.fm Page 4 Wednesday, June 28, 2006 12:04 PM
Insignia NS-27LCD 27” LCD TV
Servicing
Do not attempt to service your TV yourself
because opening or removing covers may
expose you to dangerous voltage or other
hazards. Refer all servicing to qualified service
personnel.
Replacement parts
When replacement parts are required, make
sure that the service technician uses
replacement parts specified by the manufacturer
that have the same characteristics as the
original part. Unauthorized substitutions may
result in fire, electric shock, personal injury, or
other hazards.
Overloading
Do not overload power outlets and extension
cords because this can result in a risk of fire or
electric shock.
Object and liquid entry
Never push objects of any kind into your TV
through openings because objec ts may touch
dangerous voltage points or short out parts that
could result in a fire or electric shock. Never spill
liquid of any kind on your TV.
Damage requiring service
Unplug this TV from the power outlet and refer
servicing to qualified service personnel under
the following conditions:
• When the power supply cord or plug is
damaged or frayed.
• If liquid has been spilled or objects have
fallen into your TV.
• If your TV has been exposed to rain or water.
• If your TV does not operate normally by
following the operating instructions. Adjust
only those controls that are covered by the
operating instructions because incorrect
adjustment of other controls may result in
damage and will often require extensive work
by a qualified technician to restore your TV to
its normal operation.
• If your TV has been dropped or damaged in
any way.
• When your TV exhibits a distinct change in
performance.
Replacement parts
When replacement parts are required, make
sure that the service technician uses
replacement parts specified by the manufacturer
that have the same characteristics as the
original part. Unauthorized substitutions may
result in fire, electric shock, personal injury, or
other hazards.
Safety check
After completing any service or repair to this TV,
ask the service technician to perform routine
safety checks to determine that your TV combo
is in correct operating condition.
Power source
Operated your TV only from the type of power
source indicated on the marking label. If you are
not sure of the type power supplied to your
home, consult your TV dealer or local power
company.
Lightning
For added protection for your TV’s receiver
during a lightning storm, or when it is left
unattended and unused for long periods of time,
unplug it from the power outlet and disconnect
the antenna or cable system. This helps prevent
damage to your TV from lightning and power line
surges.
Screen protection
Your TV’s screen is made of glass. Do not drop
your TV or hit the glass screen. If the screen
breaks, be careful of broken glass.
Pixel defect
Your TV’s screen is designed to display finely
detailed pictures. Occasionally, a few non-active
pixels may appear on the screen as fixed points
of blue, green, or red. This is not a defect and
does not affect your TV’s performance.
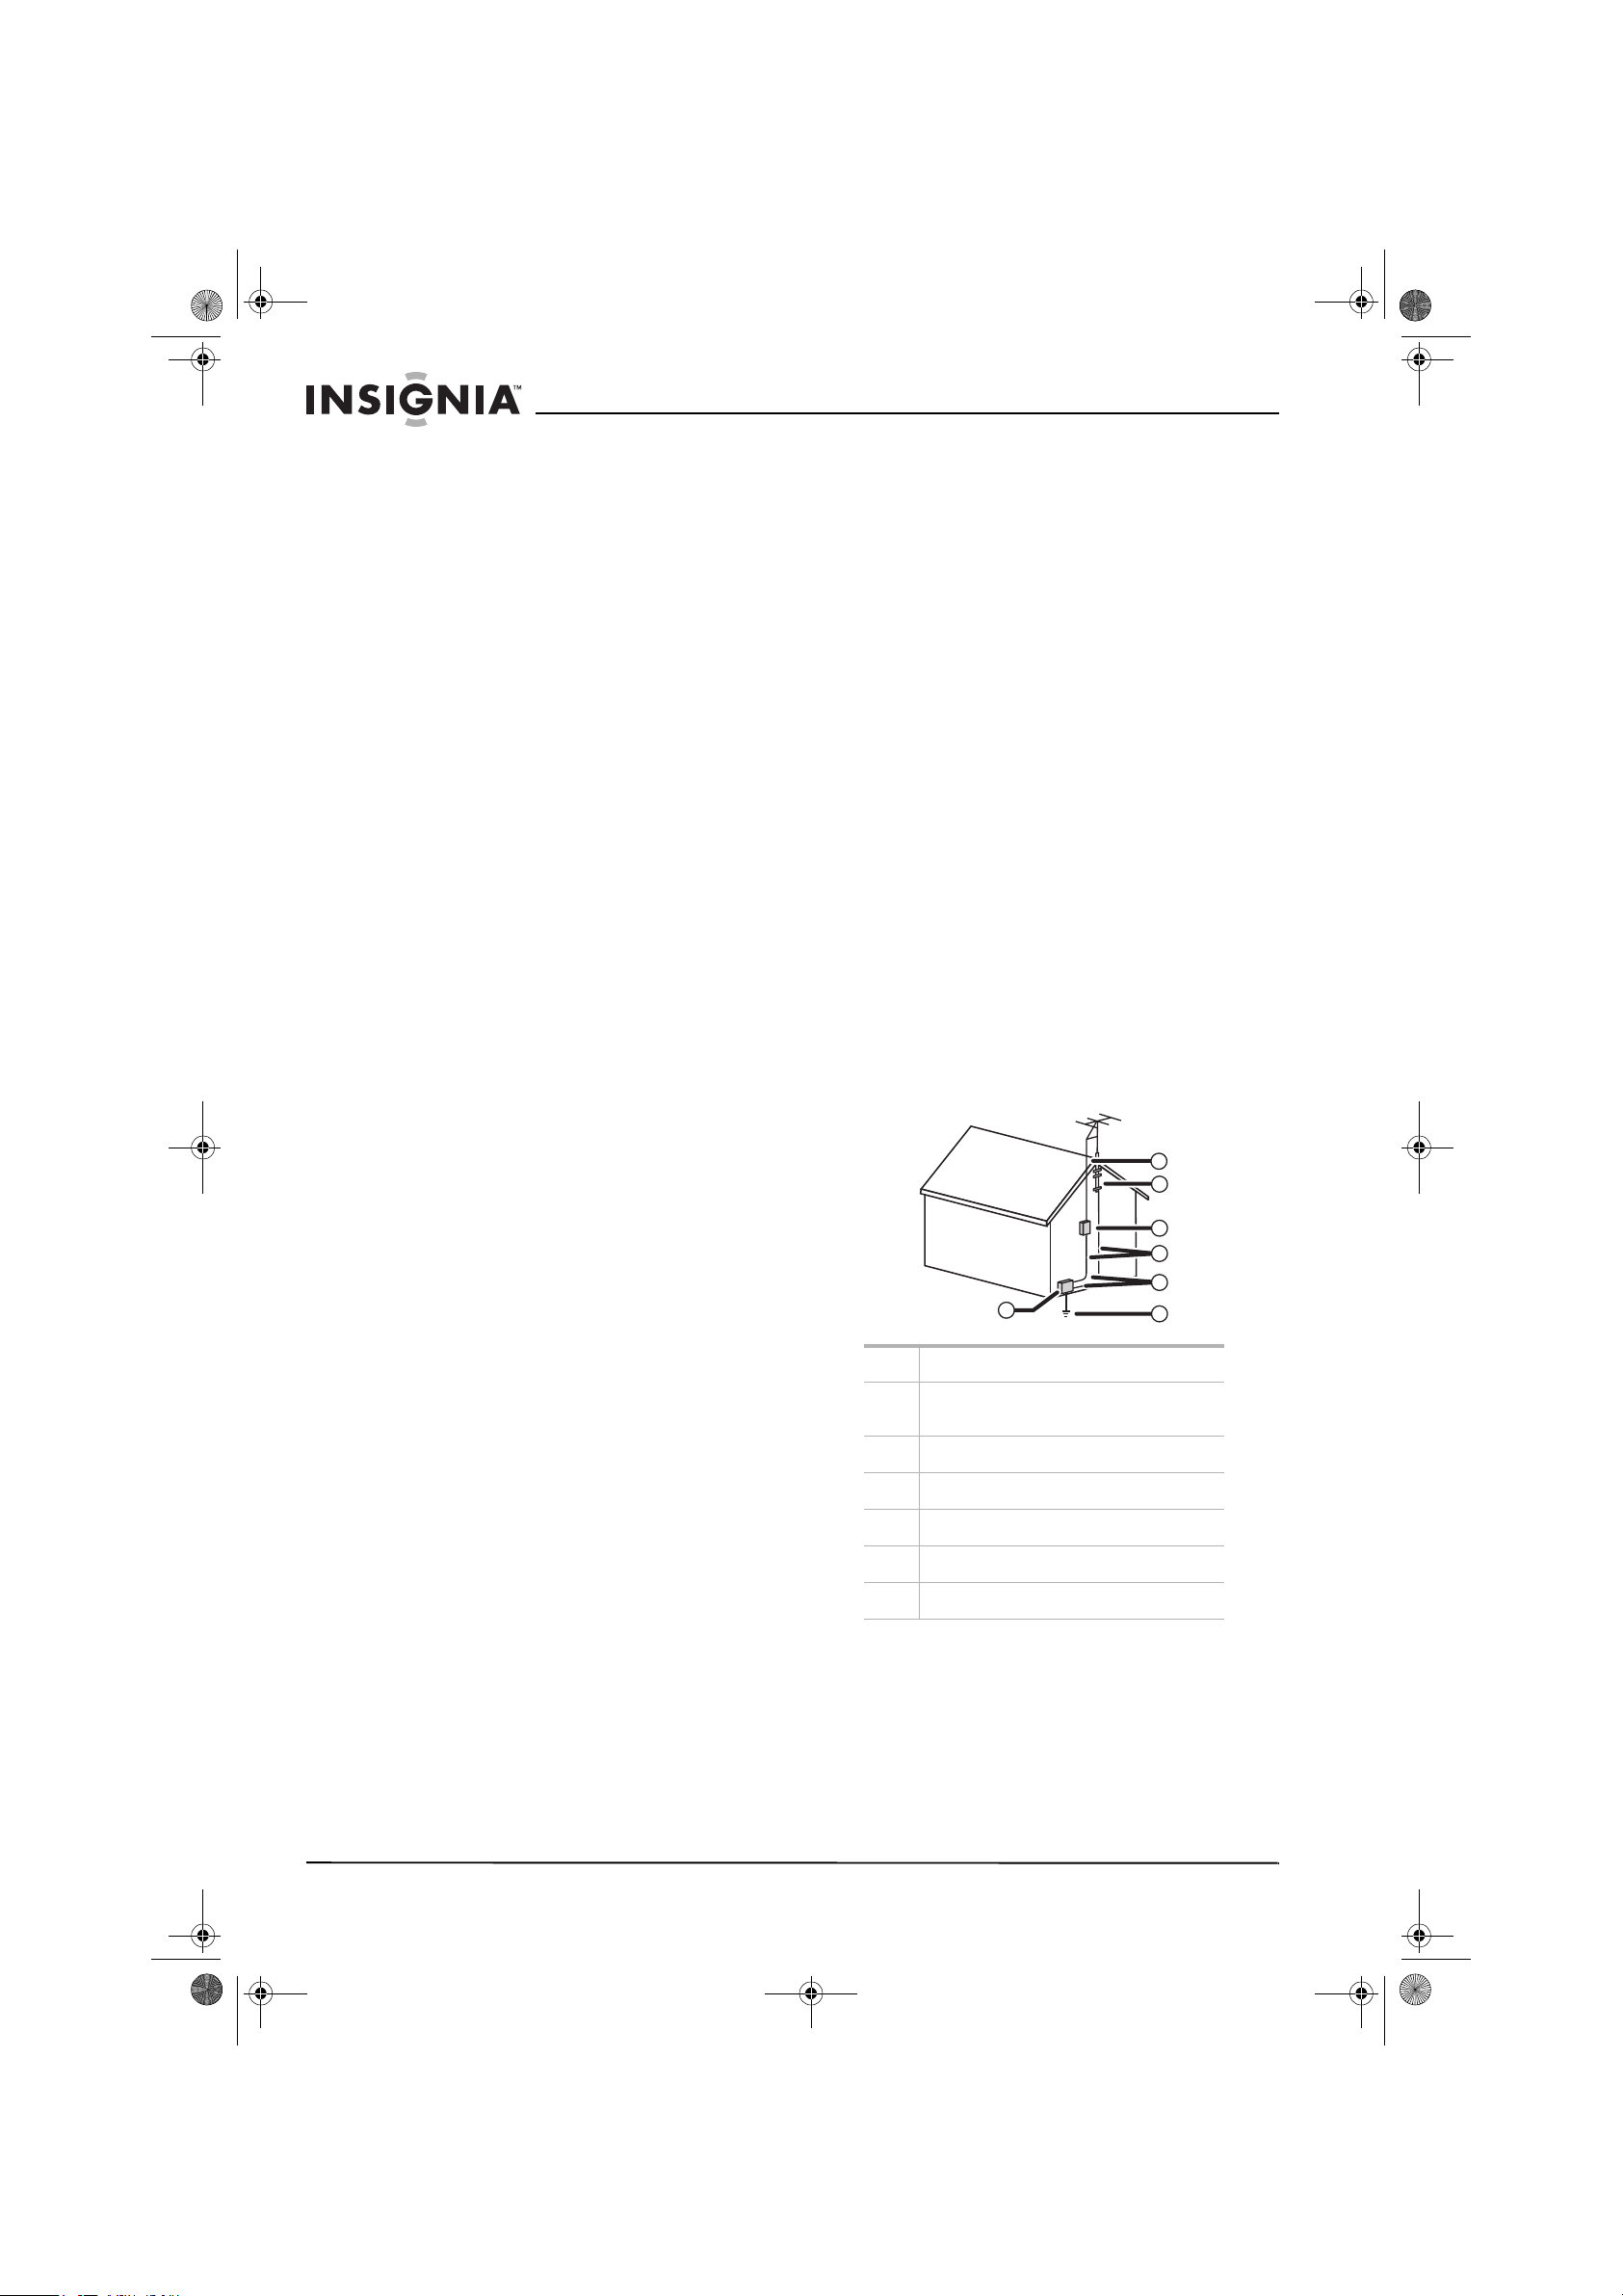
Outdoor antenna grounding
If an outside antenna or cable system is
connected to your TV, make sure that the
antenna or cable system is grounded to provide
some protection against voltage surges and
built-up static charges. Article 810 of the
National Electrical Code, ANSI/NFPA No. 70,
provides information with respect to correct
grounding of the mast and supporting structure,
grounding of the lead-in wire to an antenna
discharge unit, size of grounding conductors,
location of the antenna-discharge unit,
connection to grounding electrodes, and
requirements for the grounding electrode.
1
1 Electric se rvice equipment
2 Power service grounding electrode
system
3 Ground cla mps
4 Grounding conductors
5 Antenna discharge unit
6 Grounding clamp
7 Antenna lead-in wire
Note to CATV system installer
This reminder is provided to call the CATV
system installer’s attention to Article 820-40 of
the NEC that provides guidelines for correct
grounding and in parti c ula r, specifies that the
cable ground must be connected to the
grounding system of the building as close to the
point of cable entry as practical.
4
www.insignia-products.com
Page 5
NS-27LCD.fm Page 5 Wednesday, June 28, 2006 12:04 PM
Insignia NS-27LCD 27” LCD TV
Features
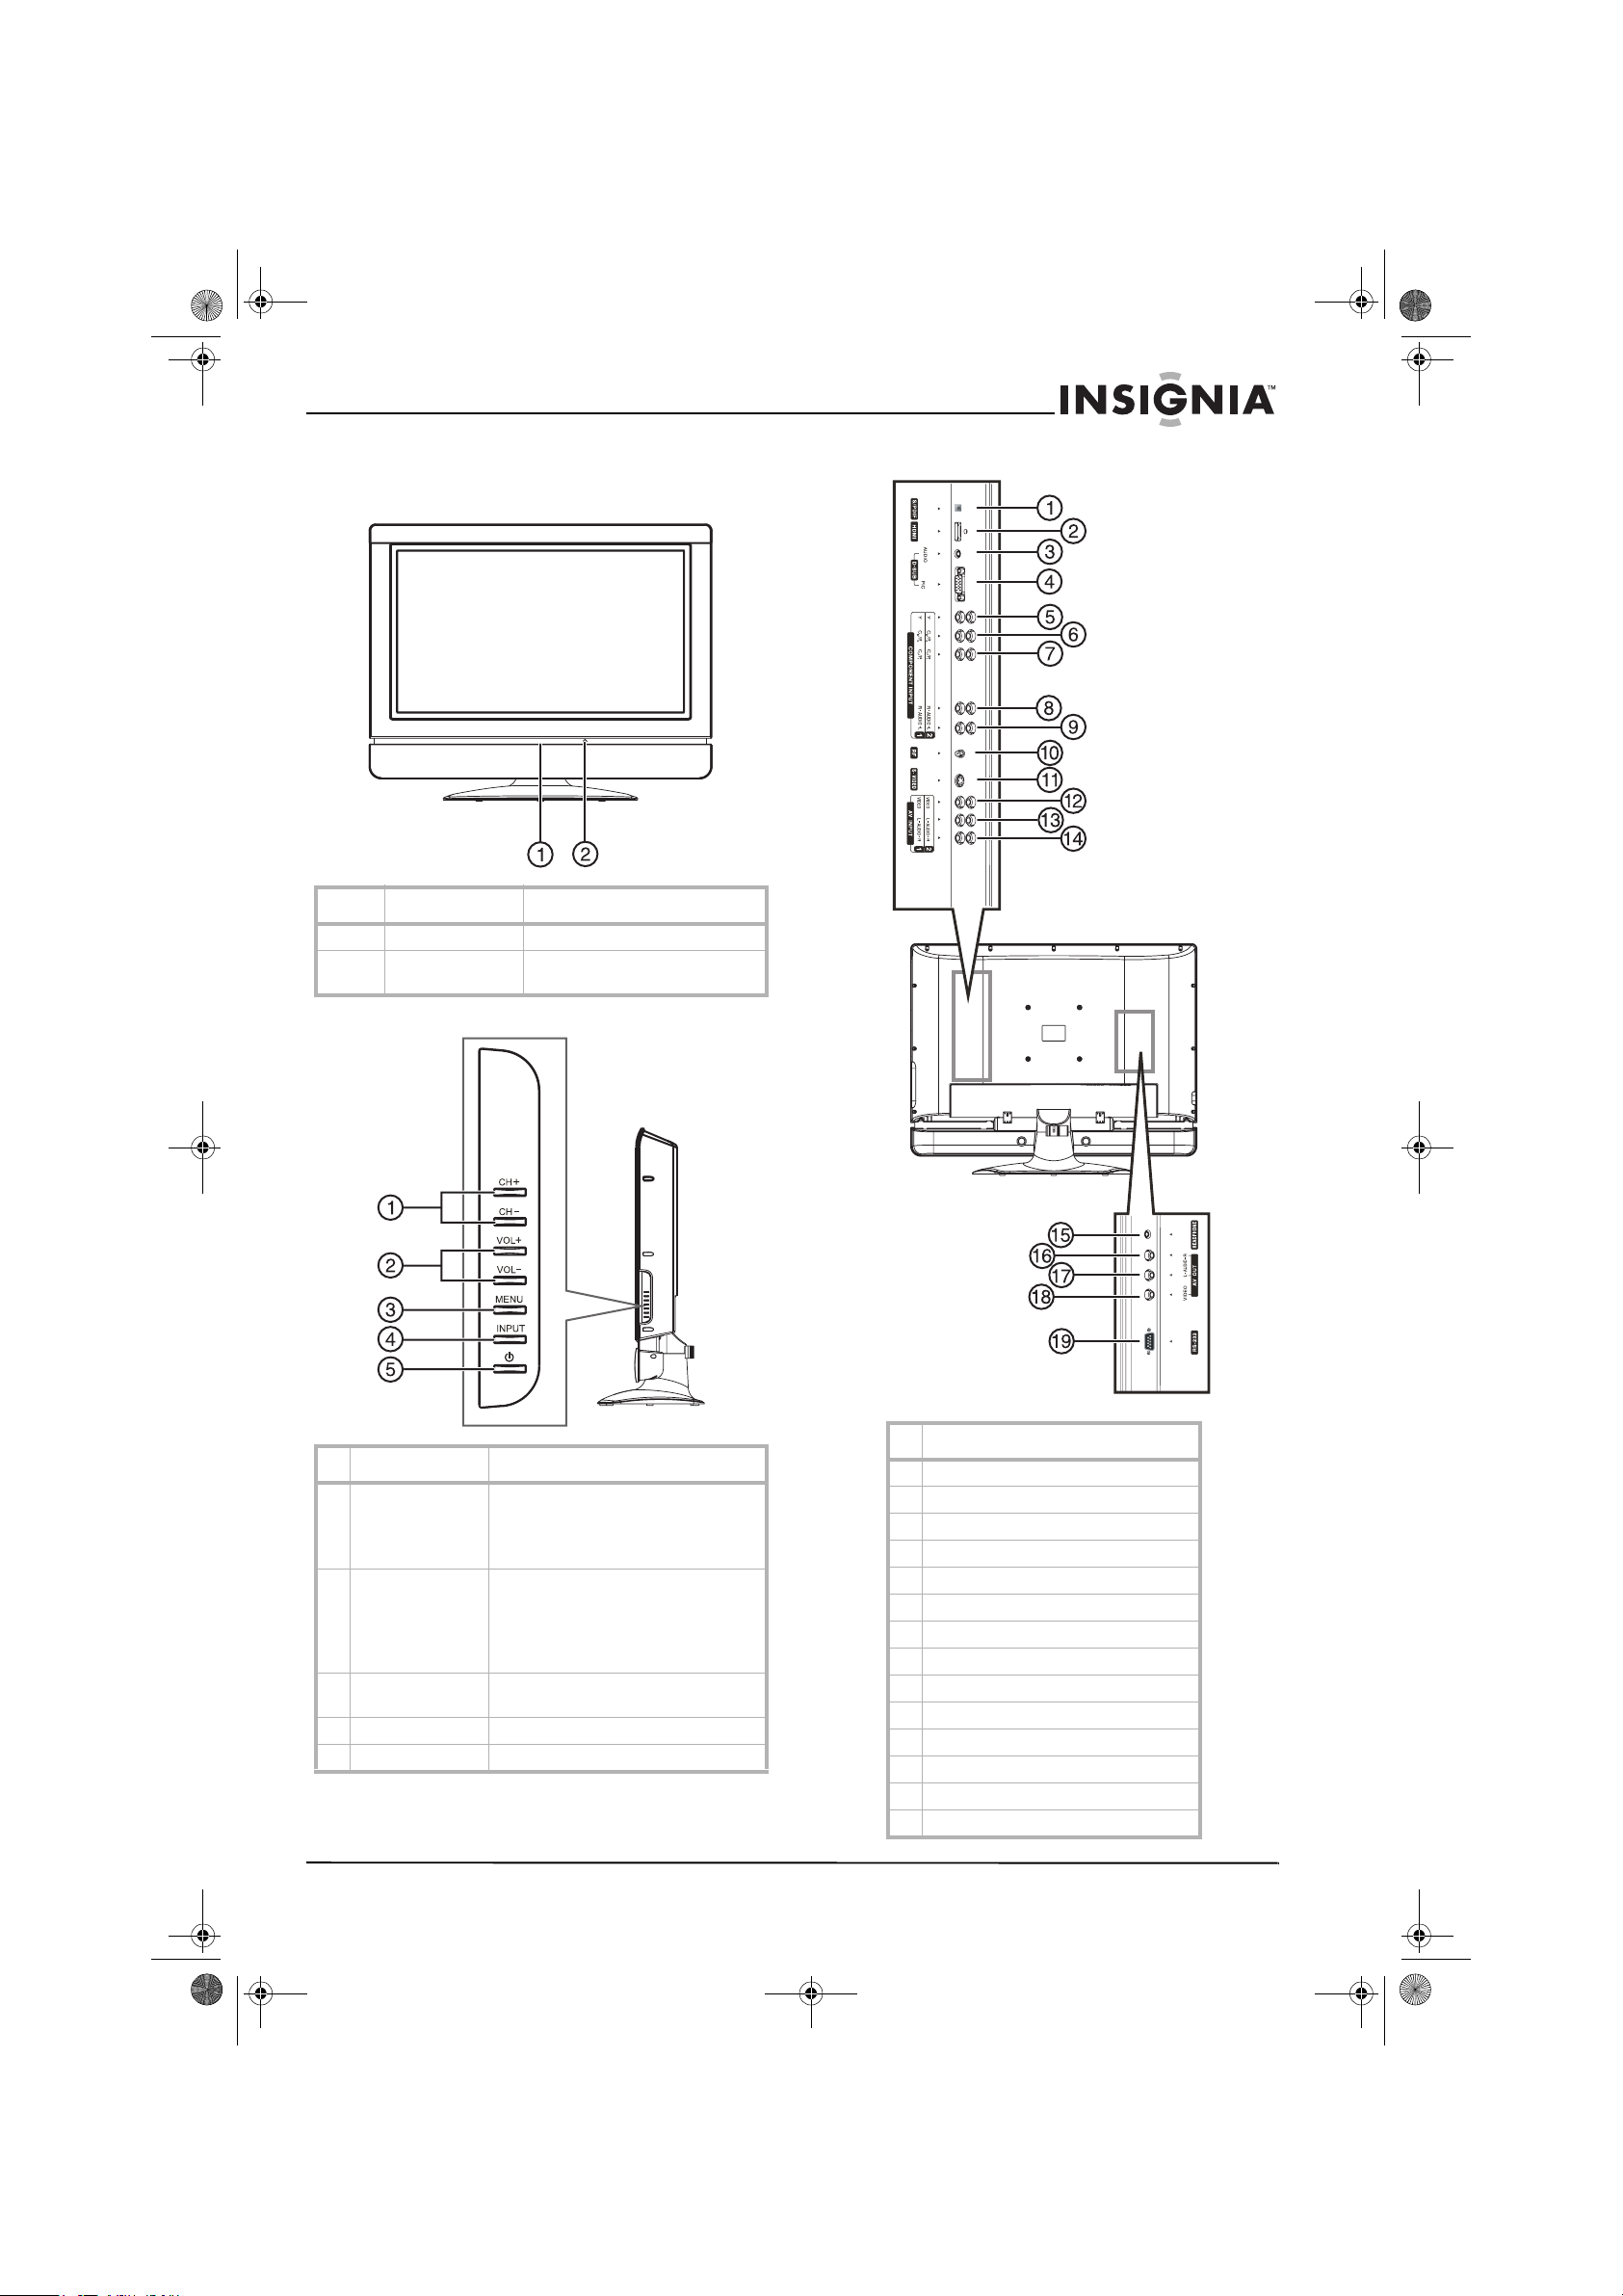
Front
Control Description
1 Power indicator Lights when your TV is turned on.
2 Remote sensor Receives signals from the remote
control.
Side
Back jacks
Remove the
jack cover
Remove
the jack
cover
Control Description
1 CH+/CH– Press to change the channel.
In the on-screen menu system, press
to select menus and options.
2 VOL+/VOL– Press to increase or decrease the
volume.
In the on-screen menu system, press
to adjust a setting or change a value.
3 MENU Press to open the on-screen menu
system.
4 INPUT Press to select the video input.
5 Power Press to turn your TV on or off.
www.insignia-products.com
Jack
1S/PDIF
2HDMI
3 D-SUB AUDIO input
4 D-SUB PIC (video) input
5 COMPONENT INPUT Y
6 COMPONENT INPUT Cb/Pb
7 COMPONENT INPUT Cr/Pr
8 COMPONENT INPUT R AUDIO
9 COMPONENT INPUT L AUDIO
10 RF (antenna input)
11 S-VIDEO
12 AV INPUT VIDEO
13 AV INPUT L AUDIO
14 AV INPUT R AUDIO
5
Page 6
NS-27LCD.fm Page 6 Wednesday, June 28, 2006 12:04 PM
Insignia NS-27LCD 27” LCD TV
Jack
15 HEADPHONE
16 AV OUT R AUDIO
17 AV OUT L AUDIO
18 AV OUT VIDEO
19 RS232 control interface
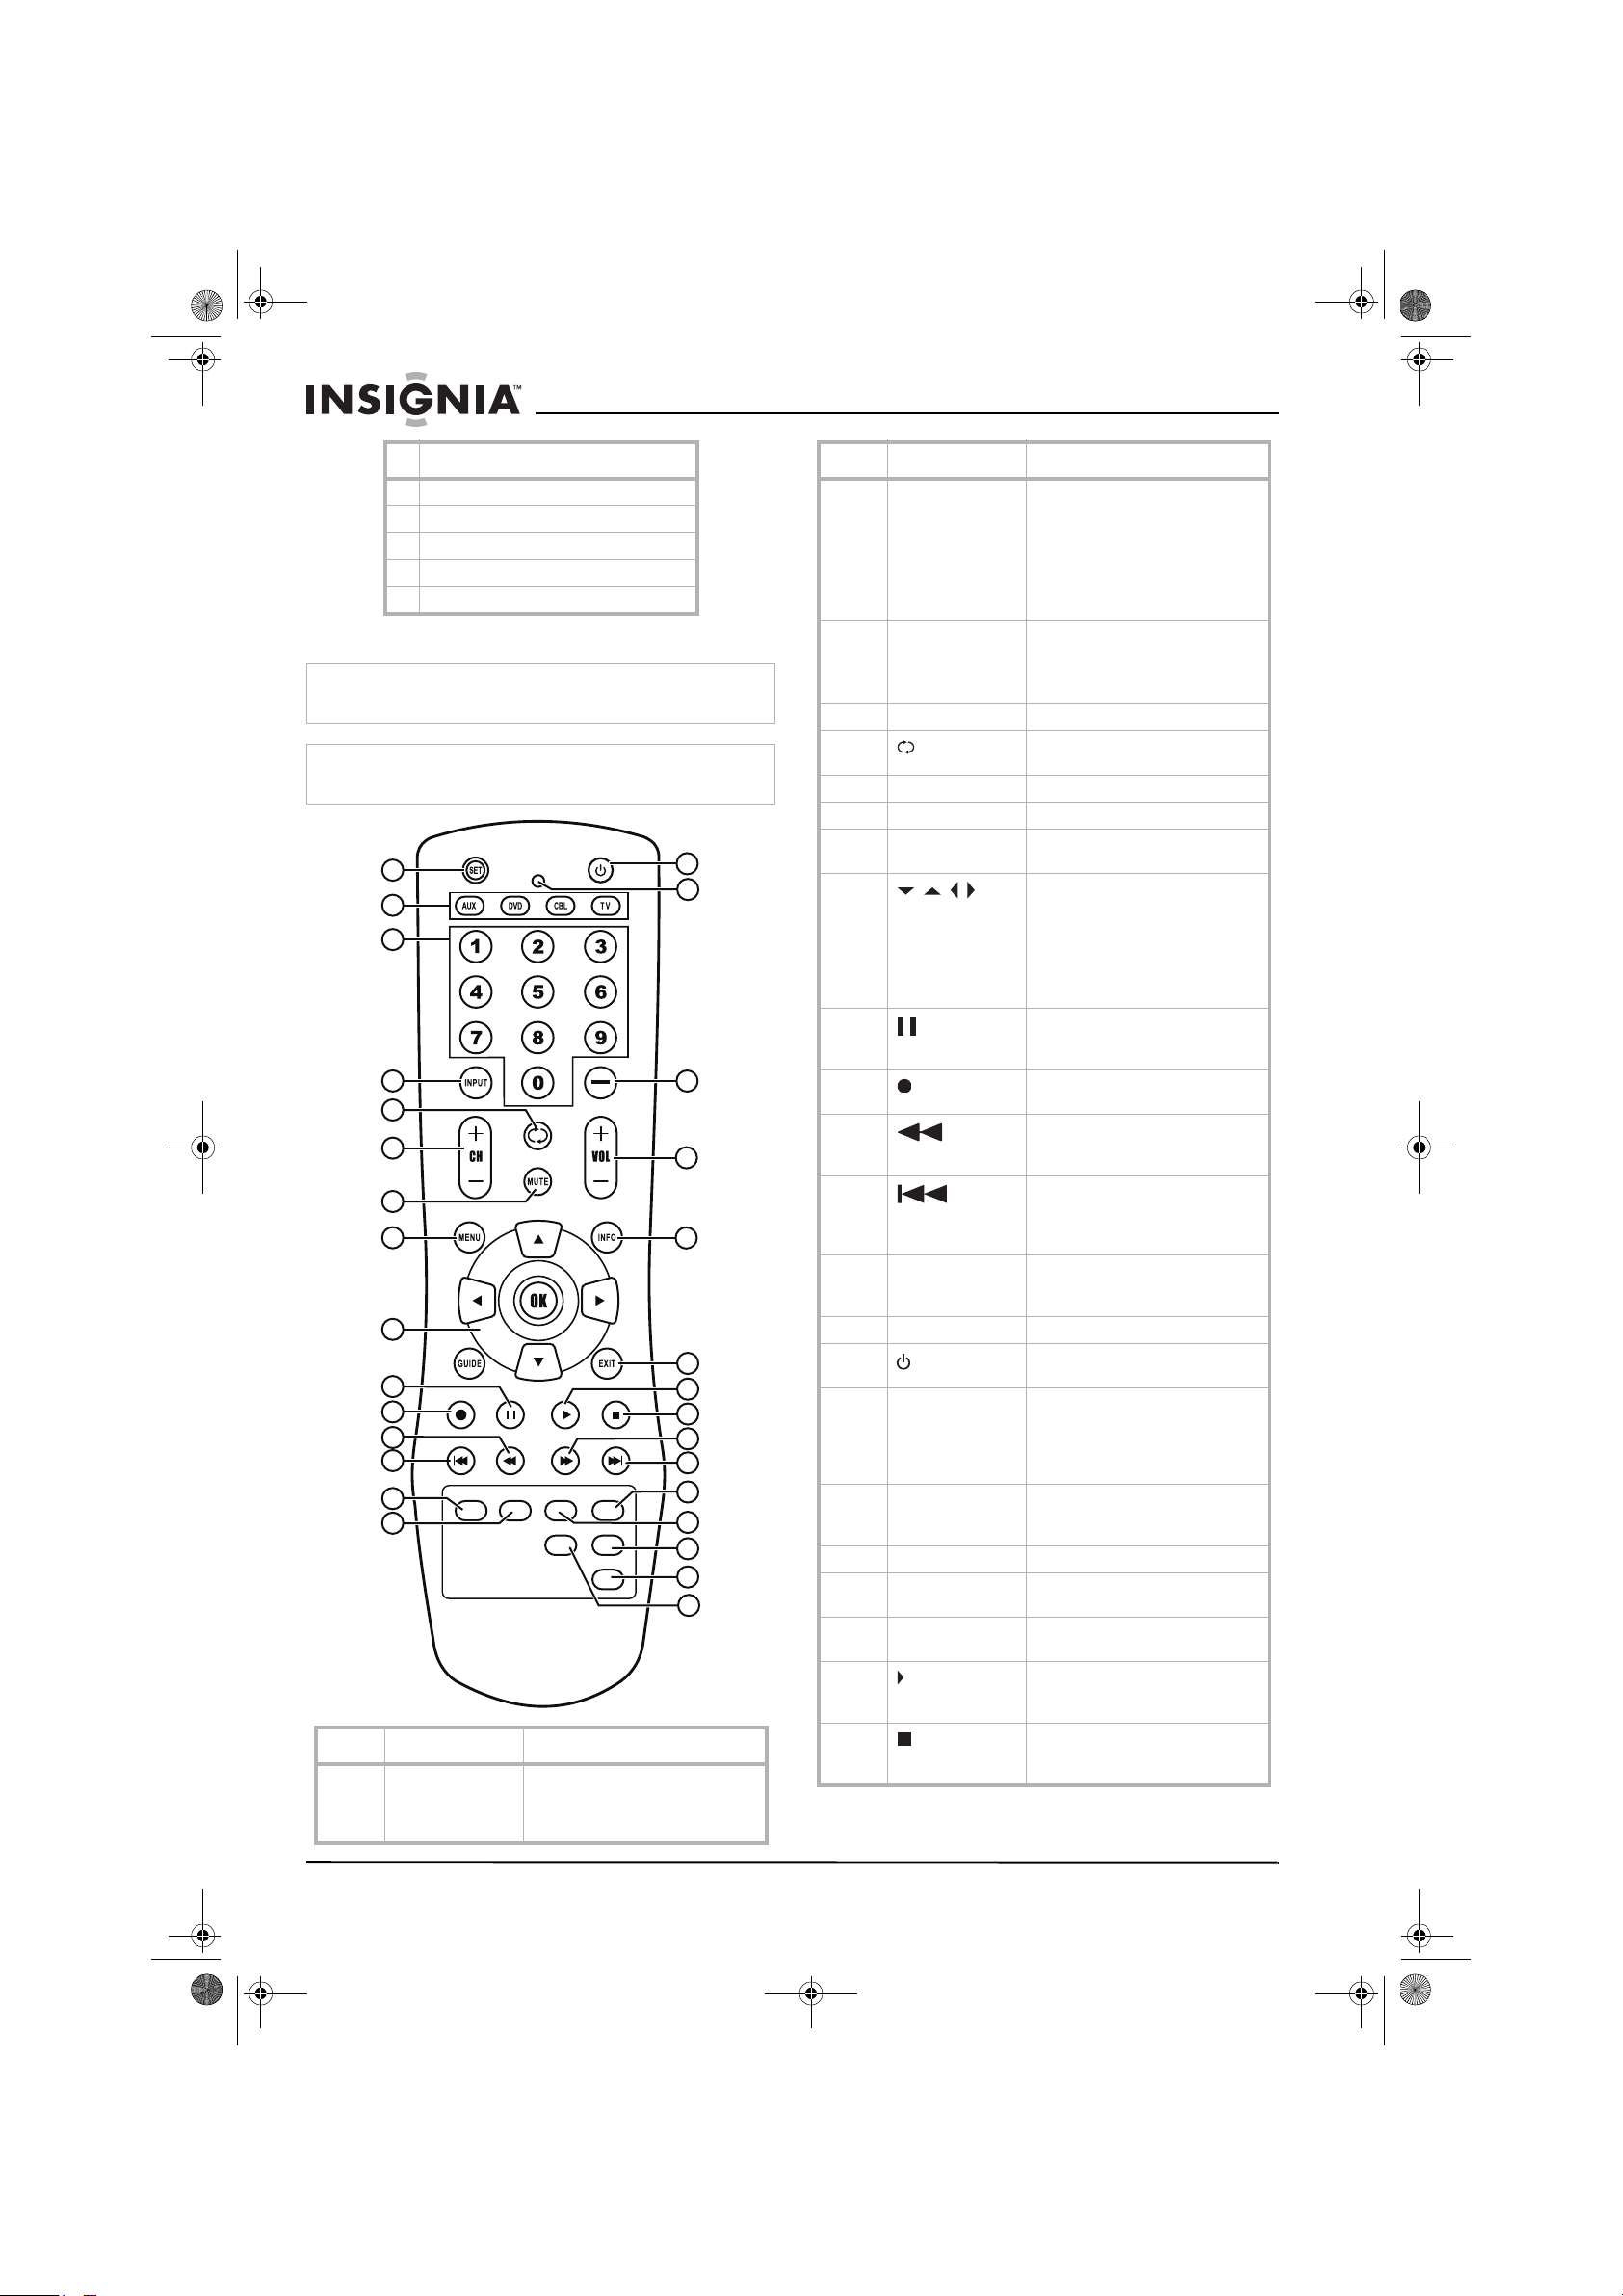
Remote control
Note
This remote control is a universal remote control. If it does not
seem to work with your TV, press the TV button.
Note
For instructions on programming the remote control, see
“Programming the remote control” on page 16.
1
2
3
4
5
6
7
8
9
10
11
12
13
14
15
MTS/SAP ZOOM CCD SLEEP
AUDIO
PICTURE
FREEZE
Button Description
1 SET Press to program the remote
control. For more information,
see “Programming the remote
control” on page16.
16
17
18
19
20
21
22
23
24
25
26
27
28
29
30
Button Description
2 Device buttons TV–Press to select the TV.
DVD–Press to select a connected
DVD player.
CBL–Press to select cable or
satellite TV.
AUX–Press to select a device
assigned to this button.
3 Number buttons Press to enter channel numbers.
In the on-screen menu system,
press to enter your parental
controls password.
4 INPUT Press to select the video input.
5 Press to go to last viewed
6 + CH – Press to change TV channels.
7 MUTE Press to mute the sound.
8 MENU Press to open the on-screen
9
10
11 Press to start a recording on a
12 Press to fast-reverse on a DVD or
13
14 MTS/SAP Press to select one of the preset
15 ZOOM Press to select the aspect ratio.
16 Press to turn on your TV or put it
17 LED Lights when you are
18 — Press to select a sub-channel. For
19 + VOL – Press to adjust the volume.
20 INFO Press to display status
21 EXIT Press to close the on-screen
22 Press to start DVD or CD playback
23 Press to stop DVD or CD playback
OK
channel.
menu system.
Press the arrows to move down,
up, left, or ri ght in the on-sc reen
menu system.
Press the OK button to confirm
changes or to toggl e options on
and off in the on-screen menu
system.
When playing a DVD, pr ess to
freeze the screen image. Pres s
again to unfreeze the image.
connected device, such as a VCR.
CD if a DVD or CD player is
connected.
Press to skip the previous chapter
on a DVD or previous track on a
CD if a DVD or CD player is
connected.
audio modes. You can select
MONO, STEREO, or SAP.
into Standby mode.
programming the remote control.
For more information, see
“Programming the remote
control” on page 16.
more information, see “Selecting
a digital sub-channel” on page 13.
information.
menu system.
if a DVD or CD player is
connected.
if a DVD or CD player is
connected.
6
www.insignia-products.com
Page 7

NS-27LCD.fm Page 7 Wednesday, June 28, 2006 12:04 PM
Insignia NS-27LCD 27” LCD TV
Button Description
24 Press to fast-forward on a DVD or
25
26 SLEEP Press to set the sleep timer. For
27 CCD Press to turn closed captions on
28 PICTURE Press to select the picture mod e.
29 FREEZE Press to freeze the video i mage.
30 AUDIO Press to select the sound mode.
CD if a DVD or CD player is
connected.
Press to skip the next chapter on
a DVD or next track on a CD if a
DVD or CD player is connected.
more information, see “Setting
the sleep timer” on page 14.
and off. For more information, see
“Viewing closed caption s” on
page 14.
Press again to unfreeze the
image. Do not freeze the video
image for long periods of t ime.
You may damage the TV screen.
Using the remote control
To use the remote control:
• Point the remote control towards the remote
sensor on the front of your TV.
The following illustration shows the remote
control range.
Setting up your TV
Installing remote control batteries
To install the remote control batteries:
1 Remove the battery cover.
2 Insert two AA batteries into the battery
compartme nt. Make sure that you match the
+ and – symbols on the batteries with the +
and – symbols in the battery compartment.
60°
30
0
0
30
16.4 ft.
(5 m)
Notes
• Do not expose the remote control to shock or liquids.
• Do not use the remote control in an area with high humidity.
• Do not place the remote control in direct sunlight.
• Do not place objects, such as furniture, between the remote
control and the remote sensor.
• The remote control may not work if direct sunlight or bright
light shines on the remote sensor. Either move your TV or
change the angle at which you use the remote control.
DISPLAY ASPECT CAPTION SLEEP
STEREO SRS
PIP SIZE TV/PC PIP INPUT
SOUND MODE
PICTURE MODE
3 Replace the cover.
Notes
• Do not mix batteries of different types.
• Do not mix old and new batteries.
• Remove batteries when the charge is depleted.
• Battery chemicals can cause a rash. If the batteries leak,
clean the battery compartment with a cloth. If chemicals
touch your skin, wash immediately.
• If the remote control is not going to be used for an extended
period of time, remove the batteries.
Connecting your TV to an electrical outlet
To connect your TV to an electrical outlet:
• Plug the power cord into an electrical
outlet.
Notes
• Make sure that you use the correct type of power. See the
label on your TV.
• If you do not intend to use y our TV f or an e xtended period of
time, unplug the power cord from the electrical outlet.
www.insignia-products.com
7
Page 8
NS-27LCD.fm Page 8 Wednesday, June 28, 2006 12:04 PM
Insignia NS-27LCD 27” LCD TV
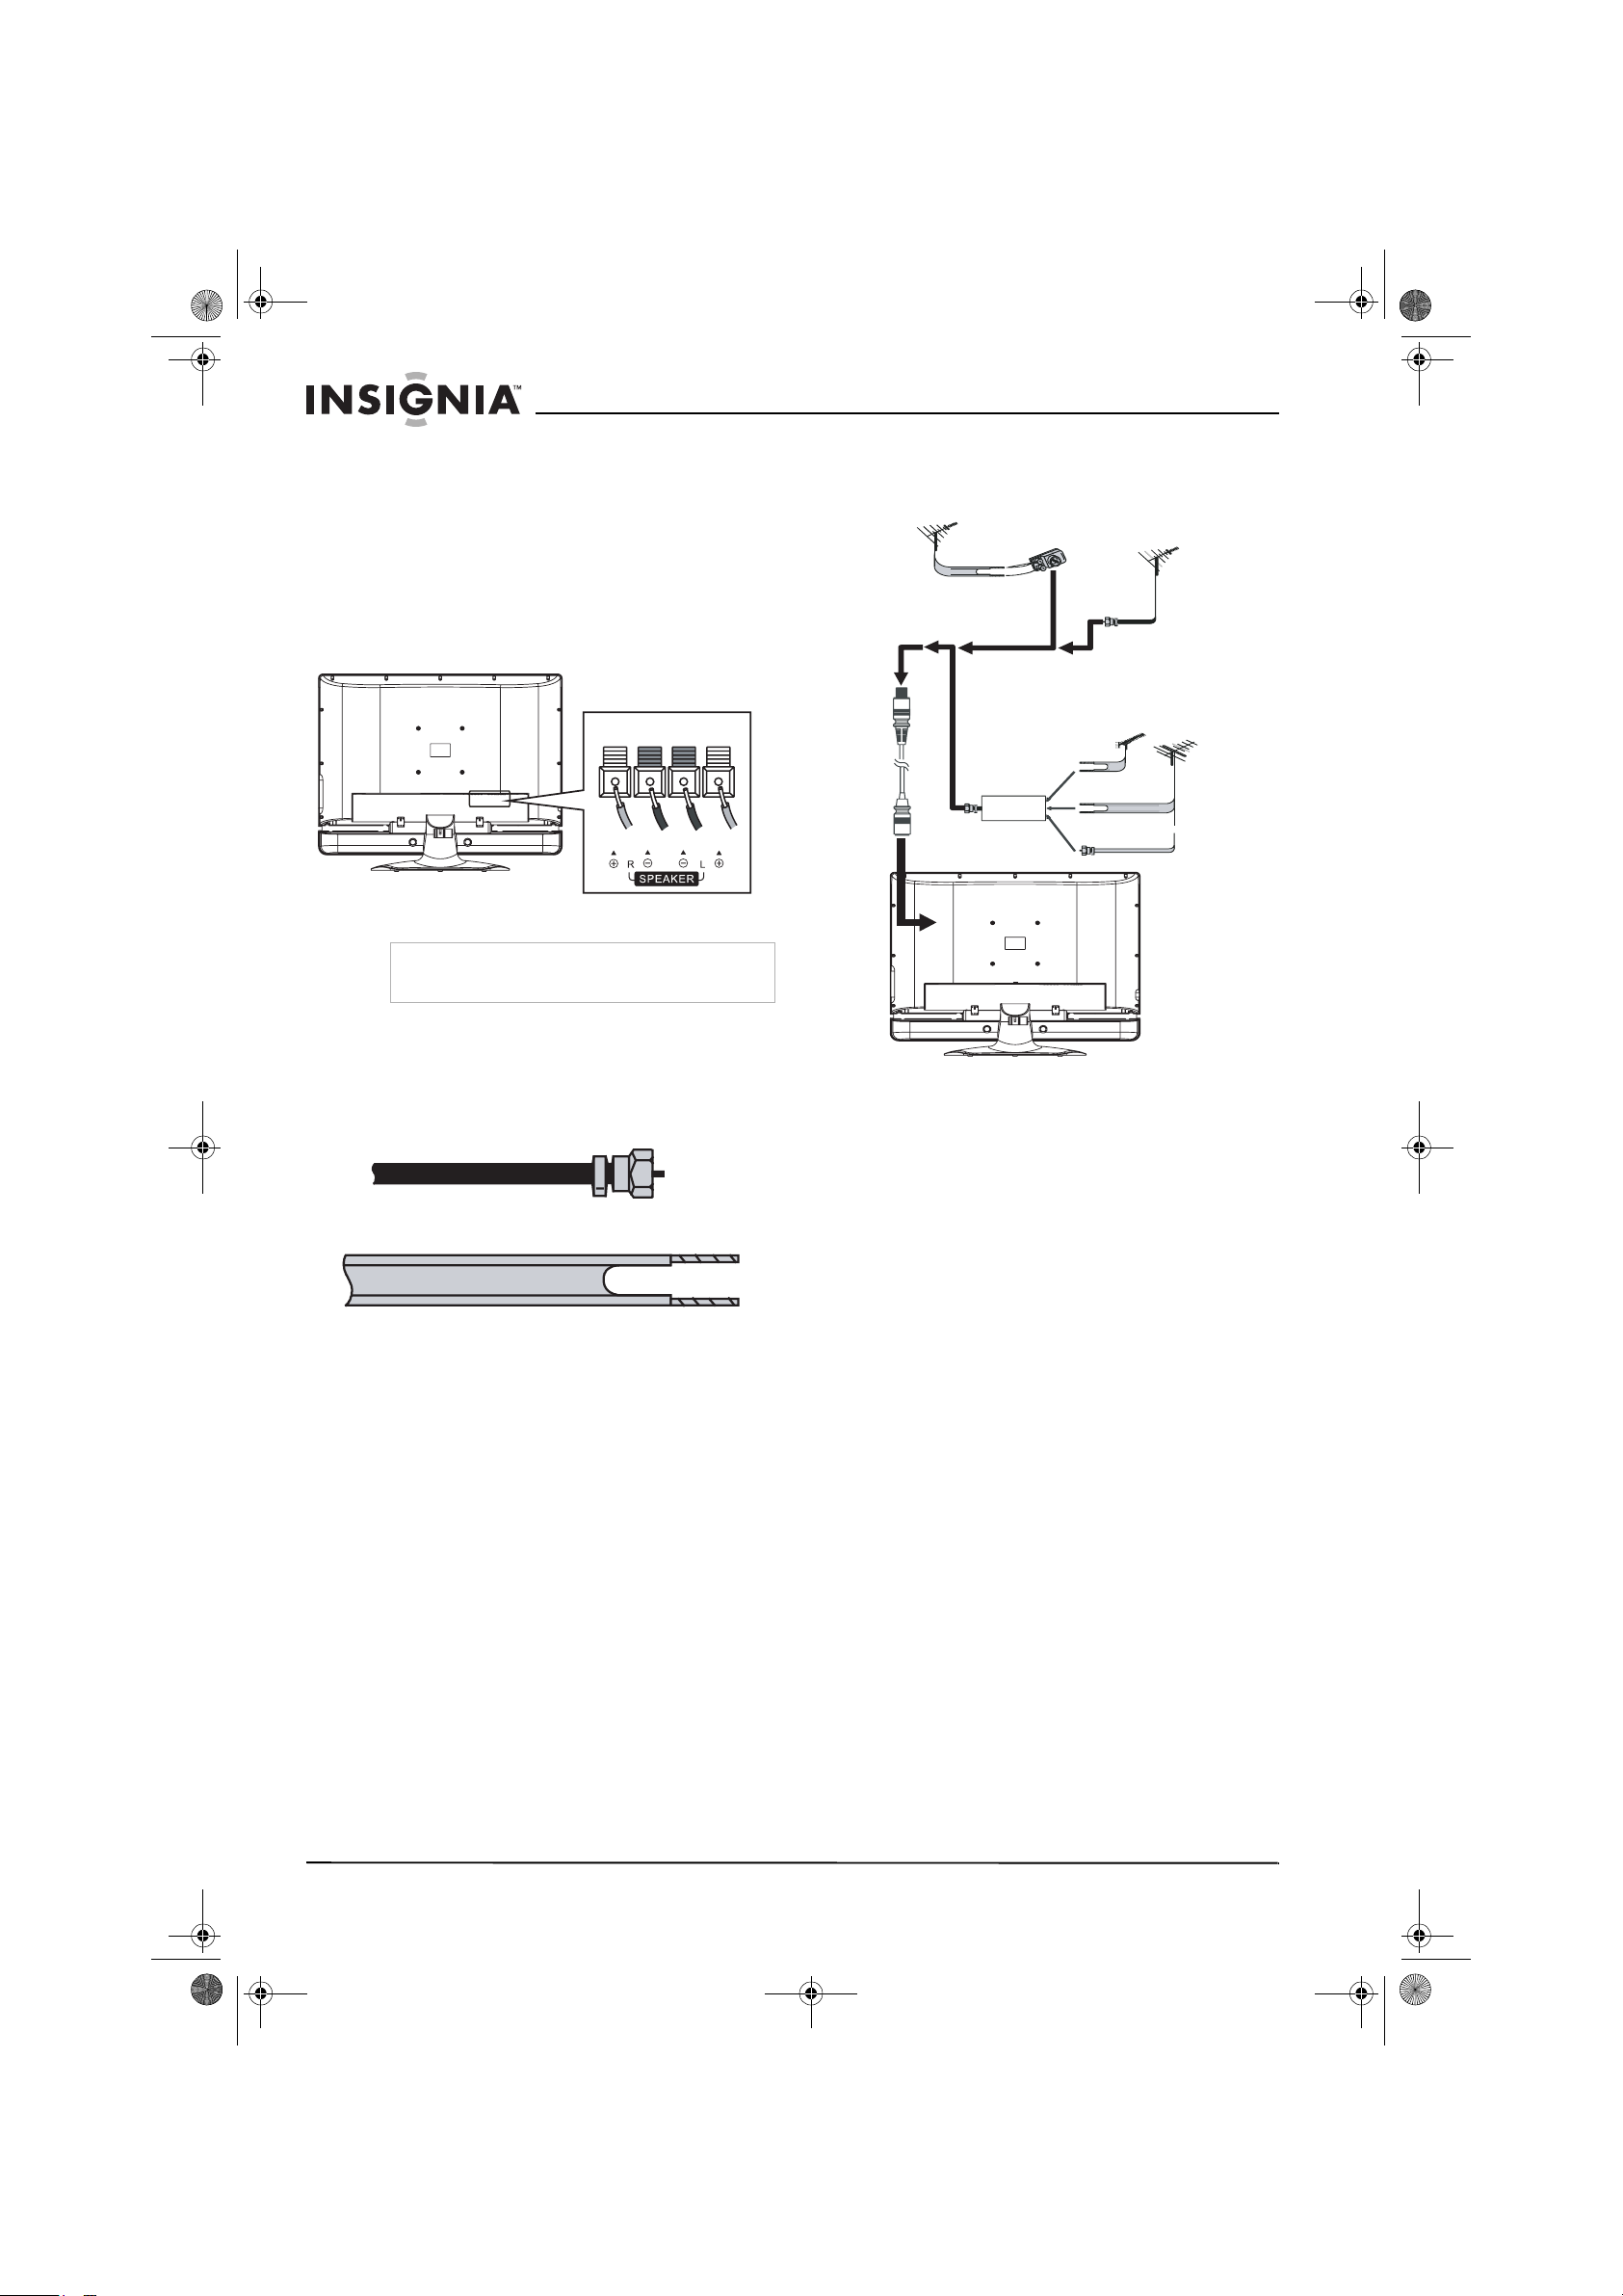
Connecting speakers
To connect speakers to your TV:
1 Unplug the TV power cord and all devices
connected to your TV.
2 Connect the speakers to the speaker jacks
on the back of your TV. Make sure that you
connect the black part of the speaker wire to
the – jack and the red part of the speaker
wire to the + jack on the back of your TV.
Red
Right speaker Left speaker
Note
The location of the speaker jacks on your TV may
vary from the illustration.
Black
Black Red
Use the following illustration to connect an
outside antenna.
Antenna
cable
VHF/UHF
antenna
300-ohm cable
with adapter
Combiner
OUT
IN
Combination antenna
OR
75-ohm
cable
UHF
antenna
OR
Separate antennas
VHF/UHF
antenna
VHF
antenna
Connecting an outside antenna
Antenna cables come in two types: 75 ohm and
300 ohm.
75 ohm cable
300-ohm cable
If your antenna cable has a 75 ohm connector,
connect the cable to the coaxial jack on the back
of your TV.
If your antenna cable has a 300 ohm connector,
connect the cable to a 300-75 ohm adapter (not
included), connect the adapter to a 75 ohm
cable, then connect the other end of the 75 ohm
connector to the coaxial jack on the back of your
TV.
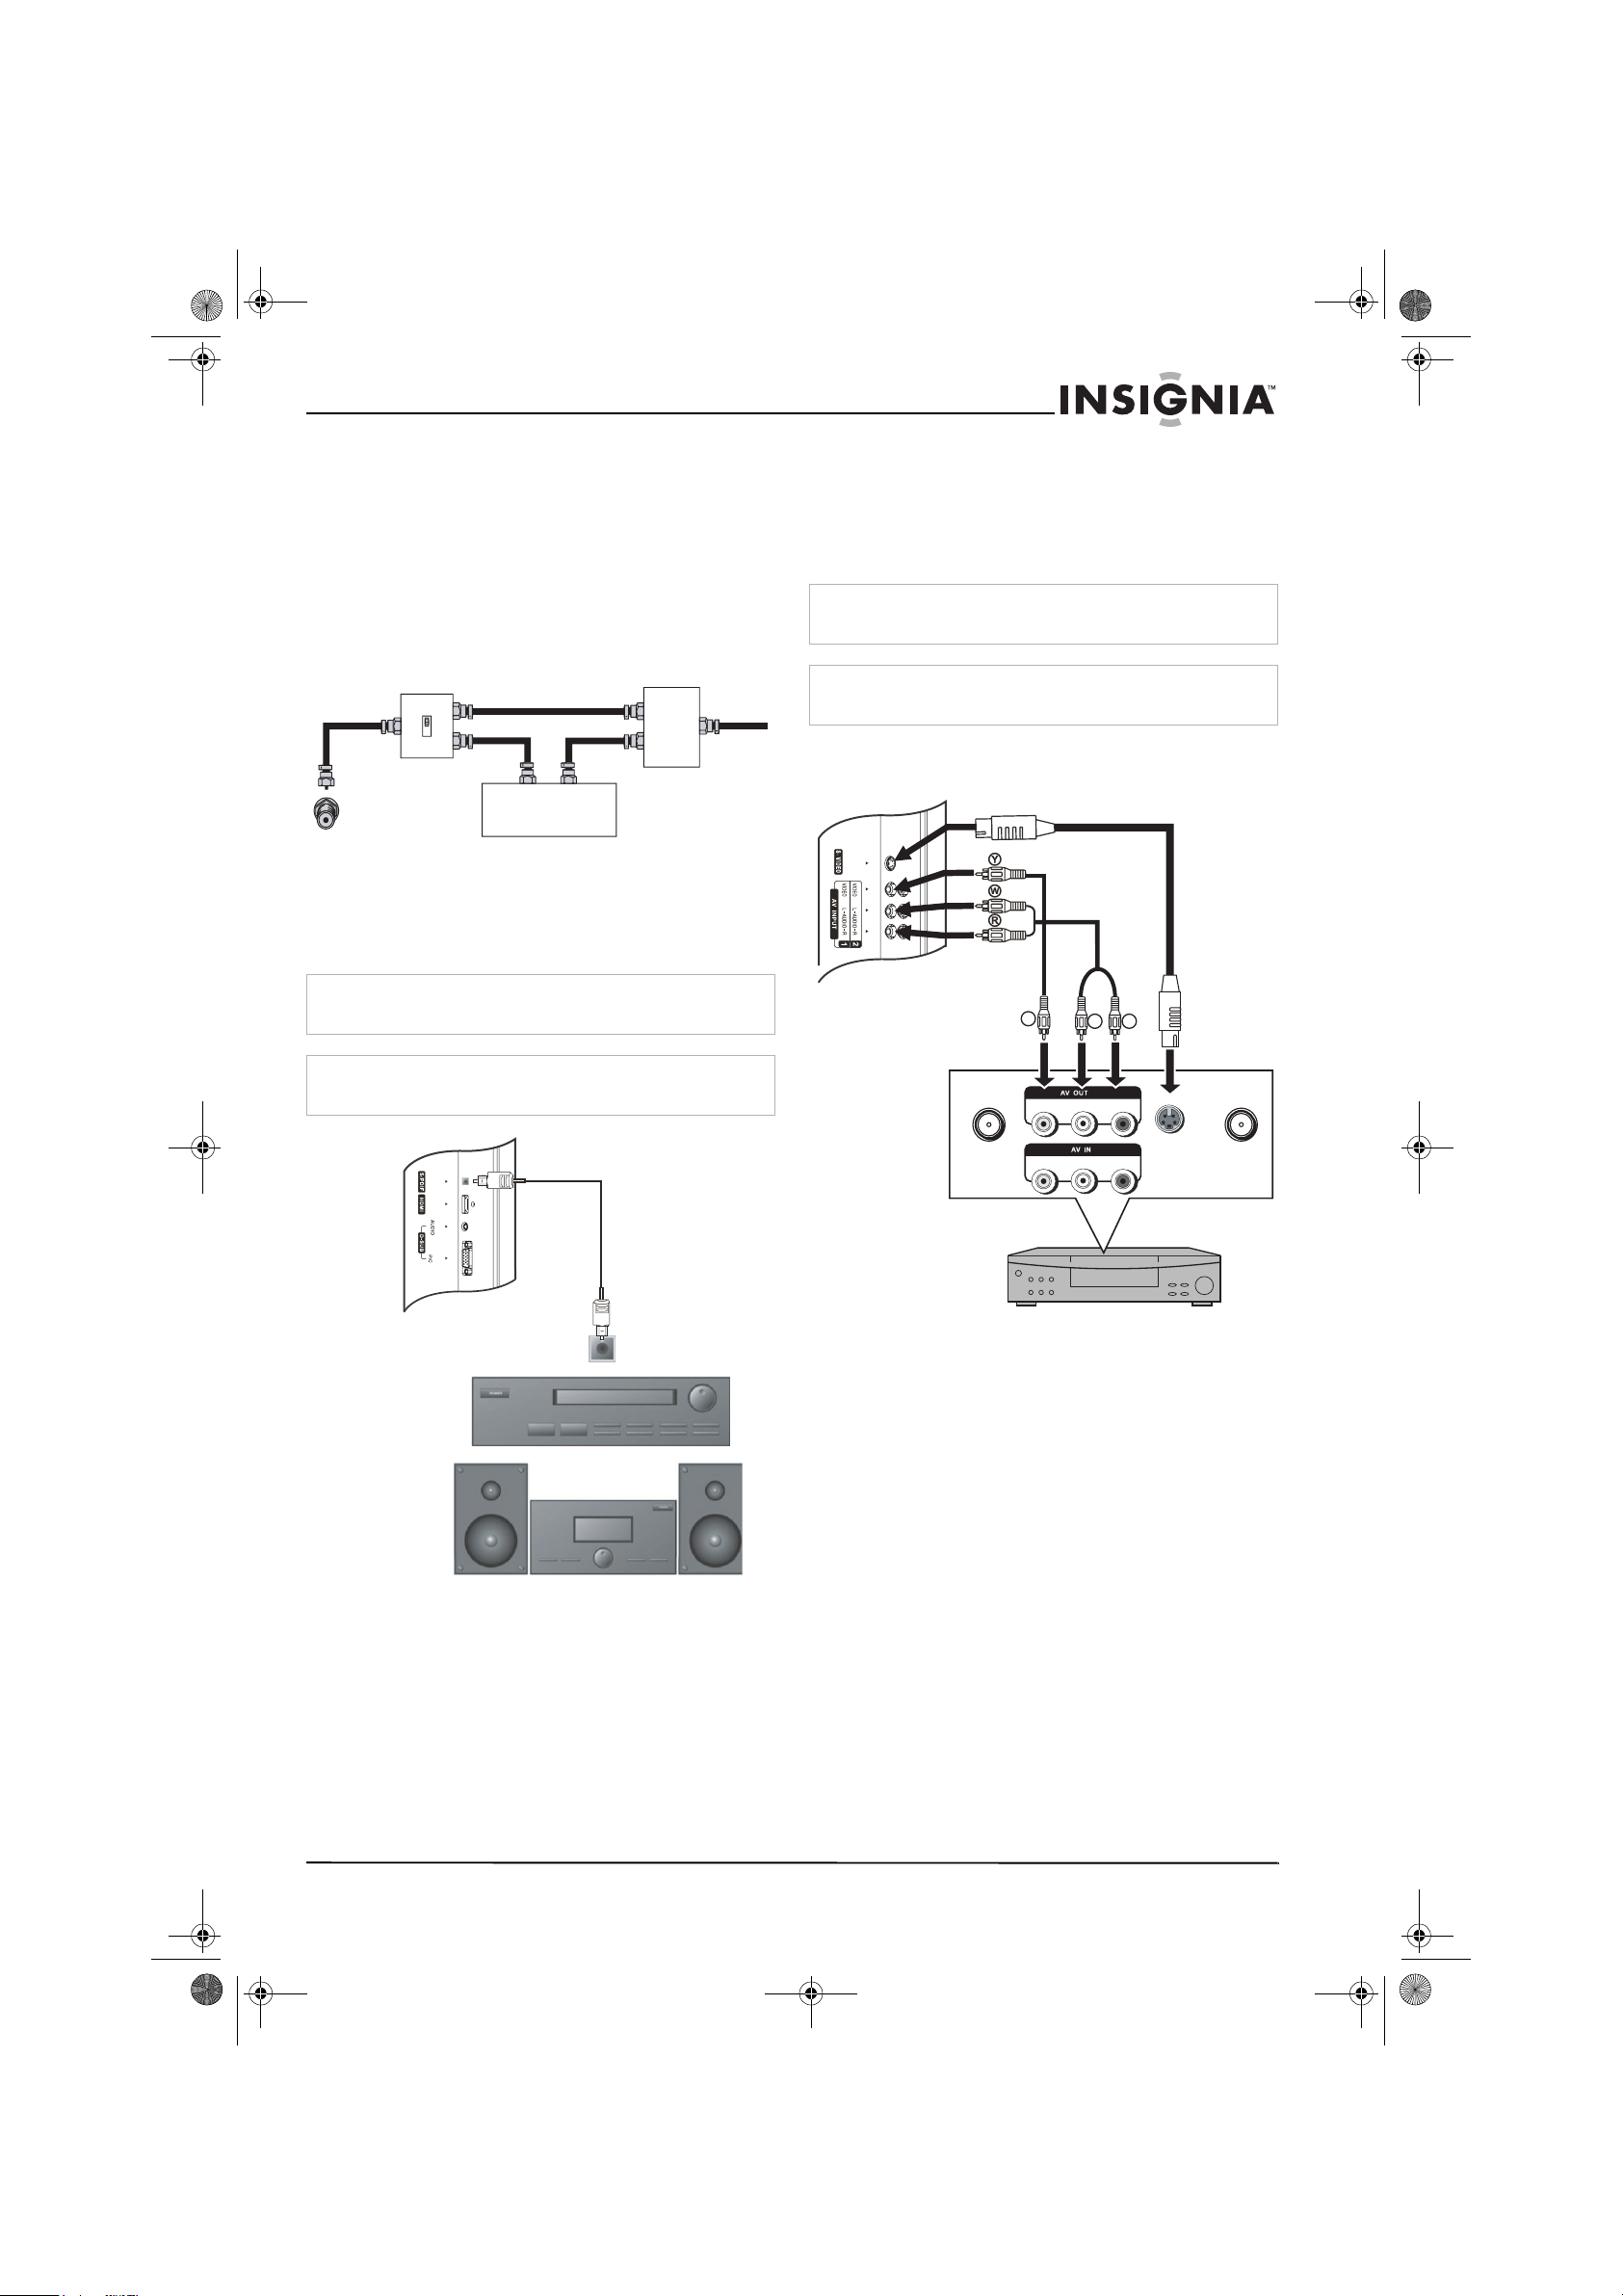
Connecting cable TV
Your TV has a 75 ohm jack for connecting cable
TV.
Some cable TV providers scramble the signals
for “premium” (pay) channels. To view these
channels you need a converter/descrambler box.
If you do not have a converter/descrambler box,
you can connect your cable TV directly to your
TV. If y ou ha v e a con v erter/descr amb ler bo x, y ou
can connect your cable TV using an RF switch
(not supplied). For more information about
connecting a converter/descramble box, contact
your cable TV provider.
To connect cable TV without a
converter/descrambler box:
1 Connect one end of a 75 ohm cable to the
coaxial jack on the back of your TV .
2 Connect the other end of the cable to the
cable TV wall outlet.
8
www.insignia-products.com
Page 9
NS-27LCD.fm Page 9 Wednesday, June 28, 2006 12:04 PM
Insignia NS-27LCD 27” LCD TV
To connect cable TV with a
converter/descrambler box:
• Use the following illustration to connect a
converter/descrambler box. (The RF switch
and the signal splitter are not provided.)
Set the RF switch to the A position to watch
unscrambled channels using your TV remote
control. Set the RF switch to the B position to
watch scrambled channels using the
converter/descrambler controls.
RF switch
A
B
Out
Cable converter/descrambler box
Two-set signal
splitter
In
Connecting a sound system
Use the following illustration to connect an audio
processor or Hi-Fi system.
Warning
Make sure that you turn off and unplug your TV before
installing devices.
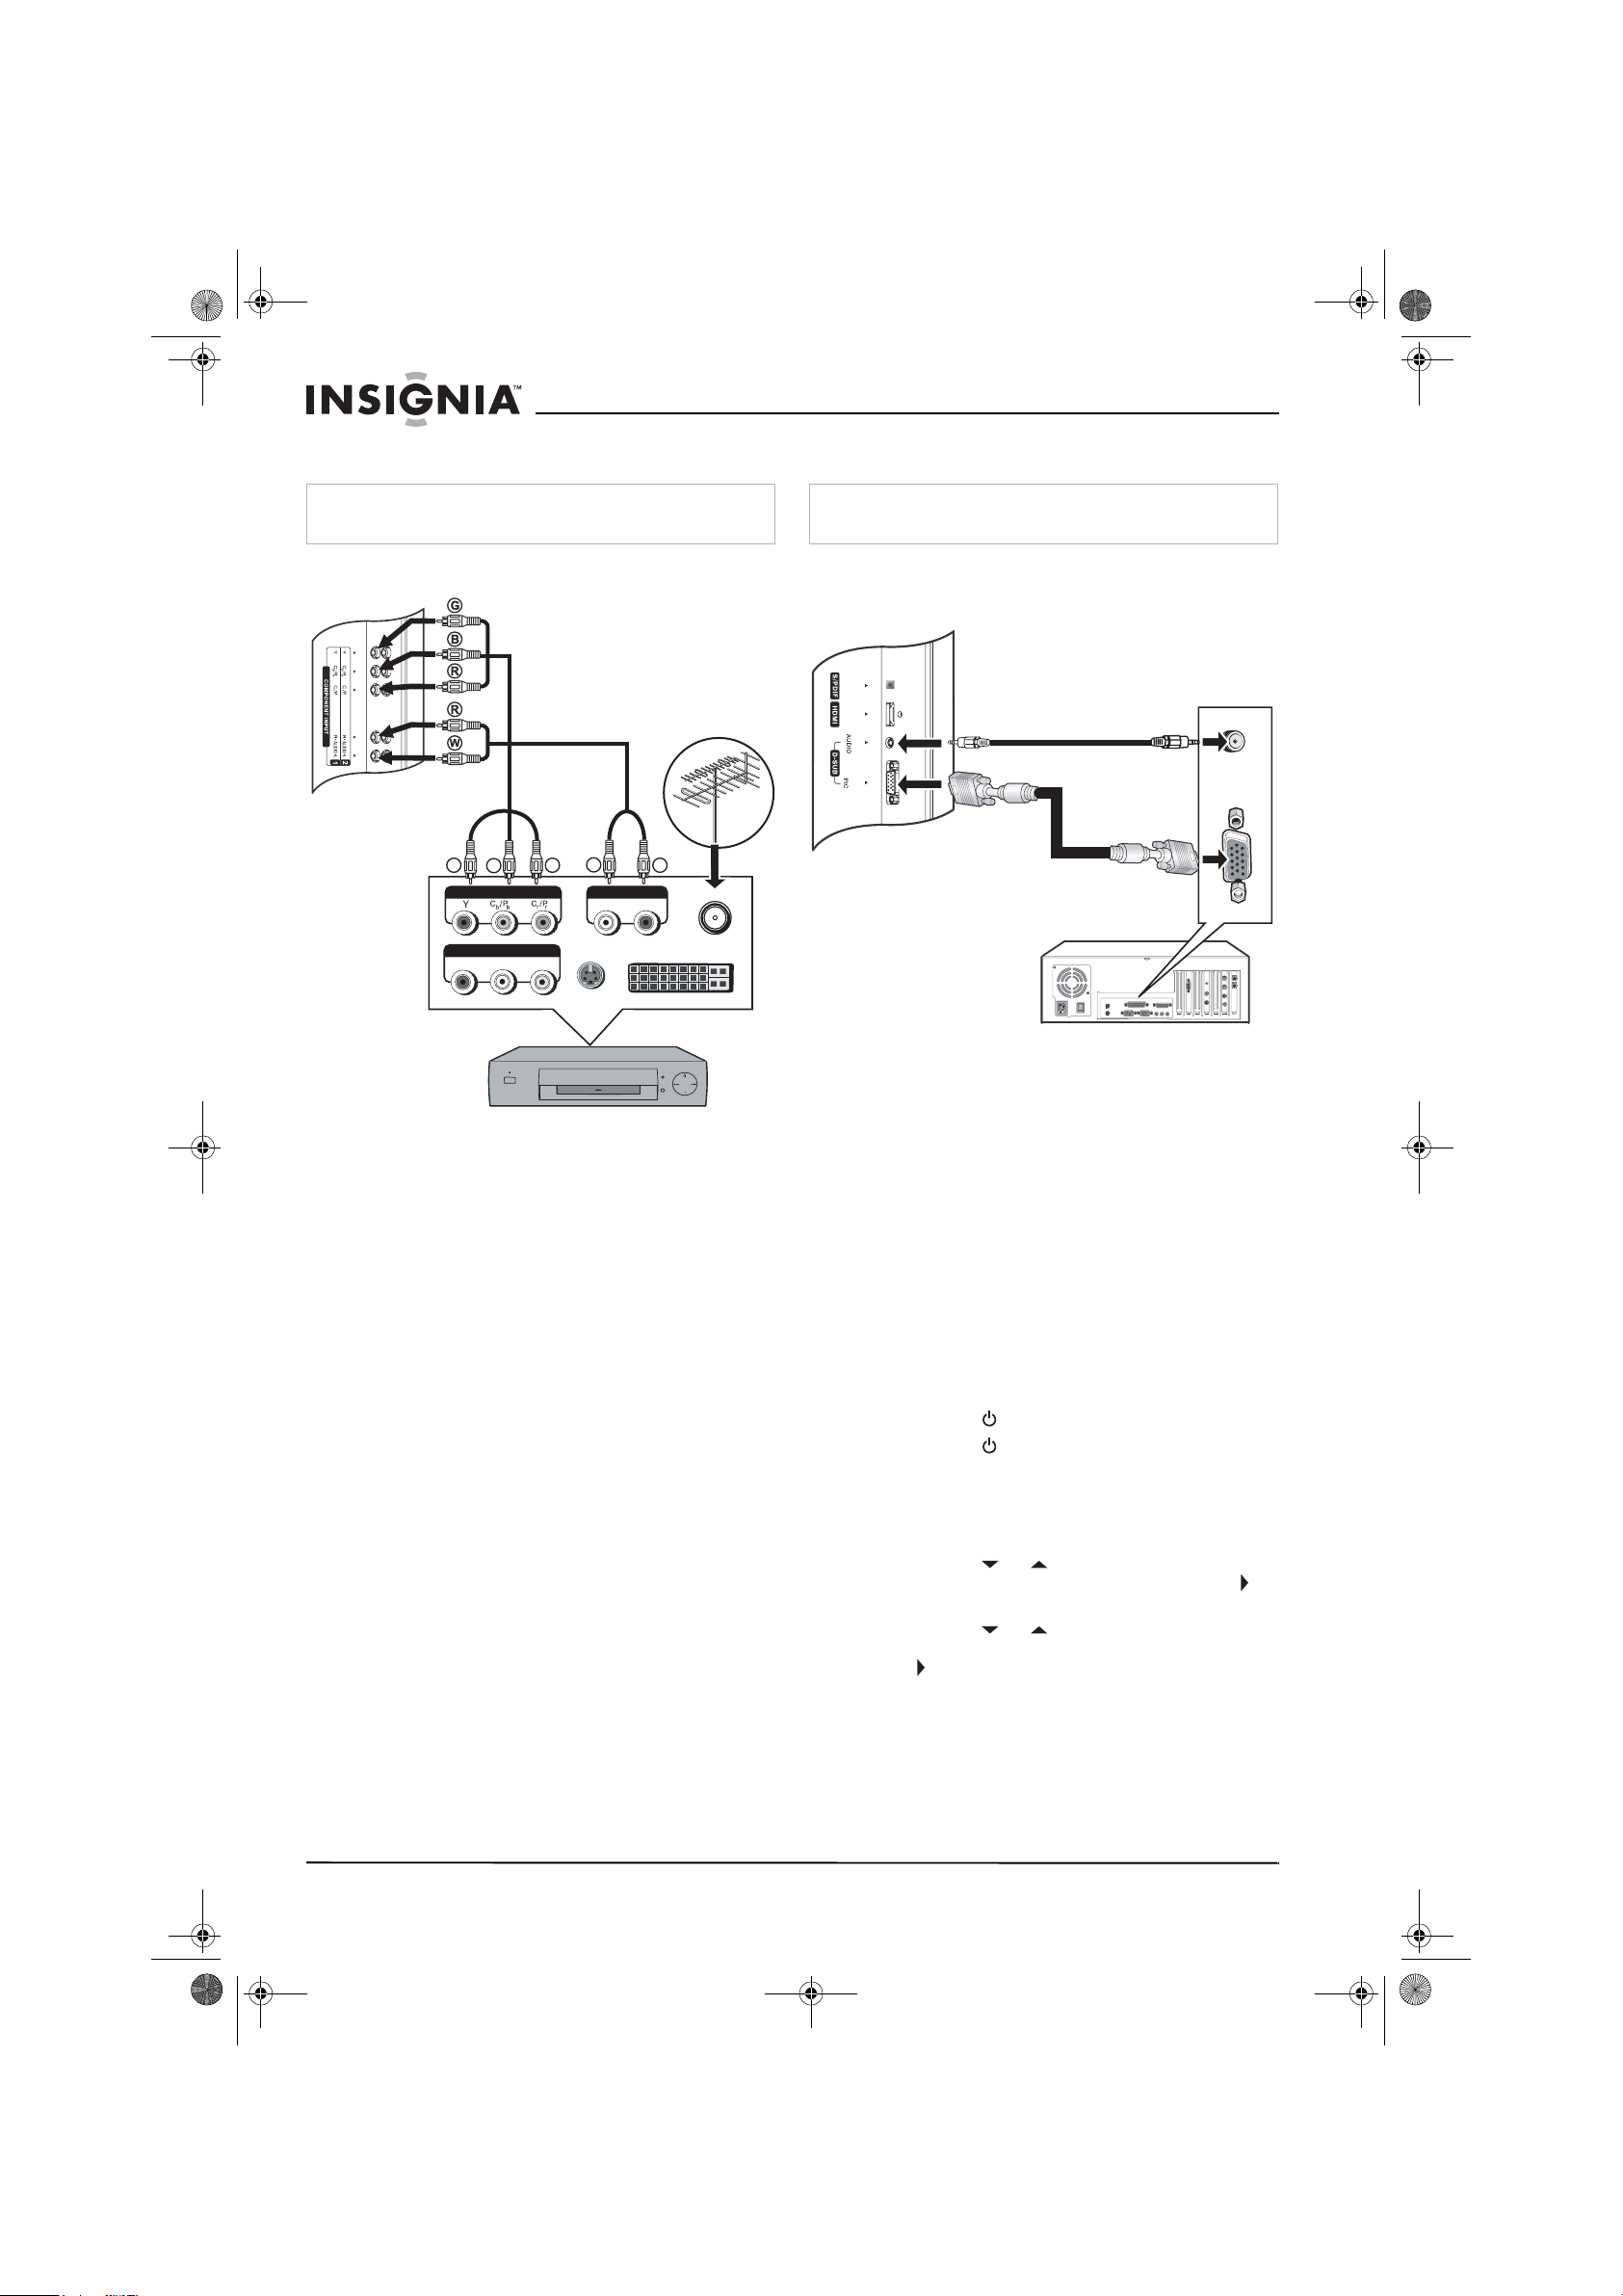
Connecting a VCR
You can connect a VCR with a standard
audio/video cable or with a S-Video cable. The
S-Video cable does not carry sound. If you use
an S-Video cable, you need to use an audio
cable to connect sound.
Note
For better video, use the S-Video jack if your VCR has an
S-Video connection.
Warning
Make sure that you turn off and unplug your TV before
installing devices.
Use the following illustration to connect a VCR.
TV
S-Video cable
OR
Y
Video cable
Audio cable
W
R
Note
For home theater systems, use an S/PDIF cable to achieve full
sound capabilities.
S/PDIF cable
S/PDIF IN jack
Audio processor
Hi-Fi system
Y=yellow (video)
W=white (audio left)
R=red (audio ri ght)
VIDEO L- AUDIO - R
VIDEO L- AUDIO - R
VCR
S-VIDEOANT OUT ANT IN
To play the VCR:
1 Turn on your TV.
2 Press the INPUT button one or more times to
select Composite1 (or S-Video if you
connected the VCR to the S0-Video jack).
3 Turn on your VCR.
4 Insert a videotape, then press the PLAY
button.
www.insignia-products.com
9
Page 10
NS-27LCD.fm Page 10 Wednesday, June 28, 2006 12:04 PM
Insignia NS-27LCD 27” LCD TV
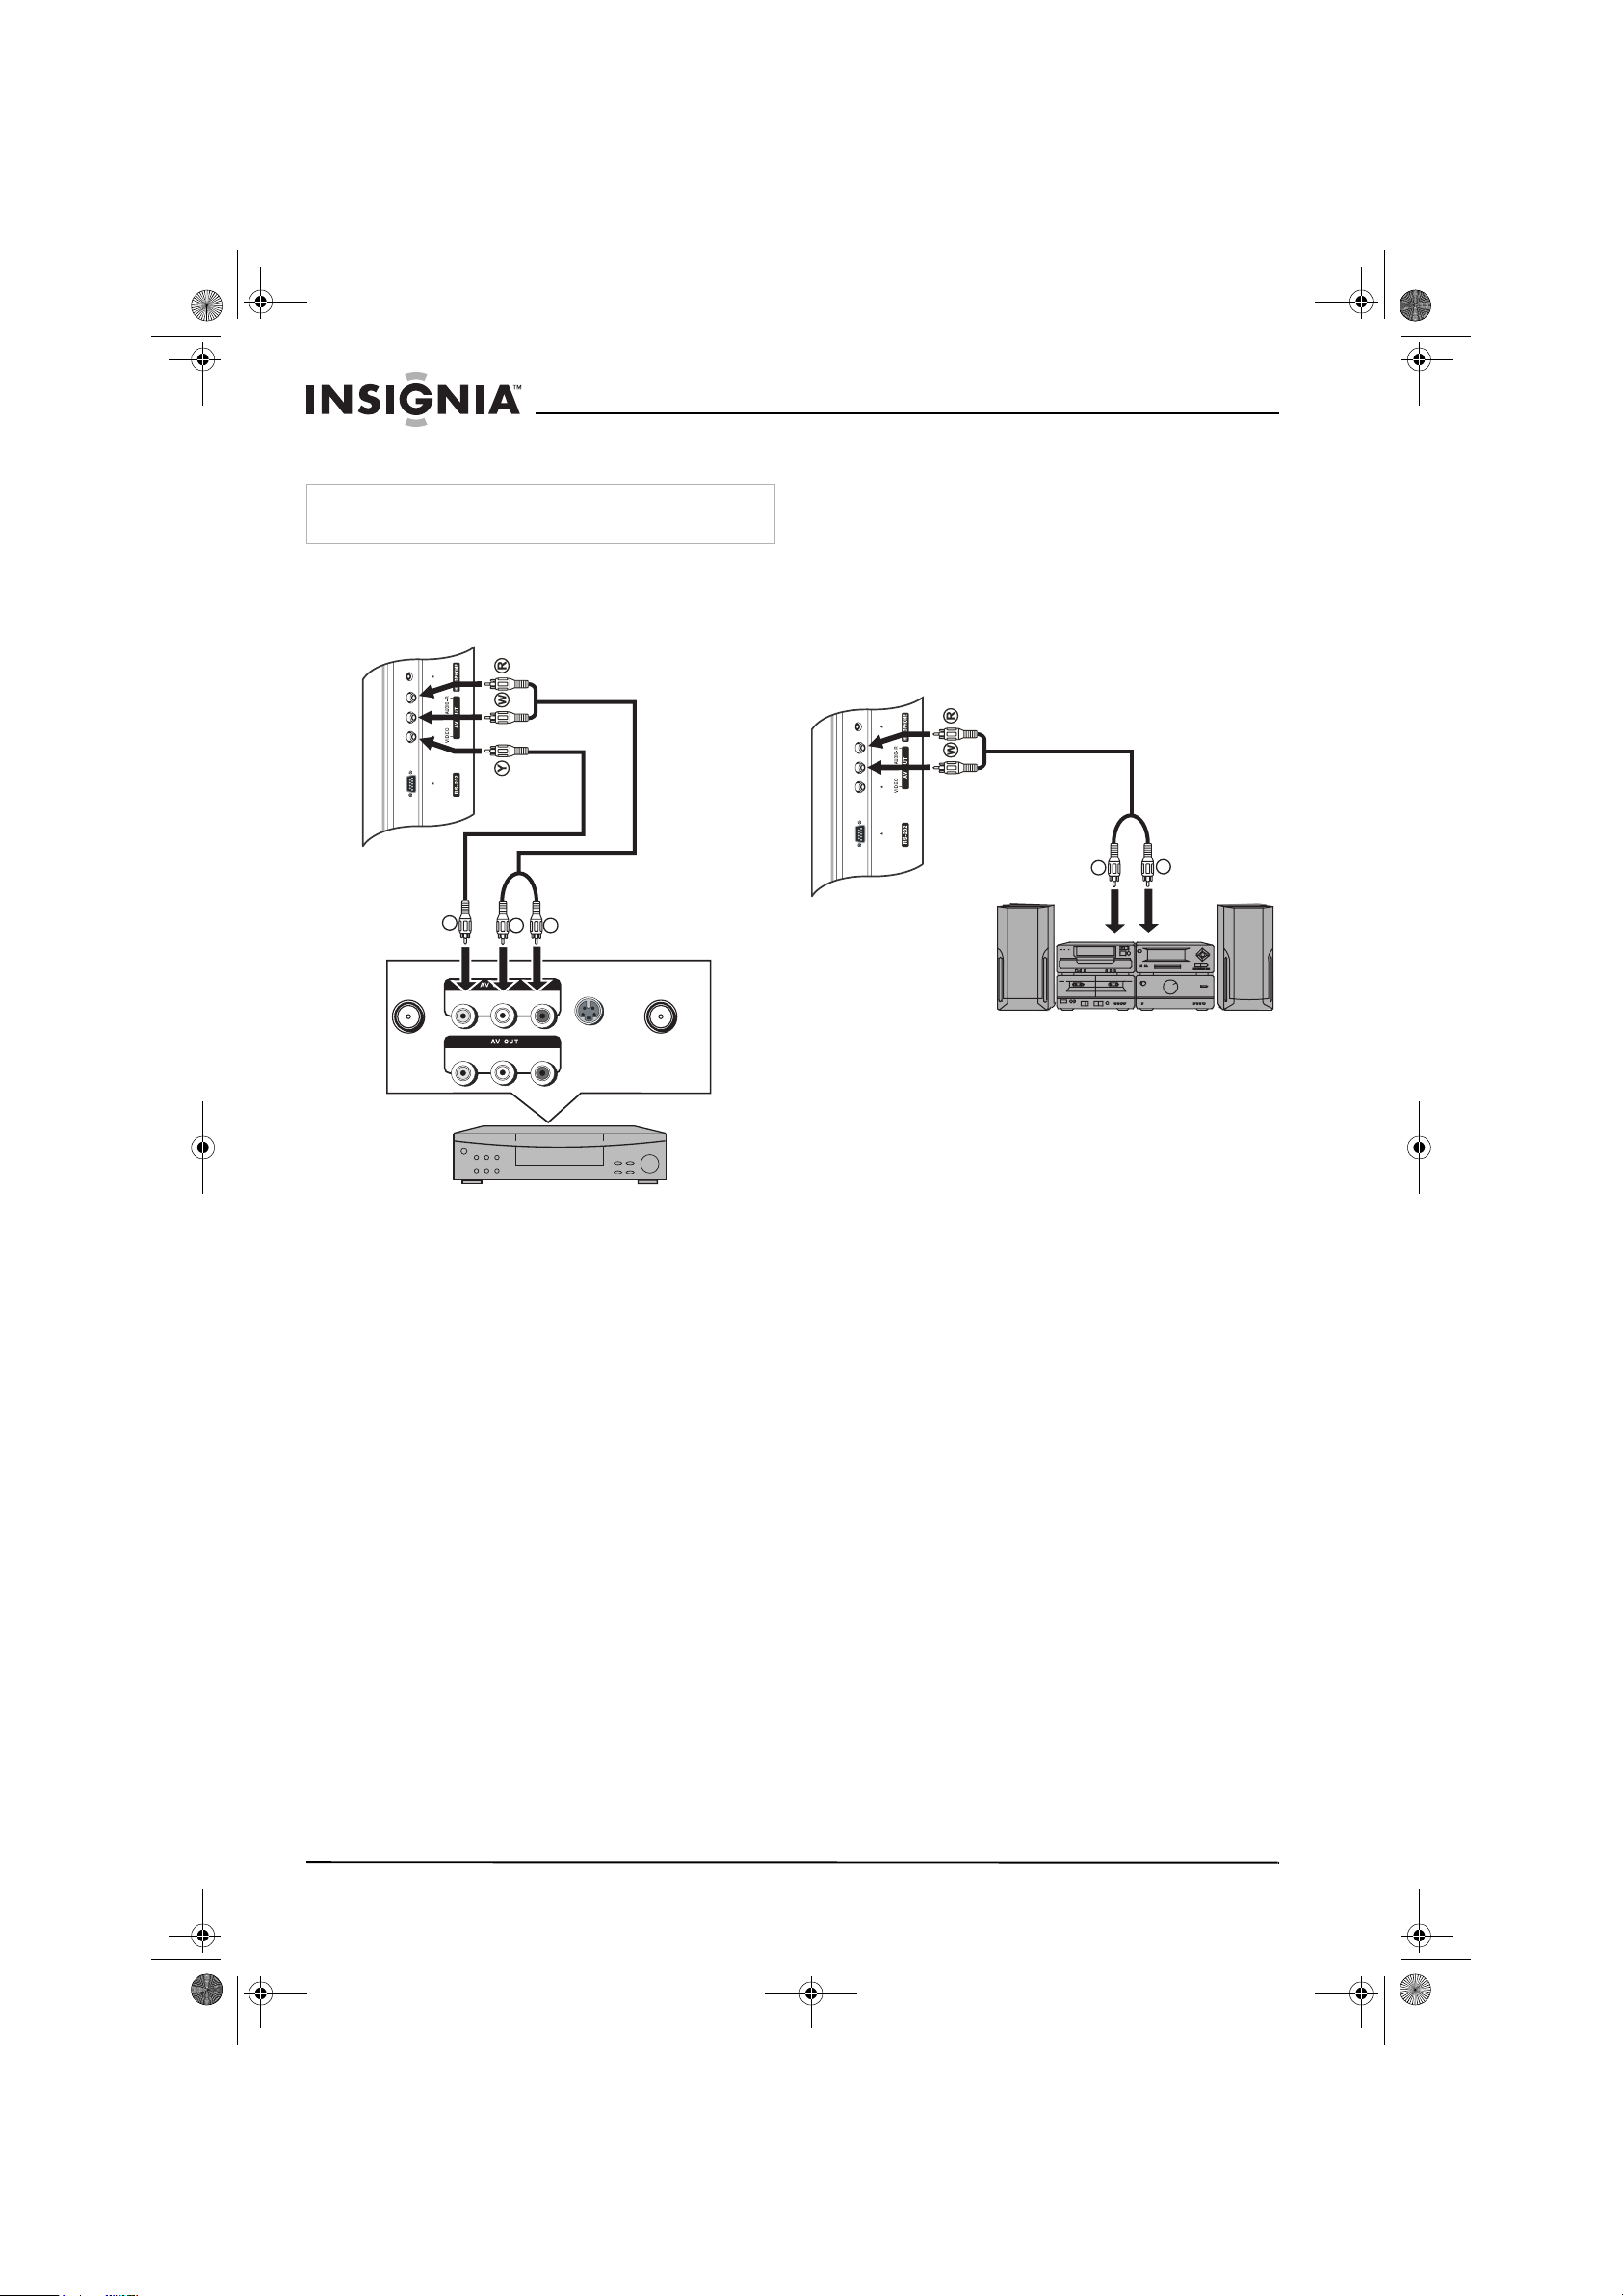
Connecting a VCR (for recording)
Warning
Make sure that you turn off and unplug your TV before
installing devices.
Use the following illustration to connect a VCR
for recording TV p r ogra ms.
TV
Video cable
Y
VIDEO L- AUDIO - R
W
Audio cable
R
S-VIDEOANT OUT ANT IN
Y=yellow (video)
W=white (audio left)
R=red (audio right)
Connecting an amplifier
Use the following illustration to connect an
external amplifier.
TV
Audio cable
R
W=white (audio left)
R=red (audio right
Amplifier
W
VIDEO L- AUDIO - R
VCR
To record a program:
1 Turn on your TV.
2 Select a program you want to record.
3 Turn on the VCR.
4 Insert a videotape, then press the record
button on the VCR.
10
www.insignia-products.com
Page 11
NS-27LCD.fm Page 11 Wednesday, June 28, 2006 12:04 PM
Insignia NS-27LCD 27” LCD TV
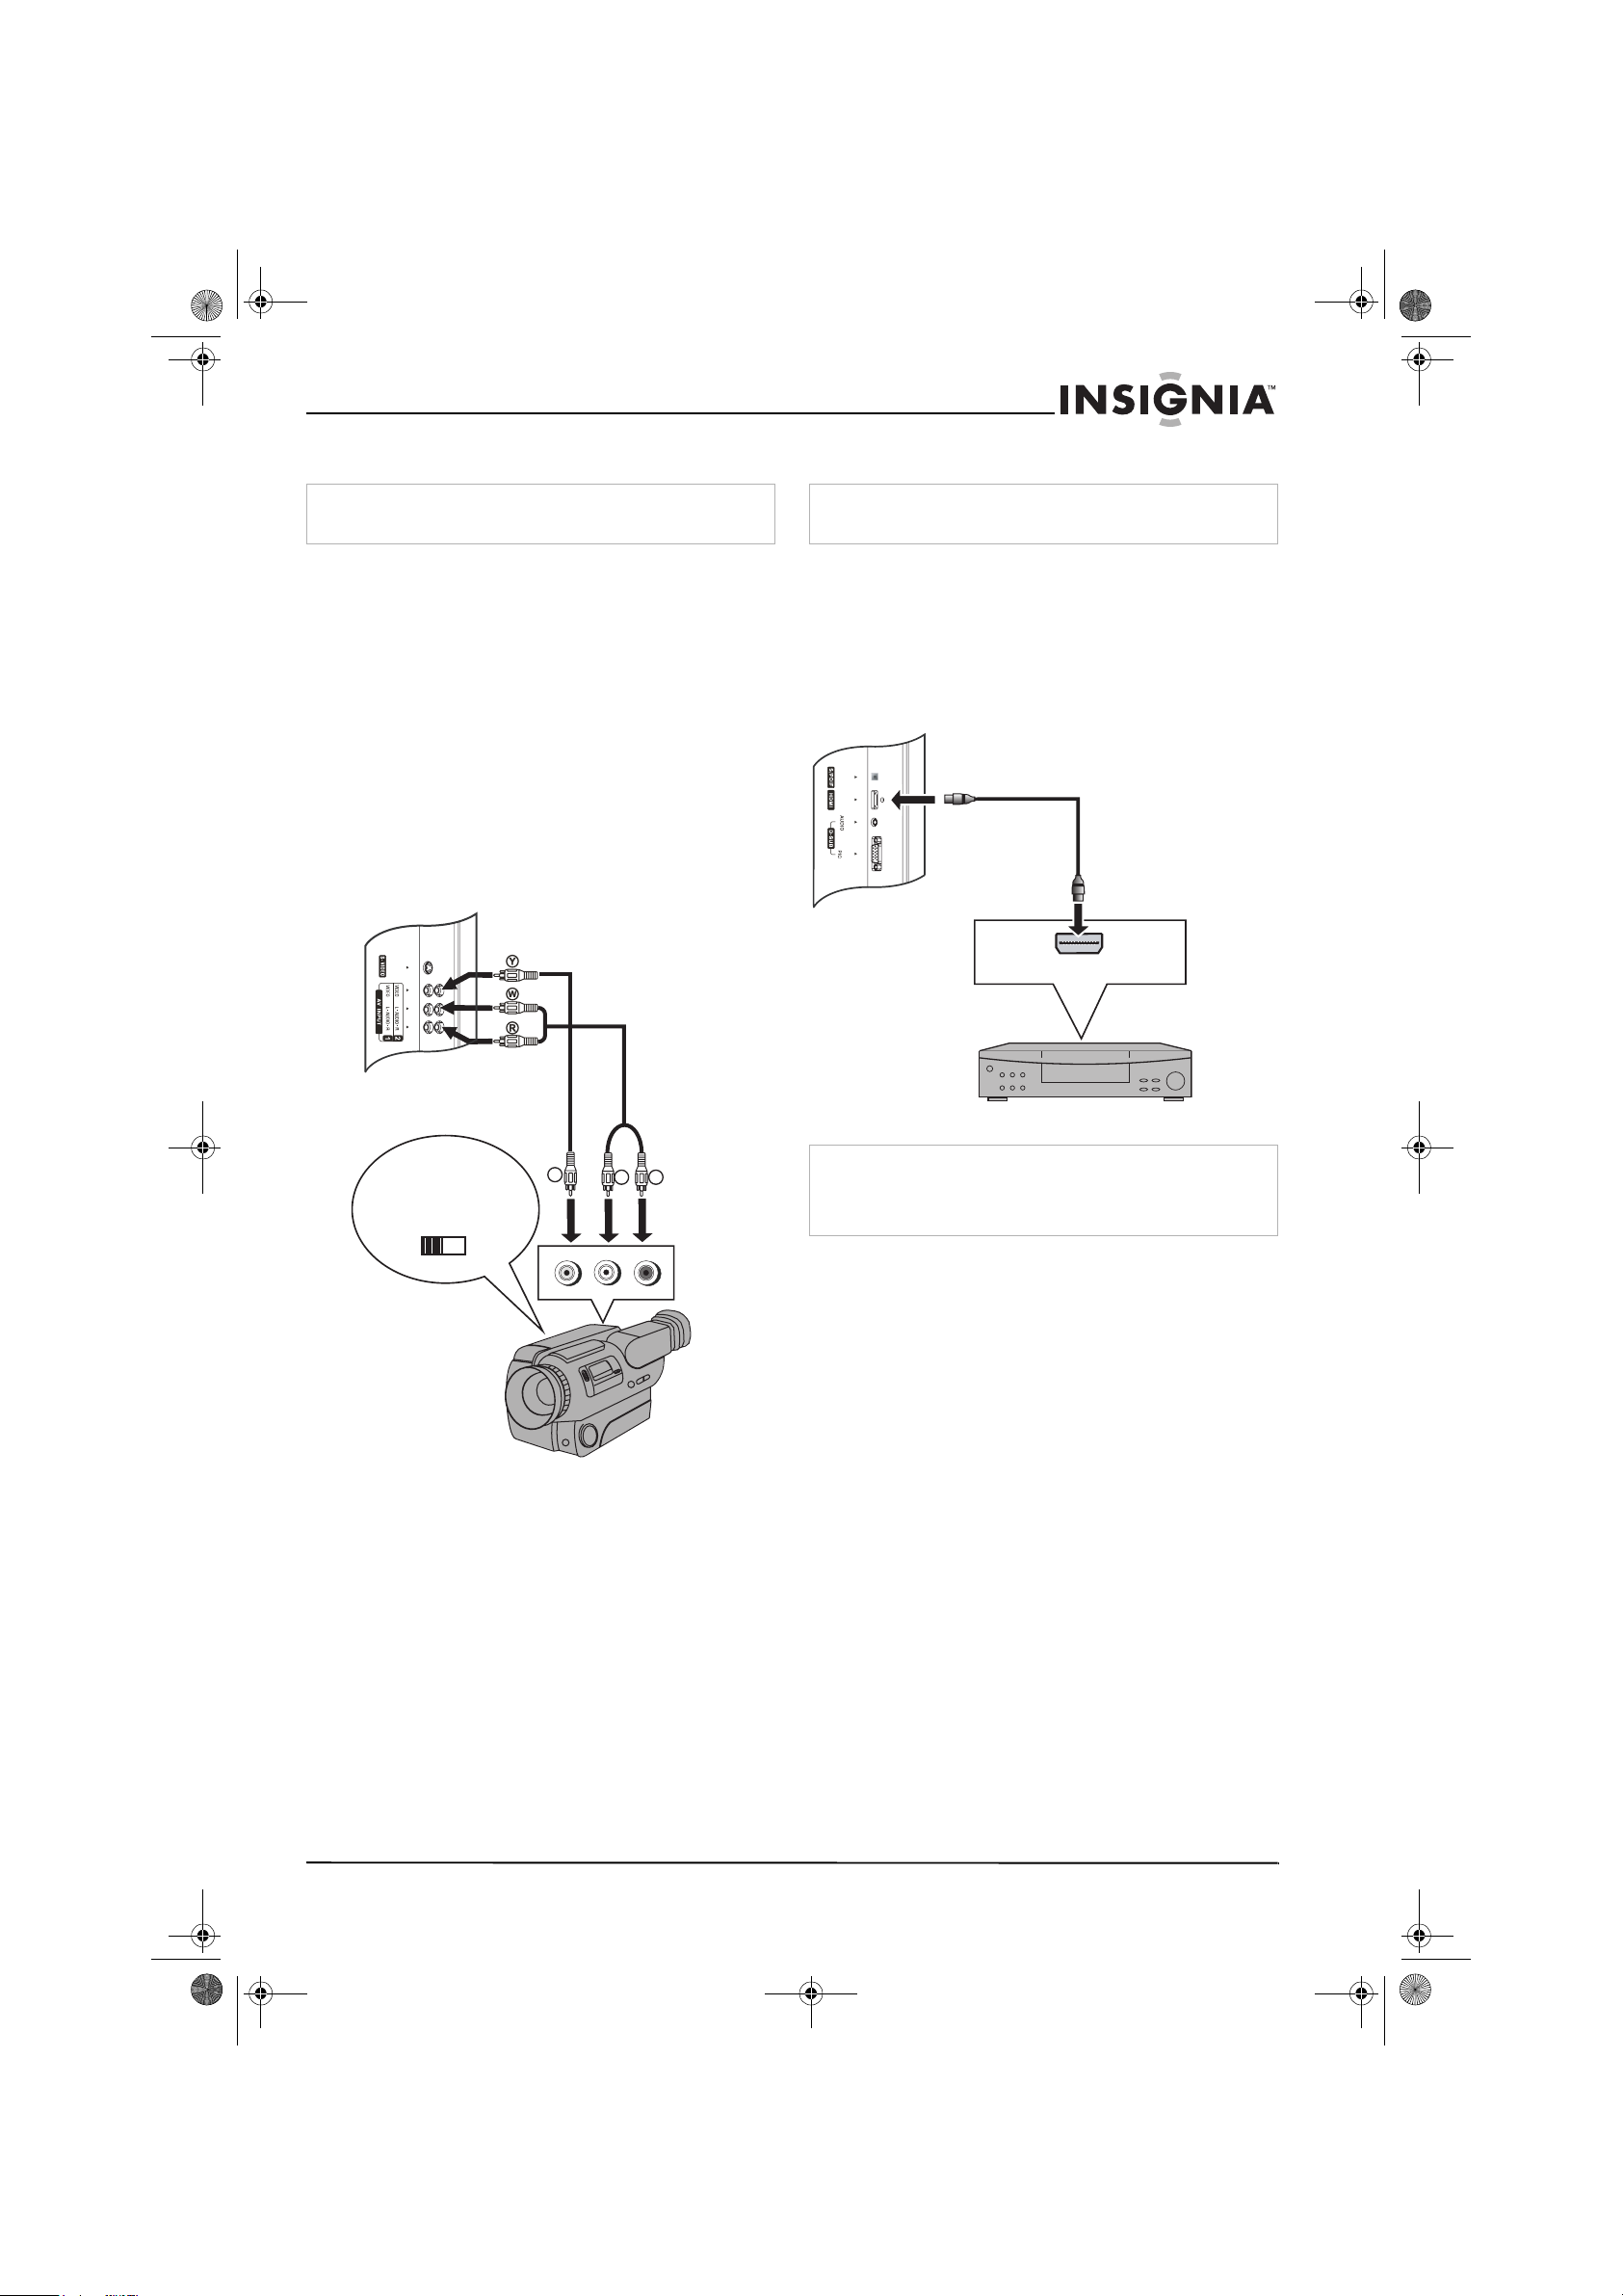
Connecting a camcorder
Warning
Make sure that you turn off and unplug your TV before
installing devices.
Use the following illustration to connect a
camcorder to your TV.
To connect a camcorder:
1 Plug the audio/video cable into the AUDIO L,
AUDIO R, and VIDEO jacks ont the back of
your TV.
2 Plug the other end of the audio/video cable
into the audio and video out jacks on the
camcorder.
TV
Y=yellow (video)
W=white (audio left)
R=red (audio right)
Connecting a DVD player
Warning
Make sure that you turn off and unplug your TV before
installing devices.
Use the following illustration to connect a DV D
player to your TV.
To connect a DVD player:
• Plug the HDMI cable into the HDMI jack
on the back of your TV and to the HDMI
out jack on the back of the DVD player.
TV
HDMI
Output
Video cable
Y
OUT IN
VIDEO L- AUDIO - R
Camcorder
Audio cable
W
R
To playback from the camcorder:
1 Turn on your TV.
2 Press the INPUT button one or more times to
select Composite2.
3 Turn on the camcorder, then set it to output
mode. See your camcorder documentation
for more information.
4 Insert a tape into the camcorder, then press
the Play button.
DVD player
Note
If the DVD player has DVI output only, use a DVI to HDMI
adapter cable (not supplied) to connect the DVD player to the
HDMI jack on the back of your TV. Then connect the audio
cable to the D-SUB AUDIO IN jack on the back of your TV.
To play a DVD:
1 Turn on your TV.
2 Press the INPUT button one or more times to
select HDMI.
3 Turn on the DVD player.
4 Insert a DVD, then press the Play button.
www.insignia-products.com
11
Page 12
NS-27LCD.fm Page 12 Wednesday, June 28, 2006 12:04 PM
Insignia NS-27LCD 27” LCD TV
Connecting a DTV receiver
Warning
Make sure that you turn off and unplug your TV before
installing devices.
TV
Video cable
G
L - AUDIO - R VIDEO
COMPONENT
AV OUT
G=green (Y)
W=white (audio left)
R=red (audio right, Cr.Pr)
B=blue (Cb/Pb)
Audio cable
W
AUDIO
L - AUDIO - R
S-VIDEO
Connecting a computer
Warning
Make sure that you turn off and unplug your TV before
installing devices.
Use the following illustration to connect a
computer to your TV.
TV
Audio cable
RBR
ANT IN
DVI
D SUB cable
DTV receiver
To watch your DTV:
1 Turn on your TV.
2 Press the INPUT button one or more times to
select Component1.
3 Turn on your DTV receiver.
Computer
To watch TV on your computer monitor:
1 Turn on your TV.
2 Press the INPUT button one or more times to
select VGA.
3 Turn on your computer, then set up your
computer for external VGA input. See your
computer documentation for more
information.
Using your TV
Turning your TV on and off
To turn on your TV:
1 Make sure that the power cord is connected
to your TV and an electrical outlet.
2 Press the button to turn on your TV.
3 Press the button again to turn off your TV
Selecting the TV source
To select the TV source:
1 Press the MENU button.
2 Press the or button one or more times
to highlight Setup, then press the OK or
button to open the Setup menu.
3 Press the or button one or more times
to highlight T uning Band, then press the OK
or button to access the tuning band
options.
12
www.insignia-products.com
Page 13
NS-27LCD.fm Page 13 Wednesday, June 28, 2006 12:04 PM
Insignia NS-27LCD 27” LCD TV
4 Select Air for an outside antenna. Select
Cable, Cable HRC, Cable IRC, or Cable
Auto for cable TV. We recommend that you
select Cable Auto for cable TV. For more
information about cable TV selections,
contact your cable TV provider.
5 Press the EXIT button to close the on-screen
menu system.
Setting up the channel list
After you select your TV source (antenna or
cable), you need to set up the channel list. When
you set up your channel list, your TV searches
for all available channels in your area and stores
a list of the channels. When your press the
CH – or + button, your TV skips the channels
that do not have a signal.
Automatically setting up channels
To automatically set up the channel list:
1 Press the MENU button.
2 Press the or button one or more times
to highlight Setup, then press the OK or
button to open the Setup menu.
3 Press the or button one or more times
to highlight Auto Ch Search.
4 Press the OK or button to start the search.
Note
You can press the Exit button to stop the search.
Manually adding or deleting channels from
the channel list
After you create a channel list using the Auto Ch
Search option, you can manually add or delete
channels from the channel list.
To add or delete channels:
1 Press the MENU button.
2 Press the or button one or more times
to highlight Setup, then press the OK or
button to open the Setup menu.
3 Press the or button one or more times
to highlight Manual Ch Set, then press the
OK or button to access the Manual Ch Set
options.
4 Press the or button to select a channel,
then press the OK button to add or delete a
channel.
5 Press the EXIT button to close the menu.
Changing channels
To change channels:
• Press the CH – or + button on the remote
control to go to the next lower or higher
channel.
Or
Press the number buttons to select a
channel. For example, if you want channel
83, press 8, then press 3.
Or
Press the button to go to the last viewed
channel.
Selecting a digital sub-channel
Most digital TV channels have more than one
channel. The main channel carries the signal for
the main TV program. The sub-channels carry
signals for additional or alternate programming,
such as a radio or news broadcast.
For example, if the main channel number is 8,
the sub-channel number might be 8-1, 8-2, and
8-3,
To select a sub-channel:
1 Press the number buttons for the main
channel, for example 8.
2 Press the – button, the press the sub-channel
button, for e xample 1.
Adjusting the volume
To adjust the volume:
• Press the VOL – or + button to decrease or
increase the volume.
• Press the MUTE button to turn off the sound.
Press the MUTE button again to turn the
sound back on.
Displaying status information
To display status information:
• Press the INFO button. Your TV displays
status information, such as the channel
number or signal source.
Selecting the video input source
To select the video input source:
• Press the INPUT button one or more times to
select the video source. You can select:
• TV–TV signal
• Composite1–AV INPUT1 jacks
• Composite2–AV INPUT2 jacks
• Component1–COMPO NENT INPUT1
jacks
• Component2–COMPO NENT INPUT2
jacks
• VGA–D-SUB jack (computer)
• HDMI–HDMI jack
• S-Video–S-Video jack
Checking the DTV signal strength
To check the DTV signal strength:
1 Press the MENU button.
2 Press the or button one or more times
to highlight Setup, the press the OK or
button to open the Setup menu.
3 Press the or button one or more times
to highlight DTV Signal, then press the OK
or button. Your TV shows the DTV signal
strength.
Adding a channel label
To add a label to a channel:
1 Press the MENU button.
2 Press the or button one or more times
to highlight Setup, then press the OK or
button to open the Setup menu.
www.insignia-products.com
13
Page 14
NS-27LCD.fm Page 14 Wednesday, June 28, 2006 12:04 PM
Insignia NS-27LCD 27” LCD TV
3 Press the or button one or more times
to highlight Channel Labels, then press the
OK or button to open the Channel Labels
Menu.
4 Press the or button to move the highlight
or cursor. Press the or button to toggle
between NTSC or ATSC or to select a
channel number or character.
5 Press the OK button to return to the previous
menu or press the EXIT button to close the
menu system.
Freezing the picture
You can freeze (still) the screen image.
Warning
To protect your TV, do not freeze the screen image for long
periods of time.
To freeze or unfreeze the picture:
• Press the FREEZE button.
Setting the clock
You can automatically set the clock from a digital
channel signal. Your TV searches for a digital
channel that has time information encoded. If the
clock is not correct after you automatically set it,
you can manually set the clock.
Automatically setting the clock
To automatically set the clock:
1 Press the MENU button.
2 Press the or button one or more times
to highlight Feature, then press the OK or
button to open the Feature menu.
3 Press the or button one or more times
to highlight Time Set, then press the OK or
button to open the Time Set menu.
4 Press the or button one or more times
to highlight Time Set Mode, then press the
OK or button to select Auto.
5 Press the or button one or more times
to highlight Time Zone, then press the OK or
button to select a time zone: Pacific,
Alaska, Hawaii, Eastern, Central, or
Mountain.
6 Press the EXIT button to close the on-screen
menu system.
Manually setting the clock
To manually set the clock:
1 Press the MENU button.
2 Press the or button one or more times
to highlight Feature, then press the OK or
button to open the Feature menu.
3 Press the or button one or more times
to highlight Time Set, then press the OK or
button to open the Time Set menu.
4 Press the or button one or more times
to highlight Time Set Mode, then press the
OK or button to select Manual.
5 Press the or button to select Year,
Date, or Time, then press the OK, , or
button to set the year, date, or time.
6 Press the EXIT button to close the on-screen
menu system.
Setting the sleep timer
The sleep timer lets you select the amount of
time before your TV turns off automatically.
To set the sleep timer:
1 Press the MENU button.
2 Press the or button one or more times
to highlight Feature, then press the OK or
button to open the Feature menu.
3 Press the or button one or more times
to highlight Sleep Timer, then press OK or
button to select the amount of time. To turn
off the timer, select Off.
Note
You can also press the SLEEP b utton to set the sleep timer.
Viewing closed captions
You can view closed captions in two modes:
CAPTION and TEXT. Each mode has four
channels. CAPTION mode shows dialogue and
commentaries for TV programs while providing a
clear picture of the program. TEXT mode shows
information not related to the program, such as
TV program schedules and weather forecasts. In
TEXT mode, part of picture may be covered by
the text.
Note
For digital broadcast systems, you can press the CCD button
on the remote control to select the closed caption mode.
To view closed captions:
• Press the CCD button one or more times to
select a closed caption mode. You can select:
• CC1
• CC2
• CC3
• CC4
•TEXT1
•TEXT2
•TEXT3
•TEXT4
•Off
Setting parental controls
Your TV has a V-chip that lets you control the
type of programs your children can watch.
Parental controls include two ratings: MPAA
(based on age) and TV Parental Guidelines
(based on content and age). A TV program may
have an MPAA or TV Parental Guidelines rating,
so you should set controls for both ratings.
Before you can select ratings, you need to set up
a parental controls password.
To set up a password:
1 Press the MENU button.
2 Press the or button one or more times
to highlight Feature, then press the OK or
button to open the Feature menu.
3 Press the or button one or more times
to highlight Parental Control, then press the
OK or button to open the Parental Control
menu.
14
www.insignia-products.com
Page 15
NS-27LCD.fm Page 15 Wednesday, June 28, 2006 12:04 PM
Insignia NS-27LCD 27” LCD TV
4 Press the or button one or more times
to highlight Password Change, the press the
OK or button to access the Password
Change option.
5 Press the number buttons to enter the old
password. If you have not set a password,
enter 0000.
6 Press the number buttons to enter a new
password, then enter the new password
again to confirm.
Caution
Write down your password and save it for future use.
Note
If you forget your password, enter 1397 for the old password,
then enter a new password.
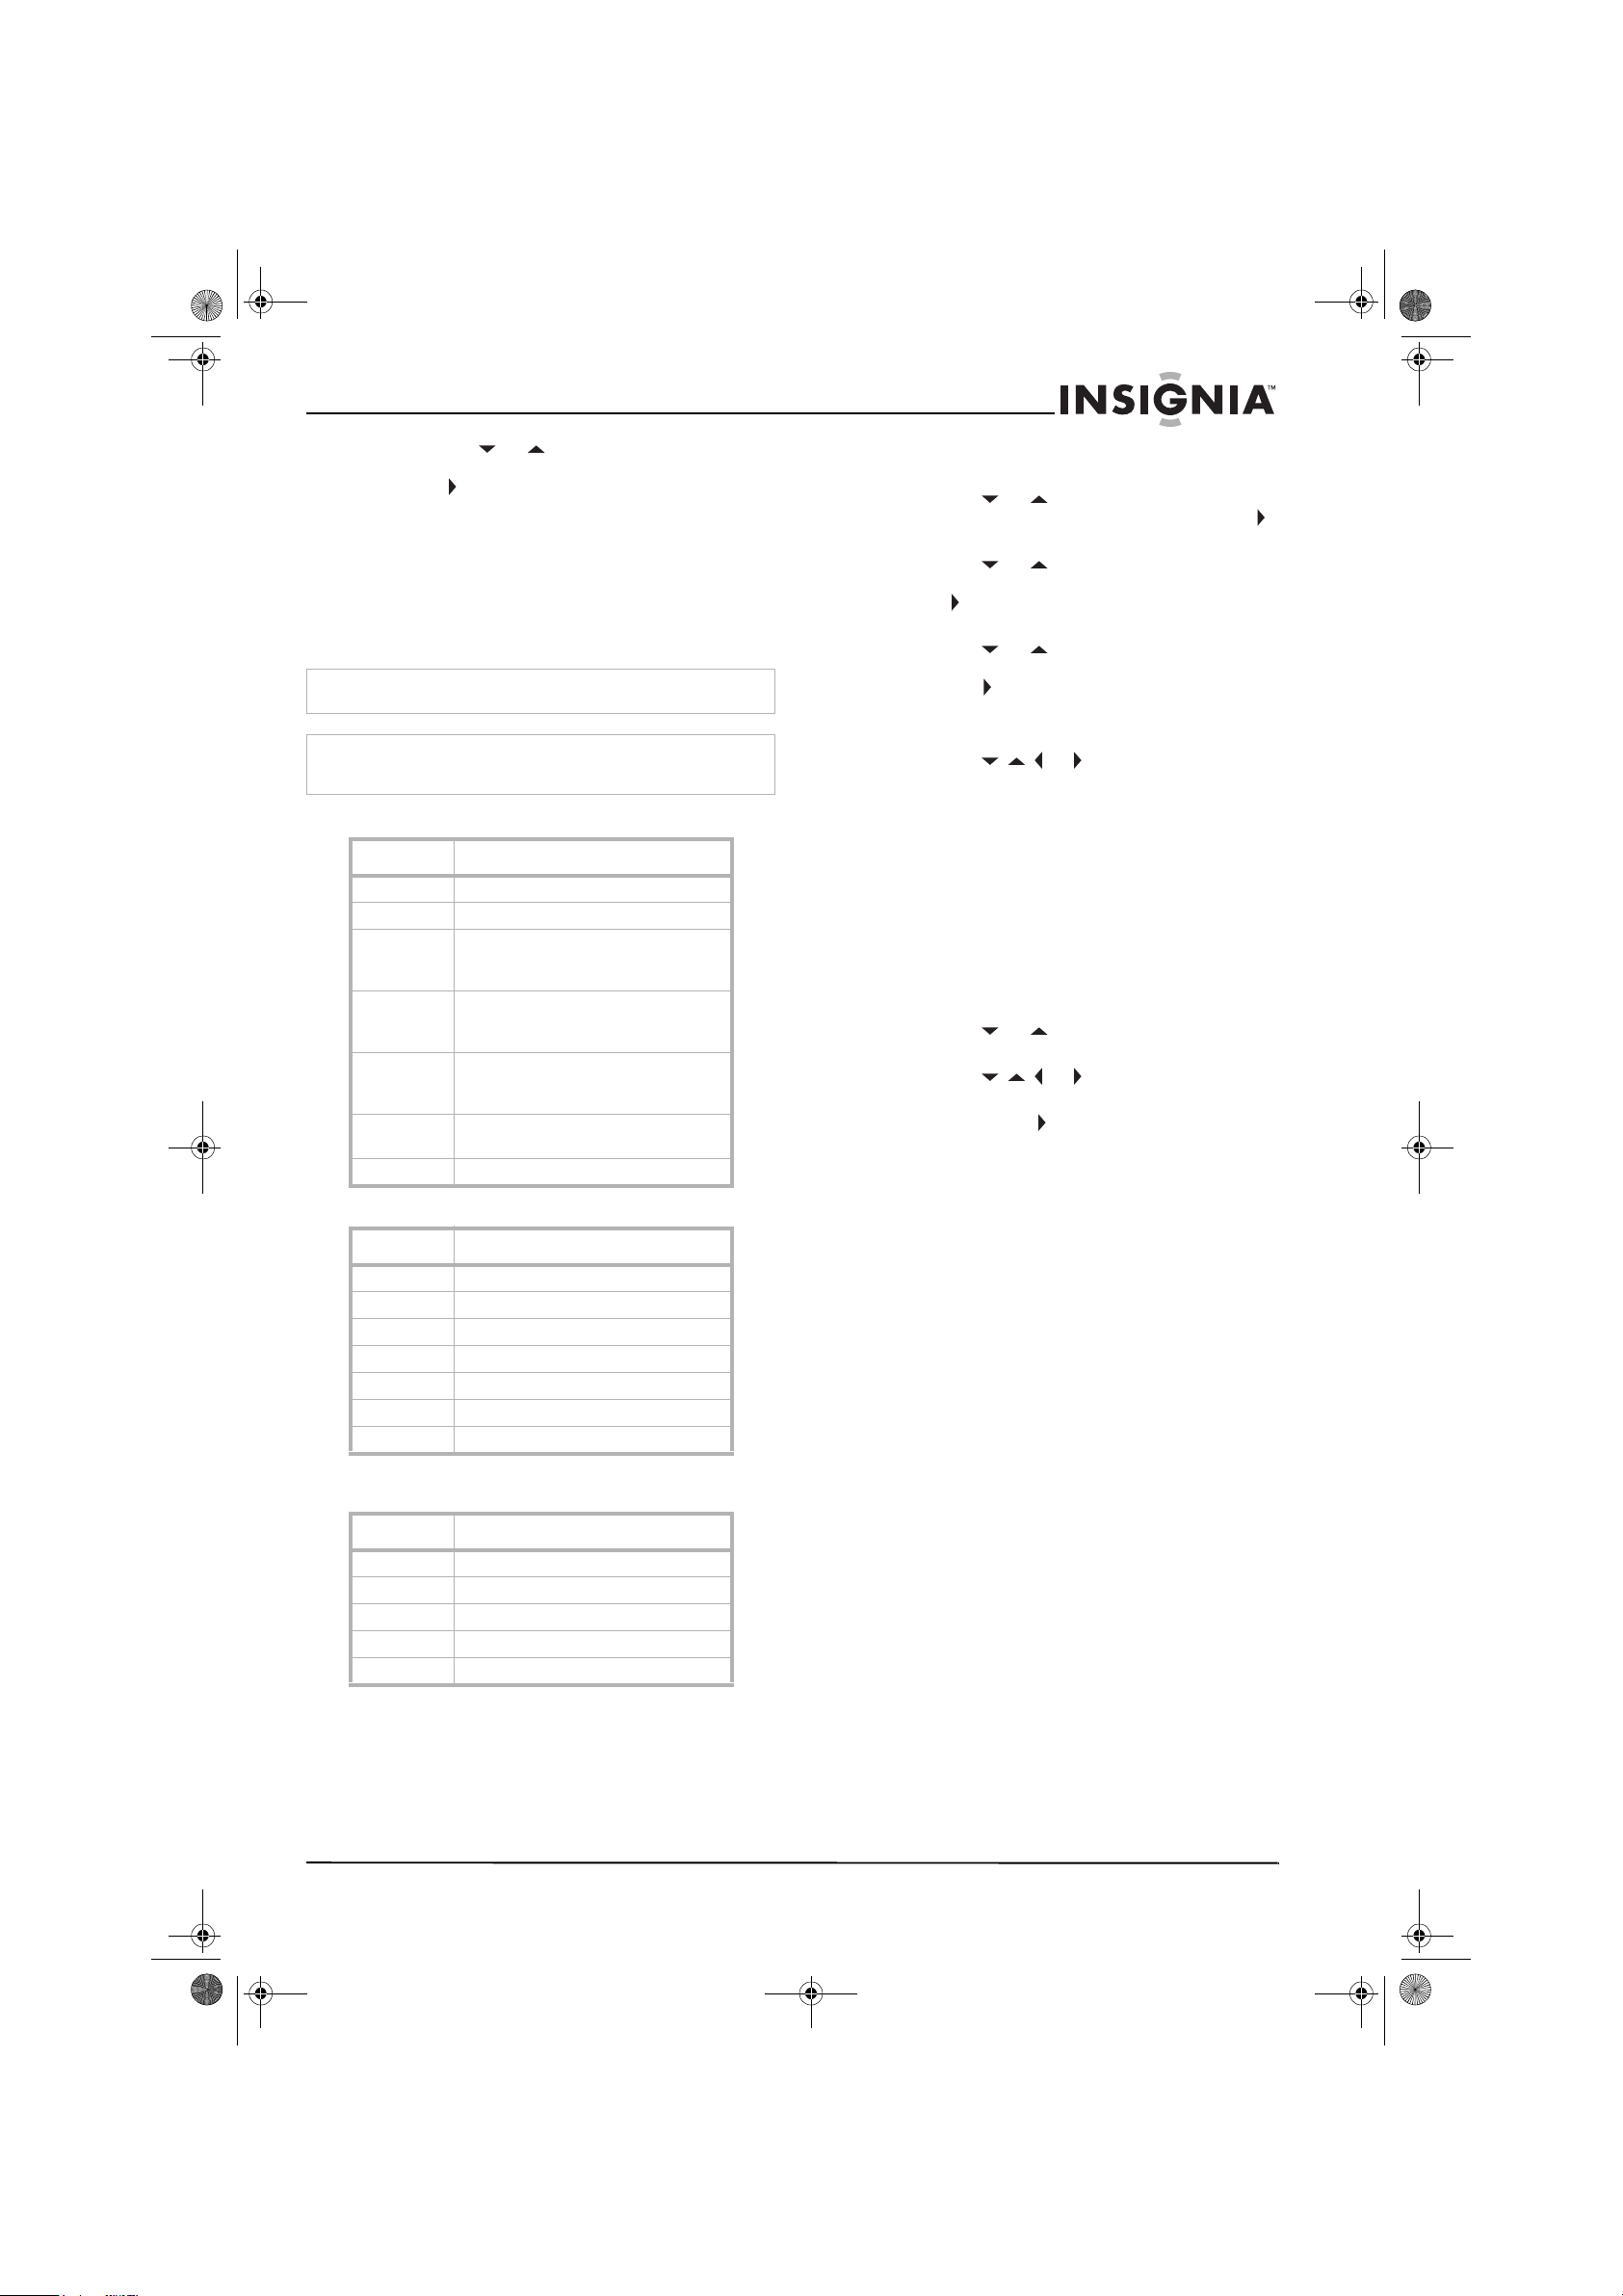
MPAA ratings
Rating Description
NONE Not rated.
G General audiences.
PG Parental guidance suggested. So me
PG-13 Parental guidance strongly suggested.
R –Restricted. Not suitable for children
NC-17 Not suitable for children under 17
X Adults only.
material may not be suitable for
children.
Some material may not be suitable for
children under 13 years of age
under 17 years of age unless
accompanied by a parent or guardian.
years of age.
TV Parental Guidelines ratings
Rating Description
NONE Not rated.
TV-Y All children.
TV-Y7 Children over seven years of age.
TV-G General audiences.
TV-PG Parental guidance suggested.
TV-14 Parents strongly cautioned.
TV-MA Mature audiences only
Some of the age based TV Parental Guidelines
ratings also have content based ratings.
To set the ratings:
1 Press the MENU button.
2 Press the or button one or more times
to highlight Feature, then press the OK or
button to open the Feature menu.
3 Press the or button one or more times
to highlight Parental Control, then press the
OK or button to open the Parental Control
menu.
4 Press the or button one or more times
to highlight Parental Control Set, then press
the OK or button to access the rating
feature.
5 Enter the password.
6 Press the or button to select a
rating, then press the OK button to block or
unblock the rating.
When you block a rating, that rating and all
higher ratings are blocked.
Using the on-screen menu syst e m
Your TV has an on-screen menu system that lets
you adjust TV settings, such as video and audio
settings.
To use the on-screen menu system:
1 Press the MENU button.
2 Press the or button one or more times
to select a menu.
3 Press the or button to navigate to
an option or adjust an option.
4 Press the OK or button to confirm an
adjustment, open a sub-menu, or toggle a
setting.
5 Press the MENU button to return to a
previous menu or press the EXIT button to
close the on-screen menu system.
Rating Description
FV Fantasy violen ce.
L Adult language.
S Sexual situations
V Violence.
D Sexually suggestive dialog.
www.insignia-products.com
15
Page 16
NS-27LCD.fm Page 16 Wednesday, June 28, 2006 12:04 PM
Insignia NS-27LCD 27” LCD TV
On-screen menus
On-screen
menu
Video
Note: Options may
vary in different
modes.
Audio
Note: Options may
vary in different
modes.
Options
Picture Mode–Selects the picture mode: User,
Nature, Soft, or Bright. You can also press the
PICTURE button to select the picture mode.
Contrast–Increases the picture level t o adjust
the white areas of the picture. Decrea ses the
picture level to adjust the black areas of the
picture.
Brightness–Increases the brightness to add
more light to dark areas of the pict ure.
Decreases the brightness to add more dark to
light areas of the picture.
Color–Adjusts the overall color of the pict ure.
Sharpness–Inc reases the sharpness level to
show cleaner and clearer ima ges. Decreases
the level to show a smoother picture.
Aspect Ratio–Selects the screen aspect ratio:
Wide, Cinema, Normal, or Zoom. You can also
press the ZOOM button to select the aspect
ratio.
Advanced Video Menu–Provides access to
advanced features:
• Noise Reduction–Reduces picture
• Tint–Increases t he color level to add
• Color Temperature–Selects one of
• 3D Y/C–Turns the 3D comb filter on or
VGA Set/Component Se t–If your TV is
connected to a computer or to component
video, adjusts the following options:
• H-Pos–Adjusts the horizontal position
• V-Pos–Adjusts the vertical position of
• Clock–Adjusts the sample frequency.
• Phase–Improves the focus of a stable
• Setting–Resets VGA mode to the
Sound Mode–Se lects the sound mode: User,
News, Music, or Movie. You can also press the
AUDIO button to select the so un d mo de .
Bass–Adjusts the l ow sounds (bass).
Treble–Adjusts the high sounds (treble).
Balance–Adjusts t he right and left speaker
volumes.
Earphone Vol–Adjust the earphone volume.
Digital Audio Output–Selects the audio mode
for the S/PDIF jack.
• RAW: AC-3 in and AC-3 out. PCM in
• PCM: AC-3 in PCM out. PCM in PCM
MTS–Selects the multi-channel TV sound
(MTS): Mono, Stereo, or SAP (second audio
program). You can also press the MTS/SAP
button to select the MTS mode.
Audio Language–Selects an alternate language
if the program has more than one language.
noise (snow).
more green to skin tones. Decreases the
color level to add more purple to sk in
tones.
three auto matic c olor ad justme nts: Co ol
for more blue, Warm for more red, and
Normal.
off.
of the image.
the image.
image.
factory defaults.
PCM out.
out.
On-screen
menu
Setup Tuning Band–Selects the TV signal source. For
Feature Source–S elects the video source. You can
Options
more information, see “Selecting the TV
source” on page 12.
DTV Signal–Displays the digital TV signal
strength. For more information, see “Checking
the DTV signal strength” on page 13.
Auto Ch Search–Automatically sets up a list of
the channels available in your area. For more
information, see “Automatically setting up
channels” on page 13.
Manual Ch Set–Lets add or delete channels
from the channel list. For more information,
see “Manually adding or deleting channels
from the channel list” on page 13.
Channel Labels–Lets you add a label to a
channel. For more informat ion, see “Adding a
channel label” on page 13.
select:
•TV
• Composite1
• Composite2
• Component1
• Component2
•VGA
•HDMI
•S-Video
You can also press the INPUT button to select
the video source.
Time S et–Sets the clock. For more
information, see “Setting the clock” on
page 14.
Sleep Tim er–Sets the sleep timer. For more
information, see “Setting t he sleep timer” on
page 14.
Parental Contro l –Access V-chip controls. For
more information, see “Setting parental
controls” on page 14.
Closed Caption Options–Customizes closed
captions for digital broadcasting systems. You
can adjust Size, Font, Text Color, Text Opacity,
Background Color, Background Opacity, Edge
Effect, and Edge Color.
CC when Mute–When this option is turned on,
your TV automatically displays closed captions
when the volume is muted.
Menu Language–S elect the language for the
on-screen menu system. You can select
English, French, or Spanish.
Programming the remote
control
Programming a device connected to your
TV
The remote control can control four devices,
such as a VCR, DVD player, cable or satellite
receiver, amplifier or tuner, or similar device.
To program the remote control:
1 Find the code for the device you want to
program. See “Appendix” on page 19. If there
is more than one code listed for a device,
write down all the codes.
2 Turn on the device you want to program, and
load media if required, for example a DVD.
3 Press a device key on the remote control, for
example, DVD, CBL, or AUX.
16
www.insignia-products.com
Page 17
NS-27LCD.fm Page 17 Wednesday, June 28, 2006 12:04 PM
Insignia NS-27LCD 27” LCD TV
4 Press and hold the SET button on the remote
control until the LED blinks twice, then
release the button.
5 Enter the first five-digit code for your device.
The LED blinks once as each digit is entered.
If the code is correct, the LED blinks twice.
Note
If the LED does not blink twice, repeat steps 3
through 5 using a different code.
6 Aim the remote at the device, then press the
button.The device should turn off.
Note
If the device does not turn off, repeat steps 4
through 6 using a different code. If you cannot find
a code that works, see “Searching for a code” on
page 17.
7 Repeat steps 1 through 6 to program
additional devices.
8 Press the SET button to save the code and
exit.
Searching for a code
To search for a code:
1 Press a device key.
2 Press and hold the SET button until the LED
blinks twice, the release the button.
3 Enter 991, then the device group number
(0=cable, 1=TV, 2=VCR, 3=audio). The LED
blinks twice.
4 Aim the remote control at the device, then
press the button. If the device responds,
go to step 7.
5 If the device does not respond, press the
CH+ button. Your remote control will try the
next code. Keep pressing the CH+ button
until the device responds. You can press the
CH– button to try a previous code.
6 To search for a code for another device,
repeat steps 1 through 5.
7 Press the SET button to save the code and
exit.
Checking the code
If you programmed a device by searching for a
code, you may want to know what four-digit code
the remote is using.
To check the code:
1 Press the device button on the remote
control.
2 Press and hold the SET button until the LED
blinks twice, then release the button.
3 Enter 990. The LED blinks twice.
4 Press 1 and count the LED blinks. This is the
first digit of the code. For example, if the LED
blinks twice, the first digit is 2. If the LED
does not blink, the first digit is 0.
5 Repeat step 4 using 2 for the second digit, 3
for the third digit, 4 for the fourth digit, and 5
for the fifth digit.
6 Press the SET button to exit.
Programming the volume lock
The remote control comes preset to let you
control the volume of each connected device.
You can change the volume lock so that one
device’s volume controls volume in all modes.
After you lock the volume control, you can unlock
the volume control for a specific device so you
can control the volume for that device
independently.
To lock the volume control:
1 Press and hold the SET button until the LED
blinks twice, then release the button.
2 Enter 993, then press the device button for
the device you want to control the volume.
The LED blinks twice. When you press the
VOL+, VOL–, or MUTE button on the remote
control, the device you selected controls the
volume regardless of which device you are
using.
To unlock the volume control:
1 Press and hold the SET button until the LED
blinks twice, then release the button.
2 Enter 993, then press VOL+ button. The LE D
blinks four times. The volume control is
unlocked.
To unlock a single device’s volume control:
1 Press the device key.
2 Press and hold the SET button until the LED
blinks twice, then release the button.
3 Enter 993, then press VOL– button. The LED
blinks four times. The volume control for the
device you selected is unlocked.
Troubleshooting the remote control
Symptom Possible solution
LED does not blink when
a button is pressed
LED blinks when a
button is pressed, but
device does not respond
LED blinks one lo ng
blink
Remote control does not
control a device or only
controls some features
of the device
No volume on a device See “Programming the vol ume lock”
Replace the batteries.
Make sure that you are at less than 15
feet (4.6 meters) from the device and
that you point the remote control at the
remote sensor on the device.
You pressed an incorrect button. Start
the procedure over again.
Make sure that the device has a remote
sensor, then try another code.
on page 17.
www.insignia-products.com
17
Page 18
NS-27LCD.fm Page 18 Wednesday, June 28, 2006 12:04 PM
Insignia NS-27LCD 27” LCD TV
Maintaining
• Do not use your TV in areas that are too hot
or too cold because the cabinet may warp or
the screen may malfunction.
• Storage temperatures are 32
50°C).
° to 122°F (0° to
• Working temperatures are 41° to 104°F (5°
to 40°C).
• Do not place your TV in direct sunlight or
near a heat source.
Cleaning your TV
Clean the screen and cabinet with a soft,
lint-free cloth. If the screen or cabinet is
especially dirty , moisten a soft, lint-free cloth in a
weak detergent solution, squeeze the excess
moisture from the cloth, then wipe the screen or
cabinet with the cloth. Use a clean cloth to dry
the screen or cabinet.
Caution
Avoid volatile substances, such as insect sprays , solvents, and
thinners.
Do not leave your TV in contact with items made from rubber
or PVC for long periods.
They may damage your TV.
Caution
Do not let liquids drip into the cabinet.
Troubleshooting
Warning
Do not try to repair your TV yourself. Refer all service to a
qualified service technician.
Symptom Possible solution
No power • Make sure that the power cord
No picture • Make sure that the video cables
Good picture but no
sound
Good sound but poor
color
Poor picture • Make sure that the room is not
is connected to your TV and an
electrical outlet.
• Unplug the power cord, wait 60
seconds, then plug the cord
back in and turn on your TV.
are connected securely to the
back of your TV.
• Adjust the contrast and
brightness.
• Make sure that the correct
video mode is selected.
• Make sure that the incoming
signal is compatible.
• Increase the volume.
• Make sure that the sound is not
muted.
• Make sure that the correct
audio mode is selected.
• Adjust the contrast, color, and
brightness settings.
too bright. Light reflecting off
the screen can make the picture
difficult to see.
• If an S-VHS camera or a
camcorder is connected while
another connected device is
turned on, the picture may be
poor. Turn off one or more
devices.
Symptom Possible solution
Horizontal dotted line • Your TV may be too close to
Remote control does not
work
Snowy picture or noise • Make sure that the A/V cables
VGA picture is not stable
or synchronized
No ouput from one of
the speakers
Control buttons do not
work
Some parts of the
screen do not light up
After images appear • Do not display a still image,
TV makes snapping
sounds
another electrical device, such
as a hair dryer or neon light.
Turn off the device or move
your TV.
• Press the TV button.
• Replace the batteries. Make
sure that the + and – symbols
on the batteries al ig n with th e +
and – symbols in the batte ry
compartment.
• Clean the remote sensor on the
front of your TV.
• Bright or fluorescen t ligh ti ng
may interfere with the remote
control signal. Turn off the light
or move your TV.
are connected correctly and
securely.
• Make sure t hat you have
selected the correct VGA mode
on your computer.
• Adjust the balance in the Sound
menu.
• Unplug the power cord, wait
few seconds, then plug the cord
back in and turn on your TV.
• The plasma screen is
manufactured using a high level
of precision technology.
Sometimes parts of the screen
may be missin g pi cture
elements or have lumi nous
spots. This is not a malfunction.
such as a logo, game, computer
image, for an extended peri od
of time. This can cause a
permanent after image to be
burned into the screen. Th is
type of damage is not covere d
by your warranty.
• Snapping sounds occur when
your TV’s cabinet expands or
contracts from variation in
temperature. This is not a
malfunction.
Specifications
• Design and specifications are subject to
change without notice.
• Weight and dimensions listed are
approximate.
Power supply AC 100-240 V 50/60 Hz
Power
consumption
Screen 27-inch
Channel coverage VHF: 2-13
Weight 41.9 lbs. (19kg)
Dimensions
W×H×D
140 W
UHF: 14-69
CATV: 1-125
CADTV: 1-135
DTV: 2-69
28.25×24×9.25 inches
(71.4 × 60.6 × 23.5 cm)
18
www.insignia-products.com
Page 19
NS-27LCD.fm Page 19 Wednesday, June 28, 2006 12:04 PM
Insignia NS-27LCD 27” LCD TV
Temperature Storage temperatures are 32° to 122°F
(0° to 50°C).
Workin g tem peratures are 41° to
104°F (5° to 40°C).
TV system NTSC-M, ATSC
Accessories User guide
Remote control
Appendix
VCR codes
ABS 21972
Admiral 20048, 20209
Aiko 20278
Aiwa 20037, 20479
Alienware 21972
America Action 20278
American High 20035
Amoisonic 20479
Anam 20162, 20037, 20240, 20278
Anam National 20162
Asha 20240
Audiovox 20037, 20278
Beaumark 20240
Bell & Howell 20104
Broksonic 20184, 20121, 20209, 20002,20479
Calix 20037
Canon 20035
Carver 20081
CCE 20072, 20278
Changhong 20048, 20081
Citizen 20037, 20278
Colt 20072
Craig 20037, 20047, 2024 0, 20072
Curtis Mathes 20060, 20035, 20 162
Cybernex 20240
CyberPower 21972
Daewoo 20045, 20104, 20278
Dell 21972
Denon 20042
DirecTV 20739
Durabrand 20039, 20038
Electrohome 20037
Electrophonic 20037
Emerex 20032
Emerson 20035, 20037, 20184, 20240,20045 ,
20121, 20043, 20 209, 20002, 20278,
20479
Fisher 20047, 20104
Fuji 20035, 20033
Fujitsu 20045
Gateway 21972
GE 20060, 20035, 20240
General 20045
Go Video 20432
GoldStar 20037, 20209, 20038, 20225
Haojie 20240
Harman/Kar do n 20081, 20038
Harwood 20072
Hewlett Packard 21972
HI-Q 20047
Hitachi 20037, 20042, 20055
Howard
Computers
HP 21972
Hughes Network
Systems
iBUYPOWER 21972
JVC 20045, 20067
KEC 20037, 20278
Kenwood 20067, 20038
KLH 20072
Kodak 20035, 20037
Kolin 20043 LG 20037, 20045 , 20042,
Logik 20072
LXI 20037
Magnavox 20035, 20039, 20081
Magnin 20240
Marantz 20035, 20081
Marta 20037
Matsushita 20035, 20162
Media Center PC 21972
MEI 20035
Memorex 20 035, 20162, 20037, 20048,20039,
MGA 20240, 20043
MGN Technology 20240
Microsoft 21972
Mind 21972
Minolta 20042
Mitsubishi 20067, 20043
Motorola 20035, 20048
MTC 20240
Multitech 20072
NEC 20035, 20037, 20048, 20104,20067,
Newave 20037
Nikko 20037
Noblex 20240
Northgate 21972
Olympus 20035
Optimus 21062, 20162, 20037, 20048,20104,
Orion 20184, 20209, 20002, 20479
Panasonic 21062, 20035, 20162, 20616,20225
Penney 20035, 20037, 20240, 20042,20038
Pentax 20042
21972
20042, 20739
20209,20038
20047, 20240, 2 0104, 20209, 20479
20038
20432
www.insignia-products.com
19
Page 20
NS-27LCD.fm Page 20 Wednesday, June 28, 2006 12:04 PM
Insignia NS-27LCD 27” LCD TV
Philco 20035, 20479
Philips 20035, 20081, 20739, 20618
Pilot 20037
Pioneer 20042, 20067
Polk Audio 20081
Profitronic 20240
Proscan 20060
Protec 20072
Pulsar 20039
Qisheng 20060
Quasar 20035, 20162
Radix 20037
Randex 20037
RCA 20060, 20035, 20240, 20042,20 880
Realistic 20035, 20037, 2004 8, 20047,20104
ReplayTV 20616
Runco 20039
Sampo 20037, 20048
Samsung 20240, 20045, 20432
Sanky 20048, 20039
Sansui 20067, 20209, 20479
Sanyo 20047, 20240, 20104
Scott 20184, 20045, 2012 1, 20043
Sears 20035, 20037, 20047, 20042,20104
Sharp 20048, 20209
Shintom 20072
Shogun 20240
Singer 20072
Sonic Blue 20616
Sony 20035, 20032, 20033, 20636,21972
STS 20042
Sylvania 20035, 20081, 20043
Systemax 21972
Tagar Systems 21972
Tashiko 20037
Tatung 20045, 20067
T e c h nic s 20035, 20 162
Teco 20035 , 20037, 20048, 20038
T e k n ik a 20035, 20037
Tivo 20636, 20618, 21503, 20739
TMK 20240
Toshiba 20045, 20042, 20067, 20043,21503,
21008, 21972
Totevision 20037, 20240
Touch 21972
Unitech 20240
Vector 20045
Vector Research 20038
Victor 20067
Video Concepts 20045
Videomagic 20037
Videosonic 20240
Viewsonic 21972
Wards 20060, 20035, 20048, 20047,20081,
White
Westinghouse
XR-1000 20035, 20072
Yamaha 20038
Zenith 20039, 20033, 2020 9, 20479
ZT Group 21972
20240, 20042, 20072
20209, 20072
Digital video disc codes
Aiwa 20641, 21912
Akai 20770
Allegro 20869
Apex Digital 20672, 20717, 20797, 21061,20796,
Blaupunkt 20717
Blue Parade 20571
Broksonic 20695
Changhong 20627, 21061
CineVision 20869
Coby 21086
Curtis Mathes 21087
CyberHome 21024, 21023, 21129, 20816, 21117
Daewoo 20833, 21172, 20869
Denon 20490
DVD2000 20521
Emerson 20591, 20675
Enterprise 20591
Fisher 21919
Funai 20675
Gateway 21158, 21073
GE 20522, 20717
Go Video 20744, 20833, 21099, 20783,21075,
Greenhill 20717
Harman/Kar do n 20582, 20702
Hitachi 20573, 20664, 21919
Hiteker 20672
Initial 20717
Integra 20627, 21924
JBL 20702
JVC 20558, 20623, 208 67
Kenwood 20490, 20534
KLH 20717, 21020, 211 49
Koss 20651, 21980
Lasonic 20798
LG 20591, 20869, 20801
Liquid Video 21980
Lite-On 21158 , 21 05 8
Loewe 20511
Magnavox 20503, 20539, 21976, 21914, 20675
Marantz 20539
21056, 21937, 2 0794, 21020, 21915
20869, 21730
20
www.insignia-products.com
Page 21
NS-27LCD.fm Page 21 Wednesday, June 28, 2006 12:04 PM
Insignia NS-27LCD 27” LCD TV
Memorex 20695
Microsoft 20522
Mintek 20717
Mitsubishi 21521, 20521
Nesa 20717
Norcent 21003
Onkyo 20503, 20627, 21924, 20792
Oritron 20651, 21980
Panasonic 20490, 21762, 21990
Philips 20503, 20539, 20646, 21914
Pioneer 20525, 20571
Polaroid 21086, 21061
Polk Audio 20539
Portland 20770
Proscan 20522
Qwestar 20651
RCA 20522, 20571, 20717, 20822
Rio 20 869
Rotel 20623
Sampo 20752, 20698
Samsung 20490, 20573, 21932, 21075, 20820
Sansui 20695
Sanyo 20695
Sharp 20630, 20752
Sharper Image 21117
Sherwood 20770
Shinco 20717
Shinsonic 20533
Sonic Blue 20869, 21099
Sony 20533, 20864, 21033, 21 904, 21903
SVA 20717
Sylvania 20675
Symphonic 20675
Teac 20717, 21984, 20809
Technics 20490
Theta Digital 20571
T o s hiba 20503, 20695
Urban Concepts 20503
Xbox 20522
Yamaha 20490, 20539, 20545
Zenith 20503, 20591, 20869
Cable converter codes
ABC 00003, 00008, 000 14
Americast 00899
Bell & Howell 00014
Bell South 00899
Clearmaster 00883
ClearMax 00883
Coolmax 00883
Daeryung 01877, 00877, 00477, 0000 8
Digi 00637
Director 00476
Dumont 00637
Gehua 00476
General
Instrument
GoldStar 00144
Hamlin 00009, 00273
Hitachi 00014
Jerrold 00476, 00810, 00276, 00003,00012,
KNC 00008
LG 00144
Memorex 00000
Motorola 00476, 00810, 00276, 01254,01376
MultiVision 00012
Pace 01877, 00237
Panasonic 00000, 00008, 00107
Panther 00637
Paragon 00000
Philips 00317, 01305
Pioneer 01877, 00877, 00144, 00533
Pulsar 00000
Quasar 00000
RadioShack 00883
Regal 00279, 00273
Runco 00000
Samsung 00000, 00144
Scientific Atlanta 01877, 00877, 00477, 00008
Sony 01006
Starcom 00003, 00014
Supercable 00276
Supermax 00883
Tocom 00012
Torx 00 003
Toshiba 00000
Trans PX 00276
Tristar 00883
TS 0000 3
V2 00883
Viewmaster 00883
00476, 00810, 0 0276, 00003,00014
00014
www.insignia-products.com
21
Page 22

NS-27LCD.fm Page 22 Wednesday, June 28, 2006 12:04 PM
Insignia NS-27LCD 27” LCD TV
Vision 00883
Vortex View 00883
Zenith 00000, 00525, 00899
Legal notices
FCC statement
Radio-TV interference
This equipment has been tested and found to
comply with the limits for a Class B digital
device, pursuant to Part 15 of the FCC Rules.
These limits are designed to provide reasonable
protection against harmful interference in a
residential installation. This equipment
generates, uses, and can radiate radio
frequency energy and, if not installed and used
in accordance with the instructions, may cause
harmful interference to radio communications.
However, there is no guarantee that interference
will not occur in a particular installation. If this
equipment does cause harmful interference to
radio or television reception, which can be
determined by turning the equipment off and on,
the user is encouraged to try to correct the
interference by one or more of the following
measures:
1 Reorient or relocate the receiving antenna.
2 Increase the separation between the
equipment and receiver.
3 Connect the equipment into an outlet on a
circuit different from that to which the receiver
is connected.
4 Consult the dealer or an experienced
radio/TV technician for help.
This Class B digital apparatus complies with
Canadian ICES-003.
Cet appareil numérique de la classe B est
conforme à la norme NMB-003 du Canada.
Warning
This equipment may generate or use radio frequency energy.
Changes or modifications to this equipment may cause
harmful interference unless the modifications are expressly
approved in the owner’s manual. The user could lose the
authority to operate this equipment if an unauthorized change
or modification is made.
Copyright
© 2006 Insignia. Insignia and the Insignia logo are
trademarks of Best Buy Enterprise Services, Inc. Other
brands and product names are trademarks or
registered trademarks of their respective holders.
Specifications and features are subject to change
without notice or obligation.
22
www.insignia-products.com
Page 23

NS-27LCD.fm Page 23 Wednesday, June 28, 2006 12:04 PM
Téléviseur ACL de 27 po Insignia NS-27LCD
Téléviseur A CL de 27
po Insignia
NS-27LCD
Table des matières
Informations sur la sécurité . . . . . . . . . . . . . . . . .23
Fonctionnalités. . . . . . . . . . . . . . . . . . . . . . . . . . .25
Installation du téléviseur . . . . . . . . . . . . . . . . . . .28
Fonctionnement du téléviseur . . . . . . . . . . . . . . .32
Programmation de la télécommande. . . . . . . . . .37
Entretien. . . . . . . . . . . . . . . . . . . . . . . . . . . . . . . .39
Problèmes et solutions. . . . . . . . . . . . . . . . . . . . .39
Spécifications. . . . . . . . . . . . . . . . . . . . . . . . . . . .40
Annexe. . . . . . . . . . . . . . . . . . . . . . . . . . . . . . . . .40
Avis juridiques . . . . . . . . . . . . . . . . . . . . . . . . . . .43
Informations sur la sécurité
Avertissement
Afin de réduire le risque de choc électrique, ne pas enlever le
couvercle (ou le panneau arrière). Ne contient aucune pièce
réparable par l'utilisateur. Confier l’entretien à du personnel
qualifié.
Afin de réduire le risque d’incendie et de choc électrique, ne
pas exposer ce téléviseur à la pluie ou l’humidité.
Attention
Pour éviter les chocs électriques, introduire la lame la plus
large de la prise du cordon d’alimentation dans la fente
correspondante de la prise secteur. Si la prise ne s'adapte
pas, contacter un électricien afin qu’il remplace la prise
secteur inadéquate. Ne pas modifier la prise du cordon
d’alimentation, sinon ce dispositif de sécurité serait inopérant.
Ce symbole indique qu'une tensi on
dangereuse, constituant un risque de choc
électrique, est présente dans cet appareil. Cette
étiquette est située au dos de l’appareil.
Ce symbole indique que d'important es
instructio ns c on c ern a nt le fonctionnement et la
maintenance figurent dans la documentation
qui accompagne cet appareil.
Avertissement
Cet appareil utilise de la soudure étain-plomb et une lampe
fluorescente contenant une petite quantité de mercure. La
mise au rebut de ces matériels peut faire l'objet d'une
réglementation relative à l’environnement. Pour des
informations de mise au rebut ou de recyclage, contacter les
autorités locales ou l’Electronic Industries Alliance sur le site
www.eia.org.
Lire les instructions
Lire toutes les instructions de sécurité et
d’utilisation avant d’utiliser cet appareil.
Conserver les instructions
Conserver les instructions de sécurité et de
fonctionnement pour toute référence ultérieure.
Respecter les avertissements et les
instructions
Respecter tous les avertissements sur cet
appareil ainsi que dans les instructions
d’utilisation. Toutes les instructions d’utilisation
et de fonctionnement doivent être observées.
Eau et humidité
Ne pas utiliser cet appareil près de l’eau. Par
exemple près d’une baignoire, un lavabo, un
évier ou un baquet à linge, dans un sous-sol
humide ou près d’une piscine.
Nettoyage
Débrancher l'appareil avant tout nettoyage. Ne
pas utiliser de nettoyant liquide ou en aérosol.
Utiliser un chiffon à poussière pour nettoyer
l’extérieur de l’appareil.
Ventilation
Les fentes et ouvertures au dos et au bas du
boîtier sont prévues pour la ventilation, pour
assurer un fonctionnement fiable de l'appareil et
le protéger contre toute surchauffe. Ces
ouvertures ne doivent être ni bloquées ni
obstruées. Elles ne doivent jamais être bloquées
en installant l’appareil sur un lit, un sofa, un tapis
ou toute autre surface semblable. Ne pas placer
l’appareil à proximité ou au-dessus d’un
radiateur ou d’une source de chaleur. Ne pas
installer l’appareil dans un meuble encastré tel
qu’une bibliothèque ou sur une étagère, sauf si
une ventilation adéquate a été prévue ou si les
instructions du fabricant ont été respectées.
Chaleur
S’assurer que l’appareil est installé à l’écart de
sources de chaleur, telles que radiateurs,
bouches de chaleur, fours ou autres appareils (y
compris les amplificateurs) qui produisent de la
chaleur.
Mise à la terre ou polarisation
Ne pas chercher à modifier le dispositif de
sécurité de la prise polarisée ou de type mise à
la terre. Une prise polarisée comporte deux
plots, un plus large que l'autre. Une prise de
type mise à la terre est composée de deux plots
et d’un troisième de mise à la terre. Ce troisième
plot, large ou rond a été prévu pour la sécurité
de l’utilisateur. Si la fiche ne s'adapte toujours
pas à la prise secteur, contacter un électricien
afin qu’il remplace la prise inadéquate.
Protection du cordon d’alimentation
Les cordons d’alimentation électrique doivent
être acheminés afin que personne ne puisse
marcher dessus et qu’aucun objet posé dessus
ne vienne les entraver. Prêter particulièrement
attention aux points de branchement du cordon
à la prise secteur et à l’endroit d’où le cordon
sort de l’appareil.
Pièces jointes
Ne pas utiliser de périphériques non
recommandés par Insignia, car ils pourraient
être source de dangers.
www.insignia-products.com
23
Page 24

NS-27LCD.fm Page 24 Wednesday, June 28, 2006 12:04 PM
Téléviseur ACL de 27 po Insignia NS-27LCD
Support
Ne pas placer cet appareil sur une table
roulante, un pied, un trépied, un support ou une
table instables. L’appareil pourrait tomber et
provoquer dans sa chute des blessures et subir
de graves dommages. N’utiliser qu’avec la table
roulante, le pied, le trépied, le support ou la table
recommandés par le fabricant ou vendus avec le
téléviseur. Pour installer l’appareil sur un support
mural, observer les instructions du fabricant et
utiliser un accessoire de montage re co mma ndé
par celui-ci. Si l’appareil est installé sur un
meuble à roulettes, déplacer l’ensemble avec
précaution. Un arrêt brusque, l’utilisation d’une
force excessive et des surfaces irrégulières
risquent de déstabiliser l’ensemble et de le
renverser.
Foudre
Pour protéger l’appareil pendant un orage ou s’il
se trouve inutilisé et sans surveillance pendant
une période prolongée, le débrancher de la prise
secteur et débrancher l'antenne ou la connexion
au réseau câblé. Ceci évitera d’endommager
l’appareil en cas de foudre et de variations de
tension du secteur.
Entretien
L’utilisateur ne doit pas essayer de réparer cet
appareil lui-même, en effet son ouverture ou le
démontage des couvercles peut l’exposer à des
tensions dangereuses et à d'autres dangers.
Toutes les réparations doivent être réalisées par
du personnel qualifié.
Pièces de rechange
Si des pièces doivent être remplacées, s’assurer
que le technicien a utilisé des pièces de
rechange spécifiées par le fabricant qui ont les
mêmes caractéristiques que les pièces d’origine.
Toute substitution par des pièces non autorisées
risque de provoquer un incendie, un choc
électrique, des blessures ou d'autres dangers.
Surcharge
Les prises secteur et les rallonges ne doivent
pas être surchargées, cela pourrait provoquer
des risques d'incendie ou de choc électrique.
Pénétration d’objets ou de liquides
N’enfoncer en aucun cas un objet dans les
ouvertures de l’appareil car il pourrait entrer en
contact avec des tensions dangereuses ou
provoquer un court-circuit à l'origine d'un
incendie ou d'un choc électrique. Ne jamais
répandre un liquide sur le téléviseur.
Dégâts nécessitant un entretien
Débrancher l’appareil de la prise secteur et
utiliser les services d’un technicien qualifié dans
les conditions suivantes :
• Lorsque le cordon d’alimentation est effiloché
ou la prise endommagée.
• Si un liquide a été répandu ou des objets
sont tombés dans l’appareil.
• Si l’appareil a été exposé à la pluie ou à
l’eau.
• Si l’appareil fonctionne anormalement en
appliquant les instructions d’utilisation. Ne
régler que les commandes décrites dans les
instructions d’utilisation ; en effet, le réglage
incorrect d’autres commandes pourrait
provoquer des dégâts, entraînant souvent
d'importantes réparations par un technicien
qualifié pour rétablir le fonctionnement
normal de l’appare il .
• Si le téléviseur est tombé ou s’il est
endommagé de quelque façon que ce soit.
• Si l'appareil présente une détérioration
marquée de ses performances.
Pièces de rechange
Si des pièces doivent être remplacées, s’assurer
que le technicien a utilisé des pièces de
rechange spécifiées par le fabricant qui ont les
mêmes caract éristiques qu e les pièces d’ origine.
Toute substitution par des pièces non autorisées
risque de provoquer un incendie, un choc
électrique, des blessures ou d'autres dangers.
Contrôle de sécurité
Après toute opération d’entretien ou rép aration
de cet appareil, demander au technicien
d’effectuer les contrôles de sécurité de routine
pour vérifier qu’il fonctionne correctement.
Source d’alimentation
Cet appareil doit fonctionner conformément à la
source d’alimentation indiquée sur les
étiquettes. En cas d’incertitude sur la tension
d'alimentation électrique de la maison, consulter
le revendeur du téléviseur ou la compagnie
d'électricité.
Foudre
Pour protéger l’appareil pendant un orage ou s’il
se trouve inutilisé et sans surveillance pendant
une période prolongée, le débrancher de la prise
secteur et débrancher l'antenne ou la connexion
au réseau câblé. Ceci évitera d’endommager
l’appareil en cas de foudre et de variations de
tension du secteur.
Protection de l’écran
L’écran du télévise ur est en v err e. Ne pa s laisser
tomber l’appareil ou heurter l’écran en verre. Si
l’écran se brise, prendre garde à ne pas se
blesser avec les morceaux de verre.
Pixels défectueux
L’écran de cet appareil est conçu pour afficher
des images fines détaillées. Il peut arriver que
certains pixels non actifs apparaissent sur
l’écran sous forme de points fixes bleus, verts ou
rouge. Ceci est normal et n’affecte pas la
performance de l’appareil.
24
www.insignia-products.com
Page 25

6
7
5
2
3
4
NS-27LCD.fm Page 25 Wednesday, June 28, 2006 12:04 PM
Téléviseur ACL de 27 po Insignia NS-27LCD
Mise à la terre d’une antenne externe
Si cet appareil est connecté à une antenne
extérieure ou à un réseau câblé, vérifier que
l'antenne ou la connexion au réseau câblé est
mis à la terre afin de bénéficier d'une certaine
protection contre les sautes de tension et les
charges électrostatiques. L'article 810 du Code
national de l’électricité (CNE), ANSI/NFPA Nº
70, fournit des informations relatives à la mise à
la terre correcte du mât et du support, la mise à
la terre du fi l conducte ur de l’an tenne à l’un ité de
décharge de l’antenne, la taille des conducteurs
de mise à la terre, l’emplacement de l’unité de
décharge de l’antenne, la connexion aux
conducteurs de terre ainsi que les normes en
matière de prise de terre.
1
1 Équipement de l a compagnie d'électricité
2 Système de mise à la terre des électrodes
de la compagnie d’électricité
Fonctionnalités
Face avant
Commande Description
1 Témoin de
Marche/Arrêt
2 Capteur de
télécommande
Panneau latéral
S'allume quand l’appareil est mis
sous tension.
Reçoit les signaux de la
télécommande.
3 Serre-fils de mise à la terre
4 Conducteurs de mise à la terre
5 Unité de décharge de l’antenne
6 Serre-fil de mise à la terre
7 Fil conducteur de l’antenne
Avis à l'installateur de TV câblée
Le présent avis a pour objet de rappeler à
l'installateur de systèmes de télévision par câble
que l'article 820-40 du Code national de
l'électricité contient des recommandations
relatives à la mise à la masse de l'appareil et, en
particulier, stipule que la terre du câble doit être
connectée au système de mise à la terre de
l'immeuble, aussi prêt que possible du point
d'entrée du câble.
Commande Description
1 CH+/CH– Permet de changer le cana l.
Dans le menu d’écra n, permet de
sélectionner les menus et les options.
2 VOL+/VOL– Permet d’augmenter ou de diminuer le
volume sonore.
Dans le menu d’écra n, permet de
régler les paramètres ou de modifier
une valeur.
3 MENU Pe rmet d’accéder au menu d’écran.
4 ENTRÉE Pe r met de sélectionner la source
d’entrée vidéo.
5 Mise en marche Permet d' allumer ou d'éteindre le
téléviseur.
www.insignia-products.com
25
Page 26

s
NS-27LCD.fm Page 26 Wednesday, June 28, 2006 12:04 PM
Téléviseur ACL de 27 po Insignia NS-27LCD
Prises arrière
Retirer le
couvercle des
prises
Retirer le
couvercle
des prise
Prise
15 CASQUE D’ÉCOUTE
16 SORTIE AV AUDIO R
17 SORTIE AV AUDIO L
18 SORTIE AV VIDÉO
19 Interface de commande RS23 2.
Télécommande
Remarque
Cette télécommande est une télécommande universelle. Si
elle ne semble pas fonctionner avec le téléviseur, appuyer sur
la touche TV.
Remarque
Pour toute information sur la programmation de la
télécommande, voir « Programmation de la télécommande »
voir page 37.
1
2
3
16
17
Prise
1S/PDIF
2HDMI
3 Entrée D-SUB AUDIO
4 Entrée D-SUB PIC (vidéo)
5 ENTRÉE À COMPOSANTES Y
6 ENTRÉE À COMPOSANTES Cb/Pb
7 ENTRÉE À COMPOSANTES Cr/Pr
8 ENTRÉE À COMPOSANTES AUDIO R
9 ENTRÉE À COMPOSANTES AUDIO L
10 Entrée antenne RF
11 S-VIDÉO
12 ENTRÉE AV VIDÉO
13 ENTRÉE AV AUDIO L
14 ENTRÉE AV AUDIO R
4
5
6
7
8
9
10
11
12
13
14
15
MTS/SAP ZOOM CCD SLEEP
LIST FAVORITE AUDIO
PIP
P.POSITION
PICTURE
SWAP FREEZE
18
19
20
21
22
23
24
25
26
27
28
29
30
26
www.insignia-products.com
Page 27

NS-27LCD.fm Page 27 Wednesday, June 28, 2006 12:04 PM
Téléviseur ACL de 27 po Insignia NS-27LCD
Touche Description
1 CONFIGURER Permet de programmer la
2 T ouches pour
périphériques
3 Touches
numériques
4 ENTRÉE Permet de sélectionner la source
5 Permet de revenir au dernier
6 + CH – Permet de changer les canaux de
7 SOURDINE Permet de mettre le son en
8 MENU Permet d’accéder au menu
9
10
11 Permet de lancer l’enregistrement
12 Permet un retour rapide sur un
13
14 MTS/SAP Permet de sélectio nner l’un des
15 ZOOM Permet de modifier le format
16 Permet de mettre le téléviseur en
17 DEL S’allume lors de la
OK
télécommande. Pour des
informations compléme ntaires,
voir « Programmation de la
télécommande » vo ir page 37.
TV – Permet de choisir le mode
TV.
DVD – Permet de choisir le mode
lecteur de DVD.
CBL – Permet de choisir le mode
TV câblé ou satellite.
AUX – Permet de choisir un
périphérique affecté à cette
touche.
Permet de saisir les numéros de
canal.
Dans le menu d’écra n, permet de
saisir le mot de passe du contrôle
parental.
d’entrée vidéo.
canal visionné.
télévision.
sourdine.
d’écran.
Utiliser les touches
directionnelles pour se déplacer
vers le bas, le haut, à gauche ou à
droite dans le menu d’ écran.
Appuyer sur OK pour confirmer
les changements ou pour activer
ou désactiver les options dans le
menu d’écran.
Pendant la lecture d'un DVD,
permet d’effectuer un arrêt sur
image. Appuyer de nouveau pour
reprendre la lecture.
sur un périphérique connecté, tel
qu’un magnétoscope.
DVD ou CD si un lecteur de DVD
ou de CD est branché.
Permet de revenir au chapitre
précédent sur un DVD ou à la
piste précédente sur un CD si un
lecteur de DVD ou de CD est
branché.
modes audio préréglés. I l est
possible de sélectionner MONO
(Mono), STEREO (Stéréo) ou SAP
(Seconde trame sonor e ) .
d’écran.
marche ou en mo de d’a ttente.
programmation de la
télécommande. Pour des
informations compléme ntaires,
voir « Programmation de la
télécommande » voir p a ge 37.
Touche Description
18 — Permet de sélectionner un canal
19 + VOL - Permet de régler le volume.
20 INFO Permet d’ afficher l’information
21 QUITTER Permet de sortir du me nu
22 Permet de lancer la lecture d’un
23 Permet d’arrêter la lecture d’un
24 Permet une avance rapide sur un
25
26 ARRÊT DIFFÉRÉ Permet de configurer l’ar r ê t
27 CCD Permet d’activer ou de désactiver
28 IMAGE Permet de sélect ionner le mode
29 Arrêt sur image Permet d’effectuer un arrêt sur
30 AUDIO Permet de sélectionn er le mode
secondaire. Pour des
informations complémentaires,
voir « Sélection d’ un canal
secondaire numérique » voir
page 33.
d’état.
d’écran.
DVD ou CD si un lecteur de DVD
ou de CD est branché.
DVD ou CD si un lecteur de DVD
ou de CD est branché.
DVD ou CD si un lecteur de DVD
ou de CD est branché.
Permet d’aller au chapitre suivant
sur un DVD ou à la piste suivante
sur un CD si un lecteur de DVD ou
de CD est bran ché.
différé de l’appa reil. Pour des
informations complémentaires,
voir « Réglage de l’arrê t différé »
voir page 34.
les sous-titres codés. Pour des
informations complémentaires,
voir « Visualisation des
sous-titres codés » voir page 35.
d’image.
l’image vidéo. Appuyer de
nouveau pour reprendre la
lecture. Ne pas effectuer un arrêt
sur l’image vidéo pen dant une
durée prolongée. L’écran du
téléviseur pourrait être
endommagé.
audio.
www.insignia-products.com
27
Page 28

NS-27LCD.fm Page 28 Wednesday, June 28, 2006 12:04 PM
Téléviseur ACL de 27 po Insignia NS-27LCD
Utilisation de la télécommande
Pour utiliser la télécommande :
• Pointer la télécommande vers le capteur
situé sur la face avant du téléviseur.
Le schéma ci-après illustre la portée de la
télécommande.
60°
16.4 ft.
(5 m)
Remarques :
• La télécommande ne doit pas recevoir de chocs ou être
exposée à des liquides.
• Ne pas utiliser la télécommande dans des endroits à forte
humidité.
• Ne pas placer la télécommande sous la lumière solaire
directe.
• Ne pas placer d’objets, tels que des meubles, entre la
télécommande et le capteur de télécommande.
• La télécommande peut ne pas fonctionner correctement si
le capteur de l’unité principale reçoit directement la lumière
du soleil ou un éclairage important. Déplacer le téléviseur
ou modifier l’angle d’utilisation de la télécommande.
30
0
0
30
MTS/SAP ZOOM CCD SLEEP
AUDIO
PICTURE
FREEZE
Installation du téléviseur
Installation des piles de la télécommande
Pour installer les piles de la télécommande :
1 Retirer le couvercle du compartiment des
piles.
3 Remettre le couvercle en place.
Remarques :
• Ne pas mélanger différents types de piles.
• Ne pas mélanger des piles neuves et usagées.
• Retirer les piles quand elles sont déchargées.
• Les produits chimiques des piles peuvent provoquer des
démangeaisons. Si les piles fuient, nettoyer le
compartiment avec un chiffon. Si les produits chimiques
sont au contact de la peau, nettoyer immédiatement.
• Retirer les piles si la télécommande n’est pas utilisée
pendant une période prolongée.
Branchement du téléviseur sur une prise
secteur.
Pour brancher le téléviseur sur une prise
secteur :
• Brancher le cordon d’alimentation sur une
prise secteur.
Remarques :
• Vérifier que la tension est correcte. Voir l’étiquette au dos
du téléviseur.
• Débrancher l’appareil de la prise secteur lorsqu'il ne doit
pas être utilisé pendant une durée prolongée.
Connexion des haut-parleurs
Pour connecter des haut-pa rleurs à l’appareil :
1 Débrancher le cordon d’alimentation de
l’appareil ainsi que tous les périphériques
connectés à ce dernier.
2 Connecter les haut-parleurs aux prises pour
haut-parleurs situées au dos de l’appareil.
S’assurer de connecter la partie noire du
câble du haut-parleur à la prise – et la partie
rouge du câble du haut-parleur à la prise +
situées au dos de l’appareil.
2 Insérer deux piles AA dans le compartiment.
Veiller à ce que les pôles + et – des piles
coïncident avec les repères + et – figurant à
l'intérieur du compartiment.
28
Remarque
www.insignia-products.com
NoirRouge
Noir Rouge
Haut-parleur
droit
L’emplacement des prises pour haut-parleurs sur
l’appareil peut différer de l’illustration.
Haut-parleur
gauche
Page 29
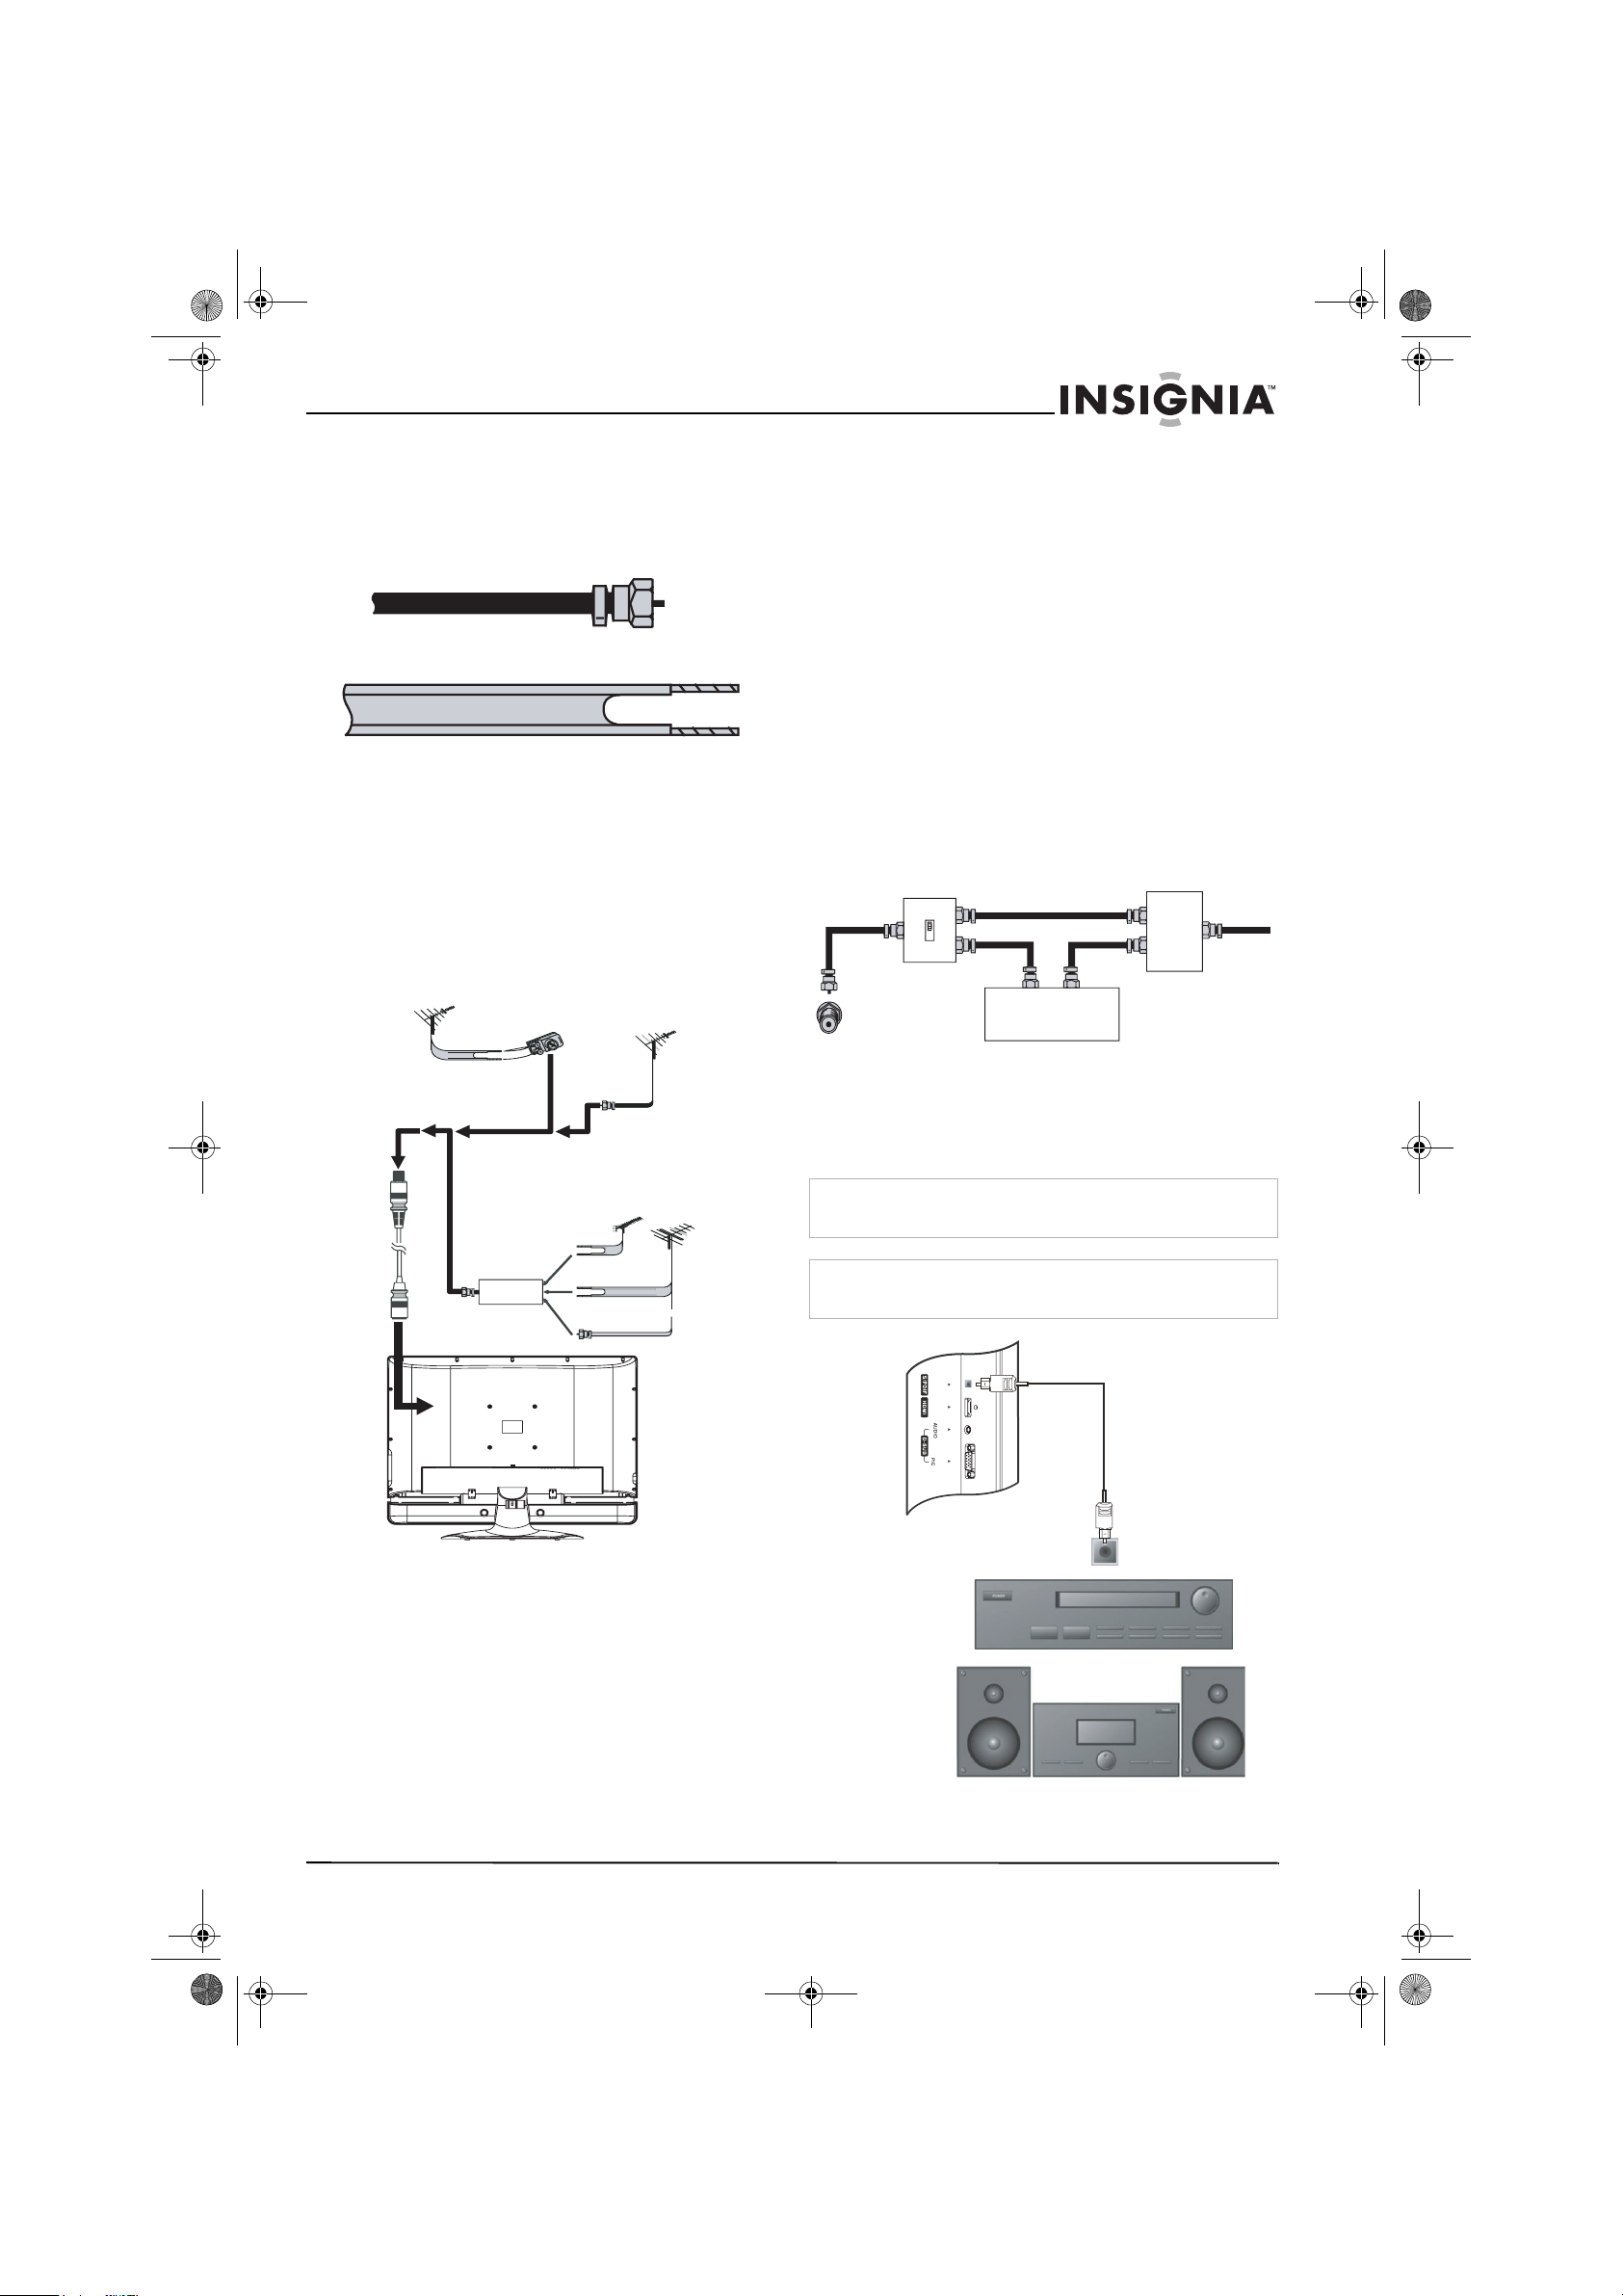
NS-27LCD.fm Page 29 Wednesday, June 28, 2006 12:04 PM
Téléviseur ACL de 27 po Insignia NS-27LCD
Connexion d’une antenne externe
Les câbles d’antenne sont de deux types :
75 ohms et 300 ohms.
75Câble de 75 ohms
Câble de 300 ohms
Si le câble d’antenne utilisé a un connecteur de
75 ohms, le brancher sur la prise coaxiale située
au dos de l’appareil.
Si le câble d’antenne utilisé a un connecteur de
300 ohms, le brancher sur un adaptateur de 300
à 75 ohms (non fourni), connecter l’adaptateur à
un câble de 75 ohms, puis brancher l’autre
extrémité du connecteur de 75 ohms sur la prise
coaxiale située au dos de l’appareil.
Utiliser l’illustration ci-après pour connecter une
antenne extérieure.
Câble
d'antenne
Antenne VHF / UHF
Câble de 300 ohms
avec adaptateur
OUT
(Sortie)
Mélangeur
IN
(Entrée)
Antenne combinée
OU
Câble de 75
ohms
Antenne
UHF
OU
Antennes séparées
Antenne VHF /
UHF
Antenne
VHF
Pour le raccordement à la TV câblée sans
décodeur/décrypteur :
1 Brancher une extrémité d’un câble de
75 ohms sur la prise coaxiale au dos de
l’appareil.
2 Brancher l’autre extrémité sur la prise secteur
de la TV câblée.
Pour le raccordement à la TV câblée avec un
décodeur/décrypteur :
• Se référer au schéma ci-après pour la
connexion d’un décodeur/décrypteur
(l’interrupteur RF et le répartiteur de signal
ne sont pas fournis).
Régler l’interrupteur RF en position A et
utiliser la télécommande de l’appareil pour
visualiser les canaux « en clair ». Régler
l’interrupteur RF en position B et utiliser les
commandes du décodeur/décrypteur pour
visualiser les canaux brouillés.
Interrupteur RF
A
B
Out (Sortie)
Décodeur/décrypteur pour la TV
câblée
Répartiteur de
signal à deux voies
In (Entrée)
Connexion d’un système audio
Se référer au schéma ci-après pour la connexion
d’un équipement audio ou d’un système Hi-Fi.
Avertissement
S’assurer d’éteindre et de débrancher l’appareil avant
l’installation de périphériques.
Remarque
Pour les systèmes de cinéma maison, utiliser un câble S/PDIF
pour obtenir les meilleures performances sonores.
Raccordement à la TV câblée
L’appareil est doté d’une prise de 75 ohms pour
le raccordement à la TV câblée.
Certains câblo-opérateurs brouillent les signaux
des canaux par abonnement. Pour visualiser ces
canaux, il faut obtenir un décodeur/décrypteur.
Le raccordement à la TV câblée directement à
l'appareil est possible même sans un
décodeur/décrypteur. Avec un
décodeur/décrypteur, le raccordement à la TV
câblée est possible en utilisant un interrupteur
RF (non fourni). Pour plus d’informations sur la
connexion d’un décodeur/décrypteur, contacter
le câblo-opérateur.
Équipement audio
Système Hi-Fi
(Haute fidélité)
www.insignia-products.com
Câble S/PDIF
Prise S/PDIF In
(Entrée S/PDIF)
29
Page 30

NS-27LCD.fm Page 30 Wednesday, June 28, 2006 12:04 PM
Téléviseur ACL de 27 po Insignia NS-27LCD
Connexion d’un magnétoscope
Il est possible de connecter un magnétoscope
avec un câble audio/vidéo standard ou un câble
S-Vidéo. Le câble S-Vidéo ne fournit pas de son.
Si un câble S-Vidéo est utilisé, un câble audio
est nécessaire pour la connexion du son.
Remarque
Pour obtenir une meilleure vidéo, utiliser la prise S-Vidéo si le
magnétoscope est doté d’une connexion S-vidéo.
Avertissement
S’assurer d’éteindre et de débrancher l’appareil avant
l’installation de périphériques.
Se référer au schéma ci-après pour la connexion
d’un magnétoscope.
TV
Câble S-Vidéo
OU
Câble vidéo
Câble audio
Se référer au schéma ci-après pour la connexion
d’un magnétoscope pour l'enregistrement de
programmes télévisés.
TV
Câble vidéo
Y
VIDEO L- AUDIO - R
VIDEO L- AUDIO - R
W
Y = Jaune (vidéo)
W = Blanc (audio gauche)
R = Rouge (audio droite)
Câble audio
R
S-VIDEOANT OUT ANT IN
Y = Jaune (vidéo)
W = Blanc (audio gauche)
R = Rouge (audio droite)
Magnét
Y
VIDEO L- AUDIO - R
VIDEO L- AUDIO - R
R
W
S-VIDEOANT OUT ANT IN
Pour utiliser le magnétoscope :
1 Allumer le téléviseur.
2 Appuyer une ou plusieurs fois sur INPUT
(Entrée) pour sélectionner Composite1 (ou
S-Video si le magnétoscope est connecté à
la prise S-Vidéo).
3 Mettre le magnétoscope sous tension.
4 Insérer une bande vidéo, puis appuyer sur
PLAY (Lecture).
Connexion d’un magnétoscope (pour un
enregistrement)
Avertissement
S’assurer d’éteindre et de débrancher l’appareil avant
l’installation de périphériques.
Magnétoscop
Pour enregistrer une émission télévisée :
1 Allumer le téléviseur.
2 Sélectionner l’émission à enregistrer.
3 Mettre le magnétoscope sous tension.
4 Insérer une bande vidéo, puis appuyer sur la
touche enregistrement du magnétoscope.
Connexion d’un amplificateur
Se référer au schéma ci-après pour la connexion
d’un amplificateur externe.
TV
Câble audio
R
W = Blanc (audio gauche)
R = Rouge (audio droite)
Amplificateur
W
30
www.insignia-products.com
Page 31
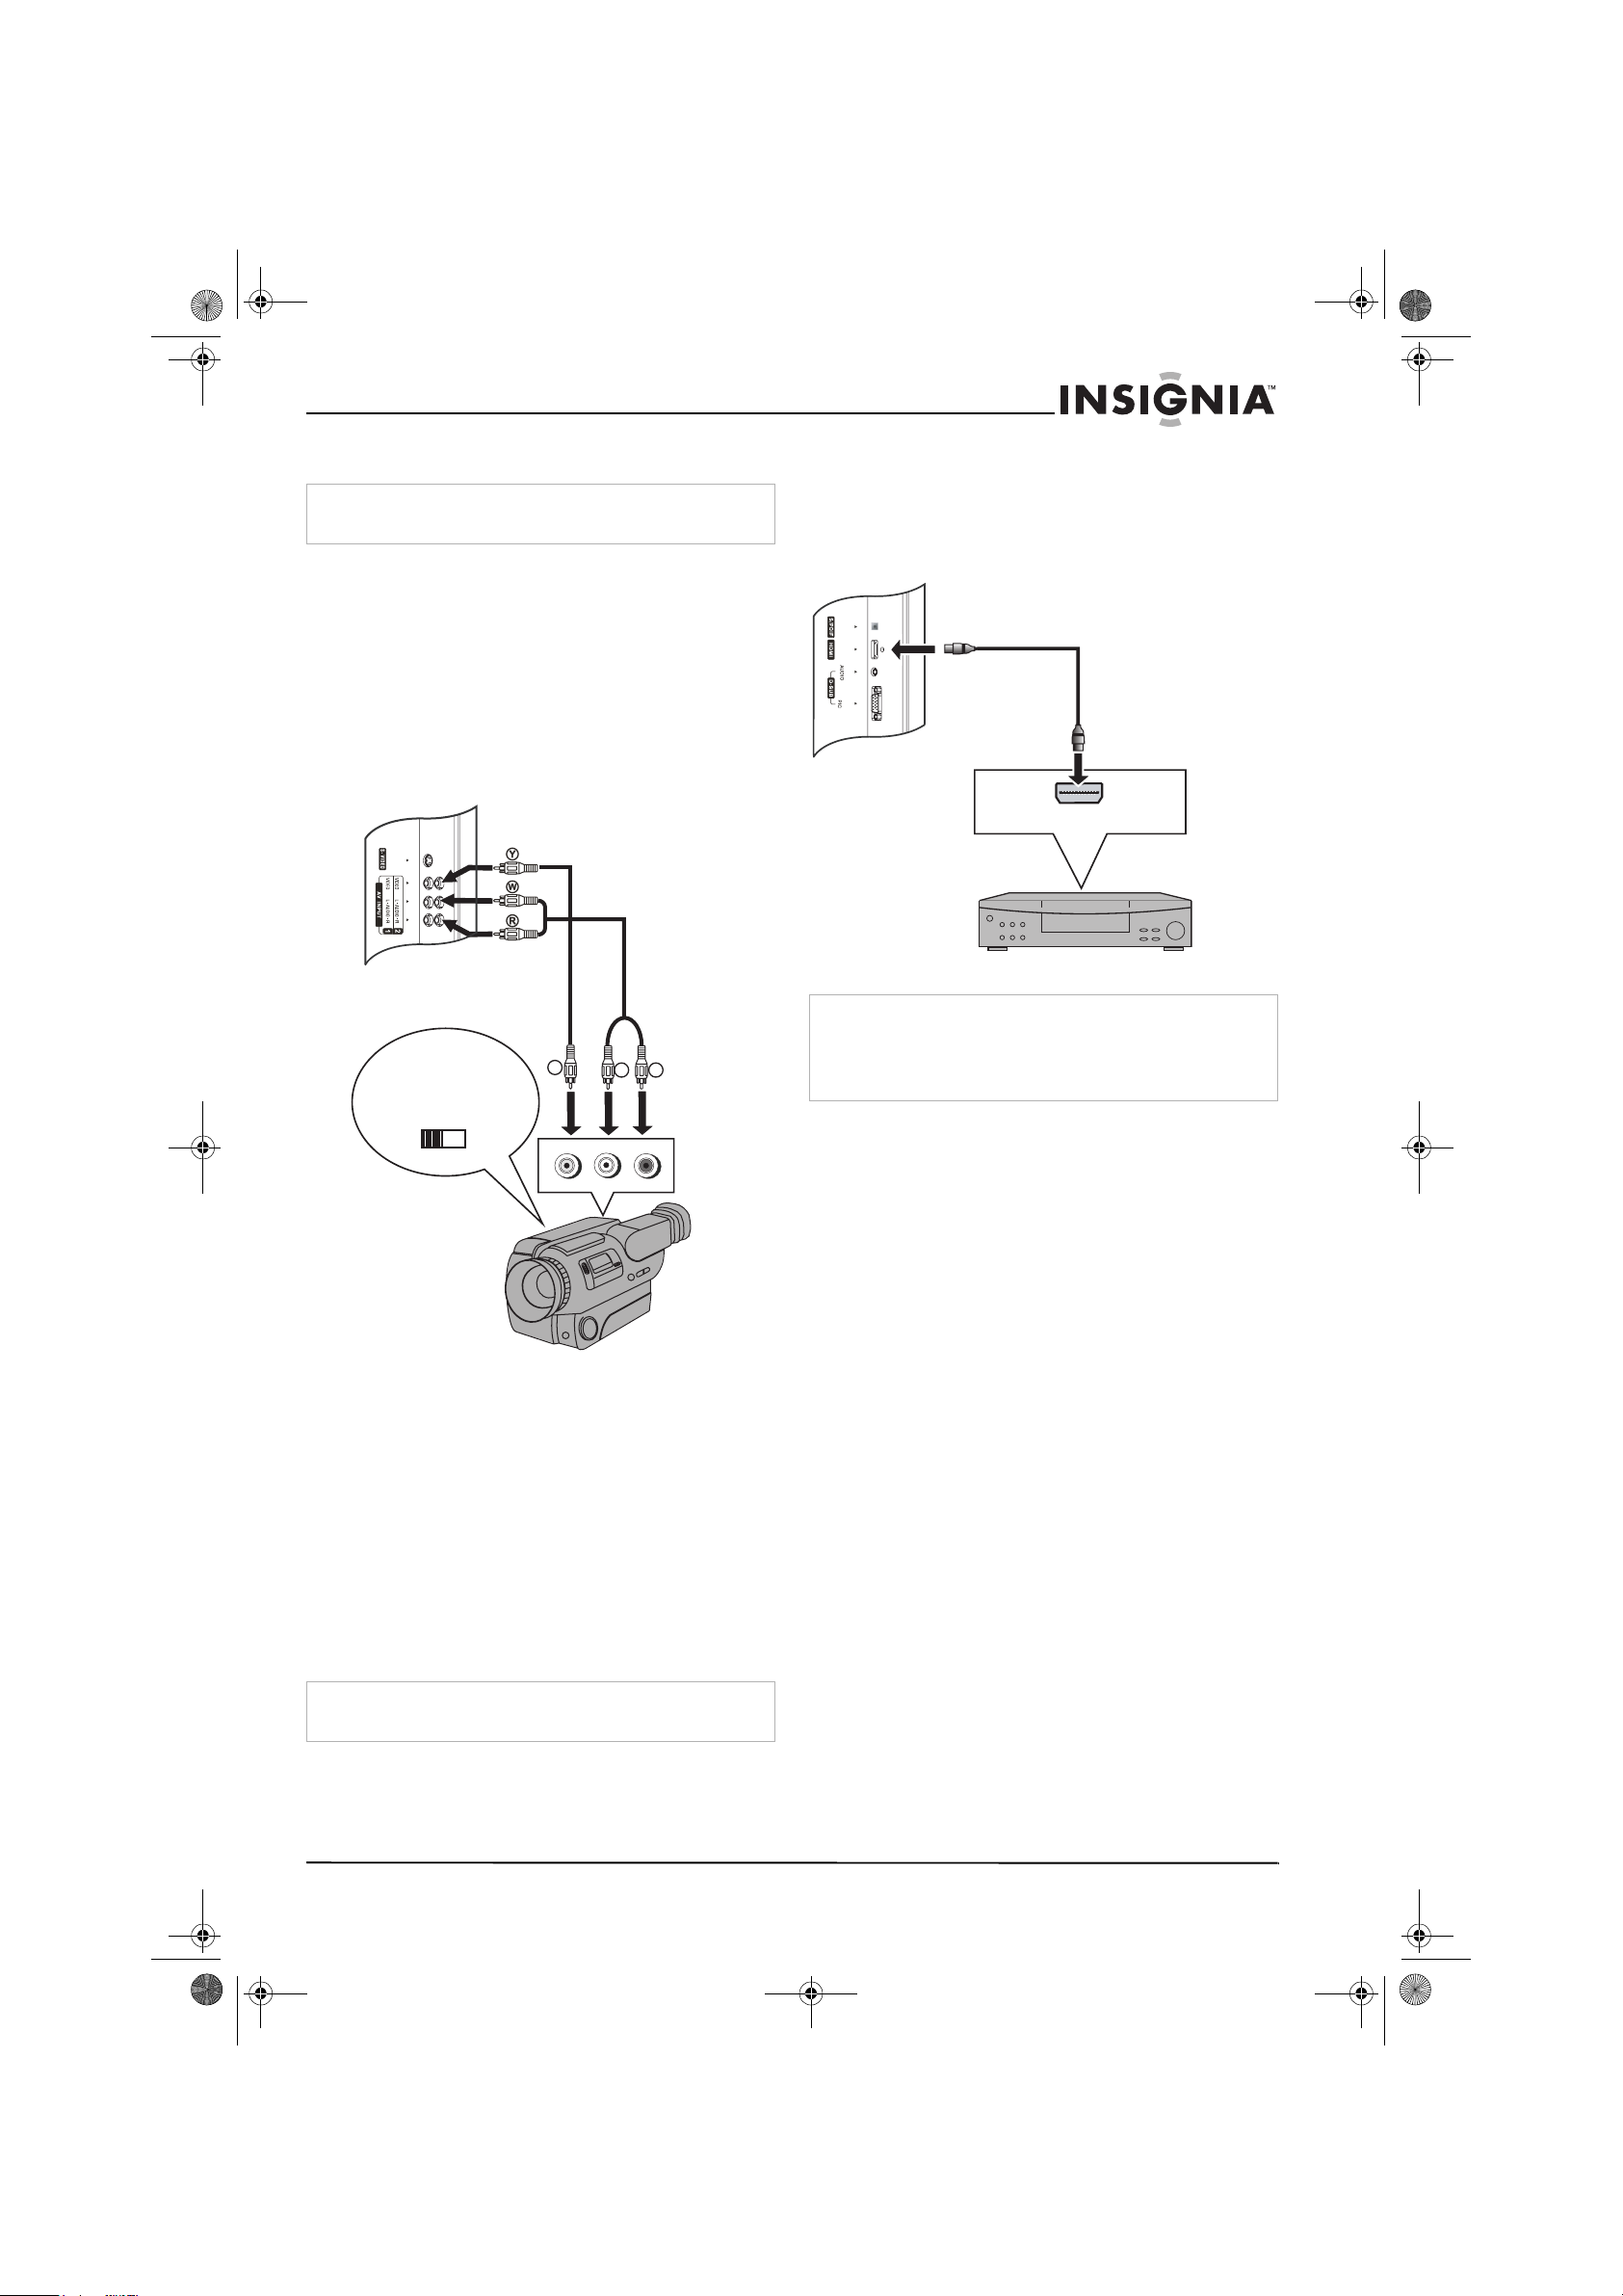
NS-27LCD.fm Page 31 Wednesday, June 28, 2006 12:04 PM
Téléviseur ACL de 27 po Insignia NS-27LCD
Connexion d’un caméscope
Avertissement
S’assurer d’éteindre et de débrancher l’appareil avant
l’installation de périphériques.
Se référer au schéma ci-après pour la connexion
d’un caméscope au téléviseur.
Pour la connexion d’un caméscope :
1 Brancher le câble audio/vidéo sur les prises
AUDIO L (gauche), AUDIO R (droite) et
VIDEO au dos de l’appareil.
2 Brancher l’autre extrémité du câble
audio/vidéo sur les prises de sortie vidéo et
audio du caméscope.
TV
OUT
(Sortie)
Câble vidéo
IN
(Entrée)
Y = Jaune (vidéo)
W = Blanc (audio gauche)
R = Rouge (audio droite)
Câble audio
Y
VIDEO L- AUDIO - R
W
Connexion d’un lecteur de DVD :
• Brancher le câble HDMI sur la prise HDMI
au dos de l’appareil et sur la prise de
sortie HDMI sur le panneau arrière du
lecteur de DVD.
TV
Sortie
HDMI
Lecteur de DVD
Remarque
Si le lecteur de DVD a seulement une sortie DVI, utiliser un
adaptateur DVI vers HDMI (non fourni) pour connecter le
lecteur de DVD à la prise HDMI au dos de l’appareil. Puis
R
connecter le câble audio à la prise D-SUB AUDIO IN (Entrée
audio D-SUB) à l’arrière du téléviseur.
Pour lire un DVD :
1 Allumer le téléviseur.
2 Appuyer une ou plusieurs fois sur
INPUT(Entrée) pour sélectionner HDMI.
3 Mettre le lecteur de DVD sous tension.
4 Insérer un DVD, puis appuyer sur PLAY
(Lecture).
Caméscope
Pour utiliser le caméscope :
1 Allumer le téléviseur.
2 Appuyer une ou plusieurs fois sur
INPUT(Entrée) pour sélectionner
Composite2.
3 Mettre le caméscope sous tension et le régler
sur le mode de sortie. Pour plus
d’informations, se référer au guide de
l’utilisateur du caméscope.
4 Insérer une bande vidéo dans le caméscope
et appuyer sur la touche lecture.
Connexion d’un lecteur de DVD
Avertissement
S’assurer d’éteindre et de débrancher l’appareil avant
l’installation de périphériques.
Se référer au schéma ci-après pour la connexion
du lecteur de DVD à l’appareil.
www.insignia-products.com
31
Page 32

NS-27LCD.fm Page 32 Wednesday, June 28, 2006 12:04 PM
Téléviseur ACL de 27 po Insignia NS-27LCD
Connexion d’un récepteur TVN
Avertissement
S’assurer d’éteindre et de débrancher l’appareil avant
l’installation de périphériques.
TV
Câble vidéo
G
COMPONENT
L - AUDIO - R VIDEO
G = Vert (Y)
W = Blanc (audio gauche)
R = Rouge (audio droite, Cr.Pr)
B = Bleu *Cb/Pb)
Câble audio
AV OUT
S-VIDEO
Récepteur TVN
W
AUDIO
L - AUDIO - R
Pour regarder la TVN :
1 Allumer le téléviseur.
2 Appuyer une ou plusieurs fois sur
INPUT(Entrée) pour sélectionner
Component1(Composante1).
3 Mettre le récepteur TVN sous tension.
Connexion d’un ordinateur
Avertissement
S’assurer d’éteindre et de débrancher l’appareil avant
l’installation de périphériques.
Se référer au schéma ci-après pour la connexion
d'un ordinateur à l'appareil.
TV
Câble audio
Câble D-SUB
RBR
ANT IN
Ordinateur
DVI
Pour regarder la télévision sur l’écran d'un
ordinateur :
1 Allumer le téléviseur.
2 Appuyer une ou plusieurs fois sur
INPUT(Entrée) pour sélectionner VGA.
3 Mettre l’ordinateur sous tension, puis le
régler en mode de sortie VGA externe. Pour
plus d’informations, se référer au guide de
l’utilisateur de l’ordinateur.
Fonctionnement du
téléviseur
Mise en Marche/Arrêt de l’appareil
Pour mettre l'appareil en marche :
1 Vérifier que le cordon d’alimentation est
connecté à l’appareil et à une prise secteur.
2 Appuyer sur la touche pour mettre
l’appareil en marche.
3 Appuyer de nouveau sur la touche pour
éteindre l’appareil
Sélection de la source du signal TV
32
Pour sélectionner la source du signal TV :
1 Appuyer sur MENU.
2 Appuyer une ou plusieurs fois sur ou
pour sélectionner Setup (Configuration), puis
sur OK ou pour ouvrir le menu de
configuration.
3 Appuyer une ou plusieurs fois sur ou
pour sélectionner Tuning Band (Bande de
syntonisation) puis sur OK ou pour accéder
aux options de bande de syntonisation.
www.insignia-products.com
Page 33

NS-27LCD.fm Page 33 Wednesday, June 28, 2006 12:04 PM
Téléviseur ACL de 27 po Insignia NS-27LCD
4 Sélectionner Air (Réception hertzienne) en
cas de raccordement à une antenne externe.
Sélectionner Cable (Câble), Cable HRC
(Câble HRC), Cable IRC (Câble IRC) ou
Cable Auto (Câble automatique) pour la TV
câblée. Il est recommandé de sélectionner
Cable Auto (Câble automatique) pour la TV
câblée. Pour plus d’informations sur la
sélection de la TV câblée, contacter le
câblo-opérateur.
5 Appuyer sur EXIT (Quitter) pour fermer le
menu d’écran.
Configuration de la liste des canaux
Après avoir sélectionné la source du signal TV
(antenne ou câble), il est nécessaire de
configurer la liste des canaux. Lors de la
configuration de la liste des canaux, l’appareil
recherche les canau x dis po nible s loca l em ent et
crée une liste de canaux enregistrés. En
appuyant sur la touche
CH – ou +, le téléviseur « saute »
automatiquement les canaux qui n'émettent pas
de signaux.
Configuration automatique des canaux
Pour configurer la liste des canaux
automatiquement :
1 Appuyer sur MENU.
2 Appuyer une ou plusieurs fois sur ou
pour sélectionner Setup (Configuration), puis
sur OK ou pour ouvrir le menu de
configuration.
3 Appuyer une ou plusieurs fois sur ou
pour sélectionner Auto Ch Search
(Recherche automatique des canaux).
4 Appuyer sur OK ou pour lancer la
recherche des canaux.
Remarque
Appuyer sur Exit (Quitter) pour arrêter la
recherche.
Ajout ou suppression manuel de canaux de
la liste des canaux
Après avoir créé la liste des canaux à partir de
l’option Recherche automatique des canaux, il
est possible d’ajouter ou de supprimer des
canaux de la liste manuellement.
Pour ajouter ou supprimer des canaux :
1 Appuyer sur MENU.
2 Appuyer une ou plusieurs fois sur ou
pour sélectionner Setup (Configuration), puis
sur OK ou pour ouvrir le menu de
configuration.
3 Appuyer une ou plusieurs fois sur ou
pour sélectionner Manual Ch Set
(Configuration manuelle des canaux), puis
sur OK ou pour accéder aux options
Manual Ch Set (Configuration manuelle des
canaux).
4 Appuyer sur ou pour sélectionner un
canal, puis sur OK pour ajouter ou supprimer
un canal.
5 Appuyer sur EXIT (Quitter) pour fermer le
menu.
Changement de canal
Pour changer de canal :
• Appuyer sur la touche CH – ou + de la
télécommande pour passer à un canal
inférieur ou supérieur.
Ou
Utiliser les touches numériques pour
sélectionner un canal. Par exemple, pour
sélectionne r le canal 83, saisir 8, puis 3.
Ou
Appuyer sur pour retourner au dernier
canal visionné.
Sélection d’un canal secondaire
numérique
La plupart des canaux TV numériques
contiennent plus d’un canal. Le canal principal
reçoit le signal pour le programme TV principal.
Les canaux secondaires reçoivent les signaux
pour la programmation supplémentaire ou
alternative, telle que la radiodiffusion ou les
journaux télé vi s és.
Par exemple, si le numéro de canal principal est
8, les numéros de canal secondaire peuvent être
8-1, 8-2 et 8-3.
Pour sélectionner un canal secondaire :
1 Utiliser les touches numériques pour saisir le
canal principal, 8 par exemple.
2 Appuyer sur –, puis sur le canal secondaire,
1 par exemple.
Réglage du volume
Pour régler le volume :
• Appuyer sur VOL – or + pour augmenter ou
diminuer le volume.
• Appuyer sur MUTE (Sourdine) pour
désactiver le son. Appuyer de nouveau sur
MUTE (Sourdine) pour réactiver le son.
Affichage de l'information d'état
Pour afficher l’information d’état :
• Appuyer sur INFO. L’appareil affiche
l’information d’état, telle que le numér o de
canal ou la source du signal.
Sélection de la source d’entrée vidéo
Pour sélectionner la source d’entrée vidéo :
• Appuyer une ou plusieurs fois sur INPUT
(Entrée) pour sélectionner la source vidéo. Il
est possible de sélectionner :
• TV – TV signal (signal TV)
• Composite1 – AV INPUT1 jacks (Prises
ENTRÉE1 AV)
• Composite2 – AV INPUT2 jacks (Prises
ENTRÉE2 AV)
• Component1 – COMPONENT INPUT1
jacks (Composante1 – Prises ENTRÉE1
POUR COMPOSANTE)
• Component2 – COMPONENT INPUT2
jacks (Composante2 – Prises ENTRÉE2
POUR COMPOSANTE)
• VGA – D-SUB jack (ordinateur) [Prise
D-SUB]
www.insignia-products.com
33
Page 34

NS-27LCD.fm Page 34 Wednesday, June 28, 2006 12:04 PM
Téléviseur ACL de 27 po Insignia NS-27LCD
• HDMI – HDMI jack (Prise HDMI)
• S-Vidéo – S-Video jack (Prise S-Vidéo)
Vérification de la puissance du signal TVN
Pour vérifier la puissance du signal TVN :
1 Appuyer sur MENU.
2 Appuyer une ou plusieurs fois sur ou
pour sélectionner Setup (Configuration), puis
sur OK ou pour ouvrir le menu de
configuration.
3 Appuyer une ou plusieurs fois sur ou
pour sélectionner DTV Sig nal (Signal TVN)
puis sur OK ou . L’apparei l affiche la
puissance du signal TVN.
Ajout d’une étiquette à un canal
Pour ajouter une étiquette à un canal :
1 Appuyer sur MENU.
2 Appuyer une ou plusieurs fois sur ou
pour sélectionner Setup (Configuration), puis
sur OK ou pour ouvrir le menu de
configuration.
3 Appuyer une ou plusieurs fois sur ou
pour sélectionner Channel Labels
(Étiquettes de canaux), puis sur OK ou
pour ouvrir le menu des étiquettes de
canaux.
4 Appuyer sur ou pour déplacer la sélection
ou le curseur. Appuyer sur ou pour
basculer entre NTSC ou ATSC ou pour
sélectionner un numéro de canal ou un
caractère.
5 Appuyer sur EXIT (Quitter) pour retourner au
menu précédent ou sur MENU pour quitter le
menu d’écran.
Arrêt sur image
Il est possible de faire un arrêt sur image (figer
l’image).
Avertissement
Pour éviter d’endommager l’appareil, ne pas faire un arrêt sur
image pendant une durée prolongée.
Pour faire un arrêt sur image ou réactiver
l'image :
• Appuyer sur FREEZE (Arrêt sur image).
Réglage de l’horloge
L’horloge peut être réglée automatiquement à
partir d’un signal numérique de canal. L’appareil
recherche un canal numérique avec l’information
de l’heure encodée. Si l’heure affichée n’est pas
correcte, régler l’horloge manuellement.
Réglage automatique de l’horloge
4 Appuyer une ou plusieurs fois sur ou
pour sélectionner Time Set Mode (Mode de
réglage de l’horloge ), puis sur OK ou pour
sélectionner Auto.
5 Appuyer une ou plusieurs fois sur ou
pour sélectionner Time Zone (Fuseau
horaire), puis sur OK ou pour configurer le
fuseau horaire : Pacific (HNP), Alaska (Heure
de l’Alaska), Hawaii (Heure de Hawaï),
Eastern (HNE), Central (HNC) ou Mountain
(HNR).
6 Appuyer sur EXIT (Quitter) pour fermer le
menu d’écran.
Réglage manuel de l’horloge
Pour régler l’horloge manuellement :
1 Appuyer sur MENU.
2 Appuyer une ou plusieurs fois sur ou
pour sélectionner Feature (Fonctionnalités),
puis sur OK ou pour ouvrir le menu des
fonctionnalités.
3 Appuyer une ou plusieurs fois sur ou
pour sélectionner Time Set (Réglage de
l’horloge), puis sur OK ou pour ouvrir le
menu du réglage de l’horloge.
4 Appuyer une ou plusieurs fois sur ou
pour sélectionner Time Set Mode (Mode de
réglage de l’horloge ), puis sur OK ou pour
sélectionner Manual (Manuel).
5 Appuyer sur ou pour sélectionner Year
(Année), Date ou Time (Heure), puis sur OK
ou pour régler l’année, la date et l’heure.
6 Appuyer sur
EXIT (Quitter) pour fermer le
menu d’écran.
Réglage de l’arrêt différé
L’arrêt différé permet de sélectionner la durée
avant que l’appareil se mette automatiquement
hors tension.
Pour régler l'arrêt différé :
1 Appuyer sur MENU.
2 Appuyer une ou plusieurs fois sur ou
pour sélectionner Feature (Fonctionnalités),
puis sur OK ou pour ouvrir le menu des
fonctionnalités.
3 Appuyer une ou plusieurs fois sur ou
pour sélectionner Sleep Timer (Arrêt différé),
puis sur OK ou pour sélectionner la durée
souhaitée. Pour désactiver l’arrêt différé,
sélectionner Off (Désactivé).
Remarque
Il est aussi possible d’utiliser la touche SLEEP (Arrêt différé)
de la télécommande pour configurer l’arrêt différé.
Pour régler automatiquement l’horloge :
1 Appuyer sur MENU.
2 Appuyer une ou plusieurs fois sur ou
pour sélectionner Feature (Fonctionnalités),
puis sur OK ou pour ouvrir le menu des
fonctionnalités.
3 Appuyer une ou plusieurs fois sur ou
pour sélectionner Time Set (Réglage de
l’horloge), puis sur OK ou pour ouvrir le
menu du réglage de l’horloge.
34
www.insignia-products.com
Page 35

NS-27LCD.fm Page 35 Wednesday, June 28, 2006 12:04 PM
Téléviseur ACL de 27 po Insignia NS-27LCD
Visualisation des s ous-titres codés
Les sous-titres codés peuvent être visualisés
dans deux modes : LÉGENDE et TEXTE. Pour
chaque mode, quatre canaux sont disponibles.
Le mode LÉGENDE affiche le texte des
dialogues et des commentaires d’émissions de
télévision tout en permettant un affichage clair
des images. Le mode TEXTE affiche des
informations qui sont indépendantes des
programmes de télévision, telles que le
program me des émissions télé visées ou les
prévisions météorologiques). Dans le mode
TEXTE, des parties de l'image peuvent être
cachés par le texte.
Remarque
Pour la diffusion numérique, il est possible d’utiliser la touche
CCD de la télécommande pour sélectionner le mode des
sous-titres codés.
Pour visualiser les sous-titres codés :
• Appuyer une ou plusieurs fois sur CCD pour
sélectionner un mode des sous-titres codés.
Il est possible de sélectionner :
• CC1
• CC2
• CC3
• CC4
•TEXT1
•TEXT2
•TEXT3
•TEXT4
•Arrêt
Configuration du contrôle parental
L’appareil est doté d’une puce antiviolence qui
permet de contrôle r l’accès à certaines
émissions par les enfants. Le contrôle parental
inclut deux classifications : MPAA (en fonction
de l’âge) et les directives parentales TV (en
fonction de l'âge et du contenu). Un programme
TV pouvant utiliser soit les niveaux MPAA ou les
directives parentales TV, les deux classifications
doivent être réglées pour un contrôle total.
Avant de sélectionner les classifications, il est
nécessaire de configurer le mot de passe du
contrôle parental.
Pour configurer un mot de passe :
1 Appuyer sur MENU.
2 Appuyer une ou plusieurs fois sur ou
pour sélectionner Feature (Fonctionnalités),
puis sur OK ou pour ouvrir le menu des
fonctionnalités.
3 Appuyer une ou plusieurs fois sur ou
pour sélectionner Parental Control (Cont rôle
parental), puis sur OK ou pour ouvrir le
menu de contrôle parental.
4 Appuyer une ou plusieurs fois sur ou
pour sélectionner Password Change
(Modification du mot de passe), puis sur OK
ou pour accéder à l’option Password
Change.
5 Utiliser les touches numériques pour saisir
l’ancien mot de passe. Si un mot de passe
personnalisé n’a pas été saisi, entrer 0000.
6 Utiliser les touches numériques pour saisir
un nouveau mot de passe, puis le saisir une
deuxième fois pour confirmation.
Attention
Prendre note du mot de passe et en conserver trace pour
référence ultérieure.
Remarque
En cas d’oubli du mot de passe, entrer 1397 comme ancien
mot de passe, puis saisir un nouveau mot de passe.
Classification MPAA
Classificati
on
AUCUNE Non classifié.
G Tout public.
PG Surveillance parenta l e suggérée.
PG -13 Surveillance pa re ntale fortement
R – Réservé aux adultes. Interdit aux
NC-17 Déconseil lé aux mineurs de moins de
X Pour adultes uniquement.
Description
Certains aspects peuvent ne pas
convenir à des enfants.
suggérée. Certains aspects peuvent
être totalement inap pr o pr ié s po ur de s
enfants de moins de 13 ans.
mineurs de moins de 17 an s ou
accompagnement par un adult e requis.
17 ans.
Classification des directives parentales TV
Classificati
on
AUCUNE Non classifié.
TV-Y Tous les enfants.
TV-Y7 Interdit aux enfants de moins de 7 ans.
TV-G Tout public.
TV-PG Surveill an c e pa r e nta le suggérée.
TV-14 Parents sérieusement mis en garde.
TV-MA Adul tes seulement
Description
Certaines des classifications des directives
parentales TV basées sur une tranche d’âge
spécifique ont aussi un classement en fonction
du contenu.
Classificati
on
FV Violence fic tive.
L Grossièretés.
S Situations à caractère sexuel
V Violence.
D Dialogues à caractère sexuel.
Description
www.insignia-products.com
35
Page 36

NS-27LCD.fm Page 36 Wednesday, June 28, 2006 12:04 PM
Téléviseur ACL de 27 po Insignia NS-27LCD
Pour paramétrer la classification :
1 Appuyer sur MENU.
2 Appuyer une ou plusieurs fois sur ou
pour sélectionner Feature (Fonctionnalités),
puis sur OK ou pour ouvrir le menu des
fonctionnalités.
3 Appuyer une ou plusieurs fois sur ou
pour sélectionner Parental Control (Cont rôle
parental), puis sur OK ou pour ouvrir le
menu de contrôle parental.
4 Appuyer une ou plusieurs fois sur ou
pour sélectionner Parental Control Set
(Configuration du contrôle parental), puis sur
OK ou pour accéder les paramètres des
classifications.
5 Entrer le mot de passe.
6 Appuyer sur ou pour sélectionner
la classification, puis sur OK pour l'interdire
ou l'autoriser.
L'interdiction d'une classification entraîne
l'interdiction de cette classification et de
toutes les classifications supérieures à
celle-ci.
Utilisation du système de menus d’écrans
L’appareil est doté d’un système de menus
d’écrans qui permet de régler les paramètres du
téléviseur, tels que l’image vidéo et le son.
Pour utiliser le système de menus d’écrans :
1 Appuyer sur MENU.
2 Appuyer une ou plusieurs fois sur ou
pour sélectionner un menu.
3 Appuyer sur ou pour naviguer entre
les options ou pour régler une option.
4 Appuyer sur OK ou pour confirmer un
réglage, ouvrir un sous-menu ou défiler
parmi les paramètres.
5 Appuyer sur MENU pour retourner au menu
précédent ou sur EXIT (Quitter) pour fermer
le système de menus d’écrans.
Menus d’écrans
Menu d’écran Options
Vidéo
Remarque : Les
options varient en
fonction des
différents modes
disponibles.
Picture Mode (Mode de l’image) – Sélectionne
le mode de l’image : User (Utilisateur), Nature,
Soft (Doux) ou Bright (Vif). Il est aussi possible
d’appuyer sur PICTURE pour sélectionner le
mode de l’image.
Contrast (Contraste) – Augmente la définition
de l’image pour régler les zones blanches de
l’image. Diminue la définition de l’image pour
en régler les zones noires.
Brightness (Luminosité) – Augmente la
luminosité pour ajouter plus de lumière aux
zones sombres de l’image. Diminue la
luminosité pour nuancer les zones claires de
l’image.
Couleur – Permet de régler la richesse de la
couleur de l'image.
Sharpness (Netteté) – Augmente la définition
pour afficher une image plus nette et plus
claire. Diminue la définition pour afficher une
image plus flui de .
Aspect Ratio (Format d'image) – Permet de
modifier le format d’im age : Wide
(Panoramique), Cinema, Normal ou Zoom. Il
est aussi possible d’appuyer sur ZOOM pour
sélectionner le format d’image.
Advanced Video Menu (Menu vidéo avancé) –
Pour accéder aux fonctions avancées :
• Noise Reduction (Réduction du bruit) –
• Teinte – Augmente le niveau de la
• Color Temperature (Température de
• 3D Y/ C (Y/C 3D) – Pour activer ou
VGA Set/Compone nt Set (Réglage
VGA/Réglage des composantes) – Si l’appareil
est connecté à un ordi nateur ou vidéo à
composantes, permet la configuration des
options suivantes :
• H-Pos (Position H) – Permet de régler
• V-Pos (Position V) – Permet de régler
• Clock (Horloge) – Définit la fréq uence
• Phase – Améliore la nett eté d’ une ima ge
• Setting (Réglage) – Réinitialise le mode
Diminue les parasites (neige) de
l’image.
couleur pour ajouter plus de vert a ux
tons chair. Diminue le niveau de la
couleur pour ajou ter plus de violet aux
tons chair.
couleur) – Pour sélectionner un des
trois réglages de couleur : Cool (Froide)
pour plus de b l e u, Warm (chaude) pour
plus de rouge et Normal (Normale).
désactiver le filtre en pei gne 3D.
les paramètres de la posi tion
horizontale de l’ima ge.
les paramètres de la posit ion verticale
de l’image.
d'échantillonnage.
fixe.
VGA au défaut usine.
36
www.insignia-products.com
Page 37

NS-27LCD.fm Page 37 Wednesday, June 28, 2006 12:04 PM
Téléviseur ACL de 27 po Insignia NS-27LCD
Menu d’écran Options
Audio
Remarque : Les
options varient en
fonction des
différents modes
disponibles.
Configuration Tuning Band (Bande de syntonisation) –
Sound Mode (Mode so nore) – Sélectionne le
mode sonore : User (Utilisateur), News
(Nouvelles), Music (Musique) ou Movie (Film).
Il est aussi possible d’appuyer sur AUDIO pour
sélectionner le mode sonore.
Bass (Graves) – Règle les graves (notes
basses).
Treble (Aigus) – Règle les aigus (notes
puissantes).
Balance – Règle la balance des volumes entre
les haut-parle urs droit et gauche.
Earphone Vol (Volum e de l’écouteur) – Règle
le volume de l’écouteur.
Digital Audio Output (Sortie numérique audio)
– Permet de sélectionner le mode audio pour la
prise S/PDIF.
• RAW (Brut) : Entrée AC-3 et sortie AC-3.
Entrée PCM et sortie PCM.
• PCM : Entrée A C-3 et sorti e PCM. E ntrée
PCM et sortie PCM.
MTS – Permet de sélectionner la transmission
multivoie de signau x sonores en télévision
(MTS) : Mono, Stereo (Stéréo) ou SAP
(deuxième trame sonore). Il est aussi possible
d’appuyer sur MTS/SAP pour sélectionner le
mode MTS.
Audio Language (Langue audi o) – P e rme t de
sélectionner une autre langu e si le programme
est doté de plus d’une langue.
Permet de sélectionner la source du signal TV.
Pour des informations complémentaires, voir «
Sélection de la sou rce du signal TV » voir
page 32.
DTV Signal (Signal TVN) – Affiche la puissance
du signal TV numérique. Pour des informations
complémentaires, voir « Vérification de la
puissance du signal TVN » voir page 34.
Auto Ch Search (Recherche automatique des
canaux) – Configure automatiquement une liste
des canaux disponibles localement. Pour des
informations complémentaires, voir «
Configuratio n automatique des canaux » voir
page 33.
Manual Ch Set (Réglage manuel des canaux) –
Permet d’ajouter ou de supprimer des canau x
de la liste des canaux. Pour des informations
complémentaires, voir « Aj out ou suppression
manuel de canaux de la liste des canaux » voir
page 33.
Channel Labels (Étiquettes de canaux) –
Permet d’ajouter une étiquette à un canal. Pour
des informations complémentaires, voir «
Ajout d’une étiq uette à un canal » voir page 34.
Menu d’écran Options
Fonctionnalité Source – Sélection de la source vidéo. Il est
possible de sélectionner :
•TV
• Composite1
• Composite2
• Composite1
• Composite2
•VGA
•HDMI
•S-Vidéo
Il est aussi possible d’appuyer sur INPUT
(Entrée) pour sélectionner la source vidéo.
Time S et (Réglage de l’horloge) – Pour régler
l’horloge. Pour des informations
complémentaires, voir « Réglage de l’horloge »
voir page 34.
Sleep Tim er (Arrêt différé) – Pour configurer
l’arrêt différé. Pour des informations
complémentaires, voir « R églage de l’arrêt
différé » voir page 34.
Parental Contro l (Contrôle parental) – Permet
d’accéder aux paramètres de la puce
antiviolence. Pour des informations
complémentaires, voi r « Configuration du
contrôle parental » voir page 35 .
Closed Caption Options (Options des
sous-titres codés) – Permet de personnaliser
les sous-titres codés pour la diffusion
numérique. Il est possible de régler la t aille, la
police de caractères, la co uleur du texte, la
transparence du texte, la coul eur de fond, la
transparence de fond, l’effet de la bordure et la
couleur de la bordure.
CC when Mute (Sous-t itres codés pendant la
mise en sourdine) – Quand cette option est
activée, l’appareil affiche automatiqueme nt les
sous-titres codés penda nt la mise en sourdine.
Menu Language (Langue du menu) – Permet
de sélectionner la la ngue de l’affichage des
menus d’écrans. Il est possible de sélectionner
l’anglais, le français ou l’espagn ol.
Programmation de la
télécommande
Pour programmer un périphérique
connecté à l’appareil
La télécommande peut contrôler quatre
périphériques, tels qu’un magnétoscope, un
lecteur de DVD, un récepteur câble ou satellite,
un amplificateur ou syntoniseur, ainsi que
d’autres périphériques similaires.
Pour programmer la télécommande :
1 Trouver le code pour le périphérique à
programmer. Voir « Annexe » voir page 40.
S’il existe plus d’un code pour un
périphérique, noter tous les codes.
2 Mettre le périphérique à programmer sous
tension et charger le support si nécessaire,
un disque DVD par exemple.
3 Appuyer sur la touche du périphérique
concerné de la télécommande, par exemple,
DVD, CBL ou AUX.
4 Appuyer sans relâcher sur SET (Réglage) de
la télécommande jusqu’à ce que le témoin
DEL clignote deux fois, puis relâcher.
www.insignia-products.com
37
Page 38

NS-27LCD.fm Page 38 Wednesday, June 28, 2006 12:04 PM
Téléviseur ACL de 27 po Insignia NS-27LCD
5 Saisir le code à cinq chiffres du périphérique.
Le témoin DEL clignote chaque fois qu’un
chiffre est saisi. Si le code est correct, le
témoin DEL clignote deux fois.
Remarque
Si le témoin DEL de clignote pas deux fois, répéter
les étapes 3 à 5 en essayant un code différent.
6 Pointer la télécommande vers le
périphérique, puis appuyer sur . Le
périphérique devrait s’éteindre.
Remarque
Si le périphérique ne s’éteint pas, répéter les
étapes 4 à 6 en essayant un code différent. Si
aucun des codes dans la liste ne marchent, voir «
Recherche d’un code » voir page 38.
7 Répéter les étapes 1 à 6 pour programmer
d’autres périphériques.
8 Appuyer sur SET (Réglage) pour enregistrer
le code et quitter le menu.
Recherche d’un code
Pour rechercher un code :
1 Appuyer sur la touche du périphérique.
2 Appuyer sans relâcher sur SET (Réglage)
jusqu’à ce que le témoin DEL clignote deux
fois, puis relâcher.
3 Saisir 991, puis le chiffre du groupe de
périphérique (0 = câble, 1 = téléviseur, 2 =
magnétoscope, 3 = audio). Le témoin DEL
clignote deux fois.
4 Pointer la télécommande vers le
périphérique, puis appuyer sur . Si le
périphérique répond, aller à l'étape 7.
5 Si le périphérique ne répond pas, appuyer
sur CH+. La télécommande essayera le
prochain code. Maintenir CH+ appuyé
jusqu’à ce que le périphérique réponde. Il est
possible d’appuyer sur CH– pour essayer un
code précédent.
6 Pour chercher le code d’un autre
périphérique, répéter les étapes 1 à 5.
7 Appuyer sur SET (Réglage) pour enregistrer
le code et quitter le menu.
Vérifica ti on du c o d e
Si lors de la recherche d’un code, un
périphérique a été programmé, il est
recommandé de vérifier quel code à quatre
chiffres est utilisé par la télécommande.
Pour vérifier le code :
1 Appuyer sur la touche du périphérique de la
télécommande.
2 Appuyer sans relâcher sur SET (Réglage)
jusqu’à ce que le témoin DEL clignote deux
fois, puis relâcher.
3 Saisir 990. Le témoin DEL clignote deux fois.
4 Appuyer sur 1 et compter les clignotements
du témoin DEL. Ceci est le premier chiffre du
code. Par exemple, si le témoin DEL clignote
deux fois, le premier chiffre est 2. Si le témoin
DEL ne clignote pas, le premier chiffre est 0.
5 Répéter l’étape 4 en utilisant 2 pour le
second chiffre, 3 pour le troisième chiffre, 4
pour le quatrième chiffre et 5 pour le
cinquième chiffre.
6 Appuyer sur SET (Réglage) pour quitter.
Programmation du verrouillage de volume
La télécommande est préréglée pour permettre
la commande du volume de chaque
périphérique connecté. Il est possible de
changer le verrouillage de volume afin que le
volume d’un périphériq ue com ma nde le volume
dans tous les modes.
Après avoir verrouillé le contrôle de volume, il
est possible de déverrouiller la commande du
volume d’un périphérique spécifique afin de
contrôler le volume de ce dernier
indépendamment.
Pour verrouiller la commande du volume :
1 Appuyer sans relâcher sur SET (Rég l a ge)
jusqu’à ce que le témoin DEL clignote deux
fois, puis relâcher.
2 Saisir 993, puis appuyer sur la touche du
périphérique dont le contrôle de volume est
nécessaire. Le témoin DEL clignote deux
fois. Quand les touches VOL+, VOL– ou
MUTE (Sourdine) de la télécommande sont
appuyées, le périphérique sélectionné
commande le volume quel que soit le
périphérique qui est utilisé.
Pour déverrouiller la commande du volume :
1 Appuyer sans relâcher sur SET (Rég l a ge)
jusqu’à ce que le témoin DEL clignote deux
fois, puis relâcher.
2 Saisir 993, puis appuyer sur VOL+. Le
témoin DEL clignote quatre fois. Le contrôle
du volume est déverrouillé.
Pour déverrouiller le contrôle du v olume d’un
seul périphérique :
1 Appuyer sur la touche du périphérique.
2 Appuyer sans relâcher sur SET (Rég l a ge)
jusqu’à ce que le témoin DEL clignote deux
fois, puis relâcher.
3 Saisir 993, puis appuyer sur VOL–. Le témoin
DEL clignote quatre fois. La commande du
volume pour le périphérique sélectionné est
déverrouillée.
Problèmes de la télécommande et solutions
Anomalie Solution possible
Le témoin DEL ne
clignote pas quand une
touche est appuyée
Le témoin DEL clignote
quand une touche es t
appuyée mais le
périphérique ne rép ond
pas
Le témoin DEL clignote
longuement
Remplacer les piles.
S’assurer d’être à moins de 15 pi (4,6
mètres) du périphérique et de pointer
la télécommande vers le cap teur de
télécommande du périphérique.
Une touche a été incorrecteme nt
appuyée. Recommencer de nouveau la
procédure.
38
www.insignia-products.com
Page 39
NS-27LCD.fm Page 39 Wednesday, June 28, 2006 12:04 PM
Téléviseur ACL de 27 po Insignia NS-27LCD
Anomalie Solution possible
La télécommande ne
contrôle pas un
périphérique ou ne
commande que
certaines fonctionn alités
de celui-ci
Pas de volume sur le
périphérique
Vérifier que le périphérique est doté
d'un capteur de télécommande, puis
essayer un autre code.
Voir « Programmation du verrouillage
de volume » voir page 38.
Entretien
• Ne pas utiliser cet appareil dans des endroits
trop chaud ou trop froid, cela pourrait
déformer le boîtier ou entraîner un
fonctionnement défectueux.
• Les températures de stockage sont de 32
à 122° F (0 à 50° C).
• Les températures de fonctionnement sont
de 41
à 104° F (5 à 40° C).
• Ne pas placer l’appareil sous la lumière
solaire directe ou à proximité d’une source de
chaleur.
Nettoyage de l’appareil
Nettoyer l’écran et le boîtier avec un chiffon doux
et non pelucheux. Si l’écran ou le boîtier est
extrêmement sale, humidifier un chiffon doux et
non-pelucheux avec un détergent doux dilué, le
presser pour extraire autant d’humidité, puis
essuyer l’écran ou le boîtier. Sécher l’écran ou le
boîtier avec un chiffon propre.
Attention
Éviter toutes substances volatiles, telles que les insecticides,
les solvants et les diluants.
Ne pas laisser l’appareil en contact avec des articles en
caoutchouc ou en PVC pour une durée prolongée.
Ils pourraient endommager l’appareil.
Attention
Éviter les gouttes d’eau dans le boîtier.
Problèmes et solutions
Avertissement
L’ut ilisateur ne doit pas essayer de réparer cet appareil
lui-même. Toutes les réparations doivent être effectuées par
du personnel qualifié.
Anomalie Solution possible
Pas d’alimen ta t ion • Vérifier que le cord on
Absence d’image • Vérifier que les câbles vidéo
d’alimen t a t ion est connecté à
l’appareil et à une prise secteur .
• Débrancher le cordon
d’alimentation, attendre 60
secondes, puis le rebrancher et
mettre l’appareil en marche.
sont correctement connectés à
l’arrière de l’appareil.
• Régler le contraste et la
luminosité.
• Vérifier que le mode vidéo
correcte est sélectionné.
• Vérifier que le signal d’entrée
est compatible.
Anomalie Solution possible
Bonne image mais pas
de son
Bonne qualité du son ,
mais les couleurs sont
médiocres
Image de mauvaise
qualité
Ligne pointil lée
horizontale
La télécommande ne
marche pas.
Image neigeuse et
bruitée
L ’imag e VGA est inst able
ou non synchronisée
Pas de sortie sonore sur
l’un des haut-parleurs
Les touches de
commande ne
fonctionnent pas
Certaines parties de
l’écran ne s’allument pas
Image rémanente • Ne pas afficher une image fixe
• Augmenter le volume.
• Vérifier que le son n’est pas mis
en sourdine.
• Vé rifier que le mode audio
correct est sélectionné.
• Régler le contraste, la couleur
et la luminosité.
• Vérifier que la luminosité de la
pièce n’est pas trop forte. La
lumière reflétée par l’écran peut
rendre l’image difficile à voir.
• Si une caméra S-VHS ou un
caméscope est connecté alors
qu’un autre pér iphérique
branché est sous tension,
l’image peut être médiocre.
Éteindre un ou plusieurs
périphériques.
• Le téléviseur est éventuellement
trop proche d’un appareil
électrique tel qu’un
séche-cheveux ou une lumière
au néon. Éteindre l’appareil ou
déplacer le télévise ur.
• Appuyer sur la touche TV.
• Remplacer les piles. Veiller à ce
que les pôles + et – des pile s
coïncident avec les indications
+ et – figurant à l'intérieur du
compartiment.
• Netto yer le capteur de
télécommande situé sur la
partie avant du télévi seur.
• Une lumière f orte ou
fluorescente peut interférer
avec le signal de la
télécommande. Éteindre la
lumière ou déplacer le
téléviseur.
• Vérifier que les câble s
audio-vidéo (A/V) sont
fermement connectés.
• Vérifier que le mode VGA de
l’ordinateur es t co r re c t .
• Ré gler la balance dans le menu
Sound (Son).
• Débrancher le cordon
d’alimentation, attendre
quelque secondes puis
rebrancher le cordon et
rallumer le téléviseur.
• L’écran plasma a été fabriqué en
utilisant une technologie de
précision hauteme nt avancée.
Parfois, des parties de l’écran
peuvent ne pas reproduire des
éléments d’image ou aff icher
des points lumineux. Ceci est
normal.
telle qu’un logo, un jeu, une
image d’ordinateur, pendant
une période prolongée. Ceci
peut provoquer l’incrustation
d’une image rémanente sur
l’écran. Ces dommages ne sont
pas couverts par la garantie.
www.insignia-products.com
39
Page 40

NS-27LCD.fm Page 40 Wednesday, June 28, 2006 12:04 PM
Téléviseur ACL de 27 po Insignia NS-27LCD
Anomalie Solution possible
Le téléviseur émet des
craquements
• Les craquements se produisent
quand le châssis du téléviseur
se dilate ou se contracte sous
l’effet de variations de
températures. Ceci est no rm al.
Spécifications
• La conception et les spécifications sont
sujettes à modifications sans avis préalable.
• Le poids et les dimensions indiqués sont
approximatifs.
Alimentation 100 à 240 V CA, 50/60 Hz
Consommation
électrique
Écran 27 pouces
Canaux
accessibles
Poids 41.9 lbs. (19 kg)
Dimensions
W×H×D
Température: Température de stockage : 32 à 122 °F
Standard TV NTSC-M, ATSC
Accessoires Un Guide de l’util isateur
140 W
VHF : 2-13
UHF : 14-69
Réseau câblé : 1-125
CADTV : 1-135
TVN : 2-69
28.25 × 24 × 9,25 pouces
(71,4 × 60,6 × 23,5 cm)
(0 à 50 °C).
Température en fonctionnement : 41 à
104 °F (5 à 40 °C).
Télécommande
Annexe
Codes magnétoscope
ABS 21972
Admiral 20048, 20209
Aiko 20278
Aiwa 20037, 20479
Alienware 21972
America Action 20278
American High 20035
Amoisonic 20479
Anam 20162, 20037, 20240, 20278
Anam National 20162
Asha 20240
Audiovox 20037, 20278
Beaumark 20240
Bell & Howell 20104
Broksonic 20184, 20121, 20209, 20002,20479
Calix 20037
Canon 20035
Carver 20081
CCE 20072, 20278
Changhong 20048, 20081
Citizen 20037, 20278
Colt 20072
Craig 20037, 20047, 20240, 20072
Curtis Mathes 20060, 20035, 2 0162
Cybernex 20240
CyberPower 21972
Daewoo 20045, 20104, 20278
Dell Compu ter
Corp.
Denon 20042
DirecTV 20739
Durabrand 20039, 20038
Electrohome 20037
Electrophonic 20037
Emerex 20032
Emerson 20035, 20037, 20184, 20240,2004 5,
Fisher 20047, 20104
Fuji 20035, 20033
Fujitsu 20045
Gateway 2000 21972
GE 20060, 20035, 20240
Générales 20045
Go Video 20432
GoldStar 20037, 20209, 20038, 20225
Haojie 20240
Harman Kardon 20081, 20038
Harwood 20072
Hewlett Packard 21972
HI-Q 20047
Hitachi 20037, 20042, 20055
Howard
Computers
ch 21972
Hughes Network
Systems
iBUYPOWER 21972
JVC 20045, 20067
KEC 20037, 20278
Kenwood 20067, 20038
KLH 20072
Kodak 20035, 20037
Kolin 20043 LG 20037, 20045 , 20042,
Logik 20072
LXI 20037
Magnavox 20035, 20039, 20081
Magnin 20240
Marantz 20035, 20081
Marta 20037
Matsushita 20035, 20162
Media Center PC 21972
MEI 20035
21972
20121, 20043, 2 0209, 20002, 20278,
20479
21972
20042, 20739
20209,20038
40
www.insignia-products.com
Page 41

NS-27LCD.fm Page 41 Wednesday, June 28, 2006 12:04 PM
Téléviseur ACL de 27 po Insignia NS-27LCD
Memorex 20 035, 20162, 20037, 20048,20039,
20047, 20240, 20 104, 20209, 20479
MGA 20240, 20043
MGN Technology 20240
Microsoft 21972
Mind 21972
Minolta 20042
Mitsubishi 20067, 20043
Motorola 20035, 20048
MTC 20240
Multitech 20072
NEC 20035, 20037, 20048, 20104,20067,
20038
Newave 20037
Nikko 20037
Noblex 20240
Northgate 21972
Olympus 20035
Optimus 21062, 20162, 20037, 20048,20104,
20432
Orion 20184, 20209 , 20002, 20479
Panasonic 21062, 20035, 20162, 20616,20225
Penney 20035, 20037, 20240, 20042,20038
Pentax 20042
Philco 20035, 20479
Philips 20035, 20081, 20739, 20618
Pilote 20037
Pioneer 20042, 20067
Polk Audio 20081
Profitronic 20240
Proscan 20060
Protec 20072
Pulsar 20039
Qisheng 20060
Quasar 20035, 20162
Radix 20037
Randex 20037
RCA 20060, 20035, 20240, 20042,20 880
Realistic 20035, 20037, 2004 8, 20047,20104
ReplayTV 20616
Runco 20039
Sampo 20037, 20048
Samsung 20240, 20045, 20432
Sanky 20048, 20039
Sansui 20067, 20209, 20479
Sanyo 20047, 20240, 20104
Scott 20184, 20045, 2012 1, 20043
Sears 20035, 20037, 20047, 20042,20104
Sharp 20048, 20209
Shintom 20072
Shogun 20240
Singer 20072
Sonic Blue 20616
Sony 20035, 20032, 20033, 20 636,21972
STS 20042
Sylvania 20035, 20081, 20043
Systemax 21972
Tagar Systems 21972
Tashiko 20037
Tatung 20045, 20067
Technics 20035, 20162
Teco 2003 5, 20037, 20048, 20038
T e k ni k a 20035, 20037
Tivo 20636, 20618, 21503, 20739
TMK 20240
Toshiba 20045, 20042, 20067, 20043,21503,
Totevision 20037, 20240
Toucher 21972
Unitech 20240
Vecteur 20045
Vector Research 20038
Victor 20067
Video Concepts 20045
Videomagic 20037
Videosonic 20240
Viewsonic 21972
Wards 20060, 20035, 20048, 20047,20081,
White
Westinghouse
XR-1000 20035, 20072
Yamaha 20038
Zenith 20039, 20033, 2020 9, 20479
ZT Group 21972
21008, 21972
20240, 20042, 20072
20209, 20072
Codes de disque vidéo numérique
Aiwa 20641, 21912
Akai 20770
Allegro 20869
Apex Digital 20672, 20717, 20797, 21061,20796,
Blaupunkt 20717
Blue Parade 20571
Broksonic 20695
Changhong 20627, 21061
CineVision 20869
Coby 21086
Curtis Mathes 21087
CyberHome 21024, 21023, 21129, 20816, 21117
Daewoo 20833, 21172, 20869
Denon 20490
DVD2000 20521
Emerson 20591, 20675
Entreprise 20591
Fisher 21919
21056, 21937, 2 0794, 21020, 21915
www.insignia-products.com
41
Page 42

NS-27LCD.fm Page 42 Wednesday, June 28, 2006 12:04 PM
Téléviseur ACL de 27 po Insignia NS-27LCD
Funai 20675
Gateway 2000 21158, 21073
GE 20522, 20 71 7
Go Video 20744, 20833, 21099, 20783,21075,
20869, 21730
Greenhill 20717
Harman Kardon 20582, 20702
Hitachi 20573, 20664, 21919
Hiteker 20672
Initial 20717
Integra 20627, 21924
JBL 20702
JVC 20558, 20623, 20867
Kenwood 20490, 20534
KLH 20717, 21020, 21149
Koss 20651, 21980
Lasonic 20798
LG 20591, 20869, 20801
Liquid Video 21980
Lite-On 2115 8, 21 058
Loewe 20511
Magnavox 20503, 20539, 21976, 21914, 20675
Marantz 20539
Memorex 20695
Microsoft 20522
Mintek 20717
Mitsubishi 21521, 20521
Nesa 20717
Norcent 21003
Onkyo 20503, 20627, 21924, 20792
Oritron 20651, 21980
Panasonic 20490, 21762, 21990
Philips 20503, 20539, 20646, 21914
Pioneer 20525, 20571
Polaroid 21086, 21061
Polk Audio 20539
Portland 20770
Proscan 20522
Qwestar 20651
RCA 20522, 20571, 20717, 20822
Rio 20 869
Rotel 20623
Sampo 20752, 20698
Samsung 20490, 20573, 21932, 21075, 20820
Sansui 20695
Sanyo 20695
Sharp 20630, 20752
Sharper Image 21117
Sherwood 20770
Shinco 20717
Shinsonic 20533
Sonic Blue 20869, 21099
Sony 20533, 20864, 21033, 21904, 21903
SVA 20717
Sylvania 20675
Symphonic 20675
Teac 20717, 21984, 20809
Technics 20490
Theta Digital 20571
T o s hiba 20503, 20695
Urban Concepts 20503
Xbox 20522
Yamaha 20490, 20539, 20545
Zenith 20503, 20591, 20869
Codes du décodeur câble
ABC 00003, 00008, 000 14
Americast 00899
Bell & Howell 00014
Bell South 00899
Clearmaster 00883
ClearMax 00883
Coolmax 00883
Daeryung 01877, 00877, 00477, 0000 8
Digi 00637
Director 00476
Dumont 00637
Gehua 00476
General
Instrument
GoldStar 00144
Hamlin 00009, 00273
Hitachi 00014
Jerrold 00476, 00810, 00276, 00003,00012,
KNC 00008
LG 00144
Memorex 00000
Motorola 00476, 00810, 00276, 01254,01376
MultiVision 00012
Pace 01877, 00237
Panasonic 00000, 00008, 00107
Panther 00637
Paragon 00000
Philips 00317, 01305
Pioneer 01877, 00877, 00144, 00533
Pulsar 00000
Quasar 00000
RadioShack 00883
Regal 00279, 00273
Runco 00000
Samsung 00000, 00144
Scientific Atlanta 01877, 00877, 00477, 00008
Sony 01006
00476, 00810, 0 0276, 00003,00014
00014
42
www.insignia-products.com
Page 43

NS-27LCD.fm Page 43 Wednesday, June 28, 2006 12:04 PM
Téléviseur ACL de 27 po Insignia NS-27LCD
Starcom 00003, 00014
Supercable 00276
Supermax 00883
Tocom 00012
Torx 00 003
Toshiba 00000
Trans PX 00276
Tristar 00883
TS 00003
V2 00883
Viewmaster 00883
Vision 00883
Vortex View 00883
Zenith 00000, 00525, 00899
Avis juridiques
Déclaration de la FCC
Interférences radio-TV
Cet équipement a été testé et déclaré conforme
aux limitations prévues dans le cadre de la
catégorie B des dispositifs numériques, définies
par l’article 15 du règlement de la FCC. Ces
limites ont été établies pour fournir une
protection raisonnable contre les interférences
indésirables lors d’une installation résidentielle.
Cet équipement génère, utilise et diffuse des
ondes radio et, sil n'est pas installé et utilisé
conformément aux instructions dont il fait l'objet,
il peut provoquer des interférences indésirables
avec les communications radio. Cependant, il
n’est pas possible de garantir qu’aucune
interférence ne se produira dans une installation
particulière. Si cet équipement produit des
interférences importantes lors de réceptions
radio ou télévisées, qui peuvent être détectées
en éteignant puis en rallumant l'appareil,
essayer de corriger l'interférence au moyen de
l'une ou de plusieurs des mesures suivantes :
1 Réorienter ou déplacer l’antenne réceptrice.
2 Augmenter la distance entre l’équipement et
le récepteur.
3 Brancher l’équipement sur la prise électrique
d’un circuit différent de celui auquel le
récepteur est relié.
4 Conta cter le revendeur ou un technicien
radio/télévision qualif ié.
Cet appareil numérique de la classe B est
conforme à la norme NMB-003 du Canada.
Cet appareil numérique de la classe B est
conforme à la norme NMB-003 du Canada.
Avertissement
Cet appareil peut générer ou utiliser de l'énergie
radiofréquence. Les changements ou modifications apportés à
cet appareil peuvent donner lieu à des interférences nuisibles,
à moins que les modifications ne soient expressément
approuvées dans le manuel d'instruction. L'utilisateur pourrait
perdre le droit d’utiliser cet appareil s'il a subi un changement
ou une modification non autorisée.
Droits d'auteurs
© 2006 Insignia. Insignia et le logo Insignia sont des
marques de commerce de Best Buy Enterprise
Services, Inc. Les autres noms de marques et de
produits mentionnés sont des marques de commerce
ou des marques déposées de leurs propriétaires
respectifs. Les spécifications et caractéristiques sont
susceptibles d'être modifiées sans préavis.
www.insignia-products.com
43
Page 44
NS-27LCD.fm Page 44 Wednesday, June 28, 2006 12:04 PM
Televisor con Pantalla LCD de 27" Insignia NS-27LCD
Televisor con
Pantalla LCD de 27"
Insignia NS-27LCD
Contenido
Información de seguridad . . . . . . . . . . . . . . . . . .44
Características. . . . . . . . . . . . . . . . . . . . . . . . . . .46
Preparación de su TV . . . . . . . . . . . . . . . . . . . . .49
Uso de su TV . . . . . . . . . . . . . . . . . . . . . . . . . . . .54
Programación del control remoto. . . . . . . . . . . . .59
Mantenimiento . . . . . . . . . . . . . . . . . . . . . . . . . . .60
Localización y Corrección de Fallas. . . . . . . . . . .60
Especificaciones . . . . . . . . . . . . . . . . . . . . . . . . .61
Apéndice . . . . . . . . . . . . . . . . . . . . . . . . . . . . . . .61
Avisos legales . . . . . . . . . . . . . . . . . . . . . . . . . . .65
Información de seguridad
Advertencia
Para reducir el riesgo de choque eléctrico, no retire la cubierta
o la parte posterior. No hay partes reparables por el usuario en
el interior. Para realizar reparaciones, acuda al personal de
servicio calificado.
Para reducir el riesgo de incendio o choque eléctrico, no
exponga su TV a la lluvia o la humedad.
Cuidado
Para evitar un choque eléctrico , i ntroduzca la cla vija ancha del
enchufe del cable de alimentación en la ranura ancha de un
tomacorriente. Si el enchufe no entra, solicite a un electricista
calificado con licencia que cambie el tomacorriente obsoleto.
No modifique el enchufe del cable de alimentación ya que se
anulará esta característica de seguridad.
Este símbolo indica que voltaje peligroso que
puede constituir un riesgo de choque eléctr ico
se encuentra presente dentro de su televisor.
Esta etiqueta se encuentra ubicada en la parte
posterior de su televisor.
Este símbolo indic a que hay instrucciones
importantes de operación y mantenim iento en
la literatura que acompaña a su televisor.
Advertencia
Su televisor utiliza soldadura de estaño y plomo y una lámpara
fluorescente que contiene una pequeña cantidad de mercurio.
El deshecho de estos materiales pede ser regulado por
razones ambientales. Para obtener información sobre el
deshecho o reciclaje, póngase en contacto con sus
autoridades locales o la Alianza de Industrias Electrónicas en
el sitio web www.eia.org.
Lea las instrucciones
Lea todas las instrucciones de seguridad y
operación antes de usar su TV.
Guarde las instrucciones
Conserve las instrucciones de seguridad y
operación para referencia futura.
Siga las advertencias y las instrucciones
Preste atención a todas las adver te nc ias sobre
su TV y las instrucciones de operación. Siga
todas las instrucciones de operación y uso.
Agua y humedad
No use su TV cerca del agua. Por ejemplo, no lo
use cerca de una bañera, lavabo, fregadero de
cocina o lavadero, en un sótano mojado o cerca
de una piscina.
Limpieza
Desconecte su TV antes de limpiarlo. No use
limpiadores líquidos o en aerosol. Use
solamente un paño húmedo para limpiar el
exterior de su TV.
Ventilación
Las ranuras y aberturas en el gabinete y en la
parte posterior o en la base se proporcionan con
fines de ventilación, operación confiable y
protección contra sobrecalentamiento. Estas
aberturas no se deben bloquear ni cubrir. No
cubra las aberturas al colocar su TV en una
cama, sofá, alfombra, o cualquier otra superficie
parecida. No coloque su TV cerca o sobre un
radiador o calefactor. No coloque su TV en una
instalación integrada, tal cómo un librero o
estante, a menos que se provea una ventilación
adecuada o siga las instrucciones del fabricante.
Calor
Asegúrese de que su TV se encuentre alejado
de fuentes de calor tal cómo radiadores,
calefactores, estufas u otros productos
(incluyendo amplificadores) que produzcan
calor.
Conexión a tierra o polarización
No anule el propósito de seguridad del enchufe
con polarización o con conexión a tierra. Un
enchufe polarizado tiene dos espigas una más
ancha que la otra. Un enchufe del tipo de
conexión a tierra tiene dos espigas y una clavija
de tierra. La espiga ancha y la clavija de tierra se
proveen para su seguridad. Si el enchufe no
cabe, póngase en contacto con un electricista
para reemplazar el tomacorriente obsoleto.
Protección del cable de alimentación
Los cables de alimentación deben colocarse de
manera que no se pisen o sean aplastados por
artículos colocados sobre ellos o contra ellos.
Preste atención especial a los cables en los
enchufes, en los receptáculos auxiliares y en el
punto en el que salen de su TV.
Aditamentos
No use aditamentos que no hayan sido
recomendados por Insignia ya que podrían
causar peligros.
Soporte
No coloque su TV en un carro, base, trípode,
soporte o mesa inestable. Su TV se podría caer
y sufrir daños importantes, además de causar
serias lesiones personales. Usar solamente con
carros, bases, trípodes, soportes, o mesas
especificadas por el fabricante o que se vendan
con el televisor. Si monta su TV en la pared, siga
las instrucciones del fabricante y use un
accesorio de montaje recomendado por el
fabricante. La combinación del TV y un carro
debe moverse con cuidado. Las paradas
repentinas, la fuerza excesiva y las superficies
irregulares pueden causar que su TV y el carro
se volteen de lado.
44
www.insignia-products.com
Page 45

6
7
5
2
3
4
NS-27LCD.fm Page 45 Wednesday, June 28, 2006 12:04 PM
Televisor con Pantalla LCD de 27" Insignia NS-27LCD
Rayos
Para protección adicional del receptor de TV
durante una tormenta eléctr i c a, o cuand o se
deje sin supervisión o sin usar por largos
periodos de tiempo, desconéctelo del
tomacorriente y desconecte la antena o el
sistema de cable. Esto ayudará a evitar daños a
su TV debido a relámpagos o sobretensiones en
las líneas de alimentación.
Reparación
No trate de reparar este TV usted mismo, ya que
abrir o quitar las cubiertas puede exponerlo a
voltajes peligrosos u otros peligros. Encomiende
todas las reparaciones al personal de servicio
calificado.
Piezas de repuesto
Cuando se necesitan repuestos, asegúrese de
que el técnico de reparación use repuestos
especificados por el fabricante o que tengan las
mismas características que la pieza original. Las
substituciones no autorizadas pueden resultar
en incendio, choque eléctrico, lesiones
personales u otros peligros.
Sobrecarga
No sobrecargue los tomacorrientes y los cables
de extensión ya que esto resultará en riesgo de
incendio o choque eléctrico.
Ingreso de objetos y líquidos
Nunca inserte objetos de ningún tipo en su TV a
través de las ranuras, ya que estos pueden tocar
puntos de voltaje peligrosos o hacer
cortocircuito con otros componentes, lo cual
puede causar un incendio o choque eléctrico.
Nunca derrame líquidos de ninguna clase sobre
su televisor.
Daños que requieren reparación
Desconecte este TV del tomacorriente y
encomiende su reparación a personal calificado
bajo las siguientes condiciones:
• Cuando el cable de alimentación o el enchufe
se dañe o se pele.
• Si se ha derramado líquido u objetos han
caído dentro de su TV.
• Si el TV ha sido expuesto a la lluvia o al
agua.
• Si su TV no funciona normalmente aún
siguiendo las instrucciones de operación.
Ajuste únicamente los controles que están
cubiertos en las instrucciones de operación,
ya que el ajuste incorrecto de otros controles
puede resultar en daño y frecuentemente
requerirá trabajo intensivo de un técnico
calificado para restaurar la operación normal
del TV.
• Si su TV se ha caído o dañado de cualquier
forma.
• Cuando su TV exhiba un cambio significativo
en el rendimiento.
Piezas de repuesto
Cuando se necesitan repuestos, asegúrese de
que el técnico de reparación use repuestos
especificados por el fabricante o que tengan las
mismas características que la pieza original. Las
substituciones no autorizadas pueden resultar
en incendio, choque eléctrico, lesiones
personales u otros peligros.
Verificación de segur idad
Después de comp letar la revisión o reparación
de este TV, pídale al técnico de servicio que
realice verificaciones de seguridad para
determinar que el TV se encuentra en perfecto
estado de funcionamiento.
Fuente de alimentación
Su TV debe funcionar únicamente con el tipo de
fuente de alimentación indicada en la etiqueta
de marca. Si no esta seguro del tipo de fuente
de alimentación que hay en su casa, consulte
con el vendedor de su TV o la compañía de
energía local.
Rayos
Para protección adicional del receptor de TV
durante una tormenta eléctrica, o cuando se
deje sin supervisión o sin usar por largos
periodos de tiempo, desconéctelo del
tomacorriente y desconecte la antena o el
sistema de cable. Esto ayudará a evitar daños a
su TV debido a relámpagos o sobretensiones en
las líneas de alimentación.
Protección de la pantalla
La pantalla de su TV está hecha de vidrio. No
deje caer su TV o golpee la pantalla de vidrio. Si
la pantalla se quiebra, tenga cuidado al recoger
el vidrio.
Defecto de píxel
La pantalla de su TV está diseñada para mostrar
imágenes finamente detalladas.
Ocasionalmente unos cuantos píxeles inactivos
pueden aparecer en la pantalla como puntos
fijos de color azul, verde o rojo. Este no es un
defecto y no afecta el rendimiento de su TV.
Conexión a tierra de la antena exterior
Sí una antena externa o un sistema de cable
esta conectado al TV, asegúrese de que la
antena o el sistema de cable esta conectado a
tierra, para proveer una protección contra sobre
voltajes y la acumulación de cargas estáticas. El
artículo 810 del código nacional eléctrico,
ANSI/NFPA No. 70-1984 proporciona
información con respecto a la correcta conexión
a tierra del poste y la estructura de soporte, la
conexión a tierra del alambre principal de una
unidad de descarga de antena, el tamaño de los
conductores de la conexión a tierra, la ubicación
de la unidad de descarga de antena, la conexión
a los electrodos de conexión a tierra y los
requisitos para el electrodo de conexión a tierra.
1
1 Equipo de se rvicio eléctrico
2 Sistemas de electrodos de tierra para el
servicio d e alimentación eléct rica
www.insignia-products.com
45
Page 46

NS-27LCD.fm Page 46 Wednesday, June 28, 2006 12:04 PM
Televisor con Pantalla LCD de 27" Insignia NS-27LCD
3 Abrazaderas de tierra
4 Conductores de conexión a tierra
5 Unidad de descarga de antena
6 Abrazadera de tierra
7 Cable conductor de entrada de antena
Nota para el instalador del sistema CATV
Este recordatorio se proporciona para que el
instalador del sistema CATV preste atención al
Artículo 820-40 del NEC el cual proporciona
pautas para una correcta conexión a tierra y, en
particular, especifica que la conexión a tierra del
cable debe estar conectada al sistema de tierra
de la edificación, tan cerca al punto de entrada
del cable como sea práctico.
Características
Vista Frontal
Lado
Control Descripción
1 CANAL+/CANAL– Permiten cambiar el canal.
En el sistema de menú de pantalla,
permiten seleccionar los menús y las
opciones.
Control Descripción
1 Indicador de
encendido
2 Sensor del control
remoto
Se ilumina cuando su TV está
encendido.
Recibe las señales del co ntrol
remoto.
2 VOLUMEN+/VOLU
MEN–
3 MENÚ Permite mostrar el sistema de menú de
4 ENTRADA Permite seleccionar la entrada de
5 Encendido Permite encender o apagar su TV.
Permiten subir o bajar el volumen.
En el sistema de menú de pantalla,
permiten ajustar un control o cambiar
un valor.
pantalla.
video.
46
www.insignia-products.com
Page 47

a
s
NS-27LCD.fm Page 47 Wednesday, June 28, 2006 12:04 PM
Televisor con Pantalla LCD de 27" Insignia NS-27LCD
Conectores posteriores
Remueva la
cubierta de
los
conectores
Remueva
la cubiert
de los
conectore
Conector
1S/PDIF
2HDMI
3 Entrada D-SUB AUDIO
4 Entrada D-SU B PIC (video)
5 ENTRADA DE COMPONENTE Y
6 ENTRADA DE COMPONENTE Cb/Pb
7 ENTRADA DE COMPONENTE Cr/Pr
8 ENTRADA DE COMPONENTE DE
AUDIO DERECHO
9 ENTRADA DE COMPONENTE DE
AUDIO IZQUIERDO
10 RF (entr a da de antena)
11 S-VIDEO
12 VIDEO DE LA ENTRADA AV
13 AUDIO IZQUIERDO DE LA ENTRADA
AV
14 AUDIO DERECHO DE LA ENTRADA AV
15 AURICULARES
16 AUDIO DERECHO DE LA SALIDA AV
17 AUDIO IZQUIERDO DE LA SALIDA AV
18 VIDEO DE LA SALIDA AV
19 Interfaz de control RS232
www.insignia-products.com
47
Page 48

NS-27LCD.fm Page 48 Wednesday, June 28, 2006 12:04 PM
Televisor con Pantalla LCD de 27" Insignia NS-27LCD
Control remoto
Nota
Este control remoto es universal. Si pareciera que el control
remoto no funciona con su televisor, presione el botón TV.
Nota
Para obtener instrucciones acerca de la programación del
control remoto, refiérase a Programación del control remoto”
en la página 59.
1
2
3
4
5
6
7
8
9
10
11
12
13
14
15
MTS/SAP ZOOM CCD SLEEP
LIST FAVORITE AUDIO
PIP
P.POSITION
PICTURE
SWAP FREEZE
Botón Descripción
1 CONFIGURAR Presione para programar el
2 Botones de
dispositivos
control remoto. Para obtener más
información, vea “Prog r amación
del control remoto” en la
página59.
TV – Permite selecci onar el TV.
DVD – Permite seleccionar un
reproductor de DV D conectado.
CBL – Permite seleccionar TV por
cable o satélite.
AUX – Permite seleccion ar el
dispositivo asignado a este botón.
16
17
18
19
20
21
22
23
24
25
26
27
28
29
30
Botón Descripción
3 Botones
numéricos
4 ENTRADA Permite seleccionar la entrada de
5 Permite ir al último canal visto.
6 + CANAL – Permite cambiar los canales d e
7 SILENCIAR Permite silenciar el sonido.
8 MENÚ Permite mostrar el sistema de
9
10
11 Permite comenzar a grabar en un
12 Perm ite avanzar rápidamente en
13
14 MTS/SAP Per mite seleccionar uno de los
15 ZOOM Permite seleccionar la relación de
16 Permi te enc ender su TV o po nerlo
17 Indicador LED Se ilumina cuando se programa el
18 — Permite seleccionar un sub-canal.
19 + VOL – Permite ajustar el volumen.
20 INFO Permite mostrar información de
21 SALIR Permite cerrar el si stema de
22 Permi te comenz ar a rep roducir un
23 Permite dejar de reproducir un
ACEPTAR
Permiten ingresar los números de
canal.
En el sistema de menú de
pantalla, le permiten ingresar la
contraseña del control de los
padres.
video.
TV.
menú de pantalla.
Las flechas permiten moverse
hacia abajo, arriba, izquierda o
derecha en el sistema de menú.
Presione el botón OK (Aceptar)
para confirmar los cambios o
para activar o desactivar opciones
en el sistema de menú de
pantalla.
Cuando se reproduce un DVD,
presione para congelar la imagen
en la pantalla. Presione el botón
nuevamente para descongelar la
imagen.
dispositivo conectado, tal cómo
un VCR.
un DVD o CD si un reproductor de
DVD o de CD está conectado.
Permite saltar hacia el capítulo
anterior en un DVD o a la pist a
anterior en un CD si un
reproductor de DVD o CD está
conectado.
modos de audio predefinidos.
Puede seleccionar entre MONO,
STEREO (Estéreo) y SAP.
aspecto.
en el modo Standby.
control remoto. Para obtener más
información, vea “Programación
del control remoto” en la
página 59.
Para obtener más información,
vea “Selección de un sub-canal
digital” en la pági na33.
estado.
menú de pantalla.
DVD o CD si un reproductor de
DVD o de CD está conectado.
DVD o CD si un reproductor de
DVD o de CD está conectado.
48
www.insignia-products.com
Page 49

NS-27LCD.fm Page 49 Wednesday, June 28, 2006 12:04 PM
Televisor con Pantalla LCD de 27" Insignia NS-27LCD
Botón Descripción
24 Permite avanzar rápidamente en
25
26 APAGADO
AUTOMÁTICO
27 CCD Permite activar o desactivar los
28 IMAGEN Permite seleccionar el modo de
29 CONGELAR Permite co ngelar la imagen de
30 AUDIO Presione para seleccionar el
un DVD o CD si un reproductor de
DVD o de CD está conectado.
Permite saltar hacia el siguiente
capítulo en un DVD o la siguiente
pista en un CD si un repr oductor
de DVD o de CD está conectado .
Permite configurar el
temporizador de apagado
automático. Para obtener más
información, vea “Ajust e del
temporizador de apagado
automático” en la página 56.
subtítulos optativo s. Pa ra ob tener
más información, vea
“Visualización de subtítulos
optativos” en la página 5 6.
imagen.
video. Presione el botón
nuevamente para descongelar la
imagen. No congele la imagen de
video por periodos de tiempo
extendidos. Esto pued e dañar la
pantalla de TV.
modo de sonido.
Uso del control remoto
Preparación de su TV
Instalación de las pilas del control remoto
Para instalar las pilas del control remoto:
1 Extraiga la cubierta de la pilas.
2 Inserte dos pilas AA en el compartimiento de
pilas. Verifique que los símbolos + y – en las
pilas correspondan con los símbolos + y – en
el compartimiento de las pilas.
Para usar el control remoto:
• Apunte el control remoto al sensor de control
remoto en el panel frontal de su TV.
La siguiente figura muestra el rango del control
remoto.
60°
16.4 pie
s (5 m)
Notas
• No exponga el control remoto a choques o líquidos.
• No use el control remoto en un área con alta humedad.
• No coloque el control remoto bajo la luz solar directa.
• No coloque objetos, tales cómo muebles, entre el control
remoto y el sensor del control remoto.
• Puede ser que el control remoto no funcione si luz solar
directa o luz fuerte brille sobre el sensor del control remoto.
Mueva su TV o cambie el ángulo en que usa el control
remoto.
30
0
0
30
MTS/SAP ZOOM CCD SLEEP
AUDIO
PICTURE
FREEZE
3 Vuelva a colocar la cubierta.
Notas
• No combine pilas de tipos diferentes.
• No combine pilas viejas y nuevas.
• Extraiga las pilas cuando se les acabe la carga.
• Los químicos de las pilas pueden causar sarpullido. Si las
pilas se derraman, limpie el compartimiento de pilas con un
paño. Si los químicos tocan su piel, lávese inmediatamente.
• Remueva las pilas si el control remoto no se va a usar por
un período de tiempo extendido.
www.insignia-products.com
49
Page 50
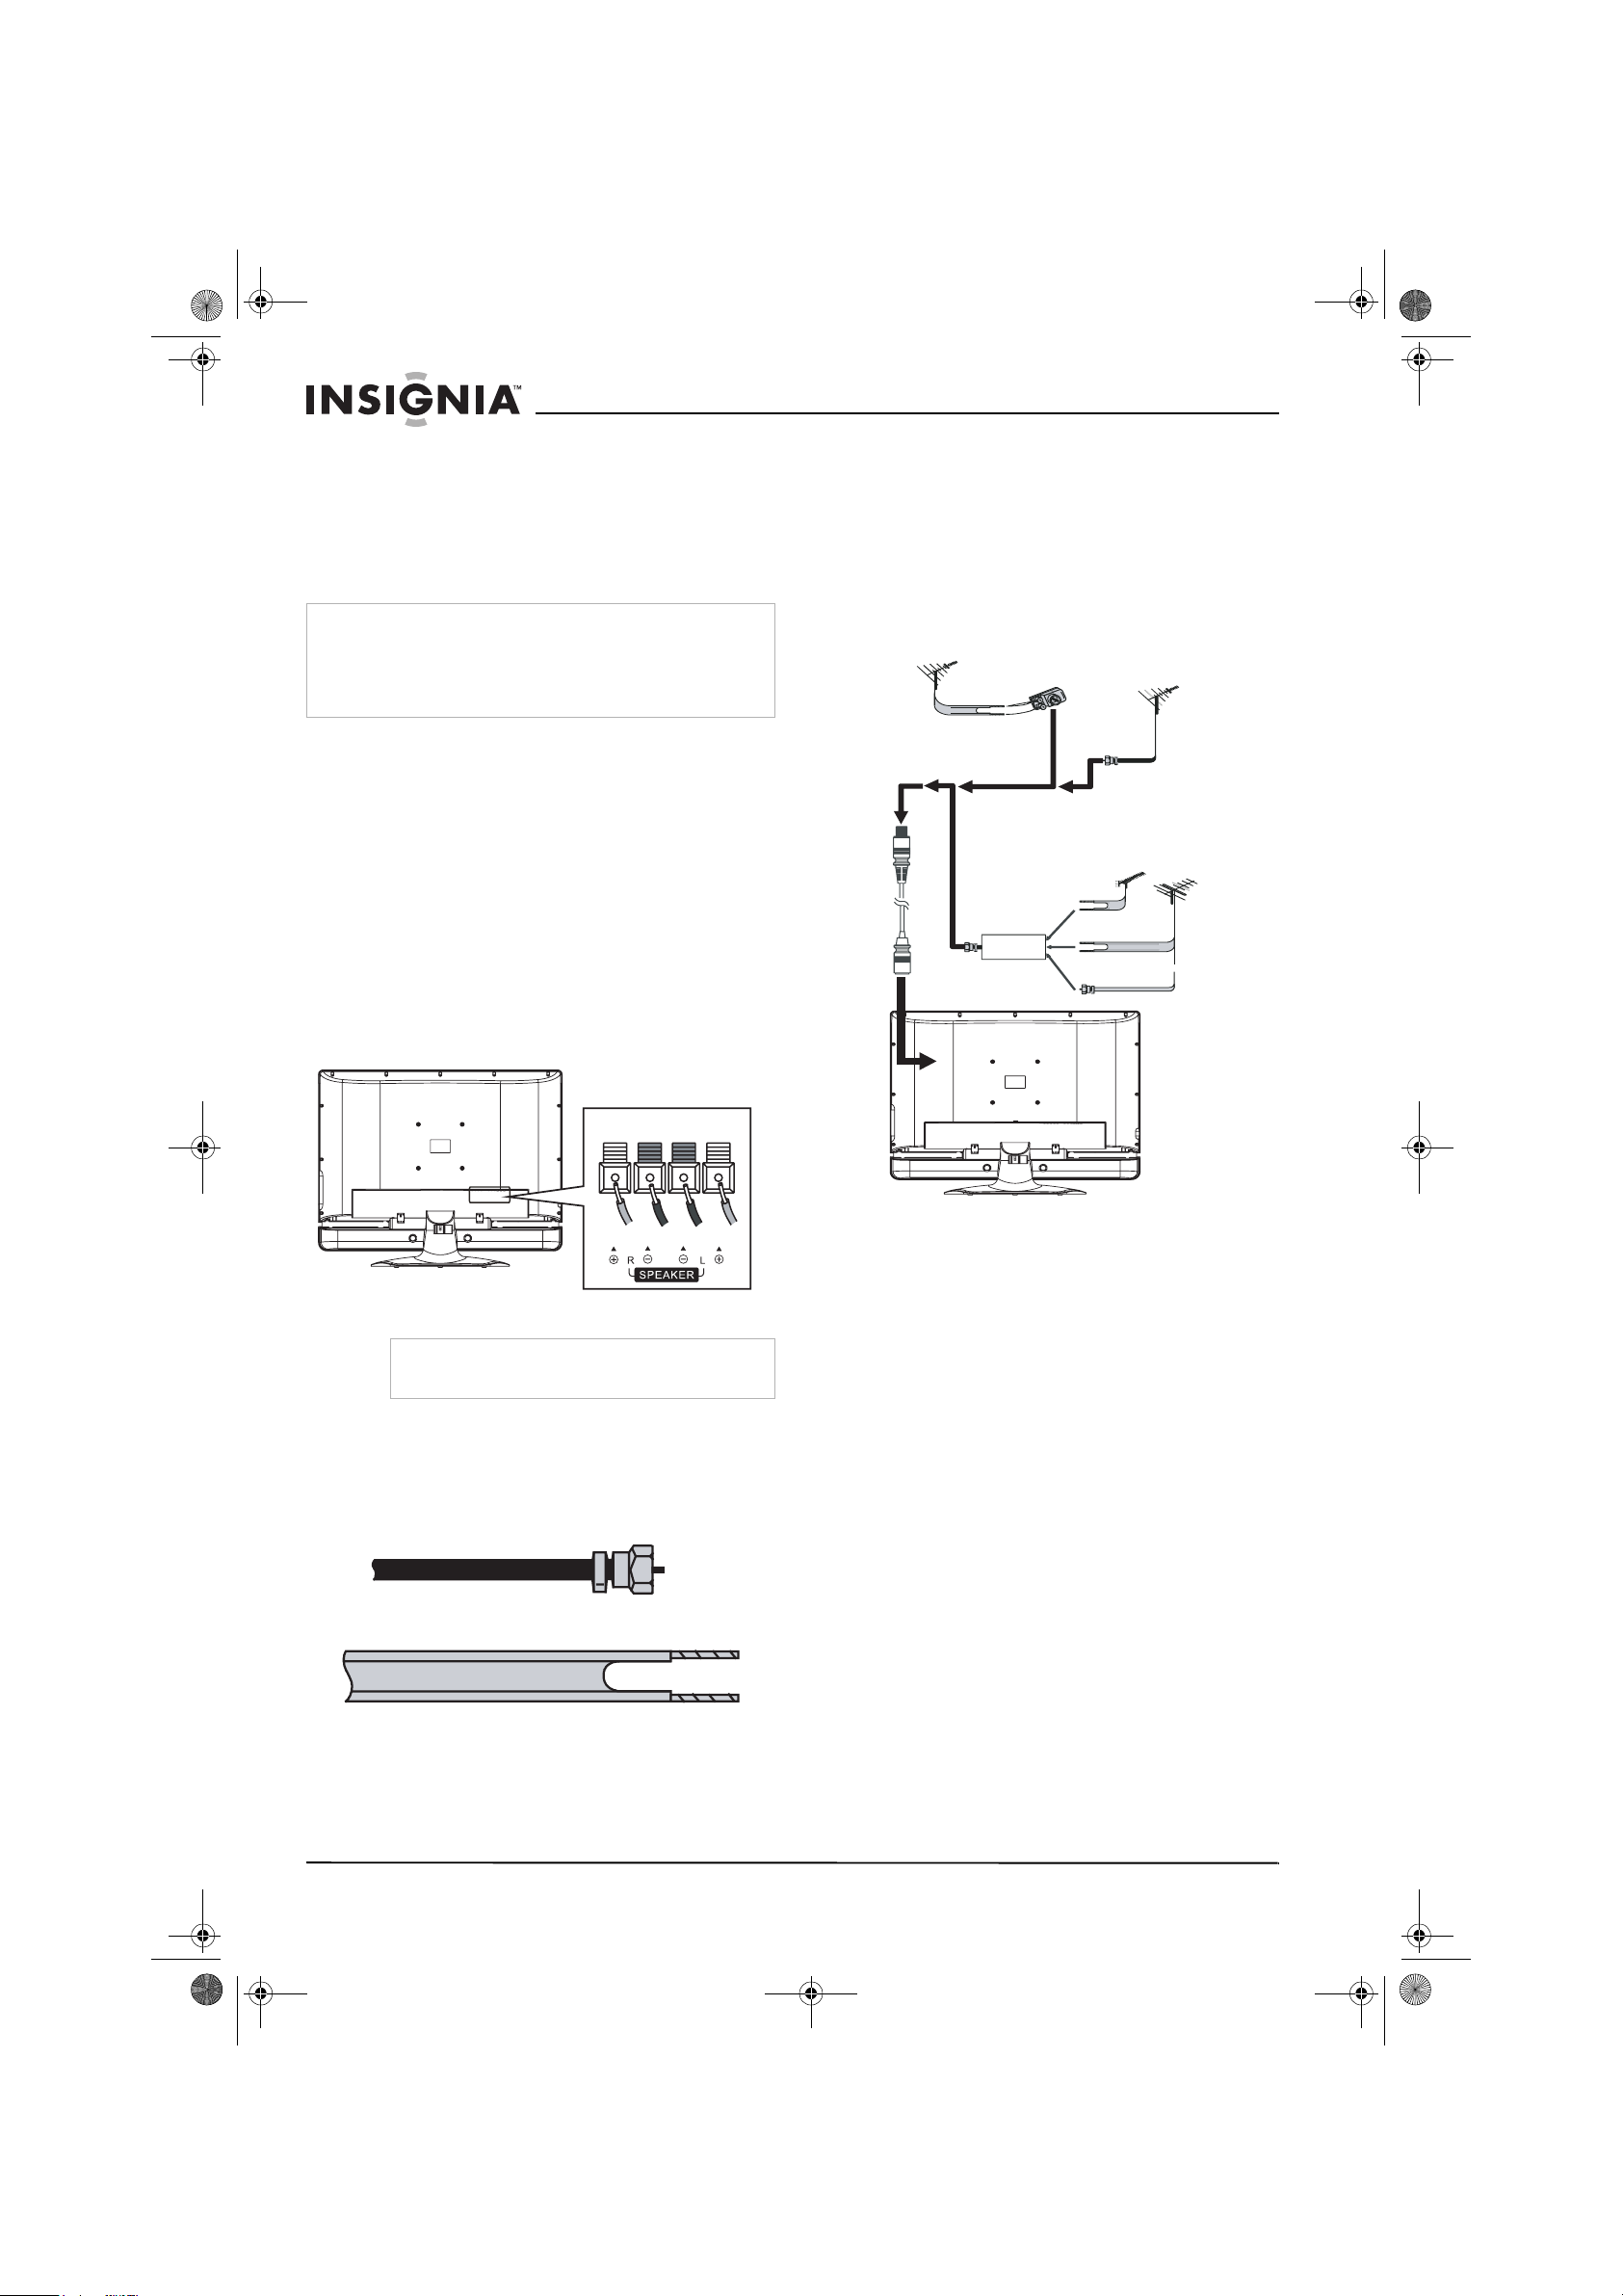
e
NS-27LCD.fm Page 50 Wednesday, June 28, 2006 12:04 PM
Televisor con Pantalla LCD de 27" Insignia NS-27LCD
Conexión de su TV a un tomacorriente
eléctrico
Para conectar su TV a un tomacorriente
eléctrico:
• Enchufe el cable de alimentación en un
tomacorriente eléctrico.
Notas
• Verifique que se está usando el tipo de alimentación
correcta. Refiérase a la etiqueta en su TV.
• Si no piensa usar su TV por un período de tiempo
extendido, desenchufe el cable de alimentación del
tomacorriente eléctrico.
Conexión de altavoces
Para conectar altavoces a su TV:
1 Desconecte el cable de alimentación del TV
y todos los dispositivos que estén
conectados a su TV.
2 Conecte los altavoces a los conectores de
altavoces en la parte posterior de su TV.
Verifique que conecte la parte negra del
cable de altavoz en el conector – y la parte
roja en el conector + en la parte posterior de
su TV.
Si su cable de antena tiene un conector de
300 ohmios, conéctelo a un adaptador de
300-75 ohmios (no incluido), conecte el
adaptador a un cable de 75 ohmios, luego
conecte el otro extremo del conector de
75 ohmios al toma coaxial en la parte posterior
de su TV.
Refiérase a la siguiente figura para conectar una
antena exterior.
Antena combinada
ENTRADA
O
Cable de 75
ohmios
Antena de
UHF
Antenas separadas
O
Antena de
VHF/UHF
Cable de 300 ohmios
con adaptador
Cable de la
antena
Antena de
VHF/UHF
Combinador
SALIDA
Antena d
VHF
Rojo
Negro
Altavoz
derecho
Nota
La ubicación de los conectores de altavoces en su
TV puede ser distinta al de la figura.
Conexión de una antena externa
Hay dos tipos de cables de antena: 75 ohmios y
300 ohmios.
Cable de 75 ohmios
Cable de 300 ohmios
Negr Rojo
Altavoz
izquierdo
Conexión de TV por cable
Su TV tiene un conector de 75 ohmios para
conectar TV por cable.
Algunos proveedores de TV por cable codifican
las señales de los canales de pago especial.
Para ver estos canales necesita una caja
convertidora/decodificadora.
Si no tiene una caja
convertidora/decodificadora, puede conectar su
TV por cable directamente a su TV. Si tiene una
caja convertidora/decodificadora, puede
conectar su TV por cable usando un interruptor
de RF (no suministrado). Para obtener más
información sobre como conectar una caja
convertidora/decodificadora, póngase en
contacto con su proveedor de TV por cable.
Para conectar TV por cable sin usar una caja
convertidora/decodificadora:
1 Conect e un extremo de un cable de
75 ohmios al toma coaxial situado en la parte
posterior de su TV.
2 Conecte el otro extremo del cable al toma de
pared de TV por cable.
Si su cable de antena tiene un conector de
75 ohmios, conéctelo al conector coaxial en la
parte posterior de su TV.
50
www.insignia-products.com
Page 51

NS-27LCD.fm Page 51 Wednesday, June 28, 2006 12:04 PM
Televisor con Pantalla LCD de 27" Insignia NS-27LCD
Para conectar TV por cable con una caja
convertidora/decodificadora:
• Refiérase a la siguiente figura para conectar
una caja convertidora/decodificadora. (El
conmutador de RF y el divisor de señal no se
suministran.)
Mueva el conmutador de RF a la posición A
para ver los canales sin codificación usando
el control remoto de su TV . Mueva el
conmutador de RF a la posición B para ver
los canales codificados usando el control de
la caja convertidora/decodificadora.
Conmutador de RF
A
B
Salida
Caja convertidora/decodificadora
de TV por cable
Divisor de señal de
dos equipos
Entrada
Conexión a un sistema de sonido
Refiérase a la siguiente figura para conectar un
procesador de audio o un sistema de alta
fidelidad (Hi-Fi).
Advertencia
Verifique que apague y desconecte su TV antes de instalar
dispositivos.
Conexión de un VCR
Puede conectar un VCR con un cable de
audio/video estándar o con un cable de S-Video.
El cable de S-Video no incluye el sonido. Si usa
un cable de S-Video, necesitará usar un cable
de audio para conectar el sonido.
Nota
Para obtener el mejor video, use el conector de S-Video si su
VCR tiene una conexión de S-Video.
Advertencia
Verifique que apague y desconecte su TV antes de instalar
dispositivos.
Refiérase a la siguiente figura para conectar un
VCR.
TV
Y=amarillo (video)
W=blanco (audio izquierdo)
R=rojo (audio derecho)
Cable de
S-Video
O
Cable de video
Cable de
Y
R
W
Nota
En el caso de sistema de teatro en casa, use un cable S/PDIF
para obtener la capacidad completa del sonido.
Cable S/PDIF
Conector de
ENTRADA
Procesador de
audio
Sistema de alta
fidelidad
VIDEO L- AUDIO - R
VIDEO L- AUDIO - R
VCR
S-VIDEOANT OUT ANT IN
Para reproducir el VCR:
1 Encienda su TV.
2 Presione el botón INPUT (Entrada) una o
más veces para seleccionar Composite1
[Compuesto 1] (o S-Video si conectó el VCR
al conector S-Video).
3 Encienda su VCR.
4 Inserte una cinta de video, luego presione el
botón PLAY (Reproducir).
Conexión de un VCR (para grabar)
Advertencia
Verifique que apague y desconecte su TV antes de instalar
dispositivos.
www.insignia-products.com
51
Page 52

)
NS-27LCD.fm Page 52 Wednesday, June 28, 2006 12:04 PM
Televisor con Pantalla LCD de 27" Insignia NS-27LCD
Refiérase a la siguiente figura para conectar un
VCR para grabar programas de TV.
TV
Cable de video
Y
VIDEO L- AUDIO - R
VIDEO L- AUDIO - R
Y=amarillo (video)
W=blanco (audio izquierdo)
R=rojo (audio derecho)
Cable de audio
R
W
S-VIDEOANT OUT ANT IN
Conexión de una cámara de video
Advertencia
Verifique que apague y desconecte su TV antes de instalar
dispositivos.
Refiérase a la siguiente figura para conectar una
cámara de video a su TV.
Para conectar una cámara de video:
1 Conecte el cable de audio/video en los
conectores AUDIO L (Audio Izquierdo),
AUDIO R (Audio Derecho), y VIDEO en la
parte posterior de su TV.
2 Conecte el otro extremo del cable de
audio/video en los conectores de salida de
audio y video de la cámara de video.
TV
Y=amarillo (video)
W=blanco (audio izquierdo
R=rojo (audio derecho)
Cable de video
Cable de audio
VCR
Para grabar un programa:
1 Encienda su TV.
2 Seleccione el programa que desea grabar.
3 Encienda el VCR.
4 Inserte una cinta de video, luego presione el
botón de grabar en el VCR.
Conexión de un amplificador
Refiérase a la siguiente figura para conectar un
amplificador externo.
TV
Cable de audio
R
W=blanco (audio izquierdo)
R=rojo (audio derecho)
Y
SALIDA ENTRA
VIDEO L- AUDIO - R
Cámara de video
R
W
Para reproducir desde la cámara de video:
1 Encienda su TV.
2 Presione el botón INPUT (Entrada) una o
más veces para seleccionar Composite2
(Compuesto 2).
W
3 Encienda la cámara de video y colóquela en
el modo de salida. Refiérase a los
documentos de la cámara de video para
obtener más información.
4 Inserte una cinta en la cámara de video y
presione el botón de reproducir.
52
Amplificador
www.insignia-products.com
Page 53

NS-27LCD.fm Page 53 Wednesday, June 28, 2006 12:04 PM
Televisor con Pantalla LCD de 27" Insignia NS-27LCD
Conexión de un reproductor de DVD
Advertencia
Verifique que apague y desconecte su TV antes de instalar
dispositivos.
Refiérase a la siguiente figura para conectar un
reproductor de DVD a su TV.
Para conectar un reproductor de DVD:
• Conecte el cable HDMI en el conector
HDMI en la parte posterior de su TV y al
conector de salida HDMI en la parte
posterior del reproductor de DVD.
TV
Salida
HDMI
Conexión de un receptor de DTV
Advertencia
Verifique que apague y desconecte su TV antes de instalar
dispositivos.
TV
Cable de video
G
COMPONENT
L - AUDIO - R VIDEO
AV OUT
G=verde (Y)
W=blanco (audio
izquierdo)
R=rojo (audio derecho,
Cr.Pr)
Cable de
audio
W
S-VIDEO
RBR
AUDIO
L - AUDIO - R
ANT IN
DVI
Reproductor de DVD
Nota
Si el reproductor de DVD sólo tiene una salida DVI, use un
cable adaptador de DVI a HDMI (no suministrado) para
conectar el reproductor de DVD al conector HDMI en la parte
posterior de su televisor. Luego conecte el cable de audio al
conector D-SUB AUDIO IN (Entrada de Audio D-SUB) en la
parte posterior de su televisor.
Para reproducir un DVD:
1 Encienda su TV.
2 Presione el botón INPUT (Entrada) una o
más veces para seleccionar HDMI.
3 Encienda el reproductor de DVD.
4 Inserte un DVD, luego presione el botón de
reproducir.
Receptor de DTV
Para ver su DTV:
1 Encienda su TV.
2 Presione el botón INPUT (Entrada) una o
más veces para seleccionar Component1
(Componente 1).
3 Encienda su receptor de DTV.
www.insignia-products.com
53
Page 54
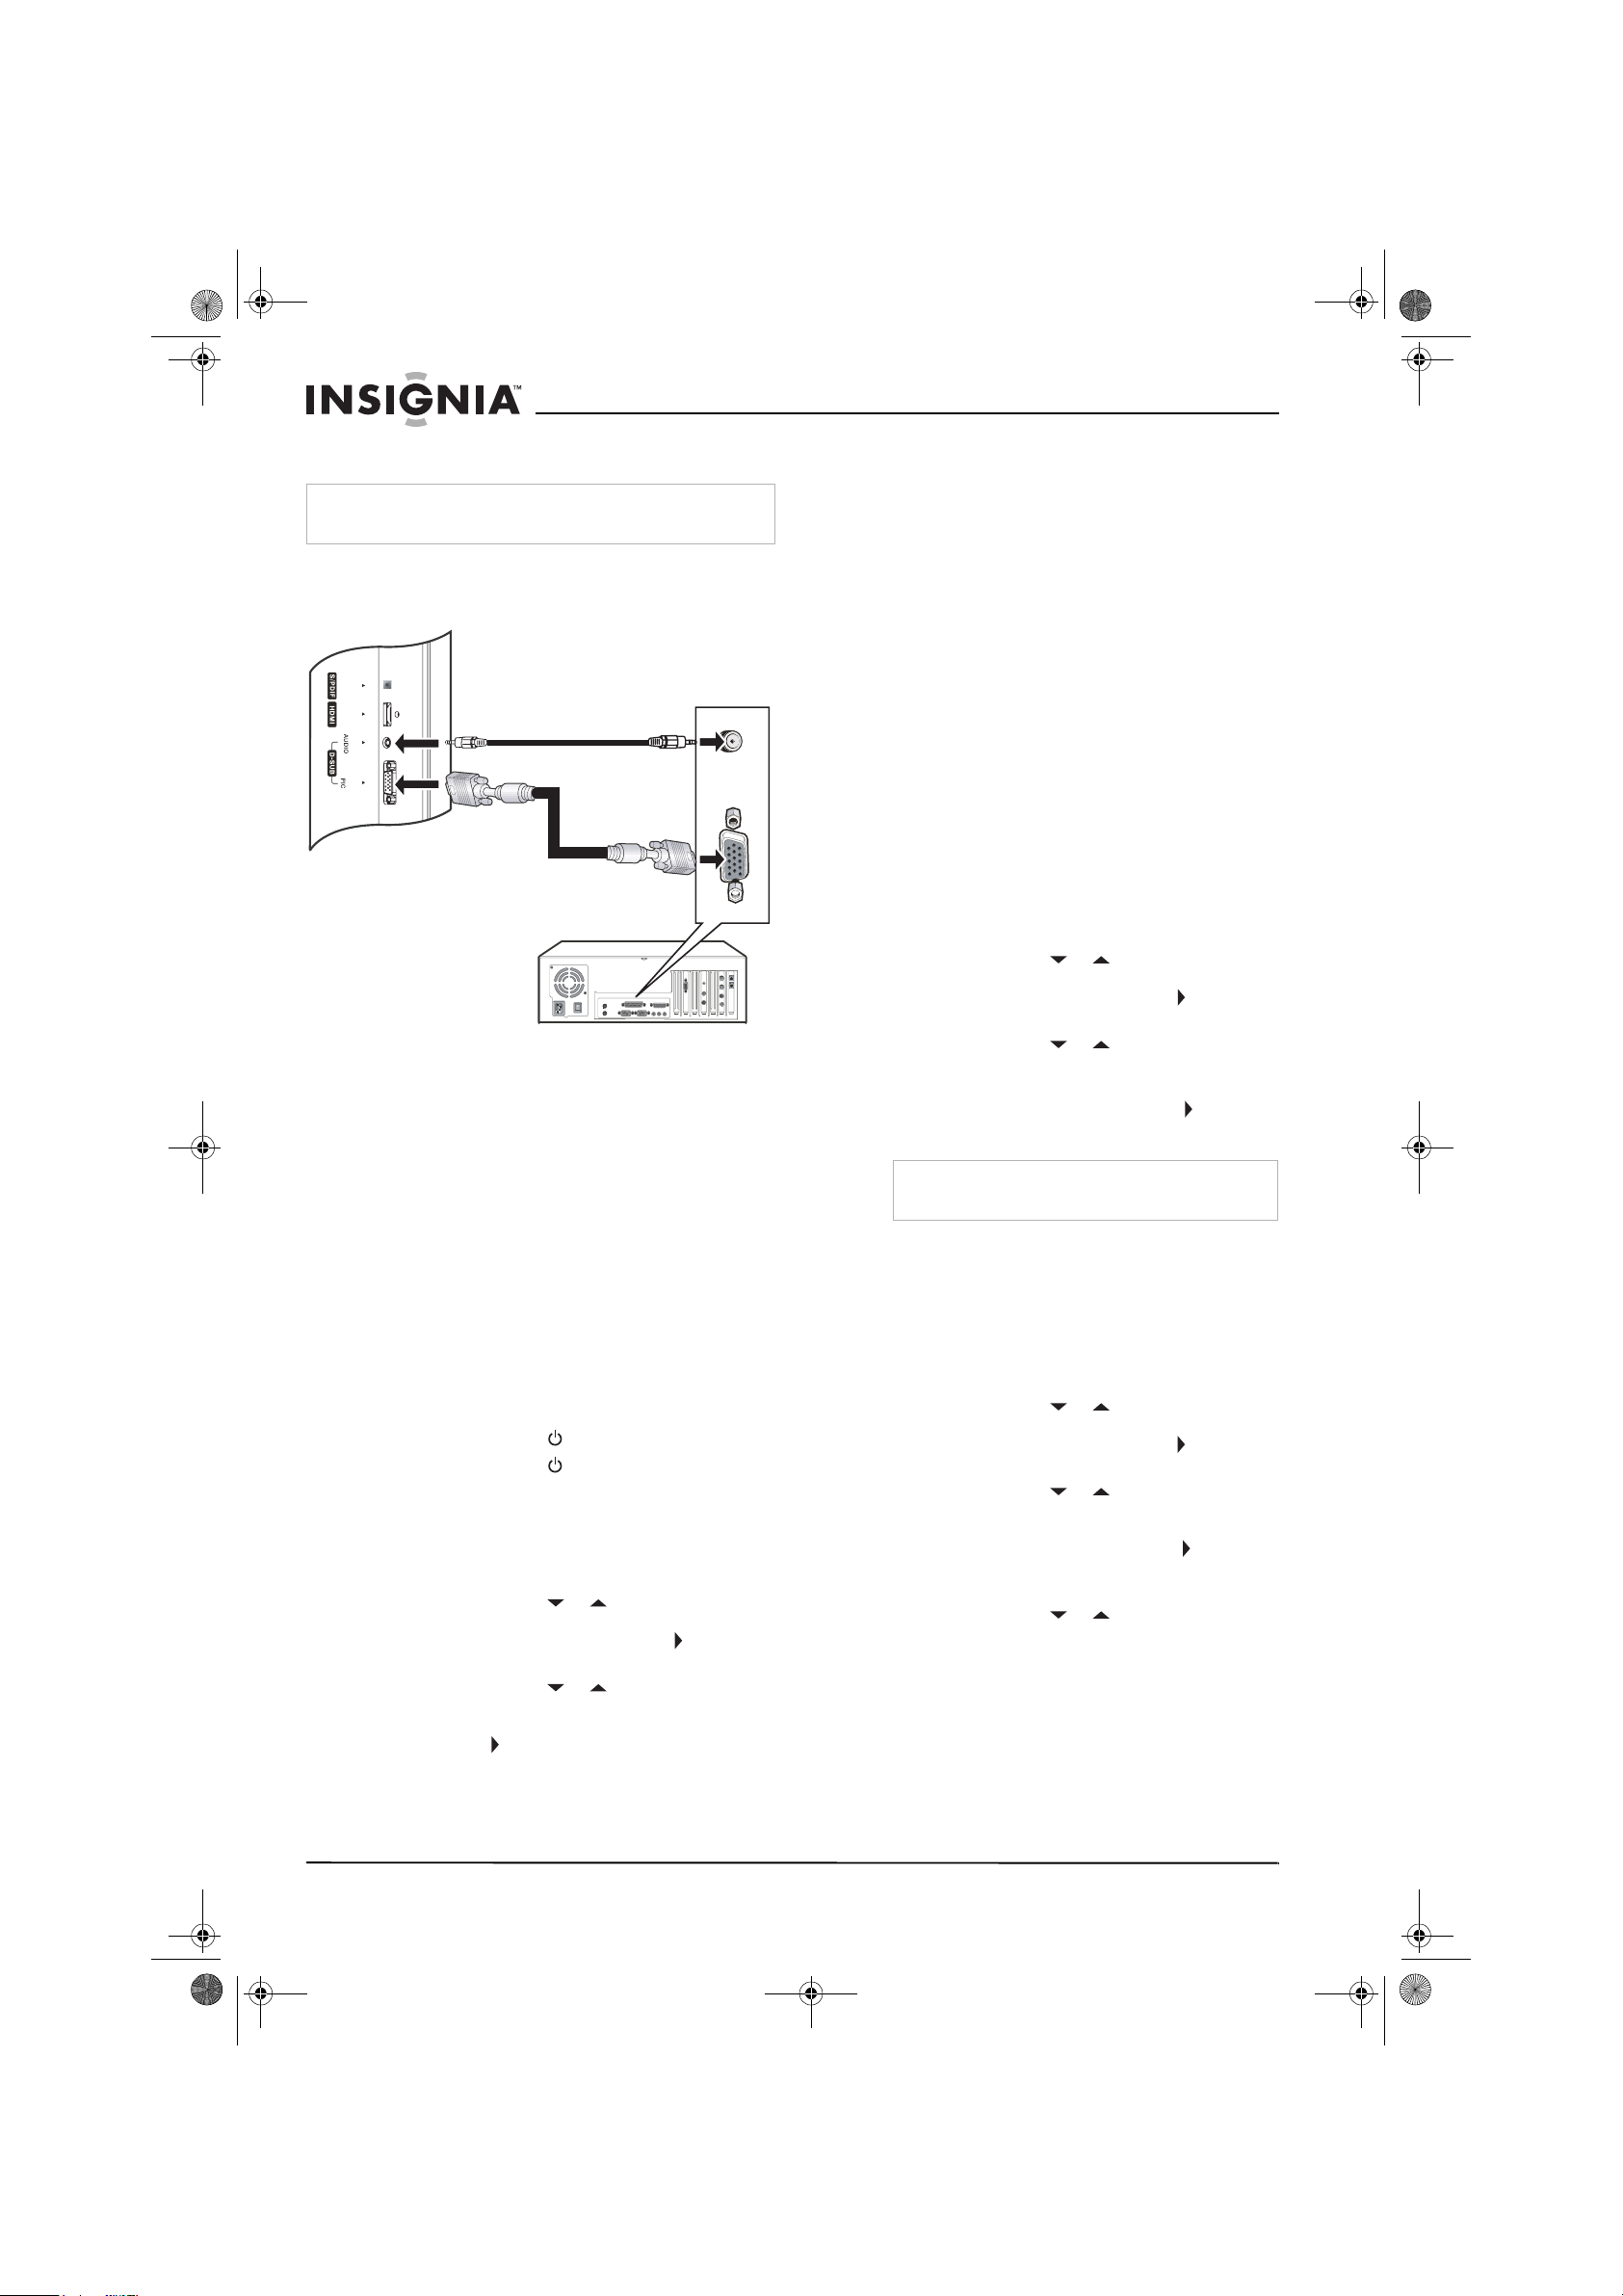
NS-27LCD.fm Page 54 Wednesday, June 28, 2006 12:04 PM
Televisor con Pantalla LCD de 27" Insignia NS-27LCD
Conexión de una computadora
Advertencia
Verifique que apague y desconecte su TV antes de instalar
dispositivos.
Refiérase a la siguiente figura para conectar una
computadora a su TV.
TV
Cable de audio
Cable D-SUB
Computadora
Para ver TV en su monitor de computadora:
1 Encienda su TV.
2 Presione el botón INPUT (Entrada) una o
más veces para seleccionar VGA.
3 Encienda su computadora, luego configure
su computadora para una entrada de VGA
externa. Refiérase a los documentos de su
computadora para obtener más información.
Uso de su TV
Cómo encender y apagar el TV
Para encender su TV:
1 Verifique que el cable de alimentación está
conectado a su TV y a un tomacorriente
eléctrico.
2 Presione el botón para encender su TV.
3 Presione el botón de nuevo para apagar
su TV.
Selección de la fuente de la señal de TV
Para seleccionar la fuente de señal de TV:
1 Presione el botón MENU (Menú).
2 Presione el botón o una o más veces
para resaltar Setup (Configuración), luego
presione el botón OK (Aceptar) o para abrir
el menú de co nfiguración.
3 Presione el botón o una o más veces
para resaltar Tuning Band (Banda de
Sintonización), luego presione el botón OK
(Aceptar) o para acceder a las opciones de
la banda de sintonización.
4 Seleccione Air (Aire) para una antena
exterior. Seleccione Cable, Cable HRC,
Cable IRC, o Cable Auto para TV por cable.
Le recomendamos que seleccione Cable
Auto para TV por cable. Para obtener más
información sobre las selecciones de TV por
cable, póngase en contacto con su
proveedor de TV por cable.
5 Presione el botón EXIT (Salir) para cerrar el
sistema de menú de pantalla.
Configuración de la lista de canales
Después de seleccionar su fuente de señal de
TV (antena o cable), necesitará configurar la
lista de canales. Cuando configure la lista de
canales, su TV buscará todos los canales
disponibles en su área y guardará una lista de
los canales. Cuando presione el botón
CH – o +, su TV se salta los canales que no
tienen señal.
Configuración automática de canales
Para configurar automáticamente la lista de
canales:
1 Presione el botón MENU (Menú).
2 Presione el botón o una o más veces
para resaltar Setup (Configuración), luego
presione el botón OK (Aceptar) o para abrir
el menú de configuración.
3 Presione el botón o una o más veces
para resaltar Auto Ch Search (Búsqueda
Automática de Canales).
4 Presione el botón OK (Aceptar) o para
comenzar la búsqueda.
Nota
Puede presionar el botón Exit (Salir) para detener
la búsqueda.
Agregando o eliminando canales
manualmente de la lista de canales
Después de crear una lista de canales usando la
opción “Auto Ch Search”, puede agregar o
eliminar canales de la lista de canales.
Para agregar o borrar canales:
1 Presione el botón MENU (Menú).
2 Presione el botón o una o más veces
para resaltar Setup (Configuración), luego
presione el botón OK (Aceptar) o para abrir
el menú de configuración.
3 Presione el botón o una o más veces
para resaltar Manual Ch Set
(Establecimiento Manual de Canales), luego
presione el botón OK (Aceptar) o para
acceder a las opciones del establecimiento
manual de canales.
4 Presione el botón o para seleccionar
un canal y luego presione el botón OK
(Aceptar) para agregar o eliminar un canal.
5 Presione el botón EXIT (Salir) para cerrar el
menú.
54
www.insignia-products.com
Page 55

NS-27LCD.fm Page 55 Wednesday, June 28, 2006 12:04 PM
Televisor con Pantalla LCD de 27" Insignia NS-27LCD
Cambio de canales
Para cambiar los canales:
• Presione el botón CH – o + en el control
remoto para ir al siguiente canal más abajo o
más arriba.
O
Presione los botones numéricos para
seleccionar un canal. Por ejemplo, si quiere
el canal 83, presione 8, luego presione 3.
O
Presione el botón para ir al último canal
visto.
Selección de un sub-canal digital
La mayoría de canales de TV digital tienen más
de un canal. El canal principal lleva la señal del
programa de TV principal. Los sub-canales
llevan las señales para programación adicional o
alternativa, tal cómo transmisiones de radio o
noticias.
Por ejemplo, si el número de canal principal es
8, el número de sub-canal puede ser 8-1, 8-2 y
8-3.
Para seleccionar un sub-canal:
1 Presione los botones numéricos del canal
principal, por ejemplo 8.
2 Presione el botón –, luego presione el botón
del sub-canal, por ejemplo 1.
Ajuste del volumen
Para ajustar el volumen:
• Presione el botón VOL – o + para bajar o
subir el volumen.
• Presione el botón MUTE para desactivar el
sonido. Presione el botón MUTE (Silenciar)
de nuevo para reactivar el sonido.
Visualización de la información de estado
Para mostrar información de estado:
• Presione el botón INFO. Su TV mostrará
información de estado, tal cómo el número
de canal o la fuente de la señal.
Selección de la fuente de entrada de video
Para seleccionar la fuente de entrada de
video:
• Presione el botón INPUT (Entrada) una o
más veces para seleccionar la fuente de
video. Se puede seleccionar:
• TV–Señal de TV
• Composite1–Conectores AV INPUT1
• Composite2–Conectores AV INPUT2
• Component1–Conectores COMPONENT
INPUT1
• Component2–Conectores COMPONENT
INPUT2
• VGA–Conector D-SUB (computadora)
• HDMI–Conector HDMI
• S-Video–Conector S-Video
Verificaci ón de la intensidad de la señal de
DTV
Para verificar la intensidad de la señal de
DTV:
1 Presione el botón MENU (Menú).
2 Presione el botón o una o más veces
para resaltar Setup (Configuración), luego
presione el botón OK (Aceptar) o para abrir
el menú de configuración.
3 Presione el botón o una o más veces
para resaltar DTV Signal (Señal de DTV) y
luego presione el botón OK (Aceptar) o . Su
TV mostrará la intensidad de la señal de
DTV.
Agregando una etiqueta de canal
Para agregar una etiqueta a un canal:
1 Presione el botón MENU (Menú).
2 Presione el botón o una o más veces
para resaltar Setup (Configuración), luego
presione el botón OK (Aceptar) o para abrir
el menú de configuración.
3 Presione el botón o una o más veces
para resaltar Channel Labels (Etiquetas de
Canal), luego presione el botón OK (Aceptar)
o para abrir el menú de etiquetas de canal.
4 Presione el botón o para mover la
selección o el cursor. Presione el botón o
para alternar entre NTSC o ATSC o para
seleccionar el número de canal o carácter.
5 Presione el botón OK (Aceptar) para
regresar al menú anterior, o presione el
botón EXIT (Salir) para ocultar el sistema de
menú.
Congelamiento de la imagen
Puede congelar (detener) la imagen en la
pantalla.
Advertencia
Para proteger su TV, no congele la imagen en pantalla por
periodos de tiempo extendidos.
Para congelar o descongelar la imagen:
• Presione el botón FREEZE (Congelar).
Ajuste del reloj
Puede ajustar el reloj automáticamente con la
señal de un canal digital. Su TV busca un canal
digital que tenga información de tiempo
codificada. Si el reloj no muestra la hora correcta
después de ajustarlo automáticamente, puede
ajustar el reloj manualmente.
Ajuste automático del reloj
Para ajustar automáticamente el reloj:
1 Presione el botón MENU (Menú).
2 Presione el botón o una o más veces
para resaltar Feature (Función), luego
presione el botón OK (Aceptar) o para abrir
el menú de funciones.
3 Presione el botón o una o más veces
para resaltar Time Set (Ajuste de Hora),
luego presione el botón OK (Aceptar) o
para abrir el menú de ajuste de hora.
www.insignia-products.com
55
Page 56

NS-27LCD.fm Page 56 Wednesday, June 28, 2006 12:04 PM
Televisor con Pantalla LCD de 27" Insignia NS-27LCD
4 Presione el botón o una o más veces
para resaltar Time Set Mode (Modo de
Ajuste de Hora), luego presione el botón OK
(Aceptar) o para seleccionar Auto.
5 Presione el botón o una o más veces
para resaltar Time Zone (Zona Horaria),
luego presione el botón OK (Aceptar) o
para seleccionar una zona horaria. Pacifico,
Alaska, Hawai, Del Este, Central o Montaña.
6 Presione el botón EXIT (Salir) para cerrar el
sistema de menú de pantalla.
Ajuste manual del reloj
Para ajustar el reloj manualmente:
1 Presione el botón MENU (Menú).
2 Presione el botón o una o más veces
para resaltar Feature (Función), luego
presione el botón OK (Aceptar) o para abrir
el menú de funciones.
3 Presione el botón o una o más veces
para resaltar Time Set (Ajuste de Hora),
luego presione el botón OK (Aceptar) o
para abrir el menú de ajuste de hora.
4 Presione el botón o una o más veces
para resaltar Time Set Mode (Modo de
Ajuste de Hora), luego presione el botón OK
(Aceptar) o para seleccionar Manual.
5 Presione el botón o para seleccionar
Year (Año), Date (Fecha), o Time (Hora),
luego presione el botón OK (Aceptar), , o
para ajustar el año, la fecha o la hora.
6 Presione el botón EXIT (Salir) para cerrar el
sistema de menú de pantalla.
Ajuste del temporizador de apagado
automático
El temporizador de apagado automático le
permite seleccionar la cantidad de tiempo que
transcurrirá antes de que su TV se apague
automáticamente.
Para ajustar el temporizador de apagado
automático:
1 Presione el botón MENU (Menú).
2 Presione el botón o una o más veces
para resaltar Feature (Función), luego
presione el botón OK (Aceptar) o para abrir
el menú de funciones.
3 Presione el botón o una o más veces
para resaltar Sleep Timer (Temporizador de
Apagado Automático), luego presione el
botón OK (Aceptar) o para seleccionar la
cantidad de tiempo. Para desactivar el
temporizador, seleccione Off (Desactivado).
Nota
También puede presionar el botón SLEEP (Apagado
Automático) para ajustar el temporizador de apagado
automático.
Visualización de subtítulos optativos
Puede ver los subtítulos optativos en dos
modos: CAPTION (Subtítulo) y TEXT (Texto).
Cada modo tiene cuatro canales. El modo
CAPTION muestra los diálogos y comentarios
de los programas de TV mientras provee una
imagen clara del programa. El modo TEXT
muestra información que no está relacionada
con el programa, tal cómo horarios de
programación de TV y pronósticos del tiempo.
En el modo TEXT, una parte de la imagen se
puede cubrir con el texto.
Nota
En el caso de sistemas de transmisión digital, puede presionar
el botón CCD en el control remoto para seleccionar el modo
de subtítulos optativos.
Para ver los subtítulos optativos:
• Presione el botón CCD una o más veces
para seleccionar un modo de subtítulos
optativos. Se puede seleccionar:
• CC1
• CC2
• CC3
• CC4
•TEXT1
•TEXT2
•TEXT3
•TEXT4
• Off (Desactivado)
Configuración de los controles de los
padres
Su TV tiene un V-chip que le permite controlar el
tipo de programas que sus niños pueden ver.
Los controles de los padres incluyen dos
clasificaciones: La MPAA (basada en la edad) y
las TV Parental Guidelines [Pautas de TV para
los padres] (basadas en el contenido y la edad).
Un programa de TV puede tener una
clasificación de MPAA o de “TV Parental
Guidelines”, así que deberá configurar los
controles para las dos clasificaciones.
Antes de que seleccione las clasificaciones,
necesitará configurar una contraseña para los
controles de los padres.
Para establecer una contraseña:
1 Presione el botón MENU (Menú).
2 Presione el botón o una o más veces
para resaltar Feature (Función), luego
presione el botón OK (Aceptar) o para abrir
el menú de funciones.
3 Presione el botón o una o más veces
para resaltar Parental Control (Control
Paterno), luego presione el botón OK
(Aceptar) o para abrir el menú de control
paterno.
4 Presione el botón o una o más veces
para resaltar Password Change (Cambio de
Contraseña), luego presione el botón OK
(Aceptar) o para acceder a la opción
Pass w ord Change (Cambio de Contraseña).
56
www.insignia-products.com
Page 57

NS-27LCD.fm Page 57 Wednesday, June 28, 2006 12:04 PM
Televisor con Pantalla LCD de 27" Insignia NS-27LCD
5 Presione los botones numéricos para
ingresar la contraseña antigua. Si no ha
configurado una contraseña, ingrese 0000.
6 Presione el número de botones para ingresar
una contraseña nueva, luego ingrese la
contraseña nueva de nuevo para confirmar.
Cuidado
Escriba su contraseña y guárdela para uso futuro.
Nota
Si olvida su contraseña, ingrese 1397 cómo contraseña
antigua e ingrese una contraseña nueva.
Clasificaciones MPAA
Clasificació
n
NONE
(Ninguna)
G Público en general.
PG Se sugiere el consejo de los pad res.
PG-13 Se recomienda fu er temente la
R –Restringido. No se recomienda para
NC-17 No se recomienda para niños menores
X Sólo para adultos.
Descripción
Sin clasificación.
Contiene material que los padres
pueden considerar inadecuado para los
niños.
supervisión de los padres. Este
programa contiene material que los
padres pueden conside rar inadecuado
para noños menores de 13 años.
niños menores de 17 años a menos
que estén acompañado s por un padre
o un custodio.
de 17 años.
Clasificaciones de “TV Parental Guidelines”
(Pautas de TV para los padres)
Clasificació
n
NONE
(Ninguna)
TV-Y Todos los niños.
TV-Y7 Dirigido a niños mayores de siete
TV-G Público en genera l.
TV-PG Se sugiere el consejo de los padres.
TV-14 Enérgico aviso para los pa dres.
TV-MA Adultos solamente
Descripción
Sin clasificación.
años.
Algunas de las clasificaciones “TV Parental
Guidelines” basadas en edad también tienen
clasificaciones basadas en el contenido.
Para ajustar las clasificaciones:
1 Presione el botón MENU (Menú).
2 Presione el botón o una o más veces
para resaltar Feature (Función), luego
presione el botón OK (Aceptar) o para abrir
el menú de funciones.
3 Presione el botón o una o más veces
para resaltar Parental Control (Control
Paterno), luego presione el botón OK
(Aceptar) o para abrir el menú de control
paterno.
4 Presione el botón o una o más veces
para resaltar Parental Control Set (Ajuste
del Control Paterno), luego presione el botón
OK (Aceptar) o para acceder a la función
de clasificaciones.
5 Ingrese la contraseña.
6 Presione el botón o para
seleccionar una clasificación, luego presione
el botón OK (Aceptar) para bloquear o
desbloquear la clasificación.
Cuando bloquea una clasificación , se
bloqueará dicha clasificación y todas las
clasificaciones por encima de ella.
Uso del sistema de menú de pantalla
Su TV tiene un sistema de menú de pantalla que
le permite ajustar los controles del TV, tal cómo
los ajustes de video y audio.
Para usar el sistema de menú de pantalla:
1 Presione el botón MENU (Menú).
2 Presione el botón o una o más veces
para seleccionar un menú.
3 Presione el botón o para navegar a
una opción o ajustar una opción.
4 Presione el botón OK (Aceptar) o para
confirmar un ajuste, abrir un submenú o
conmutar un ajuste.
5 Presione el botón MENU (Menú) p ara
regresar al menú anterior o presione el botón
EXIT (Salir) para ocultar el sistema de menú
de pantalla.
Clasificació
n
FV Violencia de fantasía.
L Lenguaje vulgar.
S Situaciones sexuales
V Violencia.
D Diálogo sexualmente sugestivo.
Descripción
www.insignia-products.com
57
Page 58
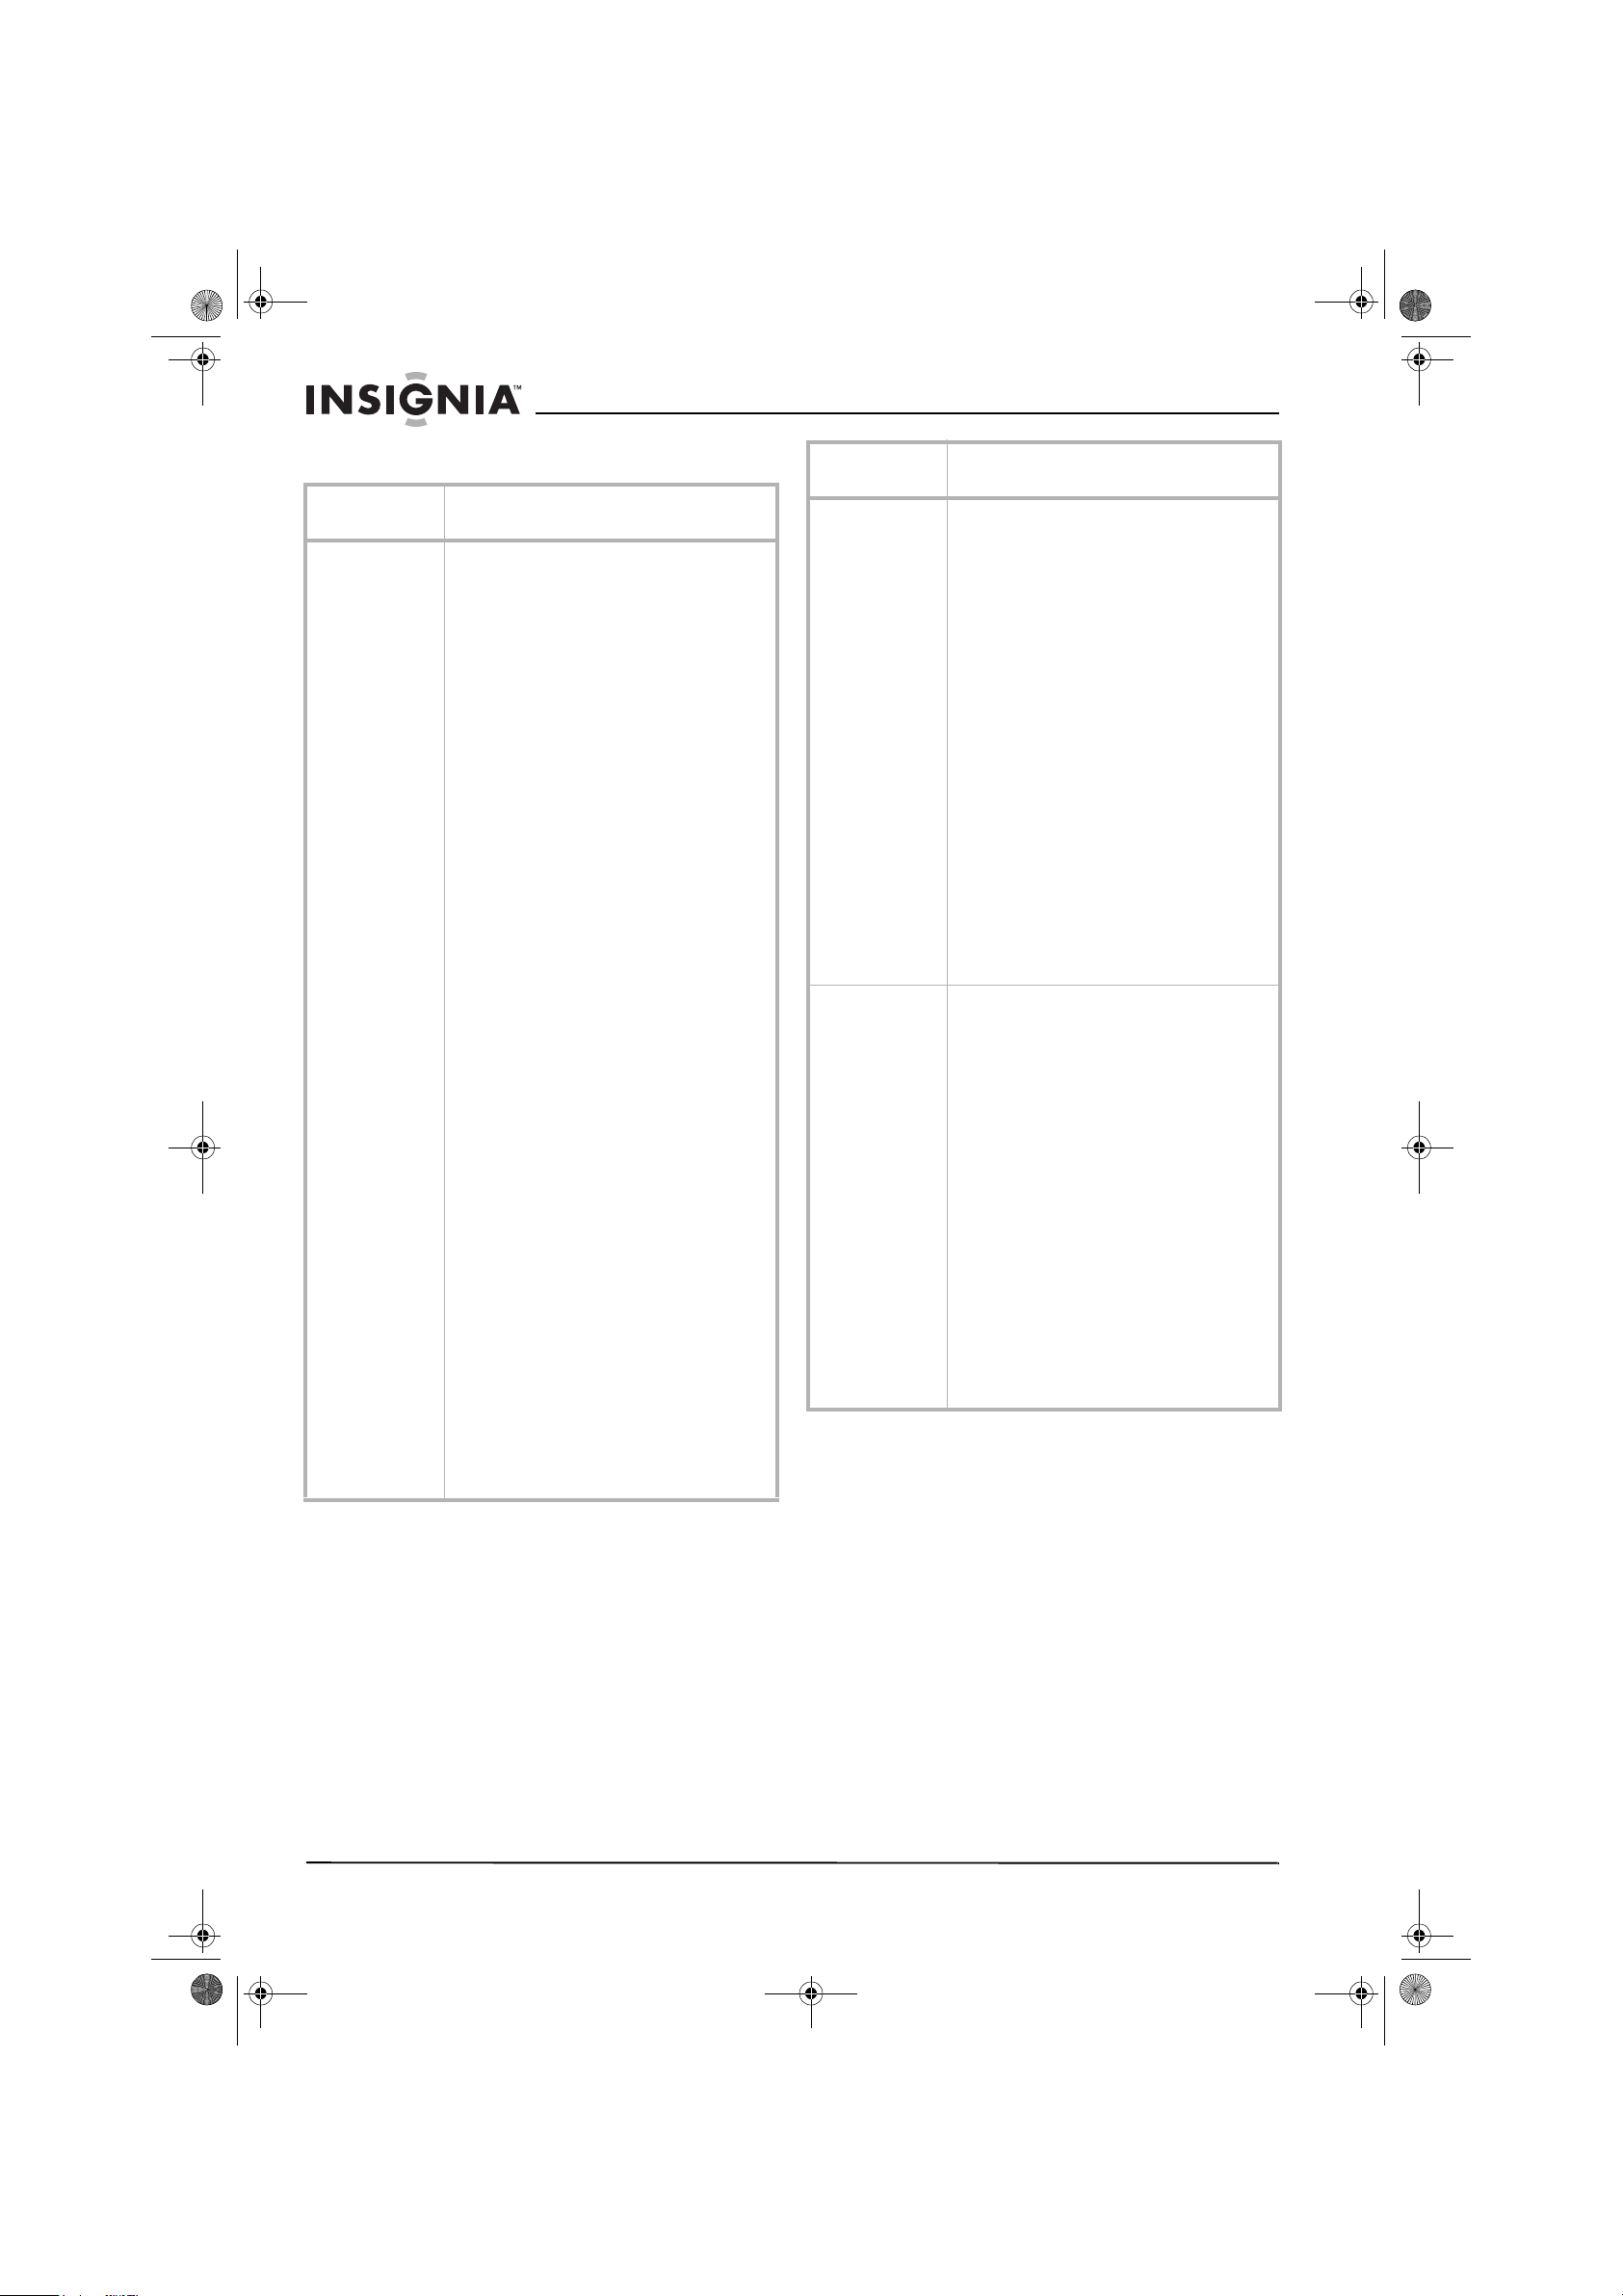
NS-27LCD.fm Page 58 Wednesday, June 28, 2006 12:04 PM
Televisor con Pantalla LCD de 27" Insignia NS-27LCD
Menús de pantalla
Menú de
pantalla
Vídeo
Nota: Las
opciones pueden
variar en
diferentes modos.
Opciones
Picture Mode (Modo de Imagen) – S elecciona
el modo de imagen: User (Usuario), Nature
(Naturaleza), Soft (Suave), o Bright (Brillante).
También puede presionar el botón PICTURE
(Imagen) para seleccionar el modo de imag en.
Contrast (Contraste) – Aumenta el nivel de la
imagen para ajustar sus áreas blancas. Reduce
el nivel de la imagen para ajustar las áreas
negras.
Brightness (Brillo) – Aumenta el brillo para
agregar más luz a las áreas oscuras de la
imagen. Reduce el brillo para agregar más
oscuridad a las áreas iluminadas de la imagen.
Color – Ajusta el color global de la imagen.
Sharpness (Nitidez) – Aumenta el nivel de
nitidez para mostrar imágenes más lim pias y
claras. Reduce el nivel para mostrar un a
imagen más suavizada.
Aspect Ratio (Relación de Aspect o) –
Selecciona la relación de aspecto de la pantalla:
Wide (Ancho), Cinema, Normal, o Zoom.
También puede presionar el botón ZOOM pa ra
seleccionar la relación de aspecto.
Advanced Video Menu (Menú de Video
Avanzado) – Provee acceso a las funciones
avanzadas:
• Noise Reduction (Reducción de Ru id o)
• Tint (Tinte) – Aumenta el nivel de color
• Color Temperature (Temperatura de
• 3D Y/C – Activa o desactiva el filtro tipo
VGA Set/Component Se t (Ajustar VGA/Ajustar
Componente) – Si su TV está con ectado a una
computadora o a video de componentes, ajusta
las siguientes opciones:
• H-Pos (Posición H) – Ajusta la posición
• V-Pos (Posición V) – Ajusta la posición
• Clock (Reloj) – Aj usta la frecuencia de
• Phase (Fase) – Mejora el foco de una
• Setting (Ajuste) – Regresa el modo VGA
– Reduce el ruido de la imagen (nieve).
para agregar más verde a los tonos de
piel. Reduce el nivel de colo r para
agregar má s violeta a los tonos de piel.
Color) – Selecciona uno de tres ajuste
de color automátic os: Cool (Frío) para
más azul, Warm (Caliente) para más
rojo, y Normal.
peine 3D.
horizontal de la imagen.
vertical de la imagen.
muestreo.
imagen estable.
a los valores de fábrica.
Menú de
pantalla
Audio
Nota: Las
opciones pueden
variar en
diferentes modos.
Setup
(Configuración)
Opciones
Sound Mode (Modo de Sonido) –Selecciona el
modo de sonido: User (Usuario), News
(Noticias), Music (Música), o Movie (Película).
También puede presionar el botón AUDIO para
seleccionar el modo de sonido.
Bass (Graves) – Ajusta los sonidos graves.
Treble (Agudos) – Ajusta los sonidos agudos.
Balance – A justa el volumen del alt avoz
derecho y el izquierdo.
Earphone Vol (Volumen de Auricular) – Ajusta
el volumen del auricular.
Digital Audio Output (Salida de Audio Digital)
– Selecciona el modo de audio para el conector
S/PDIF.
• RAW (En bru to): Entrada AC-3 y Salida
AC-3. Entrada PCM y Salida P CM.
• PCM: Entrada AC-3 y Salida PCM.
Entrada PCM y Salida PCM .
MTS – Selecciona el sonido de TV multicanal
(MTS): Mono, Stereo (Estéreo) o SAP
(Programa de Audio Secundario). También
puede presionar el botón MTS/SAP para
seleccionar el modo MTS.
Audio Language (Idioma del audio) –
Selecciona un idioma alterno si el pr ograma
tiene más de un idioma.
Tuning Band (Banda de Sintonización) –
Selecciona la f uente de señal del TV. Para
obtener más informació n, vea “Selección de la
fuente de la señal de TV” en la página 54.
DTV Signal (Señal DTV) – Muestra la
intensidad de la señal de TV digital. Para
obtener más información, vea “Verificación de
la intensidad de la señal de DTV” en la
página55.
Auto Ch Search (Búsqueda Automática de
Canales) – Configura automáticamente una
lista de los canales disponibles en su área. Para
obtener más información, vea “Configuración
automática de canales” en la página 54.
Manual Ch Set (Establecimiento Manual de
Canales) – Le permite agregar o eliminar
canales de la lista de canales. Para obtener más
información, vea “Ajuste manual del reloj” en la
página56.
Channel Labels (Etiquetas de Canal) – Le
permite agregar una etiqueta a un canal. Para
obtener más información, vea “Agregando una
etiqueta de canal” en la página 55.
58
www.insignia-products.com
Page 59

NS-27LCD.fm Page 59 Wednesday, June 28, 2006 12:04 PM
Televisor con Pantalla LCD de 27" Insignia NS-27LCD
Menú de
pantalla
Función Source (Fuente) – Selecciona la fuente de la
Opciones
señal de video. Se puede seleccionar:
•TV
• Composite1 (Compuesto 1)
• Composite2 (Compuesto 2)
• Component1 (Componente 1)
• Component2 (Componente 2)
•VGA
•HDMI
•S-Video
También puede presionar el botón INPUT
(Entrada) para seleccionar la fuente de la señal
de video.
Time S et (Ajuste de la Hora) – Ajusta el reloj.
Para obtener más información, vea “Ajuste del
reloj” en la pági na55.
Sleep Timer (Temporizador de Apagado
Automático) – Ajusta el temporizador de
apagado automático. Para obtener más
información, vea “Ajust e del temporizador de
apagado automático” en la página 56.
Parental Control (Control de los Padres) –
Acceda a los controles del V-chip. Para obtener
más información, vea “Configuración de los
controles de los padres” en la página 56.
Closed Caption Options (Opciones de
Subtítulos Optativos) – Personaliza los
subtítulos optativos para los sistema de
transmisión digital. Puede ajustar el tamaño, la
fuente, el color del texto, la opacidad del texto,
el color de fondo, la op acidad del fondo, el
efecto del borde, y el color del borde.
CC when Mute (Subtítulos optativo s cuando s e
silencia) – Cuando se activa esta opción, su TV
muestra automáticamente los subtítulos
optativos cuando se sil encia el volumen.
Menu Language (Idioma del Menú) –
Selecciona el idioma para el sistema de menú
de pantalla. Puede seleccionar inglés, francés o
español.
Programación del control
remoto
Programación de un equipo conectado a
su TV
El control remoto puede controlar cuatro
dispositivos, tal cómo un VCR, un reproductor
de DVD, un receptor de cable o satélite, un
amplificador o sintonizador, o un equipo similar.
Para programar el control remoto:
1 Encuentre el código para el dispositivo que
desea programar. Refiérase a “Apéndice” en
la página 61. Si hay más de un código listado
para un equipo, escriba todos los códigos.
2 Encienda el equipo que desea programar, y
cargue medios si se requiere, por ejemplo un
DVD.
3 Presione una tecla de dispositivo en el
control remoto, por ejemplo DVD, CBL, o
AUX.
4 Mantenga presionado el botón SET
(Establecer) en el control remoto hasta que
el indicador LED parpadee dos veces, luego
suelte el botón.
5 Ingresar el primer código de cinco dígitos
para su equipo. El indicador LED parpadeará
una vez cada vez que se ingresa un dígito. Si
el código es el correcto, el indicador LED
parpadeará dos veces.
Nota
Si el indicador LED no parpadea dos veces, repita
los pasos 3 al 5 usando un código diferente.
6 Apunte el control remoto al equipo, luego
presione el botón . El equipo se deberá
apagar.
Nota
Si el equipo no se apaga, repita los pasos 4 al 6
usando un código diferente. Si no puede
encontrar un código que funcione, refiérase a
“Búsqueda de un código” en la página 59.
7 Repita los pasos 1 al 6 para programar
equipos adicionales.
8 Presione el botón SET (Establecer) para
guardar el código y salir.
Búsqueda de un código
Para buscar una pista:
1 Presione el botón de un equipo.
2 Mantenga presionado el botón SET
(Establecer) hasta que el indicador LED
parpadee dos veces, luego suelte el botón.
3 Ingrese 991, luego el número de grupo del
equipo (0=cable, 1=TV, 2=VCR, 3=audio). El
indicador LED parpadeará dos veces.
4 Apunte el control remoto al equipo y presione
el botón . Si el equipo responde, vaya al
paso 7.
5 Si el equipo no responde, presione el botón
CH+. Su control remoto probará el siguiente
código. Mantenga presionado el botón CH+
hasta que el equipo responda. Puede
presionar el botón CH– para probar un
código anterior.
6 Para buscar un código para otro equipo,
repita los pasos 1 al 5.
7 Presione el botón SET (Establecer) para
guardar el código y salir.
Verificación del código
Si programó un equipo buscando el código, le
podría gustar saber que código de 4 dígitos está
usando el control remoto.
Para revisar el código:
1 Presione el botón del equipo en el control
remoto.
2 Mantenga presionado el botón SET
(Establecer) hasta que el indicador LED
parpadee dos veces, luego suelte el botón.
3 Ingrese 990
. El indicador LED parpadeará
dos veces.
4 Presione el botón 1 y cuente las veces que
parpadee el indicador LED. Este es el primer
dígito del código. Por ejemplo, si el indicador
LED parpadea dos veces, el primer dígito es
2. Si el indicador LED no parpadea, el primer
dígito es 0.
www.insignia-products.com
59
Page 60

NS-27LCD.fm Page 60 Wednesday, June 28, 2006 12:04 PM
Televisor con Pantalla LCD de 27" Insignia NS-27LCD
5 Repita el paso 4 usando 2 para el segundo
dígito, 3 para el tercer dígito, 4 par a el cuarto
dígito, y 5 para el quinto dígito.
6 Presione el botón SET (Establecer) para
salir.
Programación del bloqueo de volumen
El control remoto viene preconfigurado para
dejarle controlar el volumen de cada equipo
conectado. Puede cambiar el bloqueo de
volumen para que el volumen de un equipo
controle el volumen en todos los modos.
Después de bloquear el control de volumen,
puede desbloquearlo para un equipo específico
para que pueda controlar el volumen de ese
equipo independientemente.
Para bloquear el control de volumen:
1 Mantenga presionado el botón SET
(Establecer) hasta que el indicador LED
parpadee dos veces, luego suelte el botón.
2 Ingrese 993, luego presione el botón del
equipo del cual quiere controlar el volumen.
El indicador LED parpadeará dos veces.
Cuando presione el botón VOL+, VOL–, o
MUTE (Silenciar) en el control remoto, el
equipo seleccionado controlará el volumen
sin importar que equipo esté usando.
Para desbloquear el control de volumen:
1 Mantenga presionado el botón SET
(Establecer) hasta que el indicador LED
parpadee dos veces, luego suelte el botón.
2 Ingrese 993, luego presione el botón VOL+.
El indicador LED parpadeará cuatro veces.
El control de volumen se desbloqueará.
Para desbloquear el control de volumen de
un solo equipo:
1 Presione el botón del equipo.
2 Mantenga presionado el botón SET
(Establecer) hasta que el indicador LED
parpadee dos veces, luego suelte el botón.
3 Ingrese 993, luego presione el botón VOL–.
El indicador LED parpadeará cuatro veces.
El control de volumen para el equipo que ha
seleccionado estará desbloqueado.
Localización y corrección de fallas del
control remoto
Síntoma Solución probable
El indicador LED no
parpadea cuando se
presiona un botón
El indicador LED
parpadea cuando se
presiona un botón, pero
el equipo no respo nde
El indicador LED
parpadeará
extendidamente una vez
El control remoto no
controla un equipo o
sólo controla ciertas
funciones de l equipo
No hay volumen en un
equipo
Reemplace las pila s.
Verifique de que se encuentra a menos
de 15 pies (4.6 metros) del equipo y
que apunte el control remoto al sensor
del control remo to en el eq uipo.
Presionó un botó n in co r r e ct o.
Comience el procedimiento de nuevo.
Verifique que el equipo cuenta con un
sensor de control remoto, luego
pruebe con otro código.
Refiérase a “Programación del bloqueo
de volumen” en la página 60.
Mantenimiento
• No utilice su TV en áreas que son demasiado
caliente o frío porque el gabinete se puede
doblar o la pantalla puede funcionar mal.
• Las temperaturas de almacenamiento son
de 32
°F a 122 °F (0 °C a 50 °C).
• Las temperatura de operación de 41 °F a
104 °F (5°C a 40 °C).
• No coloque su TV bajo luz solar directa ni
cerca de una fuente de calor.
Limpieza de su TV
Limpie la pantalla y el gabinete con un paño
suave y sin pelusa. Si la pantalla o el gabinete
se encuentran especialmente sucios,
humedezca un paño suave y sin pelusa en una
solución detergente suave, exprima el exceso de
humedad del paño y limpie la pantalla o el
gabinete con el paño. Use un paño limpio para
secar la pantalla o el gabinete.
Cuidado
Evite usar sustancias inflamables, tal como repelentes de
insectos, solventes y diluyentes.
No deje su TV en contacto con objetos hechos de hule o PVC
por periodos de tiempo extendidos.
Estos pueden dañar su TV.
Cuidado
No deje que líquidos goteen dentro del gabinete.
Localización y Corrección
de Fallas
Advertencia
No intente reparar su TV usted mismo. Refiera toda reparación
a un técnico de servicio calificado.
Síntoma Solución probable
La unidad no enciende • Verifique que el cable de
No hay imagen • Verifique que los ca bles de
Buena imagen, pero no
hay sonido
Buen sonido pero color
deficiente
alimentación está conectado a
su TV y a un tomacorriente
eléctrico.
• Desconecte el cable de
alimentación, espere 60
segundos, luego reconecte el
cable y encienda su TV.
video están conectados
firmemente en la parte
posterior de su TV.
• Ajuste el contraste y el brillo.
• Verifique que se seleccionó el
modo de video co r re cto.
• Verifique que la señal de
entrada es compatible.
• Suba el volumen.
• Verifique que el sonido no esté
silenciado.
• Verifique que se seleccionó el
modo de audio co r r e cto.
• Ajus t e el contraste, el color y el
brillo.
60
www.insignia-products.com
Page 61

NS-27LCD.fm Page 61 Wednesday, June 28, 2006 12:04 PM
Televisor con Pantalla LCD de 27" Insignia NS-27LCD
Síntoma Solución probable
Imagen insatisfactoria • Verifique que la habita ción no
Línea punteada
horizontal
El control remoto no
funciona
Imagen con nieve o
ruido
La imagen VGA no es
estable o no está
sincronizada
No hay salida de uno de
los altavoces
Los botones de co ntro l
no funcionan
Algunas partes de la
pantalla no se iluminan
Aparecen imágenes
permanentes
El TV produce ruidos
como un “clic”
es muy brillante. La luz
reflejándose en la pantalla
puede hacer que sea difícil ver
la imagen.
• Si una cámara S-VHS o una
cámara de video se conect an
mientras se enciende otro
equipo conectado, puede ser
que la imagen se vea
insatisfactoria. Apague uno o
más equipos.
• Pue de ser que su TV se
encuentre demasiado cerca de
otro equipo eléctrico, tal cómo
una secadora de pelo o una luz
neón. Apague el equipo o
mueva su TV.
• Presione el botón TV.
• Ree mplace las pilas.
Compruebe que los símbolos +
y – en las pilas correspondan
con los símbolos + y – en el
compartimiento de la s pilas.
• Limpie el sensor del control
remoto en el frente de su TV.
• Iluminación brillante o
fluorescente puede interferir
con la señal del control remoto.
Apague la luz o mueva su TV.
• Asegúrese de que los cables de
A/V estén bi en y fi r m emente
conectados.
• Verifique que se ha
seleccionado el modo de VGA
correcto en su computadora.
• Ajuste el balance en el menú de
sonido.
• Desconecte el cable de
alimentación por unos
segundos y luego reconecte el
cable de nuevo y encienda su
TV.
• La pantalla de plasma se fabrica
usando una tecnología de
precisión de alto nivel.
Elementos de la imagen pueden
faltar de unas partes de la
imagen o pueden encon trarse
puntos luminosos. Esto no es
un mal funcionam ie n to.
• No muestre una imagen fija, tal
como un logotipo, un juego,
una imagen de computadora
por un periodo de tiempo
extendido. Esto puede causar
que una imagen permanente se
queme en la pantalla. Est e tipo
de daño no esta cubierto por su
garantía.
• Estos sonidos ocurren cuando
el gabinete de su TV se expande
o contrae debido a cambios en
la temperatura. Esto no es un
mal funcionamiento.
Especificaciones
• El diseño y las especificaciones están
sujetos a cambio sin aviso previo.
• El peso y las dimensiones listadas son
aproximados.
Fuente de
alimentación
Consumo de
energía
Pantalla 27 pulgadas
Rango de canales VHF: 2-13
Peso 41.9 lb. (19 kg)
Dimensiones
Ancho × Alto × Pr
ofundidad
Temperatura Temperaturas de almacenamiento son
Sistema de TV NTSC-M, ATSC
Accesorios Guía del usuario
100 - 240 V CA 50/60 Hz
140 W
UHF: 14-69
CATV: 1-125
CADTV: 1-135
DTV: 2-69
28.25×24×9.25 pulgadas
(71.4 × 60.6 × 23.5 cm)
32° a 122 °F (0° a 50 °C).
Temperaturas de funcionamiento son
41 °F a 104 °F (5° a 40 °C).
Control remoto
Apéndice
Códigos de VCR
ABS 21972
Admiral 20048, 20209
Aiko 20278
Aiwa 20037, 20479
Alienware 21972
America Action 20278
American High 20035
Amoisonic 20479
Anam 20162, 2 0037, 20240, 20278
Anam National 20162
Asha 20240
Audiovox 20037, 20278
Beaumark 20240
Bell & Howell 20104
Broksonic 20184, 20121, 20209, 20002,20479
Calix 20037
Canon 20035
Carver 20081
CCE 20072, 20278
Changhong 20048, 20081
Citizen 20037, 20278
Colt 20072
Craig 20037, 20047, 20240, 20072
Curtis Mathes 20060, 20035, 2 0162
Cybernex 20240
www.insignia-products.com
61
Page 62

NS-27LCD.fm Page 62 Wednesday, June 28, 2006 12:04 PM
Televisor con Pantalla LCD de 27" Insignia NS-27LCD
CyberPower 21972
Daewoo 20045, 20104, 20278
Dell 21972
Denon 20042
DirecTV 20739
Durabrand 20039, 20038
Electrohome 20037
Electrophonic 20037
Emerex 20032
Emerson 20035, 20037, 20184, 20240,20045 ,
Fisher 20047, 20104
Fuji 20035, 20033
Fujitsu 20045
Gateway 21972
GE 20060, 20035, 20240
General 20045
Go Video 20432
GoldStar 20037, 20209, 20038, 20225
Haojie 20240
Harman/Kardon 200 8 1, 20 03 8
Harwood 20072
Hewlett Packard 21972
HI-Q 20047
Hitachi 20037, 20042, 20055
Howard
Computers
HP 21972
Hughes Network
Systems
iBUYPOWER 21972
JVC 20045, 20067
KEC 20037, 20278
Kenwood 20067, 20038
KLH 20072
Kodak 20035, 20037
Kolin 20043 LG 20037, 20045, 20042,
Logik 20072
LXI 20037
Magnavox 20035, 20039, 20081
Magnin 20240
Marantz 20035, 20081
Marta 20037
Matsushita 20035, 20162
Media Center PC 21972
MEI 20035
Memorex 20 035, 20162, 20037, 20048,20039,
MGA 20240, 20043
MGN Technology 20240
Microsoft 21972
Mind 21972
20121, 20043, 20 209, 20002, 20278,
20479
21972
20042, 20739
20209,20038
20047, 20240, 20 104, 20209, 20479
Minolta 20042
Mitsubishi 20067, 20043
Motorola 20035, 20048
MTC 20240
Multitech 20072
NEC 20035, 20037, 20048, 20104,20067,
20038
Newave 20037
Nikko 20037
Noblex 20240
Northgate 21972
Olympus 20035
Optimus 21062, 20162, 20037, 20048,20104,
20432
Orion 20184, 20209, 20002, 20479
Panasonic 21062, 20035, 20162, 20616,20225
Penney 20035, 20037, 20240, 20042,20038
Pentax 20042
Philco 20035, 20479
Philips 20035, 20081, 20739, 20618
Pilot 20037
Pioneer 20042, 20067
Polk Audio 20081
Profitronic 20240
Proscan 20060
Protec 20072
Pulsar 20039
Qisheng 20060
Quasar 20035, 20162
Radix 20037
Randex 20037
RCA 20060, 20035, 20240, 20042,20880
Realistic 20035, 20037, 2004 8, 20047,20104
ReplayTV 20616
Runco 20039
Sampo 20037, 20048
Samsung 20240, 20045, 20432
Sanky 20048, 20039
Sansui 20067, 20209, 20479
Sanyo 20047, 20240, 201 04
Scott 20184, 20045, 20121, 20043
Sears 20035, 20037, 20047, 20042,20104
Sharp 20048, 20209
Shintom 20072
Shogun 20240
Singer 20072
Sonic Blue 20616
Sony 20035, 20032, 20033, 20 636,21972
STS 20042
Sylvania 20035, 20081, 20043
Systemax 21972
Tagar Systems 21972
62
www.insignia-products.com
Page 63

NS-27LCD.fm Page 63 Wednesday, June 28, 2006 12:04 PM
Televisor con Pantalla LCD de 27" Insignia NS-27LCD
Tashiko 20037
Tatung 20045, 20067
T e c h nic s 20035, 20 162
Teco 20035 , 20037, 20048, 20038
T e k n ik a 20035, 20037
Tivo 20636, 20618, 21503, 20739
TMK 20240
Toshiba 20045, 20042, 20067, 20043,21503,
Totevision 20037, 20240
Touch 21972
Unitech 20240
Vector 20045
Vector Research 20038
Victor 20067
Video Concepts 20045
Videomagic 20037
Videosonic 20240
Viewsonic 21972
Wards 20060, 20035, 20048, 20047,20081,
White
Westinghouse
XR-1000 20035, 20072
Yamaha 20038
Zenith 20039, 20033, 20209, 20479
ZT Group 21972
21008, 21972
20240, 20042, 20072
20209, 20072
Códigos de reproductores de DVD
Aiwa 20641, 21912
Akai 20770
Allegro 20869
Apex Digital 20672, 20717, 20797, 21061,20796,
Blaupunkt 20717
Blue Parade 20571
Broksonic 20695
Changhong 20627, 21061
CineVision 20869
Coby 21086
Curtis Mathes 21087
CyberHome 21024, 21023, 21129, 20816, 21117
Daewoo 20833, 21172, 20869
Denon 20490
DVD2000 20521
Emerson 20591, 20675
Enterprise 20591
Fisher 21919
Funai 20675
Gateway 21158, 21073
GE 20522, 20 71 7
Go Video 20744, 20833, 21099, 20783,21075,
21056, 21937, 20 794, 21020, 21915
20869, 21730
Greenhill 20717
Harman/Kar do n 20582, 20702
Hitachi 20573, 20664, 21919
Hiteker 20672
Initial 20717
Integra 20627, 21924
JBL 20702
JVC 20558, 20623, 208 67
Kenwood 20490, 20534
KLH 20717, 21020, 211 49
Koss 20651, 21980
Lasonic 20798
LG 20591, 20869, 20801
Liquid Video 21980
Lite-On 21158 , 21 05 8
Loewe 20511
Magnavox 20503, 20539, 21976, 21914, 20675
Marantz 20539
Memorex 20695
Microsoft 20522
Mintek 20717
Mitsubishi 21521, 20521
Nesa 20717
Norcent 21003
Onkyo 20503, 20627, 21924, 20792
Oritron 20651, 21980
Panasonic 20490, 21762, 21990
Philips 20503, 20539, 20646, 21914
Pioneer 20525, 20571
Polaroid 21086, 21061
Polk Audio 20539
Portland 20770
Proscan 20522
Qwestar 20651
RCA 20522, 20571, 20717, 20822
Rio 20869
Rotel 20623
Sampo 20752, 20698
Samsung 20490, 20573, 21932, 21075, 20820
Sansui 20695
Sanyo 20695
Sharp 20630, 20752
Sharper Image 21117
Sherwood 20770
Shinco 20717
Shinsonic 20533
Sonic Blue 20869, 21099
Sony 20533, 20864, 21033, 21904, 21903
SVA 20717
Sylvania 20675
Symphonic 20675
www.insignia-products.com
63
Page 64

NS-27LCD.fm Page 64 Wednesday, June 28, 2006 12:04 PM
Televisor con Pantalla LCD de 27" Insignia NS-27LCD
Teac 20717, 21984, 20809
Technics 20490
Theta Digital 20571
T o s hiba 20503, 20695
Urban Concepts 20503
Xbox 20522
Yamaha 20490, 20539, 20545
Zenith 20503, 20591, 20869
Códigos de convertidores de cable
ABC 00003, 00008, 000 14
Americast 00899
Bell & Howell 00014
Bell South 00899
Clearmaster 00883
ClearMax 00883
Coolmax 00883
Daeryung 01877, 00877, 00477, 0000 8
Digi 00637
Director 00476
Dumont 00637
Gehua 00476
General
Instrument
GoldStar 00144
Hamlin 00009, 00273
Hitachi 00014
Jerrold 00476, 00810, 00276, 00003,00012,
KNC 00008
LG 00144
Memorex 00000
Motorola 00476, 00810, 00276, 01254,01376
MultiVision 00012
Pace 01877, 00237
Panasonic 00000, 00008, 00107
Panther 00637
Paragon 00000
Philips 00317, 01305
Pioneer 01877, 00877, 00144, 00533
Pulsar 00000
Quasar 00000
RadioShack 00883
Regal 00279, 00273
Runco 00000
Samsung 00000, 00144
Scientific Atlanta 01877, 00877, 00477, 00008
Sony 01006
Starcom 00003, 00014
Supercable 00276
Supermax 00883
Tocom 00012
Torx 00 003
Toshiba 00000
Trans PX 00276
Tristar 00883
TS 0000 3
V2 00883
Viewmaster 00883
00476, 00810, 0 0276, 00003,00014
00014
64
www.insignia-products.com
Page 65
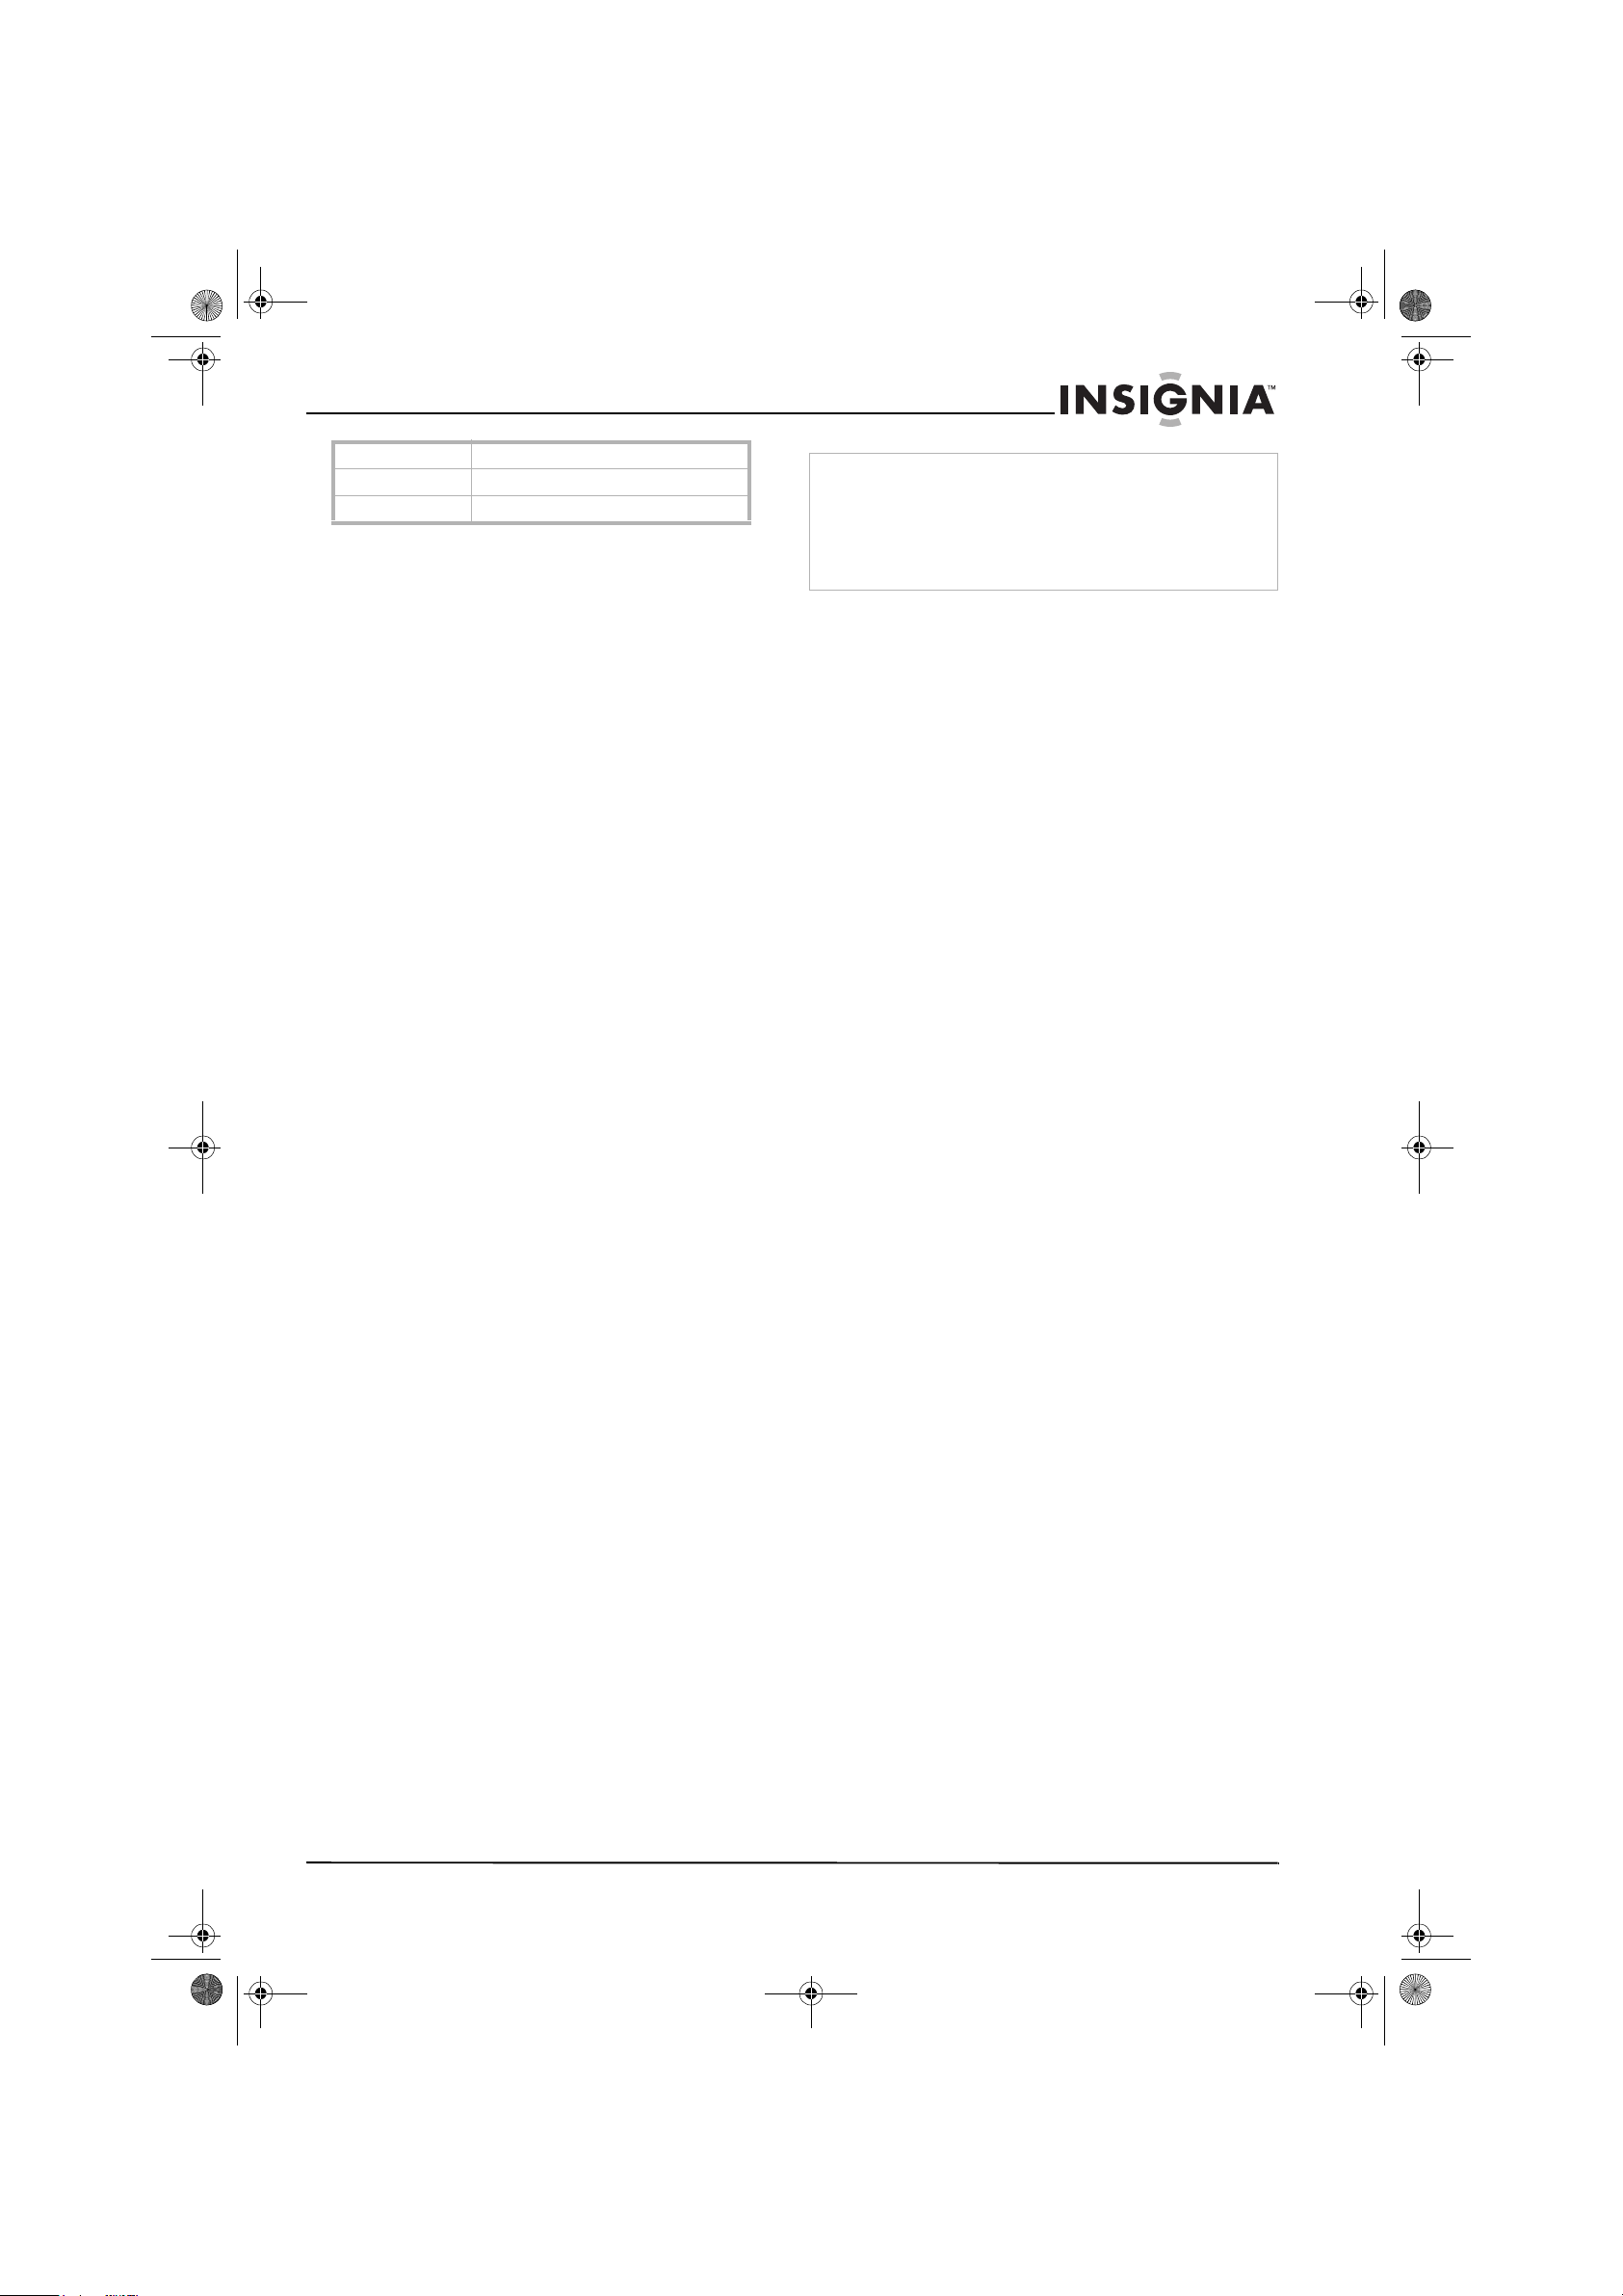
NS-27LCD.fm Page 65 Wednesday, June 28, 2006 12:04 PM
Televisor con Pantalla LCD de 27" Insignia NS-27LCD
Vision 00883
Vortex View 00883
Zenith 00000, 00525, 00899
Avisos legales
Declaración de la FCC
Interferencia de radio-TV
Este equipo ha sido sometido a pruebas y se ha
determinado que satisface los límites
establecidos para clasificarlo cómo dispositivo
digital de Clase B de acuerdo con la Parte 15 del
reglamento FCC. Estos límites se han
establecido para proporcionar una protecci ón
razonable contra interferencias perjudiciales en
una instalación residencial. Este equipo genera,
usa y puede emitir energía de radiofrecuencia.
Sí no se instala y usa de acuerdo con las
instrucciones, este aparato puede causar
interferencias perjudiciales a las
comunicaciones de radio. Sin embargo, no se
garantiza que no ocurrirá interferencia en una
instalación particular. Si el equipo causa
interf er enci as pe rj udi cial es en la rec epc ión d e la
señal de radio o televisión, lo cual puede
comprobarse encendiéndolo y apagándolo
alternativamente, se recomi enda al usuar io
corregir la interferencia mediante uno de los
siguientes procedimientos:
1 Cambie la orientación o la ubicación de la
antena receptora.
2 Aumente la distancia entre el equipo y el
receptor.
3 Conecte el equipo a un tomacorriente de un
circuito distinto de aquél al que está
conectado el receptor.
4 Solicite consejo al distribuidor o a un técnico
experto en radio/TV para obtener ayuda.
Este aparato digital de Clase B cumple con el
ICES-003 canadiense.
Cet appareil numérique de la classe B est
conforme à la norme NMB-003 du Canada.
Advertencia
Este equipo podría generar o usar energía de radiofrecuencia.
Los cambios o modificaciones que se realicen a este equipo
podrían causar interferencia perjudicial a menos que las
modificaciones estén expresamente autorizadas en el manual
de instrucciones. El usuario podría perder la autoridad de
operar este equipo si se realiza un cambio o modificación no
autorizada.
Derechos de reproducción
© 2006 Insignia. Insignia y el logotipo de Insignia son
marcas de comercio de Best Buy Enterprise Services,
Inc. Otras marcas y nombres de productos son marcas
comerciales o marcas registradas de sus dueños
respectivos. Las especificaciones y características
están sujetas a cambio sin aviso previo u obligación.
www.insignia-products.com
65
Page 66

NS-27LCD.fm Page 66 Wednesday, June 28, 2006 12:04 PM
Televisor con Pantalla LCD de 27" Insignia NS-27LCD
66
www.insignia-products.com
Page 67

NS-27LCD.fm Page 67 Wednesday, June 28, 2006 12:04 PM
Televisor con Pantalla LCD de 27" Insignia NS-27LCD
www.insignia-products.com
67
Page 68

NS-27LCD.fm Page 68 Wednesday, June 28, 2006 12:04 PM
Page 69

NS-27LCD.fm Page 69 Wednesday, June 28, 2006 12:04 PM
Page 70

NS-27LCD.fm Page 70 Wednesday, June 28, 2006 12:04 PM
Televisor con Pantalla LCD de 27" Insignia NS-27LCD
70
www.insignia-products.com
 Loading...