

Page 1

Insignia 7” Portable DVD Player Model # I-PD720, User’s Guide
TABLE OF CONTENTS
2 SAFETY PRECAUTIONS
Power Sources
Player Placement
For Safety
Lens and pickup maintenance
When using headphones
4 IMPORTANT SAFETY
INSTRUCTIONS
5 INSIGNIA FEATURES
6 WHAT’S WHAT
Player
Remote Control
8 PLAYER CONNECTIONS
AC adapter
Headphones
Connecting to a TV
Connecting to a TV and audio
amplifier
10 BEFORE YOU BEGIN
Using remote control
Playable discs
11 BASIC OPERATIONS
Loading discs
Adjusting the picture
Playing discs
Pausing discs
Playing picture CDs
Playing music CDs
13 ON SCREEN DISPLAY (OSD)
Selecting a DVD title
Selecting a DVD chapter
DVD menu play
Selecting with numbers buttons
15 BASIC SETTINGS
Changing audio language
Changing subtitle language
Changing the camera angle
Using the repeat function
Playing a CD
17 SETUP FUNCTIONS
DVD and CD menus
20 GENERAL SETUP
TV display
SPDIF output
Captions
Screen saver
Audio setup
Speaker setup
Dolby digital setup
Equalizer
3D processing
Password setup
Changing the password
Preferences
Resetting player to default
23 PLAYING DISCS
DVD audio
CD audio
CD or DVD fast play
DVD slow play
DVD repeat play
CD repeat play
Repeating one section
Selecting DVD subtitles
Selecting viewing angles
Search options
Play DVD title or chapter
DVD time search
CD time search
DVD bookmarks
Zooming in or out
Program play
Shuffle or random play
Digest play
31 MP3 OPERATION
32 ADDITIONAL TOPICS
Accessories
Handling discs
Troubleshooting
Technical specifications
Using the battery pack
- 1 -
Page 2

SAFETY PRECAUTIONS
• The lightning flash inside a triangle is intended to alert the user to the presence of
"dangerous voltage" within the product’s enclosure that may be of sufficient
magnitude to constitute risk of electric shock.
• The exclamation point inside a triangle is intended to alert the user to the
presence of important operating and maintenance instructions.
Read this manual carefully and keep it for future reference.
WARNING: To reduce the risk of fire or electric shock, do not expose this product to rain
or moisture. Do not expose the product to dripping or splashing liquids. Do not place
objects filled with liquids, such as vases, on top of the product.
CAUTION: To prevent electric shock, make sure the AC adapter is fully inserted into an
AC outlet, extension cord, or surge protector. Match the wider of the two vertical prongs
on the adapter with the wider slot in the outlet.
CAUTION: The product uses a laser. To prevent direct exposure to invisible laser
radiation, do not open the cabinet. Do not stare into the laser beams. Use of any
controls, adjustments, or procedures other than those specified herein may result in
hazardous radiation exposure.
WARNING: Any change or modification to the product, not expressly approved by
INSIGNIA or its authorized parties, could void the user’s authority to operate the product.
NOTE: If the product requires servicing, contact Best Buy or Insignia customer service.
Visit our website at
www.insignia-products.com for more information.
Power Sources
This product operates using the supplied AC adapter, car adapter and rechargeable
batteries.
Make sure that the input voltage printed on the AC adapter is the local voltage. In
the United States, it should be 120 volts.
To avoid electrical shock, do not touch the AC adapter with wet hands.
When connecting with car adapter (cigarette lighter), be sure the input voltage of
the adapter is identical to the car voltage (12 volts DC).
If the product will not be used for a long time, unplug the AC adapter and remove
the rechargeable batteries
To unplug the AC adapter, hold and pull on the adapter, not the cord.
- 2 -
Page 3

Where to place the player
Avoid placing the product in the following places:
In direct sunlight or near a source of heat such as a radiator or heat vent.
In a closed automobile, on a dashboard or a parcel shelf. Excess heat may
deform the product, causing it to malfunction.
Where it is very dusty or sandy.
Wet or humid places, such as bathroom.
Near sources of strong magnetism, such as a television, speaker or magnet.
Where there is movement or vibration, such as on a car dashboard or an
unstable shelf.
Where the temperature is extremely hot or cold.
Where the product is exposed to rain or water.
For Safety
Do not attempt to service the product yourself. All servicing should only be done
by qualified service personnel.
If liquid or objects get inside the product, unplug the AC adapter immediately to
cut the power and contact Insignia customer service.
Do not drop or shake the product, or expose it to strong shocks. Strong
vibrations will damage the product.
Note: When product is in use for a long period of time, the surface of the product will
become heated. This heat is expected and should not affect performance.
Lens and Pickup Maintenance
If the product is exposed to a rapid change in temperature or humidity, for
example if it’s suddenly moved from a cold place to a warm one, or from a dry to
a humid place, moisture will condense on the pickup lens and the product will
perform poorly or malfunction. If this happens, evaporate the moisture by
removing the disc and leaving the product on for about one hour in a wellventilated area.
Keep the pickup lens free from dust. Keep the disc tray closed when the product
is not in use. If dust collects on the pickup lens, use a cleaning disc to clean the
lens. Always refer to the cleaning disc operation instructions.
When Using Headphones
To avoid hearing damage caused by sudden loud audio peaks, keep the
headphone volume set at the lowest level before playing a disc. Once the disc is
playing, adjust the headphone volume. Keep the headphone volume at the
lowest acceptable level to protect your ears. To avoid accidents, never wear
headphones when driving a car or boat, or riding a bicycle.
- 3 -
Page 4

IMPORTANT SAFETY INSTRUCTIONS
(1) Read these safety and operating instructions before operating the product.
(2) Keep these safety and operating instructions in a safe place for future reference.
(3) Strictly follow and adhere to all product warnings and instructions.
(4) Unplug this product from the AC outlet before cleaning. Do not use liquid or aerosol
cleaners. Use a damp cloth for cleaning.
(5) Do not use attachments that are not recommended by Insignia. They may cause
hazards.
(6) Do not use this product near water, for example, near a swimming pool, bathtub,
washbowl, kitchen sink, laundry tub, or in a wet basement.
(7) Place the unit on a study surface, such as a cart, stand, tripod, bracket, or table
recommended by the manufacturer or sold with the product. Placing this product
on an unstable surface could allow the product to fall, and cause serious personal
injury to a child or adult, and could also seriously damage the product.
(8) If you are mounting the product, use a mounting accessory recommended by the
manufacturer and follow the manufacturer’s instructions.
(9) If the product is used on a movable cart, be careful moving it. Quick stops,
excessive force and uneven surfaces may overturn the cart and damage the
product.
(10) This product must only be operated using the AC power source indicated on the
adapter. If you are not sure of the type of AC power supply to your home, consult
Best Buy or your local power company.
(11) This product may be equipped with a polarized AC line plug (a plug having one
blade wider than the other). As a safety feature, this plug will only fit into the power
outlet one way. If you are unable to fully insert the plug into the outlet, try reversing
it. If the plug still doesn’t fit, contact an electrician and replace your obsolete outlet.
Do not defeat the safety purpose of the polarized plug.
(12) Power supply cords should be positioned to prevent them from being walked on or
pinched by items placed on or against them, especially where they are connected
to the product.
(13) Protect the product from lightning and/or power line surges, or when it won’t be
used for a long time by unplugging it from the AC outlet. Also, disconnect the
product from an antenna or cable system.
(14) An outside antenna system should not be located where the antenna could fall onto
overhead power lines or other electric light or power circuits. When installing an
outside antenna system, extreme care should be taken avoid touching power lines
or circuits, as contact with these high-voltage wires could be fatal.
(15) Do not overload wall outlets, extension cords, or surge protectors to prevent the
risk of fire or electric shock.
(16) Never push objects of any kind into this product. Inserting an object could result in
a fire or electric shock. Never spill liquid of any kind on the product.
(17) Unplug this product from the AC outlet and have the product serviced by qualified
service personnel under the following conditions:
a. When the AC adapter or plug is damaged.
b. If liquid has spilled, or objects have fallen into the product.
c. If the product has been exposed to rain or water.
d. If the product does not operate normally by following the operating
instructions. Adjust only those controls that are covered by the operating
instructions. Improper adjustment of other controls may result in damage and
will often require extensive repair by a qualified technician.
e. If the product has been dropped or damaged in any way.
f. When the product exhibits a distinct change in performance.
(18) When replacement parts are required, be sure the service technician uses
replacement parts that are specified by the manufacturer, or have identical
characteristics as the original part. Unauthorized substitutions may result in fire,
electric shock or other hazards.
- 4 -
Page 5

(19) Upon completion of any service or repair performed on this product, ask your
service technician to complete a safety check to determine that the product is in
proper operating condition.
(20) The product should be kept away from heat sources such as radiators, heat
registers, stoves or other products (including amplifiers) that produce heat.
(21) During playback, a few bright or dark flecks may appear on the TFT LCD. This
happens occasionally in active matrix displays, and does not indicate a malfunction.
INSIGNIA FEATURES
MPEG2 HIGH DEFINITION video delivers over 500 lines horizontal resolution.
EXCLUSIVE FUNCTIONS including multi-angle viewing and multi-language subtitling
and audio when available. Easy-to-use parental lock provides control over disc content.
ZOOM - a unique feature that can zoom into moving or still images by 2X, 3X, or 4X the
original size, or reduce the size of pictures by 1/2, 1/3, or by 1/4 the original size.
MULTI-FUNCTION REMOTE including fast forward, fast reverse, slow play, frame play,
repeat play and program play.
TIME SEARCH lets you search for and play a specific scene on a disc, which is
especially useful for quickly replaying great scenes in action movies.
16 X 9 format TFT LCD makes disc content appear sharp and clear. TFT is short for thin
film transistor, a type of LCD flat-panel display screen. TFT technology provides the best
resolution of all the flat-panel techniques.
Easy to use on screen display (OSD) makes setup and programming simple.
Analog and coaxial digital AUDIO OUTPUTS can be connected to any amplifier to enjoy
high quality music and sound effects.
MPEG-4 VIDEO playback offers higher picture quality. Only "MPEG Discs" containing
"*.avi" video files can be played in this product.
- 5 -
Page 6

WHAT’S WHAT
DVD Player
(1) TFT LCD MONITOR
(2) SPEAKERS
(3) OPEN TRAY BUTTON
(4) POWER ON/BATTERY CHARGING
INDICATOR
(5) REMOTE CONTROL SENSOR
(6) PLAY
(7) PAUSE
(8) STOP
(9) DIRECTION BUTTONS
(10) ENTER
(11) PREV/NEXT SKIP
(12) RETURN
*The slide switch can only be set when power is OFF.
(13) TOP MENU
(14) MENU
(15) MONITOR AND +, -
(16) VOLUME CONTROL
(17) HEADPHONE 2
(18) HEADPHONE 1
(19) AV OUT
(20) VIDEO OUT/TFT (SLIDE
SWITCH)*
(21) COAXIAL OUT
(22) DC IN
(23) POWER ON/OFF
- 6 -
Page 7
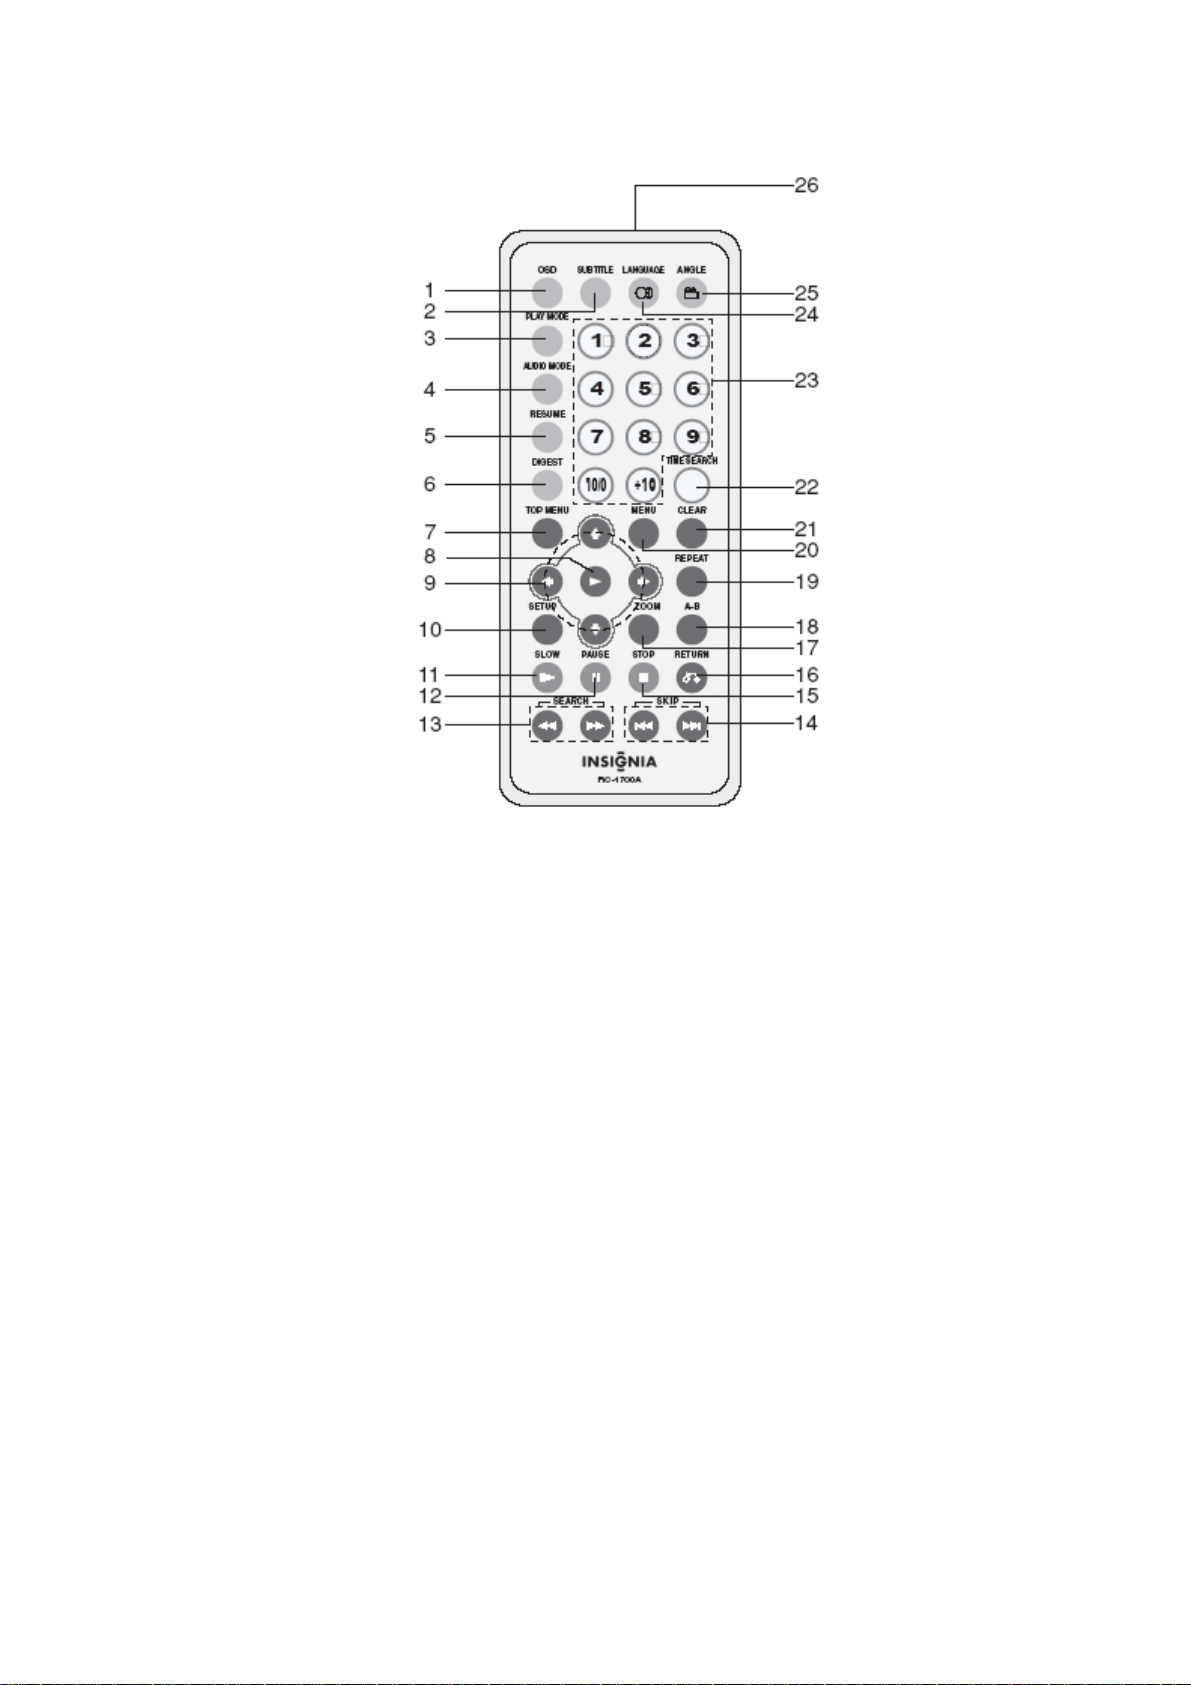
Remote control buttons and functions
(1) OSD (ON SCREEN DISPLAY)
BUTTON
(2) SUBTITLE
(3) PLAY MODE
(4) AUDIO MODE
(5) RESUME
(6) DIGEST
(7) TOP MENU
(8) PLAY
(9) DIRECTION BUTTONS
(10) SETUP
(11) SLOW
(12) PAUSE
(13) FF/FR SEARCH
(14) PREV/NEXT SKIP
(15) STOP
(16) RETURN
(17) ZOOM
(18) A-B REPEAT
(19) REPEAT
(20) MENU
(21) CLEAR
(22) TIME SEARCH
(23) NUMBER BUTTONS
(24) LANGUAGE
(25) ANGLE
(26) REMOTE TRANSMITTER
- 7 -
Page 8

PLAYER CONNECTIONS
AC adapter (A)
The player can operate or charge batteries using the supplied AC adapter.
1. Insert the DC adapter plug into the player’s DC IN jack.
2. Insert the AC adapter into an AC wall outlet. The POWER ON/BATTERY CHARGING
INDICATOR light will appear, and the product is ready for use.
Note: Turn off the product before unplugging the AC adapter to avoid damage.
Headphones (B)
1. Insert headphone plug into one of the two headphone jacks.
2. Note: Turn off the power when inserting or removing headphones.
- 8 -
Page 9
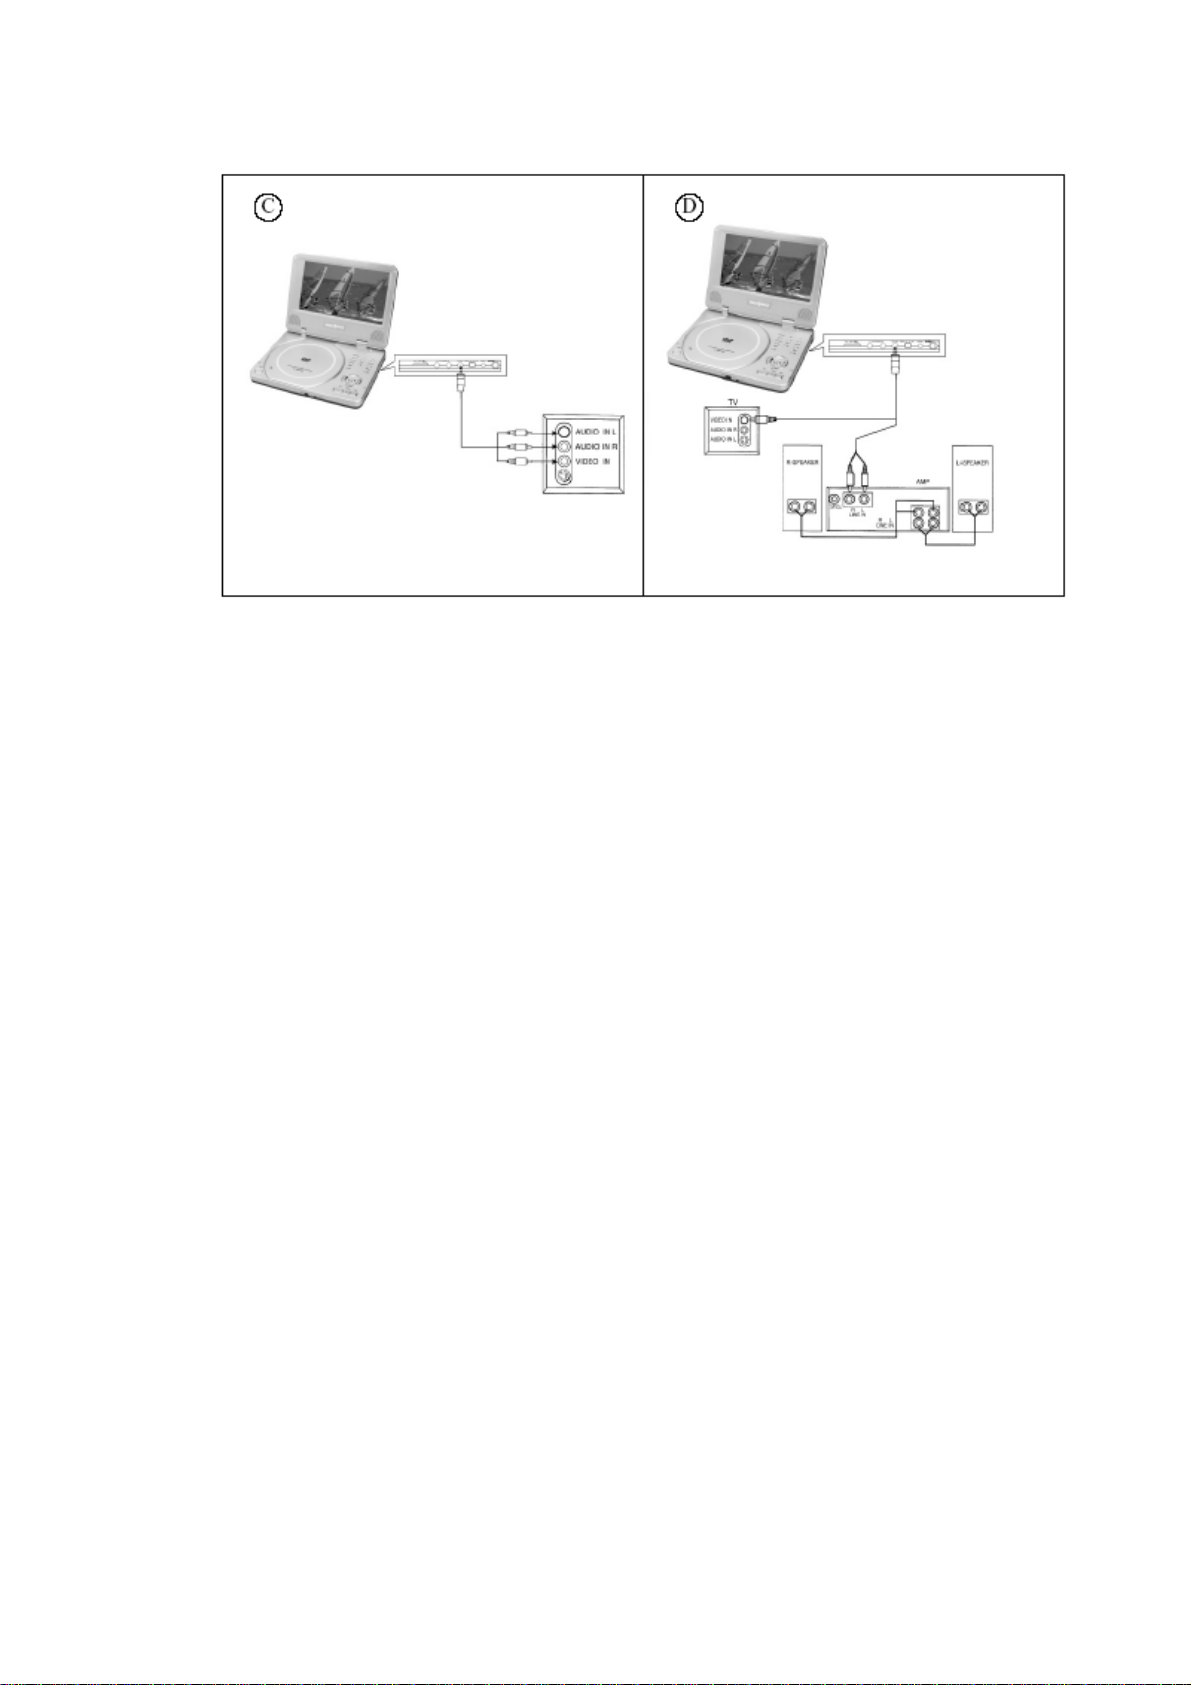
Connecting to a TV (C)
1. Connect the mini plug to the AV OUT jack on the product.
2. Connect the yellow RCA plug to the VIDEO IN jack on the TV.
3. Connect the red RCA plug to the AUDIO IN R jack on the TV.
4. Connect white RCA plug into the AUDIO IN L jack of the TV.
Connecting to a TV and audio amplifier (D)
1. Connect the mini plug to the AV OUT jack on the product.
2. Connect the yellow RCA plug into the VIDEO IN jack on the TV.
3. Connect the red RCA plug to the LINE IN R jack on the amplifier.
4. Connect the white RCA plug into the LINE IN L jack on the amplifier.
If your amplifier accepts a coaxial digital input, you can connect the DVD player to the
amplifier with a coaxial cable (not supplied with product).
Note: When the product is connected to a TV, the slide switch must be set to "VIDEO"
position.
- 9 -
Page 10
BEFORE YOU BEGIN
Using the remote control
1. Install batteries. Open the remote control battery compartment, insert batteries,
and close the compartment, as in illustration.
2. When using the remote control, point it at the remote sensor on the front of the
player. The remote’s range is 5 meters (16 feet), with a 60° acceptance angle.
3. Batteries last for about one year. If the remote control does not work, replace the
batteries.
4. Remove the batteries if remote control will not be used for a long time.
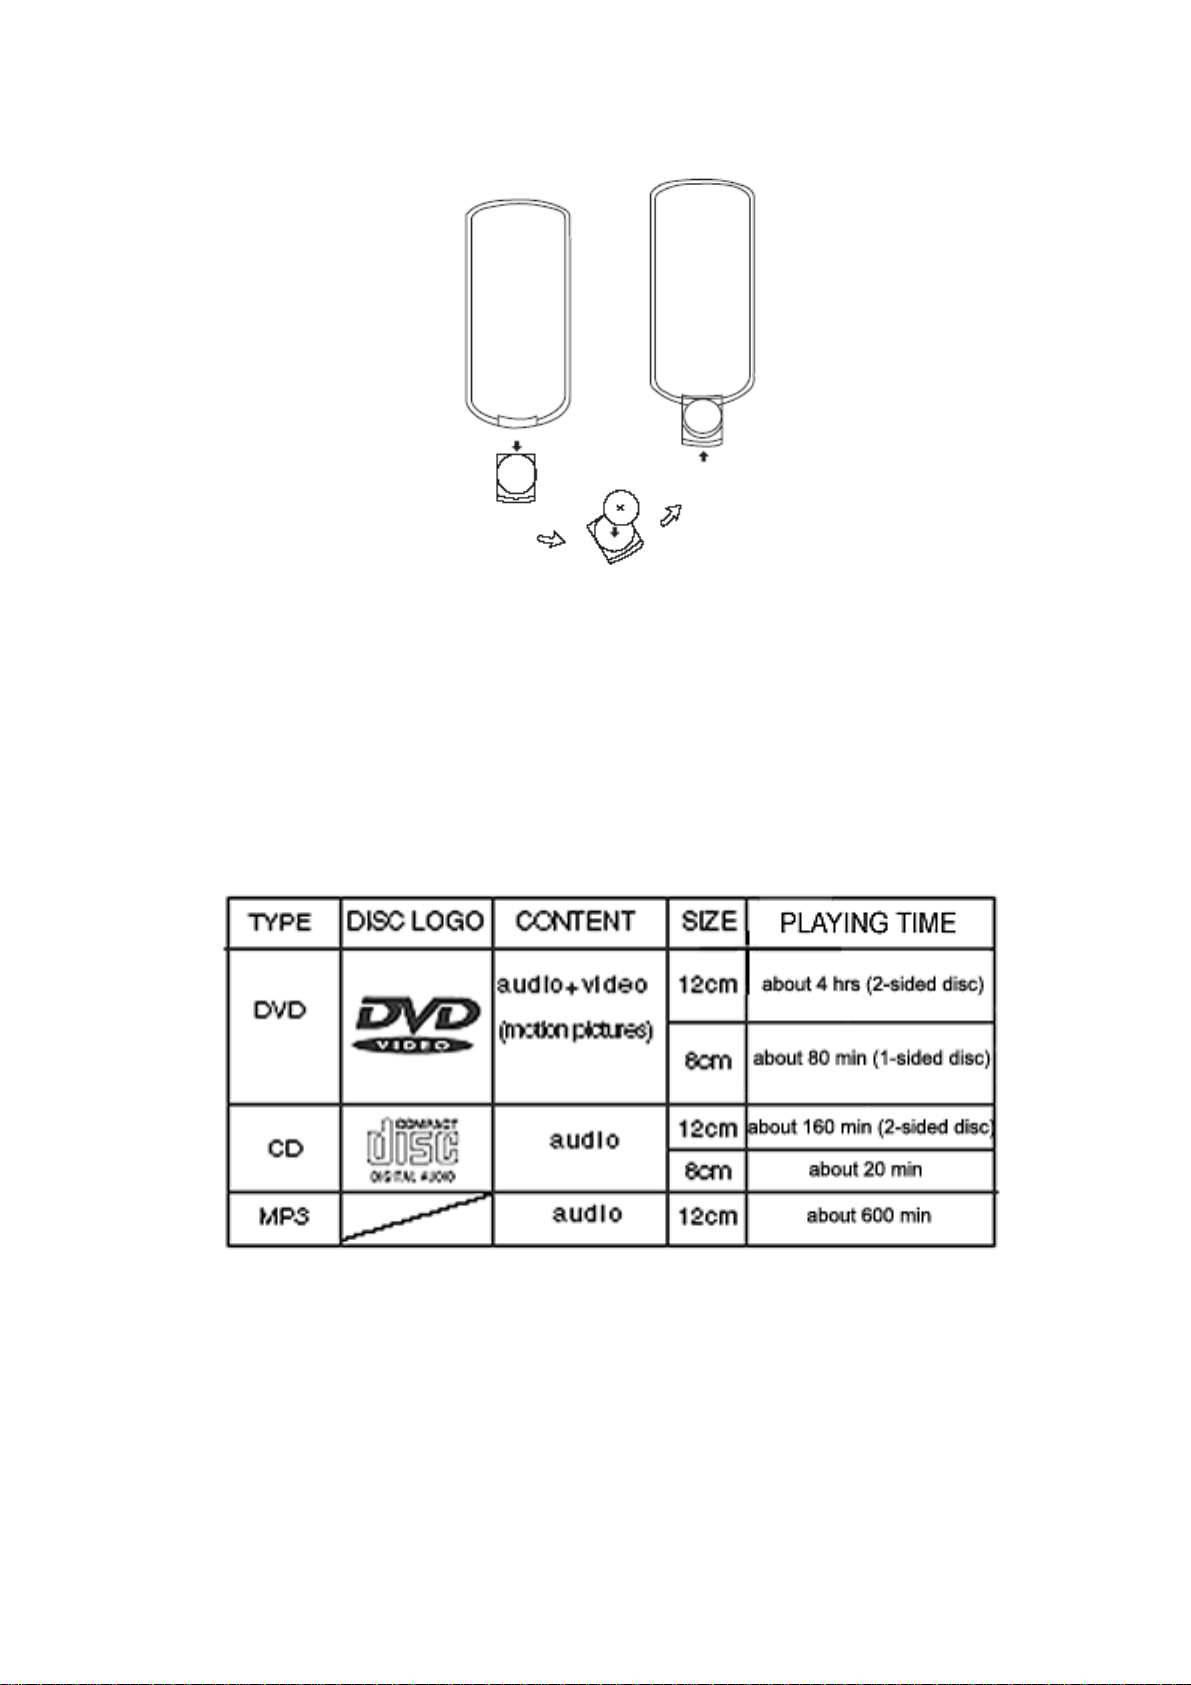
Playable Discs
- 10 -
Page 11

BASIC OPERATIONS
1. Press the lock switch to open the cabinet cover.
2. Turn the power on using POWER ON switch.
3. Adjust audio level (including headphones) using VOLUME control.
4. When connecting the player to a TV or an amplifier, adjust the volume according
to the TV owner’s manual. Set TV to AV mode.
Loading discs
1. Press OPEN to open the disc tray.
2. Hold the edges of the disc and place it in the center of the tray with the printed
side up.
3. Close the disc tray cover until it clicks.
- 11 -
Page 12

Adjusting the picture
1. Press MONITOR button to select brightness adjustment and press + or - buttons
to select the preferred brightness level.
2. Press MONITOR button again to select the color adjustment and press + or -
buttons until the preferred color is set.
3. Press MONITOR button again to select display mode and press + or - buttons to
select NORMAL/PS, NORMAL/LB, or FULL picture display mode.
Note: During playback, a few bright or dark spots may appear on the TFT LCD. This is
normal in active matrix display technology.
Playing discs
1. Load a disc and press (PLAY) to play the disc.
2. Press (STOP) to stop playback.
3. Remove the disc and switch off the product.
Note: Press (STOP) button twice to stop the playback of DVD discs.
Pausing discs
Press (PAUSE) button.
Playing picture CDs
Press (PAUSE) button to play a DVD picture disc. The player switches to step play
mode. Each time you press the (PAUSE) button, the disc advances one frame.
Playing music CDs
Press the (PAUSE) to pause playback. Press (PLAY) to resume playback.
- 12 -
Page 13

ON SCREEN DISPLAY (OSD)
The On Screen Display (OSD) controls DVD playback features. To see the OSD, press
the (OSD) button on the remote control while a DVD disc is playing. The OSD appears
across the top of the screen. Each feature is illustrated with an icon.
Use the (LEFT) or (RIGHT) buttons on the remote to select functions. When an icon (and
function) is highlighted, use (UP) or (DOWN) buttons to scroll through the choices, which
will be displayed in the text box just under the icons.
Note: You can only access the OSD when you’re playing a DVD disc. OSD features are
only available on discs include those features. For example, if you’re playing a DVD that
does not include subtitles, you won’t be able to change the subtitle language.
Note: The invalid symbol "
function that is not supported on the DVD. If one of the OSD icons is "grayed out", that
feature isn’t available for the disc you’re playing.
To remove the OSD Display from the screen, press the (OSD) button on the remote.
Selecting a DVD Title
DVDs and CDs contain music, images and video organized into unit called titles, chapters
and tracks. On a DVD containing a movie, the title is usually the title of the movie. A
DVD can contain more than one title. On a CD, the title is the title of the CD.
DVDs are divided into smaller units called chapters. A title is made up of several
chapters, and each chapter is indexed with a number that makes searching for a
particular scene much easier.
CDs are divided into smaller units called tracks. Each music track has a number that
makes searching for a particular song much easier.
: " appears on the screen when you press a button for a
Some discs contain a single title, while others contain more than one title. For example,
there might be four movies on a single DVD disc. Each movie might be considered a
title. Each title is divided into chapters. To select a title:
1. Press (OSD) on the remote while the disc is playing to launch the Display.
2. Use the (LEFT) or (RIGHT) buttons to highlight the title icon.
3. Press the (BACK) or (PLAY) buttons to go to the previous or next title.
4. Press (OSD) again to hide the display.
- 13 -
Page 14

Selecting a DVD chapter
Because DVD discs use digital technology, a title can be divided into individual chapters
(similar to tracks on a CD). You can skip to any chapter by using the Chapter feature in
the OSD.
1. While the disc is playing, press OSD on the remote to bring up the Display.
2. Press the (RIGHT) or (LEFT) buttons to highlight the Chapter icon.
3. Press the (UP) or (DOWN) buttons to go to the next or previous chapter.
4. Press (OSD) again to hide the display.
Note: You can also advance to the next chapter by pressing (FAST FORWARD) on the
remote, or go to the previous chapter by pressing (FAST REWIND).
Note: The chapter feature won’t work if the disc isn’t formatted with chapters.
DVD menu play
Some DVDs have title menus and chapter menus. On these DVDs, pressing (PLAY)
will show these menus. Press (FAST FORWARD) or (FAST REWIND) to skip the
next or previous page, select your choice with number buttons or direction buttons.
Example: Here’s how to select track 13.
1. Press (FAST FORWARD) to enter the next menu.
2. Press number buttons to select tracks.
Or you could:
1. Press (DOWN) to select track 13.
2. Press (PLAY) to start playing track 13.
3. Press (TOP MENU) to return to the title menu. Press (MENU) to return to the
root menu.
Selecting CD tracks using number buttons
While a disc is playing, use the number buttons to select tracks.
1. If the track number is less than 10, simply press a 1-10 number button. For
example: push 8 to select track 8. The screen shows:
- 14 -
Page 15

2. If the track number is over 10, press +10 and then press a 1-10 number button.
For example: To select track 12 press +10 once and number button 2 once. The
screen shows:
BASIC SETTINGS
Changing the audio language
If a DVD disc was created with additional audio language tracks (tracks recorded in
different languages), you can use the OSD to temporarily change the player’s Audio
Language setting.
1. While the disc is playing, press (OSD) on the remote to bring up the Display.
2. Press the (BACK) or (PLAY) buttons to highlight the Audio icon. The current
audio language appears in the text box below the row of icons.
3. Press the (UP) or (DOWN) buttons to scroll through the audio languages until the
desired audio language appears in the text box. The DVD audio will be played in
that language.
4. To exit from the Display, press the (OSD) button on the remote.
Note: The language feature only works if the disc was created with multiple audio tracks.
When you choose an audio language from the Display, you temporarily override the
audio language setting in the DVD player’s main menu. The audio language can also be
changed through the DVD player menu.
Selecting the subtitle language
If the DVD disc includes subtitles, you can use the Display to change the Subtitle
language.
1. When the disc is playing, press (OSD) on the remote to bring up the Display.
2. Press the (BACK) or (PLAY) buttons to highlight the Subtitle icon.
3. Press the (UP) or (DOWN) buttons to scroll through the available Subtitle
languages until the language you want appears in the text box. Subtitles will now
be displayed in that language.
4. To exit the Display, press the (OSD) button.
Note: Changing the subtitle language with the Display only affects the disc currently
being played. When the disc is removed or the player is turned off, the subtitle
language will revert to the language setting specified through the DVD main menu.
The subtitle language can also be changed
through the DVD player menu.
- 15 -
Page 16

Changing the camera angle
Some DVD discs contain multiple viewing angles for a particular scene or sequence.
When multiple angles are available, here’s how to select an angle:
1. When a disc is playing, press (OSD) on the remote to bring up the Display.
2. The Angle icon will display the number of angles available. For example, if
there are 3 different angles, the icon will read 1 of 3, this means angle 1 is
currently being played, and there are a total of three angles to choose from.
3. Press the (UP) or (DOWN) buttons to scroll through the angle choices. The
angle number will be displayed in the text window.
4. To exit Display press the (OSD) button on the remote.
Using the repeat feature
The Repeat feature is normally OFF. You can choose from among three Repeat
options:
1. ALL repeats the disc from the beginning of the DVD.
2. TITLE repeats the title that is currently playing.
3. CHAPTER repeats the chapter that is currently playing.
To Use Repeat:
1. While a disc is playing, press (OSD) on the remote to bring up the Display.
2. Highlight the Repeat icon.
3. Press the (UP) or (DOWN) buttons to scroll through the Repeat options until
the option you want is displayed in the text box.
4. The selected option will loop repeatedly until you cancel Repeat.
How to Cancel Repeat:
There are three ways to cancel Repeat:
1. Press the (STOP) button twice.
2. Go to Repeat icon in the OSD and select Off. Press (OSD) again to hide the
display.
3. Eject the disc.
Playing a CD
CD discs have the following playback features: Track, L/R, Audio (not available) and
Repeat.
Selecting a Specific Track
1. While the CD disc is playing, press (OSD) to bring up the Display.
2. Highlight the Track icon you’d like to play.
3. Press the (UP) or (DOWN) buttons to scroll through the track numbers.
Changing the audio channel output
If you are playing a Stereo CD you can change the channel output from the player.
1. Press OSD on the remote to bring up the Display.
2. Highlight the L/R icon on the Display.
- 16 -
Page 17

3. The Audio channel choices appear in the text box. Press the (UP) or
(DOWN) buttons to scroll through the choices: LEFT MONO, RIGHT MONO,
MIXED MONO, or STEREO. The selected option becomes the active
choice.
SETUP FUNCTIONS
DVD & CD menus
You might like to customize player functions to enjoy the best results for your
equipment and discs. Here’s what to do:
1. Press SETUP to set the main menu.
The main menu appears on the screen. Icons across the top of the screen
indicate setup options: General Setup, Audio Setup, Preferences, Password
Setup, and Exit. The screen looks like this:
2. Press direction (UP) or (DOWN) buttons to select an option, then press
(PLAY) to confirm. Example: Press (DOWN) to highlight “Audio Setup”, and
press (PLAY) to confirm. The screen will look like this:
- 17 -
Page 18

Press (UP) or (DOWN) to highlight “Dolby Digital Setup”, and then press (PLAY)
to enter the “Dolby Digital Setup” page. The screen shows the submenu for your
selection:
Press direction button (RIGHT) and then (DOWN) to select “Left Mono”. The
screen will look like this:
Press (PLAY) to confirm your selection. In “Dolby Digital Setup,” you have just
set “Dual Mono” to “Left Mono”. The screen shows:
- 18 -
Page 19

3. Exit the setup menu.
Press the (LEFT) button to exit from “Dual Mono”.
Press the (LEFT) button to exit from “Dolby Digital Setup”.
Press the (DOWN) button to highlight “Main Page” and press (PLAY). The
screen shows:
Press the (DOWN) button 3 times to highlight “Exit Setup” and press (PLAY) to
exit setup.
Note: You can also keep pressing the direction button until the cursor is moved
to the last icon illustrating Exit, then press the (PLAY) button to exit setup menu
completely.
- 19 -
Page 20

GENERAL SETUP
The general setup page lets you setup and control the TV display, SPDIF output,
captions, and screen saver.
TV display
1. NORMAL/PS
Select Normal/PS when the player is connected to a normal TV. Wide-screen
images are shown on the screen, but with the left and right parts of the video
frame deleted.
2. NORMAL/LB
Select this “letter box” option when the player is connected to a normal TV. The
entire wide-screen image is displayed, with black bands on the top and bottom.
3. WIDE
Select Wide when the product is connected to a wide-screen TV. The entire
wide-screen image will be displayed.
SPDIF output
Sony/Philips Digital Interface (SPDIF) works with digital audio equipment that can
playback linear PCM coded audio. Here are the options:
1. SPDIF OFF: No signal is output from the digital port.
2. SPDIF/RAW: Select this when the DVD player is connected to a digital
amplifier through the digital port. When a Dolby Digital or MPEG disc is
played, the digital audio output becomes available. The connected audio
amplifier must have Dolby Digital and MPEG decoding capabilities to play
SPDIF titles.
3. SPDIF/PCM: Select this when the DVD player is connected to a Dolby 2-
channel digital stereo amplifier. When a Dolby Digital or MPEG disc is
played, the digital port will output in PCM 2-channel format.
- 20 -
Page 21

Captions
1. When Captions is turned ON, subtitles are displayed within the TV picture.
2. When Captions is turn OFF, subtitles are turned off, and won’t be displayed.
Screen saver
When you start the screen saver, an image appears when the player stops or the
video is frozen for a few minutes. The screen saver feature can keep the TFT screen
from becoming damaged.
1. Select ON to start the screen saver.
2. Select OFF to remove the screen saver.
Audio setup
Audio setup options include speaker setup, Dolby digital setup, Channel Equalizer,
and 3D processing.
Speaker setup
The setting structure is:
LT/RT
Select this option when you’re playing a disc with a multi channel soundtrack.
The additional audio channels will be incorporated into left and right channels.
STEREO
Select Stereo when you’re playing a disc with a multi channel soundtrack, the
output signal will be incorporated to stereo.
Dolby digital setup
Here are the options:
DUAL MONO
Select this option if you’d like the output mode of both L and R channels to output
mono.
MIXED MONO
Select this function when playing 5.1-channel audio DVDs.
Dynamic Range Control (DRC)
This feature uses metadata to adjust the audio’s dynamic range so you can enjoy
the best results for your listening environment.
Equalizer
Select a graphic equalizer pattern according to the genre of the music being played.
The setting options include:
EQ TYPE
Select a music category by pressing the direction buttons and confirm your
selection by pressing the (PLAY) button.
- 21 -
Page 22

3D processing
The setting options include:
V SURR
Use this option to turn Virtual Surround sound on and off.
REVERB MODE
Select a room and the corresponding Reverb Mode that you’d like enjoy. Press
(PLAY) to confirm.
Password setup
The password setting options include:
Adjusting the picture
ON
The password function is operational. “PARENTAL” is dim and cannot be
selected.
OFF
The password is locked; “PARENTAL” option can be selected.
Changing the password
Select “Change” to change the password. The screen looks like this:
Following the screen prompts, enter the old password, then choose and confirm a
new one.
Note: The password is automatically factory set to 99999.
Preferences
Use preferences to set up audio and subtitle language (explained in Basic
Operations), disc menu language, and Parental lock-out.
Parental lock-out
Select a rating and the parental lock out will prevent the player from playing a movie with
a higher rating.
Resetting player to default
If you select this option, all function settings return to their factory preset state.
Note: "PREFERENCES" only can be selected when the player is stopped.
- 22 -
Page 23

PLAYING DISCS
DVD audio
You can choose another language from DVDs with multi-channel audio tracks. In the
LANGUAGE chooser, you’ll see these options:
Audio 1/2:AC 3 5.1CH
Audio 2/2:AC 3 5.1CH
You can also choose to listen to one or both audio channels.
In AUDIO MODE, you can select Mono Left, Mono Right, Mix-Mono, or Stereo.
Select the mode you’d like to use, and press (PLAY) to confirm.
CD audio
When playing a multi-channel CD, you can select right channel, right channel, or
stereo. In AUDIO MODE, select an option from: Mono Left, Mono Right, Mixed
Mono, and Stereo.
Choose your preference and press (PLAY) to confirm.
CD or DVD fast play
When playing a CD or DVD disc you can play it fast forward or fast reverse to quickly
search for the track you’re looking for.
1. Press FF to play fast forward. Each time you press the FF button, the fast
forward speed increases by a factor of 2 - 2X, 4X, 8X, 16X, and 32X.
2. Press FR to fast reverse the disc. Each time you press the FR button, the
fast reverse speed increases by a factor of 2 - 2X, 4X, 8X, 16X, and 32X.
3. To exit FF or FR, just press (PLAY) to switch to normal play speed.
DVD slow play
You can enjoy slow motion with the following steps.
1. Press SLOW to play a DVD slowly.
The screen displays the following options: Select the preferred slow forward or slow
reverse speed icon, and press (PLAY) to confirm and play. Press (PLAY) again to
exit slow play.
- 23 -
Page 24

DVD repeat playing
To repeat a chapter, press REPEAT, the screen will verify your choice:
To repeat a title, press REPEAT twice, and again the screen will verify your choice:
To repeat the entire disc, press REPEAT three times. the screen shows ALL.
To stop the “REPEAT” function, press the REPEAT button until ALL disappears.
CD repeat play
To repeat a CD track, press REPEAT. The screen will display Track, and the player
will repeat the current track.
To repeat an entire disc, press REPEAT twice. The screen shows ALL. All the
tracks on the CD will play, beginning with track 1.
To stop the REPEAT function, press REPEAT until ALL disappears.
- 24 -
Page 25

Repeating one selection
Use the A-B function to repeat specific scenes or music on a CD or DVD disc.
Search for and find the beginning of the scene or music you’d like to repeat and
pause the disc. Press A-B to set starting point A. The screen will display:
Now, find the end of the scene or music you’d like to repeat and pause the disc.
Press A-B a second time to set an end point B. The screen shows:
The player will play the disc from point A to point B, reset to point A, and play
repeatedly.
To stop this function, press A-B until AB disappears.
Selecting DVD subtitles
This operation only works with discs that include multiple subtitle languages.
Press SUBTITLE repeatedly until the desired language is selected. The screen
shows:
The player will now display subtitles in the selected language. To remove subtitles,
press SUBTITLE until the screen shows “Subtitle Off”.
Note: On some discs, subtitles cannot be removed. DVD discs can contain a variety
of subtitle languages or none at all. If subtitles cannot be selected, press SUBTITLE
again, and the screen will display ;.
- 25 -
Page 26

Selecting viewing angles
Some DVD discs include additional scenes taken from different viewing angles. For
example, when you watch a NASCAR race, you might watch it from the front, the
bleachers, or from the car behind you without stopping the DVD.
For example: A DVD has four viewing angles.
Press camera icon to select ANGLE1. The screen will show:
Press camera icon to select additional angles. The screen will display:
Press camera again to select the original angle and return to normal playback.
DVD & CD search options
You may directly enter a time, title or chapter number to quickly search for a specific
scene or music selection. The player will play the disc from that point.
Play DVD title or chapter
To search for a DVD title or chapter, follow this example: Search for chapter 2 in
title 6. Begin by pressing TIME SEARCH, and the screen will display:
Press the direction button and move the cursor to highlight the title number. The
screen shows:
Press button 6 to select title 6. The screen shows:
- 26 -
Page 27

Repeating these, select chapter 2 in title 6. The DVD will play from that
point.
DVD time search
Press TIME SEARCH until the screen displays:
Press the number buttons to enter the hour, minute and second of the scene
you’d like to play. For example: Enter the numbers 1, 0, 2, 3, and 8. Press 10/0
to enter 0. After setting, the product will play the disc from 1:02:38.
CD time search
To jump to a specific time on a CD, use TIME SEARCH to set the time for the desired
location. For example: Play from 00:01:38 on track 6.
Press button 6 to select track 6. The screen will show:
Press TIME SEARCH until the screen shows:
Press the buttons 0, 1, 3, and 8 to enter the time. Press 10/0 to enter 0. The
screen shows:
The player will play the CD from 00:01:38 of track 6 after setting.
Note: CD discs have three time search options:
1. You can enter the elapsed time of a disc to play.
2. You can enter the elapsed time of a track to play.
3. You can go to a track you want to play by entering the track number.
- 27 -
Page 28

DVD bookmarks
The bookmark feature lets you establish a point on the disc that the player can
quickly go to. You can store up to 12 bookmarks per disc.
Note: When you turn the player off or remove the disc, all bookmarks are cleared.
Storing a Bookmark
1. While a disc is playing, press (RESUME) on the remote.
2. The Bookmark Menu will appear.
3. When you reach the scene you want to mark, press (PLAY).
4. If you want to mark another point, press the (PLAY) button to move the
cursor to the next spot. When you reach another scene you want to mark,
press (PLAY) again.
5. Press (RESUME) to exit the Bookmark Menu and return to normal playback.
Using Bookmarks
1. While a disc is playing, press (RESUME) on the remote control.
2. The Bookmark Menu will appear.
3. Use the direction buttons to highlight the bookmarked scene you want to go
to. Press (PLAY) and the player will play the disc from that bookmark.
Zooming in or out
The zoom function works with moving video or still images. Here’s how to use it:
Press ZOOM during playback. The screen will display 2X. The picture will be
1.
enlarged to twice the size.
2.
Press ZOOM again and the screen shows 3X. The picture is enlarged three times
normal size. Each time you press zoom, the player will play the next zoom step.
The picture is enlarged three times normal size. Each time you press zoom, the
player will play the next zoom step.
Note: The product has six zoom steps: 2X, 3X, 4X, ½, 1/3, and ¼.
1. Use the (BACK), (PLAY), (UP) AND (DOWN) buttons to move the enlarged
picture.
2. To exit zoom mode, push ZOOM until the picture returns to normal size.
- 28 -
Page 29

DVD & CD program play
To use the program playback feature, enter the order in which you want DVD titles
(and chapters) or CD tracks to play. Here’s how to do it:
When playing a DVD
Press (PLAY MODE) until the screen shows:
Use the number buttons on the remote to enter the title and chapter you want to play
first. The title and chapter numbers you entered appear in the box. The screen
shows:
The cursor jumps to the next spot in the program list section. Make sure the box is
highlighted and enter your next track choice using the number buttons.
Continue adding titles and chapters until your program is complete. Play your
program by highlighting START and press (PLAY).
Note: If you want to play more than ten titles and chapters, highlight NEXT and press
(PLAY) to go to the next page.
To exit program playback, press the (STOP) button twice.
WHEN PLAYING A CD
Press (PLAY MODE) until the screen shows:
- 29 -
Page 30

Use the number buttons on the remote to enter the track number you’d like to hear.
The numbers appear in the first box. The screen displays:
The cursor jumps to the next spot in the program list section. Make sure the box is
highlighted and enter your next track.
Continue adding tracks until your program is complete. You can play your program
by highlighting START and press (PLAY).
Note: If you want to program more than ten tracks, highlight NEXT and press (PLAY)
to go to the next page.
To exit program playback, press the (STOP) button twice.
DVD & CD shuffle or random play
The player can play CDs or DVDs in random order. Here’s how to do it:
While a disc is playing, press (PLAY MODE) and select shuffle or random play. The
screen shows Shuffle or Random.
Press (PLAY) to start shuffle or random play. The player automatically selects a
track to play. To exit shuffle or random play mode, press (STOP) twice.
DVD & CD digest play
This function can be used to look through the content of the track or disc.
Playing DVDs
Press DIGEST while a disc is playing.
The screen prompts you to select from Title Digest, Chapter Digest, Title
Interval, or Chapter Interval.
Use the (DOWN) or (UP) buttons and then select TITLE DIGEST. Press
PLAY to confirm. The player begins to scan the titles, and shows the starting
picture of each title on the screen.
Each page has six pictures. Use the direction buttons to select NEXT on the
screen, and press (PLAY) to go to the next page.
To exit the digest feature, use the direction buttons to select EXIT on the
screen and press (PLAY) to confirm.
Note: If you have stored bookmarks on a DVD disc, there will be one more digest
option: BOOKMARK DIGEST.
- 30 -
Page 31

Playing CDs
Press DIGEST after the player stops.
The screen shows “scan”:
The player plays the first ten seconds of each track, one after another.
To remove digest play, press (STOP), digest play is removed and the disc
stops playing.
Note: A CD disc only has the SCAN function.
MP3 OPERATION
Selecting tracks with menu
Insert a disc and the player searches the disc. The TV screen displays the main
menu:
Press direction buttons to select a song folder. Press (PLAY) to confirm your
selection. For example: To select CD02, the TV screen displays:
1. Press direction buttons to select a song. Press (PLAY) button to start
playback.
2. Press (UP) or (DOWN) button to select other tracks, and press (PLAY) to
play.
3. In stop mode, select the folder icon on the left side then press (PLAY) button
to return to the main menu.
4. Press (LEFT) or (RIGHT) buttons to play previous or next songs.
Note: During the playback MP3 discs, all product features such as volume control
and repeat are the same as CD.
- 31 -
Page 32

ADDITIONAL TOPICS
Accessories
The following accessories are included with your player.
(1) AV cable
(1) Remote control
(1) Owner’s manual
(1) AC power adapter
(1) Rechargeable battery pack
(1) Warranty card
(1) Car cigarette adapter
Handling discs
To keep your discs clean, do not touch the play side of the disc. Do not attach paper
or tape to the disc.
Keep the disc away from direct sunlight or heat sources. Store the disc in a disc case
after playback.
Cleaning Discs
Before playing wipe the disc outwards from the center with clean cloth.
- 32 -
Page 33

Troubleshooting
If you experience the following problems while using the product, this troubleshooting
guide can help you.
No Power
If player is connected to AC adapter:
Make sure the adapter is inserted in the wall socket.
Verify that the AC adapter is inserted to the correct plug on the DVD player.
Check if the wall socket has power (Some wall sockets use an on/off switch).
If connected to the battery:
Make sure that the battery is tightly secured on the back of the DVD player.
Verify that the battery is fully charged.
If the battery and AC adapter are both plugged in, disconnect the AC
adapter.
No sound
Check if the product is connected securely.
Check if the volume of headphone is set to MIN when using headphone.
Make sure you operate the TV or amplifier correctly.
Make sure you have selected DVD player position on the amplifier.
No image
Check if the product is connected securely.
Make sure you operate the TV correctly.
Make sure you set the color system correctly.
Bad sound quality
Make sure the audio output mode is set correctly.
Make sure the audio connection between the product and amplifier is right.
Disc cannot be played
There is no disc in the product.
Put the disc on the disc tray properly with the label side up.
Clean the disc.
Moisture has condensed in the product. Remove the disc and leave the
player on for about one hour.
Remote control does not work
Remove barriers between the remote control and the player.
Point the remote control at the player’s remote control sensor.
Replace the batteries with new ones.
Image rolls and no color
The color system of the product doesn’t match with that of TV. Please select
the correct TV TYPE until TV shows normal color.
- 33 -
Page 34

Technical specifications
Laser wavelength 650nm
Video system NTSC
Frequency response 20Hz20KHz ±1dB
Signal/noise ratio ≥95dB
Audio distortion + noise ≤-80(1KHz)
Channel separation ≥85dB
Dynamic range ≥85dB
Output
Audio out (analog audio) Output level: 2V±10% Load impedance:
10kohms
Audio out (digital audio) Output level: 0.5Vp - p
Video out Output level: 1Vp - p±20%
Video load impedance 75 Ohm, imbalance, negative polarity
Power supply DC 9V 2A
Allowable motion temperature 5 – 35degrees Celsius
Power Consumption ≤20W Dimensions 190×142×29mm
Weight 825 g (1.8 lb)
This manual is only for your reference. Any change to the design and specifications
will not be advised.
This product incorporates copyright protection technology that is protected by method
claims of certain U.S. patents and other intellectual property rights owned by Best
Buy Corporation and other rights owners. Use of this copyright protection technology
must be authorized by Best Buy Corporation, and is intended for home and other
limited viewing uses only unless otherwise authorized by Best Buy Corporation.
Reverse engineering or disassembly is prohibited.
Using the battery pack
Attach the battery pack properly by following these directions. Make sure that the
battery pack is attached firmly to the player when using it. Otherwise, the battery may
become detached and cause person injury. Charge battery pack before using it.
Attaching the battery pack
First disconnect the AC adapter and the power cord from the player, and then attach
the battery pack.
1. Turn the player off.
2. Turn the player upside down.
3. Insert the battery pack’s catches into the player’s corresponding holes. Then,
slide the battery pack until it is attached firmly.
Note: Remove the battery pack from the player after being used.
Charging the battery pack
1. Turn the player off. The battery pack will charge only when the POWER to
the player is turned OFF.
2. Attach the battery pack to the player.
3. Connect the supplied AC adapter and the power cord to the player. Charging
starts, and the POWER/CHG indicator light is illuminated. When the charging
is complete the indicator light turns off.
- 34 -
Page 35

While the charge is in progress, do not disconnect the AC adapter and the power
cord until the POWER/CHG indicator turns off. The charging time of a battery pack is
approximately 4.5 hours, depending on environmental conditions.
The attached battery pack may get warm when you are charging it or operating the
player. This is normal.
The battery indicator is shown on the screen when the power in the battery pack is
running low.
Detaching the battery pack
1. Turn the player off.
2. Disconnect the AC adapter and the power cord from the player.
3. Turn the player upside down.
4. Slide the battery pack’s lock switch in the open direction, and then slide the
battery pack in the correct direction to remove it.
Playback time
After the battery pack is fully recharged, its continuously working time is as follows:
Model Operating status Continuous playing time
I-PD720 Play DVD, TFT on about 3 hours
Play DVD, TFT off about 5 hours
ATTENTION
While using the battery pack, the environmental temperature should be 5°C
(41°F) to 35°C (95°F).
A newly purchased battery pack can only be used after being fully charged.
To get the longest service life out of the battery pack, charge it under or close
to indoor temperatures.
Never dispose of battery in fire or water.
Do not use in high temperature or near heat sources.
Never connect the positive and negative poles with metal.
Do not open the battery; refer servicing only to qualified service personnel.
- 35 -
 Loading...