

Page 1

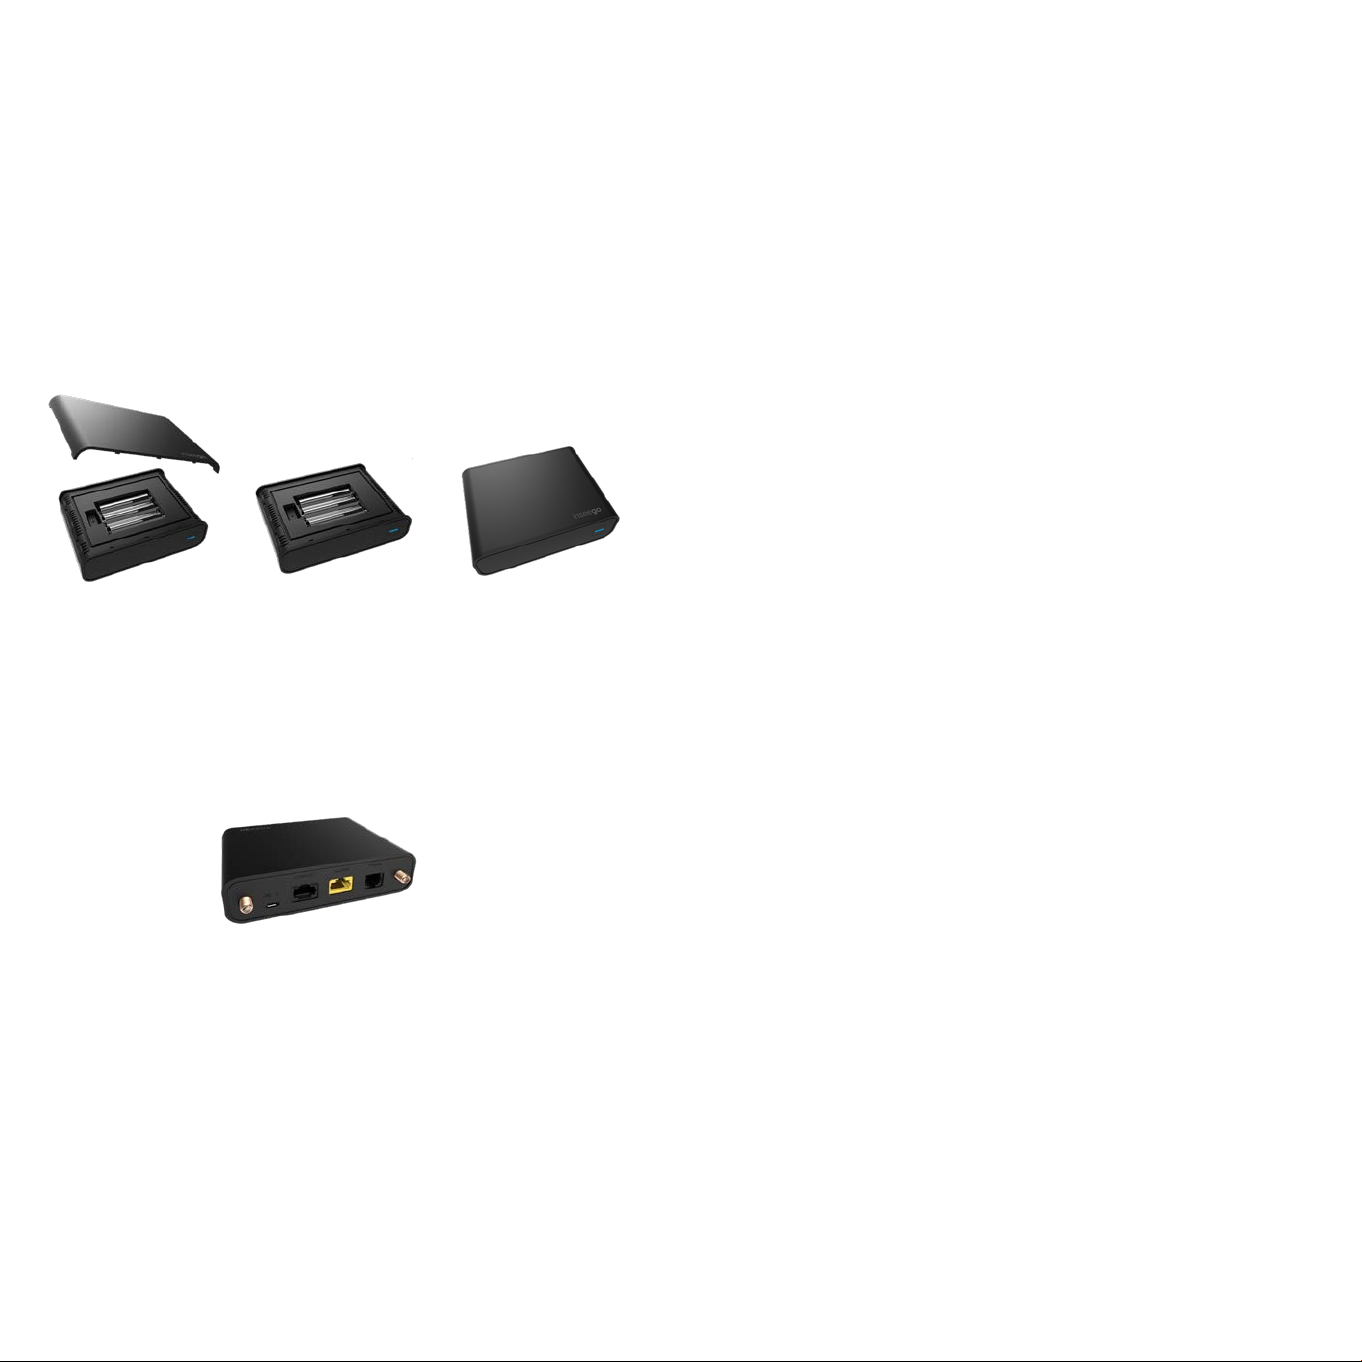
Top View
1
2
3
1 2 3 4 5 6
About your BPC100
Rear View
No. Item No. Item
1
External Antenna Connector 1 4 Alarm Port
2
Power Connector Port
3
Ethernet Port
5
Phone/Fax Port
6
External Antenna Connector 2
Note: Never place a USB-based device into the power connector port of the BPC100.
Doing so may damage the device and negat e its warranty.
No. Item
1
BPC Battery Cover
2
3 AA Backup Batteries
3
Reset button
Page 2
Setting up your BPC100
Your BPC100 comes with the SIM card installed.
Step 1: Transfer your phone number
Please read the following if you are transferring your phone number from
a different provider.
Note: Customers transferring in their business number will not be able to make or receive calls
on the BPC100 until the transfer process is completed. The transfer process can take 2
business days. Check the status of your transfer by visiting verizonwireless.com/LNP or by
calling (888)-844-7095.
Step 2: Install backup batteries for use during power outage
1. Open the
battery cover.
2. Insert three (3) AA
batteries.
3. Close the
battery cover.
Step 3: Install the power adapter
1. Insert the power adapter into the power connector port.
2. Plug the power adapter into a wall outlet.
Step 4: Connect your telephone to the BPC100
The BPC100 provides one port for either a telephone or fax machine.
1. Unplug telephone that you want to use with the BPC100 from the wall
telephone jack.
Warning:
If your existing phone has rotary or pulse dialing, it will not work with this product.
2. Plug the end of your telephone cord into the telephone port on the
back of your BPC100 (the other end of the cord must remain plugged
into the back of your telephone base unit).
3. For best results, place on a firm, flat surface. If BPC100 needs to be
mounted on a wall, please use double-sided mounting tape.
–
10
Step 5: Turn on your BPC100
Press the Power button on the front of the device to turn on the BPC100.
The power indicator will be blue when device is turned on.
Important
Please make sure your BPC100 is located in an area of your business that
receives a strong wireless signal.
Optional:
To increase signal strength, you can install the two (2) antennas included.
1. Align antennas with the antenna ports and screw securely into place
2. Restart the BPC100 after the antennas are inserted or removed.
Install the antenna
Step 6: Make calls
1. Before making a call, make sure the indicator light is solid blue. If
the indicator light is blinking red, move the BPC100 to a location that
receives a signal or try installing the optional antenna for greater signal
strength.
2. Place a call to start using the service.
Important
Customers may need to use the three-digit area code when dialing local
and long distance numbers.
Find more information
• For additional information on BPC100 settings and software updates,
please go to: http://my.bpc100 (default password = admin)
• Please refer to the User Guide at
more details.
• Customer Service is available at any Verizon Wireless store or by calling
800.922.0204.
verizonwireless.com/support
for
Note: The telephone and telephone cord ar e no t included.
Page 3

Warning
This device complies with Industry Canada’s licence-exempt RSSs.
Operation is subject to the following two conditions: (1) This device
may not cause interference; and (2) This device must accept any
interference, including interference that may cause undesired
operation of the device.
Cetappareilestconforme aux CNR exempts de licenced'Industrie
Canada. Son fonctionnementestsoumis aux deux conditions suivantes :
( 1 ) Ce dispositif ne peut causer des interférences ; et ( 2 ) Ce
dispositifdoit accepter touteinterférence , y compris les interférences
qui peuvent causer un mauvaisfonctionnement de l'appareil.
This equipment has been tested and found to comply with the limits
for a Class B digital device, pursuant to Part 15 of the FCC Rules.
These limits are designed to provide reasonable protection against
harmful interference in a residential installation. This equipment
generates uses and can radiate radio frequency energy and, if not
installed and used in accordance with the instructions, may cause
harmful interference to radio communications. However, there is no
guarantee that interference will not occur in a particular installation.
If this equipment does cause harmful interference to radio or
television reception, which can be determined by turning the
equipment off and on, the user is encouraged to try to correct the
interference by one or more of the following measures:
-- Reorient or relocate the receiving antenna.
-- Increase the separation between the equipment and receiver.
-- Connect the equipment into an outlet on a circuit different from that to which the receiver is connected.
-- Consult the dealer or an experienced radio/TV technician for help.
This device complies with part 15 of the FCC Rules. Operation is
subject to the following two conditions :
(1) This device may not cause harmful interference, and (2) this
device must accept any interference received, including interference
that may cause undesired operation.
Changes or modifications not expressly approved by the party
responsible for compliance could void the user's authority to operate
the equipment.
The antenna(s) used for this transmitter must be installed to provide
a separation distance of at least 30 cm from all persons and must not
be co-located or operating in conjunction with any other antenna or
transmitter.
Note: The telephone and telephone cord ar e no t included.
 Loading...