

Page 1
USER GUIDE
BPC100
Business Phone Connect
Page 2

©2020 Inseego Corp. All rights reserved. The information contained in this document is subject to change without
notice and should not be construed as a commitment by Inseego Corp.
Patents and Licenses
Visit https://www.inseego.com/intellectual-property/ for a complete list of all Inseego Corporate Patents.
Software License
Proprietary Rights Provisions:
The software drivers provided with this product are copyrighted by Inseego Corp. and/or Inseego Corp.’s suppliers. Although
copyrighted, the software drivers are unpublished and embody valuable trade secrets proprietary to Inseego and/or Inseego’
suppliers. The disassembly, decompilation, and/or Reverse Engineering of the software drivers for any purpose is strictly
prohibited by international law. The copying of the software drivers, except for a reasonable number of back-up copies is
strictly prohibited by international law. It is forbidden by international law to provide access to the software drivers to any
person for any purpose other than processing the internal data for the intended use of the software drivers.
U.S. Government Restricted Rights Clause:
The software drivers are classied as “Commercial Computing device Software” and the U.S. Government is acquiring only
“Restricted Rights” in the software drivers and their Documentation.
U.S. Government Export Administration Act Compliance Clause:
It is forbidden by US law to export, license or otherwise transfer the software drivers or Derivative Works to any country where
such transfer is prohibited by the United States Export Administration Act, or any successor legislation, or in violation of the
laws of any other country.
Trademarks and Service Marks
Inseego is a trademark of Inseego, Inc., and the other trademarks, logos, and service marks (collectively the “Trademarks”)
used in this user manual are the property of Inseego or their respective owners. Nothing contained in this user manual should
be construed as granting by implication, estoppel, or otherwise, a license or right of use of Inseego or any other Trademark
displayed in this user manual without the written permission of Inseego or its respective owners.
• Inseego, and the Inseego logo are all trademarks of Inseego, Inc.
• MiFi® and the MiFi logo are registered trademarks of Inseego, Inc.
• Microsoft and Windows are either registered trademarks or trademarks of Microsoft Corporation in the United States and/or
other countries.
• Apple®, Mac®, and Mac OS® are trademarks of Apple, Inc., registered in the U.S. and other countries.
• Linux® is the registered trademark of Linus Torvalds in the U.S. and other countries.
The names of actual companies and products mentioned in this user manual may be the trademarks of their respective
owners.
Inseego Revision History
Part Number Revision Description Date
90029522 Rev 1 Launch release 30 Jan 2020
FCC ID: PKRISGBPC100
PN: 90029397 Rev 1 USER GUIDE, UTOPIA, BPC100
Please visit www.inseego.com for the latest information about your device.
Page 3

Contents
Overview ..................................................................1
System Requirements. . . . . . . . . . . . . . . . . . . . . . . . . . . . . . . . . . . . . . . . . . . . . . . . . . . . . . . . . . . . . . . . . . . . . . . . 2
Components and Indicators. . . . . . . . . . . . . . . . . . . . . . . . . . . . . . . . . . . . . . . . . . . . . . . . . . . . . . . . . . . . . . . . . . 3
LED Indicator States ..................................................................... 5
Power Management ......................................................................... 6
Caring for Your BPC100 ...................................................................... 7
Getting Started. . . . . . . . . . . . . . . . . . . . . . . . . . . . . . . . . . . . . . . . . . . . . . . . . . . . . . . . . . . . . 8
Setup Overview ............................................................................. 9
Installing the Batteries . . . . . . . . . . . . . . . . . . . . . . . . . . . . . . . . . . . . . . . . . . . . . . . . . . . . . . . . . . . . . . . . . . . . . . 10
Backup Battery Tips. . . . . . . . . . . . . . . . . . . . . . . . . . . . . . . . . . . . . . . . . . . . . . . . . . . . . . . . . . . . . . . . . . . . . 10
Installing the Optional Antennas ............................................................11
Powering On the Unit. . . . . . . . . . . . . . . . . . . . . . . . . . . . . . . . . . . . . . . . . . . . . . . . . . . . . . . . . . . . . . . . . . . . . . . 12
Connecting Your Phone or Fax .............................................................. 13
Connecting a Security System Alarm ........................................................14
Connecting to the Internet. . . . . . . . . . . . . . . . . . . . . . . . . . . . . . . . . . . . . . . . . . . . . . . . . . . . . . . . . . . . . . . . . . 15
Initial Activation ............................................................................16
Transferring Your Existing Number ......................................................16
Using Your BPC100 ........................................................17
Making Calls ................................................................................18
Restrictions. . . . . . . . . . . . . . . . . . . . . . . . . . . . . . . . . . . . . . . . . . . . . . . . . . . . . . . . . . . . . . . . . . . . . . . . . . . . . 18
Receiving Calls .............................................................................19
Call Waiting ............................................................................19
Using Voice Mail ............................................................................20
Setting up Voice Mail ...................................................................20
Using Voice Mail ........................................................................20
Call Forwarding. . . . . . . . . . . . . . . . . . . . . . . . . . . . . . . . . . . . . . . . . . . . . . . . . . . . . . . . . . . . . . . . . . . . . . . . . . . . . 21
To Turn on Call Forwarding. . . . . . . . . . . . . . . . . . . . . . . . . . . . . . . . . . . . . . . . . . . . . . . . . . . . . . . . . . . . . . 21
To Turn o Call Forwarding. . . . . . . . . . . . . . . . . . . . . . . . . . . . . . . . . . . . . . . . . . . . . . . . . . . . . . . . . . . . . . 21
Using a Text Telephone .....................................................................22
Accessing Your BPC100 Web Interface ......................................23
Overview Page ............................................................................. 24
Settings Page. . . . . . . . . . . . . . . . . . . . . . . . . . . . . . . . . . . . . . . . . . . . . . . . . . . . . . . . . . . . . . . . . . . . . . . . . . . . . . . 25
Software Update Page . . . . . . . . . . . . . . . . . . . . . . . . . . . . . . . . . . . . . . . . . . . . . . . . . . . . . . . . . . . . . . . . . . . . . . 26
About Page. . . . . . . . . . . . . . . . . . . . . . . . . . . . . . . . . . . . . . . . . . . . . . . . . . . . . . . . . . . . . . . . . . . . . . . . . . . . . . . . . 27
Help Page ..................................................................................28
Page 4

Product Specications and Regulatory Information .........................29
Product Specications ......................................................................30
General ................................................................................30
Technology/Bands . . . . . . . . . . . . . . . . . . . . . . . . . . . . . . . . . . . . . . . . . . . . . . . . . . . . . . . . . . . . . . . . . . . . . . 30
Environmental. . . . . . . . . . . . . . . . . . . . . . . . . . . . . . . . . . . . . . . . . . . . . . . . . . . . . . . . . . . . . . . . . . . . . . . . . . 30
Regulatory Information . . . . . . . . . . . . . . . . . . . . . . . . . . . . . . . . . . . . . . . . . . . . . . . . . . . . . . . . . . . . . . . . . . . . . 31
Wireless Communications. . . . . . . . . . . . . . . . . . . . . . . . . . . . . . . . . . . . . . . . . . . . . . . . . . . . . . . . . . . . . . . . . . . 32
Limited Warranty and Liability ..............................................................33
Safety Hazards. . . . . . . . . . . . . . . . . . . . . . . . . . . . . . . . . . . . . . . . . . . . . . . . . . . . . . . . . . . . . . . . . . . . . . . . . . . . . . 34
Proper Battery Use and Disposal ............................................................36
Troubleshooting. . . . . . . . . . . . . . . . . . . . . . . . . . . . . . . . . . . . . . . . . . . . . . . . . . . . . . . . . . .37
Overview. . . . . . . . . . . . . . . . . . . . . . . . . . . . . . . . . . . . . . . . . . . . . . . . . . . . . . . . . . . . . . . . . . . . . . . . . . . . . . . . . . . 38
Common Problems and Solutions. . . . . . . . . . . . . . . . . . . . . . . . . . . . . . . . . . . . . . . . . . . . . . . . . . . . . . . . . . . 39
Technical Support .......................................................................... 41
iv
Page 5

1
Overview
System Requirements
Components and Indicators
Power Management
Caring for Your BPC100
Page 6

System Requirements
The BPC100 provides business voice and data service. You can connect a wired phone, fax machine,
security alarm or Internet capable device (i.e. POS machine).
To use the BPC100, you must subscribe to an eligible Verizon plan.
2
Page 7
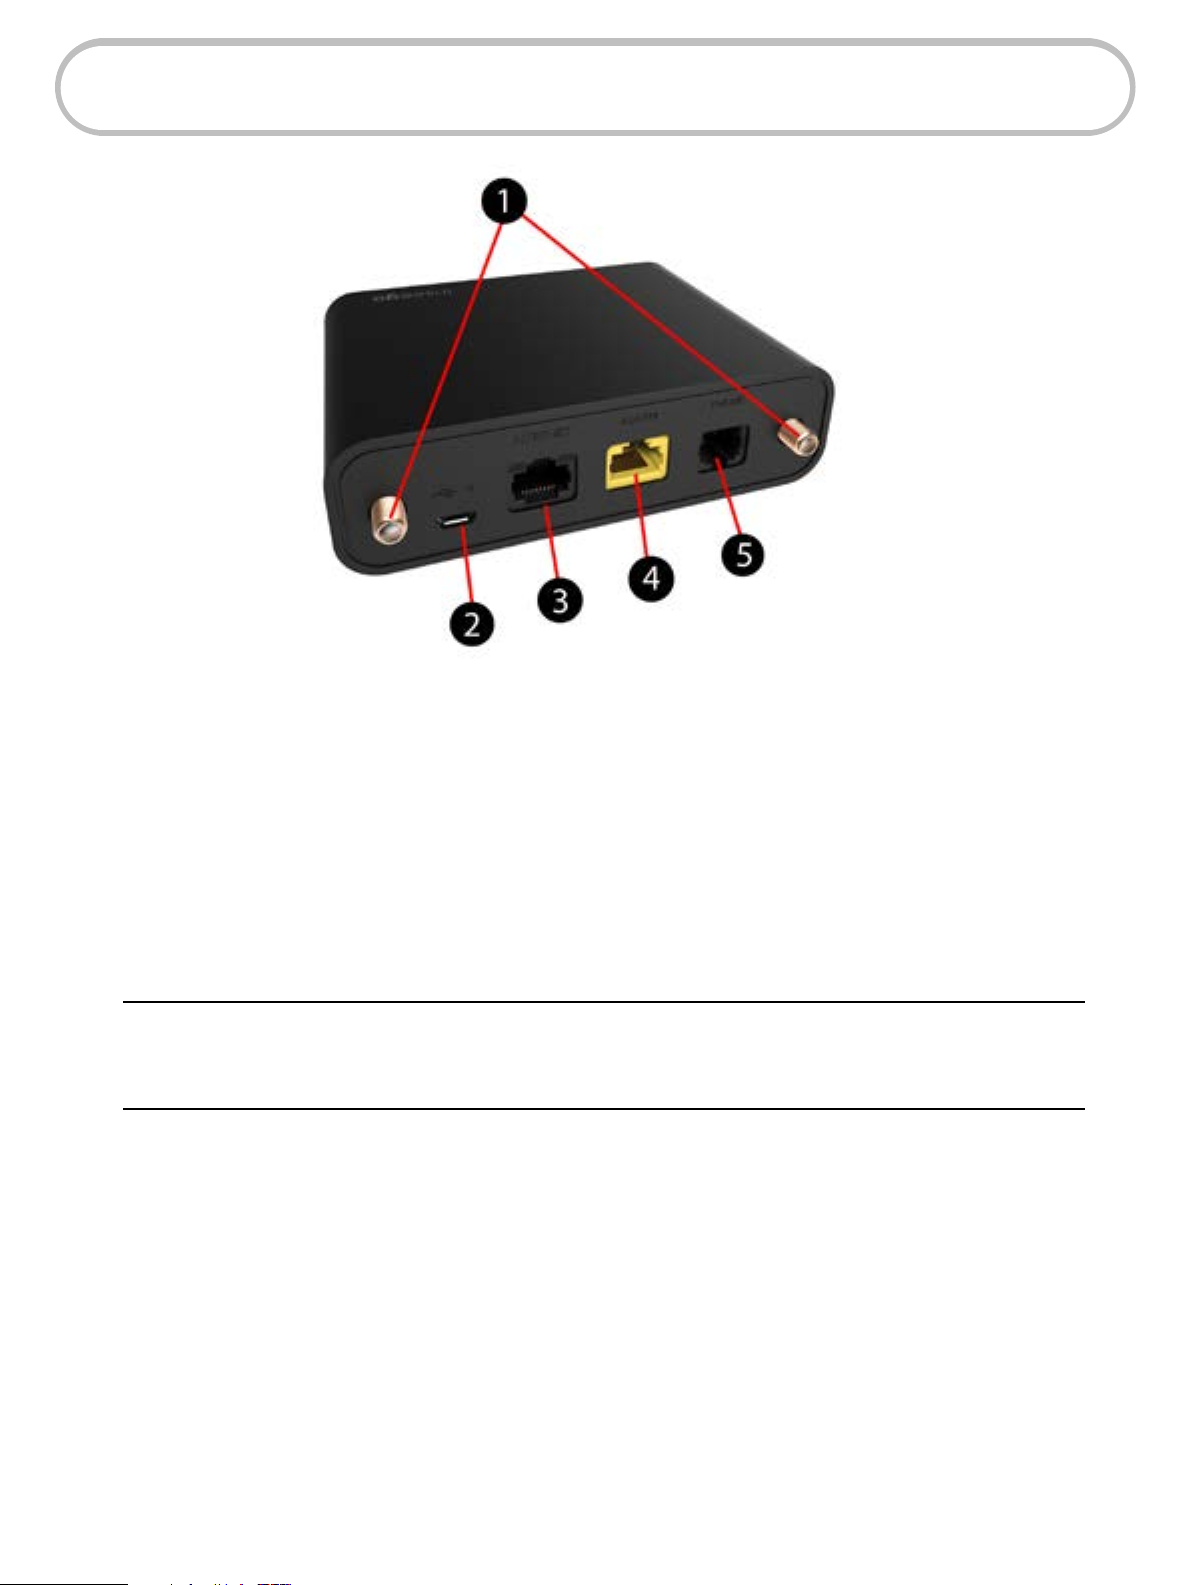
Components and Indicators
➊ External antenna connectors — connect optional antennas for improved connection in areas
of low signal strength.
➋ Power connector port — USB port for the AC power adapter.
➌ Ethernet port — Ethernet port that can support speeds up to 10Mbps download/5Mbps
upload.
➍ Alarm port — dedicated port for a security alarm.
➎ Phone/fax port — port to connect either a phone or a fax.
WARNING ! Do not connect a phone or fax to the yellow port labeled Alarm. This port is intended
for connecting a security system only. Inserting a phone line into this port will cause the phone to stop
working. Using a fax/phone port splitter may not be supported and could impact device performance.
3
Page 8
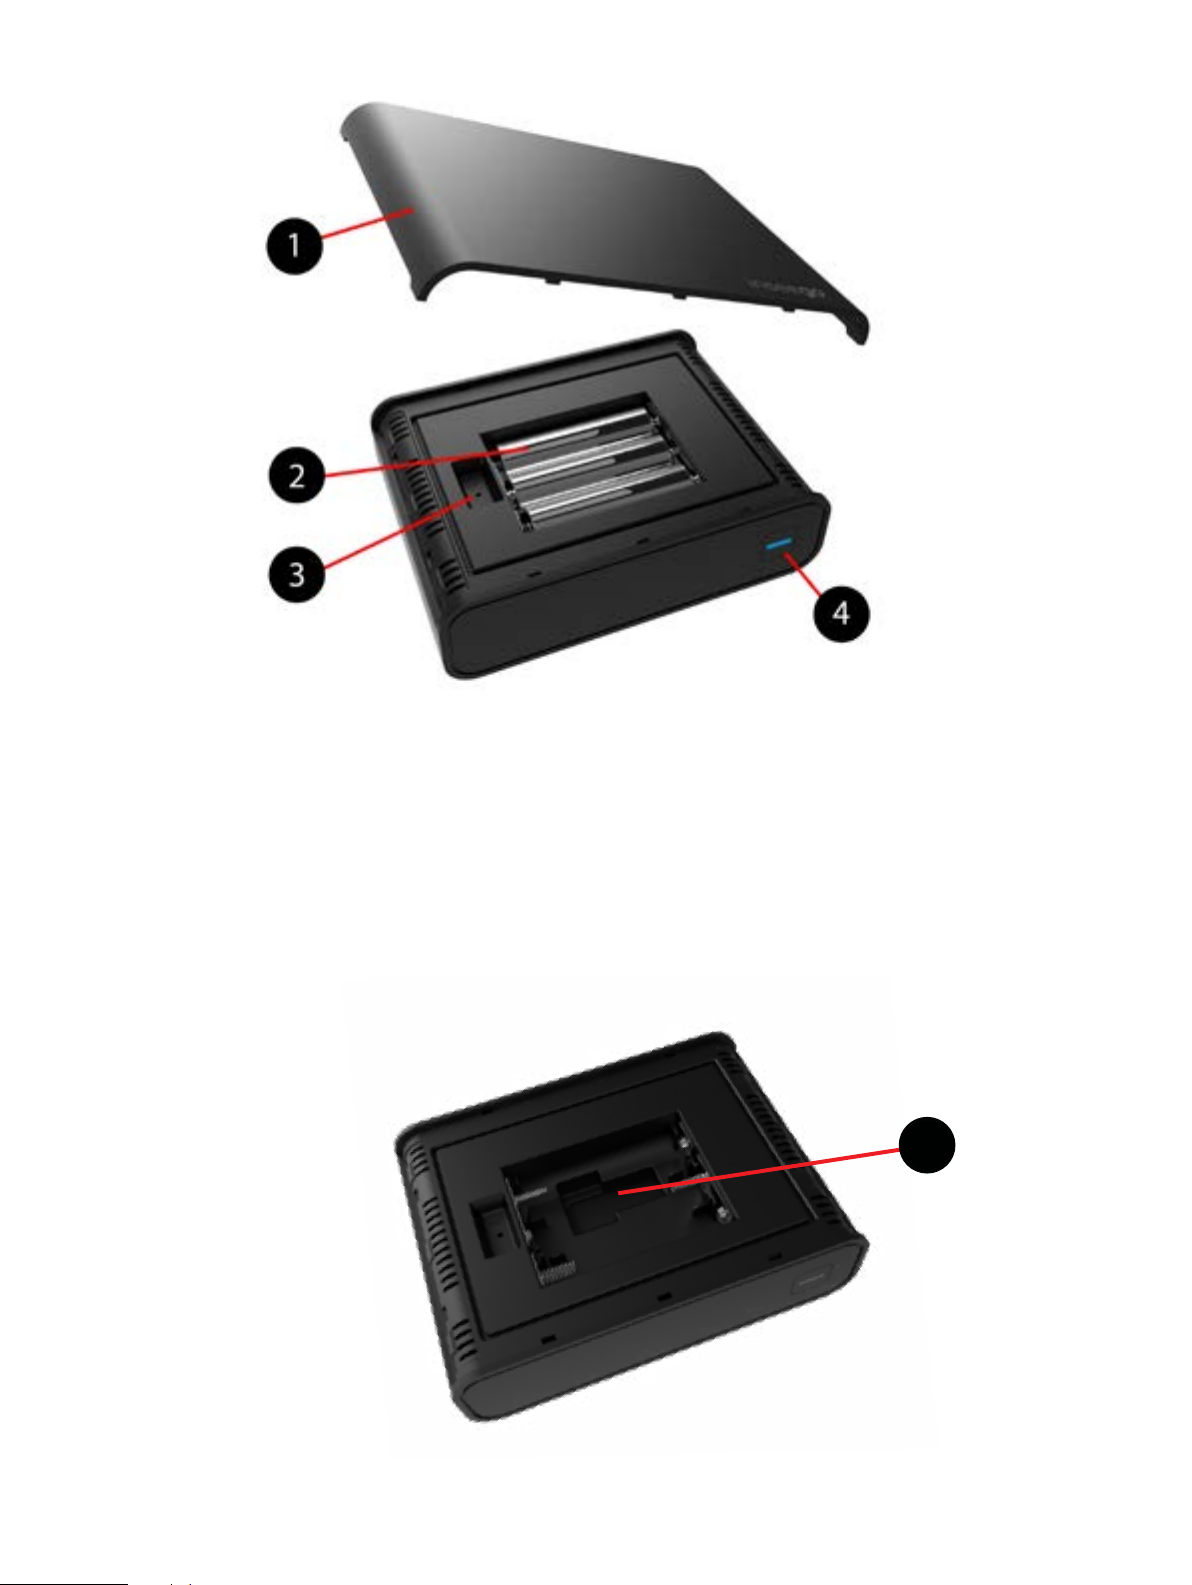
➊ Battery cover — remove to access the batteries and/or reset button.
➋ Batteries — three replaceable, non-rechargeable AA batteries in case of power failure.
➌ Reset button — resets the unit back to factory defaults.
➍ Power button/status indicator — turns unit on and o; light indicates device status (see the
following table).
➎ SIM Card
5
4
Page 9

LED Indicator States
The power button on the front of the unit includes an LED that indicates the current state of the
BPC100.
LED
STATE DESCRIPTION
• Incoming/Outgoing Call (including 911)
• Incoming/Outgoing Fax
Blue solid
• Call Waiting
• Conference Call
• Call Forwarding Enabled
• Software Update in Progress
• Voicemail Available
Blue blinking
• Missed Call
• Software Update Complete
• BPC100 Running on Backup Batteries
• No Service
Red blinking
• SIM Error
• SIM Locked
• Low Battery
Before making a call, listen for a dial tone on your telephone. If the indicator light on your BPC100
is blinking red, move the BPC100 to a location that receives a signal or try installing the optional
antennas for greater signal strength.
5
Page 10

Power Management
Your BPC100 comes with both an AC wall charger and three AA backup batteries.
During a power outage or if the wall charger is unplugged, the BPC100 continues to run o the
batteries, and the LED indicator blinks blue. Data service will not be available in battery mode.
NOTE During a power outage, only corded phones that do not require electric power
can be used to make or receive calls (including calls to 911).
If the batteries’ charge becomes low, the LED indicator light blinks red. To view the current strength
of your BPC100 batteries, use a web browser to access the Web Interface (See Accessing Your
BPC100 Web Interface on page 23.).
6
Page 11

Caring for Your BPC100
Like any electronic product, the BPC100 must be handled with care to ensure reliable operation.
The following guidelines are recommended:
• Protect the BPC100 from liquids, dust, and excessive temperatures.
• Adhesive labels can be used to mount the BPC100 on a wall. Place the adhesive labels on
the back of the device. Do not apply adhesive labels over any vents or ports; this may cause
the BPC100 to potentially overheat or alter the performance of the antenna.
• Store the BPC100 in a dry and secure location when not in use.
• Never leave the BPC100 in an unattended vehicle due to uncontrollable temperatures that
may be outside the desired temperature range for this BPC100 (Please refer to p.30 for
temperature ranges for the BPC100).
7
Page 12

2
Getting Started
Setup Overview
Installing the Batteries
Installing the Optional Antennas
Powering On the Unit
Connecting to Your Phone or Fax
Connecting a Security System Alarm
Connecting to the Internet
Initial Activation
Page 13

Setup Overview
To set up your BPC100 for the rst time:
➊ Make sure you are subscribed to an eligible Verizon plan.
➋ Install the supplied AA batteries. (See Installing the Batteries on page 10.)
➌ Install the optional antennas, if desired. (See Installing the Optional Antennas on page 11.)
➍ Power on the BPC100 unit. (See Powering On the Unit on page 12.)
➎ Connect your phone or fax machine. (See Connecting Your Phone or Fax on page 13.)
➏ Connect any security system. (See Connecting a Security System Alarm on page 14.)
➐ Activate your BPC100. (See Initial Activation on page 16.)
9
Page 14
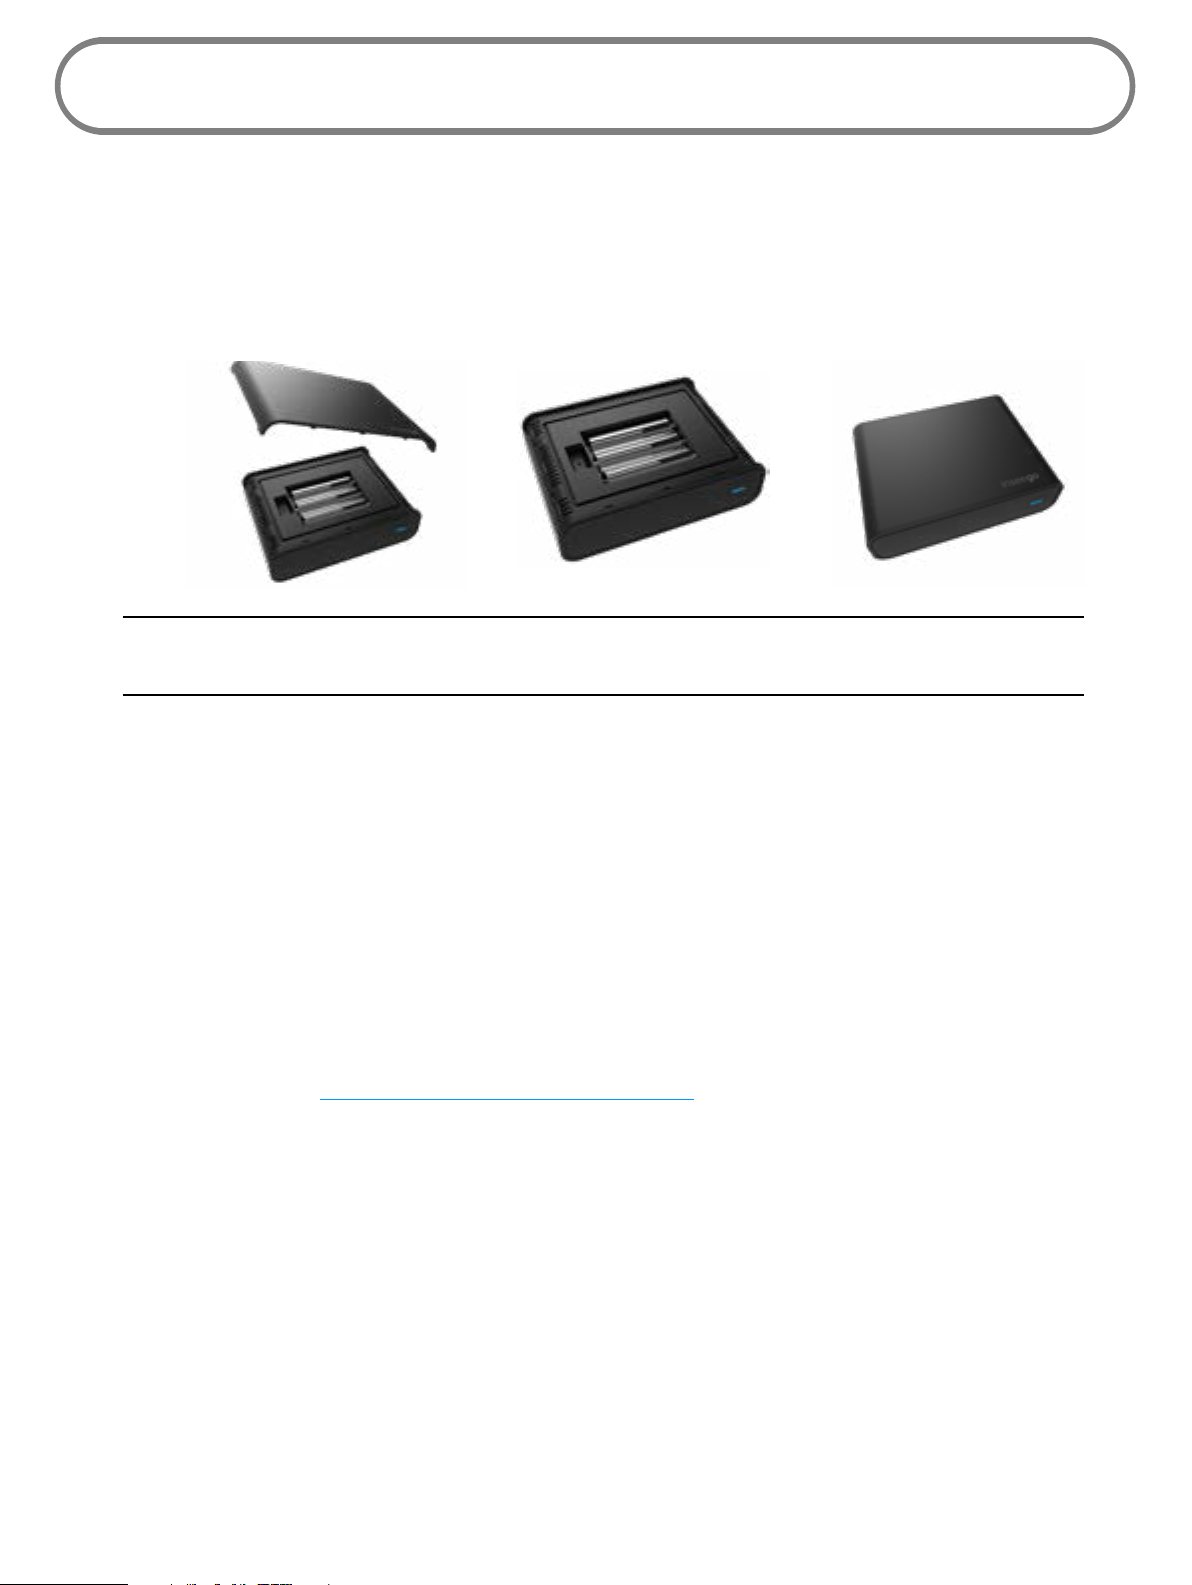
Installing the Batteries
➊ Carefully remove the battery cover from the the BPC100 and set it aside.
➋ Install the three AA batteries that came with the unit.
➌ Replace the battery cover by setting it on the BPC100 where the notches align, then press on
the cover until it clicks into place.
IMPORTANT Whenever you remove or insert the batteries, make sure your BPC100 is not
connected to any device or power source.
Backup Battery Tips
• Battery life depends on the network, signal strength, temperature, features, and accessories
you use.
• Generally, talk usage time on backup batteries is approximately three hours, and standby
time is approximately 23 hours.
• When battery charge is low, the LED indicator on the power button ashes red.
• To view the current strength of your BPC100 batteries, use a web browser to access the Web
Interface. (See Accessing Your BPC100 Web Interface on page 23.)
• Do not use sharp objects or excessive force or remove the battery, as this may damage the
BPC100 and the batteries.
• Never expose batteries to temperatures below -20°C (4°F) or above 60°C (140°F).
10
Page 15

Installing the Optional Antennas
Two external antennas are included with the BPC100 to improve connection in areas of poor
coverage. To increase signal strength, install one or both onto the antenna connectors on the
BPC100:
➊ Align each antenna with a connector and screw securely into place.
➋ Restart the BPC100 after antennas are installed or removed. To restart the BPC100, press
and hold the power button for 3 seconds until the device is o. Once powered o, press the
power button to turn the device back on.
Use the following installation instructions to comply with FCC rules on RF exposure. Failure to follow
these guidelines can result in operations that exceed RF exposure limits.
• Maintain a minimum distance of at least 20 cm (8 in) from all persons.
• Use only the antennas supplied by Verizon. Never use an antenna from another vendor or
another source.
11
Page 16

Powering On the Unit
➊ Position the BPC100 near an AC outlet.
➋ Plug the AC power cord and USB cable into the USB port on the back of the BPC100.
➌ Plug the other end of the power cord into an appropriate electrical outlet.
➍ Press and hold the power button on the front of the BPC100 to turn the system on.
WARNING! Be sure to use the power cord that came with your BPC100 to avoid damage that
may void the warranty.
The LED indicator will be blue when the device is turned on.
If the LED indicator blinks red, there might not be a strong enough signal. Make sure both antennas
are properly installed, and if necessary, move the BPC100 to an alternative location that provides a
stronger signal.
To power o the unit, simply press and hold the power button.
12
Page 17

Connecting Your Phone or Fax
The BPC100 provides one phone port that can be used for either a phone or a fax machine.
➊ Unplug your phone or fax from the wall port.
WARNING! Do NOT plug the BPC100 into your phone wall port.
➋ Plug the end of the phone cord that was just removed from the wall port into the phone
port on the back of the BPC100. The other end of the cord must remain plugged into the
back of your phone’s base unit or your fax machine.
* The BPC100 may not be compatible with all fax machines.
WARNING! Do NOT plug a phone or fax machine into the yellow port labeled Alarm. Doing so
will stop the device from working.
13
Page 18

Connecting a Security System Alarm
The BPC100 provides an alarm port for connecting a security system. Contact your security system
provider before connecting the BPC100 to your security system. In the event of an alarm, the
security system will use the BPC100 to call authorities.
➊ Plug the end of the alarm cable into the yellow port (labeled Alarm) on the BPC100.
➋ Plug the other end of the cable into the alarm port of the security system.
NOTE Alarm cables are not included with the BPC100.
* The BPC100 may not be compatible with all security systems.
14
Page 19

Connecting to the Internet
The BPC100 provides an Ethernet port that can support speeds up to 10Mbps download/5Mbps
upload.
➊ Plug the end of an Ethernet cable into the Internet port on the BPC100.
➋ Plug the other end of the cable into a device like a POS terminal to access the Internet.
NOTE Ethernet cables are sold separately.
15
Page 20

Initial Activation
A voice plan is required to make and receive calls. If you are not subscribed to a plan with voice
service, call Verizon Business Sales at 800-526-3178 to sign up for service.
Make a call to test service. Note that in most areas, you will need to include the three-digit area code
even for local calls.
Transferring Your Existing Number
IMPORTANT Customers transferring a phone number will not be able to receive calls on the
BPC100 until the transfer process is complete. This process can take 2–10 business days. When
the transfer is complete, you will receive an email at the email address you provided to Verizon.
Once your phone number transfer is complete, disconnect your phone or fax from the wall port and
connect it to the BPC100. After powered on, you will be able to make and receive calls through the
phone or fax connected to the BPC100.
To check the status of your transfer, visit www.verizonwireless.com/lnp or call the Port Center at
(888) 844-7095.
16
Page 21

3
Using Your BPC100
Making Calls
Receiving Calls
Using Voice Mail
Call Forwarding
Using a Text Telephone
Page 22

Making Calls
Before making a call, make sure the LED indicator on the power button is solid blue.
➊ Place a call by entering the desired phone number. In most areas, you will need to include
the three-digit area code, even when dialing a local number.
➋ When your call is complete, simply hang up the phone.
Restrictions
The following types of calls cannot be made with your BPC100:
• Collect or operator-assisted calls
• Phone numbers beginning with 500, 700, 900, 976
• Dial-around calls (e.g., 1010-XXXX)
• DSL or dial-up Internet service
• Calls to Medical or Life Alert systems
18
Page 23

Receiving Calls
As soon as your BPC100 is set up and activated it will be able to receive calls. When an incoming call
is received, simply answer the attached phone as you normally would.
NOTE If you have a new phone number, be sure to share it with family and friends..
Call Waiting
If a call comes in while you are on the phone, you’ll hear a click and the incoming phone number
appears on the phone screen (if available). Depress the Flash button on the phone to put the
rst call on hold and answer the second call. When you hang up or press Flash again, you are
reconnected with the rst call.
Missed Calls
If you do not pick up an incoming call, the BPC100 LED indicator light blinks blue.
19
Page 24

Using Voice Mail
Verizon includes integrated voice mail with its phone service. If you want to use it, you must rst set
it up for your account.
Setting up Voice Mail
To set up and manage your voice mail, dial *86 and follow the system prompts. For more details
about your voice mail service, visit www.verizonwireless.com/voicemail.
Using Voice Mail
➊ When the voice mail system includes messages you have not listened to, the LED indicator
on the power button blinks blue.
➋ Dial *86 to access your voice mail.
➌ Follow the system prompts to listen to and manage your voice mails.
NOTE Refer to the Troubleshooting section for additional instruction on accessing voice mail or using a
phone answering machine as your preferred method to manage your voice messages.
20
Page 25

Call Forwarding
With Call Forwarding, you can automatically transfer all calls coming into your BPC100 to another
phone number. The phone connected to your BPC100 will not ring until you turn o the service.
Airtime applies to forwarded calls even if you send the call to landline phones.
To Turn on Call Forwarding
➊ Dial *72.
➋ Immediately enter the phone number to which you want calls forwarded (for example, *72-
555-123-4567).
➌ You will hear a conrmation tone.
➍ Hang up your phone or return the phone receiver to its base.
To Turn o Call Forwarding
➊ Dial *73.
➋ You will hear a conrmation tone.
➌ Hang up your phone or return the phone receiver to its base.
21
Page 26

Using a Text Telephone
A Text Telephone (TTY) is used by those who are hearing or speech impaired to translate typed
text to voice and vice versa. To use the BPC100 with TTY, you must change the TTY mode from the
default (None) to one of the following modes:
• Full TTY translates both text to voice and voice to text. The person using the TTY can type
outgoing messages (which are translated to voice on the other end) as well as read messages
that have been translated from the connected caller’s voice.
• Voice Carry Over (VCO) translates incoming voice to text, allowing the person using the TTY
to speak directly to the other caller and read translated text on the TTY screen.
• Hearing Carry Over (HCO) translates text typed to voice, allowing the person using the TTY to
type instead of speak yet hear the connected caller’s voice.
To change TTY mode on the BPC100, dial ##56*n# where n indicates the TTY to use:
0 - None (TTY is disabled)
1 - Full TTY mode
2 - VCO mode
3 - HCO mode
22
Page 27

4
Accessing Your BPC100
Web Interface
Overview Page
Settings Page
Software Update Page
About Page
Help Page
Page 28

Overview Page
The Web Interface is web-based software that interacts directly with your BPC100. Use it for initial
setup, software updates, network status and information, and links to online help and customer
support.
To access the Web Interface, your BPC100 must be connected to a computer with an Ethernet cable.
On the computer, use a browser to log into http://my.bpc100.
The rst time you log in, use the default password: admin. You will be prompted to enter and
conrm your own individual password for future access.
When you are logged in, the website banner displays current voice signal status (
strength ( ) for your BPC100. It also includes buttons to sign into (or out of) your account and to
change your password.
The initial home page (Overview) displays general information about your BPC100 and network
status.
) and battery
Select the GPS tab to display GPS coordinates of the current location of the BPC100. Latitude,
longitude, altitude, and accuracy are shown as dened by GPS NMEA strings.
Select tabs on the left to access other pages of the website. In any of the pages, select the Help
button (
) in the top-right corner for more information about the display.
24
Page 29

Settings Page
Go to the Settings page to learn more about BPC100 LAN and network settings. Select the Backup
& Restore tab to save device settings to your computer, restore saved settings, reset the device to
factory settings, or restart the device.
25
Page 30

Software Update Page
Go to the Software Update page to check for available software updates for your BPC100.
26
Page 31

About Page
Go to the About page to view information about Internet status and your BPC100 device, or a change
the settings for data collection in logs.
27
Page 32

Help Page
Go to the Help page to access quick links to device help and customer support.
28
Page 33

5
Product Specications and
Regulatory Information
Product Specications
Regulatory Information
Wireless Communications
Limited Warranty and Liability
Safety Hazards
Proper Battery Use and Disposal
Page 34

Product Specications
General
Name: Business Phone Connect
Model: BPC100
Standards/Approvals/Certications: FCC (North America)
Weight: 272 g / 9.59 oz
Dimensions: 118 mm x 88 mm x 30 mm,
4.65 in x 3.46 in x 1.18 in
Wireless Network LTE
Batteries Three AA
Chip Set: Qualcomm 9207
Module Quectel EC25-AF (CAT 1)
Interface Types:
Phone/Fax (RJ-11) (1)/Security (RJ-31) (1)/
Ethernet (RJ-45) (1)/ Power (MicroUSB) (1)/
External Antenna (SMA (2))
LED: Network, voicemail & SIM status
GPS: A-GPS with SUPL for E911 only
Technology/Bands
Technology: LTE
Band Designation: LTE: B2/B4/B5/B13/B66
Environmental
Operating Temperature: -20 ° C to +60° C (-4°F to 140° F)
Storage Temperature: -40 ° C to +85° C (-40°F to 185° F)
Drop: 1.5 meter (4.92 feet) drop, no mechanical,
electrical or functional damage – fully
operational
Vibration Stability:
50-2000 Hz, 3 axes
30
Page 35

Regulatory Information
Federal Communications Commission (FCC) Notice
FCC ID: PKRISGBPC100
Electronic devices, including computers and wireless modems, generate RF energy incidental to their
intended function and are therefore subject to FCC rules and regulations.
This equipment has been tested to, and found to be within the acceptable limits for a Class B digital device,
pursuant to part 15 of the FCC Rules. These limits are designed to provide reasonable protection against
harmful interference when the equipment is operated in a residential environment.
This equipment generates radio frequency energy and is designed for use in accordance with the
manufacturer’s user manual. However, there is no guarantee that interference will not occur in any particular
installation. If this equipment causes harmful interference to radio or television reception, which can be
determined by turning the equipment o and on, you are encouraged to try to correct the interference by
one or more of the following measures.
• Reorient or relocate the receiving antenna.
• Increase the separation between the equipment and the receiver.
• Connect the equipment into an outlet on a circuit dierent from that to which the receiver is connected.
• Consult the dealer or an experienced radio/television technician for help.
This device complies with Part 15 of the Federal Communications Commission (FCC) Rules. Operation is
subject to the following two conditions.
• This device may not cause harmful interference.
• This device must accept any interference received, including interference that may cause undesired
operation.
WARNING: DO NOT ATTEMPT TO SERVICE THE WIRELESS COMMUNICATION DEVICE YOURSELF. SUCH ACTION
MAY VOID THE WARRANTY. THE M1000 IS FACTORY TUNED. NO CUSTOMER CALIBRATION OR TUNING IS
REQUIRED. CONTACT INSEEGO CORP TECHNICAL SUPPORT FOR INFORMATION ABOUT SERVICING YOUR
WIRELESS COMMUNICATION DEVICE.
FCC CAUTION: Any changes or modication not expressly approved by the party responsible for compliance
could void the user’s authority to operate this equipment.
MODIFICATIONS: The FCC requires that you be notied that any changes or modications made to this device
that are not expressly approved by Inseego Corp. may void your authority to operate the equipment.
NOTE: The Radio Frequency (RF) emitter installed in your modem must not be located or operated in
conjunction with any other antenna or transmitter, unless specically authorized by INSEEGO CORP.
FCC RF Exposure Guidance Statement
In order to comply with FCC/ISED RF Exposure requirements, this device must be installed to provide at least
10 cm separation from the human body at all times.
31
Page 36

Wireless Communications
IMPORTANT Due to the transmission and reception properties of wireless communications,
data occasionally can be lost or delayed.
This can be due to the variation in radio signal strength that results from changes in the
characteristics of the radio transmission path. Although data loss is rare, the environment where you
operate the modem might adversely aect communications.
Variations in radio signal strength are referred to as fading. Fading is caused by several dierent
factors including signal reection, the ionosphere, and interference from other radio channels.
INSEEGO CORP or its partners will not be held responsible for damages of any kind resulting from
the delays or errors in data transmitted or received with the BPC100 device, or failure of the BPC100
device to transmit or receive such data.
32
Page 37

Limited Warranty and Liability
Inseego Corp. warrants for the 12-month period immediately following receipt of the Product by
Purchaser that the Product will be free from defects in material and workmanship under normal
use. THESE WARRANTIES ARE EXPRESSLY IN LIEU OF ALL OTHER WARRANTIES, EXPRESS OR IMPLIED,
INCLUDING, WITHOUT LIMITATION, ALL IMPLIED WARRANTIES OF MERCHANTABILITY AND FITNESS
FOR A PARTICULAR PURPOSE.
The exclusive remedy for a claim under this warranty shall be limited to the repair or replacement,
at INSEEGO CORP’ option, of defective or non-conforming materials, parts or components. The
foregoing warranties do not extend to (I) non conformities, defects or errors in the Products due
to accident, abuse, misuse or negligent use of the Products or use in other than a normal and
customary manner, environmental conditions not conforming to INSEEGO CORP’ specication, of
failure to follow prescribed installation, operating and maintenance procedures, (II) defects, errors
or nonconformities in the Product due to modications, alterations, additions or changes not made
in accordance with INSEEGO CORP’ specications or authorized by INSEEGO CORP, (III) normal wear
and tear, (IV) damage caused by force of nature or act of any third person, (V) shipping damage, (VI)
service or repair of Product by the purchaser without prior written consent from INSEEGO CORP,
(VII) products designated by INSEEGO CORP as beta site test samples, experimental, developmental,
reproduction, sample, incomplete or out of specication Products, or (VIII) returned products if the
original identication marks have been removed or altered.
33
Page 38

Safety Hazards
Do not operate the Verizon BPC100 in an environment that might be susceptible to radio
interference resulting in danger, specically:
Areas where prohibited by the law
Follow any special rules and regulations and obey all signs and notices. Always turn o the host
device when instructed to do so, or when you suspect that it might cause interference or danger.
Where explosive atmospheres might be present
Do not operate your device in any area where a potentially explosive atmosphere might exist.
Sparks in such areas could cause an explosion or re resulting in bodily injury or even death. Be
aware and comply with all signs and instructions.
Users are advised not to operate the device while at a refueling point or service station. Users are
reminded to observe restrictions on the use of radio equipment in fuel depots (fuel storage and
distribution areas), chemical plants or where blasting operations are in progress.
Areas with a potentially explosive atmosphere are often but not always clearly marked. Potential
locations can include gas stations, below deck on boats, chemical transfer or storage facilities,
vehicles using liqueed petroleum gas (such as propane or butane), areas where the air contains
chemicals or particles, such as grain, dust or metal powders, and any other area where you would
normally be advised to turn o your vehicle engine.
Near medical and life support equipment
Do not operate your device in any area where medical equipment, life support equipment, or near
any equipment that might be susceptible to any form of radio interference. In such areas, the host
communications device must be turned o. The device can transmit signals that could interfere
with this equipment.
On an aircraft, either on the ground or airborne
In addition to FAA requirements, many airline regulations state that you must suspend wireless
operations before boarding an airplane. Please ensure that the modem is turned o prior to
boarding aircraft in order to comply with these regulations. The modem can transmit signals that
could interfere with various onboard systems and controls.
While operating a vehicle
The driver or operator of any vehicle should not operate a wireless data device while in control of a
vehicle. Doing so will detract from the driver or operator’s control and operation of that vehicle. In
some countries, operating such communications devices while in control of a vehicle is an oense.
34
Page 39

Electrostatic discharge (ESD)
Electrical and electronic devices are sensitive to electrostatic discharge (ESD). Macintosh native
connection software might attempt to reinitialize the device should a substantial electrostatic
discharge reset the device. If the software is not operational after an ESD occurrence, then restart
your computer.
35
Page 40

Proper Battery Use and Disposal
IMPORTANT In event of a battery leak:
• Do not allow the liquid to come in contact with the skin or the eyes. If contact has been
made, wash the affected area with large amounts of water and seek medical advice.
• Seek medical advice immediately if a battery has been swallowed.
• Communicate the appropriate steps to be taken if a hazard occurs. Due to the transmission
and reception properties of wireless communications, data occasionally can be lost or
delayed.
Please review the following guidelines for safe and responsible battery use.
• Do not disassemble or open, crush, bend or deform, puncture, or shred.
• Do not modify or remanufacture, attempt to insert a foreign object into the battery, immerse
or expose to water or other liquids, or expose to re, explosion, or other hazard.
• Do not short circuit a battery or allow a metallic or conductive object to contact the battery
terminals.
• Replace the battery only with another battery that has been qualied with the system per
this standard. Use of an unqualied battery may present a risk of re, explosion, leakage, or
other hazard.
• Promptly dispose of used batteries in accordance with local regulations.
• Battery usage by children should be supervised.
• Avoid dropping the BPC100 or batteries. If the BPC100 or the batteries are dropped,
especially on a hard surface, and the user suspects damage, take it to a service center for
inspection.
• Improper battery use may result in a re, explosion, or other hazard.
36
Page 41

6
Troubleshooting
Overview
Common Problems and Solutions
Technical Support
Page 42

Overview
When properly installed, the BPC100 is a highly reliable product. Most problems are caused by one
of these issues:
• Phones or ethernet devices connected to incorrect ports. Please refer to the labels next to
the ports for proper connections.
• Network coverage is unavailable due to coverage area, an account problem, or a network
problem. To display a Verizon Wireless coverage map, see the Verizon Wireless Coverage map.
The following tips can help solve many common problems encountered while using the BPC100.
First Steps
• Make sure you are using the BPC100 in the correct geographic region.
• Ensure that your wireless coverage extends to your current location.
• If you do not receive a strong voice or data signal, move the device to a dierent location.
• Ensure that you have an active subscription plan.
• Restarting your BPC100 can resolve many issues.
IMPORTANT Before contacting support, be sure to restart your BPC100.
38
Page 43

Common Problems and Solutions
The following are some common problems and solutions.
Why am I not getting a dial tone on my handset?
• Make sure the AC power adaptor is properly connected to both the unit and the wall socket.
• Check to make sure the phone cable is securely plugged into both the phone and the
BPC100 unit. Use the Web Interface to make sure you have at least two bars of signal strength
).
(
Can I create a shortcut to access my voice mail?
The availability of a shortcut feature to access voice mail messages depends solely on the
capabilities of the phone you use with the BPC100. Please refer to the user material that came with
your phone.
If your wired phone does not support a shortcut feature to access voice messages, you may have
the option to save your voice mail number into the address book on the handset and assign that
number to the #1 speed dial position on your phone’s keypad. Remember, you can always dial *86
to access your voice mail.
Can I use my phone answering device instead of voice mail?
Yes. Set the answering device to pick up after fewer rings in order for it to pick up the call before
Verizon Wireless voice mail. Alternatively, turn o your answering machine or increase the number
of rings if you would like to use the Verizon Wireless voice mail service. Please refer to the user
material provided by the answering machine manufacturer for instructions.
Does 911 work on this device?
Yes, however the GPS chipset embedded in this device will work best if the device is located near a
window or other opening.
Does the BPC100 work during a power outage?
While the BPC100 has backup batteries, if the phone connected to it requires external power to
operate, service (including the ability to make and receive 911 calls) will not be available during a
power outage. Service will only be available during a power outage if the phone connected to the
device does not rely on external power to operate (as is the case with many corded phones).
How long is the backup battery life of the BPC100?
Talk usage time on backup batteries is approximately 3 hours and standby time is approximately 23
hours. Internet connectivity is disabled to preserve talk time when in backup battery mode. Actual
values can vary with environmental conditions.**
How does Caller ID (CID) work?
CID is available on the phone you connect to the BPC100, allowing you to see the caller’s name and/
or phone number before you take the call. Monthly subscription charges may apply. Please consult
Verizon Wireless for further information.
39
Page 44

Can I adjust the volume on my phone?
You can adjust the volume using your phone connected to the BPC100.
Why do I get the recording, "Call cannot be completed as dialed?"
Check the number to ensure you’re dialing correctly, without pauses longer than four seconds
between dialed digits.
Can a fax machine connect with the BPC100 ?
Fax transmissions require successful interoperability between all of the elements in the end-toend communications path. The BPC100 supports all of the wireless network requirements and
protocols for successful faxing. There may be other communications elements in a specic end-toend transmission path that are not controlled by VZW or the device manufacturer. The BPC100 may
not be totally compliant with these other network elements and protocols and faxing may not be
successful.
How does the BPC100 support Alarm and Security Systems?
Alarm company central station servers use a variety of signaling protocols to enable communication
from a user’s alarm system to the alarm company’s central station. The Security Industry has not
standardized a single communication protocol. While all central station server protocols have been
developed to work over xed, copper telephone lines, not all of these protocols work correctly over
wireless networks. The BPC100 supports the most widely used central station server protocol called
Contact-ID. Alarm calls using other central station server protocols are not supported. The quality of
the end-to-end transmission path may aect the quality of individual alarm calls.
How do I reset the BPC100 back to factory settings?
The master reset button is in a small hole located on the bottom of the BPC100 battery
compartment. This button returns the device to factory settings.
To reset the BPC100:
➊ Place one end of an unfolded paper clip into the master reset button hole.
➋ Press the paper clip on the button for ve to six seconds; the BPC100 will restart.
** A phone that does not require separate electric power is required to place or receive calls (including 911) during a power outage.
40
Page 45

Technical Support
IMPORTANT Before contacting support, be sure to restart the BPC100 and perform the
troubleshooting steps in this guide.
For additional information and technical support, contact Inseego online support web page at
https://www.inseego.com/support or by calling +1 541-685-9045 Option 2.
41
 Loading...