


MANUAL
1
INOVEX SYSTEMS LIMITED
Windows Dispense and Checkweigh Systems
INOVEX MANAGEMENT
SYSTEMS

IINOVEX SYSTEMS LIIMIITED
Windows User Manual
Inovex Systems Limited
Alexander Court Fleming Road
Earlstrees Industrial Estate
Corby Northants NN17 4SW
United Kingdom
T: +44 (0) 1536 400222
F: +44 (0) 1536 400133
sales@inovexsystems.com
www.inovexsystems.com

Copyrightã2003 Inovex Systems Ltd. All rights reserved. No part of this
manual, including interior design, cover design and icons may be reproduced or transmitted in any form, by any means (electronic, photocopying, recording or otherwise) without prior written permission of Inovex Systems Ltd.
LIMIT OF LIABILITY.DISCLAIMER OF WARRANTY: THE AUTHOR AND PUBLISHER HAVE USED THEIR BEST EFFORTS IN PREPARING THIS MANUAL. INOVEX SYSTEMS AND INOVEX SOFTWARE AND AUTHORS MAKE NO REPRESENTATION OF WARRANTIES WITH RESPECT TO THE ACCURACY OR COMPLETENESS OF THE CONTENTS OF THS MANUAL AND ESPECIALLY DISCLAIM ANY IMPLIED WARRANTIES OF MECHANTABILITY OF FITNESS FOR A PARTICULAR PURPOSE. THERE ARE NO WARRANTIES WHICH EXTEND BEYOND THE DESCRIPTIONS CONTAINED IN THIS PARAGRAPH. NO WARANTY MAY BE CREATED OR EXTENDED BY SALES REPRESENTATIVES OR WRITTEN SALES MATERIALS. THE ACCURACY AND GUARANTEED OR WARRANTED TO PRODUCE ANY PARTICULAR RESULTS, AND THE ADVICE AND STRATEGIES CONTAINED HEREIN MAY NOT BE SUITABLE FOR EVERY INDICIDUAL. NEITHER INOVEX SYSTEMS AND INOVEX SOFTWARE NOR AUTHOR SHALL BE LIABLE FOR ANY LOSS OR PROFIT OR ANY COMMERCIAL DAMAGES, INCLUDING BUT NOT LIMITED TO SPECIAL, CONSEQUENTIAL OR OTHER DAMAGES.
Trademarks: All brand names and product names used in this manual are trade names, service marks, trade marks or registered trademarks of their respective owners. Inovex
Systems and Inovex Software is not associated with any product or vendor

Table of Contents
THIS SECTION APPLIES TO DISPENSE |
|
SYSTEMS ONLY |
5 |
|
|
GENERAL OPERATION AND SAFETY |
|
GUIDELINES |
5 |
GENERAL OPERATION |
5 |
EMERGENCY STOP OPTIONS |
6 |
RESET AFTER EMERGENCY STOP |
6 |
GENERAL SAFETY |
7 |
HAZARDOUS AREA OPERATION |
7 |
STATIC ELECTRICITY |
7 |
WHY CARE ABOUT SAFETY? |
8 |
|
|
MANAGEMENT SOFTWARE |
9 |
NAVIGATING THROUGH THE PROGRAM |
10 |
COMMON PROGRAM ELEMENTS |
10 |
|
|
THE UTILITIES MENU |
12 |
INK CATEGORY |
13 |
COLOUR GROUPS |
13 |
CUSTOMERS |
13 |
DELETED FORMULATION LIST |
14 |
DELETED MATERIAL LIST |
14 |
DELIVERY ADDRESSES |
14 |
FORMULA TYPE |
14 |
DOWNTIME REASONS |
14 |
FORMULA TYPES |
15 |
JOB CATEGORY |
15 |
MATERIAL TYPE |
15 |
PACK SIZES |
15 |
PRESSES |
15 |
PRESS RETURN LOCATIONS |
15 |
PRINT PROCESS |
16 |
PROCEDURES |
16 |
RECIRCULATION TABLE |
16 |
STANDARD TEXT |
17 |
SOLVENT TYPES |
17 |
SUBSTRATES |
17 |
SUPPLIERS |
17 |
REPLACE MATERIAL |
17 |
PERCENTAGE PRICE CHANGE |
17 |
SETUP |
18 |
PASSWORDS |
21 |
|
|
THE MATERIALS MENU |
23 |
MATERIALS |
23 |
MATERIAL ORDERS |
26 |
MATERIAL ORDERS (INCOMPLETE) |
27 |
MATERIAL ORDERS (COMPLETE) |
27 |
MATERIAL ORDERS (COMPLETE BY |
|
SUPPLIER) |
27 |
MATERIAL ORDERS RECEIVED |
27 |
MATERIAL ORDERS RECEIVED (INCOMPLETE)
28
MATERIAL ORDERS RECEIVED (COMPLETE)
28 MATERIAL ORDERS RECEIVED (COMPLETE BY
SUPPLIER) |
28 |
MATERIAL STOCK |
28 |
MATERIAL PRINT OPTIONS |
29 |
MATERIAL GRAPHS |
30 |
|
|
THE FORMULATIONS MENU |
31 |
FORMULATIONS |
31 |
FORMULATION LIST |
33 |
FORMULATION LIST BY DATE CREATED |
33 |
FORMULATION LIST BY DATE AMENDED |
33 |
FORMULATION LIST BY SUBSTRATE |
33 |
FORMULATION LIST BY INK TYPE |
34 |
FORMULATION LIST BY COLOUR GROUP |
34 |
FORMULATION LIST BY FORMULA TYPE |
34 |
FORMULATION LIST BY COLOUR GROUP AND |
|
FORMULA TYPE |
34 |
FORMULATION CODE WILD CARD SEARCH. 34 |
|
FORMULATION NAME WILD CARD SEARCH.35 |
|
FORMULATION SEARCH BY L*A*B*. |
35 |
FORMULATION PRINT OPTIONS |
35 |
|
|
THE DESIGNS MENU |
37 |
DESIGNS |
37 |
DESIGN LIST BOX |
38 |
DESIGN LIST BY SELECTED CUSTOMER |
38 |
DESIGN WILD CARD SEARCH |
39 |
DESIGN PRINT OPTIONS |
39 |
|
|
THE JOBS MENU |
40 |
JOBS |
40 |
CURRENT WORKS ORDERS |
41 |
FINISHED WORKS ORDERS |
42 |
ISSUE MATERIAL TO JOB |
42 |
JOB TO JOB TRANSFER |
42 |
ISSUE FORMULATION TO JOB |
42 |
DOWNTIME |
42 |
WORKS ORDER PRINT OPTIONS |
43 |
|
|
THE DISPENSE LOG MENU |
44 |
DETAILED DISPENSE LOG BY MATERIAL |
44 |
SUMMARY DISPENSE LOG |
44 |
DISPENSE LOG PRINT OPTIONS |
44 |
|
|
THE PRESS RETURNS MENU |
46 |
FORMULATIONS AVAILABLE IN PRESS |
|
RETURNS |
46 |
FORMULA SEARCH LIST |
46 |
PRESS RETURNS SEARCH BY LOCATION |
46 |
MATERIALS AVAILABLE IN PRESS RETURNS |
|
|
46 |
RETURN FORMULATED INKS INTO PRESS |
|
RETURNS |
47 |
RETURN MATERIALS INTO PRESS RETURNS
|
47 |
|
L*A*B* PRESS RETURNS SEARCH |
47 |
|
PRESS RETURN PRINT OPTIONS |
47 |
|
|
|
|
THE MANAGEMENT MENU |
49 |
|
THE MANAGEMENT MENU |
49 |
|
|
|
|
THE ADDRESS BOOK |
51 |
|
THE ADDRESS BOOK |
51 |
|
|
|
|
WEIGH/REMIX |
52 |
|
MANUAL WEIGH AND REMIX |
52 |
|
|
|
|
DISPENSING |
54 |
|
DISPENSING |
56 |
|
DISPENSING BY WORKS ORDER |
57 |
|
FORMULA DISPENSE |
57 |
|
MATERIAL DISPENSE |
58 |
|
LOOK IN PRESS RETURNS |
58 |
|
RETURN INKS |
58 |
|
MANUAL DISPENSING |
59 |
|
THIS SECTION APPLIES TO CHECKWEIGH |
|
|
SYSTEMS ONLY |
60 |
|
THIS SECTION APPLIES TO DISPENSE |
|
|
SYSTEMS ONLY |
61 |
|
|
|
|
SYSTEM MAINTENANCE |
61 |
|
ROUTINE MAINTENANCE |
61 |
|
DISPENSING VALVES |
61 |
|
PUMPS |
63 |
|
REPLACING A PUMP |
63 |
|
HOSES |
64 |
|
STRAINERS (IF FITTED) |
64 |
|
RE-CIRCULATION |
64 |
|
SCALE |
64 |
|
|
|
|
SOFTWARE MAINTENANCE |
65 |
|
BACKING UP DATA |
65 |
|
RESTORING DATA |
66 |
|
COMPACT |
66 |
|
BLANK |
66 |
|
REPAIR |
66 |
|
WHAT TO DO IN CASE OF PROBLEMS |
66 |
|
THE SYSTEM HANGS |
66 |
|
DISPLAY OF ERROR MESSAGES |
67 |
|
|
|
|
CUSTOMER SUPPORT |
68 |
|
TECHNICAL SUPPORT |
68 |
|
BY MAIL |
68 |
|
BY PHONE/FAX |
68 |
|
BY EMAIL |
68 |
|
SPARES |
68 |
|
|
|
|
|
|
|

I N O V E X U S E R M A N U A L
Section
A
This section applies to dispense systems
only
General Operation and
Safety Guidelines
Creating A Safe Working Environment
As with any equipment containing moving and hazardous parts there are certain safe working procedures and practises that must be adhered to achieve a safe working environment. Inovex dispense systems are approved for the application for which they were designed according to the specification stated at the time of order.
General Operation
The procedure detailed below should be followed systematically to place the system into operation for the first time or after it has been shut down. Two services are required to operate the system, the first being air which serves the pneumatic switches, dispensing valves, pumps and pneumatic logic control and secondly an electrical supply is required to drive the control system and the computer.
1.Switch on the dispense unit control via the isolator.
2.Put the power on to the computer and allow the start-up software to run.
3.Ensure all Emergency Stops are unlocked and the system is switched to automatic dispense mode on the key switch. Ensure the power lamp is on, if not press the reset button on the dispense console desk.
4.Ensure that power is on to the scale.
5.Ensure that there is a minimum air pressure of 80 psi (5.4 bar) indicated on the pressure gauge in the dispense console.
The system is now ready to run.
5

I N O V E X U S E R M A N U A L
NOTE: AIR PRESSURE OF LESS THAN 80 PSI (5.4 BAR) WILL RESULT IN A SLUGGISH
RESPONSE OF THE DISPENSING VALVES. AIR PRESSURE OF LESS THAN 60 PSI MAY
RENDER THESE VALVES INOPERATIVE.
Emergency Stop Options
In the unlikely event of an emergency and it is necessary to perform an emergency stop, there are a number of options that can be chosen.
1.Depress the Emergency Stop button on the dispensing stand.
2.Switch off the main isolator.
3.Isolate the Air supply
Reset after Emergency Stop
In the event of any of the emergency stops having been operated, to render the system operative again:
1.Ensure that the stops are returned to the 'out' position.
2.Press the system reset button on the dispense enclosure.
There are indicator lamps to show the system status. If the lamps are not lit, press the Reset button on the control panel. You should now be able to continue dispensing.
PLEASE NOTE THAT IF THE EMERGENCY OCCURRED DURING A DISPENSE AND COMPUTER WAS NOT SHUT DOWN DURING THE EMERGENCY, THE COMPUTER MAY CONTINUE DISPENSING WHEN RELEASING THE EMERGENCY STOP.
6

I N O V E X U S E R M A N U A L
General Safety
The following methods, procedures and practises must be adopted when operating the dispense system -
∙Do not operate the dispenser without all the panels and relevant safety items and guards in place, as there are moving parts under automatic control.
∙Always wear the appropriate safety equipment when operating the system including safety spectacles.
∙Before attempting to carry out any maintenance, repairs or modifications to the dispenser or its ancillary equipment:
∙Switch off the control system, isolate the electrical supply, isolate the air supply and vent any residual pressure.
∙Shut off and drain any ink, which may cause a health or safety risk from the supply and delivery lines and ensure you have permission to work on the system.
∙Observe routine maintenance procedures as laid down in this manual.
∙Ensure that the area around the dispenser and ancillary equipment is clear of personnel and or obstruction before operating the system.
∙Check for correct container alignment before initiating a dispense procedure.
∙Observe handling instructions and specific safety guidelines for the relevant inks being dispensed.
Hazardous Area Operation
2dispenser may be handling highly combustible inks and as such all the appropriate Zone 1 safety procedures and working
practises over and above those listed below MUST be implemented.If your system is designed to operate in a hazardous area the
Static Electricity
Static electricity is a very common phenomenon caused whenever two dissimilar inks separate. This separation causes an imbalance of electrons which in turn creates a voltage which, when discharged, causes a current to flow.
7

I N O V E X U S E R M A N U A L
If you experience static shocks from any of your equipment, first check that all the equipment is earthed correctly. If everything checks out OK, you can eliminate the risk by using some of the equipment mentioned in the paragraph below.
In general, to avoid getting a static shock when handling pipes, working with computer equipment and dispense equipment etc. there are several products available on the market, which help eliminate the risk. These include wristbands, ground heels, ionisers and grounding kits.
It is especially important to be aware of the dangers of static when working in a hazardous Zone 1 area and to ensure all barrels are connected to bonding clamps. Moreover, the dispense vessels should be made of conducting material and grounded using the earth clamp.
Why care about safety?
Should you hesitate whether or not to adhere to safety regulations, think about the possible hazards you may be exposed to when not observing the safety guidelines:
∙EXPLOSION
∙TRAPPING BY MOVING PARTS SUCH AS SCALE CARRIAGE AND HEADWASH
SYSTEM
∙SPRAYING WITH FLUID WHEN DISCONNECTING A VALVE, PUMP, FILTER OR
HOSE
∙SPILLAGE
8
I N O V E X D I S P E N S E S Y S T E M M A N U A L
Section
B
Management Software
Starting and navigating through the Program
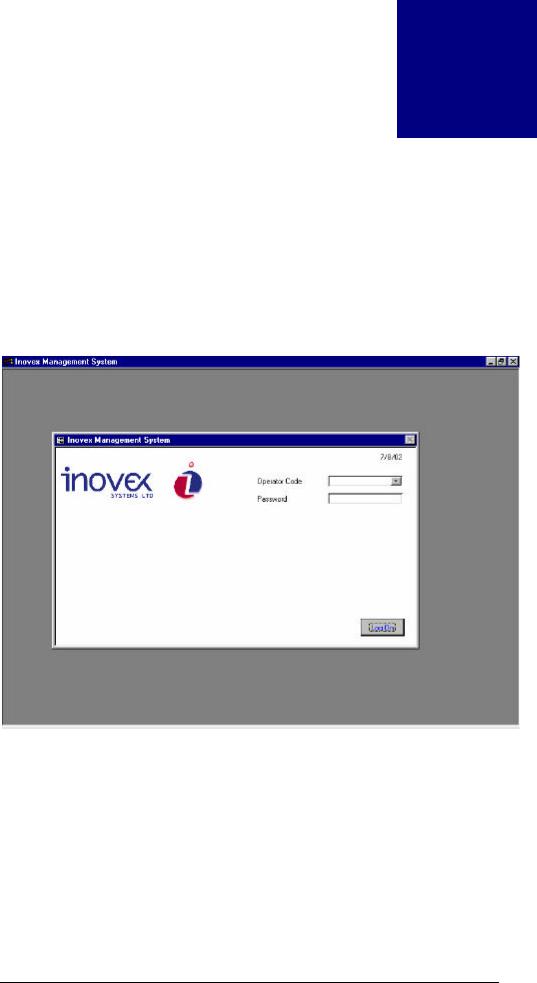
To launch the Windows Management Software use the shortcut icon on your desktop or go though the Start menu. When the program is launched you will see the system entry screen.
Entry Screen
To gain access to the program, use the Operator Code and passwords that are supplied by Inovex Systems. If you do not have these, contact Inovex to help you through this screen:
∙In the Operator Code pull down box select the desired operator and press enter or Tab.
∙In the Password box type your personal password. Press Log On and you will now go to the main program menu screen.
9
I N O V E X D I S P E N S E S Y S T E M M A N U A L
Navigating Through the Program
The best way to move around a screen in Windows is to use a mouse-pointing device. This manual assumes that a mouse/tracker ball is attached to the computer.
Menu Bar
The figure shows the Menu Bar from the Windows Management Software. Select the appropriate menu and a pull down will appear containing sub categories for that selection.
Common Program Elements
Command Buttons and Other Common
Elements.
Throughout all the screens in the software there are certain commands and elements which remain constant. For example, the picture shows a common Button Bar which appears in most of the screens with either the same configuration or one or two buttons added or removed.
a) |
b) |
c) |
d) |
e) |
f) |
g) |
h) |
a)First record in set
b)Previous record
c)Next record
d)Last record in set
e)Add new record
f)Exit the form
g)Shortcut (e.g. From Materials to Formulations)
h)Opens the report functions available for the current category
10
I N O V E X D I S P E N S E S Y S T E M M A N U A L
a) |
b) |
c) |
d) |
a)Delete a record
b)Pull down box containing the list of records for the current category
c)Edit current record
d)Refresh current record (used to force screen update)
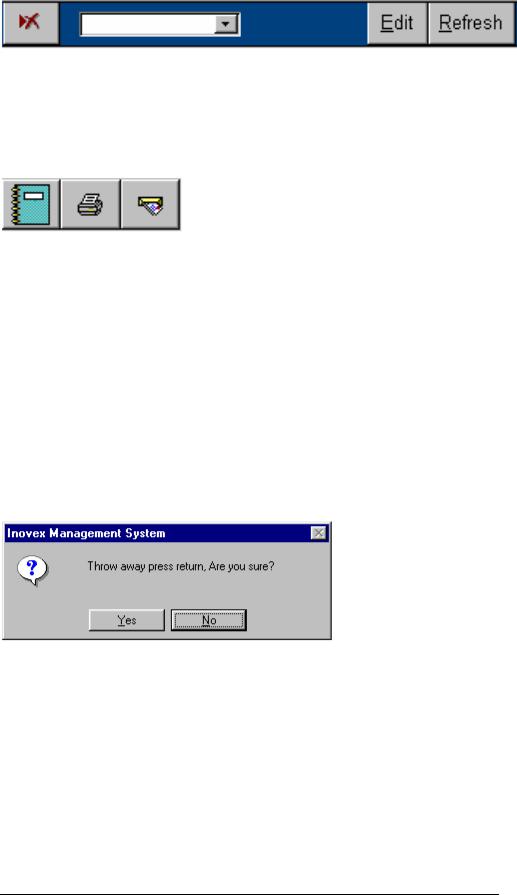
a) |
b) |
c) |
a)Preview a report
b)Print a report
c)Export a report to file
The actions of each Command button are described above and remain constant throughout most of the screens.
When you request the program to complete or instigate a task, a pop up dialogue box may sometimes appear in the middle of the screen. This screen will ask to confirm tasks such as deleting records by instructing you to press either the ’y’ key for yes, or the ‘n’ key for no. The figure below shows a typical pop up dialogue box.
Pop up Dialogue Box.
11

I N O V E X D I S P E N S E S Y S T E M M A N U A L
Chapter
1
The Utilities Menu
In order to effectively use the program you must first build a database containing all your records. To do this you initially use the input menus in the Utilities Menu, Sub group. The database will allow you to keep an up to date list of all your customers, ink categories, press return locations, passwords and any other setup information relevant to the dispense operation.
The common name for an area where you input information is a Form. Information entered on these Forms is stored in Tables. Tables allow the database to build up relationships between information, which may be contained in several different tables through preprogrammed links. This is known as a relational database.
Most of the records you enter follow the same pattern, making use of the button bar described earlier and allowing the use of codes, descriptions etc. The following examples will guide you through entering your first records and describe briefly the different options available on the screens as you progress through the program.
The best way to learn the program is to experiment with all the different options and routines. Once you have carried out a task several times you will see that most of the other tasks you perform will follow the same pattern.
12

I N O V E X D I S P E N S E S Y S T E M M A N U A L
Ink Category
The first screen we will look at in the Utilities menu is the Category screen. This form is used to enter ink type; the table is already preprogrammed with solvent based, water based & UV inks. Should you wish to add a new record, click the add record button and enter a new ink type into the form. To save the information simply exit the form.
Colour Groups
The colour groups form contains a list of the most common colours used within printing. These are used throughout the software to assign a colour swatch to a particular Material of Formulation record. This will aid visual identification of the particular colour whilst dispensing. To add a new record click the add record button and enter a colour name into the form, simply select the desired colour from the palette and save the record.
Tip. If the desired colour is not available within the palette simply select the nearest colour and nudge the Hue by clicking R, G or B.
Customers
To enter a new record into this part of the database follow the procedure below which will add the name and address of a new Customer to the table.
ðWhen the form is initially opened the cursor will initiate within the Customer Code field. Enter a code to provide a shortcut to this record when the details of the Customer are needed in other parts of the program. Press Enter to continue.
ðEnter the Name of the Customer in the Name text box and Contacts in the Contact box. Press enter to continue
ðEnter the Customers address details in the Address text box. Press Enter.
ðEnter the telephone numbers and email in the relevant fields.
ðExit the form to save the record.
ðYou may now continue to add your records by repeating the above procedure. Refer to the Button Bar paragraph earlier in this section to check the command button functions.
13

I N O V E X D I S P E N S E S Y S T E M M A N U A L
Deleted Formulation List
Once a formulation has been deleted from the formulation record set it will be archived and stored should you wish to recover the deleted data.
To undelete a formulation simply double click the deleted formulation you wish to recover, this will display a new form showing formulation details and an ‘Undelete this Formulation’ button in the upper right hand side of the form. Click this button and the formulation will be undeleted.
Deleted Material List
Once a material has been deleted from the material record set it will be archived and stored should you wish to recover the deleted data.
To undelete a material simply double click the deleted material you wish to recover, this will display a new form showing material details and an ‘Undelete Material’ button in the upper right hand side of the form. Click this button and the material will be undeleted.
Delivery Addresses
This is required for the material order processing part of the software. Enter into this form details of the delivery addresses to which you may want materials to be delivered. You can have more than one delivery address if required. To add a new record click the add record button and enter a new location into the form. To save the information simply exit the form
Formula Type
This is required to identify the formula type or ink type in the formulation form. Enter into this form details of different formula types you are going to have on the system. Typically this might be ‘Water Based Ink’, ‘Solvent Based Ink’.
Downtime Reasons
This is used in the press downtime monitoring functions of the software. Reason codes can be assigned to press downtime and these are set up in this module. The form contains three fields, a reason code and two description fields explaining the meaning of the reason code.
14

I N O V E X D I S P E N S E S Y S T E M M A N U A L
Formula Types
This is required to identify the formula types in the formulation form and at the Checkweigh/Dispense screen. Enter into this form the names of different formula types you are going to have on the system.
Job Category
This is used to identify different job categories. The form contains two fields, the first is an automatically generated identification number, the second is the job category. Typically this might be ‘Flexo’, ‘Gravure’ etc.
Material Type
This is required to identify the Materials and Formulations type in the Material Form and the Formulation Form. Enter into this form details of different Material types you are going to have on the system. By default these are set to ‘Colour’, ‘White’, ‘Lacquer’ and ‘Other’.
Pack Sizes
Pack Sizes are required by the material order processing system. Enter into this the different pack sizes that material would normally be delivered in. Typically this might be ‘Barrels’, ‘Pails’. Any number of different pack sizes can be entered.
Presses
This is required to identify the press a design or job is going to be printed on. Enter into this form details of the printing presses. The form has three fields, Press Number, Press Name, and Startup Amount which is used by the ink estimation software to ensure that at least the minimum amount of ink required to start a press and maintain it running is estimated.
Press Return Locations
Press return locations are used to identify where a press return is stored once returned from the press. To add a new record click the add record button and enter a new location into the form. To save the information simply exit the form
15
I N O V E X D I S P E N S E S Y S T E M M A N U A L
Print Process
This is required to identify the print process in the design file. The form has two fields, Print Process which might typically contain ‘Flexo’, ‘Gravure’ etc and a default GSM for the ink estimation. The default GSM can be overridden in the design file if required to do so for individual formulations as they are added to the design.
Procedures
Standard procedures are installed here, and can then be applied to certain production methods as a standard text addition.
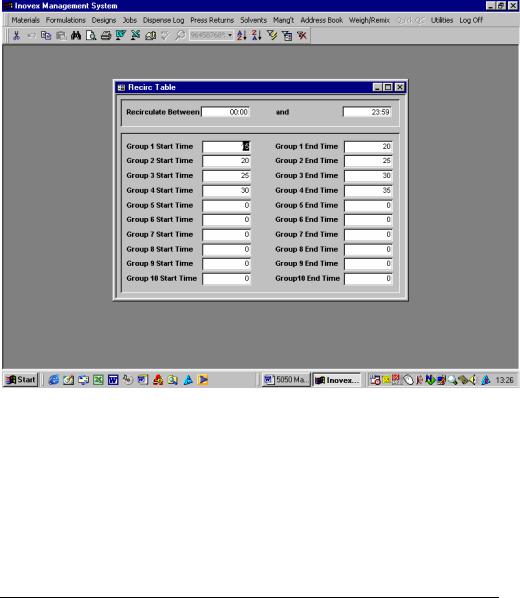
Recirculation Table
The ‘Recirculation Table’ controls when and for how long each group of ingredients are recirculated. Enter a time zone between which you want the ingredients to be recirculated (normally 24hours but some cases vary). Then set the start and end times of each group’s time to be recirculated. On the table shown, group 1 will start at 00 minutes and finish two minutes later. Group two will then start and run for two minutes. Group three will then start and so on until group 6.
16

I N O V E X D I S P E N S E S Y S T E M M A N U A L
Standard Text
Standard text’s are accompanying comments which can be added to designs at the time of installing them. If the same comments or procedures are used over and over, they can be set up as standard text, and are then obtainable by a simple draw down in the designs screen.
Solvent Types
This is required to identify the different solvents that may be contained within the raw materials and is used when allocating a percentage of solvents to a material in the material file. The form has two fields, solvent code and solvent name.
Substrates
This is required to identify the substrate that a design is to be printed on in the design file. The form has four fields, Substrate Code, Substrate Name, Supplier and Cost per Square Meter.
Suppliers
This is required by the material order processing system. Enter in here details of your material suppliers. Any number of suppliers can be included.
Replace Material
This module can be used to make bulk replacement of a material with another in the formulation file. If a material is to be replaced then the replacement material must first be entered onto the material file. In order to use this feature first select the material to be replaced as indicated, then the material to replace it, and finally, if relevant the percentage of the original that the replacing material is to have.
Percentage Price Change
This module can be used to make bulk changes to the price of materials by a given percentage for a selected supplier.
17
I N O V E X D I S P E N S E S Y S T E M M A N U A L
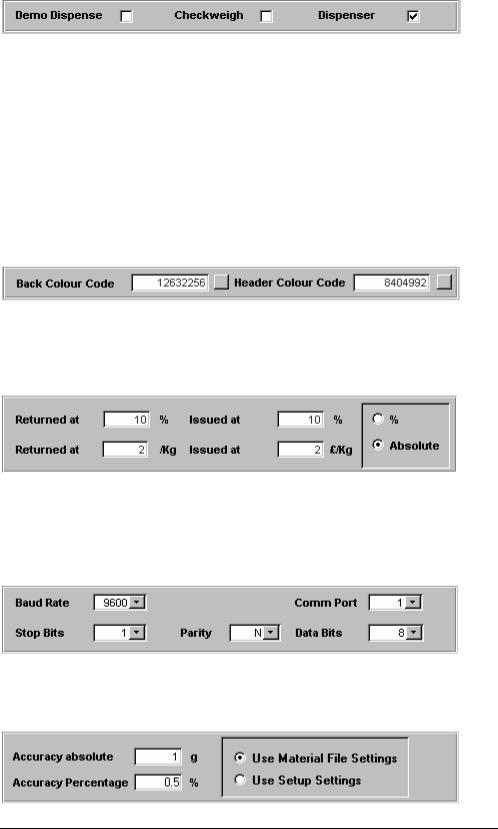
Setup
The setup form contains configuration settings for the dispenser and management system. Below are extracts from the form.
The above check boxes should be set as to the type of system you are running.
The colours of the software can be configured manually. Clicking the box to the right of the number will start a colour palette for colour selection.
Press returns can be costed in different ways depending on the users requirements. The above settings will cost an ink returned at £2 per KG and issued at £2 per KG. Should you wish to cost returns at a percentage of the original value select the % option.
Communications settings for the PLC or scale (in Checkweigh mode). These should not be altered.
18

I N O V E X D I S P E N S E S Y S T E M M A N U A L
Dispense accuracy settings can be configured from within setup or by individual material depending on selection.
Time in seconds for the dispense screen to default to operator log on.
Default setting for where stock is added on the system when using the stock control functions of the software.
Wash time & Drain time in seconds for automatic head wash systems.
Max weight, inclusive of bucket weight, to ensure dispenser does not overfill a bucket. Min weight should be slightly lower than the intended bucket weight to ensure the dispenser does not dispense without a bucket on the scale.
19
I N O V E X D I S P E N S E S Y S T E M M A N U A L
By checking the uppermost box the dispenser, following a dispense, will offer an option to print a dispense ticket. Depending on the above selection and font size will determine what is printed on the ticket.
Default dispense amounts that operators will be offered at the Dispense screen.
Enables or disables buttons on Dispense screen main menu.
Should the dispenser see a loss in weight of the above value the dispense will be suspended, thus assuming the bucket has been removed.
Enables or disables Works Order option on the dispense screen. Check this if you don’t want to use Works Orders (Jobs).
Is used to automatically check for 100 parts when formulations are added or entered. The second check box will produce a warning if a material is entered into a formula at a higher percentage than its preset maximum amount.
20
 Loading...