

Innotek Spay Collar KIT11123, Spay Collar KIT11122 Instruction Manual
™
KIT11122 / KIT11123
Instruction Guide / Manuel d’instructions
Instructivo / Gebruikshandleiding
Istruzioni per l’uso / Bedliengsanleitung

Thank you for choosing Innotek®. Through consistent use of our products, you can have a
better behaved dog in less time than with other training tools. If you have any questions,
please contact the Customer Care Center (Centre) at 1-800-826-5527 (U.S.A./Canada). For a
listing of international Customer Care Center (Centre) telephone numbers, visit our website
at www.innotek.net.
To get the most protection out of your warranty, please register your product within 30 days at
www.innotek.net/registerproduct.shtml. By registering, and keeping your receipt, you will enjoy
the product’s full warranty and should you ever need to call the Customer Care Center (Centre),
we will be able to help you faster. Most importantly, Innotek® will never give or sell your valuable
information to anyone.
This revolutionary product combines modern electronics, with state-of-the-art spray technology
and proven behavior (behaviour) modi cation techniques. Our Anti-Bark Spray Collar was
designed to assist you in training your dog and controlling his nuisance barking. Its comforting
e ect allows dogs to adapt easily and quietly to their environment while providing peace of mind
to their owners.
This instruction guide will provide you with all the information required to maximize the
e ciency of your new Anti-Bark Spray Collar™.
Our Anti-Bark Spray Collar™ is highly e cient because it distracts the animal’s primary sensory
perceptions in a harmless, painless way. The system works automatically and requires no human
intervention. Your dog will stop barking while wearing the collar. However, the e ect of the
Anti-Bark Spray Collar™ is not permanent. If you stop using the collar, your dog will eventually
resume barking. In order to reduce barking permanently without constantly using the device, you
will have to combine the Anti-Bark Spray Collar™ with proper training and elements of behavior
(behaviour) modi cation.
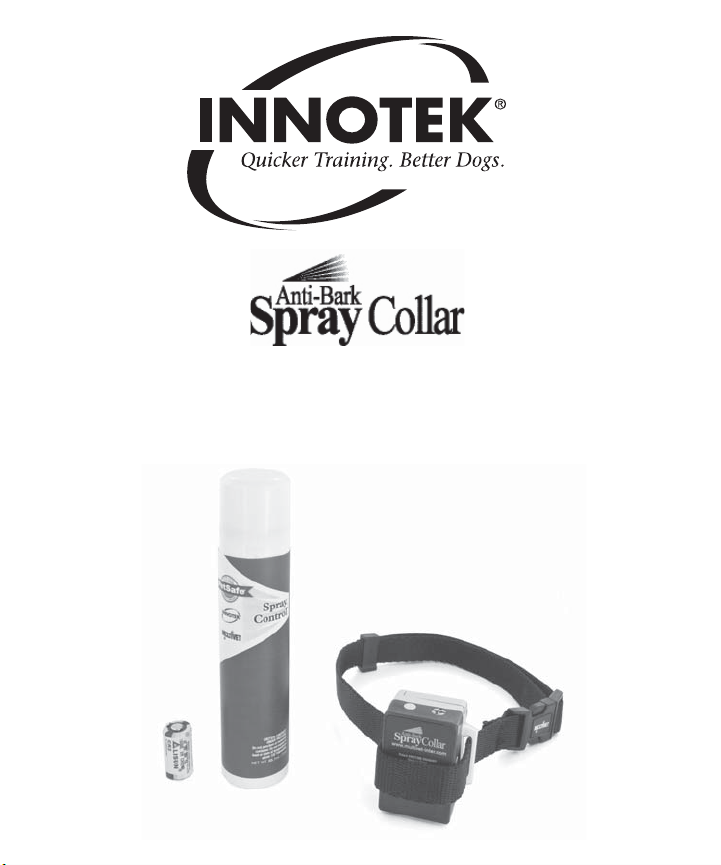
THE KIT INCLUDES
• Anti-Bark Spray device
• An adjustable collar
• A can of stainfree, hypo-allergenic spray
• One 6-volt alkaline battery
• Instruction guide
2 www.innotek.com
1
2
3
4
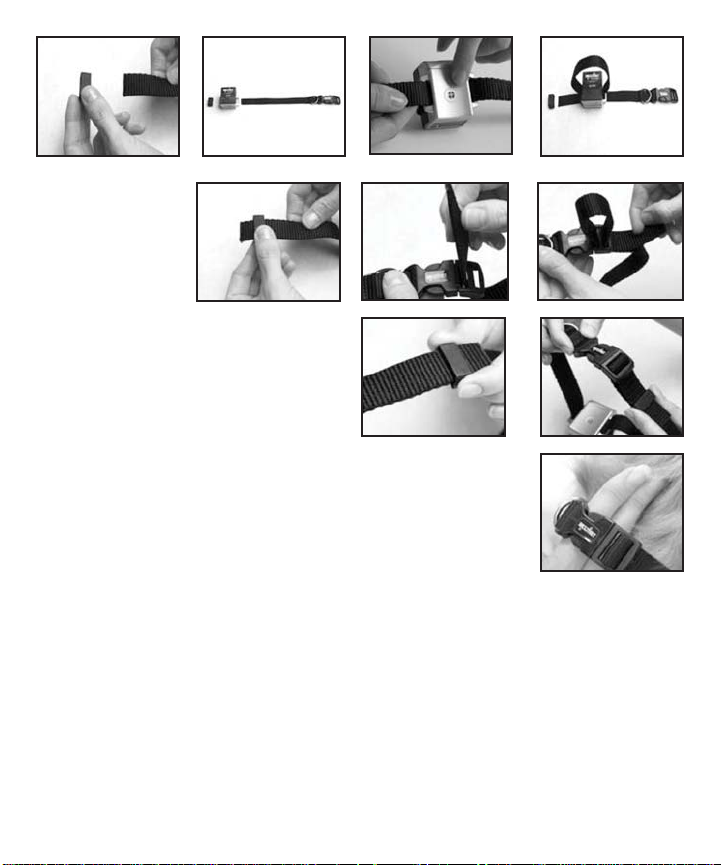
PREPARATION
Adjusting the collar
to the spray device
1. Remove the keeper
from the black collar
(1). Pass the black
collar through the
loops (2) of the spray
device (3) while
making sure that the collar does not block
the microphone’s opening (4). Put the keeper
back on the collar (5). The curved edge of the
keeper should face inside.
2. Feed the free end of the collar into the rst
slot of the buckle from the back to the front
(6). Then, thread the free end of the collar through the outside slot from
the front to the back (7). The free end should now hang on the outside,
then thread the keeper (8). When you have completed this section, the
assembled collar looks as illustrated (9).
Take o all other collars your dog may be wearing and place the Spray
Collar around his neck, making sure the spray valve is directed toward the
snout. Adjust the collar to t like a regular collar. You should be able to
easily pass two ngers (10) between your dog’s neck and the device. We suggest that you check
the collar regularly to make sure that it is well adjusted.
Note: If these instructions are not properly followed, the buckle can easily be pulled o the collar.
This could lead to the device being lost or damaged. Your dog must get used to the device before
you actually start using it. We suggest that you make your dog wear the Anti-Bark Spray Collar™
during 4 to 5 days before inserting the battery and lling the device. At the same time, we also
suggest that you remove and put the collar back frequently on your dog.
56 7
8
9
10
www.innotek.com 3
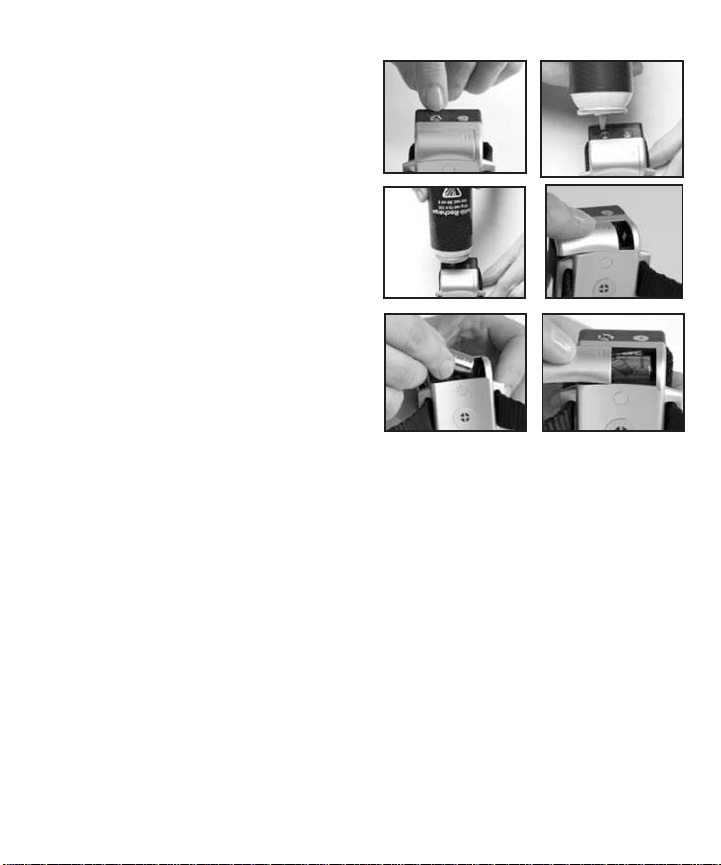
FILLING THE DEVICE
1. Set the device on a at surface, with the ll-up
valve turned upwards (11). Shake the spray can
before using it.
2. Hold the can upside down, then insert the
aerosol tip in the ll-up valve – the deepest
cavity (12) – then press down rmly for 10
seconds (13). Release pressure and press down
for another 10 seconds, then release. Note: If
spray is escaping as you attempt to ll the device,
increase the downward pressure on the re ll can to
get a better seal. You cannot over ll the device.
When completely lled, there should be enough
gas in your device for 18-23 sprays.
INSERTING THE BATTERY
Slide o the battery cover (14) and insert the 6-volt
alkaline battery without forcing it (15), keeping the
polarity in mind (+ and -). Slide the cover back on
(16).
Turn the device on - Before every use, it is best to
test the device by blowing into the microphone.
Adjust the Spray Collar onto the dog’s neck with the microphone’s opening facing inwards.
Direct the spray valve towards the dog’s snout.
Your Anti-Bark Spray Collar™ will now react when your dog barks. Training, in addition
to using the device, will accelerate and consolidate the desired behavior (behaviour)
modi cation.
11
12
13
15 16
14
DO’S AND DON’TS
• The collar should be worn only during periods of nuisance barking and no more than eight
hours per day.
• The collar must be lled to maximum capacity before placing it around your dog’s neck.
• Never ll the device while your dog is wearing it because it may damage the ll-up valve.
• To ensure that your dog does not make the connection between you and the spray collar, don’t
let him see you prepare the device, neither for the rst try, nor for subsequent use. Keep your
dog away while you prepare the device as well as when you ll it or change the battery.
• It is important that your dog’s hair doesn’t block the spray valve. Try tying a bandanna
(handkerchief) around your dog’s neck, then place the spray collar over it. If necessary, you may
also consider trimming a little of the long hair around the dog’s neck for better spray e ect.
• Remove all other collars with metallic parts or tags. These could create noise that may needlessly
activate the spraying device.
4 www.innotek.com
 Loading...