

Page 1

Ingenico 5100
Paymark Version 6.0 Contactless
Operating Guide
VERSION 1.3
Document ID: 0072
Page 2

INGENICO 5100 PAYMARK VERSION 6.0 OPERATING GUIDE Version 1.3
TABLE OF CONTENTS
1 INTRODUCTION .............................................................................................................................. 7
2 HARDWARE OVERVIEW ................................................................................................................. 7
2.1
T
HE
INGENICO 5100 T
ERMINAL
..................................................................................................... 7
2.1.1 Features of the i5100 ....................................................................................................... 8
2.1.2 The i5100 Keyboard ......................................................................................................... 9
2.1.2.1 Green/ENTER Key ..................................................................................................................... 10
2.1.2.2 Yellow/CLEAR Key .................................................................................................................... 10
2.1.2.3 Red/CANCEL Key ..................................................................................................................... 10
2.1.2.4 FUNCTION Key ........................................................................................................................... 10
2.1.2.5 FEED Key ..................................................................................................................................... 10
2.1.2.6 'Soft' Function Keys ................................................................................................................... 10
2.1.2.7 Alphanumeric Key Entry .......................................................................................................... 10
2.1.3 Card Reader .................................................................................................................. 11
2.1.3.1 Magnetic Stripe Card .............................................................................................................. 11
2.1.3.2 Smart Card (IC Card) .............................................................................................................. 11
2.2
T
HE
INGENICO 3010 P
INPAD
...................................................................................................... 12
2.2.1 Features of the Pinpad ................................................................................................. 13
2.2.2 The i3010 Keyboard ....................................................................................................... 14
2.2.2.1 Keypad ....................................................................................................................................... 14
2.2.2.2 Green/ENTER Key ..................................................................................................................... 15
2.2.2.3 Yellow/CLEAR Key .................................................................................................................... 15
2.2.2.4 Red/CANCEL Key ..................................................................................................................... 15
2.2.2.5 Function Key .............................................................................................................................. 15
2.2.2.6 Feed Key .................................................................................................................................... 15
2.2.2.7 'Soft' Function Keys ................................................................................................................... 15
2.2.3 The SkyPay-300 Reader ................................................................................................. 16
2.2.4 Features of the SkyPay-300 Reader ............................................................................. 17
2.2.5 Port Layout ..................................................................................................................... 18
2.2.6 Installation of an i3010 Pinpad ..................................................................................... 19
3 SET UP ........................................................................................................................................... 21
3.1
CONFIGURATION FLOWCHART ............................................................................................. 21
3.1.1 Overview: Procedure to Activate Paymark Terminal ............................................... 21
3.1.2 Dial-Up Configuration Flowchart ................................................................................. 22
3.1.3 TCP-IP (Broadband)/Dial Backup Configuration Flowchart..................................... 23
3.1.4 TCP-IP (Broadband) Configuration Flowchart ........................................................... 24
3.1.5 Multi Merchant Configuration Flowchart ................................................................... 25
3.2
EFTPOS CONFIGURATION ....................................................................................................... 26
3.2.1 Dial-Up Configuration ................................................................................................... 27
3.2.2 TCP-IP with Dial Back-up Configuration ...................................................................... 28
3.2.3 TCP-IP Configuration ..................................................................................................... 30
3.3
EFTPOS CONFIGURATION FOR MULTI-MERCHANT .............................................................. 31
3.4
MULTI-MERCHANT CONFIGURATION .................................................................................... 33
3.4.1 Master Memory Reset ................................................................................................... 34
3.4.2 To Deactivate Multi-Merchant Configuration ........................................................... 35
3.5
CONTACTLESS ........................................................................................................................... 36
3.5.1 Contactless Configuration ........................................................................................... 37
3.6
SINGLE MERCHANT MEMORY RESET CONFIGURATION ...................................................... 38
3.7
REMOTE KEY INJECTION (PKMS) ............................................................................................. 39
3.7.1 Remote Key Injection (PKMS) Configuration ............................................................. 39
3.7.1.1 Dial-up Configuration .............................................................................................................. 39
3.7.1.2 TCP-IP (Broadband) Configuration ....................................................................................... 40
3.7.2 Remote Key Injection (PKMS) Initialisation .................................................................. 41
Page 3

INGENICO 5100 PAYMARK VERSION 6.0 OPERATING GUIDE Version 1.3
3.8
ENABLE/DISABLE TERMINAL FUNCTIONS ............................................................................... 42
3.9
CONFIGURE RECEIPT HEADER AND FOOTER ........................................................................ 44
3.10 RESTART TERMINAL ................................................................................................................... 46
4 OPERATION OF TERMINAL ........................................................................................................... 47
4.1
MERCHANT LOGON................................................................................................................. 47
4.1.1 Pending Reversal ........................................................................................................... 47
4.2
PURCHASE TRANSACTION ...................................................................................................... 48
4.3
CONTACTLESS PURCHASE TRANSACTION ............................................................................ 49
4.3.1 Up to the CVM (Card Verification Method) Limit of $80 .......................................... 49
4.3.2 Above the CVM (Card Verification Method) Limit of $80 ........................................ 50
4.4
CASH OUT TRANSACTION ....................................................................................................... 52
4.5
REFUND TRANSACTION............................................................................................................ 53
4.6
CARD NOT PRESENT TRANSACTION....................................................................................... 55
4.7
CARD NOT PRESENT REFUND TRANSACTION ....................................................................... 57
4.8
EMV (E
UROPAY MASTERCARD VISA)
CHIP CARD TRANSACTION ............................................ 59
4.9
DEBIT TIPPING TRANSACTION.................................................................................................. 61
4.10 CREDIT CARD TIPPING TRANSACTION .................................................................................. 63
4.10.1 Authorisation .............................................................................................................. 63
4.10.2 Tip Transactions.......................................................................................................... 64
4.10.3 Tipping Utilities ............................................................................................................ 66
4.10.3.1 Void Tip ....................................................................................................................................... 66
4.10.3.2 Uploading Tip Transactions ..................................................................................................... 68
4.10.3.3 Printing Tips ................................................................................................................................ 69
4.11 CREDIT CARD HOSPITALITY TRANSACTION ........................................................................... 70
4.11.1 Hospitality Authorisation ........................................................................................... 70
4.11.2 Hospitality Completion Transaction ........................................................................ 72
4.11.3 Hospitality Utilities ...................................................................................................... 73
4.11.3.1 Hospitality Top-Up Authorisation ............................................................................................ 73
4.11.3.2 Hospitality Extra Charges Transaction .................................................................................. 76
4.12 CHEQUE VERIFICATION AUTHORISATION ............................................................................. 78
4.13 MERCHANT ADMINISTRATION FUNCTIONS ........................................................................... 79
4.13.1 Terminal Totals ........................................................................................................... 79
4.13.2 Settlement Inquiry ..................................................................................................... 80
4.13.3 Settlement Cutover ................................................................................................... 81
4.14 DUPLICATE RECEIPT .................................................................................................................. 82
4.15 ELECTRONIC OFFLINE VOUCHERS (EOV) .............................................................................. 83
4.15.1.1 Notification of EOV Mode ...................................................................................................... 84
4.15.1.2 Upload Electronic/Contactless Offline Transactions ......................................................... 84
5 ADMINISTRATION ........................................................................................................................ 85
5.1
PASSWORDS .............................................................................................................................. 85
5.2
DIAGNOSTICS ........................................................................................................................... 86
5.3
EXTRA TERMINAL FUNCTIONS ................................................................................................. 89
5.3.1 Xtra .................................................................................................................................. 89
5.4
TRAINING MODE ....................................................................................................................... 92
5.5
NEW FEATURES OF THE TERMINAL ........................................................................................... 93
5.5.1 DECLINED ALERT ............................................................................................................. 93
5.5.2 ONE OR TWO PIECE UNIT ............................................................................................... 93
5.5.3 FULL MESSAGE ENCRYPTION ......................................................................................... 93
5.5.4 CUSTOMER RECEIPT COPY ............................................................................................ 93
5.5.5 BROADBAND CONNECTIVITY ....................................................................................... 93
5.5.6 BROADBAND WITH DIAL BACKUP ................................................................................. 93
6 SAFETY AND MAINTENANCE ...................................................................................................... 94
6.1
CLEANING THE CASE ............................................................................................................... 94
6.2
GENERAL SAFETY INFORMATION ........................................................................................... 94
6.3
INGRESS GUARDS ..................................................................................................................... 94
Page 4

INGENICO 5100 PAYMARK VERSION 6.0 OPERATING GUIDE Version 1.3
6.4
EXTERNAL POWER SUPPLY ....................................................................................................... 95
6.5
CONNECTIONS ......................................................................................................................... 95
6.6
LIFT LATCH TO OPEN PRINTER LID ............................................................................................ 96
6.7
PAPER SIZE ................................................................................................................................. 96
6.8
OPERATING ENVIRONMENT .................................................................................................... 96
7 SKYZER TECHNOLOGIES CONTACT DETAILS .............................................................................. 97
Page 5

INGENICO 5100 PAYMARK VERSION 6.0 OPERATING GUIDE Version 1.3
TABLE OF FIGURES
Figure 1 – Features of the Ingenico i5100 ............................................................................. 8
Figure 2 - i5100 Keyboard ....................................................................................................... 9
Figure 3 - Features of Ingenico i3010 ................................................................................... 13
Figure 4 - i3010 Keyboard ..................................................................................................... 14
Figure 5 - Features of the SkyPay-300 Reader .................................................................... 17
Figure 6 – Port Layout for Ingenico 5100 ............................................................................. 18
Figure 7 - Cable Port Locations ............................................................................................ 95
Figure 8 - Printer Lid Opening ............................................................................................... 96
Figure 9 - Paper Roll Loading ................................................................................................ 96
Page 6

INGENICO 5100 PAYMARK VERSION 6.0 OPERATING GUIDE Version 1.3
FILE LOCATION:
A soft copy of this document can be found at:
N:\Skyzer Documents\Ingenico Operating and Merchant Quick
Guides\Paymark\Contactless Operating Guie\Ingenico 5100 Paymark
Contactless Operating Guide.doc
DOCUMENT OWNER:
All changes to this document must be approved and signed off before
release by the Marketing Manager.
REVISION RECORD
VERSION CHANGE CHANGED BY DATE
1.3 Document creation Vineel Dhani 16/09/2011
Page 7
SKYZER TECHNOLOGIES PAGE 7 OF 97
INGENICO 5100 PAYMARK VERSION 6.0 OPERATING GUIDE Version 1.3
1 INTRODUCTION
This document serves as a comprehensive guide to the operation of Skyzer’s
Ingenico 5100 EFTPOS terminal in New Zealand.
2 HARDWARE OVERVIEW
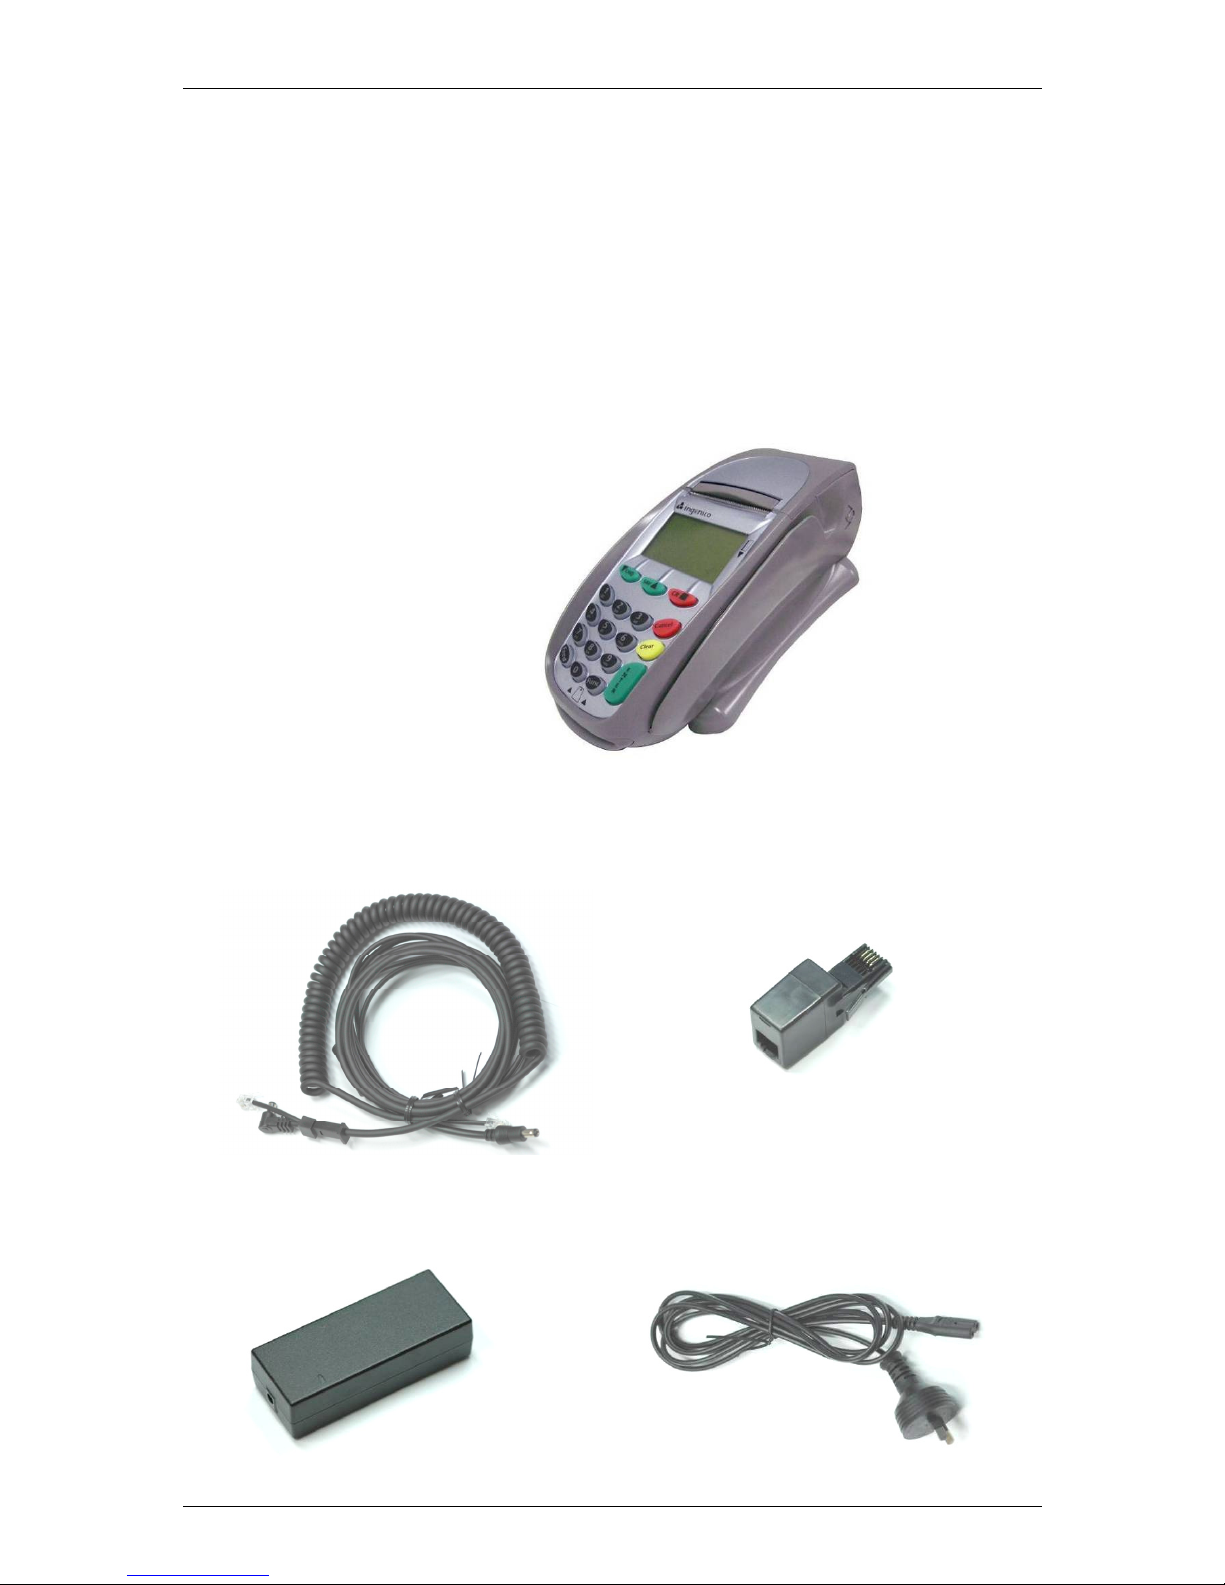
2.1 The INGENICO 5100 Terminal
The Ingenico 5100 Terminal consists of the following elements:
The Terminal Handset:
The cable that connects the terminal to both the power supply and
telephone line:
The power adapter and Figure 8 cable that connects the terminal to a 100 240V power outlet:
Page 8
SKYZER TECHNOLOGIES PAGE 8 OF 97
INGENICO 5100 PAYMARK VERSION 6.0 OPERATING GUIDE Version 1.3
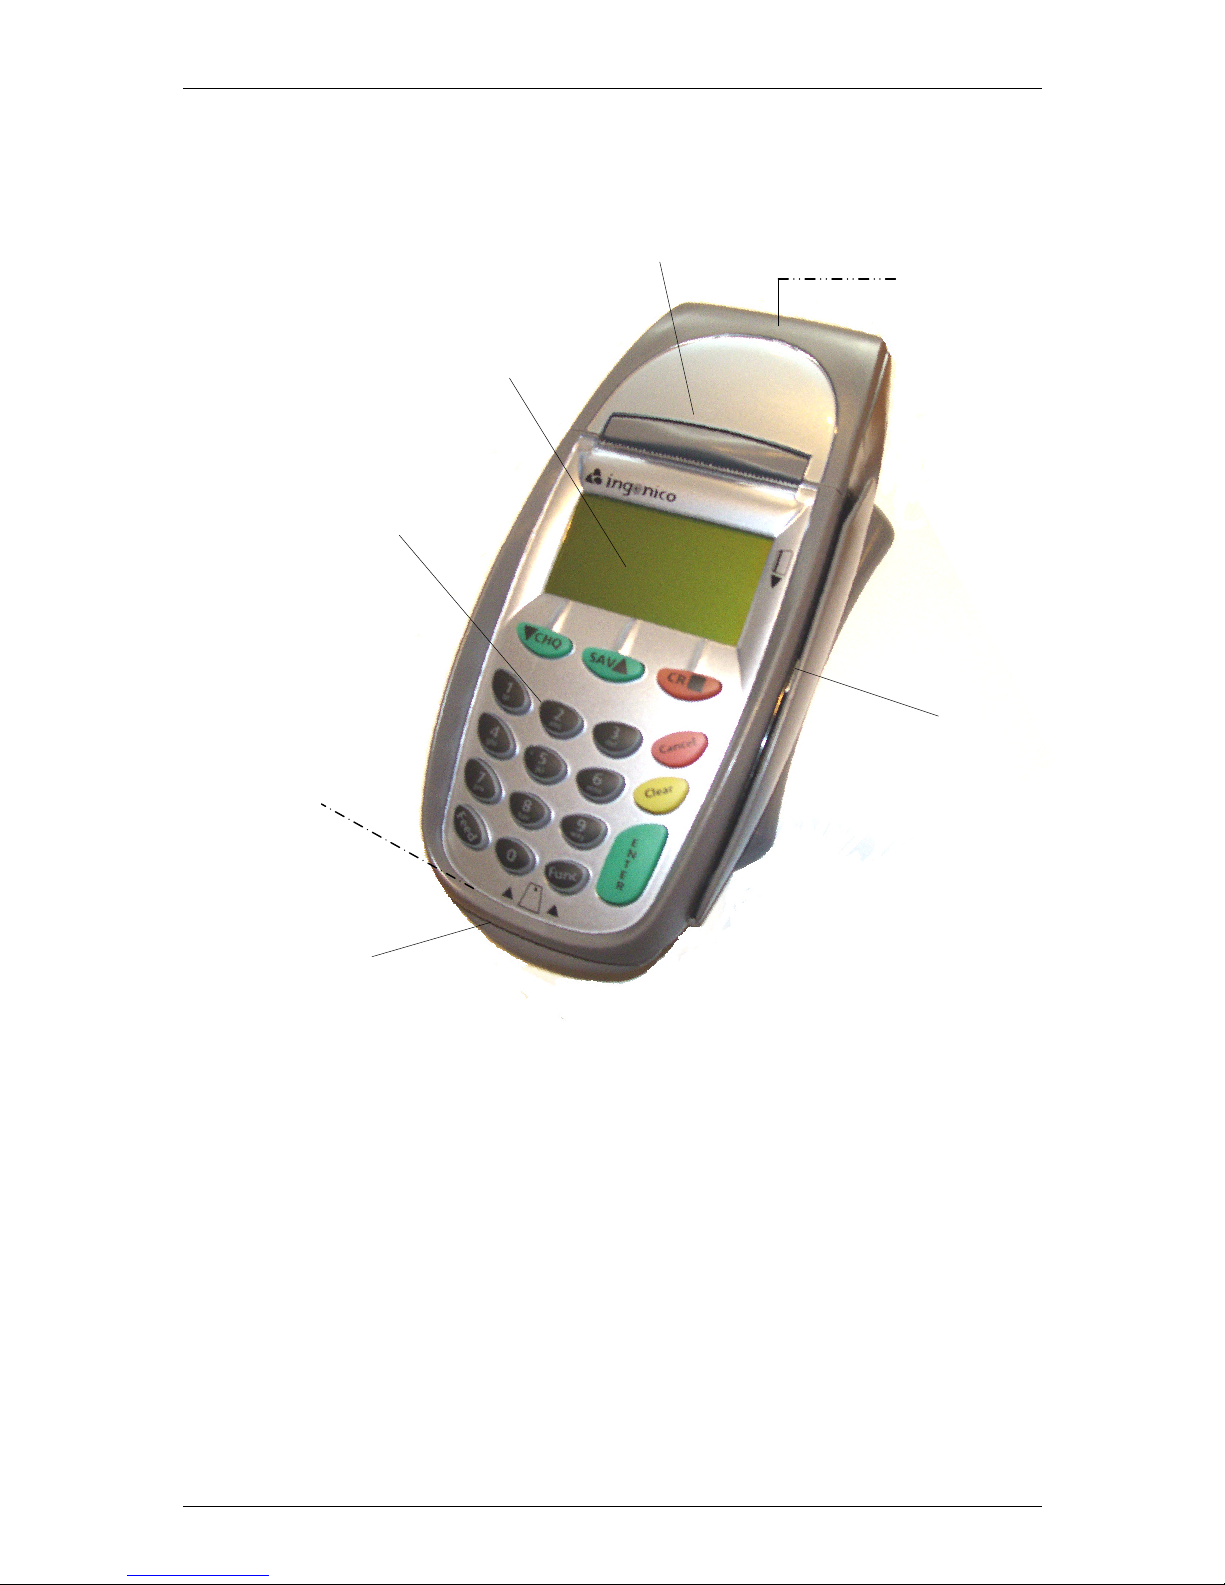
2.1.1 Features of the i5100
Figure 1 – Features of the Ingenico i5100
Smart card reader
Easy loading printer
Large graphic backlit display
Connection
Ports
SAM compartment
18-key backlit keyboard
Magnetic stripe
reader
Page 9

SKYZER TECHNOLOGIES PAGE 9 OF 97
INGENICO 5100 PAYMARK VERSION 6.0 OPERATING GUIDE Version 1.3
2.1.2 The i5100 Keyboard
The keyboard is comprised of the 0 to 9 keys. They are used for data entry
(amount, PIN and manual card number entry).
Figure 2 - i5100 Keyboard
The keyboard layout consists of:
• Keyboard (0 through 9)/
• Red/CANCEL/NO key/
• Yellow/ CLEAR/NO key/
• Green/ ENTER/YES input key/
• FUNCTION key/
• FEED key/
• Soft function/Navigation keys located directly under the display keys
(/CHQ, SAV/ & CR/) to allow the user to select alternate options
on the display.
The FEED key
advances the
paper a few
Keyboard
The FUNCTION key provides
access to the merchant
functions.
The navigation keys
navigate
in the terminal menus
The CHQ, SAV and CR key allows
account selection and soft key
functions.
The Yellow/CLEAR key
cancels the last
character
The Red/CANCEL key cancels
the procedure in progress, goes
to idle state
The Green/ENTER key validates
the input selections and
information.
Page 10

SKYZER TECHNOLOGIES PAGE 10 OF 97
INGENICO 5100 PAYMARK VERSION 6.0 OPERATING GUIDE Version 1.3
2.1.2.1 Green/ENTER Key
The ENTER key is used to signal the end of a data entry sequence or a YES
response to a question.
2.1.2.2 Yellow/CLEAR Key
The CLEAR key is used to clear data that has been entered incorrectly or to
signal a NO response to a question.
2.1.2.3 Red/CANCEL Key
The CANCEL key is used to cancel the current action and return to the
previous display or in some instances to the main display.
2.1.2.4 FUNCTION Key
The FUNCTION key is used to enter the function menu.
2.1.2.5 FEED Key
The FEED key is used to feed the paper on the receipt printer.
2.1.2.6 'Soft' Function Keys
These are the three keys located just below the display screen, also referred
to as CHQ, SAV & CR. They are controlled by the software and their function
changes depending on the prompts displayed on the bottom line of the
display. The function of these keys is displayed on the bottom line when they
are available for use.
2.1.2.7 Alphanumeric Key Entry
The alphanumeric keys are grouped in the following way.
1 Q Z <space> ? –
q z
2 A B C
a b c
3 D E F
d e f
4 G H I
g h i
5 J K L
j k l
6 M N O
m n o
7 P R S
p r s
8 T U V
t u v
9 W X Y
w x y
0 . , # * % $ &
@ ( ) / + = _
To enter an alpha letter, first press the corresponding number key, and then
press the CR or FUNC key to scroll through the alpha letters for that key.
Page 11
SKYZER TECHNOLOGIES PAGE 11 OF 97
INGENICO 5100 PAYMARK VERSION 6.0 OPERATING GUIDE Version 1.3
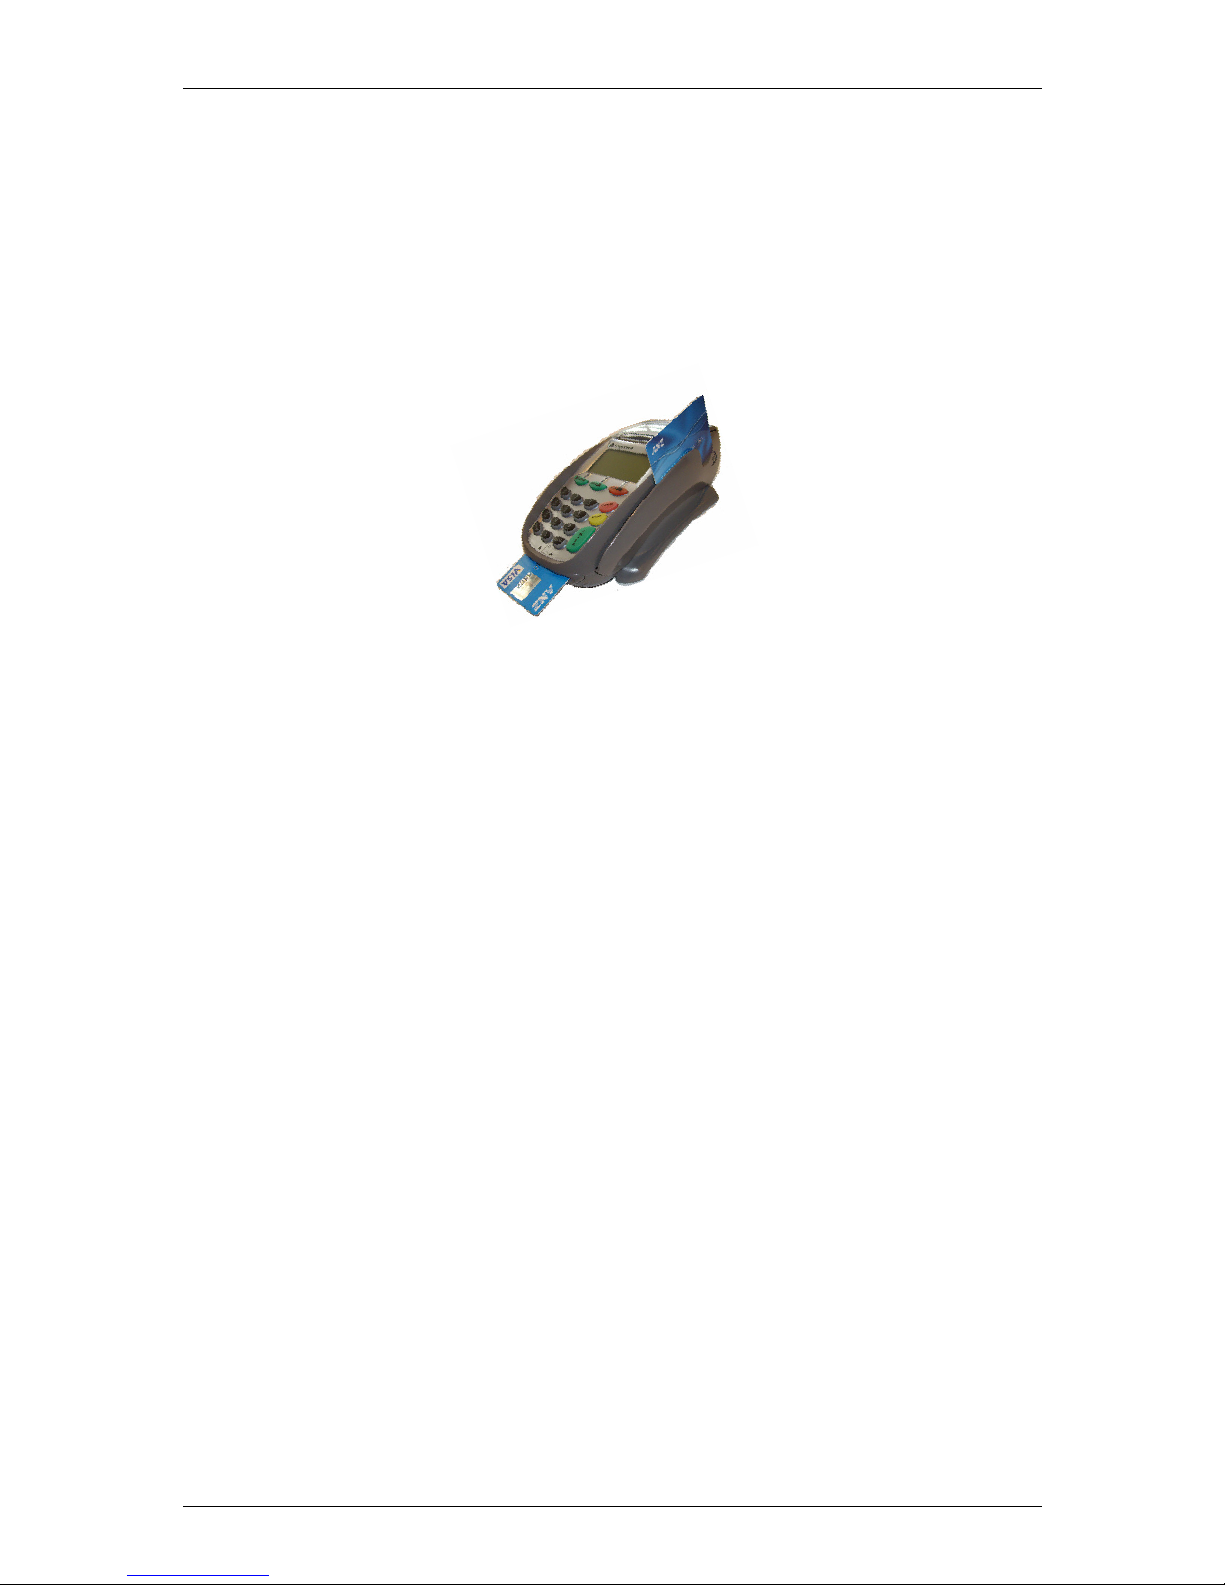
2.1.3 Card Reader
2.1.3.1 Magnetic Stripe Card
The card can be read either from bottom to top or from top to bottom, with
the stripe facing the terminal. Use a regular movement in order to ensure a
reliable card read.
2.1.3.2 Smart Card (IC Card)
Insert the card horizontally with the metallic chip facing upwards and leave in
position throughout the transaction.
Only remove the card when prompted by the terminal.
Page 12

SKYZER TECHNOLOGIES PAGE 12 OF 97
INGENICO 5100 PAYMARK VERSION 6.0 OPERATING GUIDE Version 1.3
2.2 The INGENICO 3010 Pinpad
The Ingenico 3010 pinpad consists of the following elements:
The Pinpad Handset:
The interface cable that connects the pinpad to the i5100 terminal:
Connects to
pinpad
Connects to
terminal
Page 13
SKYZER TECHNOLOGIES PAGE 13 OF 97
INGENICO 5100 PAYMARK VERSION 6.0 OPERATING GUIDE Version 1.3
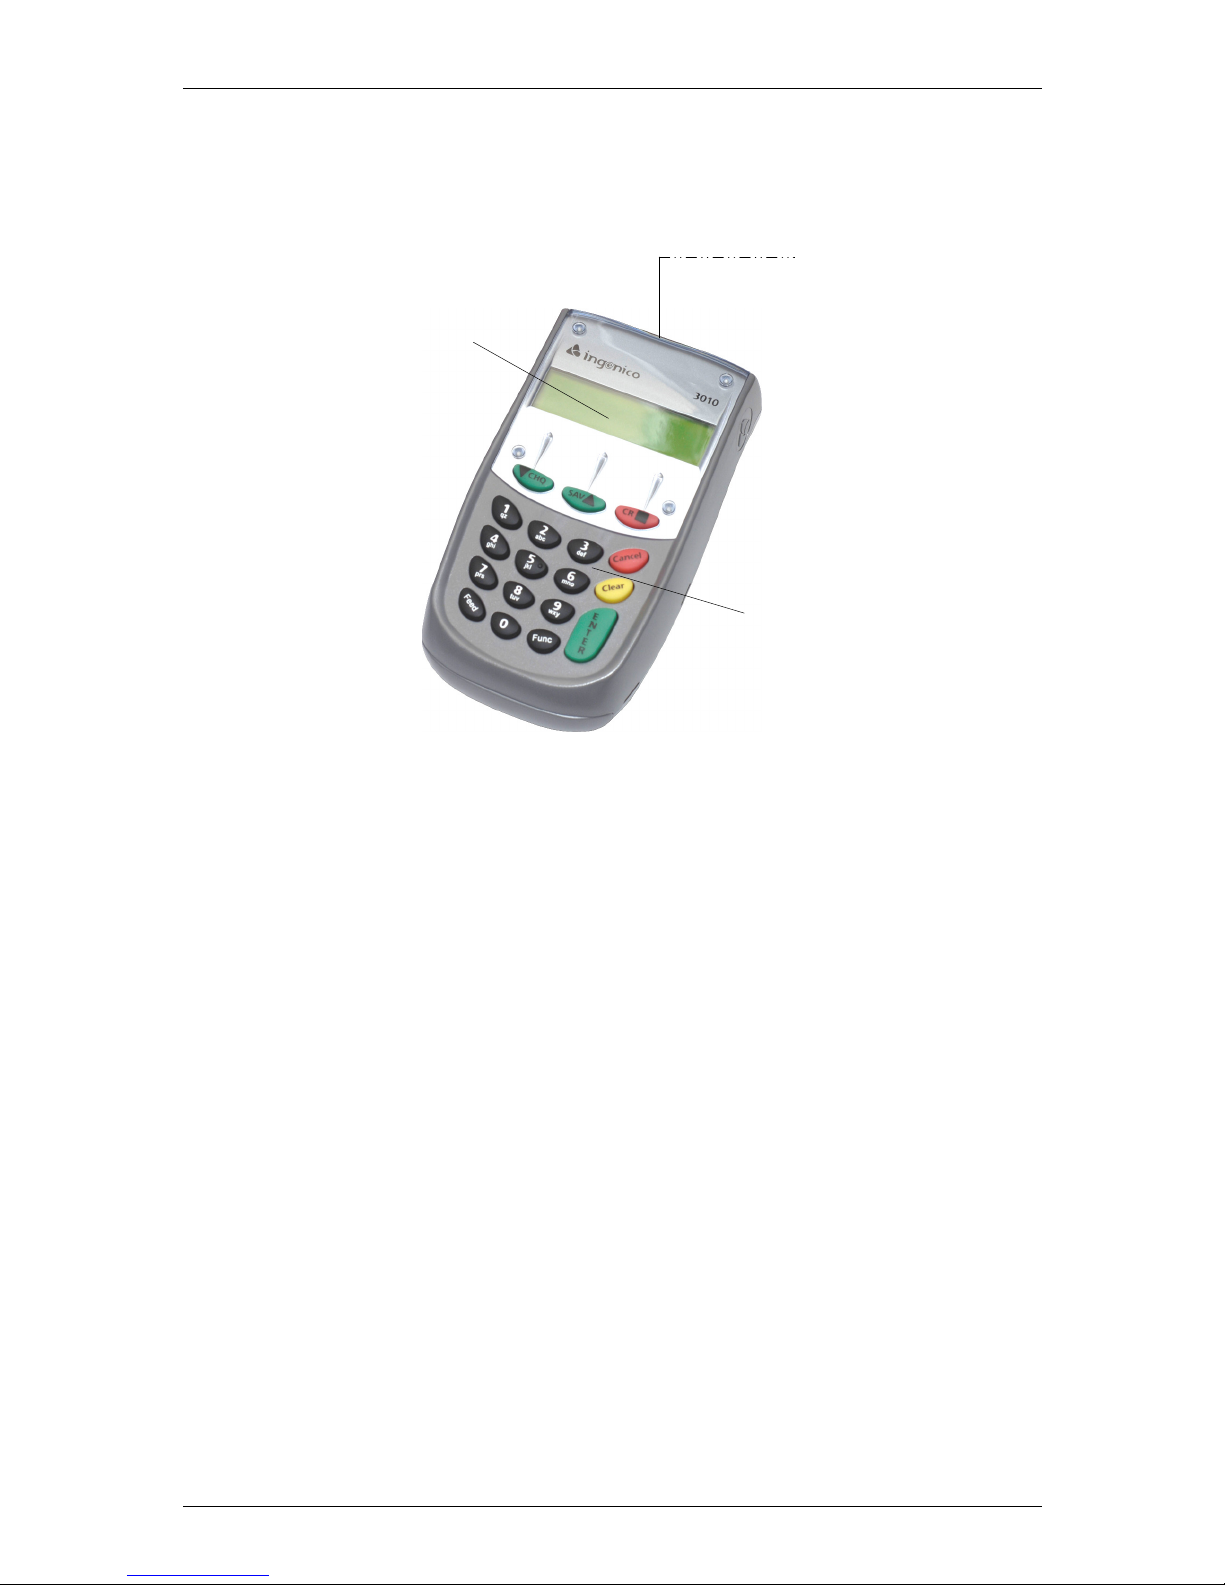
2.2.1 Features of the Pinpad
Figure 3 - Features of Ingenico i3010
18-key keyboard
Backlit display
Connection
Port
Page 14

SKYZER TECHNOLOGIES PAGE 14 OF 97
INGENICO 5100 PAYMARK VERSION 6.0 OPERATING GUIDE Version 1.3
2.2.2 The i3010 Keyboard
Figure 4 - i3010 Keyboard
The keyboard layout consists of:
• Keyboard (0 through 9)/
• Red/CANCEL/NO key/
• Yellow/ CLEAR/NO key/
• Green/ ENTER/YES input key/
• Function key/
• Feed key/
• Soft function/Navigation keys located directly under the display
(/CHQ, SAV/ & CR/) to allow the user to select options on the
display.
2.2.2.1 Keypad
The keyboard is comprised of the 0 to 9 keys. They are used for PIN entry.
Keyboard
The navigation keys
The CHQ, SAV and CR key allows
account selection and soft key
functions.
The Yellow/CLEAR key
cancels the last
The Red/CANCEL key cancels
the procedure in progress, goes
to idle state
The Green/ENTER key validates the
input selections and information.
Page 15

SKYZER TECHNOLOGIES PAGE 15 OF 97
INGENICO 5100 PAYMARK VERSION 6.0 OPERATING GUIDE Version 1.3
2.2.2.2 Green/ENTER Key
The ENTER key is used to signal the end of a PIN or Signature entry or a YES
response to a question.
2.2.2.3 Yellow/CLEAR Key
The CLEAR key is used to clear data that has been entered incorrectly or to
signal a NO response to a question.
2.2.2.4 Red/CANCEL Key
The CANCEL key is used to cancel the current action and return to the main
display.
2.2.2.5 Function Key
The FUNCTION key is disabled.
2.2.2.6 Feed Key
The FEED key is disabled.
2.2.2.7 'Soft' Function Keys
These are the three keys located just below the display screen, also referred
to as CHQ, SAV & CR. They are controlled by the software and their function
changes depending on the prompts displayed on the bottom line of the
display. The function of these keys is displayed on the bottom line when they
are available for use.
Page 16

SKYZER TECHNOLOGIES PAGE 16 OF 97
INGENICO 5100 PAYMARK VERSION 6.0 OPERATING GUIDE Version 1.3
2.2.3 The SkyPay-300 Reader
The SkyPay-300 reader consists of the following elements:
The SkyPay-300 Handset:
The cable that connects the reader to the terminal and external power
source:
Female DC
Socket
Connection
Male DC Socket
Connection
RJ12 connection
Page 17

SKYZER TECHNOLOGIES PAGE 17 OF 97
INGENICO 5100 PAYMARK VERSION 6.0 OPERATING GUIDE Version 1.3
Backlit display
LED lights
Tap area for
contactless
card
2.2.4 Features of the SkyPay-300 Reader
Figure 5 - Features of the SkyPay-300 Reader
LED lights
SkyPay-300
stand
Page 18
SKYZER TECHNOLOGIES PAGE 18 OF 97
INGENICO 5100 PAYMARK VERSION 6.0 OPERATING GUIDE Version 1.3
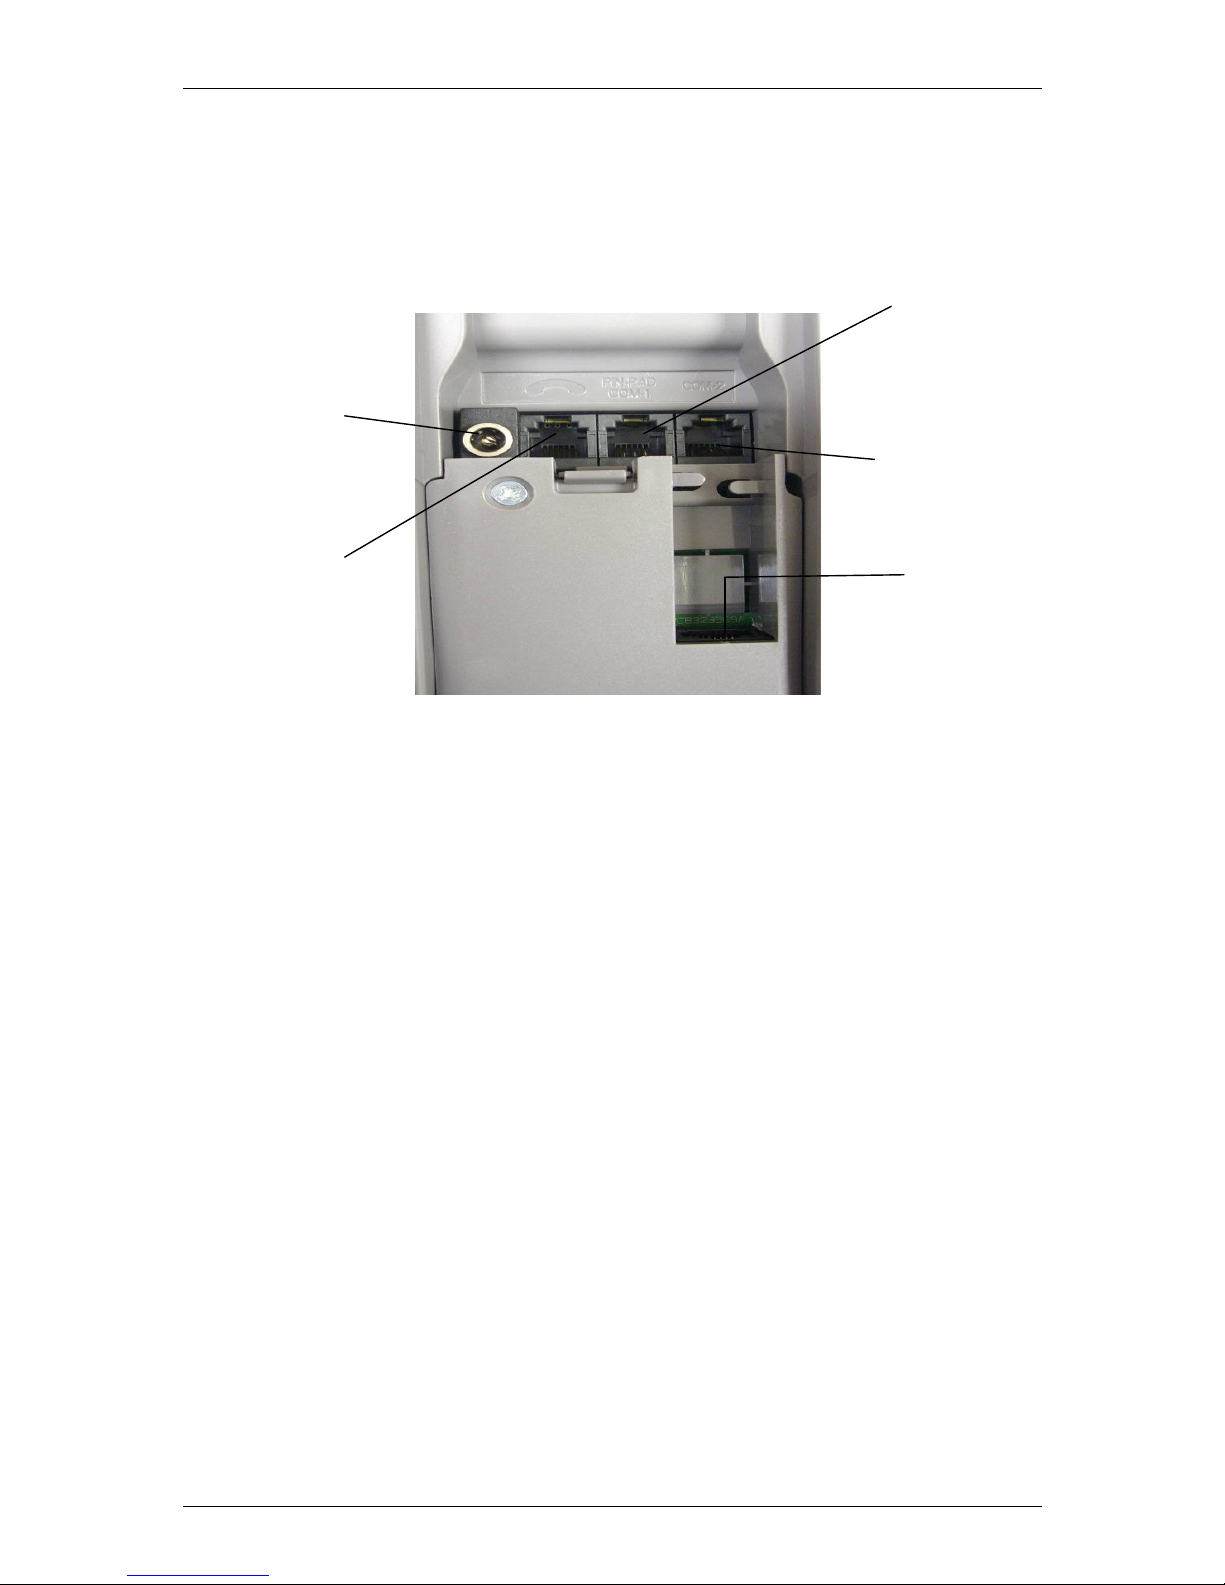
2.2.5 Port Layout
The following ports are as defined at the rear of the Ingenico 5100 terminal.
Figure 6 – Port Layout for Ingenico 5100
Note: The SkyPay-300 reader can be connected to either ports, RS232-1 or
RS232-2 as long as it’s been activated for that port. Refer to page 37 for
instructions on activating the SkyPay-300 reader port to operate on.
If the SkyPay-300 reader is activated on RS232-2 port, then the ECR interface
cannot be enabled due to RS232-2 port in use by SkyPay-300 reader.
Power Port
PSTN/Telephone
Port
Pinpad/SkyPay-300
Port
ECR Interface/SkyPay-300
Port
Ethernet
Port
Page 19

SKYZER TECHNOLOGIES PAGE 19 OF 97
INGENICO 5100 PAYMARK VERSION 6.0 OPERATING GUIDE Version 1.3
2.2.6 Installation of an i3010 Pinpad
To add an i3010 pinpad to an i5100 terminal, follow the steps below:
1. Ensure that the power supply to the i5100 terminal is turned off.
2. Plug the pinpad cable into the i3010 pinpad port.
3. Plug the pinpad cable into the RS232-1 port on the i5100 terminal.
4. Turn the power supply to the i5100 terminal back on.
The 2 phase synchronisation process between the i3010 pinpad and i5100
terminal will begin automatically.
5. The i5100 terminal will be displaying “Initializing DUKPT. Please Wait.
(aprox. 20 sec)” while synchronising with the i3010 pinpad.
6. The i3010 pinpad will begin the 2 phase synchronisation process
automatically. The following screens will appear on the i3010 pinpad
display during the synchronisation process.
Initializing
InitializingInitializing
Initializing
DUKPT.
DUKPT.DUKPT.
DUKPT.
Please Wait.
Please Wait.Please Wait.
Please Wait.
(aprox. 20 sec)
(aprox. 20 sec)(aprox. 20 sec)
(aprox. 20 sec)
Keys
Keys Keys
Keys Phase 1
Phase 1Phase 1
Phase 1
Synchronization
SynchronizationSynchronization
Synchronization
Keys
KeysKeys
Keys
Phase 2
Phase 2Phase 2
Phase 2
Synchronization
SynchronizationSynchronization
Synchronization
Connects to
Terminal RS232-1
Connects to pinpad
Page 20

SKYZER TECHNOLOGIES PAGE 20 OF 97
INGENICO 5100 PAYMARK VERSION 6.0 OPERATING GUIDE Version 1.3
7. At the conclusion of the synchronisation process, the i3010 pinpad will
display:
8. The i5100 terminal will now automatically reboot itself to establish
connection with the i3010 pinpad.
9. The i3010 pinpad will now display “PAYMARK EFTPOS” which is its
standard idle screen.
In the unlikely event that the i3010 pinpad has not been synchronised with the
serial number, perform the steps below to complete the installation process:
10. The i5100 terminal will prompt for the serial number of the i3010 pinpad to
be entered. Key the 10 digit serial number (found on the back of the
i3010 pinpad) into the i5100 terminal and press ENTER.
11. The i5100 terminal will prompt to re-enter the serial number and press
ENTER.
NOTE: When replacing an i3010 pinpad, ensure that the power supply to the
i5100 terminal is turned off. Unplug the i3010 pinpad cable from the RS232-1
port on the i5100 terminal and then proceed from step 2(as above).
I3010 PCI 02.0X
I3010 PCI 02.0XI3010 PCI 02.0X
I3010 PCI 02.0X
1234
12341234
1234----
D
D D
D
PAYMARK
PAYMARKPAYMARK
PAYMARK
EFTPOS
EFTPOSEFTPOS
EFTPOS
Enter Serial Num
Enter Serial NumEnter Serial Num
Enter Serial Num
Re
ReRe
Re----enter Serial
enter Serial enter Serial
enter Serial
Page 21
SKYZER TECHNOLOGIES PAGE 21 OF 97
INGENICO 5100 PAYMARK VERSION 6.0 OPERATING GUIDE Version 1.3
3 SET UP
3.1 CONFIGURATION FLOWCHART
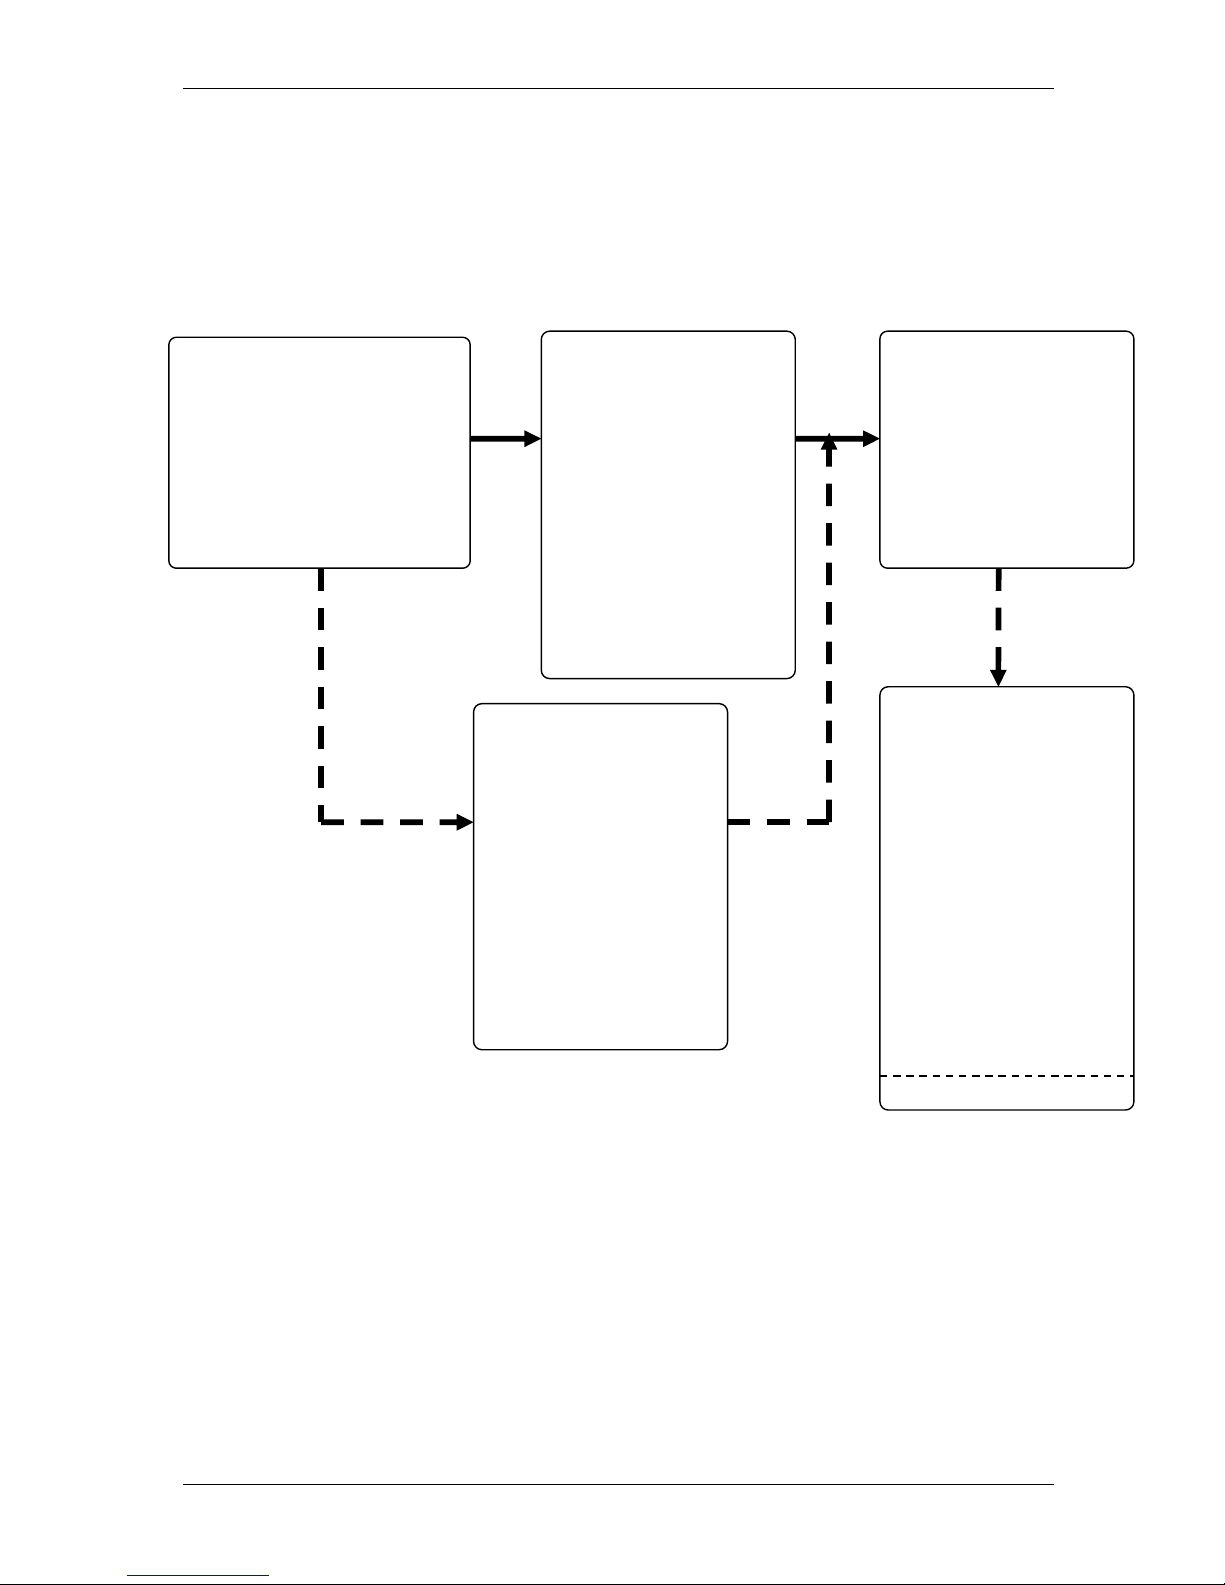
3.1.1 Overview: Procedure to Activate Paymark Terminal
NOTE: The Remote Key Injection (PKMS) can be performed through dial up and
broadband connection. Once the PKMS initialisation is successful, restart the
terminal and then a merchant logon can be initiated to obtain connectivity to
Paymark network.
TERMINAL CONFIGURATION
FUNC 3824
Configure the Terminal ID
and select preferred COMMS
mode.
1 – Dial up (Page 19)
2 – TCP-IP/Dial up (Page 20)
3 – TCP-IP (Page 21)
PKMS INITIALISATION
(Page 33)
Press FUNC 87 and then
key in the PKMS
password 6987 followed
by ENTER. Terminal will
display REMOTE INIT IN
PROGRESS followed by
ACCEPTED when
successful. Press FUNC
86 followed by ENTER
twice to restart the
terminal.
START
TERMINAL
CONFIGURATION
RECEIPT (Page 73)
Press ENTER to scroll
through until
SUPERVISOR menu is
displayed. Press the
CHQ to select XTRA to
perform TERMINAL
FUNCTIONS. Press
number 2 to display
KVC download on to
the terminal. Press ENTER
to print off the terminal
configuration receipt.
OPTIONAL
MERCHANT LOGON
(Page 37)
Press ENTER to scroll
through until
SUPERVISOR menu is
displayed. Press the SAV
to select INIT to perform
a logon.
MANUALLY KEY LOADED
If the terminal is
manually key loaded
then the merchant
needs to register the
keyset (which is located
at the back of the
terminal on Paymark
sticker) against the
terminal ID by
contacting the
Paymark helpdesk on
0800 800 996
Page 22

SKYZER TECHNOLOGIES PAGE 22 OF 97
INGENICO 5100 PAYMARK VERSION 6.0 OPERATING GUIDE Version 1.3
At the COMMS MODE,
press the corresponding
number key to select
preferred comms mode
and press ENTER
1-Dial-up
2-TCP-IP/Dial
3-TCP-IP
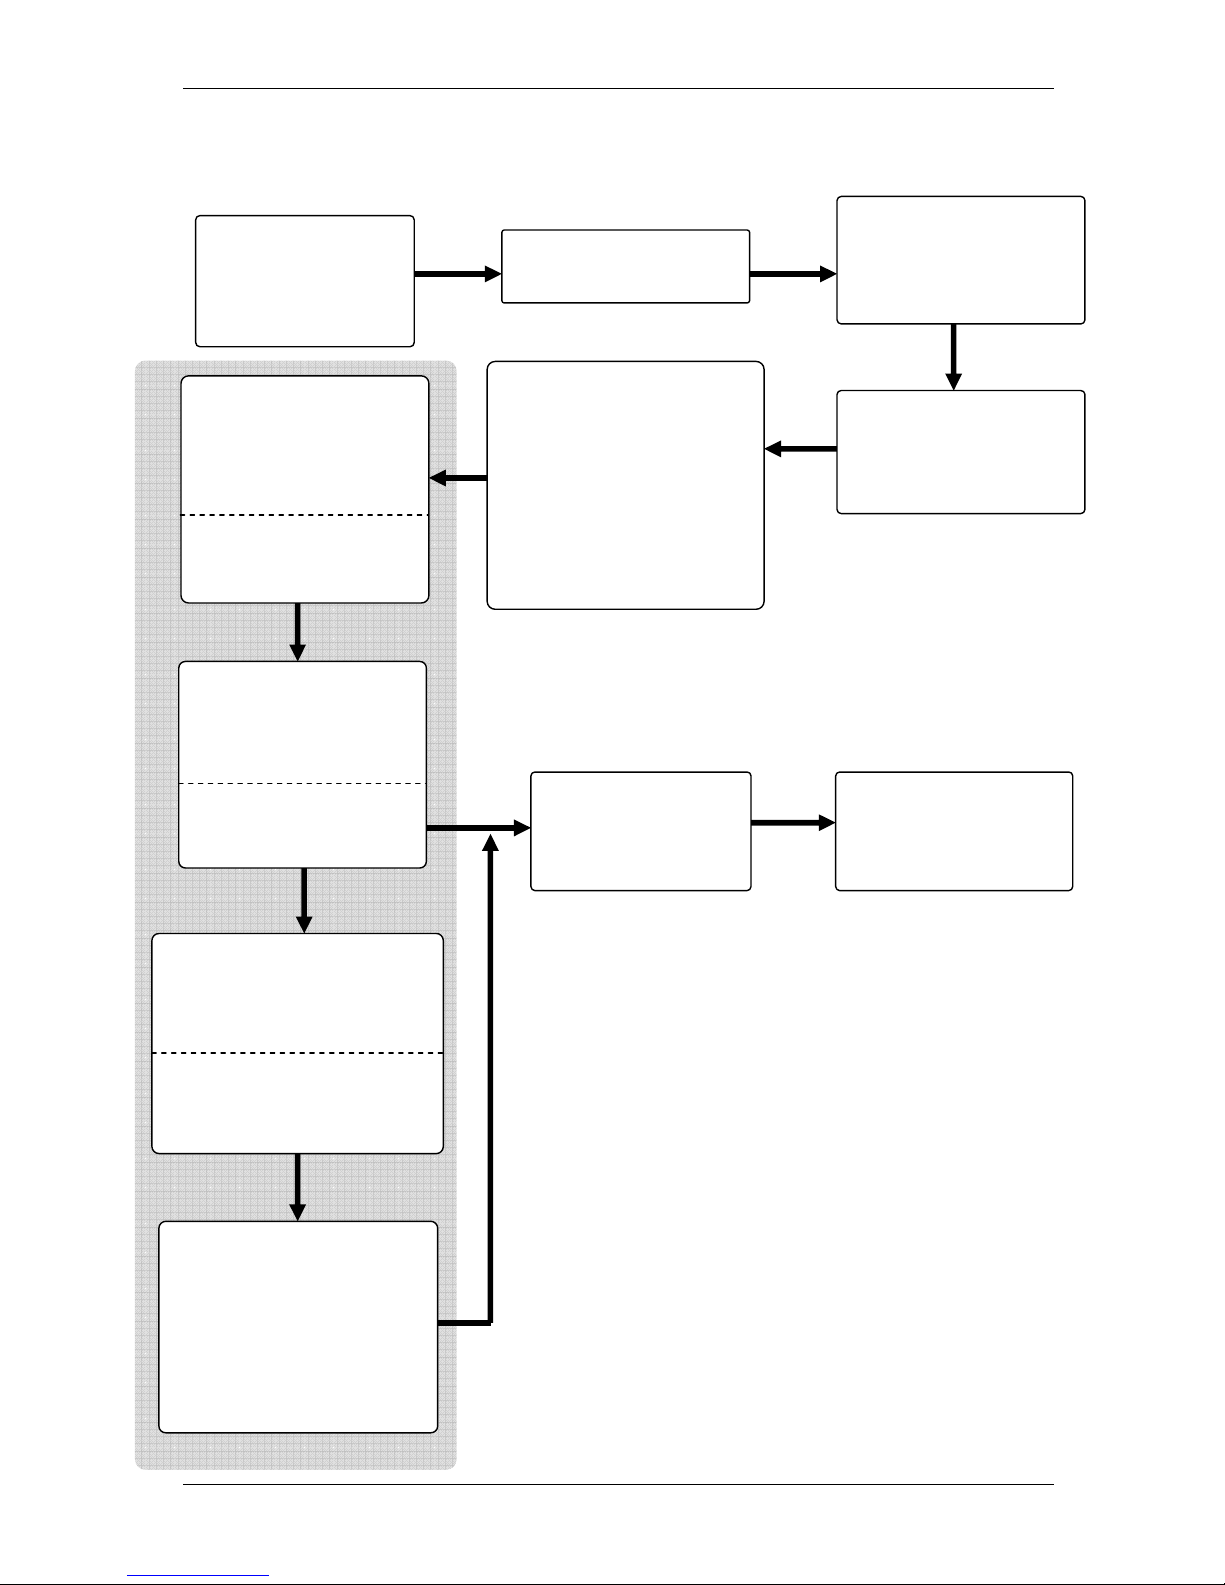
3.1.2 Dial-Up Configuration Flowchart
From the idle screen
press FUNC and
then key in 3824
followed by the
ENTER
Key in the Terminal and
Merchant ID into the
terminal followed by
ENTER.
Press ENTER at the
CONFIG PARAMS?
Network Interface
Identifier (NII) by
default will be selected
as 001 and press ENTER
START
COMPLETED
Enter the PABX
number if required
and press ENTER. To
put in a pause for a
second, put in the
character ‘A’ by
pressing 2 and then
FUNC or for wait, put
in character ‘W’ by
pressing 9 and then
FUNC.
The HOST PHONE
NO? by default will
be selected as
08797 and press
ENTER.
Save Config Y/N?
Press ENTER to save
or CLEAR to exit
without saving
Dial-up Configuration
At QUICK DIAL prompt
by default is selected
as 1-YES and press
ENTER to proceed.
If QUICK DIAL prompt
is not required, press
2-NO and then press
ENTER.
At Dial Mode, press
the corresponding
number key to select
preferred dial mode
and press ENTER
1-Tone
2-Pulse
3-Tone/Blind
By default, 1-Tone is
always selected.
Page 23

SKYZER TECHNOLOGIES PAGE 23 OF 97
INGENICO 5100 PAYMARK VERSION 6.0 OPERATING GUIDE Version 1.3
At the COMMS MODE,
press the corresponding
number key to select
preferred comms mode
and press ENTER
1-Dial-up
2-TCP-IP/Dial
3-TCP-IP
3.1.3 TCP-IP (Broadband)/Dial Backup Configuration Flowchart
From the idle screen
press FUNC and
then key in 3824
followed by the
ENTER
Key in the Terminal and
Merchant ID into the
terminal followed by
the ENTER.
Press ENTER at the
CONFIG PARAMS?
Network Interface
Identifier (NII) by
default will be selected
as 001 and press ENTER
If TCP-IP is selected, the
Primary Host IP address
is set as default
117.120.34.110, press
ENTER.
Primary Host Port
number is set as default
to 33876, press ENTER.
Manually key in the
• Static IP address
• Subnet Mask
• Gateway IP
address
START
YES
NO
At the Enable DHCP Y/N, by
default is selected as 1-YES
and press ENTER, if the site
has DHCP
If the site has no DHCP
enabled, press 2-NO and
COMPLETED
START TCP-IP Y/N?
Press ENTER to start
TCP-IP or CLEAR to exit
without starting TCP-IP
Enter the PABX
number if required
and press ENTER. To
put in a pause for a
second, put in the
character ‘A’ by
pressing 2 and then
FUNC or for wait, put
in character ‘W’ by
pressing 9 and then
FUNC.
The HOST PHONE
NO? by default will
be selected as
08797 and press
ENTER
Save Config Y/N?
Press ENTER to save
or CLEAR to exit
without saving
At Dial Mode, press
the corresponding
number key to select
preferred dial mode
and press ENTER
1-Tone
2-Pulse
3-Tone/Blind
By default, 1-Tone is
always selected.
Dial-up Configuration
At QUICK DIAL prompt
by default is selected
as 1-YES and press
ENTER to proceed.
If QUICK DIAL prompt
is not required, press
2-NO and then press
ENTER.
The Secondary Host IP
address is set as default
117.120.32.110, press
ENTER.
Secondary Host Port
number is set as default
to 33876, press ENTER.
Page 24
SKYZER TECHNOLOGIES PAGE 24 OF 97
INGENICO 5100 PAYMARK VERSION 6.0 OPERATING GUIDE Version 1.3
At the COMMS MODE,
press the corresponding
number key to select
preferred comms mode
and press ENTER
1-Dial-up
2-TCP-IP/Dial
3-TCP-IP
3.1.4 TCP-IP (Broadband) Configuration Flowchart
From the idle screen
press FUNC and
then key in 3824
followed by the
ENTER
Key in the Terminal and
Merchant ID into the
terminal followed by
the ENTER.
Press ENTER at the
CONFIG PARAMS?
Network Interface
Identifier (NII) by
default will be selected
as 001 and press ENTER
If TCP-IP is selected, the
Primary Host IP address
is set as default
117.120.34.110, press
ENTER.
Primary Host Port
number is set as default
START
YES
NO
COMPLETED
START TCP-IP Y/N?
Press ENTER to start
TCP-IP or CLEAR to exit
without starting TCP-IP
Save Config Y/N?
Press ENTER to save
or CLEAR to exit
without saving
At the Enable DHCP Y/N, by
default is selected as 1-YES
and press ENTER, if the site
has DHCP
If the site has no DHCP
enabled, press 2-NO and
then press ENTER
Manually key in the
• Static IP address
• Subnet Mask
• Gateway IP
address
The Secondary Host IP
address is set as default
117.120.32.110, press
ENTER.
Secondary Host Port
number is set as default
to 33876
, press
ENTER
.
Page 25

SKYZER TECHNOLOGIES PAGE 25 OF 97
INGENICO 5100 PAYMARK VERSION 6.0 OPERATING GUIDE Version 1.3
3.1.5 Multi Merchant Configuration Flowchart
From the idle screen
press FUNC and
then key in 7418
followed by the
ENTER
Key in the required
active merchant
numbers followed by
the ENTER. Example, if 3
merchants are
required, then key in
123 followed by the
ENTER.
Key in the merchant 1
name followed by ENTER
and then merchant 2 and
so on until all merchants
names have been
assigned. Example: to key
in the names, press the
corresponding number
key once and then FUNC
to scroll through the
alpha characters.
From the MULTI
MERCHANT SETUP
screen, press 3 to set up
active merchants
From the MULTI
MERCHANT SETUP
screen, press 4 to
assign names for the
active merchants.
From the MULTI
MERCHANT SETUP screen,
press CANCEL to exit out
and return to idle screen.
START
Press ENTER at the
CONFIG PARAMS?
SELECT MERCHANT
1. MERCHANT 1
2. MERCHANT 2
3. MERCHANT 3
will be displayed.
Press the
corresponding
number key to select
the merchant
followed by ENTER.
To configure the
active merchants on
the terminal, from the
idle screen press FUNC
and then key in 3824
followed by the ENTER.
Key in the Terminal
and Merchant ID into
the terminal followed
by the ENTER.
Network Interface
Identifier (NII) by default
will be selected as 001
and press ENTER
At the COMMS MODE,
press the corresponding
number key to select
preferred comms mode
and press ENTER
1-Dial-up (page 26)
2-TCP-IP/Dial (page 27)
3-TCP-IP (page 29)
Refer to the page number
to configure the terminal
for selected comms
mode.
Page 26
SKYZER TECHNOLOGIES PAGE 26 OF 97
INGENICO 5100 PAYMARK VERSION 6.0 OPERATING GUIDE Version 1.3
3.2 EFTPOS CONFIGURATION
The EFTPOS Configuration option enables the terminal to be configured to
operate as an EFTPOS terminal and must be done before the terminal can
process transactions.
Step
Terminal Disp
lay Comment
1.0
Press FUNC
2.0
FUNCTION
FUNCTIONFUNCTION
FUNCTION????
Enter 3824 and press ENTER.
3.0
CONFIG PARAMS?
CONFIG PARAMS?CONFIG PARAMS?
CONFIG PARAMS?
ENTER OR CLEAR
ENTER OR CLEARENTER OR CLEAR
ENTER OR CLEAR
ENTER to configure the parameters, CLEAR to cancel and exit to idle prompt.
4.0
TERMINAL ID?
TERMINAL ID?TERMINAL ID?
TERMINAL ID?
XXXXXXXX
XXXXXXXXXXXXXXXX
XXXXXXXX
This parameter specifies the Terminal ID that Paymark assigns to the terminal.
Press ENTER.
5.0
MERCHANT ID?
MERCHANT ID?MERCHANT ID?
MERCHANT ID?
XXXXXXXXX
XXXXXXXXXXXXXXXXXX
XXXXXXXXXXX
XXXX
XX
This parameter specifies the Merchant ID assigned by Paymark.
Press ENTER.
6.0
NII?
NII?NII?
NII?
001
001001
001
This parameter specifies the Network International Identifier (by default 001) that
the terminal uses to route messages to Paymark.
Press ENTER.
7.0
COMMS MODE?
COMMS MODE?COMMS MODE?
COMMS MODE?
1111----DIAL
DIALDIAL
DIAL----UP
UPUP
UP
To configure COMMS mode:
Press 1 for Dial-up configuration followed by ENTER and proceed with the
configuration as on page 27.
7.1
COMMS MODE?
COMMS MODE?COMMS MODE?
COMMS MODE?
2222----TCP
TCPTCP
TCP----IIIIP / Dial
P / DialP / Dial
P / Dial
Press 2 for TCP-IP /Dial backup configuration followed by ENTER and proceed
with the configuration as on page 28 - 29.
7.2
COMMS MODE?
COMMS MODE?COMMS MODE?
COMMS MODE?
3333----TCP
TCPTCP
TCP----IP
IPIP
IP
Press 3 for TCP-IP configuration followed by ENTER and proceed with the
configuration as on page 30.
Page 27

SKYZER TECHNOLOGIES PAGE 27 OF 97
INGENICO 5100 PAYMARK VERSION 6.0 OPERATING GUIDE Version 1.3
3.2.1 Dial-Up Configuration
1.0
QUICK DIAL?
QUICK DIAL?QUICK DIAL?
QUICK DIAL?
1111----YES 2
YES 2YES 2
YES 2----NO
NONO
NO
This parameter sets up the way that terminal dials. Select the mode by pressing the
corresponding number key.
2.0
DIAL MODE?
DIAL MODE?DIAL MODE?
DIAL MODE?
1111----TONE
TONETONE
TONE
2222----PULSE
PULSEPULSE
PULSE
3333----TONE/BLIND
TONE/BLINDTONE/BLIND
TONE/BLIND
This parameter sets up the way that the terminal dials. Select the mode by pressing
the corresponding number key.
1 = Tone - is the default setting.
In the default dial mode setting 1 (Tone), the terminal uses DTMF tones to dial the
number, but only after detecting a valid NZ dial tone. If a valid dial tone isn’t
detected, “Transmission Error” will be displayed.
2 = Pulse Dial – this comms setting is used for the older PABX systems and is
rarely used nowadays.
3 = Blind Dial – this is the same as Tone dial, however the modem ignores the
health of the dial tone on the line and simply dials the configured phone number to
call the host. This is used where the quality of the dial tone is low.
3.0
PABX?
PABX?PABX?
PABX?
1111AAAA
or
oror
or
1W
1W1W
1W
Press ENTER to bypass if no PABX prefix is required.
This parameter specifies the PABX numbers that the terminal dials to access an
outside line.
Note: The terminal pauses for 1 second after dialling if a control character ‘A’ is
inserted or to pauses for couple of seconds after dialling if a control character ‘W’ is
inserted after the PABX number. To insert a control character ‘A’ or ‘W’, press the
corresponding number key and then the FUNC key.
4.0
HOST PHONE NO?
HOST PHONE NO?HOST PHONE NO?
HOST PHONE NO?
08797
0879708797
08797
This parameter specifies the Phone number of the Paymark Host. By default, the
host phone number is set as 08797.
Press ENTER.
NOTE: If the merchant has the Toll Bar on the site, then key in this phone
number 1797 to obtain connectivity to Paymark network.
5.0
SAVE CONFIG Y/N
SAVE CONFIG Y/NSAVE CONFIG Y/N
SAVE CONFIG Y/N
Terminal prompts to save configuration. Press ENTER to save configuration on the
terminal or press CLEAR to exit and return to idle screen.
Page 28

SKYZER TECHNOLOGIES PAGE 28 OF 97
INGENICO 5100 PAYMARK VERSION 6.0 OPERATING GUIDE Version 1.3
3.2.2 TCP-IP with Dial Back-up Configuration
1.0
PRIMARY
PRIMARYPRIMARY
PRIMARY
HOST IP ADDRESS
HOST IP ADDRESSHOST IP ADDRESS
HOST IP ADDRESS
117.120.3
117.120.3117.120.3
117.120.34.110
4.1104.110
4.110
This parameter specifies the Primary Host IP Address. By default it is set to
117.120.34.110.
Press ENTER.
2.0
PRIMARY
PRIMARYPRIMARY
PRIMARY
HOST PORT
HOST PORTHOST PORT
HOST PORT
33876
3387633876
33876
This parameter specifies the Primary TCP/IP Port Number of Paymark IP Host.
3.0
SECONDARY
SECONDARYSECONDARY
SECONDARY
HOST IP ADDRESS
HOST IP ADDRESSHOST IP ADDRESS
HOST IP ADDRESS
117.120.3
117.120.3117.120.3
117.120.32222....110
110110
110
This parameter specifies the Secondary Host IP Address. By default, it is set to
117.120.32.110.
Press ENTER.
4.0
SECONDARY
SECONDARYSECONDARY
SECONDARY
HOST PORT
HOST PORTHOST PORT
HOST PORT
33876
3387633876
33876
This parameter specifies the Secondary TCP/IP Port Number of Paymark IP Host.
5.0
ENABLE DHCP Y/N
ENABLE DHCP Y/NENABLE DHCP Y/N
ENABLE DHCP Y/N
1111----YES 2
YES 2YES 2
YES 2----NO
NONO
NO
Press the corresponding number key and press ENTER to set the IP address for the
terminal.
Option 1 – to allow the terminal to dynamically obtain its IP address and proceed
with step 7.0. Option 1 is the default value.
NOTE: When terminal is configured for DHCP, reboot the terminal by
pressing and releasing the shortcut keys (CHQ + SAV + CANCEL) at the
same time. This will enable the terminal to obtain the IP addresses from
the router.
Option 2 – to enter in static IP address for the terminal and proceed with step 4.0
NOTE: When configuring the terminal for Static IP address, ensure to
obtain the IP address, subnet mask and default gateway IP address from
your ISP (Internet Service Provider) for connectivity to Paymark network.
6.0
TERM IP ADDRESS
TERM IP ADDRESSTERM IP ADDRESS
TERM IP ADDRESS
XXX.XXX.XXX.XXX
XXX.XXX.XXX.XXXXXX.XXX.XXX.XXX
XXX.XXX.XXX.XXX
Enter in the static IP address for the terminal.
Example: 192.10.1.14
Note: Press the FUNC key to insert a dot in between numbers.
7.0
SUBNET MASK
SUBNET MASKSUBNET MASK
SUBNET MASK
XXX.XXX.XXX.XXX
XXX.XXX.XXX.XXXXXX.XXX.XXX.XXX
XXX.XXX.XXX.XXX
Enter in the subnet mask for the static IP address.
Example: 255.255.255.0
8.0
GATEWAY IP ADDR
GATEWAY IP ADDRGATEWAY IP ADDR
GATEWAY IP ADDR
XXX.XXX.XXX.XXX
XXX.XXX.XXX.XXXXXX.XXX.XXX.XXX
XXX.XXX.XXX.XXX
Enter in the gateway IP address to forward the packets from.
Example: 192.10.1.1
9.0
QUICK DIAL?
QUICK DIAL?QUICK DIAL?
QUICK DIAL?
1111----YES 2
YES 2YES 2
YES 2----NO
NONO
NO
This parameter sets up the way that the terminal dials. Select the mode by pressing
the corresponding number key.
Page 29

SKYZER TECHNOLOGIES PAGE 29 OF 97
INGENICO 5100 PAYMARK VERSION 6.0 OPERATING GUIDE Version 1.3
10.0
DIAL MODE?
DIAL MODE?DIAL MODE?
DIAL MODE?
1111----TONE
TONETONE
TONE
2222----PULSE
PULSEPULSE
PULSE
3333----TONE/BLIND
TONE/BLINDTONE/BLIND
TONE/BLIND
This parameter sets up the way that the terminal dials. Select the mode by pressing
the corresponding number key.
1 = Tone - is the default setting.
In the default dial mode setting 1 (Tone), the terminal uses DTMF tones to dial the
number, but only after detecting a valid NZ dial tone. If a valid dial tone isn’t
detected, “Transmission Error” will be displayed.
2 = Pulse Dial – this comms setting is used for the older PABX systems and is
rarely used nowadays.
3 = Blind Dial – this is the same as Tone dial, however the modem ignores the
health of the dial tone on the line and simply dials the configured phone number to
call the host. This is used where the quality of the dial tone is low.
11.0
PABX?
PABX?PABX?
PABX?
1A
1A1A
1A
or
oror
or
1W
1W1W
1W
Press ENTER to bypass if no PABX prefix is required.
This parameter specifies the PABX numbers that the terminal dials to access an
outside line.
Note: The terminal pauses for 1 second after dialling if a control character ‘A’ is
inserted or to pauses for couple of seconds after dialling if a control character ‘W’ is
inserted after the PABX number. To insert a control character ‘A’ or ‘W’, press the
corresponding number key and then the FUNC key.
12.0
HOST PHONE NO?
HOST PHONE NO?HOST PHONE NO?
HOST PHONE NO?
08797
0879708797
08797
This parameter specifies the phone Number of the Paymark Host.
Press ENTER.
NOTE: If the merchant has the Toll Bar on the site, then key in this phone
number 1797 to obtain connectivity to Paymark network.
13.0
SAVE CONFIG Y/N
SAVE CONFIG Y/NSAVE CONFIG Y/N
SAVE CONFIG Y/N
Terminal prompts to save configuration. Press ENTER to save configuration on the
terminal or press CLEAR to exit and return to idle screen.
Page 30

SKYZER TECHNOLOGIES PAGE 30 OF 97
INGENICO 5100 PAYMARK VERSION 6.0 OPERATING GUIDE Version 1.3
3.2.3 TCP-IP Configuration
1.0
PRIMARY
PRIMARYPRIMARY
PRIMARY
HOST IP ADDRESS
HOST IP ADDRESSHOST IP ADDRESS
HOST IP ADDRESS
117.120.34.110
117.120.34.110117.120.34.110
117.120.34.110
This parameter specifies the Primary Host IP Address. By default, it is set to
117.120.34.110.
Press ENTER.
2.0
PRIMARY
PRIMARYPRIMARY
PRIMARY
HOST PORT
HOST PORTHOST PORT
HOST PORT
33876
3387633876
33876
This parameter specifies the Primary TCP/IP Port Number of Paymark IP Host.
3.0
SECONDARY
SECONDARYSECONDARY
SECONDARY
HOST IP ADDRESS
HOST IP ADDRESSHOST IP ADDRESS
HOST IP ADDRESS
117.120.32.110
117.120.32.110117.120.32.110
117.120.32.110
This parameter specifies the Secondary Host IP Address. By default, it is set to
117.120.32.110.
Press ENTER.
4.0
SECONDARY
SECONDARYSECONDARY
SECONDARY
HOST PORT
HOST PORTHOST PORT
HOST PORT
33876
3387633876
33876
This parameter specifies the Secondary TCP/IP Port Number of Paymark IP Host.
5.0
ENABLE DHCP Y/N
ENABLE DHCP Y/NENABLE DHCP Y/N
ENABLE DHCP Y/N
1111----YES 2
YES 2YES 2
YES 2----NO
NONO
NO
Press the corresponding number key and press ENTER to set the IP address for the
terminal.
Option 1 – to allow the terminal to dynamically obtain its IP address and proceed
with step 7.0. By default option 1 is always selected
Option 2 – to enter in the static IP address for the terminal and proceed with step
4.0
6.0
TERM IP ADDRESS
TERM IP ADDRESSTERM IP ADDRESS
TERM IP ADDRESS
XXX.XXX.XXX.XXX
XXX.XXX.XXX.XXXXXX.XXX.XXX.XXX
XXX.XXX.XXX.XXX
Enter in the static IP address for the terminal.
Example: 192.10.1.14
Note: Press the FUNC key to insert a dot in between numbers.
7.0
SUBNET MASK
SUBNET MASKSUBNET MASK
SUBNET MASK
XXX.XXX.XXX.XXX
XXX.XXX.XXX.XXXXXX.XXX.XXX.XXX
XXX.XXX.XXX.XXX
Enter in the subnet mask for the static IP address.
Example: 255.255.255.0
8.0
GATEWAY IP ADDR
GATEWAY IP ADDRGATEWAY IP ADDR
GATEWAY IP ADDR
XXX.XXX.XXX.XXX
XXX.XXX.XXX.XXXXXX.XXX.XXX.XXX
XXX.XXX.XXX.XXX
Enter in the gateway IP address to forward the packets from.
Example: 192.10.1.1
9.0
SAVE CONFIG Y/N
SAVE CONFIG Y/NSAVE CONFIG Y/N
SAVE CONFIG Y/N
Terminal prompts to save configuration. Press ENTER to save configuration on the
terminal or press CLEAR to exit and return to idle screen.
Page 31

SKYZER TECHNOLOGIES PAGE 31 OF 97
INGENICO 5100 PAYMARK VERSION 6.0 OPERATING GUIDE Version 1.3
3.3 EFTPOS CONFIGURATION FOR MULTI-MERCHANT
For a multi-merchant terminal each merchant has its own configuration.
Prior to configuring the terminal for multi-merchant, refer to page 30 to setup
the required number of active merchants on the terminal. Once assigned then
proceed with the following steps to configure the terminal for multi merchant.
Step
Terminal Display
Comment
1.0
Press FUNC
2.0
FUNCTION?
FUNCTION?FUNCTION?
FUNCTION?
Enter 3824 and press ENTER.
3.0
CONFIG PARAMS?
CONFIG PARAMS?CONFIG PARAMS?
CONFIG PARAMS?
ENTER OR CLEAR
ENTER OR CLEARENTER OR CLEAR
ENTER OR CLEAR
ENTER to configure the parameters, CLEAR to cancel and exit to idle prompt.
4.0
1 MERCHANT 1
1 MERCHANT 11 MERCHANT 1
1 MERCHANT 1
2 MERCHANT 2
2 MERCHANT 22 MERCHANT 2
2 MERCHANT 2
3 MERCHANT 3
3 MERCHANT 33 MERCHANT 3
3 MERCHANT 3
Select the corresponding number on the terminal to select the Merchant to proceed
with configuration followed by ENTER.
5.0
TERMINAL ID?
TERMINAL ID?TERMINAL ID?
TERMINAL ID?
XXXXXXXX
XXXXXXXXXXXXXXXX
XXXXXXXX
This parameter specifies the Terminal ID that Paymark assigns to the terminal.
Press ENTER.
6.0
MERCHANT ID?
MERCHANT ID?MERCHANT ID?
MERCHANT ID?
XXXXXXXXXXX
XXXXXXXXXXXXXXXXXXXXXX
XXXXXXXXXXX
This parameter specifies the Merchant ID assigned by Paymark.
Press ENTER.
7.0
NII?
NII?NII?
NII?
001
001001
001
This parameter specifies the Network International Identifier (by default 001) that
the terminal uses to route messages to Paymark.
Press ENTER.
8.0
COMMS MODE?
COMMS MODE?COMMS MODE?
COMMS MODE?
1111----DIAL
DIALDIAL
DIAL----UP
UPUP
UP
To configure COMMS mode:
Press 1 for Dial-up configuration followed by ENTER and proceed with the
configuration as on page 27.
8.1
COMMS MODE?
COMMS MODE?COMMS MODE?
COMMS MODE?
2222----TCP
TCPTCP
TCP----IP
IPIP
IP / DIAL
/ DIAL/ DIAL
/ DIAL
Press 2 for TCP-IP /Dial backup configuration followed by ENTER and proceed
with the configuration as on page 28 - 29.
8.2
COMMS MODE?
COMMS MODE?COMMS MODE?
COMMS MODE?
3333----TCP
TCPTCP
TCP----IP
IPIP
IP
Press 3 for TCP-IP configuration followed by ENTER and proceed with the
configuration as on page 30.
Proceed with the configuration as normal, until CONFIG TO ALL MERCHANT Y/N
prompt and proceed as below.
Page 32

SKYZER TECHNOLOGIES PAGE 32 OF 97
INGENICO 5100 PAYMARK VERSION 6.0 OPERATING GUIDE Version 1.3
9.0
COPY CONFIG TO
COPY CONFIG TO COPY CONFIG TO
COPY CONFIG TO
ALL MERCHANT Y/N
ALL MERCHANT Y/NALL MERCHANT Y/N
ALL MERCHANT Y/N
This feature allows the merchant to copy the configuration from COMMS mode and
below to the entire active merchants if communicating through same medium.
Press ENTER to copy the current configuration to the entire active merchants or
CLEAR to cancel and proceed with configuring each merchant for its required
COMMS mode.
10.0
PLEASE WAIT
PLEASE WAITPLEASE WAIT
PLEASE WAIT
PLEASE WAIT will be displayed while copying the current merchant configuration
to the other active merchants.
11.0
CONFIG ANOTHER
CONFIG ANOTHER CONFIG ANOTHER
CONFIG ANOTHER
MERCHANT Y/N
MERCHANT Y/NMERCHANT Y/N
MERCHANT Y/N
Press ENTER to proceed with the configuration of the next merchant or CLEAR to
cancel and exit out from the merchant configuration.
Page 33

SKYZER TECHNOLOGIES PAGE 33 OF 97
INGENICO 5100 PAYMARK VERSION 6.0 OPERATING GUIDE Version 1.3
3.4 MULTI-MERCHANT CONFIGURATION
This function is used to configure the terminal for Multi-merchant operation. The
terminal can support up to 8 Merchants.
NOTE: After activating the Multi-Merchant configuration, please return to
EFTPOS configuration for Multi-Merchant Function 3824 to enter the Terminal
and Merchant ID’s for the active merchants.
Step
Terminal Display
Description
1.0
Press FUNC
2.0
FUNCTION?
FUNCTION?FUNCTION?
FUNCTION?
Enter 7418, press ENTER
3.0
MULTI MERCHANT
MULTI MERCHANTMULTI MERCHANT
MULTI MERCHANT
SETUP
SETUPSETUP
SETUP
Terminal is now in configuration mode. Go to following steps to proceed or press
CANCEL to exit, otherwise the terminal will automatically exit after 30 seconds of
inactivity
4.0
ACTIVE MERCHANTS
ACTIVE MERCHANTSACTIVE MERCHANTS
ACTIVE MERCHANTS
12345678
1234567812345678
12345678
Press 3 to Set Active Merchants
Enter the number (from 1 – 8) for each individual merchant you wish to activate
and press ENTER
Example: To activate merchants 1 to 5, enter 12345
5.0
MULTI MERCHANT
MULTI MERCHANTMULTI MERCHANT
MULTI MERCHANT
SETUP
SETUPSETUP
SETUP
Terminal is now in configuration mode. Go to following steps to proceed or press
CANCEL to exit, otherwise the terminal will automatically exit after 30 seconds of
inactivity
6.0
MERCHANT 1 NAME
MERCHANT 1 NAMEMERCHANT 1 NAME
MERCHANT 1 NAME
MERCHANT 1
MERCHANT 1MERCHANT 1
MERCHANT 1
Press 4 to Set Merchant Name
To change the merchant name, use the numeric keypad then the FUNC key to
access the alpha characters. Press ENTER to advance to the next merchant name
7.0
MULTI MERCHANT
MULTI MERCHANTMULTI MERCHANT
MULTI MERCHANT
SETUP
SETUPSETUP
SETUP
Terminal is now in configuration mode. Go to following steps to proceed or press
CANCEL to exit, otherwise the terminal will automatically exit after 30 seconds of
inactivity
Page 34

SKYZER TECHNOLOGIES PAGE 34 OF 97
INGENICO 5100 PAYMARK VERSION 6.0 OPERATING GUIDE Version 1.3
3.4.1 Master Memory Reset
This function allows the merchant to reset the memory of the entire active
merchants on the terminal.
Step
Terminal Display
Description
1.0
Press FUNC
2.0
FUNCTION?
FUNCTION?FUNCTION?
FUNCTION?
Enter 7418, press ENTER
3.0
MULTI MERCHANT
MULTI MERCHANTMULTI MERCHANT
MULTI MERCHANT
SETUP
SETUPSETUP
SETUP
Terminal is now in configuration mode. Go to following steps to proceed or press
CANCEL to exit, otherwise the terminal will automatically exit after 30 seconds of
inactivity
4.0
DELETE CONFIG?
DELETE CONFIG?DELETE CONFIG?
DELETE CONFIG?
ENTER=YES,CLR=NO
ENTER=YES,CLR=NOENTER=YES,CLR=NO
ENTER=YES,CLR=NO
Press 8 to Delete Terminal Configuration
To delete the Terminal Configuration of the entire active merchants, press ENTER
or CLEAR to return to MULTI MERCHANT SETUP screen.
4.1
ARE YOU SURE?
ARE YOU SURE?ARE YOU SURE?
ARE YOU SURE?
ENTER=YES, CLR=NO
ENTER=YES, CLR=NOENTER=YES, CLR=NO
ENTER=YES, CLR=NO
Press ENTER to proceed with deleting the entire active merchants terminal
configuration or CLEAR to return to MULTI MERCHANT SETUP screen.
4.2
ETSL
ETSLETSL
ETSL EFTPOS
EFTPOSEFTPOS
EFTPOS
MEMORY RESET
MEMORY RESETMEMORY RESET
MEMORY RESET
This message will be displayed on the terminal for few seconds when resetting the
memory to factory default.
5.0
MULTI MERCHANT
MULTI MERCHANTMULTI MERCHANT
MULTI MERCHANT
SETUP
SETUPSETUP
SETUP
Terminal is now in configuration mode. Press CANCEL to exit, otherwise the
terminal will automatically exit after 30 seconds of inactivity
Page 35

SKYZER TECHNOLOGIES PAGE 35 OF 97
INGENICO 5100 PAYMARK VERSION 6.0 OPERATING GUIDE Version 1.3
3.4.2 To Deactivate Multi-Merchant Configuration
This function allows the merchant to deactivate multi-merchants on the
terminal if not required.
Step
Terminal D
isplay
Description
1.0
Press FUNC
2.0
FUNCTION?
FUNCTION?FUNCTION?
FUNCTION?
Enter 7418, press ENTER
3.0
MULTI MERCHANT
MULTI MERCHANTMULTI MERCHANT
MULTI MERCHANT
SETUP
SETUPSETUP
SETUP
Terminal is now in configuration mode. Go to following steps to proceed or press
CANCEL to exit, otherwise the terminal will automatically exit after 30 seconds of
inactivity
4.0
ACTIVE MERCHANTS
ACTIVE MERCHANTSACTIVE MERCHANTS
ACTIVE MERCHANTS
1111
Press 3 to Deactivate A
ctive Merchants
Terminal will display with all active merchants that was previous configured. To
deactivate multi-merchant from the terminal, key in the active merchant number
that the merchant desire to have active followed by the ENTER. This will result in
deactivating the other active merchants on the terminal.
Example: To deactivate merchants 2 to 5, enter the merchant number 1 to have
active and other active merchants will be deactivated.
5.0
MULTI MERCHANT
MULTI MERCHANTMULTI MERCHANT
MULTI MERCHANT
SETUP
SETUPSETUP
SETUP
Terminal is now in configuration mode. Press CANCEL to exit, otherwise the
terminal will automatically exit after 30 seconds of inactivity
Page 36

SKYZER TECHNOLOGIES PAGE 36 OF 97
INGENICO 5100 PAYMARK VERSION 6.0 OPERATING GUIDE Version 1.3
3.5 CONTACTLESS
All new Contactless cards include the latest advanced security features
required by the payment card industry. Payments are processed through the
same secure Visa/Mastercard technology as Chip and PIN transactions.
Contactless transactions are covered by the same fraud protection as Chip
and PIN transactions. Contactless also offers an extra level of security by
allowing the customer to retain control of their card at all times, preventing
behind the counter fraud from taking place.
Payments are made via radio wave communication between the customer's
contactless credit card and the SkyPay-300; contactless cards have an
antenna embedded in the card plastic.
By simply holding the contactless card within a few centimetres of the SkyPay300, at the point of sale, the card is detected and the chip in the card is
powered on. This allows a wireless communication link to be established
between the card and the reader enabling the transfer of information which
takes less than half a second to complete.
As soon as the transaction is complete, the SkyPay-300 will display a row of four
green lights, indicating that the contactless card can be moved away from
the reader.
The SkyPay-300 is fully compatible with the global EMV standards, as well as
Visa's PayWave and MasterCard's PayPass.
Contactless card processing is fast, secure and convenient, no more fumbling
for change or traditional card reading to hold up queues.
Page 37

SKYZER TECHNOLOGIES PAGE 37 OF 97
INGENICO 5100 PAYMARK VERSION 6.0 OPERATING GUIDE Version 1.3
3.5.1 Contactless Configuration
This function allows the merchant to select the preferred COM port to operate
contactless solution through.
Perform the following steps to select the COM port to have the contactless
solution on.
Step
Terminal Display
Description
1.0
Press FUNC
2.0
FUNCTION?
FUNCTION?FUNCTION?
FUNCTION?
Enter 7418, press ENTER
3.0
MULTI MERCHANT
MULTI MERCHANTMULTI MERCHANT
MULTI MERCHANT
SETUP
SETUPSETUP
SETUP
Terminal is now in configuration mode. Go to following steps to proceed or press
CANCEL to exit, otherwise the terminal will automatically exit after 30 seconds of
inactivity
4.0
CONTACTLESS
CONTACTLESSCONTACTLESS
CONTACTLESS
COM PORT
COM PORTCOM PORT
COM PORT
0000----NONE
NONENONE
NONE
1111----COM1
COM1COM1
COM1
2222----COM2
COM2COM2
COM2
Press 7 to Set Contactless Com Port
Select the com port number to have the contactless reader connected to.
By default, com port NONE will be selected.
5.0
MULTI MERCHANT
MULTI MERCHANTMULTI MERCHANT
MULTI MERCHANT
SETUP
SETUPSETUP
SETUP
Terminal is now in configuration mode. Press CANCEL to exit, otherwise the
terminal will automatically exit after 30 seconds of inactivity
Page 38

SKYZER TECHNOLOGIES PAGE 38 OF 97
INGENICO 5100 PAYMARK VERSION 6.0 OPERATING GUIDE Version 1.3
3.6 SINGLE MERCHANT MEMORY RESET CONFIGURATION
This function allows the merchant configuration to be reset to factory default
values.
Step
Terminal Display
Description
1.0
Press FUNC.
2.0
FUNCTION?
FUNCTION?FUNCTION?
FUNCTION?
Enter 9902 and press ENTER.
3.0
RESET
RESETRESET
RESET
MERCH
MERCHMERCH
MERCHANT CONFIG
ANT CONFIGANT CONFIG
ANT CONFIG
ENTER OR CLEAR
ENTER OR CLEARENTER OR CLEAR
ENTER OR CLEAR
Press ENTER to reset the merchant configuration or CLEAR to cancel and return to
idle screen.
4.0
1 Merchant 1
1 Merchant 11 Merchant 1
1 Merchant 1
2 Merchant 2
2 Merchant 22 Merchant 2
2 Merchant 2
3 Merchant 3
3 Merchant 33 Merchant 3
3 Merchant 3
Only applicable with Multi-Merchant setup.
Select the corresponding number on the terminal to select the Merchant followed by
ENTER.
5.0
PLEASE WAIT
PLEASE WAITPLEASE WAIT
PLEASE WAIT
Terminal displays PLEASE WAIT while retrieving the default merchant
configuration.
6.0
ETSL EFTPOS
ETSL EFTPOSETSL EFTPOS
ETSL EFTPOS
MEMORY RESET
MEMORY RESETMEMORY RESET
MEMORY RESET
Terminal prompts ETSL EFTPOS MEMORY RESET while resetting the merchant
configuration and returns to idle.
NOTE: The above function is performed to delete the configuration for the
selected merchant only.
Page 39

SKYZER TECHNOLOGIES PAGE 39 OF 97
INGENICO 5100 PAYMARK VERSION 6.0 OPERATING GUIDE Version 1.3
3.7 REMOTE KEY INJECTION (PKMS)
The Ingenico 5100 terminal supports Remote Key Injection technology to
enable automated injection of security keys from Paymark.
3.7.1 Remote Key Injection (PKMS) Configuration
This function is used to configure the Remote Key Injection operation and can
be performed through both Dial-up and TCP-IP (Broadband) mode.
3.7.1.1 Dial-up Configuration
Step
Terminal Display
Description
1.0
Press FUNC
2.0
FUNCTION?
FUNCTION?FUNCTION?
FUNCTION?
Enter 7418, press ENTER
3.0
MULTI MERCHANT
MULTI MERCHANTMULTI MERCHANT
MULTI MERCHANT
SETUP
SETUPSETUP
SETUP
Terminal is now in configuration mode. Go to following Steps to proceed or Press
CANCEL to exit, otherwise the terminal will automatically exit after 30 seconds of
inactivity
4.0
MULTI MERCHANT
MULTI MERCHANTMULTI MERCHANT
MULTI MERCHANT
SETUP
SETUPSETUP
SETUP
Select option 5 for RKI configuration by pressing the corresponding number key.
5.0
RKI
RKIRKI
RKI CONFIG?
CONFIG?CONFIG?
CONFIG?
ENTER OR CLEAR
ENTER OR CLEARENTER OR CLEAR
ENTER OR CLEAR
Press ENTER to proceed with the RKI configuration or CLEAR to cancel and exit to
idle screen
6.0
NII?
NII?NII?
NII?
018
018018
018
This parameter specifies the Network International Identifier that the terminal uses
to route messages to Paymark.
Press ENTER.
7.0
RKI
RKIRKI
RKI PHONE NO?
PHONE NO?PHONE NO?
PHONE NO?
08797
0879708797
08797
This parameter specifies the Phone number of the Paymark Host, where it will be
connecting to download the keys. By default, the RKI phone number is set as
08797.
NOTE: If the merchant has the Toll Bar on the site, then key in this phone
number 1797 to obtain connectivity to Paymark network.
8.0
MULTI MERCHANT
MULTI MERCHANTMULTI MERCHANT
MULTI MERCHANT
SSSSETUP
ETUPETUP
ETUP
Terminal is now in configuration mode. Press CANCEL to exit, otherwise the
terminal will automatically exit after 30 seconds of inactivity
Page 40

SKYZER TECHNOLOGIES PAGE 40 OF 97
INGENICO 5100 PAYMARK VERSION 6.0 OPERATING GUIDE Version 1.3
3.7.1.2 TCP-IP (Broadband) Configuration
Step
Terminal Display
Description
1.0
Press FUNC
2.0
FUNCTION?
FUNCTION?FUNCTION?
FUNCTION?
Enter 7418, press ENTER
3.0
MULTI MERCHANT
MULTI MERCHANTMULTI MERCHANT
MULTI MERCHANT
SETUP
SETUPSETUP
SETUP
Terminal is now in configuration mode. Go to following Steps to proceed or Press
CANCEL to exit, otherwise the terminal will automatically exit after 30 seconds of
inactivity
4.0
MULTI MERCHANT
MULTI MERCHANTMULTI MERCHANT
MULTI MERCHANT
SETUP
SETUPSETUP
SETUP
Select option 5 for RKI configuration by pressing the corresponding number key.
5.0
RKI
RKIRKI
RKI CONFIG?
CONFIG?CONFIG?
CONFIG?
ENTER OR CLEAR
ENTER OR CLEARENTER OR CLEAR
ENTER OR CLEAR
Press ENTER to proceed with the RKI configuration or CLEAR to cancel and exit to
idle screen
6.0
NII?
NII?NII?
NII?
018
018018
018
This parameter specifies the Network International Identifier that the terminal uses
to route messages to Paymark.
Press ENTER.
7.0
RKI
RKIRKI
RKI
HOST IP ADDRESS
HOST IP ADDRESSHOST IP ADDRESS
HOST IP ADDRESS
117.120.34.103
117.120.34.103117.120.34.103
117.120.34.103
This parameter specifies the RKI HOST IP ADDRESS of the Paymark, where it will
be connecting to download the keys. By default, the PKMS Host IP Address is set as
117.120.34.103.
8.0
RKI
RKIRKI
RKI
HOST PORT
HOST PORTHOST PORT
HOST PORT
7540
75407540
7540
This parameter specifies the RKI HOST PORT of the Paymark, where it will be
connecting to download the keys. By default, the PKMS Host Port is set as 7540.
8.0
MULTI MERC
MULTI MERCMULTI MERC
MULTI MERCHANT
HANTHANT
HANT
SETUP
SETUPSETUP
SETUP
Terminal is now in configuration mode. Press CANCEL to exit, otherwise the
terminal will automatically exit after 30 seconds of inactivity
Page 41

SKYZER TECHNOLOGIES PAGE 41 OF 97
INGENICO 5100 PAYMARK VERSION 6.0 OPERATING GUIDE Version 1.3
3.7.2 Remote Key Injection (PKMS) Initialisation
This function allows the Paymark security keys to be injected into the terminal
through the following steps below.
Step
Terminal Display
Description
1.0
Press FUNC.
2.0
FUNCTION?
FUNCTION?FUNCTION?
FUNCTION?
Key in 87 and press ENTER
3.0
RKI
RKIRKI
RKI PASSWORD?
PASSWORD?PASSWORD?
PASSWORD?
Key in 6987 and press ENTER
4.0
REMOTE INIT
REMOTE INITREMOTE INIT
REMOTE INIT
IN PROGRESS
IN PROGRESSIN PROGRESS
IN PROGRESS
Terminal starts to download remote keys into the terminal from the Paymark host.
5.0
PROCESSING NOW
PROCESSING NOWPROCESSING NOW
PROCESSING NOW
Terminal has begun to download the keys into the terminal.
6.0
ACCEPTED
ACCEPTEDACCEPTED
ACCEPTED
RKI logon was successful to download the keys to the terminal. After this, restart
the terminal by pressing FUNC 86 followed by ENTER twice.
After a successful RKI (PKMS) key injection into the terminal, restart the terminal
by performing the steps below:
Step
Terminal Display
Description
1.0
Press FUNC.
2.0
FUNCTION?
FUNCTION?FUNCTION?
FUNCTION?
Enter 86 and press ENTER.
3.0
RESTART
RESTART RESTART
RESTART
TERMINAL?
TERMINAL?TERMINAL?
TERMINAL?
Press ENTER to restart the terminal or CLEAR to cancel and return to idle screen.
Once the terminal boots up, a merchant logon (Page 47) can been initiated
and successfully completed with an ACCEPTED response, the terminal is ready
to process transaction.
Page 42

SKYZER TECHNOLOGIES PAGE 42 OF 97
INGENICO 5100 PAYMARK VERSION 6.0 OPERATING GUIDE Version 1.3
3.8 ENABLE/DISABLE TERMINAL FUNCTIONS
This menu allows certain terminal functions to be enabled or disabled as
required.
NOTE: To enable or disable any function in the terminal, press the CHQ key to
toggle between ON and OFF and to scroll back to the previous function, press
the CLEAR key.
Step
Terminal Display
Comment
1.0
Press FUNC
2.0
FUNCTION?
FUNCTION?FUNCTION?
FUNCTION?
Key in 7415 followed by ENTER
3.0
CASH OUT
CASH OUTCASH OUT
CASH OUT
ON
ONON
ON
Press CHQ to enable or disable the CASH OUT function followed by ENTER.
4.0
PURCHASE + CASH
PURCHASE + CASHPURCHASE + CASH
PURCHASE + CASH
ON
ONON
ON
Press CHQ to enable or disable the PURCHASE + CASH function followed by
ENTER.
5.0
CTL RECEIPT
CTL RECEIPTCTL RECEIPT
CTL RECEIPT
OFF
OFFOFF
OFF
Press CHQ to enable or disable the CONTACTLESS RECEIPT function followed by
ENTER.
6.0
PRE
PREPRE
PRE----PRINTING
PRINTINGPRINTING
PRINTING
OFF
OFFOFF
OFF
Press CHQ to enable or disable the PRE-PRINTING function followed by ENTER.
By default the Pre-printing is disabled.
7.0
CHEQUE AUTH
CHEQUE AUTHCHEQUE AUTH
CHEQUE AUTH
OFF
OFFOFF
OFF
Press CHQ to enable or disable the CHEQUE AUTHORISATION function followed
by ENTER.
8.0
CC TIPPING
CC TIPPINGCC TIPPING
CC TIPPING
OFF
OFFOFF
OFF
Press CHQ to enable or disable the CREDIT CARD TIPPING function followed by
ENTER.
9.0
DEBIT TIPPING
DEBIT TIPPINGDEBIT TIPPING
DEBIT TIPPING
OFF
OFFOFF
OFF
Press CHQ to enable or disable the DEBIT TIPPING function followed by ENTER.
10.0
CC HOSPITALITY
CC HOSPITALITYCC HOSPITALITY
CC HOSPITALITY
OFF
OFFOFF
OFF
Press CHQ to enable or disable the CREDIT CARD HOSPITALITY function
followed by ENTER.
11.0
PROMPT CUST COPY
PROMPT CUST COPYPROMPT CUST COPY
PROMPT CUST COPY
OFF
OFFOFF
OFF
Press CHQ to enable or disable the PROMPT CUSTOMER COPY function followed
by ENTER.
12.0
ALERT DECLINE
ALERT DECLINEALERT DECLINE
ALERT DECLINE
ON
ONON
ON
Press CHQ to enable or disable the ALERT DECLINE function followed by ENTER.
Page 43

SKYZER TECHNOLOGIES PAGE 43 OF 97
INGENICO 5100 PAYMARK VERSION 6.0 OPERATING GUIDE Version 1.3
13.0
INTERFACED
INTERFACEDINTERFACED
INTERFACED
OFF
OFFOFF
OFF
Press CHQ to enable the INTERFACED function and proceed with the step 12.1 or
press CANCEL to disable the INTERFACED function and press ENTER.
13.1
LICENSE KEY?
LICENSE KEY?LICENSE KEY?
LICENSE KEY?
XXXXXXX
XXXXXXXXXXXXXX
XXXXXXX
The License Key can only be obtained from Skyzer Technologies. Key in the
License number followed by ENTER.
NOTE: Before entering the License key, please ensure that the date and time on
the terminal is current. There are two ways of updating the date and time on the
terminal:
1. By initiating a merchant logon
2. Manually changing the date and time – Refer to page 89.
13.2
INTERFACED
INTERFACEDINTERFACED
INTERFACED
ON
ONON
ON
Press ENTER to activate the INTERFACED function.
14.0
SWIPE START
SWIPE STARTSWIPE START
SWIPE START
OFF
OFFOFF
OFF
Press CHQ to enable or disable the SWIPE START function followed by ENTER.
NOTE: This swipe start function allows the merchant to deactivate the swipe start
from the idle screen. This feature will apply in the environment of Contactless or
Interface. For example, if the EFTPOS terminal is interfaced to a POS system, the
swipe start function can be enabled to restrict the cardholders swiping their card
before the EFTPOS terminal has received the transaction from POS system.
When the interface link or contactless is enabled on the terminal, the
swipe start function will automatically be deactivated and vice-versa.
Page 44

SKYZER TECHNOLOGIES PAGE 44 OF 97
INGENICO 5100 PAYMARK VERSION 6.0 OPERATING GUIDE Version 1.3
3.9 CONFIGURE RECEIPT HEADER AND FOOTER
This function allows the merchant to customize the receipt merchant name
and address lines.
NOTE: The footer lines will only be printed off on the customer copy of the
receipt.
Step
Terminal Display
Comment
1.0
Press FUNC
2.0
FUNCTION?
FUNCTION?FUNCTION?
FUNCTION?
Enter 3825, press ENTER
3.0
CONFIG RECEIPT
CONFIG RECEIPTCONFIG RECEIPT
CONFIG RECEIPT
HEADER & FOOTER?
HEADER & FOOTER?HEADER & FOOTER?
HEADER & FOOTER?
ENTER OR CLEAR
ENTER OR CLEARENTER OR CLEAR
ENTER OR CLEAR
Press ENTER to configure the parameters or CLEAR to cancel and return to idle
screen
4.0
ERASE EXISTING
ERASE EXISTINGERASE EXISTING
ERASE EXISTING
HEADER & FOOTER?
HEADER & FOOTER?HEADER & FOOTER?
HEADER & FOOTER?
ENTER OR CLEAR
ENTER OR CLEARENTER OR CLEAR
ENTER OR CLEAR
Only applicable if header and footer was previously configured
Press ENTER to erase the existing header and footer that were previously
configured on the terminal or CLEAR to keep the previous configuration and make
minor alteration to the header and footer.
5.0
MMMMERCHANT NAME
ERCHANT NAMEERCHANT NAME
ERCHANT NAME
XXXXXXXXXXXXXXXX
XXXXXXXXXXXXXXXXXXXXXXXXXXXXXXXX
XXXXXXXXXXXXXXXX
This parameter specifies the Merchant Name. It can be configured by entering the
desired Merchant Name use the numeric keypads then the FUNC key to access the
alpha characters then press ENTER
Note: Up to 20 characters can be entered per line.
6.0
ADDRESS LINE 1
ADDRESS LINE 1ADDRESS LINE 1
ADDRESS LINE 1
XXXXXXXXXXXXXXXX
XXXXXXXXXXXXXXXXXXXXXXXXXXXXXXXX
XXXXXXXXXXXXXXXX
This parameter specifies the address in which you would like to appear on printed
receipt. It can be configured by entering desired address use the numeric keypads
then the FUNC key to access the alpha characters then press ENTER
NOTE: Two address lines can appear on printed receipted
Example: Address Line 1 - 1066 COOKS RD
7.0
ADDRESS LINE 2
ADDRESS LINE 2ADDRESS LINE 2
ADDRESS LINE 2
XXXXXXXXXXXXXXXX
XXXXXXXXXXXXXXXXXXXXXXXXXXXXXXXX
XXXXXXXXXXXXXXXX
This parameter specifies the address in which you would like to appear on printed
receipt. It can be configured by entering desired use the numeric keypads then the
FUNC key to access the alpha characters then press ENTER
Example: Address Line 2 - PENROSE
8.0
FOOTER LINE 1
FOOTER LINE 1FOOTER LINE 1
FOOTER LINE 1
XXXXXXXXXXXXXXXXXX
XXXXXXXXXXXXXXXXXXXXXXXXXXXXXXXXXXXX
XXXXXXXXXXXXXXXXXX
This parameter allows up to ten lines of text to be printed at the bottom of the
cardholder’s copy of the receipt.
It can be configured by entering desired footer use the numeric keypads then the
FUNC key to access the alpha characters then press ENTER
Page 45

SKYZER TECHNOLOGIES PAGE 45 OF 97
INGENICO 5100 PAYMARK VERSION 6.0 OPERATING GUIDE Version 1.3
9.0
FOOTER LINE 2
FOOTER LINE 2FOOTER LINE 2
FOOTER LINE 2
XXXXXXXX
XXXXXXXXXXXXXXXX
XXXXXXXXXXXXXXXXXX
XXXXXXXXXXXXXXXXXXXX
XXXXXXXXXX
Prompts will be shown for successive footer lines.
NOTE: To centre text – begin the line by adding the required number of spaces
before keying in text. To insert a space, press 1 followed by the function (FUNC)
key 5 times for a single space. Repeat until required numbers of spaces have
appeared.
Refer below for Alphanumeric Key Entry guide.
The alphanumeric keys are grouped in the following way.
1 Q Z <space> ? –
q z
2 A B C
a b c
3 D E F
d e f
4 G H I
g h i
5 J K L
j k l
6 M N O
m n o
7 P R S
p r s
8 T U V
t u v
9 W X Y
w x y
0 . , # * % $ &
@ ( ) / + = _
To enter an alpha letter, first press the corresponding number key, and then
press the CR or FUNC key to scroll through the alpha letters for that key.
Page 46

SKYZER TECHNOLOGIES PAGE 46 OF 97
INGENICO 5100 PAYMARK VERSION 6.0 OPERATING GUIDE Version 1.3
3.10 RESTART TERMINAL
This function allows the merchant to restart the terminal by following the steps
below:
Step
Terminal Display
Description
1.0
Press FUNC.
2.0
FUNCTION?
FUNCTION?FUNCTION?
FUNCTION?
Enter 86 and press ENTER.
3.0
RESTART
RESTART RESTART
RESTART
TERMINAL?
TERMINAL?TERMINAL?
TERMINAL?
Press ENTER to restart the terminal or CLEAR to cancel and return to idle screen.
Page 47

SKYZER TECHNOLOGIES PAGE 47 OF 97
INGENICO 5100 PAYMARK VERSION 6.0 OPERATING GUIDE Version 1.3
4 OPERATION OF TERMINAL
4.1 MERCHANT LOGON
To initiate a Merchant logon, follow the steps below:
Step
Terminal Display
Description
1.0
SUPERVISOR
SUPERVISOR SUPERVISOR
SUPERVISOR
XTRA INIT DUPL
XTRA INIT DUPLXTRA INIT DUPL
XTRA INIT DUPL
Press ENTER key until SUPERVISOR menu is shown on the display
Press SAV key to select INIT
2.0
1 Merchant
1 Merchant1 Merchant
1 Merchant 1111
2 Merchant
2 Merchant2 Merchant
2 Merchant 2222
3 Merchant
3 Merchant3 Merchant
3 Merchant 3333
4 ALL MERCHANTS
4 ALL MERCHANTS4 ALL MERCHANTS
4 ALL MERCHANTS
Only applicable with Multi-Merchant setup.
Select the corresponding number on the terminal to select the Merchant followed by
ENTER.
Press CLEAR or CANCEL to select a different merchant.
3.0
PROCESSING NOW
PROCESSING NOWPROCESSING NOW
PROCESSING NOW
PROCESSING NOW will be displayed
4.0
ACCEPTED
ACCEPTEDACCEPTED
ACCEPTED
ACCEPTED will be displayed when the terminal has made the connection with
Paymark
NOTE: When set up as a multi-merchant device, the terminal will first prompt for
the selection of the particular merchant.
4.1.1 Pending Reversal
Prior to removing a terminal from a merchant’s site, or reprogramming it with a
new merchant ID, it is important to perform a logon to ensure there are no
pending reversals stored on the terminal.
To clear any pending reversals stored on the terminal, simply initiate a
merchant logon.
Stored pending reversals must be cleared from the terminal in order that all
stored transaction data can be processed through the host.
Until stored pending reversals are cleared, it will not be possible to access the
merchant configuration menu and new merchant details will not be accepted
by the terminal.
Page 48

SKYZER TECHNOLOGIES PAGE 48 OF 97
INGENICO 5100 PAYMARK VERSION 6.0 OPERATING GUIDE Version 1.3
4.2 PURCHASE TRANSACTION
To perform a purchase transaction using a debit card (i.e. cheque or savings
account), follow the steps below:
Step
Terminal Display
Description
1.0
PAYMARK
PAYMARKPAYMARK
PAYMARK EFTPOS
EFTPOSEFTPOS
EFTPOS
PUR CASH RFND
PUR CASH RFNDPUR CASH RFND
PUR CASH RFND
Select desired transaction.
Example: Press CHQ key to select a purchase transaction.
NOTE: A purchase transaction can also be performed at the idle screen by simply
swiping the card and proceeding through to step 3.0.
2.0
SWIPE OR
SWIPE ORSWIPE OR
SWIPE OR
INSERT CARD
INSERT CARDINSERT CARD
INSERT CARD
Swipe or Insert the cardholder’s card.
3.0
PURCHASE AMOUNT?
PURCHASE AMOUNT?PURCHASE AMOUNT?
PURCHASE AMOUNT?
$XX.XX
$XX.XX$XX.XX
$XX.XX
Key in the purchase amount and press ENTER
4.0
CASH OUT
CASH OUT CASH OUT
CASH OUT AMOUNT?
AMOUNT?AMOUNT?
AMOUNT?
$XX.XX
$XX.XX$XX.XX
$XX.XX
Only applicable if the CASH OUT is turned on.
Press ENTER to bypass the “CASH OUT” or enter the cash withdrawal amount
followed by the ENTER key.
NOTE: Cash amounts must be multiples of the minimum currency increment (10
cents).
5.0
AW
AWAW
AWAITING ACCOUNT
AITING ACCOUNTAITING ACCOUNT
AITING ACCOUNT
The terminal waits for the cardholder to select the account type on the pinpad.
6.0
ACCOUNT $XX.XX
ACCOUNT $XX.XXACCOUNT $XX.XX
ACCOUNT $XX.XX
CHQ SAV CR
CHQ SAV CRCHQ SAV CR
CHQ SAV CR
The pinpad will prompt for account selection. Ask the cardholder to select their
account type.
Example: CHQ
7.0
AW
AWAW
AWAITING PIN
AITING PINAITING PIN
AITING PIN
The terminal waits for the cardholder to key in the PIN on the pinpad.
8.0
CHQ
CHQCHQ
CHQ----PIN $XX.XX
PIN $XX.XXPIN $XX.XX
PIN $XX.XX
****
********
****
The pinpad will prompt for the PIN entry. Ask the cardholder to key in their PIN.
9.0
PROCESSING NOW
PROCESSING NOWPROCESSING NOW
PROCESSING NOW
PROCESSING NOW will be displayed on the terminal and pinpad.
10.0
ACCEPTED
ACCEPTEDACCEPTED
ACCEPTED
Transaction has been ACCEPTED with PIN entry and prints the transaction receipt.
11.0
DECLINED
DECLINEDDECLINED
DECLINED
Transaction has been DECLINED with PIN entry and prints the transaction receipt.
Page 49

SKYZER TECHNOLOGIES PAGE 49 OF 97
INGENICO 5100 PAYMARK VERSION 6.0 OPERATING GUIDE Version 1.3
4.3 CONTACTLESS PURCHASE TRANSACTION
The contactless solution supports Purchase transaction only.
When executing the Purchase transaction, perform the following steps.
4.3.1 Up to the CVM (Card Verification Method) Limit of $80
Any contactless transaction that is executed up to the CVM limit of $80 will be
processed offline.
Step
Terminal Display
Description
1.0
PAYMARK
PAYMARKPAYMARK
PAYMARK EFTPOS
EFTPOSEFTPOS
EFTPOS
PUR C
PUR CPUR C
PUR CASH RFND
ASH RFNDASH RFND
ASH RFND
Select PUR (Purchase) transaction by pressing CHQ
Example: Press CHQ key to select a purchase transaction.
2.0
PURCHASE AMOUNT?
PURCHASE AMOUNT?PURCHASE AMOUNT?
PURCHASE AMOUNT?
$XX.XX
$XX.XX$XX.XX
$XX.XX
Key in the purchase amount and press ENTER
3.0
CASH OUT AMOUNT?
CASH OUT AMOUNT?CASH OUT AMOUNT?
CASH OUT AMOUNT?
$XX.XX
$XX.XX$XX.XX
$XX.XX
Only applicable if the CASH OUT is turned on.
Press ENTER to bypass the “CASH OUT” or enter the cash withdrawal amount
followed by the ENTER key.
NOTE: Cash amounts must be multiples of the minimum currency increment (10
cents). If the cash amount is keyed in, then the transaction won’t be
process through contactless as Cash Out is not supported.
4.0
PRESENT / INSERT
PRESENT / INSERTPRESENT / INSERT
PRESENT / INSERT
OR SWIPE CARD
OR SWIPE CARDOR SWIPE CARD
OR SWIPE CARD
Present / Insert or Swipe the cardholder’s card
5.0
Pr
PrPr
Present card
esent cardesent card
esent card
Amt:$ X.XX
Amt:$ X.XXAmt:$ X.XX
Amt:$ X.XX
In X
In XIn X
In XXXXX Seconds
SecondsSeconds
Seconds
This parameter will be displayed on the contactless screen to advise the cardholder
to tap the card on the contactless reader to proceed with the transaction.
The reader displays “In XX Seconds” before it times out where XX represents the
number of seconds remaining.
6.0
PROCESSING NOW
PROCESSING NOWPROCESSING NOW
PROCESSING NOW
This parameter will be displayed on the contactless and terminal screen to advise
the cardholder and merchant the transaction is been process.
7.0
ACCEPTED
ACCEPTEDACCEPTED
ACCEPTED
Terminal and Contactless reader will display ACCEPTED if the transaction was
successful.
8.0
DECLINED
DECLINEDDECLINED
DECLINED
Terminal and Contactless reader will display DECLINED if the transaction was
unsuccessful.
Page 50

SKYZER TECHNOLOGIES PAGE 50 OF 97
INGENICO 5100 PAYMARK VERSION 6.0 OPERATING GUIDE Version 1.3
4.3.2 Above the CVM (Card Verification Method) Limit of $80
Any contactless transaction that is executed above the CVM limit of $80 will be
processed online with a PIN or Signature.
Step
Terminal Display
Description
1.0
PAYMARK
PAYMARKPAYMARK
PAYMARK EFTPOS
EFTPOSEFTPOS
EFTPOS
PUR CASH RFND
PUR CASH RFNDPUR CASH RFND
PUR CASH RFND
Select PUR (Purchase) transaction by pressing CHQ
Example: Press CHQ key to select a purchase transaction.
2.0
PURCHASE AMOUNT?
PURCHASE AMOUNT?PURCHASE AMOUNT?
PURCHASE AMOUNT?
$XX.XX
$XX.XX$XX.XX
$XX.XX
Key in the purchase amount and press ENTER
3.0
CASH OUT AMOUNT?
CASH OUT AMOUNT?CASH OUT AMOUNT?
CASH OUT AMOUNT?
$XX.XX
$XX.XX$XX.XX
$XX.XX
Only applicable if the CASH OUT is turned on.
Press ENTER to bypass the “CASH OUT” or enter the cash withdrawal amount
followed by the ENTER key.
NOTE: Cash amounts must be multiples of the minimum currency increment (10
cents). If the cash amount is keyed in, then the transaction won’t be
process through contactless as Cash Out is not supported.
4.0
PRESENT / INSERT
PRESENT / INSERTPRESENT / INSERT
PRESENT / INSERT
OR
OR OR
OR SWIPE CARD
SWIPE CARDSWIPE CARD
SWIPE CARD
Present / Insert or Swipe the cardholder’s card
5.0
Present card
Present cardPresent card
Present card
Amt:$ X.XX
Amt:$ X.XXAmt:$ X.XX
Amt:$ X.XX
In XX Seconds
In XX SecondsIn XX Seconds
In XX Seconds
This parameter will be displayed on the contactless screen to advise the cardholder
to tap the card on the contactless reader to proceed with the transaction.
The reader displays “In XX Seconds” before it times out where XX represents the
number of seconds remaining.
6.0
PROCESSING NOW
PROCESSING NOWPROCESSING NOW
PROCESSING NOW
This parameter will be displayed on the contactless and terminal screen to advise
the cardholder and merchant the transaction is been process.
7.0
PIN OR ENTER
PIN OR ENTERPIN OR ENTER
PIN OR ENTER
Terminal will display PIN OR ENTER. Ask cardholder to key in their PIN and proceed
with step 8.0 or press ENTER for Signature transaction and proceed with step 11.0.
AWAITING PIN
AWAITING PINAWAITING PIN
AWAITING PIN
Contactless Reader will wait for the cardholder to proceed the transaction through
PIN or Signature.
8.0
PROCESSING NOW
PROCESSING NOWPROCESSING NOW
PROCESSING NOW
This parameter will be displayed on the contactless and terminal screen to advise
the cardholder and merchant the transaction is been process.
9.0
ACCEPTED
ACCEPTEDACCEPTED
ACCEPTED
Terminal and Contactless reader will display ACCEPTED if the transaction was
successful.
10.0
DECLINED
DECLINEDDECLINED
DECLINED
Terminal and Contactless reader will display DECLINED if the transaction was
unsuccessful.
Page 51

SKYZER TECHNOLOGIES PAGE 51 OF 97
INGENICO 5100 PAYMARK VERSION 6.0 OPERATING GUIDE Version 1.3
11.0
SIGN RECEIPT
SIGN RECEIPTSIGN RECEIPT
SIGN RECEIPT
SIGN RECEIPT will be displayed on both terminal and contactless screen. Tear the
receipt off and ask the cardholder to sign receipt.
12.0
SIGNATURE OK? Y/N
SIGNATURE OK? Y/NSIGNATURE OK? Y/N
SIGNATURE OK? Y/N
ENTER=YES,CLR=NO
ENTER=YES,CLR=NOENTER=YES,CLR=NO
ENTER=YES,CLR=NO
Verify the cardholder’s signature with the signature on the back of the card. If the
signature matches:
Press ENTER to accept and proceed with step 13.0
If not, press CLEAR to decline and proceed with step 14.0
13.0
SIG ACCEPTED
SIG ACCEPTEDSIG ACCEPTED
SIG ACCEPTED
SIG ACCEPTED will be displayed on both terminal and contactless screen. The
merchant presses the ENTER key to accept the cardholder’s signature after
signature matches with the card.
14.0
SIG DECLINED
SIG DECLINEDSIG DECLINED
SIG DECLINED
SIG DECLINED will be displayed on both terminal and contactless screen. The
merchant presses the CLEAR key to decline the cardholder’s signature after
signature fails to match with the card.
Page 52

SKYZER TECHNOLOGIES PAGE 52 OF 97
INGENICO 5100 PAYMARK VERSION 6.0 OPERATING GUIDE Version 1.3
4.4 CASH OUT TRANSACTION
EFTPOS allows the merchant to give cash to a cardholder, in order to lower the
amount of cash held on site. A CASH transaction transfers funds equivalent to
the amount of cash withdrawn from the cardholders account to the
merchants account.
To perform CASH OUT transaction using a debit card (i.e. cheque or savings
account), follow the steps below:
Step
Terminal Display
Description
1.0
PAYMARK
PAYMARKPAYMARK
PAYMARK EFTPOS
EFTPOSEFTPOS
EFTPOS
PUR CASH RFND
PUR CASH RFNDPUR CASH RFND
PUR CASH RFND
Select desired transaction.
Example: Press SAV key to select a cash transaction.
2.0
SWIPE OR
SWIPE ORSWIPE OR
SWIPE OR
INSERT CARD
INSERT CARDINSERT CARD
INSERT CARD
Swipe or Insert the cardholder’s card.
3.0
CASH OUT AMOUNT?
CASH OUT AMOUNT?CASH OUT AMOUNT?
CASH OUT AMOUNT?
$XX.XX
$XX.XX$XX.XX
$XX.XX
Enter the cash withdrawal amount followed by ENTER
NOTE: Cash amounts must be multiples of the minimum currency increment (10
cents).
4.0
AWAITING ACCOUNT
AWAITING ACCOUNTAWAITING ACCOUNT
AWAITING ACCOUNT
The terminal waits for the cardholder to select the account type on the pinpad.
5.0
ACCOUNT $XX.XX
ACCOUNT $XX.XXACCOUNT $XX.XX
ACCOUNT $XX.XX
CHQ SAV CR
CHQ SAV CRCHQ SAV CR
CHQ SAV CR
The pinpad will prompt for account selection. Ask the cardholder to select their
account type.
Example: CHQ
6.0
AWAITING PIN
AWAITING PINAWAITING PIN
AWAITING PIN
The terminal waits for the cardholder to key in the PIN on the pinpad.
7.0
CHQ
CHQCHQ
CHQ----PIN $XX.XX
PIN $XX.XXPIN $XX.XX
PIN $XX.XX
****
********
****
The pinpad will prompt for the PIN entry. Ask the cardholder to key in their PIN.
8.0
PROCESSING
PROCESSINGPROCESSING
PROCESSING NOW
NOWNOW
NOW
PROCESSING NOW will be displayed on the terminal and pinpad.
9.0
ACCEPTED
ACCEPTEDACCEPTED
ACCEPTED
Transaction has been ACCEPTED with PIN entry and prints the transaction receipt.
10.0
DECLINED
DECLINEDDECLINED
DECLINED
Transaction has been DECLINED with PIN entry and prints the transaction receipt.
Page 53

SKYZER TECHNOLOGIES PAGE 53 OF 97
INGENICO 5100 PAYMARK VERSION 6.0 OPERATING GUIDE Version 1.3
4.5 REFUND TRANSACTION
The terminal can be used to refund a previous sale. If it is necessary for a
cardholder to return goods then the terminal can be used to give the
cardholder a REFUND. This transaction transfers funds from the merchant’s
account to the cardholder’s account.
To perform a REFUND transaction, follow the steps below:
NOTE: The merchant requires a Merchant Refund Card to perform a refund
transaction.
Step
Terminal Display
Description
1.0
PAYMARK
PAYMARKPAYMARK
PAYMARK EFTPOS
EFTPOSEFTPOS
EFTPOS
PUR CASH RFND
PUR CASH RFNDPUR CASH RFND
PUR CASH RFND
Select desired transaction.
Example: Press CR key to select a refund transaction.
2.0
MERCHANT CARD
MERCHANT CARDMERCHANT CARD
MERCHANT CARD
Swipe the Merchant Card.
3.0
AWAITING
AWAITING AWAITING
AWAITING MER
MERMER
MER PIN
PINPIN
PIN
Terminal waits on the Merchant Pin
4.0
MERCHANT PIN?
MERCHANT PIN?MERCHANT PIN?
MERCHANT PIN?
Key in the Merchant PIN followed by ENTER key on the pinpad
5.0
SWIPE OR
SWIPE ORSWIPE OR
SWIPE OR
INSERT CARD
INSERT CARDINSERT CARD
INSERT CARD
Swipe or Insert the cardholder’s card.
6.0
REFUND AMOUNT?
REFUND AMOUNT?REFUND AMOUNT?
REFUND AMOUNT?
$XX.XX
$XX.XX$XX.XX
$XX.XX
Enter the refund amount followed by the ENTER key
7.0
AWAITING ACCOUNT
AWAITING ACCOUNTAWAITING ACCOUNT
AWAITING ACCOUNT
The terminal waits for the cardholder to select the account type on the pinpad.
8.0
ACCOUNT $XX.XX
ACCOUNT $XX.XXACCOUNT $XX.XX
ACCOUNT $XX.XX
CHQ SAV CR
CHQ SAV CRCHQ SAV CR
CHQ SAV CR
The pinpad will prompt for account selection. Ask the cardholder to select
their account type.
Example: CR
9.0
AWAITING PIN
AWAITING PINAWAITING PIN
AWAITING PIN
The terminal waits for the cardholder to key in the PIN on the pinpad.
For PIN Entry Transaction
10.0
PIN OR ENTER
PIN OR ENTERPIN OR ENTER
PIN OR ENTER
****
********
****
The Pinpad will prompt for the PIN entry. Ask the cardholder to key in their PIN and
proceed with step 11.0
Page 54

SKYZER TECHNOLOGIES PAGE 54 OF 97
INGENICO 5100 PAYMARK VERSION 6.0 OPERATING GUIDE Version 1.3
11.0
PROCESSING NOW
PROCESSING NOWPROCESSING NOW
PROCESSING NOW
PROCESSING NOW will be displayed on the terminal and pinpad.
12.0
ACCEPTED
ACCEPTEDACCEPTED
ACCEPTED
Transaction has been ACCEPTED with PIN entry and prints the transaction receipt.
13.0
DECLINED
DECLINEDDECLINED
DECLINED
Transaction has been DECLINED with PIN entry and prints the transaction receipt.
For Signature Transaction
14.0
PIN OR ENTER
PIN OR ENTERPIN OR ENTER
PIN OR ENTER
Then pinpad will prompt for the PIN entry. Ask the cardholder to press ENTER to
proceed with Signature transaction.
15.0
SIGN RECEIPT
SIGN RECEIPTSIGN RECEIPT
SIGN RECEIPT
SIGN RECEIPT will be displayed on both terminal and pinpad screen. Tear the
receipt off and ask the cardholder to sign receipt.
16.0
SIGNATURE O
SIGNATURE OSIGNATURE O
SIGNATURE OK? Y/N
K? Y/NK? Y/N
K? Y/N
ENTER=YES,CLR=NO
ENTER=YES,CLR=NOENTER=YES,CLR=NO
ENTER=YES,CLR=NO
Verify the cardholder’s signature with the signature on the back of the card. If the
signature matches:
Press ENTER to accept and proceed with step 17.0
If not, press CLEAR to decline and proceed with step 18.0
17.0
SIG ACCEPTE
SIG ACCEPTESIG ACCEPTE
SIG ACCEPTEDDDD
SIG ACCEPTED will be displayed on both terminal and pinpad screen. The
merchant presses the ENTER key to accept the cardholder’s signature after
signature matches with the card.
18.0
SIG DECLINED
SIG DECLINEDSIG DECLINED
SIG DECLINED
SIG DECLINED will be displayed on both terminal and pinpad screen. The
merchant presses the CLEAR key to decline the cardholder’s signature after
signature fails to match with the card.
Page 55

SKYZER TECHNOLOGIES PAGE 55 OF 97
INGENICO 5100 PAYMARK VERSION 6.0 OPERATING GUIDE Version 1.3
4.6 CARD NOT PRESENT TRANSACTION
Credit Card numbers can be entered manually, simply by entering the card
number into the keypad when required transaction has been selected.
Example: Purchase, Refund, Tipping Authorisation, Hospitality Authorisation,
Extra Charges and Top-up Authorisation.
Step
Terminal Display
Description
1.0
PAYMARK
PAYMARKPAYMARK
PAYMARK EFTPOS
EFTPOSEFTPOS
EFTPOS
PUR CASH RFND
PUR CASH RFNDPUR CASH RFND
PUR CASH RFND
Select desired transaction.
Example: Press CHQ key to select purchase transaction.
2.0
PRESENT/
PRESENT/PRESENT/
PRESENT/SWIPE OR
SWIPE ORSWIPE OR
SWIPE OR
INSERT CARD
INSERT CARDINSERT CARD
INSERT CARD
Rather than presenting/swiping or inserting card, press FUNC.
3.0
CARD NUMBER:
CARD NUMBER:CARD NUMBER:
CARD NUMBER:
XXXXXXXXXXXXXXXXX
XXXXXXXXXXXXXXXXXXXXXXXXXXXXXXXXXX
XXXXXXXXXXXXXXXXX
Terminal will then prompt for the card number to be manually entered.
Key in the card number and press ENTER.
4.0
EXPIRY <MMYY>:
EXPIRY <MMYY>:EXPIRY <MMYY>:
EXPIRY <MMYY>:
XXXX
XXXXXXXX
XXXX
Enter the expiry date as shown on card. Ensure that numbers are in month/year
format.
Key in expiry date and press ENTER.
5.0
CSC ON CARD Y/N
CSC ON CARD Y/NCSC ON CARD Y/N
CSC ON CARD Y/N
Terminal will prompt whether card has a CSC (Card Security Code = a 3-4 digit
number on back of card.)
Press ENTER to key in the Card Security Code number and proceed with step 6.0.
Press CLEAR to select ‘NO’ and proceed with step 7.0.
6.0
ENTER CSC CODE
ENTER CSC CODEENTER CSC CODE
ENTER CSC CODE
If YES is selected, key in the CSC code as it appears on the back of the card and
press ENTER.
7.0
SELECT REASON
SELECT REASONSELECT REASON
SELECT REASON
1. NOT ON CARD
1. NOT ON CARD1. NOT ON CARD
1. NOT ON CARD
2. CANNOT READ
2. CANNOT READ2. CANNOT READ
2. CANNOT READ
3. CUST ADVISED
3. CUST ADVISED3. CUST ADVISED
3. CUST ADVISED
If NO is selected, choose the appropriate reason by pressing the corresponding
number key.
8.0
PURCHASE AMOUNT?
PURCHASE AMOUNT?PURCHASE AMOUNT?
PURCHASE AMOUNT?
$0.00
$0.00$0.00
$0.00
Terminal will prompt for Purchase Amount
Enter the purchase amount and press ENTER.
9.0
CASH OUT
CASH OUTCASH OUT
CASH OUT AMOUNT?
AMOUNT?AMOUNT?
AMOUNT?
$0.00
$0.00$0.00
$0.00
Only
applicable if the CASH OUT is turned on.
Press ENTER to bypass “CASH OUT”
Page 56

SKYZER TECHNOLOGIES PAGE 56 OF 97
INGENICO 5100 PAYMARK VERSION 6.0 OPERATING GUIDE Version 1.3
10.0
SELECT TYPE
SELECT TYPESELECT TYPE
SELECT TYPE
1. MOTO
1. MOTO1. MOTO
1. MOTO
2. UNSECURE ECOM
2. UNSECURE ECOM2. UNSECURE ECOM
2. UNSECURE ECOM
Select the Transaction Type by pressing the corresponding number key:
1. MOTO (Mail order Telephone Order)
2. Unsecure ECOM (Electronic Commerce .e.g. Internet)
If 1 is pressed, then follow through to step 11.0.
If 2 is pressed, then follow through to step 12.0
11.0
1. SINGLE
1. SINGLE1. SINGLE
1. SINGLE
2. RECURRING
2. RECURRING2. RECURRING
2. RECURRING
3. INSTALLMENT
3. INSTALLMENT3. INSTALLMENT
3. INSTALLMENT
4. UNKNOWN
4. UNKNOWN4. UNKNOWN
4. UNKNOWN
Select option by pressing the corresponding number key:
1. SINGLE
2. RECURRING
3. INSTALLMENT
4. UNKNOWN
12.0
AWAITING ACCOUNT
AWAITING ACCOUNTAWAITING ACCOUNT
AWAITING ACCOUNT
The terminal waits on the account selection from the pinpad.
13.0
ACCOUNT $XX.XX
ACCOUNT $XX.XXACCOUNT $XX.XX
ACCOUNT $XX.XX
CHQ SAV CR
CHQ SAV CRCHQ SAV CR
CHQ SAV CR
The pinpad will prompt for account selection. Select the CR account on the pinpad.
16.0
PROCESSING NOW
PROCESSING NOWPROCESSING NOW
PROCESSING NOW
PROCESSING NOW will be displayed on the terminal and pinpad. Terminal will
now automatically connect to the Host and complete the transaction.
17.0
ACCEPTED
ACCEPTEDACCEPTED
ACCEPTED
Transaction has been ACCEPTED and prints the transaction receipt.
18.0
DECLINED
DECLINEDDECLINED
DECLINED
Transaction has been DECLINED and prints the transaction receipt.
Page 57

SKYZER TECHNOLOGIES PAGE 57 OF 97
INGENICO 5100 PAYMARK VERSION 6.0 OPERATING GUIDE Version 1.3
4.7 CARD NOT PRESENT REFUND TRANSACTION
This function allows the merchant to perform a refund transaction on the
terminal when the card is not present.
Step
Terminal Display
Description
1.0
PAYMARK
PAYMARKPAYMARK
PAYMARK EFTPOS
EFTPOSEFTPOS
EFTPOS
PUR CASH RFND
PUR CASH RFNDPUR CASH RFND
PUR CASH RFND
Select desired transaction.
Example: Press CR key to select a REFUND transaction.
2.0
MERCHANT CARD
MERCHANT CARDMERCHANT CARD
MERCHANT CARD
Swipe the Merchant Card.
3.0
AWAITING MER PIN
AWAITING MER PINAWAITING MER PIN
AWAITING MER PIN
Terminal waits on the Merchant Pin
4.0
MERCHANT PIN?
MERCHANT PIN?MERCHANT PIN?
MERCHANT PIN?
Key in the Merchant PIN followed by ENTER key on the pinpad
5.0
PRESENT/
PRESENT/PRESENT/
PRESENT/SWIPE OR
SWIPE ORSWIPE OR
SWIPE OR
INSER
INSERINSER
INSERT CARD
T CARDT CARD
T CARD
Rather than presenting/swiping or inserting card, press FUNC.
6.0
CARD NUMBER:
CARD NUMBER:CARD NUMBER:
CARD NUMBER:
XXXXXXXXXXXXXXXXX
XXXXXXXXXXXXXXXXXXXXXXXXXXXXXXXXXX
XXXXXXXXXXXXXXXXX
Terminal will then prompt for the card number to be manually entered.
Key in the card number and press ENTER.
7.0
EXPIRY <MMYY>:
EXPIRY <MMYY>:EXPIRY <MMYY>:
EXPIRY <MMYY>:
XXXX
XXXXXXXX
XXXX
Enter the expiry date as shown on the card. Ensure that numbers are in month/year
format.
Key in expiry date and press ENTER.
8.0
REFUND AMOUNT?
REFUND AMOUNT?REFUND AMOUNT?
REFUND AMOUNT?
$0.00
$0.00$0.00
$0.00
Enter the refund amount and press ENTER.
9.0
SELECT TYPE
SELECT TYPESELECT TYPE
SELECT TYPE
1. MOTO
1. MOTO1. MOTO
1. MOTO
2. UNSECURE ECOM
2. UNSECURE ECOM2. UNSECURE ECOM
2. UNSECURE ECOM
Select the Transaction Type by pressing the corresponding number key:
1. MOTO (Mail order Telephone Order)
2. Unsecure ECOM (Electronic Commerce .e.g. Internet)
If 1 is pressed, then follow through to step 10.0.
If 2 is pressed, then follow through to step 11.0
10.0
1111. SINGLE
. SINGLE. SINGLE
. SINGLE
2. RECURRING
2. RECURRING2. RECURRING
2. RECURRING
3. INSTALLMENT
3. INSTALLMENT3. INSTALLMENT
3. INSTALLMENT
4. UNKNOWN
4. UNKNOWN4. UNKNOWN
4. UNKNOWN
Select option by pressing the corresponding number key:
1. SINGLE
2. RECURRING
3. INSTALLMENT
4. UNKNOWN
Page 58

SKYZER TECHNOLOGIES PAGE 58 OF 97
INGENICO 5100 PAYMARK VERSION 6.0 OPERATING GUIDE Version 1.3
11.0
AWAITING ACCOUNT
AWAITING ACCOUNTAWAITING ACCOUNT
AWAITING ACCOUNT
The terminal waits on the account selection from the pinpad.
12.0
ACCOUNT $XX.XX
ACCOUNT $XX.XXACCOUNT $XX.XX
ACCOUNT $XX.XX
CHQ SAV CR
CHQ SAV CRCHQ SAV CR
CHQ SAV CR
The pinpad will prompt for account selection. Select the CR account on the pinpad.
13.0
PROCESSING NOW
PROCESSING NOWPROCESSING NOW
PROCESSING NOW
PROCESSING NOW will be displayed on the terminal and pinpad. Terminal will
now automatically connect to the Host and complete the transaction.
14.0
ACCEPTED
ACCEPTEDACCEPTED
ACCEPTED
Transaction has been ACCEPTED and prints the transaction receipt.
15.0
DECLINED
DECLINEDDECLINED
DECLINED
Transaction has been DECLINED and prints the transaction receipt.
Page 59

SKYZER TECHNOLOGIES PAGE 59 OF 97
INGENICO 5100 PAYMARK VERSION 6.0 OPERATING GUIDE Version 1.3
4.8 EMV (Europay MasterCard Visa) CHIP CARD TRANSACTION
An EMV chip/smart card is a plastic payment card with an embedded
microprocessor.
When processing EMV chip card transactions, merchants and cardholders
have the choice of either a PIN or signature transaction. The i5100 terminal
supports pin bypass should this function be required.
Step
Terminal Display
Description
1.0
PAYMARK
PAYMARKPAYMARK
PAYMARK EFTPOS
EFTPOSEFTPOS
EFTPOS
PUR CASH RFND
PUR CASH RFNDPUR CASH RFND
PUR CASH RFND
Select desired transaction.
Example: Press CHQ key to select a purchase transaction.
NOTE: A purchase transaction can also be performed at the idle screen by simply
inserting the card and proceeding through to step 3.0.
2.0
PRESENT/
PRESENT/PRESENT/
PRESENT/SWIPE OR
SWIPE ORSWIPE OR
SWIPE OR
INSERT CARD
INSERT CARDINSERT CARD
INSERT CARD
Insert the cardholder’s chip card into the chip card reader at the front of the
terminal.
NOTE: The chip card must remain in the terminal until the ‘REMOVE CARD’
prompt is displayed. If the card is removed to early the transaction will be
cancelled.
3.0
PURCHASE AMOUNT?
PURCHASE AMOUNT?PURCHASE AMOUNT?
PURCHASE AMOUNT?
$0.00
$0.00$0.00
$0.00
Key in the purchase amount and press ENTER.
4.0
CASH OUT
CASH OUTCASH OUT
CASH OUT AMOUNT?
AMOUNT?AMOUNT?
AMOUNT?
$0.00
$0.00$0.00
$0.00
Only applicable if the CASH OUT is turned on.
Press ENTER to bypass “CASH OUT”
5.0
AWAITING ACCOUNT
AWAITING ACCOUNT AWAITING ACCOUNT
AWAITING ACCOUNT
The terminal waits for the cardholder to select the account type on the pinpad.
6.0
ACCOUNT $XX.XX
ACCOUNT $XX.XXACCOUNT $XX.XX
ACCOUNT $XX.XX
CHQ SAV CR
CHQ SAV CRCHQ SAV CR
CHQ SAV CR
The pinpad will prompt for account selection. Ask the cardholder to select their
account type.
Example: CR
7.0
AWAITING PIN
AWAITING PINAWAITING PIN
AWAITING PIN
The terminal waits for the cardholder to key in their PIN on the pinpad.
8.0
PIN OR ENTER
PIN OR ENTERPIN OR ENTER
PIN OR ENTER
The pinpad waits for the cardholder to key in their PIN (refer to step 9.0) or
presses ENTER to proceed with the Signature (refer to step 14.0).
For PIN Entry Transaction
9.0
PIN OR ENTER
PIN OR ENTERPIN OR ENTER
PIN OR ENTER
****
********
****
The pinpad will prompt for PIN entry. Ask the cardholder to key in their PIN.
Page 60

SKYZER TECHNOLOGIES PAGE 60 OF 97
INGENICO 5100 PAYMARK VERSION 6.0 OPERATING GUIDE Version 1.3
10.0
PROCESSING NOW
PROCESSING NOWPROCESSING NOW
PROCESSING NOW
PROCESSING NOW will be displayed on the terminal and pinpad.
11.0
REMOVE CARD
REMOVE CARDREMOVE CARD
REMOVE CARD
Remove card from the chip card reader.
NOTE: If no action is taken within 7 seconds, the terminal will proceed with
printing of the receipts and REMOVE CARD prompt will display again.
12.0
ACCEPTED
ACCEPTEDACCEPTED
ACCEPTED
Transaction has been ACCEPTED with PIN entry and transaction receipt is printed.
13.0
DECLINED
DECLINEDDECLINED
DECLINED
Transaction has been DECLINED with PIN entry and transaction receipt is printed.
For Signature Transaction
NOTE: If the cardholder cannot remember their PIN or does not have a PIN, then the merchant has the option to accept
a signature transaction.
Complete steps 1-6 of the transaction process first
14.0
PIN OR ENTER
PIN OR ENTERPIN OR ENTER
PIN OR ENTER
Advise the cardholder to press ENTER on the pinpad to proceed with a Signature
transaction.
15.0
PROCESSING NOW
PROCESSING NOWPROCESSING NOW
PROCESSING NOW
PROCESSING NOW will be displayed on the terminal and pinpad.
16.0
REMOVE CARD
REMOVE CARDREMOVE CARD
REMOVE CARD
Remove card from the chip card reader.
NOTE: If no action is taken within 7 seconds, the terminal will proceed with
printing of the receipts and REMOVE CARD prompt will display again.
17.0
SIGN RECEIPT
SIGN RECEIPTSIGN RECEIPT
SIGN RECEIPT
SIGN RECEIPT will be displayed on both terminal and pinpad screen. Tear the
receipt off and ask the cardholder to sign receipt.
18.0
SIGNATURE OK? Y/N
SIGNATURE OK? Y/NSIGNATURE OK? Y/N
SIGNATURE OK? Y/N
ENTER=YES,CLR=NO
ENTER=YES,CLR=NOENTER=YES,CLR=NO
ENTER=YES,CLR=NO
Verify the cardholder’s signature with the signature on the back of the card. If the
signature matches:
Press ENTER to accept and proceed with step 19.0
If not, press CLEAR to decline and proceed with step 20.0
19.0
SIG ACCEPTED
SIG ACCEPTEDSIG ACCEPTED
SIG ACCEPTED
SIG ACCEPTED will be displayed on both the terminal and pinpad screen. The
merchant presses ENTER to accept the cardholder’s signature after verifying
signature with the card.
20.0
SIG DECLINED
SIG DECLINEDSIG DECLINED
SIG DECLINED
SIG DECLINED will be displayed on both the terminal and pinpad screen. The
merchant presses CLEAR to decline the cardholder’s signature after verifying
signature with the card.
Page 61

SKYZER TECHNOLOGIES PAGE 61 OF 97
INGENICO 5100 PAYMARK VERSION 6.0 OPERATING GUIDE Version 1.3
4.9 DEBIT TIPPING TRANSACTION
This function allows a merchant to accept a tip through a debit card on a
purchase transaction.
Step
Terminal Display
Description
1.0
PAYMARK EFTPOS
PAYMARK EFTPOSPAYMARK EFTPOS
PAYMARK EFTPOS
PUR
PUR PUR
PUR
CASH RFND
CASH RFNDCASH RFND
CASH RFND
Press ENTER until PAYMARK EFTPOS menu is displayed.
To select purchase transaction under PAYMARK EFTPOS menu, press CHQ
key on the terminal.
NOTE: A purchase transaction can also be performed by simply swiping any
given card at the idle screen and proceeding with step 3.0
2.0
PURCHASE AMOUNT?
PURCHASE AMOUNT?PURCHASE AMOUNT?
PURCHASE AMOUNT?
$5.00
$5.00$5.00
$5.00
Key in the purchase amount and press ENTER.
3.0
AWAITING TIP
AWAITING TIPAWAITING TIP
AWAITING TIP
AWAITING TIP will be displayed on the terminal.
4.0
DO YOU WISH TO
DO YOU WISH TO DO YOU WISH TO
DO YOU WISH TO
ADD A TIP Y/N
ADD A TIP Y/NADD A TIP Y/N
ADD A TIP Y/N
DO YOU WISH TO ADD A TIP Y/N will be displayed on the pinpad.
Cardholder shall advise by pressing the ENTER key for YES, to a tip and proceed
with step 5.0 or CLEAR key for NO, not to add a tip and proceed with step 7.0.
5.0
PLS ADVISE STAFF
PLS ADVISE STAFF PLS ADVISE STAFF
PLS ADVISE STAFF
OF TIP AMOUNT
OF TIP AMOUNTOF TIP AMOUNT
OF TIP AMOUNT
Cardholder will advise staff member of a tip amount they wish to tip.
6.0
TIP AMOUNT?
TIP AMOUNT?TIP AMOUNT?
TIP AMOUNT?
$5.00
$5.00$5.00
$5.00
Staff member will enter the tip amount and press ENTER.
7.0
CASH OUT AMOUNT?
CASH OUT AMOUNT?CASH OUT AMOUNT?
CASH OUT AMOUNT?
$0.00
$0.00 $0.00
$0.00
Only applicable if the CASH OUT is turned on.
Press ENTER to bypass the “CASH OUT” or enter the cash withdrawal amount
followed by the ENTER key.
NOTE: Cash amounts must be multiples of the minimum currency increment (10
cents).
8.0
SWIPE OR
SWIPE OR SWIPE OR
SWIPE OR
INSERT CARD
INSERT CARDINSERT CARD
INSERT CARD
Swipe or insert cardholder’s card on the terminal.
9.0
AWAITING ACCOUNT
AWAITING ACCOUNTAWAITING ACCOUNT
AWAITING ACCOUNT
$10.00
$10.00$10.00
$10.00
Terminal displays awaiting account selection from the cardholder.
10.0
ACCOUNT $10.00
ACCOUNT $10.00ACCOUNT $10.00
ACCOUNT $10.00
CHQ SAV CR
CHQ SAV CRCHQ SAV CR
CHQ SAV CR
Pinpad will prompt for account selection. Ask the cardholder to select the account
type.
Example: CHQ or SAV
11.0
AWAITING PIN
AWAITING PINAWAITING PIN
AWAITING PIN
$10.00
$10.00$10.00
$10.00
Terminal displays awaiting pin entry from the cardholder.
12.0
CHQ
CHQCHQ
CHQ----PIN $10.00
PIN $10.00PIN $10.00
PIN $10.00
****
********
****
Pinpad will prompt for PIN entry. Ask the cardholder to enter their PIN number
followed by ENTER.
Page 62

SKYZER TECHNOLOGIES PAGE 62 OF 97
INGENICO 5100 PAYMARK VERSION 6.0 OPERATING GUIDE Version 1.3
13.0
PROCESSING NOW
PROCESSING NOWPROCESSING NOW
PROCESSING NOW
PROCESSING NOW will be displayed on the terminal and pinpad while
processing the transaction.
14.0
ACCEPTED
ACCEPTEDACCEPTED
ACCEPTED
Transaction has been ACCEPTED and prints off transaction receipt.
15.0
DECLINED
DECLINEDDECLINED
DECLINED
Transaction has been DECLINED and prints off transaction receipt.
NOTE: The tip amount added to the transaction will be printed off on the
Customer and Merchant copy receipt on the footer line area.
Page 63

SKYZER TECHNOLOGIES PAGE 63 OF 97
INGENICO 5100 PAYMARK VERSION 6.0 OPERATING GUIDE Version 1.3
4.10 CREDIT CARD TIPPING TRANSACTION
This function allows the merchant to add a TIP amount to a credit card
transaction.
4.10.1 Authorisation
This transaction requests the approval for the Purchase to proceed. The
transaction is not a financial transaction, but verifies that the cardholder has
the funds available for the intended purchase. If approved, the authorised
amount is held until the purchase is completed.
NOTE: When Credit Card Tipping function is enabled on the terminal, the
terminal defaults to credit card tipping authorisation transaction at card swipe
or insertion of chip card from the idle screen automatically.
Step
Terminal Display
Description
1.0
TIPPING
TIPPINGTIPPING
TIPPING
AUTH ADJ
AUTH ADJAUTH ADJ
AUTH ADJ
UTIL
UTILUTIL
UTIL
Press ENTER to scroll through the menu options until the TIPPING menu is
shown on the display.
Press CHQ key to select AUTH.
2.0
SWIPE OR
SWIPE ORSWIPE OR
SWIPE OR
INSERT CARD
INSERT CARDINSERT CARD
INSERT CARD
Swipe or insert card to process the transaction.
3.0
PURCHASE AMOUNT?
PURCHASE AMOUNT?PURCHASE AMOUNT?
PURCHASE AMOUNT?
$0.00
$0.00$0.00
$0.00
Enter the Purchase amount to process the transaction and press ENTER
4.0
AWAITING ACCOUNT
AWAITING ACCOUNTAWAITING ACCOUNT
AWAITING ACCOUNT
The terminal waits on the account selection from the cardholder on the pinpad.
5.0
ACCOUNT $XX.XX
ACCOUNT $XX.XXACCOUNT $XX.XX
ACCOUNT $XX.XX
CHQ SAV CR
CHQ SAV CRCHQ SAV CR
CHQ SAV CR
The pinpad will prompt for account selection. Ask the cardholder to select the CR
account on the pinpad.
NOTE: If the card used has only one account type which is credit, the
terminal will process the transaction without prompting to select
account. However, if a transaction is executed using Chip Card, then all
the account type will be displayed for cardholder to select from.
8.0
PROCESSING NOW
PROCESSING NOWPROCESSING NOW
PROCESSING NOW
PROCESSING NOW will be displayed on the terminal and pinpad while processing
the transaction.
9.0
SIG REQUIRED
SIG REQUIREDSIG REQUIRED
SIG REQUIRED
SIG REQUIRED will be displayed on both terminal and pinpad screen. Tear the
receipt off and ask the cardholder to sign the receipt.
NOTE: Under Paymark’s specification, tipping transactions must be verified by
the cardholder’s signature rather than PIN.
Page 64

SKYZER TECHNOLOGIES PAGE 64 OF 97
INGENICO 5100 PAYMARK VERSION 6.0 OPERATING GUIDE Version 1.3
4.10.2 Tip Transactions
Adding or adjusting the tip amount to a transaction.
Step
Terminal Display
Description
1.0
TIPPING
TIPPINGTIPPING
TIPPING
AUTH ADJ
AUTH ADJAUTH ADJ
AUTH ADJ
UTIL
UTILUTIL
UTIL
Press ENTER to scroll through the menu options until the TIPPING menu is
shown on the display.
Press SAV key to select ADJ.
2.0
RETRIEVE BY
RETRIEVE BYRETRIEVE BY
RETRIEVE BY
1.
1.1.
1. TRANS NUMBER
TRANS NUMBERTRANS NUMBER
TRANS NUMBER
2. CARD NUMBER
2. CARD NUMBER2. CARD NUMBER
2. CARD NUMBER
3. AUTH NUMBER
3. AUTH NUMBER3. AUTH NUMBER
3. AUTH NUMBER
4. PURCHASE AMOUNT
4. PURCHASE AMOUNT4. PURCHASE AMOUNT
4. PURCHASE AMOUNT
5. TIP AMOUNT
5. TIP AMOUNT5. TIP AMOUNT
5. TIP AMOUNT
6. TOTAL AMOUNT
6. TOTAL AMOUNT6. TOTAL AMOUNT
6. TOTAL AMOUNT
Select the desired search criteria by pressing the corresponding number on the
terminal to retrieve the stored transaction.
Example: 1 for TRANS NUMBER
NOTE: The option 5 TIP AMOUNT will not work if that particular transaction
does not have the TIP amount entered. Once the transaction has got the TIP
amount added, then the merchant will be able to retrieve the transaction through
TIP amount.
3.0
ENTER TRAN NUM
ENTER TRAN NUMENTER TRAN NUM
ENTER TRAN NUM
Enter transaction number which can be obtained from the receipt.
Example: 000001
4.0
PLEASE WAIT
PLEASE WAITPLEASE WAIT
PLEASE WAIT
Terminal will display PLEASE WAIT while retrieving the selected transaction from
the terminal.
5.0
TRAN XXXXXX
TRAN XXXXXX TRAN XXXXXX
TRAN XXXXXX
AUTH
AUTHAUTH
AUTH
CARD XXXXXX....XXXX
CARD XXXXXX....XXXXCARD XXXXXX....XXXX
CARD XXXXXX....XXXX
TOTAL AMT NZ$XX.XX
TOTAL AMT NZ$XX.XXTOTAL AMT NZ$XX.XX
TOTAL AMT NZ$XX.XX
REQUIRED TRANS. Y/N
REQUIRED TRANS. Y/NREQUIRED TRANS. Y/N
REQUIRED TRANS. Y/N
Transaction details are displayed.
Press ENTER to select that transaction and proceed through step 6.0.
Press CLEAR to exit and return to step 2.0.
6.0
PUR $XX.XX
PUR $XX.XXPUR $XX.XX
PUR $XX.XX
TIP $0.00
TIP $0.00TIP $0.00
TIP $0.00
TOTAL $XX.XX
TOTAL $XX.XXTOTAL $XX.XX
TOTAL $XX.XX
ADJUST
ADJUSTADJUST
ADJUST TIP Y/N
TIP Y/NTIP Y/N
TIP Y/N
To add or adjust the TIP amount:
Press ENTER to proceed with adding/adjusting the TIP amount or
Press CLEAR to exit and return to Step 2.0
7.0
TIP AMT
TIP AMTTIP AMT
TIP AMT
$0.00
$0.00$0.00
$0.00
NEW TIP AMOUNT?
NEW TIP AMOUNT?NEW TIP AMOUNT?
NEW TIP AMOUNT?
$XX.XX
$XX.XX$XX.XX
$XX.XX
The TIP amount will be displayed as $0.00 if not previously entered. Key in the
TIP AMOUNT that has been specified by the cardholder then followed by
ENTER.
8.0
TIP $XX.XX
TIP $XX.XXTIP $XX.XX
TIP $XX.XX
AMT CORRECT Y/N
AMT CORRECT Y/NAMT CORRECT Y/N
AMT CORRECT Y/N
Press ENTER if the Tip amount entered is correct or CLEAR to cancel the Tip
amount and return to the previous screen to re-enter correct amount.
NOTE: The terminal is to limit the total amount of the purchase completion to a
maximum of 150% of the value of the accepted authorization i.e. the TIP
amount cannot exceed 50% of the authorised amount.
9.0
TIP ACCEPTED
TIP ACCEPTEDTIP ACCEPTED
TIP ACCEPTED
TIP amount has been accepted.
Page 65

SKYZER TECHNOLOGIES PAGE 65 OF 97
INGENICO 5100 PAYMARK VERSION 6.0 OPERATING GUIDE Version 1.3
10.0
RETRIEVE BY
RETRIEVE BYRETRIEVE BY
RETRIEVE BY
1.
1.1.
1. TRANS NUMBER
TRANS NUMBERTRANS NUMBER
TRANS NUMBER
2. CARD NUMBER
2. CARD NUMBER2. CARD NUMBER
2. CARD NUMBER
3. AUTH NUMBER
3. AUTH NUMBER3. AUTH NUMBER
3. AUTH NUMBER
4. PURCHASE AMOUNT
4. PURCHASE AMOUNT4. PURCHASE AMOUNT
4. PURCHASE AMOUNT
5. TIP AMOUNT
5. TIP AMOUNT5. TIP AMOUNT
5. TIP AMOUNT
6. TOTAL AMOUNT
6. TOTAL AMOUNT6. TOTAL AMOUNT
6. TOTAL AMOUNT
Repeat steps 2-9 to finalize any remaining tip transactions or press CLEAR to
return to idle screen.
Page 66

SKYZER TECHNOLOGIES PAGE 66 OF 97
INGENICO 5100 PAYMARK VERSION 6.0 OPERATING GUIDE Version 1.3
4.10.3 Tipping Utilities
There are three functions under the Tipping Utility menu, as follows:
4.10.3.1 Void Tip
This function allows the merchant to void a Credit Card Tipping transaction.
Note: When voiding TIP, the entire TIP transaction will be voided.
Step
Terminal Display
Description
1.0
TIPPING
TIPPINGTIPPING
TIPPING
AUTH ADJ
AUTH ADJAUTH ADJ
AUTH ADJ
UTIL
UTILUTIL
UTIL
Press ENTER to scroll through the menu options until the TIPPING menu is
shown on the display.
Press CR to select UTILITY.
2.0
SELECT FUNCTION
SELECT FUNCTIONSELECT FUNCTION
SELECT FUNCTION
1.
1.1.
1. VOID TIP
VOID TIPVOID TIP
VOID TIP
2. UPLOAD
2. UPLOAD2. UPLOAD
2. UPLOAD
3. PRINT
3. PRINT3. PRINT
3. PRINT
Select the desired function by pressing the corresponding number key.
Example: Select 1 to perform VOID TIP FUNCTION.
3.0
RETRIEVE BY
RETRIEVE BYRETRIEVE BY
RETRIEVE BY
1.
1.1.
1. TRANS NUMBER
TRANS NUMBERTRANS NUMBER
TRANS NUMBER
2. CARD NUMBER
2. CARD NUMBER2. CARD NUMBER
2. CARD NUMBER
3. AUTH NUMBER
3. AUTH NUMBER3. AUTH NUMBER
3. AUTH NUMBER
4. PURCHASE AMO
4. PURCHASE AMO4. PURCHASE AMO
4. PURCHASE AMOUNT
UNTUNT
UNT
5. TIP AMOUNT
5. TIP AMOUNT5. TIP AMOUNT
5. TIP AMOUNT
6. TOTAL AMOUNT
6. TOTAL AMOUNT6. TOTAL AMOUNT
6. TOTAL AMOUNT
Select the desired search criteria by pressing the corresponding number on the
terminal to retrieve the stored transaction.
Example: 1 for TRANS NUMBER
4.0
ENTER TRAN NUM
ENTER TRAN NUMENTER TRAN NUM
ENTER TRAN NUM
Enter the transaction number which can be obtained from the receipt.
Example: 000001
5.0
PLEASE WAIT
PLEASE WAITPLEASE WAIT
PLEASE WAIT
Terminal will display PLEASE WAIT while retrieving the selected transaction.
6.0
TRAN XXXXXX
TRAN XXXXXX TRAN XXXXXX
TRAN XXXXXX
AUTH
AUTHAUTH
AUTH
CARD XXXXXX....XXXX
CARD XXXXXX....XXXXCARD XXXXXX....XXXX
CARD XXXXXX....XXXX
TOTAL AMT NZ$XX.XX
TOTAL AMT NZ$XX.XXTOTAL AMT NZ$XX.XX
TOTAL AMT NZ$XX.XX
REQUIRED TRANS. Y/N
REQUIRED TRANS. Y/NREQUIRED TRANS. Y/N
REQUIRED TRANS. Y/N
Transaction details are displayed.
Press ENTER to select that transaction and proceed through step 7.0.
Press CLEAR to exit and return to step 3.0.
7.0
CANCEL?
CANCEL?CANCEL?
CANCEL?
TIP TRANSACTION
TIP TRANSACTIONTIP TRANSACTION
TIP TRANSACTION
Press ENTER to cancel the TIP Transaction and follow through step 8.0
Press CLEAR to exit and return to TIPPING menu.
8.0
PLEASE WAIT
PLEASE WAITPLEASE WAIT
PLEASE WAIT
Void TIP Transaction is processing
Page 67

SKYZER TECHNOLOGIES PAGE 67 OF 97
INGENICO 5100 PAYMARK VERSION 6.0 OPERATING GUIDE Version 1.3
9.0
PRINTING
PRINTINGPRINTING
PRINTING
‘Transaction Void’ receipt is printed.
Page 68

SKYZER TECHNOLOGIES PAGE 68 OF 97
INGENICO 5100 PAYMARK VERSION 6.0 OPERATING GUIDE Version 1.3
4.10.3.2 Uploading Tip Transactions
This function is used by the merchant to transmit all stored credit card tip
transactions.
Step
Terminal Display
Description
1.0
TIPPING
TIPPINGTIPPING
TIPPING
AUTH ADJ
AUTH ADJAUTH ADJ
AUTH ADJ
UTIL
UTILUTIL
UTIL
Press ENTER to scroll through the menu options until the TIPPING menu is
shown on the display.
Press CR key to select UTIL.
2.0
SELECT FUNCTION
SELECT FUNCTIONSELECT FUNCTION
SELECT FUNCTION
1.
1.1.
1. VOID TIP
VOID TIPVOID TIP
VOID TIP
2. UPLOAD
2. UPLOAD2. UPLOAD
2. UPLOAD
3. PRI
3. PRI3. PRI
3. PRINT
NTNT
NT
Select the desired function by pressing the corresponding number key.
Example: Select 2 to perform UPLOAD FUNCTION.
3.0
TIP TRANSACTIONS
TIP TRANSACTIONSTIP TRANSACTIONS
TIP TRANSACTIONS
TOTAL $XX.XX
TOTAL $XX.XXTOTAL $XX.XX
TOTAL $XX.XX
TOTAL OK? Y/N
TOTAL OK? Y/NTOTAL OK? Y/N
TOTAL OK? Y/N
Displays the total tip transactions that are currently stored on the terminal.
(NOTE: Check to see if the Total Amount matches the Total Amount of your tip
transaction receipts)
If the TOTAL is correct, press ENTER to upload the stored TIP transactions and
if the TOTAL is not correct, press CLEAR to exit and proceed with step 6.0
4.0
PROCESSING NOW
PROCESSING NOWPROCESSING NOW
PROCESSING NOW
X OF XX
X OF XXX OF XX
X OF XX
PROCESSING NOW X OF XX displays while uploading the stored tip
transactions and once finished, returns to idle screen.
Example: Processing 1 of 10, etc.
5.0
TRANSMISSION
TRANSMISSION TRANSMISSION
TRANSMISSION
COMPLETE
COMPLETECOMPLETE
COMPLETE
Once all the transactions are sent, the screen will display “TRANSMISSION
COMPLETE”
6.0
VIEW TRANS Y/N
VIEW TRANS Y/NVIEW TRANS Y/N
VIEW TRANS Y/N
Press ENTER to view transactions to modify the tip transaction amounts of the
stored advices or CLEAR to exit and return to idle screen.
Page 69

SKYZER TECHNOLOGIES PAGE 69 OF 97
INGENICO 5100 PAYMARK VERSION 6.0 OPERATING GUIDE Version 1.3
4.10.3.3 Printing Tips
This function allows the merchant to print the pending tip transactions that are
currently stored on the terminal.
Step
Terminal Display
Description
1.0
TIPPING
TIPPINGTIPPING
TIPPING
AUTH ADJ
AUTH ADJAUTH ADJ
AUTH ADJ
UTIL
UTILUTIL
UTIL
Press ENTER to scroll through the menu options until the TIPPING menu is
shown on the display.
Press CR key to select UTIL.
2.0
SELECT FUNCTION
SELECT FUNCTIONSELECT FUNCTION
SELECT FUNCTION
1.
1.1.
1. VOID TIP
VOID TIPVOID TIP
VOID TIP
2. UPLOAD
2. UPLOAD2. UPLOAD
2. UPLOAD
3. PRINT
3. PRINT3. PRINT
3. PRINT
Select the desired function by pressing the corresponding number key.
Example: Select 3 to perform PRINT FUNCTION.
3.0
RETRIEVE BY
RETRIEVE BYRETRIEVE BY
RETRIEVE BY
1.
1.1.
1. TRANS NUMBER
TRANS NUMBERTRANS NUMBER
TRANS NUMBER
2. CARD NUMBER
2. CARD NUMBER2. CARD NUMBER
2. CARD NUMBER
3. AUTH NUMBER
3. AUTH NUMBER3. AUTH NUMBER
3. AUTH NUMBER
4. P
4. P4. P
4. PURCHASE AMOUNT
URCHASE AMOUNTURCHASE AMOUNT
URCHASE AMOUNT
5. TIP AMOUNT
5. TIP AMOUNT5. TIP AMOUNT
5. TIP AMOUNT
6. TOTAL AMOUNT
6. TOTAL AMOUNT6. TOTAL AMOUNT
6. TOTAL AMOUNT
Select the desired search criteria by pressing the corresponding number to
retrieve and print the pending tip transaction.
Example: 1 for TRANS NUMBER
4.0
ENTER TRAN NUM
ENTER TRAN NUMENTER TRAN NUM
ENTER TRAN NUM
Enter the transaction number which can be obtained from the receipt.
Example: 000001
5.0
PLEASE WAIT
PLEASE WAITPLEASE WAIT
PLEASE WAIT
Terminal will display PLEASE WAIT while retrieving the stored transaction.
6.0
TRAN XXXXXX
TRAN XXXXXX TRAN XXXXXX
TRAN XXXXXX
AUTH
AUTHAUTH
AUTH
CARD XXXXXX....XXXX
CARD XXXXXX....XXXXCARD XXXXXX....XXXX
CARD XXXXXX....XXXX
TOTAL AMT NZ$XX.XX
TOTAL AMT NZ$XX.XXTOTAL AMT NZ$XX.XX
TOTAL AMT NZ$XX.XX
REQUIRED TRANS. Y/N
REQUIRED TRANS. Y/NREQUIRED TRANS. Y/N
REQUIRED TRANS. Y/N
Details of selected transaction are displayed.
Press ENTER to print the pending transaction.
Press CLEAR to exit and return to previous screen.
7.0
PRINTING
PRINTINGPRINTING
PRINTING
Pending tip transaction receipt is being printed.
Page 70

SKYZER TECHNOLOGIES PAGE 70 OF 97
INGENICO 5100 PAYMARK VERSION 6.0 OPERATING GUIDE Version 1.3
4.11 CREDIT CARD HOSPITALITY TRANSACTION
This function allows the merchant to perform hospitality transactions.
4.11.1 Hospitality Authorisation
This transaction requests the approval for the Purchase to proceed. The
transaction is not a financial transaction, but verifies that the cardholder has
the funds available for the intended purchase. If approved, the authorised
amount is held until the purchase is completed.
Step
Terminal Display
Description
1.0
HOSPITALITY
HOSPITALITYHOSPITALITY
HOSPITALITY
AUTH COMP UTIL
AUTH COMP UTILAUTH COMP UTIL
AUTH COMP UTIL
Press ENTER to scroll through the menu options until the HOSPITALITY menu
is shown on the display.
Press CHQ key to select AUTH.
2.0
SWIPE OR
SWIPE OR SWIPE OR
SWIPE OR
INSERT CARD
INSERT CARDINSERT CARD
INSERT CARD
Swipe or insert the cardholder’s card.
3.0
PURCHASE AMOUNT?
PURCHASE AMOUNT?PURCHASE AMOUNT?
PURCHASE AMOUNT?
$0.00
$0.00$0.00
$0.00
Enter the Purchase amount and press ENTER.
4.0
AWAITING ACCOUNT
AWAITING ACCOUNTAWAITING ACCOUNT
AWAITING ACCOUNT
The terminal waits on the account selection from the cardholder on the pinpad.
5.0
ACCOUNT $XX.XX
ACCOUNT $XX.XXACCOUNT $XX.XX
ACCOUNT $XX.XX
CHQ SAV
CHQ SAV CHQ SAV
CHQ SAV CR
CRCR
CR
The pinpad will prompt for account selection. Ask the cardholder to select the
account on the pinpad.
NOTE: If the card used has only one account type which is credit, the
terminal will process the transaction without prompting to select
account. However, if a transaction is executed using Chip Card, then all
the account type will be displayed for cardholder.
6.0
AWAITING PIN
AWAITING PINAWAITING PIN
AWAITING PIN
The terminal waits for the cardholder to input the pin on the pinpad.
7.0
PIN OR ENTER
PIN OR ENTERPIN OR ENTER
PIN OR ENTER
****
********
****
The pinpad will now prompt for PIN entry or SIGNATURE. Ask the cardholder
to either enter their PIN number on the pinpad or press ENTER for
SIGNATURE.
8.0
PROCESSING NOW
PROCESSING NOWPROCESSING NOW
PROCESSING NOW
PROCESSING NOW will be displayed on the terminal and pinpad while
processing the transaction.
9.0
ACCEPTED
ACCEPTEDACCEPTED
ACCEPTED
Transaction has been ACCEPTED for PIN entry and prints the transaction
receipt.
10.0
DECLINED
DECLINEDDECLINED
DECLINED
Transaction has been DECLINED for PIN entry and prints the transaction
receipt.
11.0
SIGN RECEIPT
SIGN RECEIPTSIGN RECEIPT
SIGN RECEIPT
SIGN RECEIPT will be displayed on both terminal and pinpad screen. Tear the
receipt off and ask the cardholder to sign receipt.
Page 71

SKYZER TECHNOLOGIES PAGE 71 OF 97
INGENICO 5100 PAYMARK VERSION 6.0 OPERATING GUIDE Version 1.3
12.0
SIGNATURE OK? Y/N
SIGNATURE OK? Y/NSIGNATURE OK? Y/N
SIGNATURE OK? Y/N
ENTER=YES,CLR=NO
ENTER=YES,CLR=NOENTER=YES,CLR=NO
ENTER=YES,CLR=NO
Verify the cardholder’s signature with the signature on the back of the card. If
the signature matches:
Press ENTER to accept and proceed with step 13.0
If not, press CLEAR to decline and proceed with step 14.0
13.0
SIG ACCEPTED
SIG ACCEPTEDSIG ACCEPTED
SIG ACCEPTED
SIG ACCEPTED will be displayed on both the terminal and pinpad screen. The
merchant presses ENTER to accept the cardholder’s signature after verifying
signature with the card.
14.0
SIG DECLINED
SIG DECLINEDSIG DECLINED
SIG DECLINED
SIG DECLINED will be displayed on both the terminal and pinpad screen. The
merchant presses CLEAR to decline the cardholder’s signature after verifying
signature with the card.
Page 72

SKYZER TECHNOLOGIES PAGE 72 OF 97
INGENICO 5100 PAYMARK VERSION 6.0 OPERATING GUIDE Version 1.3
4.11.2 Hospitality Completion Transaction
This transaction is a Purchase completion, which provides notification that the
authorised purchase has completed. By utilising this combination of
transactions, the merchant is provided with the ability to make an authorisation
for the anticipated end value that approves the validity of the card and
availability of funds.
The approval and other transaction details are stored in the memory of the
terminal for later use. Use of a parameter to recall the pre-authorised
transaction in the terminal creates a completion message without necessarily
requiring their customer to present their card again.
Step
Terminal Display
Description
1.0
HOSPITALITY
HOSPITALITYHOSPITALITY
HOSPITALITY
AAAAUTH COMP UTIL
UTH COMP UTILUTH COMP UTIL
UTH COMP UTIL
Press ENTER to scroll through the menu options until the HOSPITALITY menu
is shown on the display.
Press SAV key to select COMP.
2.0
RETRIEVE BY
RETRIEVE BYRETRIEVE BY
RETRIEVE BY
1.
1.1.
1. TRANS NUMBER
TRANS NUMBERTRANS NUMBER
TRANS NUMBER
2. CARD NUMBER
2. CARD NUMBER2. CARD NUMBER
2. CARD NUMBER
3. AUTH NUMBER
3. AUTH NUMBER3. AUTH NUMBER
3. AUTH NUMBER
4. PURCHASE AMOUNT
4. PURCHASE AMOUNT4. PURCHASE AMOUNT
4. PURCHASE AMOUNT
5. CARD SWIPE
5. CARD SWIPE5. CARD SWIPE
5. CARD SWIPE
6. TOTAL
6. TOTAL 6. TOTAL
6. TOTAL AMOUNT
AMOUNTAMOUNT
AMOUNT
Select the desired search criteria by pressing the corresponding number on the
terminal to retrieve stored hospitality transaction.
Example: 1 for TRANS NUMBER
3.0
ENTER TRANS NUM
ENTER TRANS NUMENTER TRANS NUM
ENTER TRANS NUM
Enter the transaction number which can be obtained from the receipt.
Example: 000001
4.0
TRAN XXXXXX
TRAN XXXXXX TRAN XXXXXX
TRAN XXXXXX
AUTH
AUTHAUTH
AUTH
CARD XXXXXX....XXXX
CARD XXXXXX....XXXXCARD XXXXXX....XXXX
CARD XXXXXX....XXXX
TOTAL AMT NZ$XX.XX
TOTAL AMT NZ$XX.XXTOTAL AMT NZ$XX.XX
TOTAL AMT NZ$XX.XX
REQUIRED TRANS. Y/N
REQUIRED TRANS. Y/NREQUIRED TRANS. Y/N
REQUIRED TRANS. Y/N
Details of selected transaction are displayed.
Press ENTER to print the pending transaction.
Press CLEAR to exit and return to previous screen.
NOTE: The total amount displayed will include the previously authorised amount,
plus any top-up amounts already processed for this transaction. This is to notify
the merchant that a top-up transaction was performed.
5.0
ORG AMT $XX.XX
ORG AMT $XX.XXORG AMT $XX.XX
ORG AMT $XX.XX
FINAL
FINALFINAL
FINAL AMOUNT?
AMOUNT?AMOUNT?
AMOUNT?
$0.00
$0.00$0.00
$0.00
Key in the amount to be finalised then press ENTER. This can be greater or
lesser than the authorised amount.
NOTE: If ENTER is pressed without entering the final amount, the transaction
will be finalised for zero dollars.
6.0
PROCESSING NOW
PROCESSING NOWPROCESSING NOW
PROCESSING NOW
PROCESSING NOW will be displayed on the terminal while processing the
transaction.
7.0
ACCEPTED
ACCEPTEDACCEPTED
ACCEPTED Transaction has been accepted and receipt is printed.
Page 73

SKYZER TECHNOLOGIES PAGE 73 OF 97
INGENICO 5100 PAYMARK VERSION 6.0 OPERATING GUIDE Version 1.3
4.11.3 Hospitality Utilities
There are two functions under Hospitality Utility menu as follows:
4.11.3.1 Hospitality Top-Up Authorisation
This transaction is an authorisation transaction which requests approval for Topup charges not covered in the original Hospitality authorisation transaction. The
value of the Top-up is added to the Hospitality Completion menu prompts.
Step
Terminal Display
Description
1.0
HOSPITALITY
HOSPITALITYHOSPITALITY
HOSPITALITY
AUTH COMP UTIL
AUTH COMP UTILAUTH COMP UTIL
AUTH COMP UTIL
Press ENTER to scroll through the menu options until HOSPITALITY menu is
shown on the display.
Press CR key to select UTIL.
2.0
SELECT FUNCTION
SELECT FUNCTIONSELECT FUNCTION
SELECT FUNCTION
1.
1.1.
1. TOP
TOPTOP
TOP----UP AUT
UP AUTUP AUT
UP AUTHHHH
2. EXTRA CHARGES
2. EXTRA CHARGES2. EXTRA CHARGES
2. EXTRA CHARGES
Select the desired function by pressing the corresponding number on the
terminal.
Example: 1 for Top-Up Authorisation
3.0
SWIPE OR
SWIPE OR SWIPE OR
SWIPE OR
INSERT CARD
INSERT CARDINSERT CARD
INSERT CARD
Swipe or Insert card to proceed with Top-up transaction and proceed with step
4.0 or press FUNC key to perform a Card Not Present transaction and proceed
with step 14.0
For PIN Entry and Signature Transaction
4.0
PURCHASE AMOUNT?
PURCHASE AMOUNT?PURCHASE AMOUNT?
PURCHASE AMOUNT?
$0.00
$0.00$0.00
$0.00
Enter the purchase amount.
5.0
ACCOUNT $XX.XX
ACCOUNT $XX.XXACCOUNT $XX.XX
ACCOUNT $XX.XX
CHQ SAV CR
CHQ SAV CRCHQ SAV CR
CHQ SAV CR
The terminal will prompt for account selection. Ask the cardholder to select the
account on the terminal.
Example: CR
6.0
PIN OR ENTER
PIN OR ENTERPIN OR ENTER
PIN OR ENTER
****
********
****
The terminal will prompt for the PIN entry. Ask the cardholder to key in their PIN
and proceed through step 8.0 or press ENTER to proceed with step 11.0 for
Signature.
7.0
PROCESSING NOW
PROCESSING NOWPROCESSING NOW
PROCESSING NOW
PROCESSING NOW will be displayed on the terminal while processing the
transaction.
8.0
ACCEPTED
ACCEPTEDACCEPTED
ACCEPTED
Transaction has been ACCEPTED for PIN entry and transaction receipt is
printed.
9.0
DECLINED
DECLINEDDECLINED
DECLINED
Transaction has been DECLINED for PIN entry and prints the transaction
receipts.
10.0
SIGN RECEIPT
SIGN RECEIPTSIGN RECEIPT
SIGN RECEIPT
SIGN RECEIPT will be displayed on the terminal screen. Tear the receipt off
and ask the cardholder to sign receipt.
Page 74

SKYZER TECHNOLOGIES PAGE 74 OF 97
INGENICO 5100 PAYMARK VERSION 6.0 OPERATING GUIDE Version 1.3
11.0
SIGNATURE OK? Y/N
SIGNATURE OK? Y/NSIGNATURE OK? Y/N
SIGNATURE OK? Y/N
ENTER=YES,CLR
ENTER=YES,CLRENTER=YES,CLR
ENTER=YES,CLR=NO
=NO=NO
=NO
Verify the cardholder’s signature with the signature on the back of the card. If
the signature matches:
Press ENTER to accept and proceed with step 12.0
If not, press CLEAR to decline and proceed with step 13.0
12.0
SIG ACCEPTED
SIG ACCEPTEDSIG ACCEPTED
SIG ACCEPTED
SIG ACCEPTED will be displayed on the terminal screen. The merchant presses
ENTER to accept the cardholder’s signature after verifying signature with the
card.
13.0
SIG DECLINED
SIG DECLINEDSIG DECLINED
SIG DECLINED
SIG DECLINED will be displayed on the terminal screen. The merchant presses
CLEAR to decline the cardholder’s signature after verifying signature with the
card.
For Card Not Present Transaction
14.0
CARD NUMBER:
CARD NUMBER:CARD NUMBER:
CARD NUMBER:
XXXXXXXXXXXXXXXXX
XXXXXXXXXXXXXXXXXXXXXXXXXXXXXXXXXX
XXXXXXXXXXXXXXXXX
Terminal will then prompt for the card number to be manually entered.
Key in the card number and press ENTER.
15.0
EXPIRY <MMYY>:
EXPIRY <MMYY>:EXPIRY <MMYY>:
EXPIRY <MMYY>:
XXXX
XXXXXXXX
XXXX
Enter the expiry date as shown on card. Ensure that numbers are in month/year
format.
Key in expiry date and press ENTER.
16.0
CSC ON CARD Y/N
CSC ON CARD Y/NCSC ON CARD Y/N
CSC ON CARD Y/N
Terminal will prompt whether card has a CSC (Card Security Code = a 3-4 digit
number on back of card.)
Press ENTER to key in the Card Security Code number and proceed with step
6.0.
Press CLEAR to select ‘NO’ and proceed with step 7.0.
17.0
ENTER CSC CODE
ENTER CSC CODEENTER CSC CODE
ENTER CSC CODE
If YES is selected, key in the CSC code as it appears on the back of the card and
press ENTER.
18.0
SELECT REASON
SELECT REASONSELECT REASON
SELECT REASON
1. NOT ON CARD
1. NOT ON CARD1. NOT ON CARD
1. NOT ON CARD
2. CANNOT READ
2. CANNOT READ2. CANNOT READ
2. CANNOT READ
3. CUST ADVISED
3. CUST ADVISED3. CUST ADVISED
3. CUST ADVISED
If NO is selected, choose the appropriate reason by pressing the corresponding
number key.
19.0
PURCHASE AMOUNT?
PURCHASE AMOUNT?PURCHASE AMOUNT?
PURCHASE AMOUNT?
$0.00
$0.00$0.00
$0.00
Terminal will prompt for Purchase Amount
Enter the purchase amount and press ENTER.
20.0
CASH OUT
CASH OUTCASH OUT
CASH OUT AMOUNT?
AMOUNT?AMOUNT?
AMOUNT?
$0.00
$0.00$0.00
$0.00
Only applicable if the CASH OUT is turned on.
Press ENTER to bypass “CASH OUT”
21.0
SELECT TYPE
SELECT TYPESELECT TYPE
SELECT TYPE
1. MOTO
1. MOTO1. MOTO
1. MOTO
2. UNSECURE ECOM
2. UNSECURE ECOM2. UNSECURE ECOM
2. UNSECURE ECOM
Select the Transaction Type by pressing the corresponding number key:
1. MOTO (Mail order Telephone Order)
2. Unsecure ECOM (Electronic Commerce .e.g. Internet)
If 1 is pressed, then follow through to step 22.0.
If 2 is pressed, then follow through to step 23.0
Page 75

SKYZER TECHNOLOGIES PAGE 75 OF 97
INGENICO 5100 PAYMARK VERSION 6.0 OPERATING GUIDE Version 1.3
22.0
1. SINGLE
1. SINGLE1. SINGLE
1. SINGLE
2. RECURRIN
2. RECURRIN2. RECURRIN
2. RECURRINGGGG
3. INSTALLMENT
3. INSTALLMENT3. INSTALLMENT
3. INSTALLMENT
4. UNKNOWN
4. UNKNOWN4. UNKNOWN
4. UNKNOWN
Select option by pressing the corresponding number key:
1. SINGLE
2. RECURRING
3. INSTALLMENT
4. UNKNOWN
23.0
ACCOUNT $XX.XX
ACCOUNT $XX.XXACCOUNT $XX.XX
ACCOUNT $XX.XX
CHQ SAV CR
CHQ SAV CRCHQ SAV CR
CHQ SAV CR
The terminal will prompt for account selection. Select the CR account on the
terminal.
24.0
PROCESSING NOW
PROCESSING NOWPROCESSING NOW
PROCESSING NOW
PROCESSING NOW will be displayed on the terminal. Terminal will now
automatically connect to the Host and complete the transaction.
25.0
ACCEPTED
ACCEPTEDACCEPTED
ACCEPTED
Transaction has been ACCEPTED and prints the transaction receipt.
26.0
DECLINED
DECLINEDDECLINED
DECLINED
Transaction has been DECLINED and prints the transaction receipt.
Page 76

SKYZER TECHNOLOGIES PAGE 76 OF 97
INGENICO 5100 PAYMARK VERSION 6.0 OPERATING GUIDE Version 1.3
4.11.3.2 Hospitality Extra Charges Transaction
This is a financial transaction to pay for goods and/or services, identified after
the customer has departed.
The “Extra Charges” transaction is performed by manually entering the Primary
Account Number (PAN).
Step
Terminal Display
Description
1.0
HOSPITALITY
HOSPITALITYHOSPITALITY
HOSPITALITY
AUTH COMP UTIL
AUTH COMP UTILAUTH COMP UTIL
AUTH COMP UTIL
Press ENTER to scroll through the menu options until HOSPITALITY menu is
shown on the display.
Press CR key to select UTIL.
2.0
SELECT FUNCTION
SELECT FUNCTIONSELECT FUNCTION
SELECT FUNCTION
1.
1.1.
1. TOP
TOPTOP
TOP----UP AUTH
UP AUTHUP AUTH
UP AUTH
2. EXTRA CHARGES
2. EXTRA CHARGES2. EXTRA CHARGES
2. EXTRA CHARGES
Select the desired function by pressing the corresponding number on the
terminal.
Example: 2 for EXTRA CHARGES
3.0
CARD NUMBER:
CARD NUMBER:CARD NUMBER:
CARD NUMBER:
XXXXXXXXXXXXXXXXX
XXXXXXXXXXXXXXXXXXXXXXXXXXXXXXXXXX
XXXXXXXXXXXXXXXXX
Terminal will then prompt for the card number to be manually entered.
When the card number has been entered, press ENTER.
4.0
EXPIRY <MMYY>:
EXPIRY <MMYY>:EXPIRY <MMYY>:
EXPIRY <MMYY>:
XXXX
XXXXXXXX
XXXX
Enter the expiry date as shown on card. Ensure that numbers are in month/year
format and press ENTER
5.0
CSC ON CARD Y/N
CSC ON CARD Y/NCSC ON CARD Y/N
CSC ON CARD Y/N
Terminal will prompt whether card has a CSC (Card Security Code = a 3-4 digit
number on back of card.)
Press ENTER to key in the Card Security Code number and proceed with step
6.0.
Press CLEAR to select ‘NO’ and proceed with step 7.0.
6.0
ENTER CSC CODE
ENTER CSC CODEENTER CSC CODE
ENTER CSC CODE
If YES is selected, key in the CSC code as it appears on the back of the card and
press ENTER.
7.0
SELECT REASON
SELECT REASONSELECT REASON
SELECT REASON
1. NOT ON CARD
1. NOT ON CARD1. NOT ON CARD
1. NOT ON CARD
2. CANNOT READ
2. CANNOT READ2. CANNOT READ
2. CANNOT READ
3. CUST ADVISED
3. CUST ADVISED3. CUST ADVISED
3. CUST ADVISED
If NO is selected, choose the appropriate reason by pressing the corresponding
number key.
8.0
SELECT TYPE
SELECT TYPESELECT TYPE
SELECT TYPE
1. MOTO
1. MOTO1. MOTO
1. MOTO
2. UNSECURE ECOM
2. UNSECURE ECOM2. UNSECURE ECOM
2. UNSECURE ECOM
Select the type of transaction to be made by pressing the corresponding number
key.
1. MOTO (Mail Order Telephone Order)
2. Unsecure ECOM (Electronic Commerce .e.g. Internet)
If 1 is pressed, then follow through step 8.0.
If 2 is pressed, then follow through step 9.0
Page 77

SKYZER TECHNOLOGIES PAGE 77 OF 97
INGENICO 5100 PAYMARK VERSION 6.0 OPERATING GUIDE Version 1.3
9.0
1. SINGLE
1. SINGLE1. SINGLE
1. SINGLE
2. RECURRING
2. RECURRING2. RECURRING
2. RECURRING
3. INSTALLMENT
3. INSTALLMENT3. INSTALLMENT
3. INSTALLMENT
4. UNKNOWN
4. UNKNOWN4. UNKNOWN
4. UNKNOWN
Select option by pressing the corresponding number on the terminal.
10.0
PURCHASE AMOUNT?
PURCHASE AMOUNT?PURCHASE AMOUNT?
PURCHASE AMOUNT?
$0.00
$0.00$0.00
$0.00
Enter the purchase amount and press ENTER.
11.0
AWAITING ACCOUNT
AWAITING ACCOUNTAWAITING ACCOUNT
AWAITING ACCOUNT
The terminal waits on the account selection on the pinpad.
12.0
ACCOUNT $XX.XX
ACCOUNT $XX.XXACCOUNT $XX.XX
ACCOUNT $XX.XX
CHQ SAV CR
CHQ SAV CRCHQ SAV CR
CHQ SAV CR
The pinpad will prompt for account selection. Select the CR account on the
pinpad.
13.0
PROCESSIN
PROCESSINPROCESSIN
PROCESSING NOW
G NOWG NOW
G NOW
PROCESSING NOW will be displayed on the terminal and pinpad while
processing the transaction.
14.0
ACCEPTED
ACCEPTEDACCEPTED
ACCEPTED
Transaction has been ACCEPTED and transaction receipt is printed.
15.0
DECLINED
DECLINEDDECLINED
DECLINED
Transaction has been DECLINED and transaction receipt is printed.
Page 78

SKYZER TECHNOLOGIES PAGE 78 OF 97
INGENICO 5100 PAYMARK VERSION 6.0 OPERATING GUIDE Version 1.3
4.12 CHEQUE VERIFICATION AUTHORISATION
A Cheque Verification transaction allows the merchant to authorise a cheque,
to verify that the cheque is valid for cheque payments.
NOTE: This function must first be activated by request through the company
called TeleCheck.
Step
Terminal Display
Description
1.0
ETSL EFTPOS
ETSL EFTPOSETSL EFTPOS
ETSL EFTPOS
CHQ
CHQCHQ
CHQ
Select desired transaction.
Example: Press CHQ key to select a Cheque Verification transaction.
2.0
CHQ SERIAL # ?
CHQ SERIAL # ?CHQ SERIAL # ?
CHQ SERIAL # ?
XXXXXX
XXXXXXXXXXXX
XXXXXX
Key in the cheque serial number and press ENTER
3.0
CHQ BRANCH # ?
CHQ BRANCH # ?CHQ BRANCH # ?
CHQ BRANCH # ?
XXXXXX
XXXXXXXXXXXX
XXXXXX
Key in the cheque branch number and press ENTER
4.0
CHQ ACCOUNT # ?
CHQ ACCOUNT # ?CHQ ACCOUNT # ?
CHQ ACCOUNT # ?
XXXXXX
XXXXXXXXXXXX
XXXXXX
Key in the cheque account number and press ENTER
5.0
PURCHASE AMOUNT?
PURCHASE AMOUNT?PURCHASE AMOUNT?
PURCHASE AMOUNT?
$0.00
$0.00$0.00
$0.00
Enter the purchase amount and press ENTER
6.0
PROCESSIN
PROCESSINPROCESSIN
PROCESSING NOW
G NOWG NOW
G NOW
PROCESSING NOW will be displayed on the terminal and pinpad while
communicating with the host and the transaction is being processed.
7.0
ACCEPTED XXXXXX
ACCEPTED XXXXXXACCEPTED XXXXXX
ACCEPTED XXXXXX
PRESS ENTER
PRESS ENTERPRESS ENTER
PRESS ENTER
If the transaction is accepted then the terminal and pinpad will display ACCEPTED
followed by the authorization ID number.
NOTE: The terminal beeps and requires the merchant to press ENTER for the
completion of the transaction and returns to idle screen.
8.0
DECLINED XXXXXX
DECLINED XXXXXXDECLINED XXXXXX
DECLINED XXXXXX
PRESS ENTER
PRESS ENTERPRESS ENTER
PRESS ENTER
If the transaction is declined then the terminal and pinpad will display DECLINED
followed by the authorization ID number.
NOTE: The terminal beeps and requires the merchant to press ENTER for the
completion of the transaction and returns to idle screen.
NOTE: There is no receipt printed for this transaction since the only requirement
is for the merchant to obtain approval for the cheque. The response message
stays on the display until the merchant presses ENTER.
Page 79

SKYZER TECHNOLOGIES PAGE 79 OF 97
INGENICO 5100 PAYMARK VERSION 6.0 OPERATING GUIDE Version 1.3
4.13 MERCHANT ADMINISTRATION FUNCTIONS
The following standard merchant administration functions are available:
NOTE: When set up as a multi-merchant device, the terminal will first prompt for
the selection of the particular merchant for each of the administration
functions above.
4.13.1 Terminal Totals
This function allows the merchant to determine the total count and amount of
all accepted transactions supported by the terminal since the totals where last
reset by the merchant.
Step
Terminal Display
Description
1.0
ADMIN
ADMINADMIN
ADMIN
TOTL INQ CUT
TOTL INQ CUTTOTL INQ CUT
TOTL INQ CUT
Press ENTER until the ADMIN menu is shown on the display.
Press CHQ key to select TOTL.
2.0
1 Merchant 1
1 Merchant 11 Merchant 1
1 Merchant 1
2 Merchant 2
2 Merchant 22 Merchant 2
2 Merchant 2
3 Merchant 3
3 Merchant 33 Merchant 3
3 Merchant 3
Only applicable with Multi-Merchant setup.
Select the corresponding number on the terminal to select the Merchant followed by
ENTER.
3.0
PRINTING
PRINTINGPRINTING
PRINTING
Totals will be printed immediately.
4.0
RESET TOTALS?
RESET TOTALS?RESET TOTALS?
RESET TOTALS?
ENTER=YES, CLR=NO
ENTER=YES, CLR=NOENTER=YES, CLR=NO
ENTER=YES, CLR=NO
The user will be prompted whether the totals should be reset.
- If yes is selected, the terminal will return to idle and totals will have been reset. (To
check this, repeat steps 1-2. Totals should all appear as $0.00 on the printout.)
- If no is selected, terminal will return to idle without resetting the totals. (To check
this, repeat steps 1-2. Totals should remain the same.)
Page 80

SKYZER TECHNOLOGIES PAGE 80 OF 97
INGENICO 5100 PAYMARK VERSION 6.0 OPERATING GUIDE Version 1.3
4.13.2 Settlement Inquiry
This function is used by the merchant to retrieve either the current subtotals or
historical settlement information from Paymark.
NOTE: Settlement inquiry data can be retrieved retrospectively to a maximum
of 14 days.
Step
Terminal Display
Description
1.0
ADMIN
ADMINADMIN
ADMIN
TOTL INQ CUT
TOTL INQ CUTTOTL INQ CUT
TOTL INQ CUT
Press ENTER until ADMIN menu is shown on the display.
Press SAV key to select INQ.
2.0
1 Merchant 1
1 Merchant 11 Merchant 1
1 Merchant 1
2 Merchant 2
2 Merchant 22 Merchant 2
2 Merchant 2
3 Merchant 3
3 Merchant 33 Merchant 3
3 Merchant 3
Only applicable with Multi-Merchant setup.
Select the corresponding number on the terminal to select the Merchant followed by
ENTER.
3.0
SE
SESE
SELECT OPTION
LECT OPTIONLECT OPTION
LECT OPTION
XX/XX OTHER
XX/XX OTHERXX/XX OTHER
XX/XX OTHER
- Press CHQ to initiate a settlement inquiry for the current settlement period (date
will be shown). Proceed with step 4.0.
- Press CR to enter a date for a different settlement period. Proceed with step 4.1
3.1
DATE
DATE DATE
DATE –––– DD
DDDD
DDMMYYYY
MMYYYYMMYYYY
MMYYYY
XX/XX/XXXX
XX/XX/XXXXXX/XX/XXXX
XX/XX/XXXX
Enter date for which you would like to make a settlement inquiry, ensuring that date
is entered in DDMMYYYY format. Press ENTER when correct date has been entered,
CLEAR if you wish to re-enter date, CANCEL if you wish to cancel settlement
inquiry.
4.0
PROCESSING NOW
PROCESSING NOWPROCESSING NOW
PROCESSING NOW
PROCESSING NOW will be displayed on the terminal while processing to retrieve
the transaction.
NOTE: Terminal will prompt for any stored Tip Transactions and/or Electronic Offline
Voucher to be transmitted. Press ENTER to transmit or press CLEAR to proceed with
settlement cutover.
5.0
TRANS. COMPLETE
TRANS. COMPLETETRANS. COMPLETE
TRANS. COMPLETE
Settlement inquiry record is printed.
NOTE: Any stored Tipping, EOV offline and/or Contactless transactions, will be
prompted to upload when Settlement Inquiry is performed. To upload these
stored transactions at that time, press ENTER or CLEAR to cancel upload and
proceed with Settlement Inquiry.
Page 81

SKYZER TECHNOLOGIES PAGE 81 OF 97
INGENICO 5100 PAYMARK VERSION 6.0 OPERATING GUIDE Version 1.3
4.13.3 Settlement Cutover
This function allows the merchant to settle the current settlement period and to
cut over to a new settlement period. This can only be performed successfully
when the terminal is within the ‘settlement window’ defined by Paymark for the
particular merchant and terminal.
Step
Terminal Display
Description
1.0
ADMIN
ADMINADMIN
ADMIN
TOTL INQ CUT
TOTL INQ CUTTOTL INQ CUT
TOTL INQ CUT
Press ENTER until ADMIN menu is shown on the display.
Press CR key to select CUT.
2.0
1 Merchant 1
1 Merchant 11 Merchant 1
1 Merchant 1
2 Merchant 2
2 Merchant 22 Merchant 2
2 Merchant 2
3 Merchant 3
3 Merchant 33 Merchant 3
3 Merchant 3
Only applicable with Multi-Merchant setup.
Select the corresponding number on the terminal to select the Merchant followed by
ENTER.
3.0
CUTOV
CUTOVCUTOV
CUTOVER NOW?
ER NOW?ER NOW?
ER NOW?
ENTER=YES, CLR=NO
ENTER=YES, CLR=NOENTER=YES, CLR=NO
ENTER=YES, CLR=NO
Press ENTER to initiate a settlement cutover or CLEAR to cancel and return to the
previous state.
NOTE: Terminal will prompt for any stored Tip Transactions and/or Electronic Offline
Voucher to be transmitted. Press ENTER to transmit or press CLEAR to proceed with
settlement cutover.
4.0
PROCESSING NOW
PROCESSING NOWPROCESSING NOW
PROCESSING NOW
PROCESSING NOW will be displayed on the terminal while processing the
transaction.
5.0
TRANS. COMPLETE
TRANS. COMPLETETRANS. COMPLETE
TRANS. COMPLETE
Settlement cutover record is printed.
NOTE: Any stored Tipping, EOV offline and/or Contactless transactions, will be
prompted to upload when Settlement Cutover is performed. To upload these
stored transactions at that time, press ENTER or CLEAR to cancel upload and
proceed with Settlement Cutover.
Page 82

SKYZER TECHNOLOGIES PAGE 82 OF 97
INGENICO 5100 PAYMARK VERSION 6.0 OPERATING GUIDE Version 1.3
4.14 DUPLICATE RECEIPT
This function causes the terminal to print a duplicate of the receipt generated
as a result of the last cardholder transaction. This function is used if the original
receipt is damaged or illegible. A financial transaction reprint receipt should
still be available after a non-financial transaction is completed or after a
second or subsequent acquirer transaction.
Step
Terminal Display
Description
1.0
SUPERVISOR
SUPERVISORSUPERVISOR
SUPERVISOR
XTRA INIT DUPL
XTRA INIT DUPLXTRA INIT DUPL
XTRA INIT DUPL
Press ENTER until SUPERVISOR menu is shown on the display.
Press CR key to select DUPL.
2.0
1 Merchant 1
1 Merchant 11 Merchant 1
1 Merchant 1
2 Merchant 2
2 Merchant 22 Merchant 2
2 Merchant 2
3 Merchant 3
3 Merchant 33 Merchant 3
3 Merchant 3
Only applicable with Multi-Merchant setup.
Select the corresponding number on the terminal to select the Merchant followed by
ENTER.
3.0
PRINTING
PRINTINGPRINTING
PRINTING
Prints the last cardholder transaction.
Page 83

SKYZER TECHNOLOGIES PAGE 83 OF 97
INGENICO 5100 PAYMARK VERSION 6.0 OPERATING GUIDE Version 1.3
4.15 ELECTRONIC OFFLINE VOUCHERS (EOV)
This function allows the terminal to accept offline transactions in the event of a
communications failure with Paymark or the banking network.
Only Purchase transactions can be accepted in EOV mode. A pre-set limit is in
place for both the number of transactions accepted per card and the amount
of the purchase.
All the transaction details are held on the terminal until connectivity with
Paymark has been restored, at which time all EOV transactions will be
uploaded to the Paymark network. During the course of the upload, a receipt
will automatically be printed for any stored transactions that are declined.
This function is only available where a merchant has bank approval to accept
EOV transactions.
The following notes relate to the operation to the terminal’s EOV operation:
• Both debit and credit cards can be used for purchase transactions in EOV
mode.
• A pre-set limit is in place for both the number of transactions accepted per
card and the purchase amount.
• ‘EFTPOS OFFLINE’ is displayed on the screen of the i5100 if an i3010 pinpad is
attached.
• If the terminal is a multi-merchant IPP unit, ‘EFTPOS OFFLINE’ will be
displayed on screen at the Merchant selection prompt and the PAYMARK
EFTPOS menu prompt will be changed to EFTPOS OFFLINE to indicate
terminal is in the EOV mode.
• Purchase transactions are held in the memory of the terminal until
connectivity with the host has been restored.
• The terminal will attempt a logon every ten minutes to check the network
status, alternatively a manual log on can be performed by the merchant.
• For all transactions processed in EOV mode, the cardholder will be
prompted to sign the merchant copy of the receipt.
• If a transaction other than a Purchase is attempted whilst in EOV mode, the
terminal will respond with the error message: “INVALID OFFLINE
TRANSACTION”.
Page 84

SKYZER TECHNOLOGIES PAGE 84 OF 97
INGENICO 5100 PAYMARK VERSION 6.0 OPERATING GUIDE Version 1.3
4.15.1.1 Notification of EOV Mode
When a terminal receives two consecutive network errors, such as Transmission
Error, System Faults or Failed to clear a pending transaction, the terminal will
then prompt “PROCESS TRANSACTION OFFLINE? Y/N” If YES/ENTER is selected,
the terminal will then go into EOV mode and process the failed transaction in
offline mode and is stored in the terminal memory. Any subsequent
transactions executed will be stored in the terminal memory as an EOV
transaction. If NO/CLEAR is selected, the terminal will go into EOV mode
without processing the failed transaction. All the transaction executed in EOV
mode will always require Signature.
NOTE: Whether terminal operating over Dial up/Broadband will only go into
EOV mode in the event of communication failure with Paymark network. If the
terminal phone line/Ethernet cable is unplugged or cut, the terminal will not go
into EOV mode due to fraud reasons.
4.15.1.2 Upload Electronic/Contactless Offline Transactions
This function allows the merchant to manually upload any
electronic/contactless offline transactions stored on the terminal to Paymark
network.
NOTE: A merchant must have bank approval to be able to accept EOV
transactions.
Once the terminal has re-established connectivity to Paymark network, it will
then start to upload the stored EOV offline transaction in batches of five with
two minutes interval until all has been uploaded to Paymark network.
Step
Terminal Di
splay
Description
1.0
Press FUNC.
2.0
FUNCTION?
FUNCTION?FUNCTION?
FUNCTION?
Enter 88 and press ENTER.
3.0
PROCESSING NOW
PROCESSING NOWPROCESSING NOW
PROCESSING NOW
X OF XX
X OF XXX OF XX
X OF XX
The terminal starts to upload the stored offline transactions which were stored on
the terminal.
Page 85

SKYZER TECHNOLOGIES PAGE 85 OF 97
INGENICO 5100 PAYMARK VERSION 6.0 OPERATING GUIDE Version 1.3
5 ADMINISTRATION
5.1 PASSWORDS
The following passwords are used for configuration and testing:
DESCRIPTION
PASSWORD PAGE NUMBER
EFTPOS Configuration 3824 26
Multi-Merchant Configuration 7418 33
Master Memory Reset 7418 and then 8 34
Contactless Configuration 7418 and then 7 37
Single Merchant Memory Reset
Configuration
9902 38
Remote Key Injection Configuration 7418 and then 5 39
Remote Key Injection Initialisation 87 and then
6987
41
Enable/Disable Terminal Functions 7415 42
Configure Receipt Header and Footer 3825 44
Restart Terminal 86 46
Upload Electronic Offline Voucher or
Contactless Offline Transactions
88 84
Diagnostics 9904 86
Extra Terminal Functions 89
Training Mode 9999 92
Page 86

SKYZER TECHNOLOGIES PAGE 86 OF 97
INGENICO 5100 PAYMARK VERSION 6.0 OPERATING GUIDE Version 1.3
5.2 DIAGNOSTICS
This function allows the merchant to perform diagnostic functions to aid in the
maintenance of the terminal.
Step
Terminal Display
Description
1.0
Press FUNC.
2.0
FUNCTION?
FUNCTION?FUNCTION?
FUNCTION?
Enter 9904, press ENTER.
3.0
SELF TEST?
SELF TEST?SELF TEST?
SELF TEST?
ENTER OR CLEAR
ENTER OR CLEARENTER OR CLEAR
ENTER OR CLEAR
Press ENTER to continue with the self test CLEAR to cancel and return to idle
prompt.
4.0
CARD READ TES
CARD READ TESCARD READ TES
CARD READ TEST?
T?T?
T?
ENTER OR CLEAR
ENTER OR CLEARENTER OR CLEAR
ENTER OR CLEAR
Press ENTER to start CARD READ TEST, CLEAR to bypass CARD READ TEST
or CANCEL to cancel and return to idle prompt.
4.1
SWIPE CARD
SWIPE CARDSWIPE CARD
SWIPE CARD
Swipe a magnetic stripe card through the magnetic stripe card reader. Press
ENTER or CLEAR to go to chip read test.
4.2
GOOD CARD READ
GOOD CARD READGOOD CARD READ
GOOD CARD READ
Displays if the terminal is successful to read the magnetic stripe data.
4.3
BAD CARD READ
BAD CARD READBAD CARD READ
BAD CARD READ
Displays if the terminal is unable to read the magnetic stripe data.
5.0
CHIP READ TEST?
CHIP READ TEST?CHIP READ TEST?
CHIP READ TEST?
ENTER OR CLEAR
ENTER OR CLEARENTER OR CLEAR
ENTER OR CLEAR
Press ENTER to start CHIP READ TEST, CLEAR to bypass CHIP READ TEST or
CANCEL to cancel and return to idle prompt.
5.1
INSERT CARD
INSERT CARDINSERT CARD
INSERT CARD
Insert the chip card into the chip card reader slot in the terminal. Press ENTER or
CLEAR to go to keyboard test.
5.2
CARD OK
CARD OKCARD OK
CARD OK
Displays if the terminal is successful to read the chip card contact.
5.3
CARD IS MUTE
CARD IS MUTECARD IS MUTE
CARD IS MUTE
Displays if the terminal is unable to read the chip card contact.
5.4
REMOVE CARD
REMOVE CARDREMOVE CARD
REMOVE CARD
Remove card from the chip card reader slot.
Page 87

SKYZER TECHNOLOGIES PAGE 87 OF 97
INGENICO 5100 PAYMARK VERSION 6.0 OPERATING GUIDE Version 1.3
6.0
KEYBOARD TEST?
KEYBOARD TEST?KEYBOARD TEST?
KEYBOARD TEST?
ENTER OR CLEAR
ENTER OR CLEARENTER OR CLEAR
ENTER OR CLEAR
Press ENTER to start KEYBOARD TEST, CLEAR bypass KEYBOARD TEST or
CANCEL to cancel the function and return to idle prompt.
6.1
CLEAR TO EXIT
CLEAR TO EXITCLEAR TO EXIT
CLEAR TO EXIT
ENTER OR CLEAR
ENTER OR CLEARENTER OR CLEAR
ENTER OR CLEAR
Press ENTER to perform keyboard test or CLEAR to exit and perform display test.
6.2
XXXXXX
XXXXXXXXXXXX
XXXXXX
The terminal echoes the keys as the merchant presses them on the terminal. If
CLEAR or CANCEL is pressed the terminal exits the keyboard test.
7.0
DISPLAY TEST?
DISPLAY TEST?DISPLAY TEST?
DISPLAY TEST?
ENTER OR CLEAR
ENTER OR CLEARENTER OR CLEAR
ENTER OR CLEAR
Press ENTER to perform a display test, CLEAR to bypass the display test,
CANCEL to cancel the function and return to idle prompt.
7.1
█ █ █ █ █ █ █ █ █ █ █
█ █ █ █ █ █ █ █ █ █ █
Screen should display this during display test. Press ENTER or CLEAR to go onto
next test, CANCEL to return to idle prompt.
8.0
PRINTER TEST?
PRINTER TEST?PRINTER TEST?
PRINTER TEST?
ENTER OR CLEAR
ENTER OR CLEARENTER OR CLEAR
ENTER OR CLEAR
Press ENTER to perform PRINTER TEST, CLEAR to bypass PRINTER TEST or
CANCEL to cancel the function and return to idle prompt.
8.1
PRINTING
PRINTINGPRINTING
PRINTING
Terminal will print a test receipt immediately when ENTER key is pressed.
9.0
PINPAD
PINPADPINPAD
PINPAD TEST?
TEST?TEST?
TEST?
ENTER OR CLEAR
ENTER OR CLEARENTER OR CLEAR
ENTER OR CLEAR
Press ENTER to start PINPAD TEST, CLEAR to bypass PINPAD TEST or
CANCEL to cancel the function and return to idle prompt.
9.1
LISTEN FOR
LISTEN FOR LISTEN FOR
LISTEN FOR
PINPAD
PINPADPINPAD
PINPAD BUZZER
BUZZERBUZZER
BUZZER
Continuous beep sound will activate on the pinpad for few seconds.
9.2
BUZZER OK?
BUZZER OK?BUZZER OK?
BUZZER OK?
ENTER OR CLEAR
ENTER OR CLEARENTER OR CLEAR
ENTER OR CLEAR
Press ENTER if the buzzer test passed or CLEAR if failed.
10.0
KEYBOARD TEST?
KEYBOARD TEST?KEYBOARD TEST?
KEYBOARD TEST?
ENTER OR CLEAR
ENTER OR CLEARENTER OR CLEAR
ENTER OR CLEAR
Press ENTER to start KEYBOARD TEST for pinpad, CLEAR to bypass
KEYBOARD TEST or CANCEL to cancel the function and go to COMMS TEST.
10.1
LOOK AT
LOOK ATLOOK AT
LOOK AT
PINPAD
PINPADPINPAD
PINPAD DISPLAY
DISPLAYDISPLAY
DISPLAY
Displays on the terminal to advise the merchant to look at the pinpad display to
proceed with the keyboard test.
10.2
CLR TO EXIT
CLR TO EXITCLR TO EXIT
CLR TO EXIT
ENTER OR CLEAR
ENTER OR CLEARENTER OR CLEAR
ENTER OR CLEAR
Press ENTER to perform a keyboard test or CLEAR to go the display test.
11.0
DISPLAY TEST?
DISPLAY TEST?DISPLAY TEST?
DISPLAY TEST?
ENTER OR CLEAR
ENTER OR CLEARENTER OR CLEAR
ENTER OR CLEAR
Press ENTER to perform a display test, CLEAR to bypass the display test,
CANCEL to cancel the function and go to COMMS TEST.
11.1
█ █ █ █ █ █ █ █ █ █ █
█ █ █ █ █ █ █ █ █ █ █
Screen should display this during display test. Press ENTER or CLEAR to go onto
next test.
Page 88

SKYZER TECHNOLOGIES PAGE 88 OF 97
INGENICO 5100 PAYMARK VERSION 6.0 OPERATING GUIDE Version 1.3
12.0
COMMS TEST?
COMMS TEST?COMMS TEST?
COMMS TEST?
ENTER OR CLEA
ENTER OR CLEAENTER OR CLEA
ENTER OR CLEARRRR
ENTER to start COMMS TEST, CLEAR to bypass COMMS TEST or CANCEL to
cancel the function and return to idle prompt.
12.1
PROCESSING NOW
PROCESSING NOWPROCESSING NOW
PROCESSING NOW
If COMMS test is performed, terminal screen will display PROCESSING NOW
and then will return with response.
12.2
ACCEPTED
ACCEPTEDACCEPTED
ACCEPTED
PRESS ENTER
PRESS ENTERPRESS ENTER
PRESS ENTER
Terminal screen will display ACCEPTED if COMMS test is successful. Press
ENTER.
13.0
IP PING TEST?
IP PING TEST?IP PING TEST?
IP PING TEST?
ENTER OR CLEAR
ENTER OR CLEARENTER OR CLEAR
ENTER OR CLEAR
Press ENTER to start IP PING TEST, CLEAR to bypass IP PING TEST or
CANCEL to cancel the function and return to idle prompt.
13.1
PING TEST
PING TESTPING TEST
PING TEST
PASSED
PASSEDPASSED
PASSED
PRESS ENTER
PRESS ENTERPRESS ENTER
PRESS ENTER
Terminal screen will display PASSED if the IP ping test is successful. Press
ENTER.
13.2
PING TEST
PING TESTPING TEST
PING TEST
FAILED
FAILEDFAILED
FAILED
PRESS ENTER
PRESS ENTERPRESS ENTER
PRESS ENTER
Terminal screen will display FAILED if the IP ping test is unsuccessful. Press
ENTER.
14.0
CTL READER TEST?
CTL READER TEST?CTL READER TEST?
CTL READER TEST?
ENTER OR CLEAR
ENTER OR CLEARENTER OR CLEAR
ENTER OR CLEAR
Press ENTER to start CTL READER TEST, CLEAR to bypass CTL READER TEST
or CANCEL to cancel the function and return to idle prompt.
14.1
CHECK READER
CHECK READERCHECK READER
CHECK READER
DISPLAY, LED’S
DISPLAY, LED’SDISPLAY, LED’S
DISPLAY, LED’S
AND BUZZER
AND BUZZERAND BUZZER
AND BUZZER
Terminal will prompt to check the reader display, LED’s and buzzer to verify if
everything is operational.
14.2
*****************
**********************************
*****************
#################
##################################
#################
!!!!!!!!!!!!!!!!!
!!!!!!!!!!!!!!!!!!!!!!!!!!!!!!!!!!
!!!!!!!!!!!!!!!!!
$$$$$$$$$$$$$$$$$
$$$$$$$$$$$$$$$$$$$$$$$$$$$$$$$$$$
$$$$$$$$$$$$$$$$$
On the contactless reader end, the following characters will be displayed on the
screen, the buzzer will be activated for few seconds and the LED’s on front and
back panel will go on.
Page 89

SKYZER TECHNOLOGIES PAGE 89 OF 97
INGENICO 5100 PAYMARK VERSION 6.0 OPERATING GUIDE Version 1.3
5.3 EXTRA TERMINAL FUNCTIONS
The terminal provides extra terminal functions which are accessible from the
Supervisor menu.
5.3.1 Xtra
Step
Terminal Display
Description
1.0
SUPERVISOR
SUPERVISORSUPERVISOR
SUPERVISOR
XTRA
XTRAXTRA
XTRA
INIT DUPL
INIT DUPLINIT DUPL
INIT DUPL
Press ENTER until SUPERVISOR menu is shown on the display.
Press CHQ key to select XTRA.
2.0
1 Merchant 1
1 Merchant 11 Merchant 1
1 Merchant 1
2 Merchant 2
2 Merchant 22 Merchant 2
2 Merchant 2
3 Merchant 3
3 Merchant 33 Merchant 3
3 Merchant 3
Only applicable with Multi-Merchant setup.
Select the corresponding number on the terminal to select the Merchant followed by
ENTER.
3.0
TERMINAL
TERMINALTERMINAL
TERMINAL
FUNCTIONS
FUNCTIONSFUNCTIONS
FUNCTIONS
Select desired function from option table listed below by pressing the corresponding
number key to activate chosen option.
Example: To print stored transactions totals, press 0 key
NOTE: Upon completion of desired function, terminal will return to idle screen.
Repeat steps 1-3 if required.
Press #
Terminal Display
Description
PRESS 0: Print Stored Transaction Totals
PRINTING
PRINTINGPRINTING
PRINTING
Terminal will display PRINTING and will print a record of all stored transactions
awaiting transmission in the terminal.
PRESS 1: Terminal Restart
RESTART
RESTARTRESTART
RESTART
TERMINAL?
TERMINAL?TERMINAL?
TERMINAL?
Press ENTER to restart the terminal CANCEL to return to idle prompt.
If ENTER key is pressed, terminal will restart and soon return to idle prompt.
PRESS 2: Display KVC and print Terminal Configuration
PRINTING
PRINTINGPRINTING
PRINTING
Terminal will display KVC and prompt to PRINT CONFIG Y/N.
Press ENTER to print off the terminal configuration report or CLEAR to exit and
return to idle screen.
PRESS 3: Print EMV or CTL Public Keys
PRINT
PRINTPRINT
PRINT
1. EMV PUBLIC KEYS
1. EMV PUBLIC KEYS1. EMV PUBLIC KEYS
1. EMV PUBLIC KEYS
2. CTL PUBLIC KEYS
2. CTL PUBLIC KEYS2. CTL PUBLIC KEYS
2. CTL PUBLIC KEYS
Press 1 to print off the EMV public keys or 2 to print off the CTL public keys.
Page 90

SKYZER TECHNOLOGIES PAGE 90 OF 97
INGENICO 5100 PAYMARK VERSION 6.0 OPERATING GUIDE Version 1.3
PRINTING
PRINTINGPRINTING
PRINTING
Displays while printing the check sum value of all EMV or CTL public keys stored
within the terminal. If the terminal has no stored EMV public keys then it will display
“NO PUBLIC KEYS” and “NO CTL KEYS” if no stored CTL public keys.
PRESS 4: Print EMV Enable Applications or CTL Configurations
PRINT
PRINTPRINT
PRINT
1. EMV APPS
1. EMV APPS1. EMV APPS
1. EMV APPS
2. CTL CONFIG
2. CTL CONFIG2. CTL CONFIG
2. CTL CONFIG
Press 1 to print off the current enabled EMV Application Identifiers (AIDs) or 2 to
print off the CTL configuration records.
PRINTING
PRINTINGPRINTING
PRINTING
Displays while printing a list of all the currently enable EMV Application Identifiers
(AIDs) or CTL configuration records supported by the terminal. If the terminal has
no EMV applications it will display “NO EMV APPS” and “NO CTL RECORDS” if no
CTL configuration records.
PRESS 5: Print Pending Transactions
PRIN
PRINPRIN
PRINT PENDING
T PENDING T PENDING
T PENDING
TRANS.
TRANS.TRANS.
TRANS.
SELECT OPTION
SELECT OPTIONSELECT OPTION
SELECT OPTION
1. PRINT ALL
1. PRINT ALL1. PRINT ALL
1. PRINT ALL
2. PRINT HOSP
2. PRINT HOSP2. PRINT HOSP
2. PRINT HOSP
TRANS
TRANSTRANS
TRANS
3.
3. 3.
3. PRINT TIP TRANS
PRINT TIP TRANSPRINT TIP TRANS
PRINT TIP TRANS
Press 1 to print all the pending transactions that are stored on the terminal or 2 to
print off a specific Hospitality transaction or 3 to print off a specific Tipping
transaction.
PRINTING
PRINTINGPRINTING
PRINTING
PRINTING displays while printing the pending transactions. If the terminal has no
pending transactions it will display “NO PENDING TRANSACTIONS”.
PRESS 6: Print Last EMV Transaction
PRINTING
PRINTINGPRINTING
PRINTING
PRINTING displays while printing the last EMV transaction. If the terminal has no
EMV transactions it will display “NO EMV TRANSACTIONS”.
PRESS 7: Print Card Prefix Table
PRINTING
PRINTINGPRINTING
PRINTING
PRINTING displays while printing Card Prefix Table.
Terminal returns to admin menu.
Page 91

SKYZER TECHNOLOGIES PAGE 91 OF 97
INGENICO 5100 PAYMARK VERSION 6.0 OPERATING GUIDE Version 1.3
PRESS 8: To change Date and Time of the terminal
DATE
DATE DATE
DATE –––– DDMMYY
DDMMYYDDMMYY
DDMMYY
19/01/09
19/01/0919/01/09
19/01/09
To change the Date, enter the day, month and the year on the keyboard and press
ENTER
TIME
TIME TIME
TIME –––– HHMMSS
HHMMSSHHMMSS
HHMMSS
12:49
12:4912:49
12:49
To change the Time, enter the hour and minutes on the keyboard and press
ENTER
NOTE: When the Merchant logon is accepted, the current date and time
are automatically updated on the terminal.
Page 92

SKYZER TECHNOLOGIES PAGE 92 OF 97
INGENICO 5100 PAYMARK VERSION 6.0 OPERATING GUIDE Version 1.3
5.4 TRAINING MODE
The terminal has a training mode that can be toggled through the following
steps:
Step
Terminal Display
Description
1.0
Press FUNC
2.0
FUNCTION?
FUNCTION?FUNCTION?
FUNCTION?
Enter 9999, press ENTER
3.0
TRAINING MODE?
TRAINING MODE?TRAINING MODE?
TRAINING MODE?
ENTER OR CLEAR
ENTER OR CLEARENTER OR CLEAR
ENTER OR CLEAR
Press ENTER to enter Training Mode, or CLEAR to exit Training Mode
4.0
PLEASE WAIT
PLEASE WAITPLEASE WAIT
PLEASE WAIT
The terminal briefly displays “PLEASE WAIT” and then returns to the idle prompt
When the terminal is in training mode, a large indication will appear on the
display that the terminal is currently in training mode. To exit Training Mode,
repeat steps 2 and 3.
NOTE: Before the terminal can operate in training mode, the terminal,
merchant ID’s must be configured and the functions that you would like to
demonstrate on. Once the terminal is in the training mode, transactions can be
executed. When executing transaction in the training mode, the amount will
be the response code for the transaction, principally the “cent” area. For
example, if a transaction has been executed for an amount of $1.00 or $1.08,
the transaction will be accepted, where 00 is for ACCEPTED response code
and 08 is for SIGN ACCEPTED. Any other amount in the “cent” area will result
the transaction to decline.
Ensure that any pending transactions that are stored on the terminal have
been settled before exiting the training mode.
Page 93

SKYZER TECHNOLOGIES PAGE 93 OF 97
INGENICO 5100 PAYMARK VERSION 6.0 OPERATING GUIDE Version 1.3
5.5 NEW FEATURES OF THE TERMINAL
5.5.1 DECLINED ALERT
To notify the merchant of a declined transaction the terminal will beep,
displaying ‘declined’ and a receipt will not be printed until the merchant
presses enter.
5.5.2 ONE OR TWO PIECE UNIT
The Ingenico 5100 can function as either an IPP terminal or as an EPP terminal
with the i3010 pinpad attached. This dual functionality allows a merchant to
simply unplug a failed pinpad, re-boot the terminal and continue processing
transactions until the pinpad can be replaced.
5.5.3 FULL MESSAGE ENCRYPTION
Merchants and cardholders can have confidence in the benefits of increased
security standards with full message encryption, allowing the secure
transmission of EFTPOS transactions across wireless or internet communications
links.
5.5.4 CUSTOMER RECEIPT COPY
Merchants now have the option available to print or not a customer copy
receipt.
5.5.5 BROADBAND CONNECTIVITY
The Ingenico 5100 terminal allows the choice of TCP/IP communication with
Paymark host.
5.5.6 BROADBAND WITH DIAL BACKUP
The Ingenico 5100 terminal allows the choice of TCP/IP with Dial as a backup
communication with Paymark host.
Page 94

SKYZER TECHNOLOGIES PAGE 94 OF 97
INGENICO 5100 PAYMARK VERSION 6.0 OPERATING GUIDE Version 1.3
6 SAFETY AND MAINTENANCE
6.1 CLEANING THE CASE
• DO NOT allow any water to enter inside the case. Remove any dust,
accumulated dirt or grime from the case using a damp cloth.
• DO NOT use solvents, cleaning fluids or abrasives. These materials could
damage the plastic housing and any exposed contacts.
6.2 GENERAL SAFETY INFORMATION
This equipment has been designed and manufactured to meet international
safety standards but, like any electrical apparatus, due care must still be
taken:
• Do read and understand the instructions before using the equipment
• DO NOT expose this apparatus to rain or moisture. This product is
approved for indoor use only. Where necessary, use a protection cover
that prevents ingress of water.
• DO NOT remove any screws or non-operator accessible covers.
• DO NOT insert any metallic objects.
• DO NOT allow liquid to spill into the terminal’s openings.
• DO NOT allow anything to rest on the power or telecom cords and
ensure that all cables are routed to prevent damage or accidental
contact.
• DO NOT continue to operate the equipment if you are in any doubt
about it woPKMSng normally, or if it is damaged in any way. Withdraw
the mains plug and consult your service agent.
6.3 INGRESS GUARDS
To help minimise risk of dust or water ingress to the terminal, the use of an
ingress guard is recommended.
Recommended supplier:
KeyCovers (Auckland)
Email: sales@keycovers.co.nz
Phone: (09) 845 1464
Page 95

SKYZER TECHNOLOGIES PAGE 95 OF 97
INGENICO 5100 PAYMARK VERSION 6.0 OPERATING GUIDE Version 1.3
6.4 EXTERNAL POWER SUPPLY
• Only an Ingenico approved power supply (CE Marked) specified for use
with this terminal must be used.
• Operate only from a power source as specified on the Power Supply
Unit.
6.5 CONNECTIONS
Take due care when attaching cables. Under no circumstances must the PSTN
(i.e. telephone) cable be inserted into the RS232 ports.
Figure 7 - Cable Port Locations
Power Supply
cord
PSTN/Telephone
Cable
ECR Interface/SkyPay-300
Cable
Ethernet Cable
Pinpad/SkyPay-300 Cable
Page 96

SKYZER TECHNOLOGIES PAGE 96 OF 97
INGENICO 5100 PAYMARK VERSION 6.0 OPERATING GUIDE Version 1.3
6.6 LIFT LATCH TO OPEN PRINTER LID
To open the printer lid, press the printer latch backwards which will release the
locks and then lift up the printer lid.
Figure 8 - Printer Lid Opening
6.7 PAPER SIZE
The paper roll size is 57mm width and 50mm diameter. Please take note of the
direction of the paper roll.
Figure 9 - Paper Roll Loading
6.8 OPERATING ENVIRONMENT
The operating temperature range for this device is between 5oC and 40oC.
Printer Latch
Press the printer latch
backwards which will
release the locks and
then lift up the printer
lid
Page 97

SKYZER TECHNOLOGIES PAGE 97 OF 97
INGENICO 5100 PAYMARK VERSION 6.0 OPERATING GUIDE Version 1.3
7 SKYZER TECHNOLOGIES CONTACT DETAILS
Phone:
NZ +64 9 259 0322
AUS +61 2 9998 7555
Fax:
NZ +64 9 259 0323
AUS +61 2 9998 7544
Address:
Skyzer Limited
30C Vestey Drive
Mt Wellington
Auckland
New Zealand
Internet Access
http://www.skyzer.co.nz
Technical Questions and Sales Enquiries
sales@skyzer.co.nz
If you have any comments or suggestions relating to this guide please contact
Skyzer Technologies directly.
 Loading...