

Infratech SL 1612, SL 2424, SL 4024, SL 3024 Installation, Use & Care Manual
ALL WEATHER W-SERIES AND WD-SERIES
QUARTZ TUBE ELECTRIC INFRARED RADIANT HE
TABLE OF CONTENTS
Warnings 2
Installation Instructions 3
Wiring Instructions 3
Mounting Instructions 4
Replacement Element Installation 5
Replacement Parts 5
Heater Coverage Areas 6
General Notes 6
Maintenance Instructions 6
Trouble Shooting 7
Location Suggestions 7
Warranty 8
ALL WEATHER W-SERIES AND WD-SERIES
QUARTZ TUBE ELECTRIC INFRARED RADIANT HE
alfresco-heating.com
888-Warm-Glo
TABLE OF CONTENTS
Warnings 2
Installation Instructions 3
Wiring Instructions 3
Mounting Instructions 4 - 5
Replacement Element Installation 5
Replacement Parts 5 - 6
Heater Coverage Areas 6
General Notes 6
Maintenance Instructions 6
Trouble Shooting 7
Location Suggestions 7
Warranty 8
READ ALL INSTRUCTIONS BEFORE USING HEATER
Unit may be a source of possible shock. NEVER attempt to service heater without disconnecting its power source.
S
ource of possible ignition.
Hig
h Temperature, risk of fire, keep electrical cords, drapery, furnishings and other combustibles at least 3’ (0.9m)
f
rom the front of heater and away from sides and rear.
MOUNTING HEIGHT/CLEARANCES
WARNINGS
CAUTION
CLEARANCE FROM COMBUSTIBLES
WARNINGS
CLEARANCE FROM COMBUSTIBLES
READ ALL INSTRUCTIONS BEFORE USING HEATER
Unit may be a source of possible shock. NEVER attempt to service heater without disconnecting its power source.
S
ource of possible ignition.
Hig
h Temperature, risk of fire, keep electrical cords, drapery, furnishings and other combustibles at least 3’ (0.9m)
f
rom the front of heater and away from sides and rear.
MOUNTING HEIGHT/CLEARANCES
“IMPORTANT INSTRUCTIONS”
“SAVE THESE INSTRUCTIONS”
WARNINGS
CAUTION
CLEARANCE FROM COMBUSTIBLES
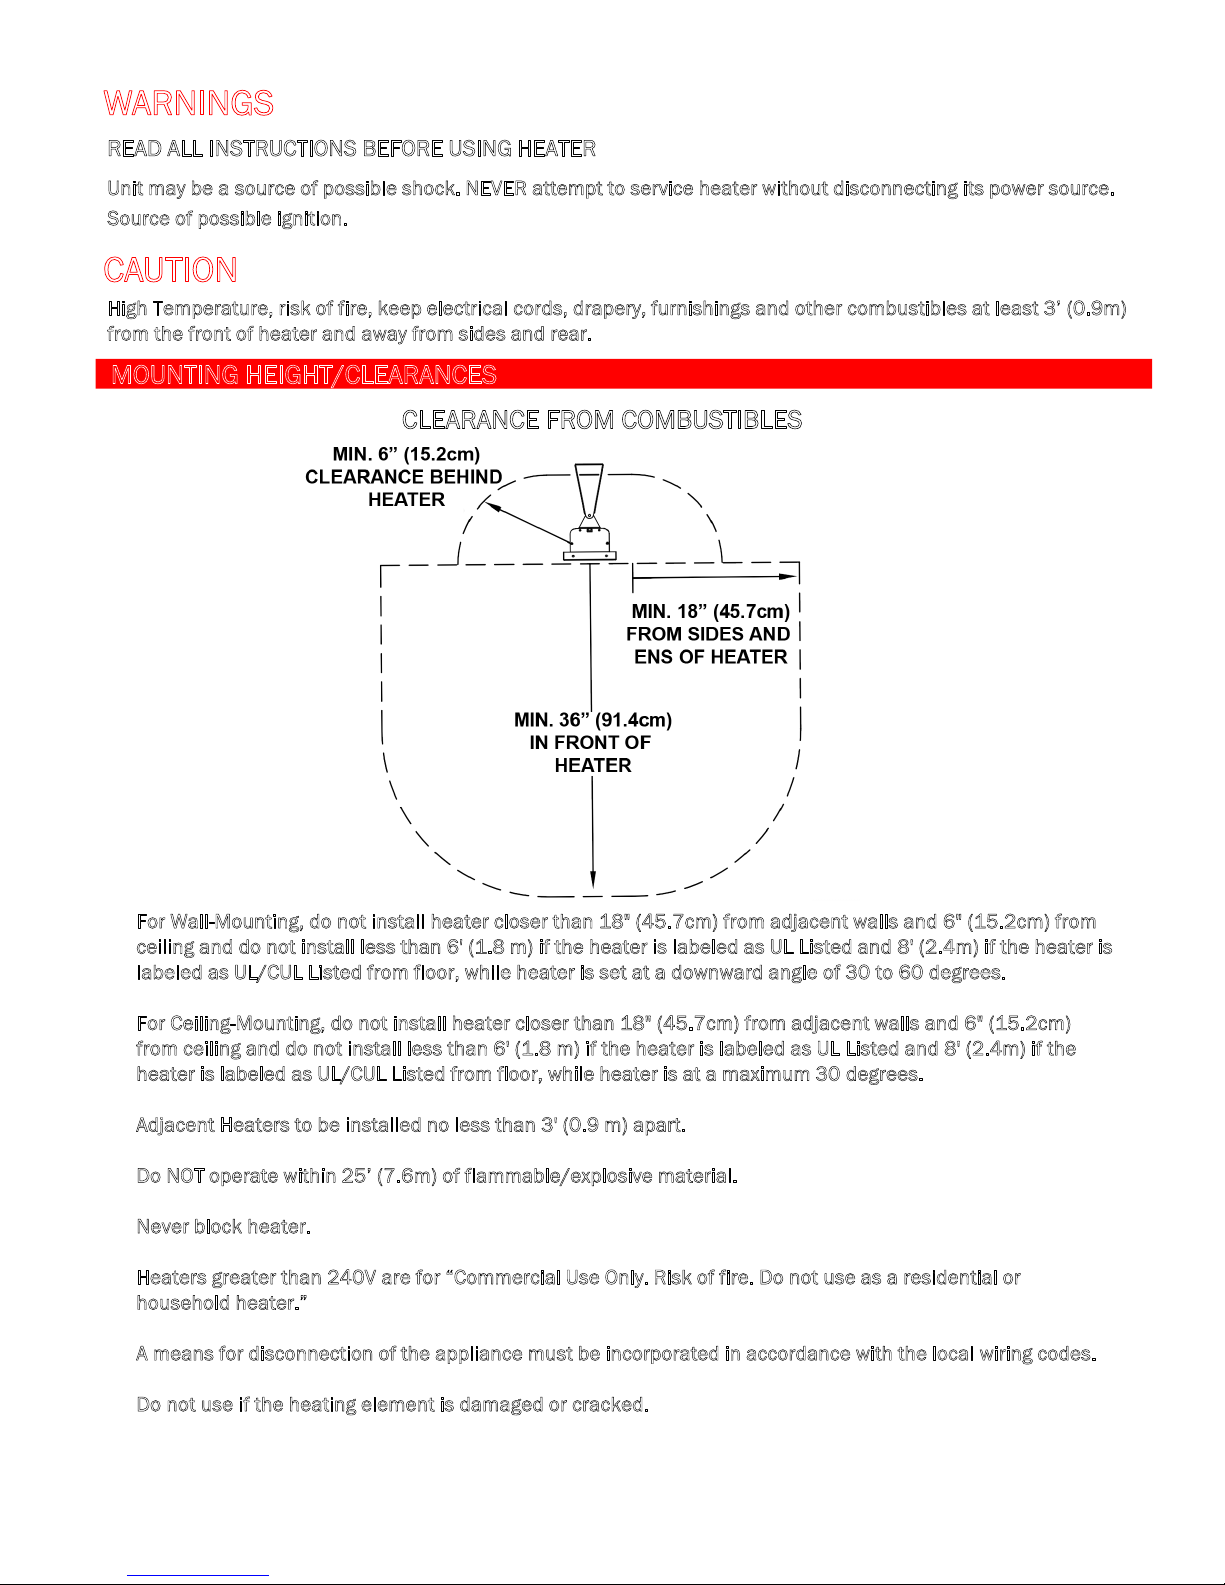
• For Wall-Mounting, do not install heater closer than 18" (45.7cm) from adjacent walls and 6" (15.2cm) from
c
eiling and do not install less than 6' (1.8 m) if the heater is labeled as UL Listed and 8' (2.4m) if the heater is
la
beled as UL/CUL Listed from floor, while heater is set at a downward angle of 30 to 60 degrees.
• Fo
r Ceiling-Mounting, do not install heater closer than 18" (45.7cm) from adjacent walls and 6" (15.2cm)
f
rom ceiling and do not install less than 6' (1.8 m) if the heater is labeled as UL Listed and 8' (2.4m) if the
h
eater is labeled as UL/CUL Listed from floor, while heater is at a maximum 30 degrees.
• Ad
jacent Heaters to be installed no less than 3' (0.9 m) apart.
• D
o NOT operate within 25’ (7.6m) of flammable/explosive material.
• N
ever block heater.
• He
aters greater than 240V are for “Commercial Use Only. Risk of fire. Do not use as a residential or
h
ousehold heater.”
• A m
eans for disconnection of the appliance must be incorporated in accordance with the local wiring codes.
• D
o not use if the heating element is damaged or cracked.
“IMPORTANT INSTRUCTIONS”
CLEARANCE FROM COMBUSTIBLES
alfresco-heating.com
888-Warm-Glo
READ ALL INSTRUCTIONS BEFORE USING HEATER
Unit may be a source of possible shock. NEVER attempt to service heater without disconnecting its power source.
ource of possible ignition.
S
CAUTION
High Temperature, risk of fire, keep electrical cords, drapery, furnishings and other combustibles at least 3’ (0.9m)
rom the front of heater and away from sides and rear.
f
MOUNTING HEIGHT/CLEARANCES
• For Wall-Mounting, do not install heater closer than 18" (45.7cm) from adjacent walls and 6" (15.2cm) from
eiling and do not install less than 6' (1.8 m) if the heater is labeled as UL Listed and 8' (2.4m) if the heater is
c
l
abeled as UL/CUL Listed from floor, while heater is set at a downward angle of 30 to 60 degrees.
• For Ceiling-Mounting, do not install heater closer than 18" (45.7cm) from adjacent walls and 6" (15.2cm)
rom ceiling and do not install less than 6' (1.8 m) if the heater is labeled as UL Listed and 8' (2.4m) if the
f
h
eater is labeled as UL/CUL Listed from floor, while heater is at a maximum 30 degrees.
djacent Heaters to be installed no less than 3' (0.9 m) apart.
• A
• D
o NOT operate within 25’ (7.6m) of flammable/explosive material.
ever block heater.
• N
• H
eaters greater than 240V are for “Commercial Use Only. Risk of fire. Do not use as a residential or
ousehold heater.”
h
• A
means for disconnection of the appliance must be incorporated in accordance with the local wiring codes.
o not use if the heating element is damaged or cracked.
• D
2
“SAVE THESE INSTRUCTIONS”
INSTALLATION INSTRUCTIONS
Connect power with flexible
conduit or appropriate cord
to allow heater to be swiveled
.
Logo Plate designed
to rotate (if required
)
If rotation is required, push in the
spring pin located on back side of
heater trim to disengage the two
pins from their alignment hole and
rotate 180°
alfresco-heating.com
888-Warm-Glo
This heater must be permanently installed and hard wired by a licensed electrician in accordance with local
electrical codes. Assembly procedure must be performed with no electrical power to unit.
Step 1: Check UL/CUL/CE label on heater for proper voltage.
Step 2: Follow supplied wiring instructions. (See wiring instructions below)
Step 3: Heater must be mounted with reflector angled down.
Step 4: All electrical connections must be in compliance with the National Electric Code (NEC) and local codes for
outdoor wiring.
Step 5: Use only wiring components UL/CUL/CE listed for outdoor use with IPX4 minimum rating.
Logo Plate designed
“T” SLOT
Allows the mounting bracket to
slide for flexible mounting options.
Logo Plate designed
to rotate (if required)
to rotate (if required
)
If rotation is required, push in the
If rotation is required, push in the
spring pin located on back side of
spring pin located on back side of
heater trim to disengage the two
heater trim to disengage the two
pins from their alignment hole and
pins from their alignment hole and
rotate 180°
rotate 180°
WIRING INSTRUCTIONS
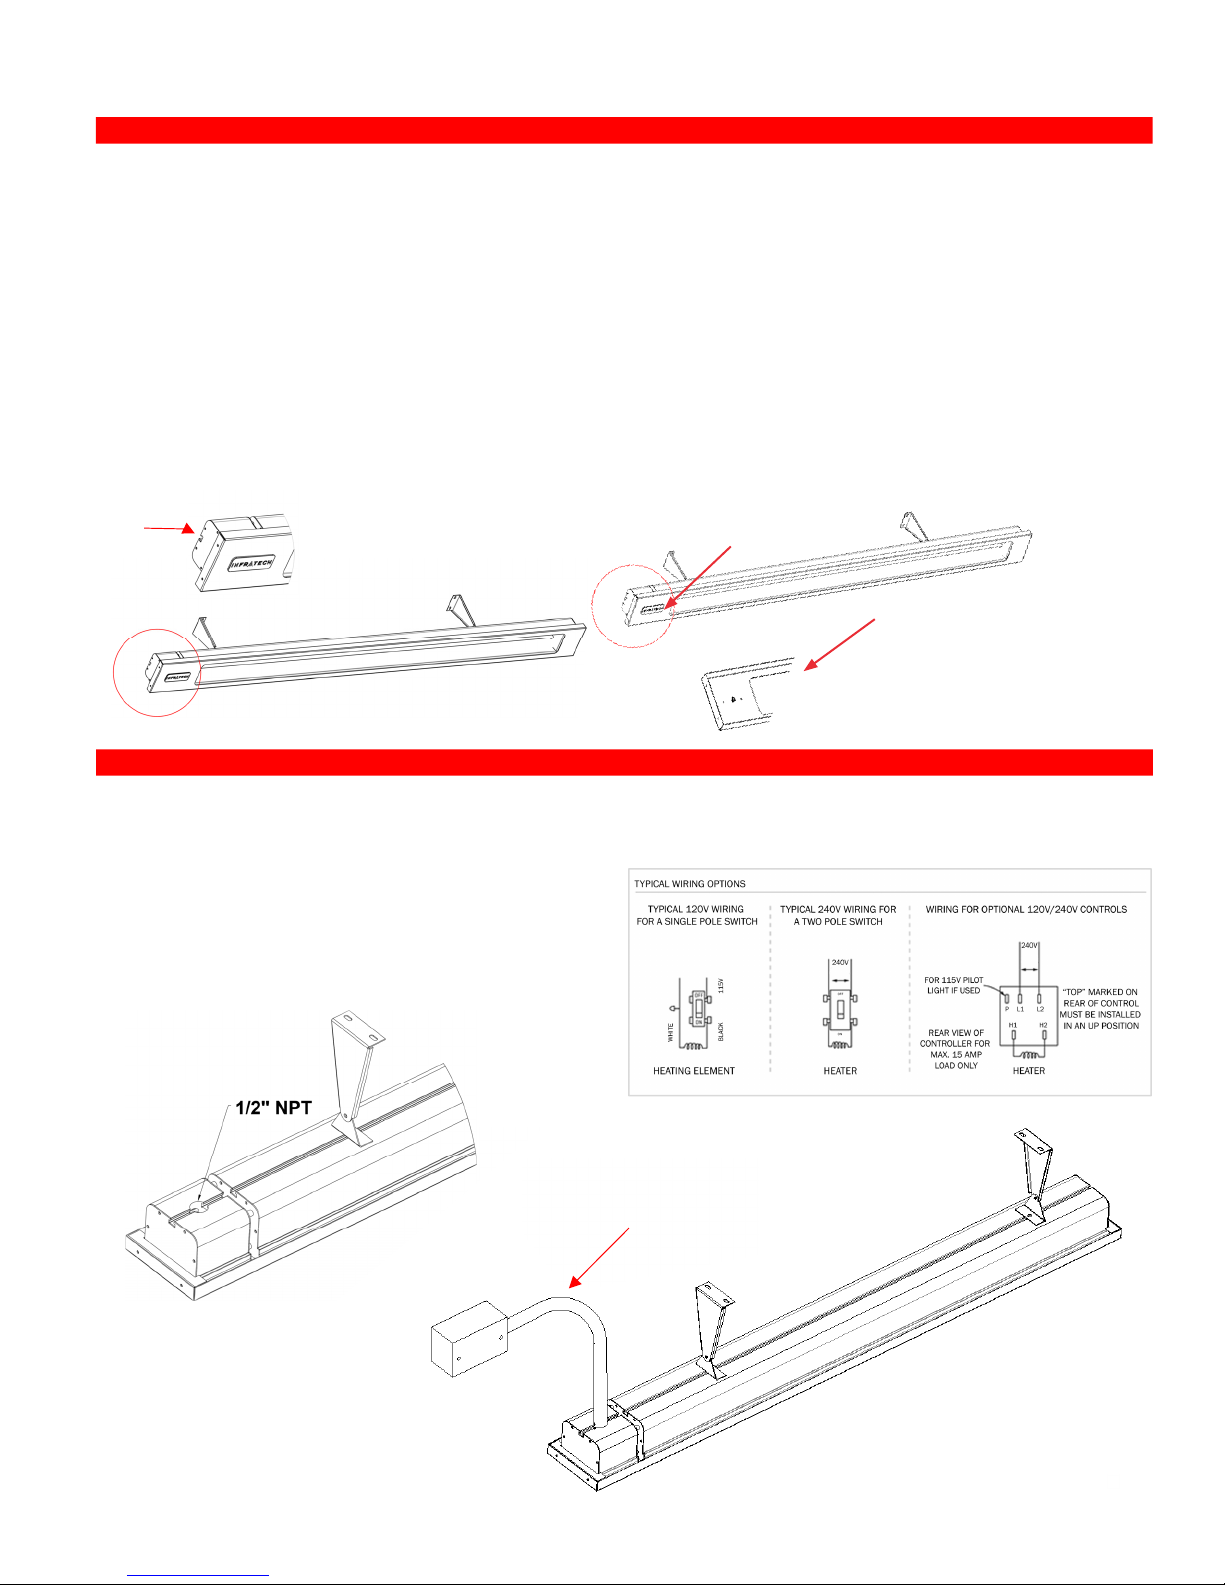
The heater is drilled and threaded for standard ½” conduit fittings. The installing electrician will need to provide
the appropriate rigid metallic, flexible or liquid tight conduit for the installation.
• Use only copper or aluminum wire
• Observe local electrical code regulations.
suitable for 90°C.
Connect power with flexible
conduit or appropriate cord
to allow heater to be swiveled
.
3
3
 Loading...