

Infinity NV31W, NV31N Owner's Manual

OWNER’S MANUAL
MANUAL DEL USUARIO
MANUEL D'UTILISATION
Model- Modelo-Modèle: NV31N, NV31W
120V., 60Hz., 12 Amps
EURO-PRO Operating LLC
Boston, MA, 02465
Tel.: 1 (888) 668-9600
www.infinityvac.com
COPYRIGHT© EURO-PRO OPERATING LLC 2008

IMPORTANT SAFETY INSTRUCTIONS
SAVE THESE INSTRUCTIONS
1
For Household Use Only
Rev. 09/07B
When using an electrical appliance, basic safety precautions should always be
observed, including the following:
Warning: To reduce the risk of electric shock, t his appliance has a polarized plug
(one blade is wider than the other). This plug will fit in a polarized outlet only one way. If
the plug does not fit fully in the outlet, reverse the plug. If it still does not fit, contact a
qualified electrician to install the proper outlet. Do NOT modify the plug in any way.
Warning: To reduce the risk of fire, electrical
shock, or injury:
1. Do NOT leave vacuum cleaner unattended
when it is plugged in. Unplug from electrical
outlet when not in use and before servicing.
2. To reduce the risk of electric shock – do
NOT use outdoors or on wet surfaces.
3. Do NOT allo w ch ildre n to use as a to y.
Close attention is necessary when used by
or near children.
4. Use only as described in this manual. Use
only manufacturer’s recommended
attachments.
5. Do NOT use with damaged cord or plug.
Do NOT use vacuum cleaner if it has been
dropped, damaged, left outdoors, or
dropped into water. Return appliance to
EURO-PRO Operating LLC for
examination, repair or adjustment.
6. Do NOT pull or carry by cord. Do NOT use
cord as a handle, close a door on cord, or
pull cord around sharp edges or corners.
Do NOT ru n a p plianc e ov er c ord. K e e p
cord away from heated surfaces.
7. Do NOT unplug by pulling on cord. To
unplug, grasp the plug, not the cord.
8. Do NOT handle plug or vacuum cleaner
with wet hands.
9. Do NOT use the vacuum cleaner to pick up
large objects or objects that are likely to
damage the vacuum cleaner.
10. Keep hair, loose clothing, fingers, feet and
all parts of body away from openings,
rotating brush roll and other moving parts.
Do NOT operate cleaner in bare feet or
when wearing open toe shoes.
11. Do NOT use without the dust cup, cyclone
chamber or all the filters in place. Use
ONLY filters and accessories provided by
EURO-PRO Operating LLC. Failure to do
so will void the warranty.
12. Never operate the vacuum with wet filters,
wet cyclonic chamber or wet dust cup.
13. Turn off all controls before plugging into or
unplugging vacuum cleaner from the
electrical outlet.
14. Use extra care when vacuuming on stairs.
Never place the vacu um o n a ta ble , ch air,
etc.
15. Do NOT pick up hot coals, cigarette butts,
matches or any hot, smoking, or burning
objects.
16. Do NOT pick up hard or sharp objects such
as glass, nails, screws, coins, etc. This may
damage the vacuum cleaner.
17. Do NOT pick up any liquids.
18. Do NOT pick up flamma ble or co mbus tible
materials (lighter fluid, gasoline, kerosene,
etc.) or use in the presence of explosive
liquids or vapor.
19. Do NOT pick up toxic material (chlorine
bleach, ammonia, drain cleaner, etc.).
20. Do NOT use in an enclosed space filled with
vapors given off by oil based paints, paint
thinner, moth proofing substances,
flammable dust, or other explosive or toxic
vapors.
21. Use only on dry, indoor surfaces.
22. Do NOT use for any purpose other than
described in this user’s guide.
23. The use of an extension cord is not
recommended.
24. Do NOT put any objects into openings. Do
NOT use with any opening blocked. Keep
free of dust, lint, hair and anything else that
may reduce air flow.
25. Store your appliance indoors in a cool, dry
area with the power cord coiled safely to
prevent any tripping accidents.
26. Keep your work area well lit.
27. Do NOT immerse the vacuum into water or
other liquids.
28. Keep end of hose, wands and other
openings away from your face and body.
29. To avoid damaging the carpet, keep the
vacuum cleaner head moving at all times.
PRECAUTIONARY MEASURES
1. Do not operate the vacuum
cleaner too close to heaters, or
radiators.
2. Before inserting the power plug
into the wall outlet, make sure
that your hands are dry.
3. Do not vacuum any liquids.
4. Keep hair, loose clothing, fingers,
feet and all parts of body away
from openings, rotating brush roll
and other moving parts.
5. When pulling out the power plug
from the wall outlet, pull the plug
not the power cord.
6. Do not pick up anything that is
burning or smoking such as
cigarettes, matches or hot ashes.
7. Do not run appliance over power
cord.
8. Do not use without dust cup,
cyclonic chamber, or ALL filters
in place.
9. Before you start vacuuming, make
sure to remove large or sharp
objects that might damage the
vacuum.
Important: If the air paths in the unit, the hose or the extension tube become
blocked, turn the vacuum cleaner off and remove the blocking substance
before you start the unit again.
2
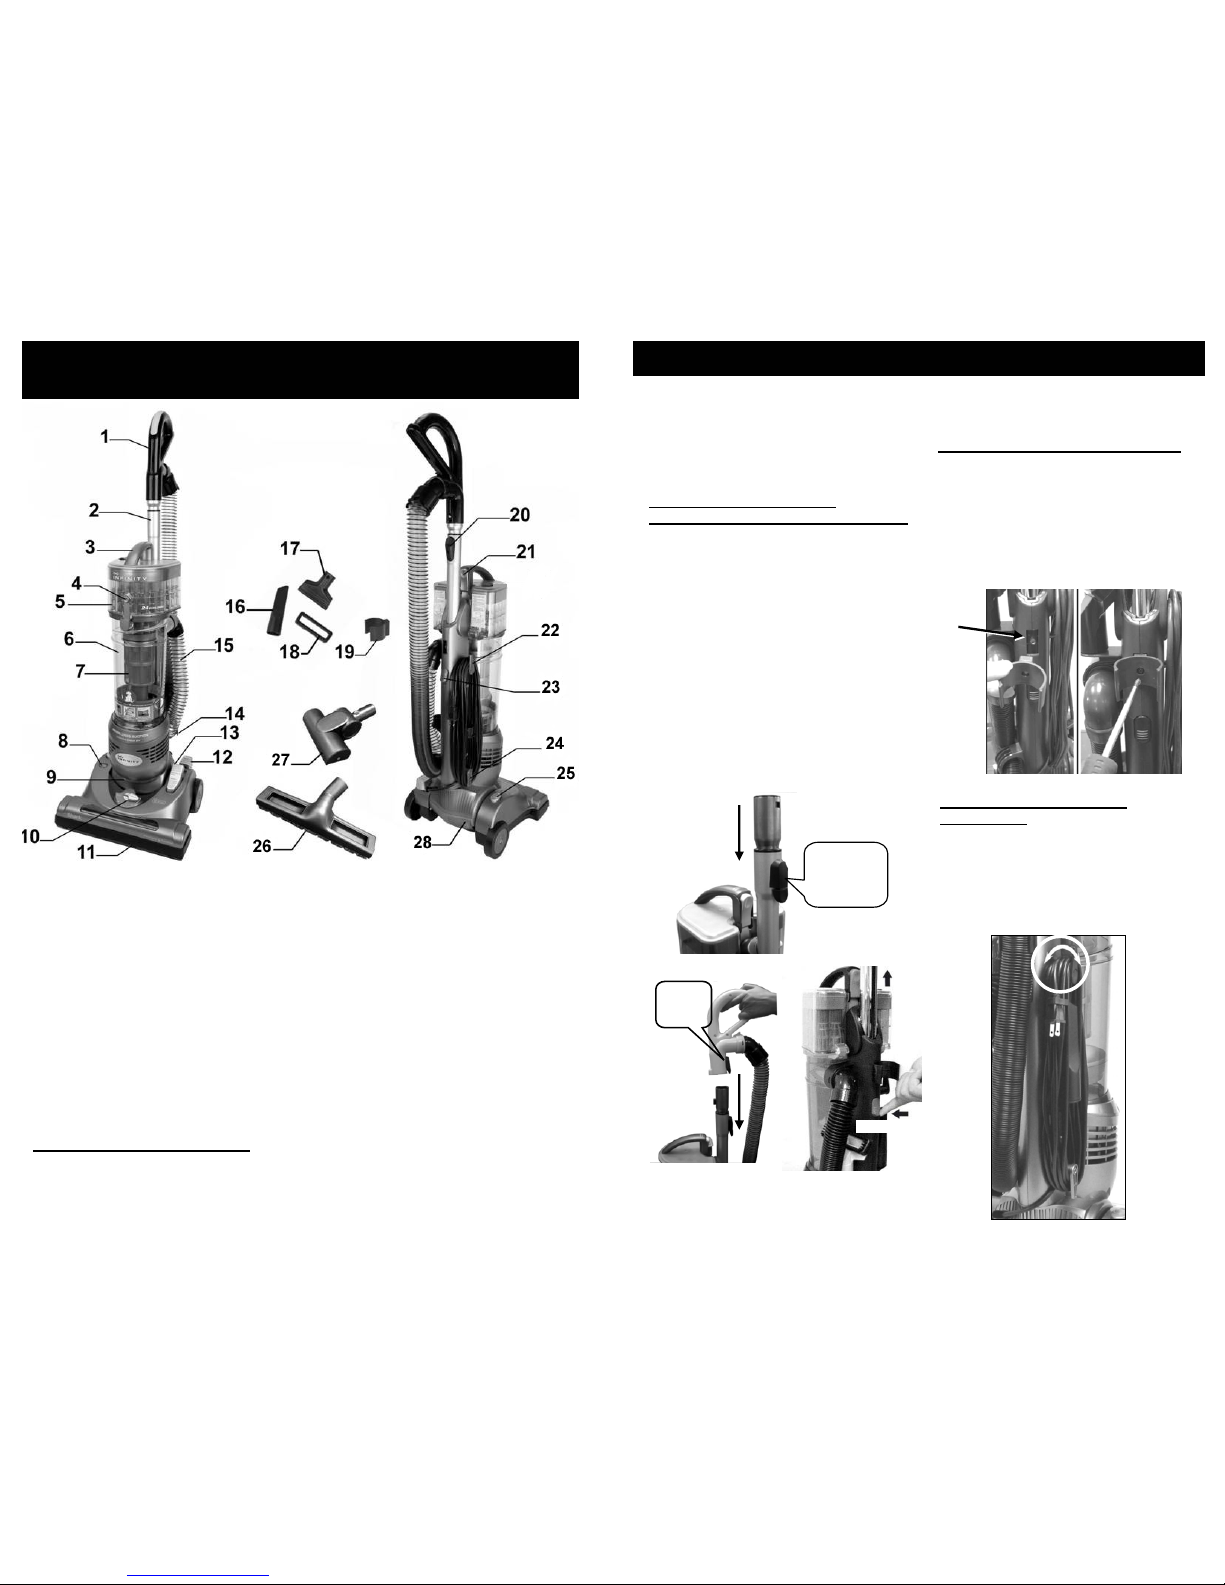
GETTING TO KNOW YOUR CYCLONIC UPRIGHT
VACUUM
Technical Specifications
Voltage: 120V., 60Hz.
Power: 12 Amps
Note: Illustrations may differ from actual unit.
3
15. Super Stretch Hose
16. Crevice Tool
17. Upholstery Brush
18. Dusting Attachment
19. Upper Hose Holder
20. Telescopic Wand Height
Adjustment
21. Dust Cup Release Button
22. Quick Release Power Cord
Holder
23. Telescopic Wand Release
24. Power Cord Holder
25. On/Off Button
26. Bare Floor Brush
27. Pet Hair Power Brush
28. Access Port
1. Ergonomic Grip
2. Telescopic Wand
3. Carry Handle
4. Cyclonic Chamber Bottom
Door Release
5. Cyclonic Chamber
6. Dust Cup
7. Debris Screen
8. Filter Indicator Light
9. Headlight
10. Carpet Height Adjustment
Knob
11. Furniture Guard
12. Handle Release
13. Carpet-To-Floor Selector
14. Lower Hose Holder
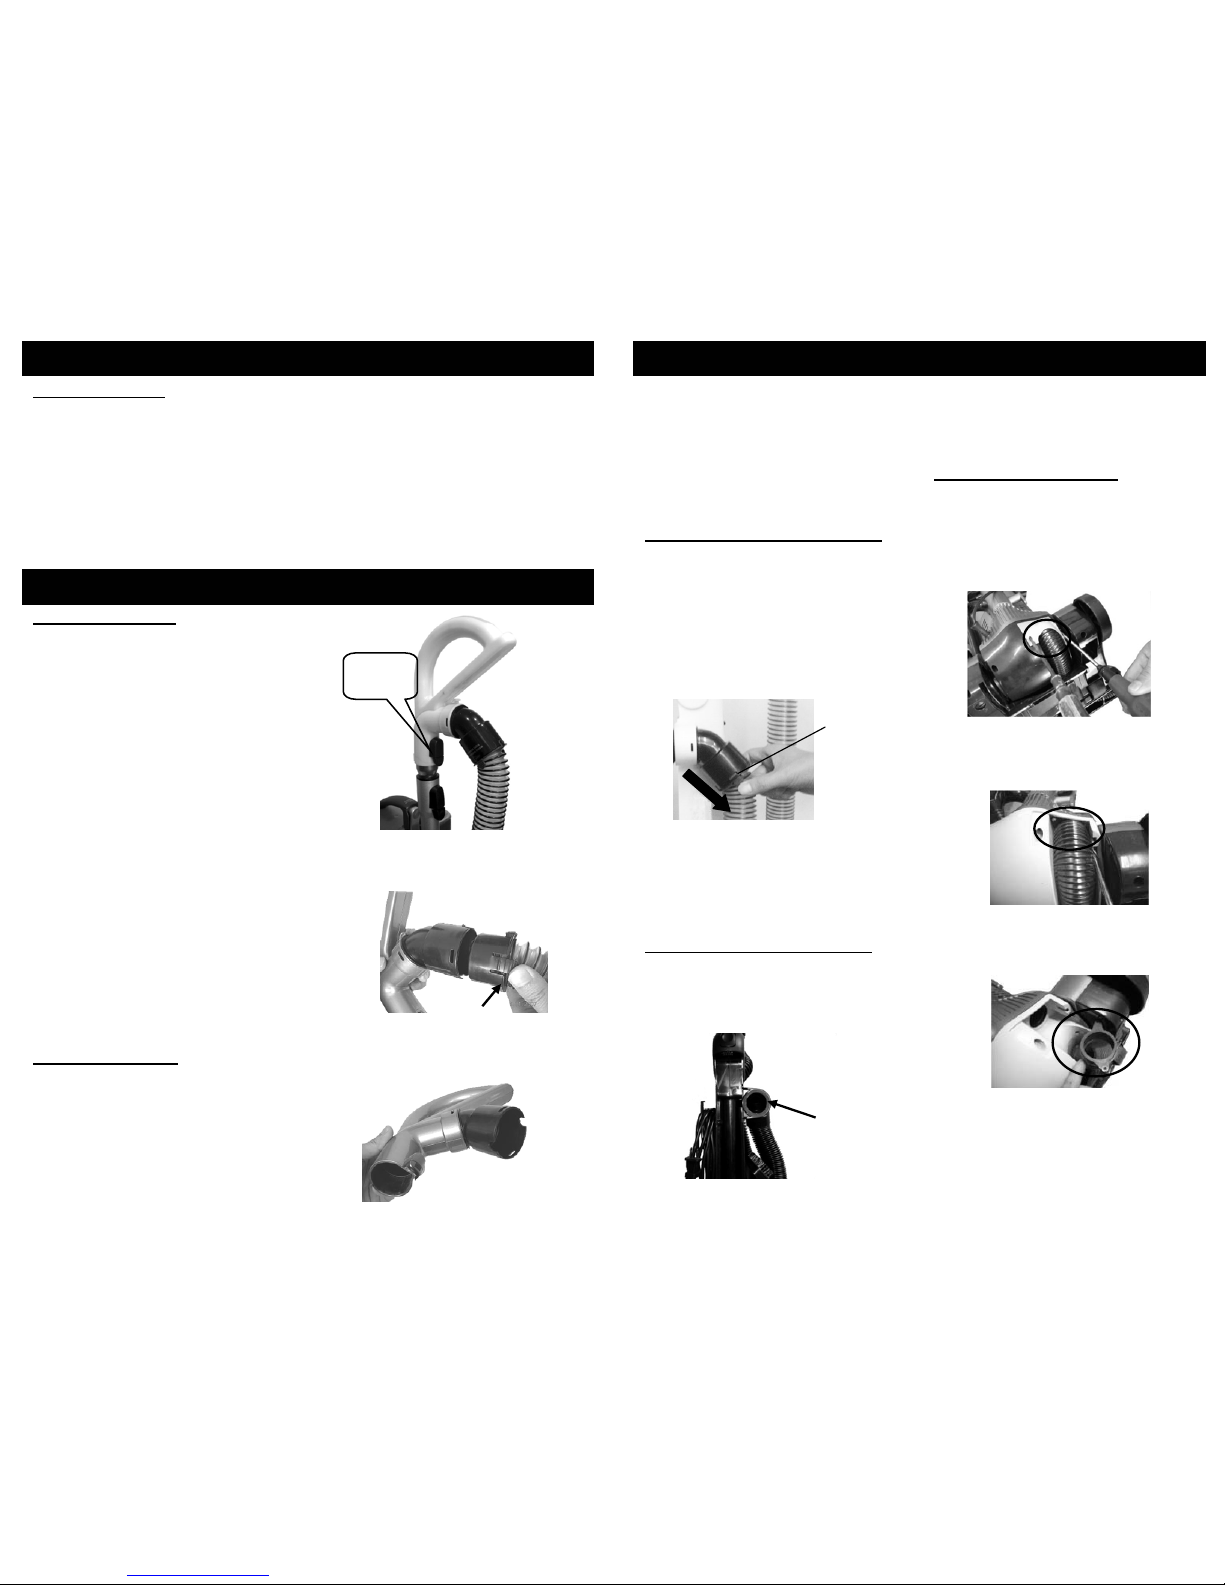
ASSEMBLY INSTRUCTIONS
WARNING: Always remove the power
plug from the electrical outlet before
assembling or removing accessories.
4
Winding & Unwinding the
Power Cord
This vacuum cleaner is equipped with a
convenient cord storage feature. The
power cord winds around the two cord
holders at the side of the unit. The top
cord holder has a quick cord release
feature. Turn the cord hook to the left
or the right to remove the power cord.
(Fig. 6)
Fig. 6
Thank you for purchasing an Infinity Vacuum. To ensure your vacuum
never loses suction, you must perform regular maintenance tasks.
Refer to your Owner’s Manual for step by step instructions.
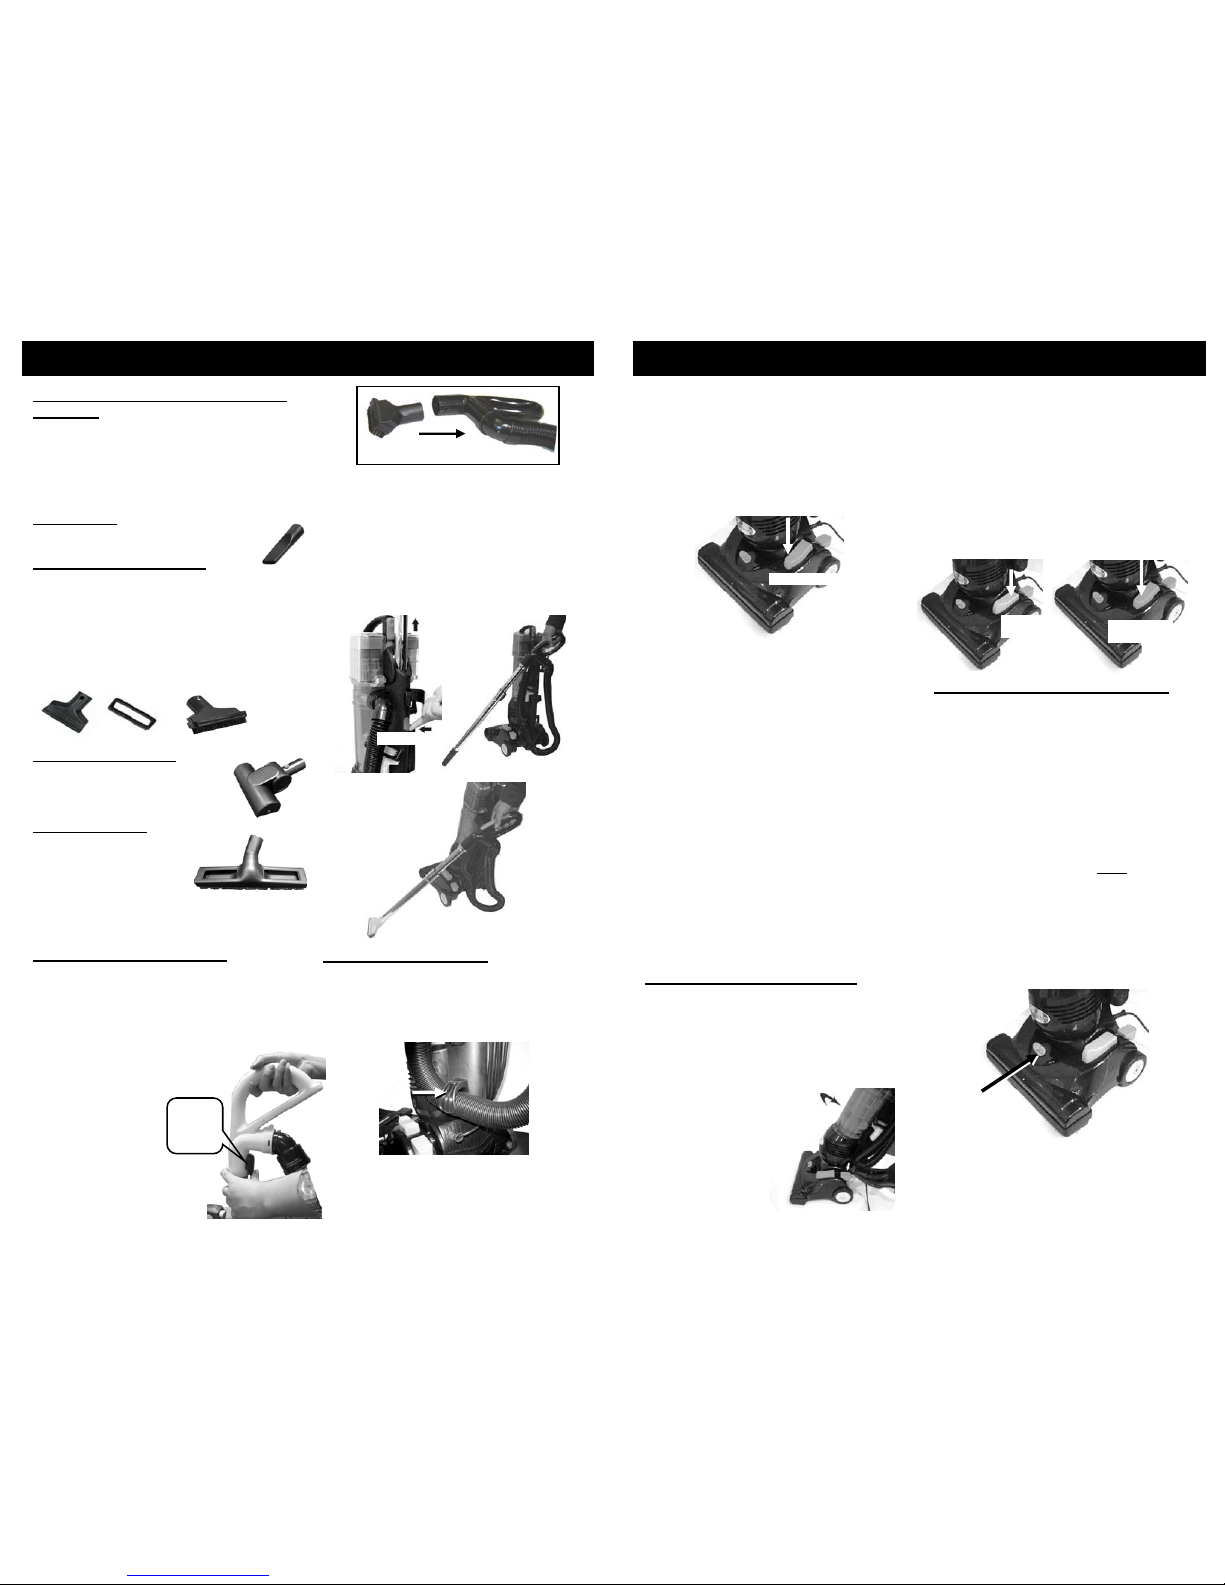
Attaching the Upper Hose Holder
1. Using a Philip’s screwdriver, remove
the screw that is already attached to
the vacuum body. (Fig. 4)
2. Place the upper hose holder into the
slot in the back of the vacuum.
(Fig. 4)
3. Using the screwdriver and the screw
provided, attach the hose clip to the
vacuum. (Fig. 5)
Fig. 4 Fig. 5
Remove
Screw
Fig. 3
Press
Fig. 2
Handle
Lock
Release
Telescopic
Wand
Height
Adjustment
Fig. 1
Inserting & Removing the
Telescopic Wand into the Main Unit
1. Insert the telescopic wand into the
opening at the top of the unit, making
sure that the telescopic wand height
adjustment knob is facing the back of
the unit. (Fig. 1)
2. Insert the handle into the top opening
of the telescopic wand making sure
that the handle lock release button is
facing towards the back of the
vacuum. Push handle down until you
hear it click into place. (Fig. 2)
3. To remove the telescopic wand, press
the telescopic wand release button
which is located on the back of the unit
and lift the telescopic wand up. (Fig. 3)
4. To remove the handle, press on the
handle lock release and lift the handle
up.
OPERATING INSTRUCTIONS
5
Fig. 10
Press
Fig. 11
Fig. 12
Using the Accessories
1. To avoid tip over, always make sure
that the hose is inserted into the
lower hose holder that is located at
the bottom of the unit, just behind the
dust cup container. (Fig. 13)
Fig. 13
Lower
Hose
Holder
+
=
Using the Vacuum for Above Floor
Cleaning
Your vacuum can be used to dust above
floor areas such as tops of furniture,
upholstery, drapes, etc. When using with
accessories, you must place the carpet-tofloor selector to the “Bare Floor/Tools”
position.
Crevice Tool
For radiators, crevices, corners,
baseboards and between cushions.
Upholstery/Dusting Brush
The upholstery/dusting brush is two brushes
in one. To use as an upholstery brush, you
must remove the dusting brush attachment.
To remove, just snap the two pieces apart.
(Fig. 7) Use the upholstery brush to remove
dust and pet hair from furniture. Use the
dusting brush to dust furniture, Venetian
blinds, books, lamp shades and shelves.
Fig. 7
Fig. 9
To attach the accessories to
the telescopic wand:
1. Press the telescopic wand release
button and pull the telescopic wand out
of the vacuum. (Fig. 10)
2. Push the desired accessory onto the
end. (Fig. 11, Fig. 12)
3. To remove the accessories, just pull
them out.
Pet Hair Power Brush
Unique pet design with duel felt
strips to grab and remove
pet hair from furniture.
Bare Floor Brush
The soft natural bristles
will not scratch floors.
Glides easily under
furniture to vacuum
up pet hair.
Note: The bare floor brush can
only be used with the telescopic wand.
Fig. 8
Press
Handle
Lock
Release
Attaching the Accessories
All the accessories can be attached either
to the handle or to the telescopic wand
except for the bare floor brush which can
only be attached to the telescopic wand.
To attach the accessories to the
handle:
1. Press the handle lock release
and pull the handle up to
remove it from the
telescopic wand.
(Fig. 8)
2. Push the desired
accessory onto
the end. (Fig. 9)
3. To remove the
accessories, just
pull them out.
Carpet
Position
Fig. 16
Fig. 17
Bare Floor /
Tools
Bare Floor / Tools
Fig. 14
Fig. 18
Carpet Height
Adjustment Knob
Fig. 15
OPERATING INSTRUCTIONS
How to Adjust for Carpet Height
WARNING: To avoid injury, keep loose
clothing, hair, fingers and all other parts
of body away from any moving parts
(such as the beater brush). Turn off the
switch and unplug the vacuum before
adjusting the vacuum for the carpet
height.
The front of the power nozzle has a
carpet height adjustment knob that
raises and lowers the motorized power
head to match the type of carpet.
(Fig. 18) With the vacuum NOT
connected to the electrical outlet, set the
adjustment to the lowest setting for
maximum cleaning. If the vacuum is too
difficult to push, move the knob to the
next highest setting until the vacuum is
comfortable to push. The brush roll must
reach the carpet for the most effective
cleaning.
Vacuuming Floors & Carpets
The upright vacuum can be used to vacuum
all types of carpeting and bare floors.
The carpet-to-floor selector should only be
adjusted while the vacuum cleaner is turned
on and is in the upright position.
1. Turn the quick release cord holder
180° to either side to release the
power cord.
2. Plug the power cord into
the electrical outlet.
3. Depress on the handle
release pedal to
release the handle.
(Fig. 15)
6
2. Turn the quick release cord holder 180°
to either side to release the power cord.
3. Plug the power cord into the electrical
outlet.
4. When using the attachments, the
vacuum must be in the upright position.
5. Ensure that brush roll is locked by
pressing the carpet-to-floor selector to
the “Bare Floor/Tools” position. (Fig. 14)
4. When vacuuming carpets, set the
carpet-to-floor selector to the “Carpet”
position to engage the brush roll.
(Fig. 16)
5. When vacuuming bare floors, set the
carpet-to-floor selector to the “Bare
Floor/Tools” position. This will lock the
brush roll and it will not turn. (Fig. 17)
CAUTION: Do not change the setting of
the carpet-to-floor selector while the
vacuum cleaner is turned off.
CAUTION: Do NOT pull the vacuum
cleaner around the room by the hose as it
could tip over and cause damage. When
using the attachments, do NOT over
extend the hose length when reaching.
Trying to reach beyond the hose reach
could cause the vacuum to tip over.
WARNING: Avoid tipping the vacuum or
setting it on furniture, fringed area rugs or
carpeted stairs while you are using the
hose with the attachments. When the
vacuum is turned on, the brush roll will
continue to rotate until you put the carpetto-floor selector to the “Bare Floor/Tools”
position. Avoid leaving the vacuum in one
place for an extended period of time,
particularly on thick carpet.
Note: When lifting your vacuum from the
carry handle, be careful not to press the
dust cup release button because you will
release the dust cup assembly.
MAINTENANCE INSTRUCTIONS
7
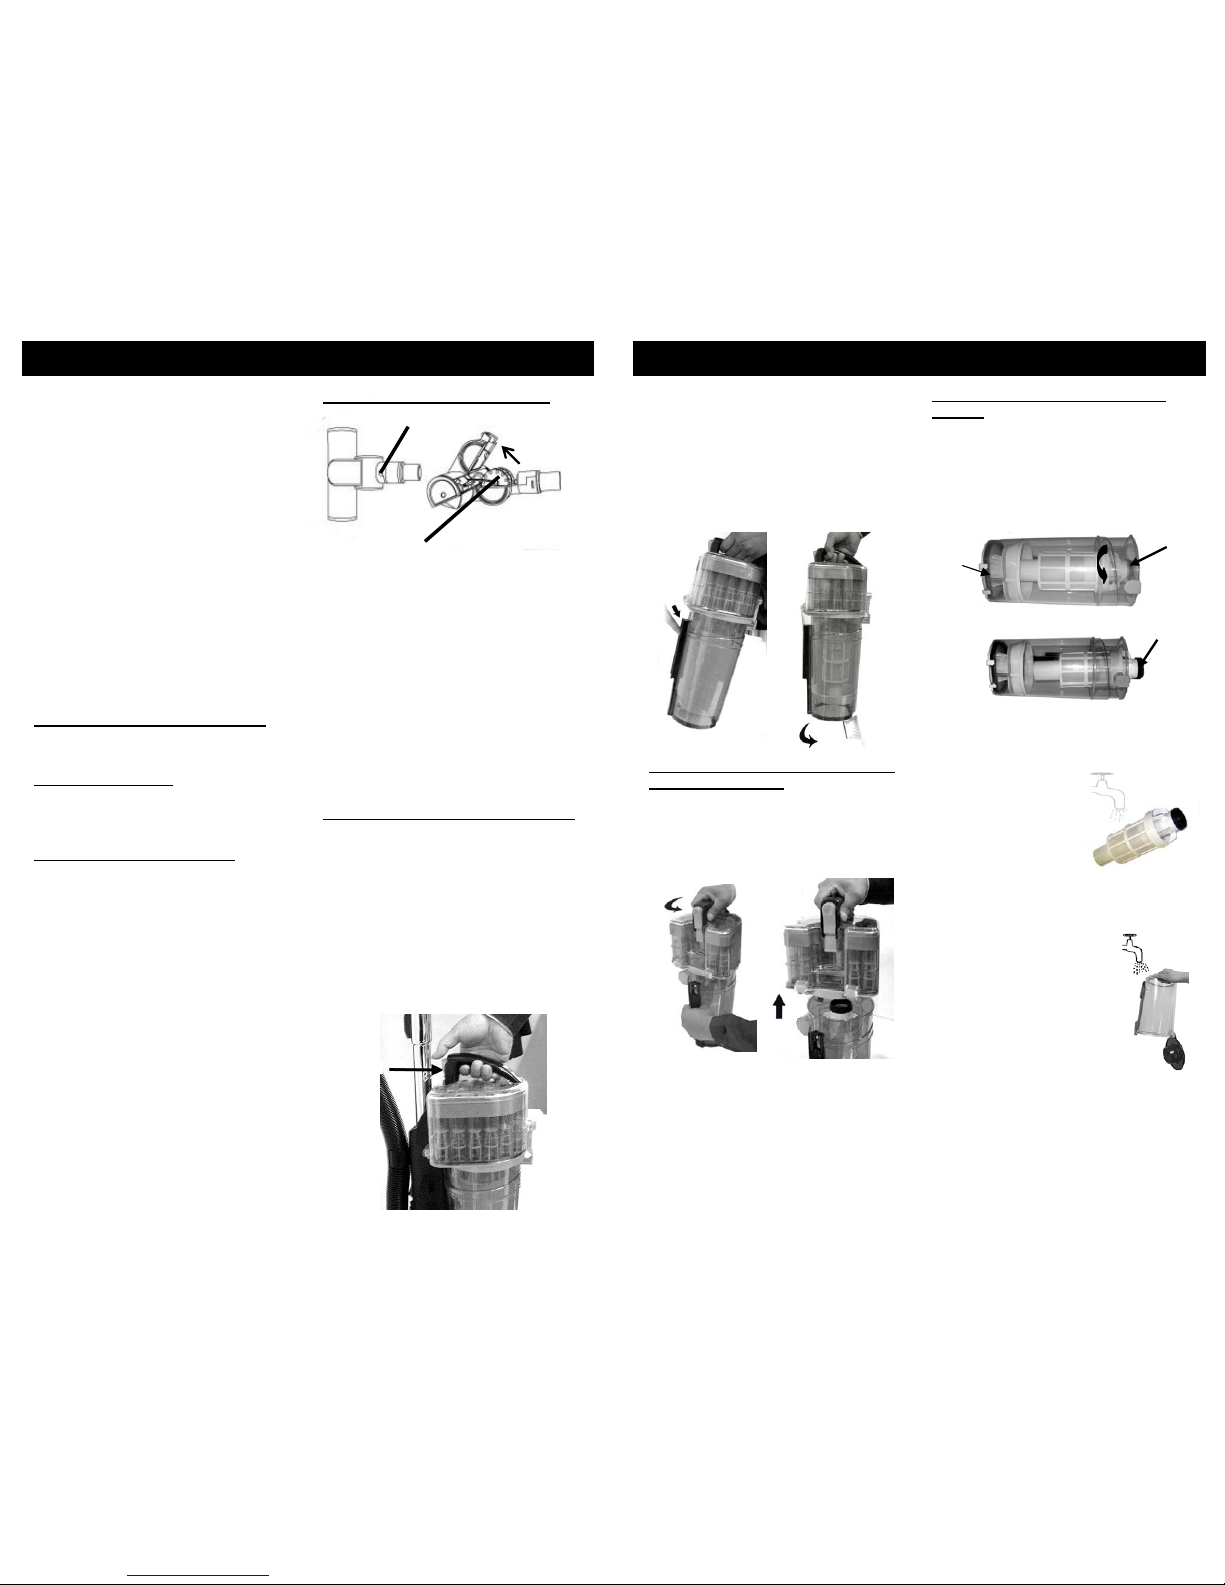
Removing the Dust Cup Assembly
CAUTION: Always unplug the unit from
the electrical outlet before removing and
emptying the dust cup. Failure to do so,
may result in electric shock or personal
injury.
To ensure that your vacuum continues to
clean thoroughly, the dust cup should be
emptied after each use and/or each time
it reaches the “MAX” fill line.
1. To remove the dust cup assembly,
press the dust cup release button
and remove the dust cup assembly.
(Fig. 20)
Fig. 20
PRESS
IMPORTANT NOTE: See the
manufacturer’s recommendations when
vacuuming delicate or hand woven
carpets. They may suggest vacuuming
your carpet with the power nozzle on a
low height with the brush roll “Off. If this
is the case, set the carpet height
adjustor to the lowest setting and place
the carpet-to-floor selector to the “Bare
Floor/Tools” position.
WARNING: Always empty the dust cup
after each use and during prolonged
usage. Never over fill the dust cup
beyond the “MAX” fill line - r emove dirt
and clean the debris screen each time
the dust cup is emptied or during
prolonged usage or risk motor damage.
Empty the cyclonic chamber every three
months depending on the amount of
usage. Never let the dust in the c yclonic
chamber surpass the “MAX” fill line.
Using the Pet Hair Power Brush
The pet hair power brush may be used
with the telescopic wand or with the
handle.
To use with the handle
:
1. Remove the handle from the unit and
push in the power brush.
2. To remove the power brush from the
handle, pull and twist.
To use with the telescopic wand:
1. Press the telescopic wand release
button and pull the telescopic wand
out of the vacuum.
2. Push the power brush onto the end.
3. To remove the power brush, pull and
twist.
The efficiency of your power brush
depends on the bristle brush rotating at
high speed. Strong air suction is needed
to accomplish this. In order to ensure
that maximum air suction is maintained,
please read the following instructions:
1. Empty the Dust Cup prior to reaching
the “MAX” fill line.
2. Ensure that the rotating bristles on
the power brush is kept free of hair
and string.
3. Inspect the turbine regularly to
ensure that the air passage is free of
dirt and debris.
Turbine
Tilt
Upwards
Locking Latch
1. Slide locking latch forward then tilt the
top housing of the brush upwards.
The top housing is hinged and will tilt
up approximately 45° only. (Fig. 19)
2. Inspect turbine wheel and air passage
for debris and/or blockage. Remove
debris if present.
3. Inspect the rotating bristle brush for
build-up hair or string. If present,
remove by carefully cutting with
scissors. Avoid damaging or cutting
the bristles or the belt.
4. Once clean, close the top cover of the
power brush and slide the locking
latch toward the rear of the brush to
lock.
Cleaning Pet Hair Power Brush
Fig. 19
MAINTENANCE INSTRUCTIONS
8
WARNING: Do NOT push the cyclonic
chamber bottom door release button
while the cyclonic chamber is still
attached to the dust cup.
2. To empty the dust cup, hold the dust
cup assembly over a garbage
container and press on the dust cup
bottom door release button.
(Fig. 21, Fig. 22)
Fig. 21
Press
Fig. 22
Separating the Dust Cup from the
Cyclonic Chamber
1. Remove the dust cup assembly.
2. While holding the dust cup assembly,
twist the carrying handle counter
clockwise to separate the cyclonic
chamber from the dust cup.
(Fig. 23, Fig. 24)
Fig. 23
Fig. 24
Fig. 25
Fig. 26
Debris
Screen
Hold
From the
bottom
Hold &
Twist
3. Take out the debris screen and rinse
it in lukewarm water by just running
it under the tap to remove any dust
that is adhering
to the screen.
(Fig. 27) Do
NOT place in
dishwasher. Let it
air dry completely
(24 hours) before
reinstalling into
the vacuum.
4. The dust cup can be washed in
lukewarm water. Do not use strong
detergents. (Fig. 28)
5. Make sure that the
dust cup and the debris
screen are completely
dry before re-assembling.
6. To replace the debris
screen, insert the debris
screen back into the dust
cup. Fit the debris screen
back into position and turn
clockwise to lock it into
position.
Cleaning the Dust Cup & Debris
Screen
To remove the debris screen:
1. Hold the dust cup in one hand and
with the other hold the debris
screen. (Fig. 25)
2. Twist the debris screen counter
clockwise to unlock and remove
from the dust cup. (Fig. 26)
Fig. 27
Fig. 28
Emptying & Cleaning the Cyclonic
Chamber
Periodically the cyclonic chamber will
need to be emptied and cleaned. This
does not have to be done every time the
dust cup is emptied but it is recommended
that you empty the cyclonic chamber
every three (3) months depending on use
or prior to the dust in the cyclonic
chamber reaching the “MAX” fill line. If dirt
level is not visible, clean every three
months.
To empty the cyclonic chamber:
1. Hold the cyclonic chamber from the
handle over a garbage can and
press the cyclonic
chamber bottom
door release button
to empty the dust.
(Fig. 29) You can
gently tap clean it
against the side
of the garbage
can to make sure
that all the dust
has been emptied from the cyclonic
chamber.
2. After emptying the cyclonic chamber,
replace it onto the dust cup and place
the dust cup assembly into the
vacuum.
Fig. 29
Cyclonic Chamber
Bottom Door
Release Button
MAINTENANCE INSTRUCTIONS
9
Filter Indicator Light
When the filter indicator light flashes, it
means that the dust cup is full, the filters
need cleaning or there is a blockage in the
air paths. You must empty the dust from
the dust cup, clean the debris screen, clean
the filters and check the unit for any
blockages. (Fig. 30)
Fig. 30
Filter
Indicator
Light
Note: Occasionally the filter indicator
light will flash momentarily if the air path
is blocked when using the above floor
tools. This is normal.
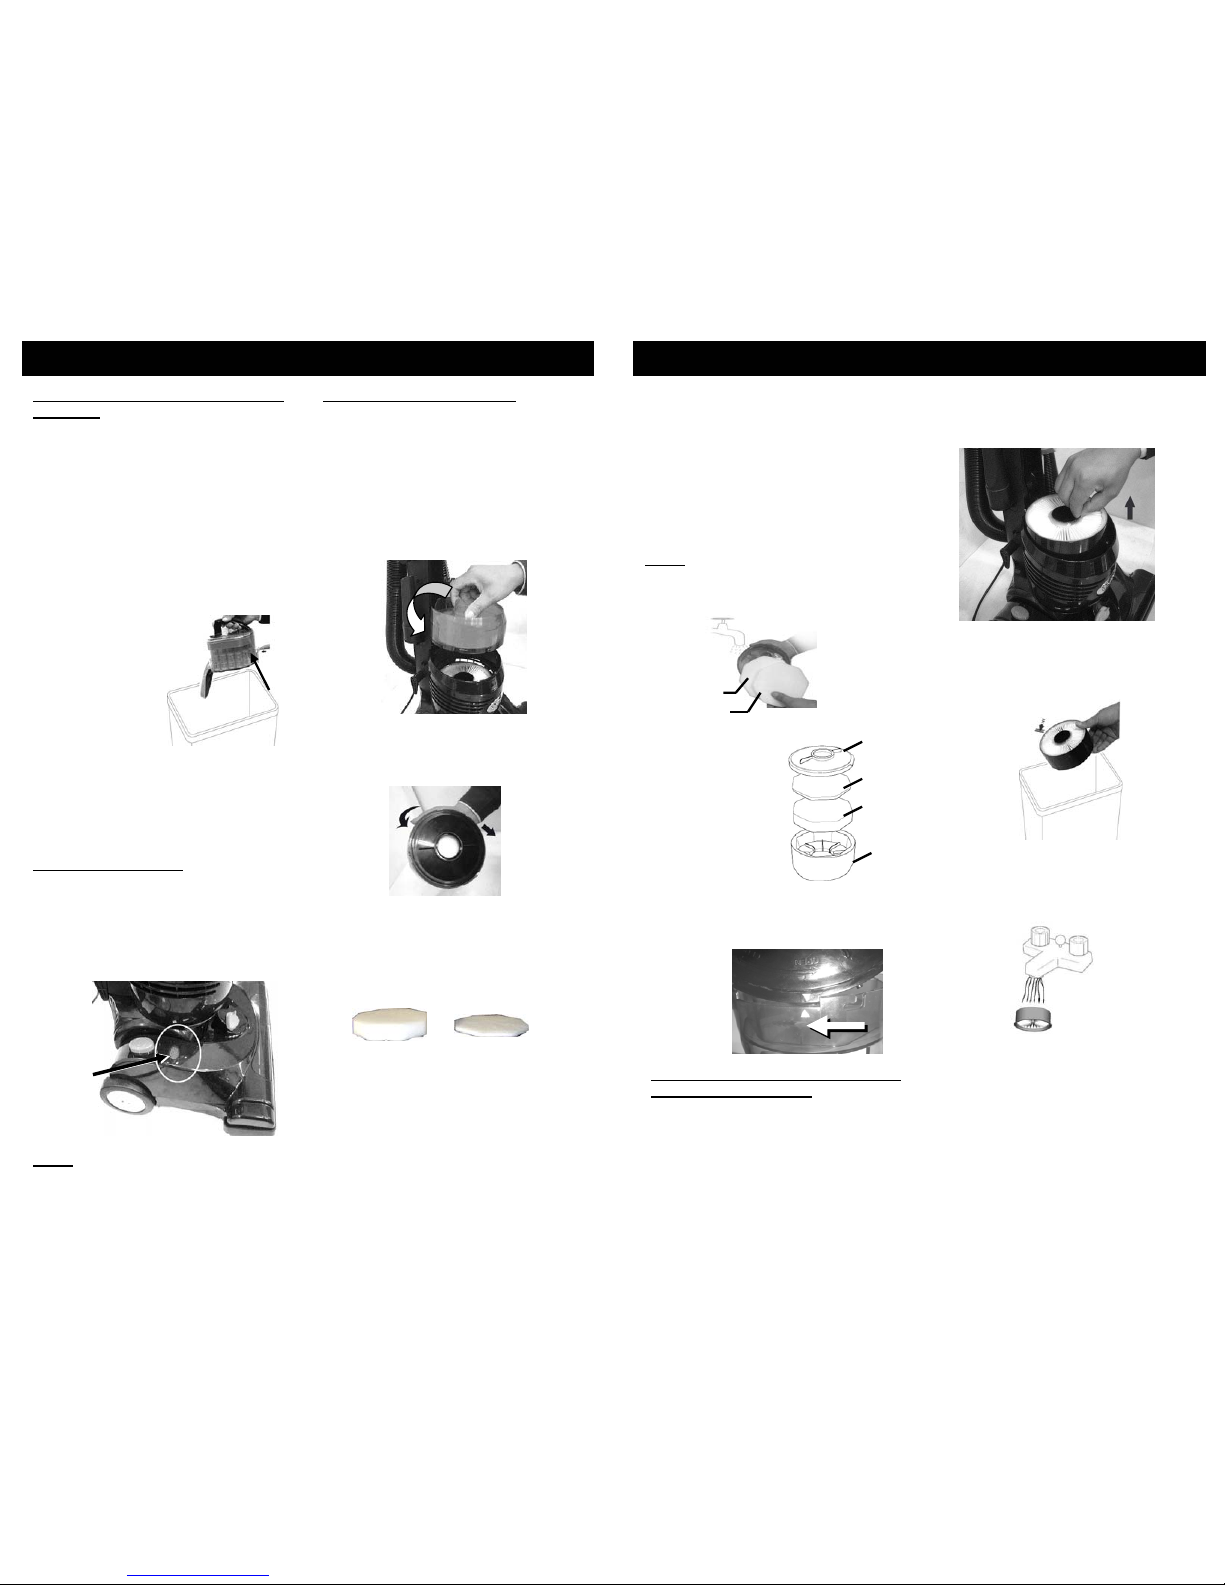
Cleaning Pre-Motor Filters
Under normal use, the 2 filters in the
filter housing should be cleaned every
three (3) to five (5) months for optimal
performance of your vacuum. The filter
indicator light will flash when the filters
need cleaning.
To remove the filter housing:
1. Hold the filter housing by the air
inlet and turn counter clockwise to
unlock. (Fig. 31)
Fig. 31
2. Turn the filter housing upside down
and turn the filter housing base
counter clockwise to open. Remove
the filter housing base. (Fig. 32)
Fig. 32
3. Inside the filter housing are two filters.
Filter 1 is a foam filter and Filter 2 is a
felt filter. Both are washable and
reusable for the lifetime of your
vacuum (under normal household
use). (Fig. 33, Fig. 34)
Fig. 33 Fig. 34
Foam Filter
Felt Filter
MAINTENANCE INSTRUCTIONS
10
5. When the filters are
dry, replace them
into the dry filter
housing. Insert the
foam filter (filter 1)
first and then place
the felt filter (filter 2)
over the foam filter.
6. Replace the filter
housing base on to
the filter housing.
(Fig. 36) Align the
arrows on the filter housing with the
arrows on the filter housing base and
turn clockwise to lock in place.
(Fig. 37)
Fig. 35
Foam Filter
Felt Filter
Fig. 37
ALIGN HERE TO CLOSE
ALIGN HERE TO CLOSE
Fig. 36
Filter
Housing
Base
Felt
Filter
Foam
Filter
Filter
Housing
4. Rinse the filters in lukewarm water
until the water runs clear. Squeeze
and let the filters air dry for 24 hours
before re-installing into the filter
housing. Do not use a washing
machine to clean the filters. Do not
use a hair dryer to dry them. Air dry
only. You can also rinse the filter
housing if you wish. Never operate
the vacuum without ALL the filters in
place. (Fig. 35)
Note: To continue using your vacuum
while the pre-motor filters are drying, you
can replace them with the extra set of premotor filters that are included.
Removing & Cleaning the Lifetime
Washable HEPA Filter
Under normal use, the HEPA filter
should be tapped cleaned and rinsed
once every three (3) years or as needed
depending on usage. This is located
underneath the filter housing.
Fig. 38
3. Vigorously tap clean the HEPA
filter on a hard surface to remove
any residual dust that might be on
the HEPA filter. (Fig. 39)
Fig. 39
5. Replace the HEPA filter back into the
vacuum after it has air dried for 24
hours.
Please Note: The white material in the
HEPA filter will discolor over time - This
is NORMAL and will NOT affect the
performance of the filter.
4. You can wash the HEPA filter by
running it under the tap allowing the
water to run on the dirty side.
(Fig. 40) Always allow 24 hours for
air drying before replacing into the
vacuum.
Fig. 40
To remove the HEPA filter:
1. Remove the filter housing.
2. Hold the HEPA filter by the center
opening and lift it up. (Fig. 38)
MAINTENANCE INSTRUCTIONS
11
Motor Thermostat
Important: This unit is equipped
with a motor protective thermostat. If for
some reason the vacuum cleaner should
overheat, the thermostat will automatically
turn the unit off. Should this occur:
• Push the On/Off button once.
• Disconnect the plug from the power
source.
• Check the source of overheati ng
problem. (i.e. clogged hose or filter)
TROUBLESHOOTING
• If clogged hose or filter is found, unclog
the hose and replace the filters.
• Wait at least 45 minutes before
attempting to reuse the vacuum.
• After unit has cooled down for 45
minutes, plug in the cleaner and push
the On/Off button. The vacuum
should start again.
• If the vacuum still does not start,
contact customer service at
1 (888) 668-9600.
Clearing Blockages
Occasionally the vacuum may become
blocked by a build up of debris which will
require cleaning. If the filter indicating
light is flashing, but the filters have been
cleaned recently, check the air paths for
blockages. To reduce the risk of
electric shock, the power cord must be
disconnected before clearing a blockage
or performing maintenance/trouble
shooting checks.
CAUTION: If any part of your unit has a
blockage, it may overheat and then
automatically shut off. Unplug the
vacuum and allow it to cool down for 45
minutes.
IMPORTANT: Damages caused while
clearing or attempting to clear blockages
are not covered under your product’s
limited warranty.
CAUTION: Beware of sharp objects
when clearing blockages.
Important: Replace parts of the
vacuum securely before continuing to
use.
2. Press on the 2 locking tabs on the
hose to release it from the handle.
(Fig. 42)
Locking
Tab
Fig. 42
3. Check the handle from both openings
and remove anything that seems to
be blocking them. (Fig. 43)
Fig. 43
Clearing the Handle
Never insert sharp objects into an
opening to clear it.
1. Unplug the unit and remove handle
from the telescopic wand by pressing
on the handle lock release button and
lifting the handle up. (Fig. 41)
Fig. 41
Handle
Lock
Release
TROUBLESHOOTING
12
Clearing the Dust Cup Air Duct
1. Unplug the vacuum.
2. Check fullness of the dust cup, if full,
remove and empty the dust cup.
3. Check the air duct behind the dust
cup for any blockage. (Fig. 45)
4. Clear the blockage from the air duct
and replace dust cup. Never insert
sharp objects into an opening to clear.
5. Plug in unit and resume vacuuming.
Dust Cup
Air Duct
Fig. 45
4. Remove the telescopic wand and
verify that it is clear by holding it up to
the light to see if there is any debris
blocking it.
5. After all the blockages have been
removed, replace the hose onto the
handle and the telescopic wand onto
the vacuum. Plug in the unit and
resume vacuuming.
Clearing the Nozzle Hose
To clear a blockage in the nozzle hose:
1. Unplug the vacuum, lock it in the
upright position and lay it flat on
the floor.
2. Using a Philips screwdriver, remove
the two (2) screws from the access
port. (Fig. 46)
Fig. 46
3. Remove the access port cover.
4. Using the Philips screwdriver again,
remove the two (2) screws that hold
down the nozzle hose. (Fig. 47)
5. Take out the nozzle hose
connector and check to see if
there is a clog in the nozzle hose.
(Fig. 48)
Fig. 47
Fig. 48
6. Clear any blockage from this
opening. Never insert sharp objects
into the opening to clean.
Clearing the Super Stretch Hose
1. Turn off the vacuum and then unplug
the cord from the power outlet.
2. To release the hose from its
connection to the handle, press the
two locking tabs and pull toward you.
(See Fig. 42 on page 11)
3. To release the hose from its
connection to the dust cup, press the
two locking tabs and pull down.
(See Fig. 44)
4. Thoroughly inspect and remove any
blockages from the hose and
connector.
5. Re-attach the hose to the handle and
dust cup connector.
6. Ensure that the locking tabs are
securely fastened.
Fig. 44
Locking
Tab
13
TROUBLESHOOTING
Cleaning & Changing the Belt
WARNING: To reduce the risk of electric
shock, the power cord must be disconnected
before performing maintenance/trouble
shooting checks.
Occasionally the power nozzle drive belt will
require changing, the frequency will depend
upon the amount of use your vacuum sees.
2. Check to see if there is a clog just
behind the brush roll. (Fig. 49)
3. Clear the blockage from this opening.
Never insert sharp objects into
opening to clean.
4. Check the brush roll to see if there are
any threads or other debris wrapped
around it. Using a scissor, carefully cut
any debris that is blocking the bristles.
5. Plug unit in, to continue vacuuming.
Fig. 50
If the brush roll does not engage when the
carpet-to-floor selector is in the “Carpet”
position:
1. Turn the vacuum "Off" and unplug
from power supply.
2. Release the handle by pressing on
the handle release pedal and pull
back until the handle is released
from its upright position. Then turn the
vacuum over and place on the floor.
3. With a flathead screw driver or a coin,
rotate the three (3) locking screws on
the belt and brush roll cover in a
counter clockwise direction to the
unlock position. (Fig. 50)
4. Remove the belt and brush roll
cover. (Fig. 51)
Fig. 51
5. Inspect the brush roll for any build-up
of hair or string. If present, remove by
carefully cutting with scissors. Be
careful not to cut or damage the
bristles.
Clearing the Intake Opening Behind
the Brush Roll
There is an intake opening behind the
brush roll underneath the unit where
debris may collect, reducing suction. To
clear this opening:
1. Unplug the unit and lay the vacuum
flat on the floor upside down.
Intake
Opening
Fig. 49
7. Replace the nozzle hose
connector back into the unit and
using the Philips screwdriver,
screw it back into place.
8. Replace the access port cover
and screw it back into place.
9. Plug the unit in and continue
vacuuming.
TROUBLESHOOTING
14
7. Once having removed the brush roll
completely, you will be able to easily
remove the belt from the motor driven
shaft. (Fig. 54)
Fig. 54
8. Slide one end of the new belt over
the drive shaft, and the other end of
the belt around the brush roll. Secure
the left side of the brush roll into
place, and then the right side. Check
to make sure that the belt is
completely centered on the motor
driven shaft and that the brush roll
turns smoothly.
Changing the Headlight
WARNING: To reduce the risk of electric
shock, the power cord must be
disconnected before performing
maintenance/trouble shooting checks.
Occasionally the headlight will require
changing.
1. Turn the vacuum off and unplug from
the electrical outlet.
2. With a flathead screw driver, insert the
end of the screwdriver into the two
slots on top of the headlight lens and
gently pull down. (Fig. 56)
9. To replace the belt and brush roll
cover, lineup the 4 locking tabs on
the belt and brush cover with the
slots on the power nozzle and push
in. (Fig. 55)
10. Rotate the locking screws clockwise
to tighten.
Fig. 55
Fig. 56
Lens Slots
3. Lift out the headlight lens.
4. Remove the light bulb by pulling it out
carefully.
5. Replace the new bulb by pushing it in.
6. To replace the headlight lens, insert
the bottom tabs of the lens into the
holding slots and snap the top back
into place to secure.
Fig. 52
6. To remove the worn or broken belt, lift
the brush roll and slide it out. Remove
the brush roll by grasping the left side
of the brush roll and pulling it upward
and out. Once the brush roll has been
pulled out slightly, slip the belt off of it.
(Fig. 52, Fig. 53)
Fig. 53
 Loading...