

Infinity 6250LQ Operation Manual

FY operation manual
- 1 -
Operation Manual
6250LQ
Thank you very much for purchasing INFINITI
In order to use INFINITI correctly and safely and understand this product’s capability, please
read this manual carefully.
The manual includes equipment structure, description, technical parameters, operation manual,
safety information, application of software, etc.
Subject to change without notice.
We tried our best to edit this manual and test our machine before market; however, we do not
guaranty errors existing. Please inform us if you find any.
All copyrights are reserved. Any violation to the copyright may cause lawsuit.
Version 1.5
September 25, 2003

FY operation manual
- 2 -
INDEX
CHAPTER 1 SAFETY INFORMATION
1.1" Important Safety Information
1.2" Caution When Using Printer
1.3" Guidance When Using Ink Container
1.4" Choosing Printer Installation Place
1.5" Caution, Warning, and Attention
CHAPTER 2 TECHNICAL SPECIFICATION
CHAPTER 3 EQUIPMENT ASSEMBLY AND ADJUSTMENT
3.1" Assemble Digital Printer
3.2" Adjust Digital Printer
3.3" Cautions before Turn on INFINITI 6250LQ
CHAPTER 4 EQUIPMENT STRUCTURE AND ACCESSORIES
CHAPTER 5 PANEL BASIC OPERATION
5.1" Menu Structure of Control Panel
5.2" Function Description in Detail
5.3" Printing Steps
CHAPTER 6 INK SUPPLY、CLEANING SYSTEM AND DESCRIPTION FOR
MULTI-FUNCTION AUXILIARY BOARD
CHAPTER 7 INK SUPPLY SYSTEM
7.1" Summary
7.2" System Diagram
7.3 Function Description
7.4 Operation Description
7.5 Intelligent Detection Function
7.6 Intellectualized Manual Button
CHAPTER 8 CLEANING SYSTEM
8.1" Summary
8.2" System Diagram
8.3" Operation Description
CHAPTER 9 HEATING SYSTEM
9.1" Summary
9.2" System Diagram
9.3" Function Description
9.4" Working processing and character
CHAPTER 10 SOFTWARE OPERATION
10.1" Installation
10.2" Usage of software
10.3" Operation of RIP
CHAPTER 11 MAINTENANCE GUIDE
11.1" Preparation for the printer
11.2" Prepare software
11.3" Adjustment
11.4" Maintenance for print head

FY operation manual
- 3 -
Chapter 1
SAFETY INFORMATION
1.1" Important Safety Information
Before using your INFINITY FY6250LQ InkJet Digital Printer, Please read following safety information. Pay
attention to the cautions on the Printer.
• Don’t block the hole on the cover.
• Don’t insert any object into the Printer groove. Don’t let any kind of moistures splash into Printer.
• Only use the Power Supply according to the label. You may choose either AC 110V or 220V for
different countries and regions.
• Please make sure the connection is correct for the Power Supply Cable before turning on the Printer
• Avoid to use the Socket controlled by the switch on the wall or by auto timing controller
• Please keep Printer away from the Magnet Interaction, For example: Speaker and Mobil-phone
• Don’t use damaged Electrical Power wire
• Don’t try to repair Printer by yourself
• Contact your Local Service Center to repair, if the following situations occur:
Power wire or Socket damaged
Liquid splashes into Printer
Printer damaged and Cover broken
Printer can’t work properly or printing quality has conspicuous change
1.2" Caution When Using Printer
• Don’t use your hand to move print head; otherwise the Printer will be damaged.
• Always use power switch to Turn On/Off the Printer. Before Shutting down the Printer, do not pull
out Power Supply wire or Data Wire.
• Before moving the Printer, please make sure the Print head at Original position and firmed.
1.3" Guidance When Using Ink Container
• Keep ink container away from children. Don’t drink or touch.
• If ink spills on the skin, please wash with soap and water. If ink splashes into eye, please wash with
water immediately
• Don’t shake the ink container, which causes ink leak.
• After three months, you should take off the ink container, clean it and dry it.
• Please keep surrounding clean when you replace a new ink container. It helps you improve printing
quality.
1.4" Choosing Printer Installation Place
• Make sure to leave enough space for the Printer; otherwise, the Printer may not work properly.
• Don’t leave Printer at a place where temperature and humidity change severely. Avoid sunshine,
strong light and heat.
• Avoid shaking and vibration.
• Keep sufficient room for air circulation.
• Place Printer nearby the Power socket, so it is easy to connect or disconnect the Power Supply

FY operation manual
- 4 -
1.5" Caution, Warning and Attention
Caution
Must obey in order to ensure person’s safety.
Warning
Must obey in order to protect the machine.
Attention
It includes the important and useful information about operation.
FY operation manual
- 5 -
Chapter 2
TECHNICAL SPECIFICATION
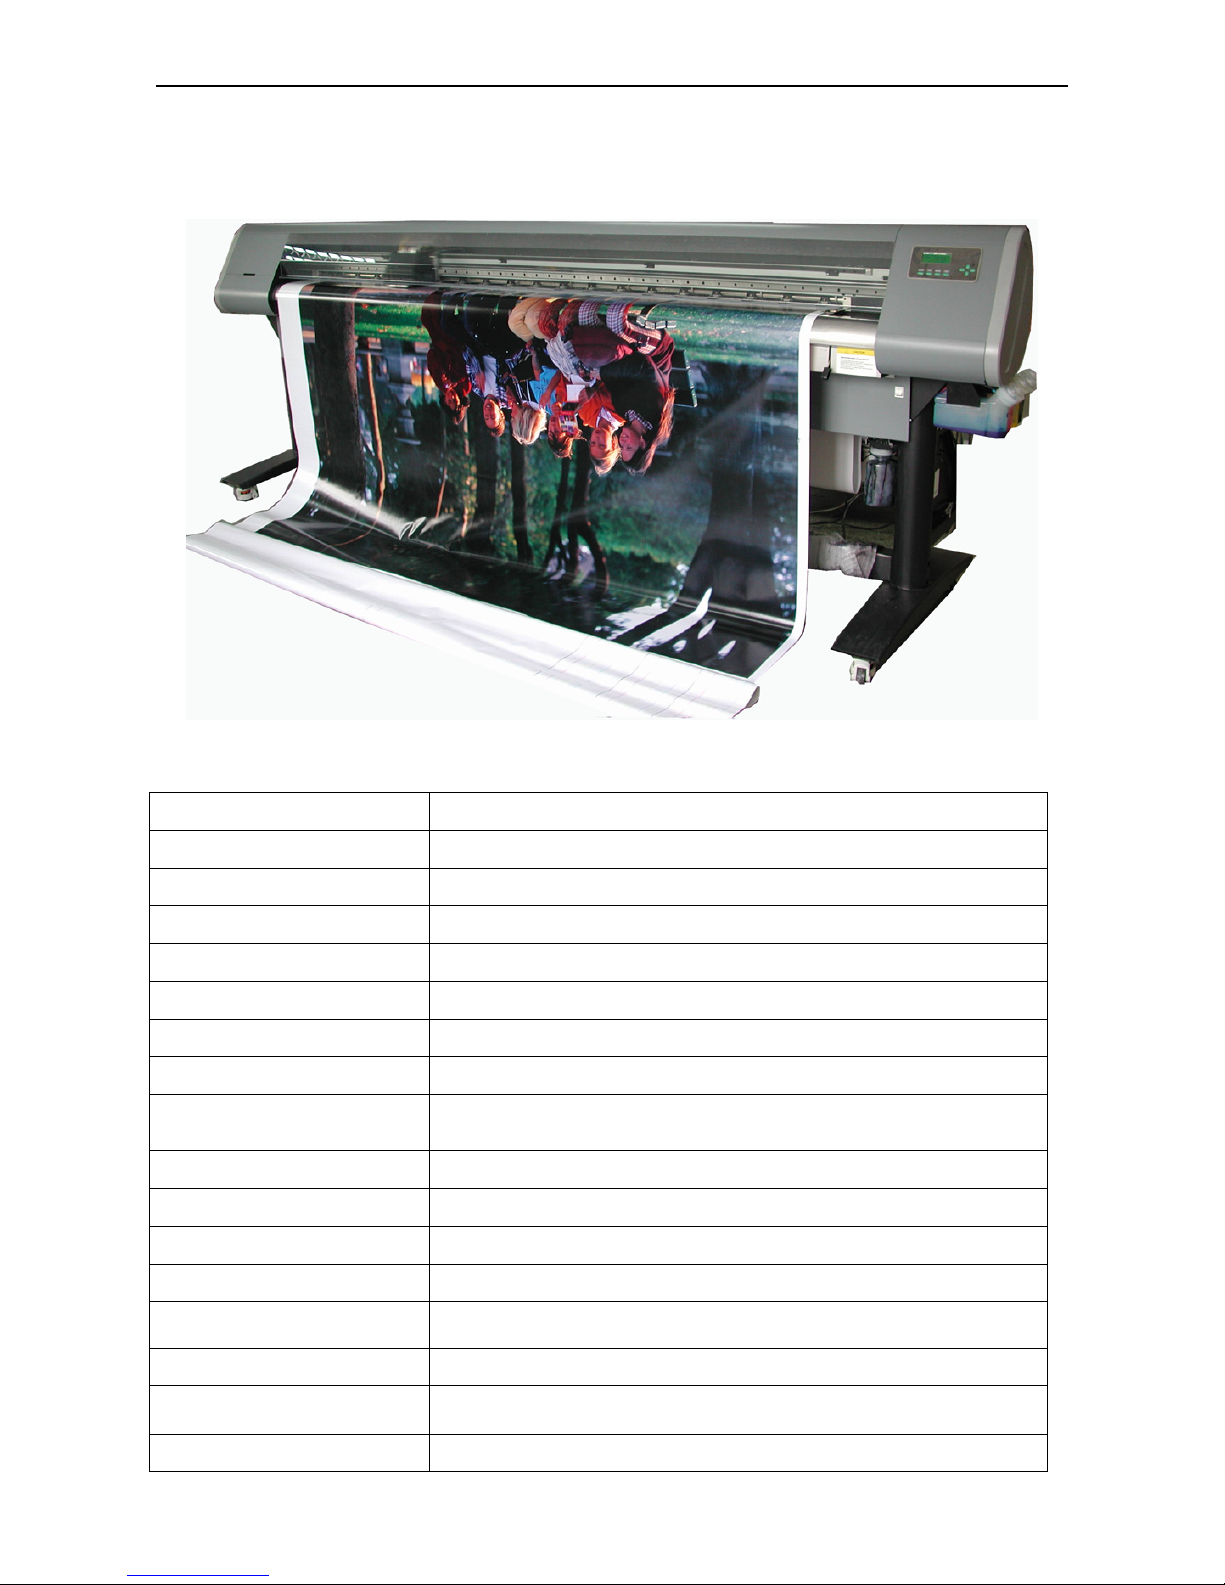
Figure2-1 Outlook
Production Type INFINITI Serials:6250LQ
Print technique 6250LQ:SPECTRA SL-128 piezo head, 4 heads inside
Resolution
180dpi、270dpi、360dpi、540dpi、720dpi
Pattern quality Photo effect (basic, high quality)
Media width 2530mm
Max printing width 2520mm
Display LCD display with 8 key panels
Ink type Solvent-base:C, M, Y, K
Ink supply
300ml/min auto flow pump ink supply,volume of main tank
800ml/color
Ink inspection system Auto/manual ink supply, ink low detector
Printing software
Support RIP drives for Window98、2000、XP etc
Media type Normal PVC banner, vinyl, coating film, polyester, etc.
Media transfer Roller paper of sheet (size bigger than A4 or 210mm)
Media feeding system
Auto feeding and take-up units
weight less than 40kg/roll
Print head height Adjustable distance between 2mm-4mm to media
Heating system
Front-rear temperature control, two-digit LED display, adjustable
30°C-60°C
Clamp Manual adjust media width

FY operation manual
- 6 -
Print head cleaning system
Auto cleaning device with anti-clogged flash function and auto
adjustable purging setup
Safety system Inside safety lock with function or shut down system
Printing interface High speed data transport PCI card
Print Language HH-RTL printing language
Noise Printing status≤ 60dB/waiting status≤ 40dB (ISO7779)
Printer-size ( including ink
box)/net weight
Size: Length × Width × Height
3600 mm×870 mm×1270 mm / 305kg
Package size/weight
3720 mm×890 mm×1100 mm/368KG
Input Voltage
AC 100 - 240 V, 50HZ/60HZ
(Heating voltage can be set up by an engineer inside machine;
control power supply is automatically set up)
Voltage for the feeding and
the cleaning system
AC 220V, 50HZ/60HZ(optional: AC 110V)
Power ( when AC 220V
applied)
Control:≤ 3A
Heating:≤ 5A
Feeding、cleaning:≤ 5A
Software platform
Window98、2000、XP
Working environment
Tem p era t ur e :20°C - 28°C
Subject to change without notice.
FY operation manual
- 7 -
Chapter 3
EQUIPMENT ASSEMBLY AND ADJUSTMENT
3.1 Assemble Digital Printer
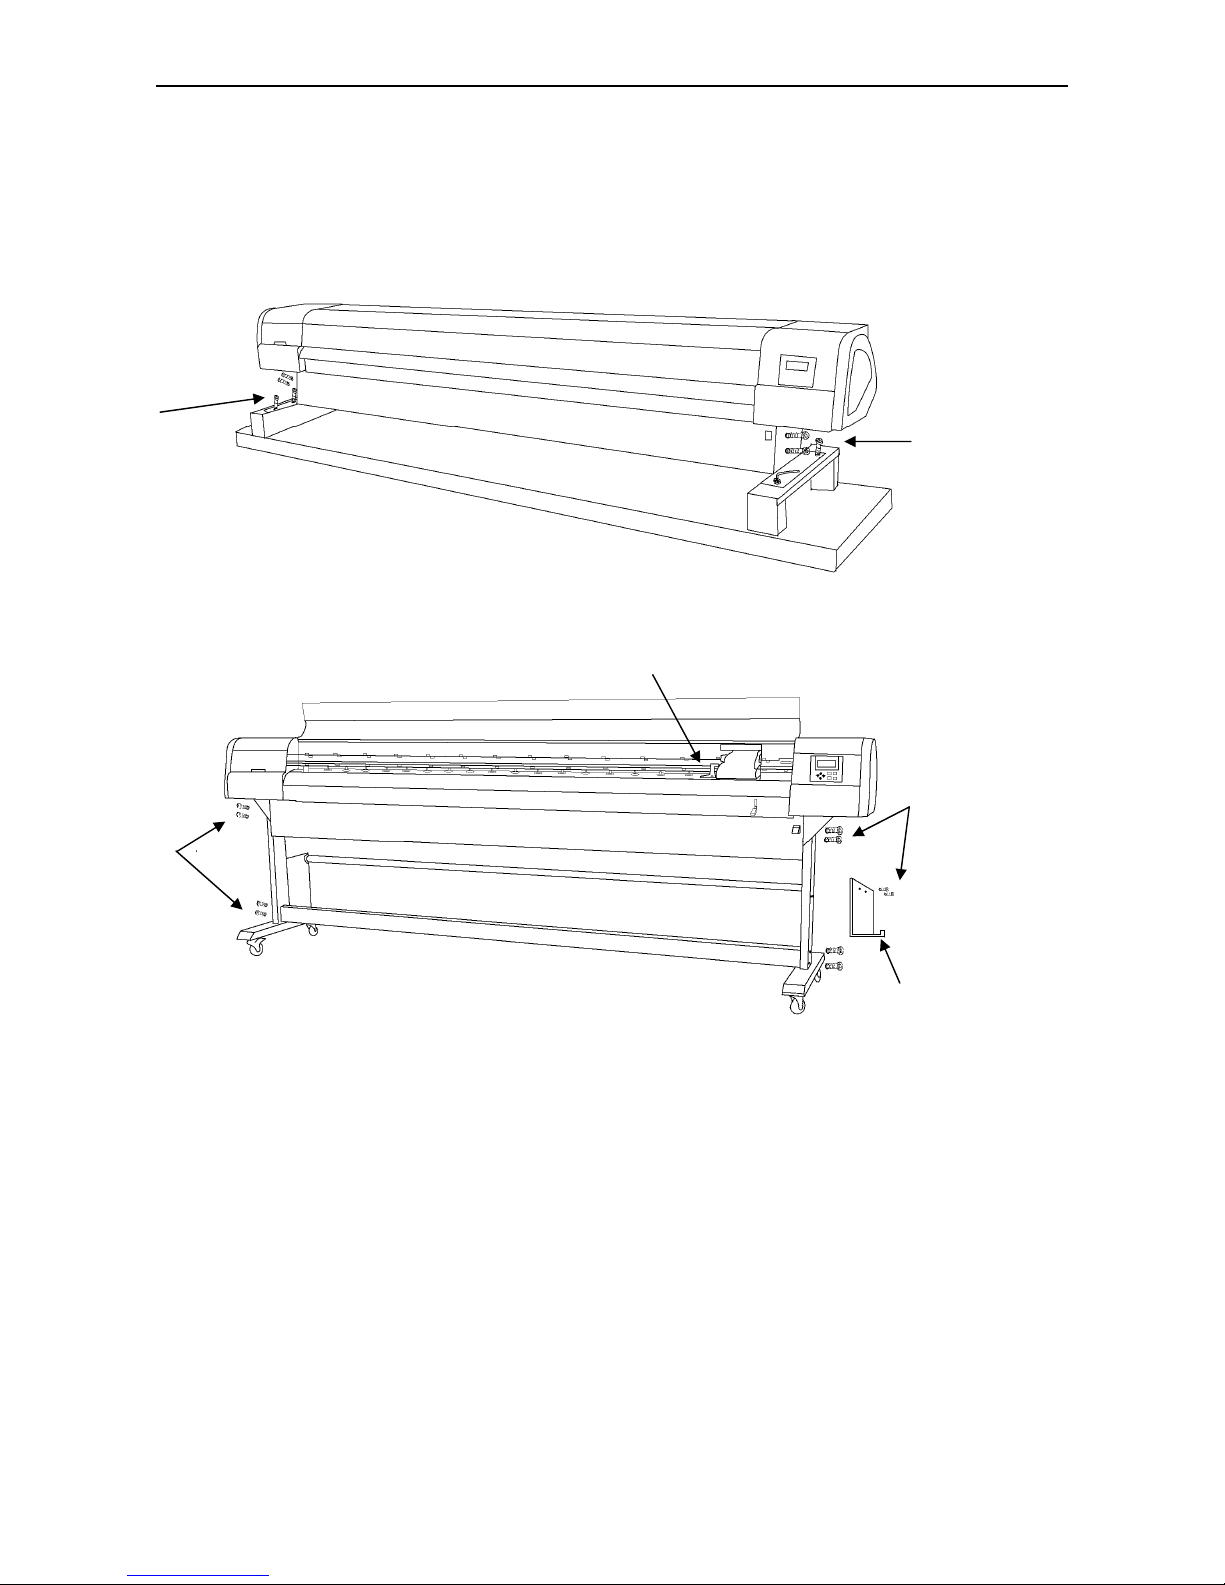
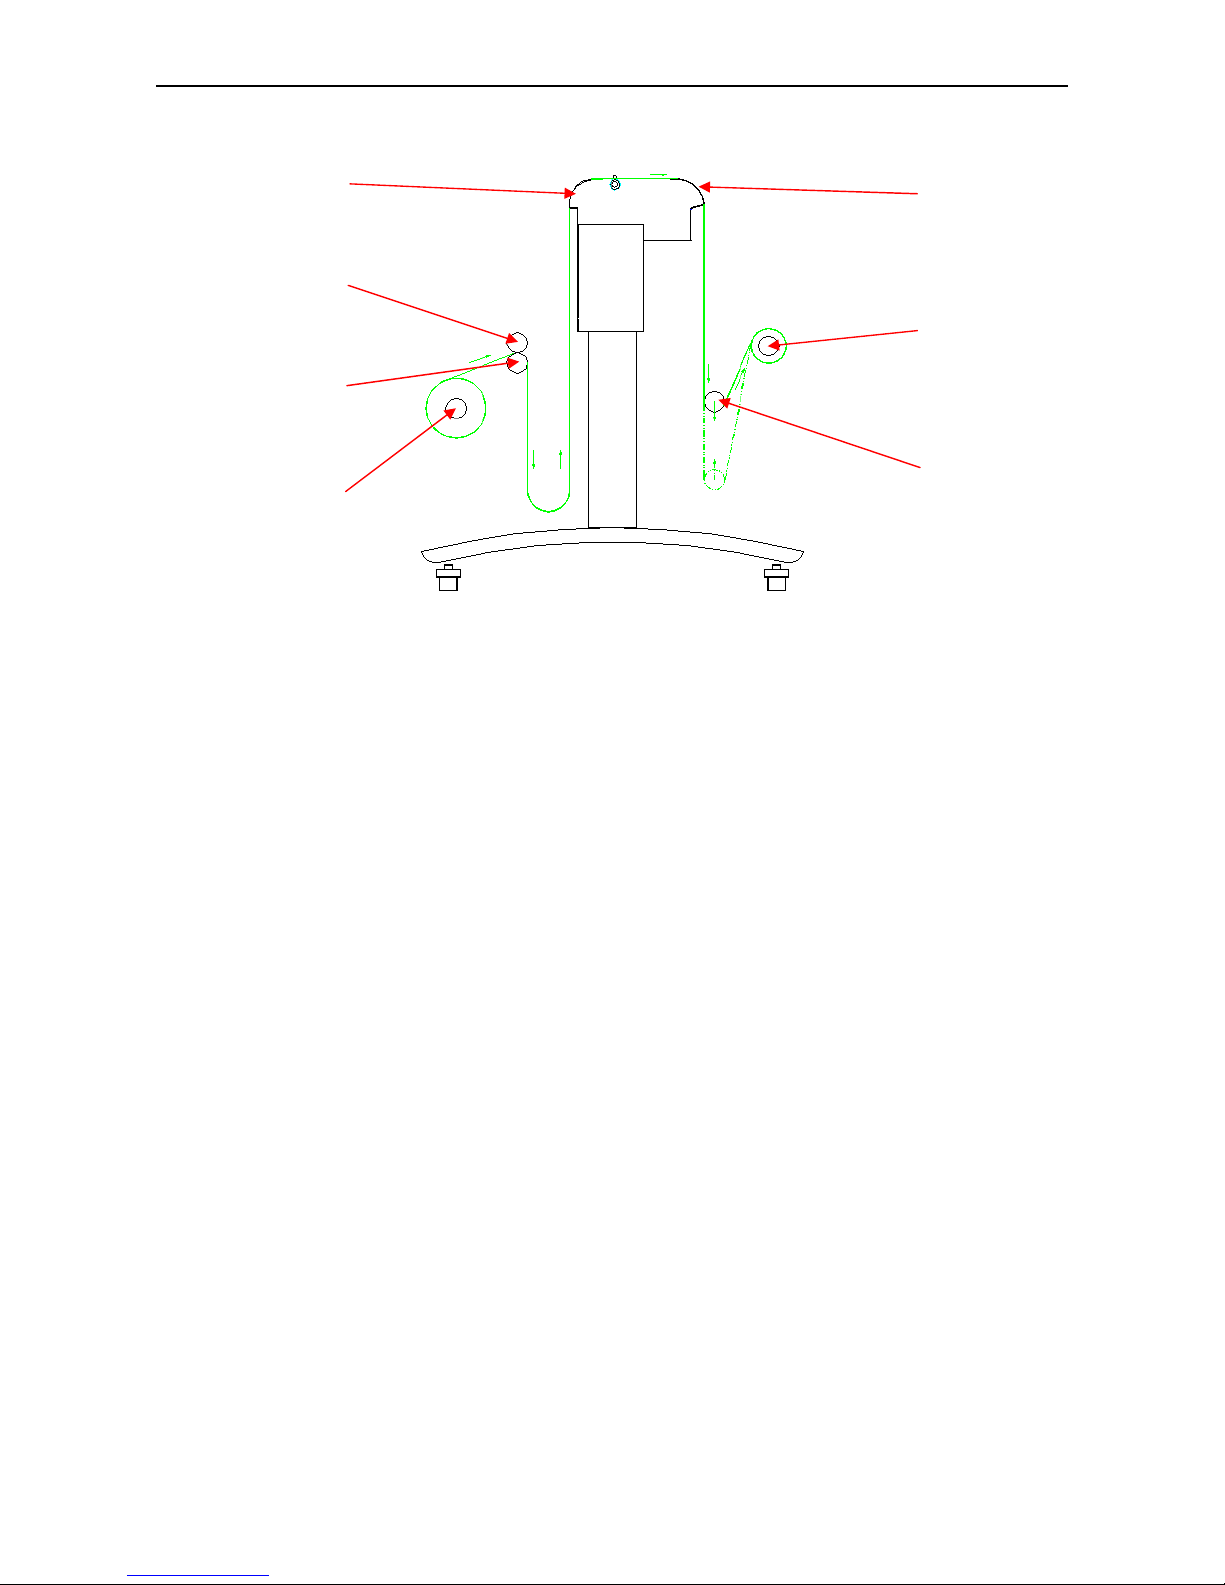
Figure 3-1 Packing screw’s detachment
Figure 3-2 Screw installation and print head fixation screw detachment
1. According to the Pattern above, please assemble kickstand by following step: feet with truckle,
kickstand, and ink supply box.
2. Please tighten all Screws on the Feet; prepare to assemble the Core Part.
3. Please confirm carrying on assemble project with sufficient workmates, and then tighten all screws
with core part. Confirm no shaking occurs.
4. Install ink supply system on right side.
5. Please connect all data wire and power wire correctly.
3.2 Adjust Digital Printer
1. Make sure all data wire and power wire connected correct, and then Turn on your Printer.
2. Put media on the roll behind the Printer or insert single sheet paper on the printing table. Clamp the
pole on the right of Printer. The Printer detects the media width automatically.
Screw
detachment
Screw
detachment
Print head fixation
screw detachment
Screw
installation
Screw
installation
Ink tank

FY operation manual
- 8 -
3.3 Cautions before turn on INFINITI 6250LQ
1. In order to make print head clean easily, please be equipped with:
• Chemical reagent: CH
3
COCH2CH3.
• Cleanroom wiper.
2. In order to inspect temperature and humidity for working surroundings, please prepare measure
instruments/gauges with measurement functions of humidity and temperature. Requirement for
environment:
• Temperature: 20°C - 28°C
• Humidity: 40% - 70%
3. Power supply standard
• You may select AC 110V or 220V for different countries or regions.
• Control power supply: AC 100 - 240V 50/60HZ
• Heating power supply: AC 100 - 240V 50/60HZ
• Take up power supply: AC 100 / 240V 50/60HZ (optional: AC 100 V)
• Cleaning power supply: AC 100 / 240V 50/60HZ (optional: AC 100 V)
• Ground wire must be well connected for Printer. Be equipped a UPS regulated power supply for
better solution.
4. Requirement for computer
In order to avoid problems caused by computer, please choose high quality computer or brand
computer such as DELL or IBM, etc.
FY operation manual
- 9 -
Chapter 4
EQUIPMENT STRUCTURE AND ACCESSORIES
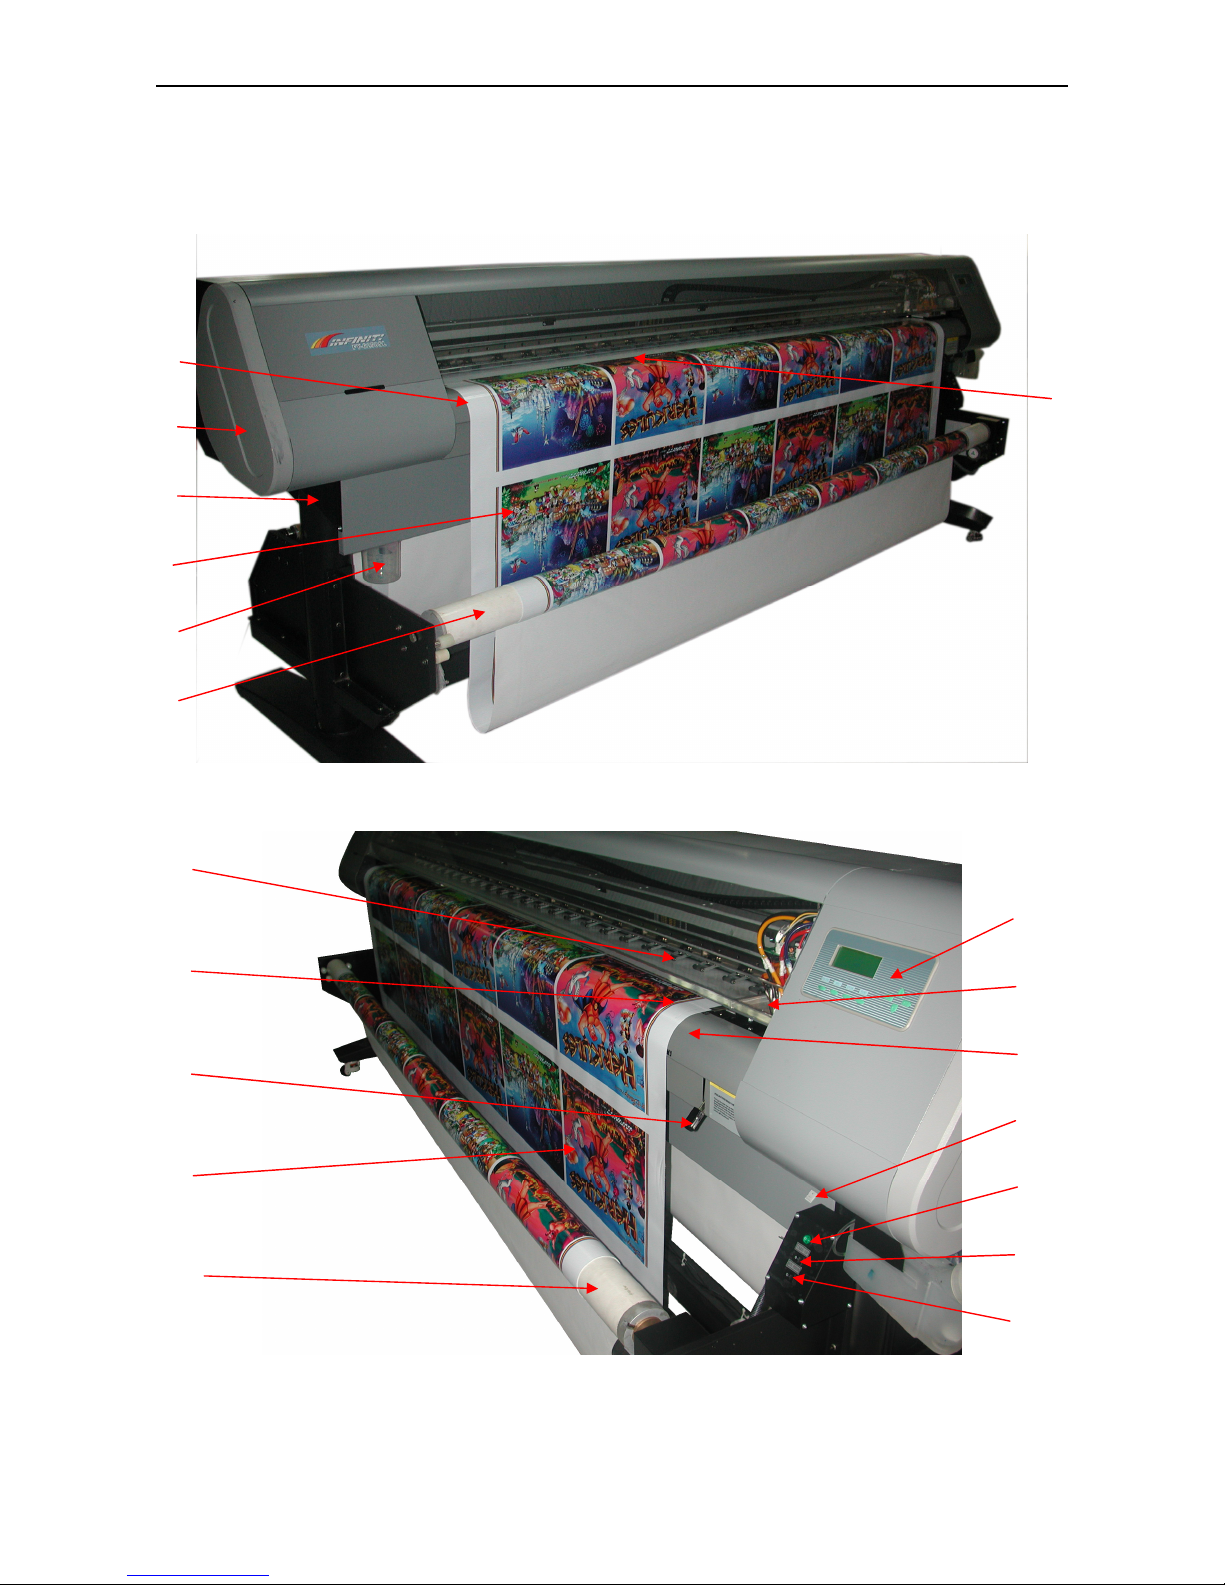
Figure 4-1 INFINITI 6250LQ (Front)
Figure 4-2 INFINITI 6250LQ (Front)
3
10
12
11
2
18
31
7
1
10
4
24
25
26
6
3
5
2
31
FY operation manual
- 10 -
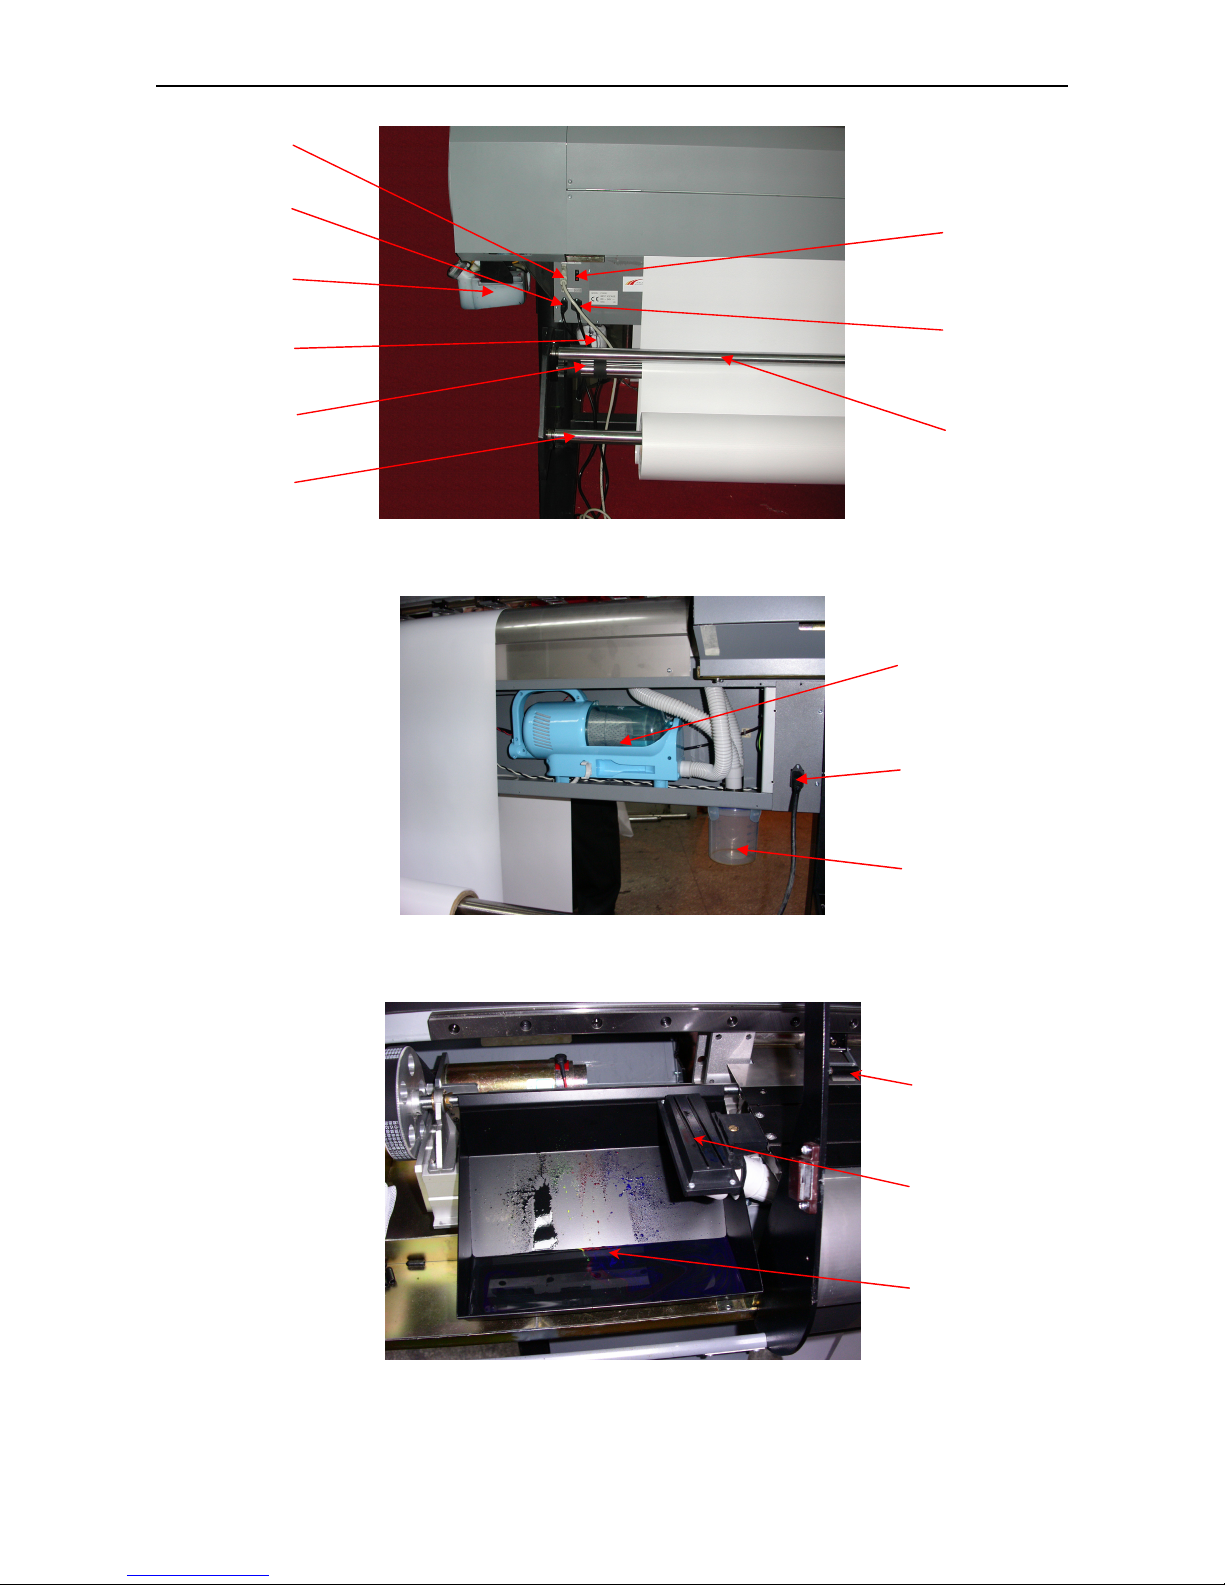
Figure 4-3 INFINITI 6250LQ (Back)
Figure 4-4 INFINITI 6250LQ (Back)
Figure 4-5 INFINITI (Partial)
6
17
13
20
21
19
14
28
27
23
22
29
15
16
18
FY operation manual
- 11 -
Figure 4-6 INFINITI 6250LQ
1. Print Head:4 piezo print heads for INFINITI 6250LQ
2. Printing media:
3. Printing board:
4. Power Switch:Turn on/off Printer
5. Clamp Pole:Control roller up / down for loading or unloading media
6. Press Roller:Corporate with rubble feed roller and make media move smoothly
7. LCD Control Panel:To set up parameter, execute all function and changing printing mode
8. Multi-function Auxiliary Board
9. Clamp:Manually adjust media width and keep media move straight
10. Heating board:
11. Frame:Support the machine
12. Side Cover:There are two side covers on left and right sides
13. Waste Ink Trough:Use to collect the waste ink
10
29
28
27
10
31
30

FY operation manual
- 12 -
14. Main Waste Ink Bottle:Use to collect the waste ink
15. Vacuum:
16. Vacuum Power Socket:
17. Suck Mouth:
18. Waste Ink Bottle:Use to collect the waste ink from suck mouth
19. Main ink tank and cleaning solution tank:a total five lines, including C, M, Y, K and solvent flushing,
800ml/each
20. Printing Interface Socket:Connect to Data card on computer
21. Power Socket:Provide power for Printer
22. Heater Power Socket:Provide power for Heater
23. Heater corona protection switch:For heater corona protection
24. Take-up/Down feed Media Power Switch:
25. Take-up Media control power:To control the media rolling forward or backward
26. Down feed Media control power:To control the media rolling forward or backward
27. Down feed Media support roller:
28. Down Feed Media Roller:Pull media out
29. Down Feed Media Press Roller:Increase the power when pulling media out
30. Take-up Media Press Roller: To ensure media tension all the same, a fixed pressure should be given to
media when taking up. Alternatively, you may put a light pole on
31. Take-up Media Roller: Used to take up media
FY operation manual
- 13 -
Chapter 5
PANEL BASIC OPERATION
5.1 Menu Structure of Control Panel
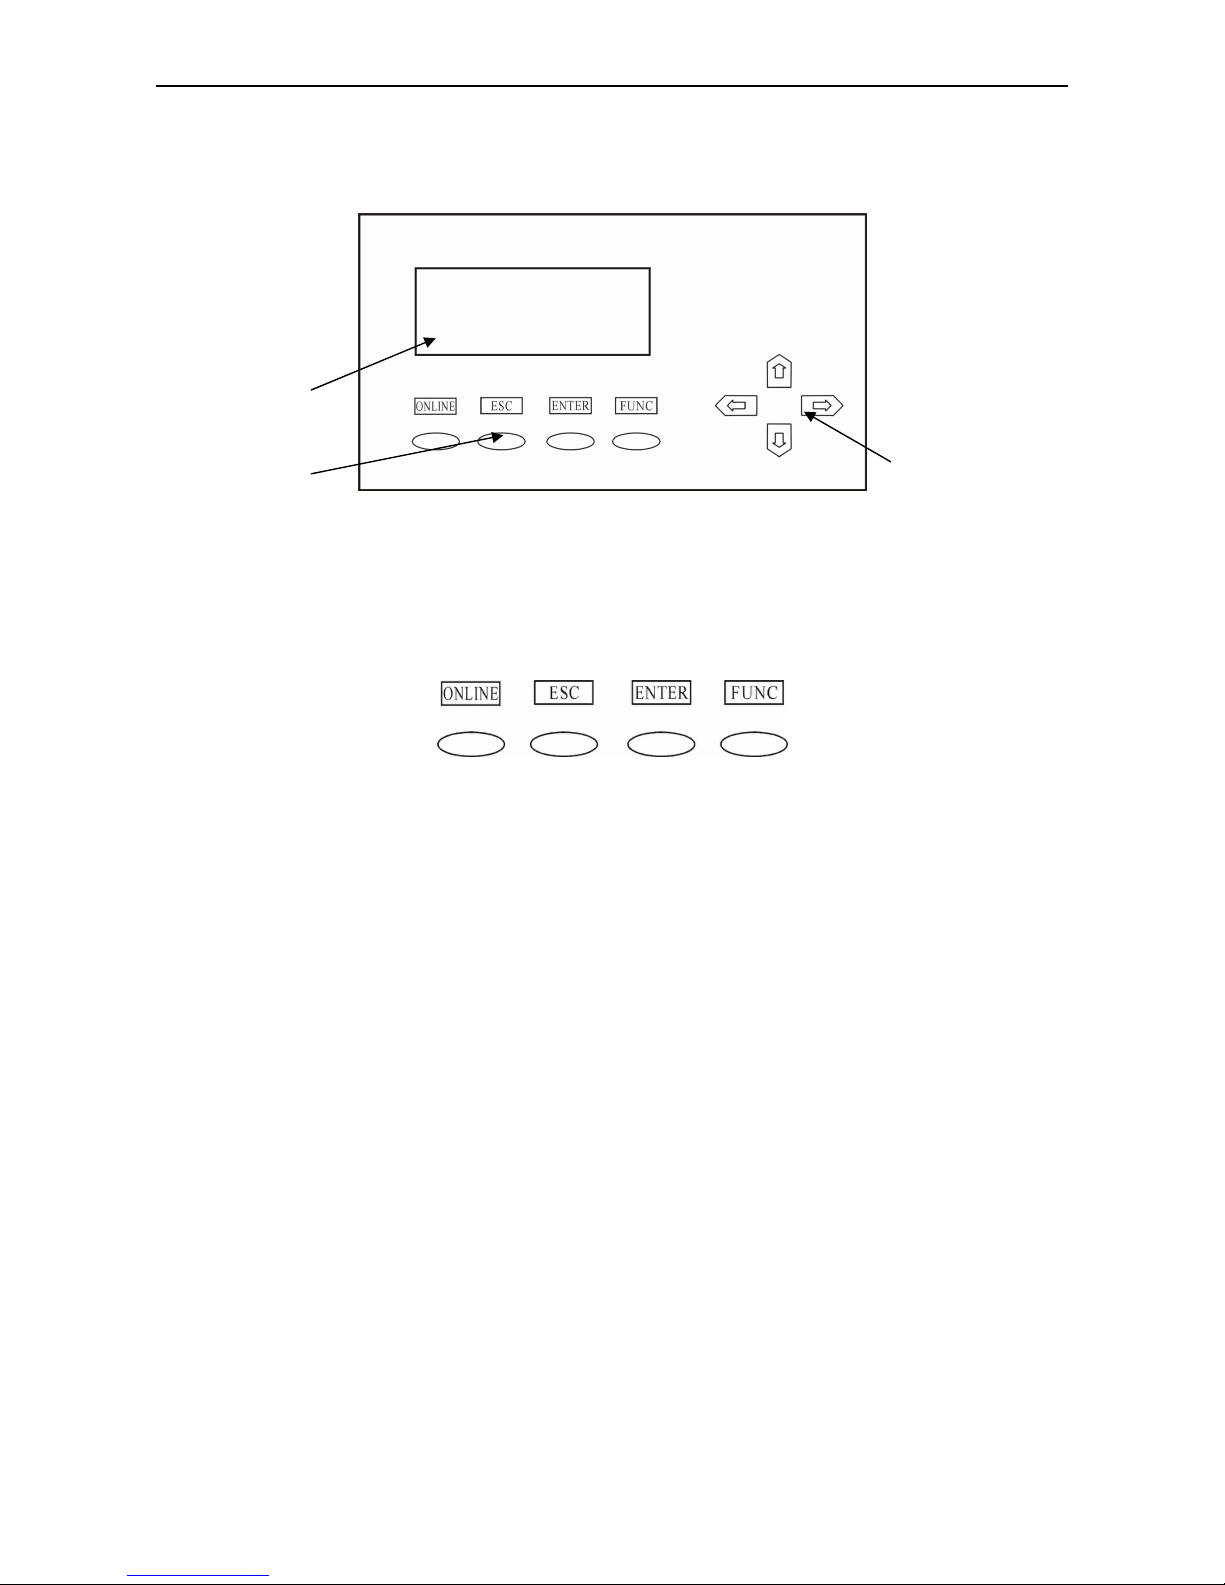
Figure 5-1 Control Panel
Function Keys
1. Direction (Arrow) Key
2. Function Key
1) ONLINE:Use to switch between online mode and offline mode; press down for 3-4 seconds
to pause a printing task
2) ESC:Back to the upper menu
3) ENTER:Confirm the menu command and execute it
4) FUNC:Operation key--press FUNC key, Printer is on self test mode when offline; Press FUNC
key, print head move to left side when it is on Clean Pos mode
3. Basic Operation
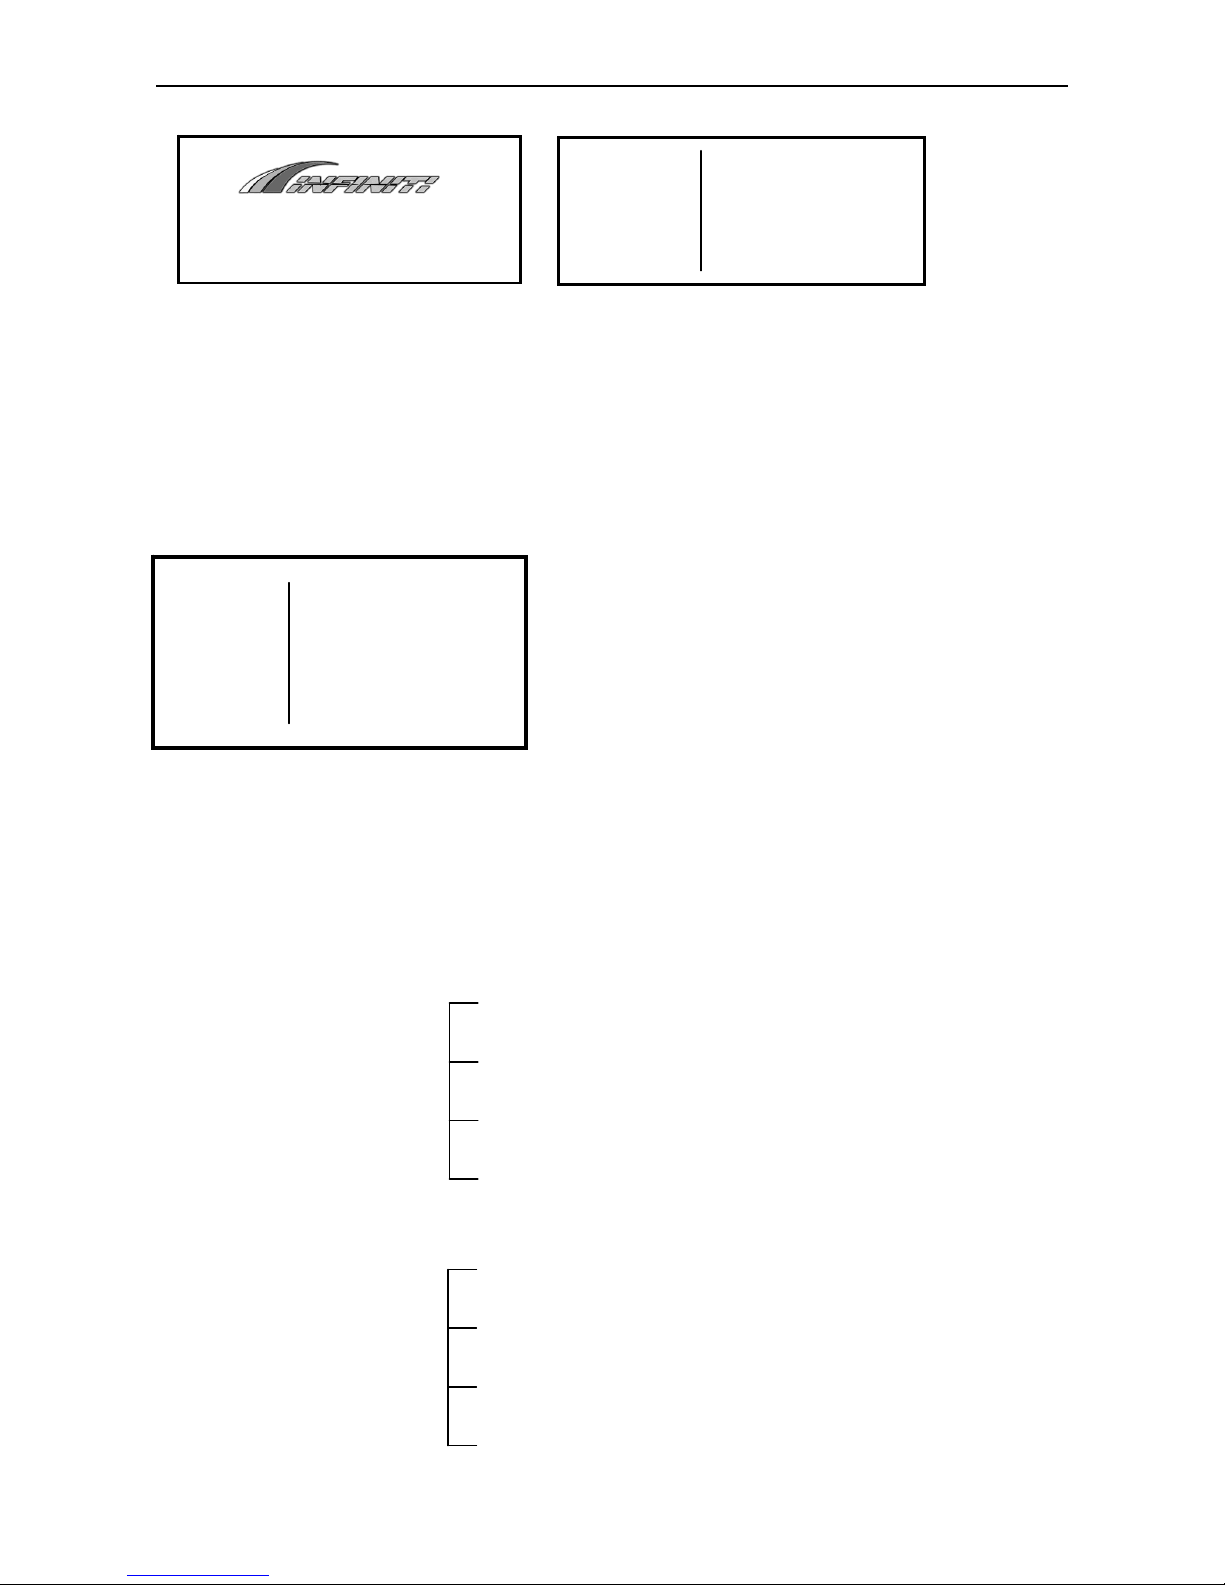
After turning on, Printer starts self-test automatically, including X motor test and Y motor test. Once finishing
the self-test, print head go back to the original position. You will see the following information displayed on
the LCD screen:
• Mark
/// INFINITI
with machine model
• Version
• Then back to basic operation menu.
The machine is on a normal track, as shown below.
Function Key
LCD
Direction Key
FY operation manual
- 14 -
Figure 5-2 Main Menu
Sign + stands for submenu followed. Sign – stands for no submenu followed.
In this case, press / key of the arrow keys can circularly display these four menus up and down. When
there’s a sign “+” after the menu arrow (that is the first line on menu), press ENTER key, and submenu will
be displayed. For example, when the arrow point to “1.Moving system”, press ENTER key, it will display on
the LCD screen as follows:
In this case, press ESC key, it will go back to main menu. Press / key of the arrow keys can circularly
display these four menus up and down. When there’s a sign “–” after the menu arrow (that is the first line
on menu), press ENTER key to execute operation. Press ESC key to exit operation.
5.2 Function Description in Detail
Dendritic structure of menu:
5.2.1" Moving System
MENU →
M1
OFFINE
1.X-MOVE -
2.Media Detect -
3.Clean Pos -
-
CH6250LQ
MENU
OFFLINE
1. Moving System +
2. Clean Tools +
3. Adjustment +
4. O
p
tions +
M1 stands for the submenu of the first main
menu
MENU
M1
OFFINE
X - Move
Media Detect
Clean Pos
Print Pos
MENU
OFFINE
Moving System
Clean Tools
Adjustment
Options
 Loading...