


2016 Infiniti Q70
Hybrid
Quick Reference Guide

Behind
steering
wheel
1
2
7 7
6
8
3
9
Behind
steering
wheel
4
5
22
10
11
14 15
16
18
19 20
17
Behind
steering wheel
21
ADAPTIVE FRONT LIGHTING SYSTEM
1
(AFS) SWITCH*
INSTRUMENT BRIGHTNESS
2
CONTROL SWITCHES*
VEHICLE INFORMATION DISPLAY*
3
TRIP RESET SWITCH*
4
TRIP COMPUTER SWITCHES
5
HEADLIGHT AND TURN SIGNAL SWITCH
6
PADDLE SHIFTERS
7
ASSIST CHARGE GAUGE
8
EV INDICATOR LIGHT
9
10
WIPER AND WASHER SWITCH
11
STEERING WHEEL SWITCHES FOR
AUDIO/BLUETOOTH
12
INTELLIGENT CRUISE CONTROL
13
DYNAMIC DRIVER ASSISTANCE SWITCH*
®
12
23
13
24
26
25
14
VEHICLE DYNAMIC CONTROL (VDC)
OFF SWITCH*
15
BACK-UP COLLISION INTERVENTION (BCI)
SYSTEM OFF SWITCH*
16
WARNING SYSTEMS SWITCH
17
TILT/TELESCOPIC STEERING WHEEL SWITCH*
18
REAR SUNSHADE SWITCH*
19
HEATED STEERING WHEEL SWITCH*
20
TRUNK LID RELEASE SWITCH
21
HOOD RELEASE*
22
CONTROL PANEL DISPLAY SCREEN
23
HEATER AND AIR CONDITIONER (automatic)
24
AUDIO SYSTEM
25
CLIMATE-CONTROLLED SEAT SWITCH*
26
INFINITI DRIVE MODE SELECTOR
25
*See your Owner’s Manual for information.

new system features
Around View® Monitor with Moving Object Detection (MOD) (if so equipped) ..2
Approaching Vehicle Sound for Pedestrians (VSP) System .................3
Automatic Anti-glare Mirrors ..........................................4
Blind Spot Warning (BSW) and Blind Spot Intervention
Back-up Collision Intervention (BCI) (if so equipped) .....................4
Predictive Forward Collision Warning (PFCW) (if so equipped)...............5
Forward Emergency Braking (FEB) (if so equipped)........................5
Lane Departure Warning (LDW) (if so equipped) ..........................5
essential information
Tire Pressure Monitoring System (TPMS) ................................6
Direct Response Hybrid™ System Warning Light .........................6
Hybrid Awareness ..................................................7
INFINITI Drive Mode Selector.........................................7
Warning Systems Switch (if so equipped) ...............................8
Accessing the Front Cup Holders ......................................8
Loose Fuel Cap.....................................................9
Fuel-filler Door .....................................................9
Clock Set/Adjustment ...............................................9
table of contents
first drive features
INFINITI Connection™ (if so equipped) ...............................10
INFINITI Intelligent Key System......................................12
Trunk Lid Release..................................................13
Power Front Seat Adjustments .......................................13
Automatic Drive Positioner ..........................................14
Outside Mirror Control Switch........................................14
Assist Charge Gauge ...............................................15
Starting/Stopping the Hybrid System .................................15
Headlight Control Switch............................................15
Wiper and Washer Switch ...........................................16
Heater and Air Conditioner (automatic) ................................17
FM/AM/SiriusXM
®
Satellite Radio with CD/DVD (if so equipped) Player......19
USB (Universal Serial Bus) Connection Port/iPod
Conventional (Fixed Speed) Cruise Control . . . . . . . . . . . . . . . . . . . . . . . . . . . . . 20
Intelligent Cruise Control (ICC) (if so equipped) .........................21
system guide
Trip Computer.....................................................22
Bluetooth
System Operating Tips ...........................................23
Bluetooth
Bluetooth
Bluetooth
Navigation System (if so equipped) ...................................28
DVD Player (if so equipped) .........................................30
HomeLink
®
Hands-free Phone System .................................23
®
System with Navigation (if so equipped) .....................24
®
System without Navigation (if so equipped) ..................25
®
Streaming Audio with Navigation (if so equipped) .............27
®
Universal Transceiver.....................................30
®
(BSI) (if so equipped) 4
®
Interface...............20
Please see your Owner’s Manual for important safety information
and system operation limitations.
• A cellular telephone should not be used for any purpose while
driving so full attention may be given to vehicle operation.
• Always wear your seat belt.
• Supplemental air bags do not replace proper seat belt usage.
• Children 12 and under should always ride in the rear seat
properly secured in child restraints or seat belts according to
their age and weight.
For more information, refer to the “Safety — Seats, seat belts and
supplemental restraint system (section 1)”, the “Monitor, climate, audio,
phone and voice recognition systems (section 4)” and the “Starting and
driving (section 5)” of your Owner’s Manual.
• Do not drink and drive.
Additional information about your vehicle is also available in your Owner’s
Manual, Navigation System Owner’s Manual and at www.InfinitiUSA.com.
To view detailed
instructional videos, go to
www.infinitiownersinfo.mobi/2016/q70
or snap this barcode with an
appropriate barcode reader.
new system features
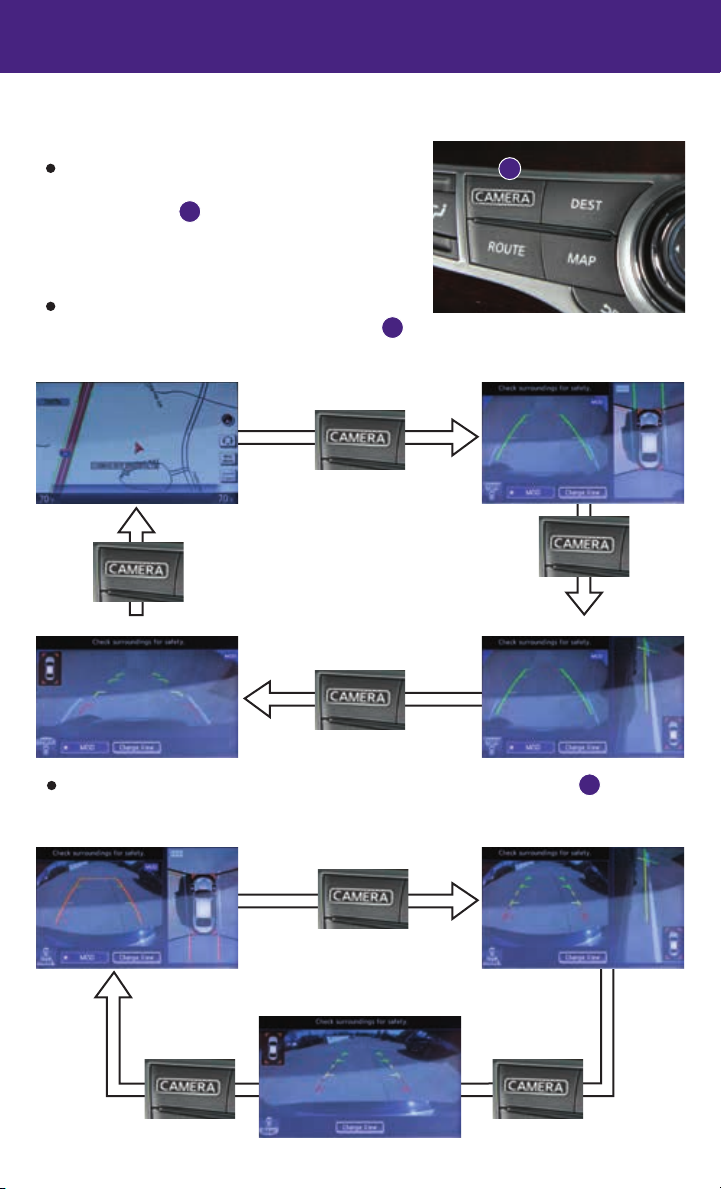
Around View® Monitor (AVM) with Moving Object Detection (MOD)
(if so equipped)
With the ignition switch in the ON position, the
Around View® Monitor is activated by pressing the
CAMERA button 1, located on the control panel, or
by moving the shift lever to the R (REVERSE)
position. The control panel displays various views
of the position of the vehicle.
When the shift lever is in the P (PARK), N (NEUTRAL)
or D (DRIVE) position and the CAMERA button 1 is
pressed, the following views will display in order:
Start from any Control Panel screen
Press
Press
1
Front view and bird’s-eye view
Press
Front wide view
Press
Front view and front-side view
When the shift lever is in the R (REVERSE) position and the CAMERA button 1 is pressed,
the following views will display in order:
Rear view and bird’s-eye view
Press
Rear wide view
Rear view and front-side view
PressPress
2

The colored guide lines on the display screen indicate vehicle width and approximate
distances to objects with reference to the vehicle body line.
• Red 1.5 ft (0.5 m); Yellow 3 ft (1 m); Green 7 ft (2 m) and 10 ft (3 m).
There are some areas where the system will not show objects.
• When in the front or the rear view display, an
2
object below the bumper or on the ground may
not be viewed
2
.
• When in the bird’s-eye view, a tall object near
the seam of the camera viewing areas
3
will not appear in the monitor.
The distance between objects viewed on the
Around View® Monitor (AVM) differs from the
actual distance.
Objects in the bird’s-eye view will appear further
3
than the actual distance.
MOVING OBJECT DETECTION (MOD)
If the MOD system detects moving objects
surrounding the vehicle, a yellow frame 4 will
4
5
be displayed on the camera image and a chime
will sound.
In the bird’s-eye view, a yellow frame is displayed
7
on those camera images (front, rear, right, left)
where moving objects are detected.
When the following are displayed:
• Blue MOD icon
• Gray MOD icon
5
; the system is operative in this view.
6
; the system is not operative in this view.
• No MOD icon; the system is off.
To temporarily turn the system on or off, touch the Sonar-MOD key 7.
For more information, refer to the “Monitor, climate, audio, phone and voice recognition systems (section 4)” of
your Owner’s Manual.
6
Approaching Vehicle Sound for Pedestrians (VSP) System
The Vehicle Sound for Pedestrians system helps alert pedestrians to the presence of the
vehicle when it is being driven at a low-speed.
When the vehicle starts to move, it produces a sound. The sound stops when the vehicle
speed reaches approximately 19 mph (30 km/h) while accelerating.
This sound will activate again when decelerating to a speed less than 16 mph (25 km/h).
For more information, refer to the “Hybrid System Overview (section Hybrid System)” of your Owner’s Manual.
3
new system features
Automatic Anti-glare Mirrors
The inside rearview mirror and both outside mirrors are designed to automatically change
reflection according to the intensity of the headlights of the vehicle following you.
The anti-glare system will be automatically turned on when the ignition switch is in
the ON position.
For more information, refer to the “Pre-driving checks and adjustments (section 3)” of your Owner’s Manual.
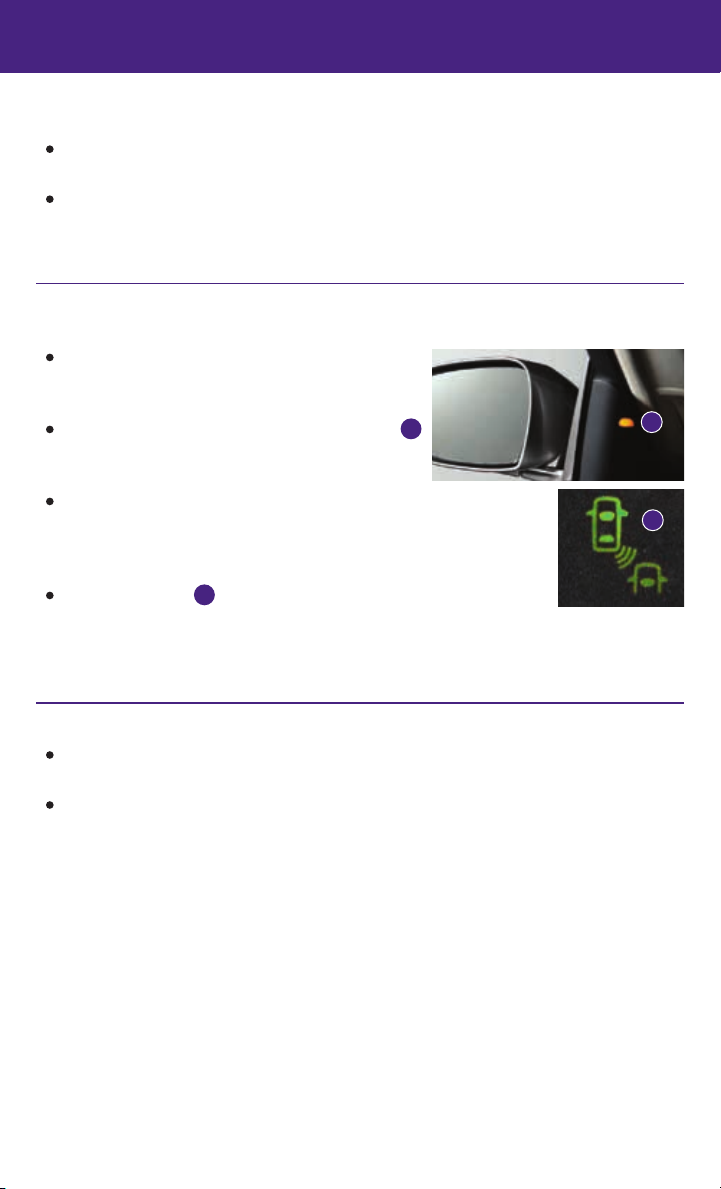
Blind Spot Warning (BSW) and Blind Spot Intervention® (BSI)
(if so equipped)
The Blind Spot Warning (BSW) system alerts the
driver when another vehicle moves into the vehicle’s
detection zone.
An indicator light located near the outside mirror 1
will illuminate if the radar sensors detect a vehicle
in the detection zone.
The Blind Spot Intervention® (BSI) system can assist the driver in
returning the vehicle to the center of the traveling lane by applying
individual brake pressure to the left or right wheels for a short period
of time.
The indicator light 2 will first illuminate in orange and then turn green
before extinguishing. This indicates that the Blind Spot Warning (BSW)
and Blind Spot Intervention® (BSI) systems are operational.
For more information, refer to the “Starting and driving (section 5)” of your Owner’s Manual.
1
2
Back-up Collision Intervention (BCI) (if so equipped)
The Back-up Collision Intervention (BCI) system can help alert the driver of an approaching
vehicle or objects behind the vehicle when backing out of parking spaces.
The rear radar sensors detect the approaching vehicle from up to approximately
49 ft (15 m) from the bumper.
For more information, refer to the “Starting and driving (section 5)” of your Owner’s Manual.
4

Predictive Forward Collision Warning (PFCW) (if so equipped)
The Predictive Forward Collision Warning (PFCW) system can help alert the driver when
there is sudden braking of the second vehicle traveling in front of the vehicle ahead that is
traveling in the same lane.
The PFCW uses a sensor in the front bumper to measure the distance of a second vehicle
ahead in the traveling lane. The system operates at speeds above 3 mph (5 km/h).
If there is a potential risk, the PFCW will warn the driver with a blinking driver assist
system forward indicator and an audible warning tone will be heard.
For more information, refer to the “Starting and driving (section 5)” of your Owner’s Manual.
Forward Emergency Braking (FEB) (if so equipped)
The Forward Emergency Braking (FEB) system can assist the driver when there is risk of a
forward collision with the vehicle in the traveling lane.
The FEB operates at speeds greater than 3 mph (5 km/h).
If there is a risk of a collision, an audible tone will be heard, a visual warning will display
and the vehicle will push up on the accelerator pedal. If the driver releases the accelerator
pedal, the vehicle will begin applying the brakes; however, if the driver does nothing, the
system will issue another audible and visual warning and apply the brakes harder.
For more information, refer to the “Starting and driving (section 5)” of your Owner’s Manual.
Lane Departure Warning (LDW) (if so equipped)
The Lane Departure Warning (LDW) system can help alert the driver when the vehicle is
traveling too close to either the left or the right side of a traveling lane.
The system will operate when the vehicle is driven at speeds of approximately 45 mph
(70 km/h) and above and only when the lane markings are clearly visible on the road.
When the vehicle approaches either the left or the right side of the traveling
lane, the LDW system will chime and the orange LDW light 1 on the
instrument panel will blink to alert the driver.
The LDW system can be turned on and off through
the Settings menu in the vehicle information
display. To temporarily turn off the system, push the
warning systems switch 2 .
When the system is off, the indicator light 3 on the
switch is off.
For more information, refer to the “Instruments and controls (section 2)” and the “Starting and driving (section 5)” of your
Owner’s Manual.
1
2
3
5

essential information
Tire Pressure Monitoring System (TPMS)
A CHECK TIRE PRESSURE warning message will
appear in the vehicle information display 1 and
the low tire pressure warning light
when one or more tires are low in pressure and air
is needed.
• The tire pressures should be checked when the
tires are cold. The tires are considered cold after
the vehicle has been parked for 3 hours or more or
driven less than 1 mi (1.6 km) at moderate speeds.
After the tire pressures are adjusted, drive the vehicle at speeds above 16 mph
(25 km/h). The CHECK TIRE PRESSURE warning message and low tire pressure warning
light 2 will extinguish.
When the low tire pressure warning light 2 flashes for 1 minute and then remains on, the
TPMS is not functioning properly. Have the system checked. It is recommended you visit
an INFINITI retailer for this service.
Tire pressure rises and falls depending on the heat caused by the vehicle’s operation and
the outside temperature. Low outside temperature can lower the temperature of the air
inside the tire, which can cause a lower tire inflation pressure. This may cause the low tire
pressure warning light
pressure in your tires.
• Check the tire pressure (including the spare tire) often and always prior to long
distance trips.
The Tire and Loading Information label contains valuable information. Please refer to the
“Technical and consumer information” (section 9) of your Owner’s Manual for the location
of the Tire and Loading Information label.
For more information, refer to the “Instruments and controls (section 2)”, the “Starting and driving (section 5)” and the
“Maintenance and do-it-yourself (section 8)” of your Owner’s Manual.
to illuminate. If the warning light illuminates, check the tire
2
will illuminate
2
1
2
Direct Response Hybrid™ System Warning Light
This light will illuminate when the ignition switch is
in the ON position and will extinguish when the
hybrid system is started.
The light will also illuminate when a malfunction
occurs in the electric motor or hybrid system.
When this light illuminates while driving, immediately stop the vehicle in a safe location
and contact an INFINITI retailer.
If the hybrid system warning light blinks while driving, it may indicate that the Li-ion
battery charge is low and you cannot continue to drive.
For more information, refer to the “Instruments and controls (section 2)” of your Owner’s Manual.
6

Hybrid Awareness
Your vehicle is virtually silent in the electric mode. If you exit your vehicle while it is ON but
the hybrid system is not running, the hybrid system will automatically start, informing you
that the vehicle is still ON.
Do not store your INFINITI Intelligent Key within the detection range of the vehicle.
This may cause welcome lights and other functions to activate, creating unwanted
battery drain.
The hybrid system is designed for optimum efficiency and performance. Activation of the
electric mode may vary with driving conditions and driver input. A full battery display does
not indicate the vehicle should be in the electric mode.
For more information, refer to the “Hybrid System Overview (section Hybrid System)” of your Owner’s Manual.
INFINITI Drive Mode Selector
Turn the switch to one of the following positions to select the corresponding drive mode:
• (Standard) - Used for standard or normal driving.
1
SPORT – The hybrid system and transmission will
2
adjust, resulting in higher hybrid system rpm and
a more aggressive shift pattern. In this mode, fuel
economy may be reduced.
SNOW – Used on snowy roads or slippery areas.
3
In this mode, hybrid system output is controlled to
avoid wheel spin.
ECO – Adjusts hybrid system and transmission points to enhance fuel economy.
4
ECO PEDAL SYSTEM (if so equipped)
With the INFINITI Drive Mode Selector switch in the ECO mode, the ECO pedal system
assists the driver in improving fuel economy.
The ECO pedal system applies force to make the accelerator pedal heavier, depending on
the accelerator pedal operation.
To change the ECO pedal reaction force:
1. Press the SETTING button on the control panel.
2. Touch the “ECO DRIVE” key.
3. Touch the “ECO pedal” key and select one of the options below:
• OFF – Turns the ECO pedal system off.
• Soft – Softens the reaction force.
• Standard – Reaction force is normal.
For more information, refer to the “Starting and driving (section 5)” of your Owner’s Manual.
1
4
3
2
7
essential information
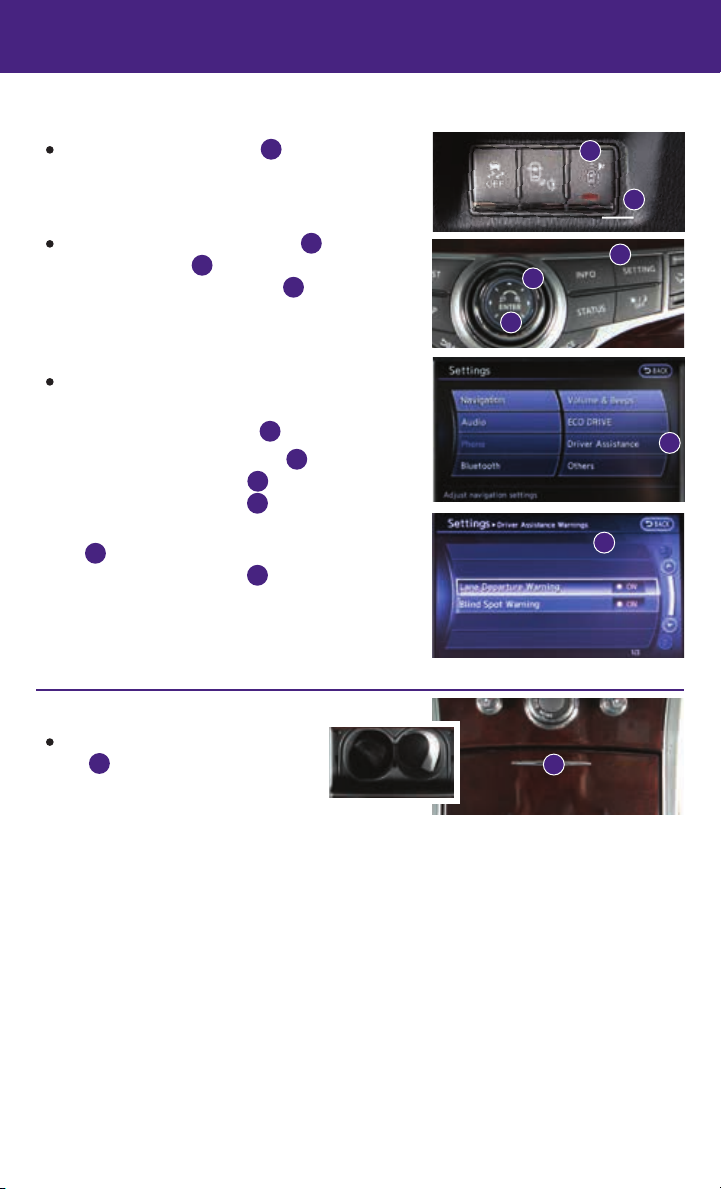
Warning Systems Switch (if so equipped)
The warning systems switch 1 will turn on or off
any enabled warning systems, including the Lane
Departure Warning and Blind Spot Warning systems.
Systems that are not enabled will always remain off.
When the warning systems switch 1 is turned off,
the indicator light 2 on the switch is off. If the
warning systems indicator light 2 is illuminated,
the system is on. The indicator will also be off if all
of the warning systems are deactivated using the
Settings menu.
To enable or disable these systems, perform the
following operation:
1. Press the SETTING button
2. Using the INFINITI Controller
“Driver Assistance” key 5 on the display. Then
press the ENTER button 6 .
3. Highlight the corresponding warning system key
, select ON (enabled) or OFF (disabled) and
7
press the ENTER button 6 .
For more information, refer to the “Starting and driving (section 5)” of your
Owner’s Manual.
on the control panel.
3
, highlight the
4
1
2
3
4
6
5
7
Accessing the Front Cup Holders
To open the cup holders, push the
lid 1 down and release.
For more information, refer to the “Instruments and
controls (section 2)” of your Owner’s Manual.
8
1
Loose Fuel Cap
A LOOSE FUEL CAP warning message will appear in
the vehicle information display 1 when the
1
fuel-filler cap is not tightened correctly.
To tighten, turn the cap clockwise until a single click
is heard.
The warning message will extinguish when the
vehicle detects the fuel-filler cap is properly
tightened and the reset button 2 is pressed for
more than 1 second.
If the cap is not properly tightened, the Malfunction
Indicator Light may illuminate.
For more information, refer to the “Instruments and controls (section 2)” and the “Pre-driving checks and adjustments
(section 3)” of your Owner’s Manual.
2
Fuel-filler Door
The fuel-filler door is located on the passenger’s side of
the vehicle.
When the doors of the vehicle are locked or
unlocked, the fuel-filler door is automatically locked
or unlocked at the same time.
To open the door, push the upper left side of the door.
For more information, refer to the “Pre-driving checks and adjustments (section 3)” of your Owner’s Manual.
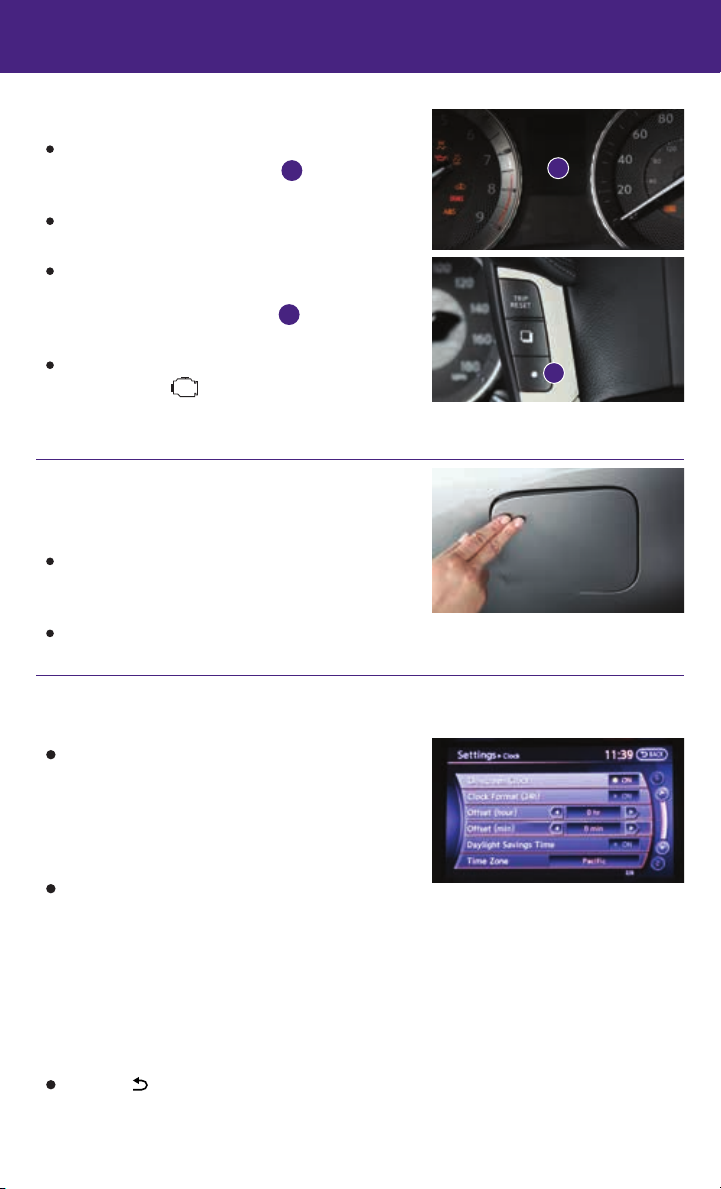
Clock Set/Adjustment
DIGITAL CLOCK ADJUSTMENT
To adjust the time and the appearance of the clock
on the display:
1. Press the SETTING button on the control panel.
2. Select the “Others” key.
3. Select the “Clock” key.
The following settings can be adjusted:
• On-screen Clock: The clock in the upper right corner of the display can be turned ON or OFF.
• Clock Format (24h): The clock can be set to 12 hours or 24 hours.
• Offset (hour): The time can be adjusted by increasing or decreasing per hour.
• Offset (min): The time can be adjusted by increasing or decreasing per minute.
• Daylight Savings Time: The application of Daylight Savings Time can be turned ON or OFF.
• Time Zone: Adjust the time zone. Choose a time zone from the available list.
Press the BACK button to return to the previous screen.
For more information, refer to the “Monitor, climate, audio, phone and voice recognition systems (section 4)” of your
Owner’s Manual.
9
 Loading...