

Page 1

Micro Inspector Pro
Getting started
Version 2.0
Page 2
Micro Inspector Pro
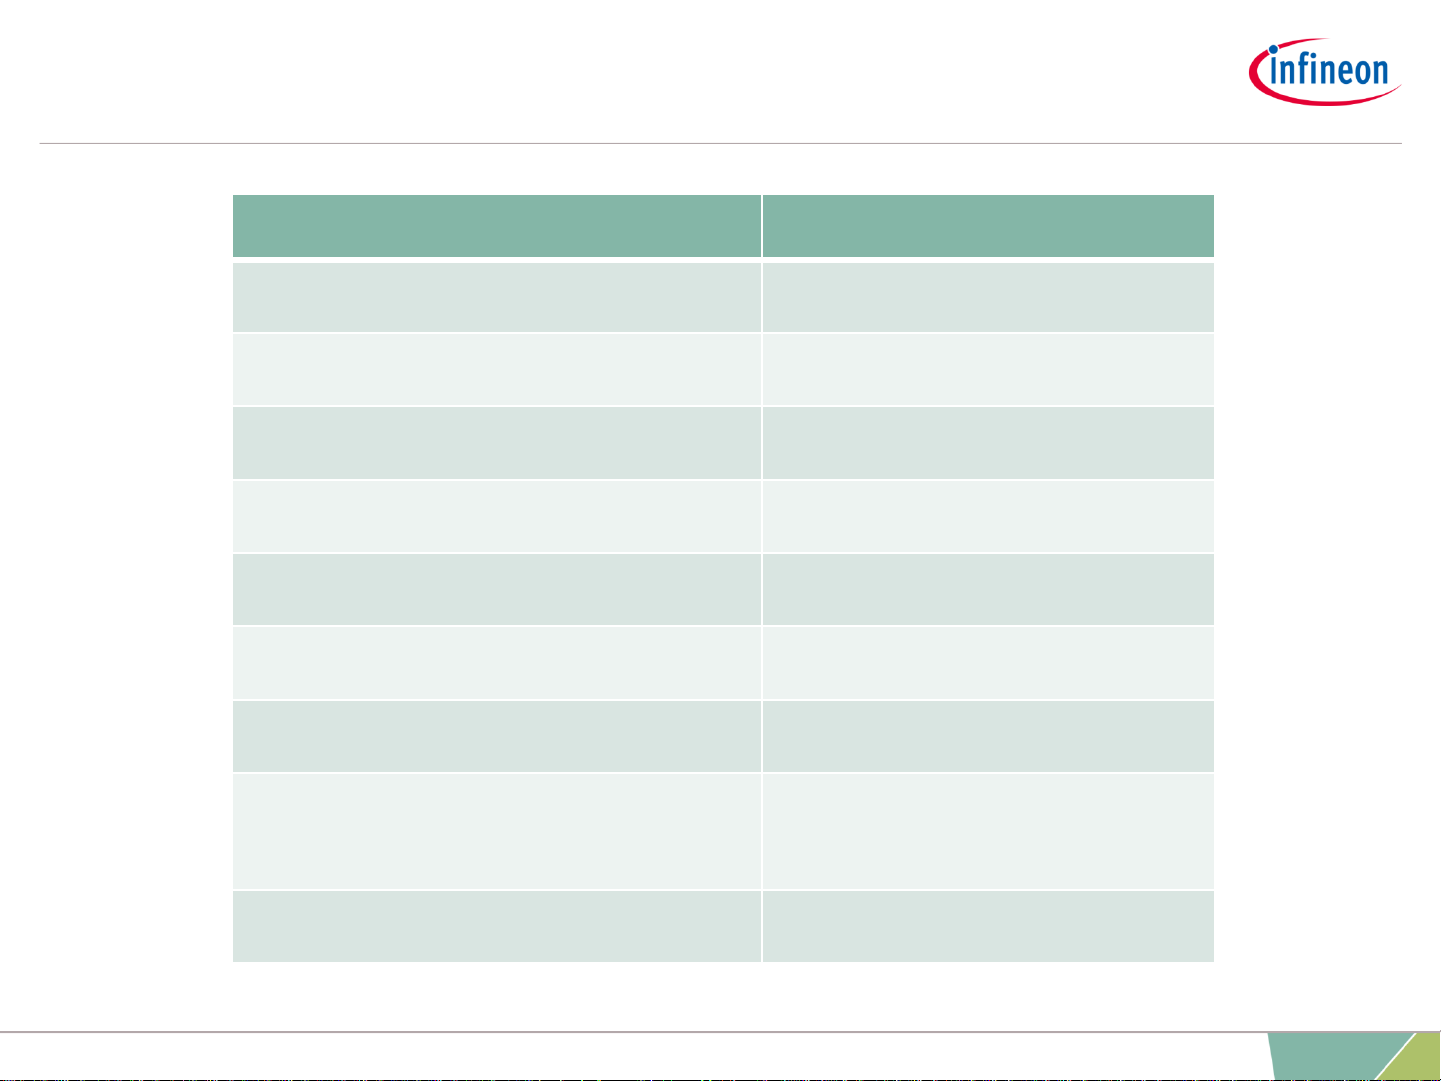
Feature List
Feature Micro Inspector Pro
View workspace
Create/Edit workspace
Save workspace
View oscilloscope
Create/Edit oscilloscope
Target device selection
Symbol browser
Create/Edit memory dump
screen
View memory dump screen
2
2020-04-28 Copyright © Infineon Technologies AG 2020. All rights reserved. Infineon Proprietary
Page 3

› Necessary preconditions
› Download Infineon Toolbox
› Install the tool
› How to get a license
› Informative notes
› Creating a Dashboard
› Creating an Oscilloscope
Chapter 3:
Working with Micro Inspector Pro
Chapter 1:
Preconditions
Chapter 2:
Installing Micro Inspector Pro
Getting started: Micro Inspector Pro
3
2020-04-28 Copyright © Infineon Technologies AG 2020. All rights reserved. Infineon Proprietary
Page 4
Getting started: Micro Inspector Pro
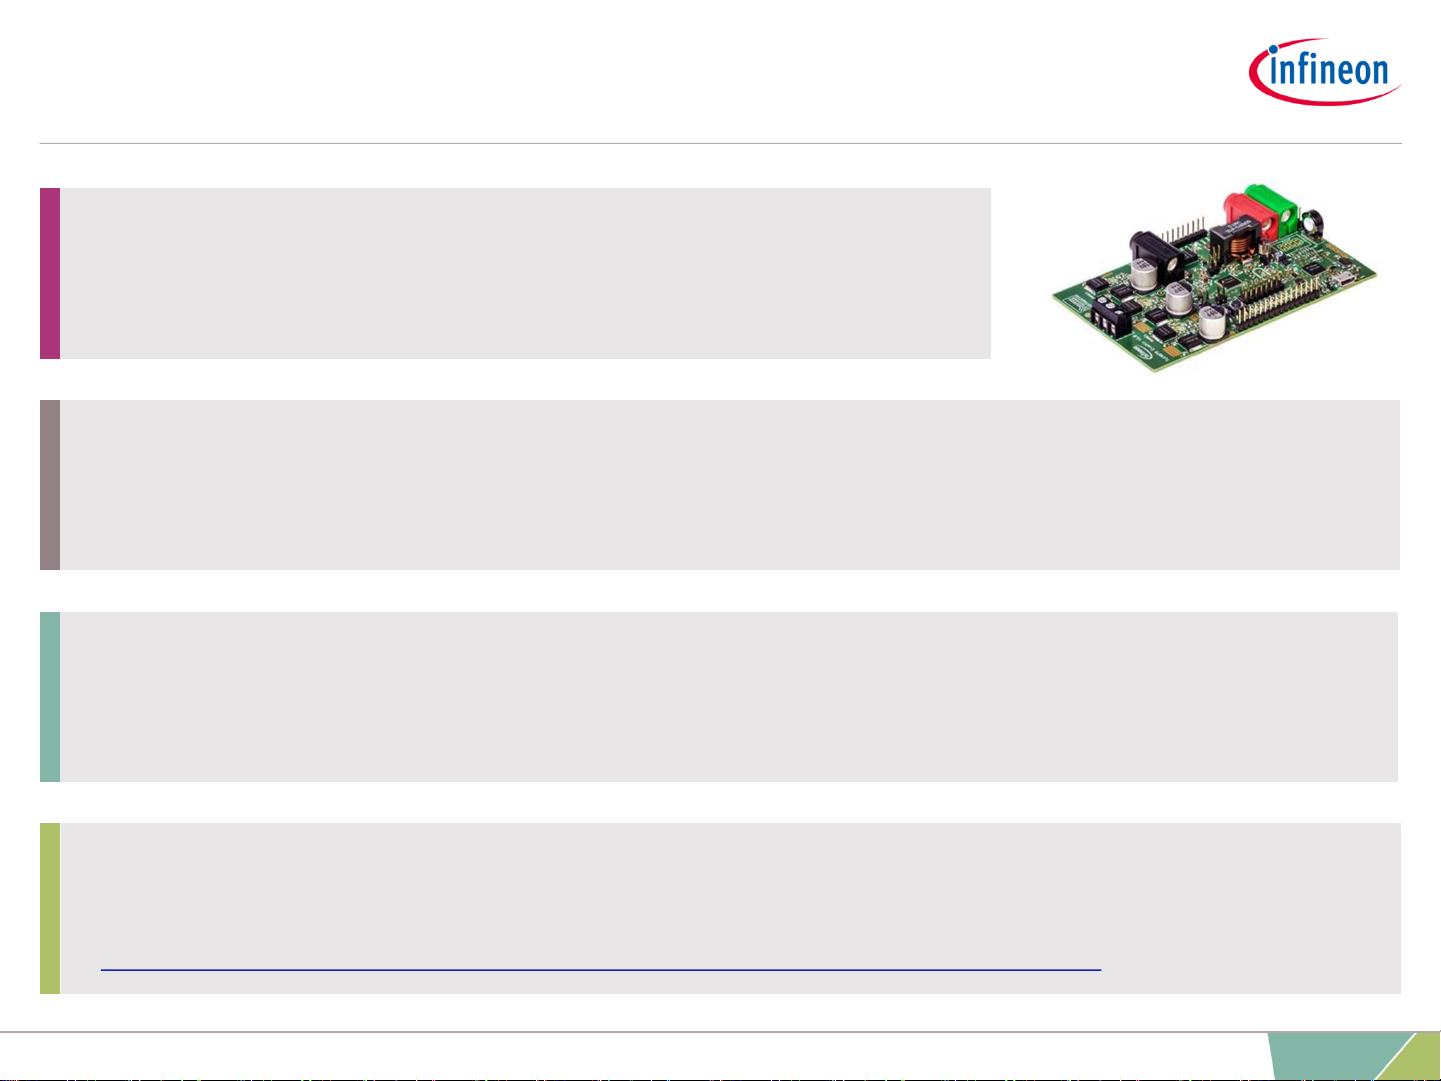
Chapter 1: Necessary Preconditions
2. A compiled program for that board as an ELF/axf file
(or a file with respective information)
3. A HEX file available and also flashed to the board
(in this example the TLE9879)
1. Have an Evalkit available
(in this example the TLE9879)
4. SEGGER JLink downloaded and installed and SEGGER JLink driver
needs to be installed in host PC
https://www.segger.com/downloads/jlink/#J-LinkSoftwareAndDocumentationPack
4
2020-04-28 Copyright © Infineon Technologies AG 2020. All rights reserved. Infineon Proprietary
Page 5
Getting started: Micro Inspector Pro
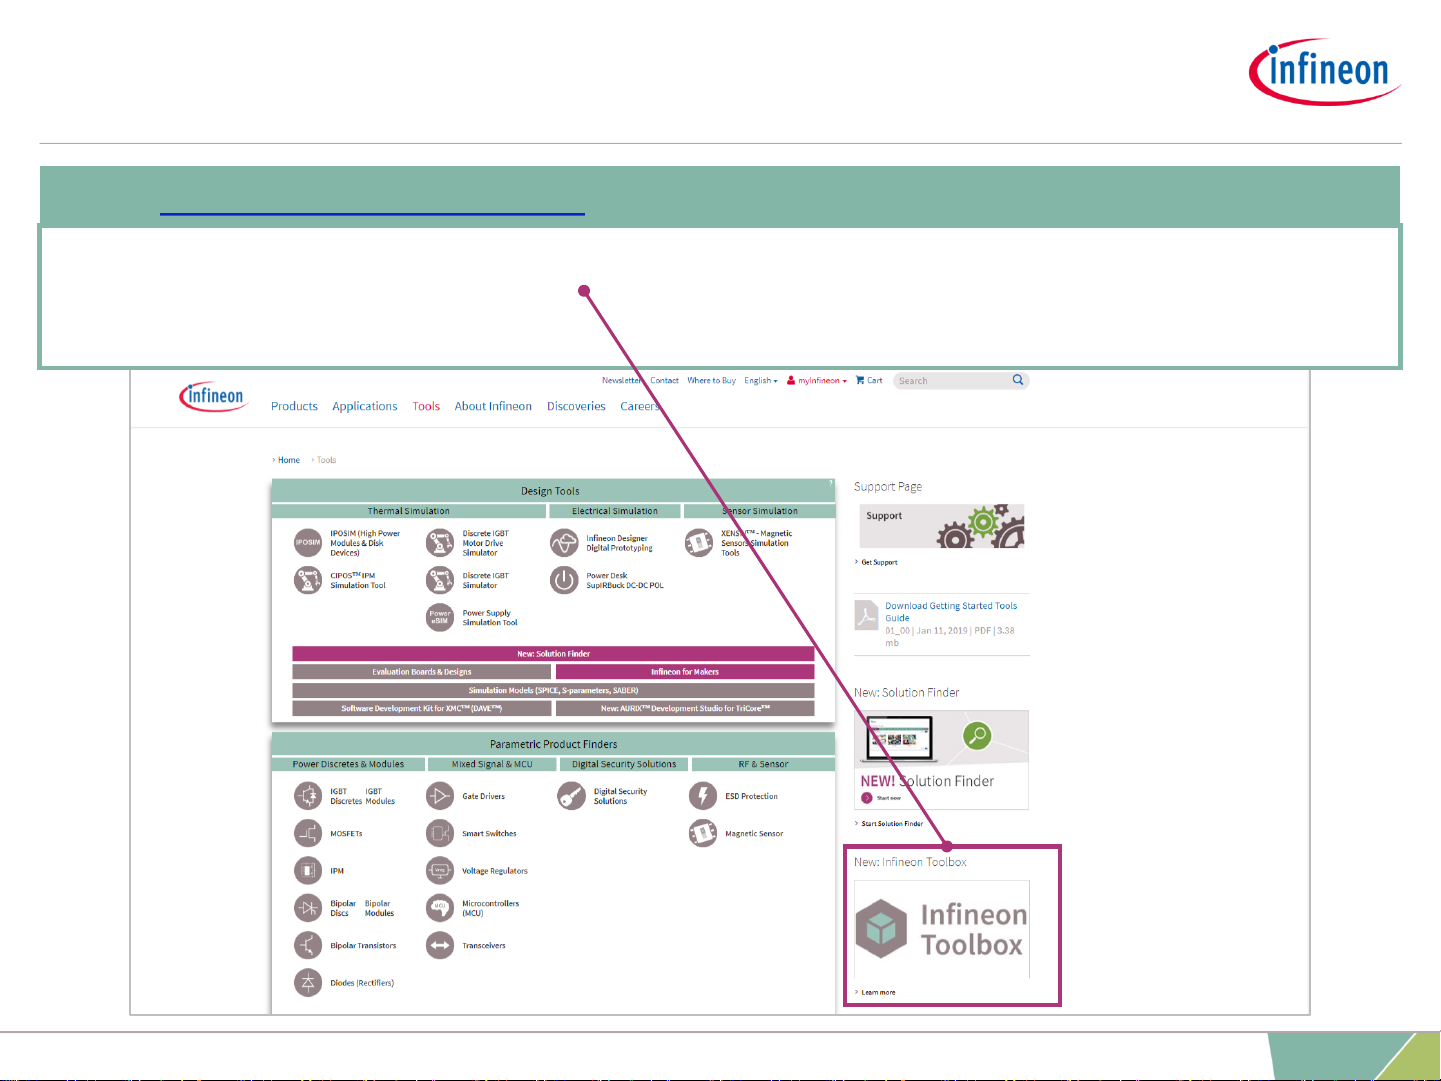
Chapter 2: Infineon Toolbox Installation
Open http://www.Infineon.com
› Navigate to “Tools”
› Install the Infineon Toolbox
5
2020-04-28 Copyright © Infineon Technologies AG 2020. All rights reserved. Infineon Proprietary
Page 6
Getting started: Micro Inspector Pro
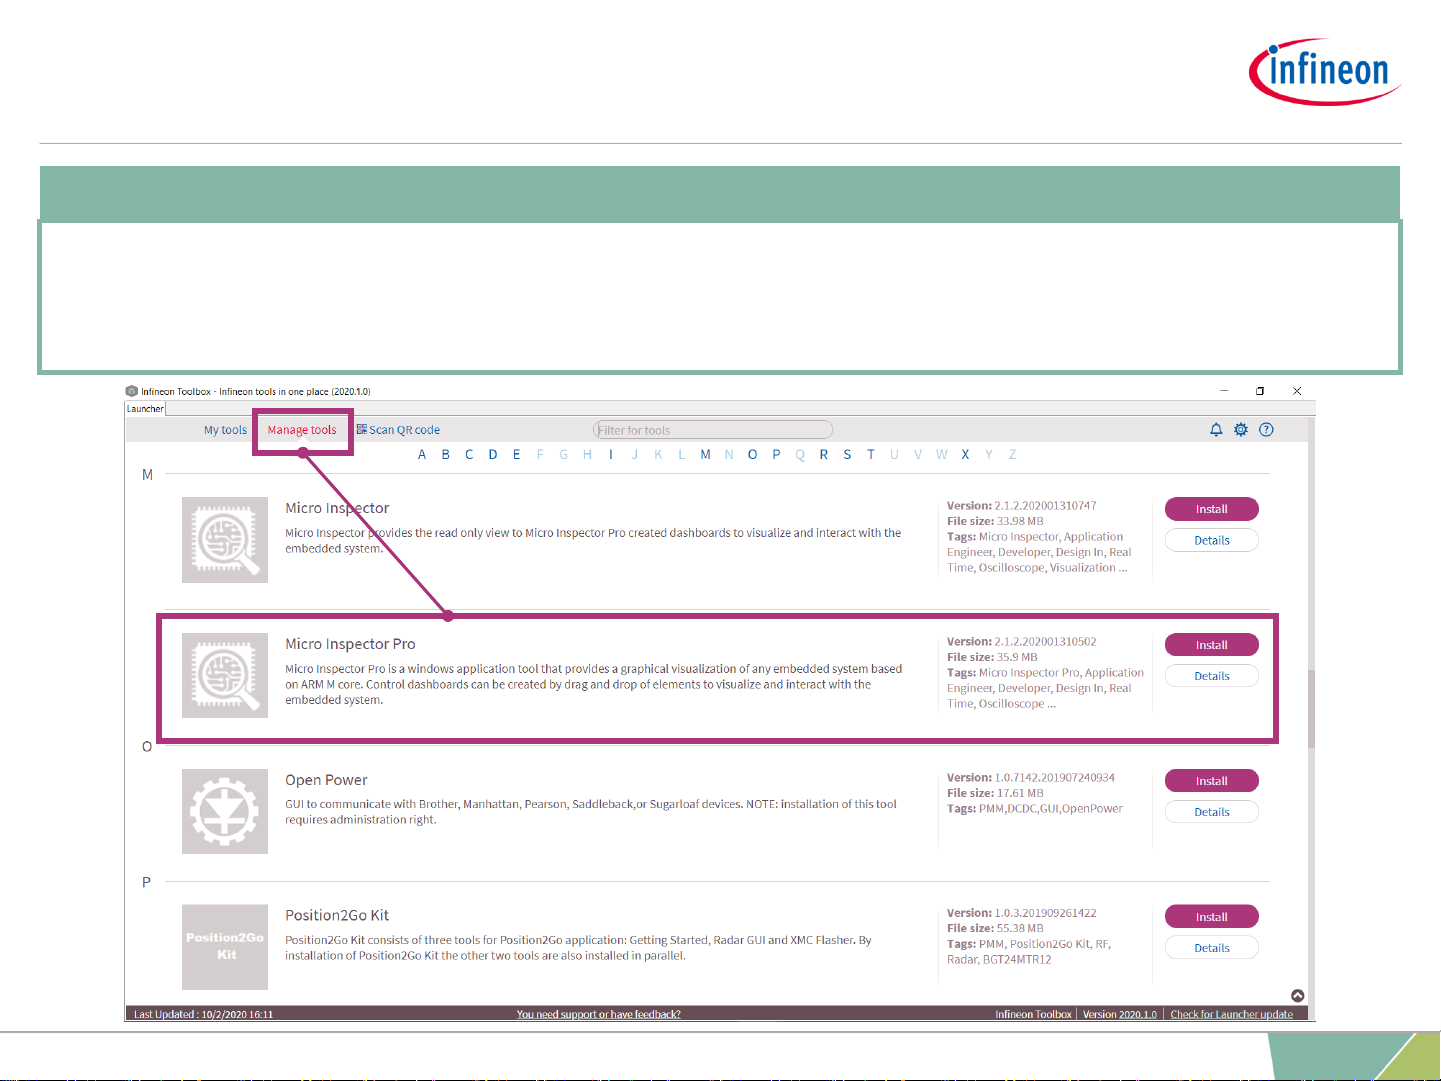
Chapter 2: Micro Inspector Pro installation
Open Infineon Toolbox
› Navigate to “Manage Tools”
› Install the Micro Inspector Pro
6
2020-04-28 Copyright © Infineon Technologies AG 2020. All rights reserved. Infineon Proprietary
Page 7

Getting started: Micro Inspector Pro
Chapter 2: How to upgrade from unregistered to registered version
Open the Micro Inspector Pro tool
› This message will be displayed
› Click on the link inside the pop-up
window
› http://www.Infineon.com/support
› Provide the necessary information on the Infineon support page and
submit your request
› You get your license details via e-mail (approx. after 2 working days)
› Open the tool and click on "Unregistered" in the bottom right corner
› Enter the license details in the window that opens
› Proceed with the licensed tool
7
2020-04-28 Copyright © Infineon Technologies AG 2020. All rights reserved. Infineon Proprietary
Page 8

Getting started: Micro Inspector Pro
Chapter 4: Informative notes
Micro Inspector Pro has two modes:
Default mode: No connection to the device
Elements can be added to the Dashboard, variables can be
assigned but elements are not clickable
Play mode: Connection to device
Graphical elements can be clicked
› To ensure a smooth Dashboard creation,
make sure that the zooming level is set to 100%.
› The use of writing variables can lead to
changes in your program.
8
2020-04-28 Copyright © Infineon Technologies AG 2020. All rights reserved. Infineon Proprietary
Page 9

Getting started: Micro Inspector Pro
Creating a Dashboard I
1
3
4
1. Load the ELF/axf file of your
project in the Symbol Browser
located in:
xxx\Boards\Infineon\TLE9879_EvalKit\BLDC_SEN
SORLESS_FOC_EXAMPLE_TLE987X\Objects
(Make sure that the program is already compiled)
2. Choose TLE9879 in the Settings
Menu
3. Choose the elements you need
from the Micro Inspector Pro
Toolbox
4. Add them to the data screen
using drag and drop
2
9
2020-04-28 Copyright © Infineon Technologies AG 2020. All rights reserved. Infineon Proprietary
Page 10

Getting started: Micro Inspector Pro
Creating a Dashboard II
1. Assign the right variables from
your ELF/afx file to the respective
elements via drag and drop from
the Symbol Browser
2. Click on 'Run' to run your
Dashboard
3. The executed example
Dashboard looks like this
4. Using on-board potentiometer to
set motor speed
5. Clicking on 'Stop' terminates the
execution.
1
3
2
3
5
4
10
2020-04-28 Copyright © Infineon Technologies AG 2020. All rights reserved. Infineon Proprietary
Page 11

Getting started: Micro Inspector Pro
Creating an Oscilloscope I
Preconditions:
› Any IDE (in this case KEIL µVision is used):
https://www.keil.com/demo/eval/arm.htm
› Target code to use the Oscilloscope of Micro Inspector Pro
› Please click on 'Target Code' in the menu bar of Micro Inspector Pro and
you can find the target code file (TargetCode.zip) needed for
Oscilloscope
Project adaption to support the Oscilloscope feature
11
2020-04-28 Copyright © Infineon Technologies AG 2020. All rights reserved. Infineon Proprietary
Page 12

Getting started: Micro Inspector Pro
Creating an Oscilloscope II
Project adaption to support the Oscilloscope feature
1. Add the target code to your project,
files:
a) Copy the probe_scope.c,
probe_scope.h and probe_scope_cfg.h
files from the target code
b) Create a new folder in example project
and paste the probe_scope files in this
folder
c) Add a new group under your main folder
in your KEIL project
d) Add the probe_scope files to the new
group
a)
b)
c)
d)
12
2020-04-28 Copyright © Infineon Technologies AG 2020. All rights reserved. Infineon Proprietary
Page 13

Getting started: Micro Inspector Pro
Creating an Oscilloscope III
Project adaption to support the Oscilloscope feature
2. Add the target code to your project, code
a. Include the probe_scope.h file in
your main.c file in the KEIL project
Code: #include "probe_scope.h"
b. Call the ProbeScope_Init function in
your main function
Code: ProbeScope_Init(20000);
e) Setup the project to include the folder
by 1. Clicking on "Options for target"
2. "C/C++" perspective
3. Include the path
4. Select the folder with the
probe_scope files
1
2
3
4
13
2020-04-28 Copyright © Infineon Technologies AG 2020. All rights reserved. Infineon Proprietary
Page 14

Getting started: Micro Inspector Pro
Creating an Oscilloscope IV
Project adaption to support the Oscilloscope feature
c) Open the Emo_RAM.c file and include
the same "probe scope" header file as
in the main.c
Code: #include "probe_scope.h"
d) Call the ProbeScope_Sampling(); function
in the ‚Emo_handleFOC‘ function → This
function returns the output value and it is
called in "Emo_handleFOC"
e) Configure the probe_scope files
Open the probe_scope_cfg.h file and configure the values according to your
requirements (see example below for TLE9879 EvalKit)
14
2020-04-28 Copyright © Infineon Technologies AG 2020. All rights reserved. Infineon Proprietary
Page 15

Getting started: Micro Inspector Pro
Creating an Oscilloscope V
Project adaption to support the Oscilloscope feature
3. Set the PWM Frequency:
a) Open Infineon Toolbox Search for
“Config Wizard for Embedded Power
ICs” Install and start it
b) Load the config.icwp file located in:
…path\Boards\Infineon\TLE9879_EvalKit\BLDC_
SENSORLESS_FOC_EXAMPLE_TLE987X\RTE\
Device\TLE9879QXA40
c) Set the PWM Frequency to 10 kHz
Save the change
d) Go to Keil uVision Compile project
Flash to target device
15
2020-04-28 Copyright © Infineon Technologies AG 2020. All rights reserved. Infineon Proprietary
Page 16

Getting started: Micro Inspector Pro
Creating an Oscilloscope VI
Project adaption to support the Oscilloscope feature
4. Start Micro Inspector Pro
a. Open the ELF/afx. File
b. Add an Oscilloscope to your screens
5. Configure the Oscilloscope
a. Search for the necessary variables
in the Symbol Browser
b. Assign the to channels by double-
clicking on them
6. Establish a debug connection to the
target device
a. Initiate the debug session in KEIL
This enables the Micro Inspector
Pro to establish a connection to the
debugger
b. Run the example project
16
2020-04-28 Copyright © Infineon Technologies AG 2020. All rights reserved. Infineon Proprietary
Page 17

 Loading...