

Page 1
Instructions for use
WASHER-DRYER
GB
English,1
CSI
Русский,13
PWDE 7125 S
RO
Românã,25
Contents
GB
Installation, 2-3
Unpacking and levelling
Connecting the electricity and water supplies
The first wash cycle
Technical data
Description of the washer-dryer, 4-5
Control panel
Display
How to run a wash cycle or a drying cycle, 6
Wash cycles and options, 7
Table of programmes and wash cycles
Wash options
Detergents and laundry, 8
Detergent dispenser drawer
Preparing the laundry
Special wash cycles
Precautions and advice, 9
General safety
Disposal
Opening the porthole door manually
Care and maintenance, 10
Cutting off the water and electricity supplies
Cleaning the washer-dryer
Cleaning the detergent dispenser drawer
Cleaning the pump
Checking the water inlet hose
Troubleshooting, 11
Service, 12
1
Page 2
Installation
GB
This instruction manual should be kept in a safe place
for future reference. If the washer-dryer is sold,
transferred or moved, make sure that the instruction
manual remains with the machine so that the new
owner is able to familiarise himself/herself with its
operation and features.
Read these instructions carefully: they contain vital
information relating to the safe installation and operation
of the appliance.
Unpacking and levelling
Unpacking
1. Remove the washer-dryer from its packaging.
2. Make sure that the washer-dryer has not been
damaged during the transportation process. If it has
been damaged, contact the retailer and do not proceed
any further with the installation process.
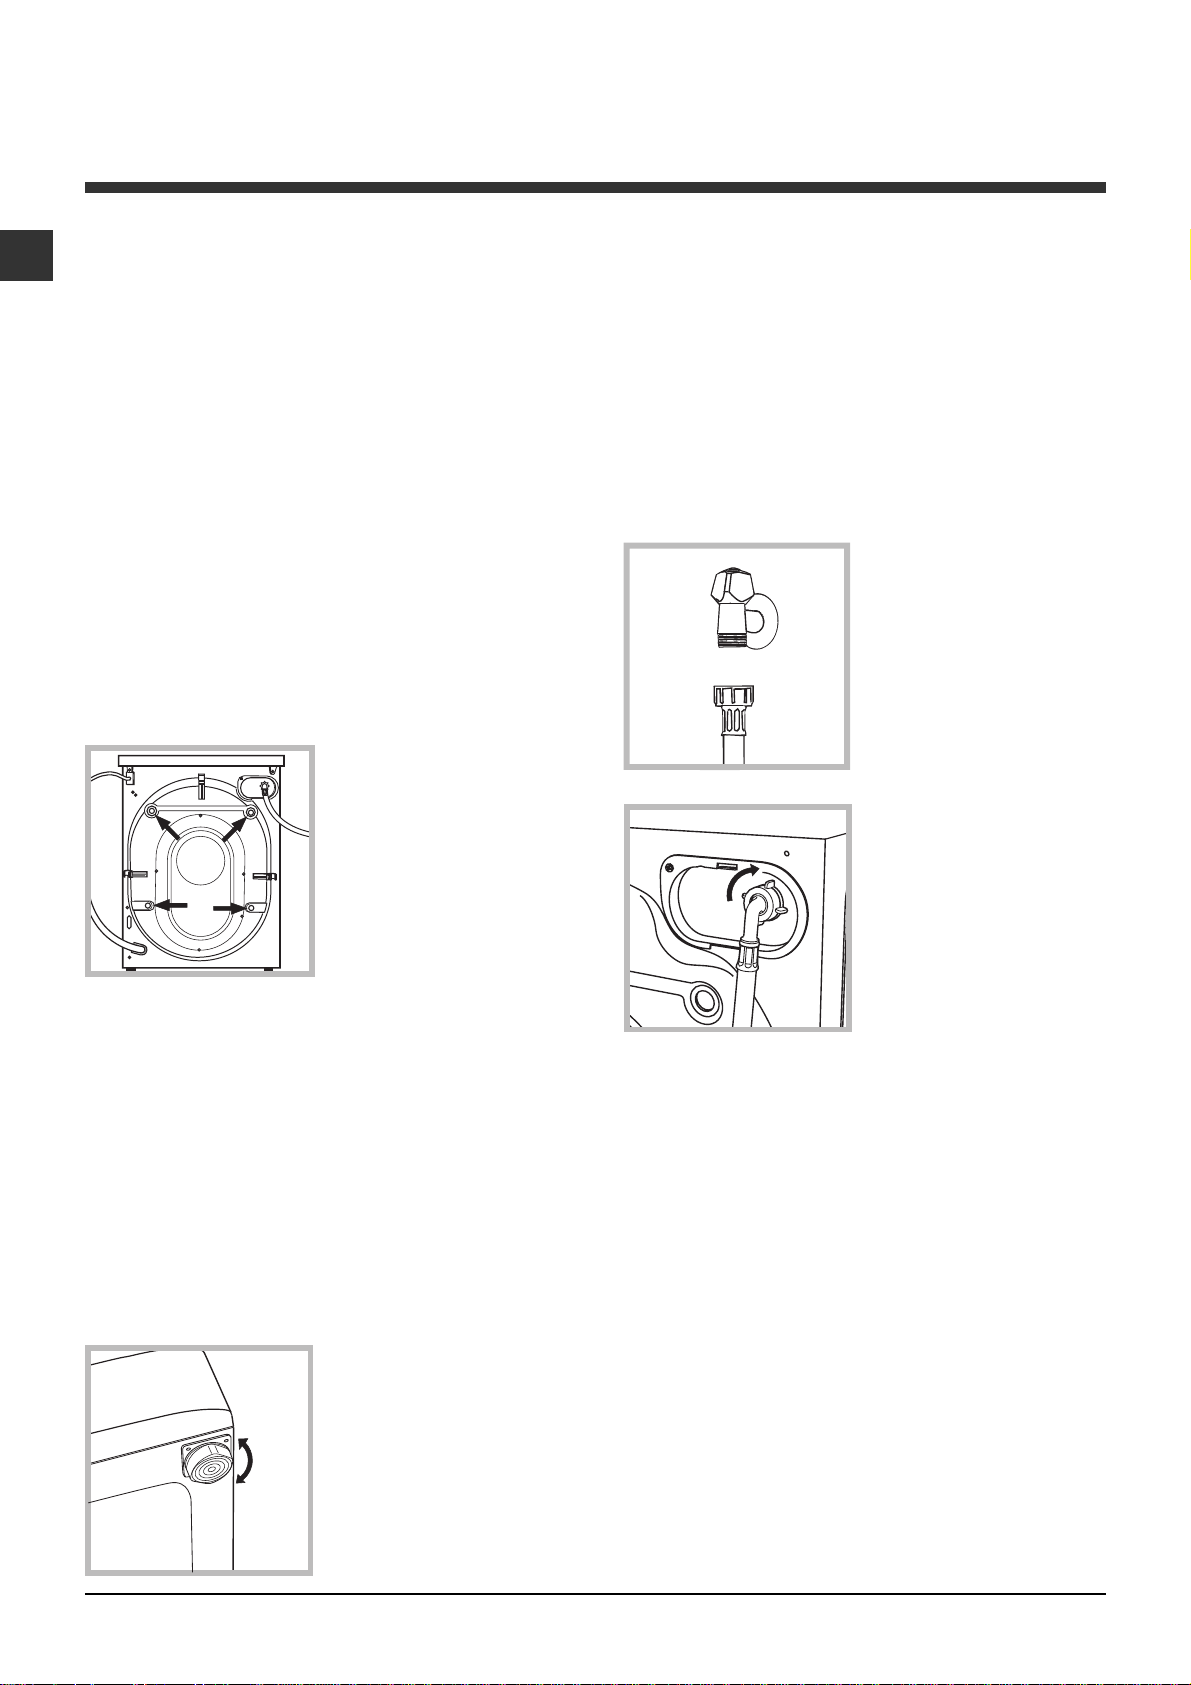
3. Remove the 4
protective screws (used
during transportation) and
the rubber washer with
the corresponding spacer,
located on the rear part of
the appliance (see figure).
4. Close off the holes using the plastic plugs provided.
5. Keep all the parts in a safe place: you will need them
again if the washer-dryer needs to be moved to another
location.
Levelling the machine correctly will provide it with
stability, help to avoid vibrations and excessive noise and
prevent it from shifting while it is operating. If it is placed
on carpet or a rug, adjust the feet in such a way as to
allow a sufficient ventilation space underneath the
washer-dryer.
Connecting the electricity and water
supplies
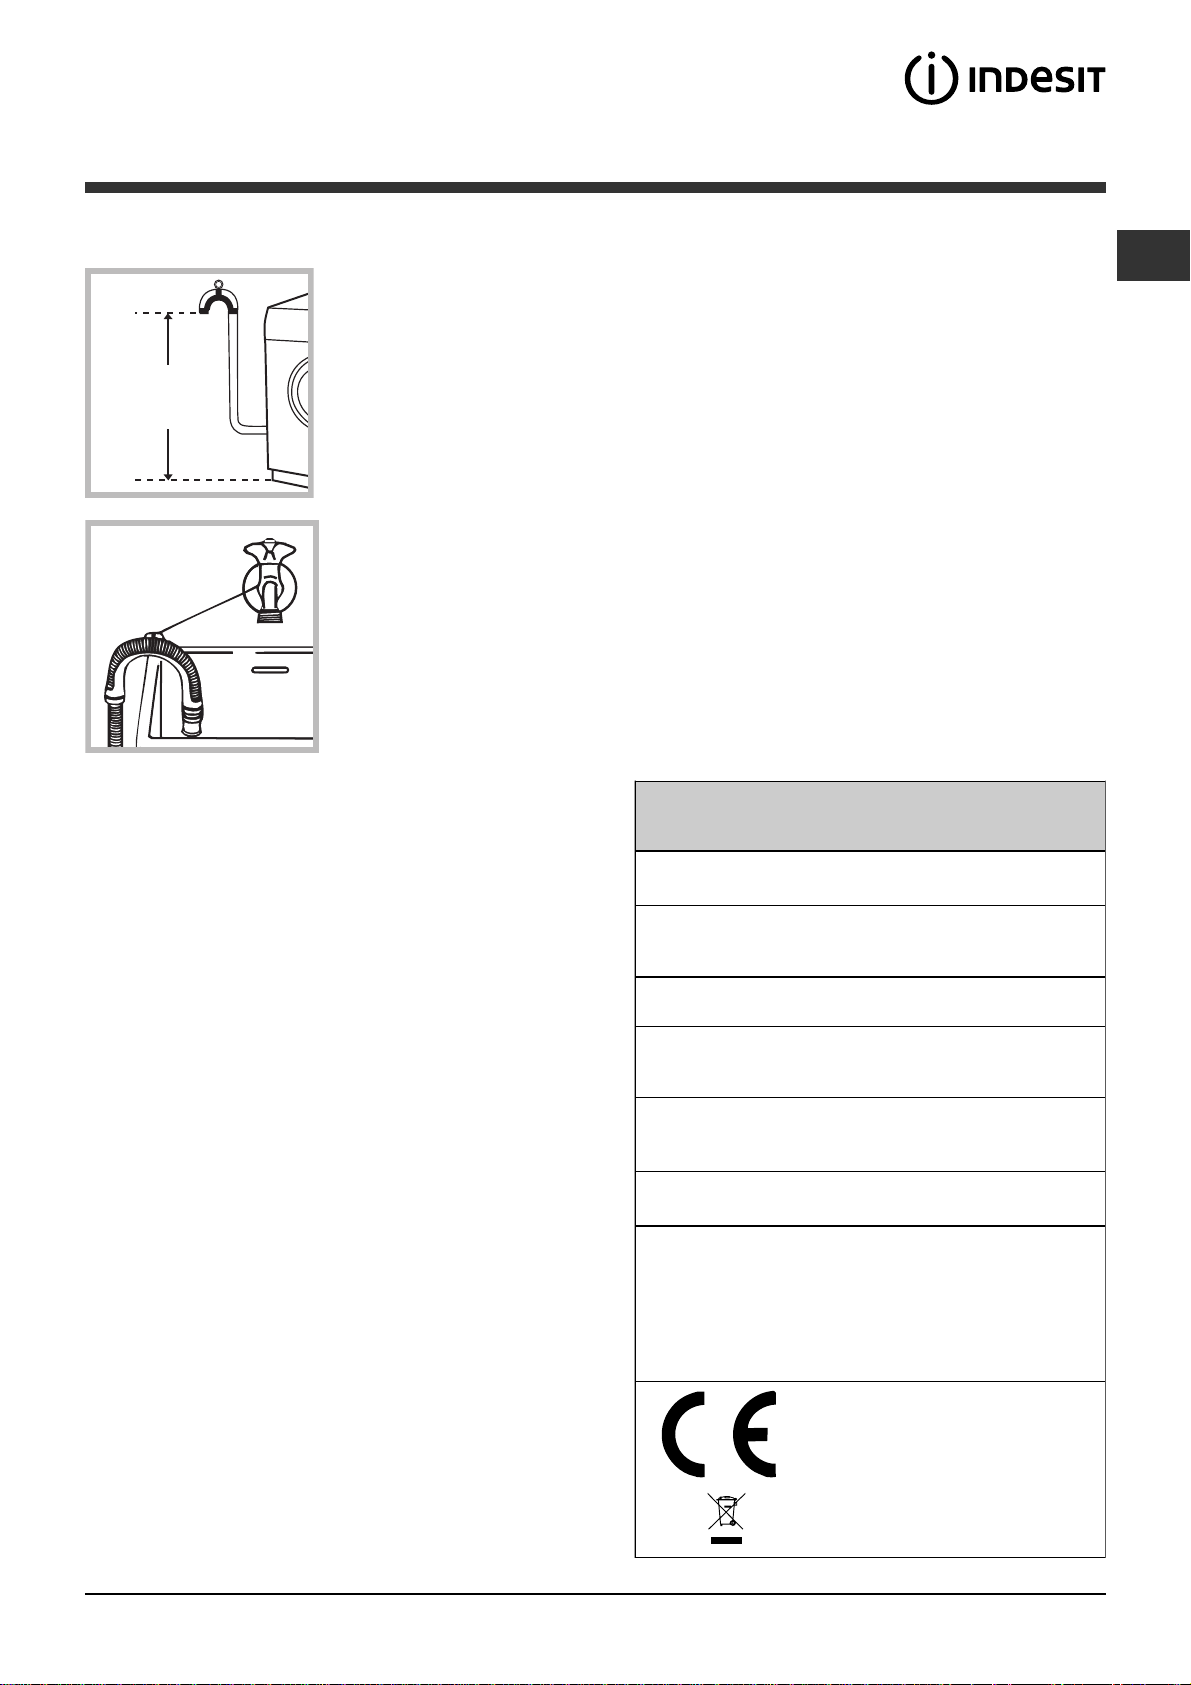
Connecting the water inlet hose
1. Connect the inlet hose
by screwing it to a cold
water tab using a 3/4 gas
threaded connection (see
figure).
Before performing the
connection, allow the
water to run freely until it is
perfectly clear.
2. Connect the inlet hose
to the washer-dryer by
screwing it onto the
corresponding water inlet
of the appliance, which is
situated on the top righthand side of the rear part
of the appliance (see
figure).
3. Make sure that the hose is not folded over or bent.
Packaging materials should not be used as toys for
children.
Levelling
1. Install the washer-dryer on a flat sturdy floor, without
resting it up against walls, furniture cabinets or anything
else.
2. If the floor is not
perfectly level,
compensate for any
unevenness by tightening
or loosening the adjustable
front feet (see figure); the
angle of inclination,
measured in relation to the
worktop, must not exceed
2°.
2
The water pressure at the tap must fall within the
range of values indicated in the Technical data table (see
next page).
If the inlet hose is not long enough, contact a
specialised shop or an authorised technician.
Never use second-hand hoses.
Use the ones supplied with the machine.
Page 3
Connecting the drain hose
Connect the drain hose,
without bending it, to a
drain duct or a wall drain
situated between 65 and
100 cm from the floor;
65 - 100 cm
alternatively, place it
over the edge of a
basin, sink or tub,
fastening the duct
supplied to the tap (see
figure). The free end of
the hose should not be
underwater.
We advise against the use of hose extensions; if it is
absolutely necessary, the extension must have the
same diameter as the original hose and must not
exceed 150 cm in length.
Electrical connections
Before plugging the appliance into the electricity
socket, make sure that:
the socket is earthed and complies with all
applicable laws;
the socket is able to withstand the maximum
power load of the appliance as indicated in the
Technical data table (see opposite);
the power supply voltage falls within the values
indicated in the Technical data table (see opposite);
the socket is compatible with the plug of the
washer-dryer. If this is not the case, replace the
socket or the plug.
The washer-dryer must not be installed outdoors,
even in covered areas. It is extremely dangerous to
leave the appliance exposed to rain, storms and
other weather conditions.
When the washer-dryer has been installed, the
electricity socket must remain within easy reach.
Do not use extension cords or multiple sockets.
The cable should not be bent or compressed.
The power supply cable must only be replaced by
authorised technicians.
Warning! The company shall not be held responsible
in the event that these standards are not observed.
The first wash cycle
Once the appliance has been installed, and before you
use it for the first time, run a wash cycle with
detergent and no laundry, using wash cycle number 2.
Technical data
Model
Dimensions
Capacity
Electrical
connections
Water connections
Spin speed
Energy rated
programmes
according to
regulation
EN 50229
PWDE 7125 S
width 59,5 cm
height 85 cm
depth 55 cm
from 1to 7 kg for wash programme
from 1 to 5 kg for the drying programme
please refer to the technical data
plate fixed to the machine
maximum pressure 1 MPa (10 bar)
minimum pressure 0.05 MPa (0.5 bar)
drum capacity 52 litres
up to 1200 rotations per minute
Wash: programme 2; temperature
60°C; using a load of 7 kg.
Drying:first drying cycle performed
with a 2 kg load, by selecting the
drying level "A1" (IRON);
Second drying cycle performed with a
5 kg load, selecting the maximum
drying level "A4" (EXTRA).
This appliance conforms to the
following EC Directives:
- 89/336/EEC dated 03/05/89
(Electromagnetic Compatibility) and
subsequent modifications
- 2006/95/EC (Low Voltage)
- 2002/96/EC
GB
3
Page 4
Description of the washer-dryer
GB
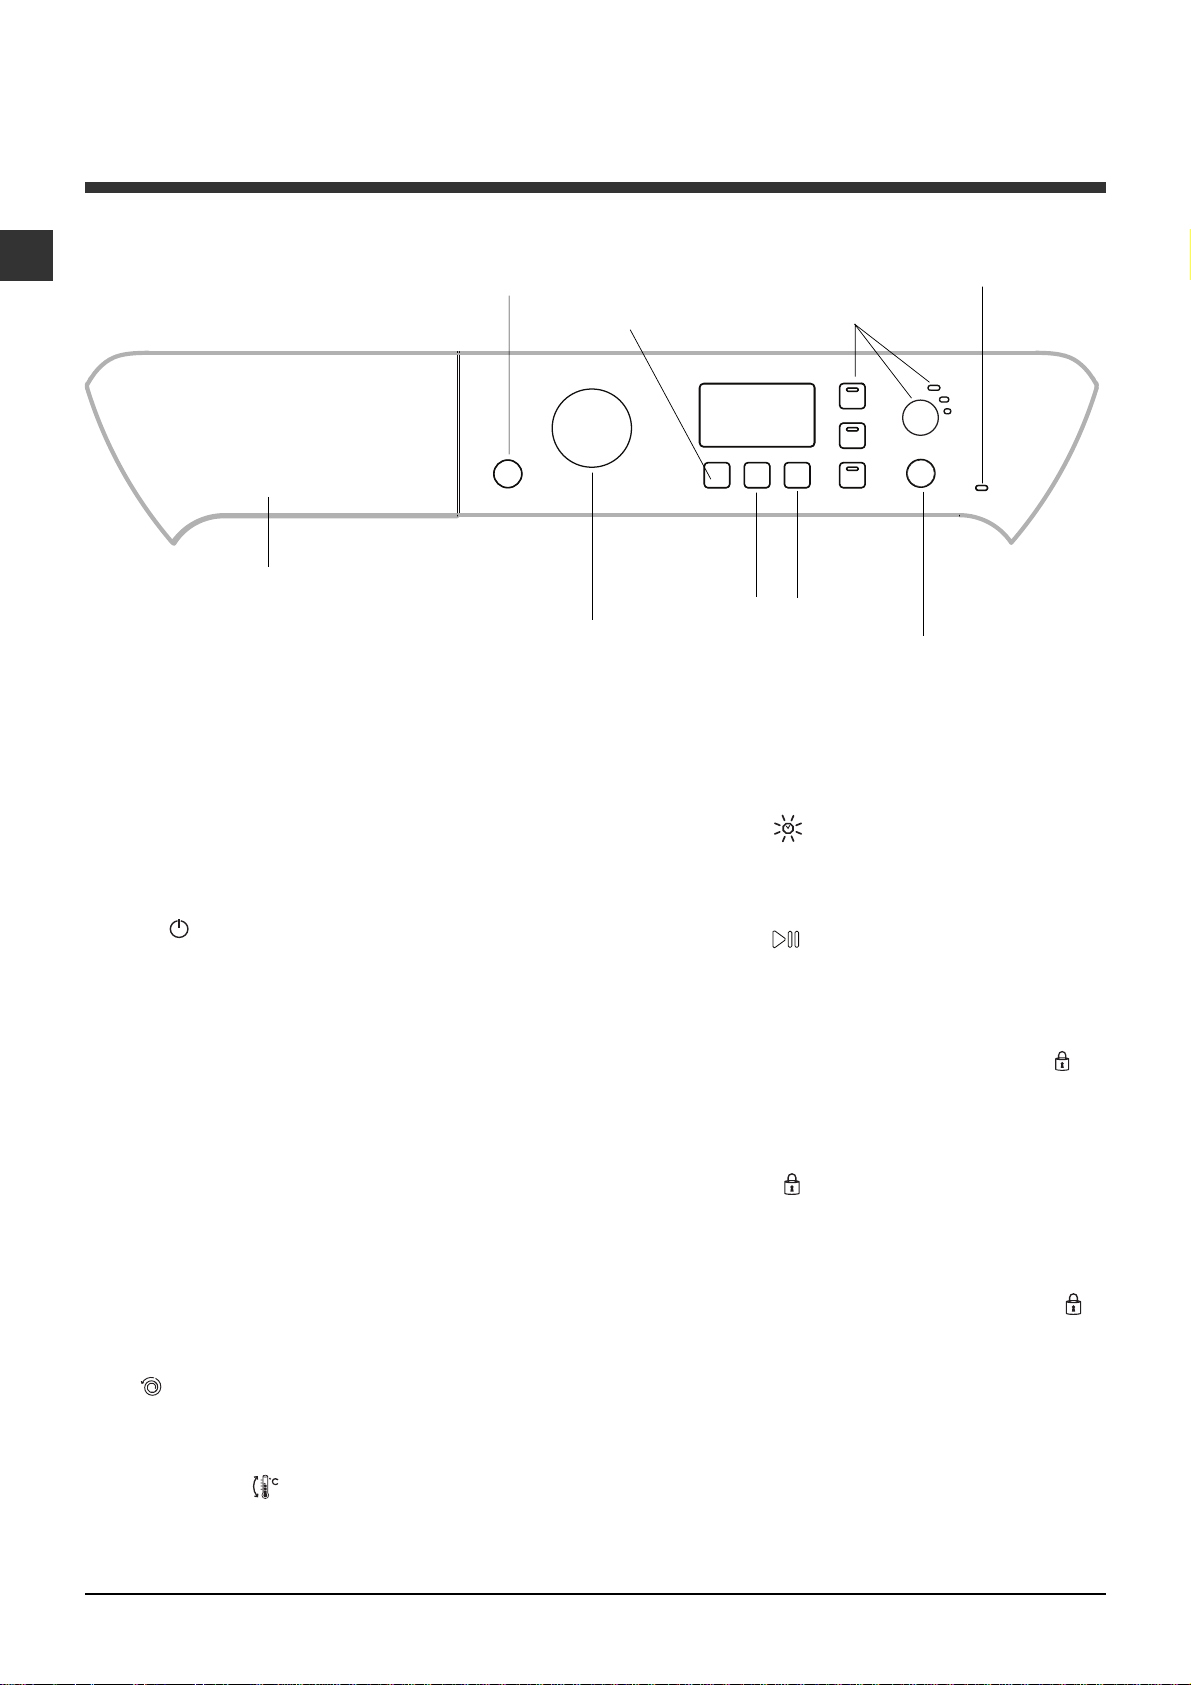
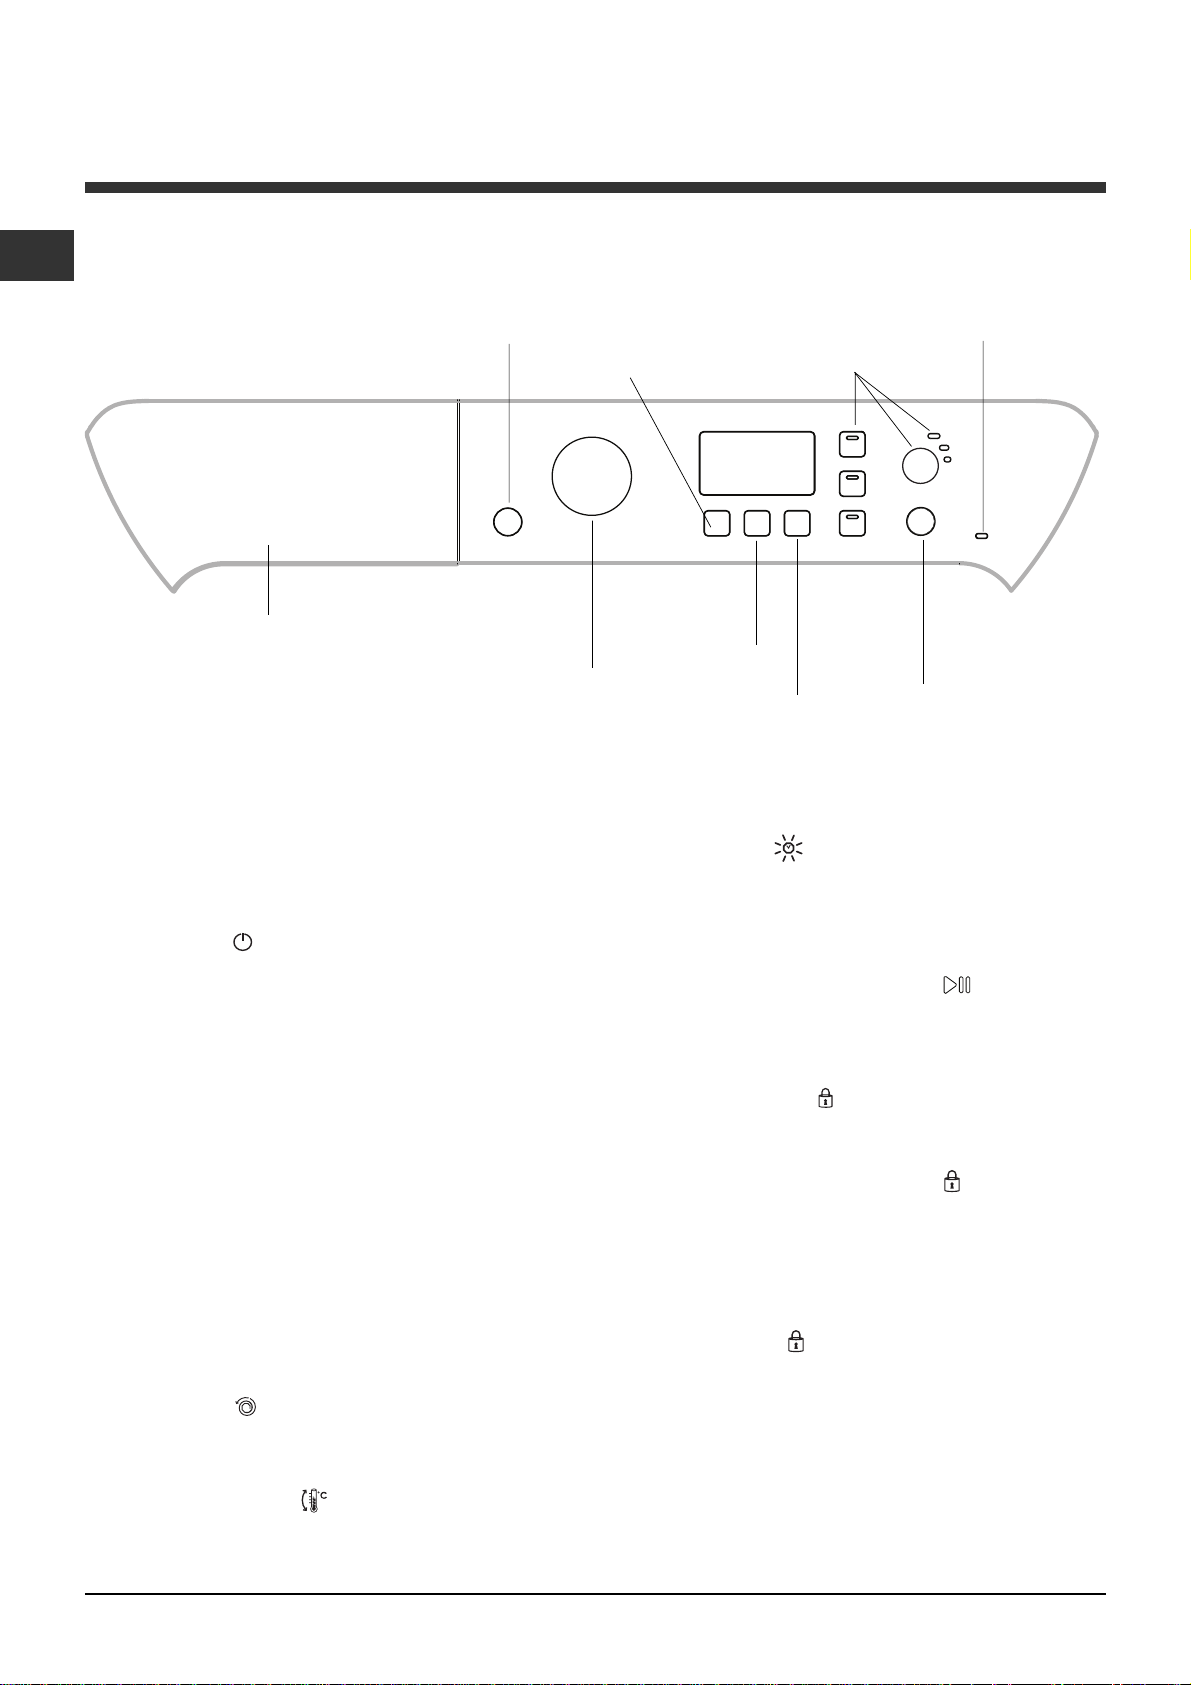
Control panel
Detergent dispenser drawer
ON/OFF
button
SELECTOR
WASH
CYCLE
KNOB
TEMPERATURE
button
SPIN
button
OPTION
buttons and
indicator lights
DISPLAY
DRYING
button
DOOR
LOCKED
indicator light
START/PAUSE
button and indicator
light
Detergent dispenser drawer: used to dispense
detergents and washing additives ( see Detergents
and laundry).
ON/OFF
machine on or off. The START/PAUSE indicator light
which flashes slowly in a blue colour shows that the
machine is switched on. To switch off the washerdryer during the wash cycle, press and hold the
button for approximately 3 seconds; if the button is
pressed briefly or accidentally the machine will not
switch off.
If the machine is switched off during a wash cycle,
this wash cycle will be cancelled.
WASH CYCLE SELECTOR KNOB: used to set the
desired wash cycle (see Table of programmes and
wash cycles).
OPTION buttons and indicator lights: press to
select the available options. The indicator light
corresponding to the selected option will remain lit.
SPIN
exclude the spin cycle; the value appears on the
display.
TEMPERATURE
completely exclude the temperature; the value
appears on the display.
button: press this briefly to switch the
button: press to reduce or completely
button: press to reduce or
DRYING button
drying; the selected drying level or time will appear on
the display (see "How to run a wash cycle or a drying
cycle").
START/PAUSE
the blue indicator light flashes slowly, press the button
to start a wash cycle. Once the cycle has begun the
indicator light will remain lit in a fixed manner. To
pause the wash cycle, press the button again; the
indicator light will flash in an amber colour. If the
symbol is not illuminated, the door may be opened. To
start the wash cycle from the point at which it was
interrupted, press the button again.
DOOR LOCKED
The lit symbol indicates that the door is locked. To
prevent any damage, wait until the symbol turns off
before opening the door.
To open the door while a cycle is in progress, press
the START/PAUSE button; if the DOOR LOCKED
symbol is switched off the door may be opened.
Standby mode
This washer-dryer, in compliance with new energy
saving regulations, is fitted with an automatic standby
system which is enabled after a few minutes if no
activity is detected. Press the ON-OFF button briefly
and wait for the machine to start up again.
: press to decrease or exclude
button and indicator light: when
indicator light:
4
Page 5
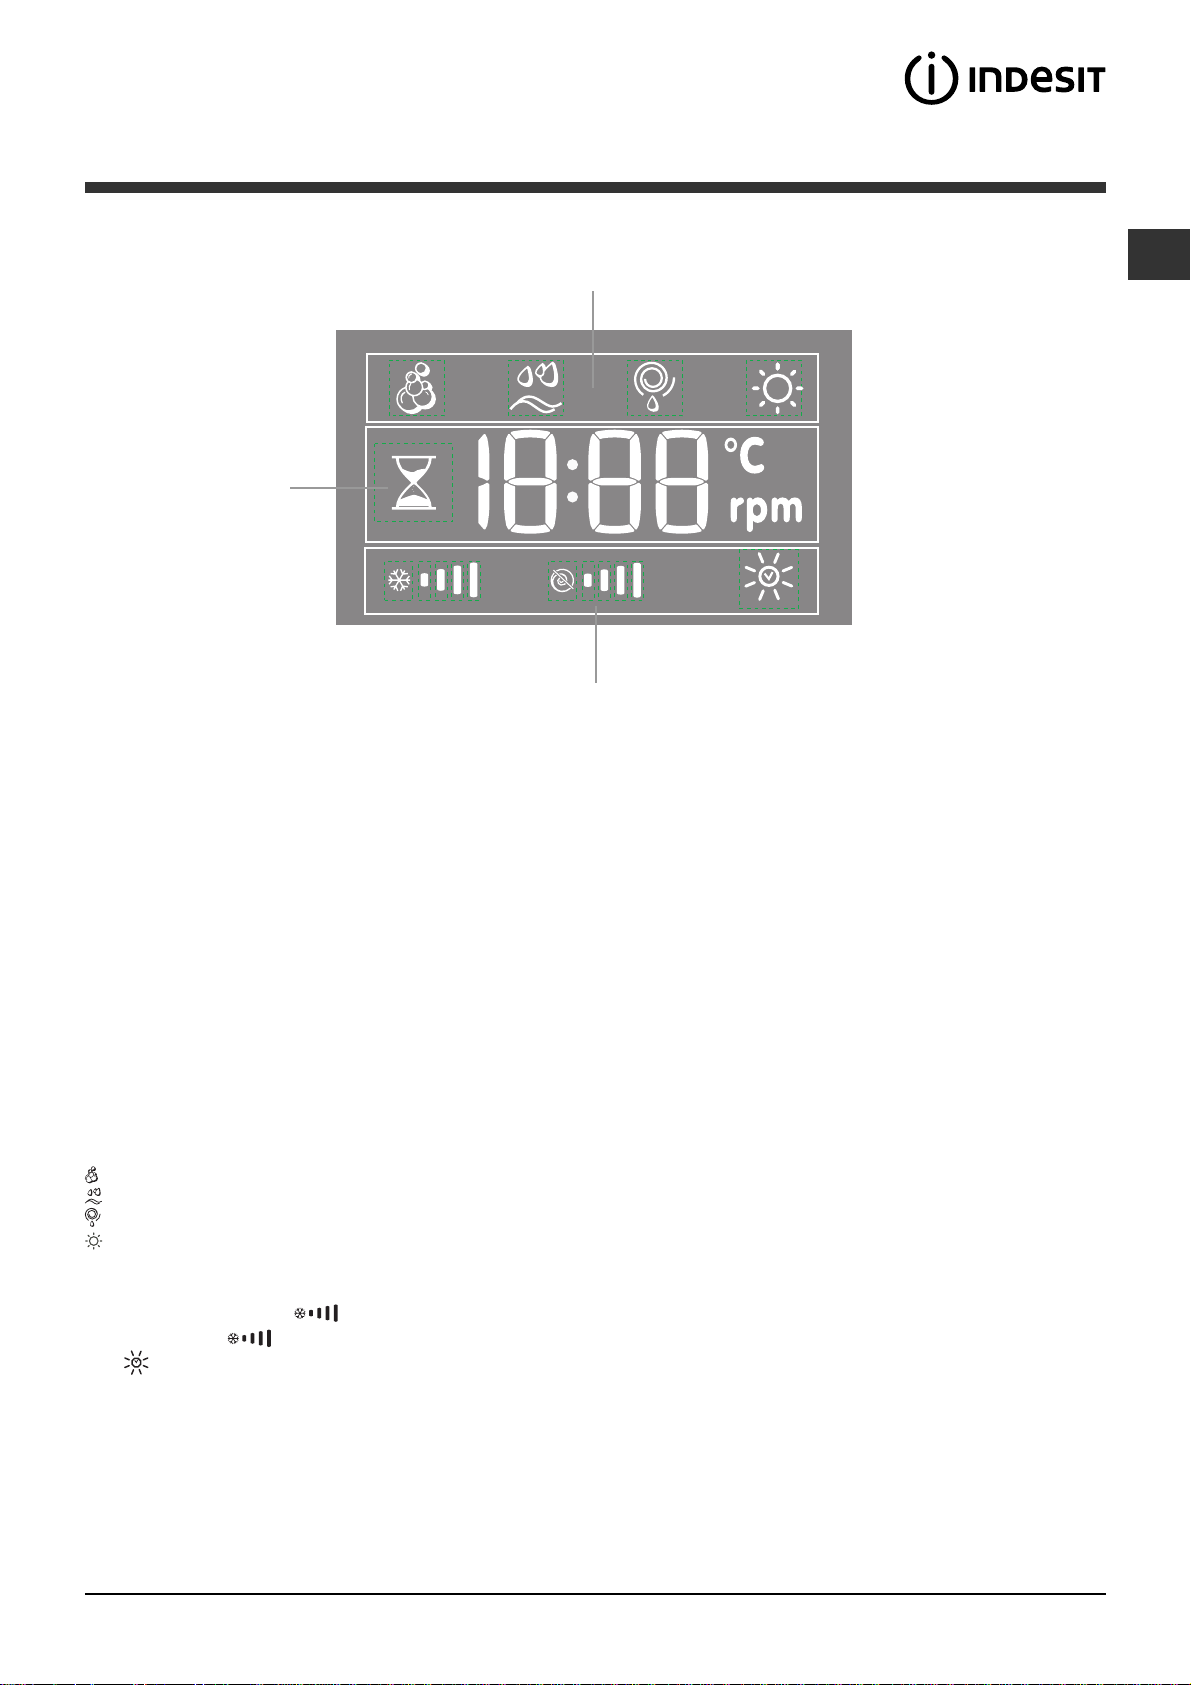
Display
B
GB
A
C
The display is useful when programming the machine and provides a great deal of information.
The duration of the available wash cycles and the remaining time of a running cycle appear in section A; if the
DELAYED START option has been set, the countdown to the start of the selected wash cycle will appear.
Furthermore, pressing the corresponding button allows you to view the maximum temperature, spin speed and
drying level or time values attained by the machine during the selected cycle.
The hour-glass flashes while the machine is processing data, depending on the wash cycle and Smart level
selected. After a maximum of 10 minutes, the hour-glass icon remains lit in a fixed manner and the final amount
of time remaining is displayed. The hour-glass icon will then switch off approximately 1 minute after the final
amount of time remaining has appeared.
The phases scheduled for the selected cycle and, once the cycle has begun, the current phase of the wash cycle
(and drying cycle, if applicable) appear in section B:
Main wash
Rinse
Spin/Drain
Drying
The icons corresponding to temperature, spin and Drying (working from the left) are displayed in section C.
The temperature bars
The spin bars
The
symbol lights up while the drying settings are being adjusted.
indicate the maximum spin level which may be selected for the set cycle.
indicate the maximum temperature level which may be selected for the set cycle.
5
Page 6
How to run a wash cycle or a
drying cycle
GB
1. SWITCH THE MACHINE ON. Press the
button; the START/PAUSE indicator light will flash
slowly in a blue colour.
2. LOAD THE LAUNDRY. Open the porthole door.
Load the laundry, making sure you do not exceed
the maximum load value indicated in the table of
programmes and wash cycles on the following page.
3. MEASURE OUT THE DETERGENT. Pull out the
detergent dispenser drawer and pour the detergent
into the relevant compartments as described in
Detergents and laundry.
4. CLOSE THE DOOR.
5. SELECT THE WASH CYCLE. Use the WASH
CYCLE SELECTOR knob to select the desired wash
cycle. A temperature and spin speed is set for each
wash cycle; these values may be adjusted. The
duration of the cycle will appear on the display.
6. CUSTOMISE THE WASH CYCLE. Use the
relevant buttons:
Modify the temperature and/or spin
speed. The machine automatically displays the
maximum temperature and spin speed values set for
the selected cycle, or the most recently-used settings
if they are compatible with the selected cycle. The
temperature can be decreased by pressing the
button, until the cold wash OFF setting is reached.
The spin speed may be progressively reduced by
pressing the
(the OFF setting). If these buttons are pressed
again, the maximum values are restored.
Setting the drying cycle
The first time the button
will automatically select the maximum drying cycle
which is compatible with the selected wash cycle.
Subsequent presses will decrease the drying level and
then the drying time, until the cycle is excluded
completely ("OFF"). If these buttons are pressed
again, the maximum values are restored.
Drying may be set as follows:
A- Based on the desired laundry dryness level:
Iron: suitable for clothes which will need ironing
afterwards. the remaining dampness softens
creases, making them easier to remove. "A1"
appears on the display.
Hanger: ideal for clothes which do not need to be
dried fully. "A2" appears on the display.
Cupboard: suitable for laundry which can be put
back in a cupboard without being ironed. "A3"
appears on the display.
Extra: suitable for garments which need to be dried
completely, such as sponges and bathrobes. "A4"
appears on the display.
B - Based on a set time period: between 30 and 180
minutes (Max. load 4 kg).
button, until it is completely excluded
is pressed, the machine
If your laundry load to be washed and dried is
much greater than the maximum stated load (see
adjacent table of programmes), perform the wash
cycle, and when the cycle is complete, divide the
garments into groups and put some of them back
in the drum. At this point, follow the instructions
provided for a "Drying only" cycle. Repeat this
procedure for the remainder of the load.
A cooling-down period is always added to the end
of each drying cycle.
Drying only
Use the cycle selector knob to select a drying cycle
(11-12-13) in accordance with the type of fabric.
The desired drying level or time may also be set
using the DRYING button
Modify the cycle settings.
Press the button to enable the option; the indicator
light corresponding to the button will switch on.
Press the button again to disable the option; the
indicator light will switch off.
.
If the selected option is not compatible with the
set wash cycle, the indicator light will flash and the
option will not be activated.
If the selected option is not compatible with a
previously selected one, the indicator light
corresponding to the first function selected will flash
and only the second option will be activated; the
indicator light for the option which has been
activated will be illuminated.
Note: if the SMART option has been selected,
none of the incompatible options may be activated.
The options may affect the recommended load
value and/or the duration of the cycle.
7. START THE WASH CYCLE. Press the START/
PAUSE button. The corresponding indicator light will
turn blue, remaining lit in a fixed manner, and the
door will be locked (the DOOR LOCKED
will be lit). To change a wash cycle while it is in
progress, pause the washer-dryer using the
START/PAUSE button (the START/PAUSE indicator
light will flash slowly in an amber colour); then
select the desired cycle and press the START/
PAUSE button again. To open the door while a
cycle is in progress, press the START/PAUSE
button; if the DOOR LOCKED
off the door may be opened. Press the START/
PAUSE button again to restart the wash cycle from
the point at which it was interrupted.
8. THE END OF THE WASH CYCLE. This will be
indicated by the text END on the display; when
the DOOR LOCKED
may be opened. Open the door, unload the laundry
and switch off the machine.
symbol switches off the door
symbol is switched
symbol
If you wish to cancel a cycle which has already
begun, press and hold the
stopped and the machine will switch off.
button. The cycle will be
6
Page 7
Wash cycles and
4
2
3
1
4
2
1
3
options
Table of programmes and wash cycles
Description of the wash cycle
Wash
cycles
Smart cycles
Cottons with Pre-wash
1
soiled whites.
White Cottons
2
whites.
White Cottons (1)
2
whites and resistant colours.
White Cottons (2)
2
whites and delicate colours.
Cottons
3
resistant colours.
Coloured Cottons(3)
4
whites and delicate colours.
Synthetics
5
colours.
6 Jeans
7 Shirts
Special cycles
8 Wool
Silk /C u rt a ins
9
and viscose, lingerie.
10 Outwear
Partial cycles
11 Drying Cottons
12 Drying Synthetics
13 Drying Wool
Partial cycles
Rinse
For all Test Institutes:
1) Test wash cycle in compliance with regulation EN 50229: select wash cycle 2 with a temperature of 60°C.
2) Long wash cycle for cottons: select wash cycle 2 with a temperature of 40.
3) Short wash cycle for cottons: select wash cycle 4 with a temperature of 40.
Spin
Drain
.
: heavily soiled whites and
: heavily soiled resistant
: extremely
: extremely soiled
: heavily soiled
: heavily soiled
: lightly soiled
: for wo ol, cas hm ere, etc.
: for garme nts in s ilk
Max.
tem p .
(°C)
90° 1200
90° 1200
60° 1200
40° 1200
60° 1200
40° 1200
60°
40°
40°
40°
30°
30°
Max.
speed
(rpm )
800
800
600
800
0 - -
400 - -
- -
- -
- -
- 1200
- 1200
- 0 - - - - - 7
Drying
•
•
•
•
•
•
•
•
•
•
•
•
•
•
•
Wash options
The option optimises washing to suit the quantity of
laundry loaded into the machine, thereby reducing the overall
wash cycle duration while minimising water and energy
consumption. Press the
wash cycle desired:
Intensive: vigorous wash cycle for garments with a heavy soil level.
4 You: standard wash cycle for garments with a normal soil level.
Fast: quick wash cycle for garments with a light soil level.
This may only be used in conjunction with wash cycles 1, 2, 3, 4, 5
(all three levels) and 6, 7 (4 You and Fast levels).
Easy iron
By selecting this function, the wash and spin cycles will be modified
in order to reduce the formation of creases. At the end of the cycle
the washer-dryer will perform slow rotations of the drum, while the
EASY IRON and START/PAUSE indicator lights will flash (blue and
orange respectively). To end the cycle, press the START/PAUSE
button or the EASY IRON button. For wash cycles number 9-10,
the machine will end the cycle while the laundry is soaking; the EASY
IRON and START/PAUSE indicator lights will flash. To drain the
water so that the laundry may be removed, press the START/
PAUSE button or the EASY IRON button.
It cannot be used in conjunction with wash cycles 8, 11, 12, 13,
, .
Note: If you also want to run the drying cycle, this option is
enabled only if combined with level A1 (Iron dry).
button to select the type of
Fabric
softener
-
•
•
•
•
•
•
-
•
•
•
•
•
•
•
•
•
•
Max.
load
(kg)
3,5
Cycle
duration
7
7
7
7
7
7
3
2
The duration of the wash cycles can be checked on the display.
Pre-
wash
•
-
-
-
-
-
-
-
-
Main wash Bleach
•
•
•
•
•
•
•
•
•
Detergents
-
•
•
•
-
-
- - 2
•
•
1,5
1
- - - - 5
- - - - 3
- - - - 1,5
- -
- - - - 7
•
•
7
Stain removal
This function is particularly useful
for the removal of stubborn
stains. Insert extra
compartment 4 (supplied with
the appliance) into compartment
1. When pouring in the bleach,
be careful not to exceed the
max level marked on the
central pivot (see figure). To
bleach laundry with no other
washing action, pour the bleach
into extra compartment 4, select the Rinse cycle
and
activate the Stain removal option . To bleach during a wash
cycle, pour in the detergent and any fabric softener you wish to
use, select the desired wash cycle and enable the Stain
removal option. The use of extra compartment 4 excludes
the pre-wash function.
It cannot be used in conjunction with wash cycles 1, 6, 8, 9, 10,
11, 12, 13,
, .
Delayed start
To set a delayed start for the selected cycle, press the
corresponding button repeatedly until the required delay
period has been reached. When this option is enabled, the
corresponding indicator light will remain lit. To remove the
delayed start setting, press the button until the text "OFF"
appears on the display.
This option can be used in conjunction with all cycles.
GB
7
Page 8
Detergents and laundry
GB
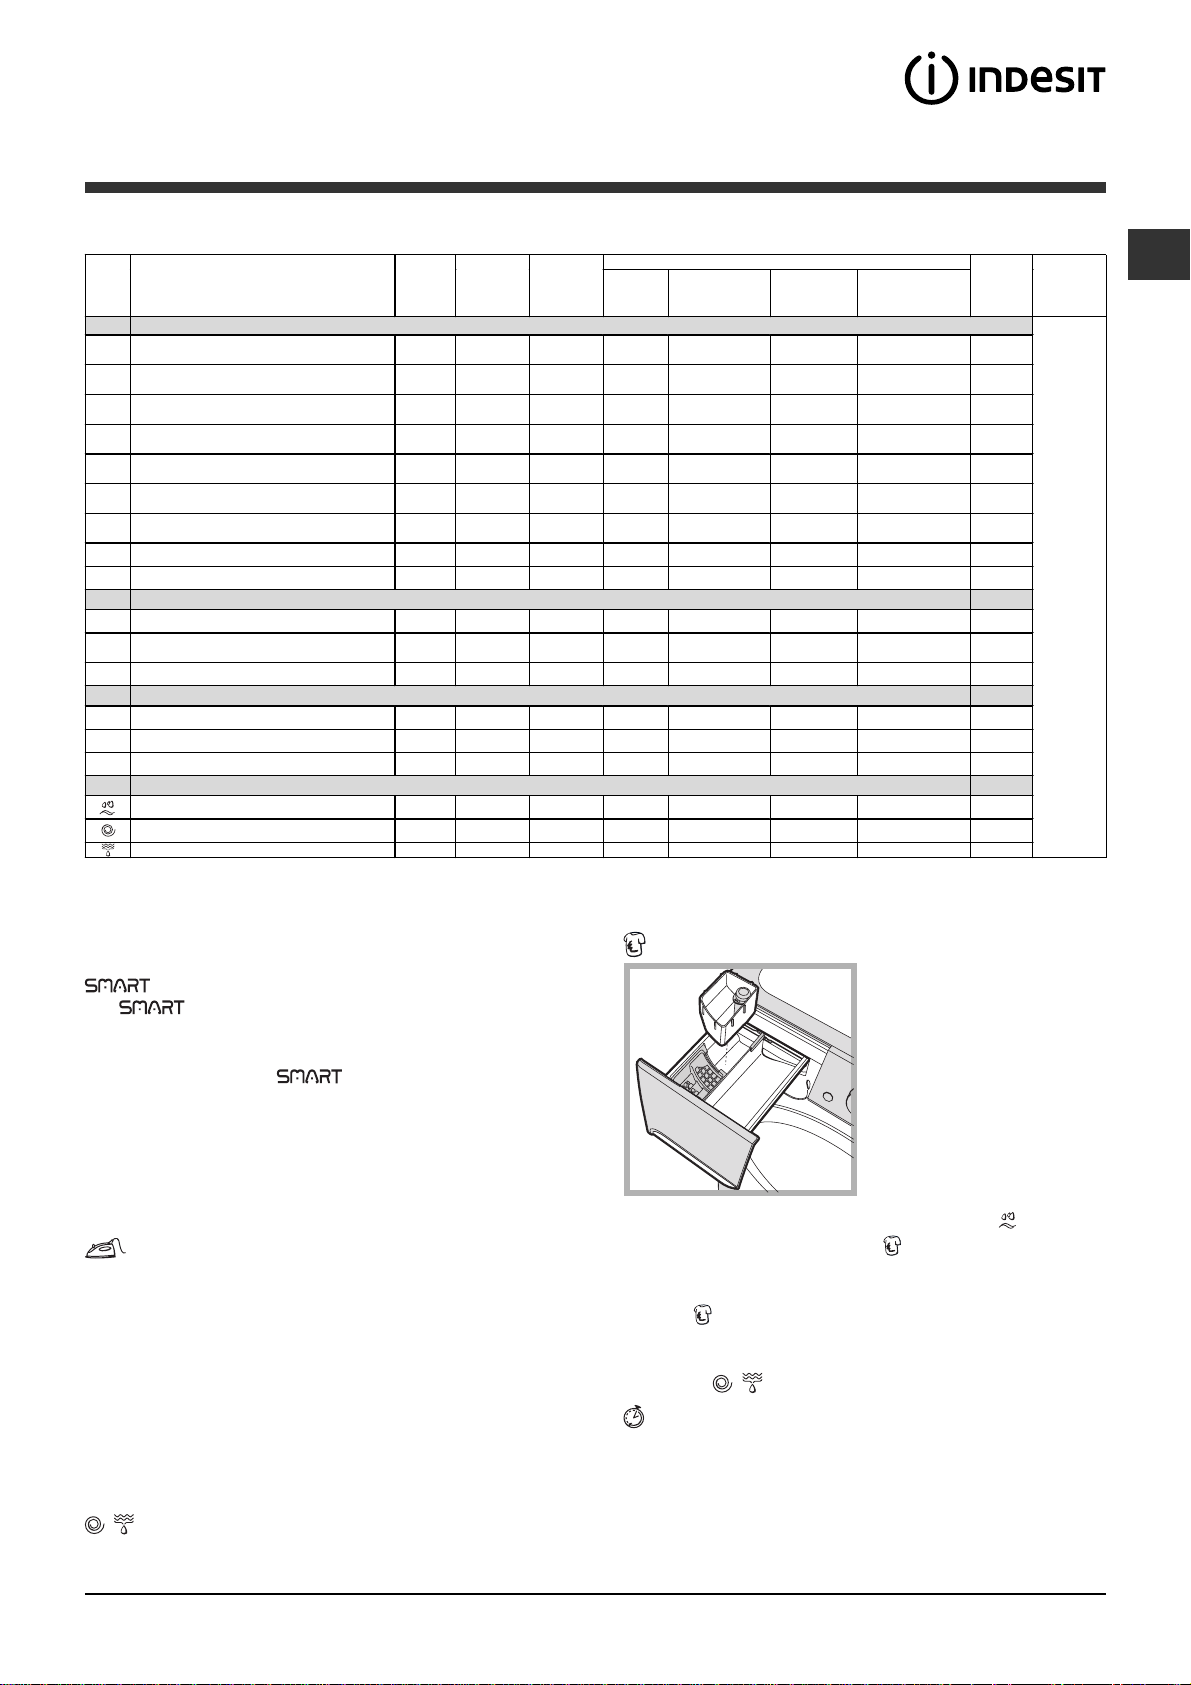
Detergent dispenser drawer
Successful washing results also depend on the correct
dose of detergent: adding too much detergent will not
necessarily result in a more efficient wash, and may in
fact cause build up on the inside of your appliance and
contribute to environmental pollution.
Do not use hand washing detergents; they create too
much foam.
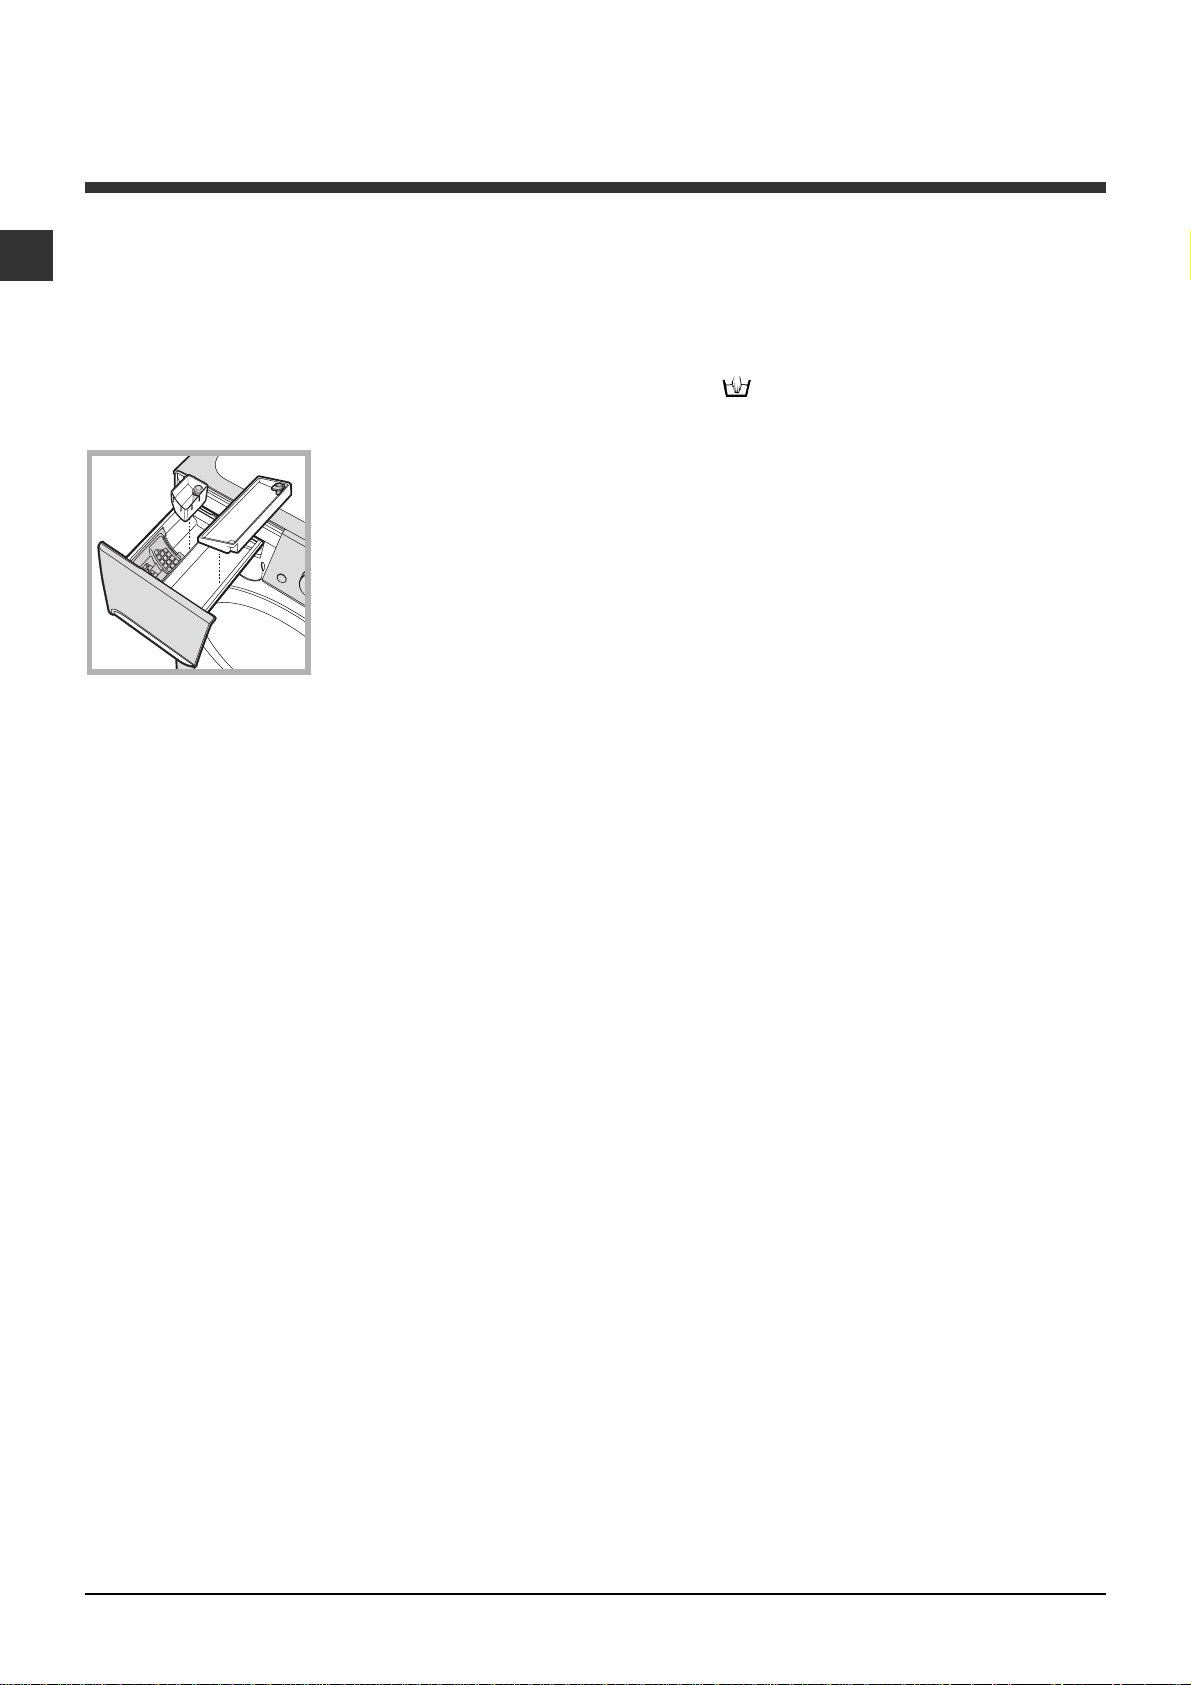
Open the detergent
4
1
3
Compartment 1: Pre-wash detergent (powder)
Before pouring in the detergent, make sure that extra
compartment 4 has been removed.
Compartment 2: Washing detergent (powder or
liquid)
Liquid detergent should only be poured in immediately
prior to the start of the wash cycle.
Compartment 3: Additives (fabric softeners,
etc.)
The fabric softener should not overflow the grid.
extra compartment 4: Bleach
extra compartment 5: we recommend this
compartment is used for liquid detergent.
5
2
dispenser drawer and pour
in the detergent or washing
additive, as follows.
Preparing the laundry
Divide the laundry according to:
- the type of fabric/the symbol on the label
- the colours: separate coloured garments from
whites.
Empty all garment pockets and check the buttons.
Do not exceed the listed values, which refer to the
weight of the laundry when dry:
Durable fabrics: max. 7 kg
Synthetic fabrics: max. 3 kg
Delicate fabrics: max. 2 kg
Wool: max. 1,5 kg
Silk: max. 1 kg
Shirts: use special wash cycle 7 to wash shirts in
various fabrics and colours.
It guarantees maximum care is taken of the garments
and minimises the formation of creases.
Wool: wash cycle 8 can be used to wash all woollen
garments in the machine, even those carrying the hand
wash only
special detergent and do not exceed the maximum load
of 1,5 kg.
Silk: use special wash cycle 9 to wash all silk
garments. We recommend the use of special detergent
which has been designed to wash delicate clothes.
Curtains: we recommend you fold the curtains and
place them in a pillow case or mesh bag. Use wash
cycle 9.
Outwear(
repellent fabrics and winter jackets (e.g. Gore-Tex,
polyester, nylon); for best results, use a liquid detergent
and dosage suitable for a half-load; pre-treat necks,
cuffs and stains if necessary; do not use softeners or
detergents containing softeners. Stuffed duvets cannot
be washed with this programme.
Load balancing system
Before every spin cycle, to avoid excessive vibrations
before every spin and to distribute the load in a
uniform manner, the drum rotates continuously at a
speed which is slightly greater than the washing
rotation speed. If, after several attempts, the load is
not balanced correctly, the machine spins at a
reduced spin speed. If the load is excessively
unbalanced, the washer-dryer performs the
distribution process instead of spinning. To encourage
improved load distribution and balance, we
recommend small and large garments are mixed in
the load.
label. To achieve the best results, use a
wash cycle
10): is studied for washing water-
How much does your laundry weigh?
1 sheet 400-500 g
1 pillow case 150-200 g
1 tablecloth 400-500 g
1 bathrobe 900-1,200 g
1 towel 150-250 g
Special wash cycles
Jeans: turn the garments inside out before washing
and use liquid detergent. Use wash cycle 6.
8
Page 9
Precautions and tips
This washer-dryer was designed and constructed in
accordance with international safety regulations. The
following information is provided for safety reasons and
must therefore be read carefully.
General safety
This appliance was designed for domestic use only.
The washer-dryer must only be used by adults, in
accordance with the instructions provided in this manual.
Do not touch the machine when barefoot or with wet
or damp hands or feet.
Do not pull on the power supply cable when
unplugging the appliance from the electricity socket.
Hold the plug and pull.
Do not open the detergent dispenser drawer while the
machine is in operation.
Do not touch the drained water as it may reach
extremely high temperatures.
Never force the porthole door. This could damage the
safety lock mechanism designed to prevent accidental
opening.
If the appliance breaks down, do not under any
circumstances access the internal mechanisms in an
attempt to repair it yourself.
Always keep children well away from the appliance
while it is operating.
The door can become quite hot during the wash cycle.
If the appliance has to be moved, work in a group of
two or three people and handle it with the utmost
care. Never try to do this alone, because the
appliance is very heavy.
Before loading laundry into the washer-dryer, make
sure the drum is empty.
During the drying phase, the door tends to get
quite hot.
Do not use the appliance to dry clothes that have
been washed with flammable solvents (e.g.
trichlorethylene).
Do not use the appliance to dry foam rubber or
similar elastomers.
Make sure that the water tap is turned on during
the drying cycles.
optimise the cost of re-using and recycling the
materials inside the machine, while preventing
potential damage to the atmosphere and to public
health. The crossed-out dustbin is marked on all
products to remind the owner of their obligations
regarding separated waste collection.
For more information relating to the correct disposal of
household appliances, owners should contact their
local authorities or appliance dealer.
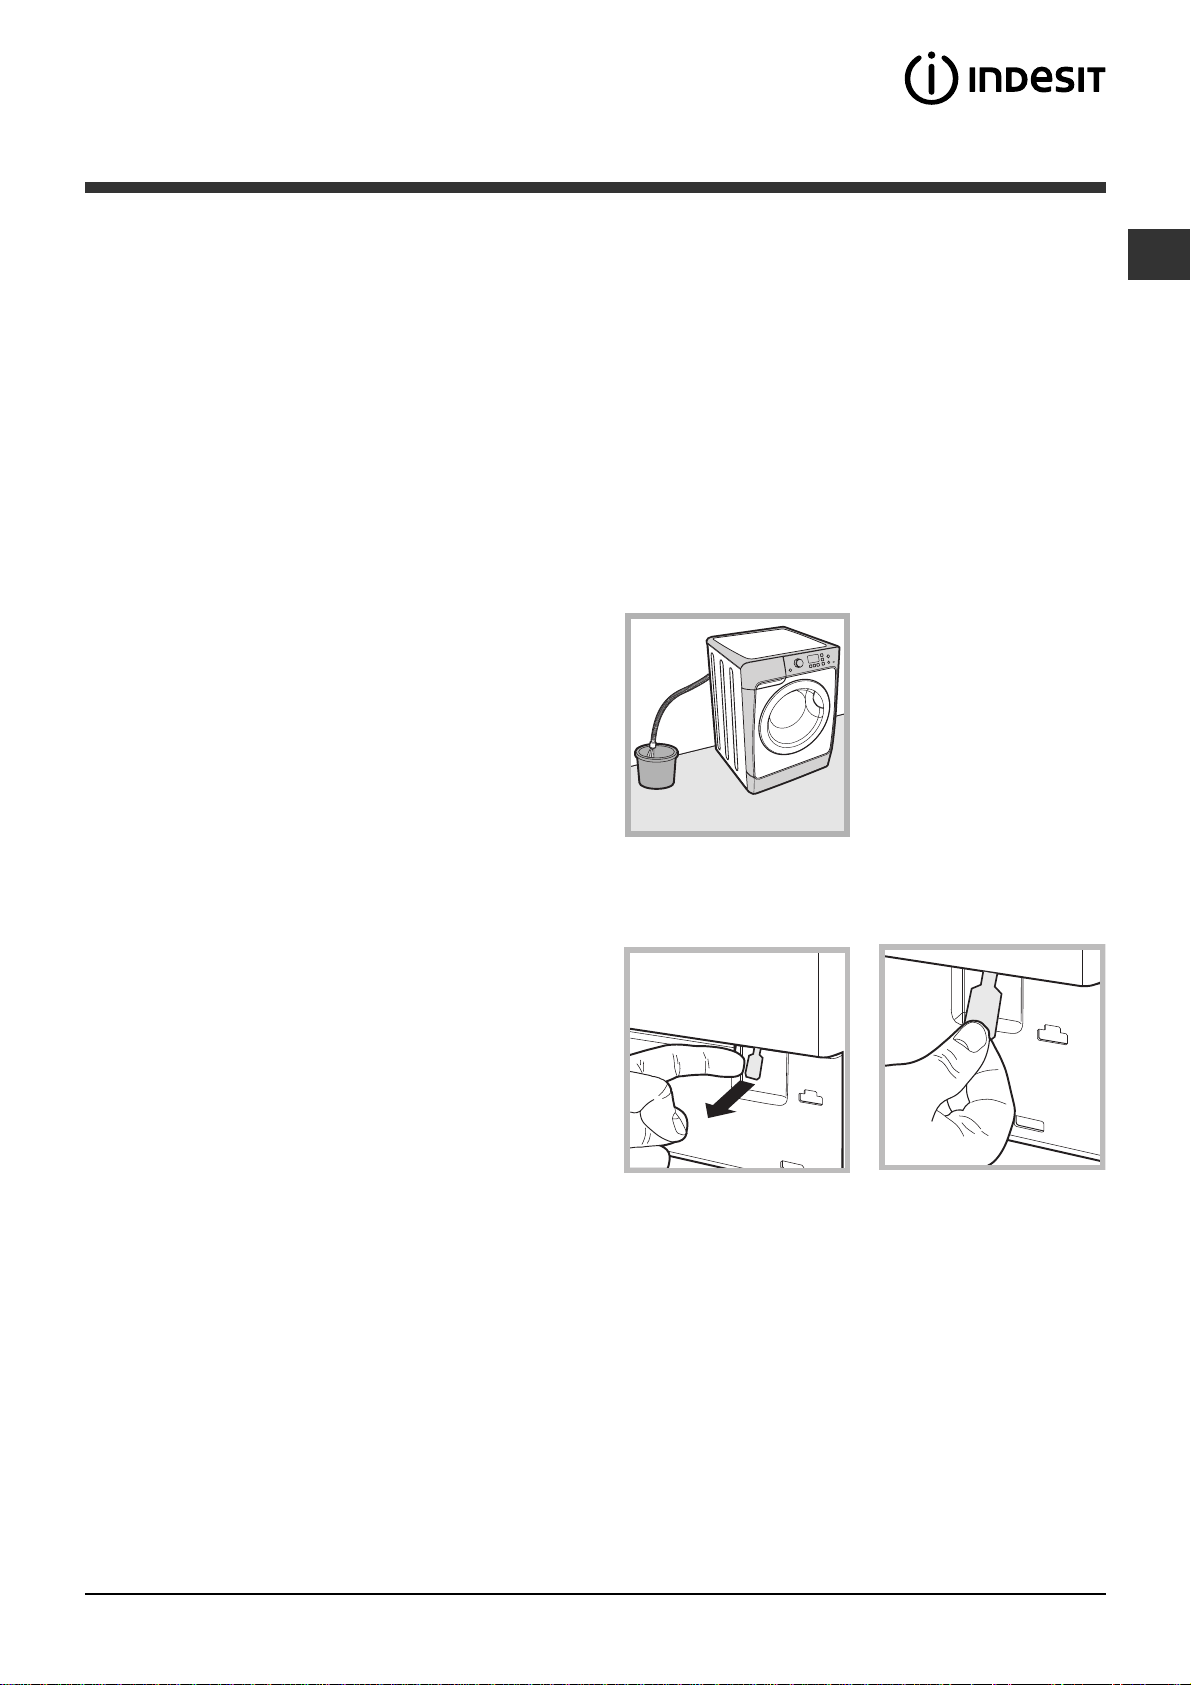
Opening the porthole door manually
In the event that it is not possible to open the porthole
door due to a powercut, and if you wish to remove
the laundry, proceed as follows:
1. Remove the plug from
the electrical socket..
2. Make sure the water
level inside the machine is
lower than the door
opening; if it is not, remove
excess water using the
drain hose, collecting it in a
bucket as indicated in the
figure.
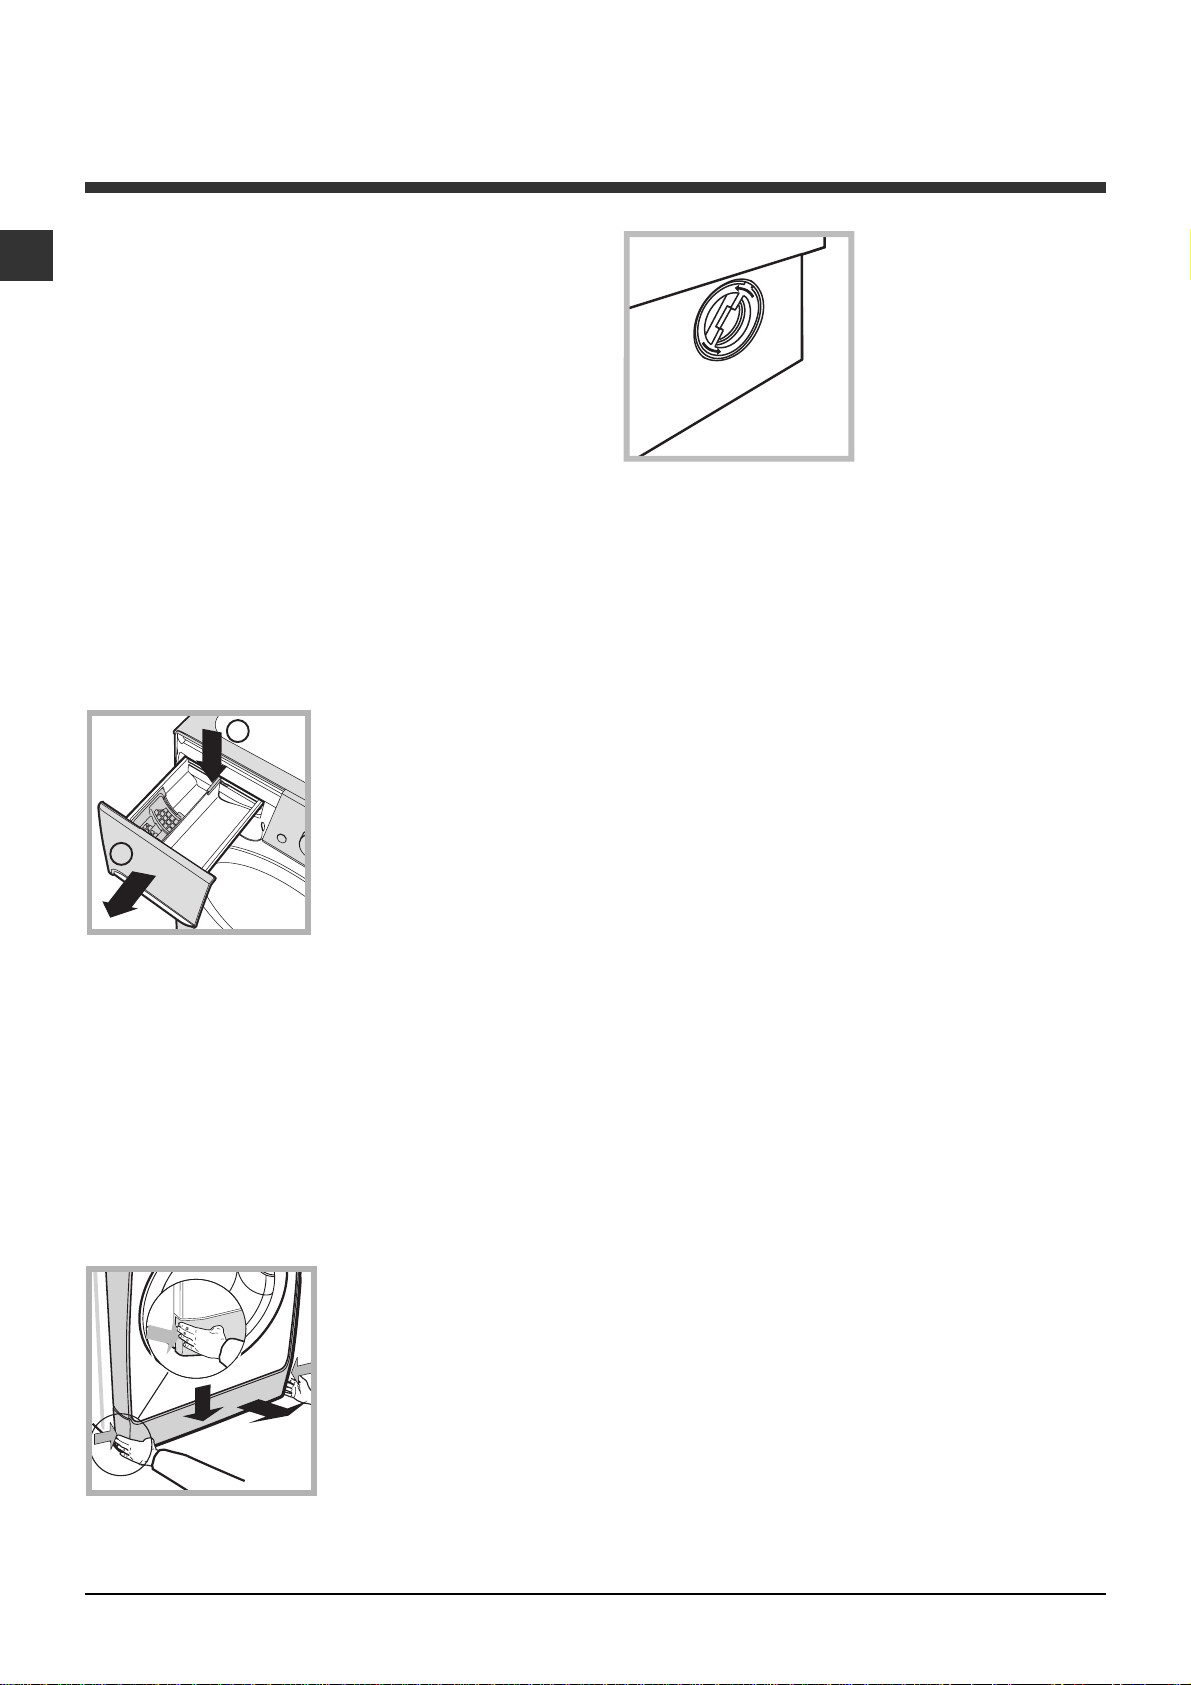
3. Remove the cover panel on the lower front part of
the washer-dryer (see overleaf).
4. Pull outwards using the tab as indicated in the
figure, until the plastic tie-rod is freed from its stop
position; pull downwards and open the door at the
same time.
GB
Disposal
Disposing of the packaging materials:
observe local regulations so that the packaging may
be re-used.
The European Directive 2002/96/EC relating to Waste
Electrical and Electronic Equipment (WEEE) states
that household appliances should not be disposed of
using the normal solid urban waste cycle. Exhausted
appliances should be collected separately in order to
5. Reposition the panel, making sure the hooks are
securely in place before you push it onto the
appliance.
9
Page 10
Care and maintenance
GB
Cutting off the water and electricity
supplies
Turn off the water tap after every wash cycle. This
will limit wear on the hydraulic system inside the
washer-dryer and help to prevent leaks.
Unplug the washer-dryer when cleaning it and during
all maintenance work.
Cleaning the washer-dryer
The outer parts and rubber components of the
appliance can be cleaned using a soft cloth soaked in
lukewarm soapy water. Do not use solvents or
abrasives.
Cleaning the detergent dispenser
drawer
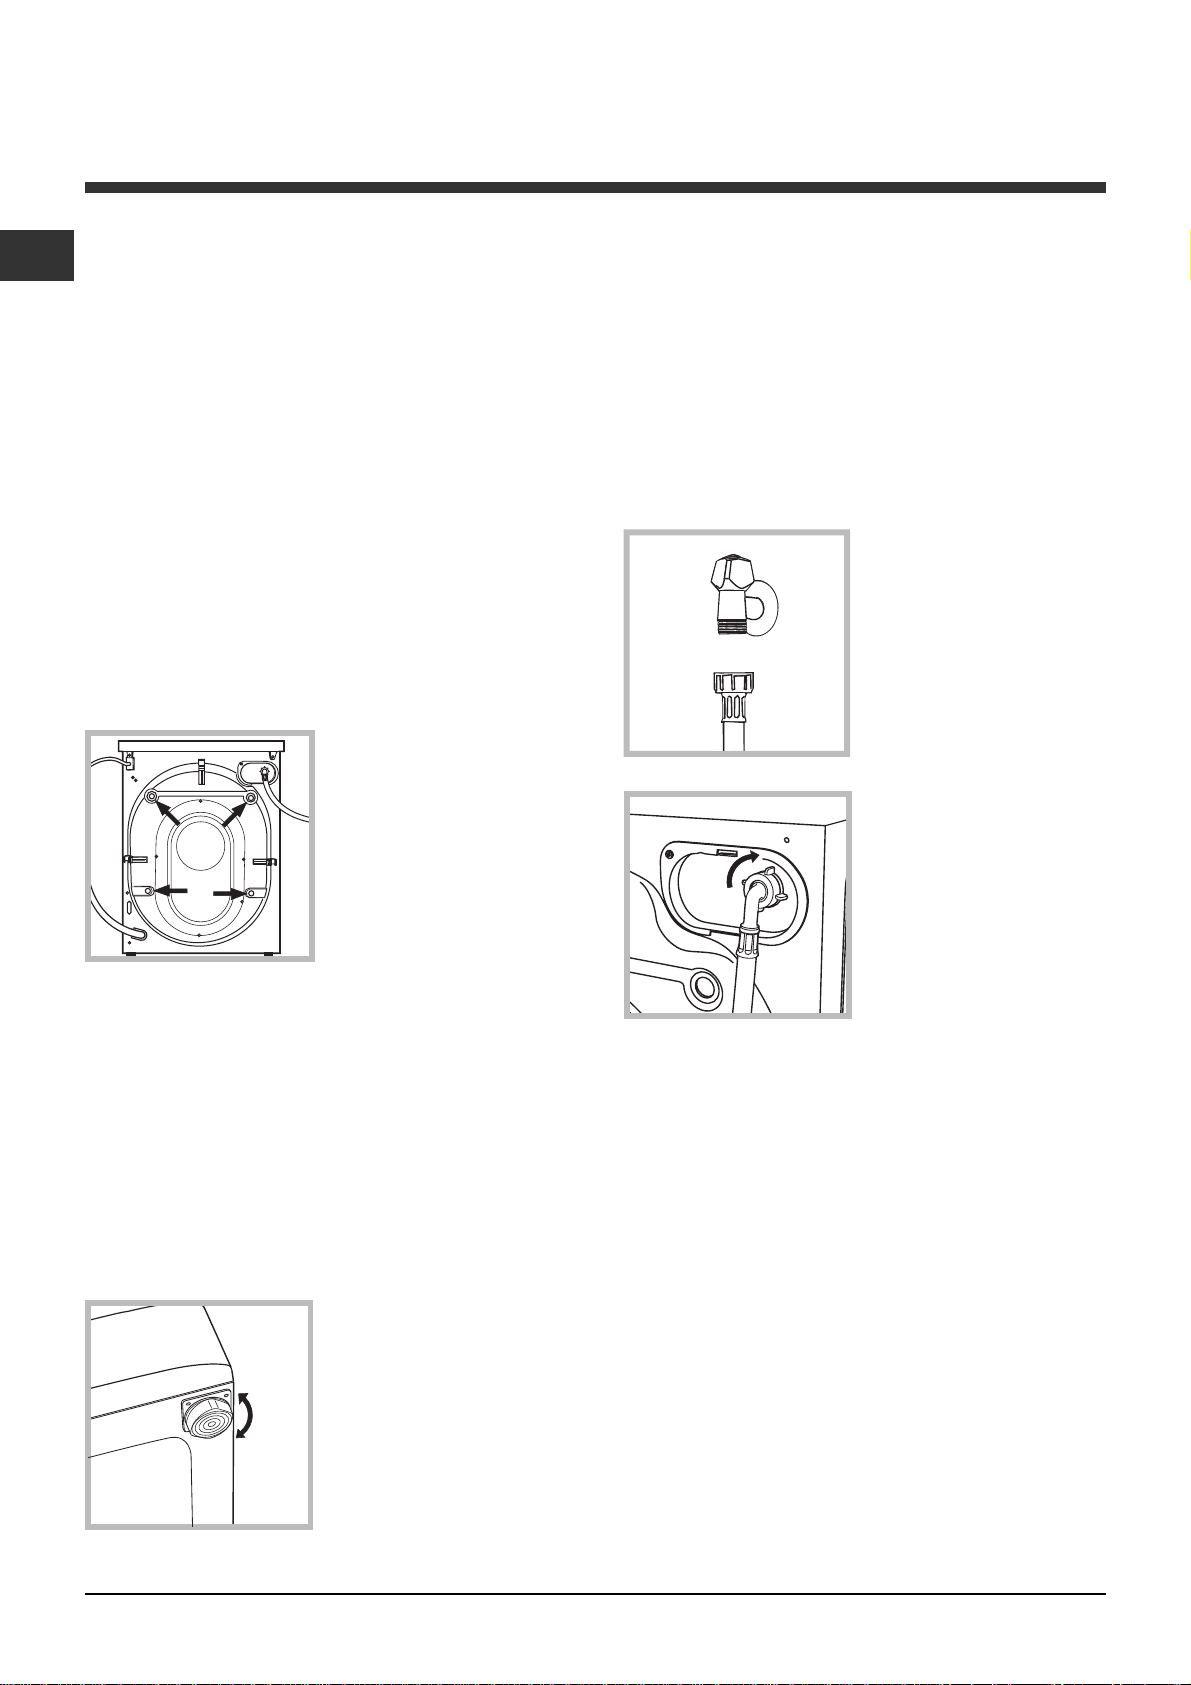
1
2
To remove the drawer, press
lever (1) and pull the drawer
outwards (2) (see figure).
Wash it under running
water; this procedure should
be repeated frequently.
2. Unscrew the lid by
rotating it anti-clockwise
(see figure): a little water
may trickle out. This is
perfectly normal.
3. Clean the inside thoroughly.
4. Screw the lid back on.
5. Reposition the panel, making sure the hooks are
securely in place before you push it onto the
appliance.
Checking the water inlet hose
Check the inlet hose at least once a year. If there are
any cracks, it should be replaced immediately: during
the wash cycles, water pressure is very strong and a
cracked hose could easily split open.
Never use second-hand hoses.
Cleaning the pump
The washer-dryer is fitted with a self-cleaning pump
which does not require any maintenance. Sometimes,
small items (such as coins or buttons) may fall into the
protective pre-chamber at the base of the pump.
Make sure the wash cycle has finished and unplug
the appliance.
To access the pre-chamber:
1. Take off the cover panel
on the front of the
1
2
3
machine by first pressing it
in the centre and then
pushing downwards on
both sides until you can
remove it (see figures).
10
Page 11

Troubleshooting
Your washer-dryer could occasionally fail to work. Before contacting the Technical Assistance Service (see
Service), make sure that the problem cannot be not solved easily using the following list.
Problem:
The washer-dryer does not
switch on.
The wash cycle does not start.
The washer-dryer does not fill
with water (the text H2O
flashes on the display).
The washer-dryer continuously
takes in and drains water.
Possible causes / Solutions:
The appliance is not plugged into the socket fully, or not enough to make
contact.
There is no power in the house.
The washer-dryer door is not closed properly.
The ON/OFF button has not been pressed.
The START/PAUSE button has not been pressed.
The water tap has not been opened.
A delayed start has been set.
The water inlet hose is not connected to the tap.
The hose is bent.
The water tap has not been opened.
There is no water supply in the house.
The pressure is too low.
The START/PAUSE button has not been pressed.
The drain hose is not fitted at a height between 65 and 100 cm from the floor
(see Installation).
The free end of the hose is under water (see Installation).
The wall drainage system is not fitted with a breather pipe.
If the problem persists even after these checks, turn off the water tap, switch the
appliance off and contact the Technical Assistance Service. If the dwelling is on one
of the upper floors of a building, there may be problems relating to water drainage,
causing the washer-dryer to fill with water and drain continuously. Special antidraining valves are available in shops and help to prevent this inconvenience.
GB
The washer-dryer does not
drain or spin.
The washer-dryer vibrates a lot
during the spin cycle.
The washer-dryer leaks.
The option and START/PAUSE
indicator lights flash rapidly and
an error code appears on the
display (e.g.: F-01, F-..).
There is too much foam.
The washer-dryer does not dry.
The wash cycle does not include draining: some cycles require the draining
process to be enabled manually.
The EASY IRON option is enabled: To complete the wash cycle, press the
START/PAUSE button (see Wash cycles and options).
The drain hose is bent (see Installation).
The drainage duct is clogged.
The drum was not unlocked correctly during installation (see Installation).
The washer-dryer is not level (see Installation).
The washer-dryer is trapped between cabinets and walls (see Installation).
The water inlet hose is not screwed on properly (see Installation).
The detergent dispenser drawer is blocked (for cleaning instructions, see Care
and maintenance).
The drain hose is not fixed properly (see Installation).
Switch off the machine and unplug it, wait for approximately 1 minute and
then switch it back on again.
If the problem persists, contact the Technical Assistance Service.
The detergent is not suitable for machine washing (it should display the text
for washer-dryers or hand and machine wash, or the like).
Too much detergent was used.
The appliance is not plugged into the socket, or not enough to make contact.
There has been a power failure.
The appliance door is not shut properly.
A DELAY TIMER has been set.
DRYING is in the OFF position.
11
Page 12

Service
GB
Before contacting the Technical Assistance Service:
Check whether you can solve the problem alone (see Troubleshooting).
Restart the wash cycle to check whether the problem has been solved.
If this is not the case, contact an authorised Technical Assistance Centre.
Always request the assistance of authorised technicians.
Have the following information to hand:
the type of problem;
the appliance model (Mod.);
the serial number (S/N).
This information can be found on the data plate applied to the rear of the washer-dryer, and can also be found on
the front of the appliance by opening the door.
12
Page 13

Руководство по эксплуатации
СТИРАЛЬНАЯ МАШИНА
CIS
Русский
PWDE 7125 S
Содержание
Монтаж, 14-15
Распаковка и выравнивание
Водопроводное и электрическое подсоединение
Первый цикл стирки
Технические данные
Описание стиральной машины, 16-17
Консоль управления
Дисплей
Порядок выполнения цикла стирки и сушки, 18
Программы и дополнительные функции, 19
Таблица программ
Дополнительные функции мойки
Стиральные порошки и белье, 20
Ячейка для стирального порошка
Подготовка белья
Специальные программы
Предосторожности и рекомендации, 21
Общие требования по безопасности
Утилизация
Открывание люка вручную
CIS
Техническое обслуживание и уход, 22
Отключение воды и электрического тока
Порядок чистки стиральной машины
Чистка ячейки для стирального порошка
Порядок чистки насоса
Проверка шланга подачи воды
Неисправности и методы их устранения, 23
Сервисное обслуживание, 24
13
Page 14
Установка
Важно сохранить данное руководство для его
CIS
последующих консультаций. В случае продажи,
передачи или переезда на новую квартиру
необходимо проверить, чтобы руководство
оставалось вместе со стиральной машиной, чтобы
ее новый владелец мог ознакомиться с порядком ее
функционирования и соответствующими
предупреждениями.
Внимательно прочитайте инструкции: в них
содержатся важные сведения о монтаже изделия,
его эксплуатации и безопасности.
Распаковка и выравнивание
Снятие упаковки
1. Распаковать стиральную машину.
2. Проверить, чтобы стиральная машина не была
повреждена в процессе перевозки. При
обнаружении повреждений не выполнять ее
подсоединений, а обратиться к продавцу.
3. Снимите 4 винта,
предохраняющие
машину в процессе
перевозки, и резиновую
заглушку с
соответствующей
распорной шайбой,
расположенные в
задней части
стиральной машины (ñì.
схему).
Точное выравнивание обеспечивает стабильность
стиральной машины, помогает избежать ее
вибраций и смещений в процессе
функционирования. В случае установки машины
на ковер или ковровое покрытие отрегулировать
ножки таким образом, чтобы под стиральной
машиной оставался достаточный зазор для
вентиляции.
Водопроводное и электрическое
подсоединение
Порядок подсоединения водопроводного шланга
1. Прикрутите шланг
подачи к
водопроводному крану
холодной воды с
резьбовым отверстием
3/4 газ, (см. схему).
Перед подсоединением
откройте водопроводный
кран до тех пор, пока из
него не потечет чистая
вода.
2. Подсоедините
водопроводный шланг к
машине, привинтив его к
специальному
водопроводному крану,
расположенному в
задней верхней части
справа (см. схему).
4. Закройте отверстия прилагающимися
резиновыми заглушками.
5. Сохраните все детали: они должны быть
установлены на стиральную машину в случае ее
повторно й перевозки.
Не разрешайте детям играть с упаковочными
материалами.
Нивелировка
1. Установите стиральную машину на плоском и
прочном полу, не прислоняя ее к стенам, мебели и
прочим предметам.
2. Если пол не является
идеально
горизонтальным,
необходимо
компенсировать
неровность,
отрегулировав по
высоте передние ножки
(см. схему). Уклон,
измеренный при
помощи уровня,
установленного на
поверхность машины, не должен превышать 2°.
3. Проверьте, чтобы водопроводный шланг не был
заломлен или сжат.
Водопроводное давление в кране должно быть в
пределах значений, указанных в таблице
Технические данные (см. страницу рядом).
Если длина водопроводного шланга будет
недостаточной, следует обратиться в
специализированный магазин или к
уполномоченному сантехнику.
Никогда не пользуйтесь б/у шлангами.
Используйте шланги, прилагающиеся к машине.
14
Page 15
Присоединение сливного шланга
Подсоедините сливной
шланг, не сгибая его, к
сливному трубопроводу
или к настенному сливу,
расположенному на
65 - 100 cm
высоте 65 100 см от
пола.
Не используйте удлинители и тройники.
Сетевой кабель изделия не должен быть согнут
èëè ñæàò.
Замена сетевого кабеля может осуществляться
только уполномоченными техниками.
Внимание! Компания-производитель снимает с себя
всякую ответственность в случае несоблюдения
вышеописанных правил.
Первый цикл стирки
CIS
или поместите конец
шланга в раковину или
в ванну, прикрепив
прилагающуюся
направляющую к крану
(см. схему). Свободный
конец сливного шланга
не должен быть
погружен в воду.
Не рекомендуется использовать удлинительные
шланги. При необходимости удлинение должно
иметь такой же диаметр, что и оригинальный шланг,
и его длина не должна превышать 150 см.
Электрическое подключение
Перед подсоединением штепсельной вилки
изделия к сетевой розетке необходимо проверить
следующее:
сетевая розетка должна быть заземлена и
соответствовать нормативам;
сетевая розетка должна быть расчитана на
максимальную мощность стиральной машины,
указанную в таблице Технические данные (ñì.
таблицу сбоку);
напряжение электропитания должно
соответствовать значениям, указанным в таблице
Технические данные (см. таблицу сбоку);
сетевая розетка должна быть совместимой со
штепсельной вилкой стиральной машины. В
противном случае необходимо заменить сетевую
розетку или штепсельную вилку.
Запрещается устанавливать стиральную машину
на улице, даже под навесом, так как является
опасным подвергать ее воздействию дождя и
грозы.
Стиральная машина должна быть расположена
таким образом, чтобы доступ к сетевой розетке
оставался свободным.
По завершении установки, перед началом
эксплуатации необходимо произвести один цикл
стирки со стиральным веществом, но без белья, по
программе .
Техничес кие характер истики
Ìîäå ë ü
Размеры
Загрузка
Электрические
параметры
Гидравлические
параметры
Скорость
отжима
Kонтрольные
программы
согласно
нормативу
EN 50 229
PWDE 7125 S
ши ри н а 59 , 5 с м
высота 85 см
глубина 55 см
от 1 до 7 кг на цикл стирки;
от 1 до 5 кг на цикл сушки;
cмотрите паспортную табличку с
тех ническими х арактеристиками на
машине
max давление 1 Мпа (10 бар)
min давление 0,05 Мпа (0,5 бар)
объем барабана 52 л
äî 1200 îá/ìèí
стирки:
60°С; при загрузке до 7 кг.
сушка:
2 кг белья при выборе режима сушки
"A1" (Под утюг);
вторая сушка с загрузкой 5 кг белья при
выборе режима сушки "A4" (Экстра).
Машина соотв етствует следующим
Директивам Европейского
Экономического сообщества:
- 89/336 /ЕЕС от 03.05.89 (электромагнитной совмес тимости) и
последующие модификации
- 2 002 / 96/CE
- 2006/95/CE (низкого напряжения)
программа 2; температура
первая сушка с загрузкой
15
Page 16
Описание стиральной машины
Консоль управления
CIS
Кнопка
ON/OFF
Кнопка
ТЕМПЕРАТУРА
Кнопки с индикаторами
ФУНКЦИИ
ДИСПЛЕЙ
Индикатор ËÞÊ
ЗАБЛОКИРОВАН
Ячейка для стирального вещества
Ячейки для стирального вещества: äëÿ
загрузки стиральных веществ и добавок (см.
Стиральные вещества и типы белья).
Кнопка ON/OFF
включения или выключения машины. Индикатор
START/PAUSE, редко мигающий синим цветом,
означает, что машина включена. Для выключения
стиральной машины в процессе стирки необходимо
держать нажатой кнопку, примерно 3 секунды.
Короткое или случайное нажатие не приведет к
отключению машины.
В случае выключения машины в процессе стирки
текущий цикл отменяется.
РУКОЯТКА ВЫБОРА ПРОГРАММ: служат для
выбора нужной программы (см. Таблица
программ).
Кнопки и индикаторы ДОПОЛНИТЕЛЬНЫЕ
ФУНКЦИИ: служат для выбора имеющихся
дополнительных функций. Индикатор,
соответствующий выбранной функции , останется
включенным.
Кнопка ОТЖИМ
сокращения скорости или полного исключения
отжима значение показывается на дисплее.
Кнопка ТЕМПЕРАТУРА
сокращения температуры или полного исключения
нагрева значение показывается на дисплее.
: быстро нажмите эту кнопку для
: нажмите эту кнопку для
: нажмите эту кнопку для
РУКОЯТКА
ВЫБОРА
ПРОГРАММ
Кнопка ОТЖИМ
Кнопка
СУШКА
Кнопка СУШКА
продолжительности или исключения сушки;
выбранный режим и продолжительность сушки
показываются на дисплее (см. «Порядок
выполнения цикла стирки и сушки и сушки»).
Кнопка и индикатор START/PAUSE
индикатор редко мигает, нажмите кнопку для запуска
цикла стирки. После пуска цикла индикатор
перестает мигать. Для прерывания стирки вновь
нажмите эту кнопку; индикатор замигает оранжевым
цветом. Если символ
машины. Для возобновления стирки с момента,
когда она была прервана, вновь нажмите эту кнопку.
Индикатор ЛЮК ЗАБЛОКИРОВАН
Включенный символ означает, что люк
заблокирован. Во избежание повреждений, перед
тем как открыть люк, необходимо дождаться, пока
погаснет этот символ. Если требуется открыть люк
после запуска цикла, нажмите кнопку START/
PAUSE. Когда погаснет индикатор ЛЮК
ЗАБЛОКИРОВАН
Режим ожидания
Настоящая стиральная машина отвечает
требованиям новых нормативов по экономии
электроэнергии, укомплектована системой
автоматического отключения (режим сохранения
энергии), включающейся через несколько минут
простоя машины. Нажмите один раз кнопку ON/OFF
и подождите, пока машина вновь включится.
: нажмите для сокращения
не горит, можно открыть люк
, можно открыть люк.
Кнопка с индикатором
START/PAUSE
: когда синий
16
Page 17

Дисплей
CIS
B
A
C
Дисплей служит для программирования машины и предоставляет пользователю множество сведений.
В секторе A показывается продолжительность различных имеющихся программ и, после запуска цикла,
время, остающееся до завершения программы. Если был задан ТАЙМЕР ОТСРОЧКИ, на дисплее
показывается время, остающееся до запуска выбранной программы.
Кроме того при помощи соответствующей кнопки на дисплее показываются максимальные значения
температуры, скорости отжима, режим или продолжительность сушки, которые машина может выполнить в
зависимости от заданной программы.
В процессе обработки данных машиной в зависимости от программы и от выбранного уровня Smart мигает
символ песочные часы. Максимум через 10 минут после запуска символ песочные часы перестает мигать
и горит стабильно, показывая окончательное остаточное время. Символ песочные часы погаснет примерно
через 1 минуту после визуализации окончательного остаточного времения.
В секторе Â показываются фазы выбранного цикла, и после запуска программы текущая фаза стирки и
возможной сушки.
Стирка
Полоскание
Отжим/Слив
Cушка
В секторе C показываются слева направо символы температура, отжим и Cушка.
Полоски температуры
для выбранной программы.
Полоски отжима
выбранной программы.
Символ
загорается в процессе программирования сушки.
показывают максимальный температурный уровень, который может быть задан
показывают максимальную скорость отжима, которая может быть задана для
17
Page 18

Порядок выполнения цикла стирки
и сушки
1. ПОРЯДОК ВКЛЮЧЕНИЯ МАШИНЫ. Нажмите
CIS
кнопку
синим цветом.
2. ЗАГРУЗКА БЕЛЬЯ. Откройте люк машины.
Загрузите в барабан белье, не превышая
максимальный допустимый вес, указанный в
таблице программ на следующей странице.
3. ДОЗИРОВКА СТИРАЛЬНОГО ВЕЩЕСТВА Выньте
дозатор и поместите стиральное вещество в
специальные ячейки, как описано в разделе
Стиральные вещества и типы белья.
4. ЗАКРОЙТЕ ЛЮК.
5. ВЫБОР ПРОГРАММЫ. При помощи рукоятки
выбора ПРОГРАММ выберите нужную
программу; в данной программе задана
температура и скорость отжима, которые можно
изменить. На дисплее показывается
продолжительность данного цикла.
6. ПЕРСОНАЛИЗИРОВАННЫЕ ЦИКЛЫ СТИРКИ.
Нажмите соответствующие кнопки:
Измените температуру и/или скорость
отжима. Машина автоматически показывает на
дисплее максимальные температуру и скорость
отжима, предусмотренные для выбранной программы,
или последние выбранные значения, если они
совместимы с выбранной программой. При помощи
кнопки
вплоть до стирки в холодной воде OFF. При помощи
кнопки
отжима вплоть до его исключения OFF. При еще
одном нажатии этих кнопок вернутся максимальные
допустимые значения.
Программирование сушки
При первом нажатии кнопки
автоматически выбирает максимальный режим
сушки, совместимый с выбранной программой. При
последующих нажатиях кнопки режим уменьшается
и, следовательно, сокращается продолжительность
сушки вплоть до ее исключения OFF. При еще
одном нажатии этих кнопок вернутся максимальные
допустимые значения.
Можно выбрать следующие режимы сушки:
A - по требуемому уровню сушки белья:
Ïîä óòþã: рекомендуется для белья, которое
затем требуется гладить. Степень остаточной
влажности смягчает складки и делает глажку
более легкой. На дисплее показывается «À1».
На вешалку: идеально подходит для вещей,
не нуждающихся в полной сушке.
показывается «À2».
 øêàô: подходит для белья, сразу складываемого
в шкаф без глажки.
Экстра: подходит для белья, нуждающегося в
полной сушке, такого как махровые полотенца
и халаты.
B - По продолжительности: от 30 äî 180 минут
(Макс. загрузка 4 кг).
; индикатор START/PAUSE редко мигает
можно постепенно уменьшить температуру
можно постепенно уменьшить скорость
машина
На дисплее показывается «À3».
На дисплее показывается «À4».
На дисплее
В случае, если вес белья, предназначенного
для стирки и сушки, превышает максимальную
допустимую загрузку (смотрите таблицу
сбоку), выполните цикл стирки, и по его
завершении, разделите белье на части и
производите его сушку частями. Затем
следуйте инструкциям, описывающим функцию
«Только сушка». Повторите те же операции
для сушки оставшегося белья.
ПРИМЕЧАНИЕ: по завершении сушки всегда
производится цикл охлаждения белья.
Только сушка
При помощи рукоятки выбора программ
выберите режим сушки (11-12-13) â
зависимости от типа белья. Можно также
выбрать нужный режим или продолжительность
сушки при помощи кнопки СУШКА
Измените параметры цикла.
Нажмите кнопку для активации
дополнительной функции; индикатор
соответствующей кнопки загорится.
Вновь нажмите кнопку для отключения
дополнительной функции, индикатор погаснет.
Если выбранная дополнительная функция
является несовместимой с заданной программой,
индикатор будет мигать, и такая функция не
будет активирована.
Если выбраная дополнительная функция
несовместима с ранее активированной функцией,
индикатор соответствующий первой
активированной функции функции замигает, и
будет активирована только вторая функция,
индикатор активированнойфункциизагорится .
Примечание: если активирована дополнительная
функция SMART, никакая другая дополнительная
функция не может быть активирована.
Дополнительные функции могут изменить
рекомендуемую загрузку машины и/или
продолжительность цикла.
7. ЗАПУСК ПРОГРАММЫ Нажмите кнопку START/
PAUSE. Соответствующий индикатор загорится
синим светом, и люк заблокируется (символ ЛЮК
ЗАБЛОКИРОВАН
программы в процессе выполнения цикла
переключите машину в режим паузы при помощи
кнопки START/PAUSE (индикатор START/PAUSE
редко мигает оранжевым цветом). Затем выберите
новый цикл и вновь нажмите кнопку START/
PAUSE. Если требуется открыть люк после пуска
цикла, нажмите кнопку START/PAUSE. Когда
погаснет индикатор ЛЮК ЗАБЛОКИРОВАН
можно открыть люк. Вновь нажмите кнопку START/
PAUSE для возобновления программы с момента,
в который она была прервана.
8. ЗАВЕРШЕНИЕ ПРОГРАММЫ. Показывается
сообщением на дисплее END. После того, как
погаснет символ ЛЮК ЗАБЛОКИРОВАН
можно будет открыть люк. Откройте люк,
выгрузите белье и выключите машину.
загорится). Для изменения
,
,
Если требуется отменить текущий цикл стирки,
держите нажатой кнопку
прервется, и машина выключится.
несколько секунд. Цикл
18
Page 19

Программы и
4
2
3
1
4
2
1
3
дополнительные функции
Таблица программ
Ìàêñ.
скорость
Ìàêñ .
Описание программы
Программы
Smart
Õ/á изделия ñ предварительной стиркой:
1
белье
2 Белое õ/á белье:
2
2
3 Хлопок:
4
5
6 Джинсы
7 Рубашки
8 Шерсть:
9 ØÅËÊ/ЗАНАВЕСКИ:
10
11
12
13
Для всех институтов тестирования:
1) Программы управления в соответствии с Директивой EN 50229: задайте программу 2 с температурой 60°C.
2) Длинная программа для х/б белья: задайте программу 2 с температурой 40°C.
3) Короткая программа для х/б белья: задайте программу 4 с температурой 40°C.
.
Белое õ/á белье (1):
белье
.
Белое õ/á белье (2):
белье
.
очень грязное белое и прочное цветное белье
ЦВЕТНОЙ ХЛОПОК (3):
деликатное белье
Синтетические ткани:
загряз не ни е м
Специальные программы
Верхняя одежда
Программы сушки
Сушка
ХЛОПОK
Сушка
СИНТЕТИKА
Сушка
Øeðcòü
Частичные программы
Полоскание
Отжим
- 1200 • - - - - 7
Ñëèâ
- 0 - - - - - 7
Очень грязное белое белье
очень грязное белое и прочное цветное
Очень грязное белое и деликатное цветное
Мало загрязненное белое и цветное
.
Прочное цветн ое белье с незначит ел ьн ым
.
шерсть, кашемир и т.д
- 1200 • - - • • 7
издели я из шелка, вискозы и нижнее белье
.
Очень грязное белое
.
.
.
Дополнительные функции стирки
(оборотов
òåìï.
в минуту
(°C)
90° 1200 • • • - • 7
90° 1200 • - • • • 7
60° 1200 • - • • • 7
40° 1200 • - • • • 7
60° 1200 • - • • • 7
40° 1200 • - • • • 7
60° 800 • - • • • 3
40° 800 • - • - • 3,5
40° 600 • - • • • 2
40° 800 • - • - • 1,5
30° 0 - - • - • 1
30° 400 - - • - - 2
- - • - - - - 5
- - • - - - - 3
- - • - - - - 1,5
Сушка
Функция пятновыведения
Дополнительная функция позволяет оптимизировать
результат стирки в зависимости от объема белья, загруженного
в машину, сокращая продолжительность стирки, а также
расход воды и электроэнергии. Кроме того при помощи кнопки
можно выбрать нужный Вам режим стирки.
Intensive: интенсивный режим стирки для белья с сильным
загрязнением.
4 You: стандартный режим стирки для белья с обычным
загрязнением.
Fast: короткий режим стирки для белья с незначительным
загрязнением.
Эта функция может быть активирована только для
программ 1, 2, 3, 4, 5 (для всех трех уровней) и 6, 7 (уровни
4 You è Fast).
Легкая глажка
При выборе этой функции циклы стирки и отжима
изменяются таким образом, чтобы сократить сминаемость
белья. По завершении цикла машина производит медленное
вращение барабана. Индикатор функции Легкая глажка и
индикатор START/PAUSE мигают (первый синим, второй
оранжевым цветом). Для завершения цикла нажмите кнопку
START/PAUSE или кнопку Легкая глажка. При выборе
программы 9-10 машина завершает цикл без слива воды, и
индикатор фукции Легкая глажка и индикатор START/PAUSE
мигают. Для слива воды и выгрузки белья необходимо нажать
кнопку START/PAUSE или кнопку Легкая глажка.
Не может быть активирована в программах 8, 11, 12, 13
Примечание: Если вы также хотите запустить цикл
сушки, этафункция может быть использована только
совместно с уровнем сушки A1 (Ïîä óòþã).
, .
отбеливатель в дополнительный дозатор 4, выберите
программу Ополаскивание
функцию Пятновыведение
стирки поместите стиральное вещество и добавки, выберите
нужную программу и активируйте дополнительную функцию
Пятновыведение
дозатор 4, функция предварительная стирка исключается.
Не может быть активирована в программах 1, 6, 8, 9, 10, 11,
12, 13,
, .
Пуск с задержкой
Для программирования пуска выбранной программы с
задержкой нажмите соответствующую кнопку вплоть до
получения нужного времени задержки. Когда включена
эта функция, соответствующий индикатор горит. Для
отмены запуска с задержкой нажмите кнопку несколько
раз до тех пор, пока на дисплее не появится OFF.
Эта функция совместима с любой программой.
Стиральные вещества и добавки
Предва
рительн
àÿ
мойка
. Если используется дополнительный
Макс .
загру
çêà
(êã)
Стирка
Îòáå
ëèâà
òåëü
Ополаск
иватель
Эта функция служит для
удаления наиболее трудных
пятен. Вставьте
дополнительный
прилагающийся дозатор 4 в
дозатор 1. При заливе
отбеливателя не превышайте
макс. уровень, указанный
на стержне в центре (ñì.
схему). Для выполнения
только отбеливания залейте
и включите дополнительную
. Для отбеливания в процессе
Ïðîä
îëæè
ò-òü
цикла
Продолжительность программ стирки можно
проверять по дисплею.
CIS
19
Page 20

Стиральные вещества и
типы белья
Ячейка для стирального вещества
CIS
Хороший результат стирки зависит также от
правильной дозировки стирального вещества:
избыток стирального вещества не гарантирует
более эффективную стирку, напротив, способствует
образованию налетов внутри стиральной машины и
загрязнению окружающей среды.
Не используйте стиральные вещества для ручной
стирки, так как они образуют слишком много пены.
Выньте ячейку и
4
1
3
Перед засыпкой стирального порошка необходимо
проверить, чтобы не был установлен
дополнительный дозатор 4.
Ячейка 2: Стиральное вещество для стирки
(порошок или жидкий)
Жидкое средство для стирки заливается
непосредственно перед запуском машины.
Ячейка 3: Добавки (ополаскиватель и т.д.)
Не наливайте ополаскиватель выше решетки
дозатора.
дополнительный дозатор 4: Отбеливатель
дополнительный дозатор 5: рекомендуется
использовать этот дозатор для жидкого стирального
вещества.
5
2
поместите в нее
стиральное вещество или
добавку в следующем
порядке.
Ячейка 1: Стиральное
ввещество для
предварительной
стирки (порошок)
Подготовка белья
Разделите белье по следующим признакам:
- тип ткани / обозначения на этикетке
- цвету: отделите цветное белье от белого.
Выньте из карманов все предметы и проверьте
пуговицы.
Не превышайте максимальную загрузку
барабана, указанную для сухого белья:
Прочные ткани: макс. 7 кг
Синтетические ткани: макс. 3 кг
Деликатные ткани: макс. 2 кг
Шерсть: макс. 1,5 кг
Шелк: макс. 1 кг
Сколько весит белье?
1 простыня 400-500 гр.
1 наволочка 150-200 гр.
1 скатерть 400-500 гр.
1 халат 900-1200 гр.
1 полотенце 150-250 гр.
Специальные программы
Джинсы: выверните наизнанку изделия перед
стиркой и используйте жидкое моющее средство.
Используйте программу 6.
Рубашки: используйте специальную программу 7
для стирки рубашек из разных тканей и разных
расцветок. Это обеспечит максимальную
сохранность вещей и сократит их сминаемость.
Шерсть: программа 8 позволяет стирать в
стиральной машине любые шерстяные вещи, даже
те, на этикетках которых указан символ ручная
стирка
результата используйте специальный стиральный
порошок и не превышать вес загрузки 1,5 кг.
Øåëê: используйте специальную программу 9 для
стирки всех шелковых вещей. Рекомендуется
использовать специальное стиральное вещество
для деликатных тканей.
Занавески: сверните занавески и положите их в
наволочку или в сетчатый мешочек. Используйте
программу 9.
Верхняя одежда (программа 10) разработана для
стирки водоотталкивающих тканей и ветровок
(напр., goretex, полиэстер, нейлон); для достижения
лучших результатов используйте жидкие моющие
средства в соответствующей дозировке для
полузагрузки; обработайте предварительно
манжеты, воротники и участки с пятнами; не
используйте смягчитель или моющие средства со
смягчителем. Эта программа не предназначена
для стирки пуховиков.
Система балансировки белья
Перед каждым отжимом во избежание чрезмерных
вибраций и для равномерного распределения белья
в барабане машина производит вращения со
скоростью, слегка превышающей скорость стирки.
Если после нескольких попыток белье не будет
правильно сбалансировано, машина произведет
отжим на меньшей скорости по сравнению с
предусмотренной. В случае чрезмерной
разбалансировки машина выполнит распределение
белья вместо отжима. Для оптимизации
распределения белья и его правильной
балансировки рекомендуется перемешать мелкое
белье с крупным.
. Для получения оптимального
20
Page 21

Предосторожности и
рекомендации
Стиральная машина спроектирована и изготовлена
в соответствии с международными нормативами по
безопасности. Необходимо внимательно прочитать
настоящие предупреждения, составленные в целях
вашей безопасности.
Общие требования безопасности
Данное изделие предназначено исключительно
для домашнего использования.
Стиральной машиной должны пользоваться
только взрослые лица, соблюдающие инструкции,
приведенные в данном техническом руководстве.
Не прикасайтесь к изделию влажными руками,
босиком или с мокрыми ногами.
Не тяните за сетевой кабель для отсоединения
штепсельной вилки изделия из сетевой розетки,
возьмитесь за вилку рукой.
Не открывайте ячейку для стирального порошка
при работающей машине.
Проявлять осторожность при сливе воды, так как
она может быть очень горячей.
Категорически запрещается пытаться открыть
люк силой: это может привести к повреждению
защитного механизма, предохраняющего от
случайного открывания машины.
В случае неисправности категорически
запрещается открывать внутренние механизмы
изделия с целью их самостоятельного ремонта.
Следите, чтобы дети не приближались к
работающей стиральной машине.
В процессе стирки люк стиральной машины
может нагреться.
При необходимости переместить стиральную
машину следует выполнять эту операцию вдвоем
или втроем с предельной осторожностью.
Никогда не перемещайте машину водиночку, так
как машина очень тяжелая.
Перед помещением в стиральную машину белья
проверьте, чтобы барабан был пуст.
В процессе сушки люк стиральной машины
может нагреться.
Не подвергайте автоматической сушке белье,
выстиранное с применением возгораемых
растворителей (например, триелина).
Не сушите в автоматической сушке паралоновые
изделия или подобные эластомеры.
В процессе сушки проверьте, чтобы
водопроводный кран был открыт.
Утилизация
Уничтожение упаковочных материалов:
соблюдайте местные нормативы с целью
вторичного использования упаковочных
материалов.
Согласно Европейской Директиве 2002/96/СЕ
касательно утилизации электронных и
электрических электроприборов электроприборы
не должны выбрасываться вместе с обычным
городским мусором. Выведенные из строя
приборы должны собираться отдельно для
оптимизации их утилизации и рекуперации
составляющих их материалов, а также для
безопасности окружающей среды и здоровья.
Символ «зачеркнутая мусорная корзина»,
имеющийся на всех приборах, служит
напоминанием об их отдельной утилизации.
За более подробной информацией о правильной
утилизации бытовых электроприборов
пользователи могут обратиться в специальный
центр по сбору вторсырья или в магазин.
Открывание люка вручную
Если по причине отключения электроэнергии
невозможно открыть люк машины, чтобы выгрузить
чистое белье, действуйте следующим образом:
1. выньте штепсельную
вилку машины из сетевой
розетки.
2. проверьте, чтобы
уровень воды в машине
был ниже отверстия люка.
В противном случае
слейте излишек воды
через сливную трубу в
ведро, как показано на
схеме.
3. снимите переднюю панель стиральной машины
(см. схему ниже).
4. потяните наружу язычок, показанный на схеме,
вплоть до освобождения пластикового
блокировочного винта. Затем потяните его вниз и
одновременно откройте люка.
5. установите на место переднюю панель, проверив
перед ее прикреплением к машине, чтобы крюки
вошли в соответствующие петли.
CIS
21
Page 22

Техническое обслуживание и уход
Отключение воды и электрического тока
CIS
Перекрывайте водопроводный кран после каждой
стирки. Таким образом сокращается износ
водопроводной системы машины и сокращается
риск утечек.
Выньте штепсельную вилку из сетевой розетки в
процессе чистки и технического обслуживания
стиральной машины.
Порядок чистки стиральной машины
Для чистки наружных и резиновых частей стиральной
машины используйте тряпку, смоченную теплой
водой с мылом. Не используйте растворители или
абразивные чистящие средства.
Чистка дозатора стиральных веществ
1
2
Чтобы вынуть дозатор,
нажмите на язычок (1) и
вытащите дозатор (2) (ñì.
схему).
Промойте дозатор под
струей воды. Эта операция
должна выполняться
регулярно.
2. отвинтите крышку,
повернув ее против
часовой стрелки (ñì.
схему): небольшая
утечка воды является
нормальным явлением;
3. тщательно прочистите внутри кожуха;
4. завинтите крышку на место;
5. установите на место переднюю панель, проверив
перед ее прикреплением к машине, чтобы крюки
вошли в соответствующие петли.
Проверка водопроводного шланга
Проверяйте шланг подачи воды не реже одного
раза в год. При обнаружении трещин или разрывов
шланга замените его: в процессе стирки сильное
водопроводное давление может привести к
внезапному отсоединению шланга.
Никогда не пользуйтесь б/у шлангами.
Порядок чистки насоса
Стиральная машина оснащена самочистящимся
насосом, не нуждающимся в техническом
обслуживании. Тем не менее мелкие предметы
(монеты, пуговицы) могут упасть за кожух,
предохраняющий насос, расположенный в его
нижней части.
Проверьте, чтобы цикл стирки завершился, и
выньте штепсельную вилку из сетевой розетки.
Для доступа к кожуху:
1. снимите переднюю
панель стиральной
1
2
3
машины, нажав в
центре, затем потяните
ее вниз за края и
снимите ее (см. схемы).
22
Page 23

Неисправности и
методы их устранения
Если ваша стиральная машина не работает. Прежде чем обратиться в Центр Сервисного обслуживания (см.
Сервисное обслуживание), проверьте, можно ли устранить неисправность, следуя рекомендациям, приведенным в
следующем перечне.
Неисправности:
Стиральная машина не
включается.
Цикл стирки не запускается.
Стиральная машина не
заливает воду (На дисплее
мигает надпись H2O).
Машина непрерывно заливает и
сливает воду.
Возможные причины / Методы устранения:
Штепсельная вилка не вставлена в сетевую розетку или отходит и не
обеспечивает контакта.
В доме отключено электричество.
Люк машины закрыт неплотно.
Не была нажата кнопка ON/OFF
Не была нажата кнопка START/PAUSE.
Перекрыт водопроводный кран.
Был запрограммирован запуск с задержкой.
Водопроводный шланг не подсоединен к крану.
Шланг согнут.
Перекрыт водопроводный кран.
В доме нет воды.
Недостаточное водопроводное давление.
Не была нажата кнопка START/PAUSE.
Сливной шланг не находится на высоте 65 100 см. от пола (см. Установка).
Конец сливного шланга погружен в воду (см. Установка).
Настенное сливное отверстие не оснащено вантузом для выпуска воздуха.
Если после вышеперечисленных проверок неисправность не будет устранена,
следует перекрыть водопроводный кран, выключить стиральную машину и
обратиться в Центр Сервисного Обслуживания. Если ваша квартира находится на
последних этажах здания, могут наблюдаться явления сифона, поэтому
стиральная машина производит непрерывный залив и слив воды. Для устранения
этой аномалии в продаже имеются специальные клапаны против явления сифона.
CIS
Стиральная машина не сливает
воду и не отжимает белье
Стиральная машина сильно
вибрирует в процессе отжима.
Утечки воды из стиральной
машины.
Индикаторы дополнительных
функций и индикатор «START/
PAUSE» часто мигают, на
дисплее показывается код
аномалии (например: F-01, F-..).
В процессе стирки образуется
слишком обильная пена.
Стиральная машина не
производит сушку.
Выбранная программа не предусматривает слив воды: для некоторых
программ необходимо включить слив вручную.
Включена дополнительная функция ЛЕГКА ГЛАЖКА: для
завершения программы нажмите кнопку START/PAUSE (Программы и
дополнительные функции).
Сливной шланг согнут (см. Установка). Засорен сливной трубопровод.
В момент установки стиральной машины барабан был
разблокирован неправильно (см. Установка).
Стиральная машина установлена неровно (см. Установка).
Машина зажата между стены и мебелью (см. Установка).
Плохо прикручен водопроводный шланг (см. Установка).
Засорен дозатор стирального вещества (порядок его чистки ñì. â
параграфе Техническое обслуживание и уход).
Сливной шланг плохо закреплен (см. Установка).
Выключите машину и выньте штепсельную вилку из сетевой розетки,
подождите 1 минуту и вновь включите машину. Если неисправность не
устраняется, обратитесь в Центр Сервисного Обслуживания.
Стиральное вещество непригодно для стирки в стиральной машине (на
упаковке должно быть указано для стирки в стиральной машине, для
ручной и машинной стирки или подобное).
В дозатор было помещено чрезмерное количество стирального вещества.
Штепсельная вилка не соединена с электро розеткой или отходит и не
обеспечивает контакта.
В доме отключено электричество.
Люк машины закрыт неплотно.
Была запрограммирована задержка запуска цикла.
СУШКИ находится в положении OFF.
23
Page 24

Сервисное обслуживание
CIS
Перед тем как обратиться в Сервисное Обслуживание:
Проверьте, нельзя ли устранить неисправность самостоятельно (см. Неисправности и
методы их устранения);
Вновь запустите программу для проверки исправности машины;
В случае неудачи обратитесь в Центр Сервисного обслуживания.
Никогда не обращайтесь к неуполномоченным техникам.
При обращении в Центр Сервисного Обслуживания необходимо сообщить:
тип неисправности;
модель изделия (Мод.);
серийный номер (S/N).
Все эти данные указаны на паспортной табличке, расположенной на задней панели и спереди
люка стиральной машины.
24
Page 25

Instrucþiuni de folosire
MAªINÃ DE SPÃLAT RUFE
RO
Românã
PWDE 7125 S
Sumar
RO
Instalare, 26-27
Despachetare ºi punere la nivel
Racorduri hidraulice ºi electrice
Primul ciclu de spãlare
Date tehnice
Descrierea maºinii de spãlat, 28-29
Panoul de control
Display
Cum se efectueazã un ciclu de spãlare sau de
uscare, 30
Programe ºi opþiuni, 31
Tabel de programe
Opþiuni de spãlare
Detergenþi ºi rufe, 32
Sertarul detergenþilor
Pregãtirea rufelor
Programe particulare
Precauþii ºi sfaturi, 33
Siguranþa generalã
Scoaterea aparatului din uz
Deschiderea manualã a uºii
Întreþinere ºi curãþire, 34
Întreruperea alimentãrii cu apã ºi curent electric
Curãþarea maºinii de spãlat
Curãþarea sertarului pentru detergenþi
Curãþarea pompei
Controlarea furtunului de alimentare cu apã
Anomalii ºi remedii, 35
Asistenþã, 36
25
Page 26

Instalare
RO
Este important sã pãstraþi acest manual pentru a-l
putea consulta în orice moment. În caz de vânzare, de
cesiune sau de schimbare a locuinþei, acesta trebuie
sã rãmânã împreunã cu maºina de spãlat pentru a
informa noul proprietar cu privire la funcþionare ºi la
respectivele avertismente.
Citiþi cu atenþie instrucþiunile: veþi gãsi informaþii
importante cu privire la instalare, la folosire ºi la
siguranþã.
Despachetare ºi punere la nivel
Despachetare
1. Scoaterea din ambalaj a maºinii de spãlat.
2. Controlaþi ca maºina de spãlat sã nu fi fost
deterioratã în timpul transportului. Dacã este
deterioratã, nu o conectaþi ºi contactaþi agentul de
vânzare.
3. Scoateþi cele 4
ºuruburi de protecþie
pentru transport ºi
cauciucul cu distanþierul
respectiv, situate în
partea posterioarã (a se
vedea figura).
O nivelare precisã conferã stabilitate maºinii ºi evitã
vibraþii, zgomote ºi deplasãri pe timpul funcþionãrii. În
cazul mochetelor sau a unui covor, reglaþi picioruºele
astfel încât sã menþineþi sub maºina de spãlat un
spaþiu suficient pentru ventilare.
Racorduri hidraulice ºi electrice
Racordarea furtunului de alimentare cu apã
1. Conectaþi furtunul de
alimentare, înºurubându-l
la un robinet de apã rece
cu gura filetatã de ¾ gaz (a
se vedea figura).
Înainte de conectare,
lãsaþi apa sã curgã pânã
când nu a devenit
limpede.
2. Conectaþi tubul de
alimentare la maºina de
spãlat, înºurubândul la
priza de apã respectivã,
amplasatã în partea
posterioarã, sus în
dreapta (a se vedea
figura).
4. Închideþi orificiile cu dopurile din plastic aflate în
dotaþie.
5. Pãstraþi toate piesele: pentru cazul în care maºina
de spãlat va trebui sã fie transportatã, piesele vor
trebui montante din nou.
Ambalajele nu sunt jucãrii pentru copii!
Punere la nivel
1. Instalaþi maºina de spãlat pe un paviment plan ºi
rigid, fãrã a o sprijini de ziduri, mobilã sau altceva.
2. Dacã podeaua nu este
perfect orizontalã,
compensaþi
neregularitãþile
deºurubând sau
înºurubând picioruºele
anterioare (a se vedea
figura); unghiul de
înclinare, mãsurat pe
planul de lucru, nu trebuie
sã depãºeascã 2°.
3. Fiþi atenþi ca furtunul sã nu fie nici pliat, nici îndoit.
Presiunea apei de la robinet trebuie sã fie cuprinsã în
valorile din tabelul cu Date tehnice (a se vedea pagina
alãturatã).
Dacã lungimea furtunului de alimentare nu este
suficientã, adresaþivã unui magazin specializat sau
unui instalator autorizat.
Nu folosiþi niciodatã tuburi folosite deja.
Utilizaþi tuburile furnizate cu maºina.
26
Page 27
Conectarea furtunului de golire
65 - 100 cm
Conectaþi furtunul de
evacuare, fãrã al îndoi, la
o conductã sau la o gurã
de evacuare în zid,
situate între 65 ºi 100 cm
de pãmânt;
trebuie sã fie uºor accesibilã.
RO
Nu folosiþi prelungitoare ºi prize multiple.
Cablul nu trebuie sã fie îndoit sau comprimat.
Cablul de alimentare trebuie sã fie înlocuit doar de
instalatorii autorizaþi.
Atenþie! Firma îºi declinã orice responsabilitate în
cazul în care aceste norme nu se respectã.
sau sprijiniþil pe
marginea unei chiuvete
sau a unei cãzi, legând
elementul de ghidare la
robinet (a se vedea
figura). Capãtul liber al
furtunului de golire nu
trebuie sã rãmânã
cufundat în apã.
Nu se recomandã folosirea furtunurilor prelungitoare;
dacã este indispensabil, acestea trebuie sã aibã
acelaºi diametru ca ºi furtunul original ºi nu trebuie sã
depãºeascã 150 cm lungime.
Racordarea electricã
Înainte de a introduce ºtecherul în priza de curent,
asiguraþi-vã cã:
priza sã fie cu împãmântare ºi conformã prevederilor
legale;
priza sã poatã suporta sarcina maximã de putere a
maºinii, indicatã în tabelul cu Date tehnice (a se
vedea alãturi);
tensiunea de alimentare sã fie cuprinsã în valorile
indicate în tabelul cu Date tehnice (a se vedea
alãturi);
priza sã fie compatibilã cu ºtecãrul maºinii de
spãlat. În caz contrar înlocuiþi priza sau ºtecãrul.
Maºina de spãlat nu trebuie instalatã afarã, nici chiar
în cazul în care spaþiul este adãpostit, deoarece este
foarte periculoasã expunerea maºinii la ploi ºi furtuni.
Primul ciclu de spãlare
Dupã instalare, înainte de folosire, efectuaþi un ciclu de
spãlare cu detergent ºi fãrã rufe, selectând programul 2.
Date tehnice
Model
Dimensiuni
Capacitate
Legãturi electrice
Legãturi hidrice
Turaþia de
centrifugare
Programe de control
în baza normei
EN 50229
PWDE 7125 S
lãrgime: 59,5 cm
înãlþime: 85 cm
profunzime: 55 cm
de la 1 la 7 kg pentru spãlare
de la 1 la 5 kg pentru uscare
vezi eticheta cu caracteristicile tehnice,
aplicatã pe maºinã
presiune maximã: 1 MPa (10 bari)
presiune minimã: 0,05 MPa (0,5 bari)
capacitatea cuvei: 52 litri
pânã la 1200 de rotaþii pe minut
spãlare:
programul 2; temperatura de
60°C efectuat cu 7 kg de rufe.
uscare:
prima uscare efectuatã cu 2 kg
de rufe, selectând nivelul de uscare
"A1" (CÃLCARE); a doua uscare
efectuatã cu 5 kg de rufe, alegând
nivelul "A4" (EXTRA).
Acest aparat este conform cu
urmãtoarele Directive Comunitare:
- 89/336/CEE din data de 03/05/89
(Compatibilitate Electromagneticã) ºi
modificãri succesive
- 2002/96/CE
- 2006/95/CE (Tensiuni Joase)
Dupã instalarea maºinii de spãlat, priza de curent
Zgomot
(dB(A) re 1 pW)
Spãlare: 58
Turaþie de centrifugare: 77
27
Page 28

Descrierea maºinii de spãlat
RO
Panoul de control
Sertarul detergenþilor
Butonul ON/OFF
SELECTOR
PROGRAME
Buton
TEMPERATURÃ
CENTRIFUGÃ
DISPLAY
Buton
Butoaneºi indicatoare
OPÞIUNI
Buton
USCARE
Indicator UªÃ
BLOCATÃ
Buton ºi indicator
START/PAUSE
Sertarul detergenþilor: pentru a introduce detergenþii
sau aditivele (a se vedea Detergenþi ºi rufe).
Buton ON/OFF
porni sau opri maºina de spãlat. Indicatorul START/
PAUSE emite un semnal intermitent de culoare
albastrã, ceea ce vã confirmã pornirea maºinii.
Pentru a opri funcþionarea maºinii de spãlat în timpul
spãlãrii, este necesar sã þineþi apãsatã butonul circa
3 secunde; o apãsare de scurtã duratã sau
accidentalã nu va opri maºina.
Oprirea maºinii de spãlat în timpul executãrii unui
ciclu va anula programul în curs de desfãºurare.
SELECTOR PROGRAME: pentru a alege programul
dorit (a se vedea Tabel programe).
Butoane ºi indicatoare OPÞIUNE: pentru a selecta
opþiunile disponibile. Indicatorul privind opþiunea
selectatã va rãmîne aprins.
Buton CENTRIFUGA
reduce numãrul de rotaþii sau a bloca storcãtorul;
numãrul de turaþii se poate vedea pe display.
Buton TEMPERATURA
diminua sau exclude temperatura; valoarea acesteia
va fi afiºatã pe display.
: apãsaþi scurt butonul pentru a
: apãsaþi butonul pentru a
: apãsaþi butonul pentru a
Buton USCARE
exclude uscarea; nivelul ºi durata de uscare alese vor
fi afiºate pe ecran (a se vedea Cum se efectueazã un
ciclu de spãlare sau de uscare).
Buton ºi indicator PORNIRE/PAUZÃ
albastru emite un semnal intermitent, apãsaþi butonul
pentru a porni ciclul de spãlare. Dupã activarea
ciclului, ledul rãmâne aprins. Pentru a introduce o
pauzã în timpul spãlãrii, apãsaþi din nou butonul ledul
va lumina intermitent, de culoare aurie. Dupã stingerea
indicatorului luminos
continua spãlarea, de unde a fost întreruptã, apãsaþi
din nou butonul.
Indicator UªÃ BLOCATÃ
Iluminarea simbolului indicã blocarea hubloului. Pentru
a evita daune este necesar sã se aºtepte ca simbolul
sã se stingã înainte de a deschide uºa.
Pentru a deschide uºa în timpul executãrii unui ciclu,
apãsaþi butonul START/PAUSE; când simbolul UªÃ
BLOCATÃ
Modalitatea de stand by
Aceastã maºinã de spãlat rufe, conform noilor
norme legate de economia de curent electric, este
dotatã cu un sistem de oprire automat (stand-by)
care intrã în funcþiune dupã câteva minute de
neutilizare. Apãsaþi scurt tasta ON/OFF ºi aºteptaþi
repunerea în funcþiune a maºinii.
se stinge, puteþi deschide uºa.
: apãsaþi pentru a reduce sau
: când ledul
, puteþi deschide uºa. Pentru a
28
Page 29
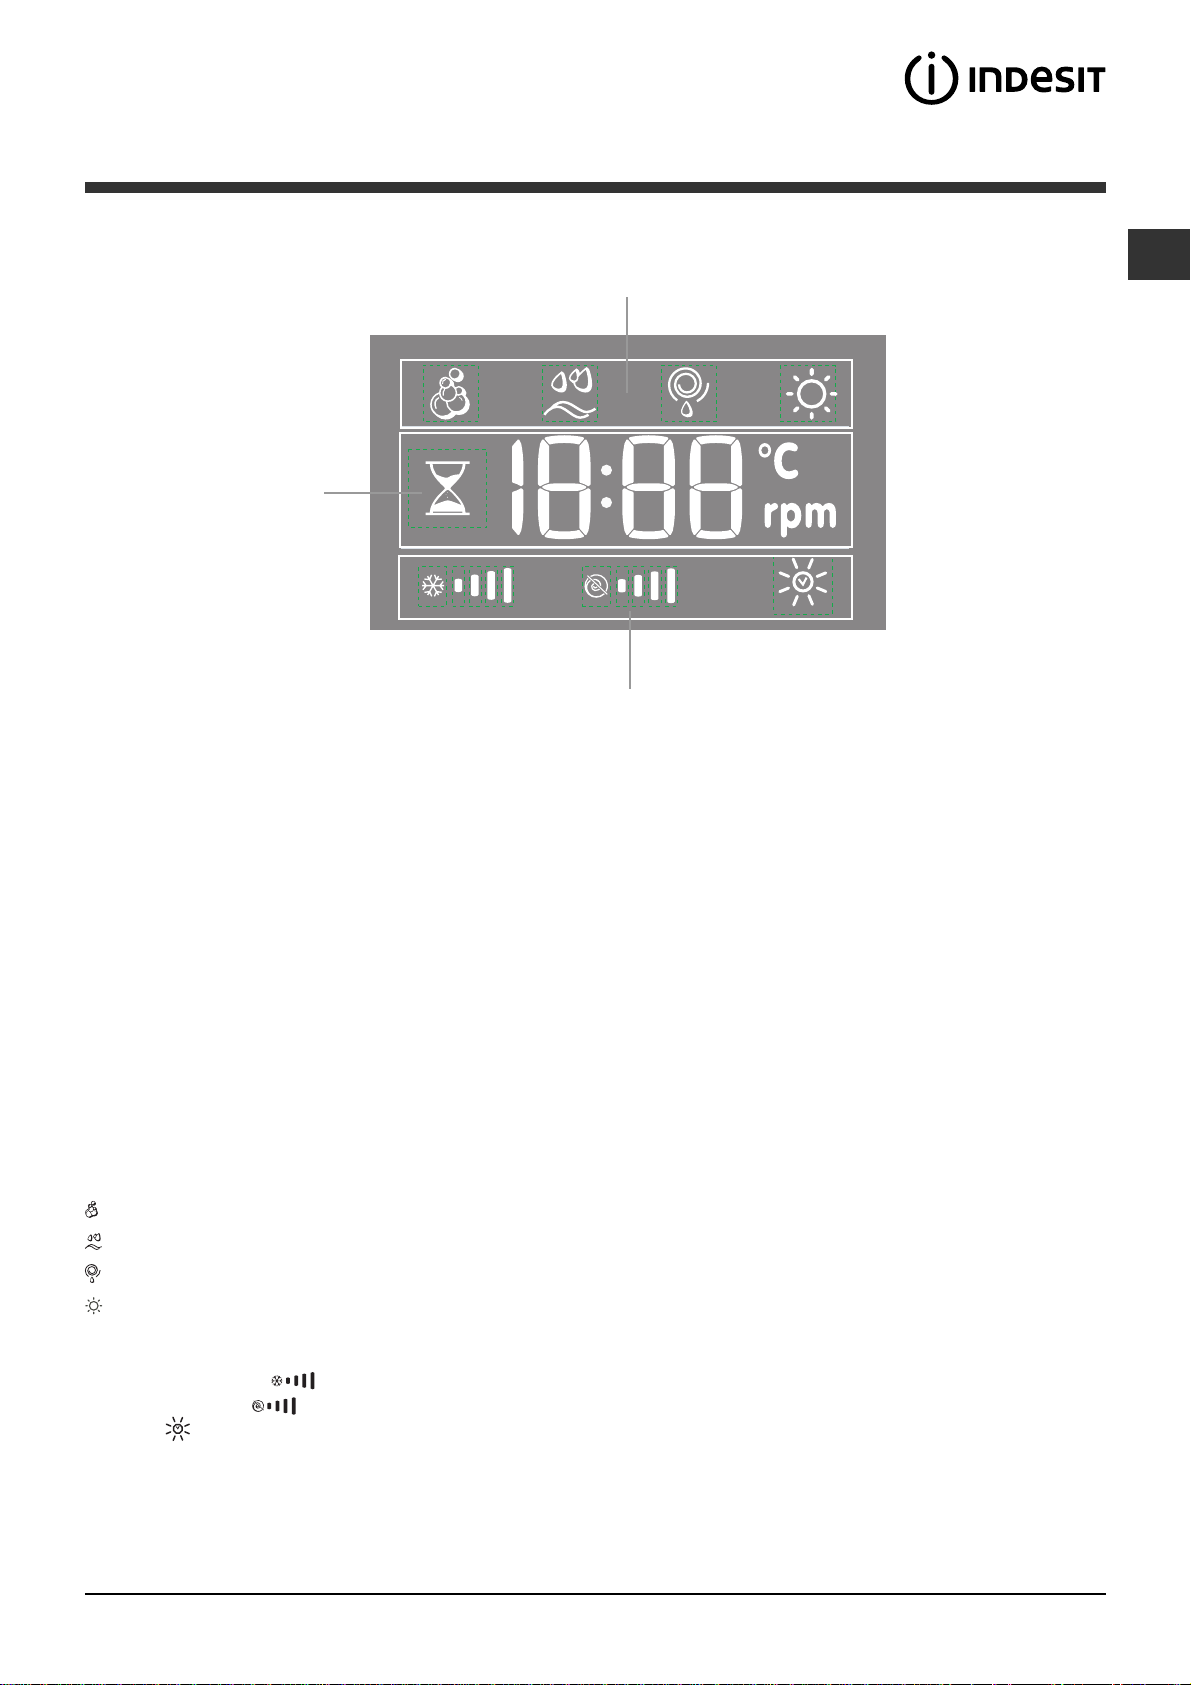
Display
RO
B
A
C
Ecranul este util pentru a programa maºina ºi a furniza numeroase informaþii.
În secþiunea A este afiºatã durata diferitelor programe la dispoziþie ºi a celui rãmas, în cazul unui ciclu de spãlare
deja în desfãºurare; dacã a fost programat un interval de PORNIRE ÎNTÂRZIATÃ, este afiºat intervalul rãmas pânã la
pornirea programului selectat.
În plus, prin apãsarea tastei corespunzãtoare, sunt afiºate valorile maxime de temperaturã, vitezã de stoarcere ºi
duratã de uscare, pe care maºina le poate realiza în cadrul programului selectat.
Clepsidra lumineazã intermitent în faza în care maºina elaboreazã datele conform programului ºi nivelului Smart
selectat. Dupã max. 10 minute de la pornire pictograma clepsidrã lumineazã continuu ºi se afiºeazã timpul rãmas
definitiv. Pictograma clepsidrã se va stinge apoi dupã circa 1 minut de la afiºarea timpului rãmas definitiv.
În secþiunea B sunt afiºate fazele prevãzute pentru ciclul selecþionat ºi cele în curs de desfãºurare (spãlare ºi
eventual uscare), în cazul unui program deja pornit.
Spãlare
Clãtire
Centrifugã/Golire
Uscare
În secþiunea C sunt prezente, începând de la stînga, iconiþele pentru temperaturã, centrifugã ºi Uscare.
Barele temperaturã
Barele centrifugã
Simbolul
se aprinde în timpul reglãrii fazei de uscare.
indicã nivelul maxim de temperaturã care poate fi selectat pentru ciclul setat.
indicã nivelul maxim de centrifugare care poate fi selectat pentru ciclul setat.
29
Page 30

Cum se efectueazã un ciclu de
spãlare sau de uscare
RO
1. PUNEREA ÎN FUNCÞIUNE A MAªINII Apãsaþi
butonul
intermitent lent cu culoarea albastrã.
2. INTRODUCEREA RUFELOR Deschideþi uºa.
Introduceþi rufele în maºinã, fiind atenþi sã nu
depãºiþi cantitatea indicatã în tabelul de programe a se vedea pagina urmãtoare.
3. DOZAREA DETERGENTULUIExtrageþi sertarul ºi
turnaþi detergent în compartimentele respective,
dupã indicaþiile din capitolul Detergenþi ºi rufe.
4. ÎNCHIDEÞI UªA.
5. ALEGEREA PROGRAMULUI Selectaþi cu butonul
PROGRAME programul dorit; acestuia îi sunt
asociate o temperaturã ºi o vitezã de centrifugã care
pot fi modificate. Pe ecran va apãrea ºi durata
ciclului.
6. PERSONALIZAREA CICLULUI DE SPÃLARE.
Apãsaþi butoanele: respective.
Modificarea temperaturii ºi/sau a
centrifugei. Maºina afiºeazã automat temperatura
ºi centrifuga maxime prevãzute pentru programul
ales, sau ultimele selectate, dacã sunt compatibile
cu programul. Apãsând butonul
progresiv temperatura pînã spãlarea rece OFF.
Apãsând butonul
pînã la excluderea sa OFF. Din acest moment,
apãsarea ulterioarã a butonelor va aduce valorile la
cele maxime prevãzute.
Alegerea programului de uscare
La prima apasare a tastei
automat nivelul de uscare maxim, compatibil cu
programul selectat. Urmatoarele apasari reduc
nivelul si ulterior durata de uscare, pâna la
excluderea completa a fazei (OFF). Din acest
moment, apãsarea ulterioarã a butonelor va aduce
valorile la cele maxime prevãzute.
5unt prevãzute douã posibilitãþi:
A - În funcþie de gradul de umiditate al rufelor de
uscat:
Cãlcare: Indicat ptr rufele ce necesitã cãlcare
Nivelul de umiditate rezidualã înmoaie pliurile ºi
deci facilitã întinderea lor, prin cãlcare. Ecranul
afiºeazã A1.
Umeraº: Indicat ptr rufele care nu au nevoie de o
uscare completã. Ecranul afiºeazã A2.
Dulap: Ideal ptr hainele de pus în dulap, fãrã
cãlcare. Ecranul afiºeazã A3.
Extra: Indicat ptr hainele care au nevoie de o
uscare perfectã, ca de ex., prosoapele ºi halatele
de baie. Ecranul afiºeazã A4.
B - În funcþie de timp: de la 30 la 180 de minute
(Sarcina max. 4 kg).
La încheierea procesului de uscare se activeazã o
fazã de rãcire. Dacã în mod excepþional cantitatea
; indicatorul PORNIRE/PAUZÃ va lumina
se reduce
se reduce progresiv centrifuga
, masina alege
de rufe de spãlat ºi uscat este superioarã
maximului prevãzut (a se vedea tabelul alãturat),
efectuaþi spãlarea, iar la încheierea programului,
subdivizaþi cantitatea ºi repuneþi o parte în maºinã.
Dupã care urmaþi instrucþiunile prevãzute pentru
efectuarea doar a uscãrii. Repetaþi aceeaºi
procedurã pentru rufele rãmase.
Doar a uscãrii
Alegeþi cu selectorul programelor un anumit tip de
uscare (11-12-13) în baza þesutului. Se poate fixa
nivelul sau durata de uscare, dupã dorinþã, cu
tasta USCARE
Modificarea caracteristicilor
ciclului.
Apãsaþi butonul pentru a activa opþiunea;
indicatorul corespunzãtor butonului se va aprinde.
Apãsaþi din nou butonul pentru a dezactiva
aceastã opþiune; indicatorul luminos respectiv se
va stinge.
.
Dacã opþiunea selectatã nu este compatibilã cu
programul ales, ledul corespunzãtor va semnaliza
iar funcþia nu se va activa.
Dacã opþiunea selectatã nu este compatibilã cu o
altã opþiune, reglatã anterior, ledul corespunzãtor
primei opþiuni va emite un semnal intermitent ºi va fi
activatã numai a doua opþiune (ledul corespunzãtor
acesteia se va aprinde).
Notã: dacã este activatã opþiunea SMART orice altã
opþiune incompatibilã nu va putea fi activatã.
Cantitatea de rufe admisã precum ºi durata ciclului
pot varia în funcþie de funcþia aleasã.
7. ACTIVAREA UNUI PROGRAM. Apãsaþi butonul
START/PAUSE. Indicatorul luminos se va aprinde culoare albastrã ºi uºa se va bloca (simbolul UªÃ
BLOCATÃ
program în timpul executãrii unui ciclu, apãsaþi
butonul START/PAUSE pentru a întrerupe
momentan ciclul); indicatorul corespunzãtor butonul
START/PAUSE se va aprinde intermitent culoarea
aurie) ºi alegeþi noul ciclul dorit ºi apãsaþi din nou
butonul START/PAUSE. Pentru a deschide uºa în
timpul executãrii unui ciclu, apãsaþi butonul START/
PAUSE; când simbolul UªÃ BLOCATÃ
puteþi deschide uºa. Apãsaþi din nou butonul
START/PAUSE pentru a relua programul de unde
era oprit.
8. TERMINAREA PROGRAMULUI La încheierea
ciclului, pe ecran va apãrea mesajul END ; când
simbolul UªÃ BLOCATÃ
deschide uºa. Deschideþi uºa, scoateþi rufele ºi
opriþi maºina de spãlat.
se va aprinde). Pentru a modifica un
se stinge,
se stinge, puteþi
Dacã doriþi sã anulaþi un ciclu deja activat, apãsaþi
îndelung butonul
se va opri.
. Ciclul se va întrerupe iar maºina
30
Page 31
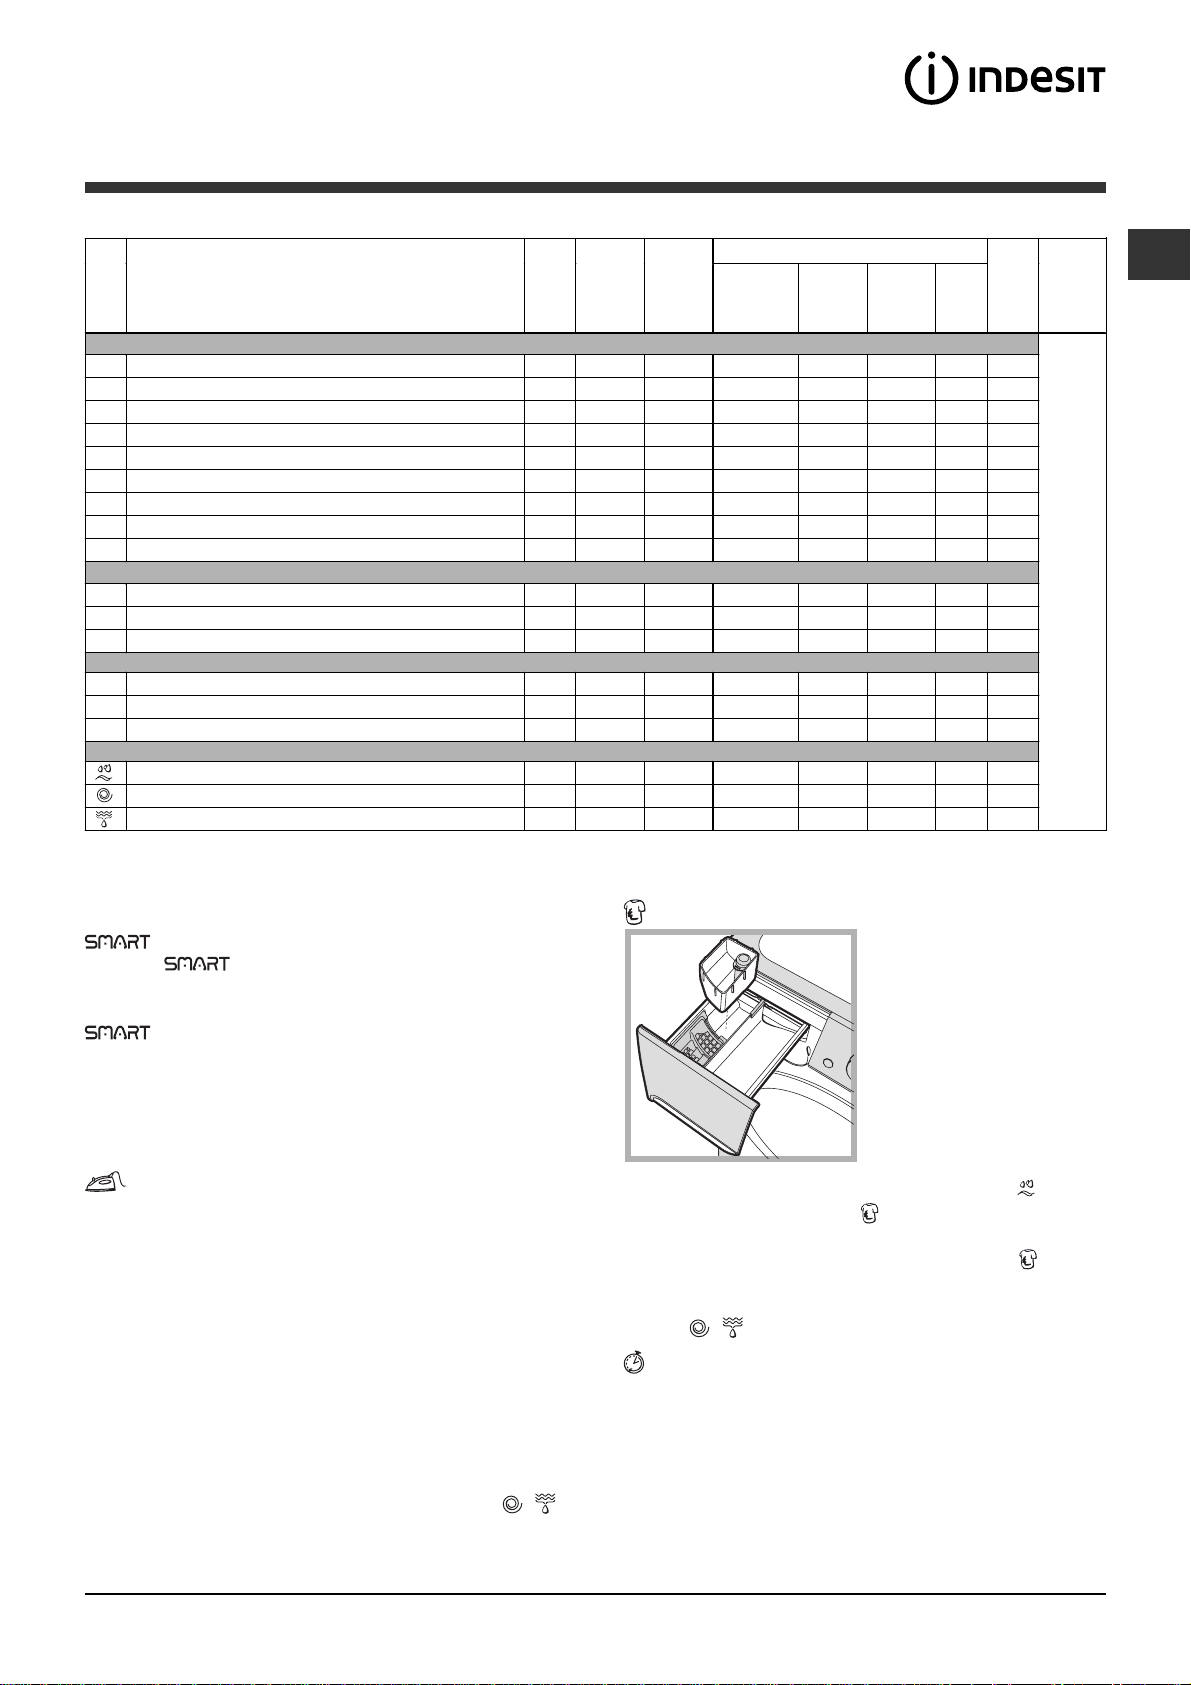
Programe ºi opþiuni
4
2
3
1
4
2
1
3
Tabel de programe
Viteza
Temp.
Descrierea Programului
Programe
Smart
1 Bumbac cu prespãlare: rufe al be foart e murdare.
2 Bumbac albituri: rufe albe foarte murdare.
2 Bumbac albituri (1): albe ºi colorate rezistente foarte murdare.
2 Bumbac (2): albe ºi colorate delicate foarte murdare.
3 Bumbac: albe ºi colorate rezistente foarte murdare.
4 Bumbac Colorat (3): albe puþin murdare ºi colorate delicate.
5 Sintetice: colorate rezistente foarte murdare.
6 Jeans
7 Cãmãºi
8 Lânã: pentru lânã, caºmir, etc.
9 Mãtase/Perdele: pentru articole din mãtase, vâscozã, lenjerie.
10 Outwear
11 Bumbac
12 Sintetice
13 Lânã
Clãtire
Centrifugã
Golire
Pentru toate Instituþiile de Testare:
1) Programul de control conform normei EN 50229: setaþi programul 2 cu o temperaturã de 60°C.
2) Program pentru bumbac, prelungit: setaþi programul 2 cu o temperaturã de 40°C.
3) Program bumbac, rapid: setaþi programul 4 cu o temperaturã de 40°C.
Programe Speciale
Programe de U sc are
Parþiale
Opþiuni de spãlare
Opþiunea permite optimizarea spãlãrii în funcþie de
cantitatea de rufe efectiv încãrcatã în maºinã, reducând
timpii ºi consumurile de apã ºi energie. Apãsând butonul
se poate selecta ºi tipul de spãlare dorit.
Intensive: spãlare energicã pentru rufe foarte murdare.
4 You: spãlare standard pentru rufe murdare normal.
Fast: spãlare rapidã pentru rufe puþin murdare.
Se poate activa numai la programele 1, 2, 3, 4, 5 (toate
cele trei niveluri) ºi 6, 7 (nivelurile 4 You ºi Fast).
Cãlcare facilitatã
Selectând aceastã opþiune, spãlarea ºi centrifuga vor fi
modificate în mod oportun, pentru a reduce plierea
rufelor. La terminarea ciclului maºina de spãlat va
efectua rotaþii lente ale cuvei; indicatorul opþiunii
CÃLCARE FACILITATÃ ºi cel al START/PAUSE vor
lumina intermitent(primul albastru, al doilea auriu).
Pentru a termina ciclul, apãsaþi butonul START/PAUSE
sau butonul CÃLCARE FACILITATÃ. La programul 9-10
maºina va termina ciclul cu rufele în înmuiere,
indicatorul funcþiei CÃLCARE FACILITATÃ ºi cel al
START/PAUSE vor lumina intermitent. Pentru a goli
apa din maºinã ºi a scoate rufele, apãsaþi butonul
START/PAUSE sau butonul CÃLCARE FACILITATÃ.
! Nu se poate activa la programele 8, 11, 12, 13, , .
N.B.: Dacã doriþi sã efectuaþi ºi uscarea, acest
buton este activ doar în cazul în care este cuplat cu
nivelul A1 (Cãlcare).
max.
max.
(rotaþii
(°C)
minut)
90° 1200
90° 1200
60° 1200
40° 1200
60° 1200
40° 1200
60° 800
40° 800
40° 600
40° 800
30° 0
30° 400
pe
Uscare
• • • - •
• - • • •
• - • • •
• - • • •
• - • • •
• - • • •
• - • • •
• - • - •
• - • • •
• - • - •
- - • - •
- - • - -
- - • - - - -
- - • - - - -
- - • - - - -
1200
-
1200
-
0
-
• - - • •
• - - - -
- - - - -
Antipete
sertarul adiþional 4, setaþi programul Clãtire
activaþi opþiunea Antipete
spãlãrii, vãrsaþi detergentul ºi aditivii, selectaþi
programul dorit ºi activaþi opþiunea Antipete
Folosirea sertarului adiþional 4 exclude prespãlarea.
Nu se poate activa la programele 1, 6, 8, 9, 10, 11,
12, 13,
Pornirea întârziatã
Pentru a programa pornirea întârziatã a maºinii,
apãsaþi tasta respectivã pentru a alege timpul de
întârziere dorit. Când opþiunea este activã, Indicatorul
luminos rãmâne aprins. Pentru a ºterge pornirea
întârziatã, apãsaþi tasta pânã când pe ecran vedeþi
inscripþia OFF.
Se poate activa pe toate programele
Detergenþi ºi aditivi
Prespãlare Spãlare
, .
Sarc
Durata
ina
rant
Bals
Max.
(Kg)
7
7
7
7
7
7
3
3,5
2
1,5
1
1,5
5
3
1,5
7
7
7
ciclului
Puteþi vizualiza durata programelor de spãlare pe display.
am
rufe
Decolo
Aceastã funcþie este utilã
pentru a elimina petele
rezistente. Introduceþi
sertarul adiþional 4, din
dotare, în sertarul 1. La
dozarea decolorantului, nu
depãºiþi nivelul max
indicat pe pivotul central (a
se vedea figura). Pentru a
effettuare numai albirea
turnaþi decolorantul în
ºi
. Pentru albirea în timpul
.
RO
31
Page 32

Detergenþi ºi rufe
RO
Sertarul detergenþilor
Un rezultat bun la spãlare depinde ºi de dozarea
corectã a detergentului: excesul de detergent nu
garanteazã o spãlare mai eficientã, ci contribuie la
încrustarea pãrþilor interne ale maºinii de spãlat ºi la
poluarea mediului înconjurãtor.
Nu introduceþi în maºinã detergenþii pentru spãlarea
manualã deoarece formeazã prea multã spumã.
Extrageþi sertarul pentru
4
1
3
introdus.
Compartimentul 2: Detergent pentru spãlare (sub
formã de praf sau lichid)
Detergentul lichid trebuie vãrsat doar înainte de pornire.
Compartimentul 3: Aditivi (soluþie de înmuiat, etc.)
Soluþia de înmuiat nu trebuie sã iasã deasupra
grãtarului.
sertar adiþional 4: Decolorant
sertar adiþional 5: Pentru a îmbunatati calitatea spalarii,
utilizati acest recipient numai cu detergent lichid.
5
2
detergenþi ºi introduceþi
detergentul sau aditivul
dupã cum urmeazã:
Compartimentul 1:
Detergent pentru prespãlare
(sub formã de praf)
Înainte de a adãuga
detergentul verificaþi ca
sertarul adiþional 4 sã nu fie
Pregãtirea rufelor
Subdivizaþi rufele în funcþie de:
- tipul de þesãturã / simbolul de pe etichetã.
- culori: separaþi rufele colorate de cele albe.
Goliþi buzunarele ºi controlaþi nasturii.
Nu depãºiþi valorile indicate, referite la greutatea
rufelor uscate:
Þesãturi rezistente: max 7 kg
Materiale sintetice: max 3 kg
Þesãturi delicate: max 2 kg
Lânã: max 1,5 kg
Mãtase: max 1 kg
Cât cântãresc rufele?
1 cearceaf 400-500 g.
1 faþã de pernã 150-200 g.
1 faþã de masã 400-500 g.
1 halat de baie 900-1.200 g.
1 prosop 150-250 g.
Lânã:cu programul 8 se pot spãla cu maºina toate
hainele de lânã, inclusiv cele cu eticheta a se spãla
numai manual
rezultate, folosiþi un detergent specific ºi nu depãºiþi
1,5 kg de rufe.
Mãtase: utilizaþi programul special 9 pentru spãlarea
articolelor din mãtase. Se recomandã folosirea unui
detergent special pentru articole delicate.
Perdele: împãturiþi-le ºi aºezaþi-le într-o faþã de pernã
sau într-un sac perforat. Utilizaþi programul 9.
Outwear (programul 10) a fost studiat pentru spãlarea
þesãturilor hidrofobe ºi a gecilor rezistente la vânt (ex.
goretex, poliester, nailon); pentru a obþine cele mai
bune rezultate, utilizaþi detergent lichid într-o cantitate
adecvatã unei încãrcãri pe jumãtate a maºinii;
desfaceþi manºetele, gulerele ºi scoateþi petele; nu
utilizaþi balsam de rufe sau detergent cu balsam.
Acest program nu poate fi utilizat pentru spãlarea
pufoaicelor cãptuºite.
Sistemul de echilibrare a sarcinii
Pentru a evita trepidaþiile excesive, înainte de
stoarcere, cuva maºinii va distribui cantitatea de rufe în
mod uniform, centrifuga efectuând câteva rotaþii la o
vitezã mai mare decât viteza de spãlare. Dacã, dupã
numeroase încercãri, maºina nu reuºeºte sã
echilibreze greutatea, stoarcerea rufelor se va face la o
vitezã mai micã decât cea prevãzutã în program. Dacã
instabilitatea este prea mare, maºina va distribui
greutatea în locul centrifugei. Pentru a favoriza o mai
bunã repartizare a rufelor ºi echilibrarea corectã a
maºinii, se recomandã sã introduceþi în maºinã atât
articole mari cât ºi mici.
. Pentru a obþine cele mai bune
Programe particulare
Jeans: întoarceþi pe dos rufele înainte de spãlare ºi
utilizaþi un detergent lichid. Utilizaþi programul 6.
Cãmãºi:utilizaþi programul 7 special pentru a spãla
cãmãºile din material ºi cu culori diferite.
Programul asigurã o calitate maximã ºi reduce
formarea pliurilor.
32
Page 33

Precauþii ºi sfaturi
Maºina de spãlat a fost proiectatã ºi construitã
conform normelor internaþionale de protecþie. Aceste
avertizãri sunt furnizate din motive de siguranþã ºi
trebuie sã fie citite cu atenþie.
Siguranþa generalã
Acest aparat a fost conceput exclusiv pentru
utilizarea în locuinþe.
Maºina de spãlat trebuie sã fie folositã doar de
persoane adulte care respectã instrucþiunile din
acest manual.
Nu atingeþi maºina când sunteþi desculþi sau cu
mâinile sau picioarele ude sau umede.
Nu scoateþi ºtecherul din prizã trãgând de cablu, ci
apucând ºtecherul.
Nu deschideþi sertarul detergenþilor în timp ce
maºina se aflã în funcþiune.
Nu atingeþi apa de evacuare: poate avea o
temperaturã ridicatã.
Nu forþaþi în nici un caz uºa: s-ar putea deteriora
mecanismul de siguranþã care evitã deschiderea
accidentalã.
În caz de defecþiune, nu umblaþi în niciun caz la
mecanismele din interior ºi nu încercaþi sã o reparaþi
singuri.
Controlaþi mereu ca în apropierea maºinii aflate în
funcþiune, sã nu se afle copii.
Pe durata spãlãrii uºa se poate încãlzi.
Dacã trebuie sã deplasaþi maºina, cereþi ajutor unei alte
(sau 2) persoane ºi fiþi foarte atenþi. Niciodatã nu deplasaþi
maºina singuri deoarece aceasta este foarte grea.
Înainte de a introduce rufele, controlaþi ca ºi cuva sã
fie goalã.
În timpul uscãrii, uºa maºinii de spãlat se încãlzeºte.
Nu uscaþi rufele pe care le-aþi spãlat cu solvenþi
inflamabili (de ex. trielinã).
Nu uscaþi rufele cu aplicaþii din cauciuc sintetic sau
elastomeri asemãnãtori.
Fiþi atenþi ca pe durata fazelor de uscare robinetul
de apã sã fie deschis.
Scoaterea din uz
a le colecta separat. Pentru informaþii suplimentare
cu privire la scoaterea sin uz a electrocasnicelor,
deþinãtorii acestora pot apela la centrele de
colectare a deºeurilor sau la vânzãtorii de la care au
achiziþionat produsele respective.
Deschiderea manualã a uºii
Dacã nu este posibil sã deschideþi uºa din cauza
întreruperii curentului electric ºi doriþi totuºi sã întindeþi
rufele, procedaþi dupã cum urmeazã:
1. scoateþi ºtecherul din
prizã.
2. verificaþi ca nivelul de apã
din maºinã sã fie sub
marginea uºii; în caz
contrar, scoateþi apa în
exces cu ajutorul furtunului
de golire, punând-o într-un
vas, dupã indicaþiile din
figura.
3. îndepãrtaþi panoul de acoperire de pe latura
anterioarã a maºinii de spãlat (a se vedea pagina
urmãtoare).
4. utilizând limba indicatã în figurã, trageþi spre dvs
pânã când eliberaþi din opritor tirantul de plastic; trageþi
apoi în jos ºi, în acelaºi timp, deschideþi uºa.
RO
Eliminarea ambalajelor:
respectaþi reglementãrile locale, în acest fel
ambalajele vor putea fi refolosite.
Directiva Europeanã 2002/96/CE cu privire la
deºeurile care provin de la aparatura electricã sau
electronicã prevede ca aparatele electrocasnice sã
nu fie colectate împreunã cu deºeurile urbane
solide, obiºnuite. Aparatele scoase din uz trebuie sã
fie colectate separat atât pentru a optimiza rata de
recuperare ºi de reciclare a materialelor
componente cât ºi pentru a evita pericolele care pot
afecta sãnãtatea omului sau polua mediul
înconjurãtor. Simbolul tomberonului tãiat care apare
pe toate produsele vã aminteºte tocmai obligaþia de
5. montaþi din nou panoul verificând, înainte de a-l
împinge spre maºinã, de a fi introdus cârligele în
orificiile respective.
33
Page 34

Întreþinere ºi curãþire
RO
Întreruperea alimentãrii cu apã ºi curent
electric
Închideþi robinetul de apã dupã fiecare spãlare. Se
limiteazã astfel uzura instalaþiei hidraulice a maºinii
de spãlat ºi se eliminã pericolul scurgerilor.
Scoateþi ºtecãrul din priza de curent atunci când
curãþaþi maºina de spãlat ºi când se efectueazã
lucrãri de întreþinere.
Curãþarea maºinii de spãlat
Partea externã ºi pãrþile din cauciuc pot fi curãþate cu
o lavetã înmuiatã în apã cãlduþã ºi sãpun. Nu folosiþi
solvenþi sau substanþe abrazive.
Curãþarea sertarului pentru detergenþi
1
2
Pentru a scoate sertarul,
apãsaþi pe levierul (1) ºi
trageþi-l spre exterior (2) (a
se vedea figura).
Spãlaþi-l sub un jet de apã;
aceastã operaþie trebuie
efectuatã cât mai des
posibil.
2. deºurubaþi capacul
rotindu-l în sens antiorar
(a se vedea figura). este
normal sã iasã puþinã
apã;
3. curãþaþi cu grijã interiorul;
4. înºurubaþi la loc capacul;
5. montaþi din nou panoul verificând, înainte de a-l
împinge spre maºinã, de a fi introdus cârligele în
orificiile respective.
Controlarea furtunului de alimentare cu apã
Controlaþi tubul de alimentare cel puþin o datã pe an.
Dacã prezintã crãpãturi sau fisuri trebuie înlocuit: pe
parcursul spãlãrilor, presiunea puternicã ar putea
provoca crãpãturi neaºteptate.
Nu folosiþi niciodatã tuburi folosite deja.
Curãþarea pompei
Maºina de spãlat este dotatã cu o pompã de
autocurãþare care nu are nevoie de întreþinere. Se
poate întâmpla însã ca unele obiecte mici (monede,
nasturi) sã cadã în anticamera care protejeazã pompa,
situatã în partea inferioarã a acesteia.
Verificaþi ca ciclul de spãlare sã fie încheiat ºi
scoateþi ºtecãrul din prizã.
Pentru a avea acces la anticamerã:
1. îndepãrtaþi panoul de
acoperire de pe latura
1
2
3
anterioarã a maºinii,
apãsând spre centru,
apoi împingeþi în jos de
pe ambele laturi ºi
scoateþi-l (a se vedea
figurile).
34
Page 35

Anomalii ºi remedii
Se poate întâmpla ca maºina de spãlat sã nu funcþioneze. Înainte de a apela serviciul de Asistenþã (a se vedea
Asistenþa), verificaþi dacã nu este vorba de o problemã uºor de rezolvat:
Anomalii:
Maºina de spãlat nu porneºte.
Ciclul de spãlare nu porneºte.
Maºina de spãlat nu încarcã apã
(Pe display este vizualizat scris
H2O).
Maºina de spãlat încarcã ºi
descarcã apã încontinuu.
Maºina de spãlat nu se goleºte
sau nu stoarce.
Cauze posibile / Rezolvare:
ªtecãrul nu este introdus în priza de curent, sau nu face contact.
Aveþi o panã de curent la domiciliu.
Uºa nu este bine închisã.
Butonul ON/OFF nu a fost apãsatã.
Butonul START/PAUSE nu a fost apãsat.
Robinetul de apã nu este deschis.
A fost setatã o întârziere faþã de ora pornirii.
Furtunul de alimentare cu apã nu este racordat la robinet.
Furtunul este îndoit.
Robinetul de apã nu este deschis.
Apa la domiciliul dvs. este opritã.
Apa nu are presiune suficientã.
Butonul START/PAUSE nu a fost apãsat.
Furtunul de golire nu a fost instalat la o înãlþime cuprinsã între 65 ºi 100
cm de pãmânt (a se vedea Instalare).
Capãtul furtunului de evacuare este cufundat în apã (a se vedea Instalare).
Evacuarea din perete nu are rãsuflare pentru aer.
Dacã dupã aceste verificãri problema nu se rezolvã, închideþi robinetul de apã,
stingeþi maºina de spãlat ºi chemaþi Asistenþa. Dacã locuinþa se aflã la ultimele
etaje ale unui edificiu, este posibil sã aibã loc fenomene de sifonare, motiv
pentru care maºina de spãlat încarcã ºi descarcã apã încontinuu. Pentru a
elimina acest inconvenient, se gãsesc în comerþ supape anti-sifonare.
Programul nu prevede golirea apei: cu unele programe trebuie pornit manual.
Este activatã opþiunea Cãlcare facilitatã: pentru a încheia programul,
apãsaþi butonul START/PAUSE (Programe ºi opþiuni).
Furtunul de golire este îndoit (a se vedea Instalare).
Conducta de descãrcare este înfundatã.
RO
Maºina de spãlat vibreazã foarte
mult în timpul stoarcerii.
Maºina de spãlat pierde apã.
Indicatoarele Opþiunilor ºi ale
START/PAUSE lumineazã intermitent
repede ºi display-ul afiºeazã un cod
de anomalie (ex.: F-01, F-..).
Se formeazã prea multã spumã.
Maºina de spãlat nu usucã.
Cuva, în momentul instalãrii, nu a fost deblocatã în mod corespunzãtor (a
se vedea Instalare).
Maºina de spãlat este în pantã (a se vedea Instalare).
Maºina de spãlat este prea aproape de pereþi ºi mobilier (a se vedea Instalare).
Furtunul de alimentare cu apã nu este bine înºurubat (a se vedea Instalare).
Sertarul detergenþilor este înfundat (pentru a-l curãþa a se vedea Întreþinere ºi curãþare).
Furtunul de golire nu este bine fixat (a se vedea Instalare).
Opriþi maºina ºi scoateþi ºtecãrul din prizã; aºteptaþi aprox. 1 minut înainte
de a o reaprinde.Dacã nu obþineþi nici un rezultat, apelaþi Centrul de Service
pentru asistenþã.
Detergentul nu este compatibil cu maºina de spãlat (trebuie sã fie scris pentru
maºina de spãlat, de mânã ºi în maºina de spãlat, sau ceva asemãnãtor).
Dozajul a fost excesiv.
ªtecherul nu este introdus sau nu a fost suficient introdus în priza de
curent astfel încât sã existe conexiune electricã.
În casã nu este curent electric.
Hubloul nu este bine închis.
A fost fixatã o întârziere de pornire.
USCARE este poziþionat în dreptul valorii OFF.
35
Page 36

Asistenþã
195078293.02
06/2009 - Xerox Fabriano
RO
Înainte de a lua legãtura cu Asistenþa:
Verificaþi dacã puteþi rezolva singuri problema (a se vedea Anomalii ºi remedii);
Porniþi din nou programul pentru a controla dacã inconvenientul a fost eliminat;
În caz negativ, contactaþi un Centru de Asistenþã Tehnicã.
Nu apelaþi niciodatã la persoane neautorizate.
Comunicaþi:
tipul de anomalie;
modelul maºinii (Mod.);
numãrul de serie (S/N).
Aceste informaþii sunt specificate pe plãcuþa cu date tehnice, lipitã în partea din spate a maºinii de spãlat precum ºi
în partea anterioarã, dupã ce deschideþi uºa.
36
 Loading...