

INDESIT PAA 642 IX/I EE User Manual
PAA 642 IX/I EE
Українська
Інструкція по використанню
ВАРИЛЬНА ПОВЕРХНЯ
Зміст
Інструкція по використанню,1
Запобіжні заходи,3
Допомога,4
Опис приладу,5
Установка,17
Ввімкнення і використання,21
Запобіжні заходи та поради,21
Обслуговування та догляд,22
Усунення несправностей,22
English
Operating Instructions
HOB
Contents
Operating Instructions,1
Warnings,2
Assistance,4
Description of the appliance,5
Installation,6
Start-up and use,9
Precautions and tips,9
Maintenance and care,10
Troubleshooting,10
Română
Instrucţiuni de utilizare
PLITA
Sumar
Instrucţiuni de utilizare,1
Avertizări,2
Asistenţă ,4
Descrierea aparatului,5
Instalarea,11
Pornirea şi folosirea,15
Precauţii şi sfaturi,15
Întreţinere,16
Anomalii şi remedii,16
Warnings
Avertizări
WARNING: The appliance and its accessible parts
become hot during use. Care should be taken to
avoid touching heating elements. Children less than 8
years of age shall be kept away unless continuously
supervised. This appliance can be used by children
aged from 8 years and above and persons with
reduced physical, sensory or mental capabilities or
lack of experience and knowledge if they have been
given supervision or instruction concerning use of the
appliance in a safe way and understand the hazards
involved. Children shall not play with the appliance.
Cleaning and user maintenance shall not be made
by children without supervision.
WARNING: Unattended cooking on a hob with fat or
oil can be dangerous and may result in re. NEVER
try to extinguish a re with water, but switch off the
appliance and then cover ame e.g. with a lid or a
re blanket.
WARNING: Danger of re: do not store items on the
cooking surfaces.
Never use steam cleaners or pressure cleaners on
the appliance.
Remove any liquid from the lid before opening it. Do
not close the glass cover (if present) when the gas
burners or electric hotplates are still hot.
The appliance is not intended to be operated by
means of an external timer or separate remote
control system.
CAUTION: the use of inappropriate hob guards can
cause accidents.
ATENŢIE: Acest aparat şi părţile sale accesibile devin
foarte calde în timpul folosirii. Trebuie să ţi atenţi şi
să nu atingeţi elementele de încălzire. Îndepărtaţi
copiii sub 8 ani dacă nu sunt supravegheaţi continuu.
Acest aparat poate utilizat de copiii de peste 8 ani
şi de persoane cu capacităţi zice, senzoriale sau
mentale reduse sau fără experienţă şi cunoştinţe
dacă se aă sub o supraveghere corespunzătoare
sau dacă au fost instruiţi cu privire la folosirea
aparatului în mod sigur şi dacă îşi dau seama de
pericolele corelate. Copiii nu trebuie să se joace cu
aparatul. Operaţiunile de curăţare şi de întreţinere nu
trebuie să e efectuate de copii fără supraveghere.
ATENŢIE: Lăsarea unui aragaz nesupravegheat cu
grăsimi şi uleiuri poate periculoasă şi poate provoca
un incendiu. Nu trebuie NICIODATĂ să încercaţi
să stingeţi o acără/incendiu cu apă, ci trebuie să
stingeţi aparatul şi să acoperiţi acăra, de exemplu
cu un capac sau cu o pătură ignifugă.
ATENŢIE: Risc de incendiu: nu lăsaţi obiecte pe
suprafeţele de gătit.
Nu folosiţi niciodată aparate cu aburi sau sub
presiune pentru a curăţa aparatul.
Eliminaţi eventualele reziduuri de lichid de pe capac,
înainte de a-l deschide. Nu închideţi capacul din sticlă
(dacă este prezent) cu arzătoarele de gaz sau plita
electrică încă calde.
Aparatul nu trebuie pus în funcţiune prin intermediul
unui temporizator extern sau al unui sistem separat
de comandă la distanţă.
ATENŢIE: folosirea unor protecţii necorespunzătoare
ale plitei poate provoca accidente.
2

Запобіжні заходи
УВАГА: Під час роботи цей прилад, а також
його доступні частини нагріваються до високих
температур. Слід бути особливо обережними,
щоб не торкатися нагрівальних елементів. Діти
віком до 8 років мають знаходитися на небезпечній
відстані від приладу, якщо неможливо забезпечити
постійний контроль над ними. Дозволяється
користування цим приладом дітьми віком від 8
років, а також особами з обмеженими фізичними,
сенсорними або розумовими можливостями або
особами без належного досвіду і знань, якщо
вони перебувають під постійним контролем або
проінструктовані щодо правил з небезпечного
користування приладу і усвідомлюють ступені
ризику. Не дозволяйте дітям гратися з приладом.
Операції з очищення і догляду не повинні
виконуватися дітьми без належного контролю.
УВАГА: Небезпечно залишати без нагляду плити
з жиром або олією, тому що це може призвести
до пожежі. НІ В ЯКОМУ РАЗІ не слід намагатися
погасити полум’я/пожежу водою. Необхідно
вимкнути прилад і накрити полум’я, наприклад,
кришкою або вогнетривким покривалом.
УВАГА: Небезпека пожежі: не залишайте речі на
варильних поверхнях.
Забороняється використання апаратів для
очищення парою або високим тиском.
Витріть насухо всі наявні на кришці рідини, перш
ніж відкрити її. Не закривайте скляну кришку
(якщо вона наявна), якщо газові пальники або
електричні конфорки залишаються нагрітими.
Не передбачено увімкнення приладу за допомогою
зовнішнього таймеру або окремої системи
дистанційного керування.
УВАГА: використання невідповідних захисних
пристроїв варильної поверхні може призвести до
нещасних випадків.
3
Assistance
Communicating:
• Type of trouble
• Appliance model (Mod.)
• Serial number (S/N)
This information is found on the data plate located on the appliance and/or
on the packaging.
Asistenţă
Comunicaţi:
• tipul de anomalie;
• modelul maşinii (Mod.);
• numărul de serie (S/N).
Aceste informaţii se găsesc pe plăcuţa de caracteristici din frigider, în partea
de jos, în stânga.
Допомога
Повідомити:
• тип несправності;
• модель приладу (Mod.)
• cерійний номер (S/N)
Ці дані знаходяться на табличці з даними на самому приладі.
4
Description of the appliance
1
2
6
Опис приладу
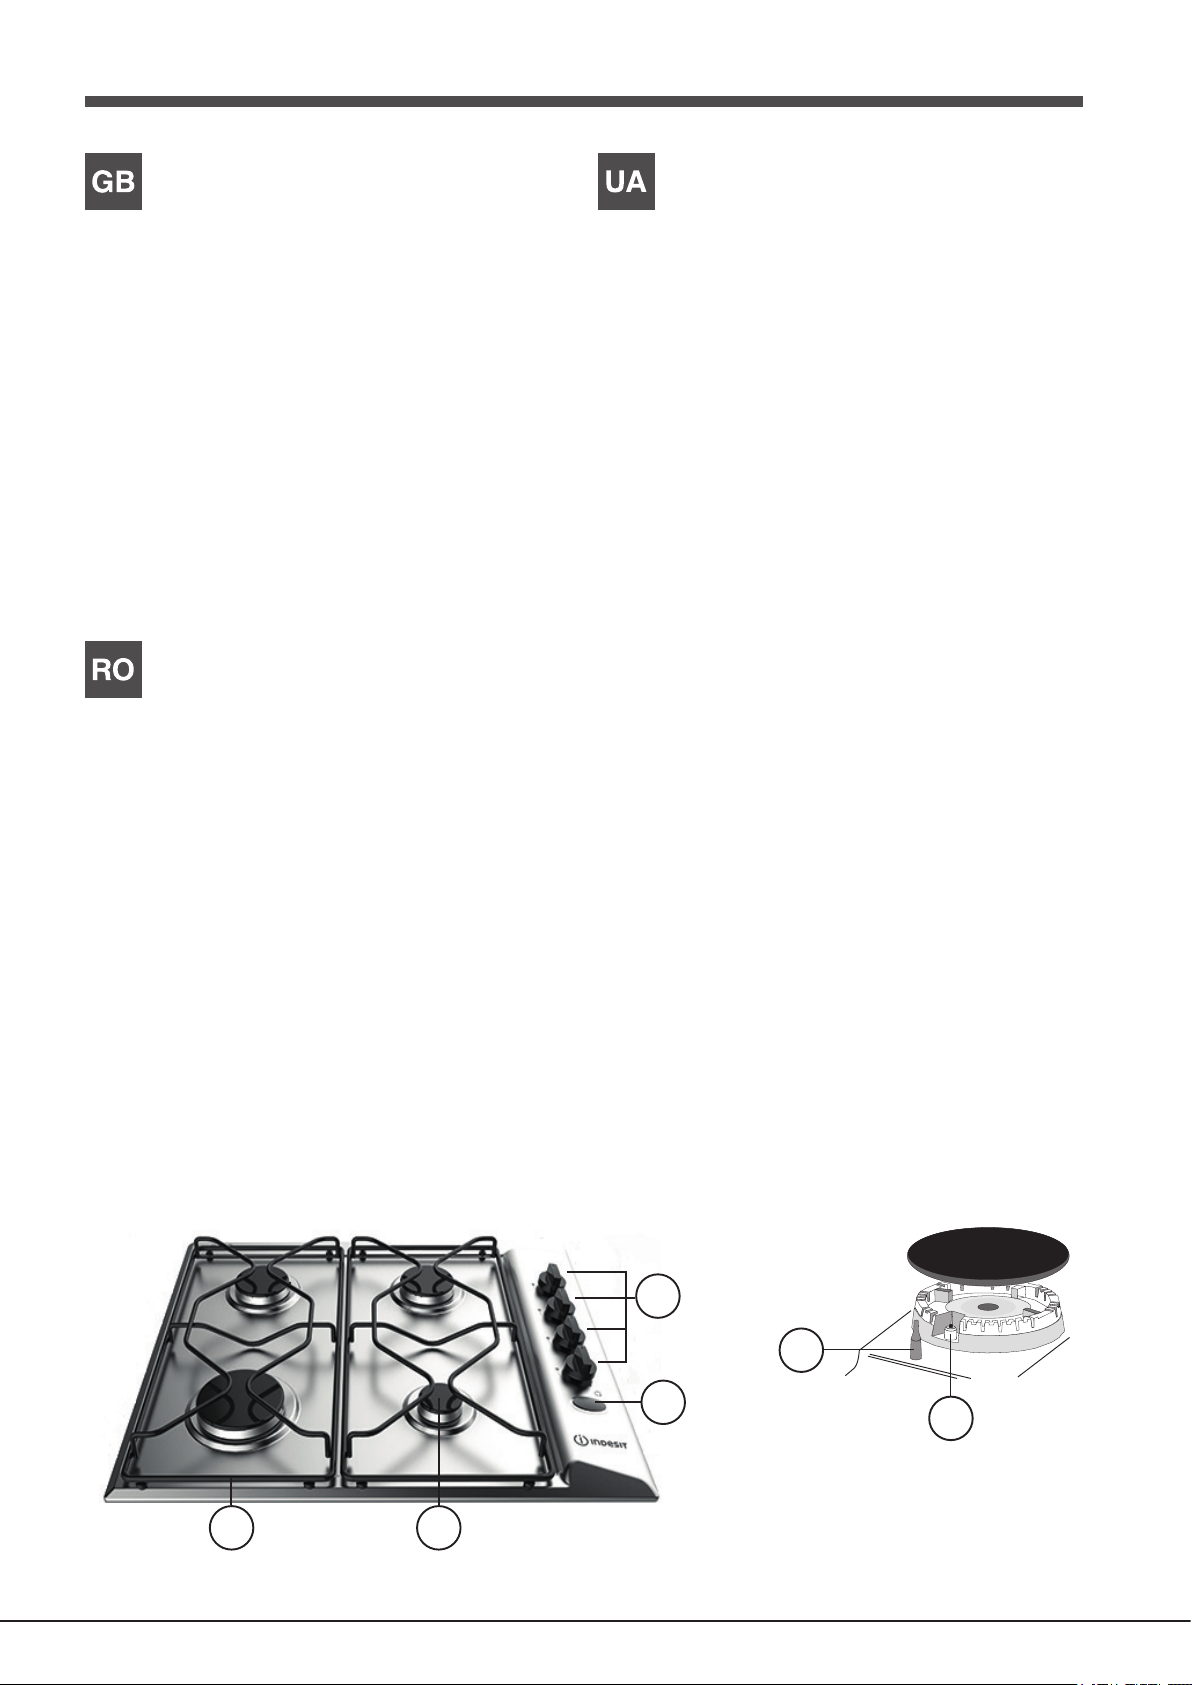
Overall view
1. Support Grid for COOKWARE
2. GAS BURNERS
3. Control Knobs for GAS BURNERS
4. GAS BURNERS button
5. Ignition for GAS BURNERS
6. SAFETY DEVICES
• GAS BURNERS differ in size and power. Use the diameter of the cookware
to choose the most appropriate burner to cook with.
• Control Knobs for GAS BURNERS for ame adjustment.
• GAS BURNER IGNITION enables a specic burner to be lit automatically.
• SAFETY DEVICE stops the gas flow if the flame is accidentally
extinguished.
Descrierea aparatului
Vedere de ansamblu
1. Grătare de sprijin pentru RECIPIENTELE DE COACERE
2. ARZĂTOARE PE GAZ
3. Selectoare de comandă ale ARZĂTOARELOR PE GAZ
4. Buton de aprindere al ARZĂTOARELOR PE GAZ
5. Dispozitiv de aprindere al ARZĂTOARELOR PE GAZ
6. DISPOZITIV DE SIGURANŢĂ
Загальний вигляд
1. Підтримуюча Решітка для ПОСУДУ
2. ГАЗОВІ ПАЛЬНИКИ
3. Ручки управління ГАЗОВИХ ПАЛЬНИКІВ
4. Кнопкa запалювання ГАЗОВИХ ПАЛЬНИКІВ
5. Запалювання для ГАЗОВИХ ПАЛЬНИКІВ
6. ПРИСТРОЇ БЕЗПЕКИ
• ГАЗОВІ ПАЛЬНИКИ відрізняються за розмірами тапотужністю.
Використовуйте для приготування їжі посудз діаметром у відповідності
до розміру найбільшпідходящого пальника.
• ГАЗОВИMИ ПАЛЬНИКAMИ
полум’я
• Запалювання для ГАЗОВИХ ПАЛЬНИКІВ дозволяють, привключенні,
запалювати конкретні пальники автоматично.
• ПРИСТРІЙ БЕЗПЕКИ зупиняє потік газу, якщо полум’явипадково
гасне.
• ARZĂTOARELE PE GAZ sunt de diferite dimensiunişi puteri. Alegeţi-le
pe cele adecvate diametruluirecipientului utilizat.
• Selectoarele de comandă ale ARZĂTOARELOR PEGAZ şi sunt folosite
pentrureglarea ăcării.
• Dispozitivul de aprindere al ARZĂTOARELOR PEGAZ permite aprinderea
automată a arzătoaruluiprestabilit.
• DISPOZITIVUL DE SIGURANŢĂ este utilizat încazul stingerii accidentale
a ăcării, împiedicândscurgerile de gaz.
3
4
5
5
Installation
Top 20 mm
Top 30-50 mm
GB
! Before operating your new appliance please read this instruction booklet
carefully. It contains important information for safe use, installation and care
of the appliance.
! Please keep these operating instructions for future reference. Pass them on
to possible new owners of the appliance.
Positioning
! Keep packaging material out of the reach of children. It can become a choking
or suffocation hazard (see Precautions and tips).
! The appliance must be installed by a qualied professional according to the
instructions provided. Incorrect installation may cause harm to people and
animals or may damage property.
! This unit may be installed and used only in permanently ventilated rooms
in accordance with current national regulations. The following requirements
must be observed:
• The room must be equipped with an air extraction system that expels
any combustion fumes. This may consist of a hood or an electric fan that
automatically starts each time the appliance is switched on.
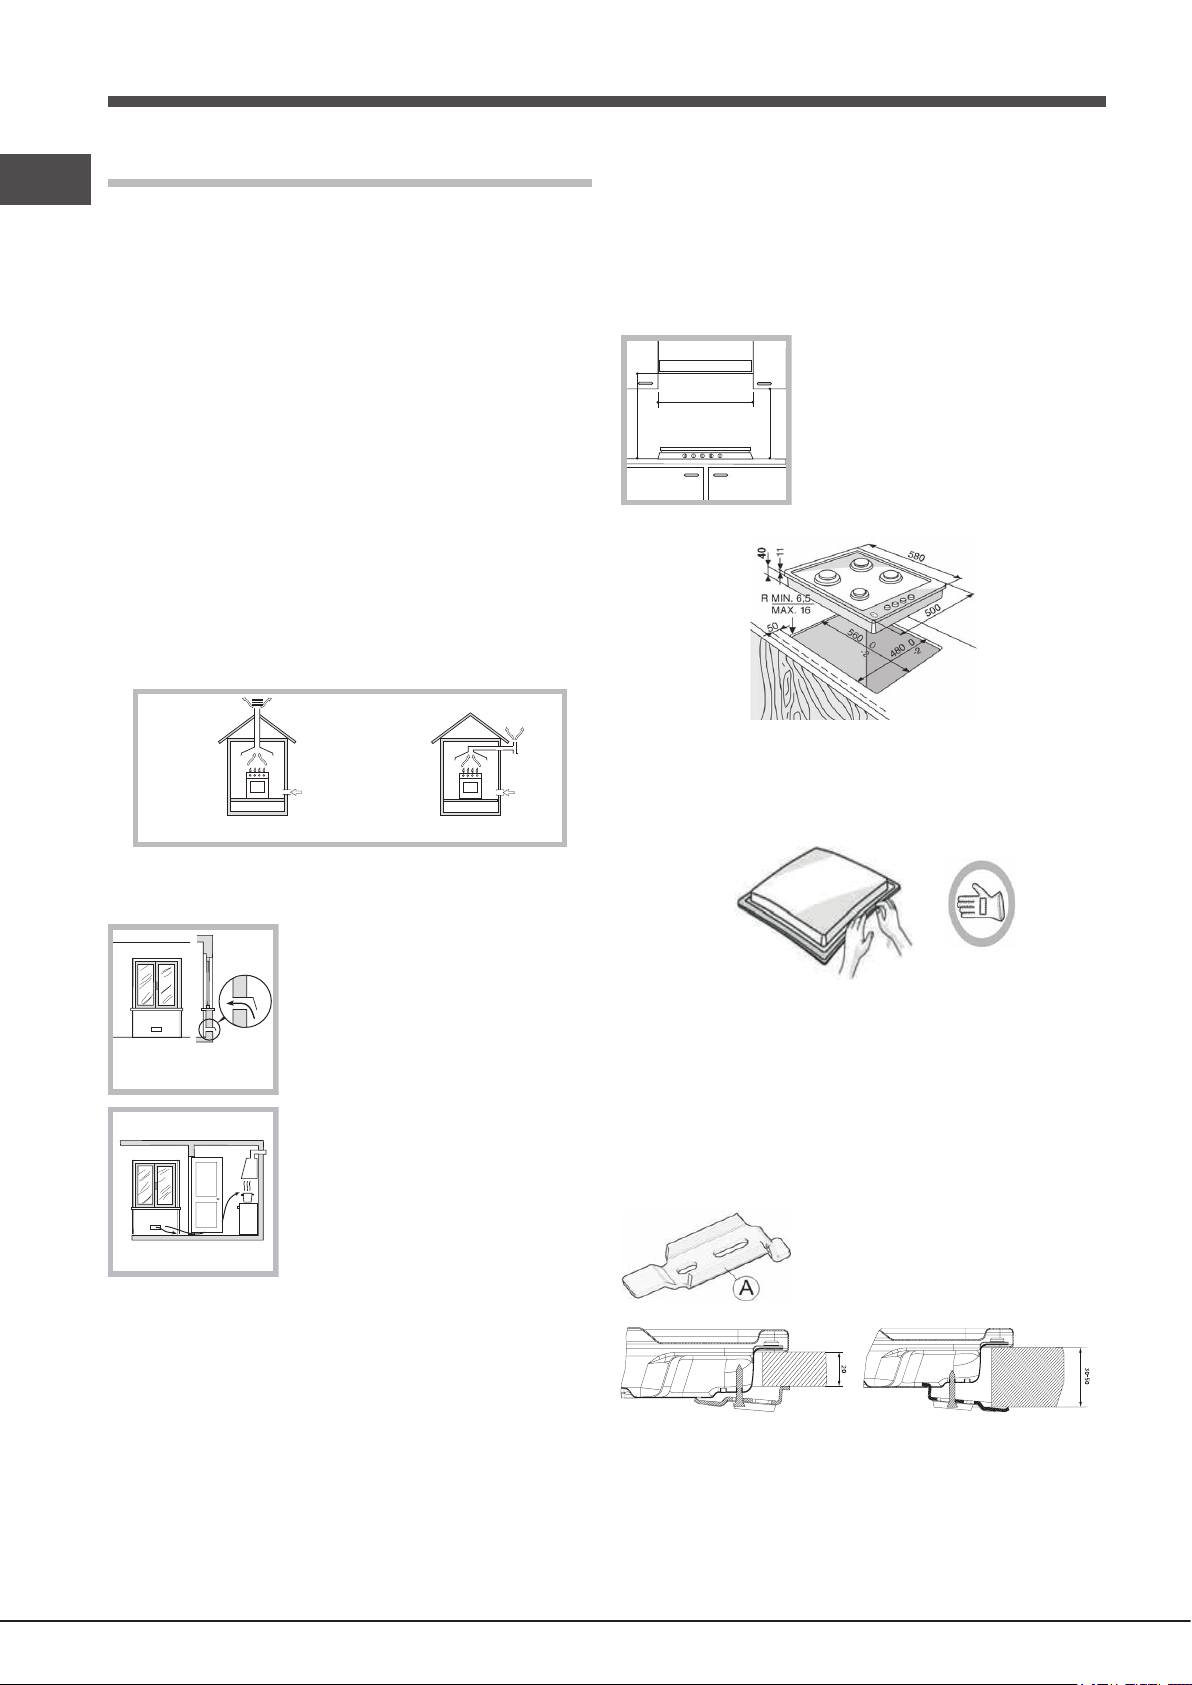
Fitting the appliance
The following precautions must be taken when installing the hob:
• Kitchen cabinets adjacent to the appliance and taller than the top of the
hob must be at least 200 mm from the edge of the hob.
• Hoods must be installed according to their relative installation instruction
manuals and at a minimum distance of 650 mm from the hob (see gure).
• Place the wall cabinets adjacent to the hood at a minimum height of 420
mm from the hob (see gure).
If the hob is installed beneath a wall cabinet,
the latter must be situated at a minimum of 700
600mm min.
650mm min.
mm above the hob.
420mm min.
• The installation cavity should have the dimensions indicated in the gure.
NOTE: In case of installation of a hood above the hob, please refer to the
hood instructions for the correct distance.
In a chimney stack or branched flue.
(exclusively for cooking appliances)
Directly to
the Outside
• The room must also allow proper air circulation, as air is needed for
combustion to occur normally. The ow of air must not be less than 2 m3/h
per kW of installed power.
The air circulation system may take air directly
from the outside by means of a pipe with an
inner cross section of at least 100 cm2; the
opening must not be vulnerable to any type
Examples of
ventilation holes
for comburant air.
Adjacent
Room
A
Room to be
Vented
of blockages.
The system can also provide the air needed for
combustion indirectly, i.e. from adjacent rooms
tted with air circulation tubes as described
above. However, these rooms must not be
communal rooms, bedrooms or rooms that
may present a re hazard.
Enlarging the ventilation slot
between window and floor.
• Intensive and prolonged use of the appliance may necessitate
supplemental ventilation, e.g. opening a window or increasing the power
of the air intake system (if present).
• Liquid petroleum gas sinks to the oor as it is heavier than air. Therefore,
rooms containing LPG cylinders must also be equipped with vents to allow
gas to escape in the event of a leak. As a result LPG cylinders, whether
partially or completely full, must not be installed or stored in rooms or
storage areas that are below ground level (cellars, etc.). It is advisable to
keep only the cylinder being used in the room, positioned so that it is not
subject to heat produced by external sources (ovens, replaces, stoves,
etc. ) which could raise the temperature of the cylinder above 50°C.
• After having cleaned the perimeter surface, apply the supplied gasket to
the hob as shown in the gure.
Position the hob in the worktop opening made respecting the dimensions
indicated in the Instruction.
NOTE: the power supply cable must be long enough to permit its upward
extraction.
To secure the hob, use the brackets (A) provided with it. Fit the brackets into the
relevant bores shown by the arrow and fasten them by means of their screws
in accordance with the thickness of the worktop (see the following gures).
• Where the hob is not installed over a built-in oven, a wooden panel must
be installed as insulation. This must be placed at a minimum distance of
20 mm from the lower part of the hob.
6
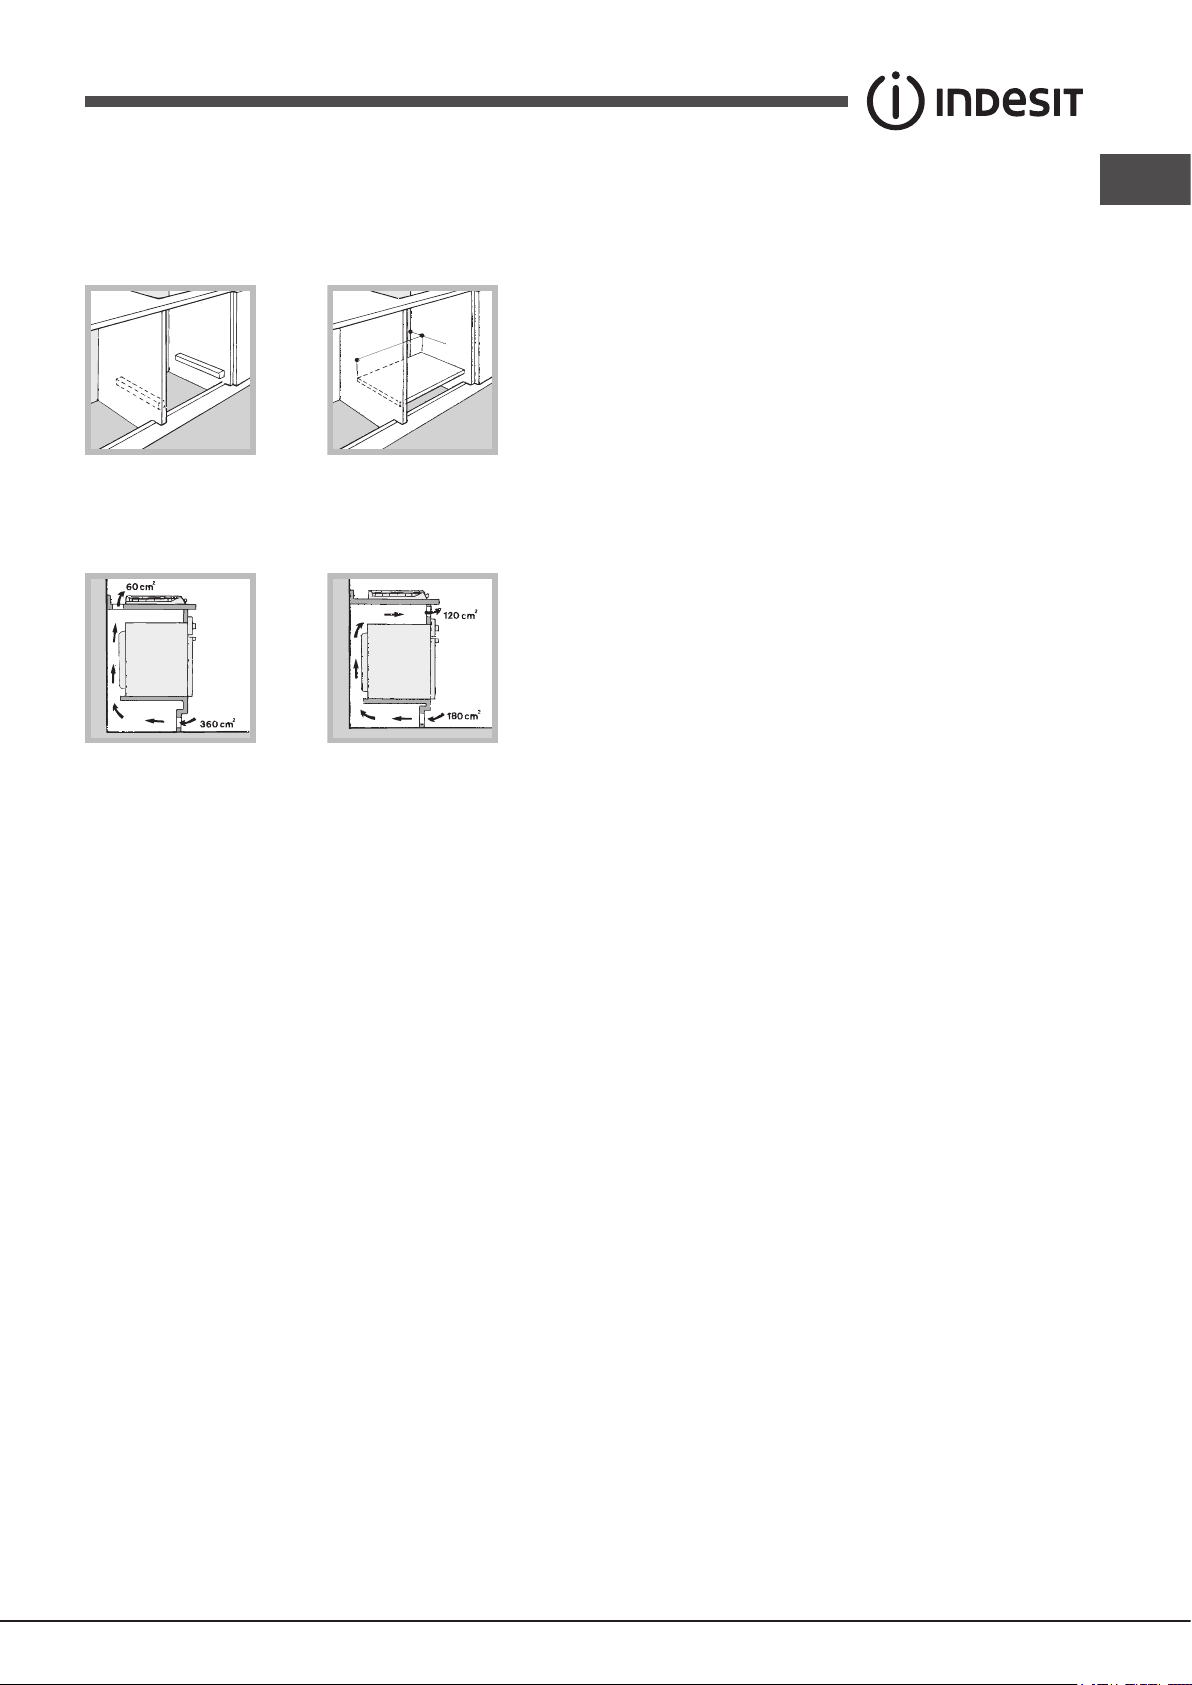
Ventilation
To ensure adequate ventilation, the back panel of the cabinet must be
removed. It is advisable to install the oven so that it rests on two strips of
wood, or on a completely at surface with an opening of at least 45 x 560
mm (see diagrams).
45 mm.
560 mm.
Where a hob is installed above an oven without a forced ventilation cooling
system, adequate ventilation must be provided inside the cabinet by means
of air holes through which air can pass (see gure).
Electrical connection
Hobs equipped with a three-pole power supply cable are designed to operate
with alternating current at the voltage and frequency indicated on the data
plate (this is located on the lower part of the appliance). The earth wire in the
cable has a green and yellow cover. If the appliance is to be installed above
a built-in electric oven, the electrical connection of the hob and the oven must
be carried out separately, both for electrical safety purposes and to make
extracting the oven easier.
Connecting the supply cable to the mains
Install a standardised plug corresponding to the load indicated on the data
plate.
The appliance must be directly connected to the mains using an omnipolar
circuit-breaker with a minimum contact opening of 3 mm installed between
the appliance and the mains.
The circuit-breaker must be suitable for the charge indicated and must comply
with current electrical regulations (the earthing wire must not be interrupted
by the circuit-breaker). The supply cable must not come into contact with
surfaces with temperatures higher than 50°C.
! The installer must ensure that the correct electrical connection has been
made and that it is compliant with safety regulations.
Before connecting to the power supply, make sure that:
• the appliance is earthed and the plug is compliant with the law.
• the socket can withstand the maximum power of the appliance, which is
indicated on the data plate.
• the voltage is in the range between the values indicated on the data plate.
• the socket is compatible with the plug of the appliance. If the socket is
incompatible with the plug, ask an authorised technician to replace it. Do
not use extension cords or multiple sockets.
! The cable must not be bent or compressed.
GB
! The cable must be checked regularly and replaced by authorised technicians
only (see Assistance).
! The manufacturer declines any liability should these safety measures not
be observed.
Gas connection
The appliance should be connected to the main gas supply or to a gas
cylinder in compliance with current national regulations. Before carrying out
the connection, make sure the cooker is compatible with the gas supply you
wish to use. If this is not the case, follow the instructions indicated in the
paragraph “Adapting to different types of gas.”
When using liquid gas from a cylinder, install a pressure regulator which
complies with current national regulations.
! Check that the pressure of the gas supply is consistent with the values
indicated in Table 1 (“Burner and nozzle specications”). This will ensure the
safe operation and longevity of your appliance while maintaining efcient
energy consumption.
Connection with a rigid pipe (copper or steel)
! Connection to the gas system must be carried out in such a way as not to
place any strain of any kind on the appliance.
There is an adjustable L-shaped pipe tting on the appliance supply ramp
and this is tted with a seal in order to prevent leaks. The seal must always
be replaced after rotating the pipe tting (seal provided with appliance). The
gas supply pipe tting is a threaded 1/2 gas cylindrical male attachment.
Connecting a flexible jointless stainless steel pipe to a threaded
attachment
The gas supply pipe tting is a threaded 1/2 gas cylindrical male attachment.
These pipes must be installed so that they are never longer than 2000 mm
when fully extended. Once connection has been carried out, make sure that
the exible metal pipe does not touch any moving parts and is not compressed.
! Only use pipes and seals that comply with current national regulations.
Checking the tightness of the connection
! When the installation process is complete, check the pipe ttings for leaks
using a soapy solution. Never use a ame.
Adapting to different types of gas
To adapt the hob to a different type of gas other than default type (indicated
on the rating plate at the base of the hob or on the packaging), the burner
nozzles should be replaced as follows:
1. Remove the hob grids and slide the burners off their seats.
2. Unscrew the nozzles using a socket spanner of the appropriate size, and
replace them with nozzles for the new type of gas (see table 1 “Burner
and nozzle characteristics”).
3. Reassemble the parts following the above procedure in the reverse order.
4. Once this procedure is nished, replace the old rating sticker with one
indicating the new type of gas used. Sticker are available from any of our
Service Centres.
• Adjusting the burners’ primary air
Does not require adjusting.
! Once the appliance has been installed, the power supply cable and the
electrical socket must be easily accessible.
7
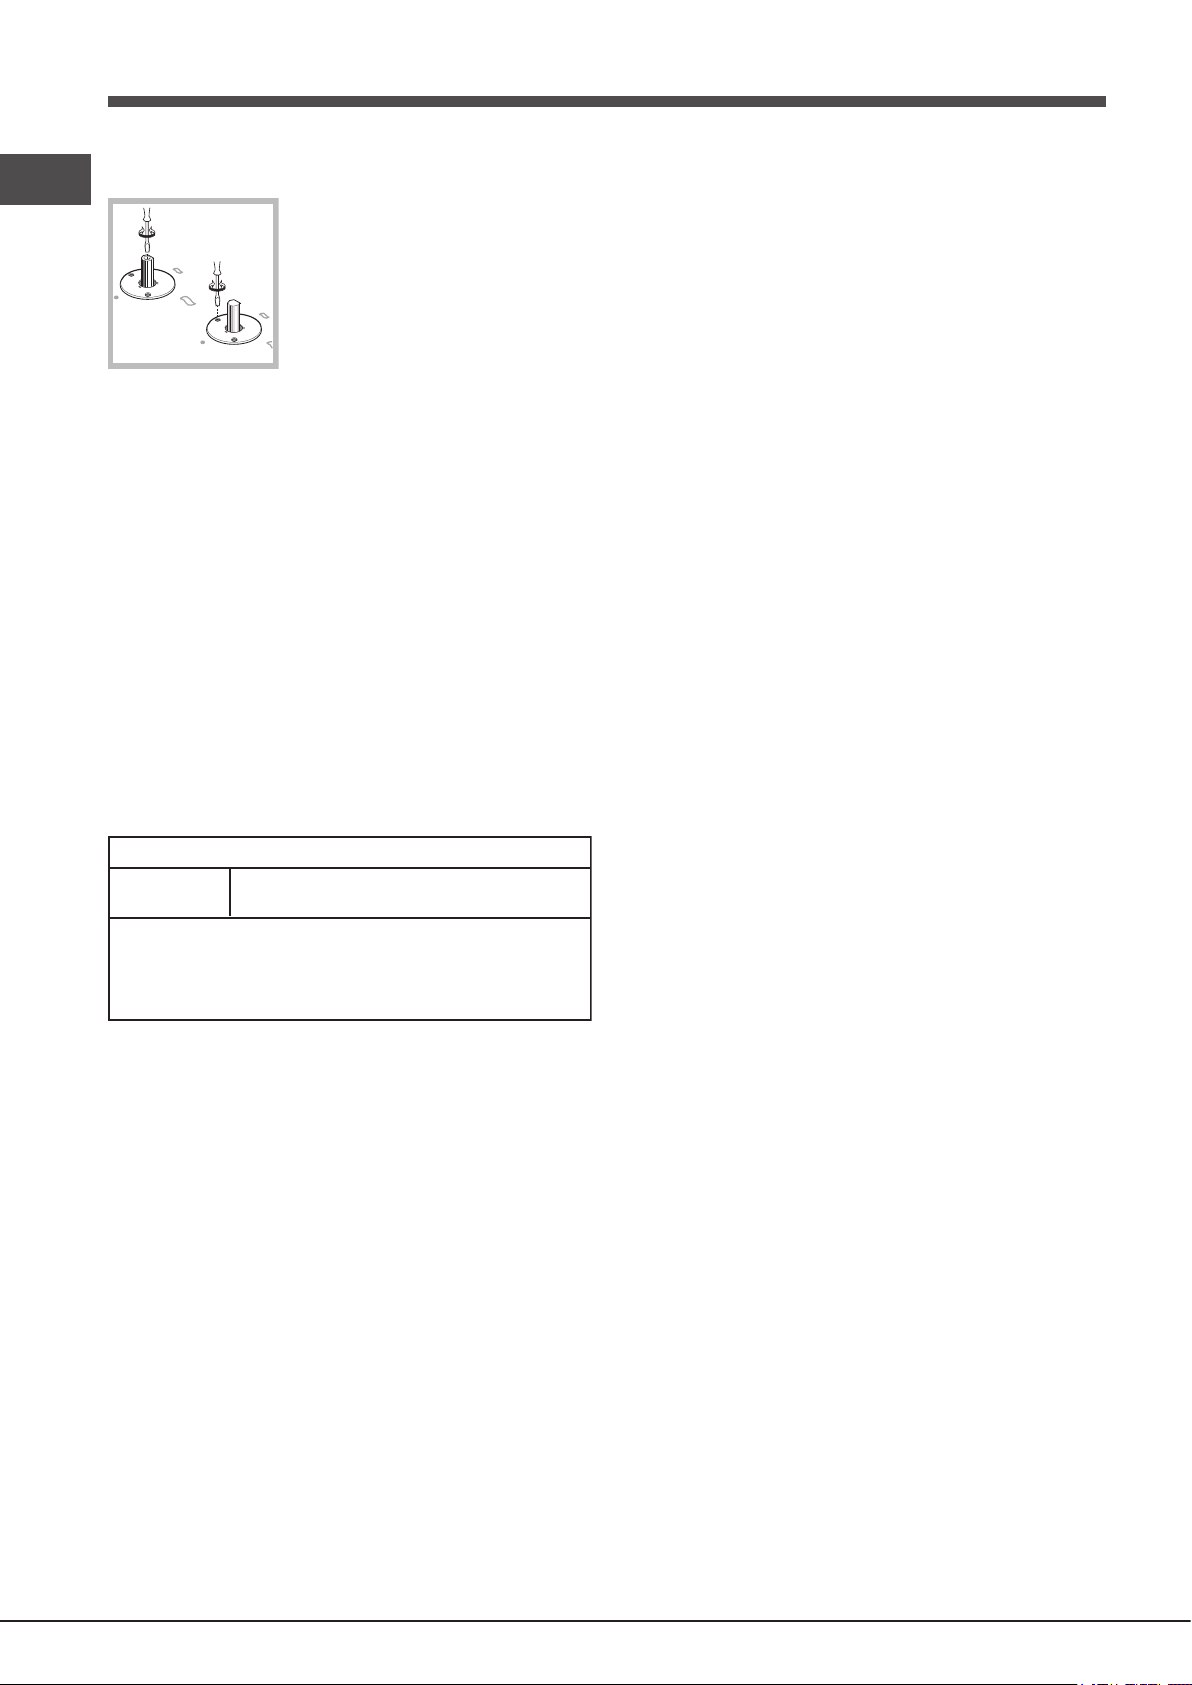
• Setting the burners to minimum
GB
1. Turn the tap to the low ame position;
2. Remove the knob and adjust the adjustment
screw, which is positioned in or next to the tap
pin, until the ame is small but steady.
3. Having adjusted the ame to the required low setting, while the burner is
alight, quickly change the position of the knob from minimum to maximum
and vice versa several times, checking that the ame does not go out.
4. Some appliances have a safety device (thermocouple) tted. If the device
fails to work when the burners are set to the low ame setting, increase
this low ame setting using the adjusting screw.
5. Once the adjustment has been made, replace the seals on the by-passes
using sealing wax or a similar substance.
! If the appliance is connected to liquid gas, the regulation screw must be
fastened as tightly as possible.
! Once this procedure is nished, replace the old rating sticker with one
indicating the new type of gas used. Stickers are available from any of our
Service Centres.
! Should the gas pressure used be different (or vary slightly) from the
recommended pressure, a suitable pressure regulator must be tted to the
inlet pipe (in order to comply with current national regulations).
DATA PLATE
Electrical
connections
see data plate
ECODESIGN
This appliance conforms to the EU Regulation no. 66/2014
implementing Directive 2009/125/EC.
standard EN 30-2-1
Burner and nozzle specications
Refer to the injector table of you Country
8
 Loading...