


Mode demploi
LAVE-LINGE
F
Français,1
English,13GBItaliano,25
CIS
Nederlands,37NLРусский,49
SIXL 126
Sommaire
F
Installation, 2-3
I
Déballage et mise à niveau
Raccordements eau et électricité
Caractéristiques techniques
Description de lappareil, 4-5
Tiroir à produits lessiviels autonettoyant
Bandeau de commandes
Système déquilibrage de la charge
Comment faire un cycle de lavage, 6
Programmes de lavage, 7
Produits lessiviels et linge, 8
Triage du linge
Conseils de lavage
Précautions et conseils, 9
Sécurité générale
Mise au rebut
Economies et respect de lenvironnement
Dispositif récolte-gouttes
Entretien et soin, 10
Coupure de larrivée deau et du courant
Nettoyage de lappareil
Nettoyage du tiroir à produits lessiviels.
Entretien du Hublot et du tambour
Nettoyage de la pompe
Contrôle du tuyau darrivée de leau
Anomalies et remèdes, 11
Assistance, 12
1
Installation
F
consulter à tout moment. En cas de vente, de
cession ou de déménagement, veiller à ce quil suive
toujours lappareil pour que son nouveau propriétaire
soit informé sur son mode de fonctionnement et
puisse profiter des conseils correspondants.
Conserver ce mode demploi pour pouvoir le
Une bonne mise à niveau garantit la stabilité de
lappareil et évite quil y ait des vibrations, du bruit et
des déplacements en cours de fonctionnement. Si
lappareil est posé sur de la moquette ou un tapis,
régler les petits pieds de manière à ce quil y ait
suffisamment despace pour assurer une bonne
ventilation.
Lire attentivement les instructions : elles fournissent
des conseils importants sur linstallation, lutilisation et
la sécurité de lappareil.
Raccordements eau et électricité
Raccordement du tuyau darrivée de leau
Déballage et mise à niveau
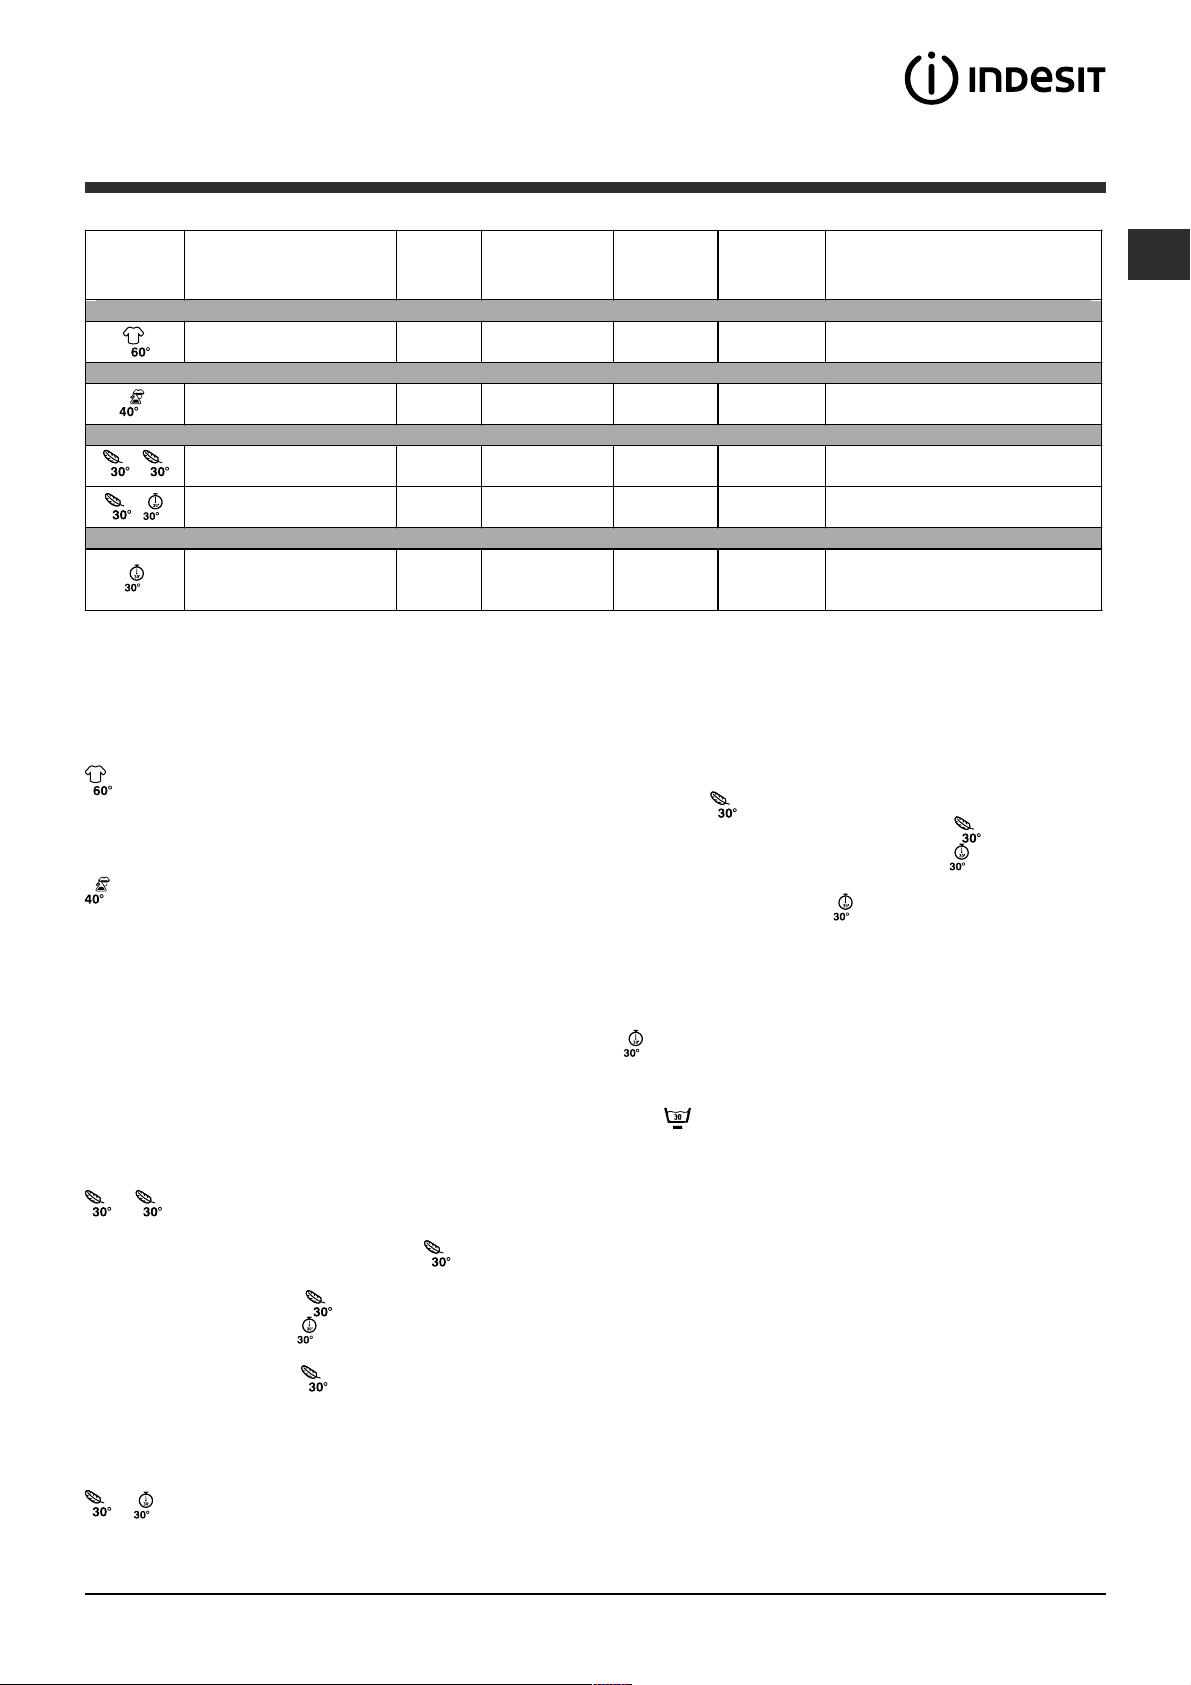
1. Monter le joint A sur
Déballage
1. Déballer lappareil.
2. Contrôler que lappareil na pas été endommagé
pendant le transport. Sil est abîmé, ne pas le
raccorder et contacter le vendeur.
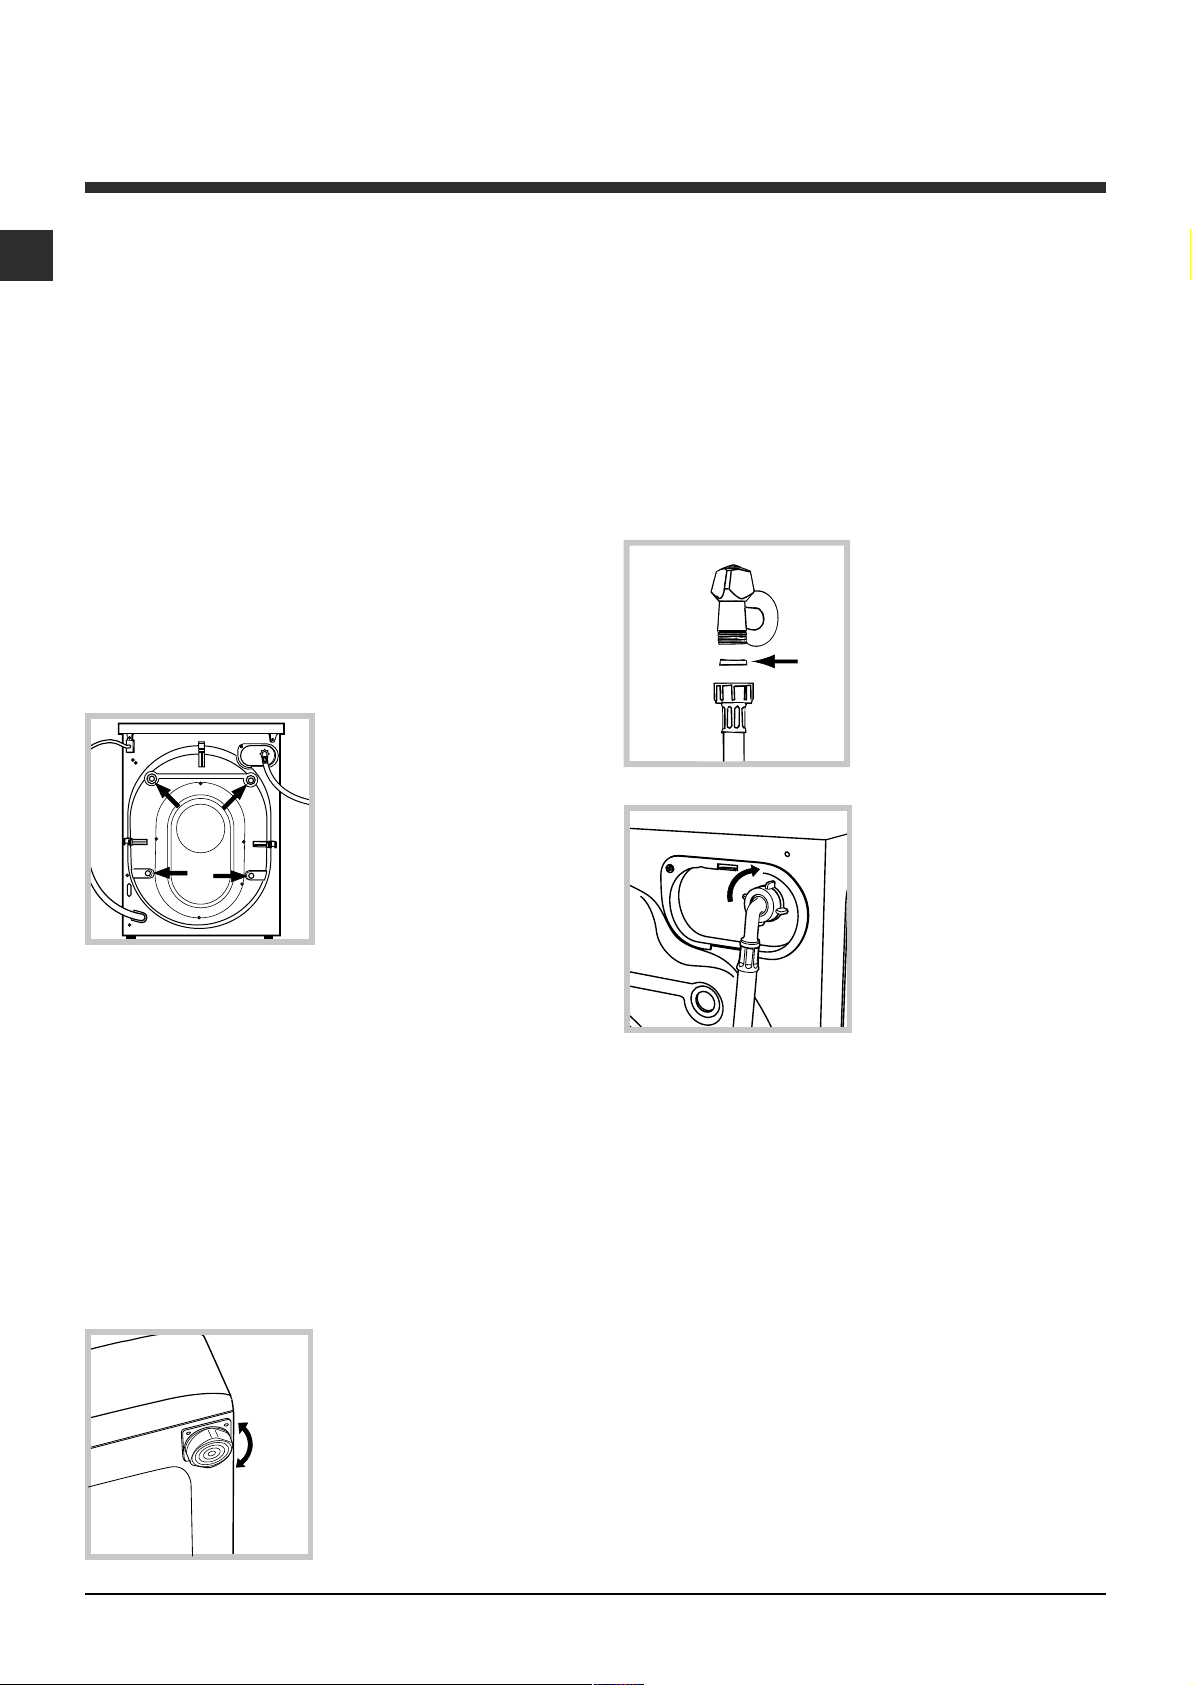
3. Enlever les 4 vis de
protection servant au
transport, le caoutchouc
et la cale, placés dans la
partie arrière (voir figure).
A
lextrémité du tuyau
dalimentation et le visser
à un robinet deau froide
à embout fileté 3/4 gaz
(voir figure).
Faire couler leau jusquà
ce quelle soit limpide et
sans impuretés avant de
raccorder.
2. Raccorder le tuyau
darrivée de leau à
lappareil en le vissant à
la prise deau prévue,
dans la partie arrière en
haut à droite (voir figure).
4. Boucher les trous à laide des bouchons plastique
fournis.
5. Conserver toutes ces pièces: il faudra les remonter
en cas de transport de lappareil.
Les pièces demballage ne sont pas des jouets pour
enfants.
Mise à niveau
Lappareil peut savérer bruyant si ses deux pieds
avant nont pas été réglés correctement.
1. Installer lappareil sur un sol plat et rigide, sans
lappuyer contre des murs, des meubles ou autre.
2. Si le sol nest pas
parfaitement horizontal,
visser ou dévisser les
petits pieds avant (voir
figure); pour niveler
lappareil; son angle
dinclinaison, mesuré sur
le plan de travail, ne doit
pas dépasser 2°.
3. Attention à ce que le tuyau ne soit pas plié ou
écrasé.
La pression de leau doit être comprise entre les
valeurs indiquées dans le tableau des Caractéristiques
techniques (voir page ci-contre).
Si la longueur du tuyau dalimentation ne suffit pas,
sadresser à un magasin spécialisé ou à un technicien
agréé.
2

Raccordement du tuyau de vidange
Raccorder le tuyau
dévacuation, sans le plier,
à un conduit dévacuation
ou à une évacuation
murale placés à une
65 - 100 cm
distance du sol comprise
entre 65 et 100 cm;
ou bien laccrocher à un
évier ou à une baignoire,
dans ce cas, fixer le
support en plastique
fourni avec lappareil au
robinet (voir figure).
Lextrémité libre du tuyau
dévacuation ne doit pas
être plongée dans leau.
Nutiliser ni rallonges ni prises multiples.
F
Le câble ne doit être ni plié ni trop écrasé.
Le câble dalimentation ne doit être remplacé que
par des techniciens agréés.
Attention! Nous déclinons toute responsabilité en cas
de non-respect des normes énumérées ci-dessus.
Lutilisation dun tuyau de rallonge est absolument
déconseillée mais si on ne peut faire autrement, il faut
absolument quil ait le même diamètre que le tuyau
original et sa longueur ne doit pas dépasser 150 cm.
Branchement électrique
Avant de brancher la fiche dans la prise de courant,
contrôler que:
la prise est bien reliée à la terre et est conforme
aux normes;
la prise est bien apte à supporter la puissance
maximale de lappareil indiquée dans le tableau des
Caractéristiques techniques (voir ci-contre);
la tension dalimentation est bien comprise entre
les valeurs figurant dans le tableau des
Caractéristiques techniques (voir ci-contre);
la prise est bien compatible avec la fiche de
lappareil. Autrement, remplacer la prise ou la fiche.
Cet appareil ne doit pas être installé à lextérieur,
même à labri, car il est très dangereux de le laisser
exposé à la pluie et aux orages.
Après installation de lappareil, la prise de courant
doit être facilement accessible.
Caractéristiques techniques
Modèle
Dimensions
Capacité
Raccordements
électriques
Raccordements
hydrauliques
Vitesse
d'essorage
Programmes de
contrôle selon la
norme EN 60456
SIXL 126
largeur 59,5 cm
hauteur 85 cm
profondeur 53,5 cm
de 1 à 6 kg
voir la plaque signalétique appliquée
sur la machine
pression maximale 1 MPa (10 bar)
pression minimale 0,05 MPa (0,5 bar)
capacité du tambour 52 litres
jusqu'à 1200 tours minute
programme ;
effectué avec une charge de 6 kg.
Cet appareil est conforme aux
Directives Communautaires suivantes:
- 73/23/CEE du 19/02/73 (Basse
Tension) et modifications suivantes
- 89/336/CEE du 03/05/89
(Compatibilité électromagnétique) et
modifications suivantes
- 2002/96/CE
3

Description de lappareil
F
TABLEAU DE
BORD
HUBLOT
PIEDS REGLABLES
Tiroir à produits lessiviels autonettoyant
Ce lave-linge est équipé dun tout nouveau tiroir à
produits lessiviels autonettoyant qui permet
daméliorer la qualité du lavage.
Le tiroir se trouve à lintérieur du hublot.
STOP
STOP
M
A
M
X
A
X
AB
1. Ouvrir le hublot pour accéder au tiroir à produits
lessiviels (voir figure A).
2. Introduire la lessive ou ladditif de lavage à
lintérieur des bacs, à travers les grilles de protection,
comme suit:
Bac
Bac
additifs en poudre.
Pour introduire les pastilles, soulever la grille de
protection du tiroir.
Bac
Lintroduction de produits lessiviels ou dadditifs
liquides dans le bac du milieu peut causer un
déversement non souhaité.
: lessive liquide et additifs liquides.
: lessive en poudre ou en pastilles et
: assouplissant.
POIGNEE
HUBLOT
PORTILLON
DACCES A
LA POMPE
DE VIDAGE
Possibilité de contrôle du niveau de lessive à travers
les fenêtres transparentes du tiroir.
Les bacs
et disposent en outre de flotteurs
indicateurs (voir figure B). Les flotteurs se soulèvent
jusquà effleurer les grilles de protection des bacs
quand la quantité maximum de lessive/assouplissant
pouvant être introduite est atteinte.
Nous recommandons de ne jamais dépasser les
niveaux maximums indiqués sur le tiroir à produits
lessiviels.
Nous recommandons de toujours se conformer
aux instructions de dosage fournies par le fabricant
de lessive. Nous conseillons dintroduire les
lessives particulièrement denses directement dans
le tambour sans utiliser le tiroir à produits
lessiviels.
Le dépassement des niveaux maximums indiqués sur
lappareil peut causer un débordement de lessive par
le bas du tiroir.
Un excès de lessive ne lave pas mieux mais pollue
davantage lenvironnement.
Leau utilisée pendant le cycle de lavage procède à
lélimination de tout excédent de lessive dans le tiroir.
Il est toutefois possible de sortir le tiroir (voir
Entretien et soin).
Pour bien doser les produits lessiviels, nous conseillons
dutiliser le doseur fourni avec le lave-linge.
La capacité maximum du tiroir est de:
- lessives liquides: 1 dose 1/2
- lessives en poudre: 2 doses
- assouplissant: 1 dose
4

Bandeau de commandes
Voyants
INDICATION
DU TEMPS
DE LAVAGE
Touche
DEMARRAGE
PROGRAMME
EXPRESS
Touche
MARCHE/
ARRET
Voyant rouge
HUBLOT
VERROUILLE
Touche
DEMARRAGE
PROGRAMME
COTON BLANC
F
Touche
DEMARRAGE
PROGRAMME
DÉLICAT
Touche MARCHE/ARRET:
appuyer pour allumer ou éteindre lappareil.
Quand lappareil est allumé, les icônes des touches
de démarrage du programme commencent à
clignoter tandis que les voyants dindication du temps
de lavage sallument au fixe.
Pour annuler le cycle, appuyer 2 secondes de suite
sur la touche marche/arrêt pendant le cycle de
lavage.
Le voyant
se met à clignoter pendant quelques
secondes tandis que lappareil procède au vidage
automatique de leau de la cuve.
Voyant rouge HUBLOT VERROUILLE:
allumé, il indique que le hublot est verrouillé pour
empêcher toute ouverture accidentelle. Pour éviter
dabîmer lappareil, attendre que le voyant séteigne,
à la fin du cycle de lavage ou pendant une pause
du cycle, avant douvrir le hublot. Lattente à la fin
du programme de lavage est de deux minutes
environ.
Un clignotement très rapide du voyant HUBLOT
VERROUILLE signale une anomalie (voir Anomalies
et remèdes).
Touche
DEMARRAGE
PROGRAMME MIX
COULEUR
REPASSAGE FACILE
Voyants INDICATION DU TEMPS DE LAVAGE:
ils sallument les uns après les autres pour indiquer le
déroulement du programme de lavage. A la fin du
programme tous les voyants se mettent à
clignoter.
Pour davantage de détails, consulter Comment faire
un cycle de lavage.
Système déquilibrage de la charge
Avant tout essorage, pour éviter des vibrations
excessives et répartir le linge de façon uniforme,
lappareil fait tourner le tambour à une vitesse
légèrement supérieure à la vitesse de lavage.
Si au bout de plusieurs tentatives, la charge nest
toujours pas correctement équilibrée, lappareil
procède à un essorage à une vitesse inférieure à la
vitesse normalement prévue.
En cas de déséquilibre excessif, lappareil procède à
la répartition du linge plutôt quà son essorage.
Les tentatives déquilibrage peuvent prolonger la
durée totale du cycle de 10 minutes maximum.
Touches DEMARRAGE PROGRAMME:
appuyer pour lancer le programme de lavage
sélectionné.
- touche allumée en fixe: programme en cours.
- touches clignotantes: en attente de sélection.
5

Comment faire un cycle
de lavage
F
lappareil, effectuer un cycle de lavage avec un
produit lessiviel mais sans linge et sélectionner le
programme
1. ALLUMER LAPPAREIL à laide de la touche MAR-
CHE/ARRET
DEMARRAGE PROGRAMME se mettent à
clignoter et les voyants dINDICATION DU TEMPS
DE LAVAGE sallument au fixe, pour indiquer que le
lave-linge est prêt à recevoir les instructions
voulues.
2. CHARGER LE LINGE. Ouvrir le hublot à laide de la
poignée prévue. Charger le linge en faisant
attention à ne pas dépasser la quantité indiquée
dans le tableau des programmes de la page
suivante.
3. DOSER LA LESSIVE ET LES ADDITIFS
Distribuer les produits lessiviels dans le tiroir situé à
lintérieur du hublot en veillant à ne pas dépasser
les niveaux maximums indiqués à la surface du tiroir
et sur les flotteurs indicateurs. Pour de plus amples
détails, consulter Description de lappareil.
4. FERMER LE HUBLOT.
dindication du temps de lavage séteignent. Le
voyant HUBLOT VERROUILLE sallume au fixe
pour indiquer que le verrouillage de sécurité du
hublot est activé.
Pour la description des programmes de lavage
disponibles, consulter Programmes de lavage.
La procédure de démarrage du programme
DELICATS
30° page suivante.
Au cours du programme, les voyants dINDICATION
DU TEMPS DE LAVAGE sallument progressivement
pour indiquer où en est le déroulement du
programme.
.
. Les icônes des touches de
5. LANCER LE
PROGRAMME DE
LAVAGE en appuyant
sur la TOUCHE DE
DEMARRAGE DU
PROGRAMME. Licône
correspondant au
programme sélectionné
sallume au fixe tandis
que tous les voyants
diffère, voir paragraphe Délicats
6. Pour INTERROMPRE LE PROGRAMME DE
LAVAGE appuyer sur la touche de démarrage du
programme éclairée qui se met aussitôt à clignoter.
Au bout de deux minutes environ, le voyant
HUBLOT VERROUILLE séteint pour indiquer que
le hublot peut être ouvert.
En cas de rajout de lessive, sassurer que le
flotteur indicateur MAX nest pas en position
soulevée.
Pour redémarrer le programme de lavage, refermer
le hublot et appuyer à nouveau sur la touche de
démarrage correspondante.
Pour assurer une sécurité optimale, le hublot reste
verrouillé (le voyant HUBLOT VERROUILLE
demeure allumé même au bout des deux minutes
prévues) tant que le tambour contient une quantité
deau qui pourrait déborder à louverture. Dans ce
cas, appuyer 2 secondes de suite sur la touche
MARCHE/ARRET
attendre le vidage automatique de leau.
7. FIN DU PROGRAMME
A la fin du programme de lavage, licône
correspondant au programme sélectionné reste
éclairée au fixe tandis que tous les voyants
dindication du temps de lavage commencent à
clignoter.
Pour démarrer un nouveau cycle de lavage, il faut
éteindre lappareil puis le rallumer en appuyant
DEUX FOIS sur la touche MARCHE/ARRET
Remarque: Avant la première utilisation de
Le dessin ci-contre
montre un cas où environ
50% du cycle a été
effectué.
A la fin du cycle, tous les
voyants dINDICATION
DU TEMPS DE LAVAGE
sont allumés et
clignotent.
pour éteindre lappareil et
.
6
Programmes de lavage
Charge
Touche Textiles
COTON BLANC
MIX COULEUR 40° / REPASSAGE FACILE
DÉLICAT
+
+
EXPRESS / RINÇAGE À FROID
Coton et synthétiques 3
Les durées des programmes indiquées dans le tableau sont purement indicatives, elles sont calculées pour une charge moyenne.
Coton blanc résistant 6 60°C 1200 145
Coton et synthétiques
couleurs
Laine (essorage final
délicat)
Soie et rideaux (sans
essorage final)
maxi
(Kg)
4,5 40°C 1000 105
1,5 30°C 600 50
1,5 30°C non* 50 Lavage, rinçages, vidange
Température
30°/eau
froide**
Essorage
(tours
minute)
800 30
Durée du
cycle
(minutes)
Description du cycle de
lavage
Lavage, rinçages, essorages
intermédiaires et essorage final
Lavage, rinçages et essorage
délicat
Lavage, rinçages et essorage
délicat
Lavage (uniquement si le
programme "Rapide" est activé),
rinçages, essorage délicat
*Remarque: pour savoir comment exclure lessorage du programme délicats, consulter le paragraphe Délicat
30° plus bas dans la page.
**Remarque: pour savoir comment effectuer un rinçage à leau froide de linge lavé à la main, consulter le
paragraphe Express / Rinçage à froid plus bas dans la page.
COTON BLANC 60°
Dédié au lavage de tout le linge blanc en coton plus
résistant. La température de lavage plus élevée permet
dobtenir dexcellents résultats de lavage en classe A.
MIX COULEUR 40°/ REPASSAGE FACILE
Ce programme permet de laver tous les articles de
couleur, quils soient synthétiques ou coton. Lessorage
est minutieusement contrôlé pendant tout le cycle de
lavage pour froisser le moins possible les tissus et
simplifier ainsi leur repassage.
Possibilité de laver simultanément coton et synthétiques.
DÉLICAT 30°
Cycle réservé au lavage des articles en laine, en soie et
de tous les articles plus délicats. Compte tenu des
différentes caractéristiques de ces articles, ce
programme doit être activé de façon différente:
+ CYCLE DELICATS AVEC ESSORAGE FINAL
(pour articles en laine): appuyer sur la touche
DEMARRAGE PROGRAMME DELICATS
. Au bout de
3 secondes environ, les touches DEMARRAGE
PROGRAMME DELICATS et DEMARRAGE
PROGRAMME EXPRESS
se mettent à clignoter.
Appuyer à nouveau sur la touche DEMARRAGE
PROGRAMME DELICATS
pour effectuer le lavage qui
se termine par une phase dessorage délicat. Ce
programme prévoit des mouvements du tambour dûment
étudiés pour éliminer leau en excès imprégnant les tissus,
réduire le frottement et protéger ainsi les articles en laine.
+ CYCLE DELICATS AVEC SUPPRESSION
DESSORAGE (spécial articles en soie, viscose et rideaux, à
ne pas utiliser pour le lavage de la laine):
appuyer sur la touche DEMARRAGE PROGRAMME
DELICATS
DEMARRAGE PROGRAMME DELICATS
DEMARRAGE PROGRAMME EXPRESS
. Au bout de 3 secondes environ, les touches
et
se mettent à
clignoter. Appuyer sur la touche DEMARRAGE
PROGRAMME EXPRESS
pour effectuer un lavage sans
essorage final. En fin de cycle, lappareil vidange
automatiquement leau contenue dans le tambour. Nous
conseillons de sortir aussitôt le linge de lappareil pour éviter
quil se froisse excessivement.
EXPRESS / RINÇAGE À FROID
Ce programme permet de laver en 30 minutes à peine coton
et synthétiques peu sales ou qui portent létiquette lavage à
30°
. Il permet aussi de rincer coton et synthétiques
précédemment lavés à la main (sauf laine et soie).
Grâce à des capteurs spéciaux, le lave-linge est en
mesure de détecter la présence de produit lessiviel
sur le linge introduit dans le tambour:
- si aucun produit lessiviel nest détecté sur le linge, il
effectuera le cycle de lavage EXPRESS;
- sil détecte la présence de produit lessiviel (articles
lavés à la main) il effectuera automatiquement le cycle
RINÇAGE À FROID.
GESTION AUTOMATIQUE DES RINCAGES
La fonction de rinçage est contrôlée, pour chaque programme,
par des capteurs spéciaux. En cas darticles excessivement
imprégnés de lessive en fin de lavage, la phase de rinçage
sera automatiquement prolongée jusquà lélimination
totale du produit lessiviel. Dans ce cas, la durée du
programme de lavage peut se prolonger légèrement par
rapport à la durée indiquée dans le tableau des programmes.
F
7

Produits lessiviels et linge
F
Triez correctement votre linge daprès:
- le type de textile / le symbole sur létiquette.
- les couleurs: séparer le linge coloré du blanc.
Vider les poches et contrôler les boutons.
Ne pas dépasser les quantités de charge
maximales indiquées par les Programmes de
lavage.
Combien pèse le linge ?
1 drap 400-500 g
1 taie doreiller 150-200 g
1 nappe 400-500 g
1 peignoir 900-1.200 g
1 serviette éponge 150-250 g
1 jean 400-500 g
1chemise 150-200 g
Conseils de lavage
Triage du linge
Linge de lit et de toilette (draps, serviettes,
peignoirs etc): utiliser le programme COTON
BLANC 60°
performances de lavage en classe A. Lessorage
intensif permet déliminer efficacement leau en
excès.
Articles en coton blanc (chemises, tee-shirts,
nappes etc.): utiliser le programme COTON
BLANC 60°. Traiter les taches tenaces au savon
solide avant de procéder au lavage.
Articles en coton couleurs (chemises, tee-shirts
etc.): utiliser le programme MIX COULEUR 40°
qui permet doptimiser les performances de lavage
sans abîmer les couleurs. La fonction de
REPASSAGE FACILE, incorporée dans la phase
dessorage, réduit la formation de faux plis et
simplifie lopération de repassage. Nous
recommandons dutiliser de la lessive liquide.
Articles en textiles synthétiques, blanc ou
couleurs (chemises, tee-shirts etc.): utiliser le
programme MIX COULEUR 40°
recommandons de ne pas laver simultanément
blanc et couleurs au cours dun même cycle de
lavage car les couleurs risquent de déteindre sur
le blanc. Nous recommandons dutiliser de la
lessive liquide.
qui garantit les meilleures
. Nous
,
Articles coton ou textiles synthétiques couleurs
portant létiquette lavage à 30°
programme EXPRESS
est assuré par la basse température de lavage.
Nous recommandons dutiliser de la lessive liquide.
Articles en laine (pulls, écharpes etc.): utiliser le
programme DÉLICAT 30° avec essorage final
+ . Les mouvements imprimés au tambour
pendant le lavage et la phase dessorage délicat
réduisent les risques de feutrage des tissus. Nous
conseillons dutiliser des lessives spéciales laine.
Nous recommandons de ne pas dépasser la
charge maximale autorisée.
Articles en soie (chemises etc.): utiliser le
programme DÉLICAT 30° avec suppression
dessorage
séjourner trop longtemps dans le tambour en fin
de lavage pour éviter une formation excessive de
faux plis.
Rideaux: utiliser le programme DÉLICAT 30° avec
suppression dessorage
recommandons de bien les plier et de les glisser
dans une taie doreiller ou dans un sac genre filet.
Les laver à part en veillant à ne pas dépasser la
charge maximale autorisée.
+ . Veiller à ne pas laisser le linge
. Le respect des couleurs
+ . Nous
: utiliser le
8

Précautions et conseils
Cet appareil a été conçu et fabriqué conformément
aux normes internationales de sécurité. Ces
consignes sont fournies pour des raisons de sécurité,
il faut les lire attentivement.
Sécurité générale
Cet appareil est conçu pour un usage domestique.
Cet appareil ne doit être utilisé que par des adultes
qui devront se conformer aux instructions du mode
demploi.
Ne jamais toucher lappareil si lon est pieds nus et
si les mains sont mouillées ou humides.
Ne jamais tirer sur le câble pour débrancher la fiche
de la prise de courant.
Ne pas toucher à leau de vidange, elle peut
atteindre des températures très élevées.
Ne pas forcer pour ouvrir le hublot: le verrouillage
de sécurité qui protège contre les ouvertures
accidentelles pourrait sendommager.
En cas de panne, éviter à tout prix daccéder aux
mécanismes internes pour tenter une réparation.
électroménagers usés, prière de sadresser au
service public préposé ou au vendeur.
Economies et respect de lenvironnement
Économie de produit lessiviel, deau, dénergie
et de temps
Pour ne pas gaspiller de ressources, utiliser
lappareil à sa charge maximale. Mieux vaut une
pleine charge que deux demies pour faire jusquà
50% déconomie délectricité.
Pour éviter de laver à de hautes températures,
traiter les taches avec un produit détachant ou les
mettre tremper avant de les laver.
Bien doser la quantité de produit lessiviel en
fonction de la dureté de leau, du degré de
salissure et de la quantité de linge à laver évite les
gaspillages et protège lenvironnement: bien que
biodégradables, les produits lessiviels contiennent
des éléments qui altèrent léquilibre de la nature.
Eviter le plus possible lutilisation dassouplissant.
Effectuer les lavages tard dans laprès-midi et
jusquaux premières heures du matin permet de
réduire la charge dabsorption des opérateurs
énergétiques.
F
Veiller à ce que les enfants ne sapprochent pas de
lappareil pendant son fonctionnement.
Pendant le lavage, le hublot a tendance à se
réchauffer.
Deux ou trois personnes sont nécessaires pour la
déplacer en faisant très attention. Ne jamais
déplacer lappareil tout seul car il est très lourd.
Avant dintroduire le linge, sassurer que le tambour
est bien vide.
Mise au rebut
Mise au rebut du matériel demballage:
se conformer aux réglementations locales de
manière à ce que les emballages puissent être
recyclés.
La directive européenne 2002/96/CE sur les
déchets déquipements électriques et électroniques
prévoit que les électroménagers ne peuvent pas
être traités comme des déchets solides urbains
ordinaires. Les appareils usagés doivent faire lobjet
dune collecte séparée pour optimiser le taux de
récupération et de recyclage des matériaux qui les
composent et empêcher tout danger pour la santé
et pour lenvironnement. Le symbole de la poubelle
barrée est appliqué sur tous les produits pour
rappeler quils font lobjet dune collecte sélective.
Pour tout autre renseignement sur la collecte des
Dispositif récolte-gouttes
Lappareil est équipé dun dispositif récolte gouttes
situé à lintérieur de la porte pour capturer toute
goutte deau résiduelle en fin de lavage.
Nous conseillons de contrôler périodiquement le
niveau dhumidité de léponge placée dans le tiroir
récolte gouttes. En cas de besoin, elle peut être lavée
ou remplacée comme suit:
1. appuyer légèrement
dans le bas du tiroir pour
le faire sortir.
2. enlever léponge qui se
trouve à lintérieur, la
rincer et la tordre
soigneusement. Elle peut
être remplacée par une
des éponges de rechange
fournies avec lappareil.
3. remettre léponge à lintérieur du tiroir.
4. remettre le tiroir à sa place et sassurer que les
ressorts présents sur la porte aillent bien se loger
dans les emplacements prévus sur le tiroir.
5. attention à ce que le tiroir rentre bien dans son
logement.
9

Entretien et soin
F
courant
Fermer le robinet de leau après chaque lavage.
Cela réduit lusure de linstallation hydraulique de
lappareil et évite tout danger de fuites.
Débrancher la fiche de la prise de courant lors de
toute opération de nettoyage et de travaux
dentretien.
Nettoyage de lappareil
Coupure de larrivée deau et du
Pour nettoyer lextérieur et les parties en
caoutchouc, utiliser un chiffon imbibé deau tiède et
de savon. Nutiliser ni solvants ni abrasifs.
Nettoyage du tiroir à produits
lessiviels
Nous recommandons de bien sassurer que le
tiroir à produits lessiviels ne contient ni lessive ni eau
avant de le sortir de son logement. Sil y en
contient, faire bien attention car ils pourraient
déborder du tiroir pendant lopération.
Entretien du Hublot et du tambour
Toujours laisser le hublot entrouvert pour éviter la
formation de mauvaise odeurs.
Nettoyage de la pompe
Lappareil est équipé dune pompe autonettoyante qui
nexige aucune opération dentretien. Il peut toutefois
arriver que de menus objets (pièces de monnaie,
boutons) tombent dans la préchambre qui protège la
pompe, placée en bas de cette dernière.
Sassurer que le cycle de lavage est bien terminé et
débrancher la fiche.
Pour accéder à cette préchambre:
1. retirer la protection
située dans le bas du
lave-linge en la tournant
dans le sens inverse
des aiguilles dune
montre (voir figue);
Le lavage du tiroir à produits lessiviels de ce lavelinge a lieu automatiquement pendant les cycles de
lavage. Il peut toutefois arriver, bien que rarement,
que des résidus se déposent lors de lutilisation de
certains produits lessiviels. Pour nettoyer le tiroir,
procéder comme suit:
1. Ouvrir le hublot pour
avoir accès au tiroir.
2. Saisir le tiroir par le
bac central et tirer vers
le haut pour le sortir de
son logement comme
illustré par la figure. Ne
pas saisir le tiroir par la
grille, elle risquerait de
sabîmer.
3. Décrocher la partie
supérieure du tiroir pour
accéder aux bacs
comme illustré par la
figure.
4. Laver le tiroir à leau
courante.
5. Remettre la partie
supérieure du tiroir à sa
place et introduire le
tiroir dans son logement jusquau déclic.
2. dévisser le couvercle
en le tournant dans le
sens inverse des aiguilles
dune montre (voir figure):
il est normal quun peu
deau sécoule;
3. nettoyer soigneusement lintérieur;
4. revisser le couvercle;
5. pour revisser le bouchon de protection, tourner
dans le sens des aiguilles dune montre, la flèche à
lintérieur du bouchon doit être tournée vers le haut.
Contrôle du tuyau darrivée de leau
Contrôler le tuyau dalimentation au moins une fois
par an. Procéder à son remplacement en cas de
craquèlements et de fissures: car les fortes pressions
subies pendant le lavage pourraient provoquer des
cassures.
Nutiliser que des tuyaux neufs.
10

Anomalies et remèdes
Il peut arriver que lappareil ne fonctionne pas bien. Avant dappeler le Service de dépannage (voir Assistance),
contrôler sil ne sagit pas par hasard dun problème facile à résoudre à laide de la liste suivante.
Anomalies:
Lappareil ne sallume pas.
Le cycle de lavage ne démarre
pas.
Il ny a pas darrivée deau
(le voyant HUBLOT VERROUILLE
clignote rapidement).
Lappareil prend leau et vidange
continuellement.
Causes / Solutions possibles:
La fiche nest pas branchée dans la prise de courant ou mal branchée.
Il y a une panne de courant.
Le hublot nest pas bien fermé.
La touche MARCHE/ARRET na pas été enfoncée.
Les touches DEMARRAGE PROGRAMME nont pas été enfoncées
(elles continuent à clignoter).
Le robinet de leau nest pas ouvert.
Le tuyau darrivée de leau nest pas raccordé au robinet.
Le tuyau est plié.
Le robinet de leau nest pas ouvert.
Il y a une coupure deau.
La pression nest pas suffisante.
Les touches DEMARRAGE PROGRAMME nont pas été enfoncées
(elles continuent à clignoter).
Le tuyau de vidange nest pas installé à une distance du sol comprise
entre 65 et 100 cm (voir Installation).
Lextrémité du tuyau de vidange est plongée dans leau (voir Installation).
Lévacuation murale na pas dévent.
F
Lappareil ne vidange pas ou
nessore pas.
Lappareil vibre beaucoup
pendant lessorage.
Lappareil fuit.
Le voyant HUBLOT VERROUILLE
clignote très rapidement.
Si après ces vérifications, le problème persiste, fermer le robinet de leau,
éteindre lappareil et appeler le service Assistance. Si lappartement est situé en
étage dans un immeuble, il peut y avoir des phénomènes de siphonnement qui
font que le lave-linge prend et évacue leau continuellement. Pour supprimer cet
inconvénient, on trouve dans le commerce des valves spéciales antisiphonnement.
Le tuyau dévacuation est plié (voir Installation).
La conduite dévacuation est bouchée.
Les vis de protection servant au transport nont pas été enlevées lors
de linstallation de lappareil. Enlever les vis (voir Installation).
Lappareil nest pas posé à plat (voir Installation).
Lappareil est coincé entre des meubles et le mur (voir Installation).
Le tuyau darrivée de leau nest pas bien vissé (voir Installation).
Le tiroir à produits lessiviels est bouché (pour le nettoyer voir Entretien et soin).
Le tuyau de vidange nest pas bien fixé (voir Installation).
Le dispositif récolte gouttes est plein. Laver léponge ou la remplacer
(voir Précautions et Conseils).
Eteindre lappareil et débrancher la fiche de la prise de courant, attendre 1
minute environ avant de rallumer. Il va falloir reprendre le cycle du début.
Si lanomalie persiste, appeler le service dassistance.
Il y a un excès de mousse.
Le produit de lavage utilisé nest pas une lessive spéciale machine (il
faut quil y ait linscription pour lave-linge, main et machine, ou
autre semblable).
La quantité utilisée est excessive.
11

Assistance
F
Avant dappeler le service après-vente:
Vérifier si on ne peut pas résoudre lanomalie par ses propres moyens (voir Anomalies et Remèdes);
Remettre le programme en marche pour contrôler si linconvénient a disparu;
Si ce nest pas le cas, contacter un Service dassistance technique agréé.
En cas dinstallation erronée ou dutilisation incorrecte, lintervention est à la charge de lutilisateur.
Ne jamais sadresser à des techniciens non agréés.
Communiquer:
le type de panne;
le modèle de lappareil (Mod.);
son numéro de série (S/N);
Ces renseignements se trouvent sur la plaque signalétique de lappareil.
12

Instructions for use
Contents
Installation, 14-15
GB
English
Unpacking and levelling
Connecting the electricity and water supplies
Technical details
Description of the machine, 16-17
Self-cleaning detergent dispenser drawer
Control panel
Load balancing system
Running a wash cycle, 18
Wash programmes, 19
Detergents and laundry, 20
Preparing the laundry
Washing recommendations
WASHING MACHINE
GB
GB
SIXL 126
Precautions and advice, 21
General safety
Disposal
Saving energy and respecting the environment
Drip-tray system
Care and maintenance, 22
Cutting off the water or electricity supply
Cleaning the machine
Cleaning the detergent dispenser drawer
Caring for the door and drum of your appliance
Cleaning the pump
Checking the water inlet hose
Troubleshooting, 23
Service, 24
13

Installation
GB
This instruction manual should be kept in a safe
place for future reference. If the appliance is sold,
transferred or moved, make sure that the instruction
manual remains with the machine so that the new
owner is able to familiarise himself/herself with its
operation and features.
Read these instructions carefully: they contain vital
information relating to the safe installation and
operation of the appliance.
Unpacking and levelling
Unpacking
1. Unpack the washing machine.
2. Make sure that the machine has not been
damaged during the transportation process. If it has
been damaged, contact the retailer and do not
proceed any further with the installation process.
3. Remove the 4
protective screws (used
during transportation)
and the rubber washer
with the corresponding
spacer, located on the
rear part of the appliance
(see figure).
4. Close off the holes using the plastic plugs
provided.
5. Keep all the parts in a safe place: they will be
needed again if the washing machine is moved to
another location.
Levelling the machine correctly will provide it with
stability, help to avoid vibrations and excessive noise
and prevent it from shifting while it is operating. If it is
placed on carpet or a rug, adjust the feet in such a
way as to allow a sufficient ventilation space
underneath the machine.
Connecting the electricity and water
supplies
Connecting the water inlet hose
1. Insert seal A into the
end of the inlet hose and
screw the latter onto a
cold water tap with a 3/4
A
gas threaded opening
(see figure).
Before performing the
connection, allow the
water to run freely until it
is perfectly clear.
2. Connect the inlet hose
to the machine by
screwing it onto the cold
water inlet of the
appliance, which is
situated on the top righthand side of the rear part
of the appliance(see
figure).
Packaging materials should not be used as toys for
children.
Levelling
Your machine may make a considerable amount of
noise if the two front feet have not been adjusted
correctly.
1. Install the washing machine on a flat and sturdy
floor, without placing it against walls, cabinets or
other furniture.
2. If the floor is not
perfectly level, compensate for any unevenness
by tightening or loosening
the adjustable front feet
(see figure); the angle of
inclination, measured in
relation to the worktop,
must not exceed 2°.
14
3. Make sure that the hose is not folded over or bent.
The water pressure at the tap must fall within the
values indicated in the Technical details table (see
next page).
If the inlet hose is not long enough, contact a
specialised shop or an authorised technician.

Connecting the drain hose
65 - 100 cm
Connect the drain hose,
without bending it, to a
draining duct or a wall
drain situated between
65 and 100 cm from the
floor;
alternatively, place it
over the edge of a
basin, sink or tub,
fastening the duct
supplied to the tap (see
figure). The free end of
the hose should not be
underwater.
Do not use extension cords or multiple sockets.
GB
The cable should not be bent or compressed.
GB
The power supply cable must only be replaced by
authorised technicians.
Warning! The company shall not be held responsible
in the event that these regulations are not respected.
We advise against the use of hose extensions; if it
is absolutely necessary, the extension must have the
same diameter as the original hose and must not
exceed 150 cm in length.
Electrical connections
Before plugging the appliance into the electricity
socket, make sure that:
the socket is earthed and complies with all
applicable laws;
the socket is able to withstand the maximum
power load of the appliance as indicated in the
Technical data table (see opposite);
the power supply voltage falls within the values
indicated in the Technical data table(see opposite);
the socket is compatible with the plug of the
appliance. If this is not the case, replace the
socket or the plug.
The machine must not be installed outdoors, even
in covered areas. It is extremely dangerous to leave
the appliance exposed to rain, storms and other
weather conditions.
The mains socket must remain within easy reach
after the washing machine has been installed.
Technical details
Model
Dimensions
Capacity
Electric
connections
Wat er
connections
Spin speed
Control
programmes
according to EN
60456 directive
SIXL 126
59.5 cm wide
85 cm high
53.5 cm deep
from 1 to 6 kg
please refer to the technical data plate
fixed to the machine
maximum pressure 1 MPa (10 bar)
mini mum pressure 0.05 MPa (0.5 bar)
drum capacity 52 litres
up to 1200 rpm
programme ;
run with a load of 6 kg.
This appliance is compliant with the
following European Community
Directives:
- 73/23/CEE of 19/02/73 (Low
Voltage) and subsequent amen dments
- 89/336/CEE of 03/05/89
(Electromagnetic Compatibility) and
subsequent amendments
- 2002/96/CE
15

Description of the machine
GB
PORTHOLE
DOOR
ADJUSTABLE FEET
Self-cleaning detergent dispenser
drawer
This washing machine is fitted with an innovative selfcleaning detergent drawer which enhances the
quality of each wash.
The drawer is located inside the porthole door.
CONTROL
PANEL
PORTHOLE
DOOR
HANDLE
ACCESS
PANEL FOR
THE DRAIN
PUMP
The detergent level can be seen through the corresponding
transparent windows provided on the compartment.
Inside compartments and , there are also
floating indicators (see figure B) . When the
maximum quantity of detergent/fabric softener has
been measured out, the indicators rise until they
touch the grilles protecting the compartments.
STOP
STOP
M
A
M
X
A
X
AB
1. Open the porthole door to access the detergent
dispenser drawer (see figure A).
2. Pour the detergent or the additive into the
compartments, over the protective grilles, as follows:
Compartment
: detergent and additives in
liquid form.
Compartment
: detergent in powder or tablet
form and powder addititves.
To place the tablets inside, lift up the grille
protecting the drawer.
Compartment
: fabric softener.
Pouring liquid detergent or additives into the central
compartment may cause leakages to occur.
We recommend that the maximum levels
indicated on the detergent dispenser drawer are
not exceeded.
We recommend that the dosage instructions on
the detergent packaging are followed carefully. If
using certain particularly thick types of detergent,
we suggest that these are placed directly inside the
drum and not in the detergent dispenser drawer.
Exceeding the maximum levels indicated on the
machine may cause the detergent to leak out of the
bottom part of the drawer.
Exceeding the stated amount of detergent does not
result in a more effective was; it simply pollutes the
environment more.
The water used during the wash cycle will remove
any excess detergent from the drawer. It is, however,
possible to remove the drawer manually (see Care
and Maintenance).
To facilitate the process of measuring out the
detergents, we recommend that the dosing device
supplied with the washing machine is used.
The maximum capacity of the drawer is as follows:
- liquid detergents: 1 1/2 measures
- powder detergents: 2 measures
- fabric softener: 1 measure
16

Control panel
WASHING TIME
INDICATOR
lights
START DAILY
WASH 30
PROGRAMME
button
ON/OFF button
DOOR
LOCKED red
indicator
light
START WHITE
COTTON
PROGRAMME
button
GB
GB
START DELICATES
PROGRAMME
button
ON/OFF button: press this to switch the machine on or off.
When the machine is switched on, the buttons
used to start various programmes begin to flash,
while the washing time indicator lights illuminate in
a fixed manner.
To cancel the cycle, press and hold the on/off button
for approximately 2 seconds while the wash cycle is
in progress.
indicator light will flash for a few seconds
The
and the machine will automatically drain the water in
the tub.
DOOR LOCKED red indicator light:
when the indicator light is illuminated the door is
locked to prevent it being opened accidentally; to
avoid damaging the appliance, wait for the light to
switch off before opening the door after the cycle
has ended or when the cycle is paused. The light
will remain lit for approximately two minutes after
the washing programme has finished.
START COLOUR
MIX EASY-IRON
PROGRAMME
button
WASHING TIME INDICATOR lights: these light up
in sequence to indicate the progress of the washing
programme. At the end of the programme all
the indicator lights begin to flash.
For further details, please refer to the chapter entitled
Running a wash cycle.
Load balancing system
To avoid excessive vibrations before every spin, the
machine distributes the load in a uniform manner by
rotating the drum continuously at a speed which is
slightly greater than the washing rotation speed.
When, despite repeated attempts, the load is not
perfectly distributed, the machine spins at a lower
speed than stated for the wash cycle.
If the load is excessively unbalanced, the machine
performs the distribution process instead of spinning.
Balancing attempts may increase the total duration of
the cycle, up to a maximum of 10 minutes.
Rapid flashing of the DOOR LOCKED indicator light
indicates a fault (see Troubleshooting).
START PROGRAMME buttons:
press one of these to start the selected washing
programme.
- button lit in a fixed manner: programme in progress.
- buttons flashing: awaiting selection.
17

Running a wash cycle
GB
Note: Once the appliance has been installed, and
before you use it for the first time, run a wash cycle
with detergent and no laundry, using the
programme.
1. SWITCH ON THE MACHINE by pressing the ON/
OFF
PROGRAMME buttons begin to flash and the
WASHING TIME INDICATOR lights light up in a
fixed manner, to indicate that the washing machine
is ready to receive instructions.
2. LOAD THE LAUNDRY. Open the door using the
handle. Load the laundry, making sure you do not
exceed the maximum load value indicated in the
table of programmes on the following page.
3. MEASURE OUT THE DETERGENT AND
ADDITIVES.
Pour the detergents into the drawer located inside
the porthole door, taking care not to exceed the
maximum levels indicated on the surface of the
drawer and by the floating indicators. For further
details, please refer to the chapter entitled
Description of the machine.
4. CLOSE THE DOOR.
manner, and all the wash time indicator lights
switch off. The DOOR LOCKED indicator light
illuminates in a fixed manner, to signal the
activation of the door safety device.
For a description of the wash programmes
available, please refer to the chapter entitled
Wash programmes.
The procedure used to start the DELICATES
programme is different; see paragraph "Delicates
30°" on the following page.
During the programme the WASH TIME
INDICATOR lights illuminate in sequence, indicating
how much of the programme has already been
completed.
button. The icons for the START
5. START THE
WASHING
PROGRAMME by
pressing the
corresponding START
PROGRAMME
BUTTON. The icon
corresponding to the
selected programme
illuminates in a fixed
The diagram at the side
refers to a situation in
which approximately
50% of the cycle has
been completed.
At the end of the cycle,
all the WASHING TIME
INDICATOR lights begin
to flash.
6. The WASH PROGRAMME can be SUSPENDED by
pressing the illuminated start programme button
which begins to flash. After approximately two
minutes the DOOR LOCKED indicator light will
switch off to indicate that the door may be
opened.
If you wish to add more detergent, make sure that
the MAX floating indicator is not in a raised
position.
To restart the wash programme, close the door
again and press the corresponding start button
once more.
To guarantee maximum safety, whenever there is a
quantity of water in the drum which could leak out
of the machine, it will not be possible to open the
door (the DOOR LOCKED indicator light will remain
lit even after the two minutes have passed).
The machine, in this case, should be switched off
by pressing for approximately 2 seconds the ON/
OFF
drained automatically.
7. AT THE END OF THE PROGRAMME
At the end of the wash programme, the icon
corresponding to the selected programme remains
lit in a fixed manner, while all the washing time
indicator lights begin to flash.
To start a new wash cycle the machine must be
switched off and switched back on again, by
pressing the ON/OFF
button, then waiting for the water to be
button TWO TIMES.
18

Wash programmes
Button Fabrics
WHITE
Du rable w hite co tton
COLOR MIX 40° / EASY IRON
Colou red cotton
and synthetics
DELICATES
+
+
WASH / COLD WATER RINSE
DAILY
The duration of the programmes indicated in the table are for guidance purposes only, and are calculated based on an average load quantity.
Wool (final delicate spin
cycle)
Silk and curtains (without
final spin cycle)
Cotton and synthetics
Max.
load
Te m p e r a tu r e
(kg)
6 60°C 1200 145
4,5 40°C 1000 105
1,5 30°C 600 50
1,5 30°C no* 50
30°/cold
3
water**
Spin
speed
(rpm )
800 30
duration
(minutes)
Cycle
Wash cycle description
Wash cycle, rinse cycles, intermediate
an d final spin cycles
Was h cycle, rinse cycles and delicate
sp in cycle
Was h cycle, rinse cycles and delicate
sp in cycle
Wash cycle, rinse cycles and drainage
Wash cycle (only if the "
programme activated), rinse cycles,
delicate spin cycle
Rapid
wash"
*Note: for information relating to excluding the spin cycle in the delicates programme, please refer to the
Delicates 30° paragraph further down the page.
**Note: for information relating to rinsing hand-washed clothes in cold water, please refer to the
Daily wash 30 / Cold water rinse paragraph further down the page.
WHITE COTTON 60°
Designed for the washing of all durable white cotton
garments. Higher washing temperatures offer improved
washing results in Class A appliances.
COLOUR MIX 40° / EASY-IRON
This programme can be used to wash all your coloured
garments, whether cotton or synthetic fabric. The spin
cycle is carefully controlled during the entire wash cycle,
so as to reduce the formation of creases in the fabric
and make it easier to iron.
Cotton and synthetic garments can be washed at the
same time.
DELICATES 30°
A cycle designed for the washing of all woollen, silk and
delicate garments. As these garments have different
features, this programme requires an activation
process which is different from the others:
+ DELICATES CYCLE WITH FINAL SPIN (for
woollen garments): press the START DELICATES
PROGRAMME
button. After approximately 3
seconds, the START DELICATES PROGRAMME
and START DAILY WASH PROGRAMME buttons
begin to flash. Press the START DELICATES
PROGRAMME
button to perform the wash, which
ends with a delicate spin cycle. This programme
includes drum movements which have been carefully
researched to remove excess water from the fabric,
thereby reducing friction and helping to protect your
woollen garments.
+ DELICATES CYCLE WITH SPIN PHASE
EXCLUDED (for silk and viscose garments and for
curtains; not to be used for washing wool):
press the START DELICATES PROGRAMME
button. After approximately 3 seconds, the START
DELICATES PROGRAMME
WASH PROGRAMME
the START DAILY WASH PROGRAMME
and START DAILY
buttons begin to flash. Press
button to
perform the wash without the final spin cycle. At the
end of the cycle, the machine will automatically drain
the water contained in the drum. We recommend that
the garments are removed from the washing machine
straight away, in order to limit the formation of creases.
DAILY WASH 30 / COLD WATER RINSE
This programme can be used to wash lightly soiled
cotton or synthetic fabrics, or garments with the "wash
at 30°"
instruction on the label, in just 30 minutes. It
is also possibile to rinse cotton or synthetic garments
which have been washed by hand (this does not include
wool or silk).
Thanks to its special sensors, the washing machine
is able to recognise when the garments placed in the
drum have detergent on them.
- if no detergent is detected on the clothes, the DAILY
WASH 30' cycle will be performed;
- if detergent is detected (cloths which have been
washed by hand), the COLD WATER RINSE cycle will
be performed automatically.
AUTOMATIC RINSE MANAGEMENT
The rinse function is monitored and controlled in every
programme by special sensors. If the garments are
very soapy at the end of the wash, the rinse cycle
will be extended automatically until the detergent is
removed completely. In this case the wash
programme duration may be slightly increased in relation
to the information given in the table of programmes.
GB
GB
19

Detergents and laundry
GB
Preparing the laundry
Divide the laundry according to:
- the type of fabric/the symbol on the label;
- the colours: separate coloured garments from
whites.
Empty all garment pockets and check the
buttons.
Do not exceed the load values indicated for the
Wash programmes.
Washing recommendations
Bed and bathroom laundry (sheets, towels,
bathrobes, etc.): use the WHITE COTTON
programme which guarantees the most efficient
wash in Class A appliances. The intensive spin
cycle eliminates all excess water efficiently.
White cotton garments (shirts, T-shirts,
tablecloths, etc.): use the WHITE COTTON 60°
programme. If there are any stubborn stains, they
should be pre-treated with solid soap before the
wash cycle is started.
Coloured cotton garments (shirts, T-shirts,
underwear, etc.): use the COLOUR MIX 40°
programme, which maximises the performance of
the wash without damaging the colours. The spin
cycle phase, thanks to the incorporated EASY
IRON function, reduces the formation of creases
at the end of the wash, making the fabric easier
to iron. We recommend the use of liquid
detergent.
White or coloured synthetic garments (shirts,
T-shirts, underwear, etc.): use the COLOUR MIX
40°
and coloured garments are not washed in the
same wash cycle, to prevent any colour leakage
from seeping into the white clothing. We
recommend the use of liquid detergent.
programme. We recommend that white
How much does your laundry weigh?
1 sheet 400-500 g
1 pillow case 150-200 g
1 tablecloth 400-500 g
1 bathrobe 900-1.200 g
1 towel 150-250 g
1 pair of jeans 400-500 g
1 shirt 150-200 g
Coloured synthetic and cotton garments, with
wash at 30°
the DAILY WASH 30
washing temperature protects the coloured fabrics.
We recommend the use of liquid detergent.
Woollen garments (jumpers, scarves, etc.): use
the DELICATES 30° programme with final spin
+ . The movement of the drum during the
wash and the delicate spin cycle reduces fabric
matting. We recommend the use of detergents
specifically designed for woollen garments. We
recommend that the maximum load level is not
exceeded.
Silk garments (shirts, underwear, etc.): use the
DELICATES 30° programme with the spin excluded
+ . Try not to leave the laundry in the drum for
too long after the wash cycle has finished, to
prevent excessive creasing.
Curtains: use the DELICATES 30° programme
with the spin excluded
they are folded and placed inside a pillowcase or a
mesh bag. Wash them separately, making sure
the maximum load level is not exceeded.
instruction on the care label: use
programme. The low
+ . We recommend
20

Precautions and advice
This machine was designed and constructed in
accordance with international safety regulations. The
following information is provided for safety reasons
and must therefore be read carefully.
General safety
This appliance was designed for domestic use only.
The machine must only be used by adults, in
accordance with the instructions given in this manual.
Do not touch the machine when barefoot or with
wet or damp hands or feet.
Do not pull on the power supply cable when
unplugging the appliance from the electricity
socket. Hold the plug and pull.
Do not touch the drained water as it may reach
extremely high temperatures.
Never force the porthole door. this could damage
the safety lock mechanism designed to prevent
accidental opening.
If the appliance breaks down, do not under any
circumstances access the internal mechanisms in
an attempt to repair it yourself.
Always keep children well away from the appliance
while it is operating.
The door can become quite hot during the wash cycle.
If the appliance has to be moved, work in a group
of two or three people and handle it with the
utmost care. Never try to do this alone, because
the appliance is very heavy.
Before loading laundry into the washing machine,
make sure the drum is empty.
Disposal
Disposing of the packaging materials: observe local
regulations so that the packaging may be re-used.
The European Directive 2002/96/EC on Waste
Electrical and Electronic Equipment, requires that
old household electrical appliances must not be
disposed of in the normal unsorted municipal
waste stream. Old appliances must be collected
separately in order to optimise the recovery and
recycling of the materials they contain and reduce
the impact on human health and the
environment. The crossed out "wheeled bin"
symbol on the product reminds you of your
obligation, that when you dispose of the appliance
it must be separately collected.
Consumers should contact their local authority or
retailer for information concerning the correct
disposal of their old appliance.
Saving energy and respecting the
environment
Saving detergents, water, energy and time
To avoid wasting resources, the washing machine
should be used with a full load. One full load instead of
two half loads saves up to 50% of the energy used.
Treating stains with a stain remover, or leaving
them to soak before they are washed, reduces the
need to wash the garments at high temperatures.
Use the correct quantity of detergent, in
accordance with the water hardness, how soiled
the garments are and the amount of laundry you
have, in order to avoid wastage and to protect the
environment: although they are biodegradable,
detergents still contain ingredients which alter the
balance of nature. Avoid using fabric softener
wherever possible.
If you use your washing machine between late
afternoon and the early hours of the morning, you will
help to reduce the peak load of the electricity board.
Drip-tray system
The machine is fitted with a drip-tray system on the
inside of the door, which catches any residual drips of
water at the end of the cycle.
We recommend that the dampness level of the
sponge inside the drip-tray compartment is checked
regularly. If necessary, it may be cleaned or replaced
as follows:
1. Remove the
compartment by applying
a light pressure to the
lower part.
2. Remove the sponge
inside it, rinse it under
running water and wring it
out thoroughly. It may
also be replaced with one
of the spare sponges
provided.
3. Place the sponge back inside the compartment.
4. Replace the compartment in the door, making
sure the springs on the door are correctly
inserted into the corresponding slots on the
compartment.
5. Make sure that the compartment is slotted back
into position correctly.
GB
GB
21

Care and maintenance
GB
Cutting off the water and electricity
supply
Turn off the water tap after every wash. This will
limit wear on the hydraulic system in the machine
and help to prevent leaks.
Unplug the appliance when cleaning it and during
all maintenance work.
Cleaning the machine
The outer parts and rubber components of the
appliance can be cleaned using a soft cloth soaked in
lukewarm soapy water. Do not use solvents or
abrasives.
Cleaning the detergent dispenser
drawer
We recommend you check that there is no
detergent or water inside the detergent drawer
before removing it. If these substances are present,
proceed with care as they may leak out of the
drawer while it is being removed.
Caring for the door and drum of your
appliance
Always leave the porthole door ajar in order to
prevent unpleasant odours from forming.
Cleaning the pump
The washing machine is fitted with a self-cleaning
pump which does not require any maintenance.
Sometimes, small items (such as coins or buttons)
may fall into the pre-chamber which protects the
pump, situated in its bottom part.
Make sure the wash cycle has finished and unplug
the appliance.
To access the pre-chamber:
1. remove the protective
casing on the lower part
of the washing machine,
turning it in an
anticlockwise direction
(see figure);
The detergent dispenser drawer in this machine is
cleaned automatically during the wash cycles.
However, residues may form very occasionally after
certain detergents have been used. To clean the
drawer, proceed as follows:
1. Open the door to
access the drawer.
2. Remove the drawer by
pulling upwards, holding it
by the central
compartment as
indicated in the figure. Do
not grip the drawer by
the grille as this may
damage it.
3. Unhook the drawer
cover to access the
compartment, as
indicated in the figure.
4. Clean the drawer
under running water.
5. Re-hook the cover
and replace the drawer,
pushing until it clicks into
place.
2. unscrew the lid by
rotating it anti-clockwise
(see figure): a little water
may trickle out. This is
perfectly normal;
3. clean the inside thoroughly;
4. screw the lid back on;
5. screw the protective cap back on by turning it in a
clockwise direction, making sure the arrow on the
inside part of the cap is facing upwards.
Checking the water inlet hose
Check the inlet hose at least once a year. If there are
any cracks, it should be replaced immediately: during
the wash cycles, water pressure is very strong and a
cracked hose could easily split open.
Never use second-hand hoses.
22

Troubleshooting
Your washing machine could occasionally fail to work. Before contacting the Technical Assistance Centre
(see Service), make sure that the problem is not easily solved using the following list.
GB
Problem:
The washing machine does not
switch on.
The wash cycle wont start.
The washing machine does not fill
with water (the door locked LED
flashes rapidly).
The machine continuously fills
with water and drains.
Possible causes / Solutions:
The appliance is not plugged into the socket fully, or is not making
contact.
There is no power in the house.
The washing machine door is not closed properly.
The ON/OFF button has not been pressed.
The START PROGRAMME buttons have not been pressed (they
are still flashing).
The water tap has not been opened.
The water inlet hose is not connected to the tap.
The hose is bent.
The water tap has not been opened.
There is no water supply in the house.
The pressure is too low.
The START PROGRAMME buttons have not been pressed (they
are still flashing).
The drain hose is not fitted at a height between 65 and 100 cm
from the floor ( see Installation).
The free end of the hose is under water (see Installation).
The wall drainage system is not fitted with a breather pipe.
If the problem persists even after these checks, shut off the water
tap, switch the appliance off and contact the Technical Assistance
Service. If the dwelling is on one of the upper floors of a building,
there may be problems relating to water drainage, causing the
washing machine to fill with water and drain continuously. Special
anti-draining valves are available in shops and help to avoid this
inconvenience.
GB
The washing machine does not
drain or spin.
The machine vibrates a lot during
the spin cycle.
The washing machine leaks.
The DOOR LOCKED indicator light
flashes rapidly.
Too much foam.
The drain hose is bent (see Installation).
The drainage duct is clogged.
The protective screws (used during transportation) were not
removed when the appliance was installed. Remove the screws
(see Installation).
The machine is not level (see Installation).
The machine is trapped between cabinets and walls (see
Installation).
The water inlet hose is not screwed on properly (see Installation).
The detergent dispenser is blocked (to clean it, see Care and
maintenance).
The drain hose is not fixed in place properly (see Installation).
The drip-tray system is full. Clean the sponge or replace it (see
"Precautions and advice").
Switch off the machine and unplug it, wait for approximately 1
minute and then switch it back on again. The wash cycle will have
to be started again from the beginning. If the problem persists,
contact the Technical Assistance Service.
The detergent is not suitable for machine washing (it should bear
the description for washing machines or hand and machine
wash, or similar instructions).
Too much detergent was used.
23

Service
GB
Before calling for Assistance:
Check whether you can solve the problem alone (see Troubleshooting);
Restart the programme to check whether the problem has been solved;
If it has not, contact the Authorised Technical Assistance Service.
If the machine has been installed or used incorrectly, you may be charged for the maintenance callout
service.
Always request the assistance of authorised technicians.
Have the following information to hand:
the type of problem;
the appliance model (Mod.);
the serial number (S/N).
The above information can be found on the data plate located on the appliance itself.
24

Istruzioni per luso
LAVABIANCHERIA
I
Italiano
SIXL 126
Sommario
I
Installazione, 26-27
Disimballo e livellamento
Collegamenti idraulici ed elettrici
Dati tecnici
Descrizione della macchina, 28-29
Cassetto detersivi autopulente
Pannello di controllo
Sistema bilanciamento del carico
Come effettuare un ciclo di lavaggio, 30
Programmi di lavaggio, 31
Detersivi e biancheria, 32
Preparare la biancheria
Consigli di lavaggio
Precauzioni e consigli, 33
Sicurezza generale
Smaltimento
Risparmiare e rispettare lambiente
Sistema raccogli-gocce
Manutenzione e cura, 34
Escludere acqua e corrente elettrica
Pulire la macchina
Pulire il cassetto dei detersivi
Curare oblò e cestello
Pulire la pompa
Controllare il tubo di alimentazione dellacqua
Anomalie e rimedi, 35
Assistenza, 36
Assistenza Attiva 7 giorni su 7
25

Installazione
È importante conservare questo libretto per poterlo
I
consultare in ogni momento. In caso di vendita, di
cessione o di trasloco, assicurarsi che resti insieme
alla macchina per informare il nuovo proprietario sul
funzionamento e sui relativi avvertimenti.
Leggere attentamente le istruzioni: ci sono
importanti informazioni sullinstallazione, sulluso
e sulla sicurezza.
Disimballo e livellamento
Disimballo
1. Disimballare la macchina.
2. Controllare che la macchina non abbia
subìto danni nel trasporto. Se fosse danneggiata
non collegarla e contattare il rivenditore.
3. Rimuovere le 4 viti di
protezione per il trasporto e il gommino con il
relativo distanziale, posti
nella parte posteriore
(vedi figura).
Un accurato livellamento dà stabilità alla macchina
ed evita vibrazioni, rumori e spostamenti durante il
funzionamento. In caso di moquette o di un tappeto,
regolare i piedini in modo da conservare sotto la
macchina uno spazio sufficiente per la ventilazione.
Collegamenti idraulici ed elettrici
Collegamento del tubo di alimentazione
dellacqua
1. Inserire la guarnizione
A nellestremità del tubo
di alimentazione e
avvitarlo a un rubinetto
A
dacqua fredda con
bocca filettata da 3/4
gas (vedi figura).
Prima di allacciare, far
scorrere lacqua finché
non sia limpida.
2. Collegare il tubo di
alimentazione alla
macchina
avvitandolo allapposita
presa dacqua, nella
parte posteriore in alto
a destra (vedi figura).
4. Chiudere i fori con i tappi di plastica in dotazione.
5. Conservare tutti i pezzi: qualora la macchina
debba essere trasportata, dovranno essere
rimontati.
Gli imballaggi non sono giocattoli per bambini.
Livellamento
La vostra macchina potrà essere rumorosa se i due
piedini anteriori non sono stati regolati correttamente.
1. Installare la macchina su un pavimento piano e
rigido, senza appoggiarla a muri, mobili o altro.
2. Se il pavimento non
fosse perfettamente
orizzontale, compensare
le irregolarità svitando o
avvitando i piedini
anteriori (vedi figura);
langolo di inclinazione,
misurato sul piano di
lavoro, non deve superare i 2°.
3. Fare attenzione che nel tubo non ci siano né
pieghe né strozzature.
La pressione idrica del rubinetto deve essere
compresa nei valori della tabella Dati tecnici
(vedi pagina a fianco).
Se la lunghezza del tubo di alimentazione non
fosse sufficiente, rivolgersi a un negozio specializzato
o a un tecnico autorizzato.
26

Collegamento del tubo di scarico
Collegare il tubo di
scarico, senza piegarlo,
a una conduttura di
scarico o a uno scarico
a muro posti tra 65 e
65 - 100 cm
100 cm da terra;
oppure appoggiarlo al
bordo di un lavandino o
di una vasca, legando
la guida in dotazione al
rubinetto (vedi figura).
Lestremità libera del
tubo di scarico non
deve rimanere immersa
nellacqua.
Non usare prolunghe e multiple.
I
Il cavo non deve subire piegature o compressioni.
Il cavo di alimentazione deve essere sostituito solo
da tecnici autorizzati.
Attenzione! Lazienda declina ogni responsabilità
qualora queste norme non vengano rispettate.
È sconsigliato usare tubi di prolunga; se indispen-
sabile, la prolunga deve avere lo stesso diametro del
tubo originale e non superare i 150 cm.
Collegamento elettrico
Prima di inserire la spina nella presa della corrente,
accertarsi che:
la presa abbia la messa a terra e sia a norma
di legge;
la presa sia in grado di sopportare il carico
massimo di potenza della macchina, indicato nella
tabella Dati tecnici (vedi a fianco);
la tensione di alimentazione sia compresa nei
valori indicati nella tabella Dati tecnici (vedi a
fianco);
la presa sia compatibile con la spina della
macchina. In caso contrario sostituire la
presa o la spina.
La macchina non va installata allaperto, nemmeno
se lo spazio è riparato, perché è molto pericoloso
lasciarla esposta a pioggia e temporali.
A macchina installata, la presa della corrente deve
essere facilmente raggiungibile.
Dati tecnici
Modello
Dimensioni
Capacità
Collegamenti
elettrici
Collegamenti
idrici
Velo cità di
centrifuga
Programmi di
controllo secondo
la norma EN 60456
SIXL 126
larghezza cm 59,5
altezza cm 85
profondità cm 53,5
da 1 a 6 kg
vedi la targhetta caratteristiche
tecniche applicata sulla macchina
pressione massima 1 MPa (10 bar)
pressione minima 0,05 MPa (0,5 bar)
capacità del cesto 52 litri
sino a 1200 giri al minuto
Programma ;
effettuato con 6 kg di carico.
Questa apparecchiatura è conforme
alle seguenti Direttive Comunitarie:
- 73/23/CEE del 19/02/73 (Bassa
Tensione) e successive modificazioni
- 89/336/CEE del 03/05/89
(Compatibilità Elettromagnetica) e
successive modificazioni
- 2002/96/CE
27

Descrizione della macchina
I
OBLÒ
Cassetto detersivi autopulente
Questa lavabiancheria è dotata di un innovativo
cassetto dei detersivi autopulente, in grado di
migliorare la qualità del lavaggio.
Il cassetto è posto allinterno delloblò.
PIEDINI REGOLABILI
E possibile visualizzare il livello di detersivo sulle apposite
finestre trasparenti realizzate sul cassetto.
Allinterno delle vaschette
presenti degli indicatori galleggianti LA@E BECKH=*.
Quando è stata inserita la quantità massima di detersivo/ammorbidente, gli indicatori si sollevano fino a
sfiorare le griglie di protezione delle vaschette.
PANNELLO
COMANDI
MANIGLIA
OBLÒ
SPORTELLO
DI ACCESSO
ALLA POMPA
DI SCARICO
e sono inoltre
STOP
STOP
M
A
M
X
A
X
AB
1. Aprire loblò per accedere al cassetto dei detersivi
(vedi figura A).
2. Versare il detersivo o ladditivo allinterno delle
vaschette, sopra le griglie di protezione, come segue:
Vaschetta
Vaschetta
: detersivo liquido e additivi liquidi.
: detersivo in polvere o pastiglie e
additivi in polvere.
Per inserire le pastiglie, sollevare la griglia di
protezione sul cassetto.
Vaschetta
: ammorbidente.
Versare detersivi o additivi liquidi nella vaschetta
centrale può causarne la fuoriuscita indesiderata.
Si raccomanda di non superare mai i livelli
massimi indicati sul cassetto dei deterisivi.
Si raccomanda di seguire sempre le istruzioni di
dosaggio presenti sulle confezioni dei detersivi.
Per alcuni detersivi particolarmente densi si
suggerisce l'inserimento direttamente all'interno
del cestello e non nel cassetto detersivi.
Un caricamento oltre i livelli massimi indicati sulla
macchina può causare una fuoriuscita di detersivo
dalla parte bassa del cassetto.
Eccedendo nell'uso di detersivi non si lava in modo
più efficace, ma si contribuisce ad inquinare maggiormente l'ambiente.
L'acqua utilizzata durante il ciclo di lavaggio provvede a rimuovere eventuale detersivo in eccesso dal
cassetto. E' comunque possibile estrarre manual-
mente il cassetto (vedi "Manutenzione e cura").
Per facilitare il dosaggio dei detersivi, si consiglia di
utilizzare l'apposito dosatore fornito in dotazione con
la lavabiancheria.
La capacità massima del cassetto corrisponde a:
- detersivi liquidi: 1 1/2 misurini
- detersivi in polvere: 2 misurini
- ammorbidente: 1 misurino
28

Pannello di controllo
Spie
INDICAZIONE
TEMPO DI
LAVAGGIO
Pulsante
ACCENSIONE/
SPEGNIMENTO
Spia rossa
OBLÒ
BLOCCATO
I
Pulsante
AVVIO
PROGRAMMA
RAPIDO 30
Pulsante
AVVIO
PROGRAMMA
DELICATI
Pulsante ACCENSIONE/SPEGNIMENTO:
premerlo per accendere o spegnere la macchina.
A macchina accesa, le icone dei pulsanti di avvio
programma iniziano a lampeggiare, mentre le spie di
indicazione del tempo di lavaggio si illuminano fisse.
Per annullare il ciclo, tenere premuto il pulsante
accensione/spegnimento per circa 2 secondi durante il ciclo di lavaggio.
La spia
lampeggerà per alcuni secondi mentre
la macchina effettua lo scarico automatico dell'acqua presente nella vasca.
Spia rossa OBLÒ BLOCCATO:
la spia accesa indica che loblò è bloccato per
impedire aperture accidentali; per evitare danni è
necessario, dopo la fine del ciclo o con ciclo in
pausa, attendere che la spia si spenga prima di
aprire loblò. Il tempo di attesa dopo la fine del
programma di lavaggio è di circa due minuti.
Il lampeggio molto veloce della spia OBLO
BLOCCATO segnala unanomalia (vedi Anomalie e
rimedi).
Pulsante
AVVIO
PROGRAMMA
COTONE
BIANCHI
Pulsante
AVVIO
PROGRAMMA
COLOR MIX
STIRA FACILE
Spie INDICAZIONE DEL TEMPO DI LAVAGGIO:
si accendono in progressione ad indicare lo svolgersi
del programma di lavaggio. Al termine del pro-
gramma tutte le spie iniziano a lampeggiare.
Per maggiori dettagli, vedi "Come effettuare un
ciclo di lavaggio".
Sistema bilanciamento del carico
Per evitare vibrazioni eccessive prima di ogni
centrifuga la macchina distribuisce il carico in modo
uniforme, questo avviene effettuando delle rotazioni
continue del cesto ad una velocità leggermente
superiore a quella di lavaggio.
Quando nonostante ripetuti tentativi il carico non
viene perfettamente distribuito, la macchina effettua
la centrifuga ad una velocità inferiore a quella prevista.
In presenza di eccessivo sbilanciamento la macchina effettua la distribuzione al posto della centrifuga.
Gli eventuali tentativi di bilanciamento possono
allungare la durata totale del ciclo fino ad un
massimo di 10 minuti.
Pulsanti AVVIO PROGRAMMA:
premere per avviare il programma di lavaggio selezionato.
- pulsante illuminato fisso: programma in corso.
- pulsanti lampeggianti: in attesa di selezione.
29

Come effettuare un ciclo di
lavaggio
Nota: Dopo linstallazione, prima delluso, effettua-
I
re un ciclo di lavaggio con detersivo e senza biancheria impostando il programma
1. ACCENDERE LA MACCHINA premendo il pulsante
ACCENSIONE/SPEGNIMENTO . Le icone dei
pulsanti di AVVIO PROGRAMMA iniziano a lampeggiare e le spie di INDICAZIONE DEL TEMPO
DI LAVAGGIO si illuminano fisse, ad indicare che
la lavabiancheria è pronta a ricevere istruzioni.
2. CARICARE LA BIANCHERIA. Aprire loblò utilizzando l'apposita maniglia. Caricare la biancheria,
facendo attenzione a non superare la quantità di
carico indicata nella tabella programmi della
pagina successiva.
3. DOSARE IL DETERSIVO E ADDITIVI
Dosare i detersivi all'interno del cassetto posto
all'interno dell'oblò, avendo cura di non superare i
livelli massimi indicati sulla superficie del cassetto
e sugli appositi indicatori galleggianti. Per maggiori
dettagli, vedi "Descrizione della macchina".
4. CHIUDERE LOBLO.
di lavaggio si spengono. La spia OBLO BLOCCATO si illumina fissa ad indicare il blocco di sicurezza delloblò.
Per una descrizione dei programmi di lavaggio
disponibili, vedi Programmi di lavaggio.
La procedura per avviare il programma
DELICATI
"Delicati 30°" alla pagina seguente.
Nel corso del programma le spie di INDICAZIONE
DEL TEMPO DI LAVAGGIO si illuminano progressivamente, ad indicare quanta parte del programma sia
già stata effettuata.
è differente, vedi paragrafo
.
5. AVVIARE IL PROGRAMMA DI LAVAGGIO premendo il
relativo PULSANTE
AVVIO PROGRAMMA.
Licona relativa al
programma seleziona-
to si illumina fissa,
mentre tutte le spie
di indicazione tempo
Il disegno a fianco si
riferisce ad una situazione in cui è statoeffettuato circa il 50% del
ciclo.
Al termine del ciclo tutte
le spie di INDICAZIONE
DEL TEMPO DI LAVAGGIO sono accese e
lampeggianti.
6. E' possibile SOSPENDERE IL PROGRAMMA DI
LAVAGGIO premendo il pulsante di avvio programma illuminato che inizia a lampeggiare.
Dopo circa due minuti si spegnerà la spia OBLO
BLOCCATO ad indicare che è possibile aprire
loblò.
Nel caso si voglia aggiungere ulteriore detersivo,
fare attenzione che l'indicatore galleggiante MAX
non sia in posizione sollevata.
Per riavviare il programma di lavaggio
richiudere l'oblò e premere nuovamente il relativo
pulsante di avvio.
Per garantirti la massima sicurezza, qualora sia
presente nel cestello una quantità di acqua tale
che potrebbe fuoriuscire all'esterno, non sarà
possibile aprire l'oblò (la spia OBLO' BLOCCATO
rimarrà accesa anche trascorsi i due minuti).
E, in questo caso, necessario spegnere la macchina premendo per circa 2 secondi il pulsante
ACCENSIONE/SPEGNIMENTO
scarico automatico dell'acqua.
7. FINE DEL PROGRAMMA
Al termine del programma di lavaggio, licona
relativa al programma selezionato continua ad
essere illuminata fissa, mentre tutte le spie di
indicazione del tempo di lavaggio iniziano a
lampeggiare.
Per avviare un nuovo ciclo di lavaggio è necessario spegnere e riaccendere la macchina,
premendo DUE VOLTE il pulsante ACCENSIONE/
SPEGNIMENTO
.
e attendere lo
30
g
Programmi di lavaggio
**
Centrifuga
(giri al
minuto)
1200 145
1000 105
600 50
no* 50
800 30
Pulsante Tessuti Max.
BIANCHI
C
otone bianco resistente
COL OR MIX 40° / STIRA FACILE
C
otone e sintetici colorati
DELICATI
+
+
RAPIDO
Le durate dei programmi indicate nella tabella sono puramente indicative, e sono calcolate prendendo in considerazione una quantità di carico media.
30' /
Lana (centrifuga finale
delicata
Seta e
centrifuga finale)
RISCIACQUO
C
otone e sintetici
)
tende
(senza
Te m p e r at u r a
(kg)
66
4,5 4
1,5 3
1,5 3
3
0°C
0°C
0°C
0°C
30°/acqua
fredda
Durata
del ciclo
(minuti)
Descrizione del ciclo di lavaggio
Lavaggio, risciacqui, centrifughe
intermedie e finale
Lavaggio, risciacqui, centrifuga delicata
Lavaggio, risciacqui, centrifuga delicata
Lavaggio, risciacqui, s carico
Lavaggio (solo se attivo il programma
"Rapido"), risciacqui, centrifu
a delicata
*Nota: per informazioni su come escludere la centrifuga dal programma delicati, vedi paragrafo "Delicati 30°" più
in basso nella pagina.
**Nota: per informazioni su come effettuare il solo risciacquo in acqua fredda di capi precedentemente lavati a
mano, vedi paragrafo "Rapido 30'/Risciacquo" più in basso in questa pagina.
COTONE BIANCHI 60°
Dedicato al lavaggio di tutti i capi bianchi in cotone più
resistenti. La temperatura di lavaggio più alta consente
di ottenere i migliori risultati di lavaggio in classe A.
COLOR MIX 40° / STIRA FACILE
Con questo programma puoi lavare tutti i tuoi capi
colorati, sia in cotone che in tessuti sintetici. La
centrifuga è controllata accuratamente durante lintero
ciclo di lavaggio, in modo di ridurre la formazione di
pieghe sui tessuti per facilitarne la stiratura.
E' possibile lavare contemporaneamente capi in
cotone ed in tessuti sintetici.
DELICATI 30°
Ciclo dedicato al lavaggio dei tuoi capi in lana, in seta e
di tutti i tuoi capi più delicati. Viste le differenti
caratteristiche di questi capi, questo programma
richiede unattivazione differente dagli altri:
+ CICLO DELICATI CON CENTRIFUGA
FINALE (per capi in lana): premi il pulsante AVVIO
PROGRAMMA DELICATI
pulsanti AVVIO PROGRAMMA DELICATI
PROGRAMMA RAPIDO
. Dopo circa 3 secondi i
e AVVIO
iniziano a lampeggiare.
Premi nuovamente il pulsante AVVIO PROGRAMMA
DELICATI
per effettuare il lavaggio, che termina
con una fase di centrifuga delicata. Questo
programma prevede movimenti del cestello
appositamente studiati per rimuovere l'acqua in
eccesso dai tessuti riducendo lo sfregamento e
contribuendo a proteggere i tuoi capi in lana.
+ CICLO DELICATI CON ESCLUSIONE DELLA
CENTRIFUGA (per capi in seta, viscosa e per il lavaggio
delle tende; da non usare per il lavaggio della lana):
premi il pulsante AVVIO PROGRAMMA DELICATI
.
Dopo circa 3 secondi i pulsanti AVVIO PROGRAMMA
DELICATI
e AVVIO PROGRAMMA RAPIDO
iniziano a lampeggiare. Premi il pulsante AVVIO
PROGRAMMA RAPIDO
per effettuare il lavaggio
senza centrifuga finale. Al termine del ciclo, la
macchina scaricherà automaticamente l'acqua
presente nel cestello. Si consiglia di rimuovere subito i
capi dalla lavabiancheria al termine del lavaggio, per
evitare il formarsi di pieghe in eccesso.
RAPIDO 30 / RISCIACQUO
Con questo programma puoi lavare in soli 30 minuti i tuoi
capi in cotone o in tessuti sintetici poco sporchi, o che
recano sull'etichetta l'indicazione "lavaggio a 30°"
. Puoi
inoltre effettuare il risciacquo di capi in cotone o sintetici
precedentemente lavati a mano (esclusi lana e seta).
Grazie ad appositi sensori, la lavabiancheria è in
grado di riconoscere la presenza di detersivo sui
capi inseriti nel cestello:
- se non è presente detersivo, sui capi, sarà effettuato
il ciclo RAPIDO 30';
- se è presente detersivo (capi prelavati a mano) sarà
effettuato automaticamente un ciclo di RISCIACQUO.
GESTIONE AUTOMATICA DEI RISCIACQUI
La funzione di risciacquo è controllata, in ogni programma,
da appositi sensori. In caso di capi eccessivamente
insaponati a fine lavaggio, la fase di risciacquo sarà
prolungata automaticamente fino alla rimozione
completa del detersivo. In questo caso la durata del
programma di lavaggio potrà essere lievemente maggiore
rispetto a quanto indicato nella tabella programmi.
I
31

Detersivi e biancheria
Preparare la biancheria
I
Suddividere la biancheria secondo:
- il tipo di tessuto / il simbolo sulletichetta.
- i colori: separare i capi colorati da quelli bianchi.
Vuotare le tasche e controllare i bottoni.
Non superare i valori di carico massimo indicati
nei Programmi di lavaggio.
Consigli di lavaggio
Quanto pesa la biancheria?
1 lenzuolo 400-500 gr.
1 federa 150-200 gr.
1 tovaglia 400-500 gr.
1 accappatoio 900-1.200 gr.
1 asciugamano 150-250 gr.
1 jeans 400-500 gr.
1 camicia 150-200 gr.
Biancheria da letto e da bagno (lenzuola,
asciugamani, accappatoi etc.): utilizza il pro-
gramma COTONE BIANCHI 60°
sce le migliori prestazioni di lavaggio in classe A.
La centrifuga intensiva consente di eliminare
efficacemente lacqua in eccesso.
Capi in cotone bianchi (camicie, magliette,
tovaglie etc.): utilizza il programma COTONE
BIANCHI 60°. Se fossero presenti macchie
ostinate, è bene pretrattarle con sapone solido
prima di effettuare il ciclo di lavaggio.
Capi in cotone colorati (camicie, magliette,
biancheria etc.): utilizza il programma COLOR
MIX 40°
prestazioni di lavaggio senza danneggiare i colori.
La fase di centrifuga, grazie alla funzione STIRA
FACILE incorporata, riduce la formazione di
pieghe a fine lavaggio, facilitando la stiratura. Si
raccomanda lutilizzo di detersivo liquido.
Capi in tessuti sintetici, bianchi o colorati
(camicie, magliette, biancheria etc.): utilizza il
programma COLOR MIX 40°
di non lavare contemporaneamente capi bianchi e
capi colorati nello stesso ciclo di lavaggio, per
evitare che eventuali perdite di colore possano
depositarsi sui capi bianchi. Si raccomanda lutilizzo di detersivo liquido.
, che consente di massimizzare le
che garanti-
. Si raccomanda
Capi in cotone o in tessuti sintetici colorati,
recanti sulletichetta lindicazione lavaggio a
30°
bassa temperatura di lavaggio consente la massima
tutela dei colori. Si raccomanda l'utilizzo di detersivo liquido.
Capi in lana (maglie, sciarpe etc.): utilizza il
programma DELICATI 30° con centrifuga finale
lavaggio e la fase di centrifuga delicata riducono
linfeltrimento dei tessuti. Si consiglia lutilizzo di
detersivi specifici per i capi in lana. Si raccomanda
di non superare il livello massimo di carico.
Capi in seta (camicie, biancheria etc.): utilizza il
programma DELICATI 30° con esclusione della
centrifuga
tempo il bucato nel cestello a fine lavaggio, per
evitare la formazione di pieghe in eccesso.
Tende: utilizza il programma DELICATI 30° con
esclusione della centrifuga
di piegarle e sistemarle allinterno di una federa o
di un sacchetto a rete. Lavarle da sole facendo
attenzione a non superare il livello massimo di
carico.
: utilizza il programma RAPIDO 30 . La
+ . La movimentazione del cestello durante il
+ . Cerca di non lasciare troppo
+ . Si raccomanda
32

Precauzioni e consigli
Questa macchina è stata progettata e costruita in
conformità alle norme internazionali di sicurezza.
Queste avvertenze sono fornite per ragioni di
sicurezza e devono essere lette attentamente.
Sicurezza generale
Questo apparecchio è stato concepito esclusiva-
mente per un uso di tipo domestico.
La macchina deve essere usata solo da
persone adulte e secondo le istruzioni riportate
in questo libretto.
Non toccare la macchina a piedi nudi o con le
mani o i piedi bagnati o umidi.
Non staccare la spina dalla presa della corrente
tirando il cavo, bensì afferrando la spina.
Non toccare lacqua di scarico, che può
raggiungere temperature elevate.
Non forzare in nessun caso loblò: potrebbe
danneggiarsi il meccanismo di sicurezza che
protegge da aperture accidentali.
In caso di guasto, in nessun caso accedere ai
meccanismi interni per tentare una riparazione.
prodotti per ricordare gli obblighi di raccolta
separata.
Per ulteriori informazioni, sulla corretta dismissione
degli elettrodomestici, i detentori potranno rivol
gersi al servizio pubblico preposto o ai rivenditori.
Risparmiare e rispettare lambiente
Risparmiare detersivo, acqua, energia e tempo
Per non sprecare risorse bisogna utilizzare la
macchina con il massimo carico. Un carico pieno al
posto di due mezzi fa risparmiare fino al 50% di energia.
Trattando le macchie con uno scioglimacchia o
lasciandole in ammollo prima del lavaggio, si
riduce la necessità di lavare ad alte temperature.
Dosare bene il detersivo in base alla durezza
dellacqua, al grado di sporco e alla quantità di
biancheria evita sprechi e protegge lambiente:
pur biodegradabili, i detersivi contengono elementi
che alterano lequilibrio della natura. Inoltre evitare
il più possibile lammorbidente.
Effettuando i lavaggi dal tardo pomeriggio fino alle
prime ore del mattino si collabora a ridurre il
carico di assorbimento delle aziende elettriche.
Sistema raccogli-gocce
I
Controllare sempre che i bambini non si avvicinino
alla macchina in funzione.
Durante il lavaggio loblò tende a scaldarsi.
Se devessere spostata, lavorare in due o tre
persone con la massima attenzione. Mai da soli
perché la macchina è molto pesante.
Prima di introdurre la biancheria controlla che il
cestello sia vuoto.
Smaltimento
Smaltimento del materiale di imballaggio:
attenersi alle norme locali, così gli imballaggi
potranno essere riutilizzati.
La direttiva Europea 2002/96/CE sui rifiuti di
apparecchiature elettriche ed elettroniche, preve
de che gli elettrodomestici non debbano essere
smaltiti nel normale flusso dei rifiuti solidi urbani.
Gli apparecchi dismessi devono essere raccolti
separatamente per ottimizzare il tasso di recupero
e riciclaggio dei materiali che li compongono ed
impedire potenziali danni per la salute e l'ambiente.
Il simbolo del cestino barrato è riportato su tutti i
La macchina è equipaggiata con un sistema raccogli-gocce sulla parte interna della porta per catturare
eventuali gocce d'acqua residue a fine ciclo.
Si consiglia di verificare periodicamente il livello di
umidità della spugnetta presente nel cassettino
raccogli-gocce. In caso di necessità è possibile
pulirla o sostituirla come segue:
1. estrarre il cassettino,
esercitando una leggera
pressione sulla parte
inferiore dello stesso.
2. rimuovere la spugna
presente al suo interno,
sciacquarla in acqua
corrente e strizzarla
accuratamente. E'
anche possibile sostituirla con una delle spugne di ricambio fornite in dotazione.
3. reinserire la spugna all'interno del cassetto.
4. rimontare il cassettino sulla porta, avendo cura
che le molle presenti sulla porta stessa si inseriscano correttamente nelle apposite sedi presenti
sul cassettino.
5. verificare che il cassettino rientri correttamente
nella sua sede.
33

Manutenzione e cura
Escludere acqua e corrente elettrica
I
Chiudere il rubinetto dellacqua dopo ogni
lavaggio. Si limita così lusura dellimpianto
idraulico della macchina e si elimina il pericolo
di perdite.
Staccare la spina della corrente quando si
pulisce la macchina e durante i lavori di
manutenzione.
Pulire la macchina
La parte esterna e le parti in gomma possono
essere puliti con un panno imbevuto di acqua tiepida
e sapone. Non usare solventi o abrasivi.
Pulire il cassetto dei detersivi
Si raccomanda di verificare che non siano presenti
detersivi o acqua all'interno del cassetto detersivi
prima di estrarlo. Qualora fossero presenti fare
attenzione in quanto potrebbero fuoriuscire dal
cassetto durante la sua rimozione.
Curare oblò e cestello
Lasciare sempre socchiuso loblò per evitare che
si formino cattivi odori.
Pulire la pompa
La macchina è dotata di una pompa autopulente
che non ha bisogno di manutenzione. Può però
succedere che piccoli oggetti (monete, bottoni)
cadano nella precamera che protegge la pompa,
situata nella parte inferiore di essa.
Assicurarsi che il ciclo di lavaggio sia terminato e
staccare la spina.
Per accedere alla precamera:
1. rimuovere la protezione posta nella parte
bassa della
lavabiancheria,
ruotandola in senso
antiorario (vedi figura);
Il cassetto detersivi di questa lavabiancheria viene
pulito automaticamente durante i cicli di lavaggio. E
tuttavia possibile in rari casi che, utilizzando particolari detersivi, possano formarsi alcuni residui. Per
pulire manualmente il cassetto, eseguire le seguenti
operazioni:
1. Aprire loblò per
accedere al cassetto.
2. Estrarre il cassetto
verso lalto, afferrandolo
per la vaschetta centrale come indicato nella
figura. Non afferrare il
cassetto per la griglia,
perché si rischierebbe di
danneggiarla.
3. Sganciare la copertura del cassetto per
avere accesso alle
vaschetta, come
indicato nella figura.
4. Lavare il cassetto
sotto lacqua corrente.
5. Riagganciare la
copertura e reinserire il
cassetto nel suo
alloggiamento, fino a sentire lo scatto.
2. svitare il coperchio
ruotandolo in senso
antiorario (vedi figura): è
normale che fuoriesca
un po dacqua;
3. pulire accuratamente linterno;
4. riavvitare il coperchio;
5. riavvitare il tappo di protezione ruotandolo in
senso orario avendo cura che la freccia indicata
sulla parte interna del tappo stesso sia posta verso
l'alto.
Controllare il tubo di alimentazione
dellacqua
Controllare il tubo di alimentazione almeno una volta
allanno. Se presenta screpolature e fessure va
sostituito: durante i lavaggi le forti pressioni potrebbero provocare improvvise spaccature.
Non utilizzare mai tubi già usati.
34

Anomalie e rimedi
Può accadere che la macchina non funzioni. Prima di telefonare allAssistenza (vedi Assistenza), controllare che
non si tratti di un problema facilmente risolvibile aiutandosi con il seguente elenco.
Anomalie:
La macchina
non si accende.
Il ciclo di lavaggio
non inizia.
La macchina non carica acqua
(la spia OBLÒ BLOCCATO lampeggia rapidamente).
La macchina carica e scarica
acqua di continuo.
Possibili cause / Soluzione:
La spina non è inserita nella presa della corrente, o non abbastanza
da fare contatto.
In casa non cè corrente.
Loblò non è ben chiuso.
Il pulsante ACCENSIONE/SPEGNIMENTO non è stato premuto.
I pulsanti AVVIO PROGRAMMA non sono stati premuti (stanno ancora
lampeggiando).
Il rubinetto dellacqua non è aperto.
Il tubo di alimentazione dellacqua non è collegato al rubinetto.
Il tubo è piegato.
Il rubinetto dellacqua non è aperto.
In casa manca lacqua.
Non cè sufficiente pressione.
I pulsanti AVVIO PROGRAMMA non sono stati premuti (stanno ancora
lampeggiando).
Il tubo di scarico non è installato fra 65 e 100 cm da terra (vedi Installazione).
Lestremità del tubo di scarico è immersa nellacqua (vedi Installazione).
Lo scarico a muro non ha lo sfiato daria.
I
La macchina non scarica
o non centrifuga.
La macchina vibra
molto durante la centrifuga.
La macchina perde acqua.
La spia OBLÒ BLOCCATO lampeggia in modo molto veloce.
Se dopo queste verifiche il problema non si risolve, chiudere il rubinetto
dellacqua, spegnere la macchina e chiamare lAssistenza. Se labitazione si trova agli ultimi piani di un edificio, è possibile che si verifichino
fenomeni di sifonaggio, per cui la macchina carica e scarica acqua di
continuo. Per eliminare linconveniente sono disponibili in commercio
apposite valvole anti-sifonaggio.
Il tubo di scarico è piegato (vedi Installazione).
La conduttura di scarico è ostruita.
Le viti di protezione per il trasporto non sono state rimosse al
momento dellinstallazione. Rimuovere le viti (vedi Installazione).
La macchina non è in piano (vedi Installazione).
La macchina è stretta tra mobili e muro (vedi Installazione).
Il tubo di alimentazione dellacqua non è ben avvitato (vedi Installazione).
Il cassetto dei detersivi è intasato (per pulirlo vedi Manutenzione e cura).
Il tubo di scarico non è fissato bene (vedi Installazione).
Il sistema raccogli-gocce è pieno. Pulire la spugnetta o sostituirla
(vedi "Precauzioni e Consigli").
Spegnere la macchina e togliere la spina dalla presa, attendere circa
1 minuto quindi riaccenderla. Sarà necessario avviare il ciclo da capo.
Se lanomalia persiste, chiamare lAssistenza.
Si forma troppa schiuma.
Il detersivo non è specifico per macchina (deve esserci la
dicitura per lavatrice, a mano e in lavatrice, o simili).
Il dosaggio è stato eccessivo.
35

Assistenza
I
Prima di contattare lAssistenza:
Verificare se lanomalia può essere risolta autonomamente (vedi Anomalie e rimedi);
Riavviare il programma per controllare se linconveniente è stato ovviato;
In caso negativo, contattare il Servizio Assistenza Tecnico Autorizzato.
In caso di errata installazione o uso non corretto potrete essere chiamati al pagamento dellintervento.
Non ricorrere mai a tecnici non autorizzati.
Comunicare:
il tipo di anomalia;
il modello della macchina (Mod.);
il numero di serie (S/N);
Queste ultime informazioni si trovano sulla targhetta caratteristiche posta sullapparecchio.
*
Assistenza Attiva 7 giorni su 7
In caso di necessità dintervento chiamare il Numero Unico Nazionale 199.199.199*.
Un operatore sarà a completa disposizione per fissare un appuntamento con il Centro Assistenza Tecnico
Autorizzato più vicino al luogo da cui si chiama.
È attivo 7 giorni su 7, sabato e domenica compresi, e non lascia mai inascoltata una richiesta.
36
* Al costo di 14,25 centesimi di Euro al minuto (iva inclusa) dal Lun. al Ven. dalle 08:00 alle 18:30, il Sab. dalle 08:00 alle
13:00 e di 5,58 centesimi di Euro al minuto (iva inclusa) dal Lun. al Ven. dalle 18:30 alle 08:00, il Sab. dalle 13:00 alle 08:00
e i giorni festivi, per chi chiama da telefono fisso.
Per chi chiama da radiomobile le tariffe sono legate al piano tariffario delloperatore telefonico utilizzato.
Le suddette tariffe potrebbero essere soggette a variazione da parte delloperatore telefonico; per maggiori informazioni
consultare il sito www.indesit.com.

Gebruiksaanwijzing
WASAUTOMAAT
NL
Nederlands
SIXL 126
Inhoud
NL
Installatie, 38-39
Uitpakken en waterpas zetten
Hydraulische en elektrische aansluitingen
Technische gegevens
Beschrijving van de wasautomaat, 40-41
Zelfreinigend wasmiddelbakje
Bedieningspaneel
Balanceersysteem van de lading
Het uitvoeren van een wascyclus, 42
Wasprogrammas, 43
Wasmiddelen en wasgoed, 44
Voorbereiden van het wasgoed
Wastips
Voorzorgsmaatregelen en advies, 45
Algemene veiligheid
Afvalverwijdering
Energiebesparing en bescherming van het milieu
Druppelopvangsysteem
Onderhoud en verzorging, 46
Afsluiten van water en stroom
Reinigen van de wasautomaat
Reinigen van het wasmiddelbakje
Onderhoud van deur en trommel
Reinigen van de pomp
Controleren van de wateraanvoerslang
Storingen en oplossingen, 47
Service, 48
37

Installatie
NL
Het is belangrijk deze handleiding te bewaren voor
latere raadpleging. In het geval u het apparaat
verkoopt of u verhuist, dient u de gebruiksaanwijzing
bij het apparaat te bewaren zodat de nieuwe
gebruiker de functies en betreffende raadgevingen
kan doornemen.
Lees de instructies aandachtig door: u vindt er
belangrijke informatie betreffende installatie, gebruik
en veiligheid.
Uitpakken en waterpas zetten
Uitpakken
1. Het apparaat uitpakken.
2. Controleer of de wasautomaat geen schade heeft
geleden gedurende het vervoer. Indien dit wel het
geval is moet hij niet worden aangesloten en moet u
contact opnemen met de handelaar.
3. Verwijder de 4
schroeven die het
apparaat beschermen
tijdens het vervoer en de
rubberen ring met
bijbehorende
afstandsleider die zich
aan de achterkant
bevinden (zie afbeelding).
4. Sluit de openingen af met de bijgeleverde plastic
doppen.
5. Bewaar alle onderdelen: mocht de wasautomaat
ooit weer moeten worden vervoerd, dan moeten deze
onderdelen weer worden aangebracht.
Een correcte nivellering geeft de machine stabiliteit en
voorkomt trillingen, lawaai en het zich verplaatsen van
de automaat tijdens de werking. In het geval van
plaatsing op vloerbedekking of tapijt regelt u de
stelvoetjes zodanig dat onder de wasautomaat
genoeg plaats is voor ventilatie.
Hydraulische en elektrische
aansluitingen
Aansluiting van de watertoevoerbuis
1. Plaats de pakking A op
het uiteinde van de
waterbuis en schroef
deze op een
A
koudwaterkraan met een
mondstuk met
schroefdraad van 3/4 gas
(zie afbeelding).
Voordat u hem aansluit
moet u het water laten
lopen totdat het helder is.
2. Verbind de
watertoevoerbuis aan de
wasautomaat door hem
op de betreffende
watertoevoer te
schroeven, rechtsboven
aan de achterkant (zie
afbeelding).
Het verpakkingsmateriaal is geen speelgoed voor
kinderen.
Waterpas zetten
De wasautomaat kan veel lawaai maken als de twee
voorste stelvoetjes niet juist zijn afgesteld.
1. Installeer de wasautomaat op een rechte en
stevige vloer en laat hem niet tegen een muur,
meubel of dergelijke steunen.
2. Als de vloer niet volledig
horizontaal is kunt u de
onregelmatigheid opheffen
door de stelvoetjes aan de
voorkant losser of vaster
te schroeven (zie
afbeelding); de
inclinatiehoek, gemeten
ten opzichte van het
werkvlak, mag de 2° niet
overschrijden.
38
3. Let erop dat er geen knellingen of kronkels in de
buis zijn.
De waterdruk van de kraan moet zich binnen de
waarden van de tabel Technische Gegevens bevinden
(zie bladzijde hiernaast).
Als de toevoerbuis niet lang genoeg is moet u zich
wenden tot een gespecialiseerde winkel of een
bevoegde installateur.

Aansluiting van de afvoerbuis
Steek de afvoerslang
zonder hem te knikken in
een afvoerpijp dat een
hoogte moet hebben van
65 tot 100 cm vanaf de
65 - 100 cm
grond gerekend;
of hang hem aan de
rand van een wasbak of
badkuip, en bind de
bijgeleverde steun aan
de kraan (zie afbeelding).
Het uiteinde van de
afvoerslang mag niet
onder water hangen.
Gebruik nooit verlengstukken voor de buis; indien dit
niet te vermijden is moet het verlengstuk dezelfde
doorsnede hebben als de oorspronkelijke buis en mag
hij niet langer zijn dan 150 cm.
Gebruik geen verlengsnoeren of dubbelstekkers.
NL
Het snoer mag niet gebogen of samengedrukt
worden.
De voedingskabel mag alleen door een bevoegde
installateur worden vervangen.
Belangrijk! De fabrikant kan niet aansprakelijk worden
gesteld wanneer deze normen niet worden nageleefd.
Technische gegevens
Elektrische aansluiting
Voordat u de stekker in het stopcontact steekt moet
u zich ervan verzekeren dat:
het stopcontact geaard is en voldoet aan de
geldende normen;
het stopcontact het maximum vermogen van de
wasautomaat kan dragen, zoals aangegeven in de
tabel Technische Gegevens (zie hiernaast);
de spanning zich bevindt tussen de waarden die
zijn aangegeven in de tabel Technische Gegevens
(zie hiernaast);
de contactdoos geschikt is voor de stekker van de
automaat. Indien dit niet zo is moet de stekker of
het stopcontact vervangen worden.
De wasautomaat mag niet buitenshuis worden
geïnstalleerd, ook niet op een beschutte plaats,
aangezien het gevaarlijk is hem aan regen en onweer
bloot te stellen.
Als de wasautomaat is geïnstalleerd moet het
stopcontact gemakkelijk te bereiken zijn.
Model
Afmetingen
Vermogen
Elektrische
aanslui tin gen
Aansluiting
waterleiding
Snelheid
centrifuge
Controle-programma's volgens de
norm EN 60456
SIXL 126
breedte cm 59,5
hoogte cm 85
diepte cm 53,5
van 1 tot 6 kg
zie het typeplaatje met de technische
eigenschappen dat op het apparaat
is bevestigd
max. druk 1 MPa (10 bar)
min. druk 0,05 MPa (0,5 bar)
Inhoud trommel 52 liters
tot 1200 toeren per minuut
programma ;
uitgevoerd met 6 kg lading.
Deze apparatuur voldoet aan de
volgende EEC voorschriften:
-73/23/EEC van 19/02/73
(Laagspanning) en successievelijke
modificaties
-89/336/EEC van 03/05/89
(Elektromagnetische compatiabiliteit)
en successievelijke modificaties
- 2002/96/CE
39

NL
Beschrijving van de wasautomaat
BEDIENINGSPANEEL
DEUR
WASAUTOMAAT
STELVOETJES
Zelfreinigend wasmiddelbakje
Deze wasautomaat is voorzien van een revolutionair
zelfreinigend wasmiddelbakje dat in staat is de
waskwaliteit te verbeteren.
Het bakje bevindt zich aan de binnenkant van de deur.
STOP
STOP
M
A
M
X
A
X
AB
1. Open de deur om toegang te krijgen tot het
wasmiddelbakje (zie afbeelding A).
2. Giet of strooi het wasmiddel of wasversterker in de
bakjes, over de beschermingsroosters, zoals hierna
aangegeven:
Bakje
wasversterkers.
Bakje : waspoeder of tabletten en
wasversterkers in poedervorm.
Om de tabletten in te voeren, tilt u het
beschermrooster van het bakje op.
Bakje
Het gieten van wasmiddelen of vloeibare
wasversterkers in het middelste bakje kan een
ongewild leeglopen ervan veroorzaken.
: vloeibaar wasmiddel en vloeibare
: wasverzachter.
HANDVAT DEUR
WASAUTOMAAT
TOEGANGSLUIK
AFVOERPOMP
U kunt het wasmiddelniveau aflezen vanaf de speciale
doorzichtige venstertjes die zich op het bakje bevinden.
In de bakjes
en bevinden zich bovendien
vlottertjes die de hoeveelheid wasmiddel aangeven
(zie afbeelding B). Als u de maximale hoeveelheid
wasmiddel/wasverzachter invoert zullen de
vlottertjes stijgen totdat ze de beschermroosters
van de bakjes bereiken.
Zorg ervoor nooit de maximum niveaus te
overschrijden die op het wasmiddelbakje staan
aangegeven.
We raden u aan altijd de doseringsinstructies op
te volgen die u op de verpakking van het
wasmiddel zelf terugvindt. Bepaalde bijzonder
dikke vloeibare wasmiddelen kunnen beter direct in
een wasbol in de trommel worden geplaatst dan in
het wasmiddelbakje.
Als de wasautomaat meer wordt geladen dan
maximaal wordt aangegeven kan het wasmiddel aan
de onderzijde van het bakje leeglopen.
Het gebruik van een te grote hoeveelheid wasmiddel
zorgt er niet voor dat het wasgoed schoner wordt,
maar echter wel dat het milieu meer wordt vervuild.
Het water dat wordt gebruikt tijdens de wascyclus
zorgt ervoor dat eventueel overbodig wasmiddel uit
het wasbakje wordt verwijderd. Het is mogelijk het
wasmiddelbakje handmatig te verwijderen (zie
Onderhoud en verzorging).
Om het wasmiddel makkelijker te doseren raden wij u
aan het speciale doseerbakje te gebruiken dat bij de
wasautomaat wordt geleverd.
De maximum inhoud van het bakje komt overeen met:
- vloeibaar wasmiddel: 1 1/2 maatbeker
- waspoeder: 2 maatbekers
- wasverzachter: 1 maatbeker
40

Bedieningspaneel
Controlelampjes
WASDUUR
Knop
START PROGRAMMA
SNELLE WAS 30'
Knop
AAN/UIT
Rood controlelampje
DEUR
GEBLOKKEERD
Knop
START
PROGRAMMA WIT
KATOEN
NL
Knop
START
PROGRAMMA
FIJNE WAS
Knop AAN/UIT:
druk op deze knop en om de wasautomaat aan- of uit te
zetten.
Als de automaat aanstaat gaan de symbolen op de
knoppen van start programma knipperen, terwijl de
controlelampjes van de wasduur blijven branden.
Om de cyclus te annuleren houdt u de aan/uit knop
tijdens de wascyclus circa 2 seconden lang ingedrukt.
Het controlelampje
zal enkele seconden
knipperen terwijl de wasautomaat automatisch het
overtollige water afvoert.
Rood controlelampje DEUR GEBLOKKEERD:
als het controlelampje aan is betekent het dat de
deur is geblokkeerd om te verhinderen dat hij per
ongeluk open gaat. Om beschadigingen te
voorkomen moet u aan het einde van de wascyclus
of tijdens de pauze wachten tot het controlelampje
gaat knipperen voor u de deur opendoet. De
wachttijd aan het einde van het wasprogramma is
ongeveer 2 minuten.
Als het controlelampje DEUR GEBLOKKEERD snel
knippert geeft dit een storing aan (zie Storingen en
oplossingen).
Knop
START PROGRAMMA
GEKLEURD
ANTI KREUK
Controlelampjes WASDUUR:
deze lampjes gaan een voor een aan om aan te
geven in welke fase het programma zich bevindt.
Aan het einde van het programma zullen alle
controlelampjes gaan knipperen.
Voor verdere details zie Het uitvoeren van een
wascyclus.
Balanceersysteem van de lading
Om overmatige trillingen te vermijden verdeelt de
automaat de lading vóór het centrifugeren op een
gelijkmatige manier. Dit gebeurt door de trommel
voortdurend te laten draaien op een snelheid die iets
hoger ligt dan de wassnelheid.
Als, na herhaaldelijke pogingen, de lading nog steeds
niet goed is gebalanceerd, zal de wasautomaat de
centrifuge op een lagere snelheid uitvoeren dan die
was voorzien.
Als de lading zeer uit balans is zal de wasautomaat
een verdeling uitvoeren in plaats van een centrifuge.
De herhaaldelijke balanceerpogingen kunnen de totale
duur van de cyclus verlengen tot aan maximaal 10
minuten.
Knoppen START PROGRAMMA:
druk hierop om het geselecteerde wasprogramma te
starten.
- licht op knop brandt vast: programma bezig.
- licht op knop knippert: wacht op selectie.
41

Het uitvoeren van een wascyclus
NL
N.B.: Na de installatie en voor u de wasautomaat in
gebruik neemt, dient u een wascyclus uit te voeren
met wasmiddel maar zonder wasgoed, op het
programma
1. SCHAKEL DE WASAUTOMAAT IN door op de knop
AAN/UIT
knoppen START PROGRAMMA beginnen te
knipperen en de controlelampjes van de
WASDUUR blijven vast branden om aan te geven
dat de wasautomaat klaar is om instructies te
ontvangen.
2. HET WASGOED INLADEN. Open de deur met
behulp van het speciale handvat. Laad het
wasgoed in en zorg ervoor nooit de
laadhoeveelheid te overschrijden die wordt
aangegeven in de programmatabel op de volgende
bladzijde.
3. WASMIDDEL EN WASVERSTERKERS DOSEREN
Doseer wasmiddelen in het bakje in de deur. Zorg
ervoor de maximale niveaus niet te overschrijden.
Deze staan aangegeven aan de voorkant van het
bakje en op de speciale vlottertjes. Voor verdere
datails, zie Beschrijving van de wasautomaat.
4. SLUIT DE DEUR.
andere controlelampjes met betrekking tot de
wasduur uitgaan. Het controlelampje DEUR
GEBLOKKEERD blijft vast branden om aan te
geven dat de veiligheidsblokkering van het deurtje
is ingeschakeld.
Voor een beschrijving van de beschikbare
wasprogrammas, zie Wasprogrammas.
De procedure om het programma FIJNE WAS
te starten is anders. Zie hoofdstuk Fijne was
30° op de volgende pagina.
Tijdens het programma zullen de controlelampjes
WASDUUR een voor een aan gaan, om aan te geven
welk deel van het programma al is voltooid.
.
te drukken. De symbolen op de
5. START HET
WASPROGRAMMA
door op de betreffende
KNOP START
WASPROGRAMMA te
drukken. Het symbool
dat betrekking heeft op
het geselecteerde
programma blijft vast
branden, terwijl alle
De tekening hiernaast
geeft een situatie weer
waarin circa 50% van de
cyclus is uitgevoerd.
Aan het einde van de
cyclus zullen alle
controlelampjes van de
WASDUUR knipperend
branden.
6. Het is mogelijk het WASPROGRAMMA TE
ONDERBREKEN door op de verlichte startknop
van het programma te drukken deze zal dan
knipperen. Na circa twee minuten zal het
controlelampje DEUR GEBLOKKEERD uitgaan om
aan te geven dat het mogelijk is de deur te
openen.
Als u wasmiddel wilt toevoegen moet u oppassen
dat het vlottertje MAX niet reeds in de hoogste
stand staat.
Om het programma voort te zetten doet u de deur
weer dicht en drukt u nogmaals op de betreffende
startknop.
Om de maximale veiligheid te garanderen, zal het
niet mogelijk zijn het deurtje te openen indien er
teveel water in de trommel aanwezig is (het
controlelampje DEUR GEBLOKKEERD zal ook na
twee minuten aan blijven). Het is in dit geval
noodzakelijk de wasautomaat uit te zetten door
circa 2 seconden op de knop AAN/UIT
drukken en te wachten tot het water automatisch
wordt afgevoerd.
7. EINDE VAN HET PROGRAMMA
Aan het einde van het wasprogramma zal het
symbool met betrekking tot het geselecteerde
programma branden, terwijl alle controlelampjes
van de wasduur beginnen te knipperen.
Om een nieuwe wascyclus te starten dient u de
wasautomaat uit te schakelen en daarna weer in
te schakelen, door TWEE MAAL op de knop AAN/
te drukken.
UIT
te
42

Wasprogrammas
Max.
Knop Materiaal
WIT KATOEN
GEKLEURD
FIJNE WAS
+
+
SNELLE WAS 30’ / SPOELEN
Katoen en synthetisch 3 30°/koud water** 800 30
De duur van de programmas zoals aangegeven in de tabel zijn slechts geschat en gaan uit van een gemiddelde hoeveelheid wasgoed.
Wit katoen 6 60°C 1200 145
40° / AN T I KREUK
Bont katoen en synthetisch 4,5 40°C 1000 80
Wol (langzame centrifuge
op het einde)
Zijde en gordijnen (zonder
centrifuge op het einde)
Lading
(kg)
1,5 30°C 600 50
1,5 30°C
Temperatuur
Centrifuge
(toeren p er
minuut)
geen
centrifuge*
Duur van
de cyclus
(minuten)
50
Beschrijving van de
wascyclus
Wassen, spoelen, centrifuge
halverwege en op het einde
Wassen, spoelen en lichte
centrifuge
Wassen, spoelen en lichte
centrifuge
Wassen, spoelen en water
afvoeren
Wassen (alleen als het
programma "Snelle was" actief
is), spoelen en lichte centrifuge
*N.B.: voor informatie over het uitsluiten van de centrifuge bij fijne was, zie de paragraaf Fijne was 30°
onderaan de bladzijde.
**N.B.: voor informatie hoe wasgoed dat met de hand is gewassen te kunnen spoelen met koud water, zie de
paragraaf Snelle was 30'/Spoelen onderaan de bladzijde.
WIT KATOEN 60°
Geschikt voor het wassen van wit katoenen wasgoed.
De hogere wastemperatuur zorgt ervoor dat u betere
wasresultaten kunt bereiken in de klasse A.
GEKLEURD 40° / ANTI KREUK
Met dit programma kunt u al uw bonte was wassen,
zowel van katoen als synthetisch. De centrifuge wordt
nauwkeurig gecontroleerd tijdens de gehele wascyclus,
zodat er minder kreukels op de stof worden gevormd en
de kleding makkelijker kan worden gestreken.
Het is mogelijk tegelijkertijd katoenen en synthetisch
wasgoed te wassen.
FIJNE WAS 30°
Cyclus voor het wassen van wol, zijde en alle andere
fijne was. Gezien de verschillende eigenschappen van
dit wasgoed vereist dit programma een
verschillende activering:
+ CYCLUS FIJNE WAS MET CENTRIFUGE
AAN HET EINDE (voor wollen wasgoed): druk op de
knop START PROGRAMMA FIJNE WAS
. Na circa 3
seconden zullen de knoppen START PROGRAMMA
FIJNE WAS
en START PROGRAMMA SNELLE WAS
beginnen te knipperen. Druk nogmaals op de knop
START PROGRAMMA FIJNE WAS
om de wascyclus
uit te voeren die eindigt met een langzame centrifuge.
Tijdens dit programma beweegt de trommel op een
speciaal ontwikkelde manier, die ervoor zorgt dat het
overtollige water uit de stoffen wordt verwijderd, waardoor
wollen kledingstukken beter worden beschermd.
+ CYCLUS FIJNE WAS MET UITSLUITING VAN
DE CENTRIFUGE (voor kledingstukken van zijde, viscose
en voor het wassen van gordijnen en vitrage; niet te
gebruiken voor het wassen van wol): druk op de knop
START PROGRAMMA FIJNE WAS
seconden zullen de knoppen START PROGRAMMA FIJNE
WAS
en START PROGRAMMA SNELLE WAS
beginnen te knipperen. Druk op de knop START SNELLE
WAS
voor een wascyclus zonder de centrifuge aan het
einde. Aan het einde van de cyclus zal de wasautomaat
automatisch het water dat aanwezig is in de trommel
afvoeren. We raden u aan gelijk het wasgoed uit de
automaat te halen om een onnodig kreuken te vermijden.
SNELLE WAS 30' / SPOELEN
Met dit programma kunt u in slechts 30 minuten u niet
zo vuile katoenen of synthetisch kleding wassen, of
wasgoed waar op het etiket staat wassen op 30°
U kunt bovendien katoenen of synthetisch wasgoed dat
van te voren op de hand is gewassen uitspoelen (wol en
zijde uitgezonderd).
Dankzij speciale sensoren is de wasautomaat in
staat de aanwezigheid van wasmiddel waar te nemen
op het wasgoed dat in de trommel wordt geplaatst:
- als er geen wasmiddel op het wasgoed aanwezig is,
zal de cyclus SNELLE WAS 30' worden uitgevoerd;
- als er wel wasmiddel aanwezig is (kleding die met de
hand is gewassen), zal automatisch de cyclus
SPOELEN worden uitgevoerd.
AUTOMATISCH BEHEER VAN HET SPOELEN
De spoelfunctie wordt in elk programma door speciale
sensoren geregeld. In het geval het wasgoed aan het
einde van de wasfase nog vol zeep zit, zal de
spoelfase automatisch worden verlengd tot aan de
volledige verwijdering van het wasmiddel. In dit geval
zal de duur van de wascyclus iets langer zijn dan
aangegeven in de programmatabel.
. Na circa 3
NL
43

Wasmiddelen en wasgoed
NL
Voorbereiden van het wasgoed
Verdeel het wasgoed volgens:
- het soort stof / het symbool op het etiket.
- de kleuren: scheid de bonte was van de witte was.
Leeg de zakken en controleer de knopen.
Overschrijd nooit de waarden van maximale lading
die zijn aangegeven in de Wasprogrammas.
Wastips
Handdoeken en beddengoed (lakens,
handdoeken, badjassen, etc.): gebruik het
programma WIT KATOEN 60°
wasprestaties garandeert in klasse A. De intensieve
centrifuge zorgt ervoor dat het overtollige water
goed wordt verwijderd.
dat de beste
Hoeveel weegt het wasgoed?
1 laken 400-500 g.
1 sloop 150-200 g.
1 tafelkleed 400-500 g.
1 badjas 900-1200 g.
1 handdoek 150-250 g.
1 spijkerbroek 400-500 g.
1 overhemd 150-200 g.
Bonte katoenen of synthetisch wasgoed, met op
het etiket de aanwijzing wassen op 30°
gebruik het programma SNELLE WAS 30
lage wastemperatuur zorgt ervoor dat de kleuren
goed worden behouden. We raden u aan een
vloeibaar wasmiddel te gebruiken.
:
. De
Witte katoenen kledingstukken (overhemden,
t-shirts, tafellakens, etc.): gebruik het
programma WIT KATOEN 60°. Het is raadzaam
hardnekkige vlekken voor te wassen met een
stuk zeep voor u het kledingstuk in de
wasautomaat doet.
Bonte katoenen kledingstukken (overhemden,
t-shirts, linnengoed, etc.): gebruik het programma
GEKLEURD 40°
levert zonder de kleuren te beschadigen. De
centrifugefase vermindert, dankzij de functie ANTI
KREUK, de vorming van kreukels aan het einde van
de wascyclus, waardoor strijken gemakkelijker
wordt. We raden u aan een vloeibaar wasmiddel te
gebruiken.
Witte of bonte synthetische kledingstukken
(overhemden, t-shirts, linnengoed, etc.): gebruik
het programma GEKLEURD 40°
aan nooit witte en bonte was tegelijk te wassen,
om te voorkomen dat de bonte was afgeeft op de
witte was. We raden u aan een vloeibaar
wasmiddel te gebruiken.
dat de beste wasprestaties
. We raden u
Wollen kleding (truien, sjaals, etc.): gebruik het
programma FIJNE WAS 30° met centrifuge op het
einde
tijdens het wassen en de langzame centrifuge
behoeden het vervilten van de stoffen. Gebruik
wasmiddel dat speciaal voor wol is bedoeld.
Overschrijd nooit het maximale laadniveau.
Zijden kleding (blouses, linnengoed, etc.):
gebruik het programma FIJNE WAS 30° met
uitsluiting van de centrifuge
het gewassen goed nooit te lang in de trommel te
laten om te voorkomen dat het kreukt.
Gordijnen: gebruik het programma FIJNE WAS
30° met uitsluiting van de centrifuge
de gordijnen en doe ze in een kussensloop of
wasnet. Was ze alleen en zorg ervoor nooit het
maximale laadniveau te overschrijden.
+ . Het bewegen van de trommel
+ . Zorg ervoor
+ . Vouw
44

Voorzorgsmaatregelen
en advies
Deze wasautomaat is ontworpen en uitgevoerd
volgens de internationale veiligheidsnormen. Deze
aanwijzingen zijn voor uw eigen veiligheid en moeten
aandachtig worden doorgenomen.
Algemene veiligheid
Dit apparaat is uitsluitend ontworpen voor
huishoudelijk niet-professioneel gebruik.
De wasautomaat mag alleen door volwassenen
worden gebruikt en volgens de instructies in deze
handleiding.
Raak de machine niet aan als u blootsvoets bent of
met natte of vochtige handen of voeten.
Trek de stekker nooit uit het stopcontact door aan
het snoer te trekken, maar altijd door de stekker
zelf beet te pakken.
Raak het afvoerwater niet aan aangezien het
behoorlijk warm kan zijn.
Forceer de deur nooit: het veiligheidsmechanisme
dat een ongewild openen van de deur voorkomt,
kan beschadigd worden.
verwijderen van huishoudelijke apparatuur kunnen
de gebruikers zich wenden tot de gemeentelijke
reinigingsdienst of de verkoper.
Energiebesparing en bescherming
van het milieu
Bezuinigen op wasmiddel, water, energie en tijd
Teneinde geen energiebronnen te verkwisten moet
de wasautomaat altijd met een maximale lading
worden gebruikt. U spaart 50% energie met een
volle lading i.p.v. twee half volle ladingen.
Door vlekken met een ontvlekkingsmiddel te
behandelen of van te voren in te weken kunt u op
lagere temperaturen wassen.
Doseer het wasmiddel op basis van de hardheid
van het water, de vuilheidsgraad en de hoeveelheid
wasgoed. Zo vermijdt u onnodig energieverbruik en
beschermt u het milieu: ook al zijn wasmiddelen
biologisch afbreekbaar, toch bevatten ze
elementen die het evenwicht in de natuur
verstoren. Probeer bovendien zoveel mogelijk
wasverzachters vermijden.
NL
Probeer in geval van storingen nooit zelf de interne
mechanismen van de wasautomaat te repareren.
Zorg ervoor dat kleine kinderen niet te dicht bij de
machine komen als deze in werking is.
De deur kan tijdens het wassen zeer heet worden.
Als de machine verplaatst moet worden, doe dit
dan met twee of drie personen tegelijk en met
grote voorzichtigheid. Doe dit nooit alleen want het
apparaat is erg zwaar.
Voordat u het wasgoed in de automaat laadt, moet
u controleren of hij leeg is.
Afvalverwijdering
Het wegdoen van het verpakkingsmateriaal:
houdt u aan de plaatselijke normen zodat het
materiaal hergebruikt kan worden.
De Europese richtlijn 2002/96/EG, betreffende
afgedankte elektrische en elektronische
apparatuur, voorziet dat huishoudelijke apparatuur
niet met het normale afval mag worden
meegegeven. De afgedankte apparatuur moet
apart worden opgehaald om het wedergebruik van
materialen waarvan het is gemaakt te
optimaliseren en om potentiële schade aan de
gezondheid en het milieu te voorkomen. Het
symbool van de afvalemmer met een kruis staat op
elk product, om aan te geven dat het apart moet
worden weggegooid.
Voor verdere informatie betreffende het correcte
Door gedurende de late middag tot aan de vroege
morgen te wassen werkt u mee aan het beperken
van de belasting van elektrische centrales.
Druppelopvangsysteem
De wasautomaat is voorzien van een
druppelopvangsysteem aan de binnenkant van het
deurtje om eventuele overgebleven druppels aan het
einde van de cyclus op te vangen.
We raden u aan regelmatig de vochtigheidsgraad van
het sponsje in het bakje van het
druppelopvangsysteem te controleren. Indien
noodzakelijk is het mogelijk het sponsje te reinigen of
te vervangen, zoals volgt:
1. trek het bakje naar
voren door er licht aan de
onderkant tegen te
drukken.
2. verwijder het sponsje,
spoel het onder stromend
water en knijp het goed
uit. Het is bovendien
mogelijk het sponsje te
vervangen met een van
de bijgeleverde reservesponsjes.
3. doe het sponsje weer op zijn plaats in het bakje.
4. doe het bakje weer op zijn plaats in de deur. Zorg
ervoor dat de veren van de deur weer goed op
hun plaats in het bakje worden gestoken.
5. controleer of het wasmiddelbakje goed op zijn
plaats zit.
45

Onderhoud en verzorging
NL
Afsluiten van water en stroom
Sluit na iedere wasbeurt de kraan af. Hiermee
beperkt u slijtage van de waterinstallatie van de
wasautomaat alsmede lekkagegevaar.
Sluit altijd eerst de stroom af voordat u de
wasautomaat schoonmaakt en gedurende
onderhoudswerkzaamheden.
Reinigen van de wasautomaat
De buitenkant en de rubberen onderdelen kunnen
met een spons en een lauw sopje worden
schoongemaakt. Gebruik nooit schuurmiddelen of
oplosmiddelen.
Reinigen van het wasmiddelbakje
Controleer dat er geen wasmiddel of water in het
wasmiddelbakje zit voordat u het verwijdert. Als er
wel water of wasmiddel in het bakje zitten moet u
controleren dat ze niet uit het bakje lopen als u het
verwijdert.
Onderhoud van deur en trommel
Laat de deur altijd op een kier staan om nare
luchtjes te vermijden.
Reinigen van de pomp
De wasautomaat is voorzien van een zelfreinigende
pomp en hoeft dus niet te worden onderhouden. Het
kan echter gebeuren dat kleine voorwerpen (muntjes,
knopen) in het voorvakje dat de pomp beschermt en
zich aan de onderkant ervan bevindt, terechtkomen.
Verzeker u ervan dat de wascyclus klaar is en haal
de stekker uit het stopcontact.
Toegang tot het voorvakje:
1. verwijder het
beschermelement aan de
onderzijde van de
wasautomaat, door het
tegen de klok in te
draaien (zie afbeelding);
Het wasmiddelbakje van deze wasautomaat wordt
automatisch gereinigd tijdens het wasprogramma.
Het is echter mogelijk dat er bij het gebruik van
speciale wasmiddelen, in uitzonderlijke gevallen,
zeepresten achterblijven. Om het wasmiddelbakje
handmatig te reinigen gaat u als volgt te werk:
1. Open de deur om bij
het bakje te komen.
2. Trek het bakje naar
boven toe en naar
buiten. Pak het bij het
middelste bakje beet
zoals aangegeven in de
afbeelding. Pak het
bakje nooit bij het
rooster beet aangezien
u het zou kunnen beschadigen.
3. Haal het deksel van
het bakje los om
toegang tot het bakje te
krijgen, zoals
aangegeven in de
afbeelding.
4. Reinig het bakje
onder het stromende
water.
5. Haak het deksel
weer vast en doe en bakje weer op zijn plaats
totdat u klik hoort.
2. draai het deksel eraf,
tegen de klok in (zie
afbeelding): het is
normaal dat er een
beetje water uit komt;
3. maak de binnenkant goed schoon;
4. schroef het deksel er weer op;
5. schroef het beschermdeksel rechtsom weer op
zijn plaats. Zorg ervoor dat de pijl aan de binnenkant
van het deksel naar boven wijst.
Controleren van de wateraanvoerslang
Controleer minstens een maal per jaar de slang van
de watertoevoer. Als er barstjes of scheuren in zitten
moet hij vervangen worden: gedurende het wassen
kan de hoge waterdruk onverwachts breuken
veroorzaken.
Gebruik nooit oude slangen.
46

Storingen en oplossingen
Het kan gebeuren dat het apparaat niet werkt. Voor u contact opneemt met de Servicedienst (zie Service) moet
u controleren of het niet een storing betreft die u zelf makkelijk kunt verhelpen met behulp van de volgende lijst.
Storingen:
De wasautomaat gaat niet aan.
De wascyclus start niet.
De wasautomaat heeft geen
watertoevoer (Het controlelampje
DEUR GEBLOKKEERD knippert
snel).
De wasautomaat blijft water
aan- en afvoeren.
Mogelijke oorzaken / Oplossing:
De stekker zit niet in het stopcontact of niet ver genoeg om contact te
maken.
Het hele huis zit zonder stroom.
De deur zit niet goed dicht.
De AAN/UIT knop is niet ingedrukt.
De knoppen START PROGRAMMA zijn niet ingedrukt (ze knipperen nog).
De waterkraan is niet open.
De watertoevoerbuis is niet aangesloten op de kraan.
De buis is gebogen.
De waterkraan is niet open.
Het hele huis zit zonder water.
Er is onvoldoende druk.
De knoppen START PROGRAMMA zijn niet ingedrukt (ze knipperen nog).
De afvoerbuis is niet op 65 tot 100 cm afstand van de grond af
geïnstalleerd (zie Installatie).
Het uiteinde van de afvoerbuis ligt onder water (zie Installatie).
De afvoer in de muur heeft geen ontluchting.
NL
De wasautomaat voert het water
niet af of centrifugeert niet.
De machine trilt erg tijdens het
centrifugeren.
De wasautomaat lekt.
Het controlelampje DEUR
GEBLOKKEERD knippert zeer
snel.
Als na deze controle het probleem nog niet is opgelost, doet u de
waterkraan dicht, de wasautomaat uit en belt u de Servicedienst. Als u op
een van de hoogste verdiepingen van een flatgebouw woont, kan zich een
hevelingsprobleem voordoen, waarbij de wasautomaat voortdurend water
aan- en afvoert. Om deze storing te verhelpen zijn er in de handel speciale
beluchters te koop.
De afvoerslang is geknikt (zie Installatie).
De afvoerbuis is verstopt.
De transportbeveiligingsschroeven zijn niet verwijderd tijdens het
installeren. Verwijder de schroeven (zie Installatie).
De wasautomaat staat niet goed recht (zie Installatie).
De wasautomaat staat te krap tussen meubels en muur (zie Installatie).
De buis van de watertoevoer is niet goed aangeschroefd (zie Installatie).
Het wasmiddelbakje is verstopt (voor reiniging zie Onderhoud en
verzorging).
De afvoerbuis is niet goed aangesloten (zie Installatie).
Het druppelopvangsysteem is vol. Reinig of vervang het sponsje (zie
Voorzorgsmaatregelen en advies)
Doe de wasautomaat uit en haal de stekker uit het stopcontact. Wacht
circa 1 minuut en doe hem weer aan. Het is noodzakelijk de wascyclus
opnieuw te starten.
Als de storing aanhoudt, dient u de Servicedienst in te schakelen.
Er ontstaat teveel schuim.
Het wasmiddel is niet bedoeld voor wasautomaten (er moet voor
wasautomaat, handwas en machinewas, of iets dergelijks op staan).
U heeft teveel wasmiddel gebruikt.
47

Service
NL
Voordat u de Servicedienst inschakelt:
Controleer eerst of u het probleem zelf kunt oplossen (zie Storingen en oplossingen);
Start het programma opnieuw om te controleren of de storing is verholpen;
Als dit niet het geval is, kunt u contact opnemen met de erkende Servicedienst.
In het geval de wasautomaat verkeerd is geïnstalleerd of u hem niet correct heeft gebruikt zal u
gevraagd worden de reparatiekosten te betalen.
Wendt u nooit tot een niet erkende installateur.
Vermeld:
het type storing;
het model van de machine (Mod.);
het serienummer (S/N);
Deze laatste gegevens vindt u op het typeplaatsje op het apparaat.
48

Руководство по эксплуатаöèè
СТИРАЛЬНАЯ МАШИНА
Содержание
Установка, 50-51
CIS
Русский
SIXL 126
Распаковка и выравнивание
Подключение к холодной воде и электросети
Технические характеристики
Описание стиральной машины, 52-53
Самоочищающийся распределитель моющих
средств
Панель управления
Система балансировки загрузки
Выполнение программы стирки, 54
Программы стирки, 55
Моющие средства и белье, 56
Подготовка белья
Рекомендации по стирке
CIS
Предупреждения и рекомендации, 57
Основные правила безопасности
Утилизация
Экономия электроэнергии и охрана окружающей
среды
Влагосборник
Обслуживание и уход, 58
Отключение водо- и электроснабжения
Уход за машиной
Чистка распределителя моющих средств
Уход за дверцей и барабаном машины
Чистка насоса
Проверка заливного шланга
Устранение неисправностей, 59
Сервисное обслуживание, 60
49

Установка
CIS
Сохраните руководство как источник справочной
информации по оборудованию. В случае переезда,
продажи или передачи машины новому владельцу
оно должно быть в комплекте со стиральной
машиной.
Внимательно прочитайте руководство: в нем
содержатся важные сведения по безопасной
установке, эксплуатации и обслуживанию
стиральной машины.
Распаковка и выравнивание
Распаковка
1. Распакуйте стиральную машину.
2. Убедитесь, что машина не была повреждена во
время транспортировки. При обнаружении
повреждений - не подключайте машину - вяжитесь
с поставщиком немедленно.
3. Удалите с задней
части оборудования 4
транспортировоч
ных болта с установоч
ными резиновыми шайбами (ñì. ðèñ.).
Правильное выравнивание оборудования поможет
избежать шума, вибраций и смещений машины
во время ее работы.
Если стиральная машина устанавливается на
полу с ковровым покрытием, отрегулируйте ее
ножки таким образом, чтобы под основанием
машины имелось достаточ ное пространство для
вентиляции.
Подключение к холодной воде и
электросети
Подсоединение заливного шланга
1. Вставьте прокладку А
в конец заливного
шланга и наверните его
на вывод водопровода
холодной воды с
A
резьбовым отверстием
3/4 дюйма (ñì. ðèñ.).
Перед подсоединением
заливного шланга
откройте водопроводный
кран и дайте стечь
грязной воде.
4. Закройте отверстия прилагающимися ластиковыми заглушками.
5. Сохраните все детали: они понадобятся в случае
последующей транспортировки стиральной машины.
Не разрешайте детям играть с упаковочными
материалами.
Выравнивание
Машина может работать шумно в случае
неправиль-ной регулировки двух ее передних
ножек.
1. Установите стиральную машину на ровном и
прочном полу, так чтобы она не касалась стен или
мебели.
2. Если пол неровный, отрегулируйте устойчивое
положение машины
путем ращения ее
передних ножек (ñì.
ðèñ.). Угол наклона
верхней крышки корпуса
не должен превышать 2°.
2. Подсоедините
заливной шланг к
стиральной машине,
навинтив его на водоприемник,
расположенный вверху
справа на задней части
оборудования (ñì. ðèñ.).
3. Убедитесь, что шланг не перекручен и не пережат.
Давление воды должно быть в пределах начений,
указанных в табличке Технических характеристик
(см. следующую стр.).
Если длина водопроводного шланга окажется
недостаточ ной, обратитесь в специализированный
магазин или в Авторизованный сервисный центр.
50

Подсоединение сливного шланга
Подсоедините сливной
шланг, так чтобы он не
был изогнут, к сливному
трубопроводу или
сливному отверстию в
65 - 100 cm
стене, расположенному
на высоте 65-100 см от
пола.
Или поместите конец
шланга в раковину или в
ванну, подвесив шланг с
помощью
направляющей (входит в
комплект поставки),
прикрепив ее к крану
(ñì. ðèñ.). Свободный
конец шланга не дол-жен
быть погружен в воду.
Не рекомендуется использовать удлинители для
сливного шланга. При необходимости допускается
его наращивание шлангом такого же диаметра и
длиной не более 150 см.
Подсоединение к электросети
Перед включением машины в сеть убедитесь, то:
Розетка имеет заземление в соответствии с
нормами электробезопасности;
Розетка может выдержать максимальную
силовую нагрузку оборудования, указанную в
табличке технич еских данных (см. табл. сбоку);
Напряжение электропитания соответствует значе-
ниям, указанным в табличке технических данных
(см. табл. сбоку);
Розетка подходит к вилке стиральной машины. В
противном случае замените розетку или вилку.
Стиральная машина не должна устанавливаться
вне помещений (даже под навесом: чрезвычайно
опасно оставлять оборудование под оздействием
дождя и других атмосферных факторов).
После установки должен быть обеспечен вободный
доступ к питающему кабелю и вилке борудова-ния.
Не используйте удлинители и многогнездовые ро-
зетки.
Питающий кабель не должен быть перекручен
или пережат (находиться под машиной после
подключения).
Замена питающего кабеля должна роизводиться
только специалистами Авторизованного ервисного
центра.
Производитель снимает с себя всякую
ветственность в случае несоблюдения
указанных норм установки и подключения
оборудования.
Технические хар актер истики
Ìîäå ëü
Размеры
Загрузка
Электр ические
параметры
Гидравлические
параметры
Скор ость
отжима
Kонтрольные
программы
согласно
нормативу
EN 60456
SIXL 126
ши ри н а 5 9, 5 с м
высота 85 см
глубина 53,5 с м
1 - 6 êã
см. табличку технич ес ких данных на
машине
max давление 1 Мпа (10 бар)
min давление 0,05 Мпа (0,5 бар)
объе м барабана 5 2 л
äî 1200 îá/ìèí
программа ;
при загрузке до 6 кг.
Машина с оотв ет ств уе т сле ду ющим
Директивам Европейского
Экономического сообщества:
- 73/2 3/ ЕЕС от 19.02.7 3 (низкого
напряжения) и последующие модификации
- 89/336 /ЕЕС от 03.05.89 (электромагнитной совместимости) и
последующие модификации
- 2002 /96/ CE (утилизация
электрического и электронного
оборудования).
CIS
51

CIS
Описание стиральной машины
ПАНЕЛЬ
УПРАВЛЕНИЯ
ДВЕРЦА
ЗАГРУЗОЧНОГО
ЛЮКА
РЕГУЛИРУЕМЫЕ НОЖКИ
Самоочищающийся распределитель
моющих средств
Эта стиральная машина оснащена усовершенствованным самоочищающимся распределителем моющих
средств, который повышает качество стирки.
Распределитель расположен внутри дверцы загрузоч ного люка.
STOP
STOP
MAX
MAX
1. Чтобы получить доступ к распределителю оющих
средств, откройте дверцу люка (ñì. ðèñ. A).
2. Поместите моющее средство или добавки в отделения на предохранительные решетки ледующим
образом:
Отделение
добавки.
Отделение
таблетки и добавки в виде порошков.
Чтобы поместить таблетки, поднимите
редохранительную решетку отделения.
Отделение
Во избежание утечки жидких моющих средств или
добавок не заливайте их в центральное отделение.
AB
: жидкие моющие средства и
: стиральный порошок или
: смягчитель ткани.
РУЧКА ДВЕРЦЫ
ПАНЕЛЬ
ДЛЯ ДОСТУПА
К СЛИВНОМУ
НАСОСУ
Уровень средства для стирки виден через меющееся на отделении прозрачное окошко.
В отделениях
торные поплавки (ñì. ðèñ. B). При аксимальном
количестве загруженного моющего средства /
смягчителя индикаторные поплавки однимутся
вверх - до соприкосновения с предохранительными решетками.
Не превышайте максимальные уровни оющих
средств, указанные на распределителе.
Соблюдайте инструкции по дозировке моющего
средства, приведенные на его на упаковке. При
использовании очень густых средств для стирки
мы предлагаем поместить их прямо в барабан, а
не в распределитель.
Превышение указанных на машине максимальных
уровней может привести к просачиванию средств для
стирки из нижней части распределителя.
Избыточное количество моющего средства не повысит эффективность стирки и отрицательно скажется на
экологии.
Вода, используемая в процессе стирки, вымывает из
распределителя любые излишки моющих средств.
Однако распределитель можно вынуть и вручную
(см. "Обслуживание и уход").
Чтобы облегчить дозировку моющих средств, воспользуйтесь мерной емкостью, поставляемой с машиной.
Максимальный объем моющих средств для отделений распределителя соответствует:
- жидкие моющие средства: 1 1/2 мерки;
- стиральные порошки: 2 меркам;
- смягчитель ткани: 1 мерке.
è также имеются индика-
52

Панель управления
Индикаторы
ПРОДОЛЖИТЕЛЬНОСТИ
СТИРКИ
Кнопка
ЗАПУСК
ПРОГРАММЫ
БЫСТРАЯ СТИРКА, 30 мин.
Кнопка
ЗАПУСК ПРОГРАММЫ
ДЕЛИКАТНЫЕ ТКАНИ
Кнопка
ВКЛЮЧЕНИЯ/
ВЫКЛЮЧЕНИЯ
Красный индикатор
БЛОКИРОВКИ
ДВЕРЦЫ
Кнопка
ЗАПУСК ПРОГРАММЫ
БЕЛЫЕ Х/Б ТКАНИ
Кнопка
ЗАПУСК ПРОГРАММЫ
СМЕШАННЫЕ
ЦВЕТНЫЕ ТКАНИ
С ФУНКЦИЕЙ
ЛЕГКАЯ ГЛАЖКА
CIS
Кнопка ВКЛЮЧЕНИЯ/ВЫКЛЮЧЕНИЯ: служит для
включения и выключения машины.
При включении машины кнопки запуска
различных программ начинают мигать, а
индикаторы продолжительности стирки горят,
не мигая.
Чтобы отменить работающую программу,
нажмите и удерживайте кнопку нажатой примерно 2
секунды.
Индикатор
ма-шина выполнит слив воды из бака.
Красный индикатор БЛОКИРОВКИ ДВЕРЦЫ:
горящий индикатор показывает, что дверца заблокирована, чтобы предотвратить ее случайное
открытие; во избежание повреждения оборудования
подождите примерно 2 минуты, пока индикатор
погаснет, прежде чем открывать дверцу после
окончания программы стирки или ее
прерывания.
будет мигать несколько секунд è
Быстрое мигание индикатора БЛОКИРОВКИ
ДВЕРЦЫ указывает на неисправность
(см. "Устранение неисправностей").
Индикаторы ПРОДОЛЖИТЕЛЬНОСТИ СТИРКИ:
загораются один за другим, показывая последовательность выполнения программы стирки. По завершении программы все индикаторы начинают
мигать. Подробнее см. в гл. "Выполнение
программы стирки".
Система балансировки загрузки
Перед каждым циклом отжима, чтобы избежать
чрезмерной вибрации и равномерно распределить
загрузку, барабан непрерывно вращается на
скорости, которая слегка выше нормальной
скорости вращения при стирке. Если после
нескольких попыток белье все еще распределено
не равномерно, машина будет выполнять отжим на
скорости, ниже установленной для программы.
При сильной несбалансированности загрузки стиральная машина вместо отжима выполняет распределение белья. Попытки балансировки могут увелич ивать общую продолжительность цикла
максимально на 10 минут.
Кнопки ЗАПУСК ПРОГРАММЫ:
нажмите одну из этих кнопок для запуска
выбранной программы стирки:
- кнопка горит, не мигая: программа выполняется;
- кнопки мигают: машина в ожидании программиро-
вания.
53

Выполнение программы стирки
CIS
Примечание: После установки, перед первым
использованием машины запустите цикл стирки с
моющим средством, но без белья, установив
программу
1. ВКЛЮЧИТЕ МАШИНУ, нажав кнопку
ВКЛЮЧЕНИЯ/ ВЫКЛЮЧЕНИЯ
кнопок ЗАПУСК ПРОГРАММЫ начнут мигать, а
индикаторы ПРОДОЛЖИТЕЛЬНОСТИ СТИРКИ
загорятся, не мигая, показывая, что стиральная
машина готова к введению команд.
2. ЗАГРУЗИТЕ БЕЛЬЕ. Откройте дверцу, используя
ручку. Загрузите белье, проверив, что не
превышен максимальный объем загрузки,
указанный в таблице программ на следующей
странице.
3. ОТМЕРЬТЕ МОЮЩЕЕ СРЕДСТВО И ДОБАВКИ.
Добавьте средства для стирки в распределитель,
расположенный на внутренней стороне дверцы
загрузочного люка. По меткам на отделяниях
распределителя и индикаторным поплавкам
проверьте, что не превышены указанные
максимальные уровни.
4. ЗАКРОЙТЕ ДВЕРЦУ.
стирки погаснут. Индикатор БЛОКИРОВКИ
ДВЕРЦЫ будет гореть, не мигая, показывая, что
активизировано устройство безопасности дверцы.
Описание имеющихся программ стирки ñì. â ãë.
"Программы стирки".
Порядок запуска программы ДЕЛИКАТНЫЕ
ТКАНИ
следующей странице.
В процессе выполнения программы
последовательно загораются индикаторы
ПРОДОЛЖИТЕЛЬНОСТИ СТИРКИ, показывая,
насколько программа уже выполнена.
.
. Символы
5. ЗАПУСТИТЕ
ПРОГРАММУ
СТИРКИ, нажав
соответствующую
кнопку ЗАПУСКА
ПРОГРАММЫ. Символ
выбранной программы
загорится не мигая, а
все индикаторы
продолжительности
èíîé: см. "Деликатные ткани, 30°" на
Рисунок сбоку
относится к ситуации,
когда цикл выполнен
примерно на 50%.
По завершении
программы все
индикаторы ПРОДОЛЖИТЕЛЬНОСТИ
СТИРКИ начнут мигать.
6. Вы можете ПРЕРВАТЬ ПРОГРАММУ СТИРКИ,
нажав на горящую кнопку запуска программы,
которая начнет мигать. Примерно через 2 минуты
индикатор БЛОКИРОВКИ ДВЕРЦЫ погаснет,
показывая, что дверцу можно открыть.
Если требуется добавить моющее средство, убедитесь, что индикаторный поплавок
МАКСИМАЛЬНОГО уровня не находится в
верхнем положении. Чтобы возобновить
программу, закройте дверцу машины и еще раз
нажмите на соответствующую кнопку запуска
программы.
В целях безопасности всякий раз, когда в
барабане остается определенное количество
воды, которая может вытечь из машины, дверца
будет заблокирована (индикатор БЛОКИРОВКИ
ДВЕРЦЫ останется гореть даже по истечении 2-х
минут). В этом случае следует выключить
машину, нажимая примерно 2 секунды кнопку
ВКЛЮЧЕНИЯ/ВЫКЛЮЧ ЕНИЯ
пока вода сольется авто матич ески.
7. ЗАВЕРШЕНИЕ ПРОГРАММЫ.
По завершении программы стирки символ,
соответствующий выбранной программе, будет
гореть, не мигая, в то время как все остальные
индикаторы продолжительности стирки
начнут мигать.
Для запуска нового цикла стирки необходимо
выключить и включить машину, нажав ДВА РАЗА
кнопку ВКЛЮЧЕНИЯ/ВЫКЛЮЧ ЕНИЯ
, и подождать,
.
54

Программы стирки
Ìàêñ.
Кнопка Ткани
ХЛОПОК
СМЕШАННОЕ ЦВЕТНОЕ БЕЛЬЕ 40° / функция ЛЕГКАЯ ГЛАЖКА
ДЕЛИКАТНЫЕ ТКАНИ
БЫСТРАЯ СТИРКА, 30 мин. / ПОЛОСКАНИЕ
Указанная в таблице продолжительность программ является показательной и рассчитана на основе среднего объема загрузки.
Прочное белое х/б
белье
Цветное белье из
хлопка и синтетики
Шерсть (деликатный
+
отжим в конце цикла)
Шелк и занавеси
+
(без окончательного
отжима)
Xлопок и синтетика
загурзка
(êã)
6 60°C 1200 145
4,5 40°C 1000 80
1,5 30°C 600 50
1,5 30°C
3
Температура
30°/холодная
âîäà**
Скорость
отжима
(îá./ìèí.)
áåç
отжима*
800 30
Прод олжительно
сть цикла, мин.
50
Описание цикла
стирки
Стирка, полоскание,
промежуточный и
окончательный отжим
Стирка, полоскание и
деликатный отжим
Стирка, полоскание и
деликатный отжим
Стирка, полоскание и
слив
Стирка (только, если
включена программа
«Быстрая стирка,
30»,полоскание, отжим
*Примечание: oб исключении цикла отжима из программы стирки деликатных тканей см. "Деликатные ткани, 30°"
ниже.
**Примечание: o полоскании выстиранного вручную белья в холодной воде см. "Быстрая стирка, 30 мин. /
полоскание" ниже.
ХЛОПОК, 60°
Программа предназначена для стирки хлопчатобумажного белья. Более высокая температура стирки позволяет
получить лучшие результаты стирки в классе А.
СМЕШАННОЕ ЦВЕТНОЕ БЕЛЬЕ, 40° / функция
ЛЕГКАЯ ГЛАЖКА
Программа может использоваться для стирки цветного
хлопчатобумажного и синтетического белья. Скорость
отжима тщательно контролируется на протяжении всего
цикла стирки, для того чтобы уменьшить сминаемость
белья и облегчить его последующую глажку. Изделия из
хлопка и синтетики можно стирать одновременно.
ДЕЛИКАТНЫЕ ТКАНИ, 30°
Программа стирки изделий из шерсти, шелка и др. деликатных тканей. Поскольку эти ткани имеют разные
свойства, порядок запуска данной программы отличается от остальных:
+ ПРОГРАММА ДЛЯ ДЕЛИКАТНЫХ ТКАНЕЙ - С
ОТЖИМОМ В КОНЦЕ ЦИКЛА (для шерстяных изде-лий):
нажмите кнопку ЗАПУСК ПРОГРАММЫ ДЕЛИКАТНЫЕ
ТКАНИ
ПРОГРАММ ДЕЛИКАТНЫЕ ТКАНИ
. Примерно через 3 секунды кнопки ЗАПУСКА
и БЫСТРАЯ СТИРКА,
30 мин. начнут мигать. Чтобы выполнить стирку с
деликатным отжимом в конце, нажмите кнопку ЗАПУСК
ПРОГРАММЫ ДЕЛИКАТНЫЕ ТКАНИ
, которая
предусматривает особый режим вращения барабана для
удаления из белья излишней воды, что уменьшает трение
и предохраняет изделия из шерсти.
+ ПРОГРАММА ДЛЯ ДЕЛИКАТНЫХ ТКАНЕЙ -
БЕЗ ОТЖИМА (шелк, вискоза и занавеси; не использу-
выполнить стирку без окончательного отжима, нажмите
кнопку ЗАПУСК ПРОГРАММЫ БЫСТРАЯ СТИРКА, 30 мин.
. По окончании цикла машина выполнит автоматич
еский слив воды из барабана. Во избежание образо
вания складок на белье выньте его сразу же из машины.
БЫСТРАЯ СТИРКА, 30 мин. / ПОЛОСКАНИЕ
программа может использоваться для стирки всего за 30
минут слабозагрязненного белья из хлопка или синтетики,
или изделий с символом на этикетке
(стирка при 30°);
программа также позволяет выполнить полоскание
хлопчатобужных и синтетических изделий, выстиранных
вручную (не подходит для шерсти и шелка).
Благодаря специальным сенсорам стиральная машина может распознавать наличие моющего средства
на белье, загруженном в барабан:
- если моющее средство на белье не обнаружено, вы
полняется БЫСТРАЯ СТИРКА, 30 мин.;
- если определено наличие на белье моющего средства
(выстиранное вручную белье) автоматически будет выполняться цикл ПОЛОСКАНИЕ.
АВТОМАТИЧЕСКОЕ УПРАВЛЕНИЕ ПОЛОСКАНИЕМ
Функция полоскания в каждой программе управляется и
контролируется специальными сенсорами. Если в конце
стирки белье остается очень мыльным, цикл
полоскания будет автоматически продлен до тех пор,
пока моющее средство не будет полностью удалено.
В этом случае продолжительность программы стирки
может быть слегка увеличена по сравнению со
временем, указанным в таблице программ.
ется для шерсти): нажмите кнопку ЗАПУСК ПРОГРАММЫ
ДЕЛИКАТНЫЕ ТКАНИ
. Примерно через 3 секунды
кнопки ЗАПУСК ПРОГРАММЫ ДЕЛИКАТНЫЕ ТКАНИ и
БЫСТРАЯ СТИРКА, 30 мин. начнут мигать. Чтобы
CIS
55

Моющие средства и белье
CIS
Подготовка белья
Разберите белье в соответствии:
- типом ткани / символом на этикетке;
- цветом: отделите цветное белье от белого.
Выньте все из карманов и проверьте, хорошо ли
держатся пуговицы.
Не превышайте максимальные нормы загрузки
барабана, указанные в табл. "Программы
стирки".
Рекомендации по стирке
Постельное и банное белье (простыни,
полотенца, халаты и т.д.): используйте
программу
оптимальные результаты стирки в классе А.
Интенсивный отжим позволяет эффективно
удалить избыточную воду.
Белое хлопчатобумажное белье (рубашки,
майки, скатерти и т.д.): используйте
программу ХЛОПОК, 60°. Перед закладкой
белья в машину обработайте трудновыводимые
пятна с помощью твердого мыла.
Цветное хлопчатобумажное белье
(рубашки, майки, нижнее белье и пр.):
используйте программу
ЦВЕТНОЕ БЕЛЬЕ, 40°, позволяющую
оптимизировать стирку при сохранении цвета
белья. Фаза отжима, благодаря действию
функции ЛЕГКАЯ ГЛАЖКА, уменьшает по
окончании стирки образование складок на
белье, что облегчает его глажку. Рекомендуется
использовать жидкое средство для стирки.
Синтетическое белое или цветное белье
(рубашки, майки, нижнее белье и т.д.):
используйте программу
ЦВЕТНОЕ БЕЛЬЕ, 40°. Во избежание
закрашивания белого белья цветным не
стирайте вместе белое и цветное белье.
Рекомендуется использовать жидкое средство
для стирки.
ХЛОПОК, 60°, гарантиующую
СМЕШАННОЕ
СМЕШАННОЕ
Сколько весит белье?
1 простыня 400 - 500 г
1 наволочка 150 - 200 г
1 скатерть 400 - 500 г
1 банный халат 900 -1200 г
1 полотенце 150 - 250 г
1 пара джинс 400 - 500 г
1 рубашка 150 - 200 г
Цветное хлопчатобумажное или
синтетическое белье с символом на этикетке
(стирка при 30°):
используйте программу
мин. Низкая температура стирки предохраняет
цветное белье. Рекомендуется использовать
жидкое средство для стирки.
Шерстяные изделия (свитера, шарфы и т.д.):
используйте программу
ТКАНИ с отжимом в конце цикла. Режим
вращения барабана в процессе стирки и
деликатного отжима снижает сваливаемость
шерстяных вещей. Рекомендуется использовать специальные средства для стирки
шерсти. Не превышайте максимальный вес
загрузки.
Шерстяные изделия (свитера, шарфы и т.д.):
используйте программу
ТКАНИ, 30° с исключением отжима. Во
избежание образования складок на белье не
оставляйте его слишком долго в барабане после
окончания стирки.
Занавеси: используйте программу
ДЕЛИКАТНЫЕ ТКАНИ, 30° с исключением
отжима. Сложите занавеси и поместите их в
наволочку или в сетчатый мешочек. Стирайте
отдельно от другого белья, проверьте, что не
превышен максимальный вес загрузки.
БЫСТРАЯ СТИРКА, 30
+ ДЕЛИКАТНЫЕ
+ ДЕЛИКАТНЫЕ
+
56

Предупреждения и
рекомендации
Стиральная машина спроектирована и изготовлена
в соответствии с международными нормами
безопасности. Внимательно прочитайте настоящие
предупреждения, приводимые в целях вашей
безопасности.
Основные правила безопасности
Это оборудование предназначено только для бы-
тового использования.
Стиральная машина должна использоваться
только взрослыми лицами и в соответствии с
инструкциями данного руководства.
Не касайтесь работающей машины, когда Вы бо-
сиком или, если ваши руки/ноги мокрые.
Не тяните за питающий кабель, чтобы вынуть
вилку машины из розетки: беритесь за вилку.
Не касайтесь сливаемой воды, ее температура
может быть очень высокой.
Не пытайтесь с силой открыть дверцу машины:
это может повредить механизм блокировки,
служащий для предотвращения случайного
открывания дверцы.
В случае неисправности при любых обстоятель-
ствах не касайтесь внутренних частей машины,
пытаясь починить ее самостоятельно.
Следите, чтобы дети не приближались к работаю-
щей стиральной машине.
В процессе стирки дверца стиральной машины
может нагреваться.
Если необходимо переместить стиральную маши-
ну, выполняйте эту операцию вдвоем или втроем
с предельной осторожностью. Никогда не пытайтесь поднять машину в одиночку - оборудование
чрезвычайно тяжелое.
Перед помещением в стиральную машину белья
убедитесь, что барабан пуст.
Экономия электроэнергии и охрана
окружающей среды
Экономьте стиральное веществе, воду,
электроэнергию и время.
Для экономии ресурсов следует максимально
загружать стиральную машину. Один цикл стирки
при полной загрузке вместо двух циклов с
наполовину загруженным барабаном позволяет
сэкономить до 50% электроэнергии.
Если вы обработаете пятна пятновыводителем
или замочите белье перед стиркой, это поможет
избежать стирки при высоких температурах.
Правильная дозировка стирального порошка в за-
висимости от жесткости воды, степени загрязнения и объема загружаемого белья помогает избежать нерационального расхода моющего
средства и загрязнения окружающей среды: хотя
стиральные порошки и являются
биоразлагаемыми, они содержат вещества,
отрицательно влияющие на экологию. Кроме того,
по возможности избегайте использовать
ополаскиватели.
Использование стиральной машины утром или
вечером уменьшит пиковую нагрузку на
электросеть.
Влагосборник
Машина оснащена влагосборником, который расположен на внутренней стороне дверцы и служит для
сбора оставшихся после окончания стирки капель
воды.
Рекомендуем регулярно проверять степень
влажности губки, находящейся внутри
влагосборного отделения. При необходимости губку
можно промыть или заменить следующим образом:
CIS
Утилизация
Уничтожение упаковочного материала: соблюдай-
те действующие требования по утилизации
упаковоч ных материалов.
Согласно Европейской директиве 2002/96/EC по
утилизации электрического и электронного оборудования (WEEE) старые электробытовые приборы
не должны помещаться в общий городской
неотсортированный поток отходов: они должны собираться отдельно, чтобы оптимизировать восстановление и переработку их материалов и уменьшить негативное воздействие на здоровье человека
и экологию. Указанный на изделии символ
перечеркнутого ведра на колесах напоминает, что
при утилизации это оборудование следует поместить отдельно. Для получения информации по правильной утилизации старого оборудования потребители должны обратиться в местные органы управления или в фирму-поставщик.
1. Извлеките
влагосборник, слегка
нажав на него снизу.
2. Выньте губку из влагосборного отделения,
прополощите ее под
струей воды и тщательно
отожмите. Губку также
можно заменить на одну
из запасных,
прилагающихся к машине.
3. Поместите губку снова в отделение.
4. Установите влагосборник обратно, проверив,
что пружины на дверце вошли в
соответствующие отверстия на отделении.
5. Убедитесь, что влагосборник правильно вставлен
на место.
57

Обслуживание и уход
CIS
Отключение водо- и электроснабжения
Перекрывайте водопроводный кран после каждой
стирки. Таким образом сокращается износ водопроводной системы стиральной машины и устраняется вероятность протечек.
Перед мойкой и обслуживанием машины всегда
отключайте ее от электросети.
Уход за машиной
Внешние и резиновые части машины очищайте мягкой тканью с теплой мыльной водой. Не используйте
растворители или абразивные чистящие средства.
Чистка распределителя моющих
средств
Перед извлечением распределителя проверьте, не
осталось ли в нем моющее средство или вода. При
их наличии будьте внимательны при съеме распределителя, чтобы не пролить их.
Распределитель моющих средств в этой машине
очищается автоматически в процессе стирки. Но
иногда после использования определенных
моющих средств их остатки могут скапливаться в
распределителе.
Чистка распределителя выполняется следующим
образом:
1. Откройте дверцу,
чтобы получить доступ к
распределителю.
2. Вытащите
распределитель наверх,
держа его за
центральную секцию
(ñì. ðèñ.). Не беритесь
за решетку, чтобы не
сломать ее.
3. Чтобы получить
доступ к отделениям
распределителя,
открепите его крышку,
как показано на рис.
4. Промойте распределитель под струей воды.
5. Прикрепите крышку и
вставьте распределитель
на место нажав его до
щелчка.
Уход за дверцей и барабаном машины
После каждой стирки оставляйте дверцу машины
полуоткрытой во избежание образования в барабане неприятных запахов.
Чистка насоса
Стиральная машина имеет сливной насос самоочищающегося типа, который не требует особого
обслуживания. Однако мелкие предметы (монеты
или пуговицы) могут попасть в "уловитель" предохранительный фильтр, расположенный в
нижней части насоса.
Убедитесь, что цикл стирки закончился, и отключите оборудование от электросети.
Для доступа к "уловителю":
1. снимите внизу передней части стиральной
машины защитную покрышку, повернув ее
против часовой
стрелки (ñì. ðèñ.);
2. отверните крышку
фильтра, вращая ее
против часовой стрелки
(ñì. ðèñ.), может
вылиться немного воды
- это нормально;
3. тщательно очистите фильтр изнутри;
4. заверните крышку обратно;
5. заверните защитную покрышку назад, вращая ее
по часовой стрелке; проверьте, что стрелка на
внутренней части покрышки находится вверху.
Проверка заливного шланга
Проверяйте заливной шланг не реже одного раза в
год. При любых признаках течи или повреждения
немедленно замените шланг. Во время работы
машины неисправный шланг, находящийся под
давлением воды, может внезапно лопнуть.
Никогда не пользуйтесь б/у шлангами.
58

Устранение
неисправностей
Если стиральная машина не работает, прежде чем обратиться в Авторизованный сервисный центр
(см. "Сервисное обслуживание"), прочитайте этот раздел - возможно здесь Вы найдете простое решение проблемы.
CIS
Неисправность:
Стиральная машина не
включается.
Цикл стирки не запускается.
Стиральная машина не заливает
воду (индикатор БЛОКИРОВКИ
ДВЕРЦЫ быстро мигает).
Стиральная машина непрерывно
заливает и сливает воду.
Возможные причины / Решение:
Вилка не вставлена в розетку или вставлена плохо, не обеспечивая
контакта.
Сбой электропитания.
Дверца машины плохо закрыта.
Не была нажата кнопка ВКЛЮЧЕНИЯ / ВЫКЛЮЧЕНИЯ.
Не были нажаты кнопки ЗАПУСКА ПРОГРАММЫ (они еще мигают).
Закрыт кран подачи воды.
Заливной шланг не подсоединен к крану.
Шланг перекручен.
Закрыт кран подачи воды.
Отключена подача воды в доме.
Недостаточен напор воды.
Не были нажаты кнопки ЗАПУСКА ПРОГРАММЫ (они еще мигают).
Конец сливного шланга расположен ниже 65 или выше 100 см от
ïîëà (см. Установка).
Свободный конец сливного шланга погружен в воду (см. Установка).
Настенный слив не имеет респираторной трубки.
Если после произведенных проверок, проблемы остаются, перекройте кран подачи воды, выключите оборудование и обратитесь в Авторизованный сервисный центр.
Если сливной шланг встроен в канализацию, имейте ввиду, что на верхних этажах может создаваться "сифонный эффект" - машина одновременно сливает и заливает воду. Для предотвращения подобного
эффекта устанавливается специальный клапан (антисифон).
Стиральная машина
не производит слив или отжим.
Сильная вибрация при отжиме.
Протечки воды из стиральной
Машины.
Индикатор БЛОКИРОВКИ
ДВЕРЦЫ быстро мигает.
Избыточное пенообразовани.
Перекручен сливной шланг (см. Установка).
Засор в канализации.
При установке стиральной машины не были сняты транспортиро-
вочные болты, снимите их (см. Установка).
Стиральная машина не выровнена (см. Установка).
Недостаточен зазор между машиной и стеной/мебелью (см. Установка).
Заливной шланг плохо закреплен на водопроводном кране (см. Установка).
Распределитель забит остатками моющих средств (о чистке рас-
пределителя см. Обслуживание и уход).
Плохо закреплен сливной шланг (см. Установка).
Влагосборника переполнен. Промойте губку или замените ее
(см. Предупреждения и рекомендации).
Выключите машину и отключите ее от электросети; подождите при-
мерно 1 минуту, затем снова включите машину. Цикл стирки должен
запуститься с начала. Если проблема осталась, обратитесь в Авто-
ризованный сервисный центр за помощью.
Моющее средство непригодно для машинной стирки (на упаковке
средства должно быть указано "для стирки в стиральных машинах" или
"для ручной и машинной стирки" и т.п.).
Передозировка моющего средства.
59

Сервисное
обслуживание
195061570.03
05/2007 - Xerox Business Services
CIS
Перед тем, как обратиться в Авторизованный сервисный центр:
Убедитесь, что вы не можете устранить неисправность самостоятельно (см. Устранение
неисправностей);
Запустите программу повторно для проверки исправности машины;
В противном случае обратитесь в Авторизованный сервисный центр по телефону,
указанному в гарантийном документе;
При неправильной установке машины Вы можете утратить право на гарантийное
обслуживание оборудования.
Не пользуйтесь услугами лиц, не уполномоченных Производителем. При ремонте требуйте
использования оригинальных запасных частей.
ППри обращении в Авторизованный сервисный центр сообщите:
тип неисправности;
номер гарантийного документа (сервисной книжки, сервисного сертификата и т.п.);
модель машины (Мод.) и серийный номер (S/N), указанные в информационной табличке,
расположенной на оборудовании.
60
 Loading...