

Indesit LFT 228 A/HA, LFT 320HX/HA, LFT 321HX/HA, LFT 321 HXUK, LFT 228 AUK Service Manual
...
Service Manual
Manual LFT 228-320 - 321
Edition
2007.10.15
Language
English
E
Service
Manual
Service Manual
Manual LFT 228-320 - 321
Edition
2007.10.15
Language
English
DISHWASHER
PLATFORM EOS.
BUILT IN
Model. Comm.
Covered Code
LFT 228 A/HA 46454
LFT 320 HX/HA 46455
LFT 321 HX/HA 46456
LFT 228 AUK 49044
LFT 321 HXUK 49045
ISSUE 1 - OTT. 2007
Service Manual
Manual LFT 228-320 - 321
Edition
2007.10.15
Language
English
2
INDEX
Chapter 1 Description of Product 3
Chapter 2 General Information 3
2.1 Captions 3
2.2 Dashboard 4
2.3 General Technical Data 5
Chapter 3 Installation of Product 5
Chapter 4 Description of Product 8
4.1 Programmes 8
4.2 Technical Programme-Features 9
4.3 Washing-Option 9
4.4 Method of Use 10
4.5 Innovative features 11
Chapter 5 Components 14
Chapter 6 Eletrical Layout 18
Chapter 7 Help-mode 18
7.1 Demo-mode 18
7.2 Self-test mode 18
7.2.1 Self-Activation Test Sequence “SAT” 18
7.2.2 Machine Sequence Procedure 19
7.2.3 How to visualise faults 20
7.2.4 Fault Table 20
7.3 Dr. (PC,Palm,Smart Reader) 21
Chapter 8 Dismantling 22
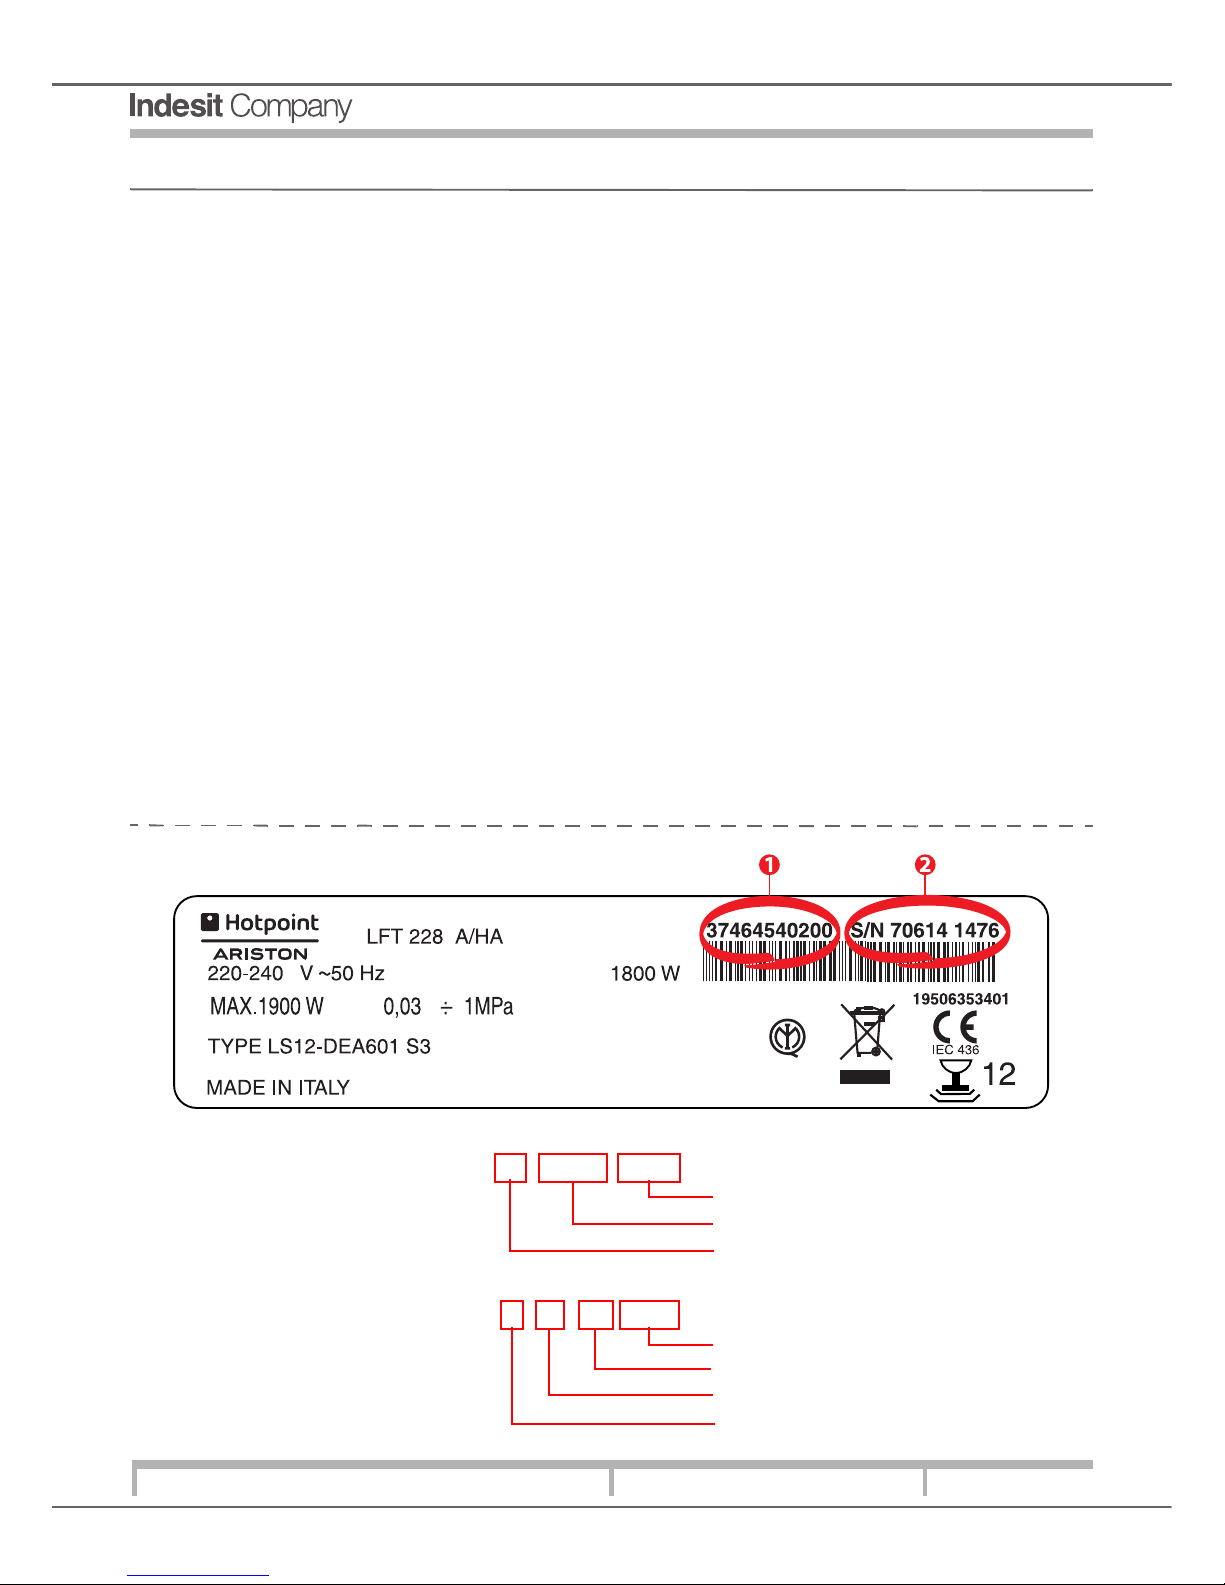
IDENTIFICATION PRODUCT-PLATE
1 Industrial Bar-code: 37 46454 0200
Commercial/Technological Modifications
Commercial Bar-code number
Plant Bar-code Number
2 Serial Number: 7 06 14 1476
Plant Sequence Number
Day of manufacture
Month of Manufacture
Year of Manufacture

Service Manual
Manual LFT 228-320 - 321
Edition
2007.10.15
Language
English
3
CHAPTER 1: DESCRIPTION OF PRODUCT
1 Upper Dish-Rack
2 Upper Water Syphon
3 Flip-overs
4 Dish-Rack Height-Adjustor
5 Lower Dish-Rack
6 Lower Water-Syphon
7 Cutlery-Basket
8 Washing-Filter
9 Salt-Dispenser
10 Detergent-Dispenser and
Sparkling-rinse Agent Dispenser
11 Data Plate
12 Dashboard
CHAPTER 2: GENERAL INFORMATION
2.1 CAPTIONS
HOTPOINT/ARISTON:
L F T 1 2 4 H IX
D.Dishwashers F.F.60cm Integrated 1.all. Basic 1:LED N.Programs A:Water-stopI X:Innox
S.45cm 2.all.medium 2: Digit 4 intermed.range BK:black
3. all.high 6 H:Water-stop WH:white
8 Top range Alu:Alumin.
0=10 Empty:Overflow BR:Brown
1=11
SCHOLTES:
L T E 12 2 08
D:Dishwashers Integrated Built-In Nr.Dishes (12) 1 Med.Range N.programs
2TOP Range 06
08
10
11
INDESIT:
D I F 2 6 A
D.Dishwasher I.Integrated F: 60m 0:55DB(a) n.programs A=Water-stop
fullsize 1:53DB 4 Interm.range
2:51DB(a) 6 Empty: Overflow
3:49DB(a)
Service Manual
Manual LFT 228-320 - 321
Edition
2007.10.15
Language
English
4
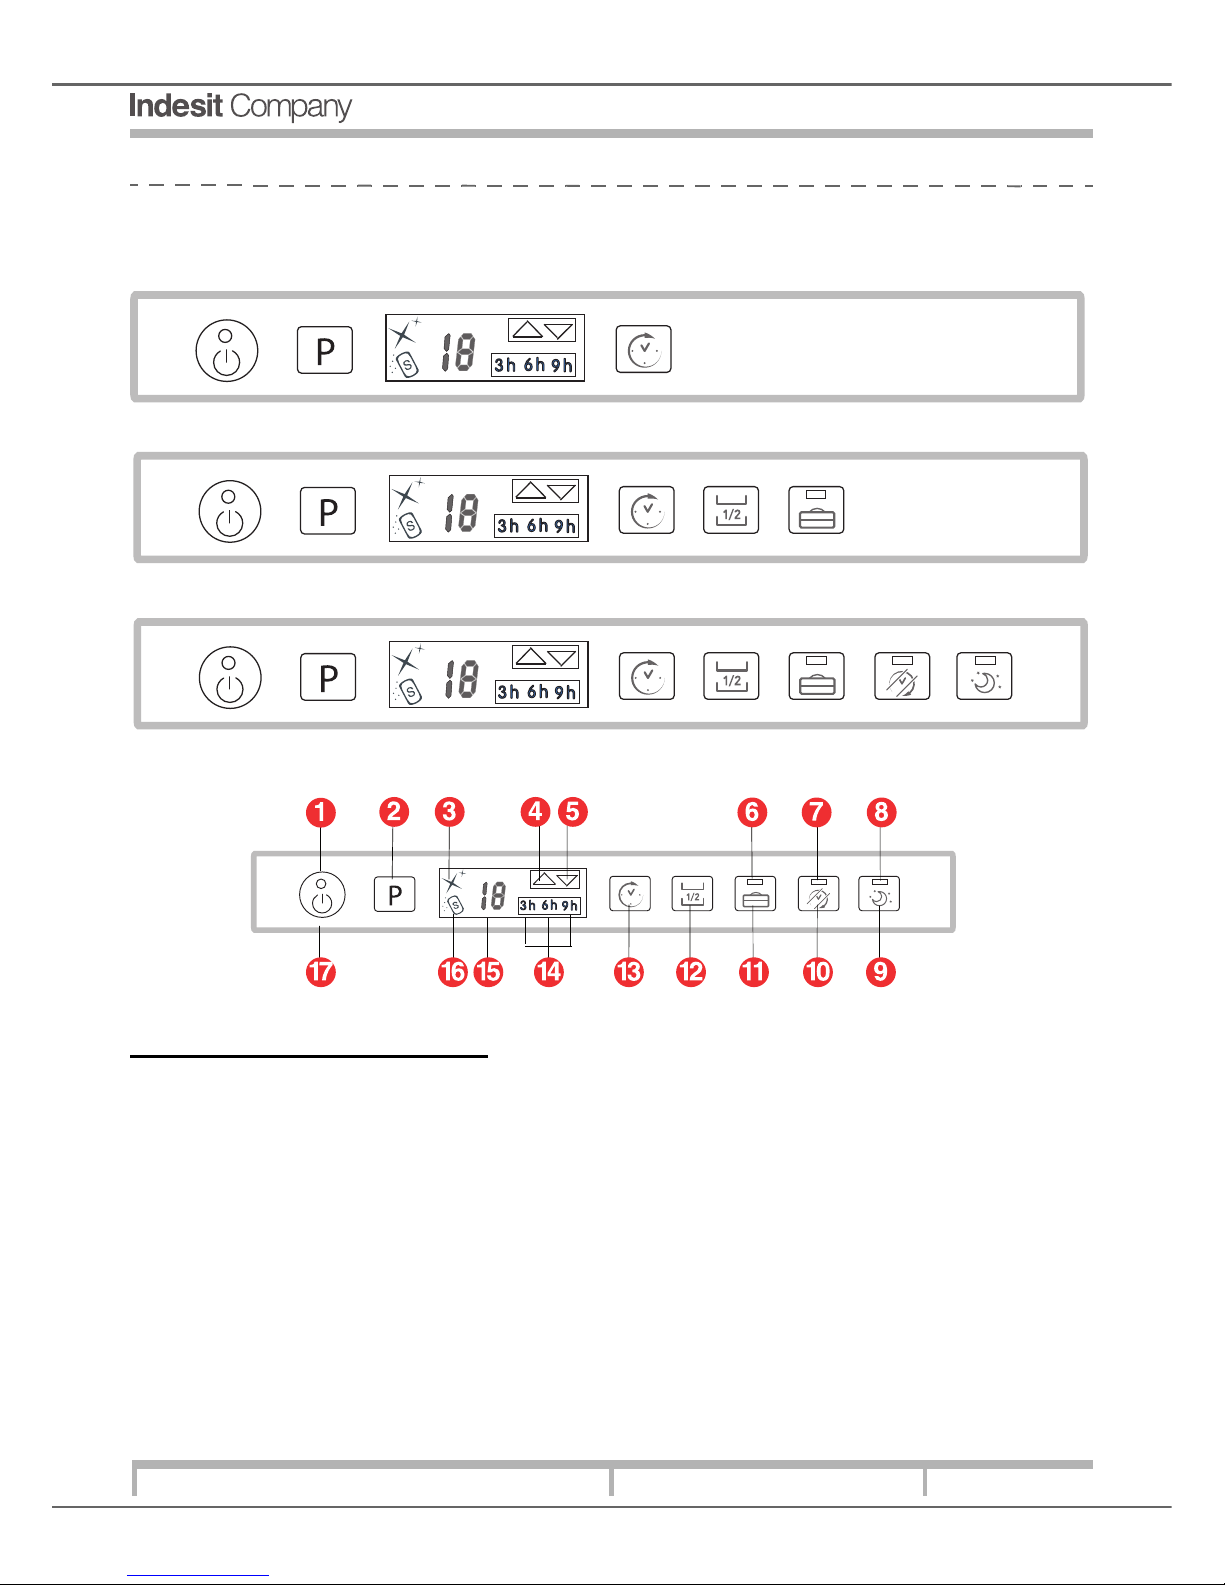
2.2 DASHBOARD
Machines that have “Digit” interfacing are available with three different types of dashboards depending on the model.
Herebelow are the dashboards available on the models “Full Integrated”:
Function Selector Defintions
1. ON/OFF Light-indicator Switch 10. Shortime Option Mode
2. Programme Selector 11. Multi-function Tablet Selector
3. No Sparkling-agent indicator 12. Half-fill up Selector
4. Upper Half-fill up indicator 13 Delay Start selector
5. Lower Half-fill up indicator 14 Delay Start indicator
6. Multi-function Tablet indicator 15 Fluorescent Programme-number Selector
7. Shortime Mode indicator 16 No-salt indicator
8. Good-Night Option Mode 17 On-Off/Reset Selector
9. Good-Night Option Selector
Service Manual
Manual LFT 228-320 - 321
Edition
2007.10.15
Language
English
5
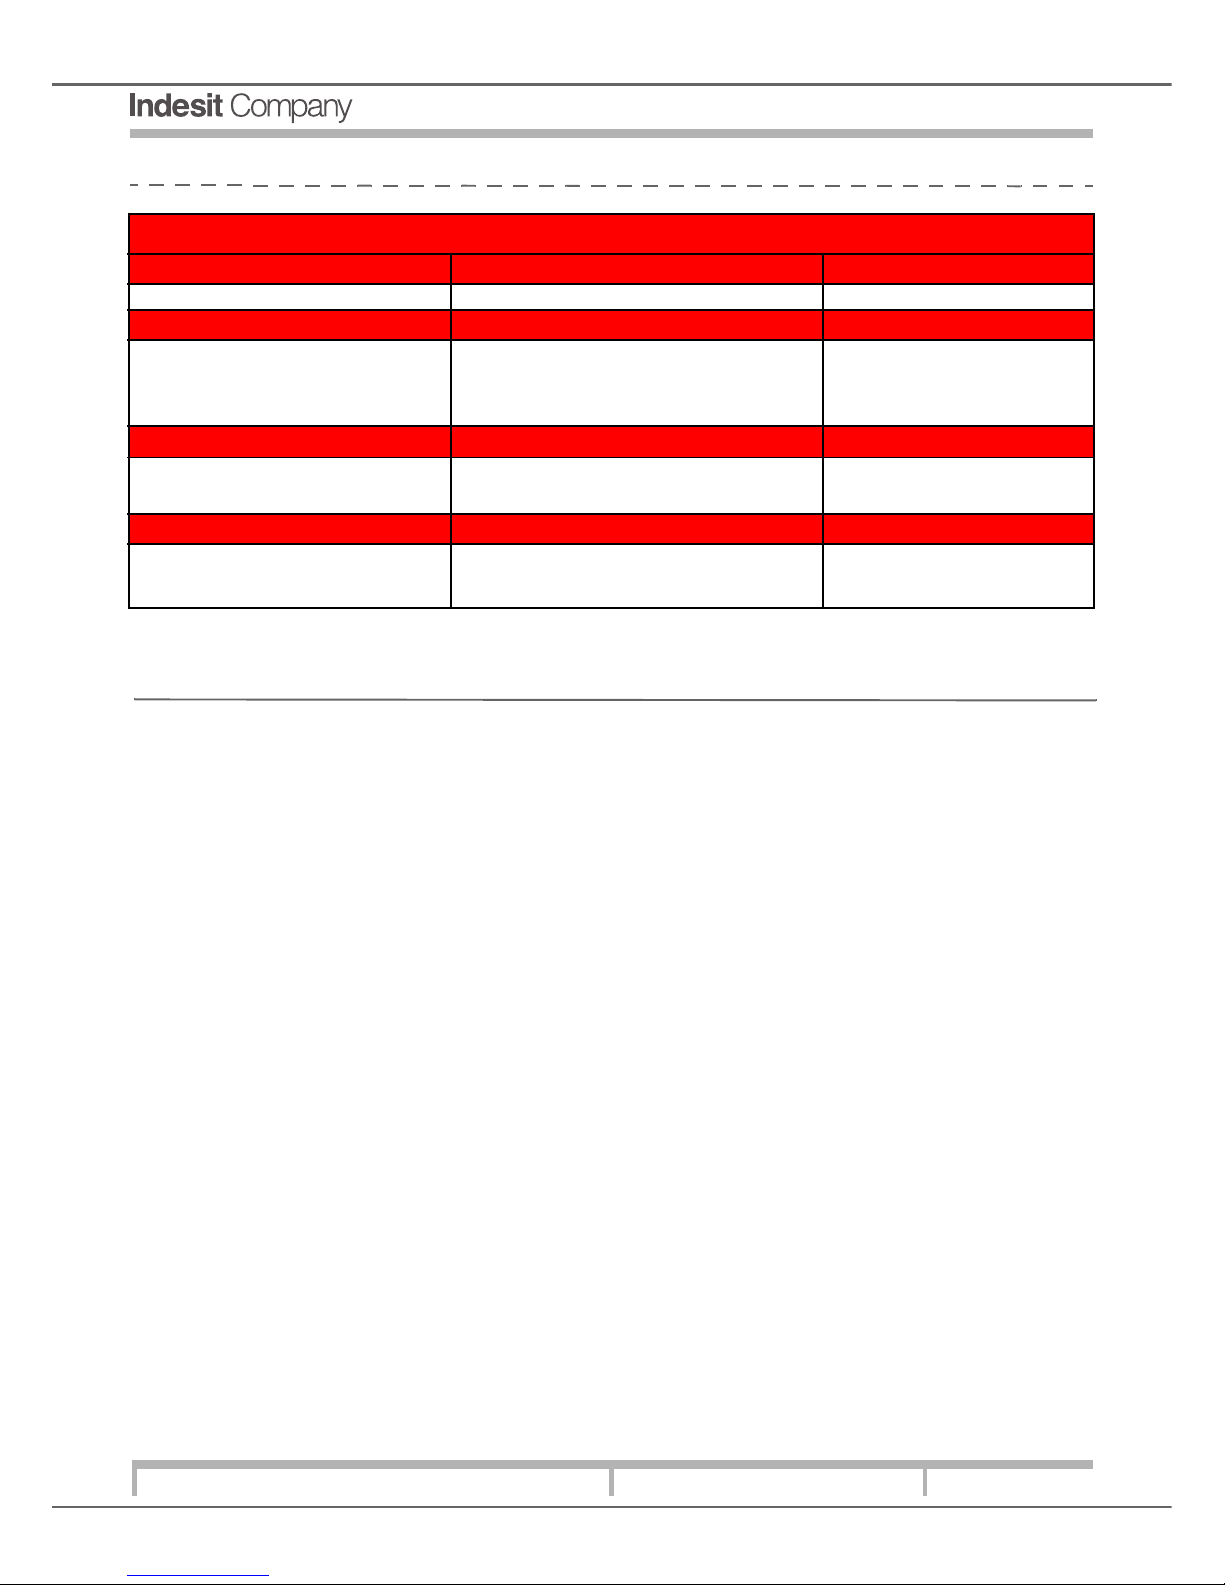
2.3: GENERAL TECHNICAL DATA
TECHNICAL DATA
EU UK
Capacity 12 Standard Covers 12 Standard Covers
Dimensions
Width 59,5 cm 59,5 cm
Height 82 cm 82 cm
Depth 57 cm 57 cm
Water Supply Connections
Maximum pressure 10 bars 10 bars
Minimum pressure 0,5 bars 0,5 bars
Electric Connections
Power strength 220/230 Volt/ 50 Hz 220/240 Volt 50 Hz
Minimum pressure 1900 Watts 1900 Watts
CHAPTER 3: INSTALLATION OF PRODUCT
Select the site where the dishwasher is to be set up; it can also be set up having the back or side-panels against other furniture or
against the wall.Thedishwasher is supplied with charging-and-disfill up-pipes, that can be adjusted to the left or to the right to ease
the setting up.
HEIGHT ADJUSTMENT
Introduce the dishwasher in the space and adjust the height by means of the central screw for the rear part and the fore-feet for
the front part of the machine. By means of a screw-driver, turn the screw clockwise or anti clockwise in order to increase or reduce
the height.
LEVELLING
Once the dishwasher has been positioned, adjust the feet by either fastening or unfastening them according to the height
required, and proceed to level them out so that th machine is well fixed to the floor. Ensure that its inclination angle does not
exceed more than 2 degrees. This will ensure a correct functioning of the product.
COLD-WATER SUPPLY CONNECTION
Connect the incoming cold-water pipe. Should the pipes be brand new or not have been used for a certain period of time, it is
recommended to allow the water to flow through till it comes out clean. Such precautionary-measures will prevent probable
water-blockage and damage to the dishwasher.
Service Manual
Manual LFT 228-320 - 321
Edition
2007.10.15
Language
English
6
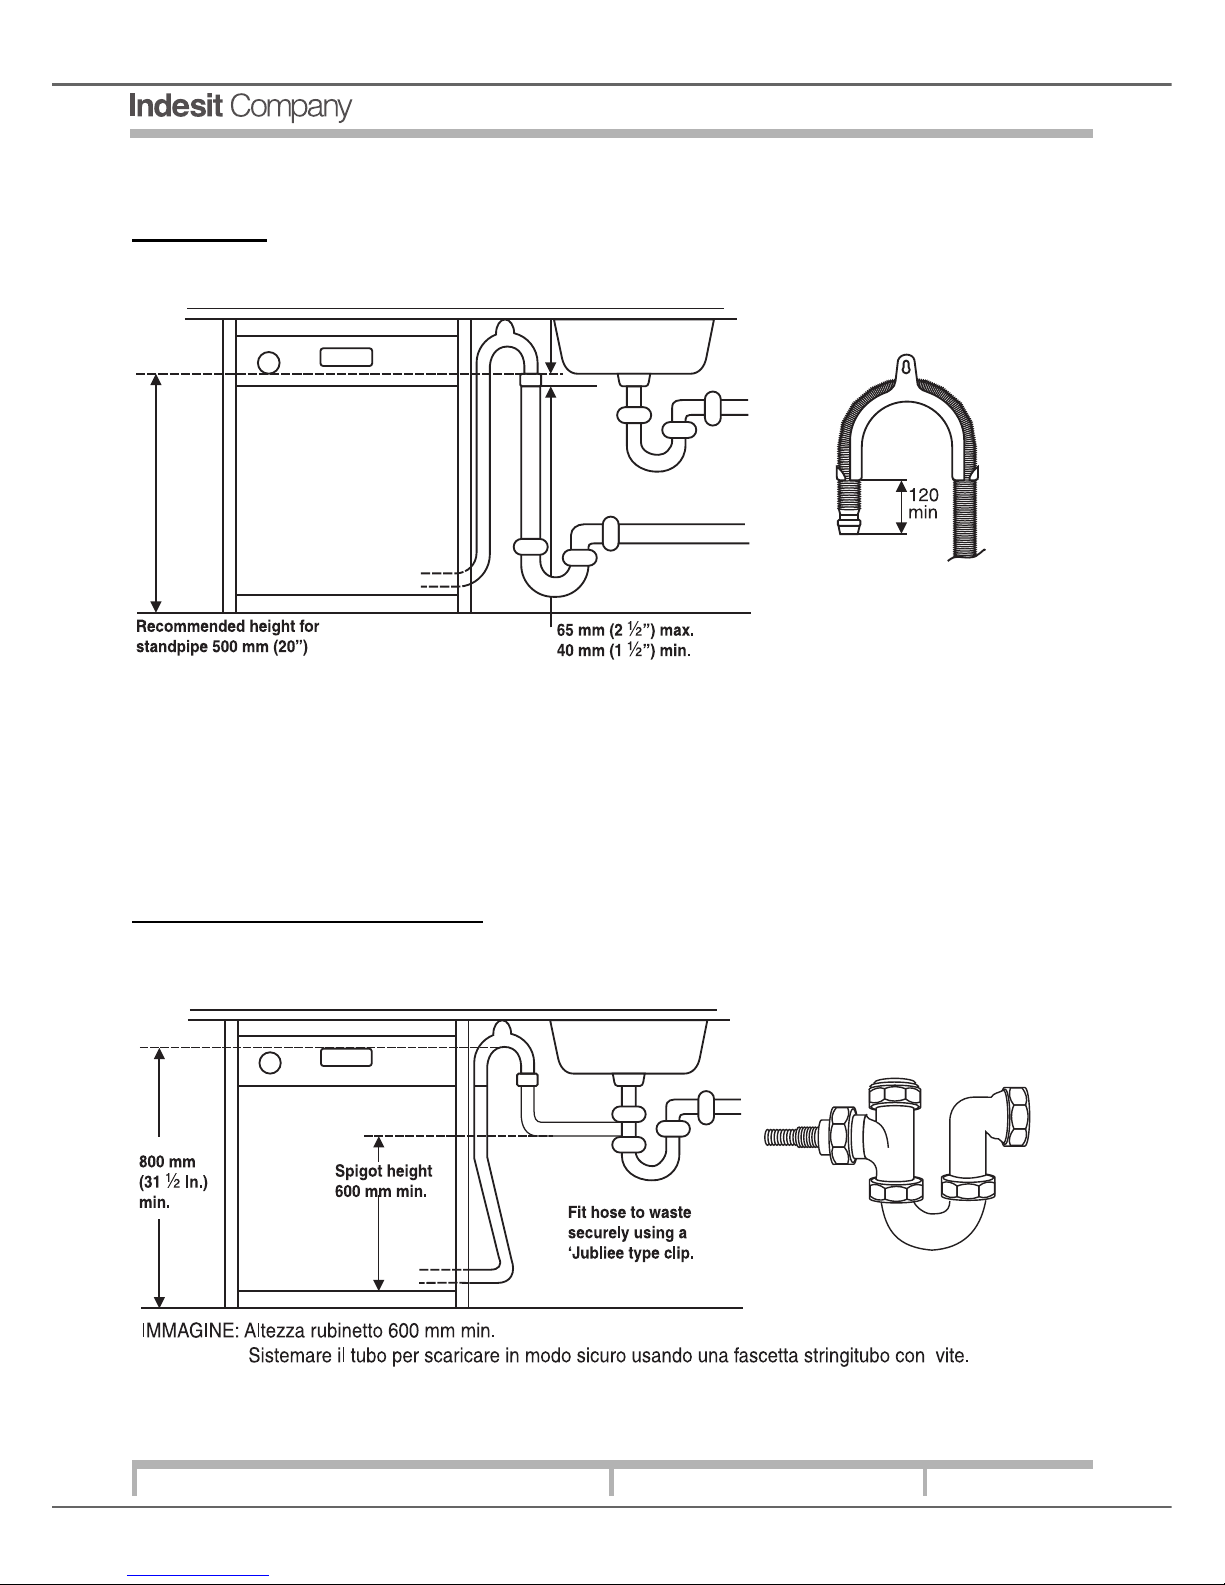
DISCHARGING PIPE CONNECTION
Standhose
Ensure that the flexible discharging-pipe has not been introduced too deep inside the standhose. Should the discharging-pipe be
equipped with “support-flaps”, ensure that they too be completely introduced into the standhose.
Above illustration: Recommended height of the standhose 500m (20”)
This will prevent the hose from tipping-over during setting-up and use.
Donot place the standhose near to electric-sockets and ENSURE that it is uncoiled and is placed in the direction as shown in the
illstration above.
The standhose must be provided with a hole measuring at least 38mm (1 1/2”). It must be set up as illustrated above, be
provided with a syphon and must discharge into the discharging plumbing system. However, it MUST NOT be connected to the
discharging-hose connections of the water-basin.
FILLING UP BASIN SYSTEM
Regarding discharging plumbing-system under the basin:
Before connecting the flexible discharging-hose, it is recommended to get rid off any internal residuals in the hose which could
give rise to hose blockages.
ILLUSTRATION: Tap-height 600mm min.
Secure discharge-hose using a Jubillee-type clip.

Service Manual
Manual LFT 228-320 - 321
Edition
2007.10.15
Language
English
7
Eliminate any residuals on the discharge-syphon and ensure that the sealing-cap has been removed. The flexible hose must be
directed and placed at a minimum height of 800mm (3 ½ “)
NB: Ensure that the diameter of the water-basin discharge-hose measure at least 32mm.
1. Uncoil the extreme end of the flexible GREY hose from the back of the machine.
2. Position the flexible GREY discharge-hose on the supporting-elbow as shown above.
3. Set up a discharge system under the wash-basin, cut away the membrane, the obstruction or cap.
4. Secure the flexibledischarge-hose to the discharge system under water-basin.
INSTRUCTIONS ON INSTALLATION OF INTEGRATED DISHWASHER
Important
The dishwasher must be well-secured to the built-in top in order to avoid it tilting over while extracting full dish-racks.
Adjusting posterior legs
Fit the dishwasher in the space and adjust the height by working on the screw placed on the front part at theback and on the forelegs. By using a screwdriver, turn the screw in a clockwise direction in order to lift the dishwasher and in an anti-clockwise
direction to lower it.
Tape no-condensation
Some models have been provided with a transparent condensation-proof tape. It must be secured onto the lower part of the
wooden work-surface, in order to protect it against condensation- formation.
Should it not be envisaged on the model-type, it may be ordered as a spare-part from authorised dealers.

Service Manual
Manual LFT 228-320 - 321
Edition
2007.10.15
Language
English
8
CHAPTER 4: DESCRIPTION OF THE PRODUCT
4.1 PROGRAMMES
NB:
1. The Programme number and type may vary depending on the dishwasher model
2. To find out which of the optons are compatible to the programmes, consult the Option-Table.
3. Washing-Time cycle” is automatically modified according to different options selected by user and depending to
what extent the dishes are dirty.
Indications for
Programme-
selection
Programmes Detergent
(A)=Dispenser A
(B)=Dispenser B
Programmes that
envisage drying
mode
Compatile
options
Prog.Time -+10%
tollerance Hrs/mins
Powder
Liquid Tablet
Very dirty dishes +pots (not
indicated for fragile ware
1.Self-Intensive
30g (A) 30ml
(A)
1(A) Yes A-B-C-D 2-15'
Ordinary dirty pots + dishes
standard-daily programme
2. Self-Normal
30g(A) 30ml
(A)
1(A) Yes A-B-C-D-E 1:43'
Daily Dirty DishesLimited
Q.ty (4 Dishes + 1 Pot
+1Pan)
3. Daily
25g(A) 25ml(A) 1(A No A-B-C 1:00'
Pre-cycle Washing-machine
on standb for next fill up
4.Soak
No No No No A-B 0:08'
Ecological +low Energy
Consumption ideal for
Dishes+ Pans
5. Ecological
25g(A)
5g(B)
25ml(A)
5ml(B)
1 (A) Yes A-B-C-E 2:35'
Quick Time-Energy saving
Cycle not very dirty dishes
soon after use: 2 dishes,
2glasses + nos.4 cutlery + 1
pot + 1 small pan
6. Quick
25mg
(A)
25ml
(A)
1 (A) No A-C 0.25'-0.35'
Quick Time + energy saving
cycle indicated for fragile
ware soon after use (12
Wine/Champagne glasses +
fragile dishes.
7. Crystal Ware
30g
(A)
30ml(A) 1(A) Yes A-B-C 1-30'
Different washing-processes for
both racks: Fragile-ware:
Crystal+glasses on top+intense
for pots on bottom
8.Self-dual wash
30g
(A)
30ml(A) 1(A) Yes A-B-D 1:43'
Very dirty pots with dried
food-residual
9. Ultra-Intensive
30g(A)
5g(B)
30ml(A
5ml(B)
1(A)
1(Bott
om
Dispen
ser
Yes A-B-C 2.07'
Rinse + drying only for dusty
ware
10.Special Guests
No No No Yes A-B 0.32'
Hygienic wash especially for
Baby Bottles,Rings,
Dummies cutlery.fill up only
on top rack
11.Baby cycle
20g
(A)
20ml(A) No No A 1:20'
 Loading...