

Indesit KN6C61A/NL S Operating Instructions Manual
English
Русский
GB
RS
Operating Instructions
COOKER AND OVEN
Contents
Operating Instructions,1
WARNING,3
Description of the appliance-Overall view,2
Description of the appliance-Control Panel,3
Installation,18
Start-up and use,20
Cooking modes,20
Using the hob,23
Precautions and tips,24
Care and maintenance,25
Assistance,25
Руководство по эксплуатации
КУХОННАЯ ПЛИТА С ДУХОВЫМ ШКАФОМ
Содержание
Руководство по эксплуатации,1
ПРЕДУПРЕЖДЕНИЯ,3
Описание изделия-Общий вид,8
Описание изделия-Панель управления,10
Монтаж,34
Включение и эксплуатация,36
Программы приготовления,36
Bарочная панель,39
Предосторожности и рекомендации,40
Техническое обслуживание и уход,41
Техническое обслуживание,42
FR
Français
Mode d’emploi
CUISINIERE ET FOUR
Sommaire
Mode d’emploi,1
AVERTISSEMENT,3
Description de l’appareil-Vue d’ensemble, 8
Description de l’appareil-Tableau de bord, 10
Installation,26
Mise en marche et utilisation,28
Utilisation du four,28
Utilisation du plan de cuisson,31
Précautions et conseils, 32
Nettoyage et entretien,33
Assistance,33
KN6C61A/NL S
Nederland
NL
Gebruiksaanwijzing
FORNUIS EN OVEN
Inhoud
Gebruiksaanwijzing,1
WAARSCHUWING,3
Beschrijving van het apparaat-Aanzichttekening,8
Beschrijving van het apparaat-Bedieningspaneel,10
Installatie, 43
Starten en gebruik,45
De kookzones,45
Gebruik van de oven,48
Voorzorgsmaatregelen en advies,49
Onderhoud en verzorging,50
Servicedienst,50
DE
Deutsch
Bedienungsanleitungen
HERD UND OFEN
Inhalt
Bedienungsanleitungen,1
HINEISART,3
Beschreibung des Geräts-Übersicht,8
Beschreibung des Geräts-Schalttafel,10
Installation,51
Inbetriebnahme und Benutzung,53
Gebrauch des Ofens,56
Gebrauch des Kochfeldes,56
Vorsichtsmaßnahmen und Tipps,57
Pflege und Wartung,58
Hilfe,58
PT
Português
Instruções para a utilização
FOGÃO E FORNO
Índice
Instruções para a utilização,1
ADVERTÊNCIA,3
Descrição do aparelho-Vista de conjunto,8
Descrição do aparelho-Painel de comandos,10
Instalação,11
Início e utilização, 13
Utilização do plano de cozedura,15
Utilizaçao do forno,15
Precauções e conselhos,16
Manutenção e cuidados,17
Assistência técnica,17

22
LT
Lietuviu
Naudojimo instrukcijos
viryklл ir orkaitл
Turinys
Naudojimo instrukcijos,1
Бspлjimai,3
Prietaiso aprašymas -Bendras vaizdas,8
Prietaiso aprašymas -Valdymo pultas,10
Montavimas,59
Ájungimas ir naudojimas,61
Rankenëlës naudojimas,61
Orkaitës naudojimas,63
Atsargumo priemonës ir patarimai,64
Techninë prieţiűra,65
Pagalba,65
LV
Latviešu
Lietođanas instrukcija
PLÎTS UN KRASNS
Saturs
Lietođanas instrukcija,1
Brîdinâjumi,3
Ierīces apraksts -Vispārīga informācija,8
Ierīces apraksts - Vadības panelis,10
Uzstādīšana,66
eslēgšana un lietošana,68
Plīts virsmas lietošana,68
Cepeškrāsns lietošana,70
Piesardzības pasākumi un ieteikum,71
Tehniskā apkope un kopšana,71
Palīdzība,72
EE
Eesti keeles
Kasutusjuhend
PLIIT JA AHI
Sisukord
Kasutusjuhend,1
Hoiatused,3
Seadme kirjeldus - Ülevaade,8
Seadme kirjeldus - Juhtpaneel,10
Paigaldamine,73
Esmakäitamine ja kasutamine, 75
Pliidi kasutamine,75
Ahju kasutamine,78
Ettevaatusabinőud ja soovitused, 79
Hooldus,80
Klienditugi,80

3
GB
P T
ATENÇÃO: Este aparelho e as suas partes
acessíveis aquecem muito durante a
u lização.
É preciso ter atenção e evitar tocar os
elementos que aquecem.
Manter afastadas as crianças com
menos de 8 anos, caso não estejam a ser
vigiadas.
O presente aparelho pode ser u lizado
por crianças com mais de 8 anos e
por pessoas com capacidades sicas,
sensoriais ou mentais reduzidas ou com
pouca experiência e conhecimentos, caso
sejam adequadamente vigiadas ou caso
tenham recebido instruções em relação
ao uso do aparelho de forma segura
e tenham conhecimento dos perigos
associados. As crianças não devem
brincar com o aparelho. As operações de
limpeza e manutenção não devem ser
efectuadas por crianças sem vigilância.
ATENÇÃO: Deixar um fogão com gordura
e óleo sem vigilância pode ser perigoso e
provocar um incêndio.
NUNCA tente apagar as chamas com
água. É necessário desligar o aparelho
e cobrir as chamas com uma tampa ou
com uma manta ignífuga.
ATENÇÃO: Risco de incêndio: não
deixe objectos sobre as super cies de
cozedura.
ATENÇÃO: Se a super cie vitrocerâmica
es ver rachada, desligue o aparelho
para evitar a possibilidade de choques
eléctricos.
Não u lizar produtos abrasivos nem
espátulas de metal cortantes para limpar
a porta em vidro do forno, uma vez que
pode riscar a super cie, provocando a
ruptura do vidro.
As super cies internas da gaveta (se
presentes) podem fi car muito quentes.
Nunca u lize equipamento de limpeza a
vapor ou de alta pressão para limpar o
aparelho.
Elimine os líquidos presentes na tampa
antes de abri-la. Não feche a tampa de
vidro (se presente) se os queimadores
ou a chapa eléctrica ainda es verem
quentes.
ATENÇÃO: Assegure-se de que o
aparelho esteja desligado antes de
subs tuir a lâmpada, para evitar a
possibilidade de choques eléctricos.
ADVERTÊNCIA
WARNING: The appliance and its
accessible parts become hot during use.
Care should be taken to avoid touching
hea ng elements.
Children less than 8 years of
age shall be kept away unless
con nuously supervised.
This appliance can be used by children
aged from 8 years and above and
persons with reduced physical, sensory
or mental capabili es or lack of
experience and knowledge if they have
been given supervision or instruc on
concerning use of the appliance in a
safe way and understand the hazards
involved. Children shall not play with
the appliance. Cleaning and user
maintenance shall not be made by
children without supervision.
WARNING: Una ended cooking on a hob
with fat or oil can be dangerous and may
result in fi re.
NEVER try to ex nguish a fi re with
water, but switch off the appliance and
then cover fl ame e.g. with a lid or a fi re
blanket.
WARNING: Danger of fi re: do not store
items on the cooking surfaces.
WARNING: If the surface in glass-ceramic
is cracked, switch off the appliance to
avoid the possibility of electric shock.
Do not use harsh abrasive cleaners or
sharp metal scrapers to clean the oven
door glass since they can scratch the
surface, which may result in sha ering of
the glass.
The internal surfaces of the
compartment (where present) may
become hot.
Never use steam cleaners or pressure
cleaners on the appliance.
Remove any liquid from
the lid before opening it.
Do not close the
glass cover (if present) when the gas
burners or electric hotplates are s ll hot.
WARNING: Ensure that the appliance is
switched off before replacing the lamp to
avoid the possibility of electric shock.
WARNING

4
RS
FR
ВНИМАНИЕ: Данное изделие и его
доступные комплектующие сильно
нагреваются в процессе эксплуатации.
Будьте осторожны и не касайтесь
нагревательных элементов.
Не разрешайте детям младше 8 лет
приближаться к изделию без контроля.
Данное изделие может быть
использовано детьми старше 8 лет и
лицами с ограниченными физическими,
сенсорными или умственными
способностями или без опыта и знания
о правилах использования изделия при
условии надлежащего контроля или
обучения безопасному использованию
изделия с учетом соответствующих
рисков. Не разрешайте детям играть
с изделием. Не разрешайте детям
осуществлять чистку и уход за
изделием без контроля взрослых.
ВНИМАНИЕ: Опасно оставлять
включенную конфорку с маслом или
жиром без присмотра, так как это может
привести к пожару.
НИКОГДА не пытайтесь погасить
пламя/пожар водой. Прежде всего
выключите изделие и накройте пламя
крышкой или огнеупорной тканью.
ВНИМАНИЕ: Опасность пожара: не
оставляйте предметов на варочных
поверхностях.
ВНИМАНИЕ: Если стеклокерамическая
поверхность варочной панели треснула,
выключите ее во избежание ударов
током.
Не используйте абразивные вещества
или режущие металлические скребки
для чистки стеклянной дверцы духового
шкафа, так как они могут поцарапать
поверхность, что может привести к
разбиванию стекла.
Внутренняя поверхность ящика (если
он имеется) может сильно нагреться.
Никогда не используйте паровые
чистящие агрегаты или агрегаты
под высоким давлением для чистки
изделия.
Если на крышку пролита жидкость,
удалите ее перед тем,
как открыть
крышку. Не закрывайте стеклянную
крышку варочной панели (если
она имеется), если газовые или
электрические конфорки еще горячие.
ВНИМАНИЕ: Проверьте, чтобы изделие
было выключено, перед заменой
лампочки во избежание возможных
ударов током.
ПРЕДУПРЕЖДЕНИЯ
ATTENTION : cet appareil ainsi que ses
par es accessibles deviennent très
chauds pendant leur fonc onnement.
Il faut faire a en on de ne pas toucher
les éléments chauff ants.
Ne laisser s’approcher les enfants de
moins de 8 ans à moins qu’ils ne soient
sous surveillance constante.
Le présent appareil peut être u lisé par
des enfants de plus de 8 ans et par des
personnes présentant des capacités
physiques, sensorielles ou mentales
réduites ou n’ayant pas l’expérience
ou les connaissances nécessaires, à
condi on qu’ils soient sous bonne
surveillance ou qu’ils aient reçu les
instruc ons nécessaires pour une
u lisa on de l’appareil en toute sécurité
et à condi on qu’ils se rendent compte
des dangers encourus. Les enfants ne
doivent pas jouer avec l’appareil. Les
opéra ons de ne oyage et d’entre en
ne doivent pas être eff ectuées par des
enfants non surveillés.
ATTENTION : laisser un récipient de
cuisson contenant de l’huile ou de la
graisse sur le foyer est dangereux et
risque d’entraîner un incendie.
Il ne faut JAMAIS essayer d’éteindre une
fl amme ou un incendie avec de l’eau !
Il faut éteindre l’appareil et couvrir la
fl amme avec un couvercle, par exemple,
ou avec une couverture an -feu.
ATTENTION : risque d’incendie : ne
pas laisser d’objets sur les surfaces de
cuisson.
ATTENTION : si la surface vitrocéramique
est fêlée, éteindre l’appareil afi n d’éviter
tout risque d’électrocu on.
Ne pas u liser de produits abrasifs ni
de spatules métalliques coupantes pour
ne oyer la porte du four en verre, sous
peine d’érafl er la surface et de briser le
verre.
Les surfaces intérieures du roir (s’il y en
a un) peuvent devenir chaudes.
Ne jamais ne oyer l’appareil avec des
ne oyeurs vapeur ou haute pression.
Essuyer tout liquide pouvant se trouver
sur le couvercle avant de l’ouvrir. Ne pas
abaisser le couvercle en verre (s’il y en a
un) tant que les brûleurs gaz ou la plaque
électrique sont chauds.
ATTENTION : s’assurer que l’appareil
est éteint avant de procéder au
remplacement de l’ampoule, afi n d’éviter
tout risque d’électrocu on.
AVERTISSEMENT

5
NL
DE
PAS OP: Dit apparaat en zijn bereikbare
onderdelen worden jdens gebruik zeer
heet.
Zorg ervoor de verwarmende elementen
niet aan te raken.
Zorg ervoor dat kinderen die kleiner dan
8 jaar oud zijn niet dichtbij het apparaat
kunnen komen, tenzij onder constant
toezicht.
Het huidige apparaat mag alleen door
kinderen van 8 jaar en ouder en door
personen met een beperkt lichamelijk,
sensorieel of geestelijk vermogen,
of zonder ervaring en kennis worden
gebruikt, mits ze onder adequaat toezicht
zijn, of mits ze zijn onderricht m.b.t.
het veilige gebruik van het apparaat
en zich bewust zijn van de betreff ende
gevaren. Voorkom dat kinderen met
het apparaat spelen. De reinigings- en
onderhoudshandelingen mogen niet door
kinderen worden uitgevoerd, tenzij onder
toezicht.
PAS OP: Het kan gevaarlijk zijn een fornuis
met vet of olie onbewaakt te laten. Er kan
brand ontstaan.
U moet NOOIT proberen een vlam/brand
te blussen met water. U dient daarentegen
het apparaat uit te schakelen en de vlam
te bedekken met bijvoorbeeld een (blus)
deken.
PAS OP: Brandgevaar: laat nooit
voorwerpen op het kookoppervlak liggen.
PAS OP: Als het oppervlak van de
glaskeramische kookplaat gebarsten is,
moet u het apparaat uitschakelen om te
voorkomen dat u een elektrische schok
krijgt.
Gebruik geen schurende producten, noch
snijdende metalen spatels om de glazen
deur van de oven te reinigen, aangezien
deze het oppervlak zouden kunnen
krassen, en als gevolg het glas doen
verbrijzelen.
De interne oppervlakken van de lade
(indien aanwezig) kunnen warm worden.
Gebruik nooit huishoudapparaten met
stoom of hoge druk voor het reinigen van
de kookplaat.
Verwijder eventuele geknoeide
vloeistoff en van de dekplaat voordat u
hem opent. Doe het glazen deksel (waar
aanwezig) niet omlaag als de gasbranders
of de elektrische plaat nog warm zijn.
PAS OP: Controleer of het apparaat uit
staat voor u de lamp vervangt, om te
voorkomen dat u een elektrische schok
krijgt.
WAARSCHUWING
ZUR BEACHTUNG: Bei Gebrauch wird dieses
Gerät und alle zugänglichen Teile sehr heiß.
Es ist darauf zu achten, dass die
Heizelemente nicht berührt werden.
Kinder unter 8 Jahren, die nicht ständig
beaufsich gt sind, von dem Gerät
fernhalten.
Das Gerät darf von Kindern ab 8 Jahren und
Personen mit eingeschränkten körperlichen,
geis gen oder Wahrnehmungsfähigkeiten
oder aber ohne ausreichende Erfahrung und
Kenntnis verwendet werden, vorausgesetzt
sie werden ausreichend überwacht oder sie
wurden in den sicheren Gebrauch des Geräts
eingewiesen und haben eine ausreichende
Wahrnehmung der mit dem Gebrauch des
Geräts verbundenen Gefahren. Erlauben
Sie Kindern nicht, mit dem Gerät zu spielen.
Reinigungs- und Wartungsarbeiten dürfen
nicht von unbewachten Kindern ausgeführt
werden.
ZUR BEACHTUNG: Lassen Sie keine Fe e
oder Öle unbewacht auf dem Herd stehen.
Das ist gefährlich und kann einen Brand
verursachen.
NIEMALS eine Flamme/Brandherd mit
Wasser löschen. Schalten Sie das Gerät aus
und ers cken Sie die Flamme mit einem
Deckel oder einer feuerfesten Decke.
ZUR BEACHTUNG: Brandgefahr: Keine
Gegenstände auf den Kochstellen liegen
lassen.
ZUR BEACHTUNG: Sollte die
Glaskeramitoberfl äche gesprungen sein,
schalten Sie das Gerät aus, um so mögliche
Stromschläge zu vermeiden.
Verwenden Sie zur Reinigung der Glastür
des Backofens keine Scheuermi el oder
schar an ge Metallspachtel, um die
Oberfl äche nicht zu zerkratzen und so das
Zerspringen des Glases zu verursachen.
Die internen Flächen des Geschirrwagens
(falls vorhanden) können äußerst heiß
werden.
Verwenden Sie zur Reinigung des
Kochfeldes keine Dampf- oder
Hochdruckreinigungsgeräte.
Trocknen Sie eventuell auf der
Herdabdeckung befi ndliche Flüssigkeiten,
bevor Sie sie au lappen. Schließen Sie die
Glasabdeckung (falls vorhanden) nicht, wenn
die Gasbrenner oder die Elektropla e noch
heiß sind.
ZUR BEACHTUNG: Versichern Sie sich, dass
das Gerät ausgeschaltet ist, bevor Sie die
Lampe austauschen. Stromschlaggefahr.
HINEISART

6
LT
LV
ÁSPËJIMAS! Naudojamo prietaiso
paviršiai ir pasiekiamos dalys ákaista.
Bűkite atsargűs ir neprisilieskite prie
ákaitusiř prietaiso daliř.
Jaunesni nei 8 metř vaikai gali bűti
prileidžiami prie prietaiso tik prižiűrimi
suaugusiřjř.
Vyresni nei 8 metř vaikai ir asmenys,
turintys fi ziniř, jutimo ar psichiniř
sutrikimř arba nepakankamai žiniř ar
patirties, šiuo prietaisu gali naudotis
tik tuo atveju, jei jie yra prižiűrimi arba
instruktuojami, kaip saugiai naudoti
prietaisą, taip pat supranta kylančias
grësmes. Vaikams turi bűti draudžiama
žaisti su prietaisu. Neprižiűrimi vaikai
taip pat negali valyti prietaiso ar atlikti jo
priežiűros darbř.
ÁSPËJIMAS! Ant ájungtos viryklës
palikti indai su riebalais ar aliejumi gali
sukelti gaisrą.
NIEKADA nebandykite liepsnos gesinti
vandeniu – išjunkite prietaisą ir kuo
nors uždenkite liepsną, pavyzdžiui,
dangčiu arba priešgaisriniu apklotu.
ÁSPËJIMAS! Gaisro pavojus – ant
viryklës nelaikykite jokiř daiktř.
ÁSPËJIMAS! Átrűkęs keraminis
paviršius kelia elektros sműgio pavojř –
nedelsdami išjunkite prietaisą.
Orkaitës dureliř stiklo nevalykite
šiurkščiomis valymo priemonëmis
arba aštriais metaliniais šveistukais,
priešingu atveju kyla grësmë subraižyti
stiklo paviršiř, o dël to stiklas paprastai
sutrűkinëja.
Vidiniai stal
čiaus (kur yra) paviršiai gali
ákaisti.
Niekuomet nevalykite prietaiso gariniais
ar slëginiais valikliais.
Prieš atidarydami gaubtą nuo jo
nuvalykite skysčius.
Neuždarykite stiklinio dangčio (jei
sumontuotas), kol dujiniai degikliai arba
elektrinës kaitlentës neatvëso.
ÁSPËJIMAS! prieš keisdami lemputę
elektros prietaisą atjunkite nuo elektros
maitinimo tinklo – nepatirsite elektros
sműgio.
Áspëjimai
Nepieskarieties sakarsuđajâm ierîces
daďâm.
Bçrni, kuri ir jaunâki par astoňiem
gadiem, drîkst atrasties ierîces tuvumâ
tikai stingrâ pieauguđo uzraudzîbâ.
Ierîci drîkst lietot bçrni, kuri ir sasnieguđi
astoňu gadu vecumu, bet personas
ar ierobeţotâm fi ziskajâm, maňu vai
garîgajâm spçjâm un personas, kurâm
nav ierîces lietođanas pieredzes vai
nepiecieđamo zinâđanu, tikai tad,
ja tâs tiek uzraudzîtas vai ir atbilstođi
informçtas par ierîces drođu lietođanu
un iespçjamajiem riskiem. Bçrni nedrîkst
rotaďâties ar ierîci. Bçrni nedrîkst bez
uzraudzîbas tîrît ierîci un veikt tâs
apkopi.
BRÎDINÂJUMS! Atstâjot uz ieslçgtas
plîts virsmas pannu ar taukiem vai
eďďu, radîsit ugunsgrçka risku.
NEKÂDÂ GADÎJUMÂ nemçěiniet dzçst
uguni ar űdeni, bet izslçdziet plîti un
nosedziet liesmu ar vâku vai nedegođu
pârsegu.
BRÎDINÂJUMS! Aizdegđanâs risks:
neglabâjiet priekđmetus uz plîts
virsmas.
BRÎDINÂJUMS! Ja plîts stikla–
keramikas virsma ir saplaisâjusi, lai
novçrstu elektriskâs strâvas trieciena
risku, izslçdziet plîti.
Cepeđkrâsns durvju stiklu nedrîkst tîrît
ar abrazîviem tîrîđanas lîdzekďiem
vai asiem metâla skrâpjiem, jo tie bojâ
durvju virsmu un cepeđkrâsns stikls var
saplîst.
Papildu nodalîjuma (ja cepeđkrâsns ar
to ir aprîkota) iekđpuse lietođanas laikâ
var sakarst.
Ierîci nedrîkst tîrît ar tvaika vai
augstspiediena tîrîtâjiem.
Ja gâzes degďi vai elektriskâs
sildîđanas virsmas joprojâm ir karstas,
stikla pârsegu (ja tâds ir) nedrîkst
aizvçrt.
BRÎDINÂJUMS! Pirms cepeđkrâsns
lampiňas nomaiňas pârbaudiet, vai
ierîce ir izslçgta, lai nomaiňas laikâ
novçrstu elektriskâs strâvas trieciena
risku.
Brîdinâjumi

7
EE
HOIATUS: sisselülitatud seade ja selle
juurdepääsetavad osad muutuvad
kasutamise ajal kuumaks.
Olge ettevaatlik ja vältige kontakti
kütteelementidega.
Alla 8-aastased lapsed tuleb hoida
seadmest eemal, v.a. juhul, kui
nendele on tagatud pidev järelevalve.
Vanemad kui 8-aastased lapsed ja
isikud, kellel on vähenenud füüsilised,
meelelised vői vaimsed vőimed vői
vähesed kogemused ja oskused,
vőivad seda seadet kasutada juhul,
kui on tagatud nende järeelvalve
ning neile on antud juhised seadme
ohutuks kasutamiseks ja nad
mőistavad seadme kasutamisest
tulenevaid ohte. Lapsed ei tohi
seadmega mängida. Lapsed vőivad
seadet puhastada ja hooldada ainult
siis, kui on tagatud nende järelevalve.
HOIATUS: rasvas vői őlis küpseva
toidu jätmine keeduplaadile
järelevalveta on ohtlik ja vőib
pőhjustada tulekahju.
Tulekahju kustutamiseks ÄRGE
kasutage vett, vaid lülitage seade välja
ja seejärel katke leek näiteks kaane
vői tuletekiga.
HOIATUS: Tuleoht: ärge hoidke
keeduplaatidel mingeid esemeid.
HOIATUS: kui keeduplaadi
klaaskeraamiline pind on mőranenud,
lülitage seade välja – elektrilöögioht!
Ärge kasutage ahju klaasukse
puhastamiseks tugevatoimelisi
abrasiivseid puhastusvahendeid, sest
need vőivad kriimustada pinda ja klaas
vőib praguneda.
Panipaiga (kui on) sisepinnad vőivad
muutuda kuumaks.
Ärge kasutage seadme puhastamiseks
auru- ega survepuhastusseadmeid.
Ärge sulgege klaaskaant (kui
on olemas), kui gaasipőletid vői
elektrilised keeduplaadid on veel
kuumad.
HOIATUS: enne lambi väljavahetamist
veenduge, et seade on välja lülitatud –
elektrilöögioht!
Hoiatused
8
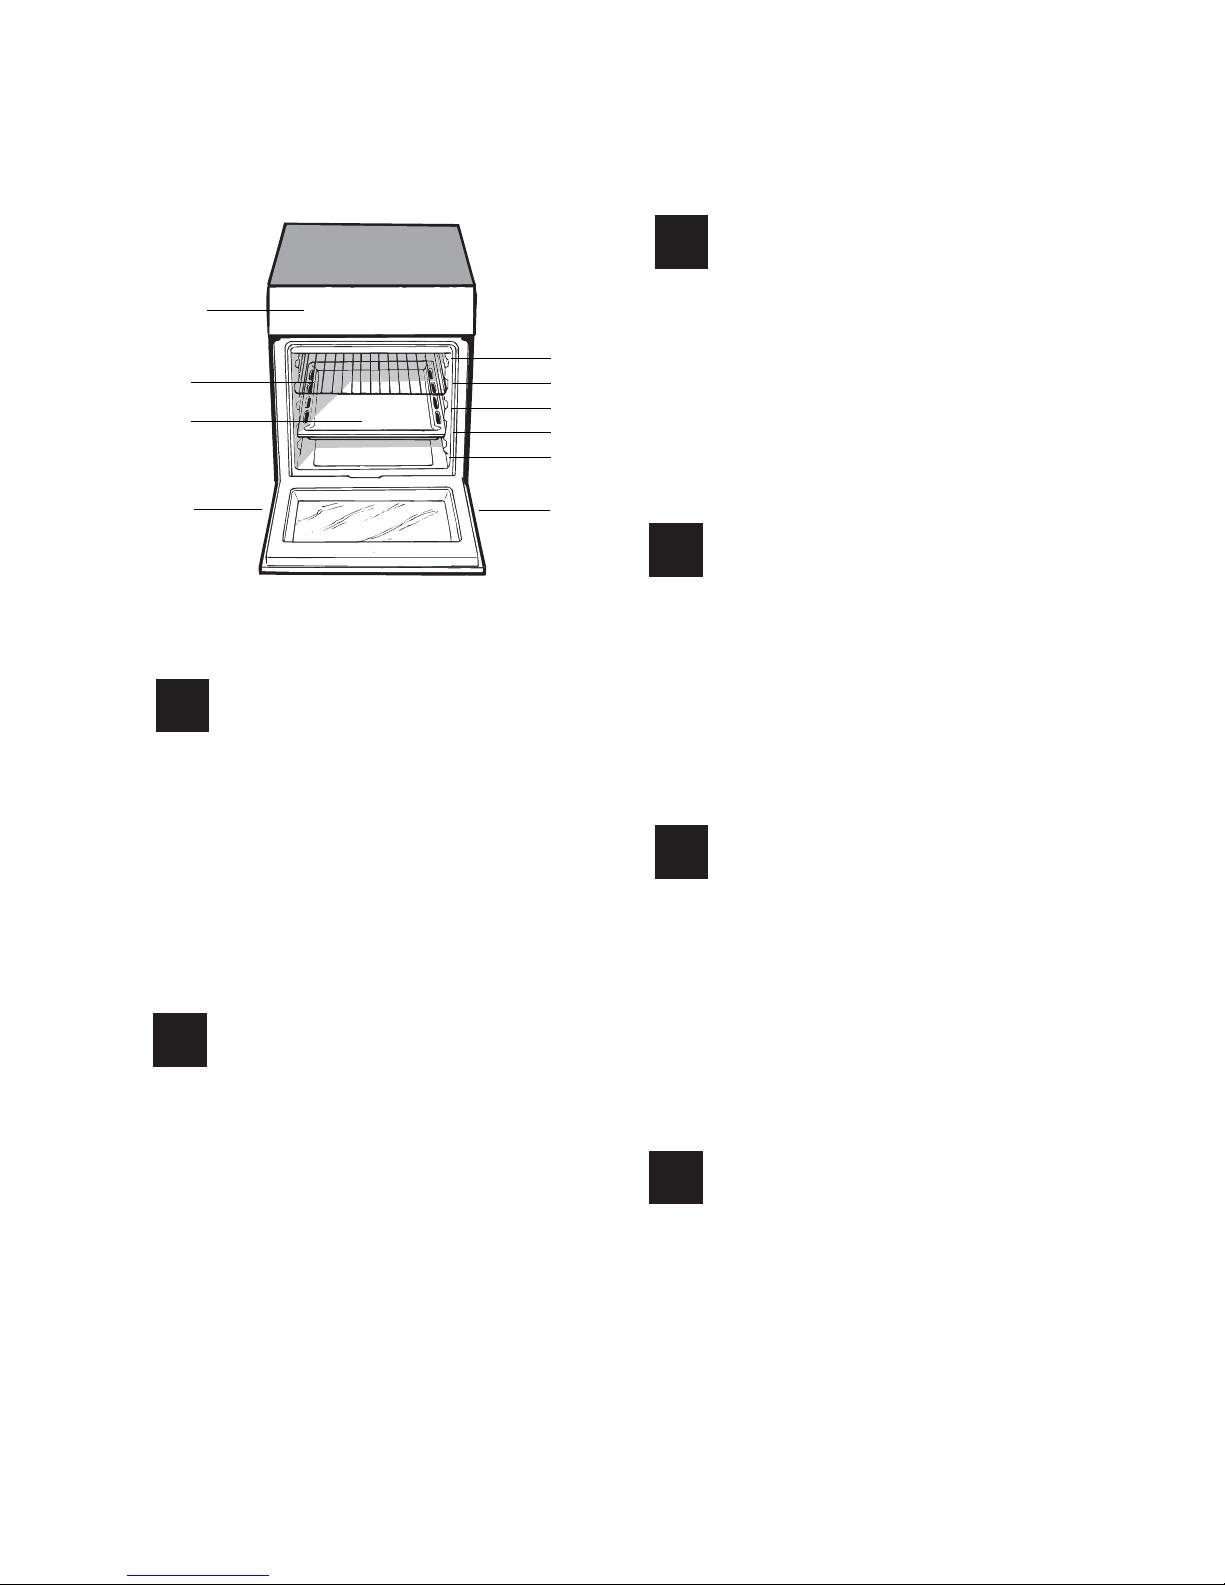
1.Glass ceramic hob
2 .Control panel
3..Sliding grill rack
4. DRIPPING pan
5. Adjustable foot
6.GUIDE RAILS for the sliding racks
7.position 5
8.position 4
9.position 3
10.position 2
11.position 1
Description of the appliance
Overall view
GB
1. Kерамическая плита
2. Панель управления
3. Решетка духовки
4. Противень или жарочный лист
5. Регулируемые ножки
6.
HAПPAB ЛЯЮЩИE для противеней решеток
7. Положение 1
8. Положение 2
9. Положение 3
10.Положение 4
11. Положение 5
Описание изделия
Общий вид
RS
1
2
3
4
5
5
6
7
8
9
10
11
1. Table de cuisson céramique
2. Tableau de bord
3. Support GRILLE
4. Support LECHEFRITE
5. Pied de réglage
6. GLISSIERES de coulissement
7. niveau 5
8. niveau 4
9. niveau 3
10. niveau 2
11. niveau 1
Description de l’appareil
Vue d’ensemble
F R
1.Keramische kookplaat
2.Bedieningspaneel
3.Ovenrek
4.Lekplaat of bakplaat
5.Stelschroeven
6.Geleidersvan de roosters
7. stand 5
8. stand 4
9. stand 3
10. stand 2
11. stand 1
Aanzichttekening
Aanzichttekening
NL
1.Glaskeramik-Kochfeld
2. Bedienfeld
3 .Einschub BACKOFENROST
4 .Einschub FETTPFANNE
5. Höhenverstellbarer Stellfuß
6. GLEITFÜHRUNGEN für die Einschübe
7. position 5
8. position 4
9. position 3
10. position 2
11. position 1
Beschreibung des Gerätes
Geräteansicht
DE
D E
PT
1 Plano de vitrocerâmica
2 Painel de comandos
3 Prateleira GRADE
4 Prateleira BANDEJA PINGADEIRA
5 Pé de regulação
6 GUIAS de deslizamento das prateleiras
7 Posição 5
8 Posição 4
9 Posição 3
10 Posição 2
11 Posição 1
Descrição do aparelho
Vista de conjunto

9
1 Stiklo keramikos kaitlentè
2 Valdymo pultas
3 KEPSNINÈ
4 SURINKIMO INDAS
5 TIškalų sulaikymo paviršius
6 Reguliuojamoji kojelè
7 padètis 5
8 padètis 5
9 padètis 5
10 padètis 5
11 padètis 5
Prietaiso aprađymas
Bendras vaizdas
LT
1 STIKLA KERAMIKAS VIRSMA
2 Vadības panelis
3 GRILĒŠANA
4 CEPE TAUKU PANNA
5 Norobe˛ota virsma traipiem
6 Regulējama kāja
7 pozīcija 5
8 pozīcija 4
9 pozīcija 3
10 pozīcija 2
11 pozīcija 1
Ierîces apraksts
Vispariga informacija
LV
1 Klaaskeraamilise keeduplaat
2 Juhtpaneel
3 GRILL
4 TILGAPANN
5 Tilgaalus
6 Reguleerimisjalg
7 tasand 5
8 tasand 4
9 tasand 3
10 tasand 2
11 tasand 1
Seadme kirjeldus
Ülevaade
EE
10
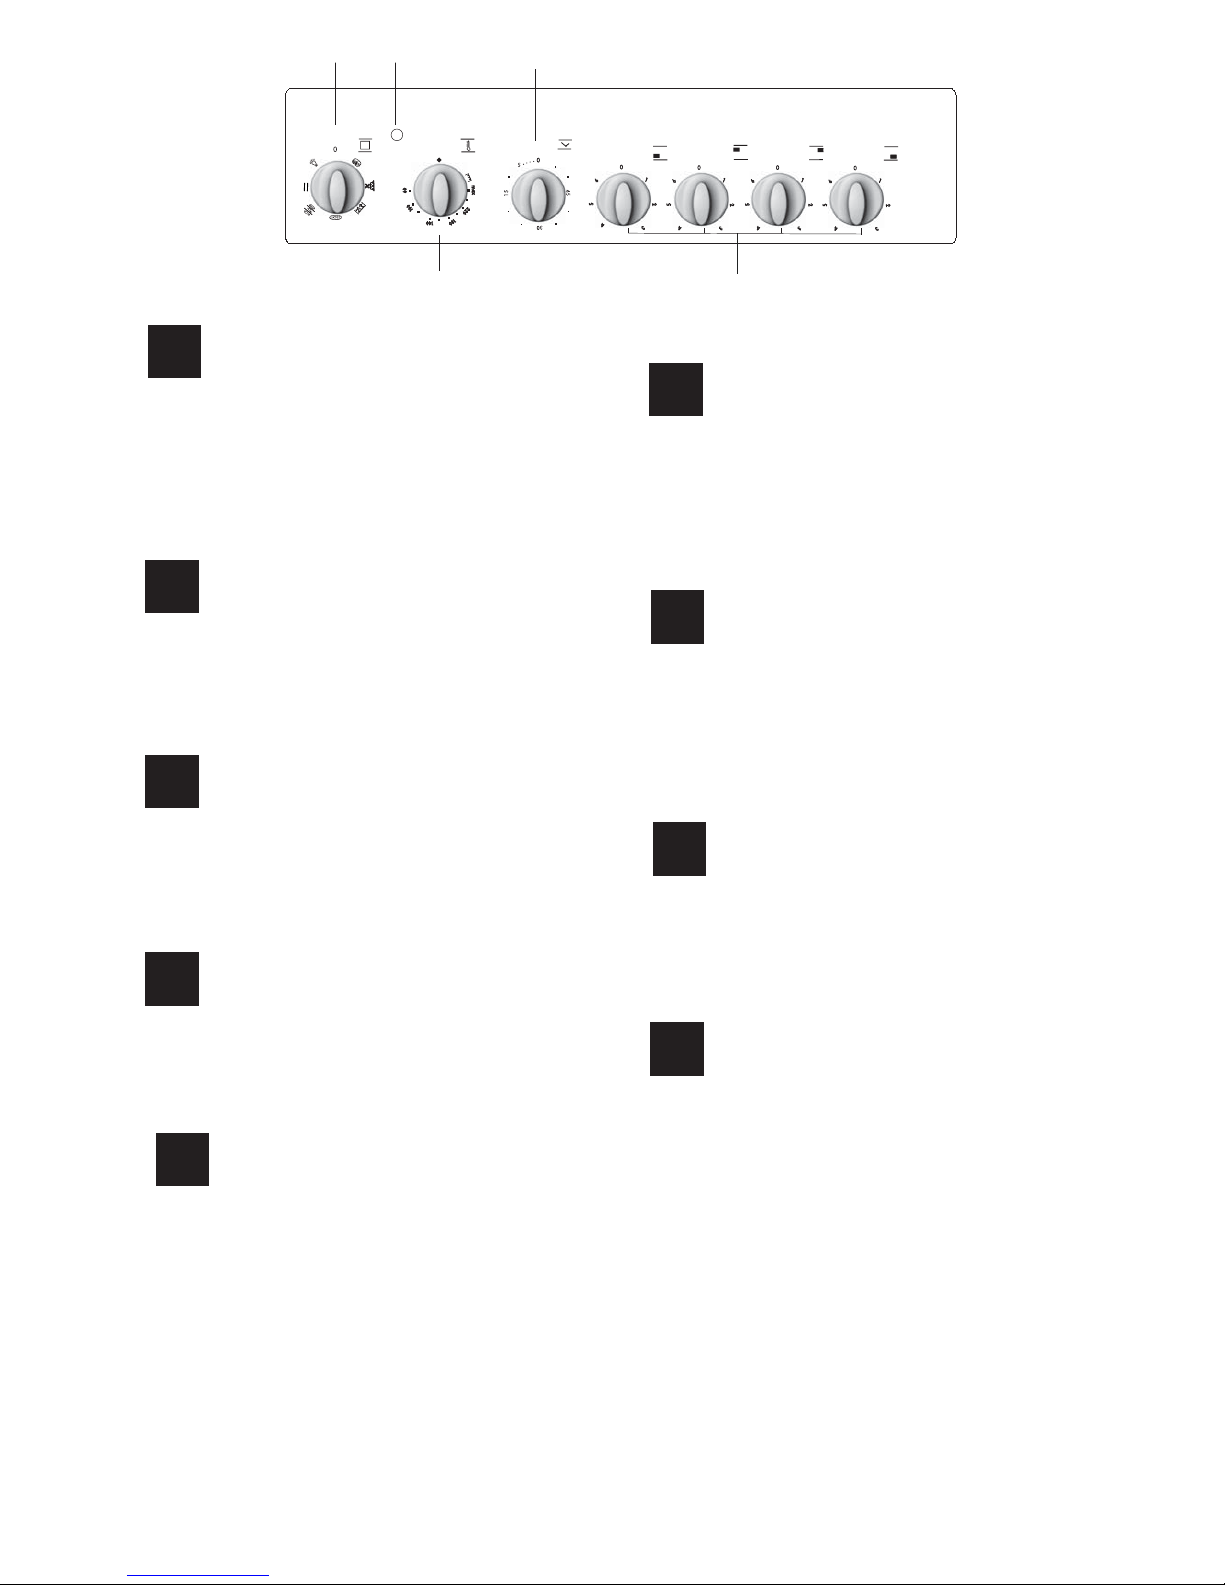
Description of the appliance
Control panel
G B
1.SELECTOR knob
2.THERMOSTAT indicator light
3.THERMOSTAT knob
4.TIMER knob
5.Electric HOTPLATE control knob
IT
Описание изделия
Панель управления
R
1.Рукоятка выбора функций духового шкафа
2.Световой индикатор термостата духового шкафа
3.Рукоятка выбора температуры
4.Таймер
5.Рукоятки электрических конфорок
1
2
3
4
5
Description de l’appareil
Tableau de bord
F R
1.Manette PROGRAMMES
2.Voyant lumineux thermostat
3.Manette du THERMOSTAT
4.Manette du MINUTEUR
5.Manette de la plaque électrique
Aanzichttekening
Bedieningspaneel
N L
1.PROGRAMMAKNOP
2.Controlelampje THERMOSTAAT
3.THERMOSTAATKNOP
4.Knop TIMER
5.Knoppen KOOKPLATEN
Beschreibung des Gerätes
Bedienfeld
DE
Schalter zur Wahl der Backofenfunktionen
Betriebskontrollleuchte THERMOSTAT
THERMOSTAT
Schalter zur Einstellung der Kochfeld-Kochzonen
Descrição do aparelho
Painel de comandos
PT
Manípulo do forno
Indicador de funcionamento termostato
Selector para a temperatura de cozedura (termostato)
Manípulo conta-minutos
Botões de comando das chapas eléctricas
Ierîces apraksts
Vispariga informacija
LV
Cepeškrāsns slēdzis
slēdzis
slēdzis
ELEKTRISKĀS SILDĪŠANAS VIRSMAS vadības slēdzis
Seadme kirjeldus
Juhtpaneel
EE
Prietaiso aprađymas
Valdymo pultas
LT
1. Orkaitë valdymo rankenëlë
2.Indikacinč TERMOSTATO lemputč
3.TERMOSTATO rankenčlč
4.LAIKMAČIO rankenčlč
5.KAITINIMO ELEMENTŘ rankenčlčs
1.Ahju ja grilli juhtnupp
2.TERMOSTAADI näidikutuli
3.TERMOSTAADI nupp
4.TAIMERI nupp
5.ELEKTRILISE KEEDUPLAADI reguleernupp
PT
11
! Antes de colocar em funcionamento o novo aparelho,
leia atentamente este livrete de instruções, pois
contém informações importantes sobre a instalação e
o funcionamento seguro do aparelho.
! Guarde as instruções de funcionamento do aparelho
para consultas posteriores: Certifique-se de que as
instruções sejam conservadas junto com o aparelho em
caso de venda, cessão ou mudança.
! A instalação do aparelho deve ser realizada segundo
estas instruções e por pessoal profissional qualificado.
! Qualquer intervenção de regulação ou manutenção,
deve ser efectuada com o aparelho desligado da rede
eléctrica.
Posicionamento e nivelamento
! É possível instalar o aparelho ao lado de móveis não
mais altos que a superfície do plano de cozedura.
! Assegurar-se de que a parede em contacto com a
parte traseira do aparelho seja de um material não
inflamável e resistente ao calor (T 90°C).
Para uma instalação correcta:
• colocar o aparelho na cozinha, na sala de jantar ou
numa sala única (não na casa de banho);
• Se o plano de cozedura for mais alto que os
móveis, o aparelho deverá ser posicionado a pelo
menos 200 mm de distância dos mesmos.
• Se o fogão for instalado embaixo de uma prateleira,
esta deverá estar pelo menos a 420 mm do plano
de cozedura.
Tal distância deve
ser de 700 mm se as
prateleiras forem de
material inflamável (ver
gura);
• Não colocar cortinas
atrás do fogão ou a
menos de 200 mm dos
seus lados;
• Se houver exaustor, o
mesmo deverá ser instalado conforme as instruções
contidas no respectivo livrete.
Nivelamento
Se for necessário nivelar o
aparelho, parafusar os pés*
de regulação nos específicos
lugares colocados nos cantos
na base do fogão (ver gura).
As pernas* fornecidas com
o aparelho, devem ser
encaixadas na base do fogão.
Ligação eléctrica
Montagem do cabo de fornecimento
Abertura da caixa de bornes:
• Utilize uma chave de fenda, para fazer alavanca nas
linguetas laterais da tampa da caixa de bornes;
• puxe e abra a tampa
da caixa de bornes.
Para instalar o cabo, realize as seguintes operações:
• desapertar o parafuso da braçadeira e os parafusos
dos contactos.
! As pontes são predispostas pela fábrica para ligação
a 230 V monofásico (ver gura).
NL
230V ~
H05RR-F 3x4 CEI-UNEL 35363
1
3
2
4
5
H05VV-F 3x4 CEI-UNEL 35746
• Para efectuar as ligações eléctricas das figuras,
utilizar as duas pontes situadas dentro da caixa (ver
gura - referência”P”)
NL2L1
L3
P
Instalação
HOOD
420
Min.
min.
650
mm. with hood
min.
700
mm. without hood
mm.
600
Min. mm.
420
Min. mm.
* Presente apenas em alguns modelos.

12
PT
NL2L1
400V 2N~
H05RR-F 4x4 CEI-UNEL 35363
H05VV-F 4x4 CEI-UNEL 35746
1
3
2
4
5
NL3L1L2
400V 3N~
H05RR-F 5x2.5 CEI-UNEL 35363
H05VV-F 5x2.5 CEI-UNEL 35746
1
3
2
4
5
• fixe o cabo de alimentação na apropriada
braçadeira e feche a tampa da caixa de bornes.
Ligação do cabo de fornecimento à rede eléctrica
Monte no cabo uma ficha em conformidade com
as normas para a carga indicada na placa de
identificação aplicada no aparelho.
O aparelho deve ser ligado directamente à rede
utilizando um interruptor omnipolar com abertura
mínima entre os contactos de 3 mm, colocado
entre o aparelho e a rede. O interruptor deve ser
dimensionado para a carga indicada e deve respeitar
as normas em vigor sobre a corrente eléctrica (o
condutor de terra não deve ser interrompido pelo
interruptor). O cabo de alimentação deve ser
colocado de maneira que em nenhum ponto entre em
contacto com temperaturas superiores aos 50ºC.
Antes de efectuar a ligação, certifique-se que:
• o aparelho tenha uma ligação à terra e seja em
conformidade com a legislação;
• a tomada tenha a capacidade de suportar a carga
máxima de potência da máquina, indicada na placa
de identificação;
• a tensão de alimentação seja entre os valores da
placa de identificação;
• a tomada seja compatível com a ficha do aparelho.
Se a tomada não for compatível com a ficha,
contacte um técnico autorizado para a substituição.
Não utilize extensões ou fichas múltiplas.
! Depois de ter instalado o aparelho, o acesso ao cabo
de alimentação e à tomada da corrente deve ser fácil.
! O cabo não deve ser dobrado nem comprimido.
! O cabo deve ser verificado periodicamente e
substituído somente por técnicos autorizados.
! A empresa exime-se de qualquer
responsabilidade se estas regras não forem
obedecidas.
PLACA DAS CARACTERÍSTICAS
Medidas do Forno
HxLxP
32x43,5x40 cm
Volume
Litros 57
Tensão e
frequência de
fornecimento
vide a placa das características
Plano de cozedura
de cerâmica
Dianteiro esq.
Traseiro esq.
Traseiro dir.
Dianteiro dir.
Absorção dos
planos de cozedura
de cerâmica Máx
1700 W
1200 W
2100 W
1200 W
6200 W
ETIQUETA DE
ENERGIA
Directiva 2002/40/CE acerca dos
fornos eléctricos. Norma EN 50304
Consumo de energia com
convecção Natural função de aquecimento:
Tradicional;
Consumo energia declaração
Classe com convecção Forçada funzione di riscaldamento:
Pastéis.
Este aparelho está em
conformidade com as seguintes
Directivas da Comunidade
Europeia: - 2006/95/CEE de
12/12/06 (Baixa Tensão) e
posteriores modificações –
89/336/CEE de 03/05/89
(Compatibilidade Electromagnética)
e posteriores modificações 93/68/CEE de 22/07/93 e
posteriores
modificações.2002/96/CE
PT
13
Início e utilização
! Quando o acender pela primeira vez, aconselhamos
de fazer funcionar o forno vazio pelo menos durante
uma hora, com o termóstato posto à temperatura
máxima e a porta fechada. Em seguida, pode apagar,
abrir a porta do forno e ventilar a sala. O odor que
se sente deve-se à evaporação das substâncias
empregadas para proteger o forno.
! Antes do uso, remova taxativamente as películas de
plástico posicionadas aos lados do aparelho.
Início do forno
1. Para seleccionar o programa de cozedura que
desejar, rode o selector dos PROGRAMAS.
2. Escolha a temperatura recomendada para o
programa ou aquela desejada girando o selector do
TERMOSTATO.
Uma lista com as cozeduras e as respectivas
temperaturas aconselhadas pode ser consultada na
específica tabela (veja a Tabela de cozedura no forno).
Durante a cozedura é sempre possível:
• modificar o programa de cozedura mediante o
selector dos PROGRAMAS;
• modificar a temperatura mediante o selector do
TERMOSTATO;
• planificar a duração e a hora do fim da cozedura
(ver abaixo);
• interromper a cozedura se recolocar o selector dos
PROGRAMAS na posição “0”.
! Nunca encoste objectos no fundo do forno, para
evitar riscos de danos ao esmalte. Utilize a posição 1
do forno apenas no caso de cozer usando o espeto
rotatório.
! Coloque sempre os recipientes de cozedura sobre a
grelha fornecida.
Indicador do TERMÓSTATO
Se estiver ligado significa que o forno está a produzir
calor. Desliga-se quando no interior do forno for
alcançada a temperatura seleccionada. A esta
altura, o indicador começa a piscar indicando que
o termostato está a funcionar e mantém constante a
temperatura.
Luz do forno
Acende-se girando o selector dos PROGRAMAS em
qualquer posição diferente do “0” e fica acesa até
quando o forno estiver a funcionar. Seleccionando
com o selector, a luz acende-se sem activar algum
elemento aquecedor.
! Para todos os programas pode ser definida uma
temperatura
entre 50°C e MÁX., excepto:
• GRILL e DUPLO GRILL (é aconselhável configurar
somente em MÁX.);
• GRATIN (é aconselhável não ultrapassar a
temperatura de 200°C).
Programa de FORNO TRADIÇÃO
Activam-se os dois elementos aquecedores inferior
e superior. Com esta cozedura tradicional é melhor
utilizar uma única prateleira: com mais de uma
prateleira haverá má distribuição da temperatura.
Programa FORNO PARA PASTÉIS
Liga-se o elemento aquecedor traseiro e entra em
funcionamento a ventoinha para garantir um calor
suave e uniforme no interior do forno. Esta função
é indicada para a cozedura de comidas delicadas,
(especialmente doces que necessitarem de levitação)
e algumas preparações “mignon” em 3 prateleiras
simultaneamente.
Programa de COZEDURA MÚLTIPLA
Activam-se todos os elementos aquecedores
(superior, inferior e circular) e entra em funcionamento
a ventoinha. Como o calor é constante e uniforme em
todo o forno, o ar coze e cora os alimentos de maneira
uniforme. É possível utilizar até duas prateleiras no
máximo contemporaneamente.
Programa do FORNO PARA PIZZA
Activam-se os elementos aquecedores inferior e
circular e entra em funcionamento a ventoinha. Esta
combinação possibilita um aquecimento rápido do
forno, com um grande fluxo de calor principalmente
por baixo. Se utilizar mais de uma prateleira de cada
vez, será necessário trocar a posição das mesmas na
metade da cozedura.
Programa de GRILL
Activa-se a parte central do elemento aquecedor
superior. Uma temperatura alta e directa do grill é
aconselhada para os alimentos que necessitarem
de uma alta temperatura superficial (bifes de vitela
ou vaca, filés, entrecôte). É um programa de baixos
consumos, ideal para grelhar pratos de pequenas
dimensões. Colocar os alimentos no meio da grelha,
pois os alimentos colocados nos cantos ficam crus.
Programa GRATIN
14
PT
Activa-se o elemento aquecedor superior e começam
a funcionar a ventoinha e o espeto rotatório (se houver).
Une a irradiação térmica unidireccional com a circulação
forçada do ar no interior do forno. Deste modo, impede-se
a queimadura da superfície dos alimentos ao aumentar-se
o poder de penetração do calor.
! As cozeduras GRILL e GRATIN devem ser
efectuadas com a porta fechada.
Espeto giratório
Para accionar o espeto giratório proceder da seguinte
maneira:
1. coloque o tabuleiro de recolha de gordura na
posição 1;
2. coloque o suporte do espeto giratório na posição 4,
e introduza o espeto no respectivo orifício, situado na
parede traseira do forno(ver gura);
3. accione o espeto giratório seleccionando
/
com o selector dos PROGRAMAS.
Conselhos práticos para cozedura
! Nas cozeduras ventiladas não utilize as posições
das prateleiras 1 e 5: estes recebem directamente ar
quente que poderia provocar queimaduras em alimentos
delicados.
COZEDURA MÚLTIPLA
• Utilize as posições 2 e 4 dos tabuleiros, coloque na 2
os alimentos que necessitarem de mais calor.
• Coloque a bandeja pingadeira embaixo e a grade em
cima.
GRILL
• Nas cozeduras GRILL coloque a grelha na posição
5 e a bandeja pingadeira na posição 1 para recolher
os resíduos de cozedura (molhos e/ou gordura). Nas
cozeduras GRATIN coloque a grelha na posição 2 ou 3
e a bandeja pingadeira na posição 1 para recolher os
resíduos de cozedura.
• É aconselhável configurar o nível de energia no
máximo. Não se alarme se a resistência superior
não permanecer constantemente acesa: o seu
funcionamento é controlado por um termóstato;
FORNO para PIZZA
• Utilize uma forma de alumínio leve, apoie-a na grelha
do forno.
Se utilizar a bandeja pingadeira aumentará os tempos
de cozedura e dificilmente será obtida uma pizza
crocante.
• No caso de pizzas com muita cobertura é aconselhável
colocar o queijo mozzarella na metade da cozedura.
Tabela de cozedura no forno
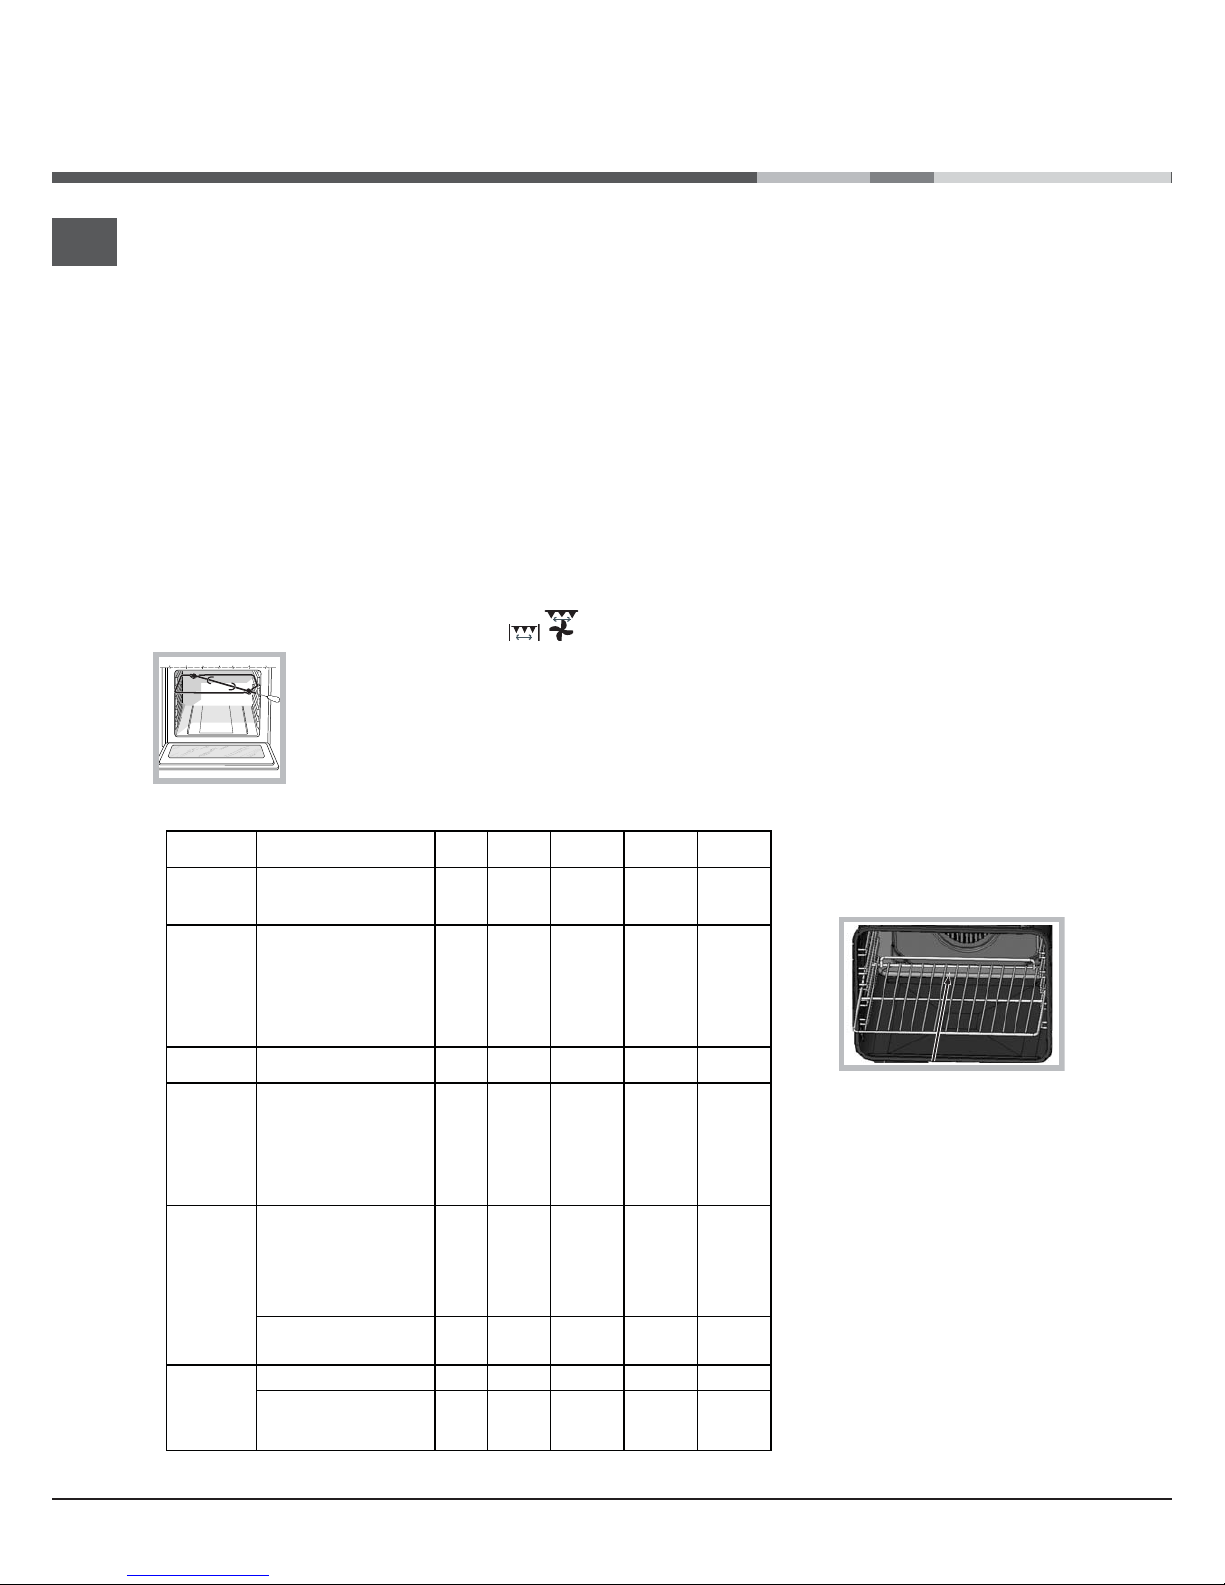
! Ao inserir a grelha, assegurar-
se de que o pino esteja na parte
posterior da cavidade (ver imagem).
Programas Alimentos Peso
(Kg)
Posição
das
prateleiras
Pré
aquecimento
(minutos)
Temperatura
aconselhada
Duração da
cozedura
(minutos)
Forno
Tradicional
Pato
Carne de vitela ou vaca assada
Carne de porco assada
Biscoitos (de massa tenra)
Tartes doces
1
1
1
1
3
3
3
3
3
15
15
15
15
15
200
200
200
180
180
65-75
70-75
70-80
15-20
30-35
Forno para
Pastéis
Tartes doces
Torta de fruta
Plum cake
Pão-de-ló
Crêpes recheadas (em 2 prateleiras)
Queques pequenos (em 2 prateleiras)
Salgadinhos folhados como queijo (em
2 prateleiras)
Bignés (em 3 prateleiras)
Biscoitos (em 3 prateleiras)
Merengues (em 3 prateleiras)
0.5
1
0.7
0.5
1.2
0.6
0.4
0.7
0.7
0.5
3
2 o 3
3
3
2 e 4
2 e 4
2 e 4
1 e 3 e 5
1 e 3 e 5
1 e 3 e 5
15
15
15
15
15
15
15
15
15
15
180
180
180
160
200
190
210
180
180
90
20-30
40-45
40-50
25-30
30-35
20-25
15-20
20-25
20-25
180
Forno para Pizza
Pizza
Carne de vitela ou vaca assada
Frango
0.5
1
1
3
2
2 ou 3
15
10
10
220
220
180
15-20
25-30
60-70
Cozedura
Múltipla
Pizza (em 2 prateleiras)
Lasanha
Cordeiro
Frango assado com batatas
Cavala
Plum cake
Bignés (em 2 prateleiras)
Biscoitos (em 2 prateleiras)
Pão-de-ló (em 1 prateleira)
Pão-de-ló (em 2 prateleiras)
Tortas salgadas
1
1
1
1+1
1
1
0.5
0.5
0.5
1
1.5
2 e 4
3
2
2 e 4
2
2
2 e 4
2 e 4
2
2 e 4
3
15
10
10
15
10
10
10
10
10
10
15
230
180
180
200
180
170
190
180
170
170
200
15-20
30-35
40-45
60-70
30-35
40-50
20-25
10-15
15-20
20-25
25-30
Linguado e chocas
Espetinhos de calamares e camarão
Chocas
Filé de bacalhau
Verduras na grelha
Bife de vitela
Chouriços
Hambúrgueres
Cavala
Tostas (ou pão torrado)
0.7
0.6
0.6
0.8
0.4
0.8
0.6
0.6
1
n.° 4 e 6
4
4
4
4
3 ou 4
4
4
4
4
4
-
-
-
-
-
-
-
-
-
-
100%
100%
100%
100%
100%
100%
100%
100%
100%
100%
10-12
8-10
10-15
10-15
15-20
15-20
15-20
10-12
15-20
3-5
Grelhador
Com espeto girat ório
Vitela no espeto
Cordeiro
Frango no espeto
1.0
1.5
1.0
-
-
-
5
5
5
Max
Max
Max
80-90
70-80
70-80
Frango na grelha
Chocas
1.5
1.5
2
2
10
10
200
200
55-60
30-35
Gratin
Com espeto giratório
Vitela no espeto
Frango no espeto
Cordeiro no espeto+ patate
1.5
1.5
1.5
-
2
2
2
5
5
5
5
200
200
200
200
70-80
70-80
70-75
70-75
PT
15
Utilização do plano de
cozedura de vitrocerâmica
! A cola aplicada nas guarnições deixa alguns traços
de graxa no vidro. Antes de utilizar o aparelho, é
recomendável eliminá-la com um produto não abrasivo
específico para a manutenção. Durante as primeiras
horas de funcionamento, pode ser que note odor de
borracha, que em todo o caso logo desaparecerá.
Ligar e desligar as zonas de cozedura
Para ligar uma zona de cozedura, rodar no sentido
horário o selector correspondente.
Para desligar, rodar o selector no sentido anti-horário até
o “0”.
A ligação do indicador luminoso FUNCIONAMENTO
CHAPAS indica que ao menos uma chapa do plano de
cozedura está a funcionar.
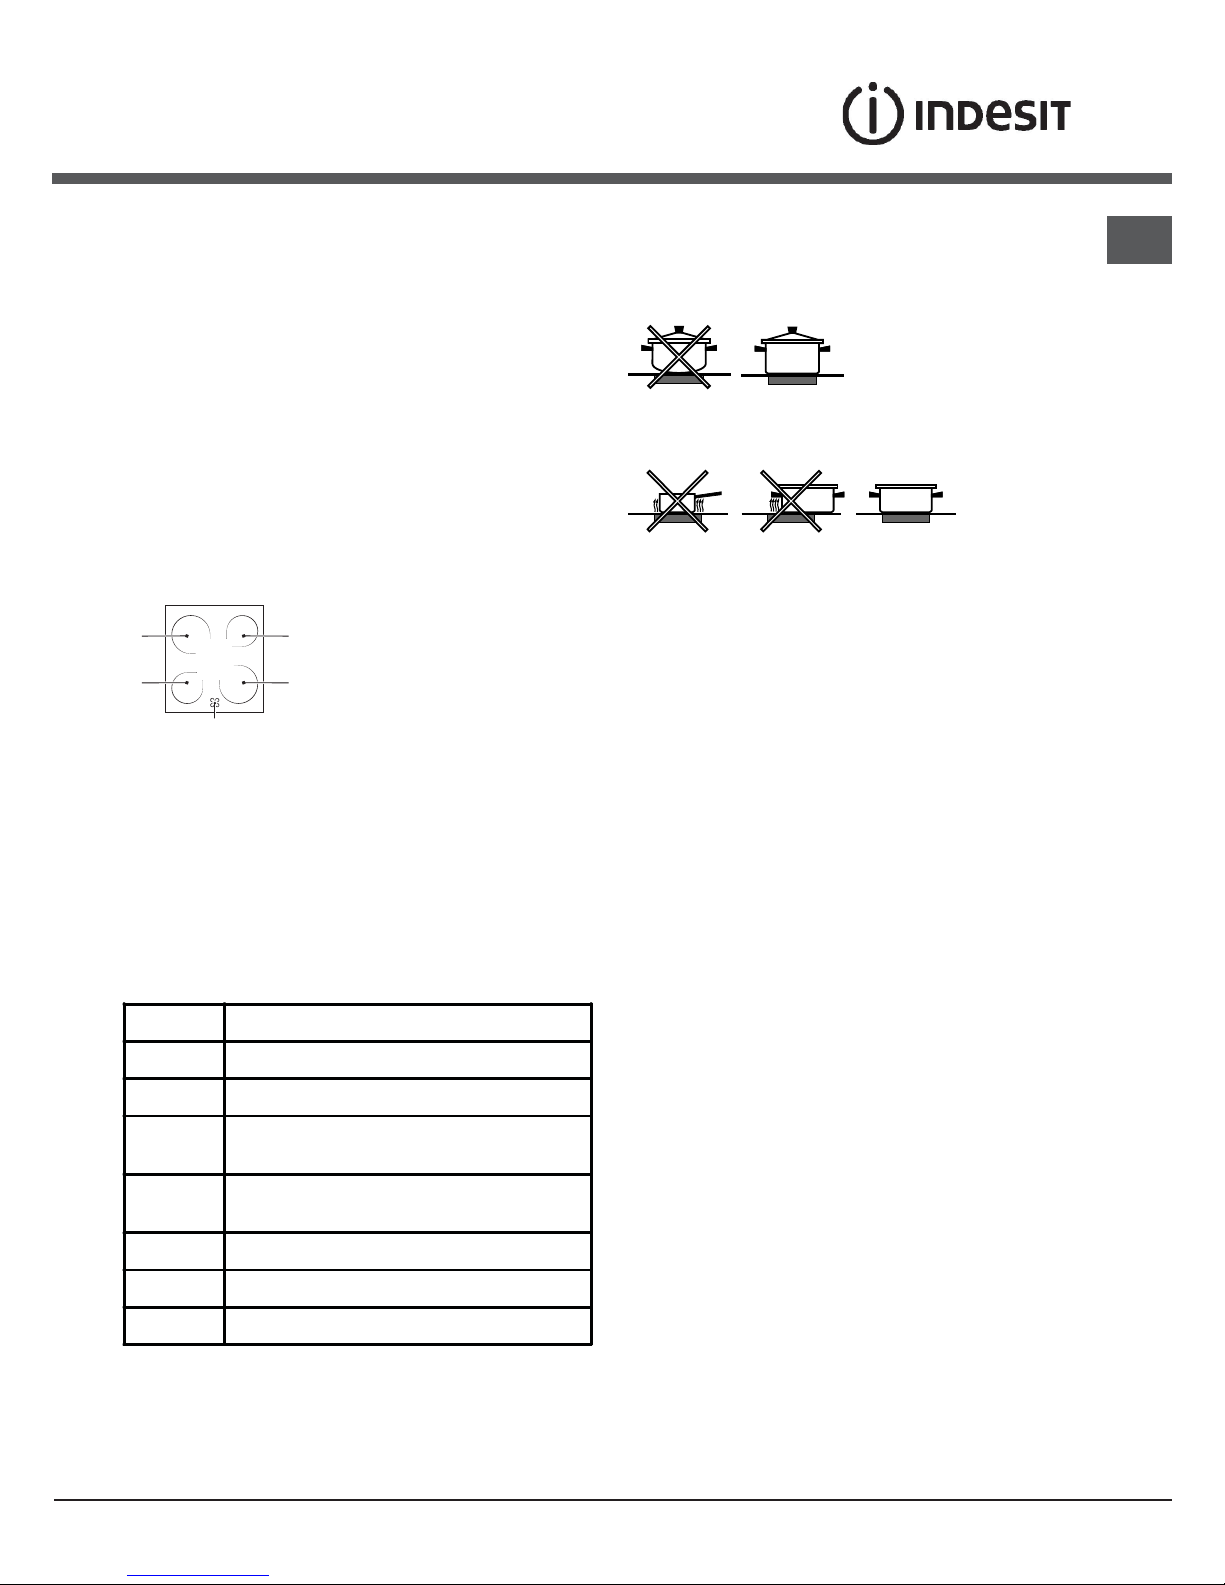
As zonas de cozedura
No plano de cozedura há
elementos aquecedores
eléctricos radiantes. Durante
o funcionamento, tornam-se
vermelhos:
A. Zona de cozedura com
elementos radiantes.
B. Indicador luminoso de calor: indica que a
temperatura da zona de cozedura correspondente é
superior aos 60ºC, mesmo no caso em que o elemento
esteja desligado mas ainda quente.
Zonas de cozedura com elementos radiantes.
Os elementos aquecedores radiantes são constituídos
por elementos aquecedores circulares que tornamse vermelhos somente 10-20 segundos após o
acendimento.
Conselhos práticos para utilização do plano de
cozedura
• Empregue panelas com fundo chato e elevada
espessura, para ter a certeza que haverá uma perfeita
aderência à zona de aquecimento;
• empregue panelas com diâmetro suficiente para cobrir
inteiramente a zona de aquecimento, de maneira que
se aproveite inteiramente o calor disponível;
• certifique-se que o fundo das panelas esteja sempre
perfeitamente enxuto e limpo: a aderência às zonas de
cozedura será ideal e seja as panelas seja o plano de
cozedura irão durar por mais tempo;
• evite utilizar as mesmas panelas que emprega nos
queimadores a gás: a concentração de calor nos
queimadores a gás poderá deformar o fundo das
panelas, que desta maneira perderá aderência;
• nunca deixe uma zona de cozedura radiante acesa
se não houver uma panela em cima, pois poderia
danificar-se.
A
A
A
A
B
Posiçăo Placa normal ou rápida
0
Apagado
1
Cozedura de legumes, verdes ou de peixe
2
Cozedura de batatas (em vapor), sopas,
grăo de bico, feijăo
3
Para continuar a cozedura de grandes
quantid. de alimentos , minestroni
4
Estufar (médio)
5
Estufar (forte)
6
Tostar ou ferver em pouco tempo

16
PT
Precauções e conselhos
! Este aparelho foi projectado e fabricado em conformidade
com as normas internacionais de segurança. Estas advertências
são fornecidas por razões de segurança e devem ser lidas com
atenção.
Segurança geral
• As instruções são válidas somente para os países de destino
para os quais os símbolos constam no livrete e na placa de
identificação do aparelho.
• Este aparelho foi concebido para utilização de tipo não
profissional no âmbito de moradas.
• Este aparelho não deve ser instalado ao ar livre, mesmo num
sítio protegido. É muito perigoso deixá-lo exposto à chuva e
temporais.
• Não toque no aparelho se estiver descalço, ou se as suas
mãos ou pés estiverem molhados ou húmidos.
• O aparelho deve ser utilizado para cozinhar alimentos,
somente por pessoas adultas e conforme as instruções
contidas neste livrete. Qualquer outro uso (como por
exemplo, aquecedor de ambientes) deve ser considerado
impróprio e portanto perigoso. O fabricante não pode ser
considerado responsável por eventuais danos derivados
de usos impróprios, errados e irrazoáveis..
• Este folheto diz respeito a um aparelho de classe 1 (isolado)
ou classe 2 - subclasse 1 (situado entre dois móveis).
• Durante o uso deste aparelho, os elementos aquecedores e
algumas das partes da porta do forno esquentam-se muito.
Tome cuidado para não tocar nos mesmos e mantenha as
crianças afastadas.
• Certifique-se de que os cabos de alimentação de outros
electrodomésticos não entrem em contacto com partes
quentes do forno.
• Nunca cubra as aberturas de ventilação e de eliminação de
calor.
• Não apoie sobre as chapas eléctricas panelas instáveis ou
deformadas, para evitar que tombem. Posicione-as sobre o
plano de cozedura com os cabos virados para o centro do
aparelho.
• Utilize luvas de forno para colocar e tirar recipientes.
• Não utilize líquidos inflamáveis (álcool, gasolina, etc.) perto do
aparelho enquanto este estiver funcionando.
• Não guarde material inflamável no vão inferior de depósito
ou no interior do forno: se o aparelho for inadvertidamente
colocado a funcionar, poderia incendiar-se.
• Assegurar-se sempre que os selectores estejam na posição 0
quando o aparelho não for utilizado.
• Não puxe pelo cabo para desligar a ficha da tomada eléctrica,
pegue pela ficha.
• Não realize operações de limpeza ou manutenção sem antes
ter desligado o aparelho da rede eléctrica.
• Em caso de defeitos do aparelho, nunca procure consertálo sozinho. Os consertos efectuados por pessoas não
qualificadas podem causar lesões ou ulteriores maus
funcionamentos do aparelho. Contactar a Assistência.
• Não coloque objectos pesados sobre a porta do forno aberta.
• As superfícies internas da gaveta (se houver) podem ficar
muito quentes.
• A placa de vitrocerâmica é resistente às batidas mecânicas,
entretanto pode rachar-se (ou eventualmente partir-se) se
for batida com um objecto pontiagudo, como um utensílio.
Nestes casos, desligue imediatamente o aparelho da rede de
alimentação e contacte a assistência técnica.
• Se a superfície do plano estiver rachada, desligue o aparelho
para evitar a possibilidade de choques eléctricos.
• Não se esqueça que a temperatura das zonas de cozedura
permanece muito alta pelo menos trinta minutos depois de
apagadas.
• Mantenha a devida distância da placa quaisquer objectos
que podem se derreter, por exemplo, objectos de plástico, de
alumínio ou produtos com um alto conteúdo de açúcar. Preste
muita atenção com as embalagens e as películas de plástico
ou alumínio: se deixá-los sobre as superfícies enquanto ainda
estiverem quentes ou mornas, podem causar um dano grave à
placa.
• Não apoie objectos metálicos (facas, colheres, tampas, etc.)
sobre o plano porque podem ficar quentes.
• Não é previsto que este aparelho seja utilizado por pessoas
(incluso crianças) com reduzidas capacidades físicas,
sensoriais ou mentais, por pessoas inexperientes ou que
não tenham familiaridade com o produto, a não ser que seja
vigiadas por uma pessoa responsável pela sua segurança ou
que tenham recebido instruções preliminares sobre o uso do
aparelho.
• Não permita que as crianças brinquem com o aparelho.
• Caso haja zonas de cozedura halógenas, não olhe para elas
por muito tempo.
• Se o fogão for colocado sobre um estrado, tome as
providências necessárias para que o aparelho não escorregue
do estrado.
• Não permita que as crianças brinquem com o aparelho.
Eliminação
• Eliminação do material de embalagem: obedeça as regras
locais, de maneira que as embalagens possam ser reutilizadas.
• A directiva Europeia 2002/96/CE relativa aos resíduos de
equipamentos eléctricos e electrónicos (REEE) prevê que os
electrodomésticos não devem ser eliminados no normal fluxo
dos resíduos sólidos urbanos. Os aparelhos não mais utilizados
devem ser recolhidos separadamente para optimizar a taxa
de recuperação e reciclagem dos materiais que os compõem
e impedir potenciais danos à saúde e ao meio ambiente.
O símbolo da lixeira cancelada está indicado em todos os
produtos para lembrar o dever de colecta selectiva.
Para maiores informações sobre a correcta eliminação dos
electrodomésticos, os proprietários poderão contactar o serviço
de colecta público ou os revendedores.
Respeitar e preservar o meio ambiente
• Utilizando o forno nos horários a partir do fim da tarde, até as
primeiras horas da manhã, estará contribuindo para reduzir
a carga de absorção das empresas de fornecimento de
electricidade.
• É recomendável realizar as cozeduras ESPETO ROTATIVO,
BARBECUE e ASSADOS sempre com a porta fechada: quer
para obter melhores resultados, quer para uma sensível
economia de energia (aproximadamente 10%).
• Controle e mantenha limpas as guarnições da porta para que
não tenham resíduos de comida e possam aderir bem na porta,
evitando dispersões de calor.

PT
17
Manutenção e cuidados
Desligar a corrente eléctrica
Antes de realizar qualquer operação, desligue o aparelho
da alimentação eléctrica.
Limpeza do aparelho
! Nunca utilize equipamento de limpeza a vapor ou de
alta pressão para limpar a aparelhagem.
• Limpe o vidro da porta do forno utilizando esponjas
e produtos não abrasivos e enxugue com um pano
macio. Não utilize materiais ásperos ou espátulas
metálicas afiadas, pois podem arranhar a superfície e
partir o vidro.
• As partes externas esmaltadas ou inoxidáveis e as
guarnições de borracha podem ser limpas com uma
esponja molhada com água morna e sabão neutro.
Se for difícil remover as manchas, empregue produtos
específicos. Após a limpeza, enxaguar com água
abundante e enxugar. Não empregue pós abrasivos nem
substâncias corrosivas.
• O interior do forno deve ser sempre limpo de
preferência depois de cada utilização, enquanto
ainda estiver morno. Utilize água quente e detergente,
enxagúe cuidadosamente e enxugue com um pano
macio. Evite produtos abrasivos.
• Os acessórios podem ser facilmente lavados como
quaisquer utensílios, inclusive numa máquina de lavar
loiça.
• Eliminar a sujeira e a gordura do painel de comandos
utilizando uma esponja não abrasiva ou um pano
macio.
• O aço inoxidável poderá manchar-se se ficar em contacto
durante muito tempo com água fortemente calcária ou com
detergentes agressivos (contendo fósforo). Após a limpeza,
enxaguar com água abundante e enxugar com atenção.
Para mais é aconselhado enxugar eventuais vazamentos de
água.
Verificação das guarnições
Verifique periodicamente o estado da guarnição ao redor
da porta do forno. Se houver danos, contacte o Centro
de Assistência Técnica mais próximo (veja a Assistência
técnica).. É aconselhável não usar o forno antes do
mesmo ter sido reparado.
Substituir a lâmpada de iluminação do
forno
1. Após ter desligado o forno da
electricidade, remova a tampa de
vidro do porta-lâmpadas (ver gura).
2. Retire a lâmpada e substitua-a por
outra análoga: tensão 230V, potência
25 W, engate E 14.
3. Monte novamente a tampa e restabeleça a ligação
eléctrica do forno.
! Não utilizar a lâmpada do forno como iluminação
de ambientes.
Limpar o plano de cozedura de
vitrocerâmica
! Evite o emprego de detergentes abrasivos ou
corrosivos, tais como sprays para churrasqueiras
e fornos, tira-manchas e produtos contra ferrugem,
detergentes em pó e esponjas com superfície abrasiva:
podem arranhar irremediavelmente a superfície.
• Normalmente é suficiente lavar o plano de cozedura
com uma esponja húmida e enxugá-lo com papel
absorvente de cozinha.
• Se o plano estiver muito sujo, esfregue com um produto
específico para limpeza de superfícies de vitrocerâmica,
enxagúe bem e enxugue com atenção.
• Para remover os maiores acúmulos de sujeira, use
uma espátula apropriada (não fornecida junto com
o aparelho). Remova imediatamente o material
derramado, sem aguardar que o aparelho arrefeça,
para evitar que os resíduos grudem. Podem ser obtidos
excelentes resultados se usar uma esponja especial
de fios de aço inoxidável - específica para planos de
vitrocerâmica - molhada de água e sabão.
• No caso em que no plano de cozedura tenham-se
acidentalmente fundidas substâncias como plástico ou
açúcar, remova-as imediatamente com a espátula, até
que a superfície esteja ainda quente.
• Depois de limpo, o plano poderá ser tratado com
um produto específico para a manutenção e a
protecção: a película invisível deixada por este produto
protegerá a superfície se algo for derramado durante
a cozedura. É recomendável realizar estas operações
e manutenção enquanto o aparelho estiver morno (não
quente) ou frio.
• Lembre-se sempre de enxaguar o plano de cozedura
com água limpa e de enxugá-lo com cuidado: os
resíduos poderiam grudar durante as sucessivas
cozeduras.
•
Este produto satisfaz os requisitos impostos pela nova Directiva
Europeia sobre a limitação dos consumos energéticos em standby.
Se não se efectuarem operações por 2 minutos, o aparelho
coloca-se automaticamente na modalidade stand-by.
A modalidade stand-by é indicada com o „Ícone Relógio” em alta
luminosidade.
Assim que se efectuar novamente alguma operação no aparelho,
o sistema voltará para a modalidade operativa.
Assistência técnica
Atenção:
Este aparelho é equipado com um sistema de diagnóstico
que possibilita detectar eventuais maus funcionamentos.
Estes são comunicados no display mediante mensagens do
seguinte tipo: “F” seguido por números.
Nestes casos será necessária uma intervenção da
assistência técnica.
! Nunca recorra a técnicos não autorizados.
Comunique:
• o tipo de avaria;
• o modelo da máquina (Mod.);
• o número de série (S/N);
Estas últimas informações encontram-se na placa de
identificação situada no aparelho.
Detergente para
vidro-cerâmica
Fontes de abastecimento
Raspador a lâmina Passatempos e construçôes
Stahl-Fix
SWISSCLEANER
WK TOP
Artigos domésticos,
Bricolage,
Ferramenta,Gęneros alimentares

18
GB
! Before operating your new appliance please read
this instruction booklet carefully. It contains important
information concerning the safe installation and
operation of the appliance.
! Please keep these operating instructions for future
reference. Make sure that the instructions are kept with
the appliance if it is sold, given away or moved.
! The appliance must be installed by a qualified
professional in accordance with the instructions
provided.
! Any necessary adjustment or maintenance must be
performed after the cooker has been disconnected
from the electricity supply.
Positioning and levelling
! It is possible to install the appliance alongside
cupboards whose height does not exceed that of the
hob surface.
! Make sure that the wall in contact with the back of
the appliance is made from a non-flammable, heatresistant material (T 90°C).
To install the appliance correctly:
• Place it in the kitchen, the dining room or the bed-sit
(not in the bathroom).
• If the top of the hob is higher than the cupboards,
the appliance must be
installed at least 600 mm
away from them.
• If the cooker is
installed underneath a
wall cabinet, there must
be a minimum distance
of 420 mm between this
cabinet and the top of
the hob.
This distance should be increased to 700 mm if the wall
cabinets are flammable (see gure).
• Do not position blinds behind the cooker or less than
200 mm away from its sides.
• Any hoods must be installed according to the
instructions listed in the relevant operating manual.
Levelling
If it is necessary to level the appliance, screw the
adjustable feet into the places
provided on each corner of the
base of the cooker (see gure).
The legs* fit into the slots on the
underside of the base of the
cooker.
Electrical connection
Fitting the power supply cable
To open the terminal board:
• Insert a screwdriver into the side tabs of the terminal
board cover.
• Pull the cover to open it.
To install the cable,
follow the instructions
below:
• Loosen the cable
clamp screw and the wire contact screws.
! The jumpers are pre-set at the Factory for 230 V
single-phase connection (see gure).
• To carry out the electrical connections as shown in
the figures, use the two jumpers inside the box (see
gure - labelled “P”).
Installation
HOOD
420
Min.
min.
650
mm. with hood
min.
700
mm. without hood
mm.
600
Min. mm.
420
Min. mm.
* Only available in certain models.
NL2L1
L3
P
NL
230V ~
H05RR-F 3x4 CEI-UNEL 35363
1
3
2
4
5
H05VV-F 3x4 CEI-UNEL 35746
GB
19
NL3L1L2
400V 3N~
H05RR-F 5x2.5 CEI-UNEL 35363
H05VV-F 5x2.5 CEI-UNEL 35746
1
3
2
4
5
NL2L1
400V 2N~
H05RR-F 4x4 CEI-UNEL 35363
H05VV-F 4x4 CEI-UNEL 35746
1
3
2
4
5
• Secure the power supply cable by fastening the
cable clamp screw then put the cover back on.
Connecting the supply cable to the electricity mains
Install a standardised plug corresponding to the load
indicated on the appliance data plate (see Technical
data table).
The appliance must be directly connected to the mains
using an omnipolar switch with a minimum contact
opening of 3 mm installed between the appliance and
the mains. The switch must be suitable for the charge
indicated and must comply with current electrical
regulations (the earthing wire must not be interrupted
by the switch). The supply cable must be positioned
so that it does not come into contact with temperatures
higher than 50°C at any point.
Before connecting the appliance to the power supply,
make sure that:
• The appliance is earthed and the plug is compliant with
the law.
• The socket can withstand the maximum power of the
appliance, which is indicated by the data plate.
• The voltage is in the range between the values
indicated on the data plate.
• The socket is compatible with the plug of the
appliance. If the socket is incompatible with the
plug, ask an authorised technician to replace it. Do
not use extension cords or multiple sockets.
! Once the appliance has been installed, the power
supply cable and the electrical socket must be easily
accessible.
! The cable must not be bent or compressed.
! The cable must be checked regularly and replaced
by authorised technicians only.
! The manufacturer declines any liability should
these safety measures not be observed.
Data plate, is located inside the flap or, after the oven
compartment has been opened, on the left-hand wall
inside the oven.
TABLE OF CHARACTERISTICS
Oven dimensions
(HxWxD)
32x43.5x40 cm
Volume
57 l
Useful measurements
relating to the oven
compartment
width 42 cm
depth 44 cm
height 8.5 cm
Voltage and frequency
see data plate
Ceramic hob
Front Left
Back Left
Back Right
Front Right
Max. ceramic hob
consumption
1700 W
1200 W
2100 W
1200 W
6200 W
ENERGY LABEL
Directive 2002/40/EC on the
label of electric ovens.
Standard EN 50304
Energy consumption for Natural
convection – heating mode:
Traditional mode
Declared energy consumption for
Forced convection Class –
heating mode:
Baking.
This appliance conforms to the
following European Economic
Community directives:
2006/95/EC dated 12/12/06 (Low
Voltage) and subsequent
amendments - 2004/108/EC
dated 15/12/04 (Electromagnetic
Compatibility) and subsequent
amendments - 93/68/EEC dated
22/07/93 and subsequent
amendments. 2002/96/EC
1275/2008 (Stand-by/Off mode)
20
GB
Start-up and use
! The first time you use your appliance, heat the empty
oven with its door closed at its maximum temperature
for at least half an hour. Ensure that the room is well
ventilated before switching the oven off and opening
the oven door. The appliance may emit a slightly
unpleasant odour caused by protective substances
used during the manufacturing process burning away.
! Before operating the product, remove all plastic film
from the sides of the appliance.
Starting the oven
1. Select the desired cooking mode by turning the
SELECTOR knob.
2. Select the recommended temperature for the
cooking mode or the desired temperature by turning
the THERMOSTAT knob.
A list detailing cooking modes and suggested cooking
temperatures can be found in the relevant table (see
Oven cooking advice table).
During cooking it is always possible to:
• Change the cooking mode by turning the
SELECTOR knob.
• Change the temperature by turning the
THERMOSTAT knob.
• Set the total cooking time and the cooking end time
(see below).
• Stop cooking by turning the SELECTOR knob to the
“0” position.
! Never put objects directly on the bottom of the
oven; this will prevent the enamel coating from being
damaged. Only use position 1 in the oven when
cooking with the rotisserie spit.
! Always place cookware on the rack(s) provided.
THERMOSTAT indicator light
When this is illuminated, the oven is generating heat.
It switches off when the inside of the oven reaches
the selected temperature. At this point the light
illuminates and switches off alternately, indicating
that the thermostat is working and is maintaining the
temperature at a constant level.
Oven light
This is switched on by turning the SELECTOR knob to
any position other than “0”. It remains lit as long as the
oven is operating. By selecting
with the knob, the
light is switched on without any of the heating elements
being activated.
Cooking modes
! A temperature value between 50°C and MAX can be
set for all cooking modes except the following:
• GRILL (recommended: set only to MAX power level)
• GRATIN (recommended: do not exceed 200°C).
TRADITIONAL OVEN mode
Both the top and bottom heating elements will be
activated. When using this traditional cooking mode, it
is best to use one cooking rack only. If more than one
rack is used, the heat will be distributed in an uneven
manner.
OVEN BAKING mode
The rear heating element and the fan are switched
on, thus guaranteeing the distribution of heat in a
delicate and uniform manner throughout the entire
oven. This mode is ideal for baking and cooking
temperature sensitive foods (such as cakes that need
to rise) and for the preparation of pastries on 3 shelves
simultaneously.
MULTILEVEL mode
All the heating elements (top, bottom and circular),
as well as the fan, will be activated. Since the heat
remains constant throughout the oven, the air cooks
and browns food in a uniform manner. A maximum of
two racks may be used at the same time.
PIZZA OVEN mode
The circular heating elements and the elements at
the bottom of the oven are switched on and the fan is
activated. This combination heats the oven rapidly by
producing a considerable amount of heat, particularly
from the element at the bottom. If you use more than
one rack at a time, switch the position of the dishes
halfway through the cooking process.
GRILL mode
The central part of the top heating element and the
rotisserie spit (where present) are activated. The high
and direct temperature of the grill is recommended for
food that requires a high surface temperature (veal and
beef steaks, fillet steak and entrecôte). This cooking
mode uses a limited amount of energy and is ideal for
grilling small dishes. Place the food in the centre of the
rack, as it will not be cooked properly if it is placed in
the corners.
GB
21
The top heating element and the rotisserie (where
present) are activated and the fan begins to
operate. This combination of features increases the
effectiveness of the unidirectional thermal radiation
provided by the heating elements through forced
circulation of the air throughout the oven. This helps
prevent food from burning on the surface and allows
the heat to penetrate right into the food.
! The GRILL and GRATIN cooking modes must be
performed with the oven door shut.
Spit roast (only available in certain models)
To operate the spit roast function (see diagram) proceed as
follows:
1. Place the dripping
pan in position 1.
2. Place the rotisserie
support in position 3 and
insert the spit in the hole
provided on the back
panel of the oven.
3. Start the rotisserie using the knob to select MODE
or .
! When the
mode is activated, the spit will stop if
the door is opened.
Practical cooking advice
! Do not place racks in position 1 or 5 during fanassisted cooking. Excessive direct heat can burn
temperature sensitive foods.
MULTILEVEL
• Use positions 2 and 4, placing the food which
requires more heat on the rack in position 2.
• Place the dripping pan on the bottom and the rack
on top.
GRILL
• When using the GRILL cooking mode, place the
rack in position 5 and the dripping pan in position
1 to collect cooking residues (fat and/or grease).
When using the GRATIN cooking mode, place
the rack in position 2 or 3 and the dripping pan in
position 1 to collect cooking residues.
• We recommend that the power level is set to
maximum. The top heating element is regulated by a
thermostat and may not always operate constantly.
PIZZA OVEN
• Use a light aluminium pizza pan. Place it on the rack
provided.
For a crispy crust, do not use the dripping pan as
it prevents the crust from forming by extending the
total cooking time.
• If the pizza has a lot of toppings, we recommend
adding the mozzarella cheese on top of the pizza
halfway through the cooking process.
Timer
To activate the Timer proceed as follows:
1. Turn the TIMER knob in a clockwise direction for
almost one complete revolution to set the buzzer.
2. Turn the TIMER knob in an anticlockwise direction
to set the desired length of time.
GRATIN mode
22
GB
Oven cooking advice table
! When inserting the shelf make sure the backstop is at the rear of the cavity (see image).
Cooking
modes
Foods Weight
(in kg)
Rack Position Pre-heating
time
(minutes)
Recommended
temperature
Cooking
time
(minutes)
Traditional
Oven
Duck
Roast veal or beef
Pork roast
Biscuits (short pastry)
Tarts
1
1
1
-
1
3
3
3
3
3
15
15
15
15
15
200
200
200
180
180
65-75
70-75
70-80
15-20
30-35
Baking
Mode
Tarts
Fruit cakes
Plum cake
Sponge cake
Stuffed pancakes (on 2 racks)
Small cakes (on 2 racks)
Cheese puffs (on 2 racks)
Cream puffs (on 3 racks)
Biscuits (on 3 racks)
Meringues (on 3 racks)
0.5
1
0.7
0.5
1.2
0.6
0.4
0.7
0.7
0.5
3
2 or 3
3
3
2 and 4
2 and 4
2 and 4
1 and 3 and 5
1 and 3 and 5
1 and 3 and 5
15
15
15
15
15
15
15
15
15
15
180
180
180
160
200
190
210
180
180
90
20-30
40-45
40-50
25-30
30-35
20-25
15-20
20-25
20-25
180
Multi-
cooking
Pizza (on 2 racks)
Lasagne
Lamb
Roast chicken + potatoes
Mackerel
Plum cake
Cream puffs (on 2 racks)
Biscuits (on 2 racks)
Sponge cake (on 1 rack)
Sponge cake (on 2 racks)
Savoury pies
1
1
1
1+1
1
1
0.5
0.5
0.5
1
1.5
2 and 4
3
2
2 and 4
2
2
2 and 4
2 and 4
2
2 and 4
3
15
10
10
15
10
10
10
10
10
10
15
230
180
180
200
180
170
190
180
170
170
200
15-20
30-35
40-45
60-70
30-35
40-50
20-25
10-15
15-20
20-25
25-30
Pizza Mode
Pizza
Roast veal or beef
Chicken
0.5
1
1
3
2
2 or 3
15
10
10
220
220
180
15-20
25-30
60-70
Soles and cuttlefish
Squid and prawn kebabs
Cuttlefish
Cod filet
Grilled vegetables
Veal steak
Sausages
Hamburgers
Mackerels
Toasted sandwiches (or toast)
0.7
0.6
0.6
0.8
0.4
0.8
0.6
0.6
1
4 and 6
4
4
4
4
3 or 4
4
4
4
4
4
-
-
-
-
-
-
-
-
-
-
Max
Max
Max
Max
Max
Max
Max
Max
Max
Max
10-12
8-10
10-15
10-15
15-20
15-20
15-20
10-12
15-20
3-5
Barbecue
With rotisserie (where present)
Veal on the spit
Chicken on the spit
Lamb on the spit
1.0
1.5
1.0
-
-
-
5
5
5
Max
Max
Max
80-90
70-80
70-80
Grilled chicken
Cuttlefish
1.5
1.5
2
2
10
10
200
200
55-60
30-35
Gratin
With rotisserie (where present)
Veal on the spit
Lamb on the spit
Chicken (on the spit) +
potatoes (roasted)
1.5
1.5
1.5
-
2
2
2
5
5
5
5
200
200
200
200
70-80
70-80
70-75
70-75
GB
23
Using the glass ceramic hob
! The glue applied on the gaskets leaves traces of
grease on the glass. Before using the appliance, we
recommend you remove these with a special nonabrasive cleaning product. During the first few hours
of use there may be a smell of rubber which will
disappear very quickly.
Switching the cooking zones on and off
To switch on a cooking zone, turn the corresponding
knob in a clockwise direction.
To switch it off again, turn the knob in an anticlockwise
direction until it is in the “0” position.
If the COOKING ZONE ON indicator light is lit, this
shows that at least one pf the cooking zones on the
hob is switched on.
Cooking zones
The hob is equipped with electric hilite heating
elements. When they are in use the following items on
the hob become red.
A. The cooking zone
with radiant heating elements.
B. The residual heat indicator
light: this indicates that
the temperature of the
corresponding cooking zone is
greater than 60°C, even when
the heating element has been switched off but is still
hot.
Description of the heating elements
The circular radiant heating elements become red 10 20 seconds after they have been switched on.
The circular hilite heating elements guarantee even
heat distribution in addition to the usual advantages
that hilite heating elements bring.
Hilite elements emit high levels of heat and light as
soon as they are switched on, offering the following
practical advantages:
· rapid heating (in relation to a gas burner)
· rapid cooling
· even temperature across the whole surface (due to
the circular heating elements)
Practical advice on using the hob
• Use pans with a thick, flat base to ensure that they
adhere perfectly to the cooking zone.
• Always use pans with a diameter that is large
enough to cover the hotplate fully, in order to use all
the heat produced.
• Always make sure that the base of the pan is
completely clean and dry: this ensures that the pans
adhere perfectly to the cooking zones and that both
the pans and the hob remain effective for a longer
period of time.
• Avoid using the same cookware that is used on gas
burners: the heat concentration on gas burners may
have warped the base of the pan, causing it not to
adhere to the surface correctly.
• Never leave a cooking zone switched on without a
pan on top of it, as doing so may cause the zone to
become damaged.
A
A
A
A
B
Setting Normal or Fast Plate
0
Off
1
Cooking vegetables, fish
2
Cooking potatoes (using steam) soups,
chickpeas, beans.
3
Continuing the cooking of large quantiti es of
food, minestrone
4
For roasting (average)
5
For roasting (above average)
6
For browning and reaching a boil in a short
time.

24
GB
Precautions and tips
! This appliance has been designed and manufactured in
compliance with international safety standards. The following
warnings are provided for safety reasons and must be read
carefully.
General safety
• These instructions are only valid for the countries whose
symbols appear in the manual and on the serial number plate
located on the appliance.
• The appliance was designed for domestic use inside the home
and is not intended for commercial or industrial use.
• The appliance must not be installed outdoors, even in
covered areas. It is extremely dangerous to leave the
appliance exposed to rain and storms.
• Do not touch the appliance with bare feet or with wet or damp
hands and feet.
• The appliance must be used by adults only for the
preparation of food, in accordance with the instructions
outlined in this booklet. Any other use of the appliance
(e.g. for heating the room) constitutes improper use and
is dangerous. The manufacturer may not be held liable
for any damage resulting from improper, incorrect and
unreasonable use of the appliance.
• The instruction booklet accompanies a class 1 (insulated)
or class 2 - subclass 1 (recessed between 2 cupboards)
appliance.
• Do not touch the heating elements or certain parts of
the oven door when the appliance is in use; these parts
become extremely hot. Keep children well away from the
appliance.
• Make sure that the power supply cables of other electrical
appliances do not come into contact with the hot parts of the
oven.
• The openings used for the ventilation and dispersion of heat
must never be covered.
• Do not use unstable or misshapen pans on the cooking
zones; this will help to avoid accidental spills. Make sure pan
handles are turned towards the centre of the hob in order to
avoid accidental burns.
• Always use oven gloves when placing cookware in the oven
or when removing it.
• Do not use flammable liquids (alcohol, petrol, etc...) near the
appliance while it is in use.
• Do not place flammable material in the lower storage
compartment or in the oven itself. If the appliance is switched
on accidentally, it could catch fire.
• Always make sure the knobs are in the • position when the
appliance is not in use.
• When unplugging the appliance, always pull the plug from the
mains socket; do not pull on the cable.
• Never perform any cleaning or maintenance work without
having disconnected the appliance from the electricity mains.
• If the appliance breaks down, under no circumstances should
you attempt to perform the repairs yourself. Repairs carried
out by inexperienced persons may cause injury or further
malfunctioning of the appliance. Contact Assistance.
• Do not rest heavy objects on the open oven door.
• The internal surfaces of the compartment (where present)
may become hot.
• The glass ceramic hob is resistant to mechanical shocks, but it
may crack (or even break) if hit with a sharp object such as a tool.
If this happens, disconnect the appliance from the electricity mains
immediately and contact a Service Centre.
• If the surface of the hob is cracked, switch off the appliance
to prevent electric shocks from occurring.
• Remember that the cooking zones remain relatively hot for at
least thirty minutes after they have been switched off.
• Keep any object which could melt away from the hob, for
example plastic and aluminium objects, or products with a
high sugar content. Be especially careful when using plastic
film and aluminium foil or packaging: if placed on surfaces
that are still hot, they may cause serious damage to the hob.
• Do not place metal objects (knives, spoons, pan lids, etc.) on
the hob as they may become hot.\
• The appliance should not be operated by people (including
children) with reduced physical, sensory or mental
capacities, by inexperienced individuals or by anyone
who is not familiar with the product. These individuals
should, at the very least, be supervised by someone who
assumes responsibility for their safety or receive preliminary
instructions relating to the operation of the appliance.
• Do not let children play with the appliance.
Disposal
• When disposing of packaging material: observe local
legislation so that the packaging may be reused.
• The European Directive 2002/96/EC relating to Waste
Electrical and Electronic Equipment (WEEE) states that
household appliances should not be disposed of using
the normal solid urban waste cycle. Exhausted appliances
should be collected separately in order to optimise the cost of
re-using and recycling the materials inside the machine, while
preventing potential damage to the atmosphere and to public
health. The crossed-out dustbin is marked on all products
to remind the owner of their obligations regarding separated
waste collection.
For further information relating to the correct disposal of
exhausted household appliances, owners may contact the
public service provided or their local dealer.
Respecting and conserving the environment
• You can help to reduce the peak load of the electricity supply
network companies by using the oven in the hours between late
afternoon and the early hours of the morning.
• Always keep the oven door closed when using the GRILL
and GRATIN modes: This will achieve improved results while
saving energy (approximately 10%).
• Check the door seals regularly and wipe them clean to ensure
they are free of debris so that they adhere properly to the
door, thus avoiding heat dispersion.
 Loading...