

Indesit KN3G21S/EU S Operating Instructions Manual

English
Русский
Украінська
GB
RS
UA
Operating Instructions
COOKER AND OVEN
Contents
Operating Instructions,1
Description of the appliance-Overall view,8
Description of the appliance-Control Panel,9
Installation,10
Start-up and use,14
Precautions and tips,17
Care and maintenance,18
Assistance,18
Руководство по эксплуатации
КУХОННАЯ ПЛИТА С ДУХОВЫМ ШКАФОМ
Содержание
Руководство по эксплуатации,1
Описание изделия-Общий вид,8
Описание изделия-Панель управления,9
Монтаж,28
Включение и эксплуатация,33
Предосторожности и рекомендации,36
Техническое обслуживание и уход,37
Техническое обслуживание,38
Інструкціі з експлуатаціі
КУХНЯ
Зміст
Інструкціі з експлуатаціі,1
Опис установки-Загальнии вигляд,8
Опис установки-Панель управління,9
Встановлення,39
Включення і використання,43
Запобіжні засоби і поради,46
Догляд i технічне обслуговування,47
Допомога,47
PT
Português
Instruções para a utilização
FOGÃO E FORNO
Índice
Instruções para a utilização,1
Descriçao do aparelho-Vista de conjunto,8
Descriçao do aparelho-Painel de comandos,9
Instalaçao,58
Início e utilizaçao, 62
Precauçoes e conselhos,65
Manutençao e cuidados,66
Assistencia técnica,66
RO
Românã
Instrucюiuni de folosire
ARAGAZ ЄI CUPTOR
Sumar
Instrucюiuni de folosire,1
Descrierea aparatului- Vedere de ansamblu,8
Descrierea aparatului-Panoul de control,9
Instalare,19
Pornire єi utilizare, 23
Precauюii єi sfaturi,26
Оntreюinere єi curгюire,27
Asistenюг,27
HU
Magyar
Használati útmutató
tűzhely és a sütő
Tartalomjegyzék
Használati útmutató,1
A készülék leírása- A készülék áttekintése,8
A készülék leírása- Kezelőpanel,9
Üzembe helyezés,48
Bekapcsolás és használat,53
Óvintézkedések és tanácsok,56
Karbantartás és ápolás,57
Szerviz,57
KN3G21S/EU S
Інструкціі з експлуатаціі
КУХНЯ
Зміст
Украінська
English
Sumar
Românã
Instrucюiuni de folosire
ARAGAZ ЄI CUPTOR
Magyar
Használati útmutató
tűzhely és a sütő
Tartalomjegyzék
Содержание
Русский
Руководство по эксплуатации
КУХОННАЯ ПЛИТА С ДУХОВЫМ ШКАФОМ
WARNING
ATENŢIE
ВНИМАНИЕ
УВАГА
FIGYELEM
ATENÇAO
,2
,3
,4
,5
,6
,7
EnglishEnglish
KZ
Ɉɪɧɚɬɭ
Ԕԝɪɵɥԑɵɫɢɩɚɬɬɚɦɚɫɵ
ɀɚɥɩɵ ɲɨɥɭ
Ȼɚɫԕɚɪɭ ɬɚԕɬɚɫɵ
ɉɚɣɞɚɥɚɧɭɧԝɫԕɚɭɥɵԑɵ
Ԕԝɪɵɥԑɵɫɢɩɚɬɬɚɦɚɫɵ
Ԕɨɫɭɠԥɧɟɩɚɣɞɚɥɚɧɭ
ɋɚԕɬɚɧɞɵɪɭɥɚɪ
ɦɟɧɤɟԙɟɫɬɟɪ
Ʉԛɬɿɦɠԥɧɟɬɟɯɧɢɤɚɥɵԕ
ԕɵɡɦɟɬɤԧɪɫɟɬɭ
Ʉԧɦɟɤ
ɉɚɣɞɚɥɚɧɭɧԝɫԕɚɭɥɵԑɵ
ɉɅɂɌȺ
Ɇɚɡɦԝɧɵ
Ԕɚɡɚԕɲɚ
1
8
9
67
71
74
75
75
Ԕɚɡɚԕɲɚ
ЕСКЕРТУ
6

GB
WARNING: The appliance and its
accessible parts become hot during
use.
Care should be taken to avoid
touching heating elements.
Children less than 8 years of age shall
be kept away unless continuously
supervised.
This appliance can be used by
children aged from 8 years and
above and persons with reduced
physical, sensory or mental
capabilities or lack of experience
and knowledge if they have been
given supervision or instruction
concerning use of the appliance in a
safe way and understand the hazards
involved. Children shall not play with
the appliance. Cleaning and user
maintenance shall not be made by
children without supervision.
WARNING: Unattended cooking on a
hob with fat or oil can be dangerous
and may result in fire.
NEVER try to extinguish a fire with
water, but switch off the appliance
and then cover flame e.g. with a lid or
a fire blanket.
Do not use harsh abrasive cleaners
or sharp metal scrapers to clean
the oven door glass since they can
scratch the surface, which may result
in shattering of the glass.
The internal surfaces of the
compartment (where present) may
become hot.
Never use steam cleaners or pressure
cleaners on the appliance.
Remove any liquid from
the lid before opening it.
Do not close the glass cover (if present)
when the gas burners or electric
hotplates are still hot.
WARNING: Ensure that the appliance is
switched off before replacing the lamp
to avoid the possibility of electric shock.
CAUTION: the use of inappropriate hob
guards can cause accidents.
WARNINGWARNING
2
! When you place the rack inside,
make sure that the stop is directed
upwards and in the back of the cavity.
ATENŢIE: Acest aparat şi părţile sale
accesibile devin foarte calde în timpul
folosirii.
Trebuie să fi ţi atenţi şi să nu atingeţi ele-
mentele de încălzire.
Îndepărtaţi copiii sub 8 ani dacă nu sunt
supravegheaţi continuu.
Acest aparat poate fi utilizat de copiii de
peste 8 ani şi de persoane cu capacităţi
fi zice, senzoriale sau mentale reduse
sau fără experienţă şi cunoştinţe dacă se
afl ă sub o supraveghere corespunzăto-
are sau dacă au fost instruiţi cu privire la
folosirea aparatului în mod sigur şi dacă
îşi dau seama de pericolele corelate.
Copiii nu trebuie să se joace cu aparatul.
Operaţiunile de curăţare şi de întreţinere
nu trebuie să fi e efectuate de copii făr
ă
supraveghere.
ATENŢIE: Lăsarea unui aragaz nesupravegheat cu grăsimi şi uleiuri poate fi
periculoasă şi poate provoca un incendiu.
Nu trebuie NICIODATĂ să încercaţi să
stingeţi o fl acără/incendiu cu apă, ci tre-
buie să stingeţi aparatul şi să acoperiţi fl
acăra, de exemplu cu un capac sau cu o
pătură ignifugă.
RO
ATENŢIEATENŢIE

3
Nu folosiţi produse abrazive, nici perii de
metal tăioase pentru a curăţa uşa de sticlă a cuptorului, deoarece ar putea zgâria
suprafaţa, provocând astfel spargerea
geamului.
Suprafeţele interne ale sertarului (dacă
este prezent) se pot încălzi.
Nu folosiţi niciodată aparate cu aburi sau
sub presiune pentru a curăţa aparatul.
!Când introducei Ġgră tarul, asiguraĠi-
vă că opritorul este îndreptat în sus úi
în partea din spate a cavitiiăĠ.
Eliminaţi eventualele reziduuri de lichid
de pe capac, înainte de a-l deschide. Nu
închideţi capacul din sticlă (dacă este
prezent) cu arzătoarele de gaz sau plita
electrică încă
calde.
ATENŢIE: Asiguraţi-vă că aparatul este
stins înainte de a înlocui lampa pentru a
evita posibilitatea electrocutărilor.
RS
ВНИМАНИЕ: Данное изделие и
его доступные комплектующие
сильно нагреваются в процессе
эксплуатации.
Будьте осторожны и не касайтесь
нагревательных элементов.
Не разрешайте детям младше 8
лет приближаться к изделию без
контроля.
Данное изделие может быть
использовано детьми старше 8
лет и лицами с ограниченными
физическими, сенсорными или
умственными способностями или
без опыта и
знания о правилах
использования изделия при условии
надлежащего контроля или обучения
безопасному использованию изделия
с учетом соответствующих рисков. Не
разрешайте детям играть с изделием.
Не разрешайте детям осуществлять
чистку и уход за изделием без
контроля взрослых.
ВНИМАНИЕВНИМАНИЕ
ВНИМАНИЕ: Опасно оставлять
включенную конфорку с маслом или
жиром без присмотра, так как это
может
привести к пожару.
НИКОГДА не пытайтесь погасить
пламя/пожар водой. Прежде всего
выключите изделие и накройте пламя
крышкой или огнеупорной тканью.
! ɉɪɢ ɭɫɬɚɧɨɜɤɟ ɪɟɲɟɬɤɢ
ɩɪɨɜɟɪɢɬɶ, ɱɬɨɛɵ ɮɢɤɫɚɬɨɪ ɛɵɥ
ɩɨɜɟɪɧɭɬ ɜɜɟɪɯ ɫ ɡɚɞɧɟɣ ɫɬɨɪɨɧɵ
ɜɵɟɦɤɢ.
Не используйте абразивные вещества
или режущие металлические скребки
для чистки стеклянной дверцы
духового шкафа, так как они могут
поцарапать поверхность, что может
привести к разбиванию стекла.
Внутренняя поверхность ящика (
если
он имеется) может сильно нагреться
Никогда не используйте паровые
чистящие агрегаты или агрегаты
под высоким давлением для чистки
изделия.
Если на крышку пролита жидкость,
удалите ее перед тем, как открыть
крышку. Не закрывайте стеклянную
крышку варочной панели (если
она имеется), если газовые или
электрические конфорки еще горячие.
ВНИМАНИЕ: Проверьте, чтобы
изделие
было выключено, перед заменой
лампочки во избежание возможных
ударов током.
Изделие не рассчитано на влючение
посредством внешнего синхронизатора
или отдельной системы дистанционного
управления.
ВНИМАНИЕ: использование
ненадлежащих предохранений варочной
панели может привести к пожару.

4
UA
УВАГА! Під час роботи цей прилад, а також
його доступні частини нагріваються до
високих температур.
Слід бути особливо обережними, щоб не
торкатися нагрівальних елементів.
Діти віком до 8 років мають знаходитися
на небезпечній відстані від приладу,
якщо неможливо забезпечити постійний
контроль над ними.
Дозволяється користування цим приладом
дітьми віком від 8 років, а також особами
з обмеженими фізичними, сенсорними
або розумовими можливостями або
особами без належного досвіду і знань,
якщо вони перебувають під постійним
контролем або проінструктовані щодо
правил з небезпечного користування
приладу і усвідомлюють ступені ризику.
Не дозволяйте дітям гратися з приладом.
Операції з очищення і догляду не повинні
виконуватися дітьми без належного
контролю.
УВАГА! Небезпечно залишати без нагляду
плити з жиром або олією, тому що це може
призвести до пожежі.
НІ В ЯКОМУ РАЗІ не слід намагатися
погасити полум’я/пожежу водою.
Необхідно вимкнути прилад і накрити
полум’я, наприклад, кришкою або
вогнетривким покривалом.
Не використовувати абразивні засоби ані
металеві загострені шпателі для очищення
скляних дверцях духовки, тому що вони
можуть пошкрябати поверхню, призводячи
до розтріскування скла.
Внутрішні поверхні відділення (де вони
наявні) можуть нагріватися до високих
температур.
Забороняється використання апаратів для
очищення парою або високим тиском.
Витріть насухо всі наявні на кришці
рідини, перш ніж відкрити її. Не
закривайте скляну кришку (якщо вона
наявна), якщо газові пальники або
електричні конфорки залишаються
нагрітими.
УВАГА! Щоб запобігти враженню
електричним струмом переконайтеся в
тому, що прилад вимкнений, перш ніж
заміняти лампочку.
УВАГА! використання невідповідних
захисних пристроїв варильної поверхні
може призвести до нещасних випадків.
УВАГАУВАГА
! ɉɿɞ ɱɚɫɬ ɜɫɬɚɜɥɹɧɧɹ ɪɟɲɿɬɤɢ
ɫɥɿɞ ɩɟɪɟɤɨɧɚɬɢɫɹ, ɳɨ ɫɬɨɩɨɪ
ɩɨɜɟɪɧɭɬɢɣ ɜɝɨɪɭ ɿ ɜɫɟɪɟɞɢɧɭ ɧɿɲɿ .
HU
FIGYELEM: A készülék és annak hozzáférhető részei a használat közben rendkívüli módon felmelegedhetnek.
Vigyázzon, hogy nehogy hozzáérjen a
fűtőelemekhez.
Ha a gyermekek nincsenek folyamatos
felügyelet alatt, tartsa távol a 8 éven aluli
gyermekeket.
Ezt a készüléket a 8 éves kort betöltött
gyermekek, valamint a testileg, érzékszervileg vagy szellemileg korlátozott, nem
hozzáértő, illetve a terméket nem ismerő
FIGYELEMFIGYELEM

5
FIGYELEM: A tűzhelyen felügyelet nélkül
otthagyott zsír vagy olaj veszélyes lehet, és
tüzet okozhat.
SOHA ne próbálja meg vízzel eloltani
a tüzet, hanem zárja el a készüléket, és
takarja le a lángot például fedővel vagy
tűzálló takaróval.
Az üveg sütőajtó tisztításához ne használjon súrolószereket vagy vágóéllel rendelkező fémspatulát, mivel azok összekaristolhatják az ajtó felületét, ami pedig az
üveg összetöréséhez vezethet.
A ók (ha van) belső felületei felmelegedhetnek.
személyek csak megfelelő felügyelet mellett, vagy a készülék biztonságos használatával kapcsolatos alapvető utasítások és a
kapcsolódó veszélyek ismeretében használhatják. Vigyázzon, hogy a gyermekek
ne játsszanak a készülékkel. A tisztítási
és karbantartási műveleteket gyermekek
felügyelet nélkül nem végezhetik.
A készülék tisztításához soha ne használjon gőztisztítót vagy nagynyomású tisztítót.
A készülék tetejének kinyitása előtt minden nedvességet töröljön le róla. Ne csu-
kja le az üvegtetőt (ha van), ha a gázégők vagy
elektromos főzőlapok még melegek.
FIGYELEM: Az esetleges áramütések elkerülése érdekében a lámpa kicserélése előtt
győződjön meg arról, hogy a készülék ki van
kapcsolva.
FIGYELEM: A főzőlap védelmeinek nem
megfelelő használata balesetet okozhat.
! A rács behelyezésekor gyĘzĘdjön
meg arról, hogy a kallantyú felfele
néz és a sütĘtér hátsó részén van.
PT
ATENÇÃO: Este aparelho e as suas
partes acessíveis aquecem muito
durante a utilização.
É preciso ter atenção e evitar tocar
os elementos que aquecem.
Manter afastadas as crianças com
menos de 8 anos, caso não estejam
a ser vigiadas.
O presente aparelho pode ser utilizado por crianças com mais de 8 anos
e por pessoas com capacidades
físicas, sensoriais ou mentais reduzidas ou com pouca experiência e
conhecimentos, caso sejam adequadamente vigiadas ou caso tenham
recebido instruções em relação ao
uso do aparelho de forma segura
e tenham conhecimento dos perigos associados. As crianças não
devem brincar com o aparelho. As
operações de limpeza e manutenção
não devem ser efectuadas por crianças sem vigilância.
ATENÇÃO: Deixar um fogão com
gordura e óleo sem vigilância
pode ser perigoso e provocar um
incêndio.
NUNCA tente apagar as chamas
com água. É necessário desligar o
aparelho e cobrir as chamas com
uma tampa ou com uma manta
ignífuga.
ATENÇAOATENÇAO

6
Não utilizar produtos abrasivos nem
espátulas de metal cortantes para
limpar a porta em vidro do forno,
uma vez que pode riscar a superfície, provocando a ruptura do vidro.
As superfícies internas da gaveta (se
presentes) podem ficar muito quentes.
Nunca utilize equipamento de limpeza a vapor ou de alta pressão para
limpar o aparelho.
Elimine os líquidos presentes na tampa antes de abri-la. Não feche a tampa de vidro (se presente) se os queimadores ou a chapa eléctrica ainda
estiverem quentes.
ATENÇÃO: Assegure-se de que o
aparelho esteja desligado antes de
substituir a lâmpada, para evitar a
possibilidade de choques eléctricos.
ATENÇÃO: O uso de protecções do
plano inadequadas pode causar incidentes.
! Quando inserir a grelha, assegure-
-se de que o bloqueio esteja voltado
para cima e na parte posterior da
cavidade.
KZKZKZ
ЕСКЕРТУ: Құрылғы мен оның қол
жететін бөліктері жұмыс кезінде қызуы
мүмкін.
Қыздыру элементтеріне тимеуге назар
аударыңыз. 8-ге толмаған балаларға
үздіксіз бақылау болмаса, құрылғыдан
аулақ ұстау керек. Бұл құрылғыны
қауіпсіз түрде қолдану бойынша кеңес
не нұсқау берілген жəне ықтимал
қауіп-қатерлерді түсінетін жағдайда,
оны 8-ге толған балалар мен дене,
сезіну немесе ой
қабілеті төмен
немесе тəжірибесі мен білімі жеткіліксіз
адамдар қолдана алады.
Балаларға құрылғымен ойнауға
болмайды. Балаларға бақылаусыз
құрылғыны тазалауға жəне оған қызмет
көрсетуге болмайды.
ЕСКЕРТУЕСКЕРТУ
ЕСКЕРТУ: Плитада майға тамақ пісірген
кезде бақылап тұрмау қауіпті болуы
жəне өрт шығуға əкелуі мүмкін.
Өртті ЕШҚАШАН сумен өшіруші
болмаңыз, оның орнына құрылғыны
өшіріп, жалынды жабыңыз, мысалы
қақпақпен немесе өртенбейтін матамен.
ЕСКЕРТУ: Өрт қаупі бар: пісіру
беттерінде заттарды сақтамаңыз.
ЕСКЕРТУ: Шыны мен керамикадан
жасалған бет шатынаған болса, тоқ соғу
мүмкіндігінің алдын алу үшін құрылғыны
өшіріңіз. Пеш есігінің шынысын тазалау
үшін қатты ысқыш тазалағыштарды
немесе өткір метал ысқыщтарды
пайдаланбаңыз, себебі олар шыныны
сызып, оның шағылуына əкелуі мүмкін.
Бөліктің (бар болса) ішкі беттері қызып
кетуі мүмкін.
Құрылғыда ешқашан бу тазартқышты
немесе шаңсорғышты пайдаланбаңыз.

7
Металл заттарды (пышақтар, қасықтар,
таба қақпақтары, т.б.) конфоркаға
қоймаңыз, себебі олар қызып кетуі
мүмкін. Қақпақты ашпас бұрын ондағы
сұйықтықты сүртіп алыңыз.
Шыны қақпақты (бар болса) газ
оттықтары немесе электр плиталар əлі
ыстық болған кезде жаппаңыз.
Пайдаланғаннан кейін
плитаны басқару
элементінің көмегімен өшіріңіз, таба
детекторына сенбеңіз.
ЕСКЕРТУ: Тоқ соғу мүмкіндігінің алдын
алу үшін шамды ауыстырмас бұрын
құрылғы өшірілгеніне көз жеткізіңіз.
Құрылғы сыртқы таймермен немесе
бөлек қашықтан басқару жүйесімен
басқарылуға арналмаған.
АБАЙ БОЛЫҢЫЗ: сəйкес келмейтін
конфоркалардың қорғану құралдарын
пайдалану жазатайым оқиғаларға себеп
болуы мүмкін.
! Тартпаны ішке салған кезде шектегіш
жоғары қарап, қуыстың артқы жағында
тұрғанына көз жеткізіңіз.
8
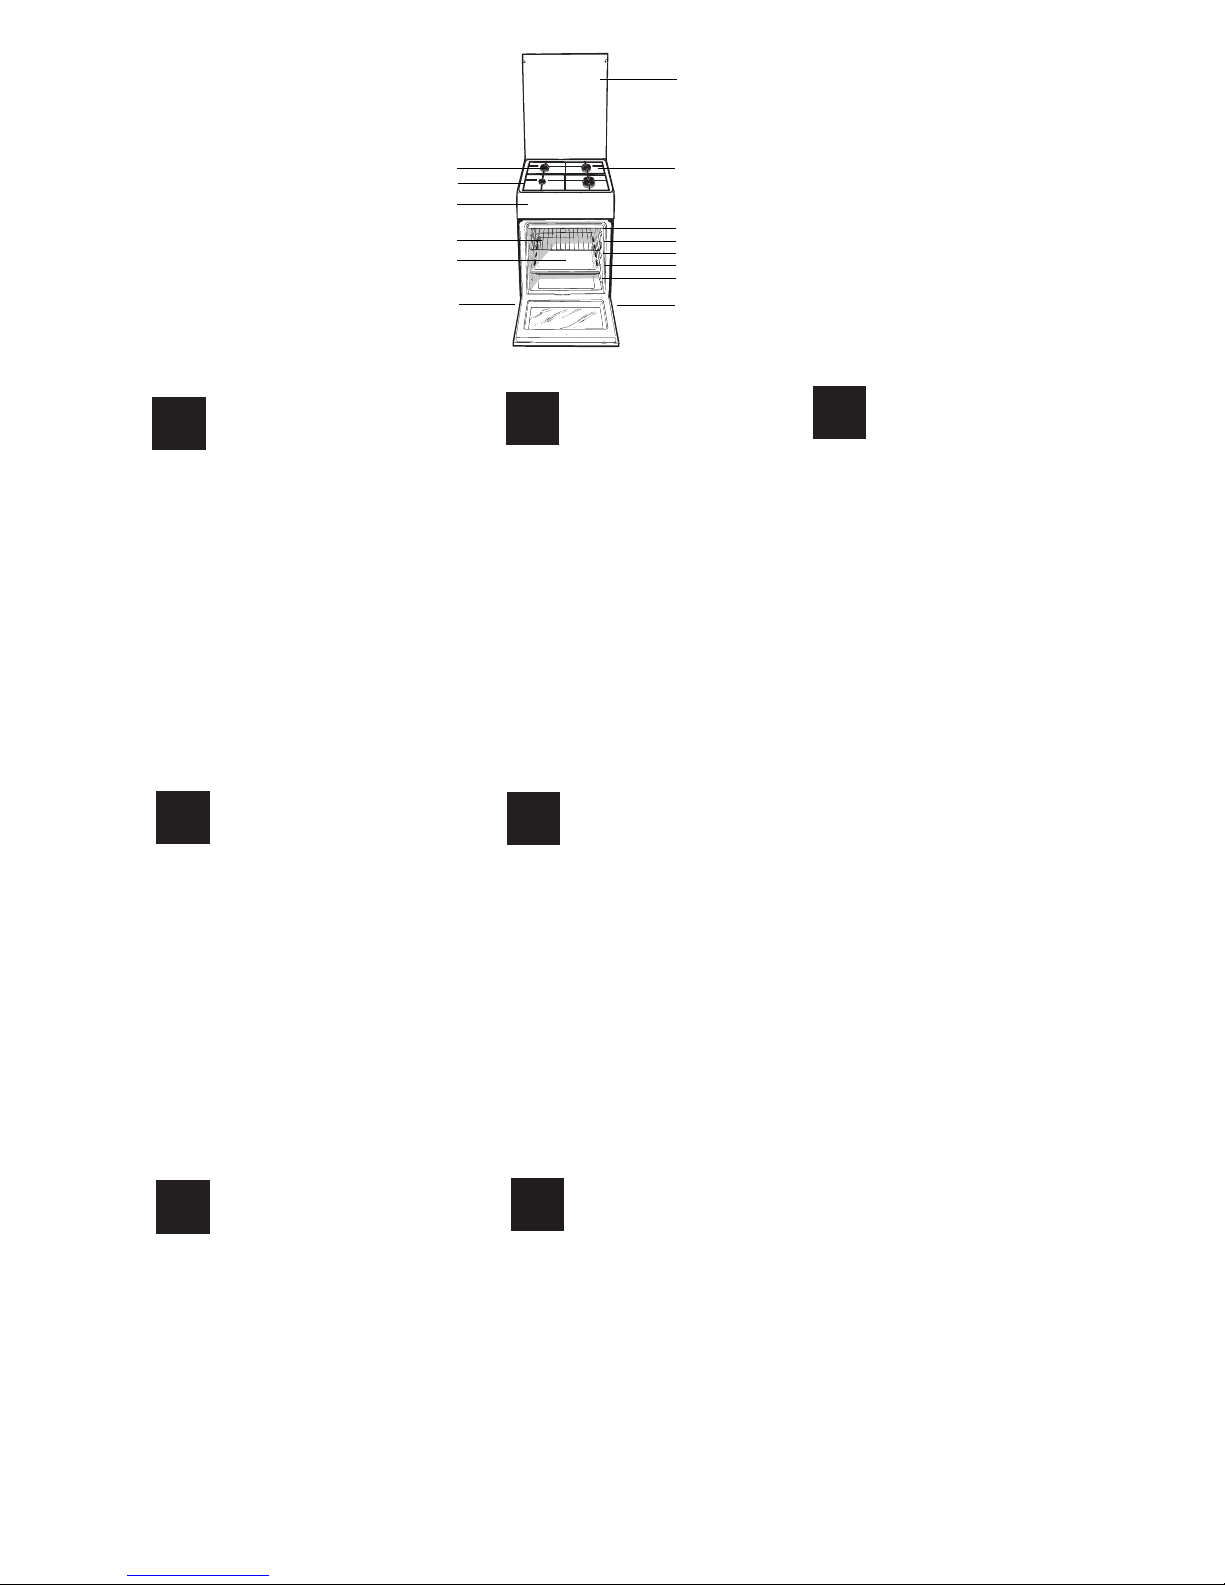
1 Hob burner
2 Hob Grid
3.Control panel
4.Sliding grill rack
5.DRIPPING pan
6.Adjustable foot
7.Containment surface for spills
8.GUIDE RAILS for the sliding racks
9.position 5
10.position 4
11.position 3
12.position 2
13.position 1
14.Glass Cover
Appliance description
Overall view
GB
1.Газовые горелки
2.Рабочая поверхность
3.Панель управления
4.Решетка духовки
5.Противень или жарочный лист
6.Регулируемые ножки
7.Электрические конфорки
8.HAПPAB ЛЯЮЩИE
9. Положение 1
10. Положение 2
11. Положение 3
12. Положение 4
13. Положение 5
14.
Cтеклянная крышка
Описание изделия
Общий вид
UA
Опис плити
Загальнии вигляд
1.Газовий пальник
2.Піддон на випадок переливань
3.Панель управління
4.Полка РЕШІТKИ
5.Полка ДEКО
6.Лапка для налаштування
7.Пoверхня для збирання збiглoї piдини
8.HAПPAB ЛЯЮЧІ для полиць
9.положення 5
10.положення 4
11. положення 3
12.положення 2
13.положення 1
14. Скляна кришка
RS
1. Queimador a gás
2.Grade do piano de trabalho
3 .Painel de comandos
4.Prateleira GRADE
5.Prateleira BANDEJA PINGADEIRA
6. Pé de regulação
7.Plano de retenção dos eventuais vazamentos
8. GUIAS de deslizamento das prateleiras
9.Posição 5
10.Posição 4
11.Posição 3
12.Posição 2
13.Posição 1
14.O sobretampo de vidro
Descrição do aparelho
Vista de conjunto
PT
1 Arzătoare pe gaz
2 Grătare plită
3 Panou frontal de control
4 Grătarul cuptorului
5 Tavă de coacere
6 Picioare reglabile
7 Plită
8 GHIDAJE alunecare rafturi
9 nivelul 5
10 nivelul 4
11 nivelul 3
12 nivelul 2
13 nivelul 1
14 Capacul din sticlă
Descriere aparatului
Vedere de ansamblu
RO
1 Gáz égõ
2 Edénytartó rács
3 Kapcsoló tábla
4 Sütõ rács
5 Serpenyõ vagy sütõtepsi
6 Állítható lábacska vagy láb
7 Zsírfelfogó borítólap
8 TÁLCASíNEK
9 helyzet 5
10 helyzet 4
11 helyzet 3
12 helyzet 2
13 helyzet 1
14 Ha felmelegedik
A készülék leírása
A készülék áttekintése
HU
1
2
3
4
5
6
6
7
8
9
10
11
12
13
14
Описание изделия
Общий вид
Описание изделия
Общий вид
Опис плити
Загальнии вигляд
Опис плити
Загальнии вигляд
1
2.
4.
5.
6.
7.
37.
8.
9.
10.
11.
12.
13.
14.
Газ оттығы
Плита торы
Төгілген сұйықтықтарды ұстайтын
бет
Басқару тақтасы
ГРИЛЬ
ТҰТҚАЛЫ ТАБА
Реттелетін аяқ
Сырғымалы тартпаларға арналған
БАҒЫТТАУШЫ ЖОЛДАР
5-позиция
4-позиция
3-позиция
2-позиция
1-позиция
Шыны қақпақ
(Ɍɟɤ ɛɟɥɝɿɥɿ ԛɥɝɿɥɟɪɞɟ ɛɨɥɚɞɵ).
KZ
ɀɚɥɩɵɲɨɥɭ
Ԕԝɪɵɥԑɵ
ɫɢɩɚɬɬɚɦɚɫɵ
9
GB
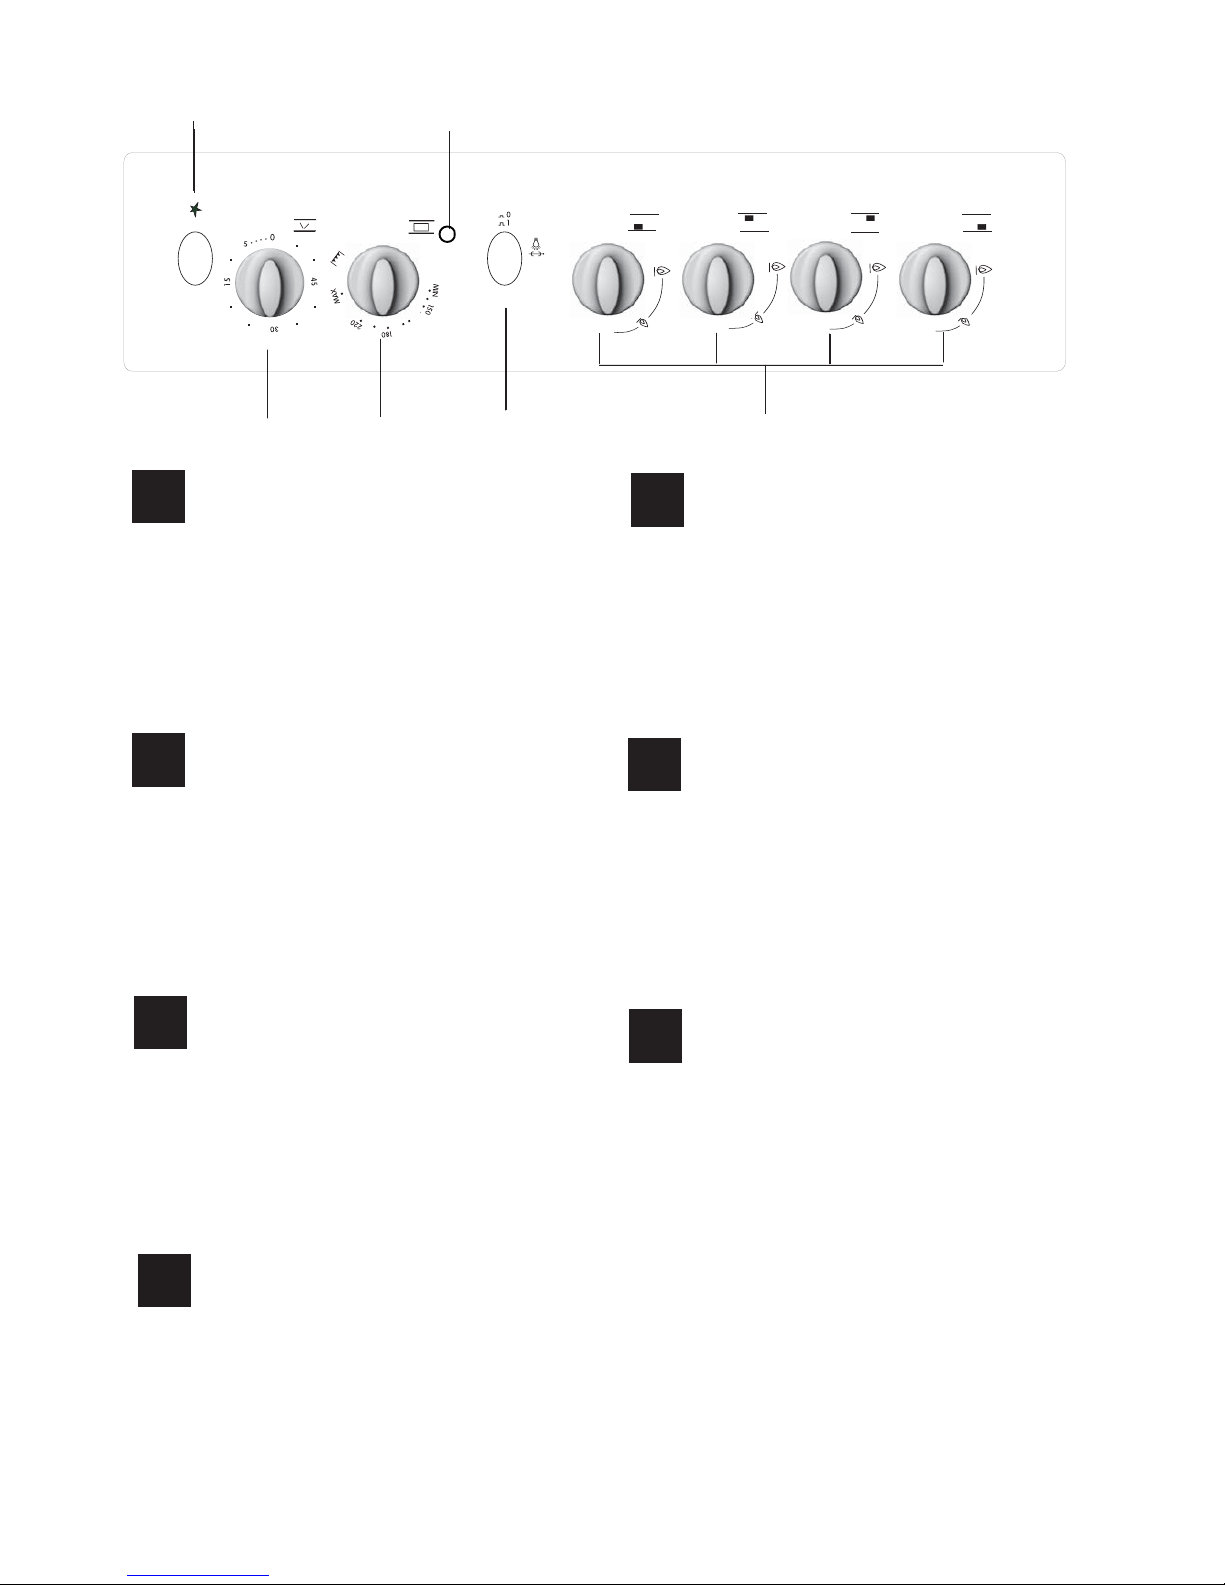
Description of the appliance
Control panel
GB
1.GAS BURNER IGNITION button*
2.TIMER knob
3.OVEN AND GRILL CONTROL knob
4.OVEN LIGHT / ROTISSERIE button
5.Hob BURNER control knob
*Available only on certain models
Описание изделия
Панель управления
UA
Опис плити
Панель управління
RS
1.Электронное зажигание конфорок варочной панели*
2.Таймер
3.Рукоятка управления духовкой и грилем
4.Кнопка включения/выключения освещения духовки
5. Рукоятки включения газовых конфорок
варочной панели
*Имеется только в некоторых моделях.
1. Автоматичне запалювання*
2.Сукоятка ТАЙМЕРА
3. Ручка ДУХОВКА й гриля
4.КНОПКА РОЖНА та ОСВІТЛЕННЯ ДУХОВКИ
5.Ручки для керування газовими
пальниками на варильній поверхні
*
Є лише в деяких моделях.
Descrição do aparelho
Painel de comandos
PT
1.Acendedor electrónico dos queimadores do plano*
2.Manípulo conta-minutos
3.Manípulo do forno e do grill
4.Manípulo luz do forno
5.Botão luz do forno e rotisserie
*Presente apenas em alguns modelos
Descriere aparatului
Panoul de control
RO
1.Buton pentru activarea aprinderii electronice *
2.Buton cronometru
3.Buton de comandã pentru cuptor ºi grill
4.Buton pentru activarea luminii din cuptor/ rotisserie
5.Butoane comandi ochiuri aragaz
*prezent doar la anumite modele
A készülék leírása
Kezelőpanel
HU
1.Gázégő gyújtási*
2.Időmérő gomb
3.Sütő és grill gomb
4. Sütő könnyű és grillező gomb
5.A tűzhely gázégőinek vezérlő gombjai
*Csak az üvegtetõs modellek esetén
1
5
3
4
2
6
6
6.GRILL Indicator light
Описание изделия
Панель
Описание изделия
Панель
Опис плити
Панель управління
Опис плити
Панель управління
6. Световой индикатор гриль
KezelőpanelKezelőpanel
6. Сигнальна лампочка гриля
6.Indicador de funcionamento grill
6.Indicator GRIL
6. Ellenőrző lámpa a grill
Пештің істеп тұрғанын
білдіретін шам
Плита оттықтарына
арналған
эл ектрондық
тұтатқыш
2.
3.
Ɍɚɣɦɟɪ ɬԝɬԕɚɫɵ*
ɉɟɲ ɩɟɧ
ɝɪɢɥɶɞɿ
4.
5.
ɉɟɲ ɲɚɦɵ ɦɟɧ ɝɪɢɥɶ- ɛɚɪ
ɬԛɣɦɟɫɿ
ɉɥɢɬɚɞɚԑɵ ɝɚɡ ɨɬɬɵԕɬɚɪɵɧ
ɛɚɫԕɚɪɭ ɬԝɬԕɚɥɚɪɵ
KZ
Ԕԝɪɵɥԑɵ
ɫɢɩɚɬɬɚɦɚɫɵ
Ȼɚɫԕɚɪɭ ɬɚԕɬɚɫɵ
(Ɍɟɤ ɛɟɥɝɿɥɿ ԛɥɝɿɥɟɪɞɟ ɛɨɥɚɞɵ).
*
*
1.
6.

10
GB
! Before operating your new appliance please read
this instruction booklet carefully. It contains important
information concerning the safe installation and
operation of the appliance.
! Please keep these operating instructions for future
reference. Make sure that the instructions are kept with
the appliance if it is sold, given away or moved.
! The appliance must be installed by a qualified
professional according to the instructions provided.
! Any necessary adjustment or maintenance must be
performed after the cooker has been disconnected
from the electricity supply.
! We recommend cleaning the oven before using it for
the first time, following the instructions provided in the
„Care and maintenance” section.
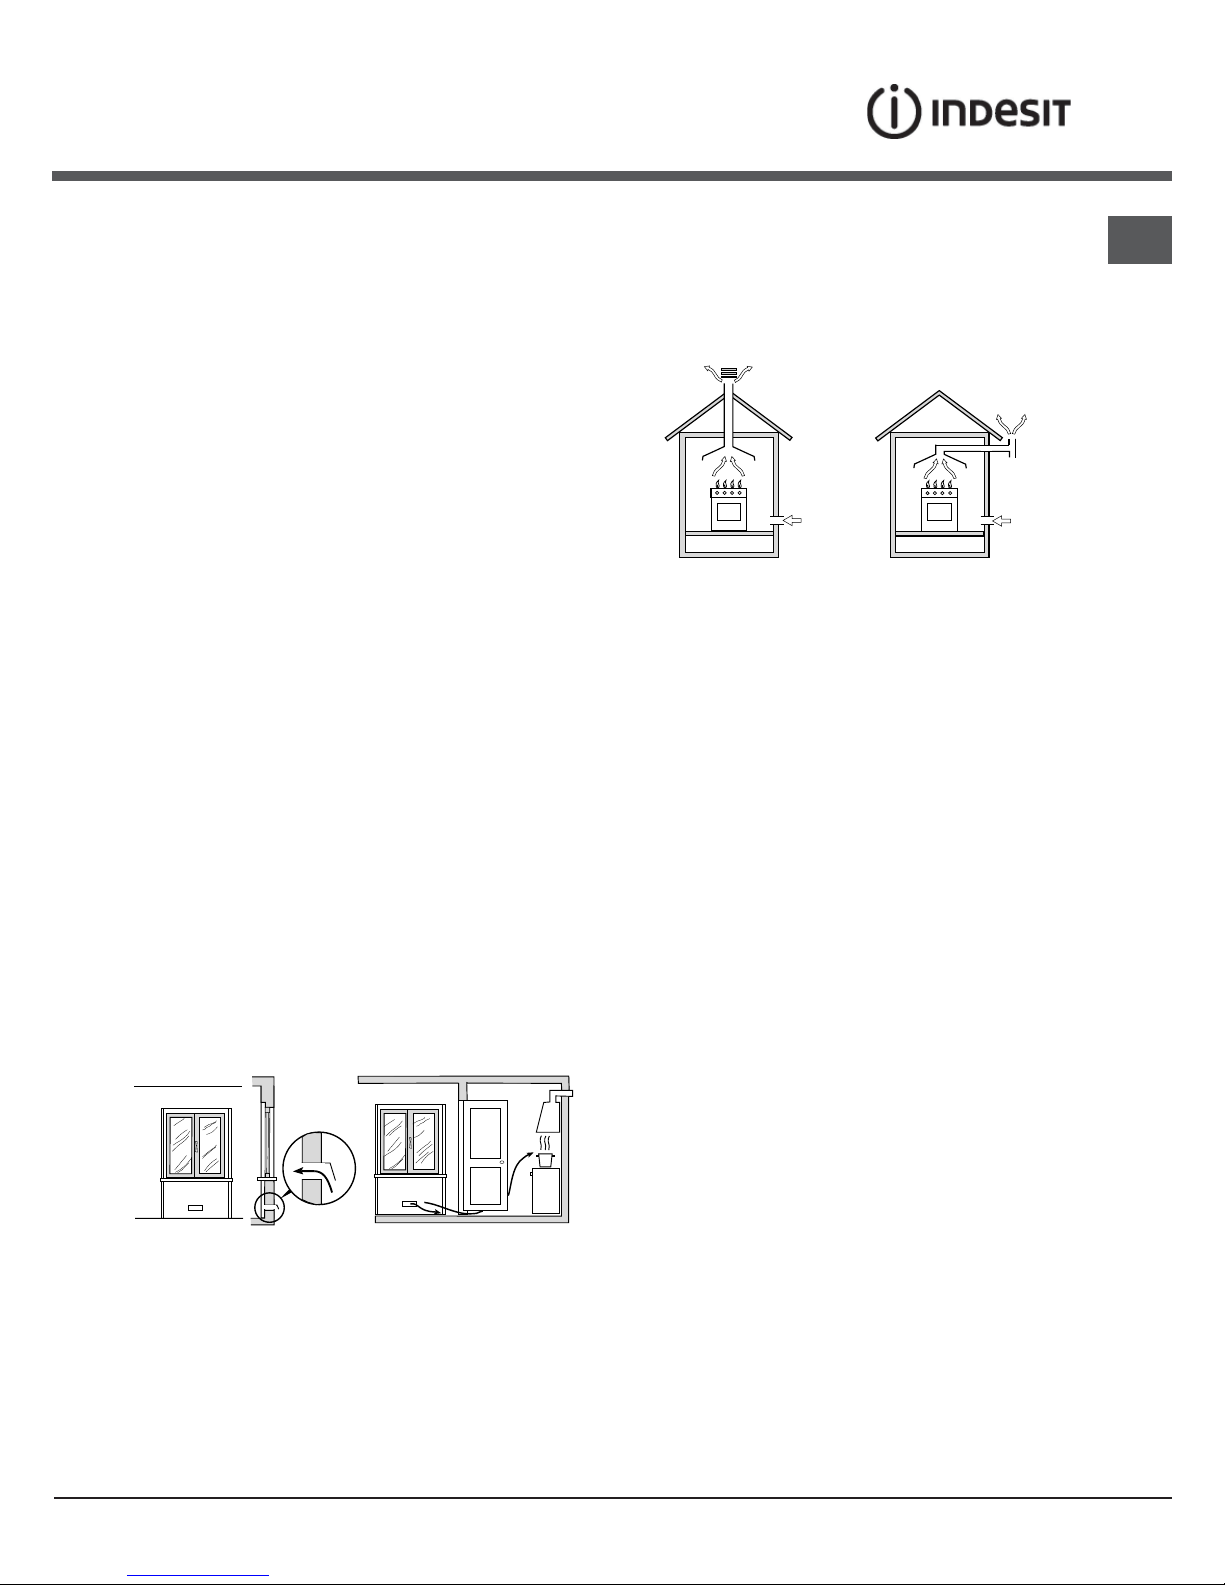
Room ventilation
The appliance may only be installed in permanentlyventilated rooms, according to current national
legislation. The room in which the appliance is installed
must be ventilated adequately so as to provide as
much air as is needed by the normal gas combustion
process (the flow of air must not be lower than 2 m
3
/h
per kW of installed power).
The air inlets, protected by grilles, should have a duct
with an inner cross section of at least 100 cm
2
and
should be positioned so that they are not liable to even
partial obstruction (see gure A).
These inlets should be enlarged by 100% - with a
minimum of 200 cm
2
- whenever the surface of the
hob is not equipped with a flame failure safety device.
When the flow of air is provided in an indirect manner
from adjacent rooms (see gure B), provided that these
are not communal parts of a building, areas with
increased fire hazards or bedrooms, the inlets should
be fitted with a ventilation duct leading outside as
described above.
A B
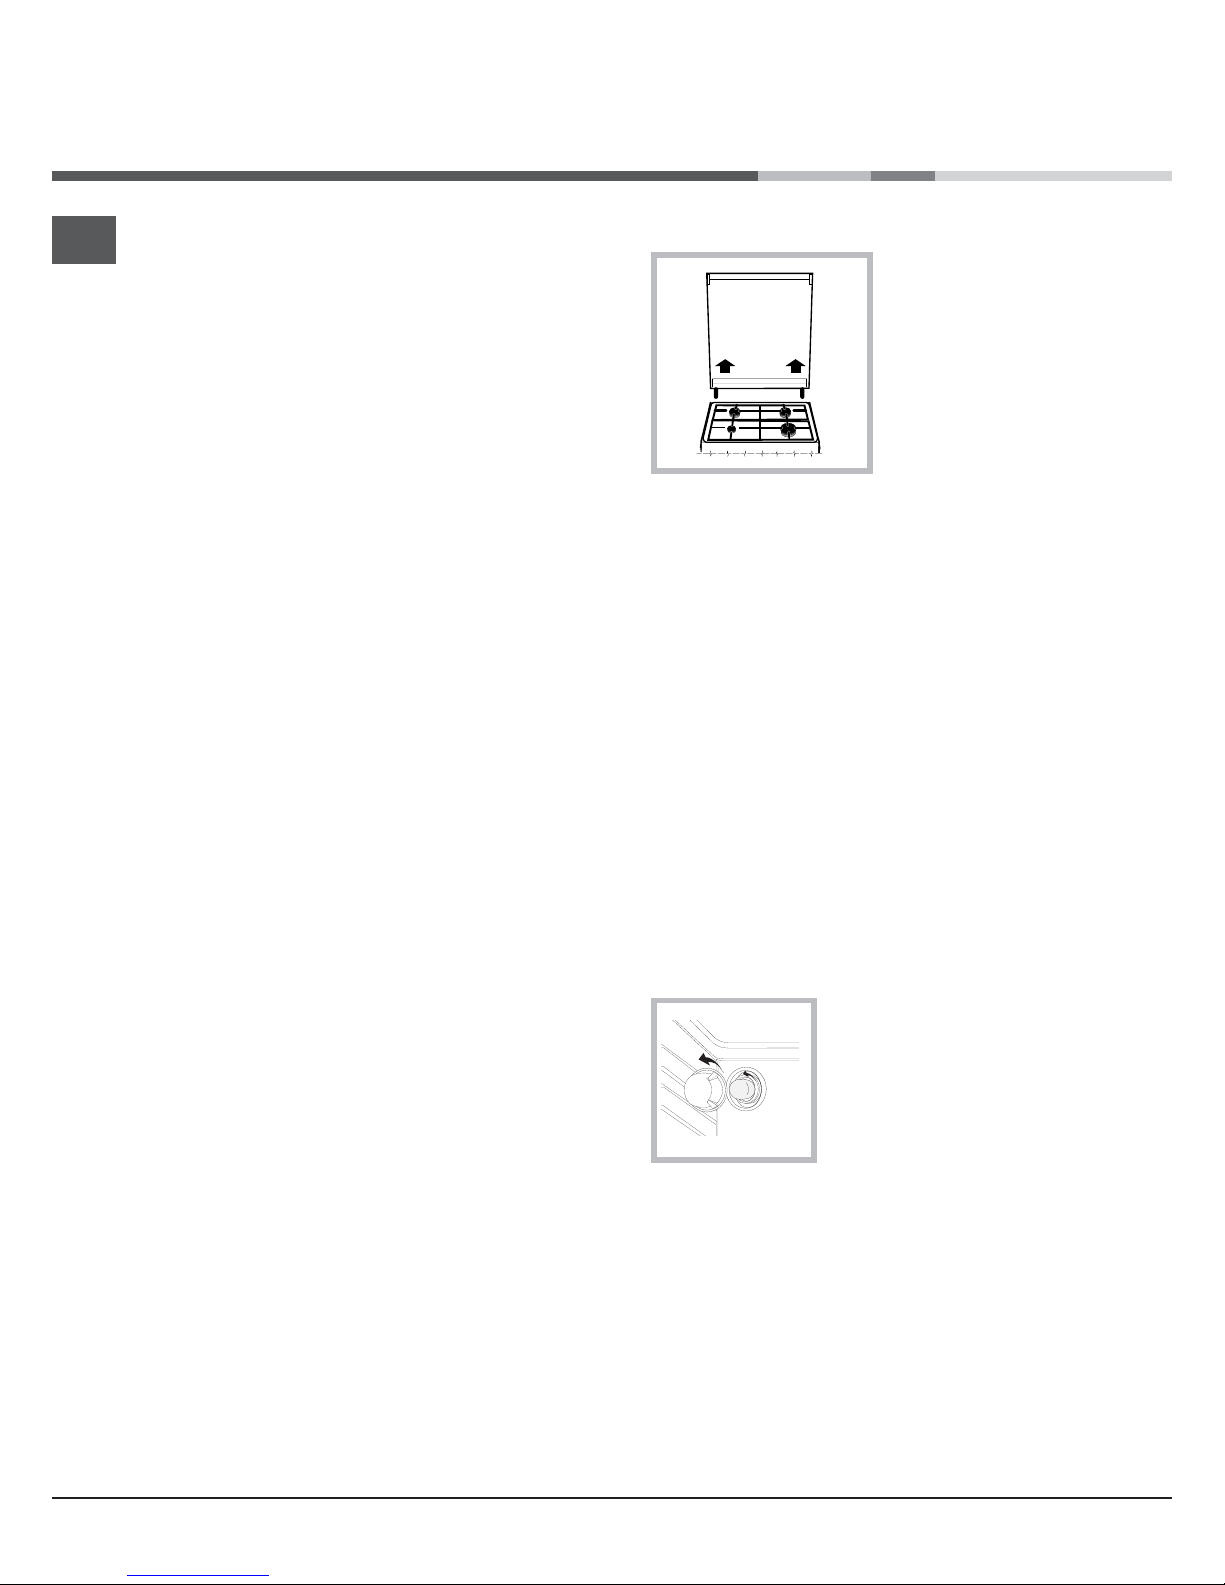
! After prolonged use of the appliance, it is advisable to
open a window or increase the speed of any fans used.
Disposing of combustion fumes
The disposal of combustion fumes should be
guaranteed using a hood connected to a safe and
efficient natural suction chimney, or using an electric
fan that begins to operate automatically every time the
appliance is switched on (see gure).
! The liquefied petroleum gases are heavier than air
and collect by the floor, therefore all rooms containing
LPG cylinders must have openings leading outside so
that any leaked gas can escape easily.
LPG cylinders, therefore, whether partially or
completely full, must not be installed or stored in rooms
or storage areas that are below ground level (cellars,
etc.). Only the
cylinder being used should be stored in the room; this
should also be kept well away from sources
of heat (ovens, chimneys, stoves) that may cause
the temperature of the cylinder to rise above 50°C.
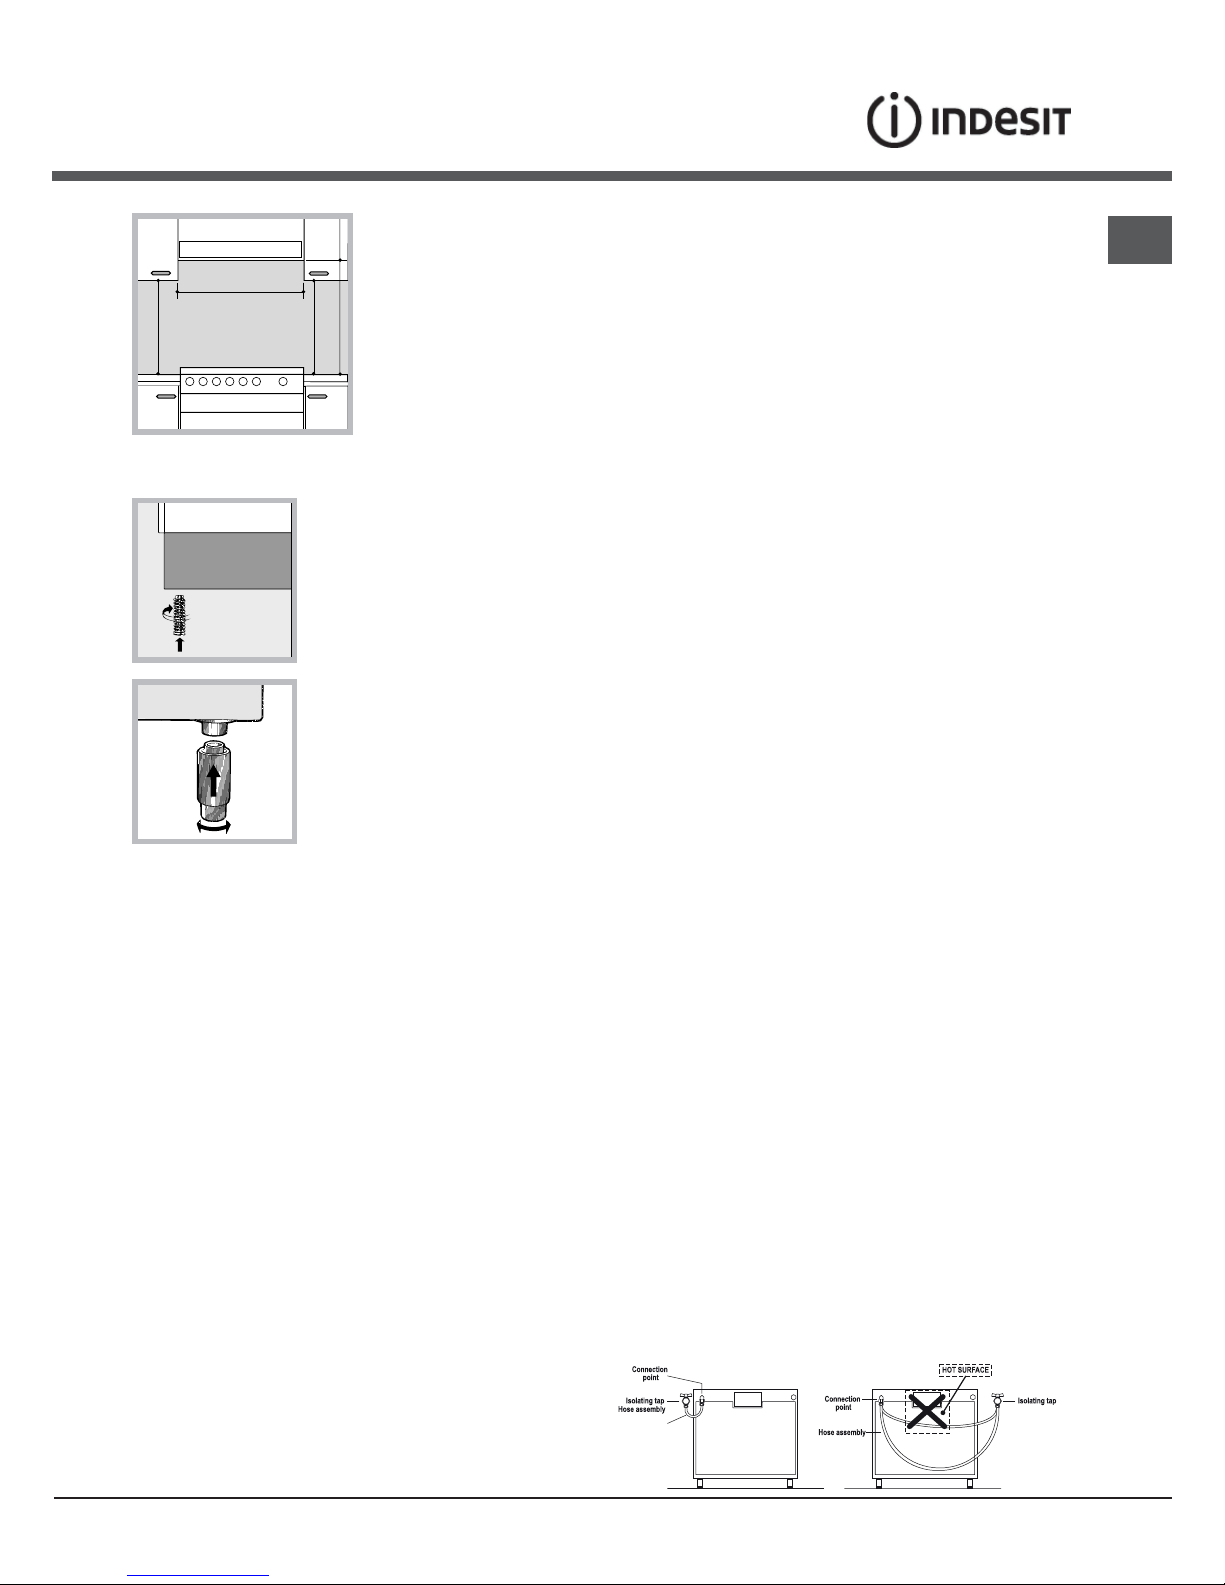
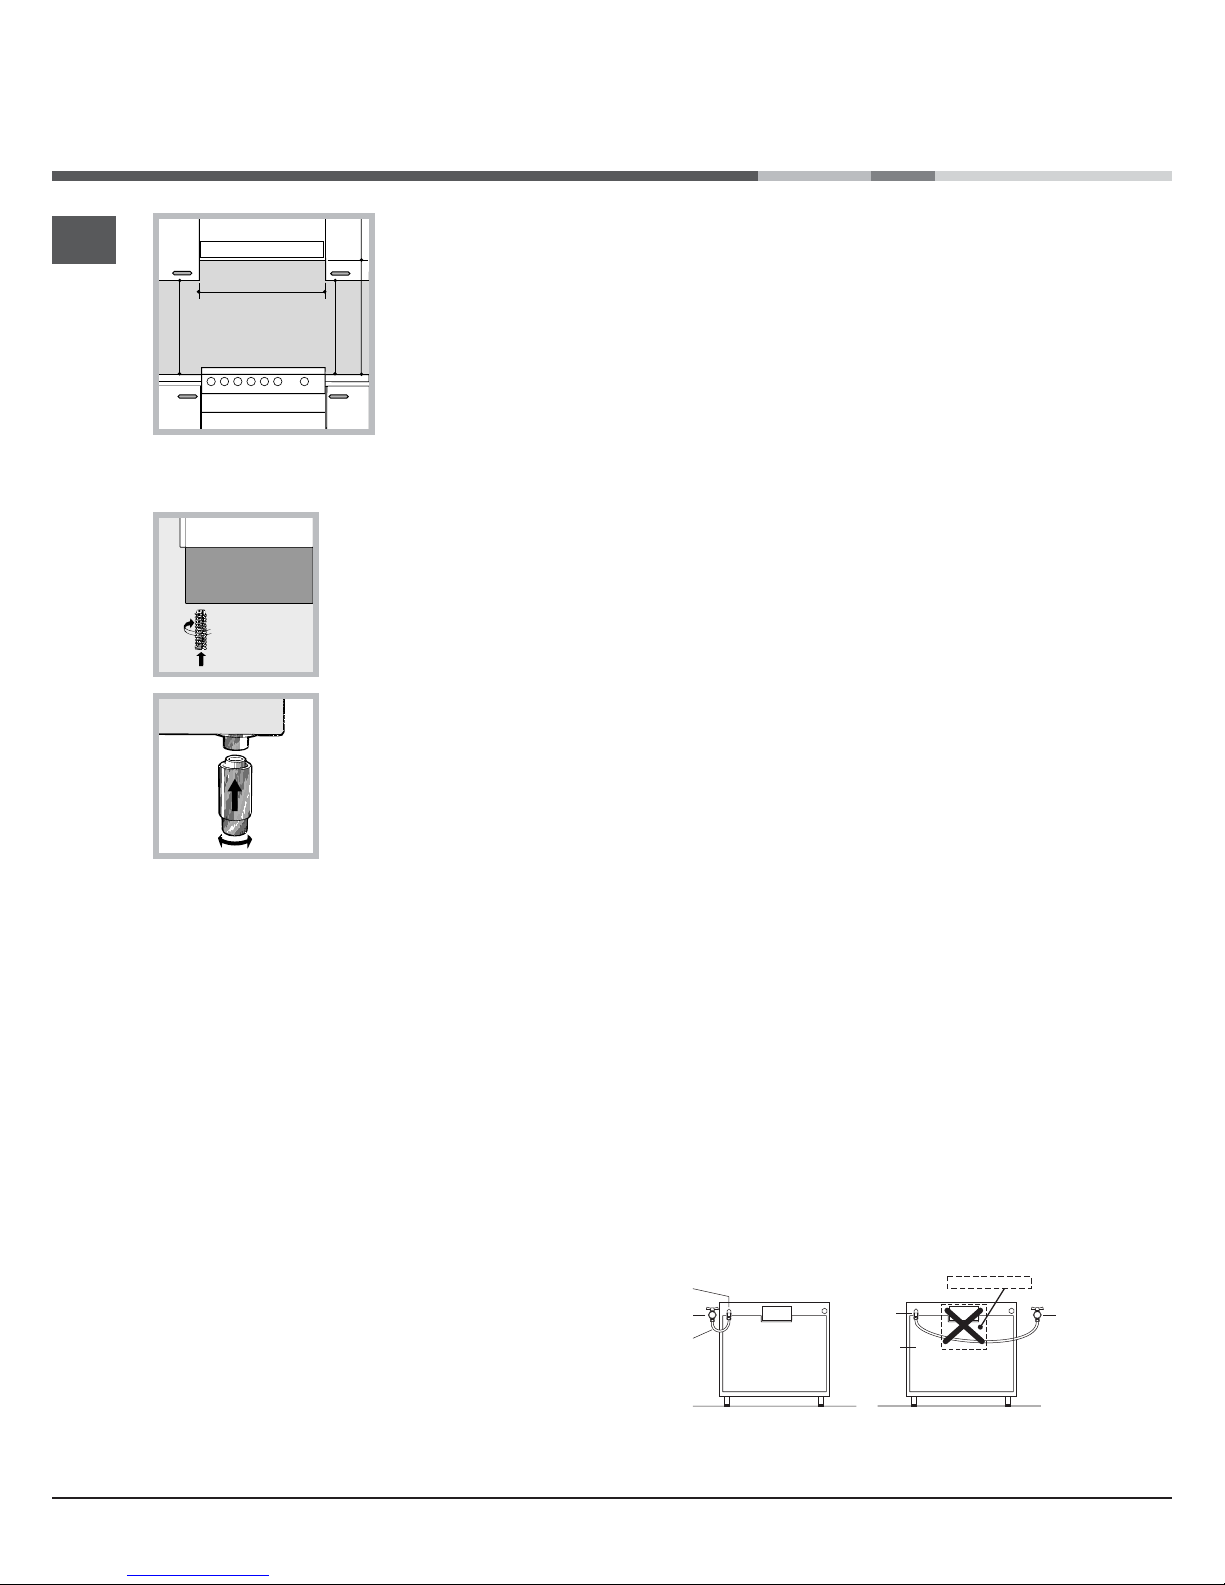
Positioning and levelling
! It is possible to install the appliance alongside
cupboards whose height does not exceed that of the
hob surface.
! Make sure that the wall in contact with the back of
the appliance is made from a non-flammable, heatresistant material (T 90°C).
To install the appliance correctly:
• Place it in the kitchen, dining room or the bed-sit (not
in the bathroom).
• If the top of the hob is higher than the cupboards,
the appliance must be installed at least 200 mm away
from them.
• If the cooker is installed underneath a wall cabinet,
there must be a minimum distance of 420 mm
between this cabinet and the top of the hob.
This distance should be increased to 700 mm if the
wall cabinets are flammable (see gure).
• Do not position blinds behind the cooker or less than
200 mm away from its sides.
• Any hoods must be installed according to the
A
Fumes channelled through
a chimney or branched
flue system reserved for
cooking appliances)
Installation
Adjacent room Room requiring
ventilation
Ventilation opening for
comburent air
Increase in the gap between
the door and the flooring
Fumes channelled
straight outside
instructions listed in the relevant operating manual.
11
GB
Levelling
If it is necessary to level
the appliance, screw the
adjustable feet into the
places provided on each
corner of the base of the
cooker (see gure).
The legs* fit into the slots on the underside of the base
of the cooker.
Electrical connection
Install a standardised plug
corresponding to the load
indicated on the appliance data
plate (see Technical data table).
The appliance must be directly
connected to the mains using an
omnipolar circuit-breaker with a
minimum contact opening of 3 mm
installed between the appliance
and the mains. The circuit-breaker
must be suitable for the charge indicated and must comply
with NFC 15-100 regulations (the earthing wire must not be
interrupted by the circuit-breaker). The supply cable must
be positioned so that it does not come into contact with
temperatures higher than 50°C at any point.
Before connecting the appliance to the power supply,
make sure that:
• The appliance is earthed and the plug is compliant with
the law.
• The socket can withstand the maximum power of the
appliance, which is indicated by the data plate.
• The voltage is in the range between the values
indicated on the data plate.
• The socket is compatible with the plug of the
appliance. If the socket is incompatible with the
plug, ask an authorised technician to replace it. Do
not use extension cords or multiple sockets.
! Once the appliance has been installed, the power
supply cable and the electrical socket must be easily
accessible.
! The cable must not be bent or compressed.
! The cable must be checked regularly and replaced
HOOD
420
Min.
min.
650
mm. with hood
min.
700
mm. without hood
mm.
600
Min. mm.
420
Min. mm.
* Only available in certain models
by authorised technicians only.
! The manufacturer declines any liability should
these safety measures not be observed.
Gas connection
Connection to the gas network or to the gas cylinder
may be carried out using a flexible rubber or steel hose,
in accordance with current national legislation and after
making sure that the appliance is suited to the type of gas
with which it will be supplied (see the rating sticker on
the cover: if this is not the case
see below). When using
liquid gas from a cylinder, install a pressure regulator
which complies with current national regulations. To
make connection easier, the gas supply may be turned
sideways*: reverse the position of the hose holder with
that of the cap and replace the gasket that is supplied
with the appliance.
!
Check that the pressure of the gas supply is
consistent with the values indicated in the Table
of burner and nozzle specifications (
see below).
This will ensure the safe operation and durability of
your appliance while maintaining efficient energy
consumption.
Gas connection using a flexible rubber hose
Make sure that the hose complies with current national
legislation. The internal diameter of the hose must
measure: 8 mm for liquid gas supply; 13 mm for
methane gas supply.
Once the connection has been performed, make sure
that the hose:
• Does not come into contact with any parts that reach
temperatures of over 50°C.
• Is not subject to any pulling or twisting forces and
that it is not kinked or bent.
• Does not come into contact with blades, sharp
corners or moving parts and that it is not
compressed.
• Is easy to inspect along its whole length so that its
condition may be checked.
• Is shorter than 1500 mm.
• Fits firmly into place at both ends, where it will
be fixed using clamps that comply with current
regulations.
!
If one or more of these conditions is not fulfilled
or if the cooker must be installed according to the
conditions listed for class 2 - subclass 1 appliances
(installed between two cupboards), the flexible steel
hose must be used instead (
see below).
12
GB
A
V
a threaded attachment
Make sure that the hose and gaskets comply with
current national legislation.
To begin using the hose, remove the hose holder on the
appliance (the gas supply inlet on the appliance is a
cylindrical threaded 1/2 gas male attachment).
! Perform the connection in such a way that the hose
length does not exceed a maximum of 2 metres,
making sure that the hose is not compressed and does
not come into contact with moving parts.
Checking the connection for leaks
When the installation process is complete, check the
hose fittings for leaks using a soapy solution. Never
use a flame.
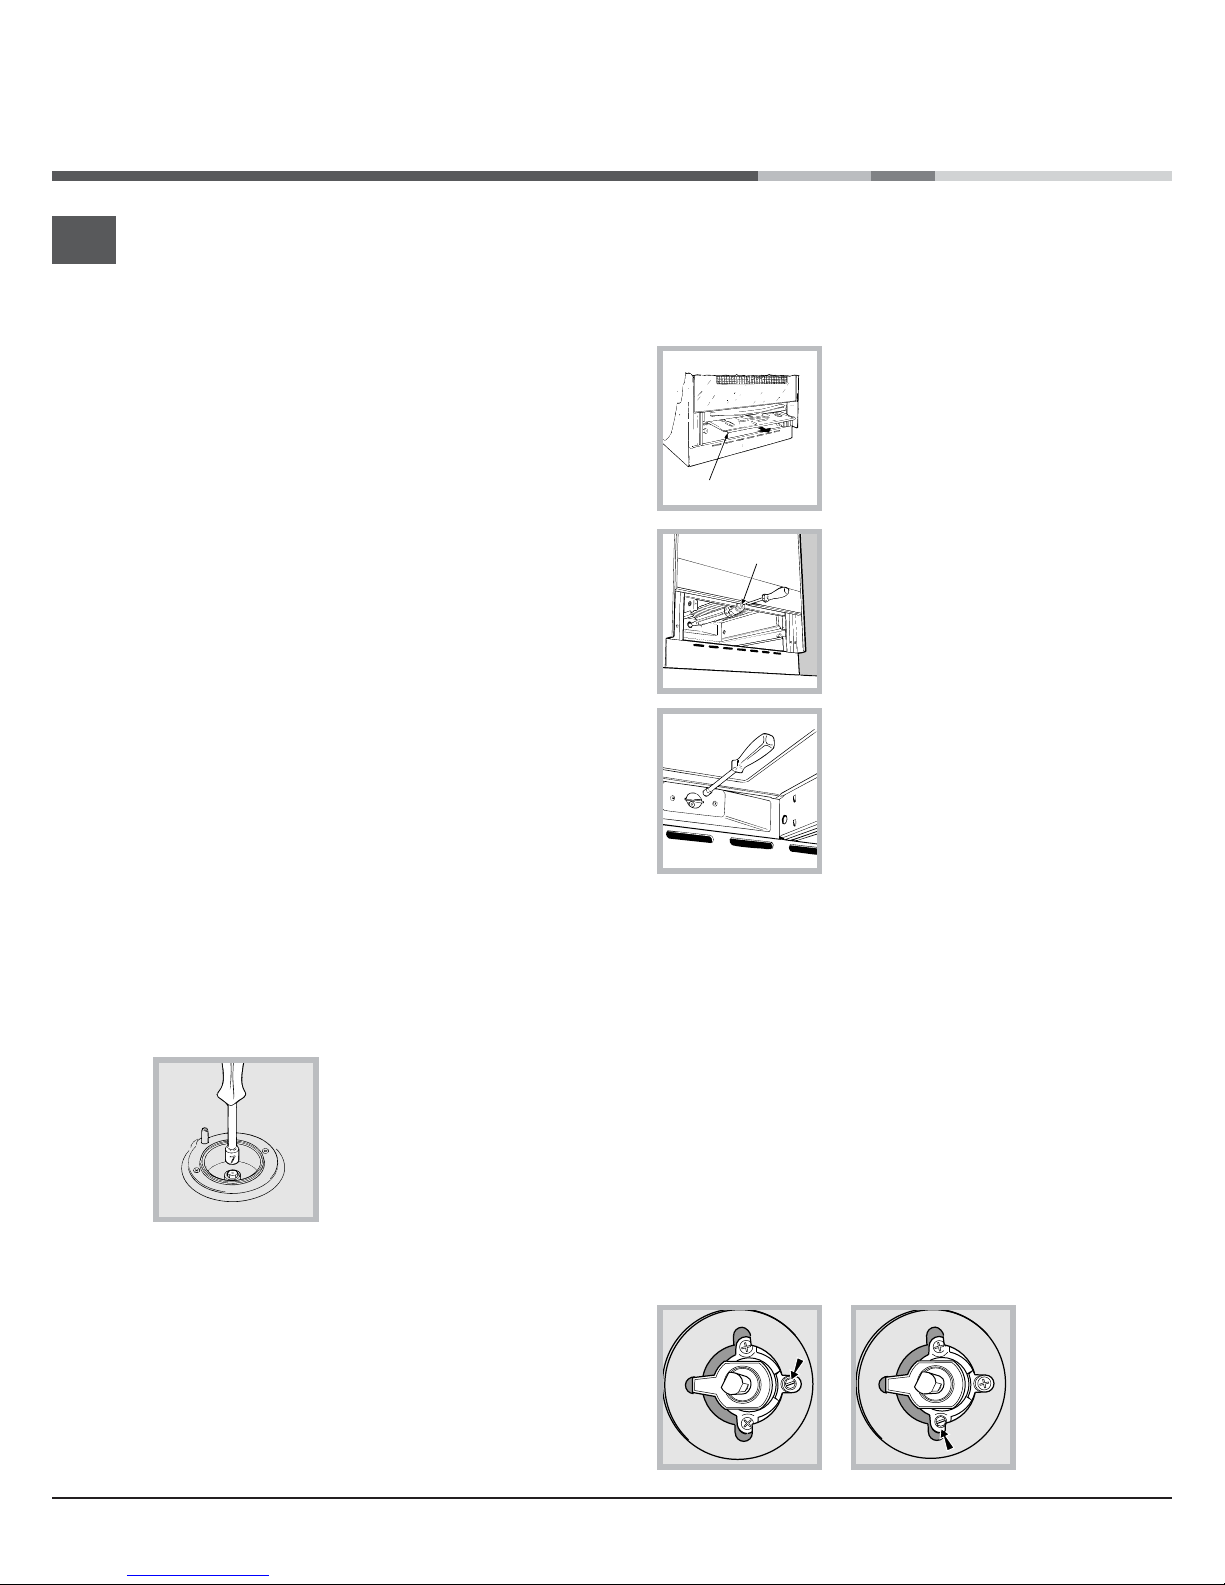
Adapting to different types of gas
It is possible to adapt the appliance to a type of gas
other than the default type (this is indicated on the
rating label on the cover).
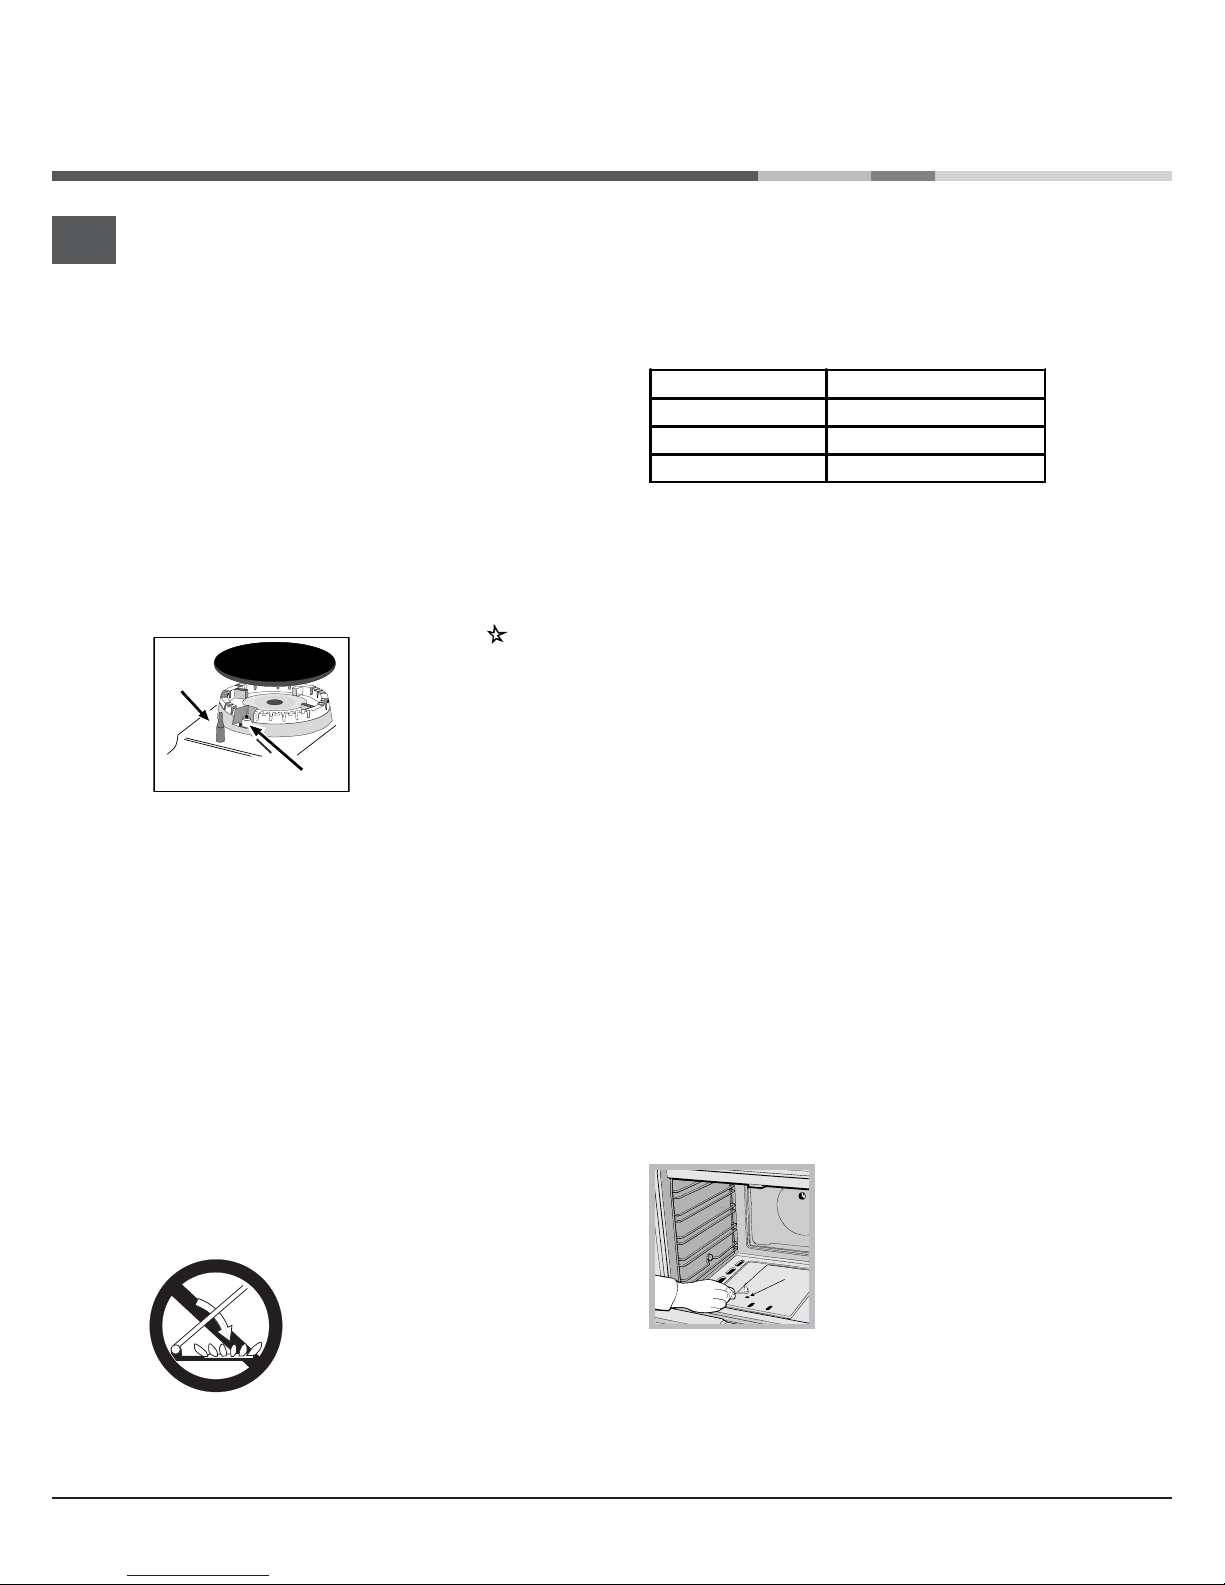
Adapting the hob
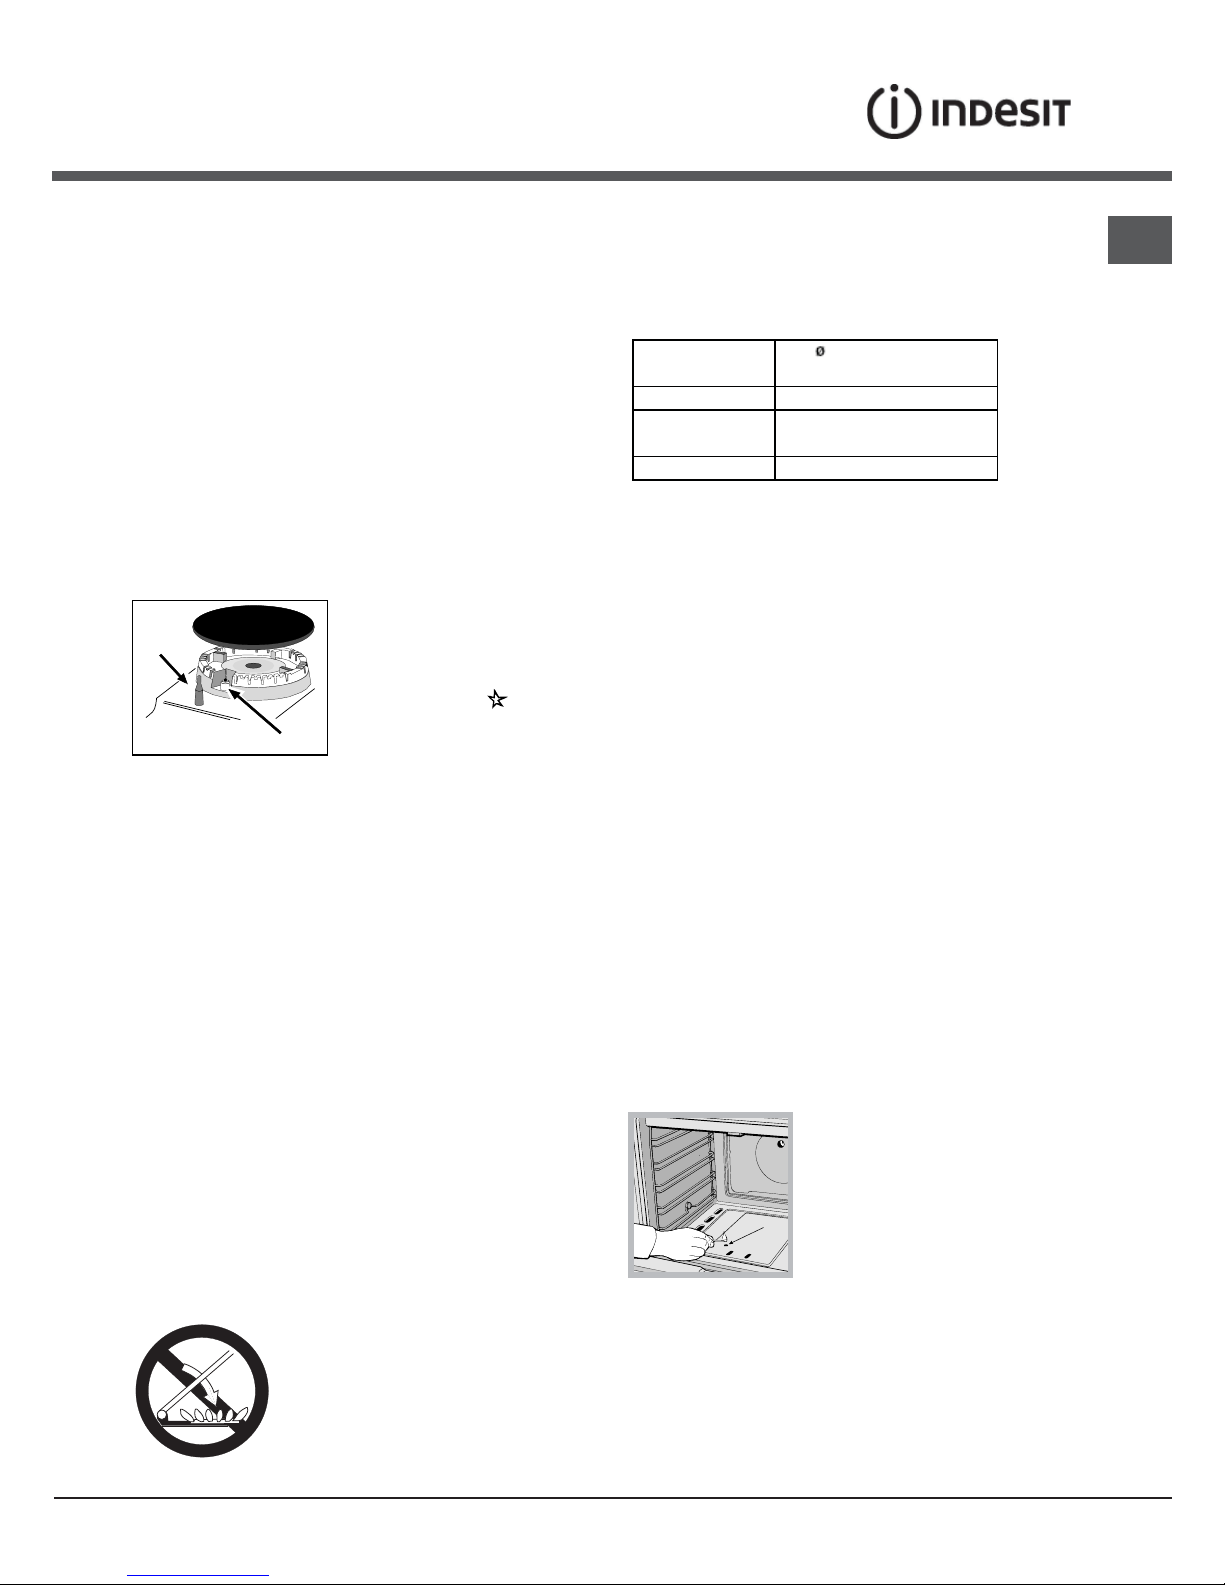
Replacing the nozzles for the hob burners:
1. Remove the hob grids and slide the burners off their
seats.
2. Unscrew the nozzles using a 7 mm socket spanner
(see gure), and replace them with nozzles suited to
the new type of gas(see Burner and nozzle speci cations
table).
3. Replace all the components by following the above
instructions in reverse.
Adjusting the hob burners’
minimum setting:
1. Turn the tap to the minimum
position.
2. Remove the knob and adjust
the regulatory screw, which is
positioned inside or next to the
tap pin, until the flame is small
but steady.
! If the appliance is connected to a liquid gas supply,
the regulatory screw must be fastened as tightly as
possible.
3. While the burner is alight, quickly change the position of
the knob from minimum to maximum and vice versa several
times, checking that the flame is not extinguished.
! The hob burners do not require primary air
adjustment.
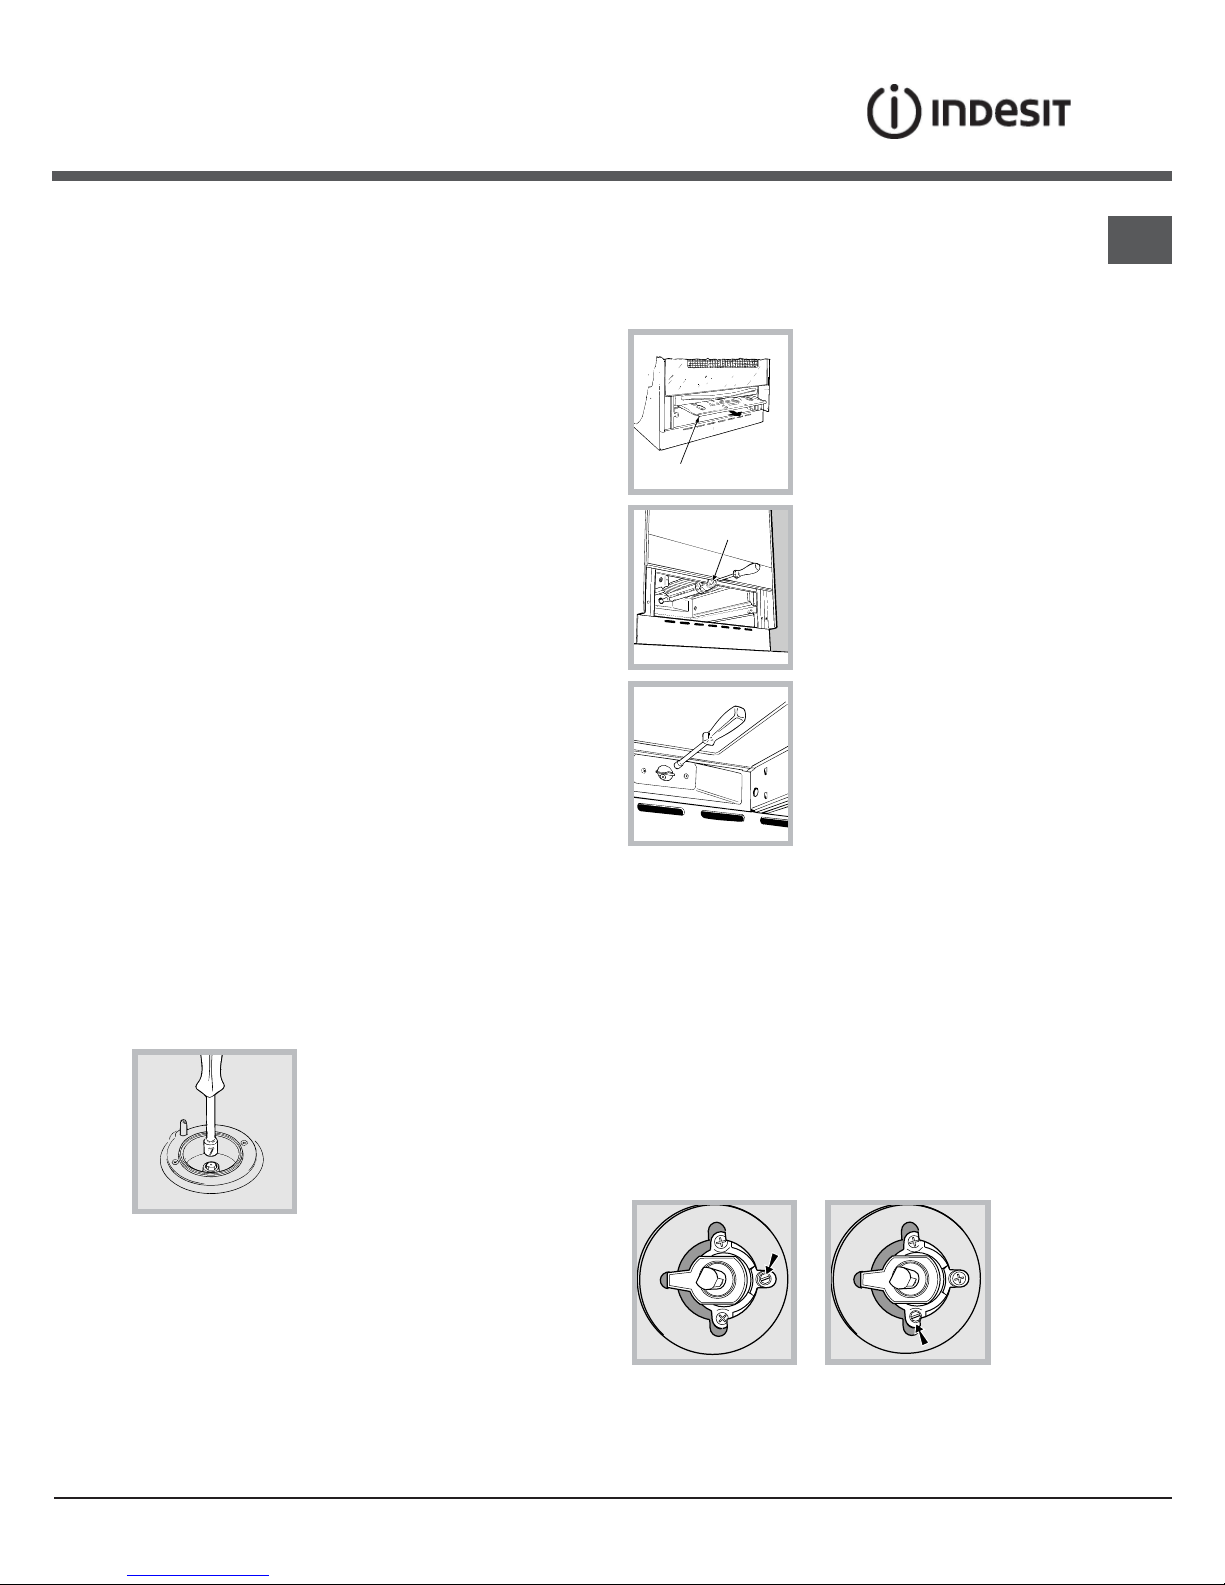
Adapting the oven
Replacing the oven burner nozzle:
1. Remove the oven compartment.
2. Slide out the protection panel A
(see diagram).
3. Remove the oven burner
after unscrewing the screws V
(see gure).
The whole operation will be
made easier if the oven door is
removed.
4. Unscrew the nozzle using a
special nozzle socket spanner
(see gure) or with a 7 mm
socket spanner, and replace it
with a new nozzle that is suited
to the new type of gas (see
Burner and nozzle speci cations
table).
Adjusting the gas oven
burner’s minimum setting:
1. Light the burner ( see Start-up
and Use).
2. Turn the knob to the
minimum position (MIN)
after it has been in the maximum position (MAX) for
approximately 10 minutes.
3. Remove the knob.
4. Tighten or loosen the adjustment screws on the
outside of the thermostat pin (see gure) until the flame
is small but steady.
! If the appliance is connected to liquid gas, the
adjustment screw must be fastened as tightly as
possible.
5. Turn the knob from the MAX position to the MIN
position quickly or open and shut the oven door,
making sure that the burner is not extinguished.
Connecting a flexible jointless stainless steel pipe to
13
GB
S
S
R
A
We recommend cleaning the oven before using it for the
first time, following the instructions provided in the „Care
and maintenance” section.
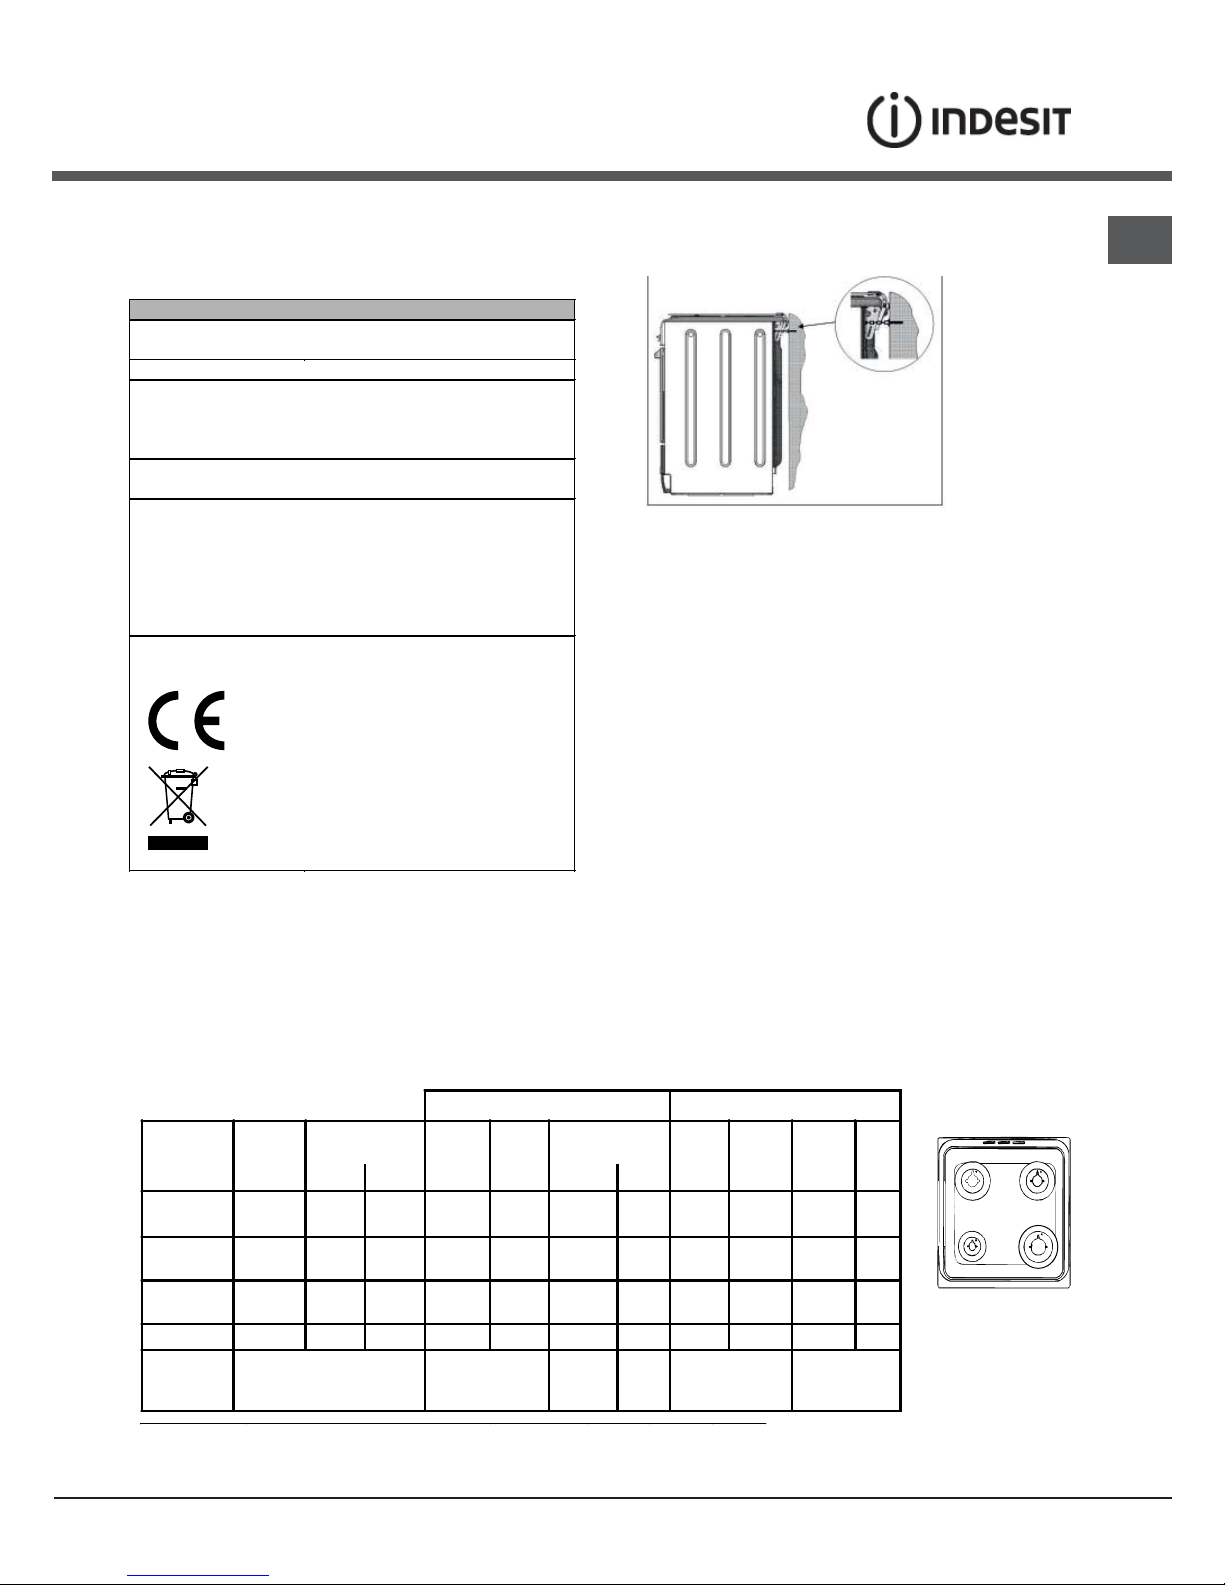
KN3G21S/EU S
Table of burner and nozzle specifications
TECHNICAL DATA
Oven dimensions
(HxWxD)
34x39x44 cm
Volume
58 l
Useful
measurements
relating to the oven
compartment
width 42 cm
depth 44 cm
height 17 cm
Power supply voltage
and frequency
see data plate
Burners
may be ada pted for use with any
type of gas shown on the data
plate, which is located inside the
flap or, after the oven
compartment has been opened,
on the left-hand wall inside the
oven.
EC Directives: 2006/95/EC dated
12/12/06 (Low Voltage) and
subsequent amendments -
2004/108/EC dated 15/12/04
(Electromagnetic Compatibility)
and subsequent amendments -
2009/142/EC dated 30/11/09
(Gas) and subsequent
amendments - 93/68/EEC dated
22/07/93 and subsequent
amendments - 2002/96/EC.
1275/2008 (Stand-by/ Off mode)
Table 1 Liquid G a s Na t ura l Ga s
Burner Diameter
(mm)
Thermal Power
kW (p.c.s.*)
By-Pass
1/100
Nozzle
1/100
Flow*
g/h
Nozzle
1/100
Flow*
l/h
Nozzle
1/100
Flow*
l/h
Nomin al Reduced (mm) (mm) *** ** (mm) (mm)
Fast
(Large)(R)
100 3.00 0.7 41 87 218 214 128 286 143 286
Semi Fast
(Medium)(S)
75 1.90 0.4 30 70 138 136 104 181 118 181
Auxiliary
(Smal l)(A)
51 1.00 0.4 30 52 73 71 76 95 80 95
Oven - 2.80 1.0 46 80 204 200 119 267 132 257
Supply
Pressures
Nominal (mb ar)
Min imum (mbar)
Maximum ( mbar)
28-30
20
35
37
25
45
20
17
25
13
6,5
18
Data plate, is located inside the flap or, after the oven
compartment has been opened, on the left-hand wall
inside the oven.
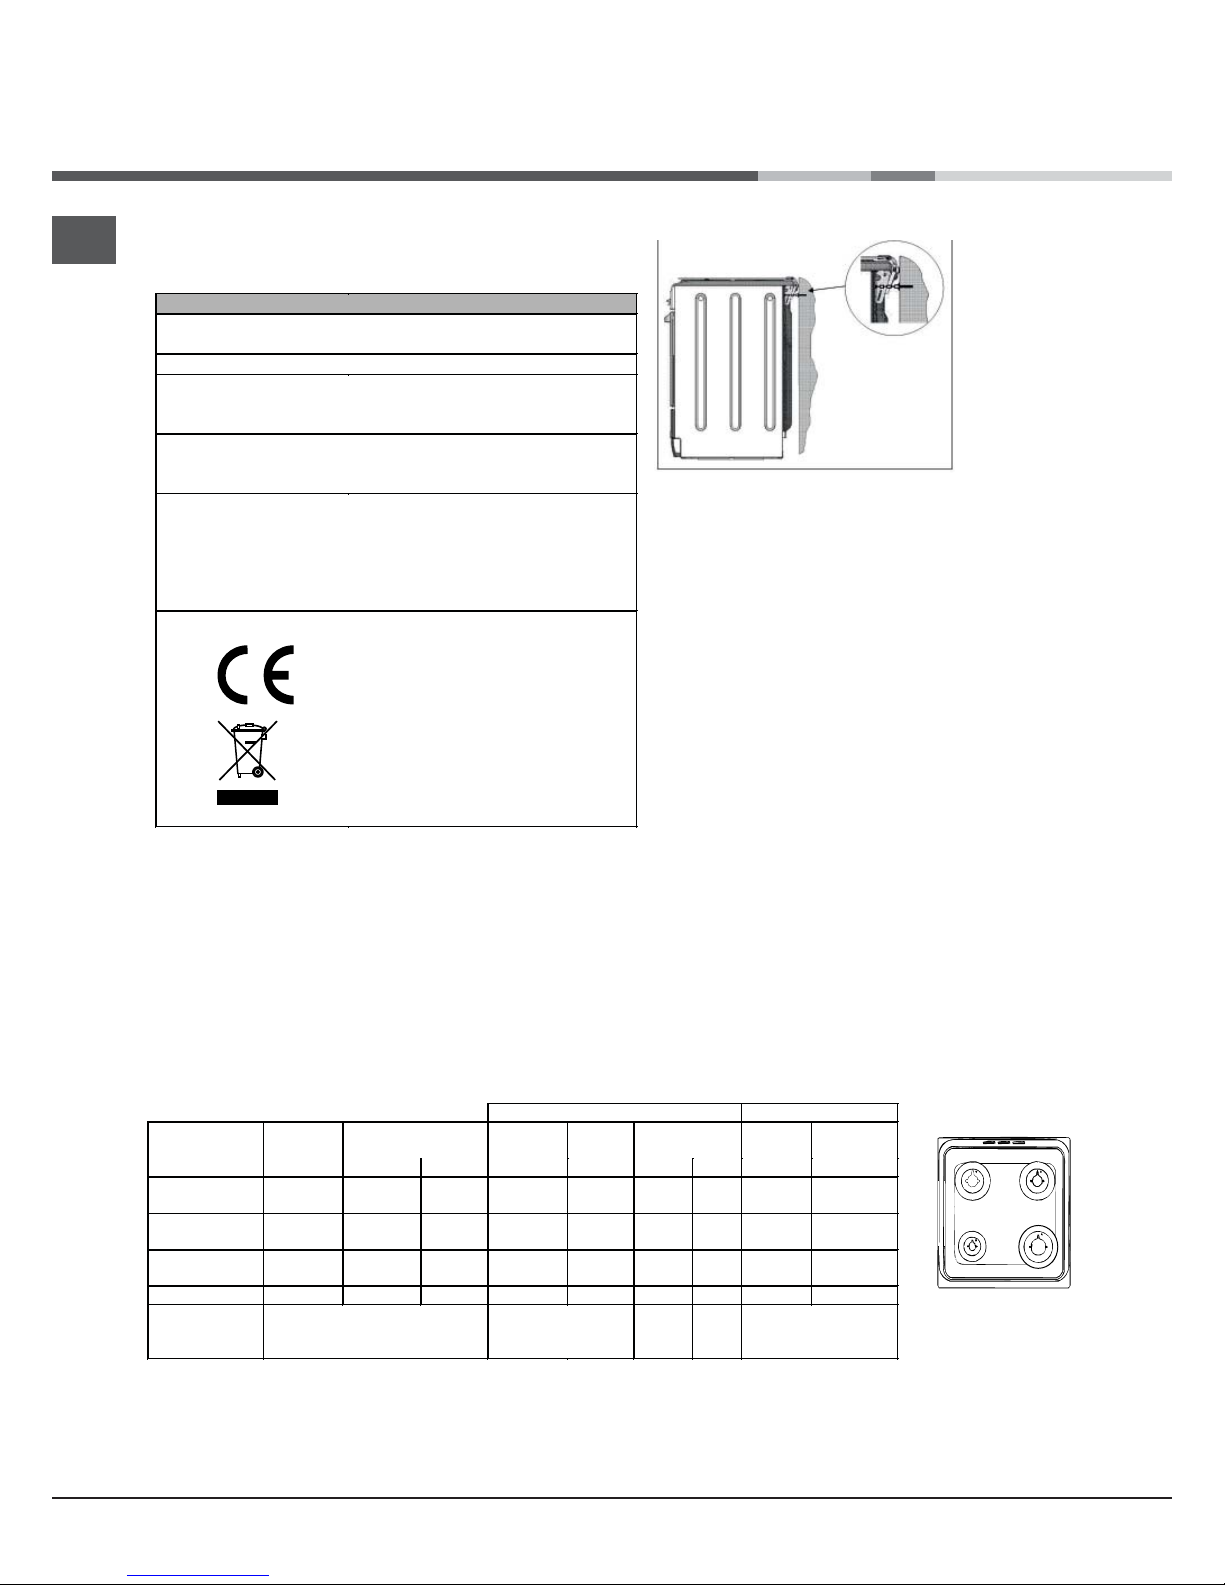
Safety Chain
! In order
to prevent
accidental
tipping of the
appliance, for
example by
a child climbing onto the
oven door, the
supplied safety
chain MUST be
installed!
The cooker is fitted with a safety chain to be fixed by
means of a screw (not supplied with the cooker) to
the wall behind the appliance, at the same height as
the chain is attached to the appliance.
Choose the screw and the screw anchor according
to the type of material of the wall behind the appliance. If the head of the screw has a diameter smaller
than 9mm, a washer should be used. Concrete wall
requires the screw of at least 8mm of diameter, and
60mm of length.
Ensure that the chain is fixed to the rear wall of the
cooker and to the wall, as shown in figure, so that
after installation it is tensioned and parallel to the
ground level.
* At 15°C 1013 mbar- dry gas *** Buta ne P.C.S. = 49,47 MJ/Kg
** Propane P.C.S. = 50,37 MJ/Kg Natu ral P.C.S. = 37,78 MJ/m³
14
GB
Using the hob
Lighting the burners
For each BURNER knob there is a complete ring showing
the strength of the flame for the relevant burner.
To light one of the burners on the hob:
1. Bring a flame or gas lighter close to the burner.
2. Press the BURNER knob and turn it in an
anticlockwise direction so that it is pointing to the
maximum flame setting E.
3. Adjust the intensity of the flame to the desired level
by turning the BURNER knob in an anticlockwise
direction. This may be the minimum setting C, the
maximum setting E or any position in between the two.
If the appliance is fitted with an electronic lighting
device* (see gure), press the ignition button, marked
with the symbol
, then
hold the BURNER knob down
and turn it in an anticlockwise
direction, towards the
maximum flame setting, until
the burner is lit.
Several models are equipped
with an ignition device
which is built into the knob; in this case the electronic
ignition device* is present (C) but the ignition button
is not. Simply press the BURNER knob and turn it
in an anticlockwise direction so that it is pointing
to the maximum flame setting, until the burner is lit.
The burner may be extinguished when the knob is
released. If this occurs, repeat the operation, holding
the knob down for a longer period of time.
! If the flame is accidentally extinguished, switch off the
burner and wait for at least 1 minute before attempting
to relight it.
If the appliance is equipped with a flame failure safety
device*(X), press and hold the BURNER knob for
approximately 2-3 seconds to keep the flame alight
and to activate the device.
To switch the burner off, turn the knob until it reaches
the stop position •.
For the burners to work in the most
efficient way possible and to save
Start-up and use
To identify the type of burner, please refer to the
diagrams contained in the “Burner and nozzle
specifications”.
Using the oven
! The first time you use your appliance, heat the empty
oven with its door closed at its maximum temperature
for at least half an hour. Ensure that the room is well
ventilated before switching the oven off and opening
the oven door. The appliance may emit a slightly
unpleasant odour caused by protective substances
used during the manufacturing process burning away.
! Before operating the product, remove all plastic film
from the sides of the appliance.
! Never put objects directly on the bottom of the oven;
this will avoid the enamel coating being damaged.
Only use position 1 in the oven when cooking with the
rotisserie spit.
Lighting the oven
To light the oven burner, bring a flame or gas lighter
close to opening F (see gure) and press the OVEN
control knob while turning it in an anticlockwise
direction until it reaches the MAX position.
If, after 15 seconds, the burner
is still not alight, release the
knob, open the oven door and
wait for at least 1 minute before
trying to light it again.
! The oven is fitted with a
safety device and it is therefore
necessary to hold the OVEN
control knob down for approximately 6 seconds.
! If the flame is accidentally extinguished, switch off the
burner and wait for at least 1 minute before attempting
to relight the oven.
F
X
C
WARNING! The glass lid can break
in if it is heated up. Turn off all the
burners and the electric plates before
closing the lid. *Applies to the models
with glass cover only.
Burner ř Cookware diameter (cm)
Fast (R) 24 - 26
Semi Fast (S) 16 - 20
Auxiliary (A) 10 - 14
Practical advice on using the burners
For the burners to work in the most efficient way
possible and to save on the amount of gas
consumed, it is recommended that only pans that
have a lid and a flat base are used. They should also
be suited to the size of the burner.
15
GB
Adjusting the temperature
To set the desired cooking temperature, turn the
OVEN control knob in an anticlockwise direction.
Temperatures are displayed on the control panel and
may vary between MIN (140°C) and MAX (250°C).
Once the set temperature has been reached, the oven
will keep it constant by using its thermostat.
Grill
By turning the OVEN control knob in an anticlockwise
direction until it reaches the
position, the infrared
ray grill is activated. The grill enables the surface of
food to be browned evenly and is particularly suitable
for roast dishes, schnitzel and sausages. Place the
rack in position 4 or 5 and the dripping pan in position
1 to collect fat and prevent the formation of smoke.
! The GRILL indicator light shows when the grill is
operating.
! Always use the grill with the oven door shut; this
achieves better cooking results and saves energy
(approximately 10%).
Turnspit
To operate the rotisserie (see diagram) proceed as
follows:
1. Place the dripping pan in position 1.
2. Place the rotisserie support in position 4 and insert
the spit in the hole
provided on the back
panel of the oven.
3. Acitvate the function
by pressing the
TURNSPIT button.
Oven light
The light may be
switched on at any moment by pressing the OVEN
LIGHT button.
Timer*
To activate the Timer proceed as follows:
1. Turn the TIMER knob in a clockwise direction 4 for
almost one complete revolution to set the buzzer.
2. Turn the TIMER knob in an anticlockwise direction 5
to set the desired length of time.
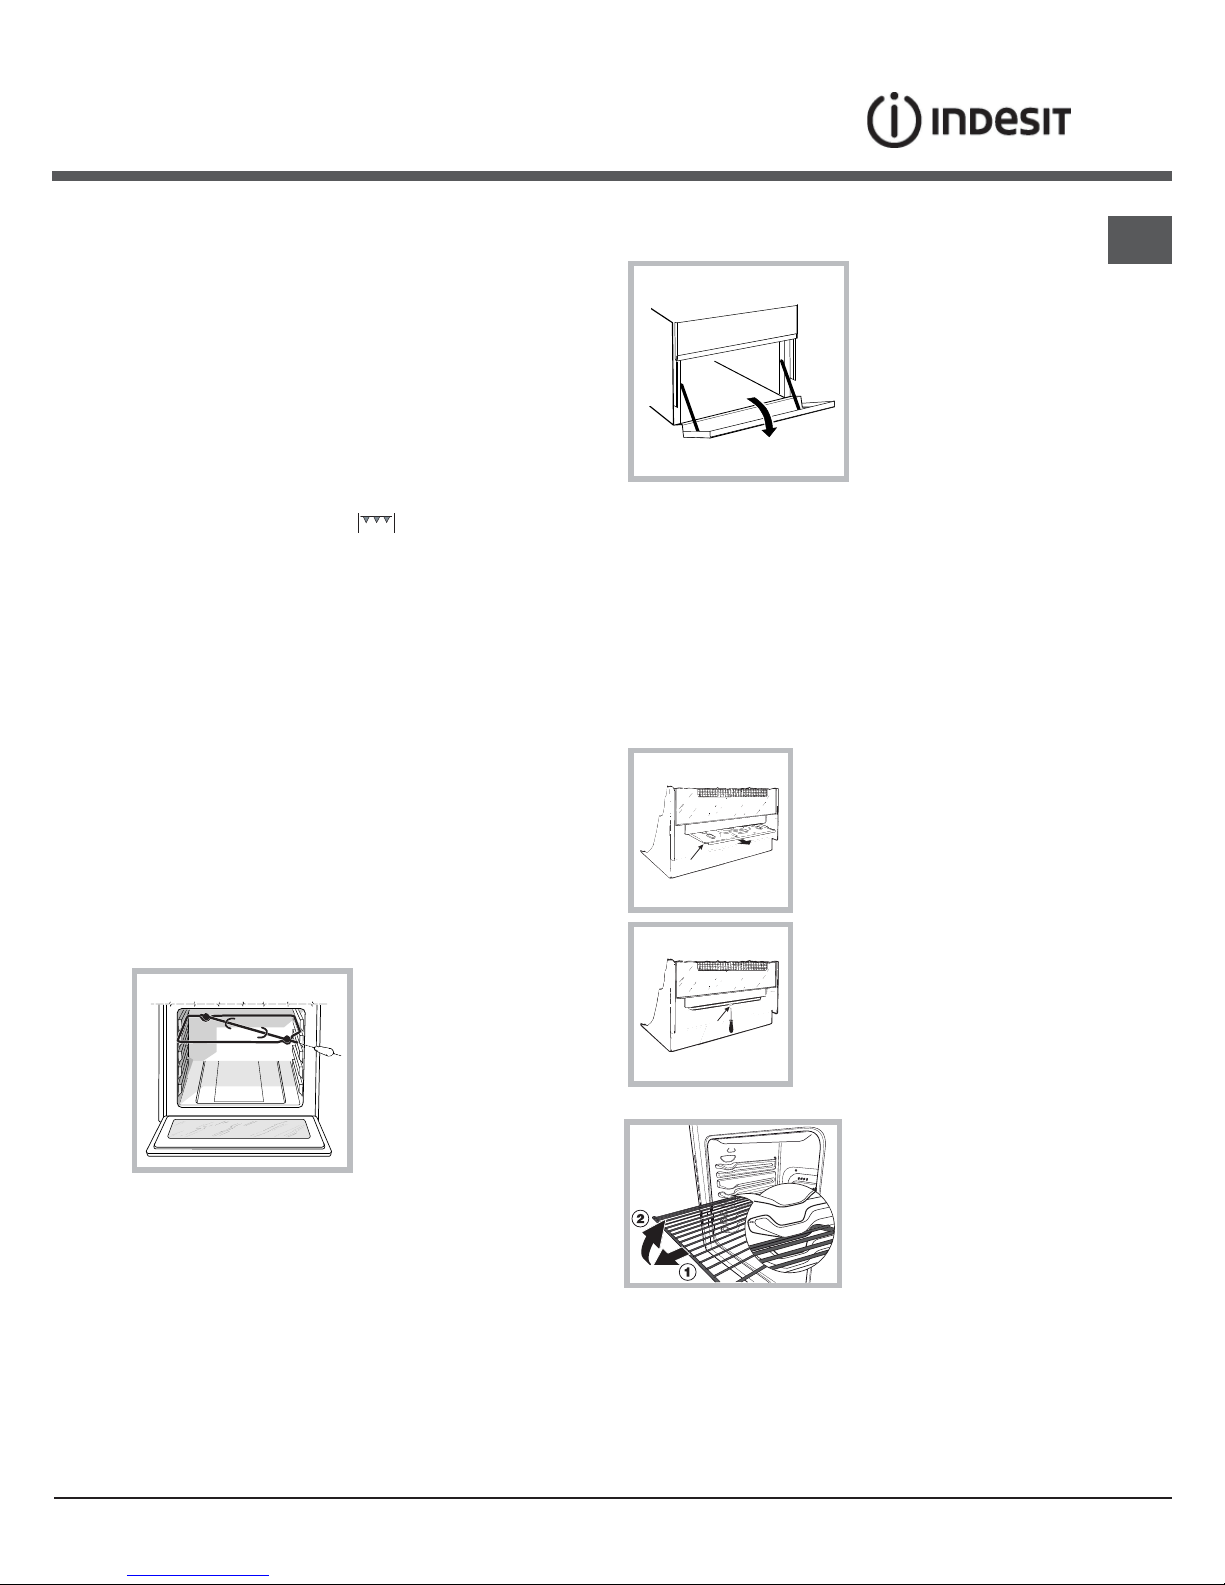
Lower compartment
There is a compartment
underneath the oven that
may be used to store
oven accessories or deep
dishes. To open the door
pull it downwards (see
gure).
! The internal surfaces of
the compartment (where present) may become hot.
! Do not place flammable materials in the lower oven
compartment.
In gas cooker models, there is a sliding protection layer
A that shields the lower compartment from the heat
generated by the burner (see gure).
To remove the sliding protection
remove the screw S (see gure).
To replace it, lock it in place with
the screw S.
! Before using the oven make
sure that the sliding protection is
fixed correctly.
A
S
WARNING! The oven is
provided with a stop system to extract the racks
and prevent them from
coming out of the oven.(1)
As shown in the drawing,
to extract them completely, simply lift the racks,
holding them on the front
part, and pull (2).
16
GB
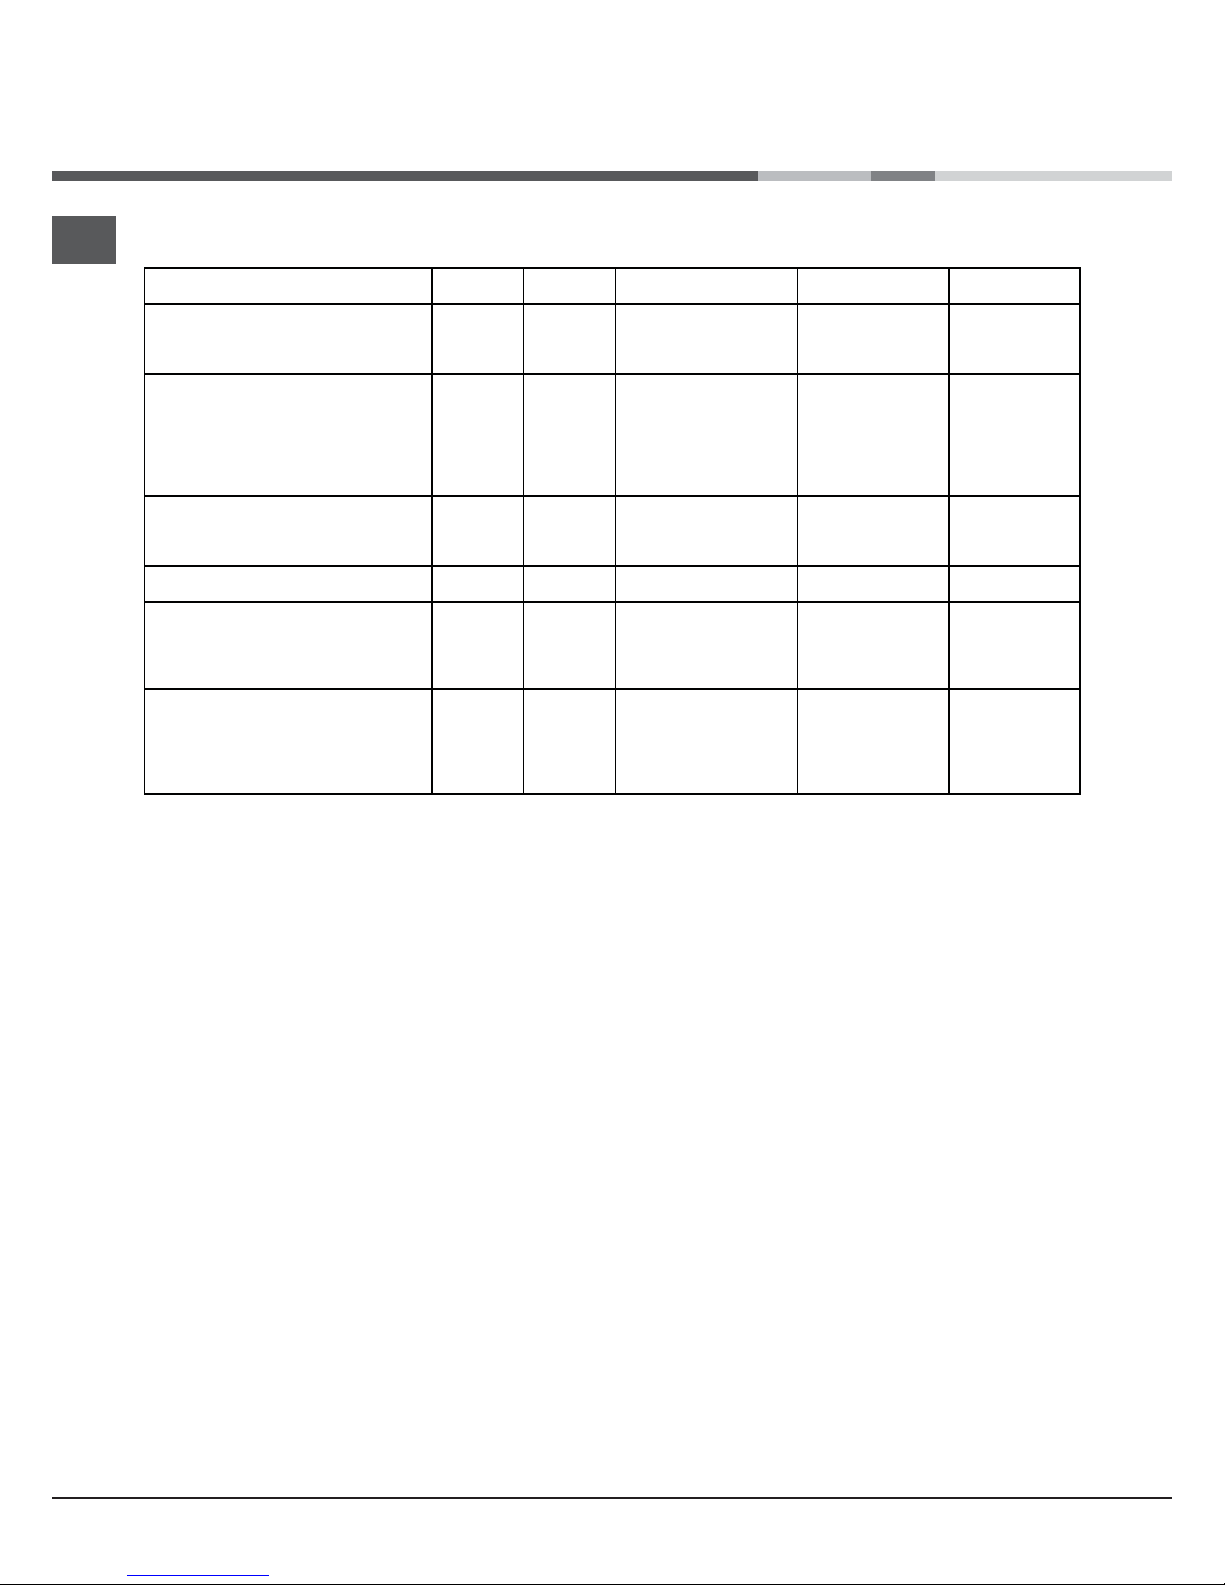
Oven cooking advice table
* Only available in certain models.
Foods
Weight (in
kg)
Rack
position
Preheating time (min)
Recommended
Temperature (°C)
Cooking time
(minutes)
Pasta
Lasagne
Cannelloni
Gratin dishes
2.5
2.5
2.5
3
3
3
10
10
10
210
200
200
60-75
40-50
40-50
Meat
Veal
Chicken
Duck
Rabbit
Pork
Lamb
1.7
1.5
1.8
2
2.1
1.8
3
3
3
3
3
3
10
10
10
10
10
10
200
220
200
200
200
200
85-90
90-100
100-110
70-80
70-80
90-95
Fish
Mackerel
Dentex
Trout baked in foil
1.1
1.5
1
3
3
3
10
10
10
180-200
180-200
180-200
35-40
40-50
40-45
Pizza
Neapolitan-style
1
3
15
220
15-20
Pies
Biscuits
Tart
Savoury pies
Leavened cakes
0.5
1.1
1
1
3
3
3
3
15
15
15
15
180
180
180
180
30-35
30-35
45-50
35-40
Grilled foods
Veal steak
Cutlets
Hamburgers
Mackerel
Toast
1
1.5
1
1
4 pcs
4
4
3
4
4
5
5
5
5
5
15-20
20
20-30
15-20
4-5

17
GB
Precautions and tips
! This appliance has been designed and manufactured in
compliance with international safety standards.
The following warnings are provided for safety reasons and
must be read carefully.
General safety
• These instructions are only valid for the countries
whose symbols appear in the manual and on the serial
number plate.• The appliance was designed for domestic
use inside the home and is not intended for commercial or
industrial use.
• The appliance must not be installed outdoors, even in
covered areas. It is extremely dangerous to leave the
appliance exposed to rain and storms.
• Do not touch the appliance with bare feet or with wet or
damp hands and feet.
• The appliance must be used by adults only for
the preparation of food, in accordance with the
instructions outlined in this booklet. Any other
use of the appliance (e.g. for heating the room)
constitutes improper use and is dangerous.
The manufacturer may not be held liable for any
damage resulting from improper, incorrect and
unreasonable use of the appliance.
• The instruction booklet accompanies a class 1 (insulated)
or class 2 - subclass 1 (recessed between 2 cupboards)
appliance.
• Keep children away from the oven.
• Make sure that the power supply cables of other electrical
appliances do not come into contact with the hot parts of
the oven.
• The openings used for the ventilation and dispersion of
heat must never be covered.
• Do not close the glass hob cover (selected models only)
when the burners are alight or when they are still hot.
• Always use oven gloves when placing cookware in the
oven or when removing it.
• Do not use flammable liquids (alcohol, petrol, etc...) near
the appliance while it is in use.
• Do not place flammable material in the lower storage
compartment or in the oven itself. If the appliance is
switched on accidentally, it could catch fire.
• Always make sure the knobs are in the • position and that
the gas tap is closed when the appliance is not in use.
• When unplugging the appliance, always pull the plug from
the mains socket; do not pull on the cable.
• Never perform any cleaning or maintenance work without
having disconnected the appliance from the electricity
mains.
• If the appliance breaks down, under no circumstances
should you attempt to repair the appliance yourself.
Repairs carried out by inexperienced persons may cause
injury or further malfunctioning of the appliance. Contact
Assistance.
• Do not rest heavy objects on the open oven door.
• The appliance should not be operated by people
(including children) with reduced physical, sensory
or mental capacities, by inexperienced individuals
or by anyone who is not familiar with the product.
These individuals should, at the very least, be
supervised by someone who assumes responsibility
for their safety or receive preliminary instructions
relating to the operation of the appliance.
• Do not let children play with the appliance.
Disposal
• When disposing of packaging material: observe local
legislation so that the packaging may be reused.
• The European Directive 2002/96/EC relating to Waste
Electrical and Electronic Equipment (WEEE) states that
household appliances should not be disposed of using
the normal solid urban waste cycle. Exhausted appliances
should be collected separately in order to optimise
the cost of re-using and recycling the materials inside
the machine, while preventing potential damage to the
atmosphere and to public health. The crossed-out dustbin
is marked on all products to remind the owner of their
obligations regarding separated waste collection.
Exhausted appliances may be collected by the public
waste collection service, taken to suitable collection areas
in the area or, if permitted by current national legislation,
they may be returned to the dealers as part of an
exchange deal for a new equivalent product.
All major manufacturers of household appliances
participate in the creation and organisation of systems for
the collection and disposal of old and disused appliances.
Respecting and conserving the environment
• You can help to reduce the peak load of the electricity
supply network companies by using the oven in the hours
between late afternoon and the early hours of the morning.
• Check the door seals regularly and wipe them clean to
ensure they are free of debris so that they adhere properly
to the door, thus avoiding
heat dispersion.
If the cooker is placed on a pedestal, take the necessary precautions to prevent the cooker from sliding
off the pedestal itself.
•
18
GB
Care and maintenance
Switching the appliance off
Disconnect your appliance from the electricity supply
before carrying out any work on it.
Cleaning the appliance
! Do not use abrasive or corrosive detergents such as
stain removers, anti-rust products, powder detergents
or sponges with abrasive surfaces: these may scratch
the surface beyond repair.
! Never use steam cleaners or pressure cleaners on
the appliance.
• It is usually sufficient simply to wash the hob using a
damp sponge and dry it with absorbent kitchen roll.
• The stainless steel or enamel-coated external parts
and the rubber seals may be cleaned using a
sponge that has been soaked in lukewarm water
and neutral soap. Use specialised products for the
removal of stubborn stains. After cleaning, rinse well
and dry thoroughly. Do not use abrasive powders or
corrosive substances.
• The hob grids, burner caps, flame spreader rings
and the hob burners can be removed
to make cleaning easier; wash them in hot water and
non-abrasive detergent, making sure all burnt-on
residue is removed before drying them thoroughly.
• For hobs with electronic ignition, the terminal part of
the electronic lighting devices should be cleaned
frequently and the gas outlet holes should be
checked for blockages.
• The inside of the oven should ideally be cleaned
after each use, while it is still lukewarm. Use hot
water and detergent, then rinse well and dry with a
soft cloth. Do not use abrasive products.
•
Clean the glass part of the oven door using a
sponge and a non-abrasive cleaning product, then
dry thoroughly with a soft cloth. Do not use rough
abrasive material or sharp metal scrapers as these
could scratch the surface and cause the glass to
crack.
• The accessories can be washed like everyday
crockery, and are even dishwasher safe.
• Stainless steel can be marked by hard water that
has been left on the surface for a long time, or by
aggressive detergents containing phosphorus.
After cleaning, rinse well and dry thoroughly. Any
remaining drops of water should also be dried.
The cover
If the cooker is fitted with
a glass cover, this cover
should be cleaned using
lukewarm water. Do not
use abrasive products.
It is possible to remove
the cover in order to make
cleaning the area behind
the hob easier. Open
the cover fully and pull it
upwards (see gure).
! Do not close the cover when the burners are alight or
when they are still hot.
Inspecting the oven seals
Check the door seals around the oven periodically. If
the seals are damaged, please contact your nearest
Authorised After-sales Service Centre. We recommend
that the oven is not used until the seals have been
replaced.
Gas tap maintenance
Over time, the taps may become jammed or difficult to
turn. If this occurs, the tap must be replaced.
! This procedure must be performed by a qualified
technician who has been authorised by the
manufacturer.
Replacing the oven
light bulb
1. After disconnecting the
oven from the electricity mains,
remove the glass lid covering
the lamp socket (see gure).
2. Remove the light bulb and
replace it with a similar one: voltage 230 V, wattage 25
W, cap E 14.
3. Replace the lid and reconnect the oven to the
electricity supply.
Assistance
Please have the following information handy:
• The appliance model (Mod.).
• The serial number (S/N).
This information can be found on the data plate located
on the appliance and/or on the packaging.
! Do not use the oven lamp as/for ambient lighting.
RO
19
! Este important să păstraţi acest manual pentru a-l
putea consulta în orice moment. În caz de vânzare,
cedare sau mutare, asiguraţi-vă că acesta rămâne cu
aparatul.
! Citiţi cu atenţie instrucţiunile: veţi găsi informaţii
importante cu privire la instalare, la folosire şi la
siguranţă.
! Instalarea aparatului se va face conform acestor
instrucţiuni, de către persoanele califi cate profesional.
! Orice intervenţie de reglare, întreţinere, etc., trebuie
efectuată cu aragazul deconectat de la reţea.
! Vă recomandăm să curăţaţi cuptorul înainte de
prima folosire, potrivit indicaţiilor cuprinse în capitolul
“Întreţinerea şi îngrijirea”.
Aerisirea încăperilor
Acest aparat poate fi instalat şi poate funcţiona doar
în încăperi aerisite în permanenţă, conform Normelor
Naţionale în vigoare. Încăperea în care va fi montat
aragazul trebuie să
fi e alimentată cu o cantitate de aer
sufi cientă pentru a asigura arderea gazelor (debitul
de aer nu poate fi mai mic de 2 m
3
/h pe kW de putere
instalată).
Prizele de aer, protejate de grătare, trebuie să aibă o
secţiune a conductei de cel puţin 100 cm
2
şi trebuie să
fi e amplasate astfel încât să nu fi e acoperite, nici măcar
parţial (vezi fi gura A).
Acestea trebuie să fi e mărite 100% - minim cu 200
cm
2
– dacă aragazul nu este dotat cu dispozitivul de
siguranţă împotriva scăpărilor de gaz sau dacă aerul
necesar arderii este tras dintr-o încăpere alăturată
(vezi fi gura B), care oricum nu poate fi o parte comună
a imobilului, o încăpere cu pericol de incendiu sau un
dormitor. Prizele de aer trebuie să aibă o conductă de
comunicare cu exteriorul, după descrierea de mai sus.
A B
! După folosirea îndelungată a aparatului, se
recomandă să deschideţi fereastra sau să măriţi viteza
de rotaţie a ventilatoarelor.
Evacuarea gazelor de ardere
Evacuarea gazelor de ardere trebuie să fi e asigurată de
o hotă legată la un coş cu tiraj natural, efi cient, sau de un
ventilator electric care să intre în funcţiune automat, la
fi ecare aprindere a aragazului (vezi fi gurile).
! Gazele de petrol lichefi ate, mai grele ca aerul,
stagnează în partea de jos a încăperii ; de aceea,
încăperea unde este amplasat aragazul - dacă folosiţi
butelii cu GPL – trebuie să aibă fante de aerisire spre
exterior, împotriva eventualelor scăpări de gaz.
Buteliile GPL, atât goale cât şi umplute parţial, nu
trebuie instalate sau depozitate în încăperi sau camere
situate sub nivelul solului (pivniţe, etc.). Păstraţi în
încăperea cu aragazul numai butelia pe care o utilizaţi,
amplasată departe de sursele de căldură (cuptoare,
sobe), care ar putea încălzi butelia la peste 50°C.
Poziţionarea şi punerea la nivel
! Este posibil să instalaţi aparatul între alte piese
de mobilier, dacă înălţimea acestora nu depăşeşte
înălţimea aragazului.
! Asiguraţi-vă că peretele din spatele aragazului este
făcut dintr-un material neinfl amabil, rezistent la căldură
(t 90°C).
Pentru o instalare corectă:
• amplasaţi aparatul în bucătărie, în sala de masă
sau într-o garsonieră fără pereţi despărţitori, dar
niciodată în baie.
• dacă aragazul este mai înalt decât celelalte piese de
mobilier, acestea trebuie să fi e distanţate cu 200 mm
de aparat ;
• dacă aragazul se instalează sub un raft, acesta din
urmă va trebui să fi e montat la o distanţă de minim
420 mm de blatul de lucru.
Dacă rafturile sunt infl amabile, distan
ţa trebuie să fi e
de 700 mm (vezi fi gura);
A
Evacuarea gazelor prin
şemineu sau
coş de fum ramifi cat
(numai pentru aparatele
de coacere)
Instalare
Încăpere
adiacentă
Încăperea de
aerisit
Canale de aerisire pentru
aerul necesar arderii
Major area spaţiului dintre
uşă şi podea
Evacuarea la exterior
20
RO
• perdelele nu trebuie
să fi e montate în spatele
aragazului şi nici la mai
puţin de 200 mm de
fl ancurile acestuia;
• eventualele hote
trebuie să fi e instalate
conform indicaţiilor
conţinute în manualul de
instrucţiuni ale acestora.
Punerea la nivel
Dacă este necesar să puneţi
la nivel aparatul, înşurubaţi
şuruburile de reglare - din
dotare – în locaşurile speciale
de sub aragaz (vezi fi gura).
Picioarele* vor fi introduse în
orifi ciile de sub aragaz.
Conectarea electrică
Montaţi pe cablu un ştecăr normalizat, capabil să suporte
sarcina indicată pe plăcuţa cu caracteristici a aparatului
(vezi tabelul cu Date tehnice).
În cazul efectuării legăturii directe la reţea, este necesar
să se monteze între aparat şi reţea un întrerupător
omnipolar cu deschiderea minimă a contactelor de 3
mm, dimensionat la sarcină, conform normelor NFC
15-100 (fi rul de împământare nu trebuie să fi e întrerupt
de întrerupător). Cablul de alimentare trebuie să fi e
poziţionat astfel încât să nu atingă în nici un punct
o temperatură cu 50°C peste temperatura mediului
ambiant.
Înainte de a efectua legătura, asiguraţivă că:
• priza să fi e cu împământare şi conform prevederilor de
lege;
• priza să poată suporta sarcina maximă de putere a
maşinii, indicată pe plăcu
ţa de caracteristici;
• tensiunea de alimentare să fi e cuprinsă în valorile
indicate pe plăcuţa cu caracteristici;
• priza să fi e compatibilă cu ştecărul aparatului. În
caz contrar înlocuiţi priza sau ştecărul; nu folosiţi
prelungitoare sau prize multiple.
HOOD
420
Min.
min.
650
mm. with hood
min.
700
mm. without hood
mm.
600
Min. mm.
420
Min. mm.
*doar pe anumite modele.
! După instalarea aparatului, cablul de alimentare şi
priza de curent trebuie să fi e uşor accesibile.
! Cablul nu trebuie să fi e îndoit sau comprimat.
! Cablul trebuie să fi e controlat periodic şi înlocuit de
electricieni autorizaţi.
! Firma îşi declină orice responsabilitate în cazul în
care aceste norme nu se respectă.
Racordarea la gaze
Racordarea la gaze sau la butelie poate fi efectuată cu
un furtun fl exibil din cauciuc sau oţel, conform normelor
naţionale în vigoare, numai după ce aţi verifi cat că
aparatul este reglat pentru tipul de gaz pe care îl veţi
folosi (vezi eticheta de pe capac: în caz contrar
vezi mai
jos). În caz de alimentare cu gaz lichefi at, de la butelie,
folosiţi regulatoare de presiune care să fi e conforme
cu normele naţionale în vigoare. Pentru a facilita
racordarea, alimentarea aragazului se poate orienta
lateral*: închideţi racordul pe care se fi xează furtunul cu
capacul respectiv şi înlocuiţi garnitura de etanşare (din
dotarea aparatului).
! Pentru o funcţionare sigură, pentru o folosire adecvată
a energiei şi o durabilitate sporită a aparaturii, asiguraţivă
că presiunea de alimentare respectă valorile indicate în
tabelul cu „Caracteristicile arzătoarelor şi duzelor” (vezi
mai jos).
Racordarea la gaze cu furtun din cauciuc
Verifi caţi ca furtunul să corespundă normelor naţionale
în vigoare. Diametrul intern al tubului de utilizat trebuie
să fi
e de: 8 mm pentru alimentarea cu gaz lichefi at şi 13
mm pentru alimentarea cu gaz metan.
După racordare, asiguraţi-vă că furtunul:
• nu atinge nici o componentă susceptibilă de a depăşi
50°C;
• nu este supus nici unui fel de forţe, de tracţiune şi de
torsiune, şi nu este curbat excesiv sau îngustat;
• nu intră în contact cu obiecte sau colţuri ascuţite,
părţi mobile şi că nu este presat;
• este uşor accesibil, pe tot traseul său, cu scopul de
al putea controla;
• are o lungime sub 1500 mm;
• este bine introdus la capete şi fi xat cu coliere de
strângere, conform normelor naţionale în vigoare.
! Dacă una sau mai multe din aceste condiţii nu sunt
respectate sau dacă aragazul este încastrat între două
u
nct de
nectare
samblu
urtun
Ansamblu
furtun
SUPRAFAŢĂ FIERBINTE
Punct de
conectare
R
obinet
e
blocare
Robinet
de blocare
RO
21
A
V
piese de mobilier – condiţii clasa a 2a, subcategoria 1 –
va trebui să utilizaţi pentru racordare un tub fl exibil din
oţel (vezi mai jos).
Racordarea la gaze cu tub fl exibil din oţel
inoxidabil, pe perete, cu cuplări fi letate
Verifi caţi ca tubul şi garniturile să corespundă normelor
naţionale în vigoare.
Pentru a monta tubul, este necesar să îndepărtaţi mufa
furtunului de pe aragaz (robinetul de alimentare cu gaz este
„tată”, de 1/2, fi letat, cilindric).
! Efectuaţi legătura astfel încât lungimea tubului să nu
depăşească 2 m (la întinderea maximă); asiguraţi-vă că
acesta nu atinge nici o componentă mobilă şi nu este
strivit.
Controlul etanşeităţii
După terminarea instalării, controlaţi perfecta
etanşeitate a tuturor racordurilor folosind o soluţie de
săpun, însă
niciodată o fl acără.
Adaptarea la diferite tipuri de gaz
Aragazul poate fi adaptat şi la alte tipuri de gaz, în afara
celui pentru care a fost predispus (indicat pe eticheta
de pe capac).
Adaptarea blatului de lucru
Înlocuirea duzelor arzătoarelor:
1. înlăturaţi grătarul şi extrageţi arzătoarele din sediul lor;
2. deşurubaţi duzele, folosind o cheie tubulară de 7 mm
(vezi fi gura), şi înlocuiţile cu cele adecvate pentru noul
tip de gaz (vezi tabelul cu “Caracteristicile arzătoarelor
şi duzelor”); .
3. montaţi la loc toate
componentele efectuând
aceleaşi operaţii ca la
demontare, dar în sens invers.
Reglarea arzătoarelor
aragazului la minim:
1. rotiţi buşonul la minim;
2. scoateţi buşonul şi rotiţi şurubul de reglare (din
interiorul sau de lângă tija centrală) până când obţineţi
o fl acără mică, constantă;
! În cazul unui gaz lichefi at, ş
urubul de reglare trebuie
să fi e înşurubat complet.
3. verifi caţi apoi ca, rotind rapid buşonul aragazului, de
la maxim la minim, să nu se stingă ochiul.
! Arzătoarele blatului nu au nevoie de reglarea aerului
primar.
Adaptarea cuptorului
Înlocuirea duzei arzătorului din cuptor:
1. scoateţi sertarul pentru încălzit alimente
2. scoateţi protecţia glisantă “A” (vezi fi gura);
3. extrageţi arzătorul cuptorului
după ce aţi scos şurubul V (vezi
fi gura);
Operaţia va fi facilitată dacă
demontaţi uşa cuptorului.
4. deşurubaţi duza arzătorului
folosind o cheie tubulară pentru
duze (vezi fi gura) sau o cheie
tubulară de 7 mm şi înlocuiţi-o
cu cea adecvată, în funcţie de
tipul de gaz (vezi tabelul cu
Caracteristicile arzătoarelor şi
duzelor).
Reglarea arzătoarelor
cuptorului la minim:
1. aprindeţi arzătorul (vezi
Pornire şi utilizare);
2. rotiţi buşonul la minim (MIN) după ce aţi lăsat arzătorul
să funcţioneze cam 10 minute la maxim (MAX);
3. scoateţi buşonul;
4. rotiţi şurubul de reglare de lângă tija termostatului
(vezi fi gurile) până când obţineţi o fl acără mică,
constantă;
! În cazul unui gaz lichefi at, şurubul de reglare trebuie
să fi e înşurubat complet;
5. verifi caţi dacă, rotind repede buşonul de la MAX
la MIN sau dacă închideţ
i şi deschideţi repede uşa
cuptorului, fl acăra rămâne aprinsă.
22
RO
Vă recomandăm să curăţaţi cuptorul înainte de prima
folosire, potrivit indicaţiilor cuprinse în capitolul “Întreţinerea
şi îngrijirea”.
Tabelul cu caracteristicile arzătoarelor şi duzelor
DATE TEHNICE
Dimensiuni cuptor H
x L x P
34x39x44 cm
Volum
l 58
Dimensiunile utile ale
sertarului de păstrare
a alimentelor la cald
lăţime42 cm
profunzime 44 cm
înălţime 17cm
Tensiunea şi
frecvenţa de
alimentare
a se vedea plăcuţa de caracteristici
Arzătoare
se pot adapta la toate tipurile de gaz
indicate pe plăcuţa cu caracteristici,
lipită pe partea internă a uşii
rabatabile sau, după deschiderea
sertarului de sub cuptor, pe peretele
interior din stânga.
Directive Comunitare: 2006/95/EC
din 12/12/06 (Tensiune Joasă) şi
modificările succesive 2004/108/EC din 15/12/04
(Compatibilitate Electromagnetică)
şi modificările succesive 2009/142/EC din 30/11/09 (Gaze)
şi modificările succesive -93/68/CEE
din 22/07/93 şi modificările
succesive - 2002/96/EC.
1275/2008 (Stand-by/ Off mode)
Tabelul 1 Gaz lichefiat Gaz natural
Diametru
(mm)
Putere termică
kW (p.c.s.*)
By Pass
1/100
duză
1/100
debit*
g/h
duză
1/100
debit*
l/h
Arzător
Nominală Redusă (mm) (mm) *** ** (mm)
Rapid (mare)
(R)
100 3.00 0.7 41 87 218 214 128 286
Semirapid
(mediu) (S)
75 1.90 0.4 30 70 138 136 104 181
Auxiliar (mic)
(A)
51 1.00 0.4 30 52 73 71 76 95
Cuptor - 2.80 1.0 46 80 204 200 119 267
Presiuni de
alimentare
Nominală (mbar)
Minimă (mbar)
Maximă (mbar)
28-30
20
35
37
25
45
20
17
25
* La 15°C 1013 mbar-gaz uscat *** Butan P.C.S. = 49,47 MJ/Kg
** Propan P.C.S. = 50,37 MJ/Kg Gaze naturale P.C.S. = 37,78 MJ/Kg
S
S
R
A
KN3G21S/EU S
Plăcuţa cu caracteristici este pe partea internă a uşii
rabatabile sau, după deschiderea sertarului de sub
cuptor, pe peretele interior din stânga,
sau pe partea din spate a aparatului
Siguranţă furnizat
! Pentru a preveni răsturnarea accidentală
a aparatului,
de exemplu de
către un copil
care se caţără
pe uşa cuptorului, TREBUIE
să fi e montat
lanţul de sigu-
ranţă furnizat!
Aragazul este echipat cu un lanţ de siguranţă care
trebuie să fi e fi xat cu un şurub (care nu este furnizat
cu
aragazul) de peretele din spatele aparatului, la aceeaşi înălţime ca şi lanţul care este ataşat la aparat.
Alegeţi şurubul şi ancora şurubului în funcţie de tipul
de material al peretelui din spatele aparatului. În
cazul în care capul şurubului are un diametru mai
mic de 9mm, trebuie să se utilizeze o şaibă. Peretele de
beton necesită un şurub cu diametrul de cel puţin 8
mm, şi lungimea de cel puţin 60mm.
Asiguraţi-vă că lanţul este fi
xat de peretele din spate
al aragazului şi de perete, aşa cum se arată în
imagine, astfel încât, după instalare, să fi e întins şi
paralel cu nivelul solului.
RO
23
Utilizarea aragazului
Aprinderea arzătoarelor
Fiecare buşon al aragazului are, în dreptul său, schiţa
arzătoarelor; ARZĂTORUL comandat de buşon este
reprezentat cu un cerc evidenţiat.
Pentru a aprinde un arzător al aragazului:
1. apropiaţi de arzător o fl acără sau o brichetă de aragaz;
2. apăsaţi şi, în acelaşi timp, rotiţi buşonul arzătorului
în sens contrar acelor de ceasornic, până în poziţia
maxim E.
3. reglaţi intensitatea fl ăcării, după dorinţă, rotind
în sens contrar acelor de ceasornic buşonul
ARZĂTORULUI: la minim C, la maxim E sau într-o
poziţie intermediară.
Dacă aparatul este dotat cu
un dispozitiv electronic de
aprindere* (C), apăsaţi mai
întâi butonul de aprindere,
indicat cu simbolul
,
apoi apăsaţi şi rotiţi buşonul
ARZĂTORULUI în sens
contrar acelor de ceasornic,
până când reperul ajunge în dreptul poziţiei maxim;
aşteptaţi aprinderea fl ăcării.
Anumite modele sunt dotate cu un dispozitiv de
aprindere integrat în buşon; în acest caz, veţi observa
numai dispozitivul de aprindere electronic* (vezi fi gura)
dar nu şi butonul de aprindere. Este sufi cient să apăsaţi
şi, în acelaşi timp, să rotiţi buşonul ARZĂTORULUI
în sens contrar acelor de ceasornic, până în poziţia
maxim şi să aşteptaţi aprinderea fl ăcării. În momentul în
care lăsaţi buşonul, se poate întâmpla ca fl acăra să se
stingă. În acest caz, repeta
ţi operaţiile, ţinând buşonul
apăsat mai mult timp.
! Dacă fl acăra se stinge accidental, opriţi arzătorul şi
aşteptaţi minim 1 minut înainte să încercaţi din nou.
Dacă aparatul este dotat cu un dispozitiv de
siguranţă*(X) împotriva scăpării d e gaz, ţineţi apăsat
buşonul ARZĂTORULUI timp de 2-3- secunde, pentru a
menţine fl acăra aprinsă şi a activa dispozitivul.
Pentru a stinge arzătorul, rotiţi buşonul până la •.
Sfaturi practice pentru utilizarea
Pornire şi utilizare
arzătoarelor
Pentru a obţine un randament maxim al arzătoarelor,
precum şi a economisi gazul, utilizaţi numai recipiente
cu fundul plat, acoperite cu capac, de dimensiuni
proporţionale cu ale arzătoarelor:
Pentru a identifi ca tipul arzătorului faceţi referire la
desenele din paragraful „Caracteristicile arzătoarelor şi
duzelor”.
Utilizarea cuptorului
! La prima aprindere, vă recomandăm să lăsaţi cuptorul
să funcţioneze în gol timp de aproximativ 1 oră, cu
termostatul la maxim şi uşa închisă. Stingeţi apoi
cuptorul, deschideţi uşa şi aerisiţi camera. Mirosul care
se degajă este datorat evaporării substanţelor utilizate
pentru a proteja cuptorul.
! Înainte de utilizare, este strict necesar să dezlipiţi folia
de plastic de pe laturile aparatului!
! Nu aşezaţi niciodată obiecte pe fundul cuptorului,
pentru că riscaţi să deterioraţi smalţul. Utilizaţi primul
nivel al cuptorului numai când folosiţi rotisorul.
Aprinderea cuptorului
Pentru a aprinde arzătorul cuptorului, apropiaţi de
orifi ciul F (vezi fi gura) o fl acără sau o brichetă şi, în
acelaş
i timp, apăsaţi şi rotiţi în sens antiorar buşonul
CUPTORULUI până la poziţia MAX.
Dacă, după 15 secunde,
arzătorul nu se aprinde,
lăsaţi buşonul, deschideţi uşa
cuptorului şi aşteptaţi cel puţin
1 minut înainte de a încerca din
nou să-l aprindeţi.
! Cuptorul este dotat cu un dispozitiv de siguranţă;
de aceea este necesar să ţineţi apăsat buşonul
CUPTORULUI timp de 6 secunde circa.
F
*
doar pe anumite modele.
X
C
ATENŢIE! Capacul din sticlă se
poate sparge dacă este încălzit.
Stingeţi toate arzătoarele sau
eventualele plite electrice înainte
de a-l închide.*Se referă numai la
modelele cu capac de sticlă
Arzător Diametru
recipienţi (cm)
Rapid (R) 24-26
Semi-rapid
(S)
16-20
Auxiliar (A) 10-14
 Loading...