

Indesit KN3C62AW-S User Manual [en, cs, pl]
KN3C62A/EU S
English
GB UA
English
Украінська
Украінська
Operating Instructions
COOKER AND OVEN
Contents
Operating Instructions,1
W ARNING,2
Description of the appliance-Overall view,6
Description of the appliance-Control Panel,7
Installation,8
Start-up and use, 10
Cooking modes,11
Using the hob,14
Precautions and tips,15
Care and maintenance,16
Assistance,16
Polski
PL
Instrukcja obsіugi
Instrukcja obsіugi
KUCHENKA I PIEKARNIK
KUCHENKA I PIEKARNIK
Spis tresci
Spis tresci
Instrukcja obsіugi,1
UWAGA,2
Opis urz№dzenia-Widok ogуlny,6
Opis urz№dzenia-Panel sterowania,7
Instalacja,17
Uruchomienie i uїytkowanie,19
Uїytkowanie piekarnika,20
Uїytkowanie pіyty grzejnej,23
Zalecenia i њrodki ostroїnoњci,24
Konserwacja i utrzymanie,25
Serwis Techniczny,25
Інструкціі з експлуатаціі
Інструкціі з експлуатаціі
КУХНЯ
КУХНЯ
Зміст
Зміст
Інструкціі з експлуатаціі,1
УВАГА
,2
Опис установки-Загальнии вигляд,6
Опис установки-Панель управління,7
Встановлення,35
Включення і використання,33
Програми приготування іжі,34
Користування робочою поверхнею,36
Запобіжні засоби і поради,37
Догляд i технічне обслуговування,38
Допомога,38
Slovensko
Slovensko
SL
Navodila za uporabo
Navodila za uporabo
KUHINJA IN PECICA
KUHINJA IN PECICA
Povzetek
Povzetek
Navodila za uporabo,1
UPOZORNĚN
Opis naprave- Celoten pogled,6
Opis naprave- Upravljalna plošca,7
Namestitev,39
Zagon in uporaba, 41
Uporaba pecice,42
Uporaba kuhalne plošče,45
Previdnostni ukrepi in nasveti,46
Vzdrževanje in nega,47
Pomoc,47
,2
HU
Használati útmutató
Használati útmutató
tűzhely és a sütő
tűzhely és a sütő
Tartalomjegyzék
Tartalomjegyzék
Használati útmutató,1
FIGYELEM
A készülék leírása- A készülék áttekintése,6
A készülék leírása- Kezelőpanel,7
Üzembe helyezés,26
Bekapcsolás és használat,28
A főzőlap használata,29
A sütő használata,32
Óvintézkedések és tanácsok,33
Karbantartás és ápolás,34
Szerviz,34
Magyar
,2
CZ
Pokyny pro použití
Pokyny pro použití
Pokyny pro použití
SPORÁK S TROUBOU
SPORÁK S TROUBOU
SPORÁK S TROUBOU
Obsah
Obsah
Obsah
Pokyny pro použití,1
UPOZORNĚNÍ
Popis zarízení-Celkový pohled,6
Popis zarízení-Ovládací panel,7
Instalace,49
Spuštení a použití, 50
Použití varné desky,54
Použití trouby,54
Opatrení a rady,59
Údržba a péce,60
Servisní služba,60
Cesky
,2

GB
WARNINGWARNING
WARNING: The appliance and its
accessible parts become hot during
use.
Care should be taken to avoid
touching heating elements.
Children less than 8 years of age shall
be kept away unless continuously
supervised.
This appliance can be used by
children aged from 8 years and
above and persons with reduced
physical, sensory or mental
capabilities or lack of experience
and knowledge if they have been
given supervision or instruction
concerning use of the appliance in a
safe way and understand the hazards
involved. Children shall not play with
the appliance. Cleaning and user
maintenance shall not be made by
children without supervision.
WARNING: Unattended cooking on a
hob with fat or oil can be dangerous
and may result in fire.
NEVER try to extinguish a fire with
water, but switch off the appliance
and then cover flame e.g. with a lid or
a fire blanket.
Do not use harsh abrasive cleaners
or sharp metal scrapers to clean
the oven door glass since they can
scratch the surface, which may result
in shattering of the glass.
The internal surfaces of the
compartment (where present) may
become hot.
Never use steam cleaners or pressure
cleaners on the appliance.
Remove any liquid from
the lid before opening it.
Do not close the glass cover (if present)
when the gas burners or electric
hotplates are still hot.
WARNING: Ensure that the appliance is
switched off before replacing the lamp
to avoid the possibility of electric shock.
WARNING: Danger of fire: do not store
items on the cooking surfaces.
WARNING: If the surface in glassceramic is cracked, switch off the
appliance to avoid the possibility of
electric shock.
PL
UWAGAUWAGA
UWAGA: To urządzenie oraz jego dostępne
części silnie się rozgrzewają podczas użytkowania.
Należy uważać, aby nie dotknąć elementów
grzejnych.
Nie pozwalać, aby dzieci poniżej 8 roku
życia zbliżały się do urządzenia, jeśli nie są
pod stałym nadzorem dorosłych.
Z niniejszego urządzenia mogą korzystać
dzieci powyżej 8 roku życia i osoby o ograniczonych zdolnościach zycznych, zmysłowych bądź umysłowych, jak również
osoby nieposiadające doświadczenia lub
znajomości urządzenia, jeśli znajdują się
one pod nadzorem innych osób lub jeśli
zostały pouczone na temat bezpiecznego
sposobu użycia urządzenia oraz zdają sobie
sprawę ze związanych z nim zagrożeń.
Dzieci nie powinny bawić się urządzeniem.
Prace związane z czyszczeniem i konserwacją nie mogą być wykonywane przez dzieci,
jeśli nie są one nadzorowane.
UWAGA: Pozostawienie bez nadzoru na
kuchence tłuszczów i olejów może być niebezpieczne i może spowodować pożar.
2

Nie należy NIGDY próbować ugasić płomieni/pożaru wodą; należy wyłączyć urządzenie i przykryć płomień np. pokrywką
lub ognioodpornym kocem.
Nie stosować środków ściernych ani
ostrych łopatek metalowych do czyszczenia
szklanych drzwiczek piekarnika, ponieważ
mogłyby porysować powierzchnię i spowodować pęknięcie szyby.
Wewnętrzne powierzchnie szu ady (jeśli
jest w danym modelu) mogą się nagrzewać.
Ezt a készüléket a 8 éves kort betöltött
gyermekek, valamint a testileg, érzékszervileg vagy szellemileg korlátozott, nem
hozzáértő, illetve a terméket nem ismerő
személyek csak megfelelő felügyelet mellett, vagy a készülék biztonságos használatával kapcsolatos alapvető utasítások és a
kapcsolódó veszélyek ismeretében használhatják. Vigyázzon, hogy a gyermekek
ne játsszanak a készülékkel. A tisztítási
és karbantartási műveleteket gyermekek
felügyelet nélkül nem végezhetik.
Nie stosować nigdy oczyszczaczy parowych
lub ciśnieniowych do czyszczenia urządzenia.
Usunąć ewentualne płyny na pokrywie
przed jej otwarciem. Nie zamykać szklanej
pokrywy (jeśli jest częścią wyposażenia),
jeśli palniki gazowe lub płyta elektryczna są
jeszcze rozgrzane.
UWAGA: Przed wymianą żarówki, należy
się upewnić, że urządzenie jest wyłączone,
aby uniknąć ryzyka porażenia prądem.
UWAGA: Ryzyko pozaru: nie pozostawia
przedmiotów na powierzchniach grzejnych.
UWAGA: Jezeli powierzchnia ze szka
ceramicznego jest peknieta
wylaczyc urzadzenie, aby uniknac
niebezpieczenstwa porazenia
pradem elektrycznym.
HU
FIGYELEMFIGYELEM
FIGYELEM: A tűzhelyen felügyelet nélkül
otthagyott zsír vagy olaj veszélyes lehet, és
tüzet okozhat.
SOHA ne próbálja meg vízzel eloltani
a tüzet, hanem zárja el a készüléket, és
takarja le a lángot például fedővel vagy
tűzálló takaróval.
Az üveg sütőajtó tisztításához ne használjon súrolószereket vagy vágóéllel rendelkező fémspatulát, mivel azok összekaristolhatják az ajtó felületét, ami pedig az
üveg összetöréséhez vezethet.
A ók (ha van) belső felületei felmelegedhetnek.
A készülék tisztításához soha ne használjon gőztisztítót vagy nagynyomású tisztítót.
A készülék tetejének kinyitása előtt minden nedvességet töröljön le róla. Ne csu-
kja le az üvegtetőt (ha van), ha a gázégők vagy
elektromos főzőlapok még melegek.
FIGYELEM: A készülék és annak hozzáférhető részei a használat közben rendkívüli módon felmelegedhetnek.
Vigyázzon, hogy nehogy hozzáérjen a
fűtőelemekhez.
Ha a gyermekek nincsenek folyamatos
felügyelet alatt, tartsa távol a 8 éven aluli
gyermekeket.
FIGYELEM: Az esetleges áramütések elkerülése érdekében a lámpa kicserélése előtt
győződjön meg arról, hogy a készülék ki van
kapcsolva.
FIGYELEM: Tűzveszély: Ne hagyjon tárgyakat a főzőfelületen.
FIGYELEM: Amennyiben az üvegkerámia
felülete megkarcolódna, az esetleges áramütés elkerülése érdekében kapcsolja ki a
készüléket.
3

UA
УВАГА! Під час роботи цей прилад, а також
його доступні частини нагріваються до
високих температур.
Слід бути особливо обережними, щоб не
торкатися нагрівальних елементів.
Діти віком до 8 років мають знаходитися
на небезпечній відстані від приладу,
якщо неможливо забезпечити постійний
контроль над ними.
Дозволяється користування цим приладом
дітьми віком від 8 років, а також особами
з обмеженими фізичними, сенсорними
або розумовими можливостями або
особами без належного досвіду і знань,
якщо вони перебувають під постійним
контролем або проінструктовані щодо
правил з небезпечного користування
приладу і усвідомлюють ступені ризику.
Не дозволяйте дітям гратися з приладом.
Операції з очищення і догляду не повинні
виконуватися дітьми без належного
контролю.
УВАГАУВАГА
закривайте скляну кришку (якщо вона
наявна), якщо газові пальники або
електричні конфорки залишаються
нагрітими.
УВАГА! Щоб запобігти враженню
електричним струмом переконайтеся в
тому, що прилад вимкнений, перш ніж
заміняти лампочку.
Витріть насухо всі наявні на кришці
рідини, перш ніж відкрити її. Не
закривайте скляну кришку (якщо вона
наявна), якщо газові пальники або
електричні конфорки залишаються
нагрітими.
УВАГА! Щоб запобігти враженню
електричним струмом переконайтеся в
тому, що прилад вимкнений, перш ніж
заміняти лампочку.
УВАГА! Небезпека пожежі: не залишайте
речі на варильних поверхнях.
УВАГА! Якщо в поверхні з’явилася
тріщина, вимкніть пристрій, щоб уникнути
можливого ураження електричним
струмом.
УВАГА! Небезпечно залишати без нагляду
плити з жиром або олією, тому що це може
призвести до пожежі.
НІ В ЯКОМУ РАЗІ не слід намагатися
погасити полум’я/пожежу водою.
Необхідно вимкнути прилад і накрити
полум’я, наприклад, кришкою або
вогнетривким покривалом.
Не використовувати абразивні засоби ані
металеві загострені шпателі для очищення
скляних дверцях духовки, тому що вони
можуть пошкрябати поверхню, призводячи
до розтріскування скла.
Внутрішні поверхні відділення (де вони
наявні) можуть нагріватися до високих
температур.
Забороняється використання апаратів для
очищення парою або високим тиском.
Витріть насухо всі наявні на кришці
рідини, перш ніж відкрити її. Не
4
SL
UPOZORNĚNUPOZORNĚN
UPOZORNENIE: Toto zariadenie a jeho
prístupné časti dosahujú počas použitia
veľmi vysokú teplotu.
Je potrebné venovať pozornosť a zabrániť
styku svýhrevnými článkami.
Udržujte deti mladšie ako 8 rokov vdostatočnej vzdialenosti, ak nie sú pod neustálym
dohľadom.
Toto zariadenie môže byť použité deťmi staršími ako 8 rokov a osobami so zníženými
fyzickými, senzorickými nebo duševnými
schopnosťami nebo osobami bez skúseností
a znalostí, ktoré sa nachádzajú pod náležitým dohľadom, alebo ktoré boli poučené
ohľadne použitia zariadení bezpečným
spôsobom a ktoré si uvedomujú súvisiace
nebezpečenstvo. Deti sa nesmú hrať so zariadením. Operácie čistenia a údržby nesmú
byť vykonávané deťmi bez dohľadu.

UPOZORNENIE: Ponechanie šporáku
sohrievanými tukmi a olejmi môže byť nebezpečné a môže spôsobiť požiar.
NIKDY nie je potrebné hasiť plameň/požiar
vodou, ale je potrebné vypnúť zariadenie a
zakryť plameň napríklad vekom alebo hydrofóbnou dekou.
Nepoužívajte abrazívne výrobky ani ostré
kovové špachtle načistenie sklenených dvierok rúry, pretože by mohli poškrabať povrch
a spôsobiť tak prasknutie skla.
Vnútorné povrchy zásuvky (ak je súčasťou)
by sa mohli ohriať na vysokú teplotu.
Nikdy nepoužívajte na čistenie zariadenia
parné čistiace zariadenia alebo zariadenia
svysokým tlakom.
Toto zařízení mohou používat děti od 8 let
a osoby se sníženými fyzickými, senzorickými nebo duševními schopnostmi nebo
osoby bez zkušeností a znalostí, které se
nacházejí pod náležitým dohledem nebo
které byly poučeny ohledně použití zařízení
bezpečným způsobem a které si uvědomují
související nebezpečí. Děti si nesmí hrát
se zařízením. Děti nesmí provádět operace
čištění a údržby bez dohledu.
UPOZORNĚNÍ: Ponechání sporáku
sohřívanými tuky a oleji může být nebezpečné a může způsobit požár.
NIKDY není třeba hasit plamen/požár vodou, ale je nutné vypnout zařízení a zakrýt
plamen například víkem nebo hydrofobní
dekou.
Pred otvorením krytu zotrite prípadné
tekutiny, ktoré sa na ňom nachádzajú. Nezavárajte sklenený kryt (ak je súčasťou), ak sú
plynové horáky alebo elektrická platňa ešte
teplé.
UPOZORNENIE: Pred výmenou žiarovky sa uistite, že zariadenie je vypnuté, aby
sa zabránilo možnosti zásahu elektrickým
prúdom.
UPOZORNENIE: Riziko požiaru: Nenechávajte predmety na varných povrchoch.
UPOZORNENIE: Ak je sklokeramický
povrch prasknutý, vypnite zariadenie, aby
ste predišli prípadnému úrazu elektrickým
prúdom.
CZ
UPOZORNĚNÍUPOZORNĚNÍ
K čištění skleněných dvířek trouby nepoužívejte abrazivní výrobky ani ostré kovové
špachtle, protože by mohly poškrábat povrch a způsobit tak prasknutí skla.
Vnitřní povrchy zásuvky (je-li součástí) by
se mohly ohřát na vysokou teplotu.
Nikdy nepoužívejte kčištění zařízení vysokotlaký parní čistič.
Před otevřením krytu setřete případné
kapaliny, které se na něm nacházejí. Nezavírejte skleněný kryt (je-li součástí) sještě
teplými plynovými hořáky nebo elektrickou
plotnou.
UPOZORNĚNÍ: Před výměnou žárovky se
ujistěte, že je zařízení vypnuté, aby se zabránilo možnosti zásahu elektrickým proudem.
UPOZORNĚNÍ: Toto zařízení a jeho
přístupné části dosahují během použití velmi vysoké teploty.
Je třeba dávat pozor a zabránit styku stopnými články.
Udržujte děti mladší 8 let vdostatečné
vzdálenosti, pokud nejsou pod neustálým
dohledem.
UPOZORNĚNÍ: Riziko požáru: Nenechávejte předměty na varných površích.
UPOZORNĚNÍ: Je-li povrch sklokeramické
varné desky prasklý, vypněte zařízení, abyste
zabránili zásahu elektrickým proudem.
5
1
2
3
4
5
Description of the appliance
GB
Overall view
6
7
8
9
10
11
5
UA
1.Kерамічна конфорка
2.Панель управління
3.Полка РЕШІТKИ
4.Полка ДEКО
5.Лапка для налаштування
6.HAПPABЛЯЮЧІ для полиць
7.положення 5
8.положення 4
9.положення 3
10.положення 2
11.положення 1
Опис плити
Загальнии вигляд
1.Glass ceramic hob
2.Control panel
3..Sliding grill rack
4.DRIPPING pan
5.Adjustable foot
6.GUIDE RAILS for the sliding racks
7.position 5
8.position 4
9.position 3
10.position 2
11.position 1
Opis urządzenia
PL
Widok ogólny
1.Ceramiczna płyta grzejna
2.Panel kontrolny
3.Półka ruszt
4.Półka brytfanna
5.Nóżki regulowane
6.Prowadnice półek
7.pozycja 5
8.pozycja 4
9.pozycja 3
10.pozycja 2
11.pozycja 1
HU
1 A kerámia fõzõlap
2 Kapcsoló tábla
3 Sütõ rács
4 Serpenyõ vagy sütõtepsi
5 Állítható lábacska vagy láb
6TÁLCASíNEK
7 helyzet 5
8 helyzet 4
9 helyzet 3
10 helyzet 2
11 helyzet 1
A készülék leírása
A készülék áttekintése
SL
1 Steklokeramična kuhalna plošča
2 Upravljalna plošča
3 Odlagalna rešetka
4 Odlagalna ponev
5 Regulacijska nožica
6 Drsna VODILA
7 Položaj 5
8 Položaj 4
9 Položaj 3
10 Položaj 2
11 Položaj 1
Celoten pogled
Popis zarízení
CZ
Celkový pohled
1.Sklokeramická varná deska
2 Ovládací panel
3 Pečící rošt
4 Pečící plech nebo plech zachycující odkapávající
5 Nastavitelné nohy omastek
6 Vodicí LIŠTY jednotlivých úrovní
7 poloha 5
8 poloha 4
9 poloha 3
10 poloha 2
11 poloha 1
Opis naprave
6
1
3
GB
6
4
GB
1.TIMER knob
2.THERMOSTAT knob
3.THERMOSTAT indicator light
4.SELECTOR knob
5.Electric HOTPLATE control knob
6.ELECTRIC HOTPLATE indicator light
Description of the appliance
Control panel
2
Opis urządzenia
PL
1.Pokrętło MINUTNIKA
2.Pokrętło TERMOSTATU
3.Lampka kontrolna TERMOSTATU
4.Pokrętło PROGRAMÓW PIEKARNIKA
5.Pokrętła ELEKTRYCZNYCH PÓL GRZEJNYCH
6.Lapmka kontrolna ELEKTRYCZNYCH PÓL GRZEJNYCH
Panel kontrolny
5
UA
1.Сукоятка ТАЙМЕРА
2.Peґyлятор TEPMOCTATУ
3. Індикатор TEPMOCTATУ
4.Peґyлятор РСПГСБМ
5.Peґyлятоpи ЕЛЕKTPИЧHИX КОHФOPOК
6. Індикатор РСБЦЮЮЧOЇ КОHФOPКИ
1.Gumb TIMER
2.Gumb TERMOSTAT
3.Lučka TERMOSTAT
4.Gumb PROGRAMI
5.Gumbi PLOŠČE
6.Lučka PLOŠČE
Опис плити
Панель управління
Opis naprave
SL
Upravljalna plošca
HU
1.Időmérő gomb
2.Hőmérséklet szabályzó gomb-Termosztát
3.Hőmérséklet ellenőrző lámpa
4.Választó gomb
5.Az elektromos főzőlap vezérlő gombja
6.Elektromos főzőmező ellenőrző lámpa
A készülék leírása
Kezelőpanel
Popis zarízení
CZ
Ovládací panel
1.Knofl ík časovače
2.Knofl ík nastavení teploty v troubě (termostat)
3.Indikátor termostatu
4.Knofl ík pro výběr režimu
5.Knofl íky fungovánía ELEKTRICKÝCH desek
6.Indikátor ELEKTRICKÝCH desek
7
Installation
HOOD
420
Min.
min.
650
mm. with hood
min.
700
mm. without hood
mm.
600
Min. mm.
420
Min. mm.
V
1
2
3
N
A
B
1 2
3
4
5
12345
1
2
3
4
5
R
S
T
N
R
S
N
R
N
400V 3N~
H05RR-F 5x2.5 CEI-UNEL 35363
H05VV-F 5x2.5 CEI-UNEL 35746
400V 2N~
H05RR-F 4x4 CEI-UNEL 35363
H05VV-F 4x4 CEI-UNEL 35746
230V 1N~
H05RR-F 3x4 CEI-UNEL 35363
H05VV-F 3x4 CEI-UNEL 35746
GB
! Before operating your new appliance please read
this instruction booklet carefully. It contains important
information concerning the safe installation and
operation of the appliance.
! Please keep these operating instructions for future
reference. Make sure that the instructions are kept with
the appliance if it is sold, given away or moved.
! The appliance must be installed by a qualified
professional according to the instructions provided.
! Any necessary adjustment or maintenance must be
performed after the cooker has been disconnected
from the electricity supply.
Positioning and levelling
! It is possible to install the appliance alongside
cupboards whose height does not exceed that of the
hob surface.
! Make sure that the wall in contact with the beck of
the appliance is made from a non-flammable, heatresistant material (T 90°C).
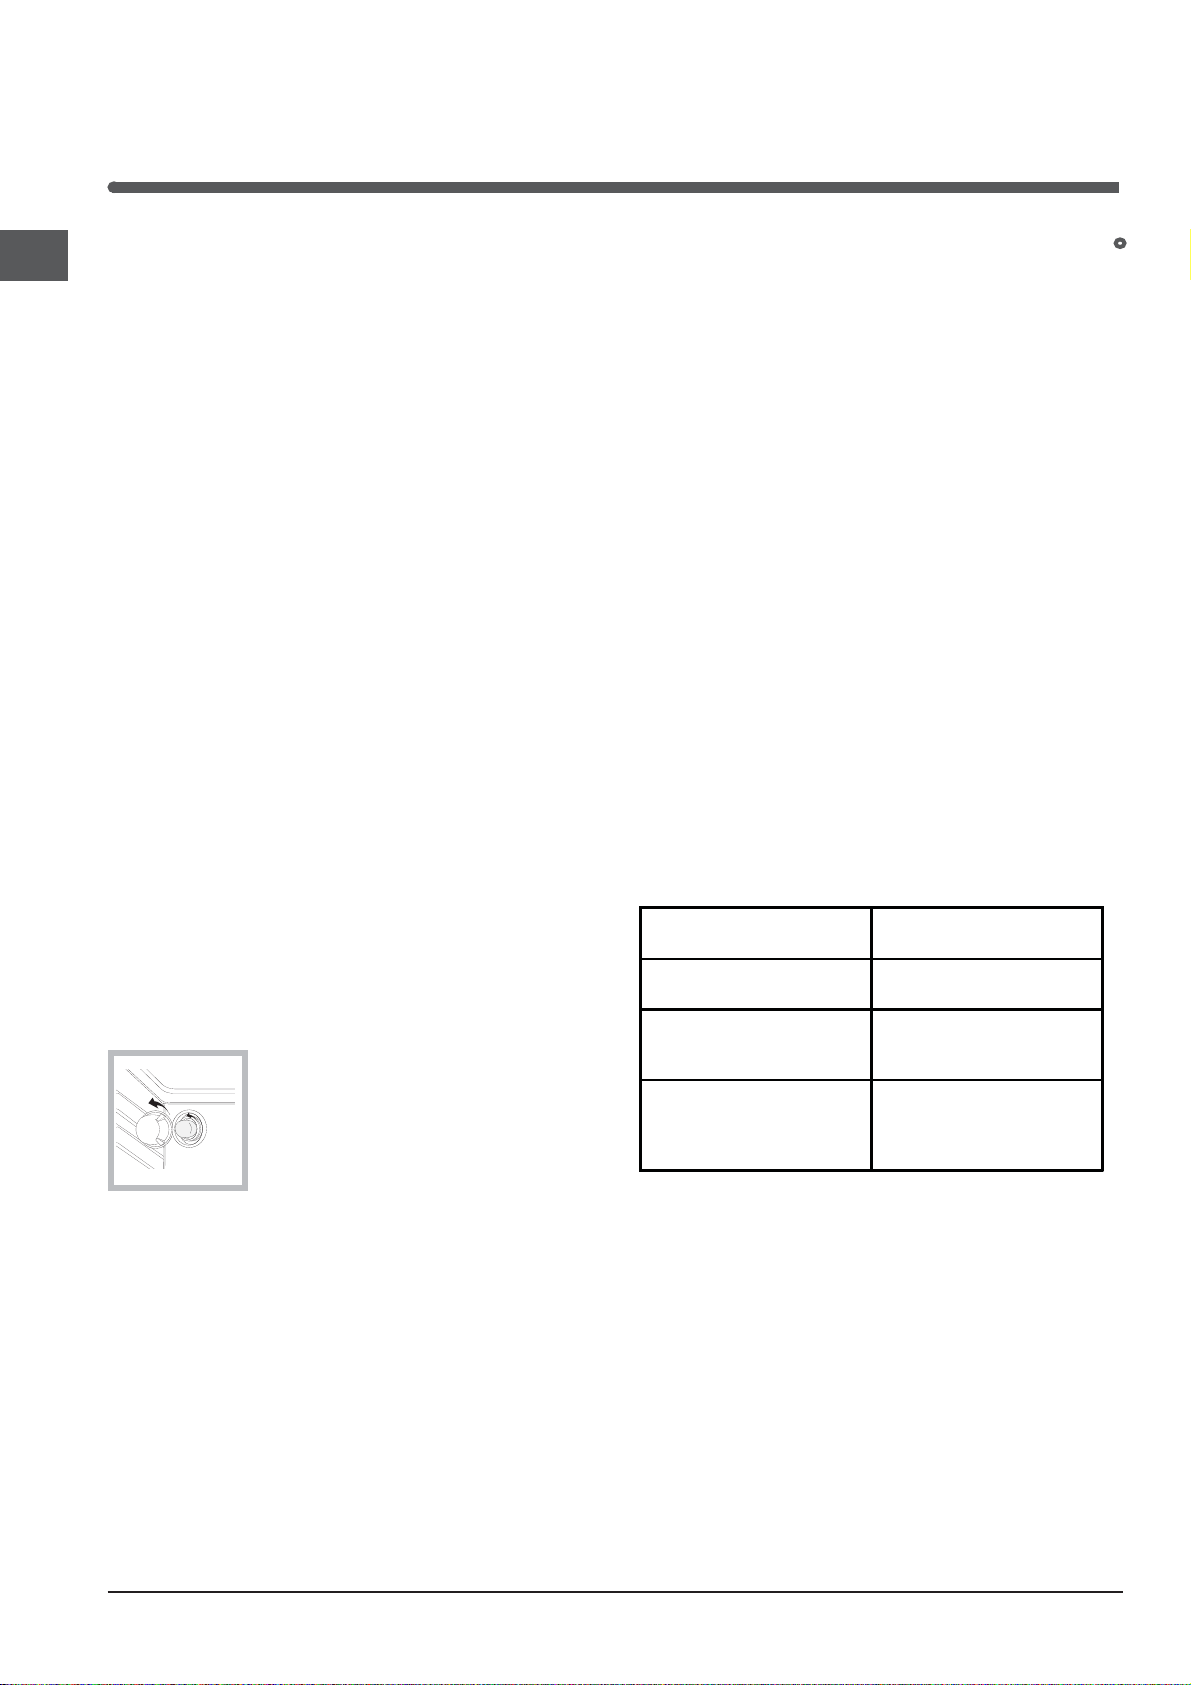
Levelling
If it is necessary to level the
appliance, screw the adjustable
feet into the places provided on
each corner of the base of the
cooker (see gure).
The legs* fit into the slots on the
underside of the base of the
cooker.
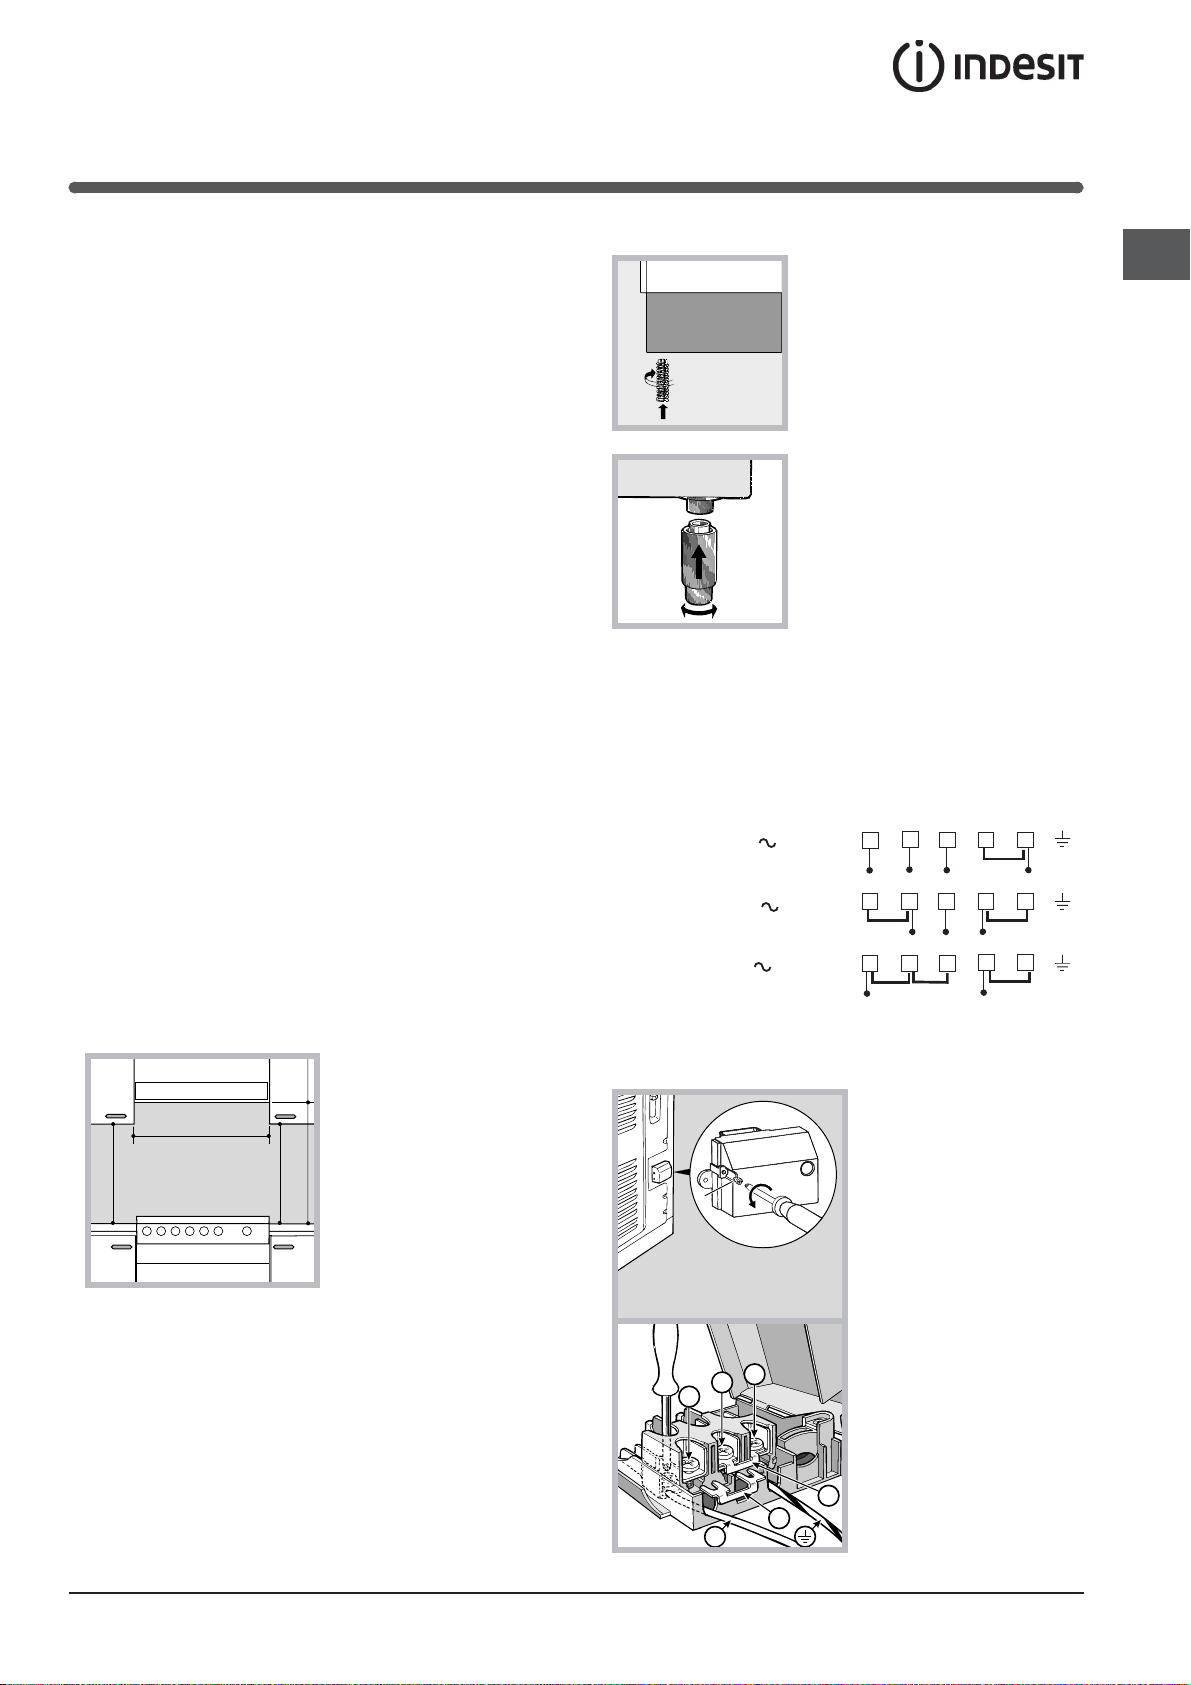
Electrical connection
Fitting the power supply cable
The cable should be suited to the type of electrical
connection used, according to the following connection
diagram:
To install the appliance correctly:
• Place it in the kitchen, dining room or the bed-sit (not
in the bathroom).
• If the top of the hob is higher than the cupboards,
the appliance must be installed at least 200 mm away
from them.
• Do not position blinds behind the cooker or less than
200 mm away from its sides.
• Any hoods must be installed according to the
instructions listed in the relevant operating manual.
Only available in certain models.
*
8
• If the cooker is
installed underneath a
wall cabinet, there must
be a minimum distance
of 420 mm between this
cabinet and the top of
the hob.
This distance should be
increased to 700 mm
if the wall cabinets are
flammable (see gure).
To install the power supply cable correctly:
1. Loosen the screw V in the terminal board and pull
the cover to open it (see
gure).
2. Position the
connection supports A
(see gure) according
to the connection
diagram shown above.
The terminal board is
designed for singlephase 230 V connection:
terminals 1, 2 and 3
are connected to each
other; jumper 4-5 is
located in the lower area
of the terminal board.
3. Position the wires N
and
as shown in
the diagram (see gure)
and proceed with the
connection process,
tightening the terminal screws as far as possible.
4. Position the remaining wires on terminals 1-2-3 and
tighten the screws.
5. Fix the power supply cable in place by fastening the
cable clamp screw.
6. Close the terminal board cover by tightening the
screws V.
Connecting the supply cable to the mains
Install a standardised plug corresponding to the load
indicated on the appliance data plate (see Technical
data table).
The appliance must be directly connected to the mains
using an omnipolar circuit-breaker with a minimum contact
opening of 3 mm installed between the appliance and the
mains. The circuit-breaker must be suitable for the charge
indicated and must comply with NFC 15-100 regulations
(the earthing wire must not be interrupted by the circuitbreaker). The supply cable must be positioned so that it
does not come into contact with temperatures higher than
50°C at any point.
Before connecting the appliance to the power supply,
make sure that:
• The appliance is earthed and the plug is compliant with
the law.
• The socket can withstand the maximum power of the
appliance, which is indicated by the data plate.
• The voltage is in the range between the values
indicated on the data plate.
• The socket is compatible with the plug of the
appliance. If the socket is incompatible with the
plug, ask an authorised technician to replace it. Do
not use extension cords or multiple sockets.
! Once the appliance has been installed, the power
supply cable and the electrical socket must be easily
accessible.
TABLE OF CHARACTERISTSICS
Dimensions
Volume
Useful
measurements
relating to the oven
compartment
Voltage and
frequency
Ceramic hob
Front Left
Back Left
Back Right
Front Right
Max. ceramic hob
consumption
ENERGY LABEL
This appliance conforms to the following
width 44 cm
height 34 cm
depth 38 cm
56 l
width 42 cm
height 23 cm
depth 44 cm
see data plate
1200 W
1700 W
1200 W
1700 W
5800 W
Directive 2002/40/EC on the label of
electric ovens.
Standard EN 50304
Energy consumption for Natural
convection – heating mode:
Convection mode;
Declared energy consumption for
Forced convection Class – heating
mode: Baking mode.
European Economic Community
directives: 2006/95/EC dated 12/12/06
(Low Voltage) and subsequent
amendments - 04/108/EEC dated
15/12/04 (Electromagnetic
Compatibility) and subsequent
amendments - 93/68/EEC dated
22/07/93 and subsequent amendments.
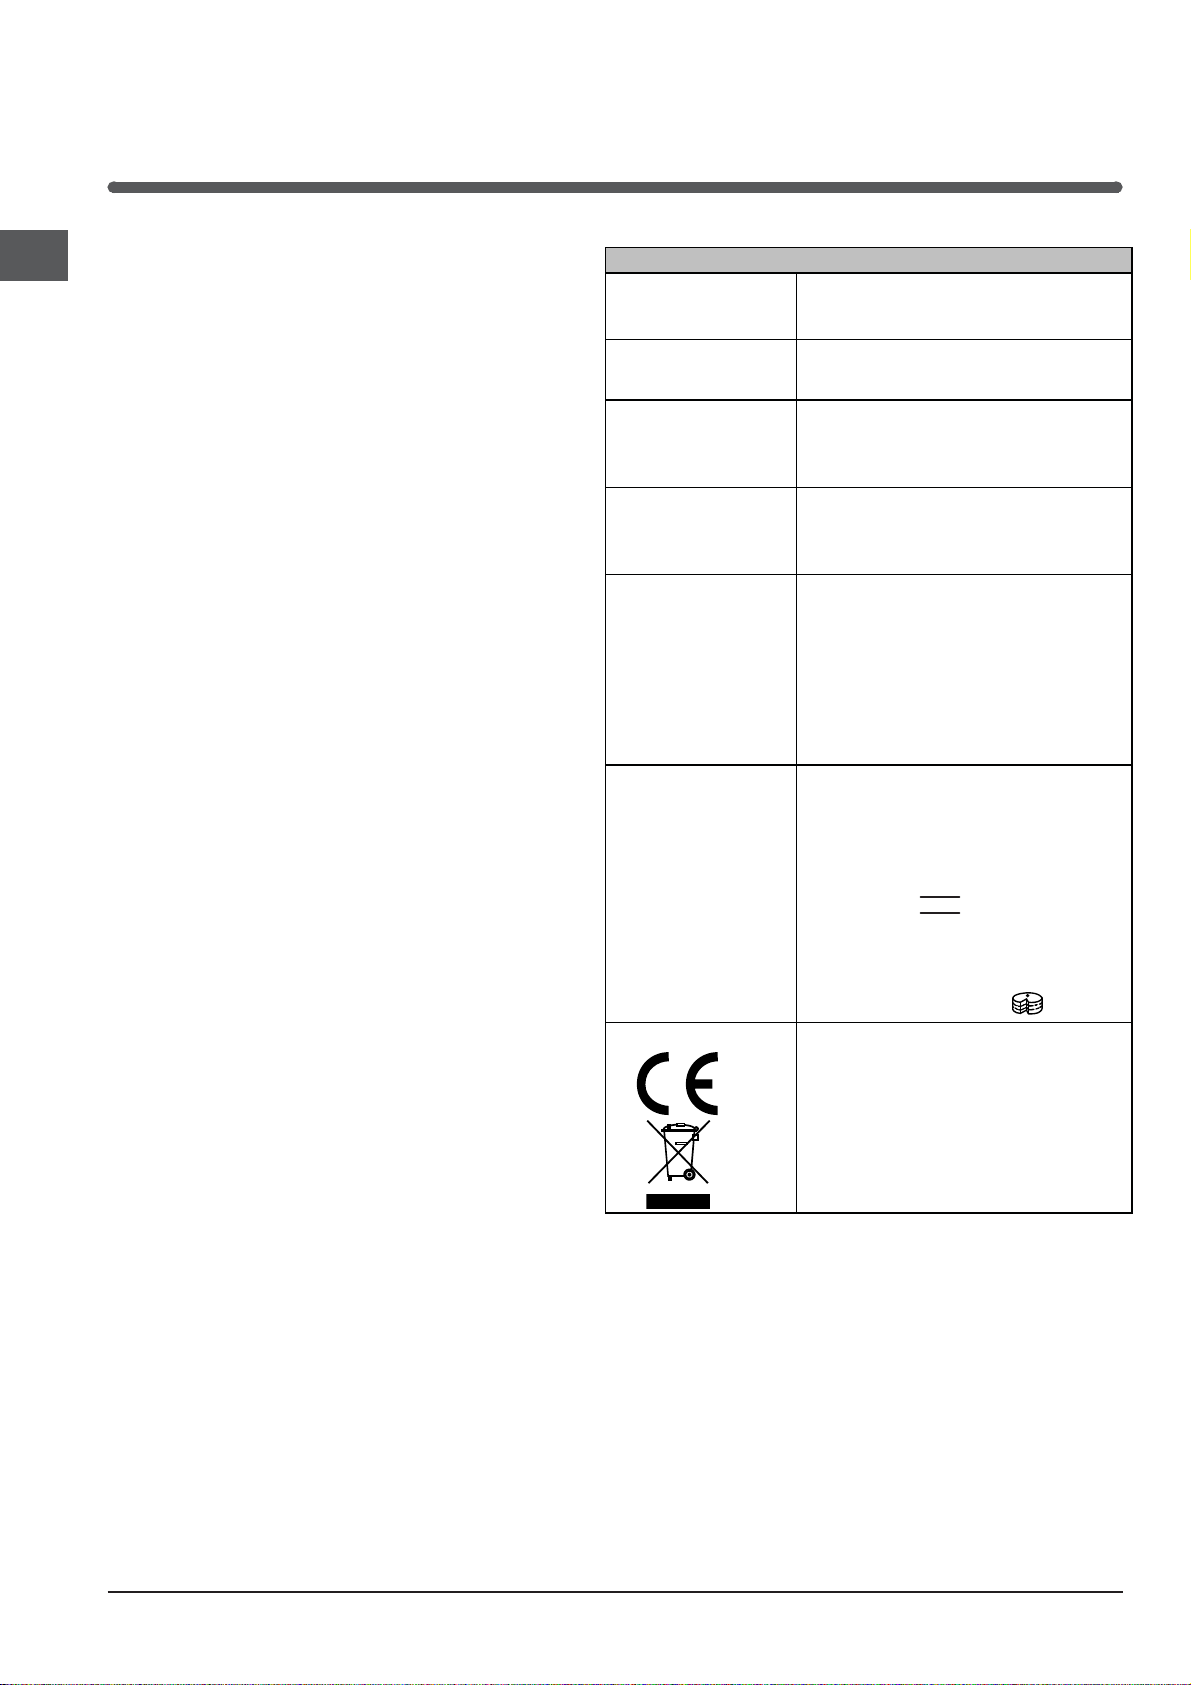
2002/96/EEC
Data plate, is located inside the flap or, after the oven
compartment has been opened, on the left-hand wall
inside the oven.
GB
! The cable must not be bent or compressed.
! The cable must be checked regularly and replaced
by authorised technicians only.
! The manufacturer declines any liability should
these safety measures not be observed.
*
Only available in certain models.
9
Start-up and use
GB
Using the oven
! The first time you use your appliance, heat the empty
oven with its door closed at its maximum temperature
for at least half an hour. Ensure that the room is well
ventilated before switching the oven off and opening
the oven door. The appliance may emit a slightly
unpleasant odour caused by protective substances
used during the manufacturing process burning away.
! Before operating the product, remove all plastic film
from the sides of the appliance.
! Never put objects directly on the bottom of the oven;
this will avoid the enamel coating being damaged.
1. Select the desired cooking mode by turning the
SELECTOR knob.
2. Select the recommended temperature for the
cooking mode or the desired temperature by turning
the THERMOSTAT knob.
A list detailing cooking modes and suggested cooking
temperatures can be found in the relevant table (see
Oven cooking advice table).
Using the cooking timer
1. To set the buzzer, turn the COOKING TIMER knob
clockwise almost one complete revolution.
2. Turn the knob anticlockwise to set the desired time:
align the minutes shown on the COOKING TIMER knob
with the indicator on the control panel.
3. When the selected time has elapsed, a buzzer
sounds and the oven turns off.
4. When the oven is off the cooking timer can be used
as a normal timer.
! To use the oven manually, in other words when you
do not wish to use the end of cooking timer, turn the
COOKING TIMER knob until it reaches the symbol.
During cooking it is always possible to:
• Change the cooking mode by turning the
SELECTOR knob.
• Change the temperature by turning the
THERMOSTAT knob.
• Stop cooking by turning the SELECTOR knob to the
“0” position.
! Always place cookware on the rack(s) provided.
THERMOSTAT indicator light
When this is illuminated, the oven is generating heat.
It switches off when the inside of the oven reaches
the selected temperature. At this point the light
illuminates and switches off alternately, indicating
that the thermostat is working and is maintaining the
temperature at a constant level.
Oven light
This is switched on by turning the SELECTOR knob to
any position other than “0”. It remains lit as long as the
with the knob, the
oven is operating. By selecting
light is switched on without any of the heating elements
being activated.
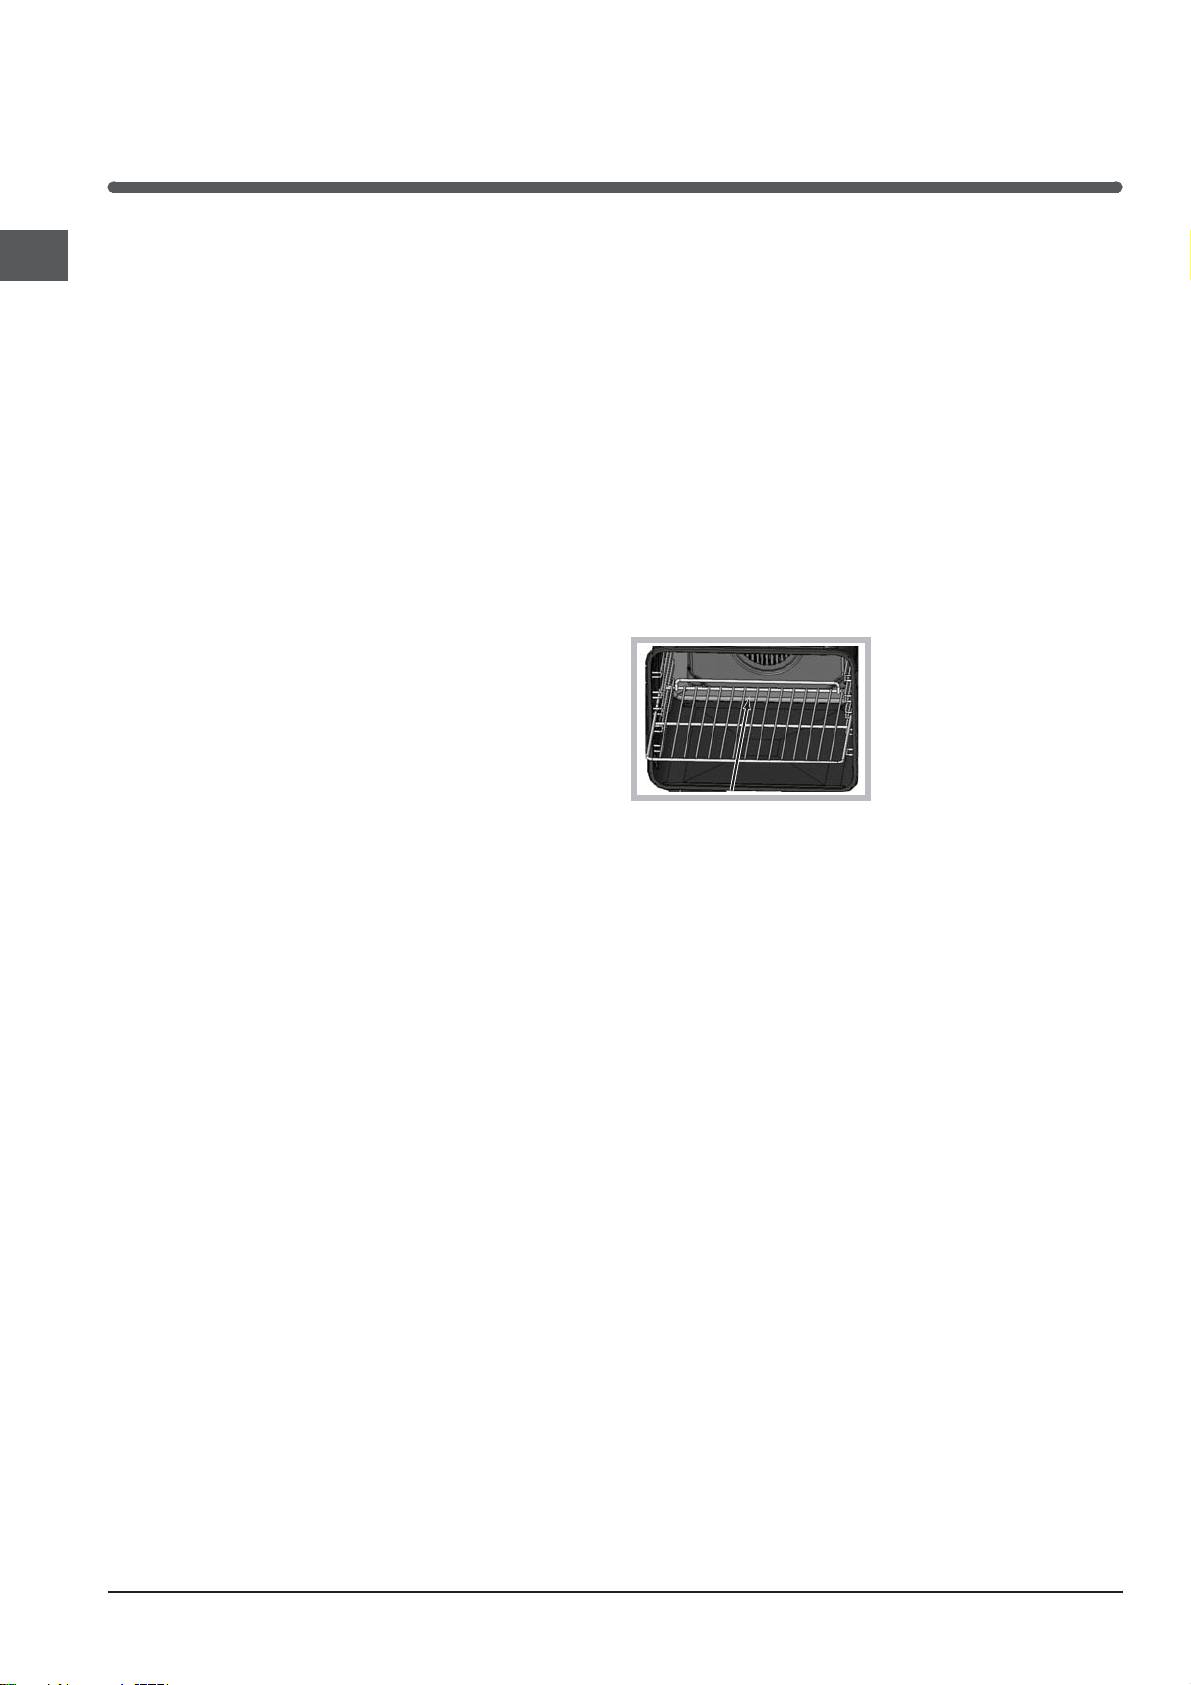
! When inserting the shelf make sure the backstop is at
the rear of the cavity (see image).
10
Cooking modes
BAKING mode
Temperature: any temperature between 50°C and Max.
The rear heating element and the fan come on,
guaranteeing delicate heat distributed uniformly
throughout the oven.
This mode is ideal for baking and cooking delicate
foods - especially cakes that need to rise - and for the
preparation of certain tartlets on 3 shelves at the same
time. Here are a few examples: cream puffs, sweet and
savoury biscuits, savoury puffs, Swiss rolls and small
portions of vegetables au gratin, etc…..
CONVECTION mode
Temperature: any temperature between 50°C and Max.
On this setting, the top and bottom heating elements
come on. This is the classic, traditional type of oven
which has been perfected, with exceptional heat
distribution and reduced energy consumption. The
convection oven is still unequalled when it comes to
cooking dishes made up of several ingredients, e.g.
cabbage with ribs, Spanish style cod, Ancona style
stockfish, tender veal strips with rice, etc. Excellent
results are achieved when preparing veal or beefbased dishes as well (braised meats, stew, goulash,
wild game, ham etc.) which need to cook slowly and
require basting or the addition of liquid. It nonetheless
remains the best system for baking cakes as well as
fruit and cooking using covered casserole dishes
for oven baking. When cooking in convection mode,
only use one dripping pan or cooking rack at a time,
otherwise the heat distribution will be uneven. Using
the different rack heights available, you can balance
the amount of heat between the top and the bottom of
the oven. Select from among the various rack heights
based on whether the dish needs more or less heat
from the top.
FAN ASSISTED mode
Temperature: any temperature between 50°C and Max.
The heating elements, as well as the fan, will come
on. Since the heat remains constant and uniform
throughout the oven, the air cooks and browns food
uniformly over its entire surface. With this mode, you
can also cook various dishes at the same time, as
long as their respective cooking temperatures are the
same. A maximum of 2 racks can be used at the same
time, following the instructions in the section entitled:
“Cooking On More Than One Rack”.
This fan assisted mode is particularly recommended
for dishes requiring a gratin finish or for those requiring
considerably prolonged cooking times, such as
for example: lasagne, pasta bakes, roast chicken
and potatoes, etc… Moreover, the excellent heat
distribution makes it possible to use lower temperatures
when cooking roasts. This results in less loss of
juices, meat which is more tender and a decrease
in the loss of weight for the roast. The fan assisted
mode is especially suited for cooking fish, which can
be prepared with the addition of a limited amount
of condiments, thus maintaining their flavour and
appearance.
Desserts: the fan assisted mode is also perfect for
baking leavened cakes.
Moreover, this mode can also be used to thaw quickly
white or red meat and bread by setting the temperature
to 80 °C. To thaw more delicate foods, set the
thermostat to 60°C or use only the cold air circulation
feature by setting the thermostat to 0°C.
mode
mode
mode
TOP OVEN
Temperature: any temperature between 50°C and Max.
The top heating element comes on.
This mode can be used to brown food at the end of
cooking.
GRILL
Temperature: any temperature between 50°C and Max.
The top heating element and the turnspit come on.
The extremely high and direct temperature of the grill
makes it possible to brown the surface of meats and
roasts while locking in the juices to keep them tender.
The grill is also highly recommended for dishes that
require a high temperature on the surface: such as beef
steaks, veal, rib steak, filets, hamburgers etc...
Always leave the oven door ajar during cooking, except
when using the turnspit.
Some grilling examples are included in the “Practical
Cooking Advice” paragraph..
FAN ASSISTED GRILL
Temperature: any temperature between 50°C and 200°C.
The top central heating element and the fan come
on. This combination of features increases the
effectiveness of the unidirectional thermal radiation of
the heating elements through forced circulation of the
air throughout the oven. This helps prevent food from
burning on the surface, allowing the heat to penetrate
right into the food. Excellent results are achieved with
kebabs made with meats and vegetables, sausages,
ribs, lamb chops, chicken in a spicy sauce, quail, pork
chops, etc.
This mode is also ideal for cooking fish steaks, like
swordfish, tuna, grouper, stuffed cuttlefish etc.
! The TOP OVEN, GRILL and FAN ASSISTED GRILL
cooking modes must be performed with the oven door
shut.
GB
11
GB
! When using the TOP OVEN and GRILL cooking
modes, place the rack in position 5 and the dripping
pan in position 1 to collect cooking residues (fat and/
or grease). When using the FAN ASSISTED GRILL
cooking mode, place the rack in position 2 or 3 and the
dripping pan in position 1 to collect cooking residues.
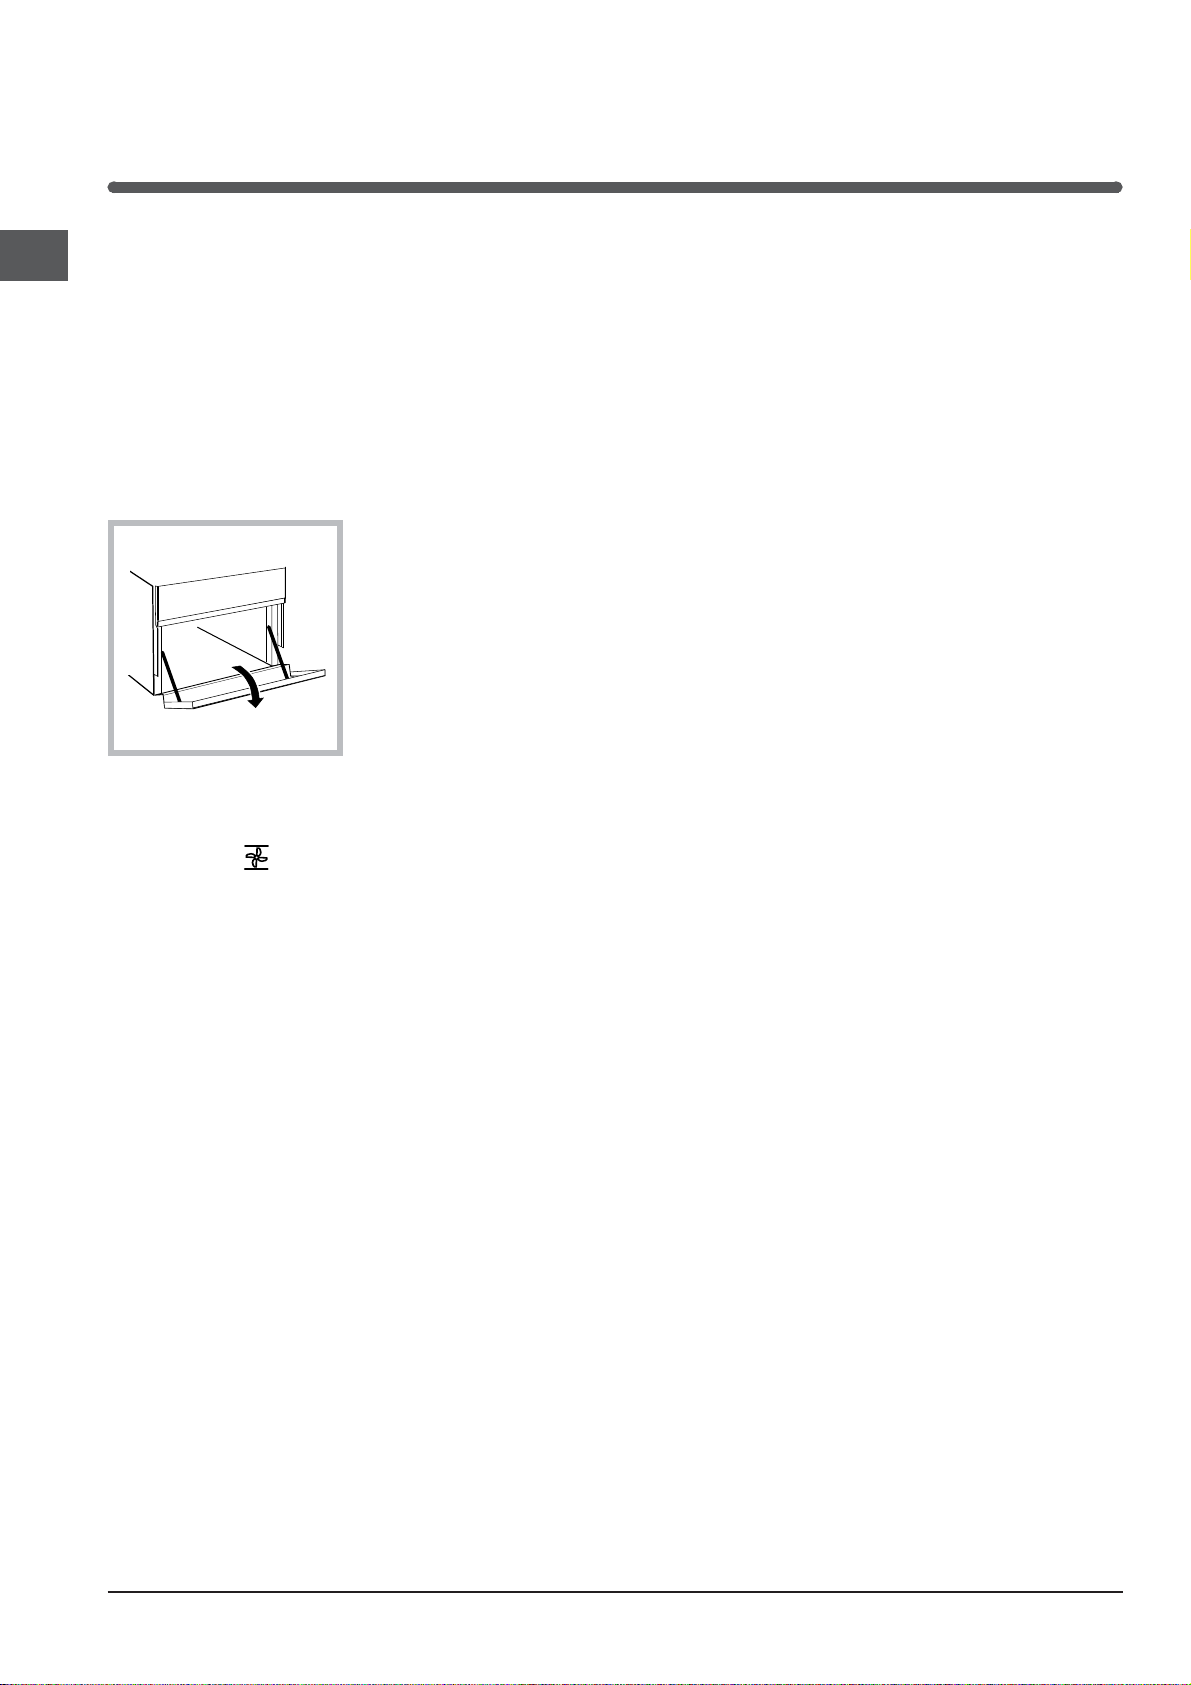
Lower oven compartment
There is a compartment underneath the oven that may
be used to storeoven accessories or deep dishes. To
open the door pull it downwards (see gure).
! Do not place
flammable materials
in the lower oven
compartment.
! The internal surfaces of
the compartment (where
present) may become
hot.
Cooking on several
shelves simultaneously
If it is necessary to use two racks, use the FAN
ASSITED mode
suited to this type of cooking. We also recommend
that:
• Positions 1 and 5 are not used. This is because
excessive direct heat can burn temperature
sensitive foods.
• Positions 2 and 4 are used and that food that
requires more heat is placed on the rack in position
2.
• When cooking foods that require different cooking
times and temperatures, set a temperature
that is halfway between the two recommended
temperatures (see Oven cooking advice table) and
place the more delicate food on the rack in position
4. Remove the food that requires a shorter cooking
time first.
• When cooking pizzas on several racks with the
temperature set to 220°C, the oven is preheated for
15 minutes. Generally speaking, cooking on the rack
in position 4 takes longer: we recommend that the
pizza cooked on the lowest rack position is removed
first, followed by the pizza cooked in position 4 a few
minutes later.
• Place the dripping pan on the bottom and the rack
on top.
, as this is the only cooking mode
12

Oven cooking advice table
GB
Selector knob
setting
Baking
Convection
Fan assisted
Top Oven
Food to be cooked Weight
(in kg)
Tarts
Fruit cakes
Plum cake
Sponge cake
Stuffed pancakes (on 2
racks)
Small cakes (on 2 racks)
Cheese puffs (on 2
racks)
Cream puffs (on 3 racks)
Biscuits (on 3 racks)
Meringues (on 3 racks)
Duck
Roast veal or beef
Pork roast
Biscuits (short pastry)
Tarts
Pizza (on 2 racks)
Lasagne
Lamb
Roast chicken +
potatoes Mackerel
Plum-cake
Cream puffs (on 2 racks)
Biscuits (on 2 racks)
Sponge cake (on 1 rack)
Sponge cake (on 2
racks)
Savoury pies
Browning food to perfect
cooking
0.5
1
0.7
0.5
1.2
0.6
0.4
0.7
0.7
0.5
1
1
1
1
1
1
1
1
1
1
0.5
0.5
0.5
1.0
1.5
- 3/4 15 220 -
Cooking rack
position from
bottom
3
2/3
3
3
2-4
2-4
2-4
1-3-5
1-3-5
1-3-5
3
3
3
3
3
2-4
3
2
2-4
2
2
2-4
2-4
2
2-4
3
Preheating time
(minutes)
15
15
15
15
15
15
15
15
15
15
15
15
15
15
15
15
10
10
10
10
10
10
10
10
10
15
Thermostat
knob
setting
180
180
180
160
200
190
210
180
180
90
200
200
200
180
180
220
200
180
180
180
170
190
180
170
170
200
Cooking
time
(minutes)
20-30
40-45
40-50
25-30
30-35
20-25
15-20
20-25
20-25
180
65-75
70-75
70-80
15-20
30-35
15-20
30-35
50-60
60-75
30-35
40-50
20-25
10-15
15-20
20-25
25-30
Grill
Fan assisted
grill
!
cooking times are approximate and may vary according to personal taste. When cooking using the grill or fan
assisted grill, the dripping pan must always be placed on the 1st oven rack from the bottom.
Soles and cuttlefish
Squid and prawn
kebabs
Cod filet
Grilled vegetables
Veal steak
Cutlets
Hamburgers
Mackerels
Toasted sandwiches
Grilled chicken
Cuttlefish
1
1
1
1
1
1
1
1
n.° 4
1.5
1.5
4
4
4
3/4
4
4
4
4
4
3
3
5
5
5
5
5
5
5
5
5
5
5
Max
Max
Max
Max
Max
Max
Max
Max
Max
200
200
8-10
6-8
10
10-15
15-20
15-20
7-10
15-20
2-3
55-60
30-35
13
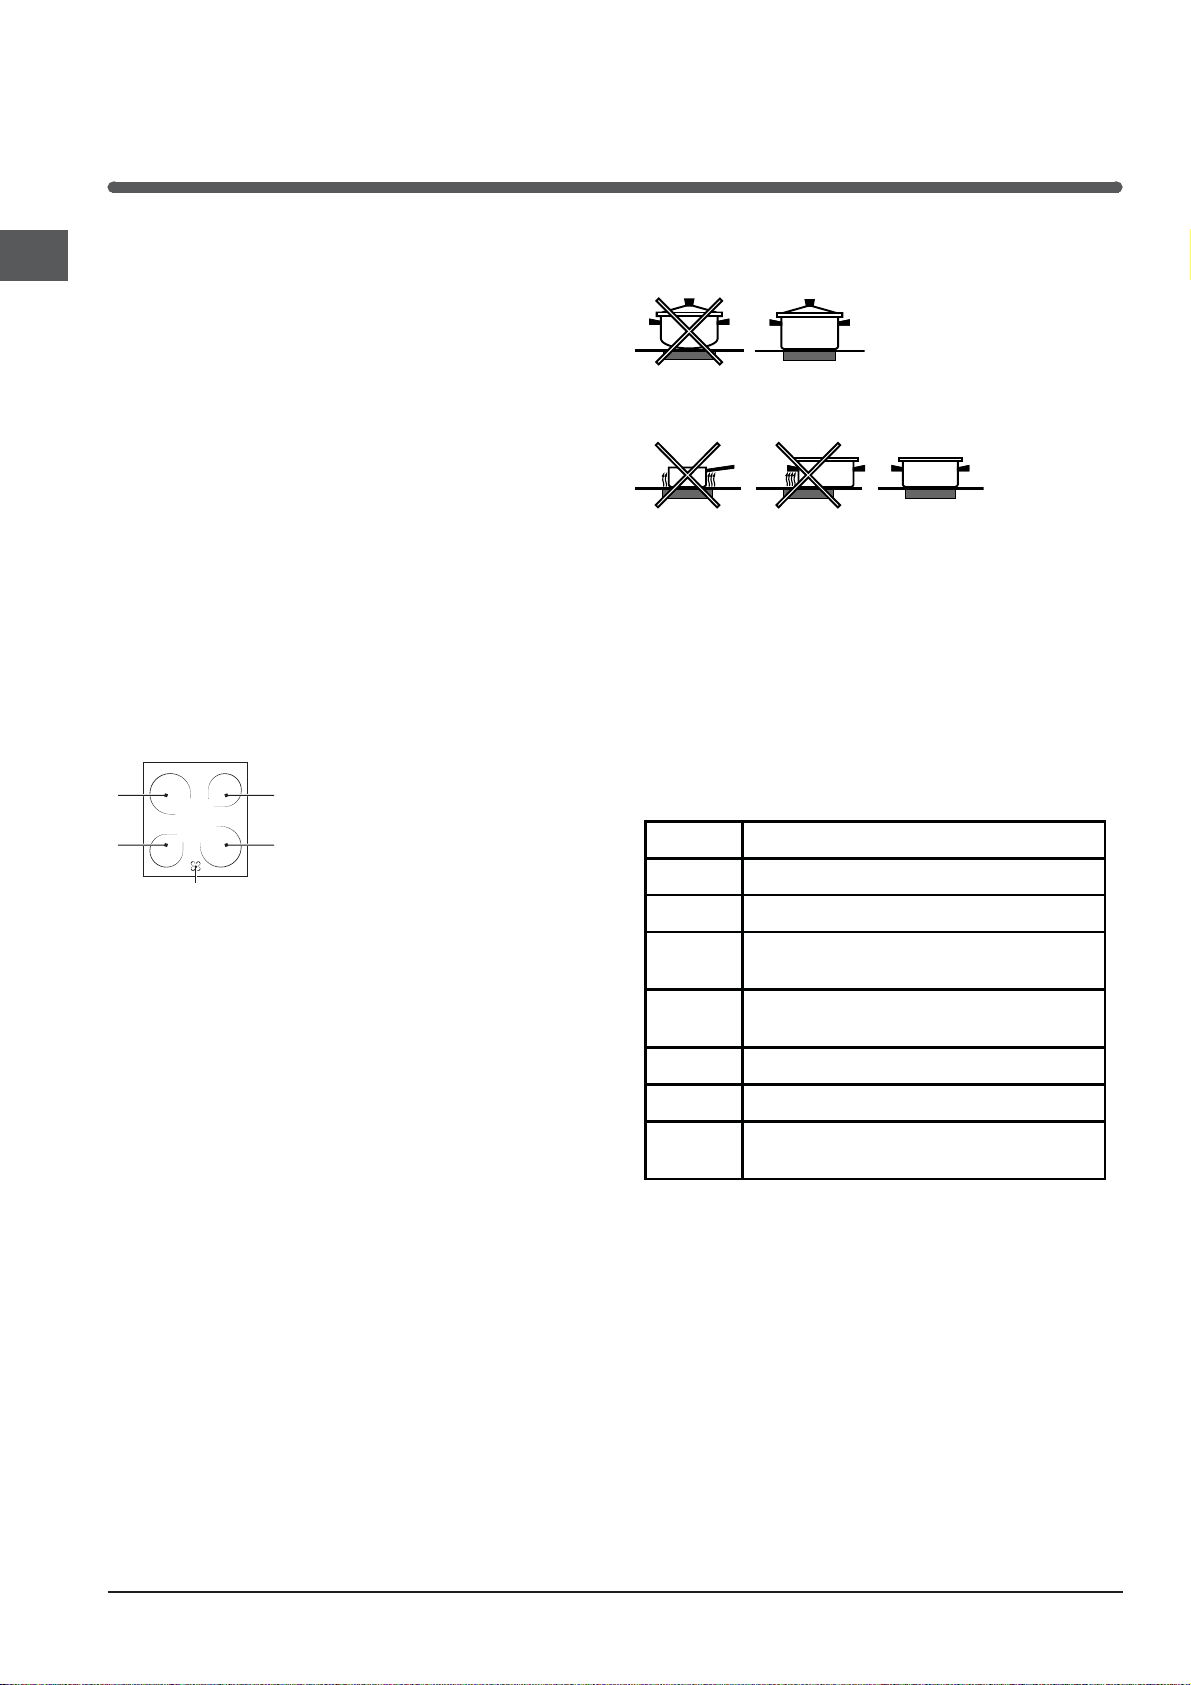
Using the glass ceramic hob
GB
! The glue applied on the gaskets leaves traces of
grease on the glass. Before using the appliance, we
recommend you remove these with a special nonabrasive cleaning product. During the first few hours
of use there may be a smell of rubber which will
disappear very quickly.
Switching the cooking zones on and off
To switch on a cooking zone, turn the corresponding
knob in a clockwise direction.
To switch it off again, turn the knob in an anticlockwise
direction until it is in the “0” position.
If the ELECTRIC HOTPLATE ON indicator light is lit, this
shows that at least one hotplate on the hob is switched
on.
Cooking zones
The hob is equipped with electric radiant heating
A
A
B
that the temperature of the corresponding cooking
zone is greater than 60°C, even when the heating
element has been switched off but is still hot.
elements. When they are in use
A
the following items on the hob
become red.
A
A. The cooking zone.
B. The residual heat
indicator light: this indicates
Practical advice on using the hob
• Use pans with a thick, flat base to ensure that they
adhere perfectly to the cooking zone.
• Always use pans with a diameter that is large
enough to cover the hotplate fully, in order to use all
the heat produced.
• Always make sure that the base of the pan is
completely clean and dry: this ensures that the pans
adhere perfectly to the cooking zones and that both
the pans and the hob last for a longer period of time.
• Avoid using the same cookware that is used on gas
burners: the heat concentration on gas burners may
have warped the base of the pan, causing it not to
adhere to the surface correctly.
• Never leave a cooking zone switched on without a
pan on top of it, as doing so may cause the zone to
become damaged.
Setting Normal or Fast Plate
Off
0
Cooking vegetables, fish
1
Cooking potatoes (using steam) soups,
2
chickpeas, beans.
Cooking zones with radiant heating elements
They have similar properties to gas burners: they are
easy to control and reach set temperatures quickly,
allowing you to actually see the power they are
providing.
Turn the corresponding knob in a clockwise direction,
to a position between 1 and 6.
Continuing the cooking of large quantit ies of
3
food, minestrone
For roasting (average)
4
For roasting (above average)
5
For browning and reaching a boil in a short
6
time.
14
Precautions and tips
! This appliance has been designed and manufactured in
compliance with international safety standards.
The following warnings are provided for safety reasons and
must be read carefully.
General safety
• The glass ceramic hob is resistant to temperature
fluctuations and shocks. It is, however, wise to remember
that blades or cooking utensils may ruin the surface of the
hob. If this happens, remove the plug of the cooker from
the electricity socket and contact an authorised Technical
Assistance Centre in order to request original spare parts.
Failure to comply with the above may compromise the
safety of the appliance.
• The appliance was designed for domestic use inside the
home and is not intended for commercial or industrial use.
• The appliance must not be installed outdoors, even in
covered areas. It is extremely dangerous to leave the
appliance exposed to rain and storms.
• Do not touch the appliance with bare feet or with wet or
damp hands and feet.
• The appliance must be used by adults only for
the preparation of food, in accordance with the
instructions outlined in this booklet. Any other use of
the appliance (e.g. for heating the room) constitutes
improper use and is dangerous. The manufacturer
may not be held liable for any damage resulting from
improper, incorrect and unreasonable use of the
appliance
• The instruction booklet accompanies a class 1 (insulated)
or class 2 - subclass 1 (recessed between 2 cupboards)
appliance.
• Keep children away from the oven.
• Make sure that the power supply cables of other electrical
appliances do not come into contact with the hot parts of
the oven.
• When unplugging the appliance, always pull the plug from
the mains socket; do not pull on the cable.
• Never perform any cleaning or maintenance work without
having disconnected the appliance from the electricity
mains.
• If the appliance breaks down, under no circumstances
should you attempt to repair the appliance yourself.
Repairs carried out by inexperienced persons may cause
injury or further malfunctioning of the appliance. Contact
Assistance.
• Do not rest heavy objects on the open oven door.
• Do not allow the cooker to be used unsupervised by
children or persons unfamiliar with it.
Disposal
• When disposing of packaging material: observe local
legislation so that the packaging may be reused.
• The European Directive 2002/96/EC relating to Waste
Electrical and Electronic Equipment (WEEE) states that
household appliances should not be disposed of using
the normal solid urban waste cycle. Exhausted appliances
should be collected separately in order to optimise
the cost of re-using and recycling the materials inside
the machine, while preventing potential damage to the
atmosphere and to public health. The crossed-out dustbin
is marked on all products to remind the owner of their
obligations regarding separated waste collection.
Exhausted appliances may be collected by the public
waste collection service, taken to suitable collection areas
in the area or, if permitted by current national legislation,
they may be returned to the dealers as part of an
exchange deal for a new equivalent product.
All major manufacturers of household appliances
participate in the creation and organisation of systems for
the collection and disposal of old and disused appliances.
Respecting and conserving the environment
GB
• The openings used for the ventilation and dispersion of
heat must never be covered.
• Always use oven gloves when placing cookware in the
oven or when removing it.
• Do not use flammable liquids (alcohol, petrol, etc...) near
the appliance while it is in use.
• Do not place flammable material in the lower storage
compartment or in the oven itself. If the appliance is
switched on accidentally, it could catch fire.
position when
• Always make sure the knobs are in the
the appliance is not in use.
•
• You can help to reduce the peak load of the electricity
supply network companies by using the oven in the hours
between late afternoon and the early hours of the morning.
• Always keep the oven door closed when using the GRILL
modes. This will achieve better results while saving energy
(approximately 10%).
• Check the door seals regularly and wipe them clean to
ensure they are free of debris so that they adhere properly
to the door, thus avoiding heat dispersion.
15
Care and maintenance
GB
Switching the appliance off
Disconnect your appliance from the electricity supply
before carrying out any work on it.
Cleaning the oven
! Do not use steam jets to clean the appliance.
• The stainless steel or enamel-coated external parts
and the rubber seals may be cleaned using a
sponge that has been soaked in lukewarm water
and neutral soap. Use specialised products for the
removal of stubborn stains. After cleaning, rinse
and dry thoroughly. Do not use abrasive powders or
corrosive substances.
• The inside of the oven should ideally be cleaned
after each use, while it is still lukewarm. Use hot
water and detergent, then rinse well and dry with a
soft cloth. Do not use abrasive products.
• Clean the glass part of the oven door using a
sponge and a non-abrasive cleaning product, then
dry thoroughly with a soft cloth. Do not use rough
abrasive material or sharp metal scrapers as these
could scratch the surface and cause the glass to
crack.
• The accessories can be washed like everyday
crockery, and are even dishwasher safe.
• Dirt and grease should be removed from the control
panel using a non-abrasive sponge or a soft cloth.
• It is usually sufficient simply to wash the hob using a
damp sponge and dry it with absorbent kitchen roll.
• If the hob is particularly dirty, rub it with a special
glass ceramic cleaning product, then rinse well and
dry thoroughly.
• To remove more stubborn dirt, use a suitable
scraper (this is not supplied with the appliance).
Remove spills as soon as possible, without waiting
for the appliance to cool, to avoid residues forming
crusty deposits. You can obtain excellent results
by using a rustproof steel wire sponge - specifically
designed for glass ceramic surfaces - soaked in
soapy water.
• If plastic or sugary substances have accidentally
been melted on the hob, remove them immediately
with the scraper, while the surface is still hot.
• Once it is clean, the hob may be treated with
a special protective maintenance product: the
invisible film left by this product protects the surface
from drips during cooking. This maintenance should
be carried out while the appliance is warm (not hot)
or cold.
• Always remember to rinse the appliance well with
clean water and dry it thoroughly: residues can
become encrusted during subsequent cooking
processes.
Inspecting the oven seals
Check the door seals around the oven regularly. If the
seals are damaged, please contact your nearest Aftersales Service Centre. We recommend that the oven is
not used until the seals have been replaced.
Replacing the oven light
bulb
1. After disconnecting the oven from
the electricity mains, remove the
glass lid covering the lamp socket
(see gure).
2. Remove the light bulb and
replace it with a similar one: voltage 230 V, wattage 25
W, cap E 14.
3. Replace the lid and reconnect the oven to the
electricity supply.
! Do not use the oven lamp as/for ambient lighting.
Cleaning the glass ceramic hob
!
Do not use abrasive or corrosive detergents (for
example, products in spray cans for cleaning
barbecues and ovens), stain removers, anti-rust
products, powder detergents or sponges with abrasive
surfaces: these may scratch the surface beyond repair.
Glass ceramic hob
cleaners
Window scraper Razor blade
scrapers
Replacement blades DIY Stores,
COLLO luneta
HOB BRITE
Hob Clean
SWISSCLEANER
Cleaning stainless steel
Stainless steel can be marked by hard water that
has been left on the surface for a long time, or by
aggressive detergents that contain phosphorus. We
recommend that the steel surfaces are rinsed well then
dried thoroughly.
Available from
DIY Stores
supermarkets,
chemists
Boots, Co-op stores,
department stores, Regional
Electricity Company shops,
supermarkets
Assistance
Please have the following information handy:
• The appliance model (Mod.).
• The serial number (S/N).
This information can be found on the data plate located
on the appliance and/or on the packaging.
16
Instalacja
HOOD
420
Min.
min.
650
mm. with hood
min.
700
mm. without hood
mm.
600
Min. mm.
420
Min. mm.
V
1
2
3
N
A
B
! Należy zachować niniejszą instrukcję, aby móc z niej
skorzystać w każdej chwili. W przypadku sprzedaży,
odstąpienia lub przeniesienia urządzenia, należy się
upewnić, czy instrukcja została przekazana wraz z nim.
! Należy uważnie przeczytać instrukcję: zawiera ona
ważne informacje dotyczące instalacji, użytkowania i
bezpieczeństwa.
! Instalacja urządzenia powinna zostać wykonana
zgodnie z niniejszymi instrukcjami przez
wykwalifi kowany personel.
! Wszelkie działania w zakresie regulacji lub
konserwacji muszą być wykonywane przy kuchence
odłączonej od zasilania elektrycznego.
Ustawienie i wypoziomowanie
! Możliwe jest zainstalowanie urządzenia obok mebli,
których wysokość nie przekracza wysokości płyty
roboczej.
! Należy się upewnić, czy ściana stykająca się z tyłem
urządzenia wykonana jest z materiału niepalnego i
odpornego na ciepło (T 90°C).
W celu umożliwienia prawidłowej instalacji:
• ustawić urządzenie w kuchni, w jadalni lub w innym
pomieszczeniu (nie w łazience);
• jeśli płyta kuchenki jest wyższa w stosunku do mebli,
powinny one znajdować się w odległości co najmniej
200 mm od urządzenia;
• jeśli kuchenka zainstalowana jest pod szafką
wiszącą, szafka powinna
się znajdować w
odległości co najmniej
420 mm nad płytą
kuchenki.
Odległość
wynosić 700 mm,
jeśli szafki wiszące
są łatwopalne (patrz
rysunek);
• nie umieszczać zasłon za kuchenką ani w odległości
mniejszej niż 200 mm od jej krawędzi;
• ewentualne okapy powinny zostać zainstalowane
według wskazówek zawartych w ich instrukcji.
Wypoziomowanie
Jeśli konieczne jest wypoziomowanie urządzenia,
Znajduje się tylko w niektórych modelach.
*
ta powinna
należy przykręcić nóżki regulacyjne, dostarczane jako
wyposażenie, w odpowiednich
gniazdach umieszczonych w
rogach podstawy kuchenki
(patrz rysunek).
Nóżki* mocowane są w
otworach pod podstawą
kuchenki.
Podłączenie
elektryczne
Montaż przewodu
zasilającego
Przewód należy dostosować do danego rodzaju
podłączenia elektrycznego, według następującego
schematu podłączeniowego:
W celu zamontowania przewodu zasilającego:
1. Odkręcić śrubę V ze skrzynki zaciskowej i w celu
H05RR-F 5x2.5 CEI-UNEL 35363
400 3N
H05VV-F 5x2.5 CEI-UNEL 35746
400V 2N
H05RR-F 4x4 CEI-UNEL 35363
H05VV-F 4x4 CEI-UNEL 35746
230V
H05RR-F 3x4 CEI-UNEL 35363
H05VV-F 3X4 CEI-UNEL 35746
1 2
S
R
12345
R
1
2
R
otwarcia zdjąć pokrywę (patrz rysunek).
2. umieścić śrubę
łącznikową „U” A (patrz
rysunek) zgodnie z
powyższym schematem
podłączeniowym.
Skrzynka zaciskowa
dostosowana jest
do podłączenia
jednofazowego 230V:
zaciski 1,2, i 3 są ze
sobą połączone ; mostek
4-5 znajduje się w
dolnej części skrzynki
zaciskowej.
3. Umieścić przewody
4
3
T
S
3
5
N
N
4
5
N
PL
17
PL
N oraz
zgodnie ze schematem (patrz rysunek)
i wykonać podłączenie dokręcając mocno śruby
zacisków.
4. umieścić pozostałe przewody w zaciskach 1-2-3 i
dokręcić śruby.
5. zamocować przewód zasilający w odpowiedniej
prowadnicy.
6. zamknąć pokrywę skrzynki zaciskowej przykręcając
śrubę V.
Podłączenie przewodu zasilającego do sieci
Zamontować na przewodzie znormalizowaną wtyczkę
dostosowaną do obciążeń wskazanych na tabliczce
znamionowej umieszczonej na urządzeniu (patrz tabela
Dane techniczne).
Urządzenie należy podłączyć bezpośrednio do
sieci przy użyciu wyłącznika wielobiegunowego o
odległości styków co najmniej 3 mm, instalowanego
pomiędzy urządzeniem a siecią. Wyłącznik musi
być dostosowany do wskazanych obciążeń i musi
odpowiadać normom NFC 15-100 (przewód uziemienia
nie powinien być przerwany przez wyłącznik). Przewód
zasilania powinien być umieszczony tak, aby w
żadnym punkcie nie był narażony na temperaturę
przekraczającą 50° C.
Przed wykonaniem podłączenia należy się upewnić,
czy:
• gniazdko posiada odpowiednie uziemienie i czy jest
zgodne z obowiązującymi przepisami;
• gniazdko jest w stanie wytrzymać maksymalne
obciążenie mocy urządzenia, wskazane na tabliczce
znamionowej;
• napięcie zasilania odpowiada wartościom podanym
na tabliczce znamionowej;
• gniazdko jest kompatybilne z wtyczką urządzenia.
Jeśli gniazdko nie jest kompatybilne z wtyczką,
należy się zwrócić do autoryzowanego technika
w celu dokonania wymiany. Nie stosować
przedłużaczy ani rozgałęziaczy.
! Po zainstalowaniu urządzenia przewód elektryczny i
gniazdko prądu powinny być łatwo dostępne.
! Przewód nie powinien być pozaginany ani
przygnieciony.
! Przewód powinien być okresowo sprawdzany
i wymieniany wyłącznie przez autoryzowanych
techników.
! Producent nie ponosi żadnej odpowiedzialności,
jeśli powyższe normy nie będą przestrzegane.
TABELA CHARAKTERYSTYK
szerokość 44 cm
Wymiary
Objętość
Wymiary użytkowe
szuflady
podgrzewania
potraw
Napięcie i
częstotliwość
zasilania
elektrycznego
Płyta grzejna ze
szkła ceramicznego
Przód lewa
Tył lewa
Tył prawa
Przód prawa
Moc pochłaniana
przez ceramiczne
płyty grzejne Max
ENERGY LABEL
Niniejsze urządzenie jest zgodne z
wysokość 34 cm
głębokość 38 cm
56l
szerokość 42 cm
wysokość 23 cm
głębokość 44 cm
patrz tabliczka znamionowa
1200 W
1700 W
1200 W
1700 W
5800 W
Dyrektywa 2002/40/WE na etykietce
piekarników elektrycznych
Norma EN 50304
Zużycie energii konwekcja naturalna —
funkcja ogrzewania:
Tradycyjny
Zużycie energii deklaracja Klasy
konwekcja wymuszona - funkcja
ogrzewania:
Piekarnik do wypieku ciast
następującymi dyrektywami unijnymi:
2006/95/EC z dnia 12.12.06 (niskie
napięcie) z późniejszymi zmianami 04/108EE z dnia 15/12/04 (zgodność
elektromagnetyczna) z późniejszymi
zmianami - 93/68/CEE z dnia 22/07/93
z późniejszymi zmianami
2002/96/CEE
Tabliczka znamionowa znajduje się wewnątrz szufl ady lub po
otwarciu szufl ady na lewej ścianie wnętrza.
*
Znajduje się tylko w niektórych modelach.
18
 Loading...