

Page 1

Free Standing Electric Cooker
Instructions for installation and use
KD6C8E
KD6C7E
KD6C0E
Page 2

Contents
Introduction 3
Installation 4
Safety Information 5
Features 7
Control Panel 8
Oven Timer Operation (KD6C8E only) 9
Clock/Minute Minder Operation (KD6C7E only) 15
Temperature Conversion Chart 17
Ceramic Hob 18
Choosing Your Utensils 21
Grill Pan and Handle 23
Grill 24
Guide to Grilling 25
Top Oven Cookery Notes (KD6C8E and KD6C7E only) 26
Main Oven Cookery Notes 27
Oven Temperature charts 28
Using the Main Oven for Other Functions 30
Care and Cleaning 31
Cooking Results Not Satisfactory? 35
Something Wrong With Your Cooker? 36
If it Still Won’t Work... 39
Key Contacts Back Cover
You must read these instructions prior to using your appliance and
retain them for future use.
2
Page 3
Introduction
Your new appliance is guaranteed* and will give lasting service. This guarantee is only applicable
if the appliance has been installed in accordance with the installation instructions detailed in
this booklet.
To help make best use of your cooking equipment,please read this booklet carefully.
The cooker is designed specifically for domestic use and responsibility will not be accepted for
use in any other installation.
When the cooker is first used an odour may be emitted,
When first using the cooker ensure that the room is well ventilated (e.g. open a window or use
an extractor fan) and that persons who may be sensitive to the odour avoid any fumes.
It is suggested that any pets be removed from the room until the smell has ceased. This odour is
due to temporary finish on oven liners and elements and also any moisture absorbed by the
insulation.
* The guarantee is subject to the provisions that the appliance:
(a) Has been used solely in accordance with the Users Instruction Book.
(b) Has been properly connected to a suitable supply voltage as stated on the
rating plate attached to this equipment.
(c) Has not been subjected to misuse or accident or been modified or repaired by
any person other than the authorised employee or agent.
(d) Has been correctly installed.
this will cease after a period of use
This appliance conforms to the following EEC Directives:
Electromagnetic Compatibility Low Voltage Equipment
89/336/EEC 73/23/EEC
92/31/EEC 93/68/EEC
93/68/EEC
3
Page 4
Installation
WARNING – THIS APPLIANCE MUST BE EARTHED.
Mains Connection
Your cooker should have been checked to ensure
volt
The cooker must be connected by a competent person such as one who is a, NICEIC registered
contractor to a suitable double-pole control unit with a minimum rating of 32A and a minimum
contact clearance of 3mm (applicable to newer properties, older properties where a 30A double
pole control unit and a minimum contact clearance of 3mm is acceptable).
The double pole control unit should be fitted adjacent to the cooker, in accordance with IEE
regulations.The control unit must be within 2 metres of but not directly above the appliance and
should be easily accessible in the event of an emergency.
The power supply cable should conform to B.S.6004 with a conductor size of 6mm
Access to the mains terminals is gained by removing the rear access cover.The mains cable must
pass through the cable clamp adjacent to the terminal block. Sufficient cable should be used to
allow the cooker to be pulled out for servicing.
Ensure that the mains cable is routed away from any brackets affixed to the rear panel and
is not trapped to the rear wall when pushing the cooker into position between cabinets.
Levelling
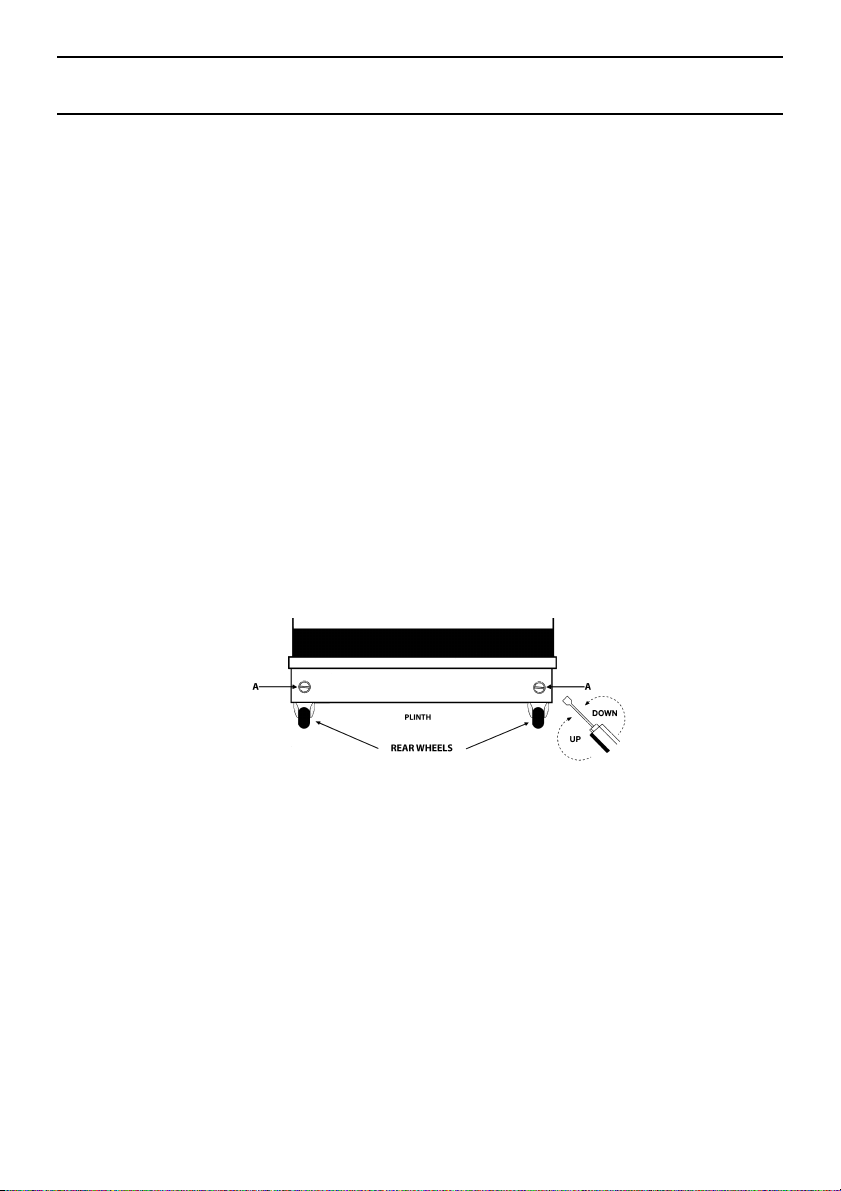
Two rear wheels and two front feet are fitted which can be adjusted up or down to set the height
(900mm - 915mm) and level the cooker.
1. The rear wheels can be raised or lowered from the BACK of the cooker by adjusting the
2. The front feet can be simply screwed in or out to lower or raise the front of the cooker.
CAUTION: Some soft floor coverings may get damaged if the cooker is not moved carefully.
NOTE: Ensure oven shelves are level by using a spirit level on the rod shelves.
this is stated on the rating plate,which is situated
age,
levelling screws ‘A’ in the plinth.
that the voltage corresponds with your supply
on the front of the plinth.
2
, minimum.
Siting the Cooker
The cooker is designed to fit between kitchen cabinets spaced 600mm apart.The space either side
need only be sufficient to allow withdrawal of the cooker for servicing. It can be used with
cabinets one side or both as well as in an angled corner setting.It can also be used freestanding.
Adjacent side walls which project above hob level,must not be nearer to the cooker than 150mm
and should be
should not be nearer than 650mm.
Note:This appliance must NOT be fitted on a platform.
Moving the Cooker
Before moving your cooker, switch off at the cooker control unit,ensure that it is cool.
Open the grill door sufficiently to allow a comfortable grip on the underside front edge of the
oven roof,avoiding any grill elements.
Radio Interference
This appliance conforms to EN 55014 regarding suppression of radio and television interference.
Note: Take care in moving the cooker as it is heavy. Take care to ensure that any floor
covering is not damaged.
protected by heat resistant material. Any overhanging
VIEWED FROM REAR
surface or cooker hood
4
Page 5

Safety Information
When used properly your appliance is completely safe but as with any electrical product
PLEASE READ THE PRECAUTIONS BELOW BEFORE USING YOUR APPLIANCE.
there are certain precautions that must be observed.
Always
● Remove all packing from the appliance before switching on for the first time.
● Understand the controls prior to using the appliance.
● Keep children away from the appliance when cooking as the surfaces will get extremely hot
during and after use.
● Turn controls off when not in use.
● Stand back when opening an oven door to allow any build up of steam or heat to disperse.
●
Always use dry good quality oven gloves when removing items from the oven/grill.
● Always place pans centrally over the hotplate making sure handles are kept away from the
edge of the hob and cannot become heated by other hotplates or pans.
●
Always take care to avoid heat or steam burns when operating the controls.
● Always turn off the electricity supply at the wall switch and allow the appliance to cool before
cleaning (or changing an oven lamp if fitted).
●
Always make sure the shelves are in the correct position before switching on the oven or grill.
● Always keep the oven/grill door closed when the appliance is not in use.
● Always keep the appliance clean as a build up of grease or fat from cooking can cause a fire.
●
Always follow the basic principles of food handling and hygiene to prevent the possibility of
bacterial growth.
● Always keep ventilation slots clear of obstructions.
● Always refer servicing to a qualified appliance service engineer.
● Always take care when removing items from the grill compartment when the lower oven is in
use as the contents will be hot
● Always turn off the electricity supply to the appliance at the wall switch should any glass panel
(if fitted) crack or shatter and then DO NOT USE THEAPPLIANCE until repaired.
● During use, the oven becomes hot. Care should be taken to avoid touching heating elements
inside the oven.
5
Page 6

Safety Information
Never
● Never stare at Halogen heating units
● Never leave children unsupervised where a cooking appliance is installed as all surfaces will be
hot during and after its use.
● Never allow anyone to sit or stand on any part of the appliance.
●
Never store items above the appliance that children may attempt to reach.
● Never leave anything on the hob surface when unattended and not in use.
● Never remove the oven shelves whilst the oven is hot.
● Never heat up unopened food containers as pressure can build up causing the container to
burst.
● Never store chemicals/food stuffs or pressurised containers in or on the appliance, or in
cabinets immediately above or next to the appliance.
● Never place flammable or plastic items on or near the hob.
● Never fill a deep fat frying pan more than 1/3 full of oil. Never use a lid.
DO NOT LEAVE DEEP FAT FRYING PANS UNATTENDED WHILE COOKING.
● Never use the appliance as a room heater.
● Never use the grill to warm plates.
● Never dry any items on either the hob or oven doors.
● Never install the appliance next to curtains or other soft furnishings.
● Never operate the grill with the grill door closed as this will cause the appliance to over heat.
● Never use ‘steam cleaners’.
SAFETY ADVICE IN CASE OF A CHIP-PAN FIRE
In the event of a chip pan fire or any other pan fire.
1. TURN OFF THE COOKER APPLIANCE AT THE WALL SWITCH.
2. COVER THE PAN WITH A FIRE BLANKET OR DAMP CLOTH, this will smother the flames and
extinguish the fire.
3.
LEAVE THE PAN TO COOL FOR AT LEAST 60 MINUTES BEFORE
caused by picking up a hot pan and rushing outside with it.
MOVING IT. Injuries are often
NEVER USE A FIRE EXTINGUISHER TO PUT OUT A PAN FIREas the force
of the extinguisher is likely to tip the pan over.
Never use water to extinguish oil or fat fires.
6
Page 7
Features
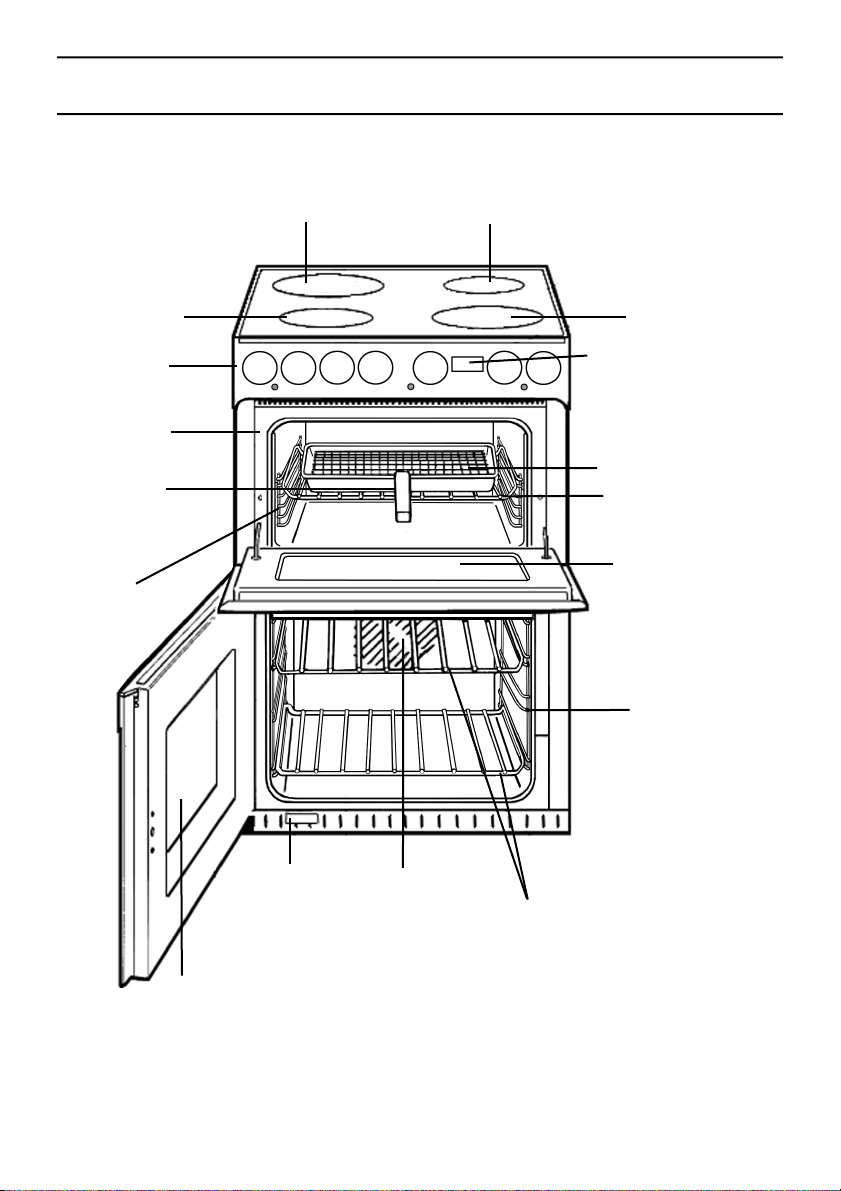
1200W Ceramic
Control panel
(varies per model)
Conventional
Grill
Grill pan with
fixed/detachable
handle
Top oven
wirework
shelf supports
1500W Ceramic
1200W Ceramic
1800W Ceramic
- Timer: (KD6C8E)
- Clock/Minute Minder:
(KD6C7E)
Grill pan food support
Models KD6C8E and
KD6C7E only:
Top oven/grill rod shelf
Inner Door Panel
(where fitted)
Main oven
wirework
shelf supports
Inner glass panel
Rating
plate
Fan blade
Main oven
rod shelves
7
Page 8
Control Panel
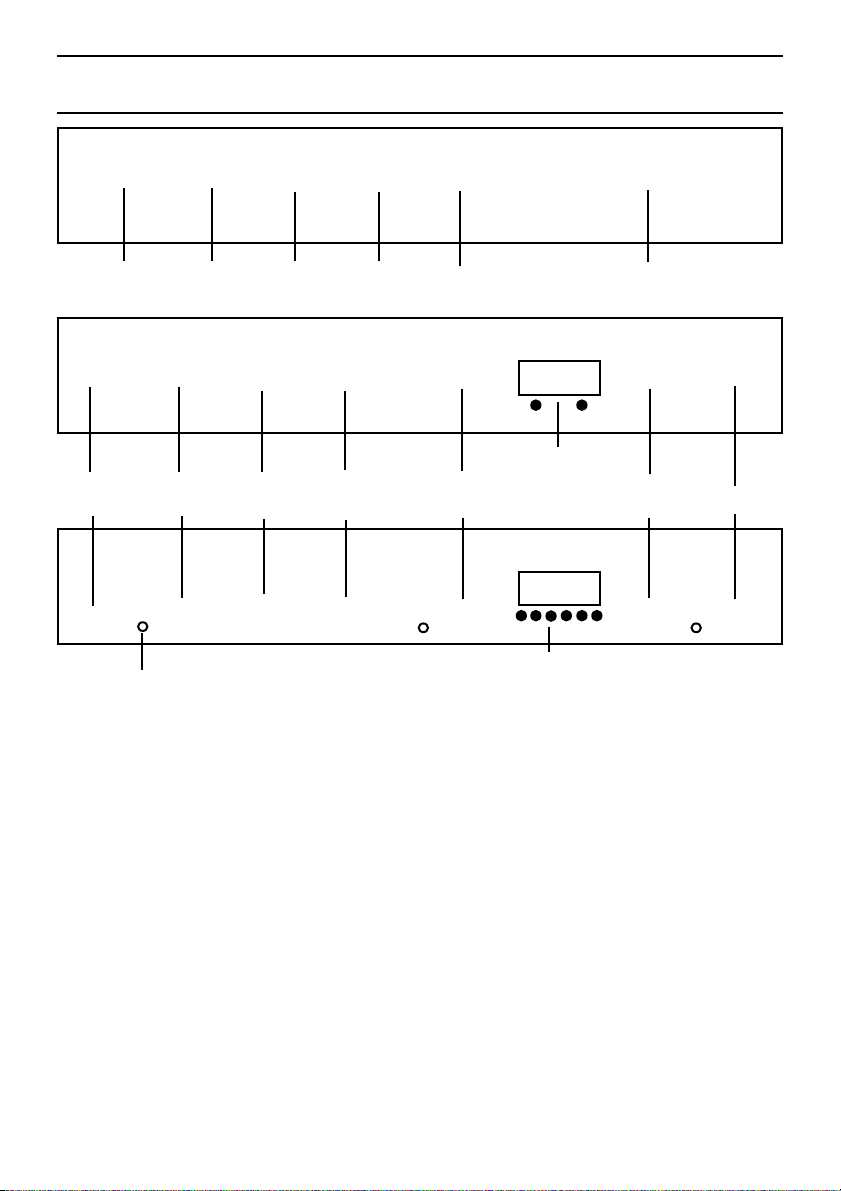
KD6C0E
❍
Front
❍
Front
left
❍
Hob Hot neon
Operating
controls when the
grill is in use
❍❍❍
left
❍❍❍
Rear
left
❍❍❍
❍❍
Main
oven
Main
oven
Front
right
Front
right
KD6C7E
KD6C8E
Grill
Clock / Minute Minder
Top
Oven
Clock, auto timer and
minute minder
(Main Oven only)
Rear
left
Rear
right
Rear
right
In common with all cookers having controls sited above the grill
compartment, care must be taken when setting the controls, due
to the hot air expelled from the grill compartment.
Note: After use, it is advisable to check that all cooker controls have been
switched Off.
❍❍❍
Grill
❍❍❍
Cooling fan
Main and Top Oven
lights:
Model KD6C8E only
Slow cooking ‘S’
(90˚C)
Hob Hot Neon
8
A gentle flow of air will be blown below the control panel when the grill
control is in use.
The oven light will illuminate when the relevant thermostat is operated.
The light will remain on during the cook period.
The main oven has an ‘S’ setting specially designed to reduce energy
usage. Full details of this can be found in the Slow Cooking section.
A short time (approx. 30 seconds) after the hob heating areas have been
turned on, the Hob Hot neon will illuminate.
This light will remain illuminated until all the hob controls have been
turned off and all hob heating areas have cooled.
Page 9

Oven Timer Operation (KD6C8E only)
The oven timer offers you the following features:
1. Time of Day
2. Automatic Cooking
3. Minute Minder
Automatic Cooking
The Main Oven (only) can be controlled by the automatic timer. When the
timer control has been set for one oven it is possible to use the other oven
manually.
Hints on
Automatic
Cooking
Timer
Operation
1. Select foods which will take the same time to cook and require
approximately the same temperature.
2. Set the oven timer so that the food has just finished or about to
finish cooking on your return to the oven. This will ensure the
food has not cooled down and does not require reheating
before serving.
3. Food should be as cold as possible when it goes into the oven,
ideally straight from the refrigerator. Frozen meat and poultry
should be thawed thoroughly before it is put in the oven.
4. We advise that warm food should never be placed in the oven if
there is to be a delay period. Stews prepared by frying the meat
and vegetables should be cooked as soon as possible.
5. We advise dishes containing left-over cooked poultry or meat,
for example Shepherds Pie, should not be cooked automatically
if there is to be a delay period.
6. Stews and joints should be cooked by the long slow method, so
that the delay period is kept to a minimum.
7. On warm days, to prevent harmful bacterial growth in certain
foods (ie poultry, joints, etc) the delayed start should be kept to
a minimum.
8. Wine or beer may ferment and cream may curdle during the
delay period, so it is best to add these ingredients just before
serving.
9. Foods which discolour should be protected by coating in fat or
tossing in water to which lemon juice has been added, prior to
placing food in the oven.
10. Dishes containing liquid should not be filled too full to prevent
boiling over.
11. Food should be well sealed (but not airtight) in a container to
prevent the loss of liquid during cooking. Aluminium foil gives a
good seal.
12. Ensure food is cooked thoroughly before serving.
1. Make sure all oven controls are turned Off.
2. Check that the electricity supply to the oven is turned On.
3. Check that the oven clock is at the right time of day.
9
Page 10
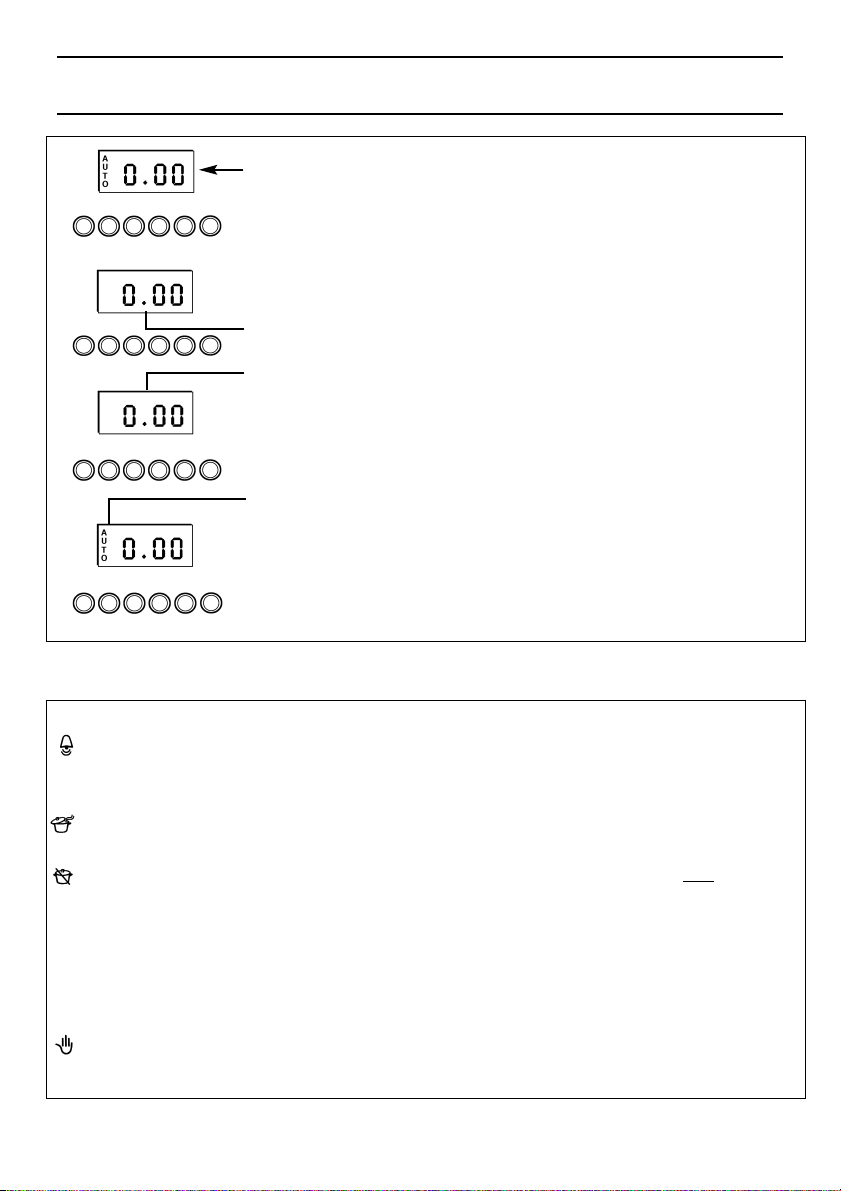
Know your Timer
CLOCKFACE
The timer incorporates a 24 hour clock.
Ensure the correct time of day is always set,before using your cooker.
SYMBOLS
A ‘bell’symbol will light up when you select a Minute Minder Period and will
remain lit for the period set.
At the end of the Minute Minder Period,the timer will emit an audible tone and
the ‘bell’symbol will disappear.
The ‘cookpot’ symbol will light up either:–
– When the timer is in manual mode, or
– During the actual Cook Period.
‘AUTO’ will light up:–
– When the timer is first turned on it will flash. It will go out when a time of day
is set or when the timer is set to manual.
The ‘AUTO’symbol will flash at the end of an Auto Cooking programme to indicate
that the programme has finished.
(When the ‘AUTO’ symbol is flashing,to return the oven to Manual operation,
turn the oven controls off,ensure that the correct time of day is set, and press
the “Manual”button – The ‘AUTO’symbol will go out).
(KD6C8E only)
TIMER FUNCTION BUTTONS
Minute Minder
Button
Here you can set a time period of up to 23 hours 59 minutes,that will count down.
When it reaches zero,the timer will emit an audible tone.
For Example: If you set 20 minutes, the audible tone will occur 20 minutes later.
AUTO COOKING PROGRAMME
Cook Period Button
End Time Button
Manual Button
“+” and “–” Buttons
10
Cook Period is the actual length of time for which,the timer will switch the oven(s) on
as part of an “Auto Cooking”programme.
(e.g.If you set 2 hours, the food will be cooked for 2 hours).
The time of day at which you want an “Auto Cooking” programme to end
For Example: If you set a “Cook Period”for 2 hours, and “End Time”of 11:00. The timer
will switch the oven(s) on at 9:00 and turn the oven(s) off at 11:00.You will hear a
audible tone at 11:00, to indicate that the Auto Cooking Programme has finished.
Notes:
- When setting an Auto Cooking programme you will need to set the oven
control(s) to the required temperature(s) when you set the timer.
- If an Auto Cooking programme has been set the oven(s) will only operate during
the pre-programmed time.
Needs to be pressed to cancel an Auto Cooking programme and return the oven(s) to
Manual operation.
Used to adjust the various timer function settings.
.
Page 11
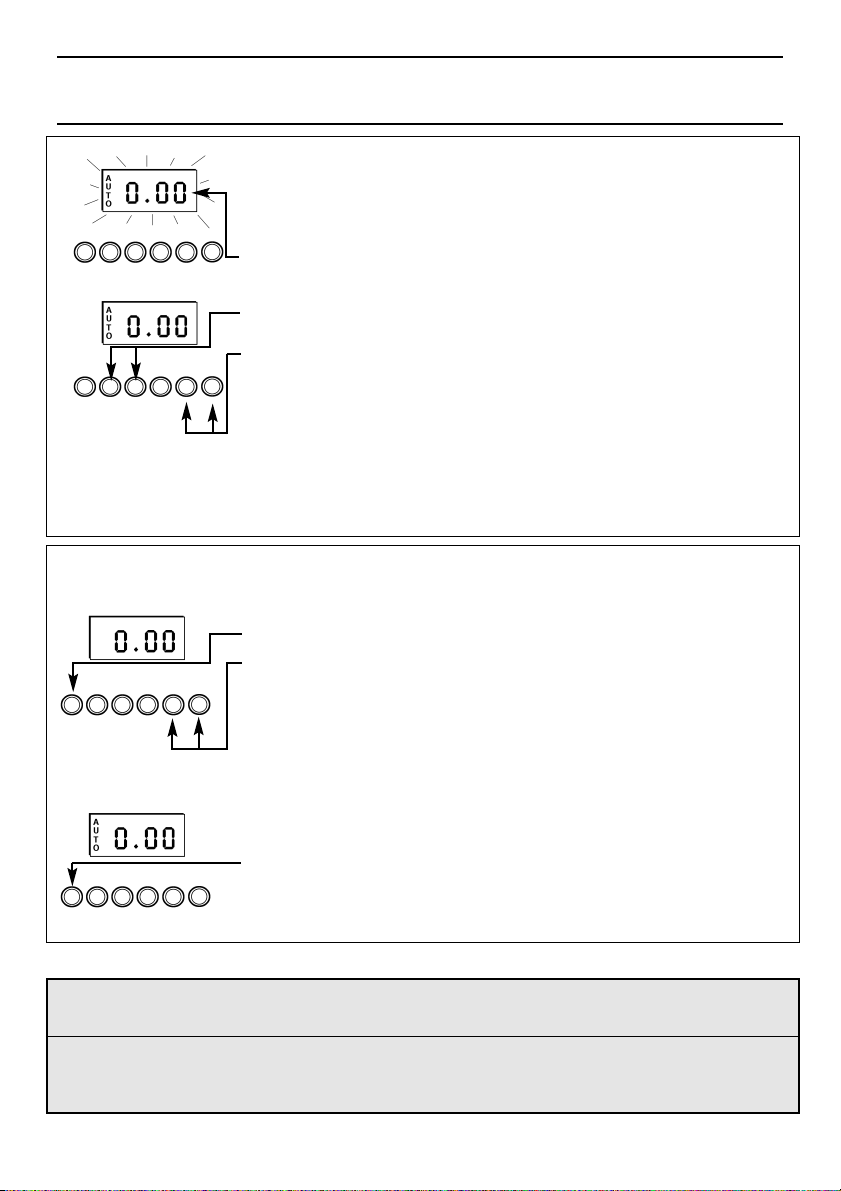
Electronic Clock & Automatic Oven Timer
Operation
(KD6C8E only)
SETTING THE TIME OF DAY
Step 1 Make sure all oven controls are turned Off.
Step 2 Check the electricity supply to the cooker is turned on.
Step 3 When switched on the display will show 0.00 and the Auto symbol,
flashing intermittently.
Step 4 Press & hold in both the Cook Period & End Time buttons together.
Step 5 With the Cook Period & End Time buttons still held in, press either the “+”
or “–” buttons to set the correct time of day.
Step 6 Release all the buttons simultaneously.
THE TIME OF DAY IS NOW SET.
To change the time of day repeat Steps 4,5 & 6 above.
Note: You cannot adjust the time of day if the timer has been set for an
Auto Cooking Programme.
SETTING THE MINUTE MINDER
Step 1 Ensure the time of day is set correctly.
Step 2 Press and hold the Minute Minder button.
Step 3 With the Minute Minder button held in, set the required Minute Minder
period using the “+” and “–”buttons. A ‘bell’symbol will light up.
Release all buttons and the timer display will revert back to the time of day.
The ‘bell’ symbol will remain lit to signify that a Minute Minder period has been
set.
At the end of the set time an audible tone will be heard,and the ‘bell’ symbol will
disappear.
Step 4 To cancel the audible tone press the Minute Minder button.
Note 1 When the Minute Minder has been set, the time remaining can be checked at any
Note 2 If necessary the Minute Minder can be cancelled before the tone sounds by
time by simply pressing the Minute Minder button.
pressing and holding the Minute Minder button and then at the same time
pressing the “–” button until 0.00 appears in the display window.
11
Page 12
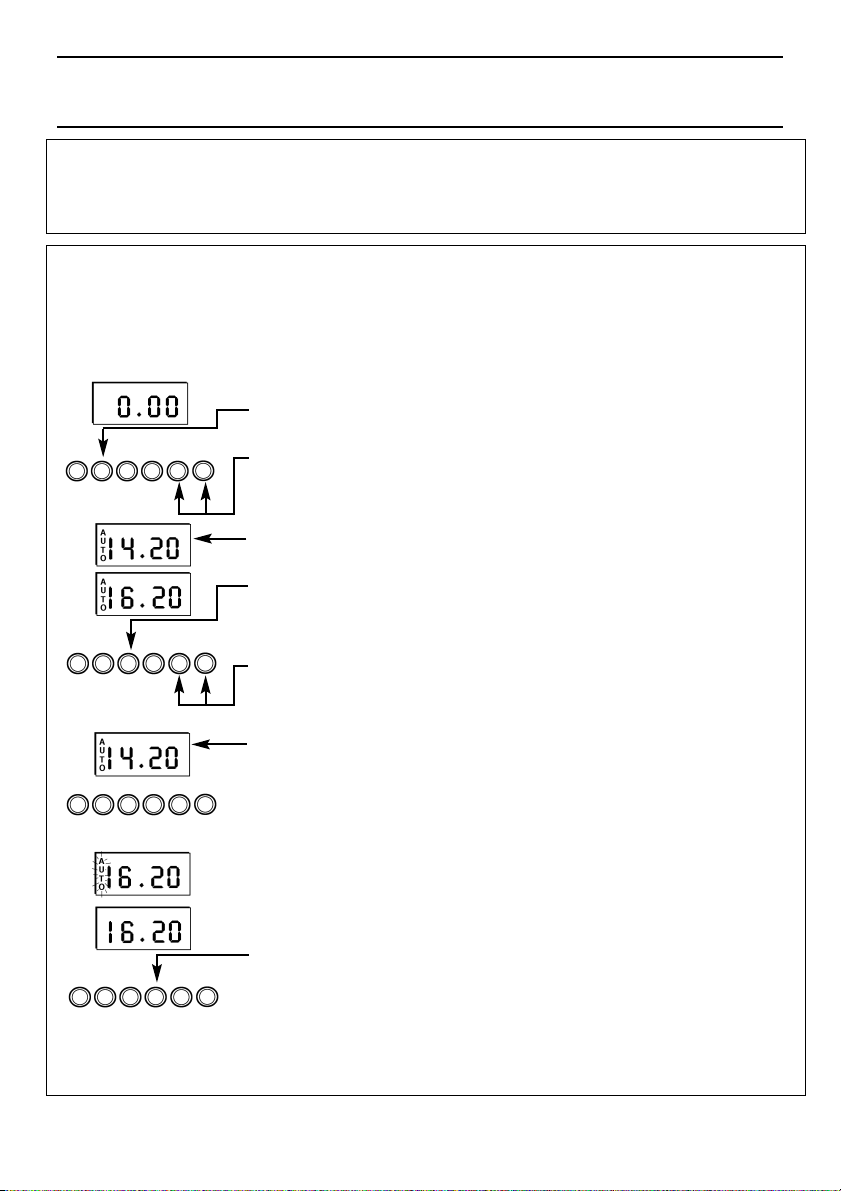
Electronic Clock & Automatic Oven Timer
Operation
AUTO COOKING PROGRAMMES
There are two Auto Cooking programmes that can be selected using your timer:–
(a) To set the timer to switch the oven(s) On and Off Automatically
(b) To set timer to switch on immediately and OFF automatically after a set cook period.
a) TO SET THE TIMER TO SWITCH THE OVEN(S) ON AND OFF AUTOMATICALLY
This allows you to cook at a specified time for a chosen period before the oven switches
off Automatically.
Step 1 Check that the correct time of day is set,if not follow instructions for setting the time of day.
Step 2 Place food onto the correct shelf position in the oven and close the oven door(s).
(KD6C8E only)
Step 3 Press and hold in the Cook Period button.
The display will read 0.00 with the ‘cookpot’ symbol lit.
Step 4 With the Cook Period button still held in,set the required Cook Period
using the “+” and “–” buttons.
Release the buttons and the timer display will revert to the time of day with the
‘Auto’ symbol and ‘cookpot’symbol lit.
Step 5 Press and hold in the End Time button.
The display will read the earliest possible end time for the Cook Period
that you have set above.
The ‘Auto’symbol and ‘cookpot’ symbol will be lit.
Step 6 With the End Time button still held in,use the “+” and “–”buttons to set
the ‘End Time’ (i.e. The time you require the oven to switch off).
Release all the buttons and the timer will revert back to the time of day.
The ‘Auto’symbol will remain lit to signify that an Auto Cooking Programme has
been set.The ‘cookpot’ symbol will go out.
Step 7 Turn the oven control(s) to the required temperature, and if necessary
select the appropriate oven function.
12
At the end of the Automatic Cook Period the Auto Symbol will flash and an
intermittent bleeping sound will be heard.
The audible tone will continue unless cancelled.
The ‘Auto’symbol will continue to flash until the timer is returned to Manual
operation (see below).
Step 8 Press the Manual button,the audible tone will be cancelled and the
oven(s) will be returned to Manual.
Step 9 Turn the oven control(s) to the OFF position.
Page 13
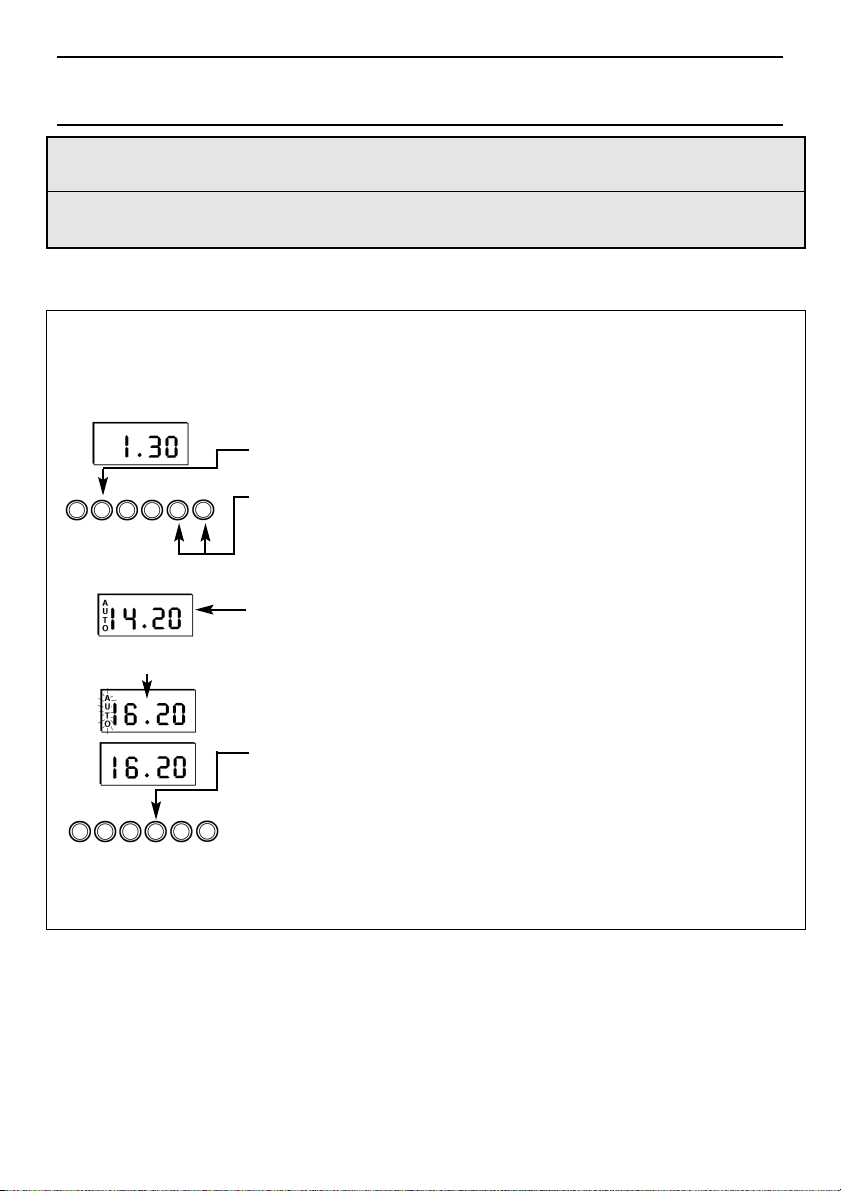
Electronic Clock & Automatic Oven Timer
Operation
(KD6C8E only)
Note 1 When cooking automatically the Cook Period can be checked at any time by simply
Note 2 When cooking automatically the End Time can be checked at any time by simply
b) TO SET TIMER TO SWITCH ON IMMEDIATELY AND OFF AUTOMATICALLY AFTER A SET COOK
NOTE:The Cookpot symbol disappears
pressing the Cook Period button.
pressing the End Time button.
PERIOD
Step 1 Check that the correct time of day is set, if not follow instructions for setting the time of day.
Step 2 Place food onto the correct shelf position in the oven and close the oven door(s).
Step 3 Turn the oven control(s) to the required temperature, and if necessary select the appropriate oven
function.
Step 4 Press & hold in the Cook Period button, the display will read 0.00 and the
‘cookpot’symbol will light up.
With the Cook Period button still held in set the required Cook Period using the
“+”and “–”buttons. Example: 1hr 30 minutes (as shown).
Note: Cook Period is the length of time the food requires to cook.
Step 5 Release all buttons.
The timer display will revert to the time of day with the ‘Auto’symbol lit &
‘cookpot‘ symbol remaining lit.
At the end of the Cook Period the ‘Auto’ symbol will flash and an intermittent
audible tone will be heard.
The audible tone will continue until cancelled.The ‘Auto’ symbol will continue to
flash until the timer is returned to Manual operation (see below).
Step 6 Press the Manual button.The audible tone will be cancelled and the
oven(s) will be returned to Manual.
Step 7 Turn the oven control(s) to the OFF position.
13
Page 14
Electronic Clock & Automatic Oven Timer
Operation
(KD6C8E only)
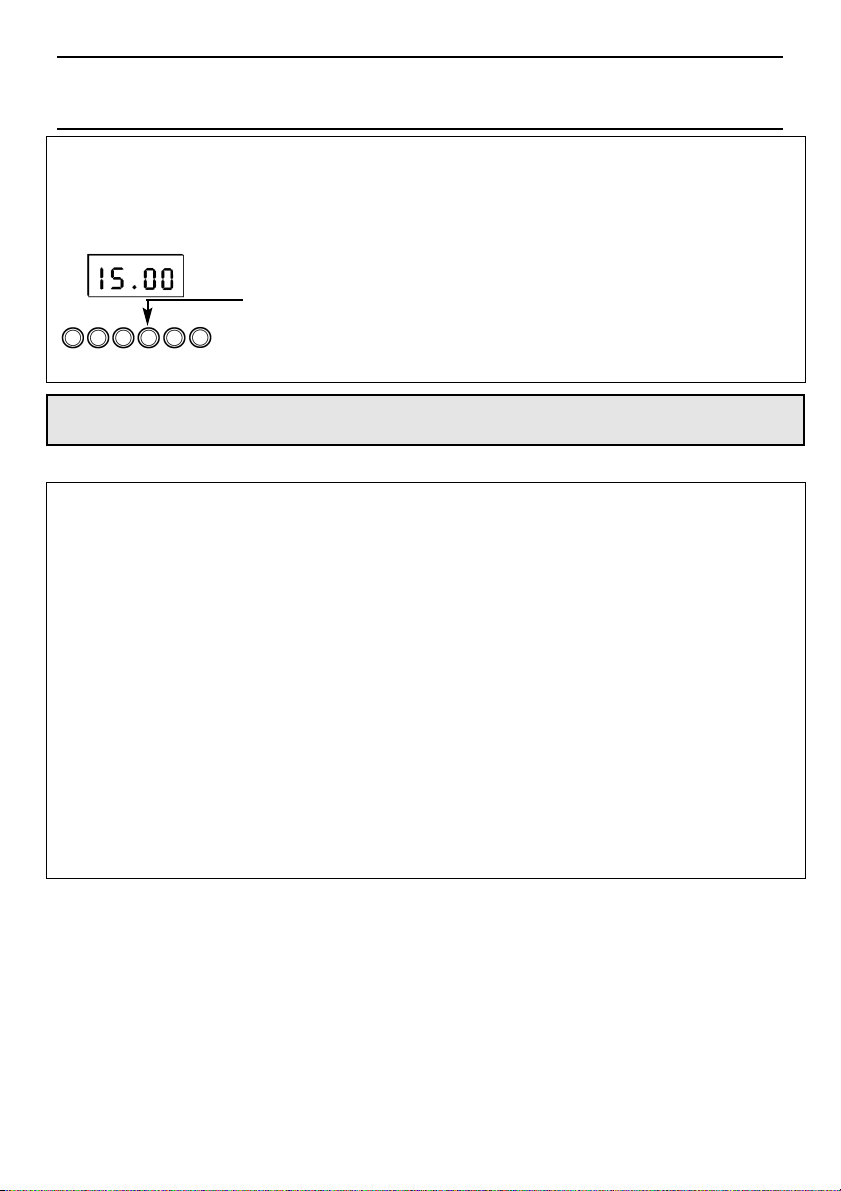
TO CANCEL AN AUTO COOKING PROGRAMME BEFORE
THE COOK PERIOD HAS FINISHED.
Step 1 Turn the oven control(s) to the OFF position.
Step 2 Press the Manual button to return the oven(s) to “Manual”operation.
The ‘Auto’symbol will go out.
Note 1 When cooking automatically the Cook Period can be checked at any time by simply pressing
OTHER NOTES ON TIMER OPERATION
1. When cooking Automatically the Cook Period can be checked at any time simply by pressing the Cook
2. When cooking Automatically the End Time can be checked at any time by simply pressing the End Time
3. Having set a Cook Period and End Time an electronic device stores the information.The device within the
4. When setting an Auto Cooking Programme and a mistake is made, to clear:–
5. If at any time the display shows three flashing zero’s 0.00 and ‘Auto’, it is likely that the electricity supply to
6. To set each function always press and hold the required function button and at the same time press “+” or
the Cook Period button.
Period button.
button.
timer will switch the oven(s) on and off at the required times.
(a) Press & release the Manual button.
(b) Start the sequence again.
the oven has been interrupted.Reset the timer to the correct time of day.
Food in the oven may,therefore, not have been cooked, before serving check food is thoroughly heated
and completely cooked.
“–” buttons.
14
Page 15
Clock/Minute Minder Operation (KD6C7E only)
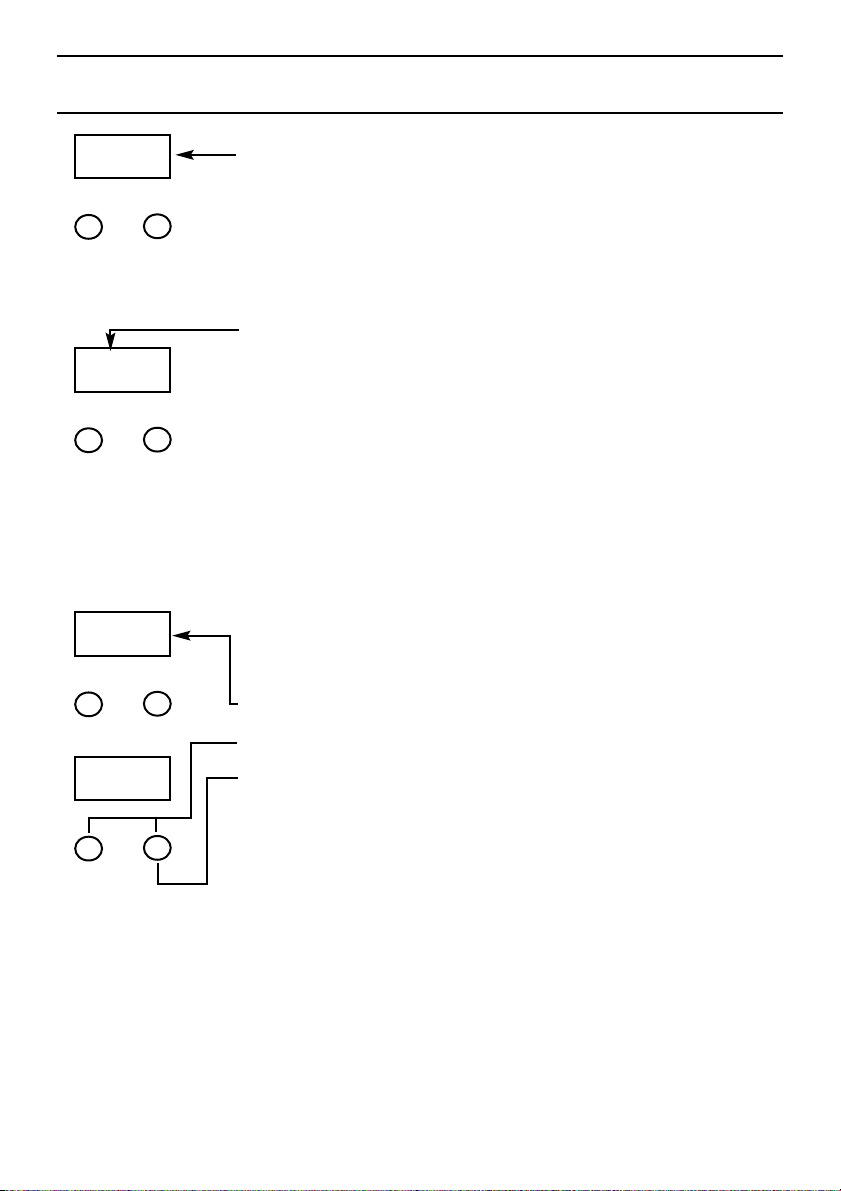
CLOCKFACE
0.00
-
0.00
+
Minute
Minder
The timer incorporates a 24 hour clock.
SYMBOLS
A ‘Bell’ symbol will light up when you select a Minute Minder Period and
will remain lit for the period set.
At the end of the Minute Minder Period,the timer will emit an audible
tone and the ‘Bell’ symbol will flash.
SETTING THE TIME OF DAY
0.00
0.00
Step 1 Make sure all oven controls are turned off.
Step 2 Check the electricity supply to the cooker is turned on.
Step 3 When switched on, the display will flash 0.00
Step 4 Press and release both buttons simultaneously.
Step 5 Press the ‘+’button to set the Time of Day.
The Time of Day can be adjusted, by using the ‘+’ button to
increase the time setting or the ‘-’ button to decrease the
time setting.
The Time of Day is set if no adjustments are made within 10
seconds.
THE TIME OF DAY IS NOW SET.
To change the time of day repeat Steps 4 & 5 above.
15
Page 16
Clock/Minute Minder Operation (KD6C7E only)
Here you can set a time period of up to 10 hours,that will count down.
When it reaches zero,the timer will emit an audible tone.
For Example: If you set 20 minutes, the audible tone will occur 20
minutes later.
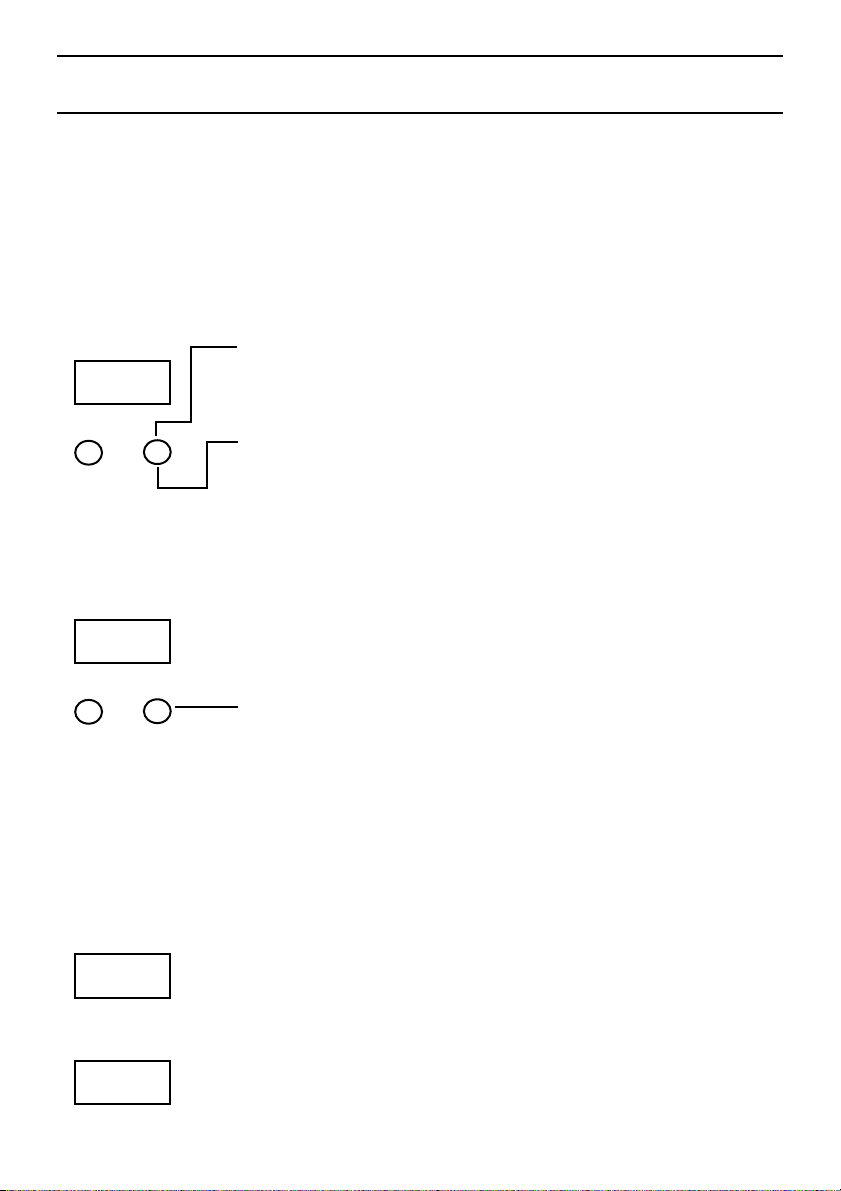
SETTING THE MINUTE MINDER
Step 1 Ensure the time of day is set correctly.
Step 2 Press and release the ‘+’ button.
0.00
0.00
19.50
Note: Step 3 must be started within 10 seconds, otherwise
you must repeat Step 2.
Step 3 Press the ‘+’button to set the required time period.
A ‘Bell’ symbol will light up.
The time period can be adjusted,by using the ‘+’button to
increase the time period or the ‘-’ button to decrease the
time period.
Release all buttons, the timer display will show the remaining time
period.The ‘Bell’symbol will remain lit to signify that a time period has
been set.
At the end of the set time an audible tone will be heard and the ‘Bell’
symbol will flash.
Step 4 To cancel the audible tone press the ‘+’ button.
To cancel the minute minder period press the ‘-’button until 0.00 is
displayed in the window then release the button.
If at any time the display shows flashing zero’s,it is likely that the
electricity supply has been interrupted.
Reset the timer to the correct time of day.
Note: The Timer display will show the minute minder
period as follows:
Any period up to 99 minutes and 50 seconds -
The display shows MINUTES and SECONDS (10s intervals)
eg. 19 minutes 50 seconds
16
1.41
Any period between 100 minutes (1 hour 40 minutes) and up
to 10 hours -
The display shows HOURS and MINUTES
eg. 1 hour 41 minutes
Page 17
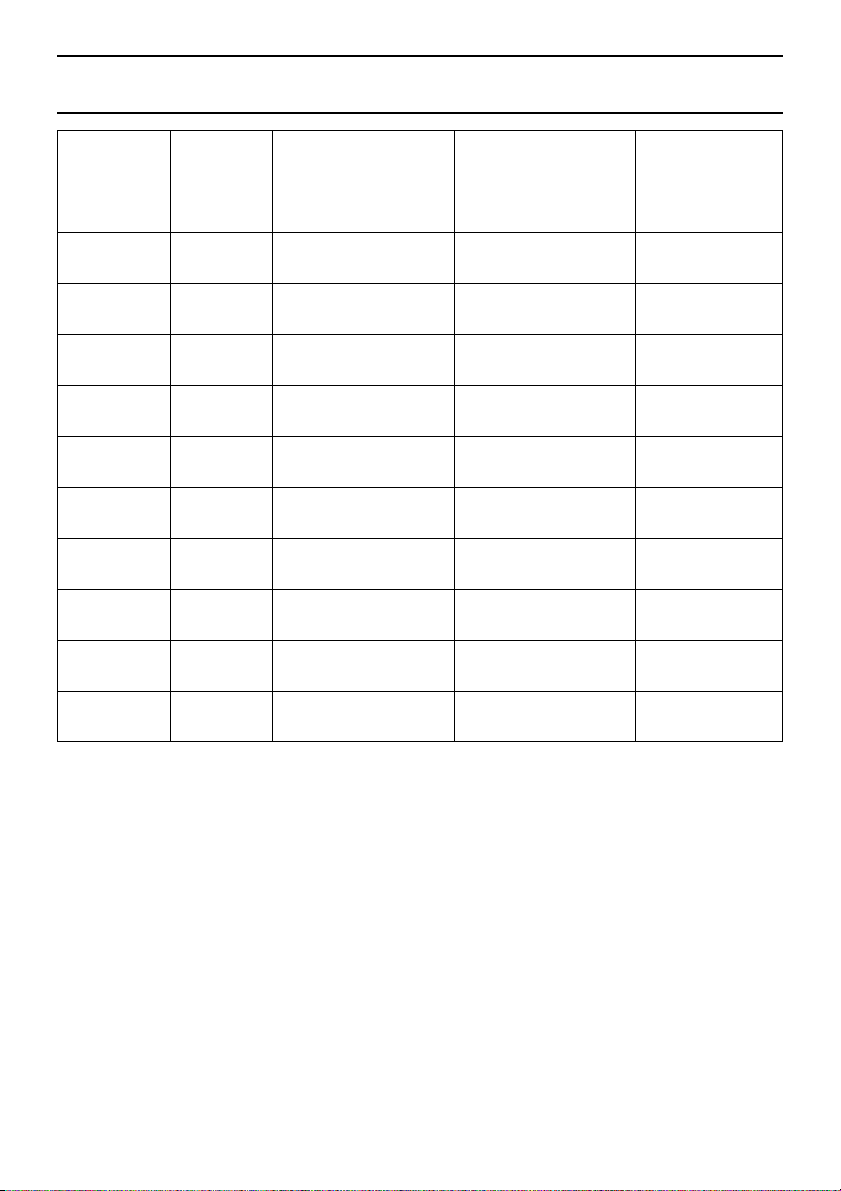
Temperature Conversion Chart
Gas
Mark
1
2
/
1
2
3
4
5
6
7
8
9
˚F
Conventional
Oven
Main
250 100
275
300
325
350
375
400
425
450
475
120
140
150
160
180
190
200
220
–
–
To p
Convection
Oven
110
130
140
150
170
180
190
210
220
–
Main
Fan
Oven
120
130
140
160
170
180
200
210
220
17
Page 18
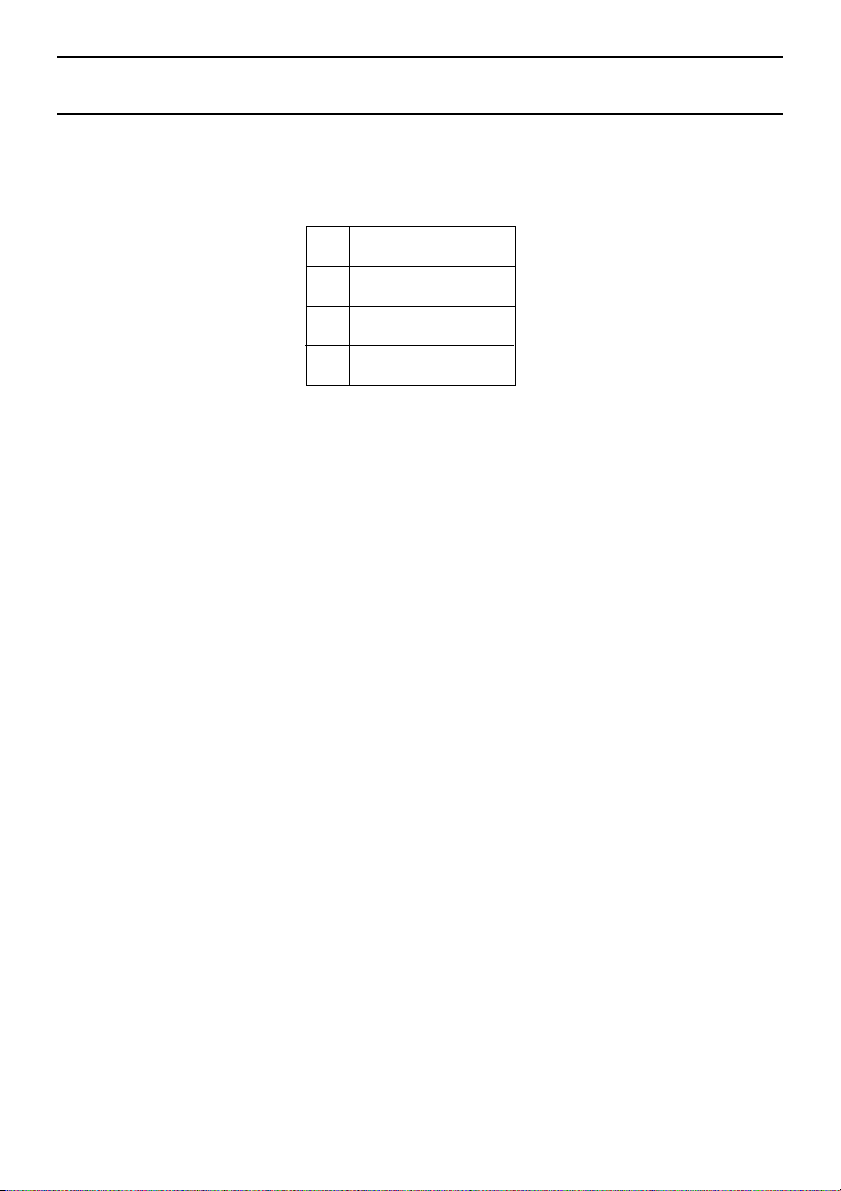
Ceramic Hob
CAUTION: IF ANY CRACK IN SURFACE BECOMES VISIBLE, TURN OFF THE MAINS COOKER SWITCH.
Under no circumstances should the hob be used with aluminium foil in contact with the hob surface.
The following boiling plates are located beneath the circular cooking areas:-
Front
6 Heat 1800W
Right
Rear
6 Heat 1500W
Left
Rear
6 Heat 1200W
Right
Front
6 Heat 1200W
Left
The cooking areas change colour when heated (become red) indicating
which heating
element is turned on. The cooking area returns to its original colour when the heating
element is switched OFF and cools.
Hotplates
When the control is turned from the 0 position, the settings on the control panel will show
1 - 6, these are 6 fixed positions for cooking.
6 is the highest setting, for fast cooking. To reduce the heat to cook more slowly or simmer,
turn the knob to a lower setting which will vary according to size and type of saucepan, the
amount and type of food, and whether or not the lid is fitted. Pans can be placed on the
unheated areas of the panel when cooking is finished and before serving food.
It is inadvisable at any time to leave a heating element switched on without a pan in
position as this wastes energy, and could make soil or rub-off from aluminium pans more
difficult to remove. To protect
incorporated
with each element. After several minutes with the control at setting 6 the
elements against overheating, safety cut-outs have been
safety cut-out switches the element Off and On continuously, thus preventing any adverse
effects that may be caused by an excessive build-up of heat in the cooking area.
Setting 1 provides low input for simmering.The control will be Off when the control knob
is turned to the O position.
If the hob should become cracked, never use until repaired. Always ensure that saucepan
handles are positioned safely.
18
Page 19
Ceramic Hob General Information
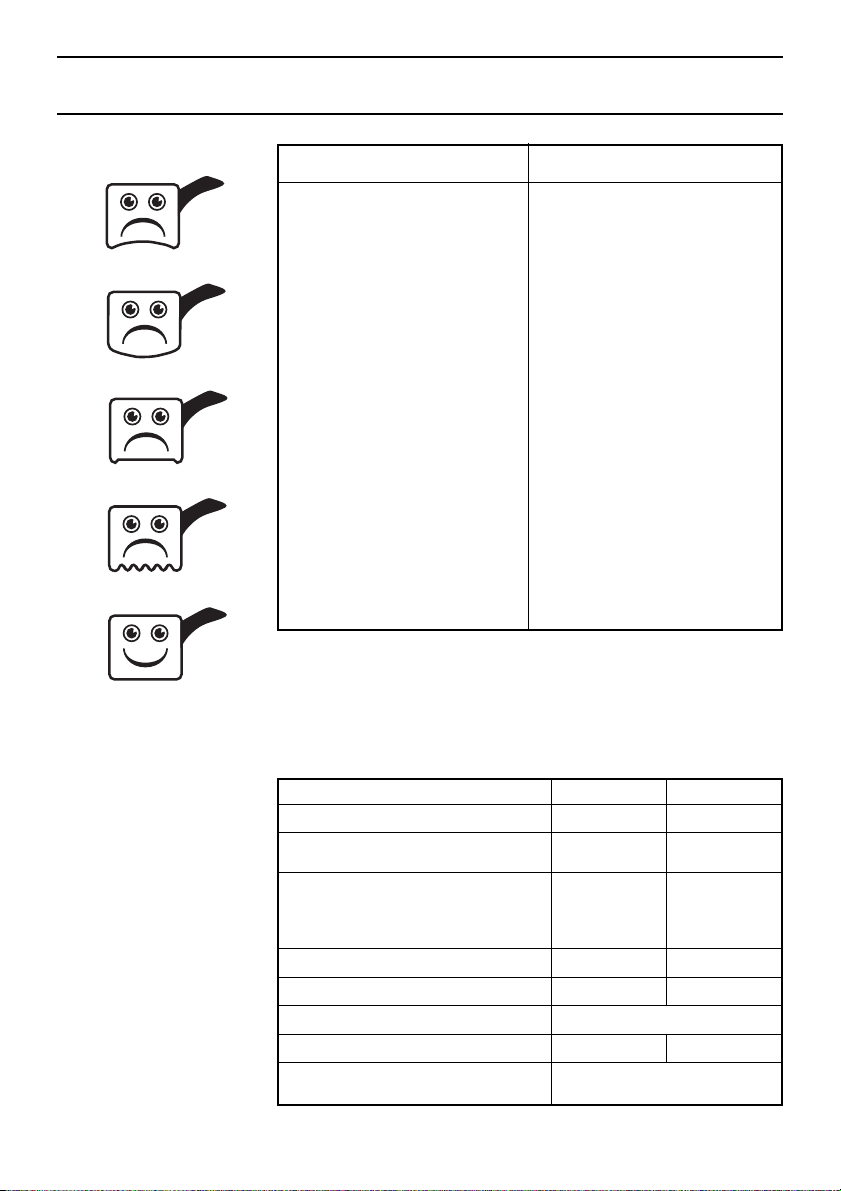
PANS SHOULD BE:
Not concave (bowed in)
Not convex (bowed out)
Not rimmed
Not deeply ridged
But essentially Flat
Always ✓ Never ✗
● Use good quality flat-based
cookware on all electric heat
sources.
● Always ensure pans have
clean, dry bases before use.
● Ensure pans match size of
heating area.
● Remember good quality
pans retain heat well, so
generally only a low or
medium heat is necessary.
● Ensure pan handles are
positioned safely and away
from heat sources.
● Always lift pans, do not drag.
● Always use pan lids except
when frying.
● Deal with spillage
immediately but with care.
THE BEST COMBINATIONS
This table is a general guide to the types of pan suitable for
different types of hobs and cookers. Remember pans should be
good quality, with smooth, flat bases. For any further information
refer to manufacturers’instructions.
● NEVER Use gauze, metal
pan diffusers, asbestos
mats and stands e.g.Wok
stands – they can cause
overheating.
● NEVER Use utensils with
skirts or rims e.g. buckets
and some kettles.
● NEVER Use badly dented
or distorted pans.
● NEVER Leave an element
switched on when not
cooking.
● NEVER Cook food directly
on a heat source.
● NEVER Drag or slide utensils,
along the hob surface.
● NEVER Stare at Halogen
heating units.
Aluminium
Stainless steel with single layer
copper base
Stainless steel with sandwich bases
of aluminium and
stainless steel or aluminium
and copper.
Enamelled steel
Enamelled aluminium
Enamelled based cast iron
Copper
Toughened glass or ceramic/
glass/pottery
Ceramic
Halogen
✓✓
✗
✗
✓✓
✓
✓
✓
✓
✓ With Extra Care ✓
✗✗
Not Recommended
19
Page 20
Ceramic Hob General Information
Do Not
Do not cook directly on the hob surface without a cooking utensil, as this
will result in damage to the surface of the hob.
Do not use the hob as a worktop surface as damage may occur to the
smooth surface of the hob.
Do not drag or slide utensils on the hob surface, as this will cause
scratches in the surface of the hob.
Do not allow a cooking utensil to come into contact with the hob
surround.
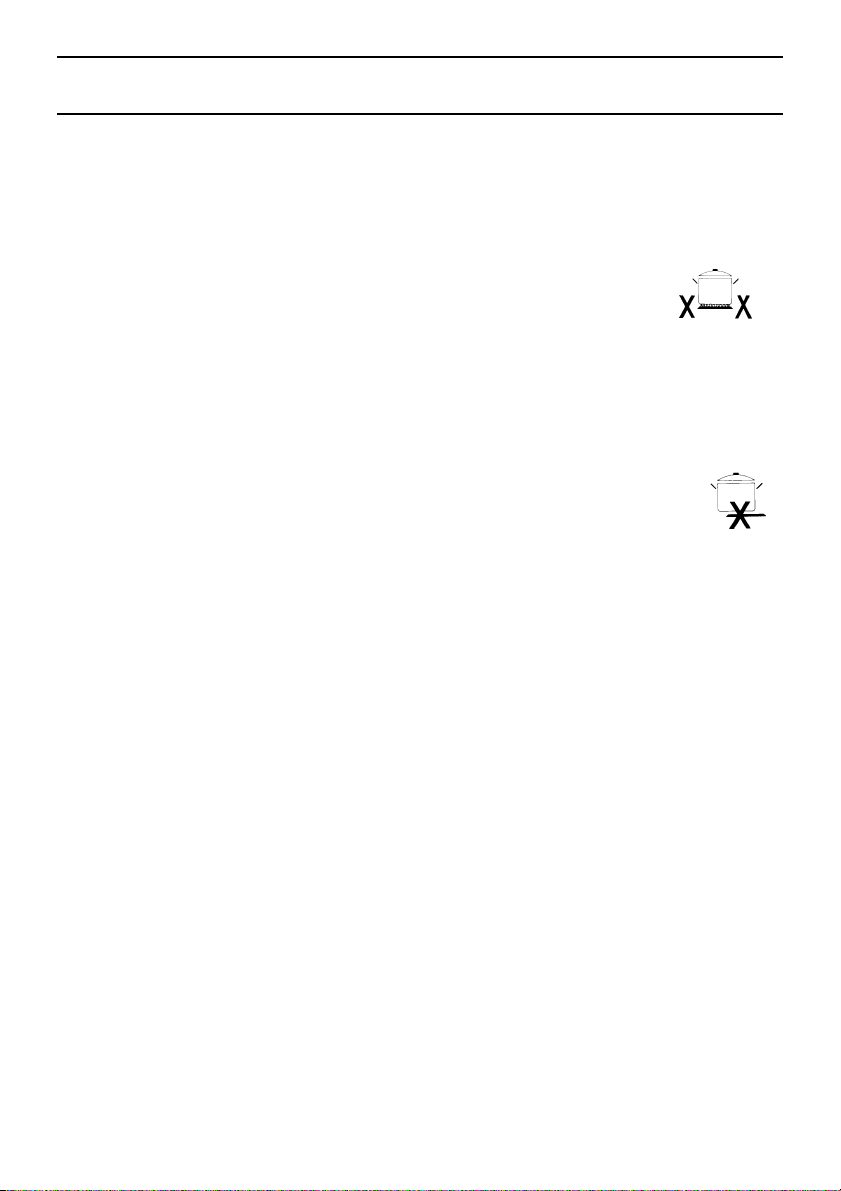
Do not place anything between the base of the utensil and
the ceramic hob,e.g. do not use asbestos mats,
aluminium or wok stand.
Do not leave any utensils,food or combustible items on the hob when it is
not in use.
Do not place aluminium or plastic foil, or plastic containers on the hob.
Do not leave the hotplates or cooking areas switched On unless they are
being used.
We recommend not to place large preserving pans or fish kettles across two
heating areas.
Do not leave utensils partly covering the heated areas.Always
ensure that they are placed centrally over the heated
areas and have the same diameter as the heating area
used.
We recommend not to use a utensil with a base diameter greater than 25cm
(l0ins).
Pressure cookers or other large pans should be used on the front cooking
areas.
Always ensure that saucepan handles are positioned safely.
IMPORTANT – As with any cooking appliance there could be some fire risk
attached to the heating of oil, particularly for deep fat frying, cooking
utensils containing oil must not be left unattended (e.g.to answer the
telephone) on or in close proximity to the patterned cooking areas.
Safety
requirements for
deep fat frying
20
In the unfortunate event of a chip pan fire:
1. Switch Off the electricity supply.
2. Smother flames with a fire blanket or damp cloth.
Burns and injuries are caused almost invariably by picking up the burning
pan and rushing outside with it.
1. Use a deep pan, large enough to completely cover the appropriate
heating area.
2. Never fill the pan more than one-third full or fat or oil.
3. Never leave oil or fat unattended during the heating or cooking period.
4. Do not try to fry too much food at a time, especially frozen food.
This only lowers the temperature of the oil or fat too much,resulting in
greasy food.
5. Always dry food thoroughly before frying,and lower it slowly into the
hot oil or fat. Frozen foods, in particular, will cause frothing and spitting,
if added to quickly.
6. Never heat fat, or fry,with a lid on the pan.
7. Keep the outside of the pan clean and free from streaks of oil or fat.
Page 21
Choosing Your Utensils
Choosing your
utensils
Remember
Do Use
Below are some guidelines to help you make the right choice of
utensils.
To obtain a satisfactory performance from a ceramic hob and to
avoid unnecessary damage, we recommend the use of good
quality utensils with smooth flat bases.
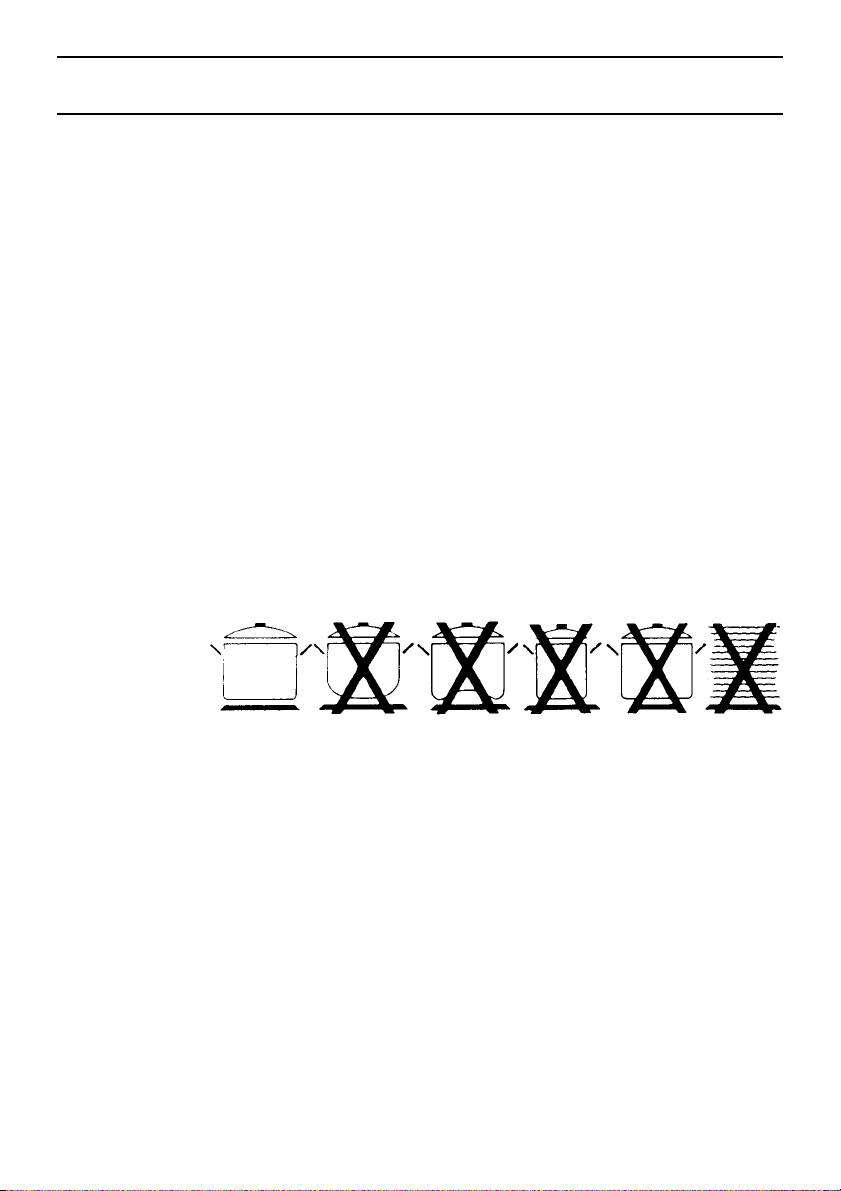
1. Purchasing a new pan will not necessarily mean it will have a
flat base, always check before buying. See diagram below.
2. Using the correct pans and utensils will result in maximum
contact with the hob and maximum efficiency as with any type
of electric hob.
Do use good quality smooth flat based utensils.
Do use a utensil which has approximately the same base area as
the heating area zone being used.
Do use utensils which have more than sufficient capacity for the
amount of food being cooked to prevent boil over or
spillage.
Do use utensils with good fitting lids.
Do use a low dome pressure cooker for best results.
Good quality
flat base
same size as
element
Convex
base too
small
Concave
base
Too
small
Too
large
No pan
Element ON
Important
WARNING: Extreme caution should be used when cleaning the
hot hob.
1. Always clean up any spillage immediately with a clean cloth or a
paper towel to avoid unnecessary damage to the hob.
Extreme care should be taken to avoid steam burns and hot
surfaces when cleaning spillage from the hob.
2. When cooking food which contains sugar (most food) or syrup,use a
utensil which is large enough to prevent boil over or spillage.Sugar
spillage will permanently damage the hob and therefore should be
cleaned off with care immediately.Taking care remove when still hot
with a razor-blade scraper.This will avoid any damage.
NEVER LET IT COOL BEFORE REMOVING.
3. Always ensure that the base of the utensil is dry before placing
on the ceramic hob.
21
Page 22

Choosing Your Utensils
Do Not
Do not use utensils with rough bases.
Do not use lightweight utensils with thin, distorted or uneven bases.
Do not use lightweight enamelled steel utensils.
Do not use cast iron utensils.
Do not use utensils with recessed, scrolled or ridged bases.
Do not use a utensil which has a base concavity greater than 1mm as this
will reduce the performance of the hob.
Do not use a utensil with a convex base.
Do not use glass ceramic utensils.
Do not use use lightweight saucepans with plain thin copper bases on
ceramic or halogen hotplates.
Note: All copper pans are excellent conductors of heat, and are hard
wearing and strong,but need quite a lot of care. They can be very heavy and
do not usually have completely flat bases.The interiors are usually lined with
a different material such as tin.
A stainless steel pan with a sandwich base of aluminium and stainless steel
is an excellent conductor of heat and is suitable for use on ceramic and halogen hobs, providing they are used in accordance with the saucepans manufacturers’ recommendations.
Stainless steel pans with a sandwich base of aluminium and copper are
excellent conductors of heat. If using stainless steel saucepans with
aluminium and copper sandwich bases on ceramic and halogen hobs,the use
of these pans must be in accordance with the saucepan manufacturers’
recommendations. Extra care should be taken to ensure the base of the pan
and the hob is cleaned, and the hob conditioned, after each and every
use, when using this type of saucepan.
If these recommendations are not followed, the result will be a build up of
small copper deposits on the surface of your hob which, if not cleaned after
each use, will result in permanent marking of your hob.
Always lift the pan from the hob,do not drag or slide across the hob surface
as damage may occur.
22
Page 23
Grill Pan and Handle
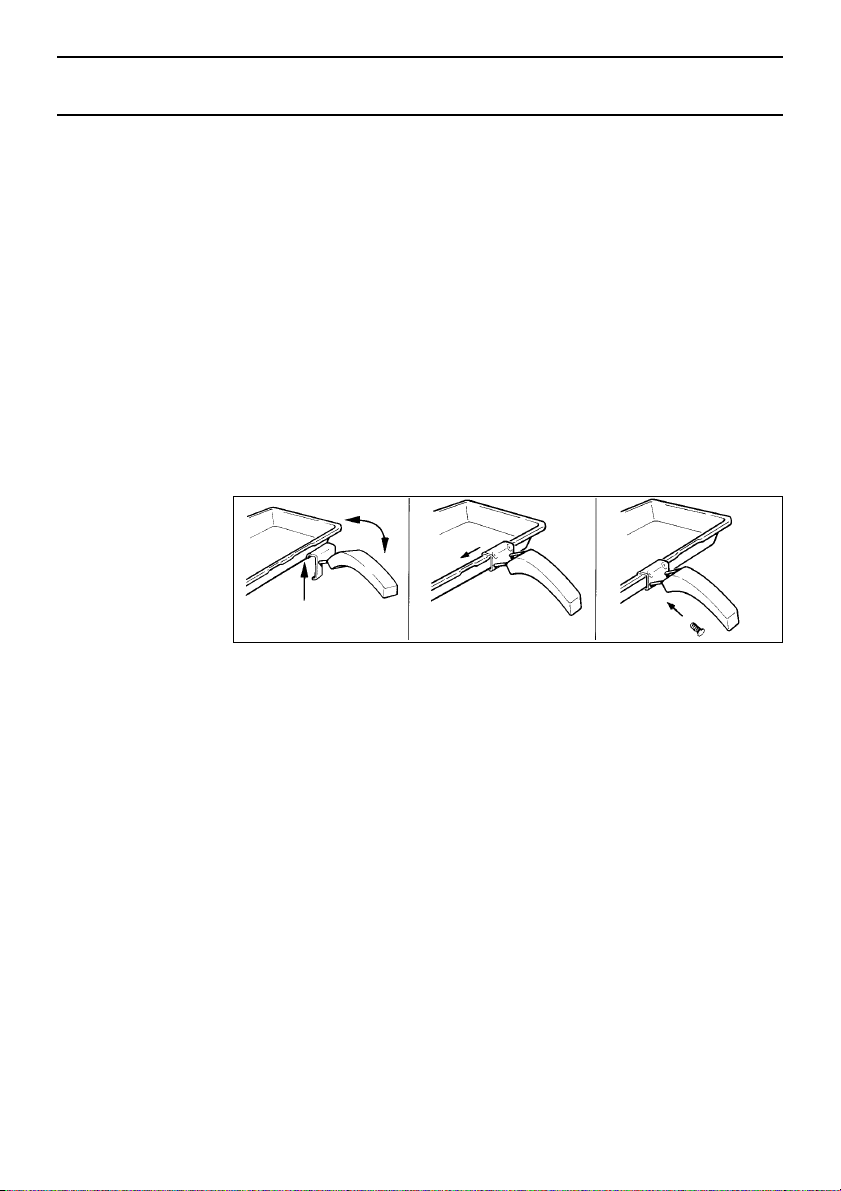
Grill pan handle The grill pan handle is detachable from the pan, to facilitate
cleaning and storage.
The handle can be either detachable from or fixed to the pan.
For a fixed handle remove the screw and washers from the grill pan
bracket, tilt the handle over the recess adjacent to the bracket (A), slide it
towards the centre of the pan (B) and let the handle locate over the
bracket (C). Replace screw and washers and ensure that they are fully
tightened up.For a detachable handle remove screw and washers from
the grill pan and keep safe.
Please note that if a fixed handle is required, the grill pan cannot
be kept in the Main Fan Oven compartment with the door closed but may
be stored in the Top compartment when the appliance is not in use.
Warning: Ensure when using grill pan handle in the detachable
manner it is centralised and secure.
AB
C
23
Page 24
Grill
Setting the Grill
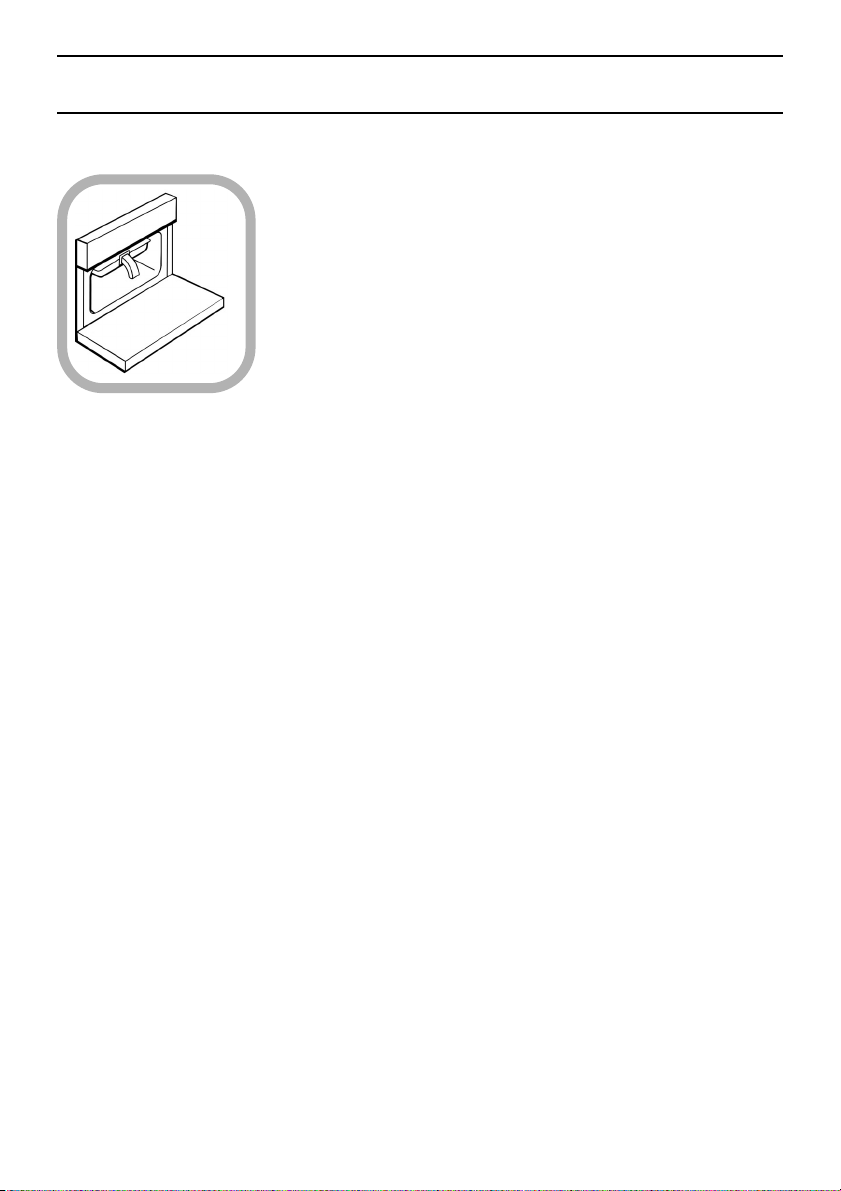
Door in
grilling
position
CAUTION - ACCESSIBLE PARTS MAY BECOME HOT WHEN THE
GRILL IS IN USE. CHILDREN SHOULD BE KEPT AWAY.
GRILLING SHOULD NEVER BE UNDERTAKEN WITH THE DOOR
CLOSED.
Model KD6C0E:
The grill control is fully variable,from the minimum setting through to
the maximum setting.
The control is Off at O.
Models KD6C8E and KD6C7E:
The grill control is designed to provide variable heat control of either
the twin grill elements on together or the single left hand grill
element only, depending upon which direction the control knob is
rotated.
- With the control rotated clockwise 1 through to 4 the twin elements
will come on together.
- With the control turned anti-clockwise 1 through to 4 and the single
left hand element will come on only.
The control is Off at O.
Note: The grill will not operate unless the top oven control is in
the OFF position.
Food which requires browning only should be placed under the hot
grill, directly on the shelf in the first or second runner from the bottom
of the oven, according to the depth of the dish.
Open the Grill door to the grilling position. i.e. fully.
With the grill door in the grilling position, heating the grill is achieved
by turning the control clockwise to the desired ‘grill setting’ on the
control panel.
24
Never:
line the grill pan with aluminium foil.
Note:
Preheat the grill at setting 4 for approximately 5 minutes. The
grill pan is placed on the shelf or grill pan support/runner and should
be correctly positioned under the grill element. Leave the control at 4
for toast,sealing and fast cooking of foods. For thicker foods requiring
longer cooking, turn the switch to a lower setting after the initial
sealing on both sides at 4.The thicker the food the lower the control
should be set.
Page 25
Guide To Grilling
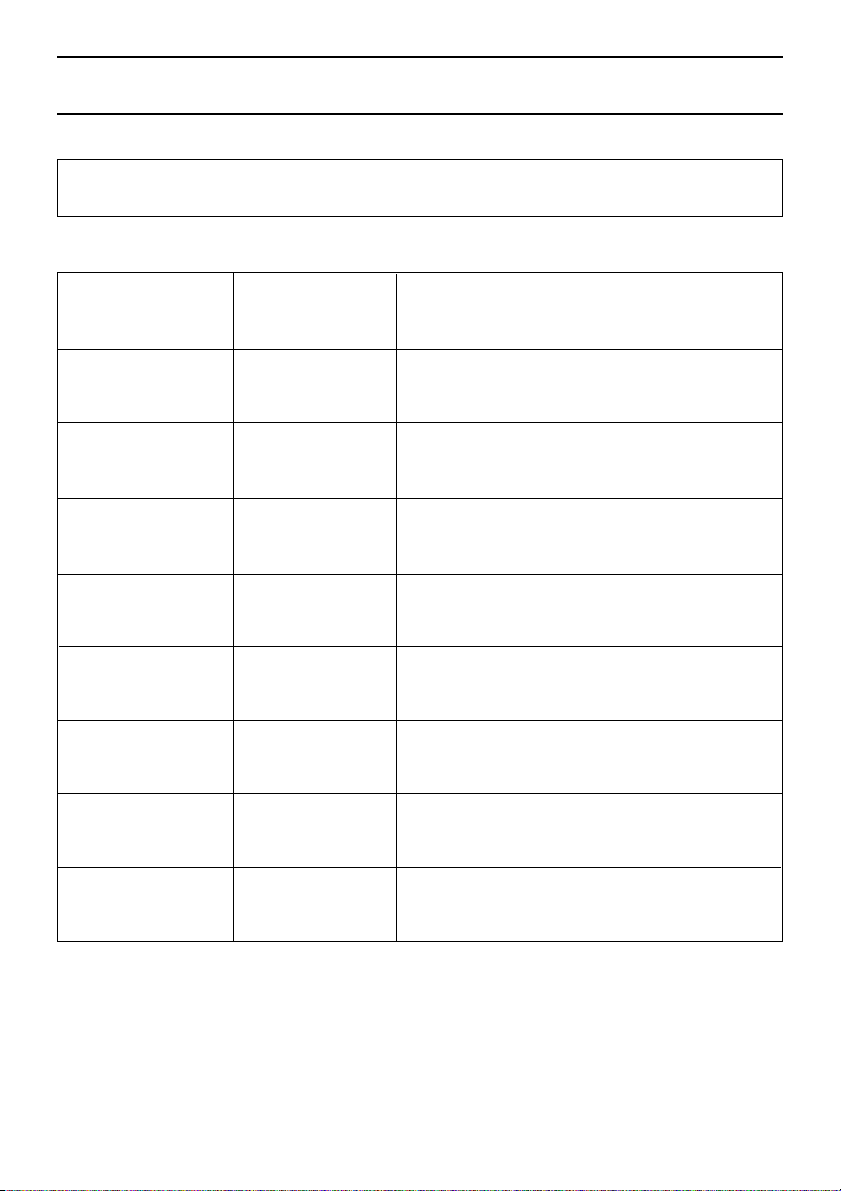
Pre - heat the grill for 5 minutes on maximum control setting before grilling
GRILL CHART
Food
Toasting of Bread
products
Small cuts of meat,
sausages, bacon,etc.
Chops etc.
Gammon steaks
Chicken pieces
Fish: fingers
Whole
Fillets
Fish in breadcrumbs
Pre - Cooked potato
products
Pizzas
Browning of food
Grill Setting
4 / Max
4 / Max for 4 mins.
reduce to lower
setting.
4 / Max for 6-8 mins.
reduce to lower
setting.
4 / Max
3
/4 full
3 /
3
3 /
/4 full
3
3 /
4 full
/
4 / Max
Approximate Cooking time
3 - 10 mins.
10 - 20 mins.
20 - 30 mins.Wire food support used in upturned
position for chicken.
10 - 20 mins.Whole fish and fillets placed in the
base of the grill pan.
15 - 20 mins.
15 - 20 mins.
12 - 15 mins. in the base of the grill pan.
8 - 10 mins. Dish placed directly on base of the
grill pan and pan placed on the base of the grill
compartment.
The settings in the above guide have been developed to cook food successfully without
excessive fat spitting and splashing.
25
Page 26

Top Oven Cookery Notes (KD6C8E and KD6C7E only)
The top oven should be used to cook small quantities of food. The oven is
designed so that the grill element operates at a reduced heat output,this
is combined with a heating element situated underneath the floor of the
oven.
To ensure even cooking of the food it is important that cooking utensils
are positioned correctly on the oven shelf so that the element is directly
above.
There are two cooking positions, the shelf placed on runner 1 or 2 (from
the base), do not use shelves upside down.
Food/utensils must not be placed directly on the oven floor.
There should always be at least 25mm (1in) between the top of the food
and the grill element.
Warning: Items stored in top oven will get hot when main oven is in use.
Operation
Cooking meat/
poultry
Top oven as
a warming
compartment for
plates
To heat the oven, turn the control knob clockwise.The top oven pilot light
will come on and remain on until the oven reaches the required temperature.
The pilot light will automatically go on and off during cooking as the
thermostat maintains the correct temperature.
Small joints of meat up to 1.5kg (3 lbs), or poultry, up to 3.6kg (8 1lbs)
(60cm cookers) in weight can be roasted in a small meat pan in the top
oven. Larger joints of meat/poultry weighing more than 3.6kg (8 1lbs)
(60cm cookers) should be roasted in the main oven.
Do not use the grill pan as a meat pan in the top oven as air
circulation will be seriously restricted.
Place the plates/dishes on the shelf,positioned on runner 1, turn top oven
control to 100°C for 10-15 minutes.Never use grill control.
26
Page 27

Main Oven Cookery Notes
The oven is fitted with wirework shelf supports and two rod shelves.
To heat the oven turn the knob clockwise, selecting the require
temperature between 80°C (176°F) and 230°C (450°F) as recommended in
the temperature chart. The pilot light will immediately come on and
remain on until the oven reaches the required temperature. This light will
then automatically go off and on during cooking as the oven thermostat
maintains the correct temperature.
It should be noted that at the end of the cooking period their may be a
momentary puff of steam when the oven door is opened. This will
disperse in a few seconds and is a perfectly normal characteristic of an
oven with a good door seal.
Since a circulaire fan oven heats up more quickly, and generally cooks food
at a lower temperature than a conventional oven, pre-heating is often
unnecessary.However, foods such as bread,scones, Yorkshire pudding,do
benefit from being placed in a pre-heated oven.
The ‘oven temperature charts’ are a guide only, giving approximate
cooking temperatures and times.To suit personal taste and requirements,
it may be necessary to increase or decrease temperatures by 10°C.
Unless otherwise indicated in the charts food should be placed in a cold
oven, i.e.without pre-heating. If food is placed in an already hot oven,the
suggested cooking time should be reduced, depending on the type and
quantity of food being cooked.
Oven positions
Temperature
and time
Frozen meat
and poultry
Since the distribution of heat in the circulaire fan oven is very even, most
foods will cook satisfactorily on any shelf position, but the shelves should
be evenly spaced.
The top oven rod shelf can be used in the main oven when cooking large
quantities of food. Additional shelves can be purchased through your
oven supplier or our Parts Department (see Key Contacts, back page).
Food or utensils should Never be placed directly an the floor of the
oven for cooking.
Never use more than 3 shelves in the oven as air circulation will be
seriously restricted.To ensure oven circulation do not use meat pans larger than 390 x 300mm (15”x12”) and baking trays no larger than 330 x
255mm (13”x 10”), these should be positioned centrally on the oven shelf.
Food should not be placed directly on the floor of the oven. To avoid
unnecessary cleaning, rod shelves which are not in use, should be
removed from the oven.
When all three shelves are used to cook large quantities of food for home
freezing or parties, it may be necessary to increase the cooking times given in
the temperature charts by a few minutes, to allow for the loss of heat due to
extra time taken to load the oven, and the larger mass of food. Baking trays
should have an equal gap at either side of the oven.
Joints of meat and whole birds should be defrosted slowly, preferably in a
domestic refrigerator (allowing 5-6 hours per 450g (1 lb), or at room
temperature (allowing 2-3 hours per 450g (1 lb).
27
Page 28
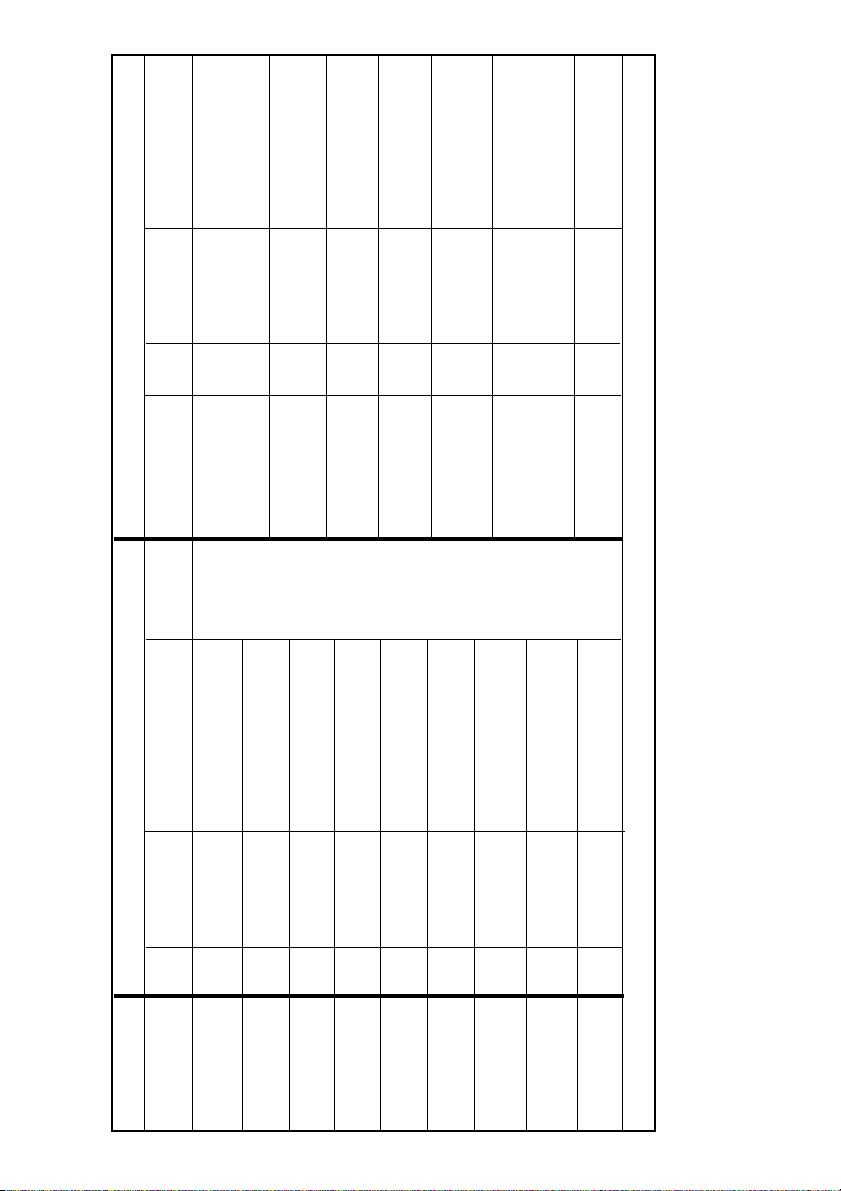
Time (approx.)
25 mins per 450g
25 mins per 450g
(1lb) + 25 mins extra
(1lb) + 20 mins extra
20-25 mins per 450g
(1lb) + 25 mins extra
(1lb) + 25 mins extra
25-30 mins per 450g
(1lb) + 20 mins extra
18-20 mins per 450g
12 mins per 450g (1lb)
13-15 mins per 450g (1lb)
e.g.10kg (22lb) = 264 mins
e.g.5kg (11lb) = 143-165 mins
- 2 hrs
2
/
1
1
˚C
(all models)
Temperature
Pre-
Fan Oven Cooking
Position in
160/180
160/180
No
Beef
No
Lamb
heat
Meat
Oven
(1lb)
160/180
No
Pork
Runner 1
160/170
No
Veal
from
oven.
bottom of
160/180
No
Chicken/
Tur key
(1lb)
up to 4kg (8lb)
Oven Temperature Charts – Meat
Time (approx.)
+ 35 mins over.
35-40 mins per 450g
35 mins per 450g (1lb)
+ 40 mins over
(1lb) + 40 mins over
40-45 mins per 450g
40 mins per 450g (1lb)
40 mins per 450g (1lb)
40-45 mins per 450g
25-30 mins per 450g
150
150/160
No
Tur key
up to 5.5kg (12lb)
140-150
No
over 5.5kg (12lb)
Casserole Stews
hrs
2
/
1
(1lb)
2-2
(1lb) + 25 mins over
25-30 mins per 450g
28
˚C
190/200
170/180
170/180
Temperature
Pre-
Meat
heat
Yes
Beef/ Lamb
(slow roasting)
Top Oven Cooking (KD6C8E and KD6C7E only)
Yes
Yes
Beef/ Lamb
(foil covered)
Pork
(slow roasting)
190/200
Yes
Pork
(foil covered)
170/180
Yes
Veal
(slow roasting)
190/200
Yes
Veal
(foil covered)
170/180
Yes
Poultry/Game
(slow roasting)
190/200
Yes
Poultry/Game
(foil covered)
Casserole
150
Yes
Cooking
If using aluminium foil, never: 1. Allow foil to touch sides of oven. 2. Cover oven interior with foil. 3.Cover shelves with foil.
The most accurate method of testing the readiness of joints of meat or whole poultry is to insert a meat thermometer into the thickest part of
a joint, or the thickest part of poultry thighs, during the cooking period.The meat thermometer will indicate when the required internal temp
has been reached.
Medium: 70˚C Pork: 90˚C
Beef - Rare: 60˚C Lamb: 80˚C Poultry: 90˚C
Well Done: 75˚C Veal: 75˚C
Page 29
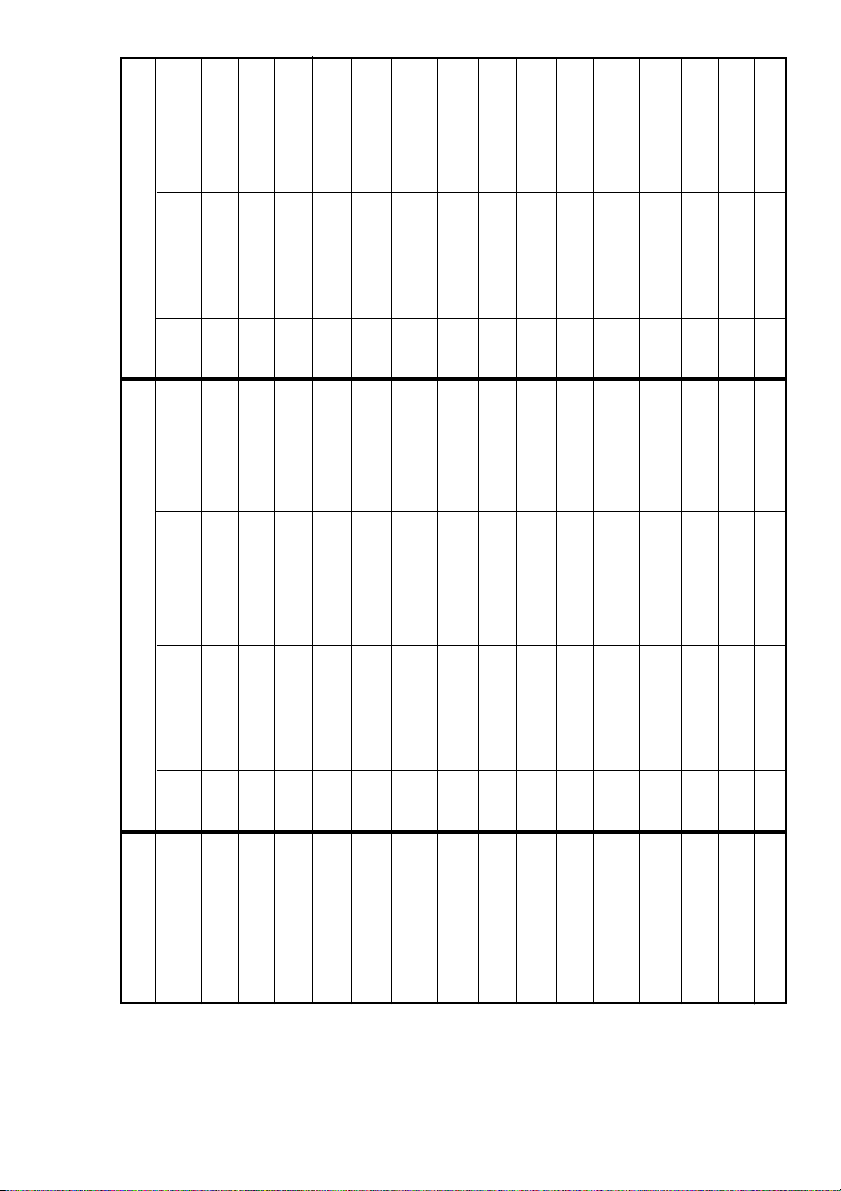
8-10
15-20
20-25
15-20
12-15
75-90
on size.
Depending
45-50
on use.
Depending
40-45
20-25
40-50
105-135
45-50
180-240
Time in mins.
˚C
210/220
Temperature
Fan Oven Cooking (all models)
Pre-
heat
In Oven
Position
Runner 1 from
Yes
bottom of oven
10-15
Time in mins.
˚C
201/220
Temperature
Oven Temperature Charts – Baking
Yes
Pre-
heat
Top Oven Cooking (KD6C8E and KD6C7E only)
170/180
Runner 1 from
Runner 1 from
bottom of oven
20-25
180/190
Yes
170/190
160/170
Yes
Runner 1 from
bottom of oven
bottom of oven
20-30
20-25
170/180
180/190
Yes
Yes
180/200
Yes
Runner 1 from
bottom of oven
10-15
200/210
Yes
Runner 1 from
190/200
130/140
140/150
Runner 1 from
Runner 1 from
bottom of oven
bottom of oven
bottom of oven
60-75 7 inch
Depending on size
Depending on recipe
150/160
Yes
190/200
140/150
Yes
Yes
190/200
Runner 1 from
bottom of oven
Depending on recipe
200/210
Yes
180/190
Yes
Runner 2 from
bottom of oven
30-40
190/200
Yes
190/200
Yes
Runner 2 from
bottom of oven
20-30
200/210
Yes
130/140
Runner 1 from
bottom of oven
90-120
140/150
Yes
140/150
Runner 1 from
Runner 1 from
bottom of oven
40-50
150/160
Yes
80-90
200/210
Yes
Runner 2 from
bottom of oven
bottom of oven
30-45
150-180
100
200/210
Yes
Yes
Baking
Food
Scones
Small Cakes
Sponge Sandwich
Swiss Roll
Semi-rich Fruit
Rich Fruit Cakes
Shortcrust Pastry
Puff Pastry
cakes
Yorkshire Pudding
Individual Yorkshire
Puddings
Milk Pudding
Baked Custard
Bread
Victoria Sandwich
Note: If soft margarine is used for cake making, temperatures recommended by the
manufacturers should be followed.Temperatures recommended in this chart refer to cakes
made with block margarines or butter only.
Meringues
29
Page 30

Using the Main Oven for other Functions
‘S’ SLOW setting (90˚C)
This is used for slow cooking,keeping food warm and warming plates for short
periods. Extra care should be taken when warming bone china,as it may be
damaged in a hot oven.
DO NOT place food or plates directly on the oven floor as this could damage both the
Advantages of “SLOW”cooking are:
The oven stays cleaner because there is less splashing.
Timing of food is not as critical, so there is less fear of overcooking.
Inexpensive joints of meat are tenderised.
Fully loading the oven can be economical.
Cooking times can be extended in some cases by up to 2 hours.
oven lining and the plates which are being warmed.
Operation:
1. Place the prepared food in the main oven and ensure the door is fully closed.
2. Select ‘S’ (Slow Cooking Temperature 90˚C) by turning Main Oven Temperature
Control clockwise ensuring the oven door is fully closed.
Storage and re-heating of food:
1. If food is to be frozen or not used immediately, place it in a clean container
and cool as soon as possible.
2. Always thaw frozen food completely in the refrigerator before re-heating.
3. Always reheat food thoroughly and ensure it is piping hot before serving.
4. Only re-heat food once.
Points to consider when preparing food for “SLOW” cooking:
1. Make sure that the dishes to be used will fit into the oven ensuring enough room
for air to circulate.
2. All dishes cooked on the slow setting will require a minimum of 6 hours, however,
if they are cooked for 1-2 hours longer then deterioration in their appearance may
be noticed.
3. Never cook joints of meat over 2.7kg (6 lb) or poultry over 2.0kg (4 lb 8oz).
We do not recommend that joints of meat or poultry are stuffed before cooking on
the slow setting.
4. To seal in the meat juices,always cook meat or poultry at 170˚C for 30 minutes
before wrapping in foil and placing on a rack over a tin (to allow good air
circulation) before turning the control to the slow setting and cooking immediately.
5. Always ensure that joints of pork and poultry are thoroughly cooked by checking
with a meat thermometer before serving.
6. Always thaw frozen foods completely before cooking.We do not recommend
placing frozen food in the oven to cook.
7. Always bring soups, liquids and casseroles to the boil before placing in the oven.
8. Ensure that casserole dishes have a good seal (not airtight) and cover to the
top with foil to prevent loss of moisture.
9. Ensure that fruit and vegetables are cut into even sized small pieces to cook
properly.
10. Always adjust seasoning before serving.
11. If using dried red kidney beans it is important that the beans are soaked and then
boiled for a minimum of 10 minutes before using in any dish to destroy any toxins.
12. When cooking fish or egg dishes it may be necessary to check during cooking to
avoid overcooking.
30
Page 31

Care and Cleaning
TURN OFF THE MAIN SWITCH AND ENSURE THE COOKER IS COLD BEFORE CLEANING.
BEFORE SWITCHING ON AGAIN,ENSURE THAT ALL CONTROLS ARE IN THE OFF POSITION.
NEVER USE BIOLOGICAL WASHING POWDER, HARSH ABRASIVES,SCOURING PADS,
AEROSOL CLEANERS OR OVEN CHEMICAL CLEANERS OF ANY KIND,UNLESS SPECIFIED
Cleaning materials to avoid:
1. Plastic or nylon pads
2. Household abrasive powders and scourers.These may scratch the surface.
3. Oven chemical cleaners, aerosols and oven pads.
Caustic cleaners such as these will etch the surface and attack the metal frame.
4. Bath and sink cleaners may mark the surface.
ALWAYS SWITCH OFF AT THE MAINS SWITCH BEFORE CLEANING.
Ceramic hotplates:
Clean your Ceramic hob top regularly and avoid repeated burning of encrusted contamination.
Your choice of cleaner will depend on the degree of soiling involved (see below).
● minor soiling, where the contamination has not burnt hard,can be wiped off with a clean
wet cloth
● major soiling and strongly-adhering burnt encrustation can be quickly and easily removed
with a razor-blade scraper
● hard water stains, grease spots and discolouration having a metallic sheen can be
removed with ‘Easy Do Cleaner Powder’
● always condition hob after cleaning by using ‘Easy Do Conditioner’or ‘Hob Brite’. Apply a
small amount of conditioner with a clean damp cloth or paper towel.Rub vigorously.
Remove excess with a clean damp cloth or paper towel.Polish with a clean cloth or paper
towel before the conditioner dries.
BELOW.
Detergent residues must always be completely removed with a clean wet cloth, (even if the
instructions for use suggest otherwise), as they can have an etching effect when reheated. Then
wipe dry.
To maintain hob in good condition, we would recommend regular use of the ‘Easy Do Powder
Cleanser’.
Sprinkle Powder Cleanser on a clean damp cloth or paper towel and rub vigorously for 3 to 4
minutes. Remove all residue with a clean damp cloth or paper towel. Then use conditioner to
protect the hob.
For more stubborn marks,mix a small amount of the powder cleanser with ‘Cif Lemon Juice’(from
a bottle) and carefully spread over the affected area.Cover with a damp paper towel and leave for
a minimum of 15 minutes.Rub vigorously.Remove excess with a clean damp cloth or paper towel
before the conditioner dries.Polish with a clean cloth or paper towel.
Easy Do products are available from many electrical retailers, our Parts Department (see Key
Contacts, back page) and our Spares Distributors. Homecare ‘Hob Brite’ is available from leading
Supermarkets.
31
Page 32

Care and Cleaning
Oven shelf supports
Models KD6C8E and KD6C7E only: The shelf supports are removable and dishwasher safe.
To remove hold the support at the front and pull away from the oven side,this can then be cleaned
in a sink or a dishwasher.
When removed it allows access to the oven side, which can be cleaned with warm soapy water.
To refit the support, insert the longer leg into the rear fixing hole and push in the front leg.
Model KD6C0E only: The grill (top cavity) shelves are fixed and should not be removed for
cleaning.
cloth. Main oven shelves, as above.
Wipe with a cloth wrung out in warm soapy water followed by a wipe with a damp clean
Decorative trims
It is advisable to clean the decorative trims regularly to prevent any build up of soiling which may
detract from the appearance of the cooker.The recommended method of cleaning is to wipe over the
trims with a soft cloth wrung out in warm water or mild non-abrasive cleaner. (If in doubt try the
cleaner on a small area of trim which is not noticeable in normal use).Then, after wiping with a cloth
wrung out in clear water,dry with a soft clean cloth.
Never use scouring pads or abrasive cleaners/powders which may scratch the surface.
Take care during cleaning not to damage or distort the door seals. Do not lift the door seal from the
oven chassis,if necessary remove the seal by carefully unhooking the corner clips.
Take care that the rating label edges are not lifted during cleaning, and furthermore that the
lettering is not blurred or removed.
Control Panel:
Wipe with a damp cloth and polish with a dry cloth.
Stainless trims
Regularly wipe with a clean, damp cloth and polish with a clean dry cloth.
Grill Door:
Wipe over the grill door decorative outer panel; with a cloth wrung out in warm soapy water, then
after wiping with a cloth wrung out in clear water,dry with a soft clean cloth.
Do not use scouring pads or abrasive powder which may scratch the surface.
Ensure that the glass panel (where fitted) is not subjected to any sharp mechanical blows.
32
Page 33

Care and Cleaning
Grill:
Remove the grill pan and the wire grid food support,it is best to wash these items immediately after
each use to prevent stains from being burnt on when used again.
Wipe out the Grill compartment, use a fine steel wool soap pad to remove stubborn stains from the
grill roof and the floor of the compartment.
Main oven / Grill:
1. Glass Door – open the oven door fully.The glass panel may now be cleaned.
Stubborn stains can be removed by using a fine steel wool soap pad.Do not use scouring pads,
or abrasive powder, which will scratch the glass. Ensure that the glass panel is not
subjected to any sharp mechanical blows.
For slight soiling the inner glass panel may be cleaned,while still warm. For removing stubborn
stains see page 32, cleaning.
2. Remove the rod shelves and meat pan.
Use a fine steel wool soap pad to remove stubborn stains from the rod shelves, meat pan and the
floor of the oven. Refer to the instructions on page 30 for cleaning the shelf supports.
Do not use aerosol cleaners on this oven as they could adversely affect the fan motor unit, and
cannot be wiped off the fan blade.
Replacement oven lamp:
WARNING:To avoid electric shocks - please ensure that the electricity supply to the appliance is
switched off and the appliance is fully cold,before removing the lamp lens.
Open the oven door and remove the rod shelves.Using a suitable cloth to protect the fingers grip
the light glass dome,unscrew anti-clockwise and lift. Reach into the aperture and unscrew the lamp
anti-clockwise. Fit replacement lamp (15W 300°C rated SES), refit dome.
Wall-mounted splash panel:
A wall-mounted splash panel is available as an optional extra from our Parts Department (see
Key Contacts, back page).
Care must be taken that rating label edges are not lifted during cleaning and furthermore that
the lettering is not blurred or removed.
For details of your nearest Service Centre please see the separate service leaflet.If you have any
queries regarding service or spares, our Parts and Service Division will be pleased to advise.
See Key Contacts, back page, for details.
33
Page 34
Care and Cleaning
Take particular care not to damage the inner surface of the door inner glass that is coated
with a heat reflective layer. Do not use scouring pads,or abrasive powder, which will
scratch the glass.Ensure that the glass panel is not subjected to any sharp mechanical
blows.
Stubborn stains can be removed by using a fine steel wool pad.
panel may be cleaned,while still warm, without removing it from the door. After cleaning,rinse
and dry with a soft cloth.
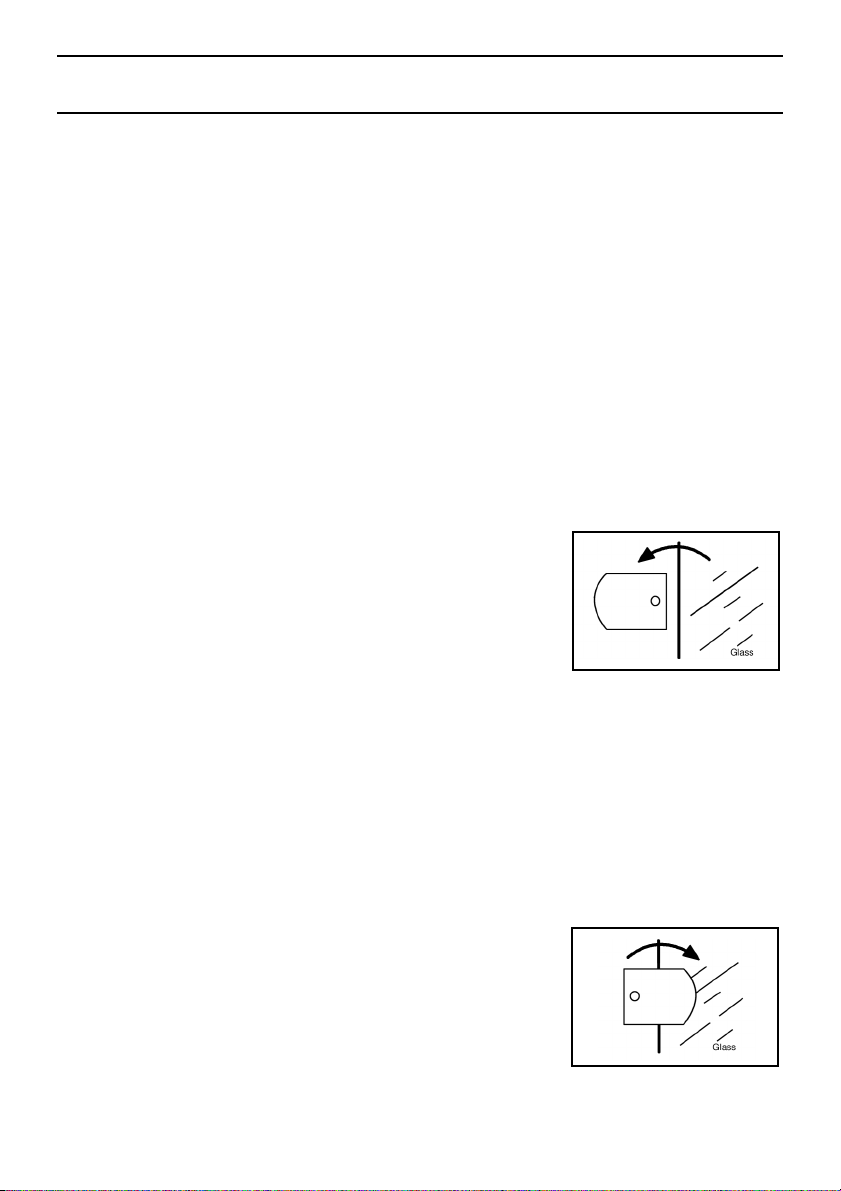
CLEANING THE DOORS
SIDE OPENING DOORS
Cleaning the door glass is the same as the drop down doors,except take care to support the
weight of the inner glass when removing and refitting.
DROP DOWN DOORS
Remove the door inner glass as follows.
For slight soiling the inner glass
1. Open the door fully and unscrew the two screws securing the glass panel so that the
2. Turn the brackets so that the glass can be removed and cleaned at the sink (Fig. 1.)
3. The inside of the outer door glass can now be cleaned while still
securing brackets can be turned.There is no need to remove the screws completely.
Fig. 1.
fitted to the cooker.
NEVER OPERATE THE COOKER WITHOUT THE INNER DOOR GLASS IN
POSITION.
Refit the door inner glass as follows.
1. NOTE: The inner door glass has a special reflective coating on one side. Replace the
2. Turn the two securing brackets back to their
door inner glass so that the statement: “IMPORTANT THIS FACE TOWARDS THE
OVEN” can be read from the inner side of the door.
original position to retain the glass and tighten the
screws. (Fig. 2.)
34
Fig. 2.
Page 35
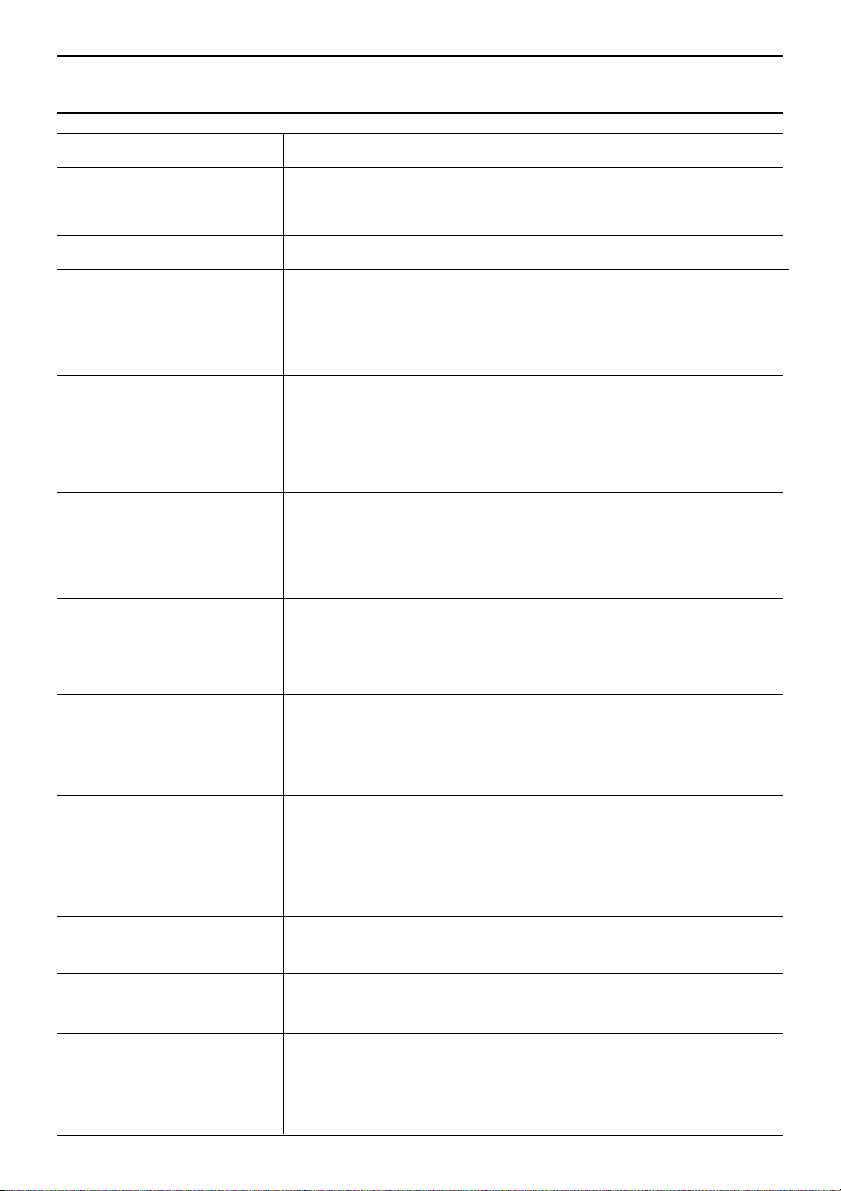
Cooking Results Not Satisfactory?
Problem
Grilling
Uneven cooking front
to back
Fat splattering Ensure that the grill is not set to too high a setting.
Baking (General)
Uneven rising of cakes
Sinking of cakes
Over/Under cooking
Fast/Slow cooking
Uneven cooking of
cakes
Oven does not cook
evenly
Top Oven Baking
(Models KD6C8E and
KD6C7E only)
Uneven cooking front
to back
Check
Ensure that the grill pan is positioned centrally below
the grill element.
Ensure that the oven shelves are level by using a spirit
level on the rod shelf and adjusting the wheels/feet.
The oven should be checked both left to right and front
to back.
The following may cause cakes to sink:
1. Preheating of fan ovens.
2. Cooking at too high a temperature.
3. Using normal creaming method with soft margarine.
(use the all-in-one method).
4. If using soft margarine use the all-in-one method
Refer to the cooking times and temperatures given in
the oven temperature charts,however,it may be necessary
to increase or decrease temperatures by 10˚C to suit
personal taste.
Do not use utensils greater than 56mm (2
1. Too large baking sheet used.
(See 'Cookery Notes', for correct sizes).
2. Over loading of oven and always ensure even air gaps around
baking tins.
3. Placed into pre-heated oven. (See oven temperature charts)
Check:
(a) Temperature and shelf positions are as recommended in the
Oven Temperature Charts.
(b) Oven utensils being used allow sufficient air flow around
them.
Ensure the cooking utensil is at least 4ins from the front
of the shelf.
1
/4ins) in height.
Uneven rising of
cakes
Overcooking
Food is taking too long to
cook
Ensure that the shelf is level (see above) and that the
food is positioned centrally in the oven.
Remember to reduce cooking temperatures by 10˚C
from standard recipes when using the top oven.
Ensure that the cooking utensil used in the top oven is not larger
than 300x225mm (12ins x 9ins).
Only cook one item at a time to avoid overloading the oven.
35
Page 36
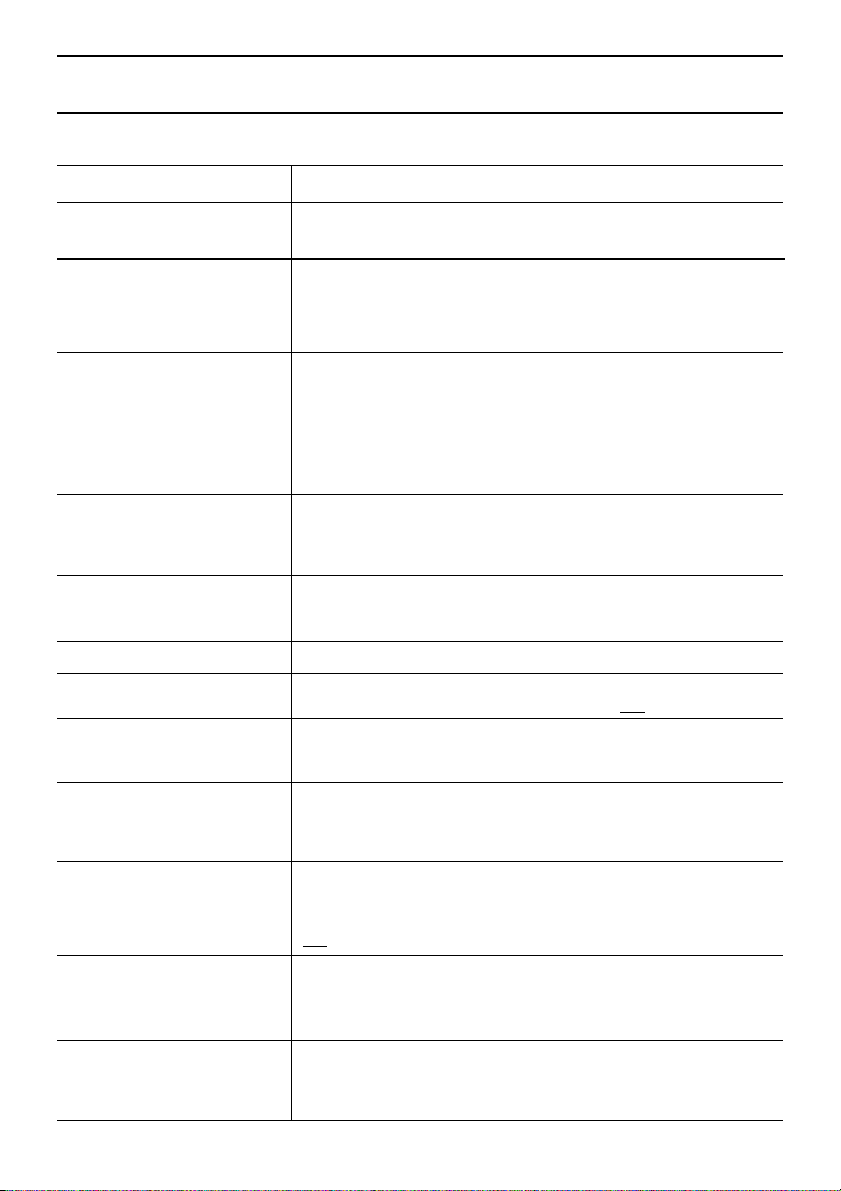
Something Wrong with your Cooker?
Before contacting your nearest Service Centre/Installer, check the problem guide
below; there may be nothing wrong with your cooker.
Problem
Slight odour or small amount of
smoke when grill / oven used for
first time.
Nothing works.
Grill / Top Oven do not work.
Main oven works.
Oven temperatures too high or
low
Oven lamp does not work
This is normal and should cease after a short period.
If you find that the timer display is blank, then it is likely that there is no
electricity supply to your oven. Check:
(i) That the main cooker wall is switched on
(ii) Other appliances, to see if you have had a power cut
(iii) The main circuit breaker for the property
Operating the cooker under the following conditions may cause a safety
device to operate:
(a) Grilling with the door closed - Always grill with the door fully open
(b) Grilling for an excessively long period at maximum setting - see
Grilling guide.
Switch off appliance and allow to cool for approx 30 mins.Switch the
cooker back on and check that the Grill / Top oven (as applicable) is
now operating.
Check temperature and shelf positions are as recommended in the
Oven Temperature Charts.
It may be necessary to increase or decrease the recommended
temperature slightly to suit your taste.
The oven lamp is not covered by the guarantee. The part is easily
changed (see the section on oven lamp replacement) A new lamp may
be obtained from our Parts department, see Key Contacts,back page.
Grill does not work
Grill keeps turning on and off.
Timer is showing ‘0.00’.
(models KD6C8E and
KD6C7E only)
Timer buzzer operates
continually
(models KD6C8E and
KD6C7E only)
Draught from beneath
control panel
Condensation on the wall at the
rear of the cooker.
Steam / Condensation in the
oven after use.
36
Ensure that the top oven control is turned fully off.
When the Grill control is operating at less than its maximum setting,
the Grill will cycle on and off, this is normal and not a fault.
The power supply to your oven has possibly been interrupted, but has
now come back on again. Reset the timer to the correct time of day
using the instructions given in the timer section of the book.
To cancel the audible tone:
- press the manual button once.
A gentle flow of air will be blown from beneath the control panel when
the appliance is used.If the appliance is still warm, this cooling fan may
run on, or restart itself when all controls have been turned off.
The fan will stop once the appliance has been cooled.This is normal and
not
a fault.
Steam and / or condensation may appear from the vent at the rear of
the appliance when using an oven particularly for foods with a high
water content e.g.frozen chips,roast chicken etc. This is normal, and any
excess should be wiped off.
Steam is a by - product of cooking any food with a high water contact.
To help minimise always:
a) Try to avoid leaving food in the oven to cool after being cooked.
b) Use a covered container, wherever possible.
Page 37

Notes
37
Page 38

Notes
38
Page 39
If It Still Won’t Work...
Contact the Service Office (UK: 08709 066 066)
If something is still wrong with your appliance after you have been through the
‘Something Wrong’list:
1. Switch off and unplug the appliance from the mains.
2. Call your nearest Service Office or local importer.
When you contact us we will want to know the following:
1. Your name,address and postcode.
2. Your telephone number.
3. Clear and concise details of the fault.
4. The Model number and the Serial number of your appliance.
5. The date of purchase (please keep the receipt as evidence will be required when
an engineer calls) enter the date here:
.............................................................................
Please make sure you have all these details ready when you call.
Spare Parts
Please remember your new appliance is a complex piece of equipment.
‘DIY’ repairs or unqualified and untrained service people may put you in danger, could
damage the appliance and might mean you lose cover under the Parts Guarantee.
If you do experience a problem with the appliance don’t take risks,call in our Service
Engineer.Our Parts are designed exclusively to fit your appliance.Do not use them for
any other purpose as you may create a safety hazard.
Disposal of your product
To minimise the risk of injury to children please dispose of your product carefully and
safely. Remove all doors and lids. Remove the mains cable (where fitted) by cutting off
flush with the appliance and always ensure that no plug is left in a condition where it
could be connected to the electricity supply.
To help the environment, Local Authority instructions should be followed for the
disposal of your product.
Disposal of old electrical appliances
The European Directive 2002/96/EC on Waste Electrical and Electronic Equipment
(WEEE), requires that old household electrical appliances must not be disposed of in the
normal unsorted municipal waste stream. Old appliances must be collected separately in
order to optimise the recovery and recycling of the materials they contain and reduce
the impact on human health and the environment.
The crossed out “wheeled bin” symbol on the product reminds you of your obligation,
that when you dispose of the appliance it must be separately collected.
Consumers should contact their local authority or retailer for information concerning the
correct disposal of their old appliance.
39
Page 40

Key Contacts
After Sales Service
Over 1100 trained specialists, directly employed by us, ensure that you can have
complete confidence in both the appliances and services we offer.
Repair Service and Information Help Desk
UK: 08709 066 066
Monday to Friday, 8am to 7.30pm
Saturday, 8.30am to 5.30pm
Sunday, 9.30am to 3.30pm
www
.indesitservice.co.uk
Republic of Ireland: 1850 302 200
Note: Our operators will require the following information:
Model number
Serial number
Extended Warranties
UK: 08709 088 088
Monday to Sunday, 8am to 8pm
www
.indesitservice.co.uk
Republic of Ireland: 1850 502 200
Genuine Parts and Accessories
UK: 08709 077 077
Monday to Friday, 8.30am to 5pm
Saturday, 8.30am to 12noon
www
.indesitservice.co.uk
Republic of Ireland: (01) 842 6836
.indesitcompany.co.uk
www
Indesit Company UK Limited, Morley Way, Peterborough, PE2 9JB
PRINTED BY SIMLEX .FOUR ASHES,WOLVERHAMPTON. 07/2005 195045063.02
 Loading...