

Indesit IHVP 6.4 AL K, IHVP 6.4 LL K User manual
EN
English, 8
FR
Français, 23
SK
Slovenský, 38
IHVP 6.4 AL K
IHVP 6.6 LM K
RU
РУССКИЙ, 13
HU
Magyar, 28
RO
Românã, 43
PL
Polski, 18
CS
Český, 33
Instructions for use
Инструкция по
зксплуатации
Instrukcja obsługi
Mode d’emploi
Használati útmutató
Návod k použití
Návod na používanie
Informaţii pentru
utilizator
2
3
4
5
6
7

EN
English
GENERAL SAFETY
Before any cleaning or maintenance operation,
disconnect hood from the mains by removing the plug
or disconnecting the mains electrical supply.
Always wear work gloves for all installation and
maintenance operations.
This appliance can be used by children aged from 8
years and above and persons with reduced physical,
sensory or mental capabilities or lack of experience
and knowledge if they have been given supervision or
instruction concerning use of the appliance in a safe
way and understand the hazards involved.
Children shall not be allowed to tamper with the
controls or play with the appliance.
Cleaning and user maintenance shall not be made by
children without supervision.
The premises where the appliance is installed must
be sufficiently ventilated, when the kitchen hood is
used together with other gas combustion devices or
other fuels.
The hood must be regularly cleaned on both the
inside and outside (AT LEAST ONCE A MONTH).
This must be completed in accordance with the
maintenance instructions provided in this manual.
Failure to follow the instructions provided in this user
guide regarding the cleaning of the hood and filters
will lead to the risk of fires.
The flaming of foods beneath the hood itself is
severely prohibited.
The use of exposed flames is detrimental to the filters and may cause a fire risk,
and must therefore be avoided in all circumstances.
Any frying must be done with care in order to make sure that the oil does not
overheat and ignite.
CAUTION: Accessible parts of the hood may become hot when used with
cooking appliances.
For lamp replacement use only lamp type indicated in the
Maintenance/Replacing lamps section of this manual.
WARNING! Do not connect the appliance to the mains until the installation is
fully complete.
With regards to the technical and safety measures to be adopted for fume
discharging it is important to closely follow the regulations provided by the local
authorities.
The ducting system for this appliance must not be connected to any existing
ventilation system which is being used for any other purpose such as discharging
exhaust fumes from appliances burning gas or other fuels.
Do not use or leave the hood without the lamp correctly mounted due to the
possible risk of electric shocks.
Never use the hood without effectively mounted grids.
The hood must NEVER be used as a support surface unless specifically
indicated.
Use only the fixing screws supplied with the product for installation or, if not
supplied, purchase the correct screws type.
Use the correct length for the screws which are identified in the Installation
Guide.
In case of doubt, consult an authorised service assistance centre or similar
qualified person.
WARNING! Failure to install the screws or fixing device in accordance with these
instructions may result in electrical hazards.
The hood can look different to that illustrated in the drawings in this
booklet. The instructions for use, maintenance and installation, however,
remain the same.
Closely follow the instructions set out in this manual. All responsibility, for
any eventual inconveniences, damages or fires caused by not complying with the
instructions in this manual, is declined. The hood is conceived for the suction of
cooking fumes and steam and is destined only for domestic use.
! It is important to conserve this booklet for consultation at any moment. In
the case of sale, cession or move, make sure it is together with the product.
! Read the instructions carefully: there is important information about
installation, use and safety.
! Do not carry out electrical or mechanical variations on the product or on the
discharge conduits.
! Before proceeding with the installation of the appliance verify that there are
no damaged all components. Otherwise contact your dealer and do not
proceed with the installation.
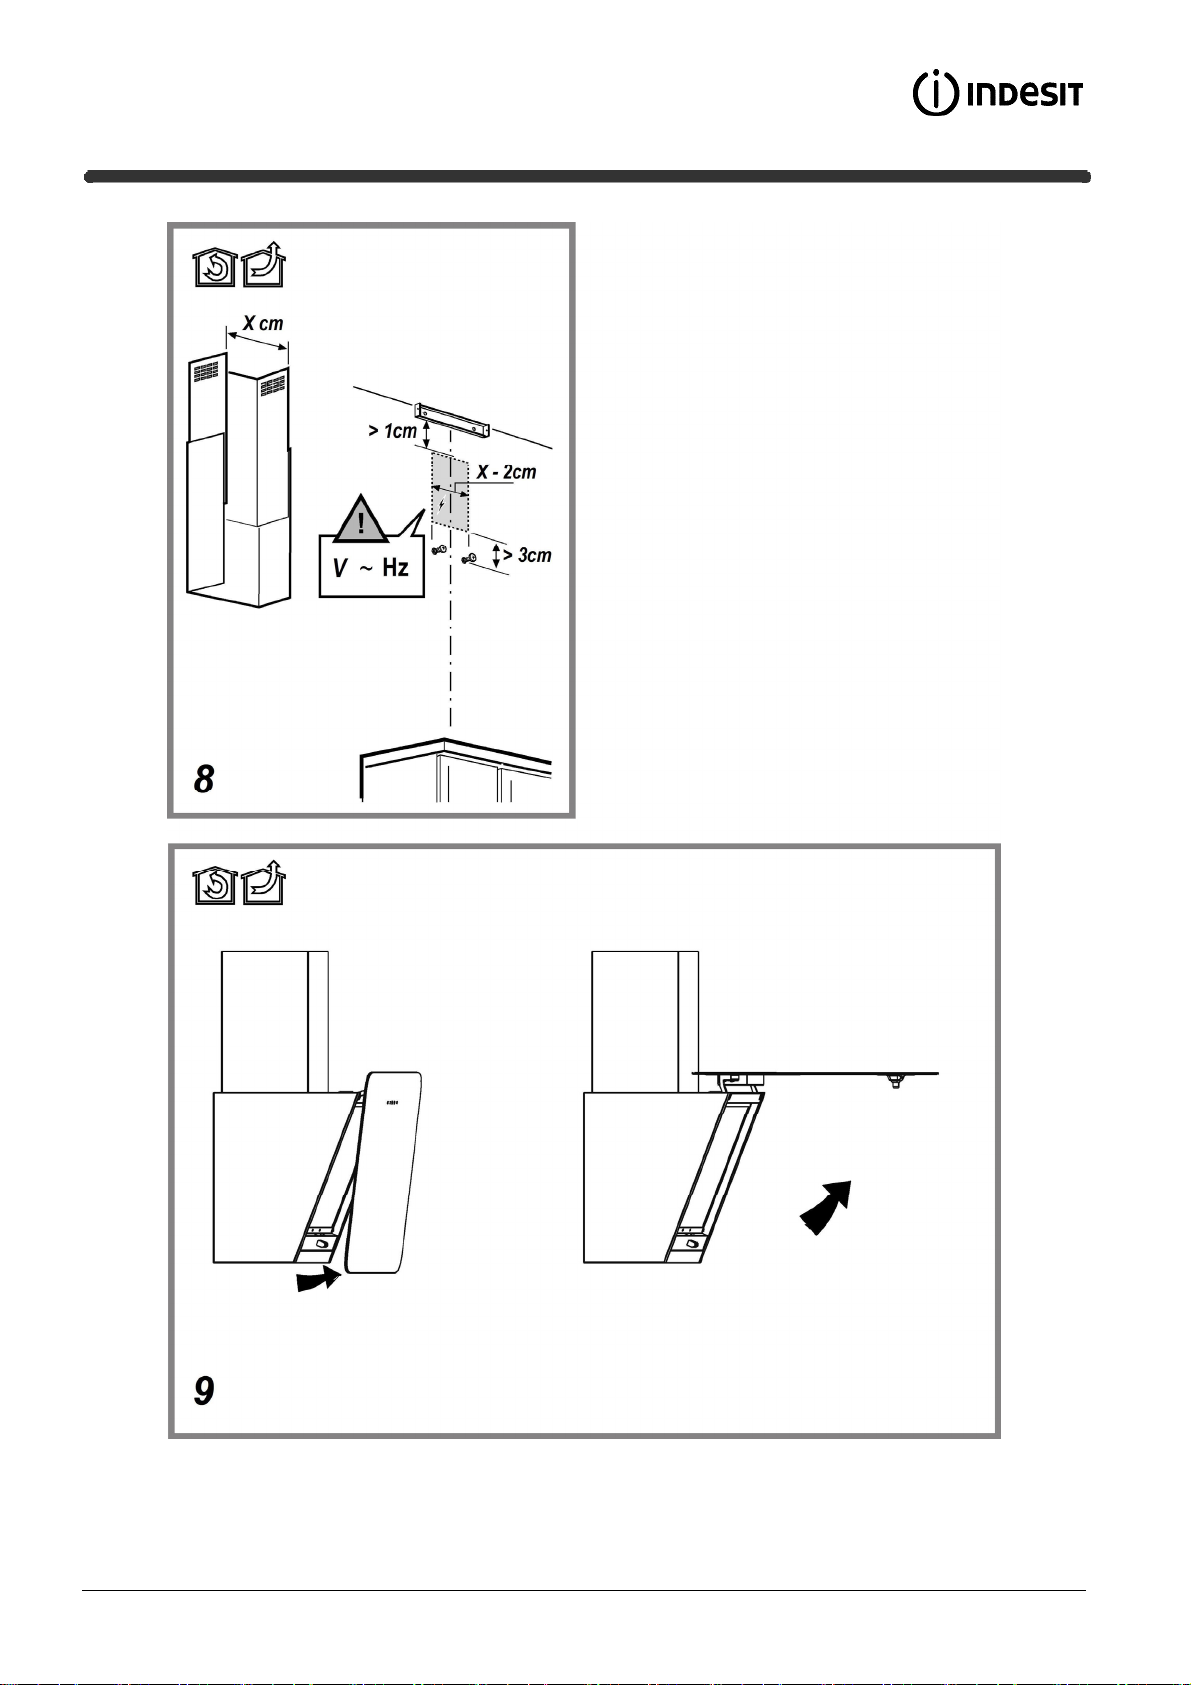
The minimum distance between the supporting surface for the cooking
equipment on the hob and the lowest part of the range hood must be not less
than 55cm from electric cookers and 70cm from gas or mixed cookers.
If the instructions for installation for the gas hob specify a greater distance, this
must be adhered to.
8
ELECTRICAL CONNECTION
The mains power supply must correspond to the rating indicated on the plate
situated inside the hood. If provided with a plug connect the hood to a socket in
compliance with current regulations and positioned in an accessible area, after
installation. If it not fitted with a plug (direct mains connection) or if the plug is not
located in an accessible area, after installation, apply a double pole switch in
accordance with standards which assures the complete disconnection of the
mains under conditions relating to over-current category III, in accordance with
installation instructions.
Warning! Before re-connecting the hood circuit to the mains supply and
checking the efficient function, always check that the mains cable is correctly
assembled.
Replacing the power cable
The hood is provided with a special power cable ; if the cable is damaged,
request a new one from Technical Service.
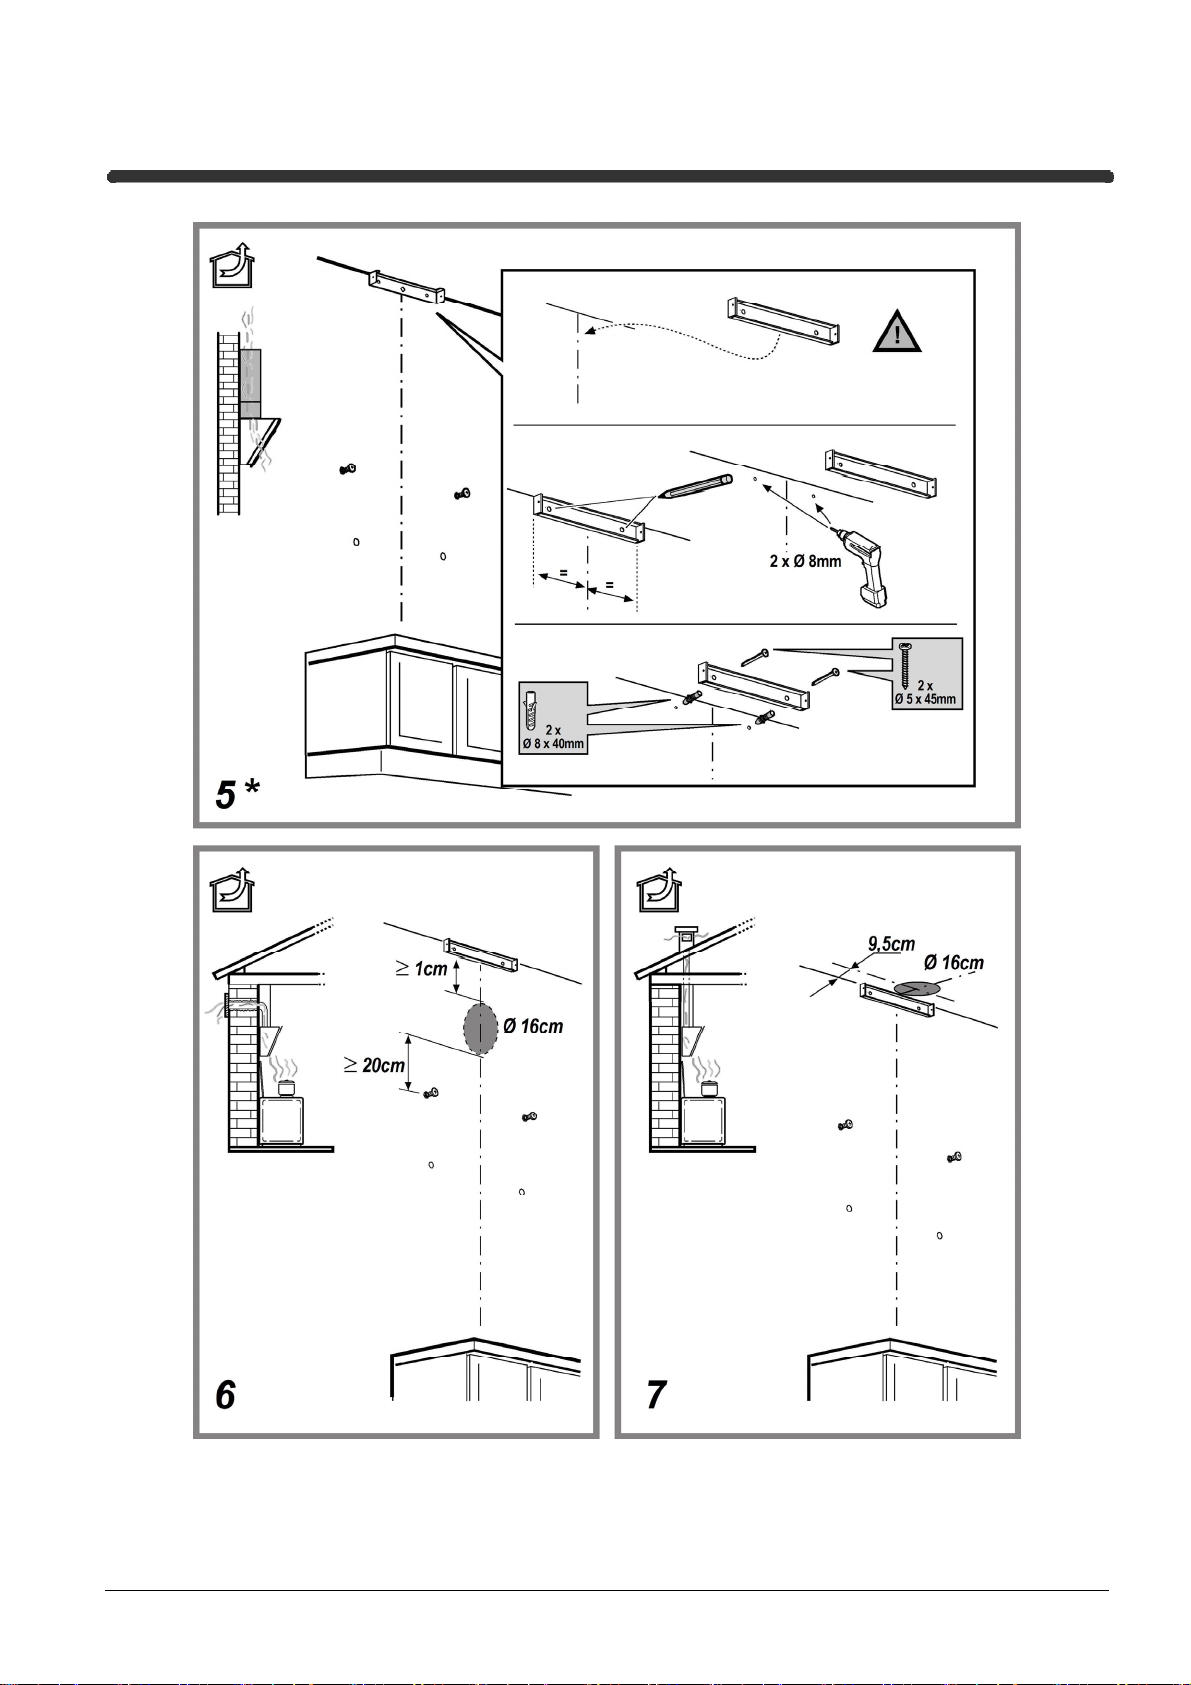
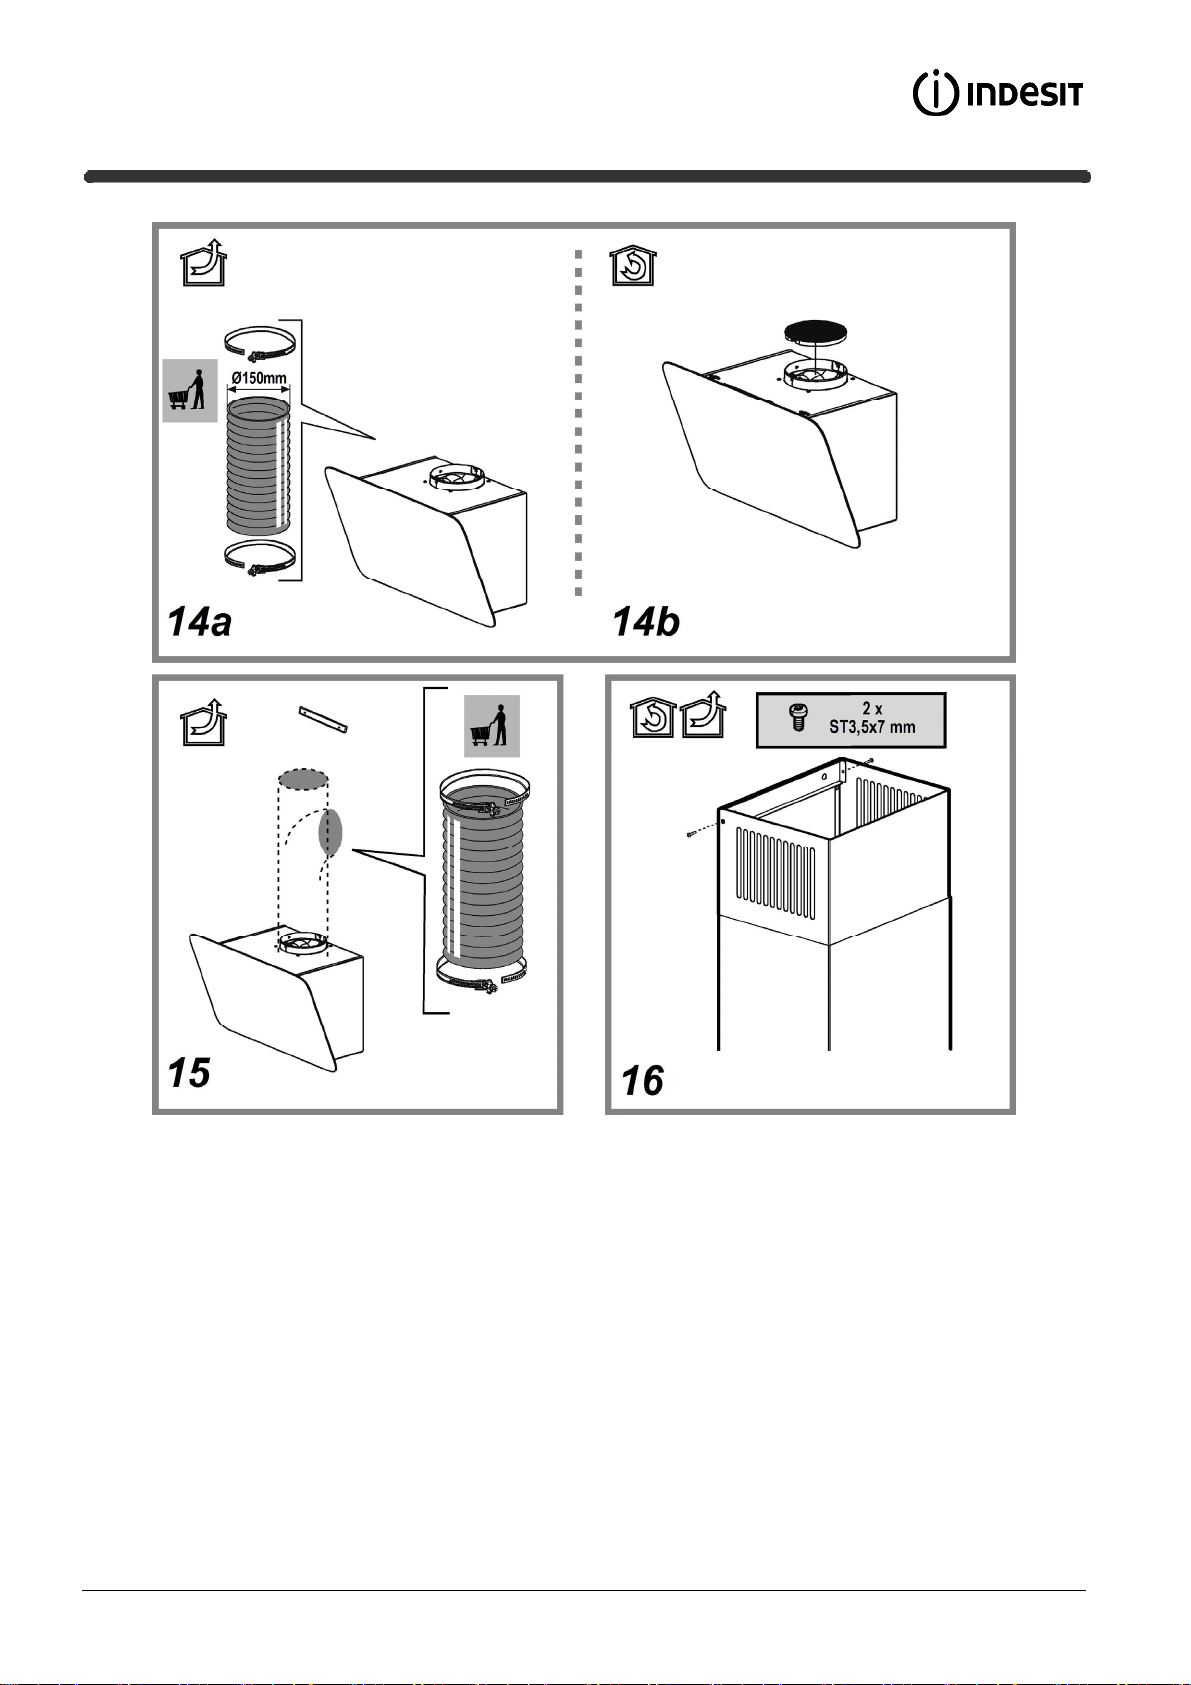
AIR VENT
(for the suction versions)
Connect the hood and discharge holes on the walls with a diameter equivalent to
the air outlet (connection flange).
Using the tubes and discharge holes on walls with smaller dimensions will cause
a diminution of the suction performance and a drastic increase in noise.
Any responsibility in the matter is therefore declined.
! Use a duct of the minimum indispensible length.
! Use a duct with as few elbows as possible (maximum elbow angle: 90°).
! Avoid drastic changes in the duct cross-section.
! The company declines any responsibility whenever these regulations are
not respected.
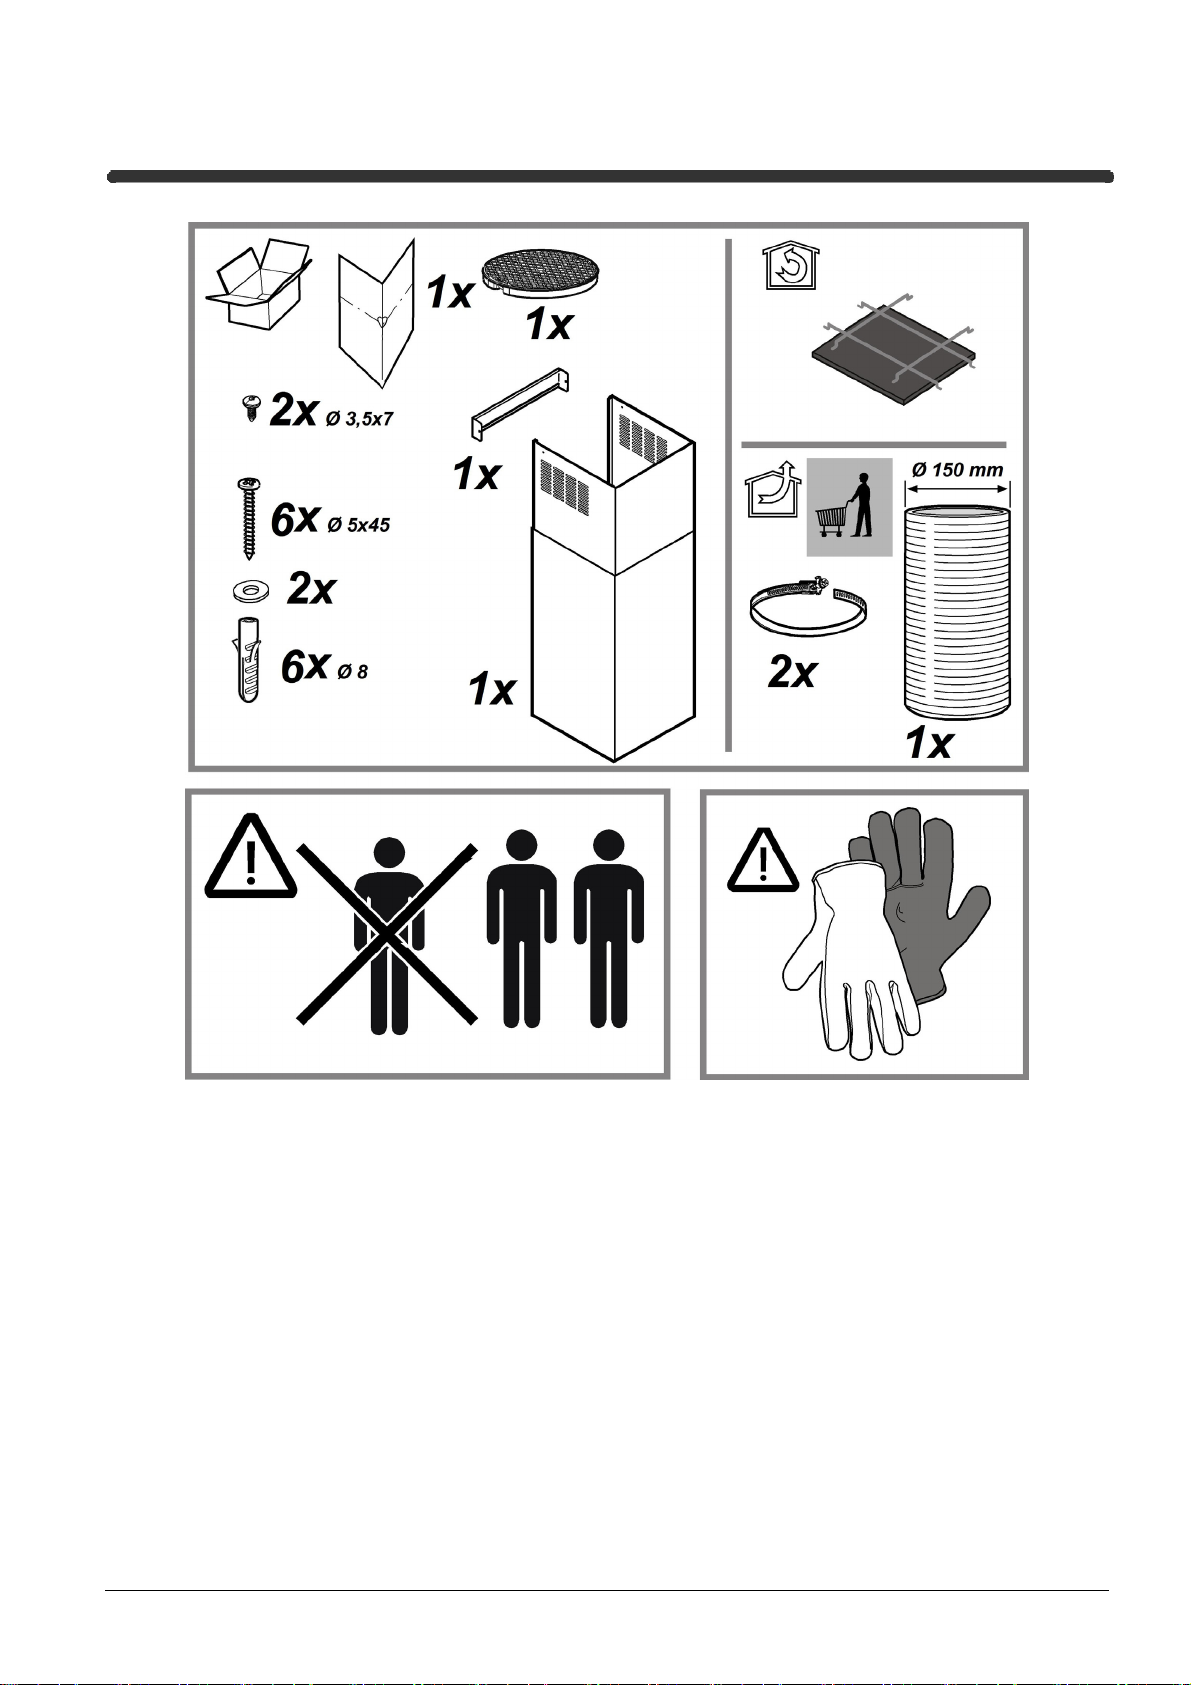
FILTERING OR DUCTING ?
! Your cooker hood is ready to be used in suction version.
To use the hood in filtering version the special ACCESSORY KIT must be
installed.
Check on the first pages of this manual if the ACCESSORY KIT is furnished
or must be bought separately.
Note: If furnished, in certain cases, the additional activated carbon filtering
system may be installed on the hood.
Information about the conversion of the hood from suction version to filtering
version is present in this manual.
Ducting version
In this case the fumes are conveyed outside of the building by means of a
special pipe connected with the connection ring located on top of the hood.
Attention! The exhausting pipe is not supplied and must be purchased apart.
Diameter of the exhausting pipe must be equal to that of the connection ring.
Attention! If the hood is supplied with active charcoal filter, then it must be
removed.
Filter version
The aspirated air will be degreased and deodorised before being fed back into
the room.
In order to use the hood in this version, you have to install a system of additional
filtering based on activated charcoal.
9
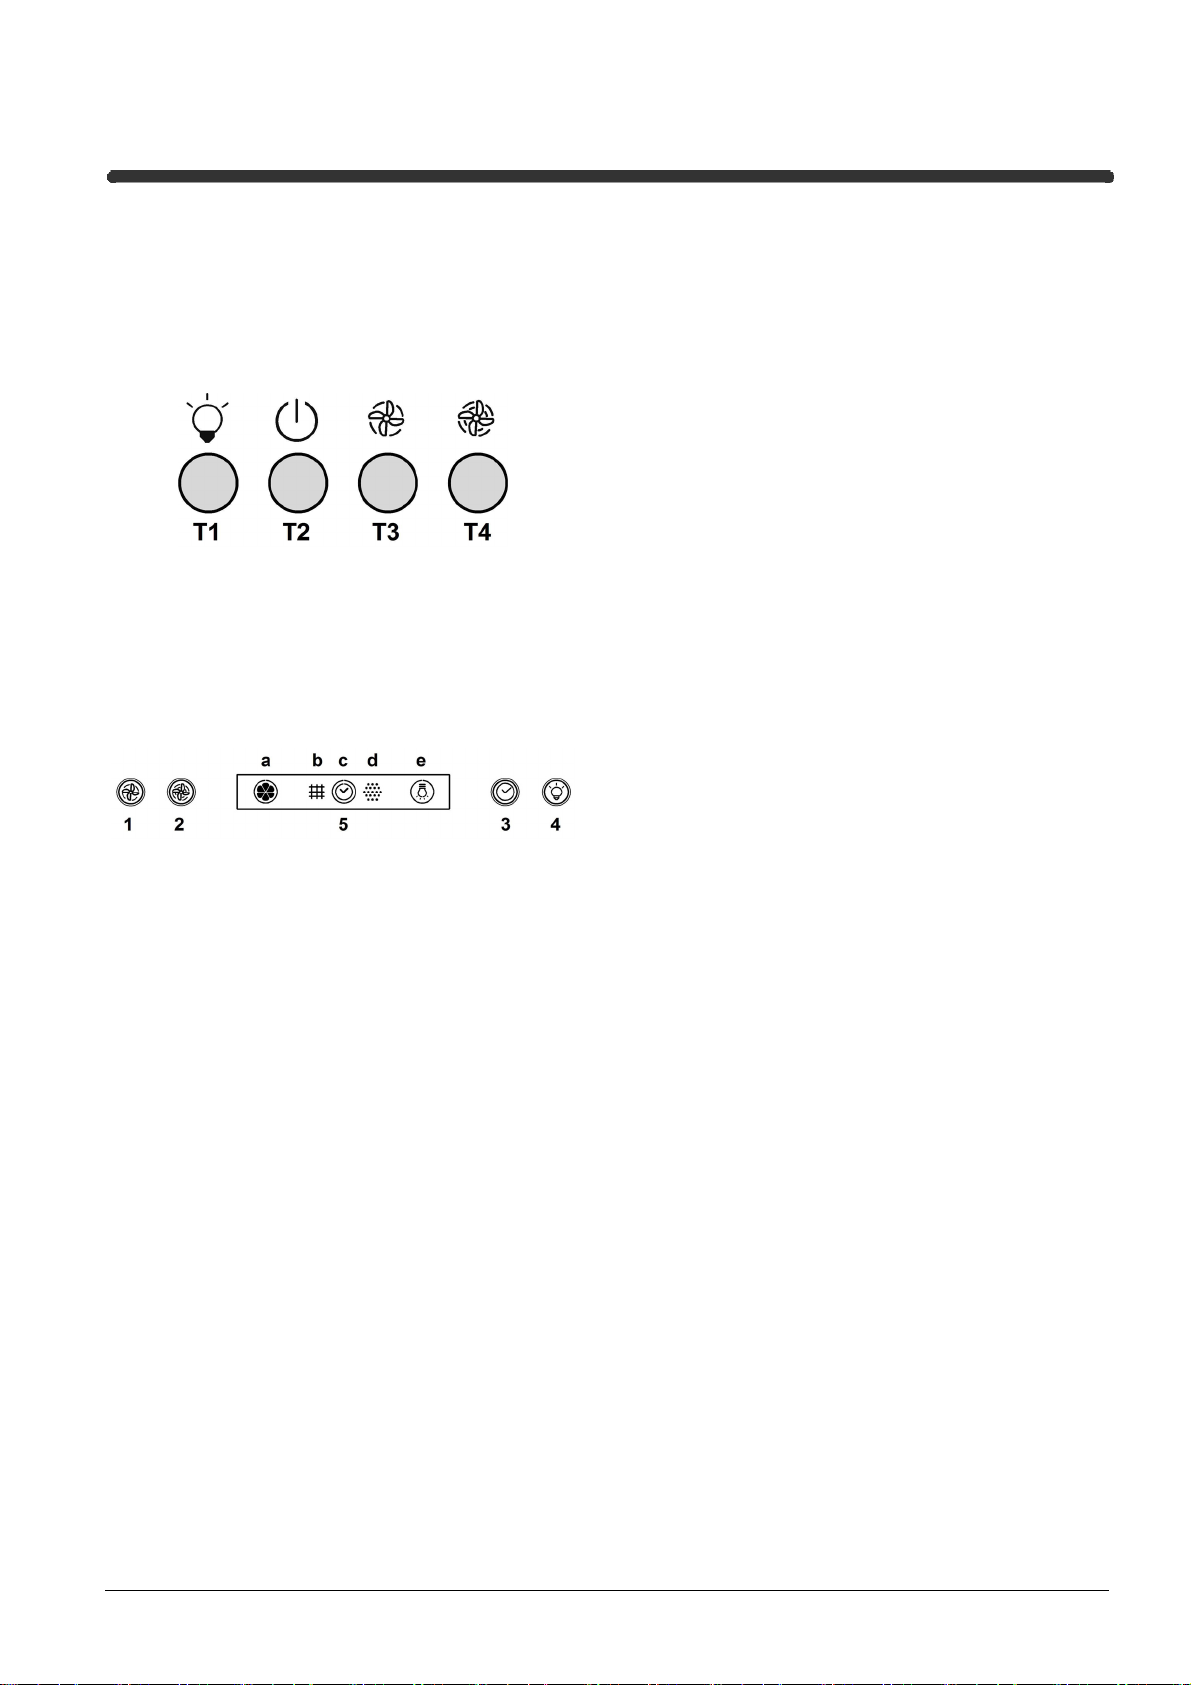
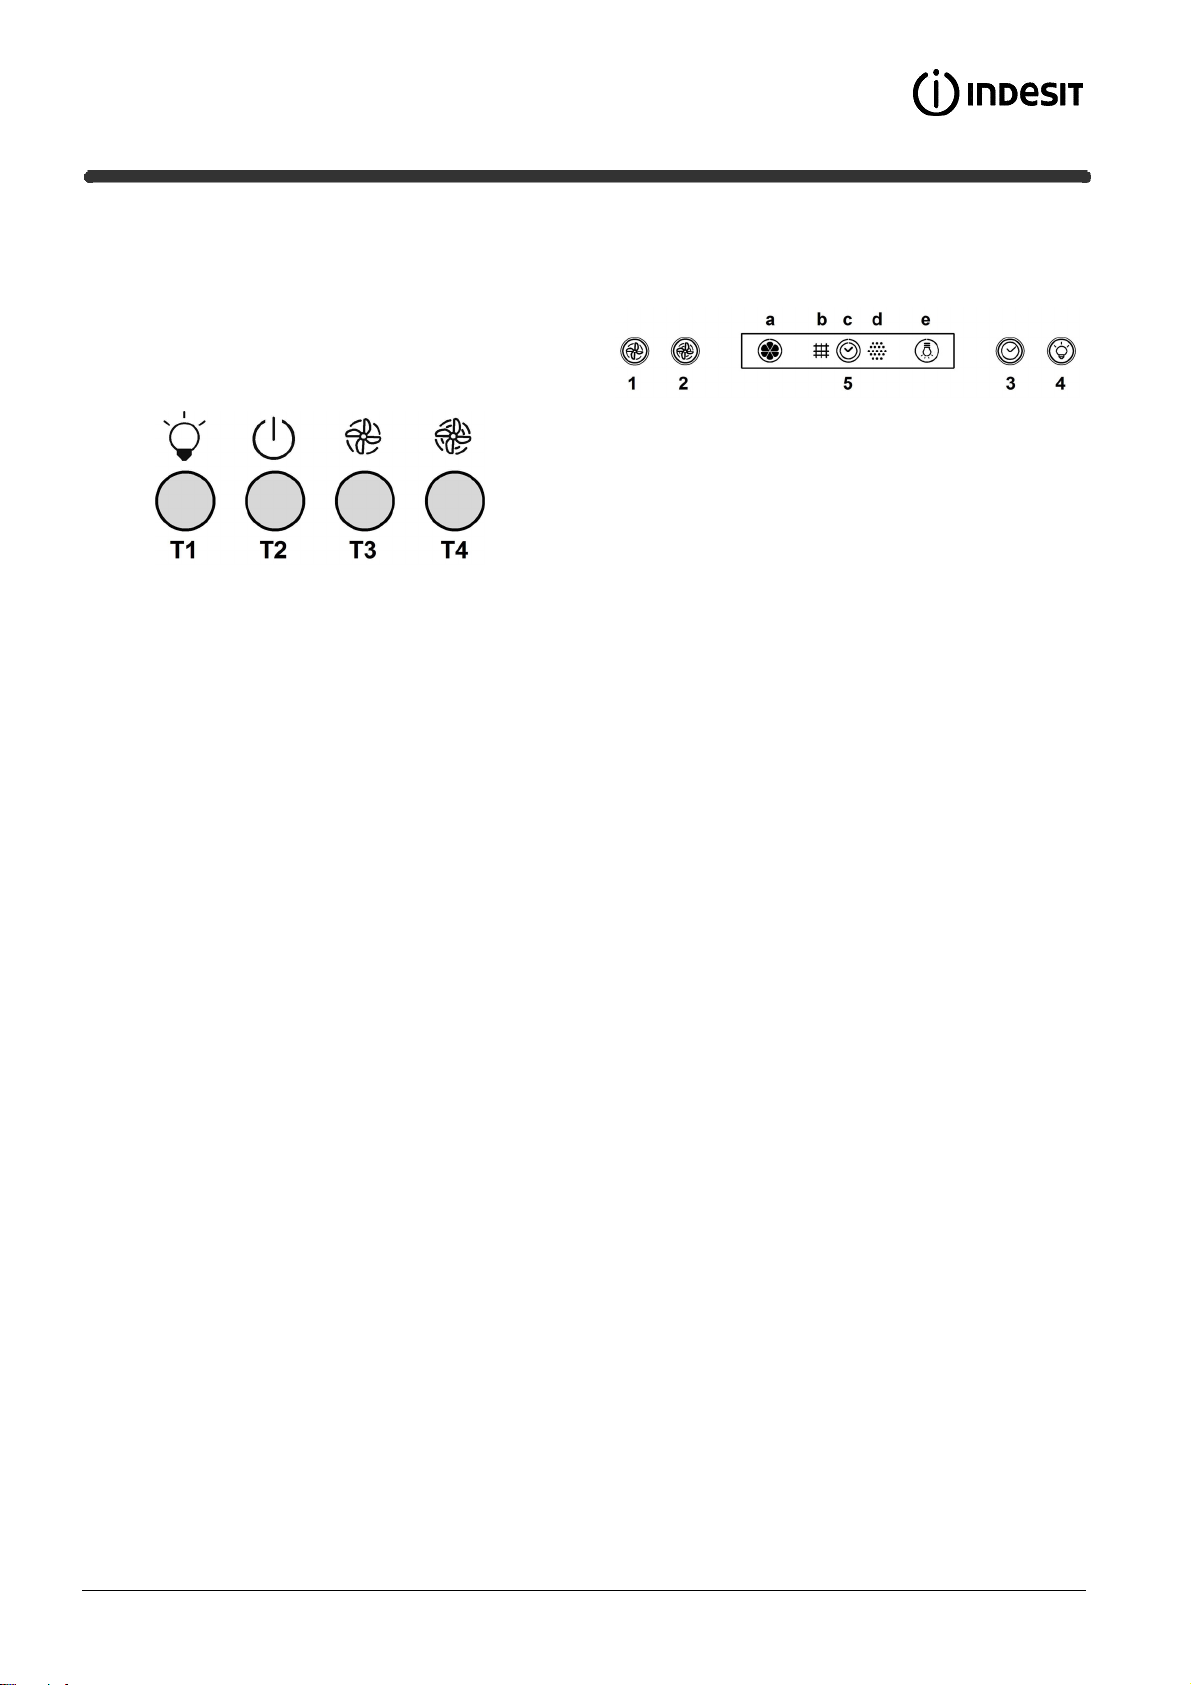
CONTROLS
The hood is fitted with a control panel with aspiration speed selection control and
a light switch to control cooking area lights.
Models with mechanical control panel
IHVP 6.6 LM K
T1. ON/OFF light switch
T2. Speed 1/OFF switch
T3. 2-speed selection
T4. 3-speed selection
Models with Soft Button panel + LCD Display
IHVP 6.4 AL K
1. OFF / Extraction speed (power) decrease button
2. ON / Extraction speed (power) increase button
Note: The intensive extraction speed (power) is timed and lasts for 5
minutes (indicator c flashes); the hood then reverts to extraction speed
(power) 2.
3. ON/OFF Timer button: delays the deactivation of the selected extraction
speed (power) by 5 minutes.
Note: the button is also used for the "Filter saturation signal reset" function
4. Light ON/OFF button
5. Display, shows:
a. Extraction speed (power): the indicator rotates according to the
selected extraction speed (power).
Safety operation: the indicator flashes.
b. Grease filter saturation: comes on when filter maintenance is
required.
c. Timer
d. Active carbon filter saturation: comes on when filter maintenance is
required.
Note: this function is normally disabled and should only be activated if
the hood is used as a filter version (with carbon filter fitted).
To do so, proceed as follows:
- switch off the hood
- press and hold buttons 1 and 3 at the same time, until the indicator
stops flashing (indicator disabled) and is lit steadily (indicator enabled).
- release the buttons.
To deactivate it, repeat the procedure: the indicator will no longer be lit
steadily (indicator enabled) and will flash instead (indicator disabled).).
e. Lighting
Safety operation
The hood has a sensor which, in the event of a sudden increase in temperature,
activates the appliance until the temperature drops significantly.
Filter saturation signal reset
After carrying out filter maintenance, press and hold button 3 until indicator.
10
MAINTENANCE
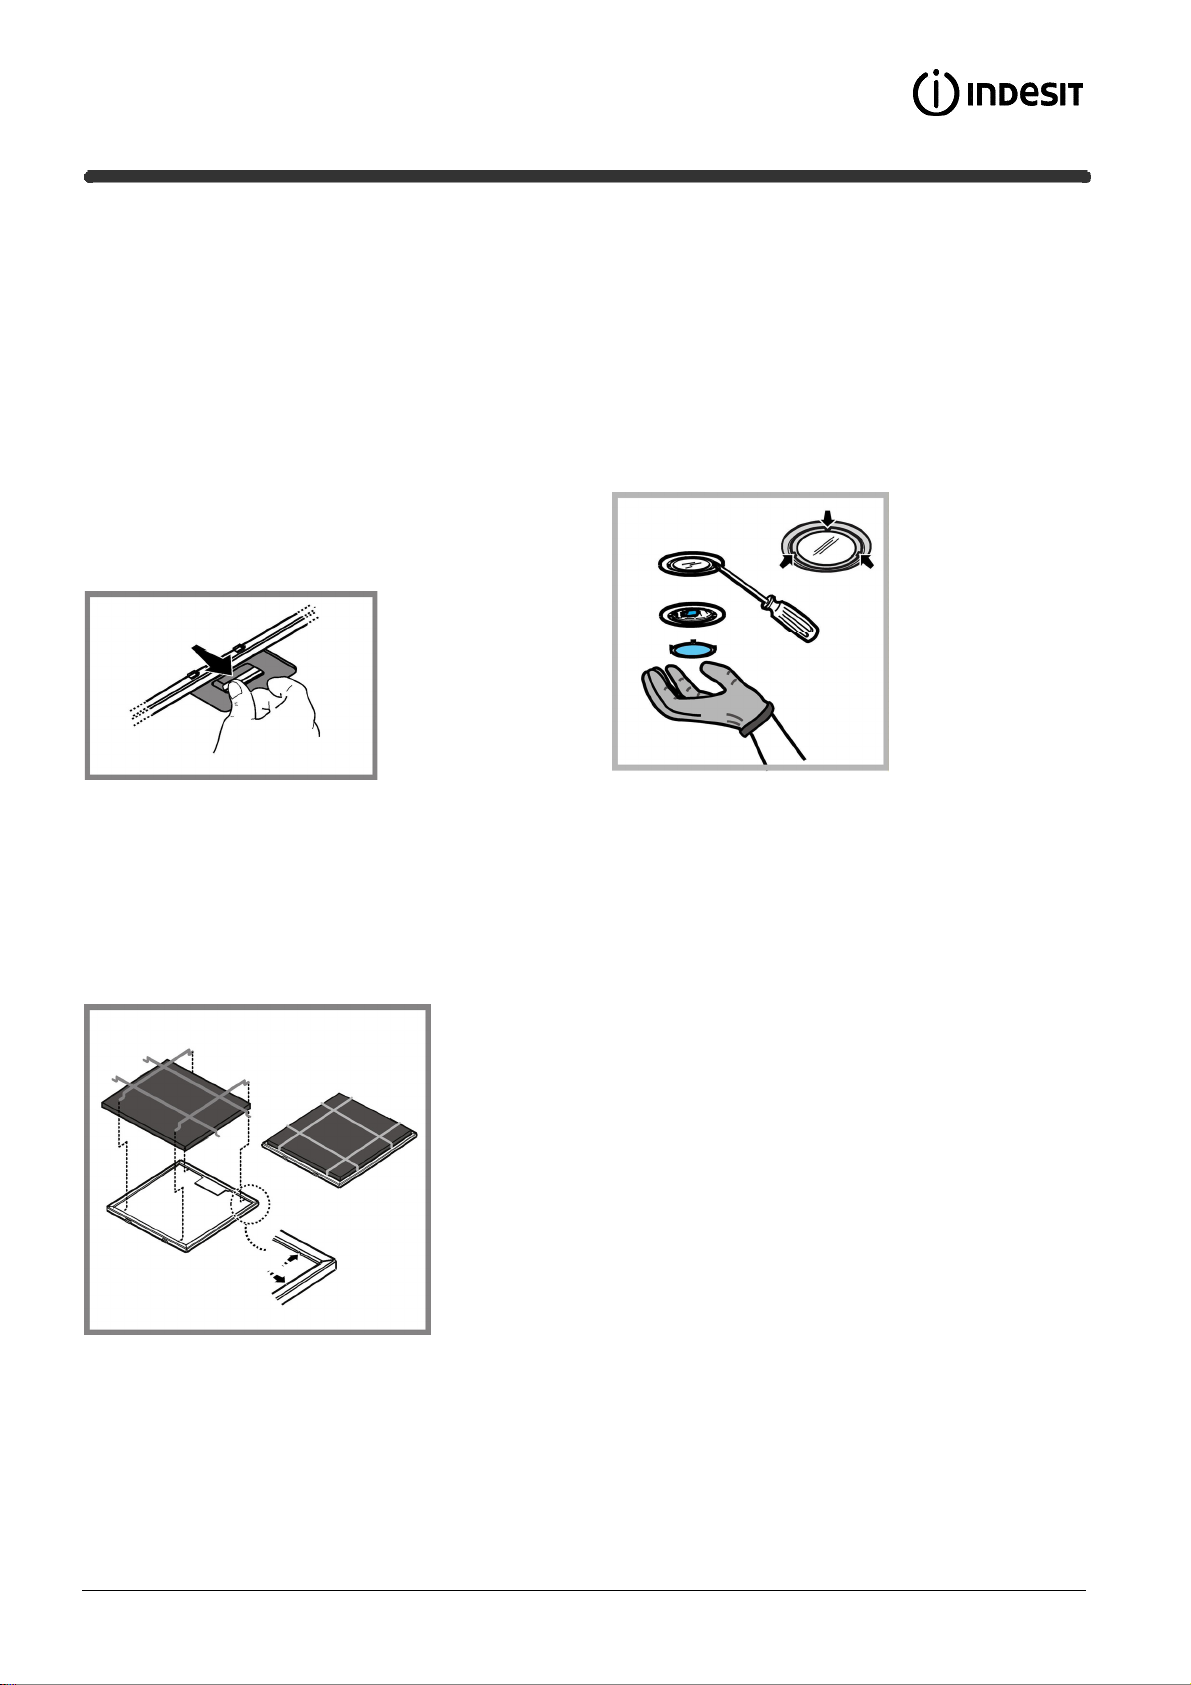
Cleaning
Clean using ONLY the cloth dampened with neutral liquid detergent. DO NOT
CLEAN WITH TOOLS OR INSTRUMENTS. Do not use abrasive products. DO
NOT USE ALCOHOL!
Perimeter aspiration panel
Clean the perimeter aspiration panel with the same frequency as the ant-fats
filter, using a cloth and not too concentrated liquid detergent. Do not use
abrasive substances.
Maintenance of the anti-grease filters
Traps cooking grease particles.
This must be cleaned once a month (or when the filter saturation indication
system – if envisaged on the model in possession – indicates this necessity)
using non aggressive detergents, either by hand or in the dishwasher, which
must be set to a low temperature and a short cycle.
When washed in a dishwasher, the grease filter may discolour slightly, but this
does not affect its filtering capacity.
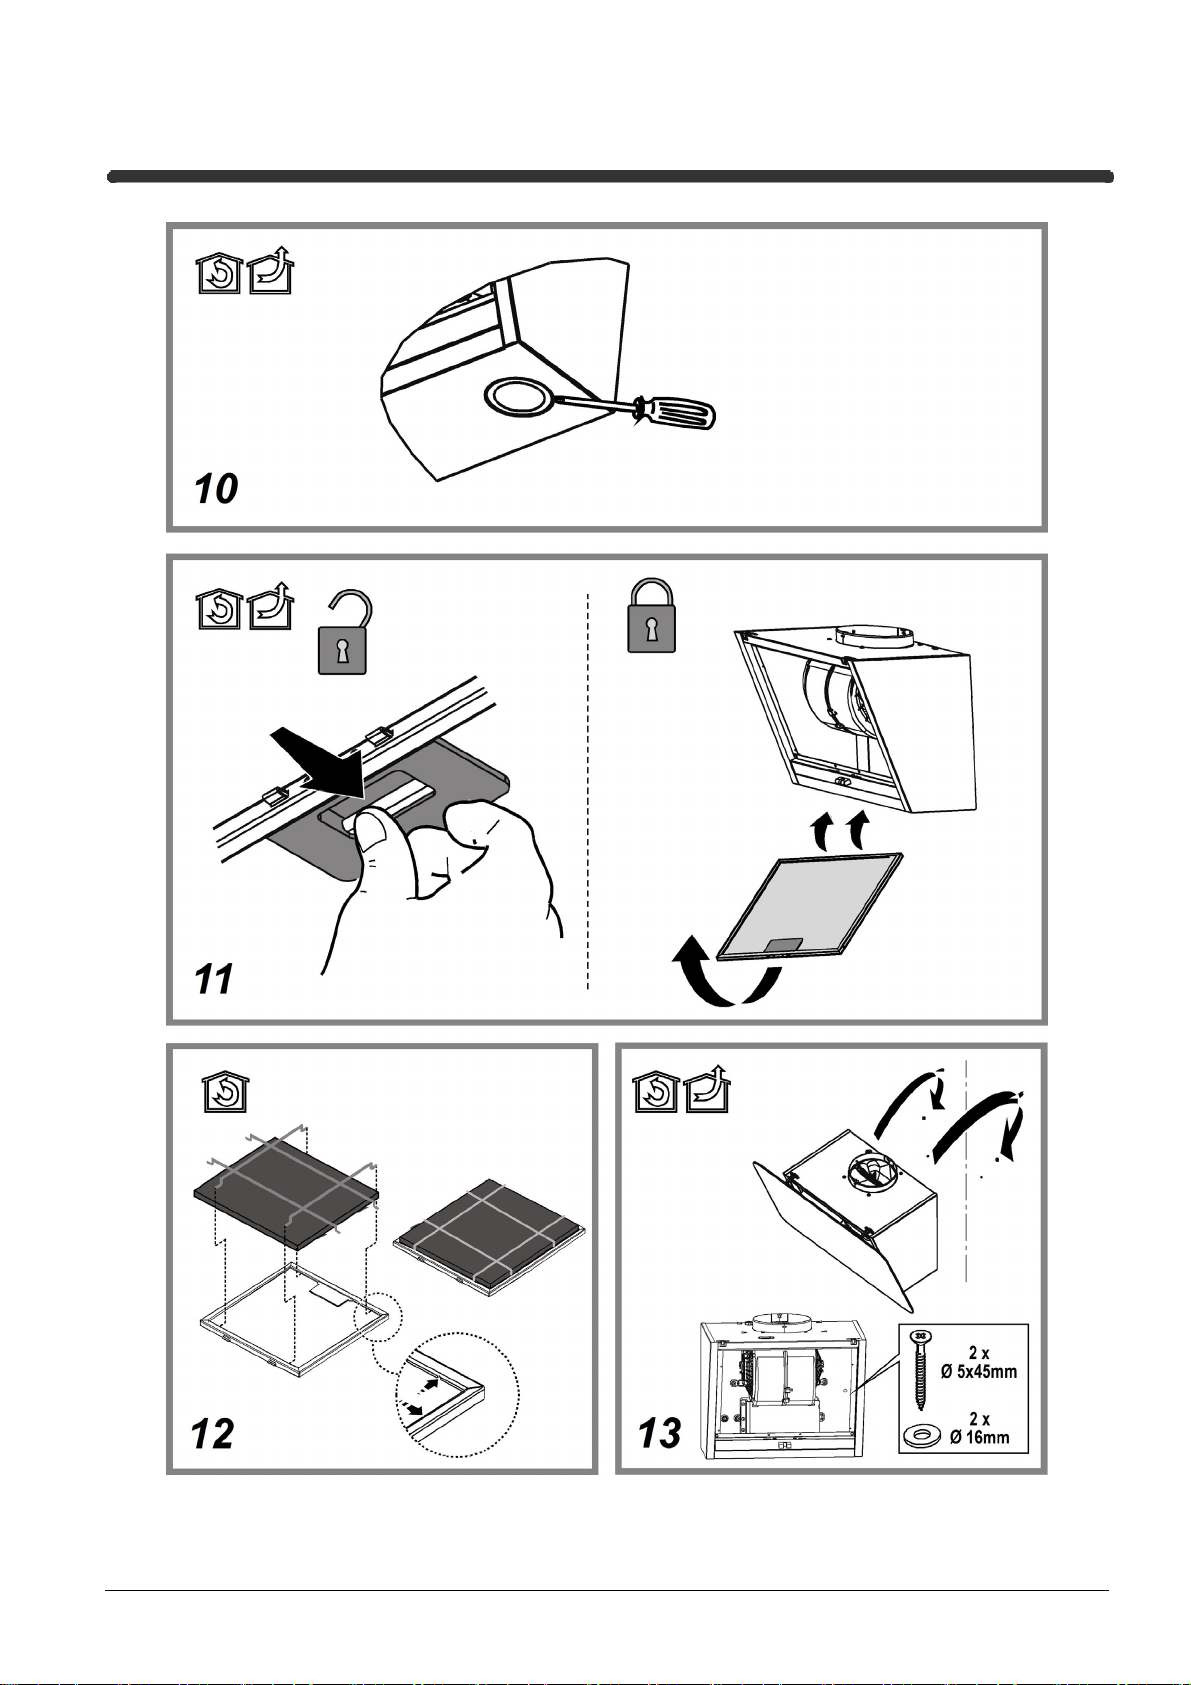
To remove the grease filter, pull the spring release handle.
Maintenance of the charcoal filter
It absorbs unpleasant odours caused by cooking.
The saturation of the charcoal filter occurs after more or less prolonged use,
depending on the type of cooking and the regularity of cleaning of the grease
filter.
In any case it is necessary to replace the cartridge at least every four mounths
(or when the filter saturation indication system – if envisaged on the model in
possession – indicates this necessity).The charcoal filter may NOT be washed or
regenerated.
Replacing lamps
IHVP 6.4 AL K
Disconnect the appliance from the electricity.
Warning! Prior to touching the light bulbs ensure they are cooled down.
Replace the old light bulb with the one of the same type as specified in the
feature label or near the light lamp on the hood.
1. Using a flat head screwdriver or equivalent tool, carefully pry loose the light
cover.
2. Remove the damaged light and replace with a new 12 Volt, 20 Watt
(Maximum) halogen light made for a G-4 base SUITABLE FOR USE IN
OPEN LUMINAIRES. Follow package directions and do not touch new light
with bare hands.
3. Reinstall the light cover. (it will snap shut).
IHVP 6.6 LM K
The hood is equipped with a lighting system based on LED technology.
The LEDs guarantee an optimum lighting, a duration up to 10 times as long as
the traditional lamps and allow to save 90% electrical energy.
For replacement, contact the technical service.
11
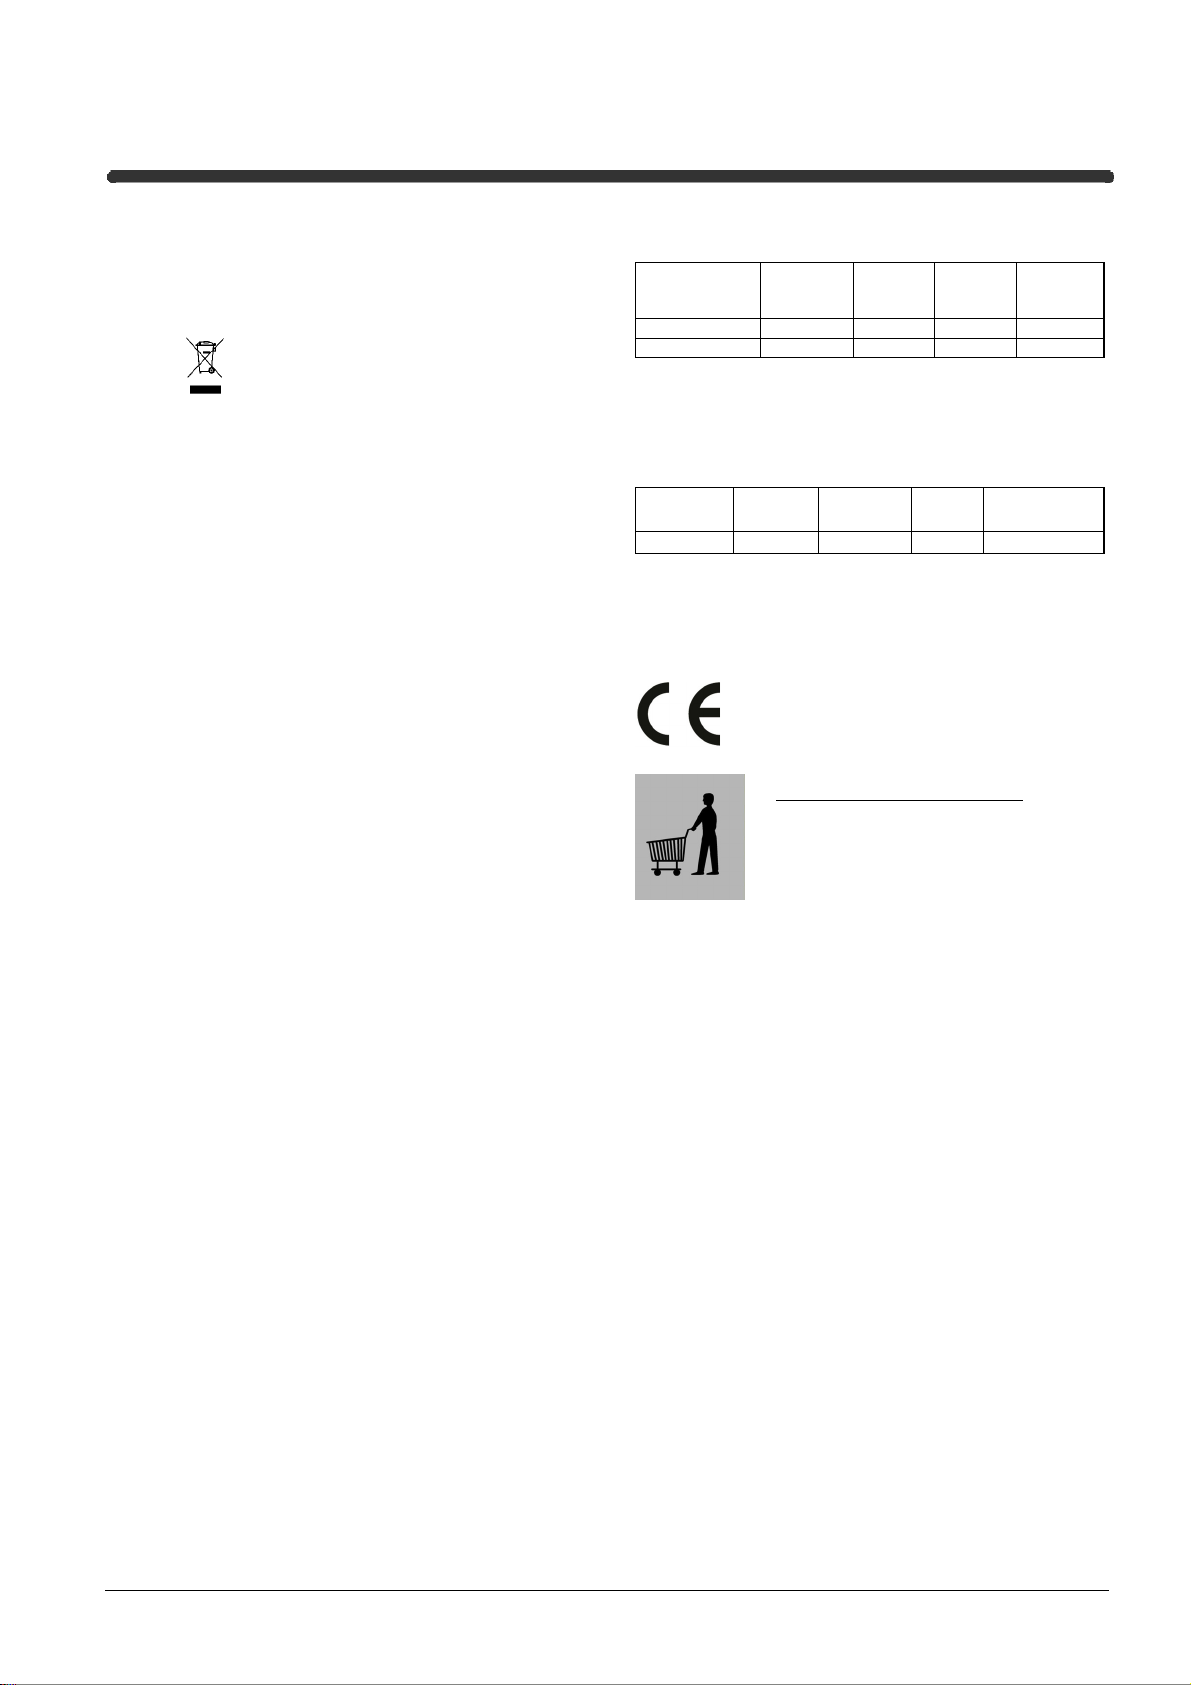
DISPOSAL
This appliance is marked according to the European directive 2012/19/EC on
Waste Electrical and Electronic Equipment (WEEE). By ensuring this product is
disposed of correctly, you will help prevent potential negative consequences for
the environment and human health, which could otherwise be caused by
inappropriate waste handling of this product.
The symbol
product, indicates that this appliance may not be treated as household waste.
Instead it should be taken to the appropriate collection point for the recycling of
electrical and electronic equipment. Disposal must be carried out in accordance
with local environmental regulations for waste disposal.
For further detailed information regarding the process, collection and recycling of
this product, please contact the appropriate department of your local authorities
or the local department for household waste or the shop where you purchased
this product.
Appliance designed, tested and manufactured according to:
• Safety: EN/IEC 60335-1; EN/IEC 60335-2-31, EN/IEC 62233.
• Performance: EN/IEC 61591; ISO 5167-1; ISO 5167-3; ISO 5168; EN/IEC
60704-1; EN/IEC 60704-2-13; EN/IEC 60704-3; ISO 3741; EN 50564; IEC
62301.
• EMC: EN 55014-1; CISPR 14-1; EN 55014-2; CISPR 14-2; EN/IEC 61000-3-2;
EN/IEC 61000-3-3. Suggestions for a correct use in order to reduce the
environmental impact: Switch ON the hood at minimum speed when you start
cooking and kept it running for few minutes after cooking is finished. Increase the
speed only in case of large amount of smoke and vapour and use boost speed(s)
only in extreme situations. Replace the charcoal filter(s) when necessary to
maintain a good odour reduction efficiency. Clean the grease filter(s) when
necessary to maintain a good grease filter efficiency. Use the maximum diameter
of the ducting system indicated in this manual to optimize efficiency and
minimize noise.
MALFUNCTIONS
If something appears not to be working properly, do the following simple checks
before calling Technical Service:
• If the hood is not working:
Check that:
- The power has not been disconnected.
- A speed has been selected.
• If the hood performs inefficiently:
Check that:
- The motor speed selected is sufficient for the amount of smoke and
vapours released.
- The kitchen is sufficiently ventilated to allow air intake.
- The charcoal filter is not worn (hood in filtering version).
• If the hood has turned off during normal functioning:
Check that:
- The power has not been disconnected.
- the omnipolar disconnection device has not tripped.
If the hood fails to operate correctly, briefly disconnect it from the mains power
supply for almost 5 sec. by pulling out the plug. Then plug it in again and try once
more before contacting the Technical Assistance Service.
on the product, or on the documents accompanying the
TECHNICAL DATA
Model
HHVP 6.4F AL K 69 -104 59,5 15 15
HHVP 6.6F LM K 69 -104 60 18,9 15
Please check the plate in order to verify the total absorption and the light
absorption.
Height
(cm)
Power
(W)
Width
(cm)
IHVP 6.4 AL K
Voltage
(V)
depth
(cm)
Cap
Ø of
exhaust
tube(cm)
Dimensions
(mm)
Halogen 2 x 20W 12 G4 33xØ10
The hood is equipped with a lighting system based on LED technology.
For replacement, contact the technical service.
Components not provided with the product
IHVP 6.6 LM K
12
РУССКИЙ
ОБЩИЕ ПРАВИЛА ТЕХНИКИ БЕЗОПАСНОСТИ
Перед началом какой либо операции по чистке
или обслуживанию, отключить вытяжку от
электрической сети вынимая вилку из розетки или
отключая общий выключатель помещения. Ля
всех операций по установке и обслуживанию
использовать рабочие рукавицы.
Прибор может быть использован детьми не
младшими 8 лет и особами со сниженными
физическими, сенсорными или умственными
способностями, или же с недостаточным опытом
ясли находятся под контролем, или если были
обучены использовать прибор в безопасный
способ и если понимают связанные с этим
опасности.
Дети должны быть под контролем и не должны
играть с прибором.
Операции по чистке и обслуживанию не должны
проводиться детьми без надзора
Помещение должно иметь достаточную
вентиляцию, когда кухонная вытяжка
используется одновременно с другими приборами
что работает газе или других топливах. Вытяжка
должна быть часто чищена как внутри так и
сверху (ХОТЯ БЫ ОДИН РАЗ В МЕСЯЦ),
додерживаться инструкций по обслуживанию
приведённых в этом руководстве. Не соблюдение
норм чистки
вытяжки и замены и чистки фильтров
может привести к загораниям.
Строго запрещено приготовление еды на
открытом огне под вытяжкой.
Использование открытого пламени наносит ущерб фильтрам и может
привести к загораниям, поэтому должно избегаться в любом случаи.
Жаренье должно проводиться под надзором чтобы избежать, что
раскалённое подсолнечное масло загорится.
ВНИМАНИЕ: Когда варочная поверхность работает, доступные части
вытяжки могут нагреваться.
Для замены лампочки освещения использовать только тип лампочки
указанный в разделе обслуживания
Внимание! Не подключать прибор до электрической сети до тех пор, пока
установка полностью не закончена.
То что касается технических мер и мер безопасности в применения до
сброса паров строго додерживаться того что предусматривается по нормам
локальных компетентных органов.
Всасываемый воздух не должен быть выпускаться в трубу,
для выбросов дымов приборами, что работают на газе или других
топливах.
Не использовать или оставлять вытяжку без лампочек правильно
установленных с риском получить удар электрическим током.
Никогда не использовать вытяжку без правильно установленной решётки!
Вытяжка НИКОГДА не должна использоваться, как опорная поверхность,
если только не указано.
Использовать только винты для
установки или, если нет в комплекте, приобрести винты правильного типа.
Использовать правильную длину винтов что указана в руководстве по
установке. В случаи сомнений, консультироваться в авторизированном
/замены лампочки этого руководства.
используемую
фиксирования в комплекте с продуктом для
центре по обслуживанию или с квалифицированным персоналом.
ВНИМАНИЕ! Не установка соответствующих винтов и приспособлений для
фиксирования в соответствии
рискам электрического происхождения.
Вытяжка может иметь дизайн, отличающийся от вытяжки показанной
на рисунках данного руководства, тем не менее, руководство по
эксплуатации, техническое обслуживание и установка остаются те же.
Изделие хозяйственно-бытового назначения. Производитель снимает
с себя всякую ответственность за неполадки, ущерб или пожар, которые
возникли при использовании прибора вследствие несоблюдения
инструкций, приведенных в данном руководстве. Вытяжка служит для
всасывания дыма и пара при приготовлении пищи и предназначена только
для бытового использования.
! Очень важно сохранить эту инструкцию, чтобы можно было обратиться
к ней в любой момент. Если изделие продается, передается или
переносится обеспечить, чтобы инструкция
! Внимательно прочитайте инструкцию. В ней находится важная
информация по установке, эксплуатации и безопасности.
! Запрещается выполнять изменения в электрической или механической
части изделия или в трубах рассеивания.
! Перед началом установки оборудования убедитесь в целостности и
сохранности всех компонентов. При наличии любых повреждений
обратитесь к поставщику и
оборудования.
Расстояние нижней грани вытяжки над опорной плоскостью под сосуды на
кухонной плите должно быть не менее 55cm – для электрических плит, и не
менее 70cm для газовых или комбинированных плит.
Если в инструкциях по установке газовой плиты оговорено большее
расстояние, то учтите это.
с этими инструкциями может привести к
всегда была с ним.
ни в коем случае не начинайте монтаж
RU
13
ЭЛЕКТРИЧЕСКОЕ СОЕДИНЕНИЕ
Напряжение сети должно соответствовать напряжению, указанному на
табличке технических данных, которая размещена внутри прибора. Если
вытяжка снабжена вилкой, подключите вытяжку к штепсельному разъему.
Он должен отвечать действующим правилам и быть расположен в
легкодоступном месте. Включить в розетку можно после установки. Если же
вытяжка не снабжена вилкой (прямое подключения к сети), или
штепсельный разъем не расположен в доступном месте, также и после
установки, то используйте надлежащий двухполюсный выключатель,
обеспечивающий полное размыкание сети при возникновении условий
перенапряжения 3-ей категории, в соответствии с инструкциями по
установке.
Внимание! прежде чем подключить к сети питания электрическую систему
вытяжки и проверить исправное функционирование ее убедитесь в том
что кабель питания правильно смонтирован.
Замена электрокабеля
Вытяжка имеет специальный кабель электропитания; в случае
повреждения кабеля, необходимо заказать его в службе по техническому
обслуживанию.
ВЫБРОС ВОЗДУХА
(для исполнения с отводом воздуха)
Подсоединить вытяжку к выводной трубе с диаметром соответствующим
отверстию выхода воздуха (соединительный фланец).
Установка труб с меньшим диаметром даст уменьшение мощности
всасывания воздуха и резкое увеличение уровня шума.
Производитель снимает с себя всякую ответственность по отношению
выше сказанного.
! Использовать трубу с минимально необходимой длиной.
Использовать трубу с наименьшим количеством изгибов
!
(максимальный угол изгиба: 90°).
! Избегать резкого изменения сечения трубы.
! Предприятие снимает с себя какую-либо ответственность если данные
правила не выполняются.
С РЕЦИРКУЛЯЦИЕЙ ИЛИ С ВЫВОДОМ ?
! Ваша вытяжка готова к использованию в режиме отвода.
Для того чтобы использовать вытяжку в режиме рециркуляции
необходимо установить ДОПОЛНИТЕЛЬНЫЙ КОМПЛЕКТ.
Проверьте на первых страницах данного руководства, входит ли
ДОПОЛНИТЕЛЬНЫЙ КОМПЛЕКТ в поставку или его необходимо
приобрести отдельно.
Примечание: Если входит в поставку оборудования, в некоторых
случаях, дополнительный комплект
быть установлен на вытяжке.
Информация по переводу вытяжки из режима отвода в режим
рециркуляции уже входит в данное руководство.
Исполнение с рециркуляцией
В этом режиме испарения выводятся наружу через гибкий трубопровод,
подсоединенный к соединительному кольцу.
Диаметр выводной трубы должен соответствовать диаметру
соединительного кольца.
Внимание! Выводная труба не входит в комплект и должна быть
приобретена отдельно.
вытяжка снабжена угольным фильтром, то уберите его
Исполнение с отводом воздуха
Должен использоваться угольный фильтр, имеющийся в наличии у вашего
дистрибутора. Втягиваемый воздух обезжиривается и дезодируется перед
тем, как вновь возвращается в помещение через верхнюю решетку.
угольных фильтров может уже
,
14
КОМАНДЫ
Вытяжка оснащена щитом управления для контроля скорости вытяжного
вентилятора и зажигания света для освещения рабочей поверхности
плиты.
Модели с механическим пультом
T1. Выключатель освещения ON/OFF.
T2. Выключатель OFF/скорость 1
T3. Переключатель скорости 2
T4. Переключатель скорости 3
IHVP 6.6 LM K
Модели с пультом Soft Button + Дисплей LCD
1. ВЫКЛ / Кнопка уменьшения скорости вытяжки (выключения
питания)
2. ВКЛ / Кнопка увеличения скорости вытяжки (включения питания)
Примечание: Повышенная скорость (мощность) вытяжки включается
на 5 минут (индикатор c мигает); затем вытяжка переключается на
скорость (мощность) 2.
3. ВКЛ/ВЫКЛ Кнопка таймера: задержка отключения выбранной
скорости вытяжки (питания ) на 5 минут.
Примечание: кнопка также используется для
“Сброс сигнала насыщения фильтров”.
4. Кнопка ВКЛ/ВЫКЛ подсветки
5. На дисплее отображается:
a. Скорость вытяжки (питания): индикатор поворачивается в
зависимости от выбранной скорости вытяжки (Вкл/Выкл питания).
Безопасный режим: индикатор мигает.
b. Насыщение жироулавливающих фильтров: появляется, когда
необходимо обслуживание фильтров.
c. Таймер
d. Насыщение жироулавливающих фильтров: появляется, когда
необходимо
Примечание: эта функция обычно отключена и должна
активироваться только, если вытяжка эксплуатируется в режиме
фильтрации (с установленным угольным фильтром).
Для этого действуйте следующим образом:
- выключите вытяжку;
- одновременно нажмитеи удерживайте кнопки 1 и 3, пока
индикатор не прекратит мигать (индикатор отключен) он не начнет
светиться постоянно (индикатор включен).
- отпустите кнопки.
Для отключения повторите процедуру: индикатор больше не будет
светиться непрерывно (индикатор включен), а будет мигать
(индикатор отключен).).
e. Подсветка
Безопасный режим
Если вытяжка снабжена датчиком, который в случае внезапного повышения
температуры, включает вытяжку, которая работает, пока температура
значительно не снизиться.
Сброс сигнала насыщения фильтров
После выполнения обслуживания фильтров
3, пока индикатор не погаснет.
обслуживание фильтров.
IHVP 6.4 AL K
включения функции
нажмите и удерживайте кнопку
15
 Loading...