

Page 1
Instruction manual
TUMBLE DRYER
EN
English, 1
PT
Português,37
IDV 75
IDV 75 S
ES
Nederlands,13NLEspañol,25
F
Français,49
Contents
EN
Installation, 2-3
Where to install the tumble dryer
Ventilation
Electrical connections
Levelling the tumble dryer
Before you start your dryer
Description of the tumble dryer, 4
Front side
Rear side
Control panel
How to carry out a drying cycle, 5
Starting a drying programme
Drying settings, 6
Drying times
Drying programmes and options
Laundry, 7
Sorting laundry
Care labels
Special items
This symbol reminds you to read this instruction
manual.
Keep this manual at hand for immediate reference
whenever necessary. Always store this manual close to the
tumble dryer and remember to pass it on to any new owners
when selling or transferring the appliance, so they may
familiarise with the warnings and suggestions herein
contained.
Read these instructions carefully: the following pages
contain important information on installation and useful
suggestions for operating the appliance.
Warnings and suggestions, 8
General safety
Information on recycling and disposal
Saving energy and respecting the environment
Care and maintenance, 9
Disconnecting the power supply
Cleaning the filter after each cycle
Checking the drum after each cycle
Cleaning the tumble dryer
Troubleshooting, 10
Assistance, 11
Spare parts
1
Page 2
Installation
0
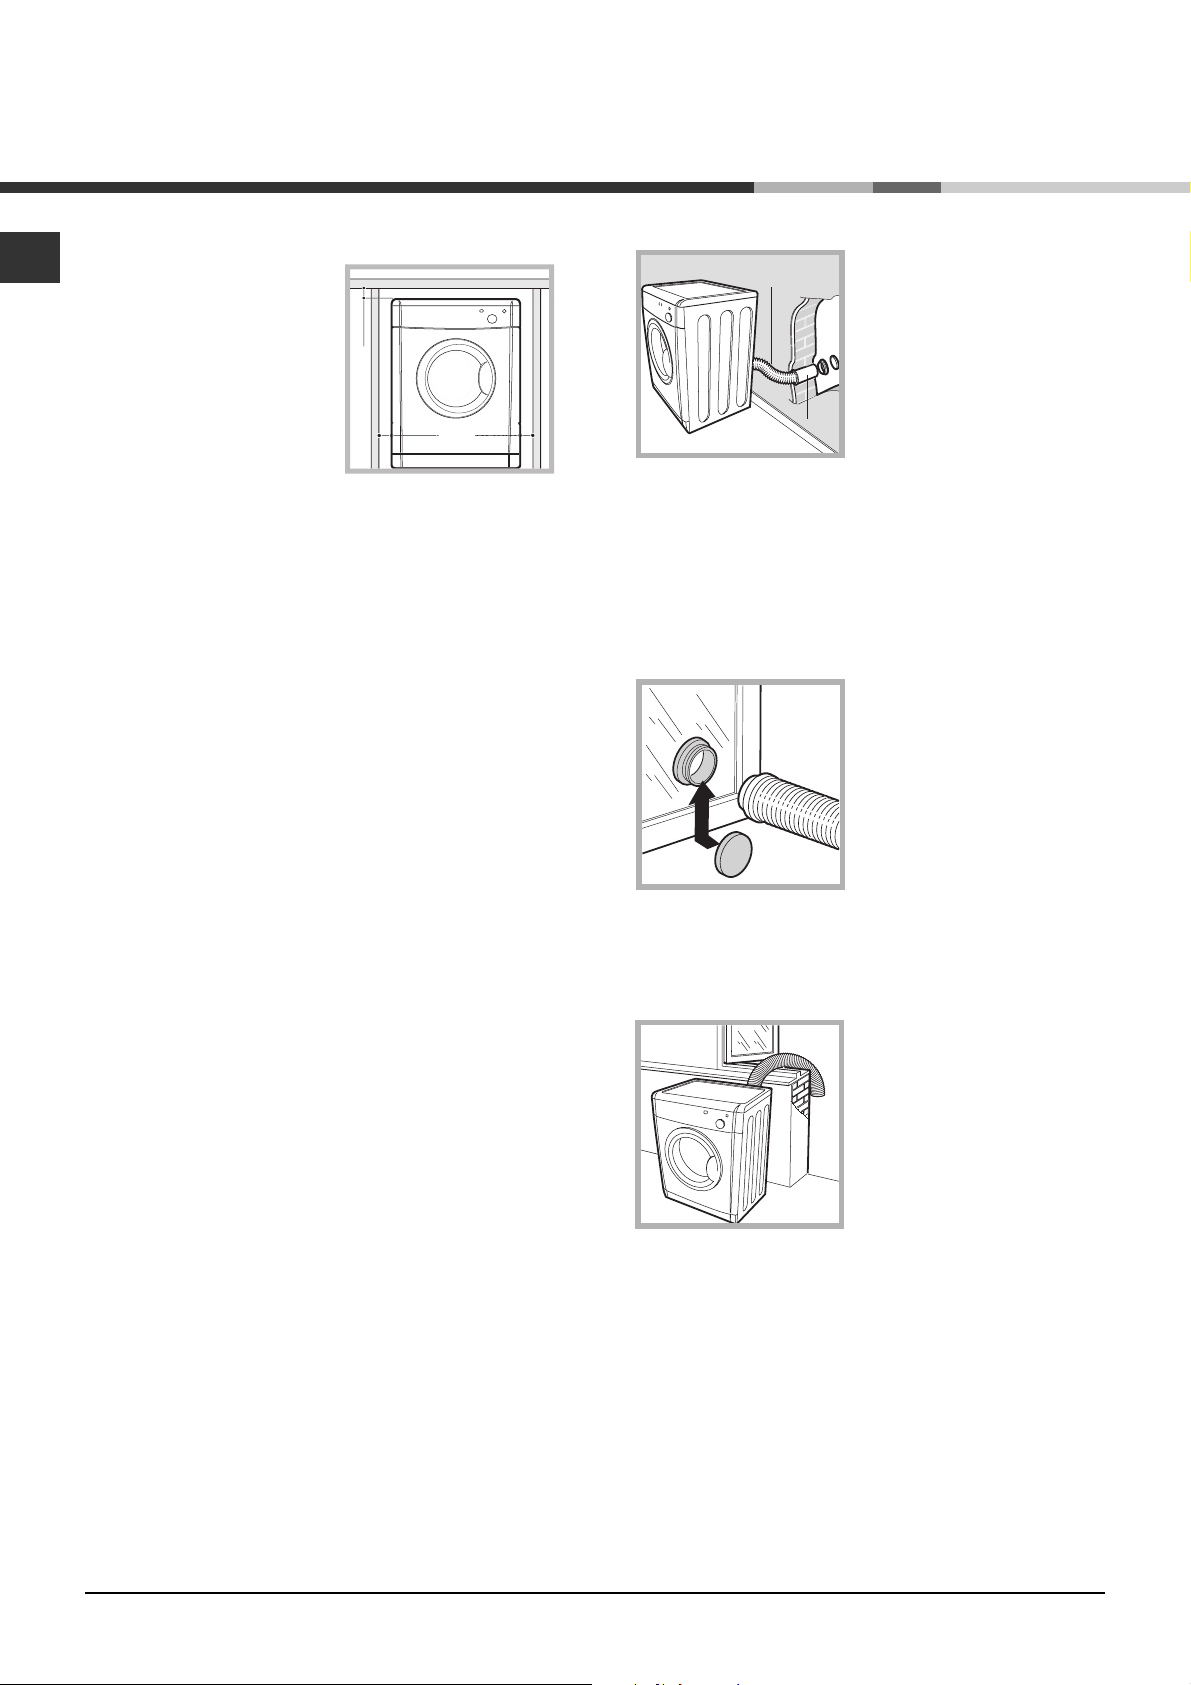
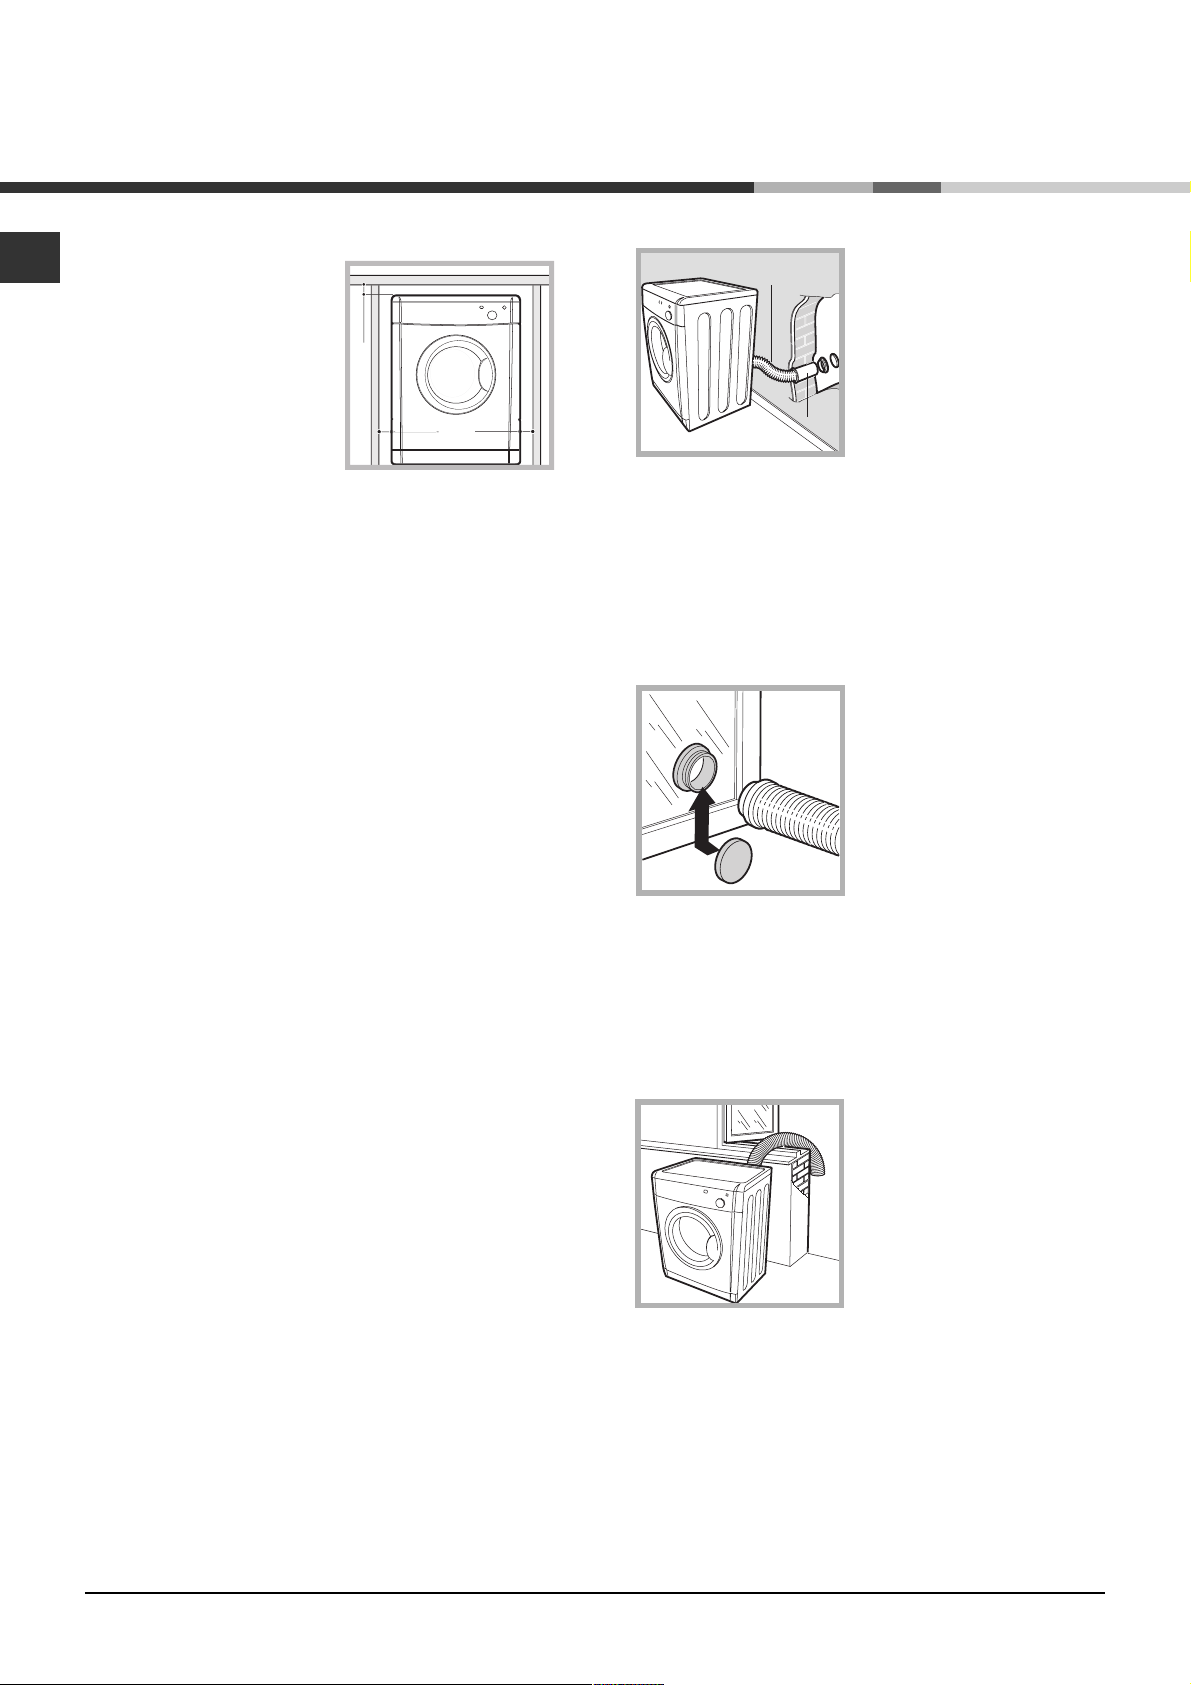
Where to install the tumble dryer
EN
Install the dryer far from gas
ranges, stoves, radiators or
hobs, as flames may damage it.
If the dryer is installed below a
worktop, ensure there are 10
mm between the upper panel of
the dryer and any objects above
it, and 15 mm between the sides
of the machine and the walls or
furniture units adjacent to it. This
ensures adequate air circulation. Make sure the air inlets on
the rear panel are not blocked or obstructed.
• You should also make sure that the room in which the
tumble dryer is installed is not damp, and that it is
adequately ventilated.
• We do not recommend that the dryer is installed in a
cupboard but the dryer must never be installed behind a
lockable door, a sliding door or a door with a hinge on the
opposite side to that of the dryer door.
m
1
Ventilation
This appliance gently dries laundry by taking in cold, clean and
relatively dry air, heating it and passing it through the fabric.
To facilitate the drying process, damp air is expelled at the
rear, through a ventilation hose. When the dryer is in use, there
has to be adequate ventilation to avoid a back flow of gases
into the room from appliances burning other fuels, including
open fires.
Mobile ventilation system
When using the tumble dryer with the mobile ventilation
system, a ventilation hose must be connected. The hose
should be securely fastened to the ventilation hole at the rear of
the appliance (see Description of the tumble dryer). We
recommend the hose is connected to an outlet near the tumble
dryer, if possible. If it cannot be installed in a permanent spot,
the tumble dryer will still function perfectly well if the ventilation
hose is passed through a partially-opened window.
Make sure you do not point the ventilation hose towards the
air inlet, which is located on the rear of the appliance.
The ventilation hose should not exceed a maximum length of
2.4 metres; it should also be shaken frequently to remove any
fluff, dust or water deposits inside it. Make sure you do not
crush the hose.
Fixed ventilation system
We recommend the ventilation hose is connected to a
ventilation system for windows or doors, available from the
retailer which originally sold you the appliance or from your
local spare parts stockist.
Wall ventilation hole
1. Leave an opening in the wall
B
downwards, so that the flow of air coming out is not
impeded.
Areas A and B should be checked frequently, to prevent the
accumulation of fluff or debris, particularly if the tumble dryer
is used very often. The hose adaptor must be fitted
correctly, in order to prevent damp air from coming back
into the room.
Window ventilation hole
There should be no cuts, kinks or U-shaped bends in the
hose, as these could impede ventilation or trap
condensation.
Ventilation through an open window
Make sure that the tumble dryer is adequately ventilated,
and that the end of the ventilation hose is not pointing
towards the air inlet pipe on the rear of the appliance.
The ventilation hose must always be fitted to ensure
optimum performance.
Make sure that the ventilation hose and the air inlet vents
are not obstructed or blocked.
Do not let the tumble dryer recirculate exhaust air.
Improper use of the tumble dryer may result in fire hazards.
The air emitted by the tumble dryer must not be expelled in
the same duct as used for the fumes produced by different
appliances which burn gas or other fuels.
Do not discharge the exhaust air into an extraction system
or any duct with an extractor fan. This will affect the way the
thermal controls operate and can result in a fire hazard.
to the left of the tumble dryer
installation site.
2. Make the hose as short and
straight as possible, in order to
prevent any moisture from
condensing and leaking back
into the appliance.
A
3. The hole in the wall must
also be straight and pointing
The ventilation hole should be
directly behind the dryer in
order to keep the hose as short
as possible.
Make sure you do not push
the tumble dryer too far
backwards, as this could lead
to the ventilation hose being
crushed, bent or even
disconnected.
The end of the hose must be
facing downwards, in order to
prevent the hot, damp air from
forming condensation in the
room or the tumble dryer.
2
Page 3

Electrical connections
Before plugging the appliance into the socket, check the
following:
Make sure your hands are dry.
The socket must have an earth connection.
The socket must be able to withstand the machines
maximum power output as indicated on the data plate (see
Description of the tumble dryer).
The power supply voltage must fall within the values
indicated on the data plate (see Description of the tumble
dryer).
The socket must be compatible with the dryers plug.
Should this not be the case, replace the plug or the
socket.
Do not use extension cords.
The dryer must not be installed outdoors, even if the
space is sheltered. It can be very dangerous if exposed
to rain or storms.
Once installed, the dryers electrical wire and plug must
be within reach.
The power cord must not be bent or squashed.
If the plug being replaced is a non-rewirable type, then
the cut-off plug must be disposed of safely. DO NOT
leave it where it can be inserted into a socket and create
a shock hazard.
The power cord should be checked periodically and
replaced by a cord specially prepared for this dryer and
fitted only by authorized technicians (see Service). New or
longer power cords are supplied at an extra charge by
authorized dealers.
The manufacturer denies any responsibility should any
of these rules not be followed.
If in doubt about any of the above consult a
qualified electrician.
Before you start your dryer
Once the tumble dryer is installed, clean the inside of the
drum before operating it and remove any dirt accumulated
during transportation.
EN
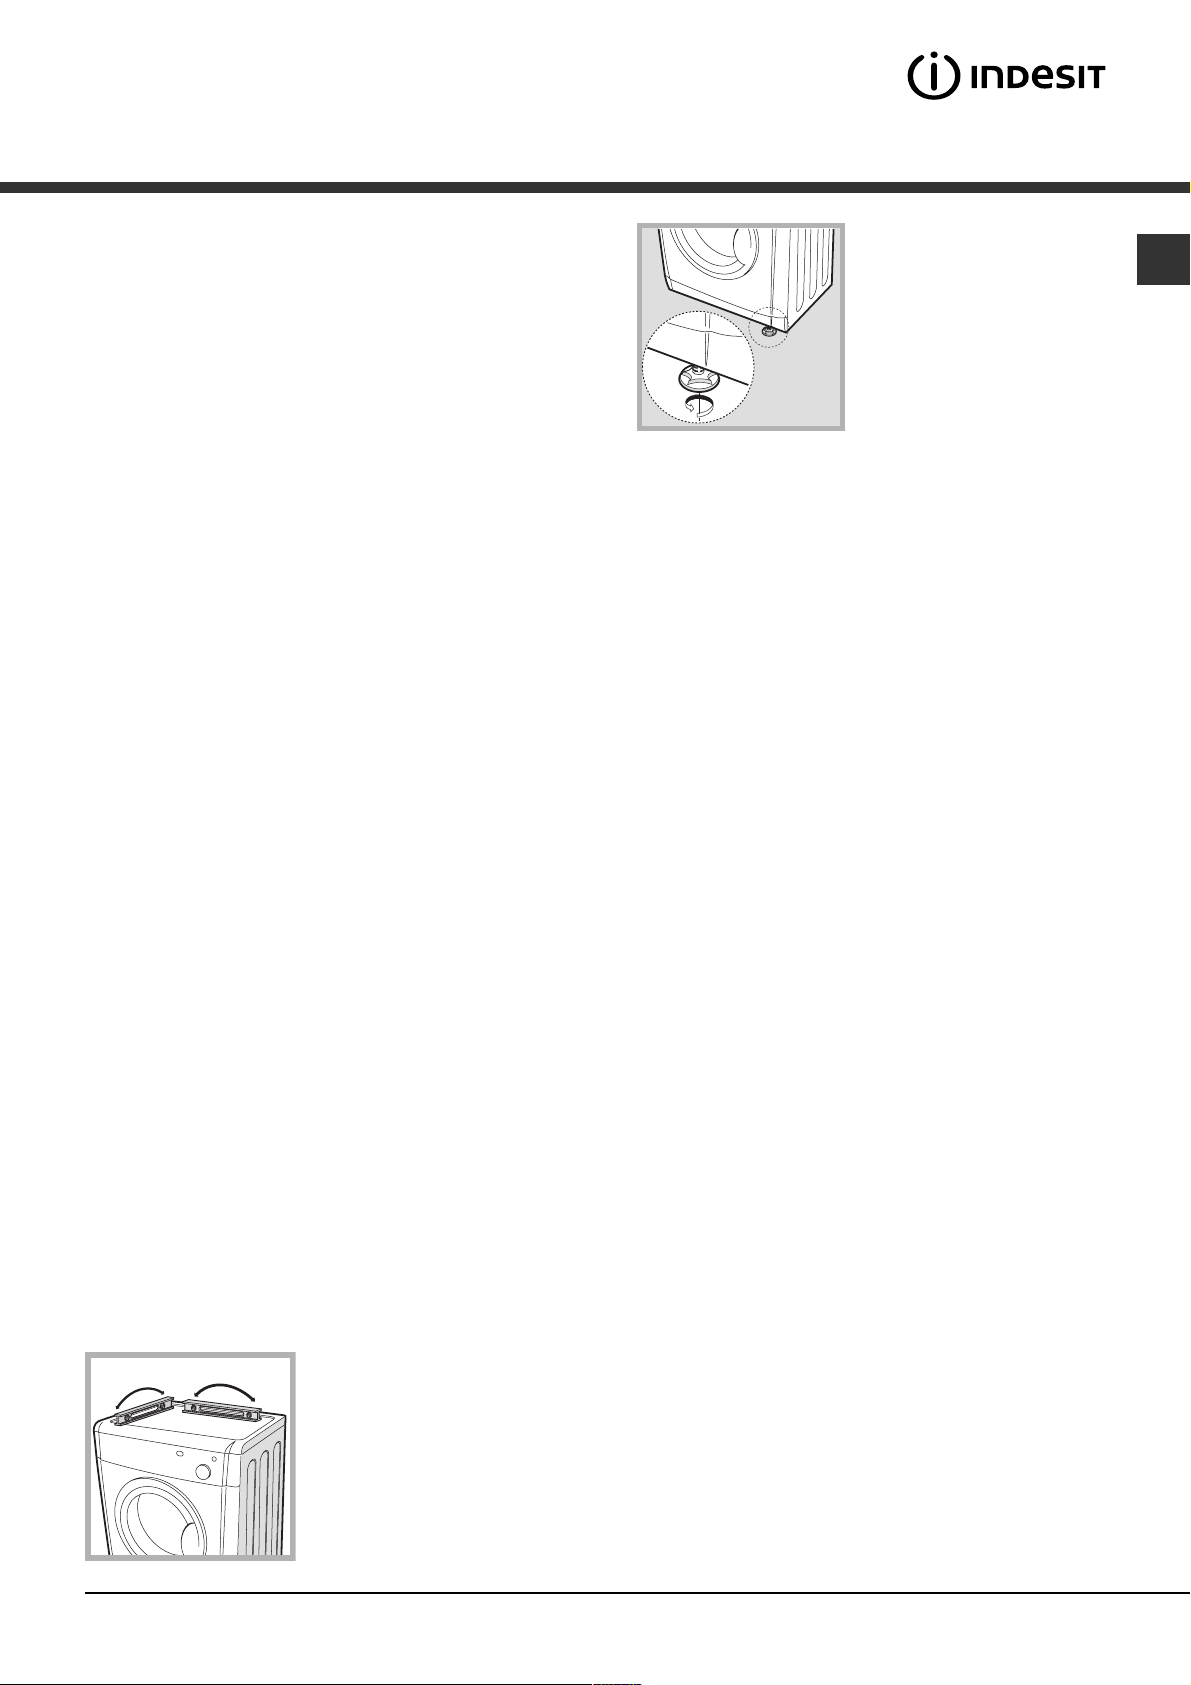
Levelling the tumble dryer
The tumble dryer should be installed level in order to
operate correctly.
After installing the tumble
dryer in its permanent
position, make sure it is
level; check its side-to-side
levelling first, followed by
front-to-back.
If the tumble dryer is not
perfectly level, use a wooden
block to support it while you
adjust the two front feet, up
or down as necessary.
3
Page 4
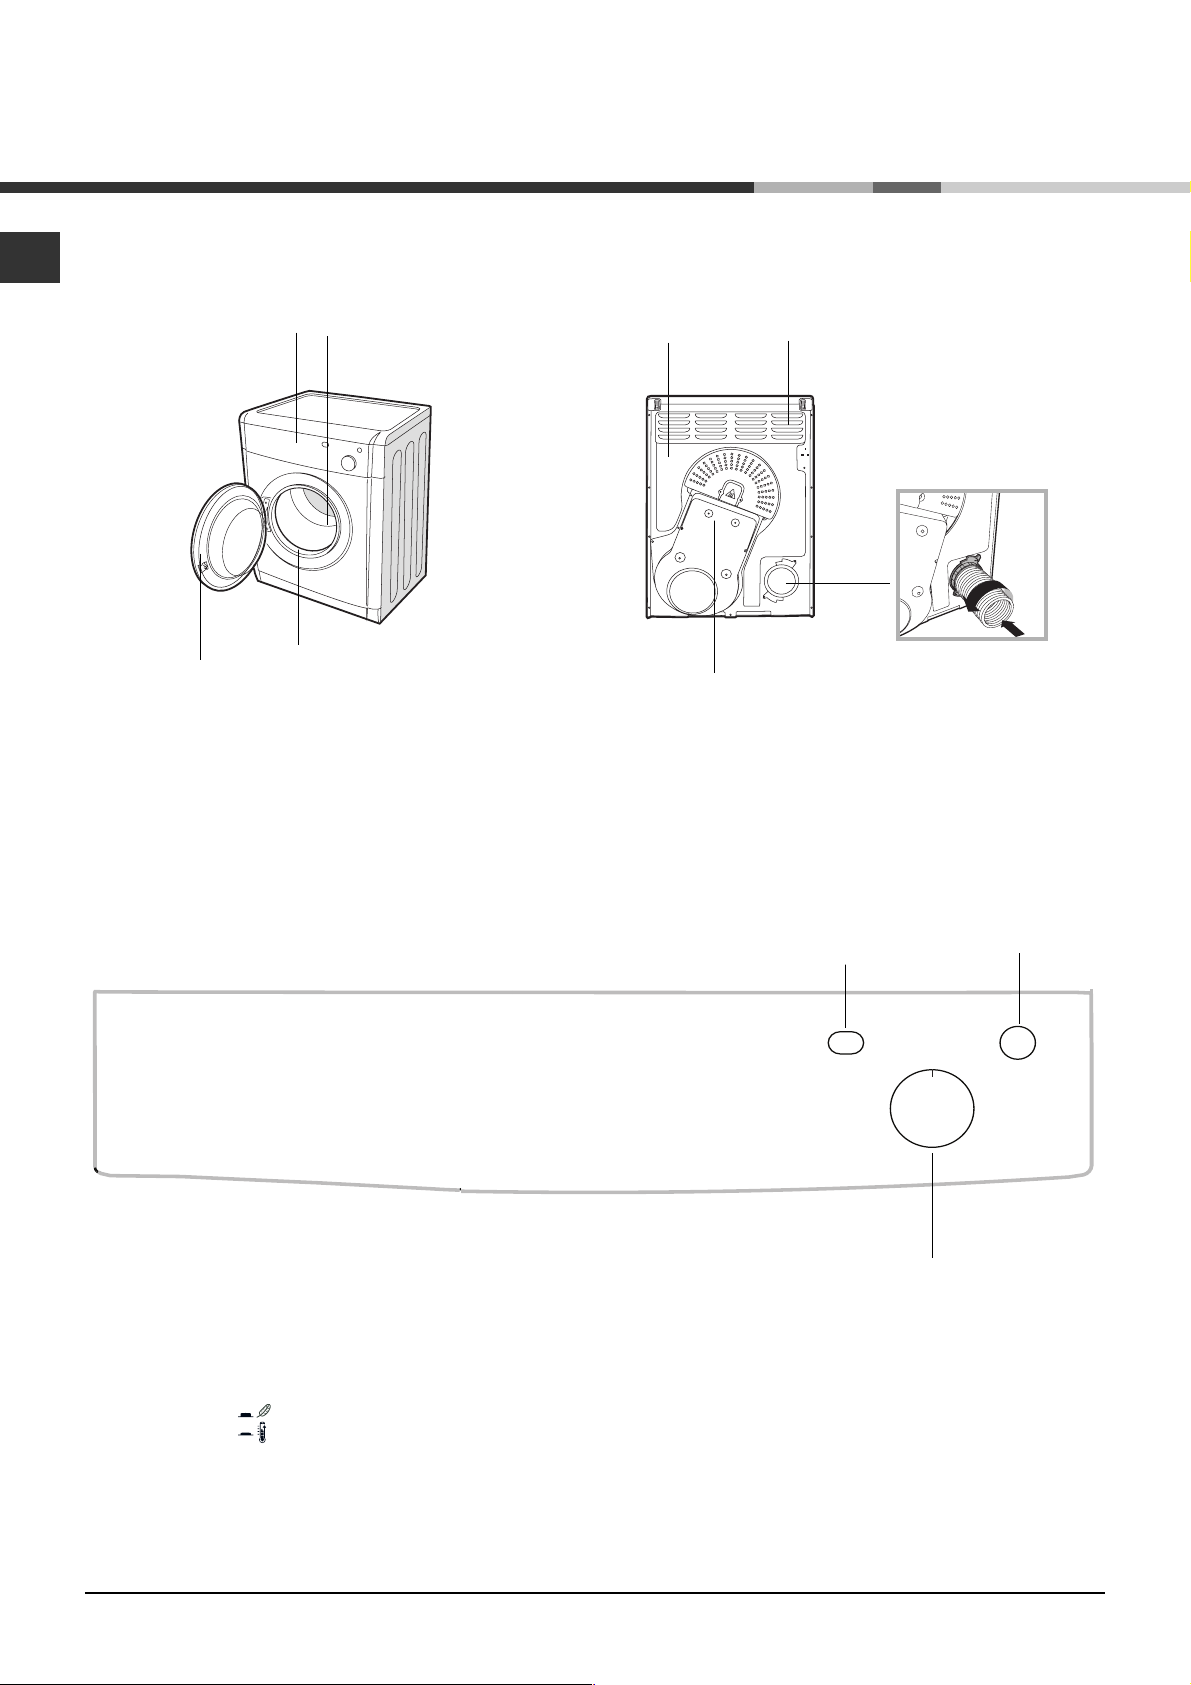
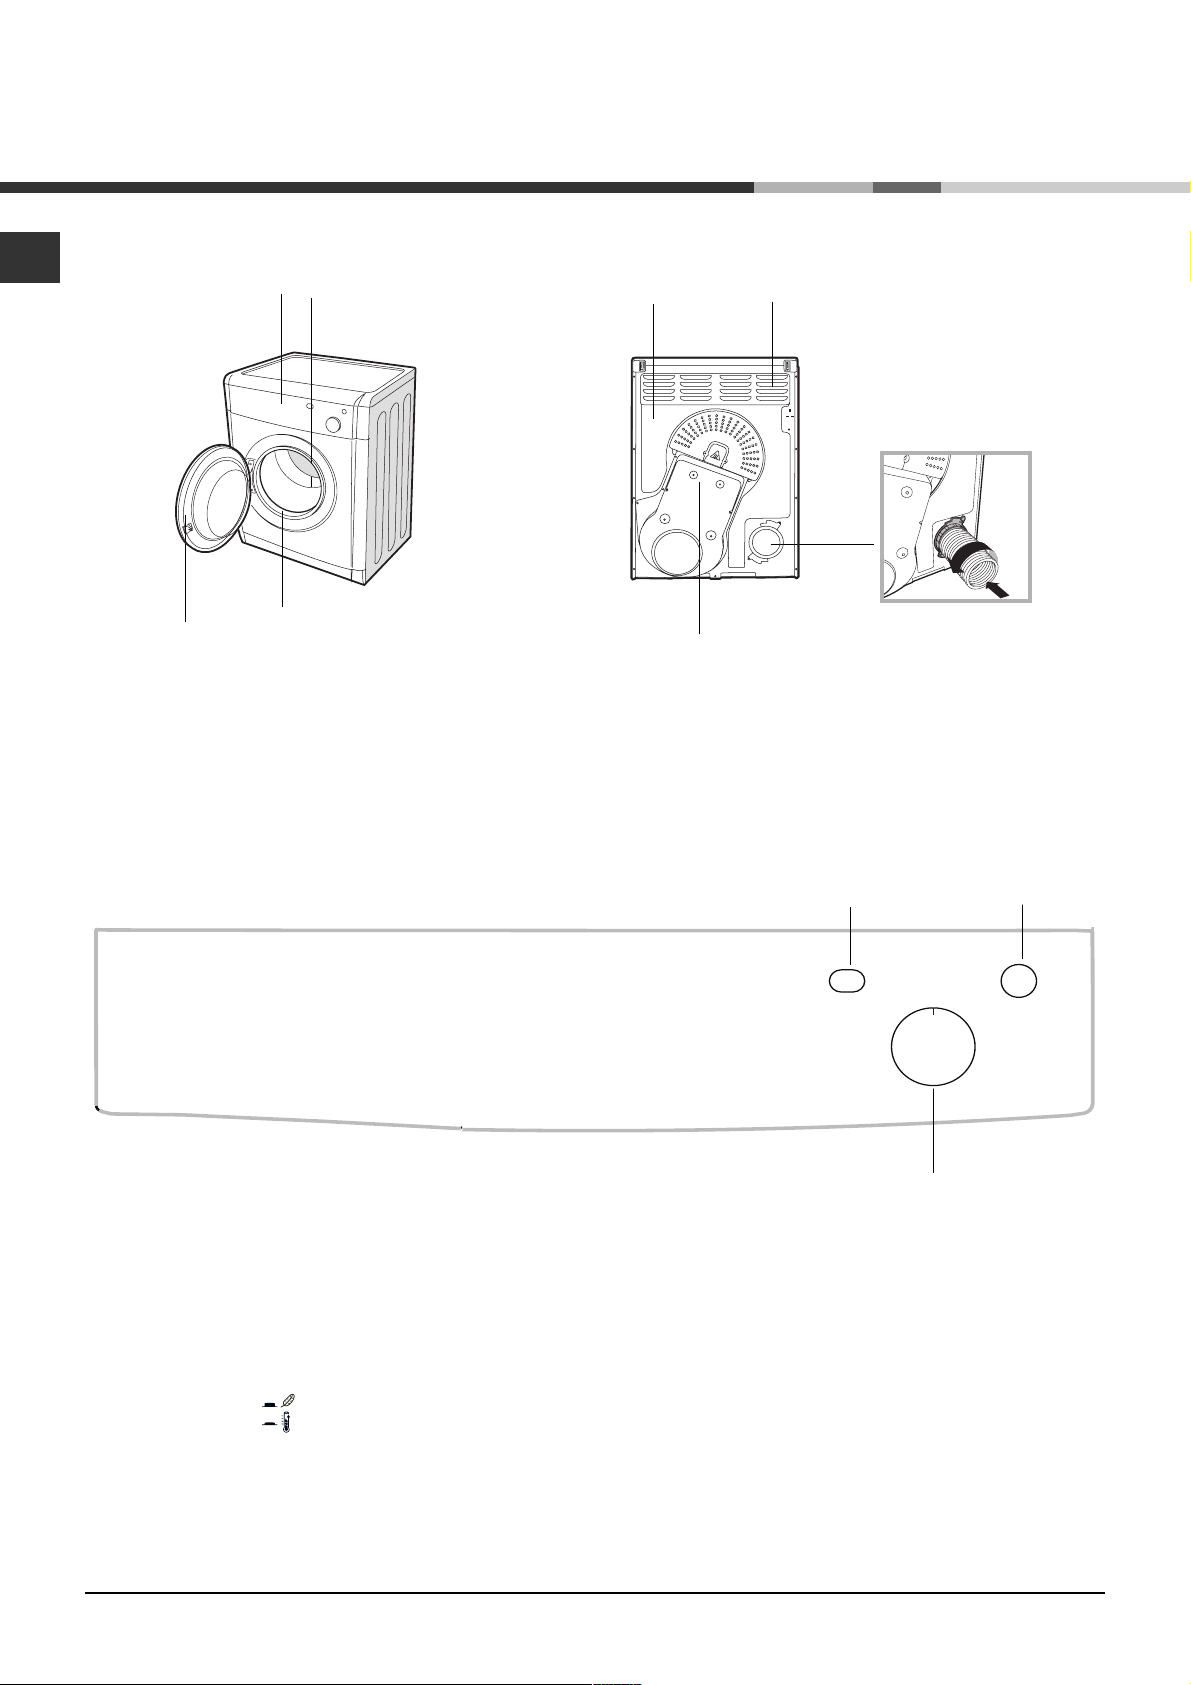
Description of the tumble dryer
Front side Rear side
EN
Control panel
Serial number
and model
number
Control panel
Filter
Drum
Rating Plate
Caution, high
temperature
Air inlet
High Heat
button
Connection for
ventilation hose
Start
button
Drying time
selector knob
Drying time selector knob
This is used to set the drying time: turn the knob in a clockwise direction until the indicator is set to the desired drying time (see
Drying settings). Do not attempt to turn the knob anticlockwise.
High Heat button
It can be used to customise the selected programme in accordance with your own requirements.
START button
Press the button to begin drying.
4
Page 5

How to carry out a
drying cycle
Starting a drying programme
1. Plug the dryer into the power supply socket.
2. Select a suitable drying programme for the type of laundry (see Laundry).
3. Open the door, ensure that the filter is clean and securely placed.
4. Load the machine, making sure that no piece of laundry gets between the door and the door seal. Close the door.
5. Turn the Drying time selector knob until the indicator is pointing towards the most suitable drying time for the type of fabric in
that load. Use the table to check the relationship between fabric type and load capacity (see Drying settings), and make sure you
are familiar with the instructions provided for each type of fabric (see Laundry). Do not attempt to turn the knob anticlockwise.
6. If necessary, set the temperature using the HIGH HEAT button.
7. Press the START button to start the drying cycle.
Laundry can be checked while the drying programme runs and any garments already dry can be removed, while drying continues
for the remaining items. After closing the door, press the START button to resume machine operation.
EN
8. The final COLD DRYING phase (i.e. the fabrics are cooled) activates during the last few minutes of the drying programme; always
allow this phase to terminate.
9. Open the door, remove the laundry then clean the filter and replace it.
10. Disconnect the dryer from the power supply.
5
Page 6
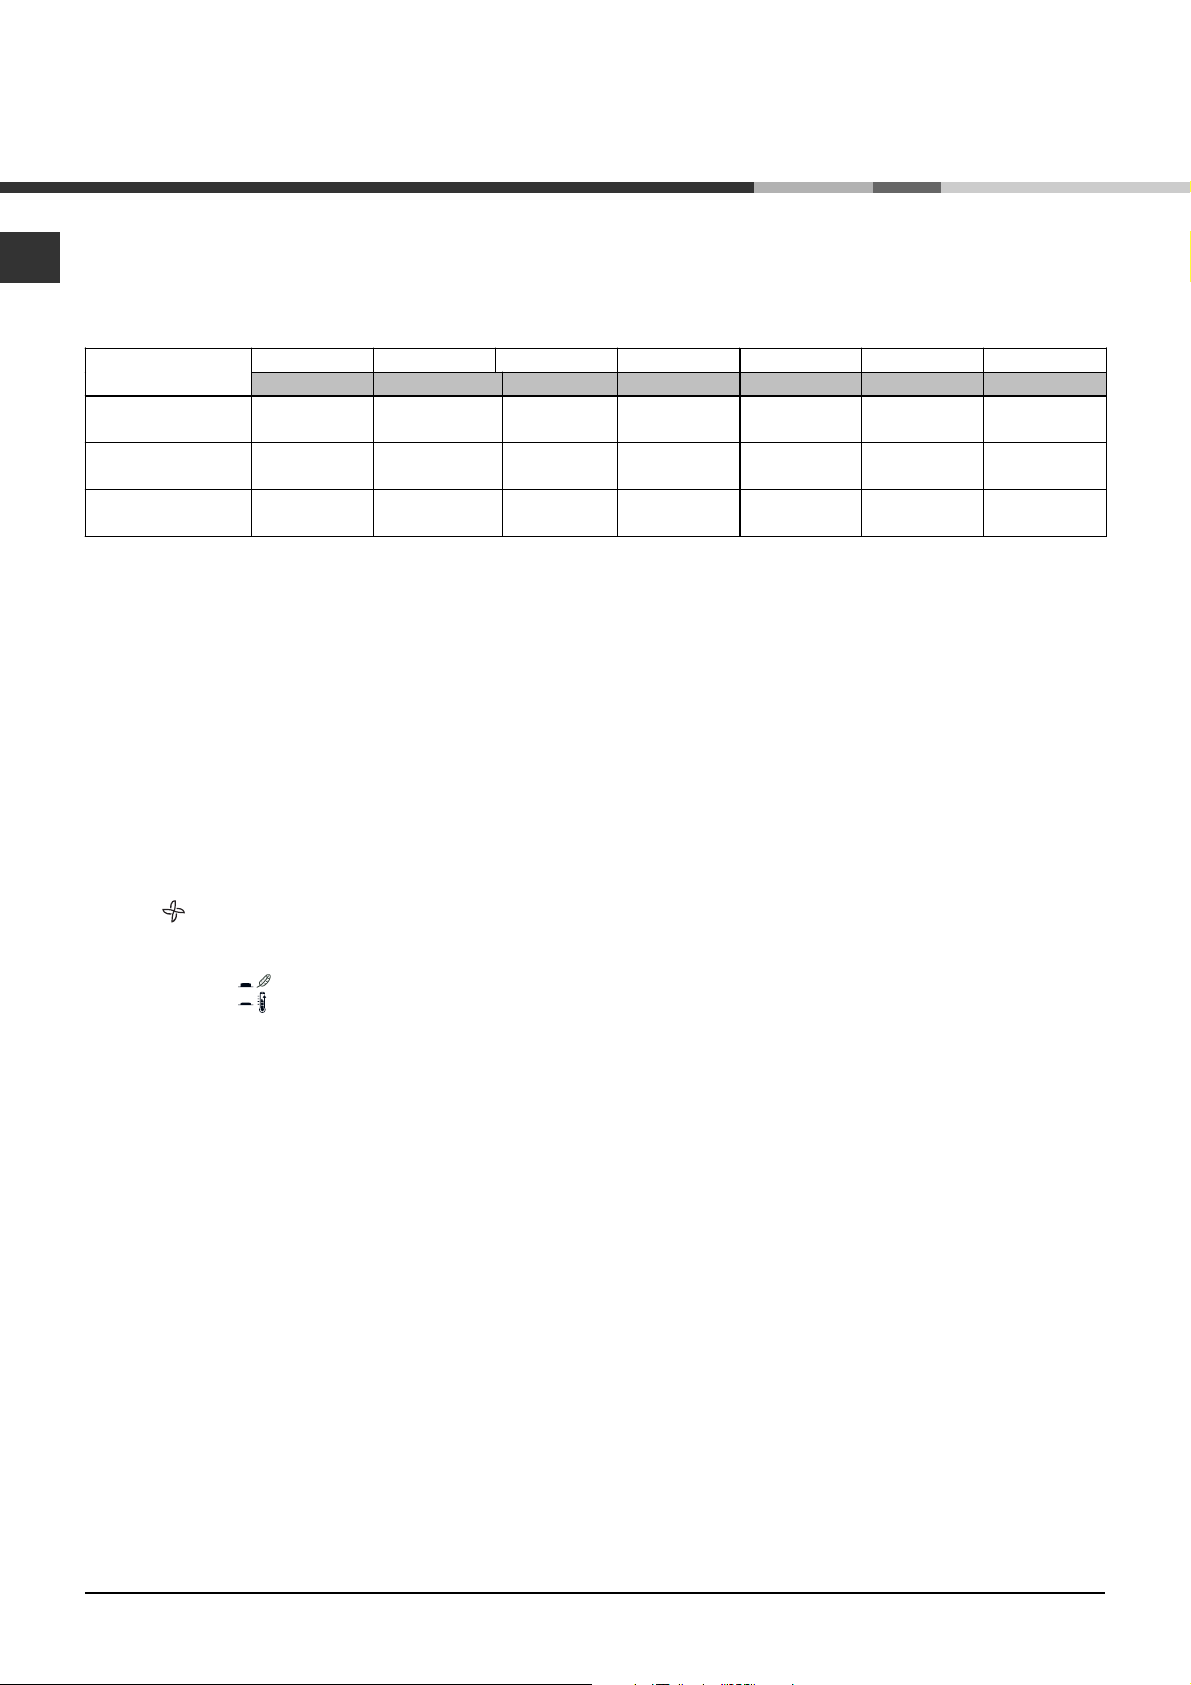
Drying settings
Drying times
EN
The drying time depends on the size of the load and on the type of fabric it contains (see Table).
The cold drying cycle runs during the final 10 minutes of the programme.
For large loads, select the High Heat option if available.
Fabric
Cotton –
high heat
Synthetics –
high heat
Acrylics –
low heat
Load
1 kg
20 - 30
minutes
20 - 30
minutes
25 - 40
minutes
Drying times are approximate and may vary depending on the following:
Amount of water retained by items after the spin cycle: towels and delicate items retain a lot of water.
Fabrics: items of the same fabric, but with different texture and thickness may have different drying times.
Amount of laundry: single items and small loads will take a short time to dry.
Drying: if items are to be ironed, they can be removed from the dryer while still slightly damp. Items that require complete drying
can be left longer.
Temperature of the room: the lower the temperature of the room, the longer it will take for the dryer to dry clothing.
Bulk: certain bulky items require special care during the drying process. We suggest removing these items and replacing them in
the dryer once they have been shaken out: repeat this procedure several times during the course of the drying cycle.
Do not over-dry items.
All fabrics contain natural dampness which helps to keep them soft and fluffy.
2 kg
35 - 45
minutes
35 - 45
minutes
40 - 60
minutes
3 kg
45 - 60
minutes
45 - 60
minutes
- - - - -
4 kg 5 kg
60 - 70
minutes
- - - -
70 - 80
minutes
6 kg
80 - 100
minutes
7 kg
90 - 120
minutes
Drying programmes and options
Refresh
A short programme suitable for refreshing fibres and garments through the emission of cool air. It lasts about 10 minutes.
As this is not a drying programme, it is not to be used for garments that are still wet.
High Heat button
The high heat button selects the drying temperature. When the button is out low heat is selected and when it is pushed in high heat
is selected
6
Page 7
Laundry
Sorting laundry
Check the symbols on the care labels of the various
garments to verify whether the garments can be safely
tumble dried.
Sort laundry according to the type of fabric.
Empty all pockets and check for loose buttons.
Close zips and hooks and fasten belts and strings without
tightening them.
Wring out garments to remove the maximum amount of
water possible.
Do not load the dryer when garments are dripping wet.
Maximum load sizes
Do not overload the drum.
The following values indicate the weight of dry garments:
Natural fibres: maximum 7 kg
Synthetic fibres: maximum 3 kg
Do not overload the dryer as this may result is reduced
drying performance.
Typical weights
Note: 1 kg = 1000 g
Garments
Blouse
Dress
Jeans
10 Nappie
Shirt
T-shirt
Cotton
Other
Cotton
Other
Cotton
Other
150 g
100 g
500 g
350 g
700 g
1,000 g
300 g
200 g
125 g
Care labels
Always check the care labels, especially when placing
garments in the tumble dryer for the first time. Below are the
most commonly used symbols:
May be tumble dried.
Do not tumble dry.
Tumble dry high heat.
Tumble dry low heat.
Items not suitable for tumble drying:
Items containing rubber parts or similar materials, or
plastic film covering (pillows, cushions or PVC sports
jackets), any type of inflammable object or objects
containing inflammable substances (used towels
containing hairspray).
Glass fibres (certain types of draperies).
Items which have been previously dry cleaned.
Items marked with the ITLC symbol (Special garments)
, which may be washed using special household
products. Follow instructions carefully.
Large bulky items (duvets, sleeping bags, pillows,
cushions, etc.) that expand when dried and hamper air
circulation inside the tumble dryer.
Special items
Blankets and bedcovers: acrylic items (Acilian, Courtelle,
Orion, Dralon) must be dried with great care at low heat.
Avoid drying for long periods.
Creased or pleated garments: read the drying instructions
supplied by the manufacturer.
Starched garments: do not dry together with nonstarched items. Remove the maximum amount of starch
solution possible before placing these items in the dryer. Do
not over-dry: starch turns powdery leaving garments limp
this defeats its purpose.
EN
Household linen
Duvet cover
(double bed)
Large tablecloth
Small tablecloth
Tea cloth
Bath towel
Hand towel
Double bed
sheet
Single bed sheet
Cotton
Other
1,500 g
1,000 g
700 g
250 g
100 g
700 g
350 g
500 g
350 g
When mixing synthetic fibres with cotton garments, the
latter may still be damp at the end of the drying cycle. If this
happens, simply put them through a short drying cycle.
Note: when setting the duration of the drying cycle,
remember that the cold drying phase runs during the last 10
minutes, during which the dryer does not dry the garments.
7
Page 8

Warnings
and suggestions
This appliance was designed and manufactured in
compliance with current international safety standards. The
EN
following information is provided for safety reasons and
must be read carefully.
General safety
The final part of a tumble dryer cycle occurs without heat
(cooling cycle) to ensure that the laundry is not damaged
due to excessive temperatures.
This tumble dryer must not be used by persons (including
children) with physical, sensory or mental impairments or
with little experience and knowledge of the appliance,
unless they are supervised or have been adequately
instructed on its use by the person responsible for their
safety.
This tumble dryer is designed for domestic and non-
professional use.
Do not touch the appliance while barefoot or with wet
hands or feet.
Unplug the appliance by pulling on the plug, not the cord.
Do not allow children near the appliance while it is in use.
After use, switch the appliance off and unplug it. Keep the
appliance door closed to prevent children using it as a
toy.
Children must be supervised to ensure that they do not
play with the appliance.
The appliance must be correctly installed and receive
adequate ventilation. The air inlet vents on the back of the
dryer must never be obstructed (see Installation).
Never direct the vent hose towards the air inlet vents on
the back of the dryer.
Never use the dryer on carpeting with high pile as this
may prevent air from entering the dryer from the base.
Check whether the dryer is empty before loading it.
The rear part of the dryer may become very hot:
do not touch it while the appliance is in use.
Do not use the dryer unless the filter is properly
positioned (see Care and Maintenance).
Do not use liquid fabric softener in the dryer; add it to the
final rinse of the wash cycle.
Do not overload the dryer (see Laundry for the maximum
load sizes).
Do not add items that are dripping wet.
Tumble dry items only if they have been washed with
water and detergent, and have been rinsed and put
through a spin cycle. Drying items that have NOT been
washed with water may cause the risk of fire.
Always read the instructions on the care label carefully
(see Laundry).
Do not tumble dry items that have been treated with
chemical products.
Never tumble dry items that are contaminated with
inflammable substances (cooking oil, acetone, alcohol,
petrol, kerosene, stain removers, turpentine, waxes, wax
removers and hairspray), unless they have been washed
in hot water with an extra amount of detergent.
Do not tumble dry rubber, rubber-backed articles and
garments, cushions with foam rubber padding, latex
foam, rubber, plastic, shower caps, water-resistant
fabrics, nappy pants or liners, polyethylene and paper.
Remove all objects from pockets, particularly lighters
(risk of explosion).
Do not tumble dry large, excessively bulky items.
Do not tumble dry acrylic fibres at high temperatures.
Complete each programme with the relative cold drying
phase.
Do not switch the tumble dryer off if items that are still
warm are inside it.
Clean the filter after each use (see Care and maintenance).
Do not allow lint to build up around the tumble dryer.
Never climb on the top of the dryer as this may damage
the appliance.
Always comply with electrical regulations and
requirements (see Installation).
Always purchase original accessories and spare parts
(see Assistance).
WARNING: Never stop the dryer before the end of the
drying cycle unless all items have been quickly removed and
hung in order to dispel heat.
Information on recycling
and disposal
As part of our continual commitment towards environmental
protection, we reserve the right to use recycled quality
components to reduce costs for our customers and to
minimise materials wastage.
Disposing of the packaging materials: follow local
regulations to allow for recycling of packaging materials.
In order to minimise the risk of injury to children, remove
the door and plug, then cut the power supply cord flush
with the appliance. Dispose of these parts separately to
prevent the appliance from being connected to a power
supply socket.
Disposal of old household appliances
European Directive 2002/96/EC concerning Waste
Electrical and Electronic Equipment (WEEE) states
that household appliances should not be disposed of
with normal household waste. Old appliances should
be collected separately in order to optimise the cost of reusing and recycling materials comprising the machine, while
preventing potential damage to public health and the
environment. The crossed-out wheeled bin symbol appears
on all products to remind owners of the obligations
regarding separate waste collection.
Owners should contact their local authorities or appliance
dealers for further information concerning the correct
disposal of household appliances.
Saving energy and respecting the
environment
Wring out items before tumble drying them to remove
the maximum amount of water possible (if they are
previously washed in a washing machine, select a spin
cycle). This ensures that energy is saved during tumble
drying.
Always use the tumble dryer at full load to save energy:
single items and small loads may take longer to dry.
Clean the filter at the end of each cycle to reduce energy
consumption costs (see Care and maintenance).
8
Page 9
Care and maintenance
Disconnecting the power supply
Disconnect the dryer when not in use or during cleaning
and maintenance operations.
Cleaning the filter after each cycle
The filter is a fundamental component of the dryer: its
function is to collect lint and fluff that form during drying.
Clean the filter once drying is completed, by rinsing it under
running water or cleaning it with a vacuum cleaner. Should the
filter become clogged, the flow of air inside the dryer will be
seriously hampered: drying times becomes longer and more
energy is consumed. Moreover, the dryer may become
damaged.
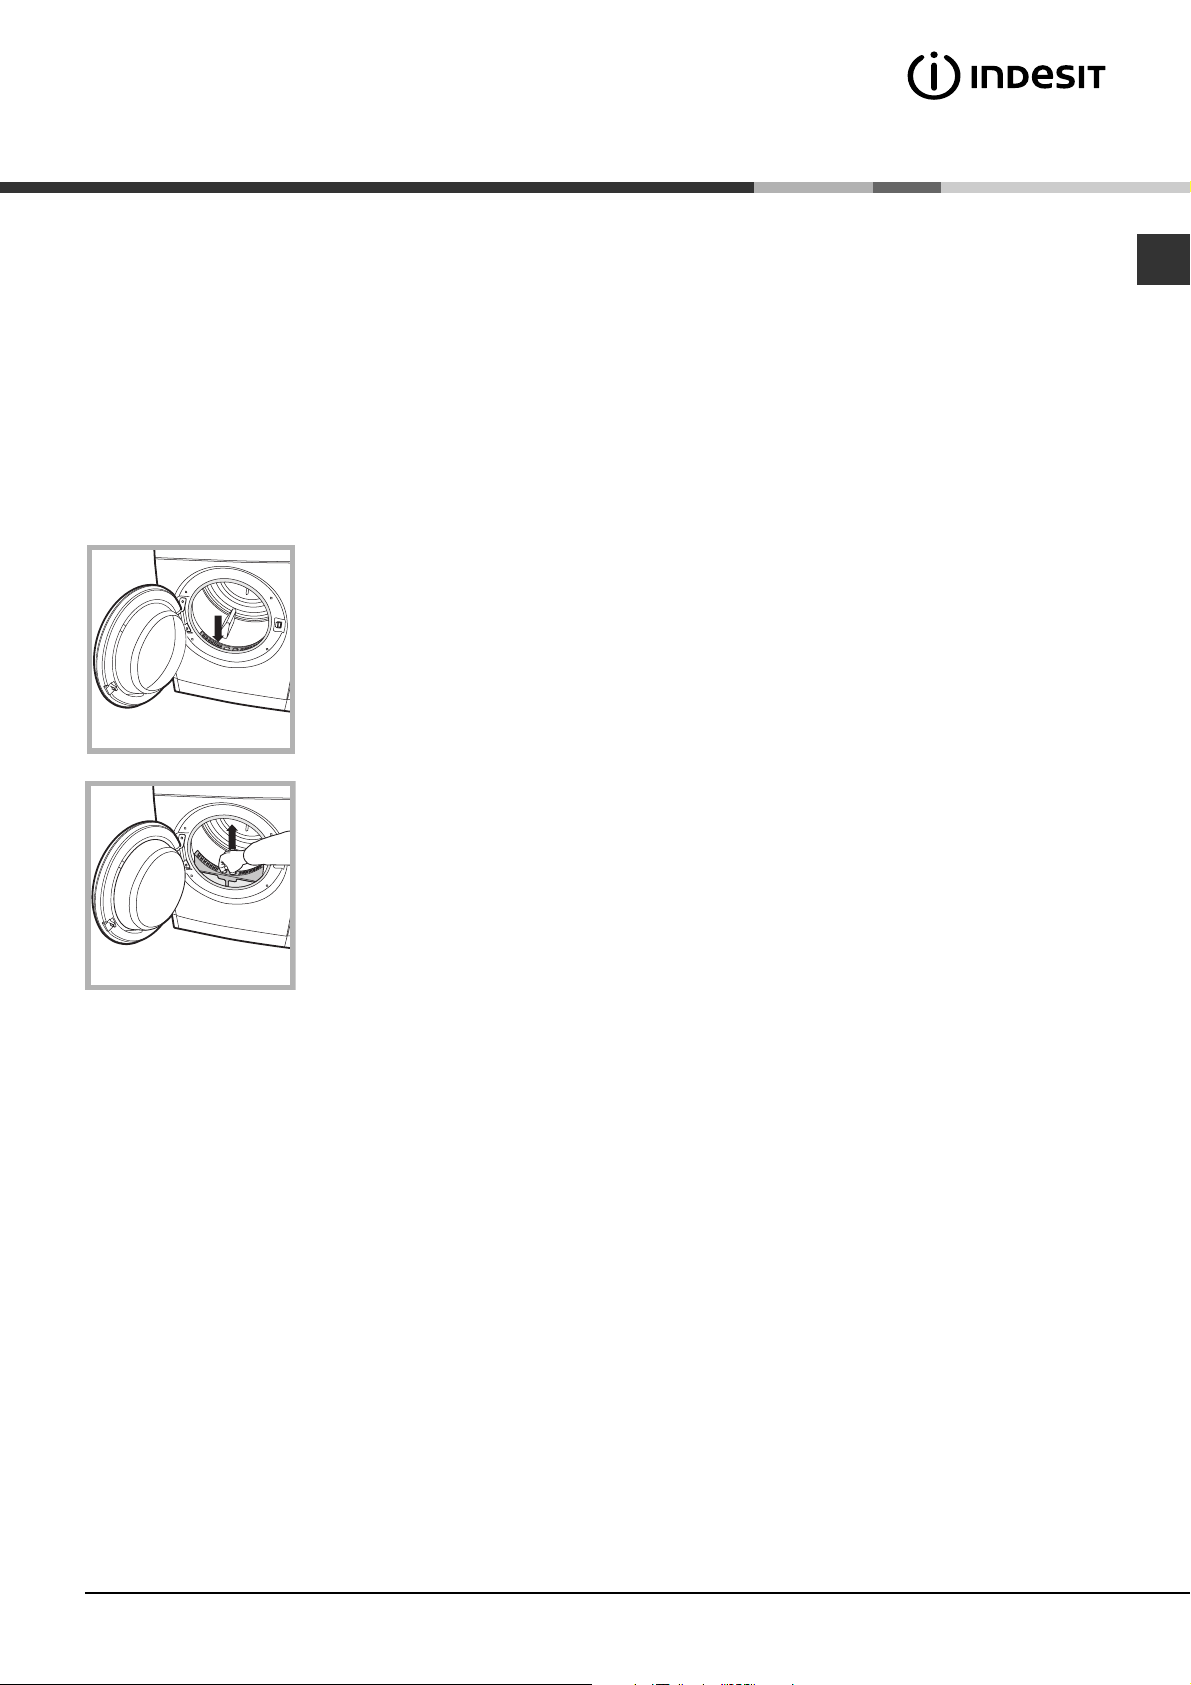
The filter is located behind of
the dryer seal (see Picture).
EN
Removing the filter:
1. Pull the filters plastic handle
upwards (see Picture).
2. Clean the fluff off the filter and
replace it correctly. Ensure that
the filter is pushed fully home.
Do not use the dryer unless the filter has been replaced in
its holder.
Checking the drum after each cycle
Rotate the drum manually to remove smaller items
(handkerchiefs) that could have been left inside the dryer.
Cleaning the drum
Avoid using abrasives, steel wool or stainless steel
cleaning agents to clean the drum.
A coloured film may appear on the stainless steel drum
surface: it may be caused by a combination of water and/or
cleaning agents such as wash-softeners. This coloured film
does not affect the dryers performance.
Cleaning the tumble dryer
The external metal and plastic parts and the rubber parts
can be cleaned with the aid of a damp cloth.
Periodically check the vent hose and all other parts of the
venting system and remove any accumulations of fluff and
lint.
Do not use solvents or abrasives.
Have the dryer checked regularly by authorised technical
personnel in order to ensure that the electrical and
mechanical parts work safely (see Assistance).
9
Page 10

Troubleshooting
If you feel that the dryer is not working properly, consult the following troubleshooting suggestions before contacting the Technical
Assistance Centre
EN
(see Assistance).
Problem:
The dryer does not start.
Drying times are too long.
The dryer is noisy during the first
few minutes of operation.
Possible causes / Solutions:
The plug has not been inserted far enough into the socket to make contact.
There has been a power cut.
The fuse has blown. Try connecting another appliance to the same socket.
If an extension cord is used, try connecting the dryer plug directly into the socket.
The door has not been closed properly.
The programme has not been set correctly (see How to carry out a drying cycle).
The
START button has not been pressed (see How to carry out a drying cycle).
The filter has not been cleaned (see Care and maintenance).
An incorrect drying time was selected for the type of load (see Laundry).
The items are too wet (see Laundry).
The dryer is overloaded (see Laundry).
The flexible ventilation hose may be blocked (see Installation).
The air inlet may be blocked or obstructed (see Installation).
The fixed ventilation flap, on the protective weatherproof cover, may be obstructed
(see Installation).
This is normal, especially if the dryer has not been used for a long time. If the noise
persists during the entire cycle, contact the Technical Assistance Centre.
10
Page 11
Assistance
Before contacting the Technical Assistance
Centre:
Follow the troubleshooting guide to check whether
problems can be solved personally (see Troubleshooting).
If not, switch the dryer off and contact the Technical
Assistance Centre closest to you.
Provide the following data when contacting the
Technical Assistance Centre:
name, address and postal code
telephone number
type of malfunction
date of purchase
the appliance model (Mod.)
the dryers serial number (S/N)
This information can be found on the data plate located
behind the door.
Spare parts
EN
This dryer is a complex machine. Attempting to repair it
personally or employing an unqualified service agent may
put the safety of people at risk, damage the machine or
invalidate the spare parts guarantee.
Always contact a qualified technician when experiencing
problems with this machine. The spare parts were
designed exclusively for this machine and should not be
used for any other purpose.
This appliance conforms to the following EEC directives:
- 2006/95/EC (Low Voltage Directive)
- 89/336/EEC, 92/31/EEC, 93/68/EEC (Electromagnetic Compatibility Directive).
11
Page 12

EN
12
Page 13
Gebruiksaanwijzing
WASDROGER
NL
Nederlands
IDV 75
IDV 75 S
Inhoudsopgave
NL
Installatie, 14-15
Waar men de wasdroger moet installeren
Ventilatie
Electrische aansluiting
Egalisatie/Nivellering van de droger
Informatie vooraf
Beschrijving van de wasdroger, 16
Voorkant
Achterkant
Bedieningspaneel
Hoe men de machine laat drogen, 17
Start van een droogcyclus
Drooginstellingen, 18
Droogtijden
Programma's en droogopties
De Was, 19
Sorteren van de was
Wasetiketten
Bijzondere kledingsstukken
Droogtijden
! Dit symbool herinnert u eraan om deze
gebruikshandleiding te lezen.
! Houd het boekje altijd bij de hand, om het gemakkelijk te
kunnen raadplegen zovaak als nodig is.
Houd het boekje altijd dicht bij de wasdroger; als men het
apparaat verkoopt of weggeeft, moet men zich herinneren
om dit boekje ook erbij te geven, zodat de nieuwe bezitters
kennis kunnen nemen van de waarschuwingen en hints voor
het gebruik van de wasdroger.
! Lees zorgvuldig deze aanwijzingen: op de volgende
paginas vindt men belangrijk informatie over de installatie en
nuttige wenken voor de werking van het toestel.
Waarschuwingen en raad, 20
Algemene veiligheid
Informatie voor het hergebruik en ontzorging
Energiebesparing en milieurespect
Zorg en onderhoud, 21
Onderbreking van de electrische voeding
Reiniging van het filter na elke cyclus
Controle van het mandje na elke cyclus
Reiniging van de
wasdroger
Problemen en oplossingen, 22
Service, 23
Reserveonderdelen
13
Page 14
0
Installatie
Waar men de wasdroger moet
installeren
NL
Vlammen kunnen de
wasdroger beschadigen, zet
deze dus ver af van kookplaten,
kachels, verwarmingen en
dergelijke.Indien het toestel
geïnstalleerd moet worden
onder een bank, is het
noodzakelijk om een ruimte van
10 mm vrij te laten tussen het
bovenste paneel van het
apparaat en andere voorwerpen hierboven, ook moet er 15
mm vrije ruimte zijn tussen de zijkanten van het apparaat en
de wanden of meubels ernaast. Op deze manier is men er
zeker van dat er voldoende luchtcirculatie is. Controleer of
de luchtgaten in de achterwand niet verstopt zijn.
• Zorg er bovendien voor dat de ruimte waarin de droger
geplaatst wordt niet vochtig is en dat er voldoende
luchtverversing is.
m
1
Ventilatie
Dit huishoudelijk apparaat droogt het wasgoed door koude,
schone en relatief droge lucht op te nemen, deze lucht te
verwarmen en door het wasgoed te laten stromen, dat zo
zacht gedroogd wordt. Om het drogen te vergemakkelijken,
wordt de vochtige lucht via een luchtafvoerslang aan de
bovenkant uitgestoten. Het is belangrijk dat de ruimte
waarin de droger wordt gebruikt voldoende geventileerd is,
zodat de hercirculatie van verbrandingsgassen van andere
apparaten voorkomen wordt.
Mobiel ventilatiesysteem
Wanneer de droger met het mobiel ventilatiesysteem gebruikt
wordt, moet een luchtafvoerslang aangesloten worden. De
slang moet stevig op de achterste luchtafvoeropening van de
droger vastgemaakt worden (zie paragraaf
Productbeschrijving). Het wordt aanbevolen om de slang
indien mogelijk aan een afvoer in de buurt van de droger te
bevestigen. Wanneer de slang niet op een definitieve manier
kan worden bevestigd, zal de droger toch optimaal presteren
door de luchtafvoerslang door een half geopend raam te laten
lopen.
Let erop om de luchtafvoerslang niet te plaatsen in de
richting van de luchtaanvoerslang die zich aan de andere kant
van de droger bevindt.
De luchtafvoerslang mag niet langer dan 2,4 meter zijn, en
moet vaak geschut worden om mogelijke resten wol, stof of
water te verwijderen. Zorg ervoor om niet op de slang te
trappen.
Vast luchtaanvoer- en afvoersysteem
Het wordt aanbevolen om de luchtafvoerslang op één van
de luchtaanvoer- en afvoersystemen voor ramen of deuren
aan te sluiten, die verkrijgbaar zijn bij de detailhandelaar waar
de droger is aangeschaft of bij de dichtstbijzijnde
onderdelenhandel.
Ventilatieopening in de muur
11. Zorg dat er ruimte overblijft
B
opening in de muur recht en afdalend zijn, zodat het
doorstromen van lucht naar buiten niet belemmerd wordt.
Plekken A en B dienen regelmatig gecontroleerd te worden
om te voorkomen dat zich wol- of stofresten vormen, met
name in het geval van veelvuldig gebruik van de droger. Het
aansluitstuk voor de luchtafvoerslang moet goed bevestigd
worden, zodat voorkomen wordt dat vochtige lucht de
ruimte binnenstroomt.
Luchtafvoeropening in het raam
Let erop om de droger niet te ver naar achteren te duwen:
hierdoor zou de luchtafvoerslang platgedrukt of gevouwen
kunnen worden of zelfs kunnen losraken.
De slang mag geen inkepingen, vernauwingen of "U"
bochten hebben: deze zouden de luchtafvoer kunnen
belemmeren of het condens kunnen laten vastlopen.
Luchtaanvoer en -afvoer door middel van een open raam
Zorg ervoor dat de droger luchtafvoer van de droger
voldoende is, en dat het uiteinde van de luchtafvoerslang
niet in de richting van de luchtaanvoer aan de achterkant
gericht is.
Om te zorgen voor een goede werking van de droger,
moet de luchtafvoerslang altijd bevestigd worden.
Controleer of de luchtafvoerslang en de
luchtaanvoerleidingen niet verstopt of dichtgeslibd zijn.
Voorkom dat de droger gebruikte lucht hercirculeert.
Oneigenlijk gebruikt van de droger kan voor brandgevaar
zorgen.
aan de kant van de muur links
van de plek waarop de droger
geïnstalleerd wordt.
2. Zorg ervoor dat de slang zo
kort en recht mogelijk is, zodat
voorkomen wordt dat
condenserend vocht in de
A
droger terug kan lopen.
3. Identiek moet ook de
1. Theoretisch gezien moet de
luchtafvoeropening, wanneer de
droger een volle lading heeft,
zich direct achter de ventilator
bevinden.
2. Het is dus belangrijk dat de
slang zo kort mogelijk is.
Het uiteinde van de slang moet
naar beneden gericht zijn, zodat
voorkomen wordt dat de
vochtige warme lucht in de
ruimte of in de droger
gecondenseerd wordt.
14
Page 15
De door de droger uitgestoten lucht mag niet worden via
hetzelfde kanaal worden afgevoerd dat de door andere
apparaten die gas of andere brandstoffen verbranden
uitgestoten rook afvoeren.
Electrische aansluiting
Voordat men de steker in de electrische contactdoos steekt
moet men het volgende controleren:
Dat uw handen droog zijn.
De steker is voorzien van een aardaansluiting.
De contactdoos moet het maximale vermogen van de
machine kunnen verdragen, men vindt deze aanwijzing op
het typeplaatje met de technische gegevens (zie Beschrijving
van de wasdroger).
De voedingsspanning moet in het bereik liggen, dat is
aangegeven op het typeplaatje met de technische gegevens
(zie Beschrijving van de wasdroger).
De contactdoos moet geschikt zijn voor het type steker
van de wasdroger. Anders moet men de contactdoos of de
steker vervangen.
! Gebruik geen verlengsnoeren.
! De wasdroger mag niet buiten worden geïnstalleerd, zelfs
als deze afgedekt is. Het kan inderdaad zeer gevaarlijk zijn
om deze huishoudelijke apparaten bloot te stellen aan regen
en onweer.
! Na installatie van de wasdroger moeten de electrische
kabel en de steker onder handbereik blijven.
! De electrische kabel mag niet gevouwen of platgedrukt
worden.
! Als de te vervangen steker aan het snoer gegoten is, moet
men deze op een veilige manier onbruikbaar maken en
ontzorgen. Laat hem dus NIET achter, anders zou iemand
hem in een contactdoos kunnen steken en een electrische
schok veroorzaken.
! De electrische kabel moet regelmatig worden
gecontroleerd en eventueel worden vervangen met een
speciaal voor deze wasdroger geschikte kabel, deze
montage mag alleen door bevoegde technici worden
uitgevoerd (zie Service). De nieuwe of langere electrische
kabels worden door bevoegde dealers geleverde tegen
betaling.
! De fabrikant aanvaardt geen enkele aansprakelijkheid
indien men zich niet aan deze regels houdt.
! In geval van twijfel over het bovenstaande wordt men
verzocht contact op te nemen met een gekwalificeerde
electricien.
Egalisatie/Nivellering van de droger
Ten behoeve van een correcte werking moet de droger op
een plat vlak worden geïnstalleerd.
Als de droger niet waterpas
staat, een stuk hout gebruiken
om de droger te ondersteunen
terwijl u de twee voorwieltjes
naar boven of beneden afstelt
totdat het apparaat waterpas
staat.
Informatie vooraf
Heeft men de wasdroger geïnstalleerd, dan moet men hem
eerst schoonmaken (vanwege het transport), de
droogtrommel van binnen reinigen en dan pas in gebruik
nemen.
NL
Nadat de droger op zijn
definitieve plaats is
geïnstalleerd, controleren of hij
waterpas staat: eerst van
zijkant tot zijkant, vervolgens
van achterkant tot voorkant.
15
Page 16
Beschrijving van
de wasdroger
Voorkant Achterkant
NL
Bedieningspaneel
Serienummer
en
modelnummer
Bedieningspaneel
Filter
Trommel
Werkingsprestaties
Let op: hoge
temperatuur
Luchtaanvoer
Aansluiting voor de
Knoppen
Hoge
temperatuur
luchtafvoerslang
Knop
START
Droogtijdenknop
Droogtijdenknop
Hiermee kan de droogtijd ingesteld worden: draai de knop met de klok mee totdat de wijzer de gewenste droogtijd aangeeft
(zie Drooginstelling).
Hoge temperatuur
Hiermee kan het gekozen programma op basis van persoonlijke voorkeuren worden ingesteld.
Knop START
Druk op de knop om het drogen te starten.
16
Page 17

Hoe men de machine laat
drogen
Start van een droogcyclus
1. Steek de steker van de wasdroger in de contactdoos van de electrische voeding.
2. Kies op basis van het soort wasgoed een droogprogramma (zie Was).
3. Open het deurtje en controleer dat het filter schoon is en in de goede positie zit.
4. Doe de was in de machine en let erop dat er geen kleding tussen het deurtje en de betreffende afdichting blijft zitten. Sluit het
deurtje.
5. Draai aan de Droogtijdenknop totdat de indicator naar het programma wijst, dat overeenkomt met het type weefsel dat men
wil drogen, controleer dit op de tabel van de programmas (zie Programmas en opties) en de aanwijzingen voor elk type weefsel
(zie Witte was).
Opgelet: indien de positie van de handknop van de programmas veranderd is na de knop START ingedrukt te hebben, zal de
nieuwe positie het gekozen programma NIET wijzigen. Om het programma te wijzigen drukt men op de knop START om het
programma in pauze te zetten. De controlelamp zal met een oranje kleure knipperen. Kies nu het nieuwe programma en de
betreffende opties.
Druk op de knop START om het nieuwe programma te starten.
NL
6. Indien nodig de temperatuur instellen met de toets Hoge Temperatuur instellen
7. Om te starten drukt men op de knop START.
Tijdens het droogprogramma kan men de was controleren en de reeds droge kleren eruit halen terwijl men de rest verder laat
drogen. Na het weer sluiten van het deurtje, moet men op START drukken om de machine weer in bedrijf te brengen.
8. Tijdens de laatste minuten van de droogprogrammas zal de laatste fase (KOUDE DROGING) worden opgestart, om de was af
te koelen; men moet de machine deze fase altijd laten afmaken.
9. Open het deurtje, haal de was eruit, reinig het filter en steek deze weer erin.
10. Haal de
wasdroger van het electrische net af.
17
Page 18
Drooginstellingen
Droogtijden
De te kiezen droogtijd hangt af van de lading en van het soort te drogen wasgoed (zie tabel).
NL
De laatste 10 minuten van het programma zijn voor de koude cyclus.
Voor grote ladingen moet men de optie Hoge Temperatuur kiezen, indien beschikbaar.
Weefsels
Katoen –
Hoge
temperatuur
Syntetisch –
Hoge
temperatuur
Acryl –
Lage
temperatuur
1 kg 2 kg 3 kg 4 kg 5 kg 6 kg 7 kg
20 - 30
minuten
20 - 30
minuten
25 - 40
minuten
35 - 45
minuten
35 - 45
minuten
40 - 60
minuten
45 - 60
minuten
45 - 60
minuten
- - - - -
Lading
60 - 70
minuten
- - - -
70 - 80
minuten
80 - 100
minuten
90 - 120
minuten
De tijden zijn bij benadering aangegeven en kunnen varieren afhankelijk van:
Hoeveelheid water in de was na de centrifuge: handdoeken en delicate was bevat nog veel water.
Weefsels: kledingsstukken met hetzelfde weefsel maar met andere weefpatronen en dikte kan een andere droogtijd hebben.
Hoeveelheid was: afzonderlijke kledingsstukken en kleine ladingen kunnen meer droogtijd nodig hebben.
Droogte: als de kledingsstukken nog gestreken moeten worden kunnen ze eerder uit de machine worden gehaald, als ze nog wat
vochtig zijn. De kledingsstukken die helemaal droog moeten zijn kunnen daarentegen langer in de machine blijven.
Temperatuur van de kamer: hoe lager de temperatuur van de kamer is waarin de wasdroger staat, hoe langer men op droge
kleding moet wachten.
Volume: enkele omvangrijke kledingsstukken hebben veel aandacht nodig bij het droogproces. We raden aan om deze uit de
machine te halen, te schudden en opnieuw in de droger te stoppen: doe dit herhaaldelijk tijdens de droogcyclus.
! Droog de kledingsstukken niet te veel.
Alle weefsels hebben een natuurlijke vochtigheid, die ervoor dient om de zachtheid en de luchtigheid ervan te handhaven.
Programma's en droogopties
Verfrissing
Kort programma, geschikt voor het verfrissen van weefsels en kledingstukken met verse lucht. Het duurt ongeveer 20 minuten.
! Dit is geen droogprogramma en moet dus niet worden gebruikt met natte kleren.
Hoge temperatuur
Wanneer u een droogtijd heeft ingesteld, drukt op deze knop om een hoge temperatuur te kiezen. De normale instelling voor een
Droging met tijdsfunctie is de lage temperatuur.
18
Page 19

De was
Sorteren van de was
Controleer de symbolen op de etiketten van alle
kledingstukken om te zien of ze met de trommel
gedroogd mogen worden.
Sorteer de was afhankelijk van het type weefsel.
Haal alles uit de zakken en controleer de knopen.
Sluit ritsen en haakjes, en maak riemen en lussen vast
zonder ze aan te trekken.
Wring de kledingstukken uit om zoveel mogelijk water eruit
te verwijderen.
! Vul de droger niet met drijfnatte kledingstukken.
Maximale afmetingen van de lading
Laadt de droogtrommel niet meer dan is toegestaan.
De volgende waarden hebben betrekking op het gewicht
van de droge kledingstukken:
Natuurlijke weefsels: maximaal 7 kg
Syntetische weefsels: maximaal 3 kg
! Om een daling van de prestaties te vermijden moet men
niet teveel in de
Typische lading
Opmerking: 1 kg = 1000 g
Kledingsstukken
Hemd
Jas
Jeans
10 luiers
Hemd
T-shirt
Witte huishoudelijke was
wasdroger stoppen.
Katoen
Overig
Katoen
Overig
Katoen
Overig
150 g
100 g
500 g
350 g
700 g
1.000 g
300 g
200 g
125 g
Wasetiketten
Controleer de wasetiketten, vooral als de kledingstukken
voor het eerst in de
wasdroger worden gedaan. Hieronder
worden de meest voorkomende symbolen gegeven:
Mag in de wasdroger.
Kan niet in de wasdroger worden gedroogd
Drogen bij hoge temperatuur.
Drogen bij lage temperatuur.
Kledingstukken niet geschikt voor drogen in trommel:
Kledingstukken met delen van rubber of dergelijke
materialen, of afwerkingen in plastic (kussens of windjacks
van PVC) en enig ander type ontvlambare voorwerpen, of
voorwerpen met ontvlambare bestanddelen (handdoeken
met haarlak erin).
Glasvezels (enkele typen gordijnen).
Kledingstukken die van te voren chemisch zijn gereinigd.
Kledingstukken met de code ITLC (Bijzondere
kledingsstukken)
, die gereinigd kunnen worden met
speciale huishoudelijke producten voor de schoonmaak.
Volg zorgvuldig de aanwijzingen.
Was met grote afmetingen (dekbedden, slaapzakken,
kussens, enz), die tijdens het drogen meer ruimte innemen
en daardoor de circulatie van lucht in de
wasdroger
verhinderen.
Bijzondere kledingsstukken
Dekens en beddespreien: acryl (Acilian, Courtelle, Orion,
Dralon) moet bijzonder zorgvuldig en bij lage temperatuur
worden gedroogd. Stel geen lange droogtijden in.
NL
Tweepersoons
dekbed
Groot tafelkleed
Klein tafelkleed
Theedoekje
Badhandoek
Handdoek
Tweepersoons
laken
Eenpersoons
laken
Katoen
Overig
1.500 g
1.000 g
700 g
250 g
100 g
700 g
350 g
500 g
350 g
Indien men kledingstukken met syntetische weefsel mengt
met katoenen kleding, dan is deze laatste mogelijk nog
vochtig aan het einde van de droogcyclus. In dit geval hoeft
men alleen nog een korte extra droogcyclus uit te voeren.
Opmerking: terwijl men de droogtijd instelt moet men
bedenken dat de laatste 10 minuten van de programmas
alleen met koude lucht gewerkt wordt, waarbij er niet veel
water uit de kledingstukken verdwijnt.
Kledingsstukken met vouwen: lees de droogaanwijzingen
die door de fabrikant worden gegeven.
Kledingsstukken met stijfsel: niet samen met
kledingsstukken zonder stijfsel drogen. Verwijder het
grootste gedeelte van de stijfseloplossing, voordat men de
kledingsstukken in de wasdroger doet. Droog niet te lang:
het stijfsel wordt poeder en de kledingsstukken worden dus
weer flexibel.
19
Page 20

Waarschuwingen
en raad
! Dit apparaat werd ontworpen en gerealiseerd volgens de
internationale normen voor de veiligheid. Deze
NL
waarschuwingen worden gegeven voor uw veiligheid en
moeten dus zorgvuldig worden opgevolgd.
Algemene veiligheid
Het laatste deel van een droogcyclus wordt uitgevoerd
zonder warmte (afkoelcyclus), om te zorgen dat de lading
op een temperatuur blijft waarop ze niet beschadigd
wordt.
Deze
Deze wasdroger werd ontworpen voor huishoudelijk, niet
Raak het toestel niet aan als men op blote voeten loopt,
Haal het toestel van het net af door aan de steker te
Laat kinderen niet in de buurt komen als het toestel
Kinderen moeten in de gaten worden gehouden om te
Het toestel moet op de juiste manier worden
Gebruik nooit de
Controleer dat er niets meer in de
De achterkant van de
Gebruik de
Gebruik geen vloeibare wasverzachter in de
Doe niet te veel in de
Doe er geen drijfnatte kleding in.
Doe alleen kleding in de
Volg altijd zorgvuldig de aanwijzingen op de wasetiketten
Doe er geen kleding in, die behandeld is met chemische
Droog nooit kleding met ontvlambare stoffen erin
Droog geen rubber, voorwerpen of kleding met rubber
wasdroger mag niet worden gebruikt door personen
(inbegrepen kinderen) met beperkte physieke, gevoels- of
mentale capaciteit, of zonder ervaring of kennis, behalve
als ze onder toezicht staan of aanwijzingen ontvangen
over het gebruik van het toestel van personen, die
verantwoordelijk zijn voor hun veiligheid.
professioneel gebruik.
of als handen of voeten nat zijn.
trekken, niet aan het snoer.
werkt. Na het gebruik moet men de
en van het voedingsnet afschakelen. Houd het deurtje
gesloten om te voorkomen dat kinderen met de
wasdroger kunnen spelen.
controleren dat ze niet met de wasdroger spelen.
geïnstalleerd en voldoende ventilatie hebben.
wasdroger op hoogpolig tapijt, als de
haren tot aan de luchtingang onderaan de
kunnen komen.
men er nieuwe wasgoed in stopt.
wasdroger kan erg warm
worden:
raak hem hier dus nooi aan als de machine werkt.
wasdroger niet als het filter, niet op de juiste
manier op hun plaats zitten (zie Onderhoud).
maar doe dit in de wasmachine, tijdens de laatste
spoelbeurt.
wasdroger (zie Was voor de
maximale afmetingen van de lading).
wasdroger, die gewassen is met
water en zeep, gespoeld en daarna gecentrifugeerd. Het
drogen van kleding die NIET met water is gewassen kan
leiden tot brandgevaar.
van de kleding (zie Was).
producten.
(keukenolie, aceton, alcohol, petroleum, kerosine,
vlekkenmiddelen, trementine, wassoorten, wasoplossers
en haarlak), behalve als ze gewassen zijn met warm water
en een extra hoeveelheid wasmiddel.
lagen, kussens met kapok, schuim, rubber, plastic,
douchekapjes, waterbestendige weefsels, onderbroeken
voor om de luiers heen, polyethyleen en papier.
wasdroger uitzetten
wasdroger zit voordat
wasdroger
wasdroger,
Verwijder alles uit de zakken van de kleding, vooral
aanstekers (deze kunnen ontploffen).
Doe er geen zeer grote en omvangrijke was in.
Droog acryl niet bij hoge temperatuur.
Laat elke programma met de betreffende koude fase
eindigen.
Zet de
Reinig het filter na elke gebruik (zie Onderhoud).
Voorkom dat het stof zich teveel rondom de
Ga niet op het bovenpaneel van de
Volg altijd de normen op en let op de electrische
Schaf altijd originele reserveonderdelen en toebehoren
! OPGELET: stop nooit de
droogcyclus is afgelopen, behalve als alle kleding snel eruit
wordt gehaald en wordt opgehangen zodat deze kan
afkoelen.
wasdroger niet uit wanneer er nog warme kleding
in zit.
wasdroger
verzamelt.
wasdroger staan,
anders kan deze beschadigd worden.
eigenschappen (zie Installatie).
aan (zie Service).
wasdroger voordat de
Informatie voor hergebruik en
ontzorging
In ons voortdurend streven naar een beter milieu behouden we
ons het recht voor om gebruikte componenten van goede
kwaliteit opnieuw te gebruiken, zodat de kosten voor de Client
en de verspilling van grondstoffen beperkt kunnen worden.
Ontzorging van verpakkingsmaterialen: volg de
plaatselijke normen en probeer de verpakkingsmaterialen
te recyclen.
Om het risico van ongelukken met kinderen te verlagen,
moet men het deurtje en de steker verwijderen en dan het
voedingssnoer zo dicht mogelijk bij het toestel eraf
knippen. Houd deze onderdelen apart, zodat men kan
garanderen dat het toestel niet kan worden aangesloten
op de spanning.
Ontzorging van oude huishoudelijk apparaten
De Europese Richtlijn 2002/96/CE voor de afval van
electrische en electronische apparaten (RAEE),
schrijft voor dat huishoudelijk apparaten niet samen
met normaal vast huishoudelijk afval mag worden
afgevoerd. De afgedankte apparatuur moet afzonderlijk
worden verzameld om de hoeveelheid hergebruikte
materialen te verhogen en potentiele schade aan gezondheid
en milieu te voorkomen. Het symbool met de
doorgestreepte vuilnismand op alle producten moet aan de
plicht tot gescheiden afvalbehandeling herinneren.
Voor meer informatie betreffende de juiste afvalbehandeling
van huishoudelijke apparatuur kan men zich wenden tot de
overheden of de dealers van deze apparatuur.
Energiebesparing en milieurespect
Voordat men de kleding droogt moet men ze wringen om
zoveel mogelijk water te verwijderen (als de was uit een
wasmachine komt moet men de centrifuge daarvan
gebruiken). Op deze manier bespaart men droogenergie.
Een volle droogtrommel bespaart energie: afzonderlijke
kledingsstukken en kleine ladingen hebben meer droogtijd
nodig.
Reinig het filter na elke cyclus, hiermee bespaart men
energie (zie Onderhoud).
20
Page 21

Zorg en onderhoud
Onderbreking van de electrische
voeding
! Maak de wasdroger los van het net als deze niet werkt of
als men bezig is met de reiniging of het onderhoud.
Reiniging van het filter na elke cyclus
Het filter is van fundamentele betekenis bij het drogen: het
dient voor het verzamelen van de stof, dat zich vormt
tijdens het drogen.
Na afloop van de droging moet men het filter dus reinigen
door het onder stromend water af te spoelen, of met een
stofzuiger. Een vol filter belemmert de luchtstroming in de
wasdroger met ernstige gevolgen voor: de droogtijd en het
energieverbruik. Ook kan de wasdroger schade oplopen
Het filter bevindt zich vóór de
afdichting van de wasdroger
(zie afbeelding).
NL
Verwijdering van het filter:
1. Trek het filter aan de plastic
handgreep omhoog (zie
afbeelding).
2. Reinig het filter en zet het op
de juiste manier weer terug.
Controleer dat het filter
helemaal erin zit: het moet
opgelijnd zijn met de afdichting
van de wasdroger.
! Gebruik de wasdroger niet zonder eerst het filter op zijn
plaats te hebben terug gezet.
Controle van het mandje na elke cyclus
Draai met de hand de trommel rond om te controleren of er
nog (kleine) stukken inzitten, zoals zakdoeken.
Reiniging van de trommel
! Voor de reiniging van de trommel mag men geen
schuurmiddelen, staalwol of schoonmaakmiddelen voor inox
gebruiken.
Anders kan er zich een gekleurd laagje op de trommel
vormen, dit kan komen door een reactie tussen water en/of
reinigingsmiddelen, zoals wasverzachter. Dit gekleurde
laagje heeft geen enkele invloed op de prestaties van de
wasdroger.
Reiniging van de wasdroger
De externe metalen, rubber en plastic delen kunnen met
een vochtige doek worden schoongemaakt.
! Gebruik geen oplosmiddelen of schuurmiddelen
! Laat de wasdroger regelmatig controleren door bevoegd
technisch personeel, zodat de veiligheid van de electrische
en mechanische onderdelen kan worden gegarandeerd (zie
Service).
21
Page 22

Problemen
en oplossingen
In het geval dat men de indruk heeft dat de
(zie Service) zorgvuldig de volgende hints raadplegen voor het zelf oplossen van problemen.
NL
Probleem:
De wasdroger start niet.
Er zijn lange droogtijden.
De wasdroger maakt lawaai
tijdens de eerste minuten.
wasdroger niet goed werkt, moet men, voordat men naar het servicecentrum belt,
Waarschijnlijke oorzaken / oplossingen:
De steker zit niet goed in de contactdoos en maakt geen contact.
De spanning is uitgevallen.
De zekering is doorgebrand. Probeer een ander toestel op dezelfde contactdoos
aan te sluiten.
Indien men een verlengsnoer gebruikt kan men proberen om de
in de contactdoos te steken.
Het deurtje zit niet goed dicht
Het programma is niet op de juiste manier ingesteld (zie Hoe men de was droogt).
Niet goed gedrukt op de knop
Het filter werd niet schoon gemaakt (zie Onderhoud).
Men heeft niet de juiste droogtijd gekozen voor deze was (zie Was).
De kleding is te nat (zie Was).
Er zit teveel was in de wasdroger (zie Was).
De buigzame luchtafvoerslang zou verstopt kunnen zijn (zie Installatie).
De luchtaanvoer zou verstopt kunnen zijn.
De schoep voor vaste ventilatie, die zicht voor tijdelijke ventilatie op de afdichting
bevindt, zou verstopt kunnen zijn (zie Installatie).
Het komt vooral voor als de droger voor een bepaalde tijd niet is gebruikt. Indien
het lawaai tijdens het drogen niet vermindert, moet men contact opnemen met het
servicecentrum.
wasdroger meteen
START (zie Hoe men de was droogt).
22
Page 23

Service
Voordat men het servicecentrum belt:
Volg de leidraad voor het oplossen van de problemen
om te kijken of men het zelf kan oplossen (zie Problemen
en oplossingen).
Anders moet men de wasdroger uitzetten en het
dichtstbijzijnde servicecentrum bellen.
Gegevens, die men moet melden aan het
servicecentrum:
Naam, adres, en postcode;
telefoonnummer;
het type defect;
de datum van de aanschaf;
het model van het apparaat (Mod.);
het serienummer (S/N) van de wasdroger.
Deze informatie vindt men op het gegevensetiket achter
het kijkglas.
Reserveonderdelen
Deze droger is een complexe machine. Als men haar zelf
probeert te repareren of hiervoor niet gekwalificeerd
personeel voor inroept, riskeert men de veiligheid van
personen, schade aan de machine en het vervallen van de
garantie op reserveonderdelen.
In geval van problemen met deze machine moet men altijd
contact opnemen met een bevoegde technicus. De
reserveonderdelen werden speciaal ontworpen voor dit
apparaat en kunnen niet voor andere doeleinden worden
gebruikt.
NL
Dit toestel is in overeenstemming met de volgende CEE richtlijnen:
- 2006/95/CEE (Bepalingen voor laagspanning);
- 89/336/CEE, 92/31/CEE, 93/68/CEE (Electromagnetische compatibiliteit).
23
Page 24

NL
24
Page 25

Manual de instrucciones
SECADORA
ES
Español
IDV 75
IDV 75 S
Índice
ES
Instalación, 26-27
Dónde instalar la secadora
Aireación
Conexión eléctrica
Nivelación de la secadora
Información preliminar
Descripción de la secadora, 28
Parte delantera
Parte trasera
Panel de control
Cómo realizar un secado, 29
Comienza un secado
Programación del secado, 30
Tiempos de secado
Programas y opciones de secado
Ropa, 31
Subdivisión de la ropa
Etiquetas de mantenimiento
Prendas especiales
Tiempos de secado
! Este símbolo te recuerda que debes leer este manual
de instrucciones.
! Mantenga al alcance de la mano el presente manual para
poder consultarlo fácilmente ante cualquier necesidad. El
manual siempre debe estar cerca de la secadora, si el
aparato es vendido o cedido a terceros, recuerde entregarlo
con su manual, de este modo se permitirá a los nuevos
propietarios conocer las advertencias y las sugerencias
sobre el uso de la secadora.
! Lea atentamente estas instrucciones: las páginas
siguientes contienen importante información sobre la
instalación y consejos útiles sobre el funcionamiento del
electrodoméstico.
Advertencias y sugerencias, 32
Seguridad general
Información para el reciclaje y el desguace
Ahorro energético y respeto del medio ambiente
Cuidados y mantenimiento, 33
Interrupción de la alimentación eléctrica
Limpieza del filtro después de cada ciclo
Control del cesto después de cada ciclo
Limpieza de la secadora
Problemas y soluciones, 34
Asistencia Técnica, 35
Repuestos
25
Page 26

0
Instalación
Dónde instalar la secadora
ES
Las llamas pueden averiar la
secadora, por lo tanto, debe
estar alejada de cocinas a gas,
estufas, radiadores o
encimeras.
Si el electrodoméstico debe
instalarse debajo de una
encimera, es necesario dejar un
espacio de 10 mm entre el
panel superior del
electrodoméstico y los otros
objetos dispuestos encima de
la misma, y un espacio de 15 mm entre los lados del
electrodoméstico y las paredes o las decoraciones
dispuestas al costado del mismo. De este modo se
garantiza una circulación de aire adecuada. Comprobar que
las tomas de aire del panel trasero no estén obstruidas.
• Asegurarse que el ambiente en el cual se instala la
secadora no sea húmedo y que haya un adecuado
intercambio de aire.
m
1
Aireación
Este electrodoméstico seca la ropa introduciendo aire frío,
limpio y relativamente seco, calentándolo y haciéndolo
pasar a través de los tejidos, que de este modo son
secados con delicadeza. Para facilitar el secado, el aire
húmedo es expulsado de la parte trasera por medio de un
tubo de aireación. Es importante que el ambiente en el cual
se utiliza la secadora esté debidamente aireado, de modo
que se evite el reciclaje de los gases de combustión de
otros aparatos.
Sistema de aireación móvil
Cuando se utiliza la secadora con el sistema de aireación
móvil, es necesario conectar un tubo de aireación. El tubo se
fija sólidamente al orificio de ventilación trasero de la secadora
(ver la sección Descripción del producto). De ser posible, se
aconseja fijar el tubo a una descarga cerca de la secadora.
Cuando no pueda instalarse de modo fijo, la secadora
asegurará óptimas prestaciones haciendo pasar el tubo de
aireación a través de una ventana parcialmente abierta.
Tener cuidado de no dirigir el tubo de aireación hacia la toma
de aire que se encuentra en la parte trasera de la secadora.
El tubo de aireación no debe superar una longitud máxima
de 2,4 metros; debe ser sacudido con frecuencia para evitar
que se formen depósitos de pelusa, polvo o agua. Tener
cuidado de no aplastar el tubo.
Sistema de aireación fijo
Se aconseja conectar el tubo de aireación a uno de los
sistemas de aireación para ventana o puerta, que pueden
adquirirse en el revendedor donde se compró la secadora o
en el revendedor de piezas de repuesto más cercano.
Orificio de aireación en la pared
1. Dejar una abertura en la
B
orificio de la pared debe ser recto y en bajada, para que no
obstaculice el flujo de aire hacia afuera.
Las áreas A y B deben ser controladas con frecuencia, para
evitar la formación de pelusa o depósitos, especialmente en
caso de uso frecuente de la secadora. El adaptador para el
tubo de aireación debe montarse correctamente, de este
modo se evita que el aire húmedo entre en la habitación.
Orificio de aireación en la ventana
Tener cuidado de no empujar demasiado hacia atrás la
secadora para no correr el riesgo de aplastar, doblar o
desconectar el tubo de aireación.
El tubo no debe presentar cortes, estrangulamientos o
curvas en "U" que pudiesen obstruir la ventilación o atrapar
la condensación.
Aireación por medio de una ventana abierta
Asegurarse que la secadora esté debidamente ventilada y
que el extremo del tubo de aireación no esté dirigido hacia el
conducto de la toma de aire posterior.
Para el funcionamiento correcto de la secadora es
indispensable montar siempre el tubo de aireación.
Controlar que el tubo de aireación y los conductos de las
tomas de aire no estén obstruidos o atascados.
Evitar que la secadora recicle aire viciado.
El uso incorrecto de la secadora puede generar un peligro
de incendio.
No descargar el aire introducido por la secadora en el
mismo canal en el que se descarga el humo emitido por
otros aparatos que queman gas u otro tipo de combustible.
pared de la izquierda del punto
en el cual será instalada la
secadora.
2. Tratar que el tubo sea lo
más corto y recto posible para
evitar que la humedad, al
condensarse, entre en la
A
secadora.
3. Del mismo modo, también el
1. En teoría, cuando la
secadora tiene la caga
completa, el orificio de aireación
debería encontrarse
directamente detrás del
ventilador.
2. Es importante que el tubo
sea lo más corto posible.
El extremo del tubo debe
dirigirse hacia abajo, para evitar
que el aire caliente y húmedo se
condense en la habitación o en
la secadora.
26
Page 27

Conexión eléctrica
Antes de introducir el enchufe en la toma eléctrica compruebe
lo siguiente:
Asegurarse que las manos estén secas.
La toma debe poseer una conexión a tierra.
La toma debe ser capaz de tolerar la potencia máxima
prevista para la máquina, indicada en la placa de los datos
de funcionamiento (ver Descripción de la secadora).
La tensión de alimentación debe estar comprendida entre
los valores indicados en la placa de datos de
funcionamiento (ver Descripción de la secadora).
La toma debe ser compatible con el tipo de enchufe de la
secadora. Si no es así, sustituya la toma o el enchufe.
! No utilice prolongaciones.
! La secadora no puede instalarse en ambientes externos, ni
siquiera si están resguardados. En efecto, es posible que
sea muy peligroso exponer este electrodoméstico a la lluvia
o a las tormentas.
! Después de la instalación de la secadora el cable eléctrico
y el enchufe deben quedar a mano.
! El cable eléctrico no debe doblarse ni aplastarse.
! Si el enchufe a cambiar está incorporado, se debe eliminar
de forma segura. NUNCA lo deje para que pueda ser
conectado a una toma y provoque descargas eléctricas
! El cable eléctrico debe controlarse periódicamente y debe
cambiarse empleando un cable específico para esta
secadora que sólo puede ser instalado por técnicos
autorizados(ver Asistencia Técnica). Los cables eléctricos
nuevos o más largos son suministrados por los
revendedores autorizados con un costo adicional .
! El fabricante declina cualquier responsabilidad si no
cumplen estas reglas.
! Si existen dudas respecto a lo indicado, llame a un
electricista cualificado.
Información preliminar
Una vez instalada la secadora, antes de ponerla en
funcionamiento limpie dentro del cesto y elimine la suciedad
que puede haberse acumulado durante el transporte.
ES
Nivelación de la secadora
La secadora debe instalarse en plano para que funcione
correctamente.
Una vez instalada la secadora
en su posición definitiva,
controlar su nivelación de lado
a lado y luego de adelante hacia
atrás.
Si la secadora no está en plano,
utilizar un bloque de madera
para sostenerla mientras se
regulan los dos pies delanteros
hacia arriba o hacia abajo, hasta
que se nivele.
27
Page 28

Descripción de la secadora
Parte delantera Parte trasera
ES
Panel de control
Número de
serie y
número de
modelo
Filtro
Panel de control
Cesto
Prestaciones de
ejercicio
Atención,
temperatura alta
Toma de aire
Conexión para el
tubo de aireación
Boton
Temperatura Alta
Mando de
tiempos de
secado
Mando de tiempos de secado
Permite programar el tiempo de secado: girar el mando en sentido horario hasta que el indicador marca el tiempo de secado
deseado (ver Programación del secado).
Temperatura alta
Permite personalizar el programa seleccionado en función de las necesidades.
Botón
START
Botón START
Presionar el botón para comenzar el secado.
28
Page 29

Cómo realizar un secado
Comienza un secado
1. Introduzca el enchufe de la secadora en la toma de alimentación eléctrica.
2. Seleccionar el secado en función del tipo de ropa (ver Ropa).
3. Abra la puerta y controle que el filtro esté limpio y en posición.
4. Cargue la máquina teniendo cuidado que ninguna prenda se interponga entre la puerta y la junta. Cierre la puerta.
5. Girar el Mando de tiempos de secado hasta que el indicador se posicione en el tiempo de secado adecuado al tipo de tejido a
secar. Consultar la tabla con la relación entre los tipos de tejido y la capacidad de carga (ver Programación del secado) y las
indicaciones para cada tipo de tejido (ver Ropa).
6. De ser necesario programar la temperatura con el botón Temperatura alta.
7. Para comenzar presione el botón START.
Durante el programa de secado es posible controlar la ropa y sacar las prendas que se hayan secado dejando que las otras
continúen. Después de cerrar la puerta, presione START para poner de nuevo en funcionamiento la máquina.
ES
8. Durante los últimos minutos de los programas de secado, comienza la fase final de SECADO EN FRÍO (los tejidos son enfriados);
es necesario dejar siempre que esta fase termine.
9. Abra la puerta, saque la ropa, limpie el filtro y vuelva a colocarlo en su lugar.
10. Desconecte la secadora de la red eléctrica.
29
Page 30

Programación del secado
Tiempos de secado
El tiempo de secado a seleccionar depende de la carga y del tejido a secar (ver la tabla).
ES
Los últimos 10 minutos del programa están dedicados al ciclo en frío.
Para grandes cargas seleccione la opción Temperatura Alta (si está disponible).
Tejidos
Algodón –
Temperatura
Alta
Sintéticos –
Temperatura
Alta
Acrílicos –
Temperatura
baja
1 kg 2 kg 3 kg 4 kg 5 kg 6 kg 7 kg
20 - 30
minutos
20 - 30
minutos
25 - 40
minutos
34 - 45
minutos
34 - 45
minutos
40 - 60
minutos
45 - 60
minutos
45 - 60
minutos
- - - - -
Carga
60 - 70
minutos
- - - -
70 - 80
minutos
80 - 100
minutos
90 - 120
minutos
Los tiempos son aproximados y pueden variar en función de:
La cantidad de agua retenida por las prendas después de la centrifugación: las toallas y las prendas delicadas retienen mucha
agua.
Tejidos: las prendas del mismo tejido, pero con trama y espesor diferentes pueden requerir tiempos de secado diferentes.
Cantidad de ropa: prendas individuales y pequeñas cargas pueden requerir más tiempo para secarse.
Secado: si las prendas deben ser planchadas es posible extraerlas de la máquina cuando aún están húmedas. Las prendas que
deben estar totalmente secas pueden dejarse más tiempo.
Temperatura de la habitación: mientras más baja es la temperatura de la habitación en la que se encuentra la secadora, más
tiempo será necesario para el secado de las prendas.
Volumen: algunas prendas voluminosas requieren especial cuidado durante el proceso de secado. Se aconseja sacar las
prendas, sacudirlas e introducirlas nuevamente en la secadora: esta operación debe repetirse varias veces durante el ciclo de
secado.
! No seque demasiado las prendas.
Todos los tejidos contienen humedad natural que los mantiene suaves y vaporosos.
Programas y opciones de secado
Refresca
Programa breve ideal para refrescar fibras y prendas a través de la emisión de aire fresco. Dura aproximadamente 10 minutos.
! Este no es un programa de secado y, por lo tanto, no se utiliza con prendas aún mojadas.
Temperatura alta
Seleccionado el secado por tiempo, presionando este botón se selecciona una temperatura elevada. Los programas con tiempo
tienen prefijada una temperatura baja.
30
Page 31

Ropa
Subdivisión de la ropa
Controle los símbolos de la etiqueta de las diferentes
prendas para comprobar si las prendas pueden
someterse a un secado en tambor.
Divida la ropa a lavar en función del tipo de tejido.
Vacíe los bolsillos y controle los botones.
Cierre las cremalleras y los ganchos y ate los cintos y
lazos sin ajustar.
Estruje las prendas para eliminar la mayor cantidad de
agua posible.
! No cargue la secadora con prendas completamente
empapadas de agua.
Máximas dimensiones de carga
No cargue el cesto por encima de su capacidad máxima.
Los siguientes valores se refieren al peso de las prendas
secas:
Fibras naturales: máximo 7 kg
Fibras sintéticas: máximo 3 kg
! Para evitar una disminución de las prestaciones de la
secadora, no la sobrecargue.
Carga tipo
Nota: 1 kg = 1000 g
Prendas
Blusa
Vestido
Jeans
10 pañales
Camisa
Camisetas
Algodón
Otro
Algodón
Otro
Algodón
Otro
150 g
100 g
500 g
350 g
700 g
1.000 g
300 g
200 g
125 g
Etiquetas de mantenimiento
Controle las etiquetas de las prendas, en especial cuando se
introducen por primera vez en la secadora. A continuación
se reproducen los símbolos más comunes:
Puede utilizarse en la secadora.
No se puede secar en secadora
Secar a alta temperatura.
Secar a baja temperatura.
Prendas que no se adaptan al secado en tambor:
Prendas que contienen partes de goma o materiales
similares o bien revestimientos de plástico (almohadas,
cojines o anoraks de PVC) y cualquier otro tipo de objeto
inflamable u objeto que contenga sustancias inflamables
(toallas sucias con laca para el cabello).
Fibras de vidrio (algunos tipos de cortinados).
Prendas que antes han sido sometidas a limpieza en
seco.
Prendas marcadas con el código ITLC (Prendas
especiales)
, que pueden lavarse con productos
especiales para la limpieza doméstica. Cumpla
atentamente con las instrucciones.
Prendas demasiado voluminosas (edredones, sacos de
dormir, almohadas, cojines, etc.) que se expanden
durante el secado e impiden la circulación del aire dentro
de la secadora.
Prendas especiales
Mantas y cubrecama: las prendas de acrílico (Acilian,
Courtelle, Orion, Dralon) deben secarse con absoluto
cuidado a temperatura baja. No programe tiempos de
secado prolongados.
ES
Ropa de casa
Funda edredón
(matrimonial)
Mantel grande
Mantel pequeño
Mantel de té
Toalla de baño
Toalla
Sábana
matrimonial
Sábana simple
Algodón
Otro
1.500 g
1.000 g
700 g
250 g
100 g
700 g
350 g
500 g
350 g
Cuando se mezclan prendas de tejido sintético con prendas
de algodón, éstas últimas podrían estar todavía húmedas al
finalizar el ciclo de secado. En este caso, se puede lanzar un
nuevo ciclo de secado breve.
Nota: cuando se programa la duración de secado, tenga
presente que los últimos 10 minutos de programa se
dedican a la fase de secado en frío, durante la cual la
secadora no seca la ropa.
Prendas con arrugas o plisadas: lea las instrucciones de
secado indicadas por el fabricante.
Prendas almidonadas: no seque estas prendas con otras
no almidonadas. Quite la mayor cantidad de solución para
almidonar antes de introducir las prendas en la secadora.
No seque estas prendas en exceso: el almidón se convierte
en polvo dejando las prendas suaves y disminuyendo su
función.
31
Page 32

Advertencias
y sugerencias
! Este electrodoméstico ha sido diseñado y fabricado
respetando las normas internacionales sobre seguridad.
ES
Estas advertencias se suministran por motivos de
seguridad y deben ser cumplidas atentamente.
Seguridad general
La parte final de un ciclo de la máquina secadora se
realiza sin calor (ciclo de enfriamiento) para asegurarse
que la ropa quede a una temperatura que no la afecte.
La presente secadora no debe utilizarse por personas
(incluidos los niños) con capacidad física, sensorial o
mental reducidas o sin experiencia y conocimiento, a
menos que sean vigiladas o reciban las instrucciones de
uso del dispositivo por parte de una persona
responsable de su seguridad.
Esta secadora ha sido proyectada para uso doméstico y
no profesional.
No toque el electrodoméstico con los pies descalzos o
con las manos o los pies mojados.
Desconecte el electrodoméstico de la red de
alimentación tirando del enchufe y no del cable.
No deje acercarse a los niños cuando el
electrodoméstico está funcionando. Después del uso
apague la secadora y desconéctela de la red de
alimentación. Mantenga la puerta cerrada para evitar que
los niños puedan utilizar la secadora como un juego.
Los niños deben ser vigilados para asegurarse que no
jueguen con la secadora.
El electrodoméstico debe instalarse de forma correcta y
debe airearse adecuadamente. Los respiraderos en la
parte trasera no deben estar nunca obstruidos (ver
instalación).
No utilice nunca la secadora sobre la moqueta cuando la
altura del pelo sea tal que impida la entrada de aire a
través de la base de la secadora.
Compruebe que la secadora esté vacía antes de cargarla.
La parte posterior de la secadora puede calentarse
mucho:
no la toque nunca cuando la máquina está
funcionando.
No utilice la secadora si el filtro no está posicionado
correctamente(ver Mantenimiento).
Nunca utilice dentro de la secadora suavizante líquido
para los tejidos, agréguelo durante el último aclarado del
ciclo de lavado.
No sobrecargue la secadora (ver Ropa para las máximas
dimensiones de carga).
No introduzca prendas totalmente mojadas.
Cargue en la secadora sólo prendas lavadas con agua y
jabón, aclaradas y centrifugadas. El secado de prendas
que NO han sido lavadas con agua genera un peligro de
incendio.
Cumpla escrupulosamente con todas las instrucciones
de las etiquetas para el lavado de las prendas (ver Ropa).
No cargue prendas que han sido tratadas con productos
químicos.
No seque nunca prendas contaminadas con sustancias
inflamables (aceite de cocina, acetona, alcohol, petróleo,
kerosén, sustancias para eliminar manchas, trementina,
ceras, sustancias para quitar la cera y lacas para el
cabello) a menos que no hayan sido lavados con agua
caliente y una cantidad adicional de detergente.
No seque goma, artículos y prendas con fondo de goma,
cojines con relleno de goma espuma, espuma de látex,
goma, plástico, gorras de ducha, tejidos resistentes al
agua, bragas cubre pañales o revestimientos, polietileno
y papel.
Quite cualquier objeto de los bolsillos, en especial los
encendedores (por el riesgo de explosión).
No cargue prendas grandes, demasiado voluminosas.
No seque fibras acrílicas a alta temperatura.
Complete cada programa con la respectiva fase de
secado en frío.
No apague la secadora cuando aún contiene prendas
calientes.
Limpie el filtro después de cada uso (ver Mantenimiento).
Evite la acumulación de pelusa alrededor de la secadora.
No se suba al panel superior de la secadora ya que
podría dañarse la máquina.
Respete siempre las normas y las características
eléctricas (ver Instalación).
Compre siempre accesorios y recambios originales (ver
Asistencia Técnica).
ATENCIÓN: no detenga nunca la secadora antes del final
del ciclo de secado a menos que todas las prendas se
extraigan con rapidez y se extiendan para disipar el calor.
Información para el reciclaje y el
desguace
Dentro del ámbito de nuestro esfuerzo permanente en
defensa del medioambiente nos reservamos el derecho de
utilizar componentes reciclados de calidad para reducir los
costos del cliente y minimizar el derroche de materiales.
Eliminación del material de embalaje: respete la normativa
local, de este modo se podrá reciclar el embalaje.
Para reducir el riesgo de accidentes para los niños, quite
la puerta y el enchufe y luego corte a ras el cable de
alimentación del aparato. Elimine estas partes por
separado para asegurarse que el electrodoméstico no
pueda ser conectado a una toma de corriente.
Electrodomésticos viejos en desuso
La norma Europea 2002/96/CE sobre la eliminación
de aparatos eléctricos y electrónicos (RAEE), indica
que los electrodomésticos no deben ser eliminados
de la misma manera que los desechos sólidos
urbanos. Los aparatos en desuso se deben recoger
separadamente para optimizar el porcentaje de
recuperación y reciclaje de los materiales que los componen
e impedir potenciales daños para la salud y el medio
ambiente. El símbolo de la papelera tachada se encuentra en
todos los productos para recordar la obligación de
recolección separada.
Para mayor información sobre la correcta eliminación de los
electrodomésticos, los poseedores de los mismos podrán
dirigirse al servicio público responsable o a los revendedores.
Ahorro energético y respeto por el
medio ambiente
Antes de secar las prendas, estrújelas para eliminar la
mayor cantidad de agua posible (si se utiliza antes la
lavadora programe un ciclo de centrifugado). De este
modo, se ahorra energía durante el secado.
Utilice siempre la secadora con la carga completa, así se
ahorra energía: prendas individuales y pequeñas cargas
requieren más tiempo para secarse.
Limpie el filtro al final de cada ciclo para disminuir los
costos relativos al consumo energético (ver
Mantenimiento).
32
Page 33

Cuidados y mantenimiento
Interrupción de la alimentación
eléctrica
! Desconecte la secadora cuando no esté funcionando, del
mismo modo durante las operaciones de limpieza y
mantenimiento.
Limpieza del filtro después de cada
ciclo
El filtro es un componente fundamental del secado: su
función es la de recoger los residuos de lana y la pelusa que
se forman durante el secado.
Al finalizar el secado limpie el filtro aclarándolo debajo de agua
corriente o limpiándolo con una aspiradora. Si el filtro se
atasca, el flujo de aire en el interior de la secadora se vería
gravemente comprometido: los tiempos de secado se
prolongan y se consume más energía. Además, pueden
producirse averías en la secadora.
El filtro se encuentra delante de
la guarnición de la secadora
(ver figura).
Limpieza de la secadora
Las partes externas de metal o de plástico y las partes de
goma pueden limpiarse con un paño húmedo.
! No use solventes ni elementos abrasivos.
! Haga controlar con regularidad la secadora por personal
técnico autorizado para garantizar la seguridad de las
piezas eléctricas y mecánicas (ver Asistencia Técnica).
ES
Remoción del filtro:
1. Tire hacia arriba la manija de
plástico del filtro (ver la figura).
2. Elimine la pelusa del filtro y
colóquelo correctamente.
Controle que el filtro se
introduzca completamente a
ras de la guarnición de la
secadora.
! No utilice la secadora si antes no se coloca el filtro en su
lugar.
Control del cesto después de cada
ciclo
Gire el cesto manualmente para quitar las prendas más
pequeñas (pañuelos) que podrían quedar dentro de la
secadora.
Limpieza del cesto
! Para la limpieza del cesto no utilice elementos abrasivos,
esponja de acero o agentes de limpieza para acero
inoxidable.
Podría formarse una pátina coloreada en el cesto de acero
inoxidable, fenómeno que podría generarse por una
combinación de agua con agentes de limpieza como
suavizantes de lavado. Esta pátina de color no tiene ningún
efecto sobre las prestaciones de la secadora.
33
Page 34

Problemas y soluciones
Cuando tenga la sensación de que la secadora no funciona de forma correcta, antes de llamar al Centro de asistencia técnica
(ver Asistencia Técnica) consulte atentamente las siguientes sugerencias para la solución de los problemas.
ES
Problema:
La secadora no arranca.
Los tiempos de secado son
prolongados.
La secadora hace ruido durante
los primeros minutos de
funcionamiento.
Causas probables/soluciones:
El enchufe no está conectado a la toma de corriente de la pared lo bastante
profundo como para que haga contacto.
Ha habido una interrupción de corriente.
El fusible está quemado. Intente conectar otro electrodoméstico en la misma toma.
Si se emplea un prolongador, intente conectar el enchufe de la secadora
directamente en la toma.
La puerta no ha sido cerrada correctamente.
El programa no ha sido programado de forma correcta (ver Cómo realizar un secado).
No se ha presionado el botón
El filtro no se ha limpiado (ver Mantenimiento).
No se ha seleccionado el tiempo de secado correcto para esta carga (ver Ropa).
Las prendas están demasiado mojadas (ver Ropa).
La secadora está sobrecargada (ver Ropa).
El tubo de aireación flexible podría estar obstruido (ver Instalación).
La toma de aire podría estar obstruida.
La aleta de aireación fija, en la cubierta para temporales, podría estar obstruida
(ver Instalación).
Es normal, especialmente si la secadora no ha sido utilizada por un tiempo prolongado.
Si el ruido continúa durante todo el ciclo, llame al centro de asistencia técnica.
START (ver Cómo realizar un secado).
34
Page 35

Asistencia Técnica
Antes de llamar al Centro de asistencia técnica:
Consulte la guía para la solución de los problemas para
ver si es posible solucionar la avería personalmente
(ver Problemas y soluciones).
De lo contrario, apague la secadora y llame al Centro de
asistencia técnica más cercano.
Datos a comunicar al Centro de asistencia
técnica:
Nombre, dirección y código postal;
número de teléfono;
el tipo de avería;
la fecha de compra;
el modelo de aparato (Mod.);
el número de serie (S/N) de la secadora.
Esta información se encuentra en la etiqueta de datos
colocada detrás de la puerta.
Repuestos
Esta secadora es una máquina compleja. Intentando
repararla personalmente o encargando su reparación a
personal no cualificado, se puede poner en riesgo la
seguridad de las personas, además de averiar la máquina
y que la garantía sobre los repuestos caduque.
En caso de problemas con el uso de la máquina, llame
siempre a un técnico autorizado. Los repuestos han sido
especialmente proyectados para este electrodoméstico y
no se prestan para otras finalidades.
ES
El presente electrodoméstico está en conformidad con las siguientes directivas CEE:
- 2006/95/CEE (Dispositivos de baja tensión);
- 89/336/CEE, 92/31/CEE, 93/68/CEE (Compatibilidad electromagnética).
35
Page 36

ES
36
Page 37

Instruções para a utilização
MÁQUINA DE SECAR ROUPA
Índice
Instalação, 38-39
PT
Português
IDV 75
IDV 75 S
Onde instalar a máquina de secar roupa
Ventilação
Ligação eléctrica
Nivelamento da máquina de secar roupa
Informações preliminares
Descrição da máquina de
secar roupa, 40
Lado anterior
Lado posterior
Painel de comandos
Como efectuar uma secagem, 41
Iniciar uma secagem
Configuração da secagem, 42
Tempos de secagem
Programas e opções de secagem
Roupa, 43
Triagem da roupa
Etiquetas de manutenção
Peças especiais
Tempos de secagem
PT
! Este símbolo serve para lembrar-te de ler este
manual de instruções.
! Mantenha o presente manual num local acessível para
poder consultá-lo facilmente sempre que necessário.
Mantenha sempre o manual junto da máquina de secar
roupa. Se a máquina for vendida ou cedida a outras
pessoas, faça-a acompanhar deste manual, para que os
novos proprietários possam conhecer as advertências e
sugestões relacionadas com a utilização da mesma.
! Leia com atenção estas instruções: as páginas seguintes
contém informações importantes sobre a instalação e
sugestões úteis sobre o funcionamento do
electrodoméstico.
Advertências e sugestões, 44
Segurança geral
Informações sobre a reciclagem e a eliminação
Economia energética e respeito pelo meio ambiente
Cuidados e manutenção, 45
Interrupção da alimentação eléctrica
Limpeza do filtro no fim de cada ciclo
Controlo do tambor no fim de cada ciclo
Limpeza da máquina de secar roupa
Problemas e soluções, 46
Assistência, 47
Peças de reposição
37
Page 38

0
Instalação
Onde instalar a máquina de secar
roupa?
PT
As chamas podem danificar a
máquina de secar roupa, que
deve pois ser instalada num
local afastado de fogões a gás,
aquecedores, radiadores ou
placas de cozinha.
Se o electrodoméstico for
instalado sob uma banca, é
necessário deixar um espaço
de 10 mm entre o painel
superior do electrodoméstico e
outros objectos colocados sobre o mesmo, e um espaço
de 15 mm entre os lados do electrodoméstico e as paredes
ou os móveis vizinhos. Deste modo, fica garantida uma
circulação do ar adequada. Controle que as tomadas de ar
do painel posterior não estejam obstruídas
• Certifique-se de que o ambiente no qual é instalada a
máquina de secar roupa não seja húmido e que haja uma
adequada troca de ar.
m
1
Ventilação
Este electrodoméstico seca a roupa introduzindo ar frio,
limpo e relativamente seco, aquecendo-o e fazendo-o
passar entre os tecidos, que assim são secados
delicadamente. Para facilitar a secagem, o ar húmido é
eliminado pela parte posterior através de um tubo de
ventilação. É importante que o ambiente no qual é utilizada a
máquina de secar roupa seja suficientemente ventilado, de
forma a evitar a reciclagem dos gases de combustão de
outros aparelhos.
Sistema de ventilação móvel
Quando utilizar a máquina de secar roupa com o sistema de
ventilação móvel, será necessário ligar um tubo de ventilação.
O tubo deve ser fixado firmemente ao furo de ventilação
posterior da máquina de secar roupa (veja a secção
Descrição do produto). Se possível, aconselha-se fixar o
tubo a uma descarga próxima da máquina de secar roupa.
Quando não puder ser instalada de forma fixa, a máquina de
secar roupa garantirá de qualquer forma um óptimo
desempenho se fizer passar o tubo de ventilação através de
uma janela parcialmente aberta.
Preste atenção para não direccionar o tubo de ventilação
par a tomada de ar, que está no lado posterior da máquina
de secar roupa.
O tubo de ventilação não deve superar o comprimento
máximo de 2,4 metros; deve também ser agitado com
frequência para remover eventuais resíduos de resíduos de
lã, pó ou água. Preste atenção para não pisar no tubo.
Sistema de ventilação fixo
Aconselha-se ligar o tubo de ventilação a um dos sistema
de ventilação para janelas ou portas, disponíveis junto ao
revendedor do aparelho, ou no revendedor de peças de
reposição mais próximo.
Furo de ventilação na parede
1. Deixe uma abertura na
B
furo na parede deve ser recto e em descida, de modo que
não dificulte o defluxo do ar para o lado externo.
As áreas A e B devem ser controladas frequentemente,
para prevenir a formação de resíduos de lã ou detritos,
especialmente no caso de um uso frequente do aparelho. O
adaptador para o tubo de ventilação deve ser montado
correctamente, de modo a evitar que o ar húmido possa
voltar para dentro do aposento.
Furo de ventilação na janela
Preste atenção para não empurrar muito para atrás a
máquina de secar roupa, porque corre o risco de esmagar,
dobrar ou desconectar o tubo de ventilação.
O tubo não deve ter cortes, esmagamentos ou curvas em
"U" que possam obstruir a ventilação ou reter a condensa.
Ventilação através de uma janela aberta
Certifique-se de que a máquina de secar roupa tenha
suficiente ventilação e que a extremidade do tubo de
ventilação não esteja direccionada para o tubo da tomada
de ar posterior.
Para o correcto funcionamento do aparelho, é
indispensável montar sempre o tubo de ventilação.
Verifique que o tubo de ventilação e os tubos das tomadas
de ar não estejam obstruídos.
Evite que a máquina de secar roupa recicle ar viciado.
O uso impróprio da máquina de secar roupa pode criar
perigo de incêndio.
Não descarregue o ar emitido pela máquina no mesmo
canal no qual é descarregado o fumo emitido por outros
aparelhos que queimam gás ou outros combustíveis.
parede à esquerda do ponto
no qual será instalada a
máquina de secar roupa.
2. Deixe o tubo o mais curto e
recto possível, de modo a
evitar que a humidade,
condensando-se, possa refluir
A
na máquina de secar roupa.
3. Da mesma forma, também o
1. Teoricamente, quando a
máquina de secar roupa está
com plena carga, o furo de
ventilação deveria estar
directamente atrás da
ventoinha.
2. É importante que o tubo
seja o mais curto possível.
A extremidade do tubo deve
ser virada para baixo, de modo
a evitar que o ar quente húmido
possa condensar-se no
aposento ou na máquina de
secar roupa.
38
Page 39

Ligação eléctrica
Antes de introduzir a ficha na tomada eléctrica, verifique o
seguinte:
Certifique-se de que tem as mãos secas.
A tomada deve estar equipada com ligação à terra.
A tomada deve ter capacidade para suportar a potência
máxima prevista para a máquina, indicada na placa dos
dados de exercício (consulte Descrição da máquina de
secar roupa).
A tensão de alimentação deve estar compreendida entre
os valores indicados na placa dos dados de exercício
(consulte Descrição da máquina de secar roupa).
A tomada deve ser compatível com o tipo de ficha da
máquina de secar roupa. Caso contrário, substitua a
tomada ou a ficha.
! Não utilize extensões.
! A máquina de secar roupa não pode ser instalada em
ambientes externos, mesmo que abrigados. Na verdade,
pode ser muito perigoso expor este electrodoméstico à
chuva ou a tempestades.
! Após a instalação da máquina de secar, o cabo eléctrico e
a ficha devem ser mantidos ao alcance da mão.
! O cabo eléctrico não deve ser dobrado nem esmagado.
! Se a ficha a substituir é do tipo incorporado, é necessário
eliminá-la de forma segura. NÃO a deixe onde possa ser
inserida numa tomada, podendo provocar choques
eléctricos.
! O cabo eléctrico deve ser controlado periodicamente e
substituído utilizando um cabo específico para esta máquina
de secar roupa, podendo ser instalado unicamente por
técnicos autorizados (consulte Assistência). Os cabos
eléctricos novos ou mais compridos são fornecidos por
revendedores autorizados por um custo adicional.
! O fabricante não se responsabiliza pela não
observância destas regras.
! Em caso de dúvida relativamente às indicações
acima, contacte um electricista qualificado.
Informações preliminares
Depois de instalada a máquina de secar roupa, antes de a
colocar em funcionamento, limpe o interior do tambor e
retire a sujidade que se possa ter acumulado durante o
transporte.
PT
Nivelamento da máquina de secar roupa
A máquina de secar roupa deve ser instalada numa
superfície plana para funcionar correctamente.
Após ter instalado a máquina
de secar roupa na posição
definitiva, controle o nível antes
de um lado ao outro, e depois
de frente para trás.
Se o aparelho não estiver
sobre uma superfície plana, use
um bloco de madeira para
levantá-lo enquanto regula os
dois pés anteriores para cima
ou para baixo, até que esteja
nivelado.
39
Page 40

Descrição da máquina
de secar roupa
Lado anterior Lado posterior
PT
Painel de comandos
Número de
série e
número do
modelo
Filtro
Painel de comandos
Tambor
Desempenho
Atenção, alta
temperatura
Tomada de ar
Ligação para o tubo
Botão
Alta
Temperatura
de ventilação
Botão
START
Selector dos
tempos de
secagem
Selector dos tempos de secagem
Consente programar o tempo de secagem: girar o selector na direcção horária até quando o indicador marcar o tempo de
secagem desejado (veja Configuração da secagem).
Alta Temperatura
Consentem personalizar o programa seleccionado conforme as próprias exigências
Botão START
Carregue no botão para iniciar a secagem.
40
Page 41

Como efectuar uma
secagem
Iniciar uma secagem
1. Introduza a ficha da máquina de secar roupa na tomada de alimentação eléctrica.
2. Seleccione a secagem em função do tipo de roupa (consulte Roupa).
3. Abra a porta e certifique-se de que o filtro está limpo e em posição.
4. Carregue a máquina tendo o cuidado de não deixar nenhuma peça de roupa entre a porta e o respectivo vedante. Feche a porta.
5. Gire o Selector dos tempos de secagem até que o indicador aponte para o tempo de secagem mais adequado ao tipo de
tecido que deve ser secado. Controle a tabela para a relação entre os tipos de tecido e as capacidades de carga (veja
Configuração da secagem) e as indicações para cada tipo de tecido (veja Roupa).
6. Se necessário, configure a temperatura actuando no botão Alta temperatura.
7. Para iniciar, prima o botão START.
Durante o programa de secagem, é possível controlar a roupa e retirar as peças que já estão secas, deixando as outras no interior
da máquina. Depois de ter voltado a fechar a porta, prima START para recolocar a máquina em funcionamento.
PT
8. Durante os últimos minutos dos programas de secagem, antes do fim do programa, é iniciada a fase final de SECAGEM A FRIO
(os tecidos são arrefecidos); é necessário deixar sempre terminar esta fase.
9. Abra a porta, retire a roupa, limpe o filtro e volte a colocá-lo no respectivo lugar.
10. Desligue a máquina de secar roupa da rede eléctrica.
41
Page 42

Configuração da secagem
Tempos de secagem
O tempo de secagem a ser seleccionado, depende da carga e do tecido a ser secado (consulte a tabela).
PT
Os últimos 10 minutos do programa são dedicados ao ciclo a frio.
Para grandes cargas, seleccione a opção Alta Temperatura, se disponível.
Carga
Tecidos
1 kg 2 kg 3 kg 4 kg 5 kg 6 kg 7 kg
Algodão –
Alta Temperatura
Sintéticos –
Alta Temperatura
Acrílicos –
Baixa Temperatura
Os tempos são aproximativos e podem variar consoante:
A quantidade de água retida nas peças após a centrifugação: as toalhas e as peças delicadas retêm muita água.
Tecidos: as peças de roupa do mesmo tecido, mas com trama e espessura diferentes, podem apresentar tempos de secagem
distintos.
20- 30
minutos
20- 30
minutos
25 - 40
minutos
35 - 45
minutos
35 - 45
minutos
40 - 60
minutos
45 - 60
minutos
45 - 60
minutos
- - - - -
60 - 70
minutos
- - - -
70 - 80
minutos
80 - 100
minutos
90 - 120
minutos
A quantidade de roupa: peças únicas e cargas pequenas podem demorar mais tempo a secar.
A secagem: se tiver de passar a ferro as peças de roupa, pode retirá-las da máquina quando ainda estão um pouco húmidas.
Por seu turno, as peças de roupa que são para secar completamente podem ficar na máquina durante mais tempo.
A temperatura da divisão: quanto mais baixa for a temperatura da divisão em que se encontra a máquina de secar roupa, mais
tempo será necessário para secar as peças de roupa.
O volume: algumas peças volumosas requerem uma atenção especial durante o processo de secagem. É aconselhável retirar
essas peças, sacudi-las e colocá-las novamente na máquina: esta operação deve ser repetida várias vezes durante o ciclo de
secagem.
! Não seque demasiado as peças de roupa.
Todos os tecidos contêm humidade natural que permite conservar a suavidade e a leveza.
Programas e opções de secagem
Arejar tecidos
Programa breve adapto para arejar as fibras e as roupas através da emissão de ar frio. Dura aproximadamente 10 minutos.
! Este não é um programa de secagem, pelo que não deve ser utilizado com peças ainda molhadas.
Alta temperatura
Se for seleccionada uma secagem temporizada, ao pressionar este botão selecciona-se uma temperatura alta. Os programas
temporizados têm por configuração uma temperatura baixa.
42
Page 43

Roupa
Triagem da roupa
Verifique os símbolos que constam das etiquetas das
diversas peças para se certificar de que podem ser
submetidas a secagem em tambor.
Efectue a triagem da roupa consoante o tipo de tecido.
Esvazie os bolsos e verifique os botões.
Feche os fechos de correr e outros fechos e ate os cintos
e os laços sem apertar demasiado.
Torça as peças de roupa para eliminar a maior quantidade
de água possível.
! Não carregue a máquina de secar roupa com peças de
roupa completamente cheias de água.
Dimensões máximas de carga
Não exceda a capacidade máxima do tambor.
Os valores seguintes referem-se ao peso das peças secas:
Fibras naturais: máximo 7 kg
Fibras sintéticas: máximo 3 kg
! Para evitar uma diminuição no desempenho da máquina de
secar roupa, não a sobrecarregue.
Carga tipo
Nota: 1 kg = 1000 g
Peças
Blusa
Vestido
Jeans
10 fraldas
Camisa
T-shirt
Algodão
Outro
Algodão
Outro
Algodão
Outro
150 g
100 g
500 g
350 g
700 g
1.000 g
300 g
200 g
125 g
Etiquetas de manutenção
Verifique as etiquetas das peças de roupa, especialmente
quando é a primeira vez que as coloca na máquina de secar
roupa. São indicados a seguir os símbolos mais comuns:
Pode colocar-se na máquina de secar.
Não colocar na máquina de secar
Secar a alta temperatura.
Secar a baixa temperatura.
Peças não adequadas à secagem em tambor:
Peças com partes de borracha ou materiais semelhantes
ou com revestimentos de plástico (almofadas,
travesseiros ou anoraques de PVC) e todo o tipo de
objectos inflamáveis ou contendo substâncias inflamáveis
(toalhas com resíduos de laca para cabelo).
Fibras de vidro (alguns tipos de cortinas).
Peças lavadas a seco anteriormente.
Peças com o código ITLC (Peças especiais)
, que
podem ser limpas com produtos especiais de limpeza
doméstica. Siga com atenção estas instruções.
Peças demasiado volumosas (edredões, sacos-cama,
almofadas, travesseiros, etc.), que se expandem durante
a secagem e impedem a circulação do ar na máquina de
secar roupa.
Peças especiais
Cobertores e colchas: as peças de acrílico (Acilian,
Courtelle, Orion, Dralon) devem ser secas com extremo
cuidado a uma temperatura baixa. Não defina tempos
longos de secagem.
PT
Roupa branca
Capa de edredão
(casal)
Toalha grande
Toalha pequena
Toalha de chá
Toalhão de banho
Toalha de rosto
Lençol de cama
de casal
Lençol de cama
de solteiro
Algodão
Outro
1.500 g
1.000 g
700 g
250 g
100 g
700 g
350 g
500 g
350 g
Se misturar peças de tecido sintético com peças de
algodão, é possível que estas últimas continuem húmidas
no fim do ciclo de secagem. Neste caso, basta iniciar outro
ciclo de secagem breve.
Nota: ao definir a duração da secagem, tenha em atenção
que os últimos 10 minutos dos programas são dedicados à
fase de secagem a frio, durante a qual a máquina de secar
roupa não seca a roupa.
Peças com pregas ou plissados: leia as instruções de
secagem fornecidas pelo fabricante.
Peças engomadas: não seque estas peças com outras
não engomadas. Antes de colocar as peças na máquina de
secar roupa, remova a maior quantidade de solução de
engomagem possível. Não seque demasiado: o amido
transforma-se em pó deixando as peças macias, deixando
assim de preencher a sua função.
43
Page 44

Advertências e sugestões
! Este electrodoméstico foi concebido e fabricado em
conformidade com as normas internacionais em matéria de
PT
segurança. Estas advertências são fornecidas por razões de
segurança e devem ser observadas com atenção.
Segurança geral
A parte final de um ciclo da máquina de enxugar roupa ocorre
sem calor (ciclo de arrefecimento) para garantir que a carga
permaneça a uma temperatura que não lhe cause danos.
A presente máquina de secar roupa não deve ser utilizada por
pessoas (incluindo crianças) com capacidades físicas,
sensoriais ou mentais reduzidas ou sem experiência e
conhecimentos, salvo se supervisionadas ou se tiverem
recebido instruções sobre a utilização do dispositivo por parte
de uma pessoa responsável pela sua segurança.
A presente máquina de secar roupa foi concebida para uso
doméstico e não profissional.
Não toque no electrodoméstico com os pés descalços nem
com as mãos ou os pés molhados.
Desligue o electrodoméstico da rede de alimentação
eléctrica, puxando pela ficha e nunca pelo cabo.
Não deixe que as crianças se aproximem do
electrodoméstico quando este está a funcionar. Após a
utilização, desligue a máquina de secar roupa e desligue a
ficha da rede de alimentação eléctrica. Mantenha a porta da
máquina de secar roupa fechada para evitar que as crianças
a utilizem nas suas brincadeiras.
As crianças devem ser mantidas sob vigilância para evitar que
brinquem com a máquina.
O electrodoméstico deve ser instalado correctamente e deve
ter uma ventilação adequada. Os respiradouros da parte
posterior não devem nunca ficar obstruídos (consulte
Instalação).
Nunca utilize a máquina de secar roupa sobre a alcatifa se a
altura do pêlo impedir a entrada do ar pela base da máquina.
Certifique-se de que a máquina está vazia antes de a
carregar.
A parte posterior da máquina de secar roupa pode ficar
muito quente:
não toque nunca nela quando a máquina estiver a
funcionar.
Nunca utilize a máquina de secar roupa se o filtro não estiver
correctamente posicionado (consulte Manutenção).
Não utilize amaciador líquido para tecidos na máquina de
secar roupa, adicione-o antes no último enxaguamento do
ciclo de lavagem.
Não sobrecarregue a máquina de secar roupa (consulte
Roupa para as dimensões máximas de carga).
Não introduza peças de roupa completamente molhadas.
Carregue na máquina apenas peças de roupa lavadas com água
e sabão, enxaguadas e centrifugadas. A secagem de peças que
NÃO tenham sido lavadas com água constitui perigo de incêndio.
Siga sempre com atenção todas as instruções indicadas nas
etiquetas de lavagem (consulte Roupa).
Não coloque peças de roupa que tenham sido tratadas com
produtos químicos.
Nunca seque peças contaminadas com substâncias
inflamáveis (óleo de cozinha, acetona, álcool, petróleo,
querosene, substâncias para remoção de nódoas, terebintina,
ceras, substâncias para remoção de cera e laca para
cabelo), a não ser que tenham sido lavadas em água quente
com uma quantidade adicional de detergente.
Não seque borracha, artigos e peças com base de borracha,
travesseiros com enchimento em espuma de borracha,
espuma de látex, borracha, plástico, toucas de banho,
tecidos resistentes à água, calcinhas para usar com fraldas
ou revestimentos, polietileno e papel.
Retire todos os objectos dos bolsos, especialmente os
isqueiros (risco de explosão).
Não carregue a máquina com peças grandes e
excessivamente volumosas.
Não seque fibras acrílicas a altas temperaturas.
Complete todos os programas com a respectiva fase de
secagem a frio.
Não desligue a máquina de secar roupa quando contiver
ainda peças quentes.
Limpe o filtro após cada utilização (consulte Manutenção).
Evite a acumulação de resíduos de lã em torno da máquina
de secar roupa.
Não suba para o painel superior da máquina de secar roupa,
pois pode danificá-la.
Respeite sempre as normas e as características eléctricas
(consulte Instalação).
Adquira sempre acessórios e peças de reposição originais
(consulte Assistência).
! ATENÇÃO: não pare nunca a máquina de secar roupa antes
do fim do ciclo de secagem, a não ser que todas as peças
sejam removidas rapidamente e estendidas para dissipar o calor.
Informações sobre a reciclagem e a
eliminação
No âmbito do nosso constante empenhamento em defesa do
meio ambiente, reservamo-nos o direito de utilizar componentes
reciclados de qualidade para reduzir os custos do cliente e
minimizar o desperdício de materiais.
Eliminação dos materiais de embalagem: siga as normas
locais para que a embalagem possa ser reciclada.
Para reduzir o risco de acidentes com crianças, retire a porta
e a ficha, e corte o cabo de alimentação rente ao aparelho.
Elimine estes componentes separadamente para ter a
certeza de que o electrodoméstico não volta a ser ligado a
uma tomada de corrente eléctrica.
Desmantelamento dos electrodomésticos
velhos
A directiva Europeia 2002/96/CE relativa aos resíduos de
equipamentos eléctricos e electrónicos (REEE) prevê que
os electrodomésticos não devem ser eliminados no
normal fluxo dos resíduos sólidos urbanos. Os aparelhos
que deixaram de ser utilizados devem ser recolhidos
separadamente para optimizar a taxa de recuperação e
reciclagem dos materiais que os compõem e impedir potenciais
danos à saúde e ao meio ambiente. O símbolo do contentor de
lixo barrado com uma cruz está presente em todos os produtos
para lembrar o dever de recolha selectiva.
Para mais informações sobre o correcto desmantelamento dos
electrodomésticos, contacte o serviço público especializado ou
os revendedores.
Economia energética e respeito pelo
meio ambiente
Antes de secar as peças de roupa, torça-as para eliminar a
maior quantidade de água possível (se antes utilizar uma
máquina de lavar, defina um ciclo de centrifugação). Deste
modo, pode economizar energia durante a secagem.
Se utilizar sempre a máquina com carga plena, pode
economizar energia: peças únicas e cargas pequenas
demoram mais tempo a secar.
Limpe o filtro no fim de cada ciclo para controlar os custos
relacionados com o consumo energético (consulte
Manutenção).
44
Page 45

Cuidados e manutenção
Interrupção da alimentação eléctrica
! Desligue a máquina de secar roupa quando não estiver a
funcionar, bem como durante as operações de limpeza e de
manutenção.
Limpeza do filtro no fim de cada ciclo
O filtro é um componente fundamental para a secagem: a
sua função consiste em recolher os resíduos de lã e o cotão
que se formam durante a secagem.
No fim da secagem, limpe o filtro enxaguando-o com água
corrente ou limpando-o com o aspirador. Se o filtro se
obstruir, o fluxo de ar no interior da máquina de secar roupa
pode ficar seriamente comprometido: os tempos de
secagem prolongam-se e o consumo de energia aumenta.
Além disso, podem verificar-se danos na máquina de secar
roupa.
O filtro encontra-se em frente
ao vedante da máquina de
secar (consulte a figura).
PT
Remoção do filtro:
1. Puxe para cima a pega de
plástico do filtro (consulte a
figura).
2. Remova os resíduos de lã
do filtro e volte a colocá-lo
correctamente. Certifique-se de
que o filtro fica bem encaixado,
rente ao vedante da máquina.
! Não utilize a máquina de secar roupa sem antes ter
recolocado o filtro no respectivo lugar.
Controlo do tambor no fim de cada ciclo
Rode manualmente o tambor para retirar as peças de roupa
mais pequenas (lenços) que possam ter ficado no interior da
máquina.
Limpeza do tambor
! Para a limpeza do tambor, não utilize detergentes
abrasivos, lã de aço ou agentes de limpeza para aço
inoxidável.
Pode formar-se uma película colorida no tambor de aço
inoxidável, fenómeno que pode ser causado por uma
combinação de água e/ou de agentes de limpeza, como o
amaciador de lavagem. Esta película colorida não afecta o
desempenho da máquina de secar roupa.
Limpeza da máquina de secar roupa
As partes externas de metal e de plástico e as partes de
borracha podem ser limpas com um pano húmido.
! Não utilize solventes nem abrasivos.
! Solicite um controlo regular da máquina de secar roupa
por pessoal técnico autorizado para garantir a segurança
dos componentes eléctricos e mecânicos (consulte
Assistência).
45
Page 46

Problemas e soluções
Se lhe parecer que a máquina de secar roupa não está a funcionar correctamente, antes de contactar o Centro de Assistência
(consulte Assistência), consulte atentamente as seguintes sugestões para a resolução dos problemas.
PT
Problema:
A máquina de secar roupa não arranca.
Os tempos de secagem são longos.
A máquina de enxugar é ruidosa nos
primeiros minutos de funcionamento.
Possíveis causas/ Soluções:
A ficha não ficou bem encaixada na tomada eléctrica para que possa fazer contacto.
Ocorreu um corte de corrente.
O fusível está queimado. Tente ligar outro electrodoméstico na mesma tomada.
Se utilizar uma extensão, tente inserir a ficha da máquina de secar roupa directamente na
tomada.
A porta não foi fechada correctamente.
O programa não foi definido correctamente (consulte Como efectuar uma secagem).
Não foi pressionado o botão START (consulte Como efectuar uma secagem).
O filtro não foi limpo (consulte Manutenção).
Não foi seleccionado o tempo de secagem correcto para esta carga (consulte Roupa).
As peças de roupa estão demasiado molhadas (consulte Roupa).
A máquina de secar roupa está sobrecarregada (consulte Roupa).
O tubo de ventilação flexível poderia estar obstruído (veja Instalação).
A tomada de ar poderia estar obstruída.
A aleta de ventilação fixa, na cobertura para temporais, poderia estar obstruída
(veja Instalação).
Isto é normal, sobretudo se a máquina de enxugar ficou inutilizada por algum tempo. Se o
ruído persistir durante todo o ciclo, contacte o centro de assistência técnica.
46
Page 47

Assistência
Antes de contactar o Centro de Assistência:
Siga o guia de resolução de problemas para tentar
resolver a avaria pessoalmente (consulte Problemas e
soluções).
Caso contrário, desligue a máquina e contacte o Centro
de Assistência mais próximo de si.
Dados para comunicar ao Centro de Assistência:
Nome, endereço e código postal;
número de telefone;
tipo de avaria;
data de aquisição;
modelo do aparelho (Mod.);
número de série (S/N) da máquina de secar roupa.
Estas informações encontram-se na etiqueta de dados
situada na parte posterior do óculo.
Peças de reposição
Esta máquina de secar roupa é uma máquina complexa.
Tentar repará-la pessoalmente ou por pessoal não
qualificado pode colocar em risco a integridade física das
pessoas, danificar a máquina e anular a garantia que
cobre as peças de reposição.
Em caso de problemas com o uso desta máquina,
contacte sempre um técnico autorizado. As peças de
reposição foram concebidas especificadamente para este
electrodoméstico e não devem ser usadas para outros
fins.
PT
Este electrodoméstico está em conformidade com a seguintes directivas CEE:
- 2006/95/CEE (Dispositivos de baixa tensão);
- 89/336/CEE, 92/31/CEE, 93/68/CEE (Compatibilidade electromagnética).
47
Page 48

PT
48
Page 49

Mode demploi
SÈCHE-LINGE
FR
Français
IDV 75
IDV 75 S
Table des matières
FR
Installation, 50-51
Où installer le sèche-linge
Ventilation
Raccordement électrique
Placement du sèche-linge de niveau
Informations préliminaires
Description du sèche-linge, 52
Côté avant
Côté arrière
Tableau de bord
Comment effectuer
un cycle de séchage, 53
Lancement du séchage
Paramètres de séchage, 54
Temps de séchage
Programmes et options de séchage
Linge, 55
Tri du linge
Étiquettes dentretien
Linge ou vêtements particuliers
Temps de séchage
! Ce symbole vous rappelle de lire ce mode d'emploi.
! Conservez cette notice dutilisation et dinstallation à
portée de main de manière à pouvoir vous y référer si
nécessaire. Conservez cette notice toujours à côté du
sèche-lingeet si vous vendez cet appareil ou que vous le
donniez à un tiers, faites en sorte que cette notice
accompagne le sèche-linge de manière à ce que le
nouveau propriétaire soit informé des avertissements et des
conseils concernant le fonctionnement de ce sèche-linge.
! Lisez attentivement ce mode demploi : les pages
suivantes contiennent des informations importantes
concernant linstallation et des conseils relatifs au
fonctionnement de cet appareil.
Précautions et conseils, 56
Sécurité générale
Informations pour le recyclage et la mise au rebut
Économie dénergie et protection de lenvironnement
Soin et entretien, 57
Interruption de lalimentation électrique
Nettoyage du filtre après chaque cycle
Contrôle du tambour après chaque cycle
Nettoyage du sèche-linge
Problèmes et solutions, 58
Assistance, 59
Pièces détachées
49
Page 50

Installation
0
Où installer le sèche-linge
FR
Placez votre sèche-linge à
une certaine distance des
cuisinières, fourneaux,
radiateurs, ou plaques de
cuisson à gaz, car les flammes
peuvent endommager cet
appareil.
Si vous installez cet appareil
sous un plan de travail, faites en
sorte de laisser un espace de
10 mm entre le dessus de
lappareil et tout autre objet sur
ou au-dessus de celui-ci, et un espace de 15 mm entre ses
côtés et les éléments dameublement ou les murs latéraux.
Ceci a pour objectif dassurer une ventilation convenable.
Sassurer que les prises dair du panneau arrière ne sont pas
bouchées.
• Vérifier que l'environnement où le sèche-linge est placé est
dépourvu d'humidité et permet le renouvellement de l'air.
m
1
Ventilation
Cet appareil électroménager sèche le linge grâce à l'émission
d'air froid, propre et relativement sec. L'air est ensuite
réchauffé et passe à travers les tissus qui sont ainsi
délicatement séchés. Pour faciliter le séchage, l'air humide est
expulsé au niveau de la face arrière dans un tuyau d'aération.
Il est essentiel que l'environnement dans lequel le sèche-linge
est utilisé soit suffisamment aéré afin de pouvoir éviter le
recyclage des gaz brûlés.
Système d'aération mobile
En cas d'utilisation du sèche-linge avec le système d'aération
mobile, l'installation d'un tuyau d'aération est nécessaire. Le
tuyau est solidement fixé à l'orifice de ventilation postérieur du
sèche-linge (voir le chapitre Description du produit). Dans la
mesure du possible, il est conseillé de relier le tuyau à la
décharge se trouvant à proximité du sèche-linge. Même s'il
n'est pas installé définitivement, le sèche-linge donnera
d'excellents résultats lorsque le tuyau d'aération est orienté
vers une fenêtre entrouverte.
Veiller à ne pas orienter le tuyau d'aération vers la prise d'air
qui se trouve à l'arrière du sèche-linge.
Le tuyau d'aération ne doit pas dépasser les 2,4 mètres. Il
doit être régulièrement secoué avant de retirer les dépôts
éventuels de déchets de laine, de poussière et l'eau. Faites
attention à ne pas marcher sur le tuyau.
Système d'aération fixe
Il est conseillé de raccorder le tuyau d'aération à l'un des
systèmes d'aération pour fenêtre ou porte disponible chez le
revendeur où a eu lieu l'achat ou chez le revendeur le plus
proche.
Trou d'aération mural
1. Laisser une ouverture dans le
B
en pente de sorte à faciliter l'évacuation de l'air.
Les zones A et B doivent faire l'objet d'un contrôle fréquent
afin d'éviter la formation de boules de laine ou de déchets,
surtout en cas d'utilisation fréquente du sèche-linge.
L'adaptateur pour le tuyau d'aération doit être placé
correctement de sorte à éviter que l'air humide puisse
rentrer dans la pièce.
Trou d'aération sur fenêtre
débrancher le tuyau d'aération.
Le tuyau doit être dépourvu de coupures, d'étranglements
ou de courbes en U susceptibles d'empêcher la ventilation
ou favoriser la condensation.
Aération par une fenêtre ouverte
S'assurer que le sèche-linge est suffisamment ventilé et
que l'extrémité du tuyau d'aération n'est pas tournée vers le
conduit de la prise d'air postérieure.
Pour un fonctionnement correct du sèche-linge, il est
indispensable de toujours installer le tuyau d'aération.
Vérifier si le tuyau d'aération et les conduites des prises
d'air ne sont pas obstrués.
Éviter que le sèche-linge puisse recycler l'air vicié.
Une utilisation inadéquate du sèche-linge risque de
provoquer un incendie.
Ne pas évacuer l'air dégagé par le sèche-linge dans le
conduit d'évacuation des fumées émises par des appareils
brûlant du gaz ou d'autres combustibles.
mur situé à gauche du lieu
d'installation du sèche-linge.
2. Faire en sorte que le tuyau
soit le plus court et le plus droit
possible de sorte à éviter que la
condensation soit refoulée vers
le sèche-linge.
A
3. De même, le trou aménagé
dans la paroi doit être droit et
1. En théorie, lorsque le sèchelinge tourne à pleine charge, le
trou d'aération devrait se
trouver directement derrière la
turbine.
2. Il est donc essentiel que le
tube soit le plus court possible.
Veiller à ne pas placer le
sèche-linge trop en retrait car il
risquerait d'écraser, plier voire
L'extrémité du tuyau doit être
orientée vers le bas de sorte à
éviter que l'air chaud humide
puisse se condenser dans la
pièce ou le sèche-linge.
50
Page 51

Raccordement électrique
Assurez-vous des points suivants avant de brancher la fiche de
lappareil dans la prise de mains:
Assurez-vous davoir les mains sèches.
La prise de courant doit être reliée à la terre.
La prise de courant doit pouvoir supporter la puissance
maximale de la machine, qui est indiquée sur la plaque
signalétique de lappareil (voir Description du sèche-linge).
La tension électrique doit appartenir à la gamme de
valeurs indiquée sur la plaque signalétique de lappareil (voir
Description du sèche-linge).
La prise de courant doit être compatible avec la fiche du
sèche-linge. Autrement, remplacez la prise ou la fiche.
! Nutilisez pas de rallonges.
! Le sèche-linge ne doit pas être utilisé à lextérieur, même si
lespace en question est abrité. Cela peut être dangereux si
lappareil est exposé à la pluie ou à des orages.
! Une fois le sèche-linge installé, le cordon dalimentation et
la fiche doivent être daccès facile.
! Le cordon dalimentation ne doit pas être courbé ou
écrasé.
! Si la fiche à remplacer est de type incorporée, il faut
léliminer conformément aux consignes de sécurité. Ne la
laissez jamais dans un endroit où elle peut être branchée à
une prise et provoquer ainsi un choc électrique.
! Le cordon dalimentation électrique doit être vérifié
périodiquement et remplacé par un cordon préparé
spécialement pour ce sèche-linge, et installé uniquement par
des électriciens agréés (voir Service après-vente). Des
cordons dalimentation neufs ou plus longs sont fournis par
les revendeurs agréés contre un supplément..
! Le fabricant rejette toute responsabilité en cas de
non-respect de toutes ou partie de ces règles.
! En cas de doute au sujet des points précédents,
consultez un électricien qualifié.
Informations préliminaires
Une fois que vous avez installé votre sèche-linge, et avant
de lutiliser, nettoyez lintérieur du tambour pour retirer les
poussières qui pourraient sy être accumulées pendant le
transport.
FR
Placement du sèche-linge de niveau
Le sèche-linge doit être installé sur une surface plane
pour un fonctionnement optimal.
Après avoir installé le sèchelinge dans sa position
définitive, contrôler s'il est
placé de niveau dans le sens
de la largeur dans un
premier temps et ensuite sur
la profondeur.
Si le sèche-linge n'est pas
de niveau, utiliser une cale
de bois pour le maintenir
pendant le réglage des deux
pieds avant jusqu'à
atteindre une position
adéquate.
51
Page 52

Description
du sèche-linge
Côté avant Côté arrière
FR
Tableau de bord
Numéro de
série et
référence du
modèle
Tableau de bord
Filtre
Panier
Performances de
fonctionnement
Attention, haute
température
Prise d'air
Raccordement pour
le tuyau d'aération
Touches
Haute
température
Bouton temps
de séchage
Bouton temps de séchage
Permet de sélectionner la durée de séchage : tourner le bouton dans le sens des aiguilles d'une montre jusqu'à ce que l'indicateur
signale la durée souhaitée (voir Paramètres de séchage).
Haute température
Permet de personnaliser le programme sélectionné en fonction des besoins.
Touche MARCHE
Appuyer sur la touche pour lancer le séchage.
Touche
Marche
52
Page 53

Comment effectuer
un cycle de séchage
Lancement du séchage
1. Branchez la fiche du sèche-linge dans la prise de courant électrique.
2. Sélectionner le séchage en fonction du type de linge (voir Linge).
3. Ouvrez la porte et assurez-vous que le filtre est propre et en place.
4. Chargez la machine en faisant attention à ce quaucun vêtement ne sinterpose entre la porte et le joint de la porte. Fermez la porte.
5. Tourner le Bouton temps de séchage jusqu'à ce que l'indicateur indique le temps de séchage le mieux adapté au type de tissu à
sécher. Consulter le tableau pour connaître le rapport entre le type de tissu et la capacité de charge (voir Paramètres de séchage)
et les indications propres à chaque type de tissu (voir Linge).
6. Le cas échéant, régler la température à l'aide du bouton Haute température.
7. Appuyer sur la touche MARCHE pour commencer.
Pendant le programme de séchage vous pouvez contrôler le linge et sortir les vêtements qui ont déjà séché, en laissant continuer
les autres. Après avoir refermé la porte, appuyez sur MARCHE pour remettre lappareil en marche.
FR
8. Les dernières minutes avant que tout programme de séchage ne soit terminé, lappareil entre dans la phase finale de SÉCHAGE
À FROID (les tissus sont refroidis), que vous devez toujours laisser se terminer.
9. Ouvrez la porte, sortez votre linge, nettoyez le filtre et remettez-le en place.
10. Débranchez le sèche-linge.
53
Page 54

Paramètres de séchage
Temps de séchage
Le temps de séchage à sélectionner dépend de la charge et du tissu à sécher (voir tableau).
FR
Les 10 dernières minutes du programme correspondent au séchage à froid.
Pour les grosses charges sélectionnez l'option Haute Température, si disponible.
Tissus
Coton –
Haute
température
Synthétique –
Haute
température
Délicats –
Basse
température
Ces temps sont approximatifs et peuvent varier en fonction des paramètres suivants :
La quantité deau retenue dans les vêtements après le cycle dessorage : les serviettes éponge et les textiles délicats retiennent
une quantité importante deau.
1 kg 2 kg 3 kg 4 kg 5 kg 6 kg 7 kg
20 ou 30
minutes
20 ou 30
minutes
25 ou 40
minutes
35 ou 45
minutes
35 ou 45
minutes
40 ou 60
minutes
45 ou 60
minutes
45 ou 60
minutes
- - - - -
Charge
60 ou 70
minutes
- - - -
70 ou 80
minutes
80 ou 100
minutes
90 ou 120
minutes
Les textiles : des articles qui sont constitué par le même type de textile mais qui ont des textures et des épaisseurs différentes
peuvent ne pas avoir le même temps de séchage.
La quantité de linge : les articles uniques ou les petites charges peuvent prendre plus longtemps à sécher.
Séchage : si vous avez lintention de repasser certains de vos vêtements, vous pouvez les sortir de la machine alors quils sont
encore un peu humides. Les autres vêtements peuvent y rester plus longtemps si vous voulez quils en sortent entièrement secs.
La température ambiante : si la pièce dans laquelle le sèche-linge est installé est froide, cela prendra plus longtemps à lappareil
pour sécher vos vêtements.
Le volume : certains articles volumineux peuvent être séchés en machine avec quelques précautions. Nous vous suggérons de
retirer plusieurs fois ces articles de la machine, de les secouer et de les remettre dans le sèche-linge jusquà ce que celui-ci ait
terminé de les sécher.
! Ne séchez pas excessivement vos vêtements.
Tous les issus contiennent une certaine quantité dhumidité naturelle, ce qui les rend doux et gonflants.
Programmes et options de séchage
Refraichîssement
Programme court qui sert à aérer les fibres et les vêtements avec de lair frais. Il a une durée de 10 minutes environ.
! Ce nest pas un programme de séchage et ne doit pas être utilisé pour des vêtements mouillés.
Haute Température
Sélectionner un séchage temporisé. Appuyer sur le bouton pour sélectionner une température supérieure. Les programmes
minutés sont par défaut réglés sur une température douce.
54
Page 55

Linge
Tri du linge
Vérifiez les symboles sur les étiquettes des vêtements
pour vous assurer que les articles peuvent être passés au
sèche-linge.
Triez votre linge par type de textile.
Videz les poches et contrôlez les boutons.
Fermez les fermetures éclair et les crochets et attachez les
ceintures et les cordons, sans serrer.
Essorez chaque article de manière à éliminer autant deau
que possible.
! Ne chargez pas de vêtements mouillés qui gouttent dans
le sèche-linge.
Capacités maximales de chargement
Ne chargez pas plus que la capacité maximale.
Les chiffres suivants font référence au poids sec:
Fibres naturelles : maximum 7 kg
Fibres synthétiques : maximum 3 kg
! Pour éviter que le sèche-linge ne perde de son efficacité,
ne le surchargez pas.
Charge typique
Remarque : 1 kg = 1000 g
Articles
Chemisier
Robe
Jeans
10 couches
Chemise
T-shirt
Linge de maison
Housse de
couette en coton
(double)
Grande nappe
Petite nappe
Nappe à thé
Drap de bain
Serviette éponge
Draps doubles
Draps 1 personne
Coton
Autre
Coton
Autre
Coton
Autre
Coton
Autre
1.500 g
1.000 g
700 g
250 g
100 g
700 g
350 g
500 g
350 g
150 g
100 g
500 g
350 g
700 g
1.000 g
300 g
200 g
125 g
Étiquettes dentretien
Regardez les étiquettes sur vos vêtements, en particulier
lorsque vous les séchez pour la première fois au sèche-linge.
Les symboles suivants sont les plus courants:
Séchage en machine.
Pas de séchage en machine.
Séchage à haute température.
Séchage à basse température.
Linge ne supportant pas le séchage au tambour :
Les articles qui contiennent du caoutchouc ou des
matériaux similaires au caoutchouc ou ceux qui
contiennent un film plastique (oreillers, coussins, ou
vêtements de pluie en PVC), tous autres articles ou objets
inflammables ou contenant des substances inflammables
(serviettes éponge imprégnées de laque à cheveux).
Fibres de verre (certain types de tentures).
Vêtements précédemment nettoyés à sec.
Articles portant le Code ITCL («Vêtements spéciaux»)
. Ces derniers peuvent être nettoyés avec des
produits spéciaux de nettoyage à domicile. Suivez
attentivement le mode demploi.
Les gros articles volumineux (couettes, sacs de
couchage, oreillers, coussins, etc.). Ceux-ci augmentent
de volume lorsquils sèchent et cela empêcherait lair de
circuler à travers le sèche-linge.
Linge ou vêtements particuliers
Couvertures et dessus de lits : les articles en acrylique
(Acilan, Courtelle, Orion, Dralon) doivent être séchés avec
des précautions particulières, à basse température. Évitez
de les sécher pendant une durée prolongée.
Vêtements plissés ou froissés : lisez les instructions de
séchage du fabricant figurant sur le vêtement.
Articles amidonnés : ne séchez pas ces derniers avec des
articles non amidonnés. Faites en sorte de retirer autant de
solution damidonnage que possible de la charge avant de
placer celle-ci dans le sèche-linge. Ne séchez pas de façon
excessive: lamidon pourrait devenir poudreux et laisser vos
vêtements sans tenue, ce qui irait à lencontre du but
recherché.
FR
À la fin dun cycle de séchage, il se peut que les cotons
soient toujours humides si vous les avez regroupés avec les
synthétiques. Si cela se produit, faites-leur simplement subir
une petite période de séchage supplémentaire.
Remarque : les 10 dernières minutes de nimporte quelle
durée programmée correspondent au séchage à froid. Vous
devez donc en tenir compte en programmant la durée de
séchage, car votre linge ne séchera pas pendant ce laps de
temps.
55
Page 56

Précautions et conseils
! Cet électroménager a été conçu et réalisé conformément
aux normes internationales de sécurité. Ces consignes sont
FR
fournies pour des raisons de sécurité, il faut les respecter
scrupuleusement.
Sécurité générale
La partie finale d'un cycle du sèche-linge se produit sans
chaleur (cycle de refroidissement) afin de s'assurer que le
linge demeure à une température qui ne risque pas de
l'abîmer.
Ce sèche-linge nest pas destiné à être utilisé par des
personnes (notamment des enfants) présentant des
capacités physiques, motrices ou mentales réduites, ou
manquant dexpérience et de connaissances, sans la
surveillance dune personne responsable de leur sécurité
ou sans instructions concernant lutilisation de lappareil.
Ce sèche-linge a été conçu pour un usage domestique, et
non professionnel.
Ne touchez pas cet appareil lorsque vous êtes pieds nus
ou avec des mains ou des pieds humides.
Débranchez cette machine en tirant sur la fiche et non sur
le cordon.
Les enfants ne doivent pas se trouver à proximité du
sèche-linge lorsque celui-ci est en marche. Après avoir
utilisé ce sèche-linge, éteignez-le et débranchez-le. Tenez
la porte fermée pour assurer que les enfants ne jouent
pas avec.
Surveillez les enfants de façon à ne pas les laisser jouer
avec le sèche-linge.
Cet appareil doit être installé correctement et avoir une
ventilation convenable. Lévent derrière le sèche-linge ne
doivent jamais être obstrués (voir Installation).
Nutilisez jamais le sèche-linge sur de la moquette où la
hauteur des poils empêcherait lair dentrer dans la sèche-
linge à partir de la base.
Vérifiez que le sèche-linge est bien vide avant de le charger.
Larrière du sèche-linge peut devenir très chaud.
Ne le touchez jamais en cours dutilisation.
Nutilisez pas le sèche-linge si le filtre ne sont pas bien en
place (voir Entretien).
Nutilisez pas de liquide assouplissant pour le linge dans
le sèche-linge ; ajoutez-le au rinçage final de votre lavage.
Ne surchargez pas le sèche-linge (Voir Linge pour les
charges maximales).
Ne chargez pas darticles qui dégouttent deau.
Ne séchez que des articles qui ont été lavés avec de leau
et un détergent, rincés et essorés. Le fait de sécher des
articles qui NONT PAS été lavés avec de leau constitue
un danger dincendie.
Vérifiez avec soin toutes les instructions de lavage sur les
étiquettes des vêtements (voir Linge).
Ne séchez pas des vêtements qui ont été traités avec
des produits chimiques.
Ne séchez jamais des articles qui ont été contaminés
avec des substances inflammables (huiles de cuisson,
acétone, alcool, essence, kérosène, détachants, essence
de térébenthine, cires, solvants pour cire et laque à
cheveux) sans les avoir lavé dans leau chaude avec une
dose supplémentaire de lessive.
Ne séchez pas de caoutchouc sec, darticles ou
vêtements doublés de caoutchouc, doreillers garnis de
coupeaux de caoutchouc mousse, de mousse (mousse
de latex), de caoutchouc, de plastique, des bonnets de
douche, des textiles imperméables, des couches-culottes
ou doublures pour couches lavables, du polyéthylène ou
du papier.
Retirez tous les objets oubliés dans les poches, les
briquets en particulier (risque dexplosion).
Ne séchez pas darticles de grande taille, très
volumineux.
Ne séchez pas de fibres acryliques à hautes températures.
Terminez chaque programme avec sa phase de séchage
à froid.
Néteignez pas le sèche-linge sil contient encore des
articles chauds.
Nettoyez le filtre après chaque utilisation (voir Entretien).
Ne laissez pas saccumuler de peluches autour du sèche-
linge.
Ne montez jamais sur le sèche-linge. Cela pourrait
lendommager.
Respectez toujours les normes et exigences électriques
(voir Installation).
Achetez toujours des pièces détachées et accessoires
dorigine (voir Service après-vente).
! ATTENTION: Narrêtez pas le sèche-linge avant la fin du
cycle de séchage si vous navez pas la possibilité de retirer
rapidement tous les articles et de les étendre pour évacuer
la chaleur.
Informations pour le recyclage et la
mise au rebut
Dans le cadre de notre engagement envers la protection de
lenvironnement, nous nous réservons le droit dutiliser des
pièces recyclées de qualité afin de réduire les coûts pour
notre clientèle et de limiter les gaspillages de matières
premières.
Mise au rebut du matériel demballage : respectez les
réglementations locales, de manière à ce que lemballage
puisse être recyclé.
Pour éviter que des enfants se blessent, ôtez la porte et
la prise et puis coupez le câble secteur au ras de
lappareil. Jetez ces pièces séparément de sorte que
lappareil ne puisse plus être branché sur une prise de
secteur.
Mise au rebut des électroménagers usagés
La directive européenne 2002/96/CE sur les déchets
déquipements électriques et électroniques (DEEE),
prévoit que les électroménagers ne peuvent pas être
traités comme des déchets solides urbains normaux.
Les appareils usagés doivent faire lobjet dune collecte
séparée pour optimiser le taux de récupération et de
recyclage des matériaux qui les composent et empêcher
tout danger pour la santé et pour lenvironnement. Le
symbole de la poubelle barrée est appliqué sur tous les
produits pour rappeler qufils font lfobjet dfune collecte
sélective.
Pour tout autre renseignement sur la collecte des
électroménagers usés, prière de sfadresser au service
public préposé ou au vendeur.
Économie dénergie et protection de
lenvironnement
Essorez les articles pour éliminer leau en excès avant de
les passer au sèche-linge (si vous utilisez une machine à
laver, sélectionnez un cycle dessorage à grande vitesse).
Ceci vous permettra déconomiser de lénergie durant le
séchage.
Séchez toujours des charges complètes vous
économiserez de lénergie : les articles uniques ou les
petites charges prennent plus longtemps à sécher.
Nettoyez le filtre après chaque utilisation pour limiter les
coûts de consommation dénergie (voir Entretien).
56
Page 57

Soin et entretien
Interruption de lalimentation
électrique
! Débranchez votre sèche-linge lorsque vous ne lutilisez
pas, lorsque vous le nettoyez et durant toutes les
opérations dentretien.
Nettoyage du filtre après chaque cycle
Le filtre est une pièce importante de votre sèche-linge : il
accumule des peluches qui se forment durant le séchage.
Par conséquent, une fois le séchage terminé, nettoyez le filtre
en le rinçant sous leau courante ou avec votre aspirateur. Si le
filtre devient bloqué, le flux dair à lintérieur du sèche-linge est
sérieusement compromis : les temps de séchage sont
allongés et vous consommez davantage dénergie. Cela peut
aussi endommager votre sèche-linge.
Le filtre se trouve devant le joint
du sèche-linge (voir figure).
FR
Pour retirer le filtre :
1. Tirez la poignée en plastique
du filtre vers le haut (voir figure).
2. Nettoyez le filtre et remettezle correctement en place.
Assurez-vous que le filtre soit
bien inséré à fond dans le joint
du sèche-linge.
! Nutilisez pas le sèche-linge sans avoir remis le filtre en place.
Contrôle du tambour après chaque cycle
Tournez le tambour à la main afin de retirer les petits articles
(mouchoirs) qui pourraient y avoir été oubliés.
Nettoyage du tambour
! Pour nettoyer le tambour, ne pas utiliser dabrasifs, de
laine dacier ni de produits de nettoyage pour acier
inoxydable.
Un film coloré peut parfois apparaître à la surface du
tambour en acier inoxydable. Il peut être dû à une
combinaison de leau et/ou des produits de nettoyage (ex.
adoucissant textile provenant du lavage). Ce film coloré
naffecte pas la performance du sèche-linge.
Nettoyage du sèche-linge
Pour nettoyer lextérieur en métal et en plastique et les
parties en caoutchouc, utiliser un chiffon humide.
! Faites vérifier régulièrement votre sèche-linge par des
techniciens agréés pour assurer la sécurité électrique et
mécanique (voir Service après-vente).
57
Page 58

Problèmes et solutions
Si vous trouvez que le sèche-linge ne fonctionne pas correctement, avant de contacter le Service après-vente (voir Assistance),
consultez attentivement le tableau suivant afin de pouvoir résoudre les problèmes éventuels:
FR
Problème:
Le sèche-linge ne démarre pas.
Lappareil met longtemps à sécher.
Le sèche-linge est bruyant durant
les premières minutes
dutilisation.
Causes / Solutions possibles :
La fiche nest pas suffisamment insérée dans la prise murale pour quil y ait contact.
Il y a une panne de courant.
Le fusible a sauté. Essayez de brancher un autre appareil dans la même prise
électrique.
Si vous utilisez une rallonge, essayez de brancher le cordon dalimentation du
sèche-linge directement dans la prise.
La porte nest pas bien fermée.
Le programme na pas été convenablement réglé (voir Comment effectuer un cycle de
séchage).
La touche de
séchage).
Le filtre na pas été nettoyé (voir Entretien).
La durée de séchage correcte na pas été sélectionnée pour la charge (voir Linge).
Les articles étaient trop mouillés (voir Linge).
Le sèche-linge était surchargé (voir Linge).
Le tuyau d'aération flexible pourrait être bouché (voir Installation).
La prise d'air pourrait être bouchée (voir Installation).
L'ailette d'aération fixe située au niveau du système de protection contre les orages
pourrait être obstruée (voir Installation).
Cela est normal, surtout si le sèche-linge na pas été utilisé pendant une période de
temps prolongée. Si le bruit persiste tout au long du cycle, appelez le SAV.
MARCHE nest pas enfoncée (voir Comment effectuer un cycle de
58
Page 59

Assistance
Avant dappeler le Centre de Service aprèsvente :
Suivez le guide daide à la résolution des problèmes
pour voir si vous narrivez pas à résoudre le problème
vous-même (voir Problèmes et solutions).
Dans le cas contraire, éteignez votre sèche-linge et
contactez le Centre de Service après-vente le plus
proche.
Informations à communiquer au Centre de
Service après-vente :
Nom, adresse et code postal ;
numéro de téléphone;
le type de panne;
la date dachat;
le modèle de lappareil (Mod.);
le numéro de série (S/N) du sèche-linge.
Vous trouverez ces renseignements sur létiquette collée
derrière la porte.
Pièces détachées
Ce sèche-linge est un appareil complexe. Si vous tentez
de le réparer vous-même ou si vous confiez cette tâche à
une personne non qualifiée, vous risquez de mettre en
danger la sécurité des personnes, dendommager
lappareil et dannuler la garantie sur les pièces.
En cas de problème dutilisation de cet appareil,
contactez toujours un technicien agréé. Les pièces
détachées ont été conçues exclusivement pour ce produit
et ne sont en aucun cas adaptées à dautres usages.
FR
Cet appareil est conforme aux Directives Européennes suivantes :
- 2006/95/CEE (Équipement Basse Tension) ;
- 89/336/CEE, 92/31/CEE, 93/68/CEE (Compatibilité Électromagnétique).
59
Page 60

FR
195077020.03
09/2009 - Xerox Fabriano
60
 Loading...