

INDESIT I6VSH2(W)/EX User Manual
I6VSH2/EX
English
EnglishEnglish
GB
EnglishEnglish
PT
Português
Operating Instructions
COOKER AND OVEN
Contents
Operating Instructions,1
ATTENZIONE,
Description of the appliance-Overall view,7
Description of the appliance-Control Panel,8
Installation,9
Start-up and use,11
Cooking modes,11
Using the hob,14
Precautions and tips,15
Care and maintenance,16
Assistance,16
Français
FR
2
Mode d’emploi
CUISINIERE ET FOUR
Sommaire
Mode d’emploi,1
ATTENTION
Description de l’appareil-Vue d’ensemble, 7
Description de l’appareil-Tableau de bord, 8
Installation,18
Mise en marche et utilisation,20
Utilisation du four,20
Utilisation du plan de cuisson,21
Précautions et conseils, 24
Nettoyage et entretien,25
Assistance,25
,2
Instruções para a utilização
FOGÃO E FORNO
Índice
Instruções para a utilização,1
ATENÇAO
Descriçao do aparelho-Vista de conjunto,7
Descriçao do aparelho-Painel de comandos,8
Instalaçao,37
Início e utilizaçao, 39
Utilizaçao do forno,39
Utilizaçao do plano de cozedura,41
Precauçoes e conselhos,42
Manutençao e cuidados,44
Assistencia técnica,44
RU
Ɋɭɤɨɜɨɞɫɬɜɨ ɩɨ ɷɤɫɩɥɭɚɬɚɰɢɢ
Ɋɭɤɨɜɨɞɫɬɜɨ ɩɨ ɷɤɫɩɥɭɚɬɚɰɢɢ
ɄɍɏɈɇɇȺə ɉɅɂɌȺ ɋ ȾɍɏɈȼɕɆ ɒɄȺɎɈɆ
ɄɍɏɈɇɇȺə ɉɅɂɌȺ ɋ ȾɍɏɈȼɕɆ ɒɄȺɎɈɆ
ɋɨɞɟɪɠɚɧɢɟ
ɋɨɞɟɪɠɚɧɢɟ
Ɋɭɤɨɜɨɞɫɬɜɨ ɩɨ
ȼɇɂɆȺɇɂȿ
Ɉɩɢɫɚɧɢɟ ɢɡɞɟɥɢɹ-Ɉɛɳɢɣ ɜɢɞ,7
Ɉɩɢɫɚɧɢɟ ɢɡɞɟɥɢɹ-ɉɚɧɟɥɶ ɭɩɪɚɜɥɟɧɢɹ,8
Ɇɨɧɬɚɠ,47
ȼɤɥɸɱɟɧɢɟ ɢ ɷɤɫɩɥɭɚɬɚɰɢɹ,48
ɉɪɨɝɪɚɦɦɵ ɩɪɢɝɨɬɨɜɥɟɧɢɹ,49
ɉɪɟɞɨɫɬɨɪɨɠɧɨɫɬɢ ɢ ɪɟɤɨɦɟɧɞɚɰɢɢ,52
Ɍɟɯɧɢɱɟɫɤɨɟ ɨɛɫɥɭɠɢɜɚɧɢɟ ɢ ɭɯɨɞ,53
Ɍɟɯɧɢɱɟɫɤɨɟ ɨɛɫɥɭɠɢɜɚɧɢɟ,54
,4
Ɋɭɫɫɤɢɣ
Ɋɭɫɫɤɢɣ
ɷɤɫɩɥɭɚɬɚɰɢɢ,1
,5
ES
Español
Manual de instrucciones
COCINA Y HORNO
Sumario
Manual de instrucciones,1
ATENCIÓN
Descripción del aparato-Vista de conjunto,7
Descripción del aparato-Panel de control,8
Instalación,27
Puesta en funcionamiento y uso,29
Uso del horno,30
Uso de la encimera,32
Precauciones y consejos,33
Mantenimiento y cuidados,34
Asistencia,34
,3
KZ
Қазақша
Қазақша
ɉɚɣɞɚɥɚɧɭɧԝɫԕɚɭɥɵԑɵ
ɉɅɂɌȺ
Ɇɚɡɦԝɧɵ
ɉɚɣɞɚɥɚɧɭɧԝɫԕɚɭɥɵԑɵ
ECKEPTYECKEPTYECKEPTY
Ԕԝɪɵɥԑɵɫɢɩɚɬɬɚɦɚɫɵ
Ԕԝɪɵɥԑɵɫɢɩɚɬɬɚɦɚɫɵ
Ɉɪɧɚɬɭ
Ԕɨɫɭɠԥɧɟɩɚɣɞɚɥɚɧɭ
ɋɚԕɬɚɧɞɵɪɭɥɚɪ
Ʉԛɬɿɦɠԥɧɟɬɟɯɧɢɤɚɥɵԕ
Ʉԧɦɟɤ
5
57
ɦɟɧɤɟԙɟɫɬɟɪ
65
1
Жалпы шолу
Басқару тақтасы
59
64
ԕɵɡɦɟɬɤԧɪɫɟɬɭ
ﺕﺎﻳﻮﺘﺤﻤﻟﺍ
ﻡﺍﺪﺨﺘﺳﻻﺍﻭ ﻞﻴﻐﺸﺘﻟﺍ
ﻲﺋﺎﺑﺮﻬﻜﻟﺍ ﻑﺮﻟﺍ ﻡﺍﺪﺨﺘﺳﺍ
ﺢﺋﺎﺼﻧﻭ ﺭﺬﺣ ﻞﺋﺎﺳﻭ
ﺔﻧﺎﻴﺼﻟﺍﻭ ﺔﻳﺎﻨﻌﻟﺍ
ﺓﺪﻋﺎﺴﻤﻟﺍ
7
8
65
A R

GB
ATTENZIONE
Remove any liquid from
the lid before opening it.
WARNING: The appliance and its
accessible parts become hot during
use.
Care should be taken to avoid
touching heating elements.
Children less than 8 years of age shall
be kept away unless continuously
supervised.
This appliance can be used by
children aged from 8 years and
above and persons with reduced
physical, sensory or mental
capabilities or lack of experience
and knowledge if they have been
given supervision or instruction
concerning use of the appliance in a
safe way and understand the hazards
involved. Children shall not play with
the appliance. Cleaning and user
maintenance shall not be made by
children without supervision.
WARNING: Unattended cooking on a
hob with fat or oil can be dangerous
and may result in fire.
NEVER try to extinguish a fire with
water, but switch off the appliance
and then cover flame e.g. with a lid or
a fire blanket.
Do not use harsh abrasive cleaners
or sharp metal scrapers to clean
the oven door glass since they can
scratch the surface, which may result
in shattering of the glass.
The internal surfaces of the
compartment (where present) may
become hot.
Never use steam cleaners or pressure
cleaners on the appliance.
Do not close the glass cover (if present)
when the gas burners or electric
hotplates are still hot.
WARNING: Ensure that the appliance is
switched off before replacing the lamp
to avoid the possibility of electric shock.
WARNING: Danger of fire: do not store
items on the cooking surfaces.
WARNING: If the surface in glassceramic is cracked, switch off the
appliance to avoid the possibility of
electric shock.
! When you place the rack inside,
make sure that the stop is directed
upwards and in the back of the cavity.
ATTENTION
FR
ATTENTION : cet appareil ainsi que
ses parties accessibles deviennent très
chauds pendant leur fonctionnement.
Il faut faire attention de ne pas toucher
les éléments chauffants.
Ne laisser s'approcher les enfants de
moins de 8 ans à moins qu’ils ne soient
sous surveillance constante.
Le présent appareil peut être utilisé par
des enfants de plus de 8 ans et par des
personnes présentant des capacités
physiques, sensorielles ou mentales
réduites ou n’ayant pas l’expérience
ou les connaissances nécessaires,
à condition qu’ils soient sous bonne
surveillance ou qu’ils aient reçu les
instructions nécessaires pour une utilisation de l’appareil en toute sécurité
et à condition qu’ils se rendent compte
des dangers encourus. Les enfants ne
doivent pas jouer avec l’appareil. Les
2

opérations de nettoyage et d’entretien
ne doivent pas être effectuées par des
enfants non surveillés.
ATTENTION : laisser un récipient de
cuisson contenant de l’huile ou de la
graisse sur le foyer est dangereux et
risque d’entraîner un incendie.
Il ne faut JAMAIS essayer d’éteindre
une flamme ou un incendie avec de
l’eau ! Il faut éteindre l’appareil et co-
uvrir la flamme avec un couvercle, par
exemple, ou avec une couverture anti-
Ne pas utiliser de produits abrasifs ni
de spatules métalliques coupantes
pour nettoyer la porte du four en verre,
sous peine d’érafler la surface et de
briser le verre.
Les surfaces intérieures du tiroir (s’il y
en a un) peuvent devenir chaudes.
Ne jamais nettoyer l’appareil avec des
nettoyeurs vapeur ou haute pression.
Essuyer tout liquide pouvant se trouver
sur le couvercle avant de l’ouvrir. Ne pas
abaisser le couvercle en verre (s’il y en a
un) tant que les brûleurs gaz ou la plaque électrique sont chauds.
ATTENTION : s’assurer que l’appareil
est éteint avant de procéder au remplacement de l’ampoule, afin d’éviter tout
risque d’électrocution.
ATTENTION : risque d’incendie : ne pas
laisser d’objets sur les surfaces de cuisson.
ATTENTION : si la surface vitrocéramique est fêlée, éteindre l’appareil afin
d’éviter tout risque d’électrocution.
-feu.
! Lors de l’introduction de la grille,
s’assurer que l’arrêt est bien tourné
vers le haut et se trouve dans la partie arrière de l’enceinte.
ES
ATENCIÓN: Este aparato y sus partes
accesibles se calientan mucho durante
el uso.
Por lo tanto, es importante evitar tocar
los elementos calentadores.
Mantenga alejados a los niños menores de 8 años si no son continuamente
vigilados.
El presente aparato puede ser utilizado por niños mayores de 8 años y por
personas con capacidades físicas,
sensoriales o mentales disminuidas o
sin experiencia ni conocimientos, si se
encuentran bajo una adecuada vigilancia o si han sido instruidos sobre el uso
del aparato de modo seguro y com-
prenden los peligros relacionados con
el mismo. Los niños no deben jugar
con el aparato. Las operaciones de limpieza y de mantenimiento no deben ser
realizadas por niños sin vigilancia.
ATENCIÓN: Dejar un quemador con
grasas o aceites sin vigilancia puede
ser peligroso y provocar un incendio.
NUNCA intente apagar una llama/incendio con agua, se debe apagar el
aparato y cubrir la llama, por ejemplo,
con una tapa o con una manta ignífu-
No utilice productos abrasivos ni
espátulas de metal cortantes para
limpiar la puerta de cristal del horno ya
que podrían rayar la superficie y quebrar el cristal.
Las superficies internas del cajón (cuando existe) pueden calentarse.
No utilice nunca limpiadores a vapor
o de alta presión para la limpieza del
aparato.
Elimine eventuales líquidos presentes
sobre la tapa antes de abrirla. No cierre
la tapa de vidrio (si existe) cuando los
quemadores o la placa eléctrica todavía
están calientes.
ATENCIÓN
ga.
3

ATENCIÓN: Antes de sustituir la lámpara controle que el aparato esté apagado
para evitar la posibilidad de choques
eléctricos.
ATENÇÃO: Deixar um fogão com
gordura e óleo sem vigilância
pode ser perigoso e provocar um
incêndio.
ATENCIÓN: Riesgo de incendio: no deje
objetos sobre las superficies de cocción.
ATENCIÓN: Si la superficie de vitrocerámica está agrietada, apague el aparato
para evitar sacudidas eléctricas.
! Cuando introduzca la parrilla, controle que el tope esté dirigido hacia
arriba y en la parte posterior de la
cavidad.
ATENÇAOATENÇAOATENÇAO
PT
ATENÇÃO: Este aparelho e as suas
partes acessíveis aquecem muito
durante a utilização.
É preciso ter atenção e evitar tocar
os elementos que aquecem.
Manter afastadas as crianças com
menos de 8 anos, caso não estejam
a ser vigiadas.
O presente aparelho pode ser utilizado por crianças com mais de 8 anos
e por pessoas com capacidades
físicas, sensoriais ou mentais reduzidas ou com pouca experiência e
conhecimentos, caso sejam adequadamente vigiadas ou caso tenham
recebido instruções em relação ao
uso do aparelho de forma segura
e tenham conhecimento dos perigos associados. As crianças não
devem brincar com o aparelho. As
operações de limpeza e manutenção
não devem ser efectuadas por crianças sem vigilância.
NUNCA tente apagar as chamas
com água. É necessário desligar o
aparelho e cobrir as chamas com
uma tampa ou com uma manta
ignífuga.
Não utilizar produtos abrasivos nem
espátulas de metal cortantes para
limpar a porta em vidro do forno,
uma vez que pode riscar a superfície, provocando a ruptura do vidro.
As superfícies internas da gaveta (se As superfícies internas da gaveta (se
presentes) podem ficar muito quen
tes.
Nunca utilize equipamento de limpeza a vapor ou de alta pressão para
limpar o aparelho.
Elimine os líquidos presentes na tampa antes de abri-la. Não feche a tampa de vidro (se presente) se os queimadores ou a chapa eléctrica ainda
estiverem quentes.
ATENÇÃO: Assegure-se de que o
aparelho esteja desligado antes de
substituir a lâmpada, para evitar a
possibilidade de choques eléctricos.
ATENÇÃO: Risco de incêndio: não
deixe objectos sobre as superfícies
de cozedura.
ATENÇÃO: Se a superfície vitrocerâmica estiver rachada, desligue o
aparelho para evitar a possibilidade
de choques eléctricos.
! Quando inserir a grelha, assegure-
-se de que o bloqueio esteja voltado
para cima e na parte posterior da
cavidade.
4

RU
ȼɇɂɆȺɇɂȿȼɇɂɆȺɇɂȿ
ВНИМАНИЕ: Данное изделие и
его доступные комплектующие
сильно нагреваются в процессе
эксплуатации.
Будьте осторожны и не
касайтесь нагревательных
элементов.
Не разрешайте детям младше 8
лет приближаться к изделию без
контроля.
Данное изделие может быть
использовано детьми старше 8
лет и лицами с ограниченными
физическими, сенсорными или
умственными способностями или
без опыта и знания
о правилах
использования изделия при
условии надлежащего контроля
или обучения безопасному
использованию изделия с
учетом соответствующих рисков.
Не разрешайте детям играть
с изделием. Не разрешайте
детям осуществлять чистку и
уход за изделием без контроля
взрослых.
ВНИМАНИЕ: Опасно оставлять
включенную конфорку с маслом
или жиром без присмотра, так
как это может
привести к пожару.
НИКОГДА не пытайтесь погасить
пламя/пожар водой. Прежде
всего выключите изделие и
накройте пламя крышкой или
огнеупорной тканью.
Не используйте абразивные
вещества или режущие
металлические скребки для
чистки стеклянной дверцы
духового шкафа, так как они
могут поцарапать поверхность,
что может привести к
разбиванию стекла.
Внутренняя поверхность ящика
(если он имеется) может сильно
нагреться
Никогда не используйте паровые
чистящие агрегаты или агрегаты
под высоким давлением для
чистки изделия.
Если на крышку пролита
жидкость, удалите ее перед
тем, как открыть крышку. Не
закрывайте
стеклянную крышку
варочной панели (если она
имеется), если газовые или
электрические конфорки еще
горячие.
ВНИМАНИЕ: Проверьте, чтобы
изделие было выключено, перед
заменой лампочки во избежание
возможных ударов током.
Изделие не рассчитано
на влючение посредством
внешнего синхронизатора
или отдельной системы
дистанционного управления
.
ВНИМАНИЕ: Опасность пожара:
не оставляйте предметов на
варочных поверхностях.
ВНИМАНИЕ: Если
стеклокерамическая
поверхность варочной панели
треснула, выключите ее во
избежание ударов током
.
! При установке решетки
проверить, чтобы фиксатор был
повернут вверх с задней стороны
выемки.
KZKZKZ
ȿɋɄȿɊɌɍȿɋɄȿɊɌɍ
ЕСКЕРТУ: Құрылғы мен оның қол
жететін бөліктері жұмыс кезінде
қызуы мүмкін.
Қыздыру элементтеріне тимеуге
назар аударыңыз.
8-ге толмаған балаларға үздіксіз
бақылау болмаса, құрылғыдан
аулақ ұстау керек.
Бұл құрылғыны қауіпсіз түрде
қолдану бойынша кеңес не нұсқау
берілген жəне ықтимал қауіпқатерлерді түсінетін жағдайда,
оны 8-ге толған балалар мен дене,
сезіну немесе
ой қабілеті төмен
немесе тəжірибесі мен білімі
5

жеткіліксіз адамдар қолдана алады.
Балаларға құрылғымен ойнауға
болмайды. Балаларға бақылаусыз
құрылғыны тазалауға жəне оған
қызмет көрсетуге болмайды.
ЕСКЕРТУ: Плитада майға тамақ
пісірген кезде бақылап тұрмау
қауіпті болуы жəне өрт шығуға
əкелуі мүмкін.
Өртті ЕШҚАШАН сумен өшіруші
болмаңыз, оның орнына құрылғыны
өшіріп, жалынды жабыңыз, мысалы
қақпақпен немесе өртенбейтін
ЕСКЕРТУ: Өрт қаупі
бар: пісіру
матамен.
беттерінде заттарды сақтамаңыз.
ЕСКЕРТУ: Шыны мен керамикадан
жасалған бет шатынаған болса, тоқ
соғу мүмкіндігінің алдын алу үшін
құрылғыны өшіріңіз.
Пеш есігінің шынысын тазалау
үшін қатты ысқыш тазалағыштарды
немесе өткір метал ысқыщтарды
пайдаланбаңыз, себебі олар
шыныны сызып, оның шағылуына
əкелуі мүмкін.
Бөліктің (бар болса) ішкі беттері
қызып кетуі мүмкін.
Құрылғыда ешқашан бу
тазартқышты немесе шаңсорғышты
пайдаланбаңыз.
Қақпақты ашпас бұрын ондағы
сұйықтықты сүртіп алыңыз.
Шыны қақпақты (бар болса) газ
оттықтары немесе электр плиталар
əлі ыстық болған кезде жаппаңыз.
ЕСКЕРТУ: Тоқ соғу мүмкіндігінің
алдын алу үшін шамды
ауыстырмас бұрын құрылғы
өшірілгеніне көз жеткізіңіз.
Тартпаны ішке салған кезде шектегіш
жоғары қарап, қуыстың
артқы
жағында тұрғанына көз жеткізіңіз.
ﻪﺒﺘﻧﺍ :ﻡﺍﺪﺨﺘﺳﻻﺍ ءﺎﻨﺃ ﺍﺪﺟ ﺔﻨﺧﺎﺳ ﺔﺳﻮﻤﻠﻤﻟﺍ ءﺍﺰﺟﺃ ﻊﻴﻤﺟﻭ ﺯﺎﻬﺠﻟﺍ ﺍﺬﻫ ﺢﺒﺼﻳ
ﻦﻴﺨﺴﺘﻟﺍ ﺮﺎﻨﻋ ﺔﺴﻣﻼﻣ ﺐﻨﺠﺗﻭ ﺭﺬﺤﻟﺍ ﻰﺧﻮﺗ ﺐﺠﻳ .
ﻦﺳ ﻦﻣ ﻞﻗﻷﺍ ﺎﻔﻃﻷﺍ ﺩﺎﻌﺑﺑ ﻢﻗ8 ﺓﺮﻤﺘﺴﻤﻟﺍ ﻢﻬﺘﺒﻗﺍﺮﻣ ﺔﻟﺎﺣ ﻲﻓ ﻻ ﺯﺎﻬﺠﻟﺍ ﻦﻋ ﺕﺍﻮﻨﺳ.
ﻦﻜﻤﻳ ﺎﻤﻛ ﺯﺎﻬﺠﻟﺍ ﺍﺬﻫ ﻡﺍﺪﺨﺘﺳﺎﺑ ﺕﺍﻮﻨﺳ
ﺔﻓﺮﻌﻤﻟﺍﻭ ﺓﺮﺒﺨﻟﺍ ﺪﻘﺘﻔﺗ ﺎﺨﺷﺃ ﻞﺒﻗ ﻦﻣ ﻭﺃ ﺓﺩﻭﺪﺤﻣ ﺔﻴﻠﻘﻋ ﺯﺎﻬﺠﻟﺍ ﻡﺍﺪﺨﺘﺳﺎﺑ ﻖﻠﻌﺘﻳ ﺎﻤﻴﻓ ﺍﺪﻴﺟ ﻢﻬﻤﻴﻠﻌﺗ ﻢﺘﻳ ﻭﺃ ﺔﻳﺎﻨﻌﺑ ﻢﻬﺘﺒﻗﺍﺮﻣ ﻢﺘﺗ ﺎﻤﻟﺎﻃ ،ﺯﺎﻬﺠﻟﺎﺑ
ﺯﺎﻬﺠﻟﺍ ﺎﻬﺑ ﺐﺒﺴﺘﻳ ﺪﻗ ﻲﺘﻟﺍ ﺮﻃﺎﺨﻤﻟﺍ ﻊﻴﻤﺠﺑ ﺎﻤﻠﻋ ﻢﻬﺘﻃﺎﺣﺍﻭ ﻢﻬﺘﻣﻼﺳ ﻦﻋ ﻮﺴﻣ ﺺﺨﺷ ﻞﺒﻗ ﻦﻣ ﻪﺴﻔﻧ .ﻢﻬﺒﻋ ﻡﺪﻋ ﻦﻣ ﺪﻛﺘﻠﻟ ﺎﻔﻃﻷﺍ ﺔﺒﻗﺍﺮﻣ ﺐﺠﻳ
ﺐﺒﺴﺘﻳ ﺪﻗ ﺎﻤﻣ ﺢﻄﺳﻷﺍ ﺪﺧ ﻲﻓ ﺐﺒﺴﺘﻳ ﻥﺃ ﻦﻜﻤﻳ ﻴﺣ ﻥﺮﻔﻠﻟ ﻲﺟﺎﺟﺰﻟﺍ ﺎﺒﻟﺍ ﻴﻈﻨﺘﻟ ﺔﻌﻃﺎﻗ ﺔﻴﻧﺪﻌﻣ ﻦﻴﻛﺎﻜﺳ ﻭﺃ ﺔﻄﺷﺎﻛ ﺕﺎﺠﺘﻨﻣ ﻡﺍﺪﺨﺘﺳﺎﺑ ﻢﻘﺗ ﻻ
ﻲﻟﺎﻌﻟﺍ ﻐﻀﻟﺎﺑ ﻭﺃ ﺭﺎﺨﺒﻟﺎﺑ ﻴﻈﻨﺗ ﺕﻻ ﺔﻄﺳﺍﻮﺑ ﺯﺎﻬﺠﻟﺍ ﻴﻈﻨﺘﺑ ﺍﺪﺑﺃ ﻢﻘﺗ ﻻ.
ﺎﻨﺧﺎﺳ.
ﺸﻛ ﺓﺪﺣﻮﺑ ﻖﺗ ﻻﻭ ﻪﺑ ﺎﺨﻟﺍ ﻢﻜﺤﺘﻟﺍ ﺯﺎﻬﺟ ﺔﻄﺳﺍﻮﺑ ﻲﻬﻄﻟﺍ
ﺔﻴﻋﻭﻷﺍ
ﺯﺎﻬﺠﻟﺍ ﻦﻋ ﻞﺼﻔﻨﻣ ﺪﻌﺑ ﻰﻠﻋ ﻦﻣ ﻢﻜﺤﺗ ﻡﺎﻈﻧ ﻭﺃ ﺔﻴﺟﺭﺎﺧ ﻲﻨﻣﺯ ﻢﻜﺤﺗ ﺓﺪﺣﻭ ﺔﻄﺳﺍﻮﺑ ﻪﻠﻴﻐﺸﺗ
ﻲﺋﺎﺑﺮﻬﻜﻟﺍ ﺭﺎﻴﺘﻟﺍ ﺔﻜﺒﺷ ﻦﻋ ﺯﺎﻬﺠﻟﺍ ﻞﺼﻔﺑ ﻢﻗﻭ ﺔﻴﺋﺎﺑﺮﻬﻛ ﻦﻴﺨﺴﺗ ﺮﺎﻨﻋ ﻱﺃﻭ ﺍﺮﺘﺣﻻﺍ ﺕﺍﺪﺣﻭ ﻊﻴﻤﺟ ﺭﻮﻔﻟﺍ ﻰﻠﻋ ءﺎﻔﻃﺑ ﻢﻗ.
ءﺎﻄﻐﻟﺍ ﻖﻠﻐﺗ ﻻ)ﺪﺟﻭ ﺍ ( ﺍﺯﺎﻣ ﻲﺋﺎﺑﺮﻬﻜﻟﺍ ﻮﻠﻟﺍﻭ ﺯﺎﻐﻟﺍ ﺍﺮﺘﺣﺍ ﺕﺍﺪﺣﻭﻭ
ﻪﺤﺘﻓ ﻞﺒﻗ ءﺎﻄﻐﻟﺍ ﻰﻠﻋ ﺓﺩﻮﺟﻮﻣ ﻞﺋﺍﻮﺳ ﻱﺃ ﻦﻣ ﺺﻠﺨﺗ . ﻲﺟﺎﺟﺰﻟﺍ
ﻦﺳ ﻦﻣ ﺮﺒﻛﻷﺍ ﺎﻔﻃﻷﺍ ﻡﻮﻘﻳ ﻥﺃ ﻦﻜﻤﻳ8 ﻭﺃ ﺔﻴﺴﺣ ﻭﺃ ﺔﻳﺪﺴﺟ ﺕﺍﺭﺪﻗ ﻱﻭ ﺎﺨﺷﺃ ﻞﺒﻗ ﻦﻣ ﻪﻣﺍﺪﺨﺘﺳﺍ
ﺎﻌﺘﺷﻼﻟ ﺓﺩﺎﻀﻣ ﺔﻴﻧﺎﻄﺑ ﺔﻄﺳﺍﻮﺑ.
ﺔﻴﻠﺧﺍﺪﻟﺍ ﻑﺮﻟﺍ ﺢﻄﺳﺃ ﺢﺒﺼﺗ ﺪﻗ)ﺪﺟﻭ ﺍ (ﺔﻨﺧﺎﺳ.
ﻲﻜﻴﺗﺎﻣﻮﺗﻭﻷﺍ ﻴﻈﻨﺘﻟﺍ
ﺔﻴﻧﺪﻌﻣ ءﺎﻴﺷﺃ ﻊﻀﺗ ﻻ)ﻟ ،ﺔﻴﻄﻏﺃ ،ﻖﻋﻼﻣ ،ﻦﻴﻛﺎﻜﺳ (ﺔﻨﺧﺎﺳ ﺢﺒﺼﺗ ﺪﻗ ﺎﻬﻧﻷ ﺪﻗﻮﻤﻟﺍ ﺢﻄﺳ ﻰﻠﻋ.
ﺪﻗﻮﻣ ءﺎﻔﻃﺑ ﻢﻗ ،ﻡﺍﺪﺨﺘﺳﻻﺍ ﺪﻌﺑ.
ﺢﻄﺳﺃ
ﻢﺘﻴﻟ ﺺﺼﺨﻣ ﺮﻴﻏ ﺯﺎﻬﺠﻟﺍ ﻥ .
A R
ﺯﺎﻬﺠﻟﺎﺑ .ﻨﺘﻟﺍ ﺕﺎﻴﻠﻤﻌﺑ ﺎﻔﻃﻷﺍ ﻡﻮﻘﻳ ﻥﺃ ﺐﺠﻳ ﻻﺔﺒﻗﺍﺮﻤﻟﺍ ﺖﺤﺗ ﻻ ﺯﺎﻬﺠﻟﺍ ﺔﻧﺎﻴﻭ ﻴﻈ.
:ﻖﺋﺍﺮﺣ ﻭﺪﺣ ﻲﻓ ﺐﺒﺴﺘﻳ ﺪﻗ ﺎﻤﻛ ﺮﻄﺧ ﺭﺪﺼﻣ ﻥﻮﻜﻳ ﺪﻗ ﻪﻧﺃ ﻴﺣ ﺔﺒﻗﺍﺮﻣ ﻥﻭﺩ ﺕﻮﻳﺯﻭ ﻢﺤﺷ ﺪﻗﻮﻤﻟﺎﺑ ﺮﺗ ﻥ.
ﺐﺠﻳ ﻻﺍﺪﺑﺃ
ﺔﻠﻌﺷ ءﺎﻔﻃ ﺔﻟﻭﺎﺤﻣ/ ﺔﻴﻄﻐﺗﻭ ﺯﺎﻬﺠﻟﺍ ءﺎﻔﻃﺑ ﻡﻮﻘﺗ ﻥﺃ ﺐﺠﻳ ﻞﺑ ،ءﺎﻤﻟﺍ ﺔﻄﺳﺍﻮﺑ ﻖﻳﺮﺣ ﻭﺃ ءﺎﻄﻏ ﺔﻄﺳﺍﻮﺑ ﺎﻤﻟﺍ ﻞﻴﺒﺳ ﻰﻠﻋ ﺔﻠﻌﺸﻟﺍ
ﻖﺋﺍﺮﺣ ﻭﺪﺣ ﺮﻄﺧ :ﻪﻄﻟﺍ ﺢﻄﺳﺃ ﻰﻠﻋ ءﺎﻴﺷﺃ ﺮﺘﺗ ﻻ
ﻲﻜﻴﻣﺍﺮﻴﺴﻟﺍ ﻲﺟﺎﺟﺰﻟﺍ ﺢﻄﺴﻟﺍ ﺥﺮﺷ ﺍ .ﺔﻴﺋﺎﺑﺮﻬﻛ ﺕﺎﻘﻌ ﻭﺪﺣ ﺐﻨﺠﺘﻟ ﺯﺎﻬﺠﻟﺍ ءﺎﻔﻃﺑ ﻢﻗ.
ﺝﺎﺟﺰﻟﺍ ﺮﺴﻛ ﻲﻓ.
ﺔﻴﻠﻤﻋ ءﺎﻨﺃﺔﻳﺎﻐﻠﻟ ﺔﻨﺧﺎﺳ ﺢﻄﺳﻷﺍ ﺢﺒﺼﺗ ﺪﻗ :ﺯﺎﻬﺠﻟﺍ ﻦﻋ ﺎﻔﻃﻷﺍ ﺩﺎﻌﺑﺑ ﻢﻗ.
ﻪﺒﺘﻧﺍ: ﺯﺎﻬﺠﻟﺍ ﻥﺃ ﻦﻣ ﺪﻛﺗ ﺔﻴﺋﺎﺑﺮﻬﻛ ﺕﺎﻘﻌ ﻭﺪﺣ ﺔﻴﻟﺎﻤﺘﺣﺍ ﺐﻨﺠﺘﺗ ﻰﺘﺣ ﺔﺒﻤﻠﻟﺍ ﺮﻴﻴﻐﺘﺑ ﻡﻮﻘﺗ ﻥﺃ ﻞﺒﻗ ﻔﻄﻣ.
ﻪﺒﺘﻧﺍ :ﻖﺋﺍﺮﺣ ﻭﺪﺣ ﻰﻟ ﺪﻗﻮﻤﻟﺍ ﺢﻄﺳ ﺔﻳﺎﻗﻭ ﺕﺍﺪﺣﻮﻟ ﺢﻴﺤﺼﻟﺍ ﺮﻴﻏ ﻡﺍﺪﺨﺘﺳﻻﺍ ﻱﺩﻳ ﺪﻗ .
ﻪﺒﺘﻧﺍ: ﻲﺟﺎﺟﺰﻟﺍ ﺢﻄﺴﻟﺍ ﻠﺗ ﺔﻟﺎﺣ ﻲﻓ:
ﻪﺒﺘﻧﺍ
ﻪﺒﺘﻧﺍ:
ﻪﺒﺘﻧﺍ:
6
1
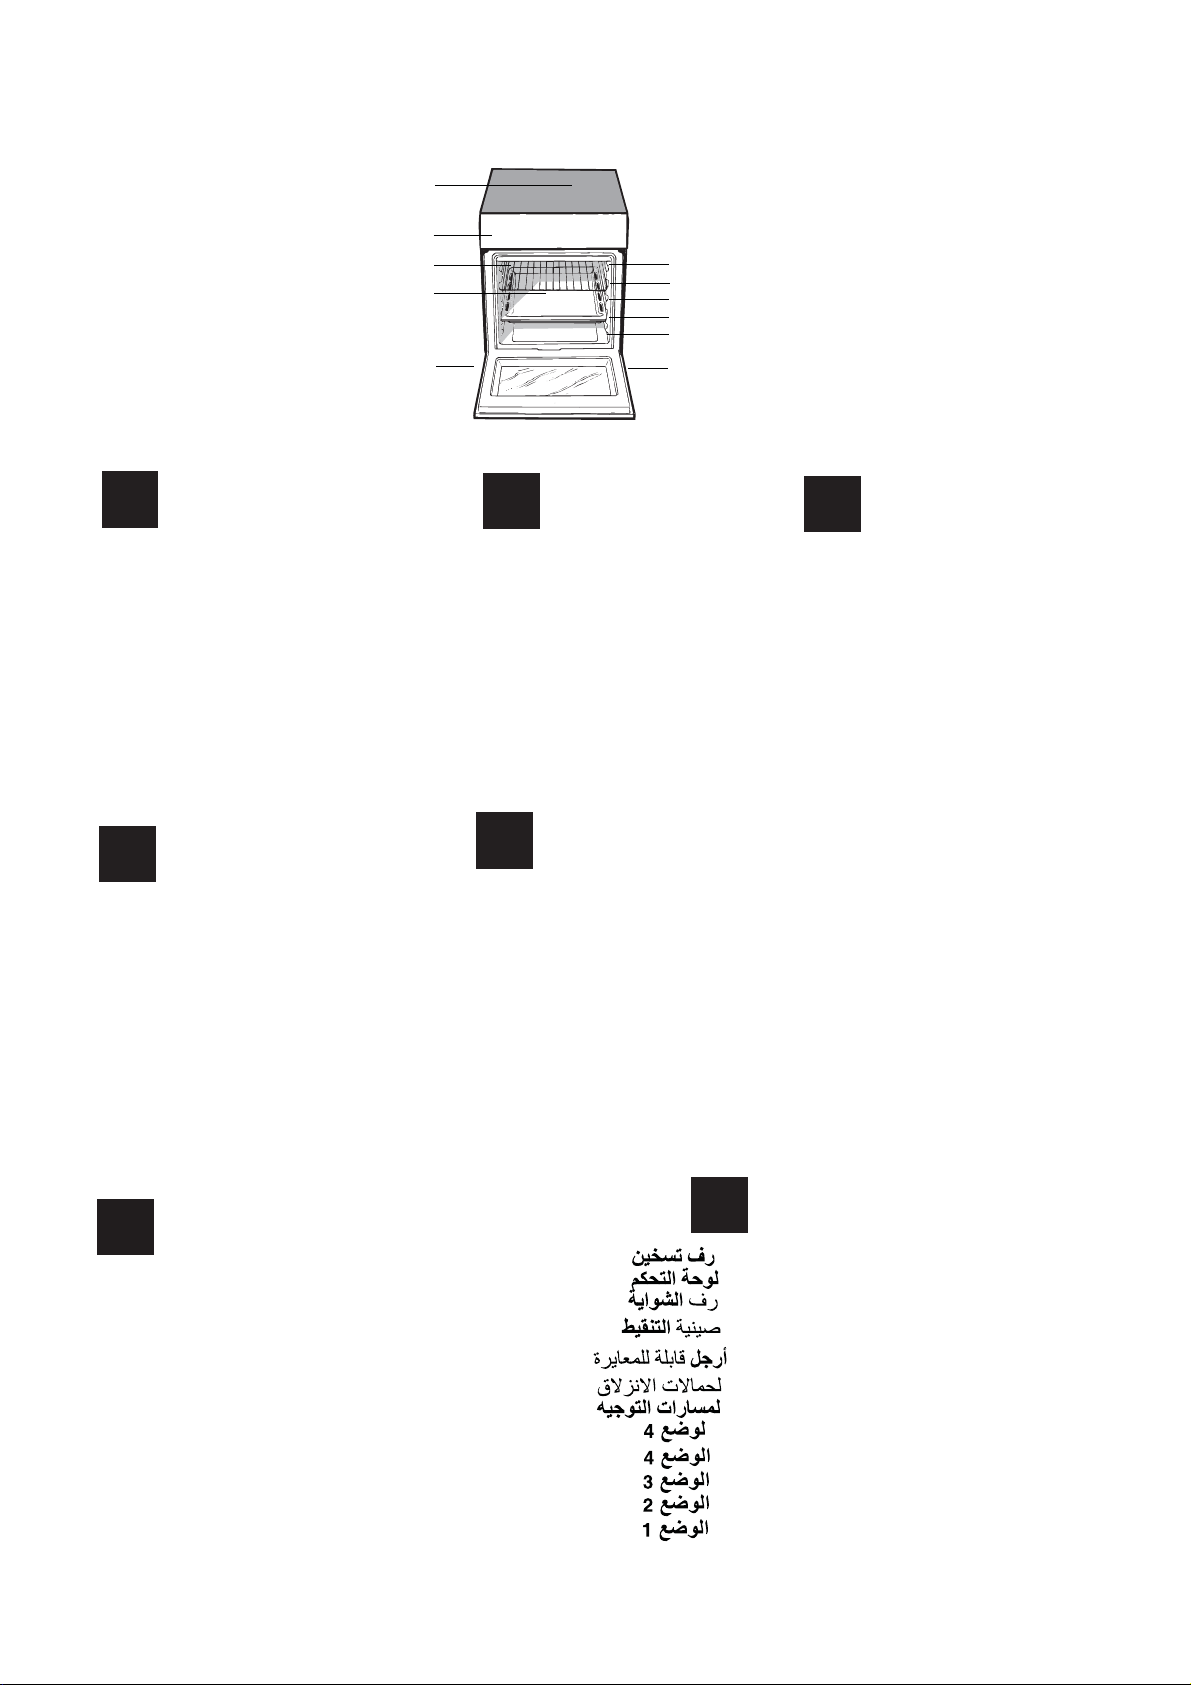
GB
1.Glass ceramic hob
2.Control panel
3.Sliding grill rack
4.DRIPPING pan
5.Adjustable foot
6.GUIDE RAILS for the racks
7.position 5
8.position 4
9.position 3
10.position 2
11.position 1
PT
1. Plano de vitrocerâmica
2. Painel de comandos
3. Prateleira GRADE
4. Prateleira BANDEJA PINGADEIRA
5. Pé de regulação
6. GUIAS de deslizamento
7.Posição 5
8. Posição 4
9. Posição 3
10. Posição 2
11. Posição 1
KZ
1.
2.
3.
4.
5.
6.
7.
8.
9.
10.
11.
Description
Overall view
Descriçao
Vista de conjunto
Ԕԝɪɵɥԑɵ
ɀɚɥɩɵɲɨɥɭ
Шыны
Басқару тақтасы
ГРИЛЬ
ТҰТҚАЛЫ ТАБА
Реттелетін аяқ
РеттелетінРеттелетін
БАҒЫТТАУШЫ ЖОЛДАР
5-позиция
4-позиция
3-позиция
2-позиция
1-позиция
керамикалық плита
ɫɢɩɚɬɬɚɦɚɫɵ
2
3
4
6
7
8
9
10
11
5
Description
FR
Vue d’ensemble
1. Table de cuisson céramique
2. Tableau de bord
3. Support GRILLE
4. Support LECHEFRITE
5.Pied de réglage
6. GLISSIERES de coulissement
7. niveau 5
8. niveau 4
9. niveau 3
10. niveau 2
11. niveau 1
Ɉɩɢɫɚɧɢɟ ɢɡɞɟɥɢɹ
Ɉɩɢɫɚɧɢɟ ɢɡɞɟɥɢɹ
Ɉɩɢɫɚɧɢɟ ɢɡɞɟɥɢɹ
RU
Ɉɛɳɢɣ ɜɢɞ
Ɉɛɳɢɣ ɜɢɞ
Ɉɛɳɢɣ ɜɢɞ
ɋɬɟɤɥɨɤɟɪɚɦɢɱɟɫɤɚɹ
1
ɩɨɜɟɪɯɧɨɫɬɶ
2 ɉɚɧɟɥɶ
3 Ɋɟɝɭɥɢɪɭɟɦɵɟ ɧɨɠɤɢ
4 ȼɚɪɨɱɧɚɹ
ɞɥɹ
5 Ɋɟɲɟɬɤɚ
HAɉPABɅəɘɓɂE ɞɥɹ
6
ɩɪɨɬɢɜɟɧɟɣ ɪɟɲɟɬɨɤ
7 ɉɨɥɨɠɟɧɢɟ
8 ɉɨɥɨɠɟɧɢɟ
9 ɉɨɥɨɠɟɧɢɟ
10 ɉɨɥɨɠɟɧɢɟ
11 ɉɨɥɨɠɟɧɢɟ
ɭɩɪɚɜɥɟɧɢɹ
ɩɚɧɟɥɶ ɫ ɛɨɪɬɢɤɚɦɢ
ɫɛɨɪɚ ɜɨɡɦɨɠɧɵɯ ɭɬɟɱɟɤ
ɞɭɯɨɜɤɢ
5
4
3
2
1
5
ES
1.ENCIMERA DE VITROCERÁMICA
2 Panel de mandos
3 Rejilla estante del horno
4 Asadera o plano de cocción
5 Patitas regulables
6. GUÍAS de deslizamiento
7.
8.
9.
10.
11.
Descripción
Vista de conjunto
POSICIÓN
5
POSICIÓN
POSICIÓN 3
POSICIÓN
POSICIÓN 1
4
2
A R
1.
2.
3.
4.
5.
6.
7.
8.
9.
10.
11.
7
GB
6
1
2
5
3
4
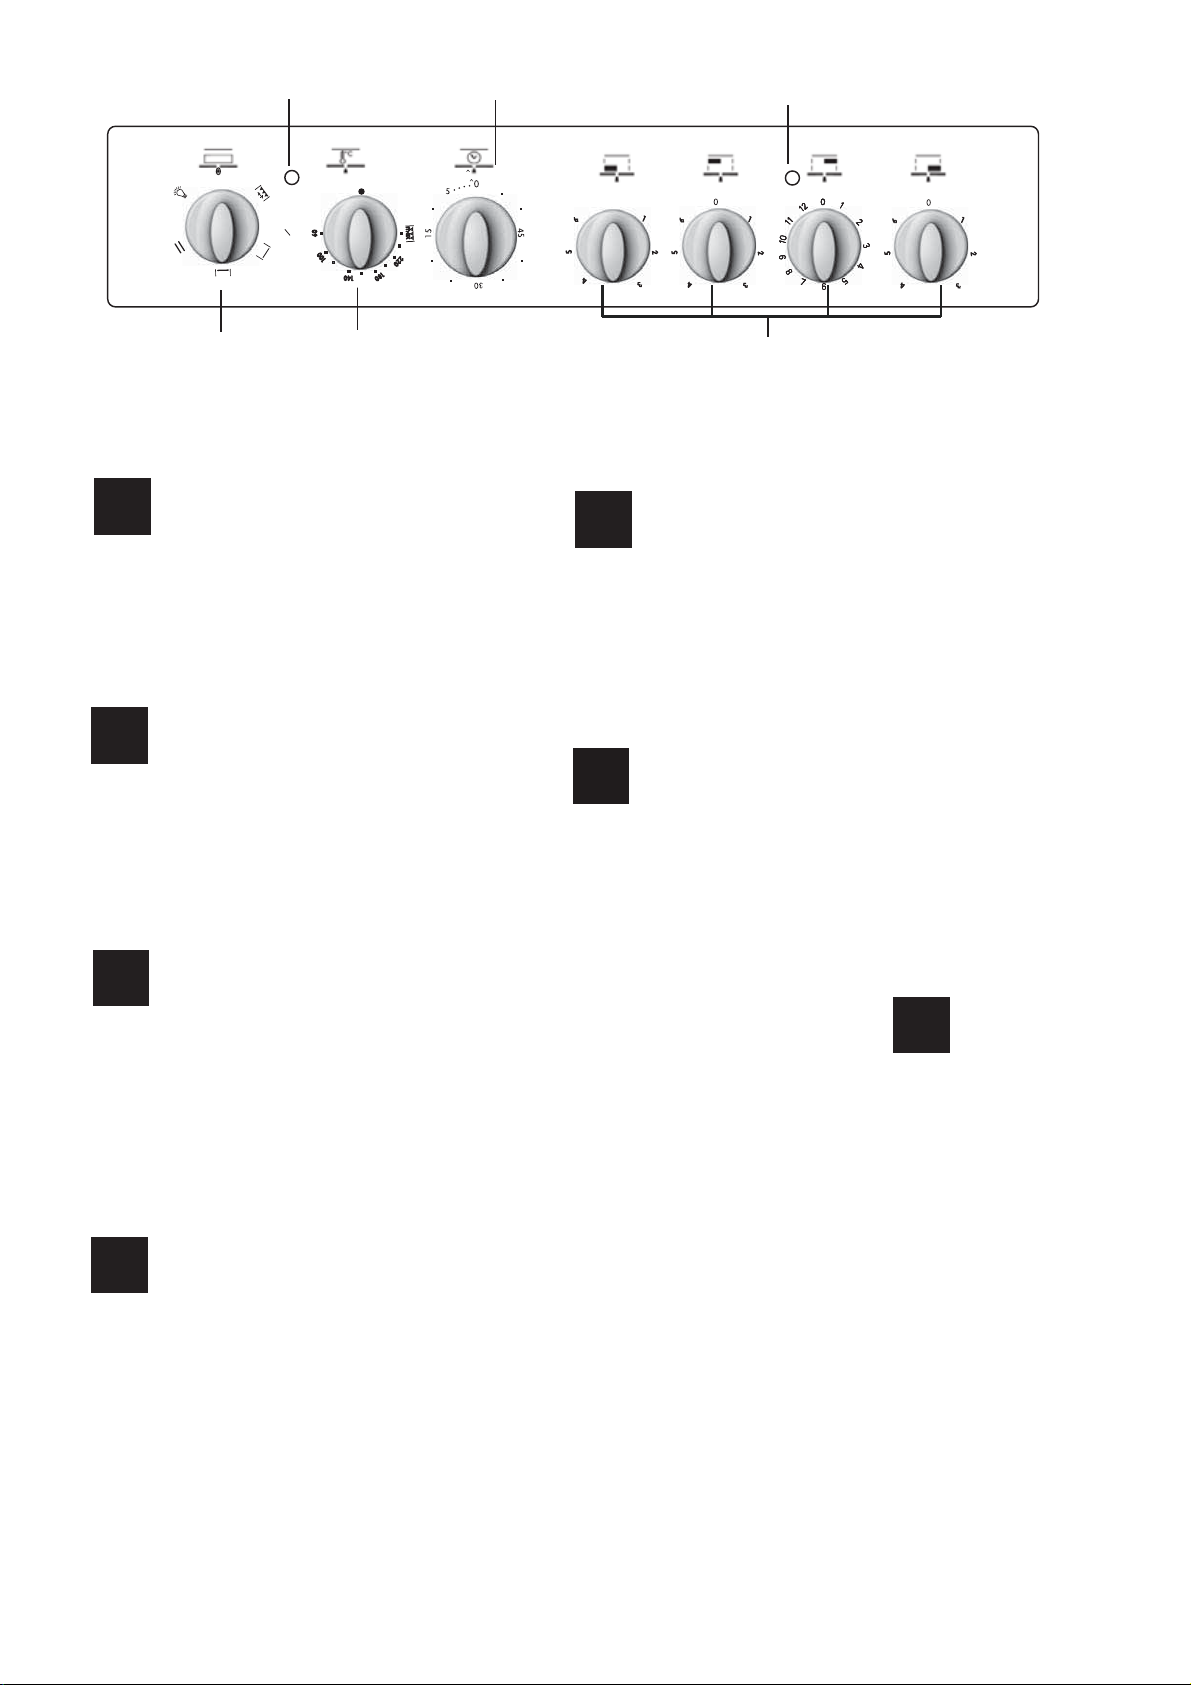
1.SELECTOR knob
2.THERMOSTAT knob
3.Electric HOTPLATE control knob
4.THERMOSTAT indicator light
5.TIMER knob
6.ELECTRIC HOTPLATE indicator ligh
FR
1.Manette PROGRAMMES
2.Manette du THERMOSTAT
3.Manette de la plaque électrique
4.Voyant lumineux thermostat
5.Manette du MINUTEUR
6.Voyant de fonctionnement de la plaque électrique
ES
1.Perilla PROGRAMAS
2.Perilla del termóstato
3.Las perillas de mando de las placas eléctricas de la
encimera
4.La luz piloto del termóstato del horno
5.El contador de minutos
6.Luz indicadora de funcionamiento de las placas
eléctricas
PT
1.Botão selector das funções de cozedura
2.Selector para a temperatura de cozedura (termostato)
3.Botões de comando das chapas eléctricas
4.Indicador de funcionamento termostato
5.Manípulo conta-minutos
6.Indicador de funcionamento chapas
Description of the appliance
Control panel
Description de l’appareil
Tableau de bord
Descripción del aparato
Panel de control
Descrição do aparelho
Painel de comandos
Ɉɩɢɫɚɧɢɟ ɢɡɞɟɥɢɹ
Ɉɩɢɫɚɧɢɟ ɢɡɞɟɥɢɹ
RU
ɉɚɧɟɥɶ ɭɩɪɚɜɥɟɧɢɹ
ɉɚɧɟɥɶ ɭɩɪɚɜɥɟɧɢɹ
1.Ɋɭɤɨɹɬɤɚ ɜɵɛɨɪɚ ɬɟɦɩɟɪɚɬɭɪɵ
2.Ɍɚɣɦɟɪ
Рукоятка управления
3.
4.ɋɜɟɬɨɜɨɣ ɢɧɞɢɤɚɬɨɪ ɬɟɪɦɨɫɬɚɬɚ ɞɭɯɨɜɨɝɨ ɲɤɚɮɚ
5.Ɋɭɤɨɹɬɤɚ ɜɵɛɨɪɚ ɮɭɧɤɰɢɣ ɞɭɯɨɜɨɝɨ ɲɤɚɮɚ
6.ɋɜɟɬɨɜɨɣ ɢɧɞɢɤɚɬɨɪ ɮɭɧɤɰɢɨɧɢɪɨɜɚɧɢɹ
ɷɥɟɤɬɪɢɱɟɫɤɢɯ ɤɨɧɮɨɪɨɤ
KZ
Термостат
1.
Таймер тұтқасы
2.
Жылумен пісіру
3.
Пештің істеп тұрғанын
4.
Таңдау
5.
6.
Электр конфорка
Ԕԝɪɵɥԑɵ
Ȼɚɫԕɚɪɭ ɬɚԕɬɚɫɵ
тұтқасы
тұтқасы
электроконфорками
ɫɢɩɚɬɬɚɦɚɫɵ
конфорка тұтқалары
білдіретін шам
шамы
ﺮﺷﺆﻣ ءﻮﺿ
ﺔﻄﺸﻨﻟﺍ ﻦﻴﺨﺴﺘﻟﺍ ﺔﺤﻴﻔﺻ
A R
ﺡﺎﺘﻔﻣ
ﺭﺎﻴﺘﺧﻻﺍ
ﺡﺎﺘﻔﻣ
ﺕﺎﺘﺳﻮﻣﺮﺜﻟﺍ
ﻢﻜﺤﺘﻟﺍ ﺢﻴﺗﺎﻔﻣ
ﻦﻴﺨﺴﺘﻟﺍ ﺢﺋﺎﻔﺼﺑ
ﺮﺷﺆﻣ ءﻮﺿ
ﺕﺎﺘﺳﻮﻣﺮﺜﻟﺍ
ﺡﺎﺘﻔﻣ
ﺖﻴﻗﻮﺘﻟﺍ ﺔﻋﺎﺳ
1.
2.
3.
4.
5.
6.
8
Installation
! Before operating your new appliance please read
this instruction booklet carefully. It contains important
information concerning the safe installation and
operation of the appliance.
! Please keep these operating instructions for future
reference. Make sure that the instructions are kept with
the appliance if it is sold, given away or moved.
! The appliance must be installed by a qualified
professional in accordance with the instructions
provided.
! Any necessary adjustment or maintenance must be
performed after the cooker has been disconnected
from the electricity supply.
Positioning and levelling
! It is possible to install the appliance alongside
cupboards whose height does not exceed that of the
hob surface.
! Make sure that the wall in contact with the back of
the appliance is made from a non-flammable, heatresistant material (T 90°C).
To install the appliance correctly:
• Place it in the kitchen, the dining room or the bed-sit
(not in the bathroom).
• If the top of the hob is higher than the cupboards,
the appliance must be installed at least 600 mm away
from them.
• If the cooker is
HOOD
Min. mm.
600
mm.
420
Min.
420
Min. mm.
• Do not position blinds behind the cooker or less than
200 mm away from its sides.
• Any hoods must be installed according to the
instructions listed in the relevant operating manual.
installed underneath a
wall cabinet, there must
be a minimum distance
of 420 mm between this
mm. with hood
mm. without hood
cabinet and the top of
650
700
min.
the hob.
min.
This distance should be
increased to 700 mm
if the wall cabinets are
flammable (see gure).
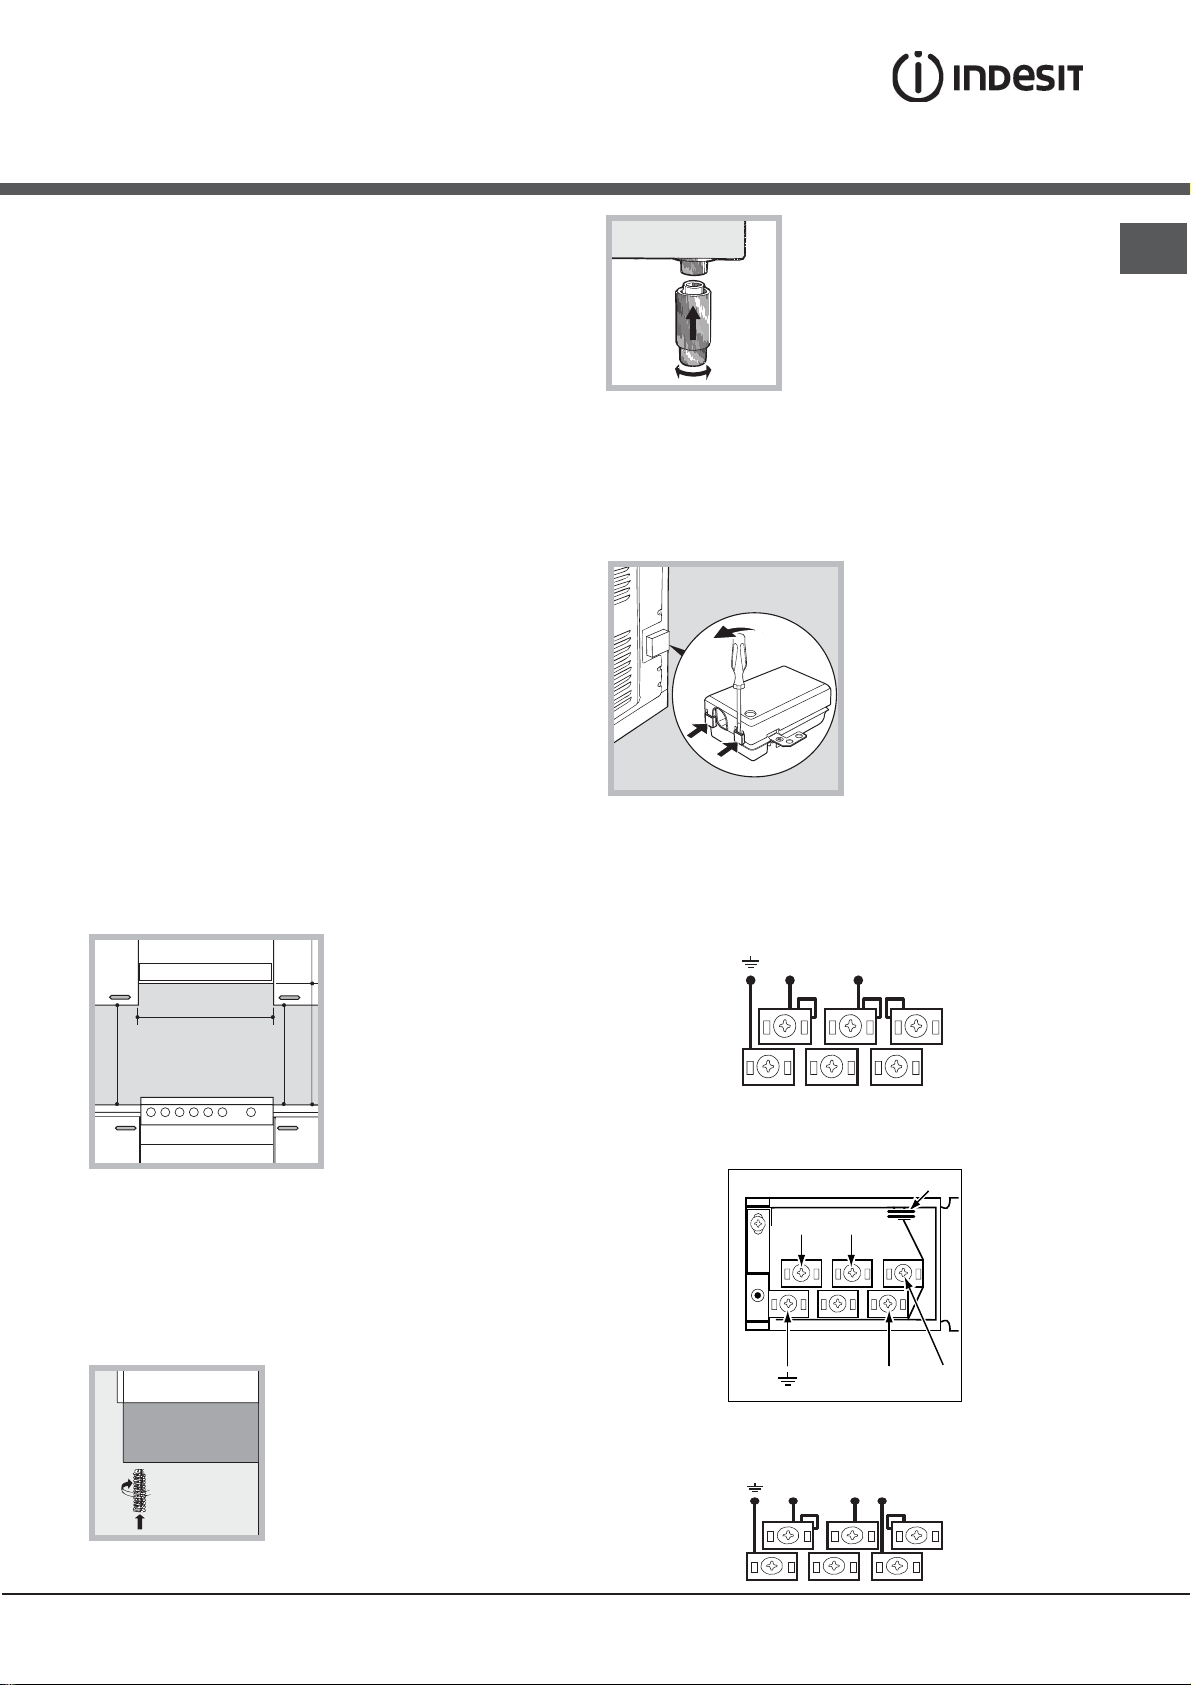
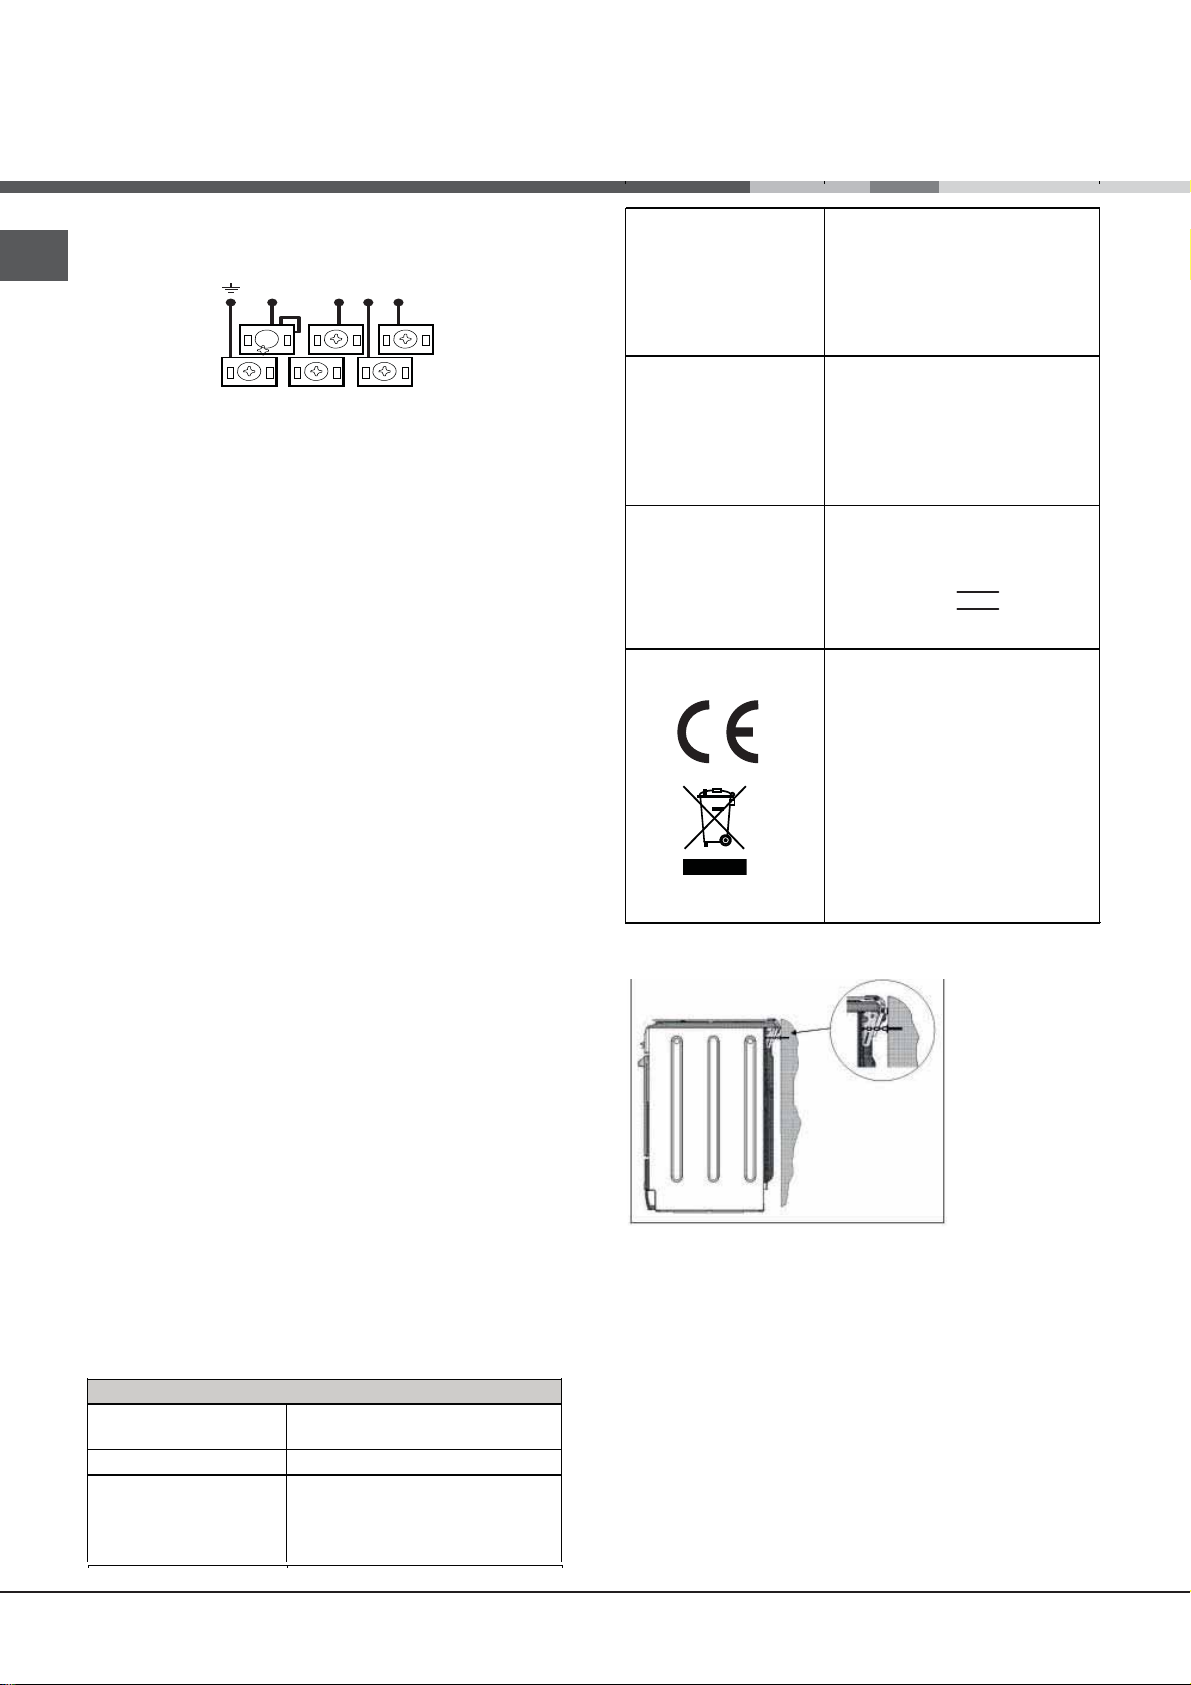
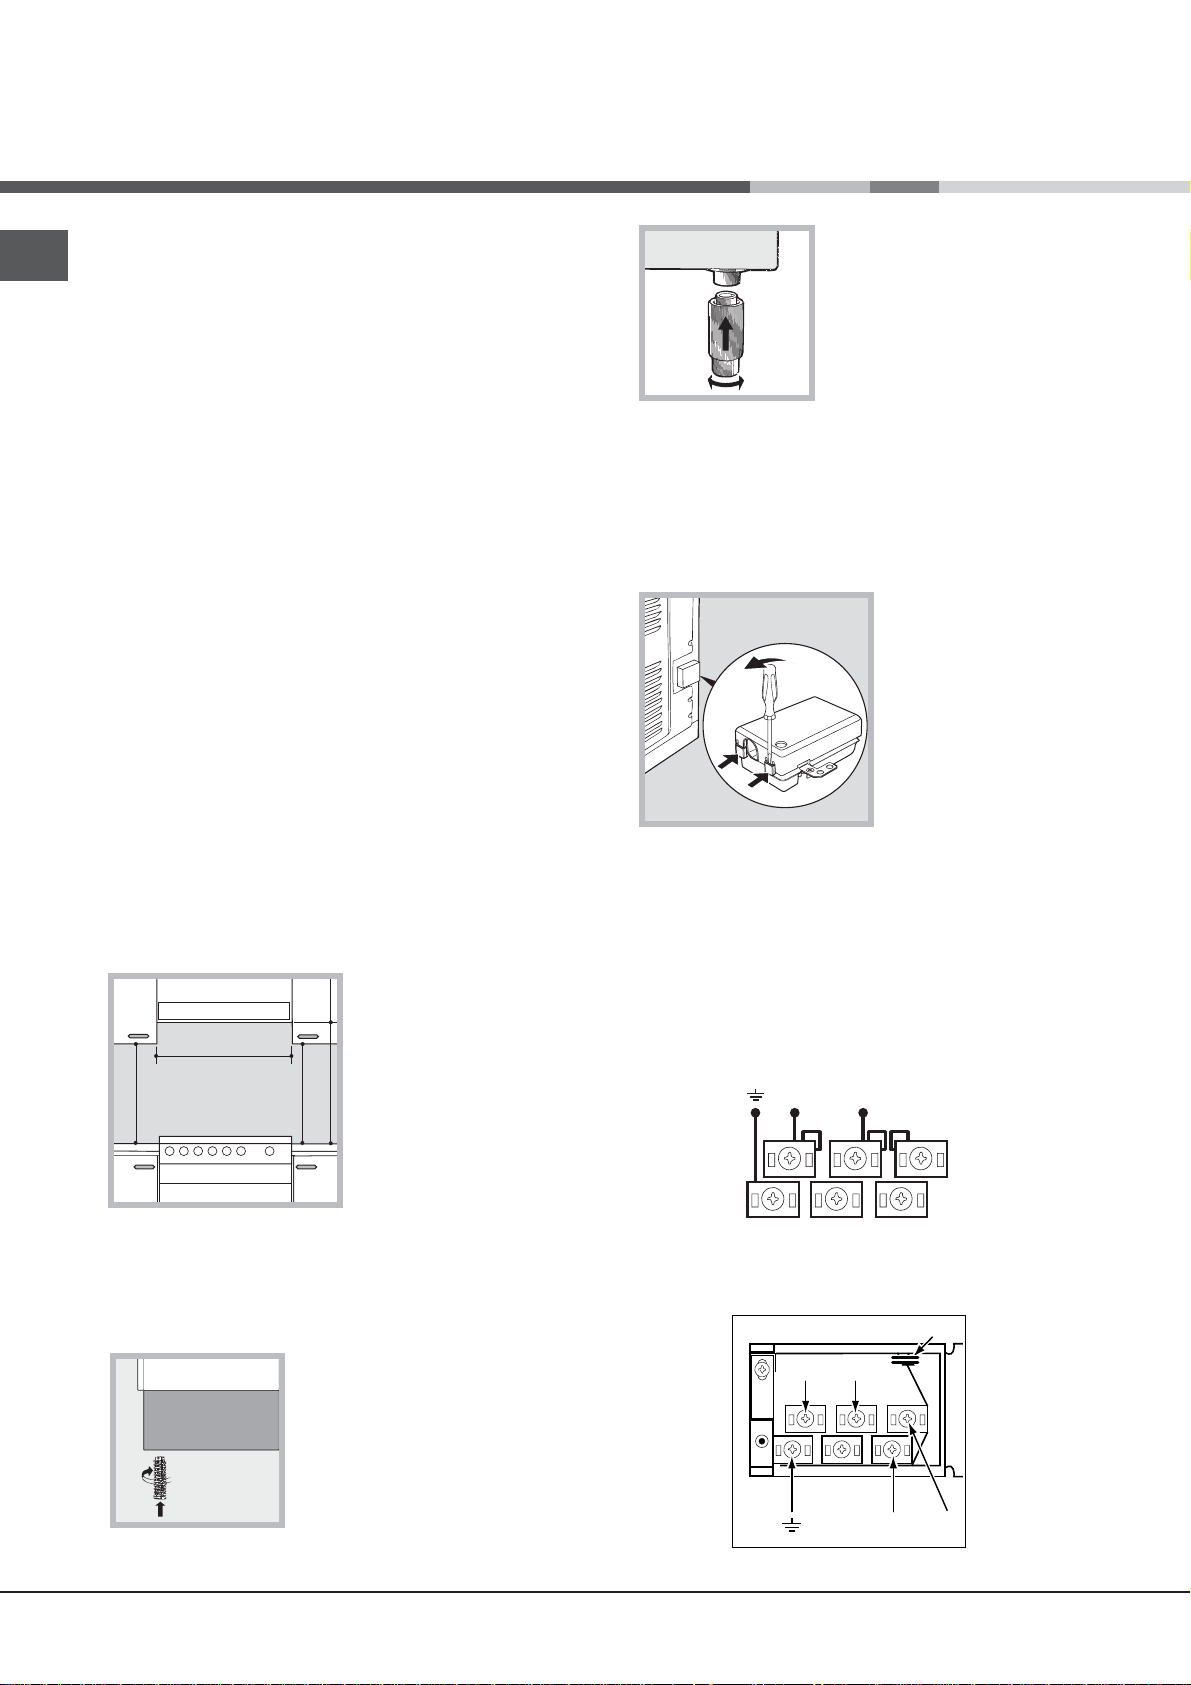
Electrical connection
Fitting the power supply
To open the terminal board:
• Insert a screwdriver into the side tabs of the terminal
board cover.
• Pull the cover to open it.
! The jumpers are pre-set at the Factory for 230 V
single-phase connection (see gure).
230V ~
H05RR-F 3x4 CEI-UNEL 35363
H05VV-F 3x4 CEI-UNEL 35746
• To carry out the electrical connections as shown in
the figures, use the two jumpers inside the box (see
gure - labelled “P”).
cable
To install the cable,
follow the instructions
below:
• Loosen the cable
clamp screw and the
wire contact screws.
NL
5
3
4
1
2
P
NL2L1
GB
Levelling
If it is necessary to level the appliance, screw the
adjustable feet into the places
provided on each corner of the
base of the cooker (see gure).
The legs* fit into the slots on the
underside of the base of the
cooker.
* Only available in certain models.
L3
400V 2N~
H05RR-F 4x4 CEI-UNEL 35363
H05VV-F 4x4 CEI-UNEL 35746
NL2L1
5
3
4
1
2
9
GB
H05RR-F 5x2.5 CEI-UNEL 35363
H05VV-F 5x2.5 CEI-UNEL 35746
400V 3N~
NL3L1L2
5
3
4
1
2
• Secure the power supply cable by fastening the
cable clamp screw then put the cover back on.
Connecting the supply cable to the electricity mains
Install a standardised plug corresponding to the load
indicated on the appliance data plate (see Technical
data table).
The appliance must be directly connected to the mains
using an omnipolar switch with a minimum contact
opening of 3 mm installed between the appliance and
the mains. The switch must be suitable for the charge
indicated and must comply with current electrical
regulations (the earthing wire must not be interrupted
by the switch). The supply cable must be positioned
so that it does not come into contact with temperatures
higher than 50°C at any point.
Before connecting the appliance to the power supply,
make sure that:
• The appliance is earthed and the plug is compliant with
the law.
• The socket can withstand the maximum power of the
appliance, which is indicated by the data plate.
• The voltage is in the range between the values
indicated on the data plate.
• The socket is compatible with the plug of the
appliance. If the socket is incompatible with the
plug, ask an authorised technician to replace it. Do
not use extension cords or multiple sockets.
! Once the appliance has been installed, the power
supply cable and the electrical socket must be easily
accessible.
! The cable must not be bent or compressed.
! The cable must be checked regularly and replaced
by authorised technicians only.
! The manufacturer declines any liability should
these safety measures not be observed.
We recommend cleaning the oven before using it for
the first time, following the instructions provided in the
„Care and maintenance” section.
TABLE OF CHARACTERISTICS
Oven dimensions
(HxWxD)
Volume
Useful
measurements
relating to the oven
compartment
32x43.5x39,5 cm
65 l
width 46cm
depth 42 cm
height 8.5 cm
see data plate
Data plate, is located inside
Voltage and
frequency
the flap or, after the oven
compartment has been
opened, on the left-hand wall
inside the oven.
Ceramic hob
Front Left
Back Left
Back Right
Front Right
Max. ceramic hob
consumption
ENERGY LABEL
This appliance conforms to the
1700 W
1200 W
2300 W
1200 W
6400 W
Directive 2002/40/EC on the
label of electric ovens.
Standard EN 50304
Natural convection energy
consumption
heating mode: Static
following European Economic
Community directives:
2006/95/EC dated 12/12/06
(Low Voltage) and subsequent
amendments - 2004/108/EC
dated 15/12/04
(Electromagnetic Compatibility)
and subsequent amendments 93/68/EEC dated 22/07/93 and
subsequent amendments.
2002/96/EC
1275/2008 (Stand-by/Off mode)
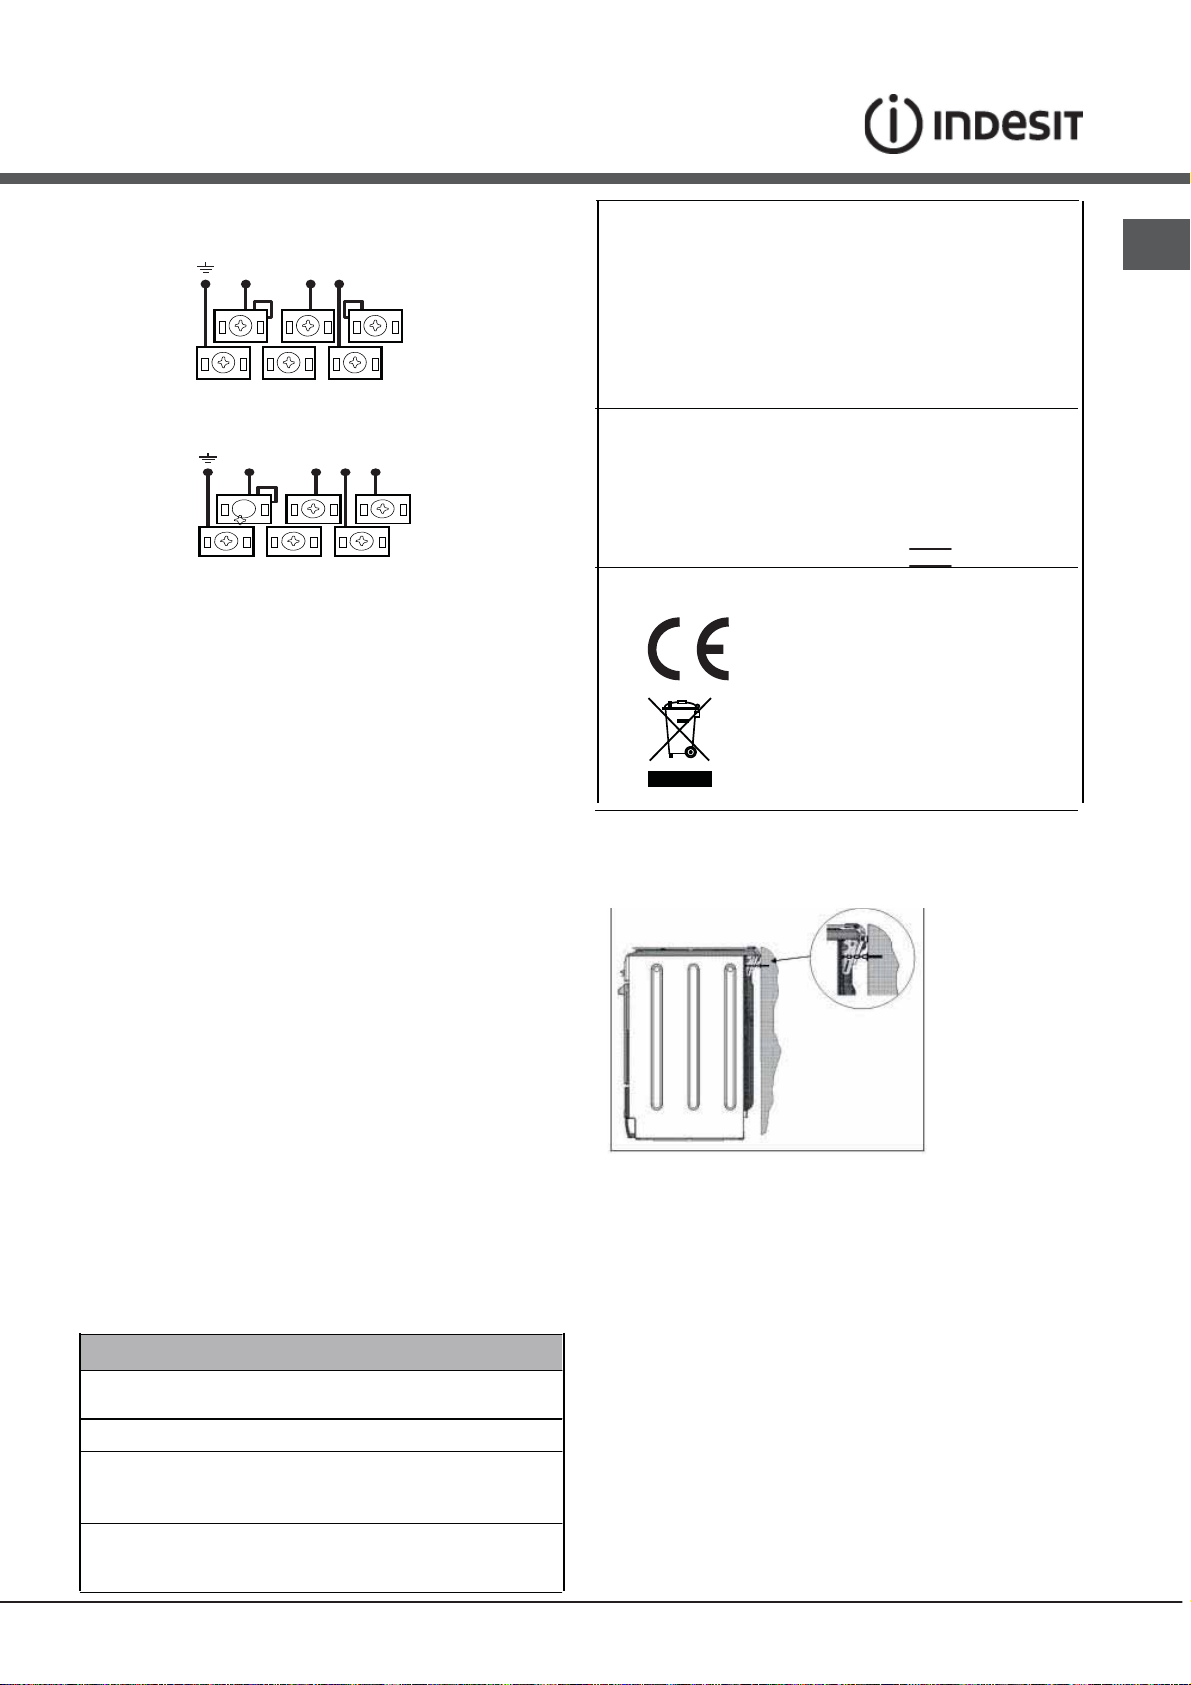
Safety Chain
! In order
to prevent
accidental
tipping of the
appliance, for
example by
a child climbing onto the
oven door, the
supplied safety
chain MUST be
installed!
The cooker is fitted with a safety chain to be fixed by
means of a screw (not supplied with the cooker) to
the wall behind the appliance, at the same height as
the chain is attached to the appliance.
Choose the screw and the screw anchor according
to the type of material of the wall behind the appliance. If the head of the screw has a diameter smaller
than 9mm, a washer should be used. Concrete wall
requires the screw of at least 8mm of diameter, and
60mm of length.
Ensure that the chain is fixed to the rear wall of the
cooker and to the wall, as shown in figure, so that
after installation it is tensioned and parallel to the
ground level.
10

Start-up and use
Using the oven
! The first time you use your appliance, heat the empty
oven with its door closed at its maximum temperature
for at least half an hour. Ensure that the room is well
ventilated before switching the oven off and opening
the oven door. The appliance may emit a slightly
unpleasant odour caused by protective substances
used during the manufacturing process burning away.
! Before operating the product, remove all plastic film
from the sides of the appliance.
1. Select the desired cooking mode by turning the
SELECTOR knob.
2. Select the recommended temperature for the
cooking mode or the desired temperature by turning
the THERMOSTAT knob.
A list detailing cooking modes and suggested cooking
temperatures can be found in the relevant table (see
Oven cooking advice table).
During cooking it is always possible to:
• Change the cooking mode by turning the
SELECTOR knob.
• Change the temperature by turning the
THERMOSTAT knob.
• Set the total cooking time and the cooking end time
(see below).
• Stop cooking by turning the SELECTOR knob to the
“0” position.
! Never put objects directly on the bottom of the oven;
this will avoid the enamel coating being damaged.
Only use position 1 in the oven when cooking with the
rotisserie spit.
! Always place cookware on the rack(s) provided.
Cooking Modes
Convection Mode
Position of thermostat knob between 60°C and Max.
On this setting, the top and bottom heating elements
come on. This is the classic, traditional type of oven
which has been perfected, with exceptional heat
distribution and reduced energy consumption. The
convection oven is still unequalled when it comes to
cooking dishes made up of several ingredients, e.g.
cabbage with ribs, Spanish style cod, Ancona style
stockfish, tender veal strips with rice, etc. Excellent
results are achieved when preparing veal or beefbased dishes as well (braised meats, stew, goulash,
wild game, ham etc.) which need to cook slowly and
require basting or the addition of liquid. It nonetheless
remains the best system for baking cakes as well as
fruit and cooking using covered casserole dishes
for oven baking. When cooking in convection mode,
only use one dripping pan or cooking rack at a time,
otherwise the heat distribution will be uneven. Using
the different rack heights available, you can balance
the amount of heat between the top and the bottom of
the oven. Select from among the various rack heights
based on whether the dish needs more or less heat
from the top.
Pastry Mode
Position of thermostat kno: Between 60°C and Max.
The bottom heating element comes on.
This mode is ideal for baking and cooking delicate
foods - especially cakes that need to rise because
the heat coming from the bottom helps the leavening
process.
Please note that it takes a considerable amount of time
for the higher temperatures to be reached, therefore
we recommend you use the “Convection Mode” in
these cases.
“Top” Oven
Position of thermostat knob: Between 60°C and Max.
The top heating element comes on.
This mode can be used to brown food at the end of
cooking.
Grill
Position of thermostat knob: Max
The top central heating element comes on.
The extremely high and direct temperature of the grill
makes it possible to brown the surface of meats and
roasts while locking in the juices to keep them tender.
The grill is also highly recommended for dishes that
require a high temperature on the surface: beef steaks,
veal, rib steak, filets, hamburgers etc...
Some grilling examples are included in the “Practical
Cooking Advice” paragraph.
The oven light
Set knob to the
oven and stays on when any of the electrical heating
elements in the oven come on.
Thermostat Light
Thermostat Light Thermostat Light Thermostat Light
This light indicates that the oven is heating. When it
turns off, the temperature inside the oven has reached
the setting made with the thermostat knob. At this
point, the light will turn on and off as the oven maintains
the temperature at a constant level.
symbol to turn it on. It lights the
* Only available in certain models.
GB
11
GB
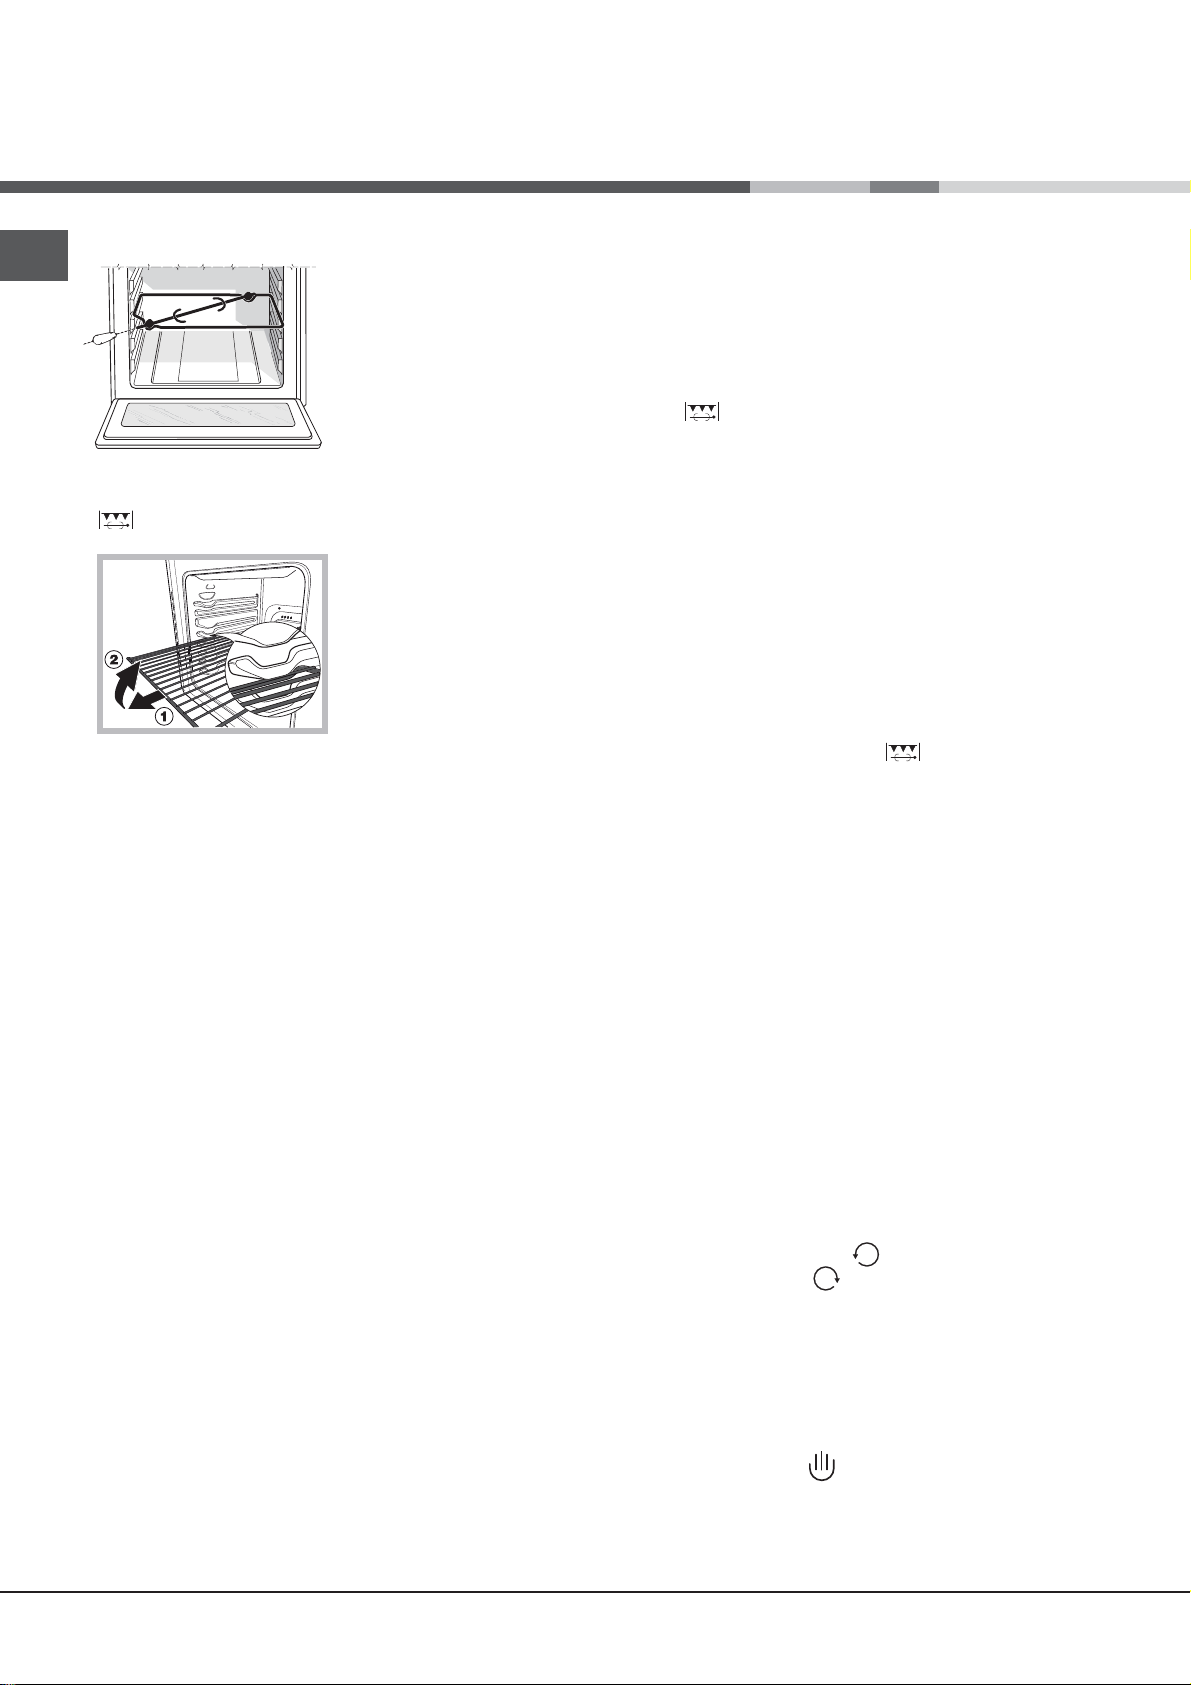
The turnspit *
To start the turnspit,
proceed as follows:
a) place the oven
tray on the 1st rack;
b) insert the special
turnspit support on the
3rd rack and position
the spit by inserting
it through the special
hole into the turnspit at the back of the oven;
c) start the turnspit using knob “L” to select setting
.
WARNING! The oven is
provided with a stop system to extract the racks
and prevent them from
coming out of the oven.(1)
As shown in the drawing,
to extract them completely, simply lift the racks,
holding them on the front
part, and pull (2).
Practical Cooking Advice
When cooking in the oven, use only one dripping pan or
rack at a time. Select from among the top or bottom rack
heights based on whether the dish needs more or less
heat from the top.
Preheating
If the oven must be preheated (this is generally the case
when cooking leavened foods), we recommend you use
the “convection mode” to reach the desired temperature
as quickly as possible. When preheating is over, which
is indicated by the red light “E” going out, select the
required cooking mode.
Baking Cakes
When baking cakes, always preheat the oven and do not
open the oven door during baking to prevent the cake
from dropping.
Using the Grill
Use the
centre of the grill (situated on the 3rd or 4th rack form
the bottom) because only the central part of the top
heating element is turned on.
Use the bottom rack (1st from the bottom), placing
the dripping pan provided to collect any sauce and/
or grease and prevent the same from dripping onto
the oven bottom.
When using this mode, we recommend you set
the thermostat to the highest setting. However,
this does not mean you cannot use lower
temperatures, simply by adjusting the thermostat
knob to the desired temperature.
In models fitted with a rotisserie
the spit kit provided when using the “grill” mode.
In this case, cook with the oven door shut, placing
the spit kit on the third oven rack from the bottom
and the dripping pan on the bottom rack to collect
any sauce and /or dripping fat.
! Always use the grill with the oven door shut. This will allow
you both to obtain excellent results and to save on energy
(approximately 10%).
Therefore the best results when using the grill modes are
obtained by placing the grid on the lower racks (see cooking
table) then, to prevent fat and grease from dripping onto the
bottom of the oven and smoke from forming, place a drippingpan on the 1st oven rack from the bottom.
Cooking Control Timer Knob
“grill” mode, placing the food under the
, you can use
Cooking Fish and Meat
When cooking white meat, fowl and fish, use temperature
settings from 180 °C to 200 °C.
For red meat that should be well done on the outside
while tender and juicy in the inside, it is a good idea to
start with a high temperature setting (200°C-220°C) for a
short time, then turn the oven down afterwards.
In general, the larger the roast, the lower the temperature
setting. Place the meat on the centre of the grid and
place the dripping pan beneath it to catch the fat.
Make sure that the grid is inserted so that it is in the
centre of the oven. If you would like to increase the
amount of heat from below, use the low rack heights. For
savoury roasts (especially duck and wild game), dress
the meat with lard or bacon on the top.
* Only available in certain models.
12
Some models are equipped with a timer program to
control when the oven shuts off during cooking. To use
this feature, you must wind the knob one full turn in the
counter-clockwise direction
the clockwise direction
up the indicator on the control panel with the number
of minutes on the knob.
At the end of the programmed length of time, the timer
will sound and automatically turn off the oven.
Attention: to use the oven in manual mode without the
cooking control timer, match the indicator on the
control panel with the
When the oven is not in use, the cooking control timer
can be used like a normal timer.
; Then, turn the knob in
, to set the time by matching
symbol on the timer knob.
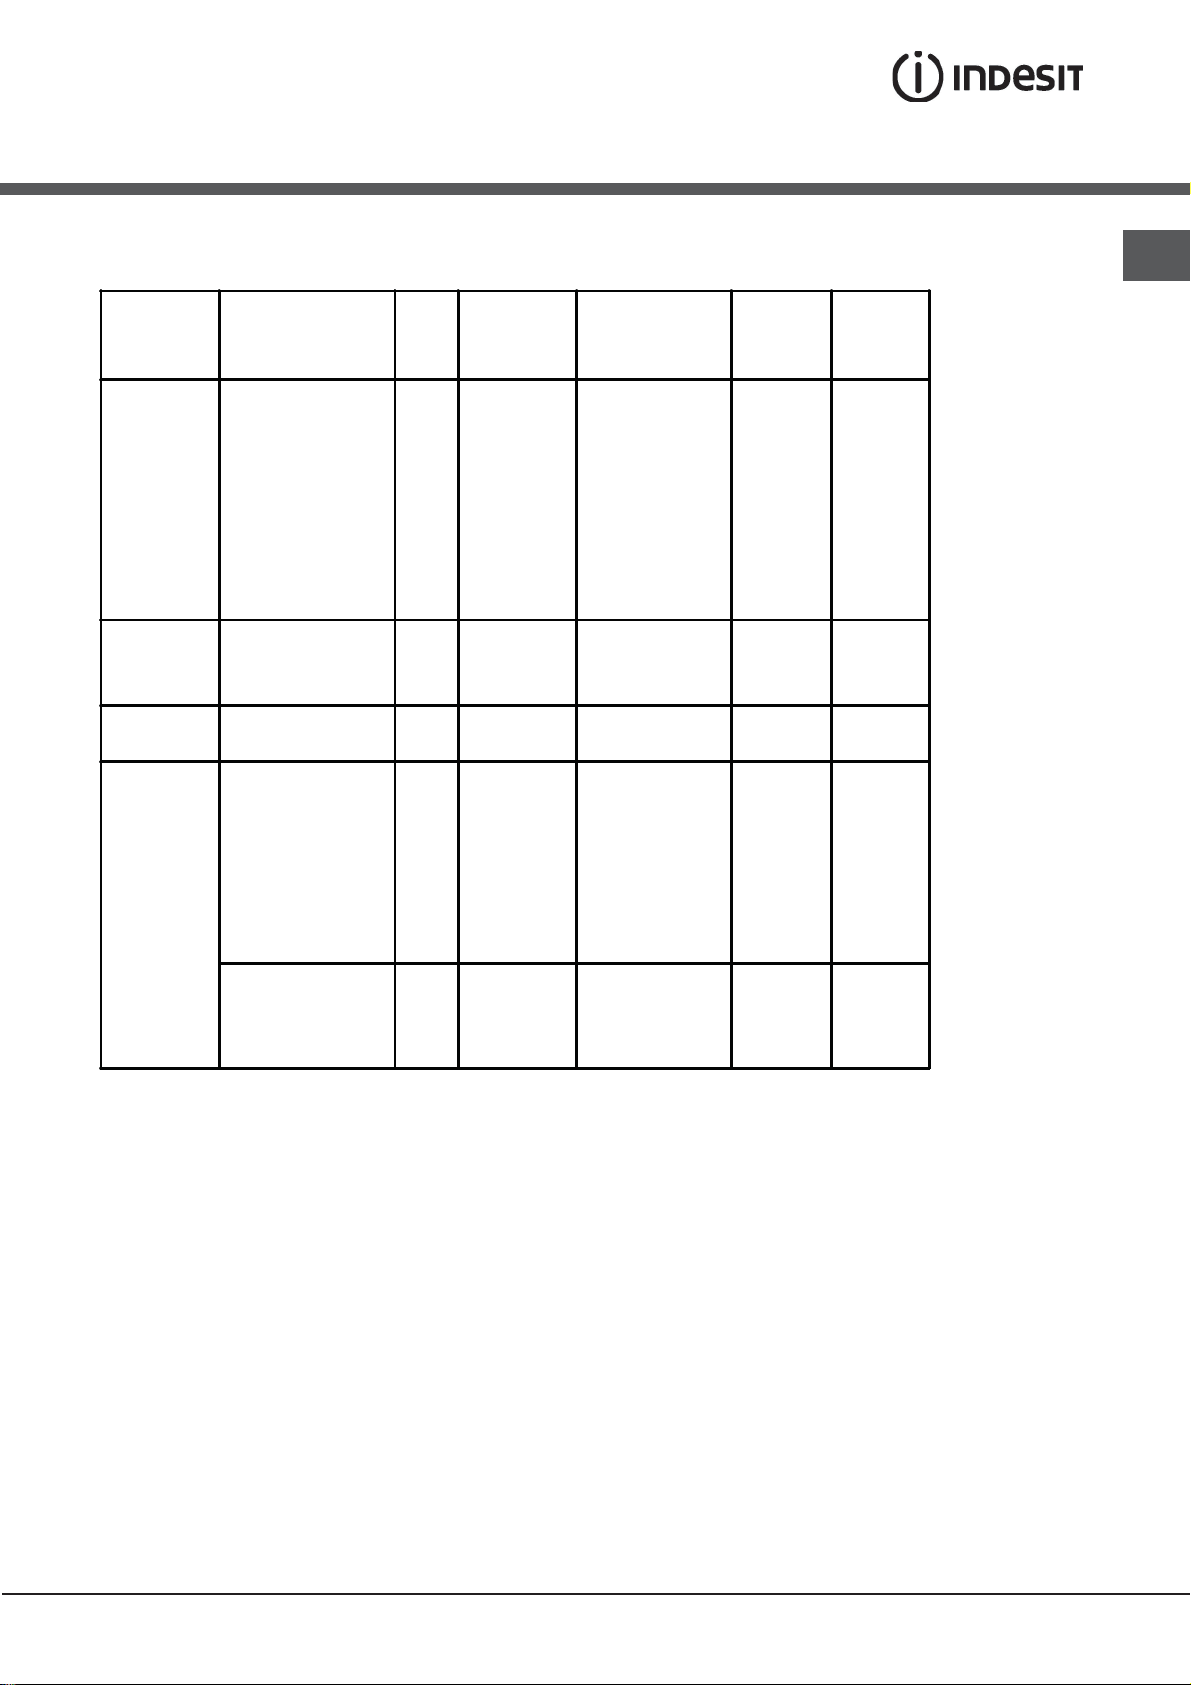
Oven cooking advice table
GB
Selector knob
setting
1 Convection
2 Pastry
Mode
3 Top Oven
4 Grill
NB: cooking times are approximate and may vary according to personal taste. When cooking using the grill, the
dripping pan must always be placed on the 1st oven rack from the bottom.
Food to be cooked Weight
Duck
Roast veal or beef
Pork roast
Biscuits (short pastry)
Tarts
Lasagne
Lamb
Mackerel
Plum-cake
Cream puffs
Sponge-cake
Savoury pies
Raised Cakes
Tarts
Fruit cakes
Brioches
Browning food to
perfect cooking
Soles and cuttlefish
Squid and prawn
kebabs
Cod filet
Grilled vegetables
Veal steak
Cutlets
Hamburgers
Mackerels
Toasted sandwiches
With rotisserie (where
present)
Veal on the spit
Chicken on the spit
Lamb on the spit
(in kg)
1
1
1
1
1
1
1
1
0.3
0.5
1.5
0,5
1
1
0,5
- 3/4 15 220 -
1
1
1
1
1
1
1
1
n.° 4
1.0
1.5
1.0
Cooking rack
position from
bottom
3
3
3
3
3
3
2
2
2
3
3
3
3
3
3
3
4
4
4
3/4
4
4
4
4
4
-
-
-
Preheating time
(minutes)
15
15
15
15
15
10
10
10
10
10
10
15
15
15
15
15
5
5
5
5
5
5
5
5
5
5
5
5
Thermostat
knob
setting
200
200
200
180
180
190
180
180
170
180
170
200
160
180
180
160
Max
Max
Max
Max
Max
Max
Max
Max
Max
Max
Max
Max
Cooking
time
(minutes)
65-75
70-75
70-80
15-20
30-35
35-40
50-60
30-35
40-50
30-35
20-25
30-35
30-40
35-40
50-60
25-30
8-10
6-8
10
10-15
15-20
15-20
7-10
15-20
2-3
80-90
70-80
70-80
13
Using the glass ceramic hob
GB
! The glue applied on the gaskets leaves traces of
grease on the glass. Before using the appliance, we
recommend you remove these with a special nonabrasive cleaning product. During the first few hours
of use there may be a smell of rubber which will
disappear very quickly.
Switching the cooking zones on and off
To switch on a cooking zone, turn the corresponding
knob in a clockwise direction.
To switch it off again, turn the knob in an anticlockwise
direction until it is in the “0” position.
If the COOKING ZONE ON indicator light is lit, this
shows that at least one pf the cooking zones on the
hob is switched on.
Cooking zones
The hob is equipped with electric radiant heating
elements. When they are in use the following items on
the hob become red.
A.The cooking zone
A
A
.
that the temperature of the
corresponding cooking zone is
greater than 60°C, even when
the heating element has been switched off but is still
hot.
C
with radiant heating elements.
B
B.The cooking zone
with HILITE heating elements.
A
C.The residual heat
indicator light: this indicates
Hilate cooking zones ensure a uniform distribution of the
temperature.
The hilite lamps warm up rapidly to high temperatures
which results in:
· Rapid temperature rise (compared to a
gas burner)
· Rapid cooling
· Uniform temperature over the entire surface
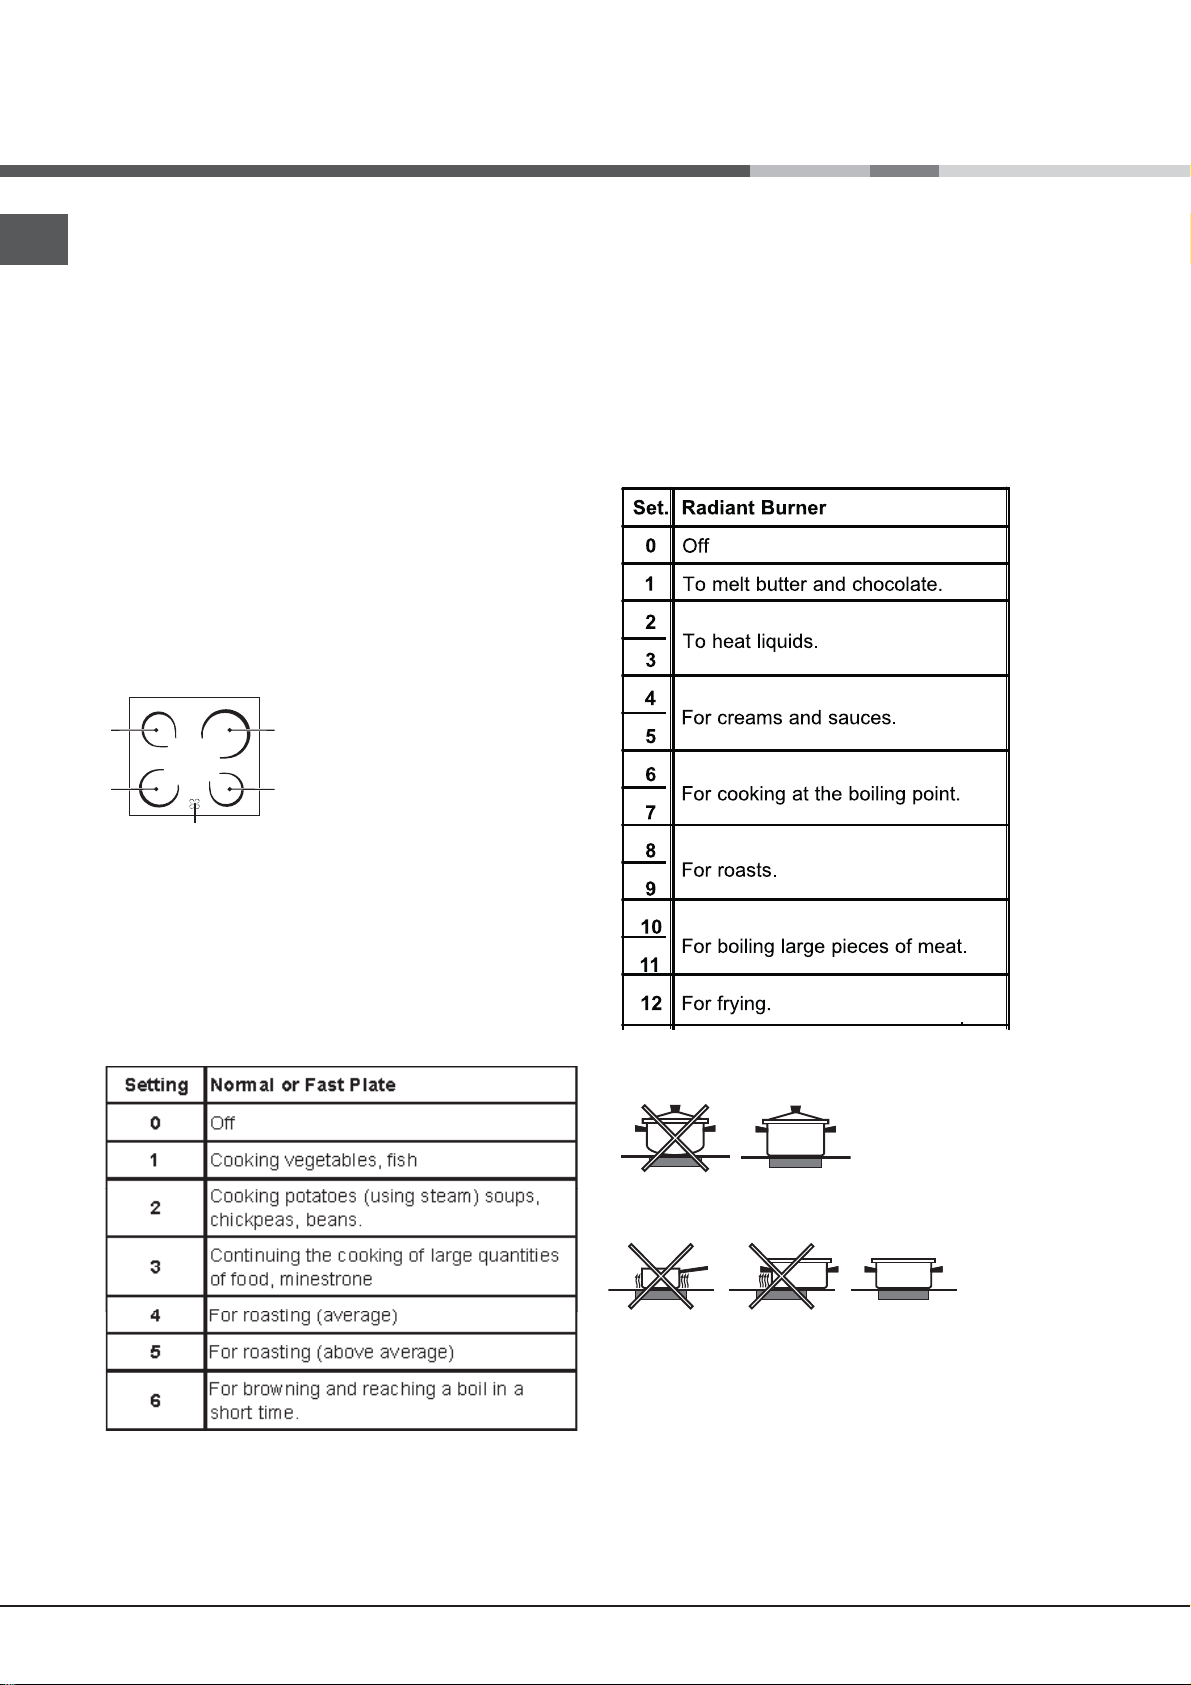
Traditional cooking zone control knobs. Each
cooking zone is tted with a control knob allowing
you to select from 12 di erent temperature settings
from a minimum of 1 to a maximum of 12.
Cooking zones with radiant heating elements.
The circular radiant heating elements become red 10 20 seconds after they have been switched on.
Cooking zones with HILITE heating elements.
Traditional cooking zones are made up of circular
heating elements. ey urn red approxmaely 10
seconds a er they have been turned on.
Practical advice on using the hob
• Use pans with a thick, flat base to ensure that they
adhere perfectly to the cooking zone.
• Always use pans with a diameter that is large
enough to cover the hotplate fully, in order to use all
the heat produced.
• Always make sure that the base of the pan is
completely clean and dry: this ensures that the pans
adhere perfectly to the cooking zones and that both
the pans and the hob remain effective for a longer
period of time.
• Avoid using the same cookware that is used on gas
burners: the heat concentration on gas burners may
have warped the base of the pan, causing it not to
adhere to the surface correctly.
• Never leave a cooking zone switched on without a
pan on top of it, as doing so may cause the zone to
become damaged.
14

Precautions and tips
! This appliance has been designed and manufactured in
compliance with international safety standards.
The following warnings are provided for safety reasons and must
be read carefully.
General safety
• These instructions are only valid for the countries whose
symbols appear in the manual and on the serial number
plate located on the appliance.
• The appliance was designed for domestic use inside the
home and is not intended for commercial or industrial use.
• The appliance must not be installed outdoors, even in
covered areas. It is extremely dangerous to leave the
appliance exposed to rain and storms.
• Do not touch the appliance with bare feet or with wet or
damp hands and feet.
• The appliance must be used by adults only for
the preparation of food, in accordance with the
instructions outlined in this booklet. Any other use of
the appliance (e.g. for heating the room) constitutes
improper use and is dangerous. The manufacturer
may not be held liable for any damage resulting from
improper, incorrect and unreasonable use of the
appliance.
• The instruction booklet accompanies a class 1 (insulated)
or class 2 - subclass 1 (recessed between 2 cupboards)
appliance.
• Do not touch the heating elements or certain parts of
the oven door when the appliance is in use; these parts
become extremely hot. Keep children well away from the
appliance.
• Make sure that the power supply cables of other electrical
appliances do not come into contact with the hot parts of
the oven.
• The openings used for the ventilation and dispersion of
heat must never be covered.
• Do not use unstable or misshapen pans on the cooking
zones; this will help to avoid accidental spills. Make sure
pan handles are turned towards the centre of the hob in
order to avoid accidental burns.
• Always use oven gloves when placing cookware in the
oven or when removing it.
• Do not use flammable liquids (alcohol, petrol, etc...) near
the appliance while it is in use.
• Do not place flammable material in the lower storage
compartment or in the oven itself. If the appliance is
switched on accidentally, it could catch fire.
• Always make sure the knobs are in the • position when the
appliance is not in use.
• When unplugging the appliance, always pull the plug from
the mains socket; do not pull on the cable.
• Never perform any cleaning or maintenance work without
having disconnected the appliance from the electricity
mains.
• If the appliance breaks down, under no circumstances
should you attempt to perform the repairs yourself.
Repairs carried out by inexperienced persons may cause
injury or further malfunctioning of the appliance. Contact
Assistance.
• Do not rest heavy objects on the open oven door.
• The internal surfaces of the compartment (where present)
may become hot.
• The glass ceramic hob is resistant to mechanical shocks, but
it may crack (or even break) if hit with a sharp object such
as a tool. If this happens, disconnect the appliance from the
electricity mains immediately and contact a Service Centre.
• If the surface of the hob is cracked, switch off the appliance
to prevent electric shocks from occurring.
• Remember that the cooking zones remain relatively hot for at
least thirty minutes after they have been switched off.
• Keep any object which could melt away from the hob, for
example plastic and aluminium objects, or products with a
high sugar content. Be especially careful when using plastic
film and aluminium foil or packaging: if placed on surfaces
that are still hot, they may cause serious damage to the hob.
• Do not place metal objects (knives, spoons, pan lids, etc.) on
the hob as they may become hot.
• The appliance should not be operated by people (including
children) with reduced physical, sensory or mental capacities,
by inexperienced individuals or by anyone who is not familiar
with the product. These individuals should, at the very least,
be supervised by someone who assumes responsibility for
their safety or receive preliminary instructions relating to the
operation of the appliance.
• Do not let children play with the appliance.
•
If the cooker is placed on a pedestal, take the neces-
GB
sary precautions to prevent the cooker from sliding
off the pedestal itself.
Disposal
• When disposing of packaging material: observe local
legislation so that the packaging may be reused.
• The European Directive 2002/96/EC relating to Waste
Electrical and Electronic Equipment (WEEE) states that
household appliances should not be disposed of using the
normal solid urban waste cycle. Exhausted appliances should
be collected separately in order to optimise the cost of reusing and recycling the materials inside the machine, while
preventing potential damage to the atmosphere and to public
health. The crossed-out dustbin is marked on all products
to remind the owner of their obligations regarding separated
waste collection.
For further information relating to the correct disposal of
exhausted household appliances, owners may contact the
public service provided or their local dealer.
Respecting and conserving the environment
• You can help to reduce the peak load of the electricity supply
network companies by using the oven in the hours between
late afternoon and the early hours of the morning.
• Always keep the oven door closed when using the TOP
OVEN, GRILL and GRATIN modes: This will achieve
improved results while saving energy (approximately 10%).
• Check the door seals regularly and wipe them clean to ensure
they are free of debris so that they adhere properly to the
door, thus avoiding heat dispersion.
15
Care and maintenance
GB
Switching the appliance off
Disconnect your appliance from the electricity supply
before carrying out any work on it.
Cleaning the oven
! Never use steam cleaners or pressure cleaners on
the appliance.
• Clean the glass part of the oven door using a
sponge and a non-abrasive cleaning product, then
dry thoroughly with a soft cloth. Do not use rough
abrasive material or sharp metal scrapers as these
could scratch the surface and cause the glass to
crack.
• The stainless steel or enamel-coated external parts and
the rubber seals may be cleaned using a sponge which
has been soaked in lukewarm water and neutral soap.
Use specialised products for the removal of stubborn
stains. After cleaning, rinse and dry thoroughly. Do not
use abrasive powders or corrosive substances.
• The inside of the oven should ideally be cleaned after
each use, while it is still lukewarm. Use hot water and
detergent, then rinse well and dry with a soft cloth. Do
not use abrasive products.
• The accessories can be washed like everyday
crockery, and are even dishwasher safe.
• Dirt and grease should be removed from the control
panel using a non-abrasive sponge or a soft cloth.
•
Stainless steel can be marked by hard water that
has been left on the surface for a long time, or by
aggressive detergents that contain phosphorus. We
recommend that the steel surfaces are rinsed well
then dried thoroughly.
Inspecting the oven seals
Check the door seals around the oven regularly. If the
seals are damaged, please contact your nearest Aftersales Service Centre. We recommend that the oven is not
used until the seals have been replaced.
Replacing the oven light bulb
1. After disconnecting the oven from the electricity mains,
remove the glass lid covering the
lamp socket (see gure).
2. Unscrew the light bulb and
replace it with a similar one:
voltage 230 V, wattage 25 W, cap
E 14.
3. Replace the lid and reconnect
the oven to the electricity supply.
! Do not use the oven lamp
as/for ambient lighting
Cleaning the glass ceramic hob
! Do not use abrasive or corrosive detergents (for
example, products in spray cans for cleaning barbecues
and ovens), stain removers, anti-rust products, powder
detergents or sponges with abrasive surfaces: these may
scratch the surface beyond repair.
• It is usually sufficient simply to wash the hob using a
damp sponge and dry it with absorbent kitchen roll.
• If the hob is particularly dirty, rub it with a special glass
ceramic cleaning product, then rinse well and dry
thoroughly.
• To remove more stubborn dirt, use a suitable scraper
(this is not supplied with the appliance). Remove spills
as soon as possible, without waiting for the appliance
to cool, to avoid residues forming crusty deposits. You
can obtain excellent results by using a rustproof steel
wire sponge - specifically designed for glass ceramic
surfaces - soaked in soapy water.
• If plastic or sugary substances have accidentally been
melted on the hob, remove them immediately with the
scraper, while the surface is still hot.
• Once it is clean, the hob may be treated with a special
protective maintenance product: the invisible film left
by this product protects the surface from drips during
cooking. This maintenance should be carried out while
the appliance is warm (not hot) or cold.
• Always remember to rinse the appliance well with clean
water and dry it thoroughly: residues can become
encrusted during subsequent cooking processes.
Glass ceramic hob cleaners Available from
Window scraper Razor blade
scrapers
Replacement blades DIY Stores,
COLLO luneta
HOB BRITE
Hob Clean
SWISSCLEANER
DIY Stores
supermarkets,
chemists
Boots, Co-op stores,
department stores, Regional
Electricity Company shops,
supermarkets
Assistance
! Never use the services of an unauthorised technician.
Please have the following information to hand:
• The type of problem encountered.
• The appliance model (Mod.).
• The serial number (S/N).
The latter two pieces of information can be found on
the data plate located on the appliance.
16
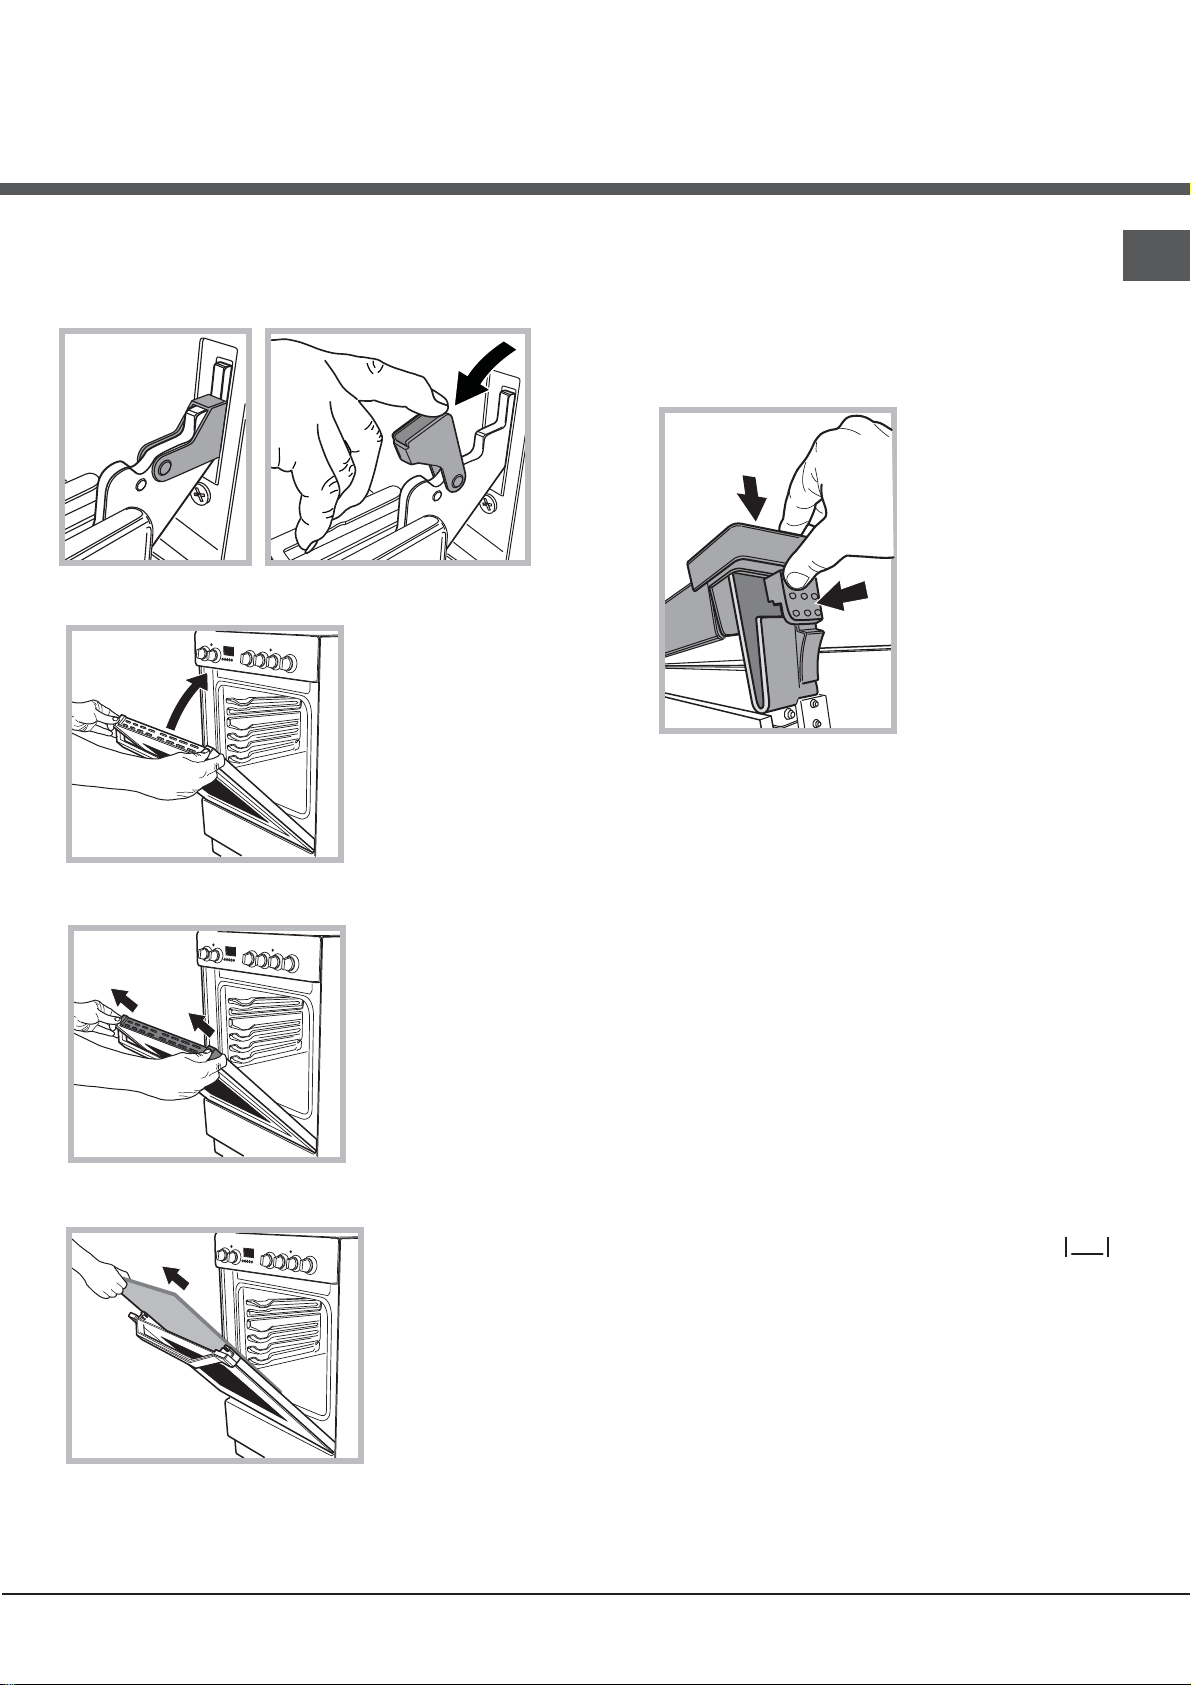
Removing and fitting the oven door:
1.Open the door
2.Make the hinge clamps of the oven door rotate
backwards completely (see photo)
3.Close the door until the clamps stop (the door will
remain open for 40° approx.) (see photo)
40°
WARNING! When reassembling the inner door
glass insert the glass panel correctly so that the
text written on the panel is not reversed and
can be easily legible.
7.Replace the profile, a click will indicate that the
part is positioned correctly.
8.Open the door completely.
9.Close the supports (see photo).
10.Now the door can be completely closed and the
oven can be started for normal use.
GB
4.Press the two buttons on the upper profile and
extract the profile (see photo)
5.Remove the glass sheet and do the cleaning as
indicated in chapter: "Care and maintenance".
6.Replace the glass.
WARNING! Oven must not be operated with inner
door glass removed!
Steam-Assisted Oven Cleaning
This method of cleaning is recommended especially after
cooking very fatty (roasted)meats.
This cleaning process allows to facilitate the removal of
dirt of the walls of the oven by the generation of steam
that is created inside the oven cavity for easier cleaning.
! Important! Before you start steam -cleaning:
-Remove any food residue and grease from the bottom
of the oven.
- Remove any oven accessories (grids and drip pans).
Perform the above operations according to the following
procedure:
1. pour 300ml of water into the baking tray in the oven,
placing it in the bottom shelf. In the models where the
drip pan is not present, use a baking sheet and place it
on the grill at the bottom shelf;
2. select the function of the oven:
and set the temperature to 100 ° C;
3. keep it in the oven for 15min;
4. turn off the oven;
5. Once cooled the oven, you can open the door to
complete the cleaning with water and a damp cloth;
6. eliminate any residual water from the cavity after
finishing cleaning
When the steam –cleaning is done, after cooking
especially fatty foods, or when grease is difficult to
remove, you may need to complete the cleaning with the
traditional method, described in the previous paragraph.
! Perform cleaning only in the cold oven!
Pastry Mode
17
Installation
FR
! Conserver ce mode d’emploi pour pouvoir le
consulter à tout moment. En cas de vente, de cession
ou de déménagement, veiller à ce qu’il suive l’appareil.
! Lisez attentivement les instructions : elles contiennent
des conseils importants sur l’installation, l’utilisation et la
sécurité de l’appareil
! L’installation de l’appareil doit être effectuée par
un professionnel du secteur conformément aux
instructions du fabricant.
! N’importe quelle opération de réglage, d’entretien
ou autre, doit être effectuée après avoir débranché la
prise de la cuisinière.
Positionnement et nivellement
! L’appareil peut être installé à côté de meubles dont la
hauteur ne dépasse pas celle du plan de cuisson.
! S’assurer que le mur en contact avec la paroi arrière
de l’appareil est réalisé en matériel ignifuge résistant à
la chaleur (T 90°C).
Pour une installation correcte :
• installer cet appareil dans une cuisine, une salle
à manger ou un studio (jamais dans une salle de
bain) ;
• si le plan de cuisson de la cuisinière dépasse le
plan de travail des meubles, ces derniers doivent
être placés à au moins 600 mm de l’appareil.
• si la cuisinière est installée sous un élément suspendu,
il faut que ce dernier soit placé à moins de 420 mm
de distance du plan.
Il faut prévoir une distance de 700 mm si les
éléments suspendus
sont inflammables (voir
gure);
• ne pas placer de
rideaux derrière ou sur
mm. with hood
mm. without hood
les côtés de la cuisinière
650
700
à moins de 200 mm de
min.
min.
distance.
mm.
420
Min.
HOOD
Min. mm.
600
420
Min. mm.
Montage des pieds* par
encastrement sous la base.
Raccordement électrique
Montage du cordon d’alimentation
Ouverture du bornier:
• Faites pression à l’aide d’un tournevis sur les
languettes latérales du couvercle du bornier;
• Tirez et ouvrez le couvercle du bornier.
Pour monter le cordon
comme suit:
• dévissez la vis du serre-câble de même que les vis
des contacts
! Les pontets sont montés en usine pour raccordement
à 230V monophasé (voir gure).
H05RR-F 3x4 CEI-UNEL 35363
H05VV-F 3x4 CEI-UNEL 35746
d’alimentation, procédez
230V ~
NL
5
3
4
2
1
• pour l’installation de hottes, se conformer aux
instructions de leur notice d’emploi.
Nivellement
Pour mettre l’appareil bien à plat, visser les pieds
de réglage fournis aux
emplacements prévus aux
coins à la base de la cuisinière
(voir gure).
18
• pour effectuer les raccordements électriques
illustrés figure, utilisez les deux pontets placés dans
le boîtier (voir gure - référence “P”)
P
NL2L1
L3
400V 2N~
H05RR-F 4x4 CEI-UNEL 35363
H05VV-F 4x4 CEI-UNEL 35746
H05RR-F 5x2.5 CEI-UNEL 35363
H05VV-F 5x2.5 CEI-UNEL 35746
NL2L1
5
400V 3N~
NL3L1L2
5
3
4
4
2
3
1
1
2
• fixez le câble d’alimentation dans le serre-câble
correspondant et fermez le couvercle.
Branchement du câble d’alimentation au réseau
électrique
En cas de raccordement direct au réseau, intercaler
entre l’appareil et le réseau un interrupteur à coupure
omnipolaire ayant au moins 3 mm d’écartement entre
les contacts, dimensionné à la charge et conforme
aux normes en vigueur (le fil de terre ne doit pas être
interrompu par l’interrupteur). Le câble d’alimentation
ne doit atteindre, en aucun point, une température
dépassant de 50°C la température ambiante.
Avant de procéder au branchement, s’assurer que :
• la prise est bien munie d’une terre conforme à la loi;
• la prise est bien apte à supporter la puissance
maximale de l’appareil, indiquée sur la plaque
signalétique;
• la tension d’alimentation est bien comprise entre les
valeurs indiquées sur la plaque signalétique;
• Ne pas utiliser de rallonges ni de prises multiples.
!Après installation de l’appareil, le câble électrique et
la prise de courant doivent être facilement accessibles
!Le câble ne doit être ni plié ni excessivement écrasé.
!Le câble doit être contrôlé périodiquement et ne peut
être remplacé que par un technicien agréé.
! Nous déclinons toute responsabilité en cas de non
respect des normes énumérées ci-dessus.
! Il est recommandé de nettoyer le four avant sa
première utilisation, en suivant les instructions
mentionnées au paragraphe „ Entretien et soin „.
CARACTERISTIQUES TECHNIQUES
Dimensions du
four HxLxP
Volume l 65
Dimensions utiles
du tiroir chauffeplats
Tension et
fréquence
d'ali mentation :
32x43,5x39,5cm
largeur 42 cm
profondeur 46 cm
hauteur 8,5 cm
voir plaquette signalétique
Plan de cuisson
vitrocéramique
Avant gauche
Arrière gauche
Arrière droit
Avant droit
Absorption Max.
plan de cuisson
vitrocéramique
ETIQUETTE
ENERGIE
La chaîne de sécurité
1700 W
1200 W
2300 W
1200 W
6400 W
Directive 2004/40/CE sur
l'étiquette des fours électriques
Norme EN 50304
- Consommation énergie
convection naturelle.
Fonction four : Statique
Directives Communautaires:
06/95/EC du 12/12/06 (Basse
Tension) et modifications
successives
-04/108/EC du 15/12/04
(Compatibilité électromagnétique)
et modifications successives
-93/68/EEC du 22/07/93 et
modifications successives2002/96/EC
1275/2008 Stand-by/ Off mod e
! Pour éviter le
basculement
de l’appareil,
par exemple
si un enfant
s’accroche
à la porte du
four, la chaîne
de sécurité
DOIT être
installée !
La cuisinière est équipée d’une chaîne de
sécurité qui doit être ¿ xée à l’aide d’une vis (non
fournie avec l’appareil) au mur derrière l’appareil, à la même hauteur que sur la cuisinière.
Choisissez une vis et un système d’ancrage
adapté au mur contre lequel se trouve l’appareil. Si la vis présente un diamètre inférieur à
9 mm, utilisez une rondelle. En présence d’un
mur en béton, la vis doit faire au moins 8 mm de
diamètre et 60 mm de long.
Veillez à ce que la chaîne soit ¿ xée derrière la
cuisinière et au mur, comme l’indique l’illustration, de sorte à être tendue et parallèle au sol
au terme de l’installation.
*N’existe que sur certains modèles
FR
19
Mise en marche et utilisation
FR
! Pour les modèles équipés d’une grille de réduction,
n’utiliser cette dernière que pour le brûleur auxiliaire,
en cas d’utilisation de casseroles ayant moins de 12
cm de diamètre.
Utilisation du four
! Lors de son premier allumage, faire fonctionner
le four à vide, porte fermée, pendant au moins une
heure en réglant la température à son maximum.
Puis éteindre le four, ouvrir la porte et aérer la pièce.
L’odeur qui se dégage est due à l’évaporation des
produits utilisés pour protéger le four.
! Avant toute utilisation, vous devez impérativement
enlever les films plastiques situés sur les côtés de
l’appareil
1. Pour sélectionner le programme de cuisson
souhaité, tourner le bouton PROGRAMMES.
2. Choisir la température conseillée pour ce
programme ou celle qu’on préfère à l’aide du bouton
THERMOSTAT.
Un tableau de cuisson sert de guide et indique
notamment les températures conseillées pour
plusieurs préparations culinaires (voir tableau cuisson
au four).
En cours de cuisson, on peut à tout moment :
• modifier le programme de cuisson à l’aide du
bouton PROGRAMMES;
• modifier la température à l’aide du bouton
THERMOSTAT ;
• programmer la durée et l’heure de fin de cuisson
(voir ci-dessous);
• interrompre la cuisson en ramenant le bouton
PROGRAMMES sur “0”.
! Ne jamais poser d’objets à même la sole du four,
l’émail risque de s’abîmer.
! Il faut toujours placer les plats sur la grille fournie
avec l’appareil.
Voyant THERMOSTAT
Allumé, il signale la montée en chaleur du four. Il
s’éteint dès que la température sélectionnée est
atteinte. Le voyant s’allume et s’éteint tour à tour pour
indiquer que le thermostat fonctionne et maintient la
température au degré près.
Eclairage du four
Pour l’allumer, amener le bouton PROGRAMMES
sur une position autre que la position “0”. Il reste
allumé tant que le four est en marche. Si on tourne le
bouton sur
résistance.
, la lampe s’allume sans activer aucune
Programmes de cuisson
! Pour tous les programmes il est possible de
sélectionner une température comprise entre 50°C et
MAX., sauf pour le programme GRIL, pour lequel il est
préconisé de sélectionner MAX.
Programme Four Statique
Mise en marche des résistances de voûte et de sole.
Pour cette cuisson traditionnelle mieux vaut cuire
sur un seul niveau : la cuisson sur plusieurs niveaux
entraînerait une mauvaise distribution de la chaleur.
Programme Pâtisserie
L’élément chauffant inférieur est branché. Cette
position est conseillée pour parfaire la cuisson
d’aliments (placés dans des plats à rôti) qui sont déjà
bien cuits à la surface mais encore mous à l’intérieur
ou pour des gâteaux garnis de fruits ou de confiture
qui ont besoin de se colorer modérément à leur
surface. A remarquer que cette fonction ne permet pas
d’atteindre une température maximum à l’intérieur du
four (250°C), il est par conséquent déconseillé de cuire
en maintenant longuement le four dans cette position
à moins qu’il ne s’agisse de gâteaux qui exigent des
températures inférieures ou égales à 180°C.
Programme Résistance de voûte
Mise en marche de la résistance de voûte. La
température plutôt élevée et directe du gril permet de
saisir immédiatement les viandes évitant ainsi qu’elles
ne durcissent en perdant leur jus.
Programme Grill
Mise en marche de la résistance de voûte et du
tournebroche. La cuisson au gril est particulièrement
recommandée pour les plats qui exigent une
température élevée à leur surface : côtes de veau et
de bœuf, entrecôtes, filet, hamburgers, etc...
! Les cuissons Grill et Résistance de voûte doivent
avoir lieu porte fermée.
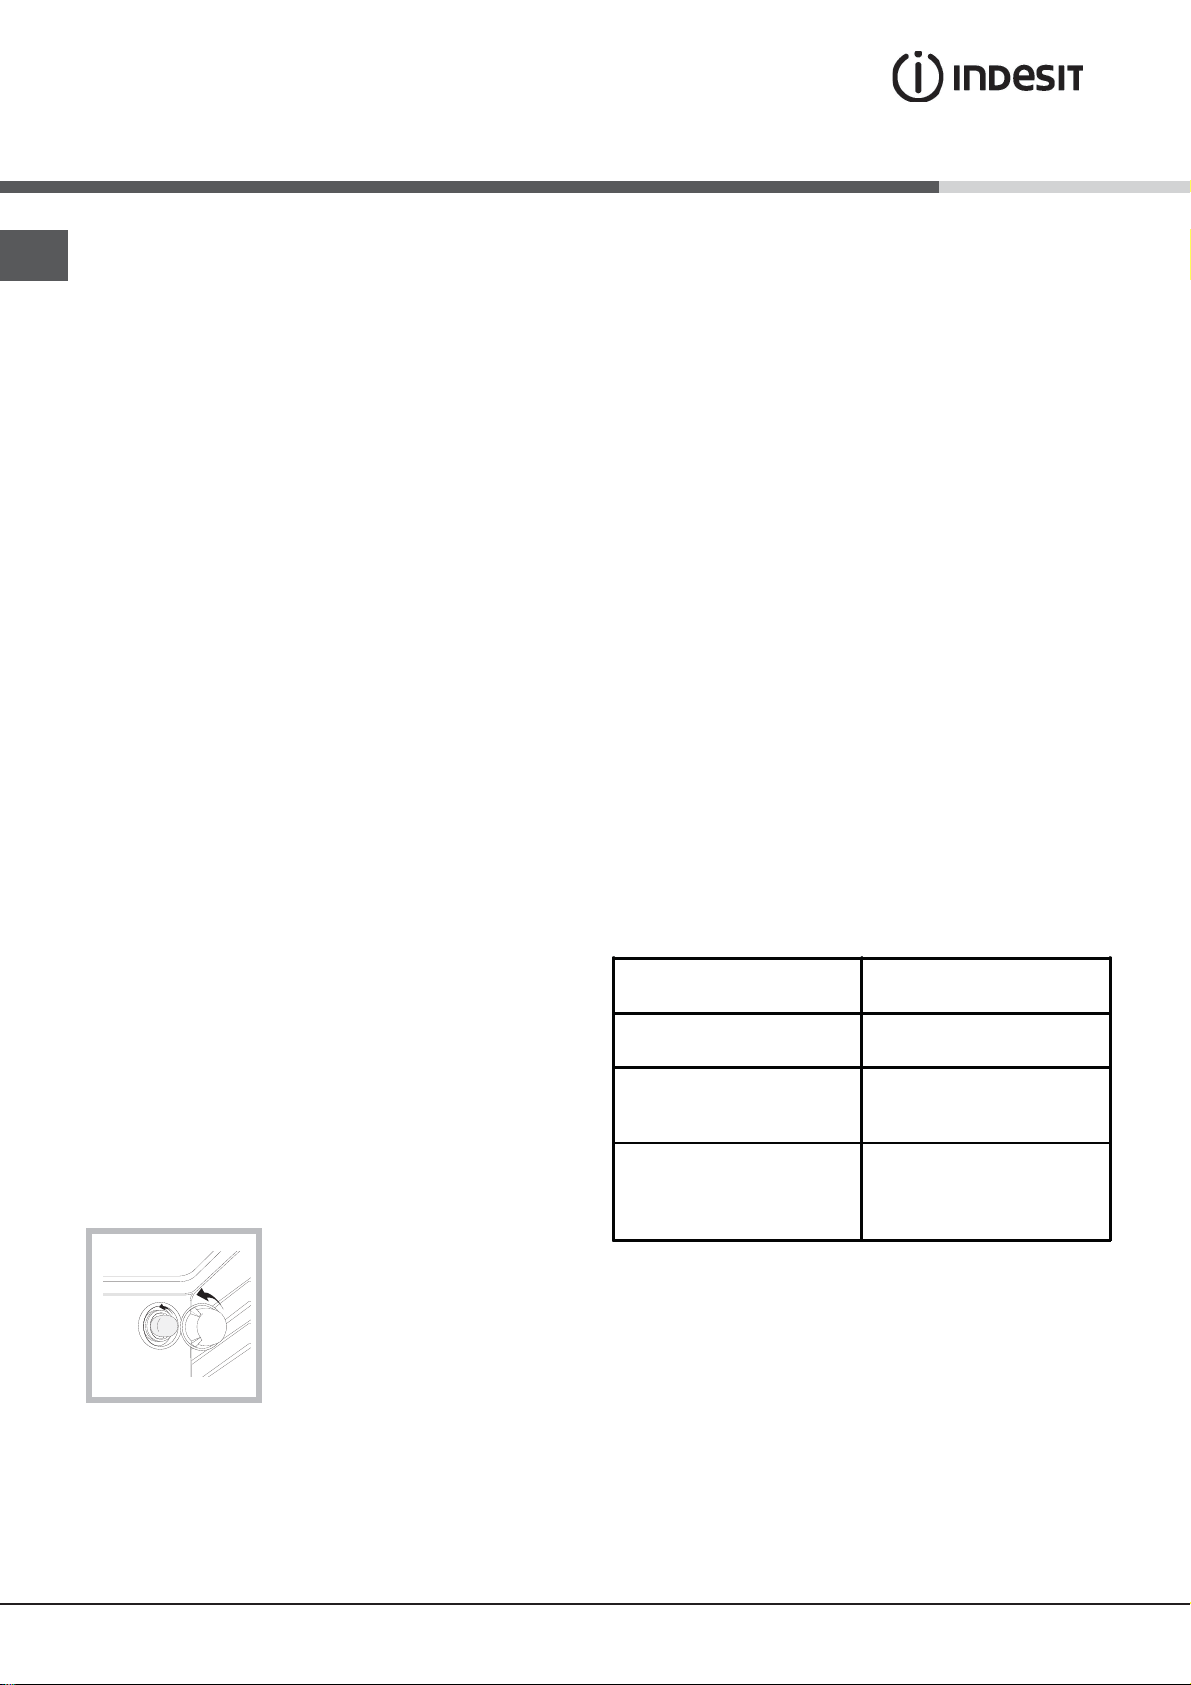
La manette du minuteur fin de cuisson
Certains modèles sont équipés d’un programmateur fin
de cuisson. Pour s’en servir, il faut remonter la sonnerie
en faisant faire un tour presque complet à la manette
dans le sens des aiguilles
tournant dans le sens inverse
désiré en amenant en face du repère fixe du bandeau
le numéro correspondant aux minutes désirées, une fois
le temps écoulé, la sonnerie retentit et le four s’éteint
automatiquement.
Attention: pour utiliser le four sans se servir du
programmateur de fin de cuisson, il faut amener en face
du repère fixe du bandeau le symbole
Quand le four est éteint, le programmateur fin de cuisson
peut être utilisé comme un simple minuteur.
d’une montre ; puis, en
, programmer le temps
.
20
Utilisation du plan de cuisson
vitrocéramique
Niche inférieure
Utilisation du plan de cuisson
! Ne pas stocker de matériel inflammable dans la niche
du bas.
! Les surfaces intérieures du tiroir (s’il y en a un)
peuvent devenir chaudes.
Tournebroche*
! La colle utilisée pour les joints laisse des traces
de graisse sur le verre. Nous conseillons de les
éliminer avant d’utiliser l’appareil à l’aide d’un produit
d’entretien non abrasif. Une odeur de caoutchouc
peut se dégager au cours des premières heures
d’utilisation, elle disparaîtra très vite.
FR
Pour actionner le
tournebroche,
procédez comme suit
1 placez la lechefrite au
gradin 1;
2 placez le berceau au
gradin 4 et encastrez
le bout arriere de la
broche dans le trou
situé au fond de
l’enceinte (voir gure);
3. pour actionner le tournebroche, sélectionnez
l’aide du bouton PROGRAMMES.
à
Conseils de cuisson
! En cas de cuisson en mode GRIL, placer la lèchefrite
au gradin 1 pour récupérer les jus de cuisson.
GRIL
• Placer la grille au gradin 3 ou 4, enfourner les plats
au milieu de la grille.
• Nous conseillons de sélectionner le niveau d’énergie
maximum. Ne pas s’inquiéter si la résistance de
voûte n’est pas allumée en permanence: son
fonctionnement est contrôlé par un thermostat.
Allumer et éteindre les foyers
Pour allumer un foyer, tourner le bouton correspondant
dans le sens des aiguilles d’une montre.
Pour l’éteindre, tourner le bouton dans le sens inverse
des aiguilles d’une montre jusqu’à “0”.
L’allumage du voyant FONCTIONNEMENT FOYERS
signale qu’au moins un foyer du plan de cuisson est
allumé.
Les foyers
Le plan de cuisson peut être équipé de foyers radiants . Ils
deviennent tous rouges pendant leur fonctionnement :
A. Foyers radiant .
A
A
C
Description des éléments
Les résistances circulaires des foyers radiants
deviennent rouges 10-20 secondes à peine après
allumage.
B. Foyer hilite.
B
C. Voyant de chaleur résiduelle : il
signale une température supérieure
A
à 60°C du foyer correspondant et
ce même après extinction de ce
dernier.
chauffants
RADIANTRADIANT
PIZZA
• Utiliser un plat en aluminium léger et l’enfourner sur
la grille du four.
En cas d’utilisation du plateau émaillé, le temps de
cuisson sera plus long et la pizza beaucoup moins
croustillante.
• Si les pizzas sont bien garnies, n’ajouter la
mozzarelle qu’à mi-cuisson.
21
FR
Foyers HILITE
Les résistances circulaires des foyers radiants
deviennent rouges 10secondes a peine apres
allumage.
Les résistances circulaires des foyers hilite
garantissent une distribution uniforme de la
température .
Les lampes hilite produisent instantanément une
quantité de lumière et de chaleur très élevée avec tous
les avantages pratiques qui s’ensuivent :
· montée rapide en température (par rapport à un
brûleur à gaz)
· refroidissement rapide
· température uniforme sur toute la surface (grâce aux
éléments chauffants circulaires
En cas de foyers double puissance, la première partie de la
course active la zone de chauffe plus petite (interne). Pour
les activer toutes les deux (interne et externe), tournez le
bouton à fond jusqu’à la position et sélectionnez le niveau de
puissance souhaité entre 12 et 1.
Conseils d’utilisation du plan de cuisson
• Utiliser des casseroles à fond plat et de forte
épaisseur pour qu’elles adhèrent parfaitement à la
zone de chauffe;
• utiliser des casseroles dont le diamètre couvre
complètement la zone de chauffe de façon à
exploiter au mieux toute la chaleur disponible;
• s’assurer que le fond des casseroles est
parfaitement sec et propre: l’adhérence aux foyers
sera ainsi optimale et tant les casseroles que le plan
de cuisson dureront plus longtemps;
• éviter d’utiliser des casseroles qui sont aussi
utilisées sur les brûleurs à gaz: la concentration de
chaleur des brûleurs à gaz peut déformer le fond de
la casserole qui perd son adhérence;
• ne jamais laisser un foyer allumé sans casserole, il
risque de s’endommager.
22
Tableau de cuisson au four
FR
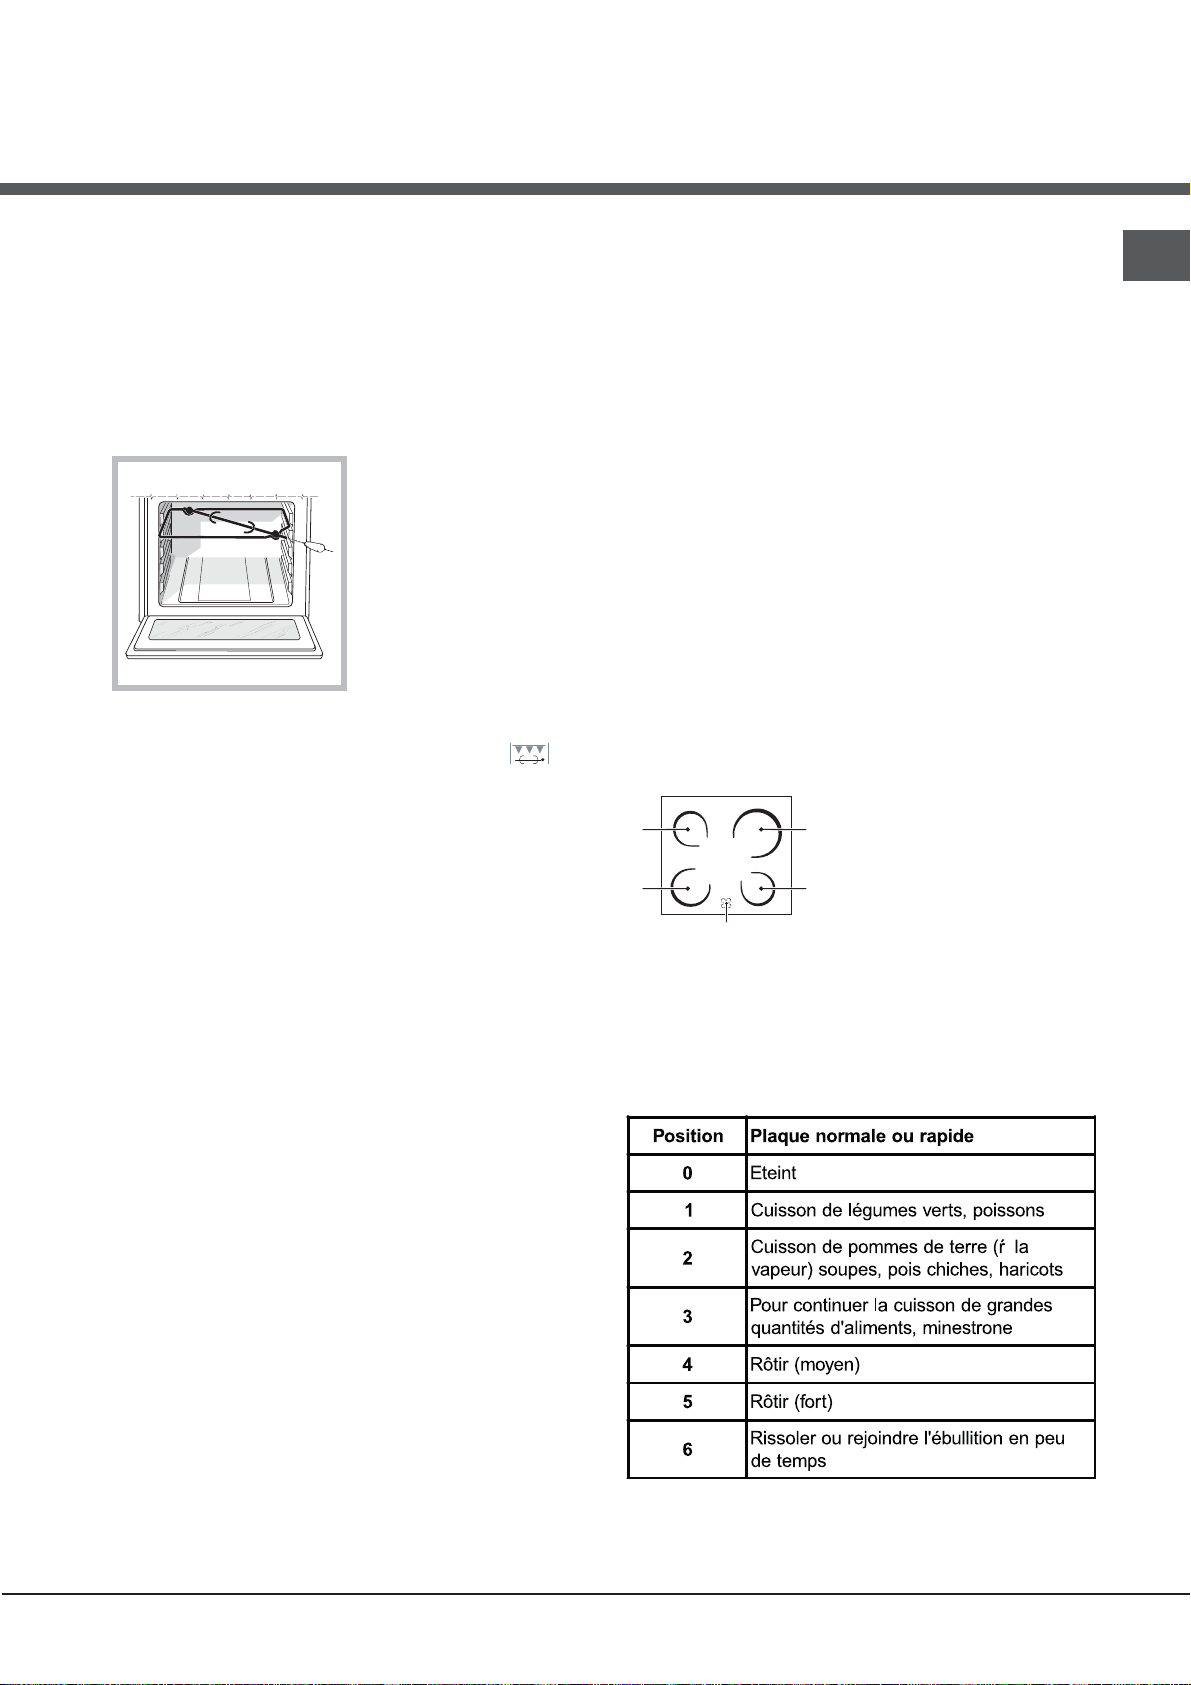
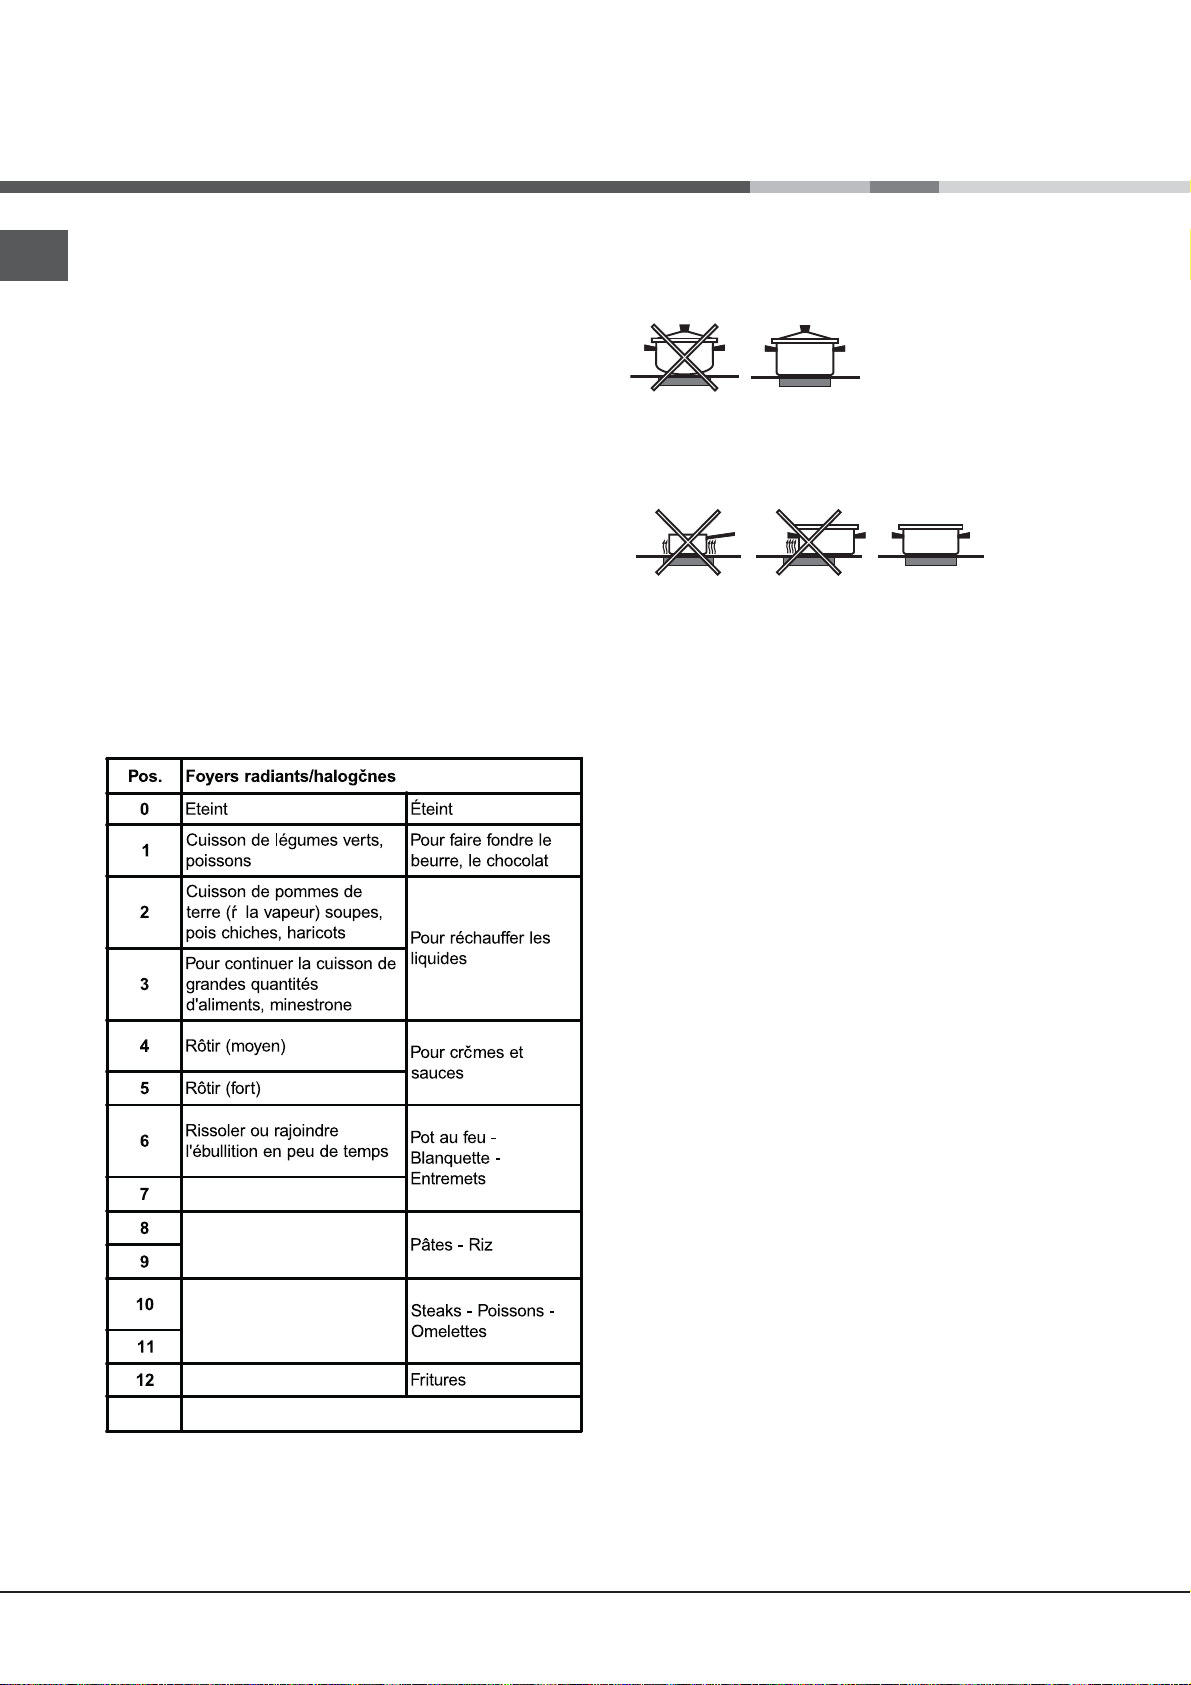
Position
sélecteur
1 Statique T raditionnel
2 Four
Pâtisserie
3 Résistance
de voĦte
Aliments Ě cuire Poids
(Kg)
Canard
Rôti de veau ou de bĞ uf
Rôti de porc
Biscuits (pâte bri sée)
Tartes
Lasagnes
Agneau
Maquereau
Plum-cake
Choux
Génoise
Quiches
Gâteaux levés
Tartes
Gâteaux aux fruits
Brioches
Pour parfaire la cuisson - 3/4 15 220 -
1
1
1
1
1
1
1
1
0.3
0.5
1.5
0,5
1
1
0,5
Position
gradins en
partant du
bas
3
3
3
3
3
3
2
2
2
3
3
3
3
3
3
3
Temp s de
préchauffage
(minutes)
15
15
15
15
15
10
10
10
10
10
10
15
15
15
15
15
Position
sélecteur de
températures
200
200
200
180
180
190
180
180
170
180
170
200
160
180
180
160
Temp s de
cuisson
(minutes )
65-75
70-75
70-80
15-20
30-35
35-40
50-60
30-35
40-50
30-35
20-25
30-35
30-40
35-40
50-60
25-30
4 Gril
N.B. : les temps de cuisson sont purement indicatifs et peuvent Ċtre modifiés selon les goĦts de chacun. En cas de
cuisson au gril, placez touj ours la l þchefrit e sur le 1er gradin en par t ant du bas.
Soles et seiches
Brochettes de calmars et
crevettes
Tranches de colin
Légumes grillés
Côte de veau
Côtelettes
Hamburgers
Maquereaux
Croque-monsieur
Avec tournebroche (sur
certains modþles)
V eau Ě la broche
Poulet Ě la broche
Agneau Ě la broche
1
1
1
1
1
1
1
1
n.° 4
1.0
1.5
1.0
4
4
4
3/4
4
4
4
4
4
-
-
-
5
5
5
5
5
5
5
5
5
5
5
5
Max
Max
Max
Max
Max
Max
Max
Max
Max
Max
Max
Max
8-10
6-8
10
10-15
15-20
15-20
7-10
15-20
2-3
80-90
70-80
70-80
23
 Loading...