

INDESIT I6GG1G(X)/UA User Manual
14
I6GG1G/UA
GB
English
Operating Instructions
COOKER AND OVEN
Contents
Operating Instructions,1
Description of the appliance-Overall view,1
Description of the appliance-Control Panel,2
Installation,4
Start-up and use,9
Precautions and tips,12
Care and maintenance,13
Assistance,13
RO
Românã
1
2
3
4
5
6
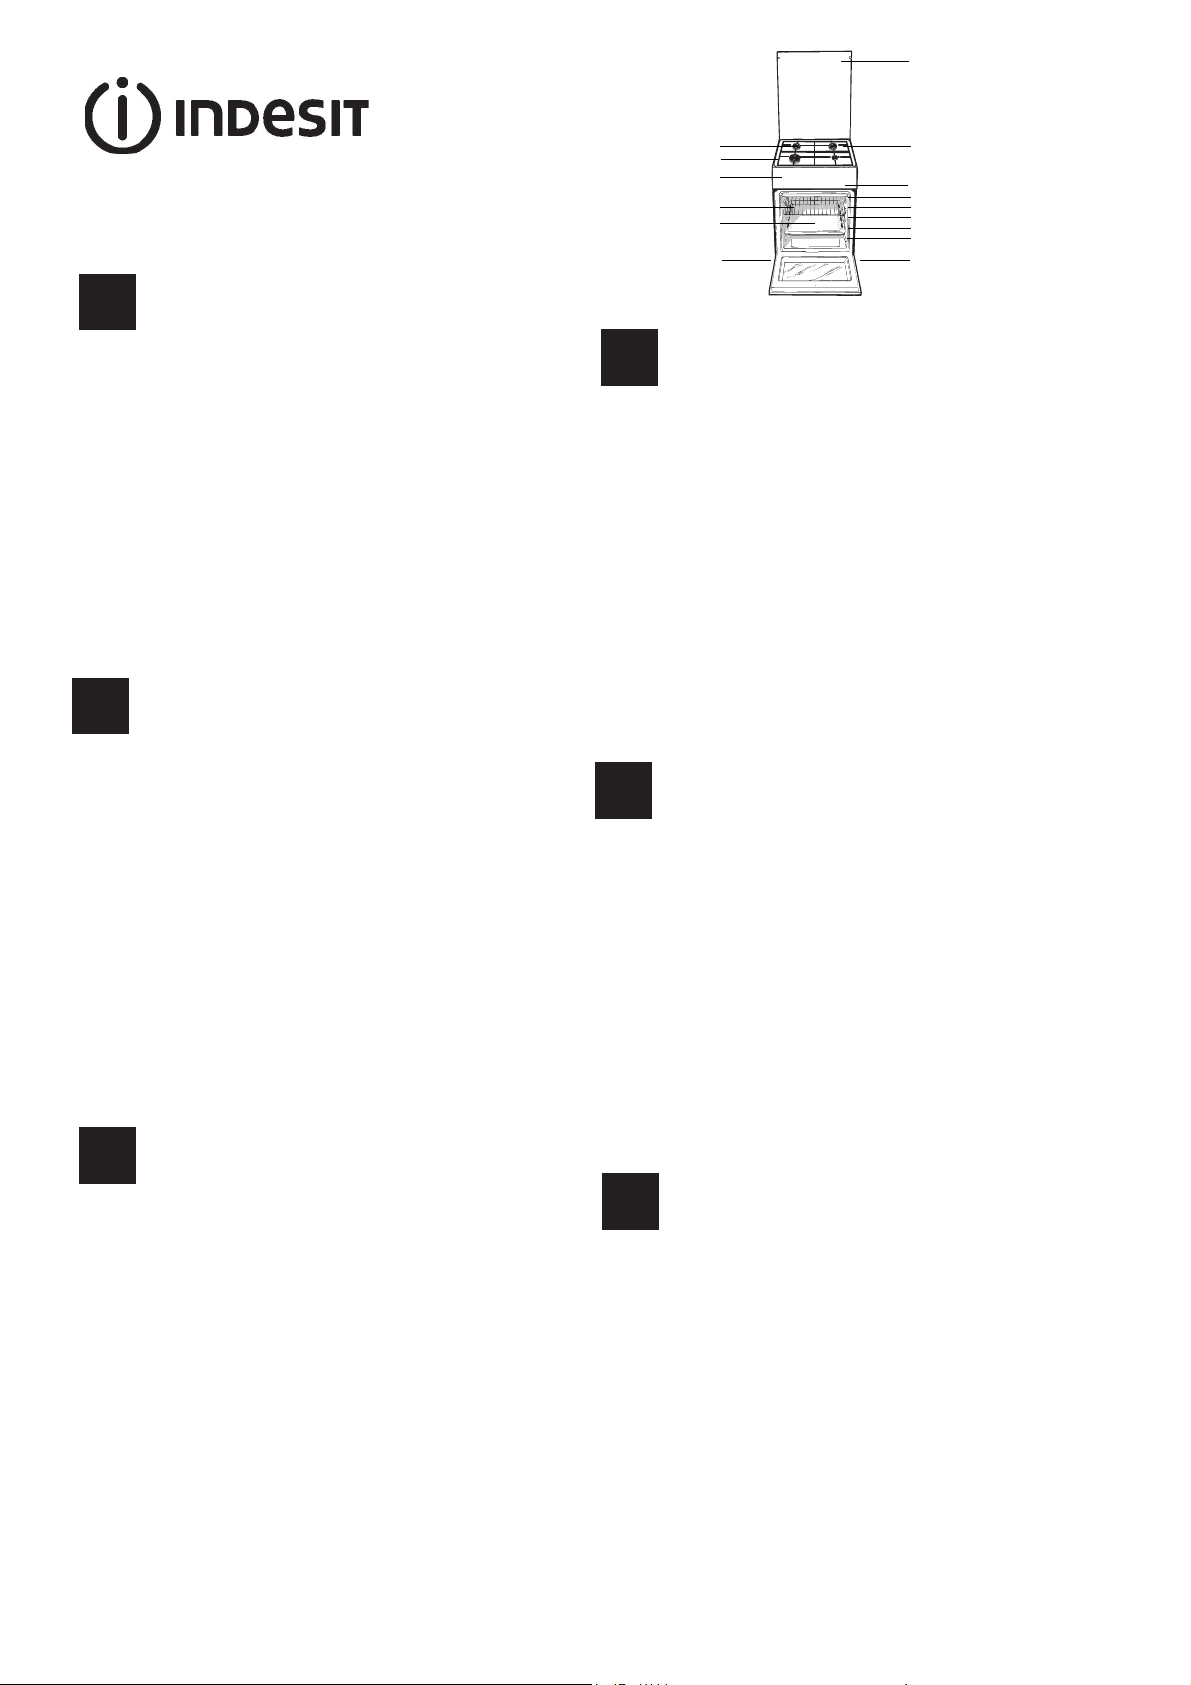
Description of the appliance
GB
Overall view
7
8
9
10
11
12
13
6
1 Hob burner
2 Hob Grid
3.Control panel
4.Sliding grill rack
5.DRIPPING pan
6.Adjustable foot
7.Containment surface for spills
8.GUIDE RAILS for the sliding racks
9.position 5
10.position 4
11.position 3
12.position 2
13.position 1
14.Glass Cover *(Available only on certain models)
Instrucюiuni de folosire
ARAGAZ ЄI CUPTOR
Sumar
Instrucţiuni de folosire,1
Descrierea aparatului- Vedere de ansamblu,1
Descrierea aparatului-Panoul de control,2
Instalare,15
Pornire şi utilizare, 19
Precauţii şi sfaturi,22
Întreţinere şi curăţire,23
Asistenţă,23
UA
Украінська
Інструкціі з експлуатаціі
КУХНЯ
Зміст
Інструкціі з експлуатаціі,1
Опис установки-Загальнии вигляд,1
Опис установки-Панель управління,2
Встановлення,25
Включення і використання,29
Запобіжні засоби і поради,32
Догляд i технічне обслуговування,33
Допомога,33
UA
1.Газовий пальник
2.Піддон на випадок переливань
3.Панель управління
4.Полка РЕШІТKИ
5.Полка ДEКО
6.Лапка для налаштування
7.Пoверхня для збирання збiглoї piдини
8.HAПPAB ЛЯЮЧІ для полиць
9.положення 5
10.положення 4
11. положення 3
12.положення 2
13.положення 1
14.Скляна кришка (Є лише в деяких моделях.)
1.Arzătoare pe gaz
2.Grătare plită
3. Panou frontal de control
4. Grătarul cuptorului
5. Tavă de coacere
6. Picioare reglabile
7. Plită
8. GHIDAJE alunecare rafturi
9. nivelul 5
10. nivelul 4
11. nivelul 3
12. nivelul 2
13. nivelul 1
14. Capacul din sticlă
(prezent doar la anumite modele)
Загальнии вигляд
RO
GR
Descriere aparatului
Vedere de ansamblu
Опис плити
2
160
1
GB
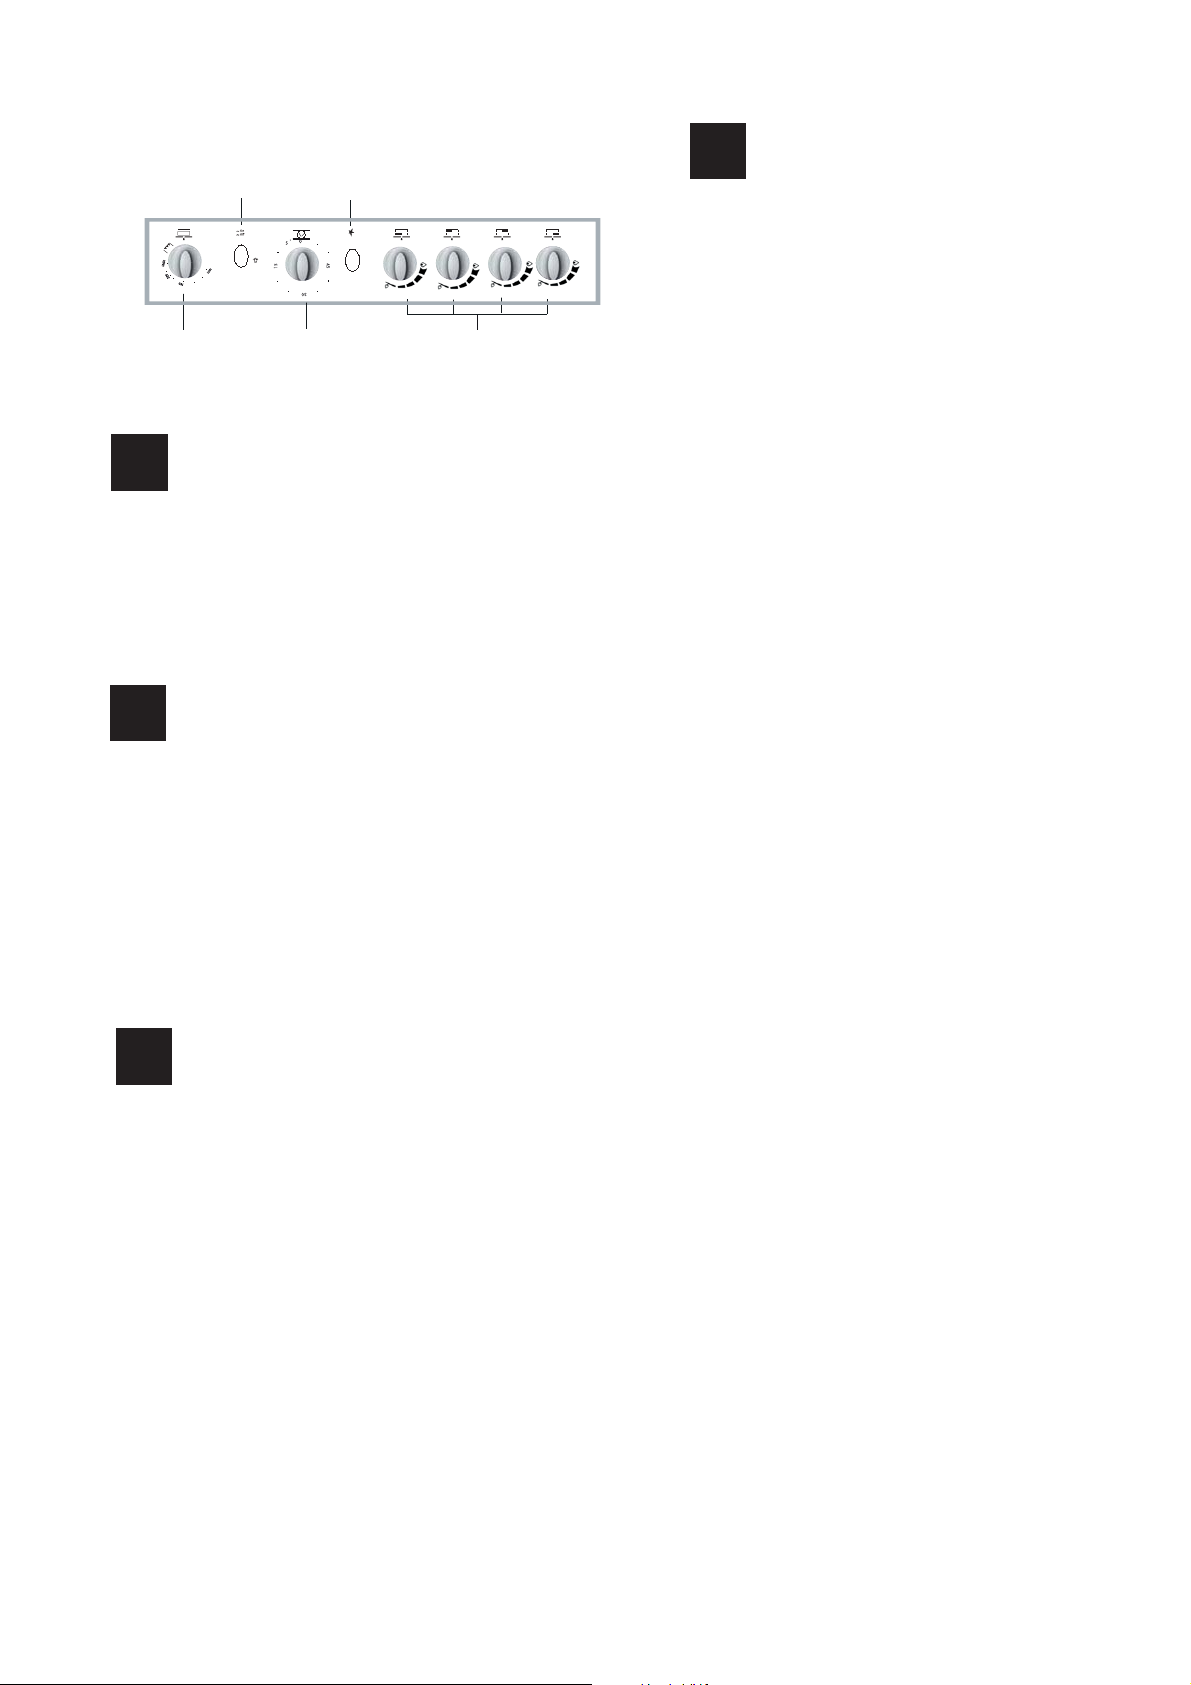
1.OVEN AND GRILL CONTROL knob
2.OVEN LIGHT / ROTISSERIE button
3.TIMER knob
4.GAS BURNER IGNITION button
5.Hob BURNER control knob
UA
1. Ручка ДУХОВКА й гриля
2.КНОПКА РОЖНА та ОСВІТЛЕННЯ ДУХОВКИ
3.Сукоятка ТАЙМЕРА
4. Автоматичне запалювання
5.Ручки для керування газовими
пальниками на варильній поверхні
RO
1.Buton de comandã pentru cuptor ºi grill
2.Buton pentru activarea luminii din cuptor/ rotisserie
3.Buton cronometru
4.Buton pentru activarea aprinderii electronice
5.Butoane comandi ochiuri aragaz
Description of the appliance
Control panel
Опис плити
Панель управління
Descriere aparatului
Panoul de control
4
3
5
GB
Warnings
WARNING: The appliance and its
accessible parts become hot during
use.
Care should be taken to avoid touching heating elements.
Children less than 8 years of age
shall be kept away unless continuously supervised.
This appliance can be used by children aged from 8 years and above
and persons with reduced physical,
sensory or mental capabilities or lack
of experience and knowledge if they
have been given supervision or instruction concerning use of the appliance in a safe way and understand
the hazards involved. Children shall
not play with the appliance. Cleaning
and user maintenance shall not be
made by children without supervision.
WARNING: Unattended cooking on a
hob with fat or oil can be dangerous
and may result in fi re.
NEVER try to extinguish a fi re with
water, but switch off the appliance
and then cover fl ame e.g. with a lid or
a fi re blanket.
Do not use harsh abrasive cleaners
or sharp metal scrapers to clean
the oven door glass since they can
scratch the surface, which may result
in shattering of the glass.
The internal surfaces of the compartment (where present) may become
hot.
Never use steam cleaners or pressure cleaners on the appliance.
Remove any liquid fro
the lid before opening it.
Do not close the glass cover (if present) when the gas burners or electric
hotplates are still hot.
WARNING: Ensure that the appliance
is switched off before replacing the
lamp to avoid the possibility of electric
shock.
CAUTION: the use of inappropriate
hob guards can cause accidents.
WARNING: Ensure that the appliance
is switched off before replacing the
lamp to avoid the possibility of electric
shock.
! When you place the rack inside,
make sure that the stop is directed
upwards and in the back of the cavity
.
2

UA
ɁȺɉɈȻȱɀɇɂɏɁȺɏɈȾȱȼ
ATENÞIE
RO
УВАГА! Під час роботи цей прилад,
а також його доступні частини
нагріваються до високих температур.
Слід бути особливо обережними, щоб
не торкатися нагрівальних елементів.
Діти віком до 8 років мають
знаходитися на небезпечній відстані
від приладу, якщо неможливо
забезпечити постійний контроль над
ними.
Дозволяється користування цим
приладом дітьми віком від 8 років,
а
також особами з обмеженими
фізичними, сенсорними або
розумовими можливостями або
особами без належного досвіду і знань,
якщо вони перебувають під постійним
контролем або проінструктовані щодо
правил з небезпечного користування
приладу і усвідомлюють ступені
ризику. Не дозволяйте дітям гратися
з приладом. Операції з очищення
і догляду не повинні виконуватися
дітьми без
належного контролю.
УВАГА! Небезпечно залишати без
нагляду плити з жиром або олією, тому
що це може призвести до пожежі.
НІ В ЯКОМУ РАЗІ не слід намагатися
погасити полум’я/пожежу водою.
Необхідно вимкнути прилад і накрити
полум’я, наприклад, кришкою або
вогнетривким покривалом.
Не використовувати абразивні засоби
ані металеві загострені шпателі
для очищення скляних дверцях
духовки, тому що вони можуть
пошкрябати поверхню, призводячи до
розтріскування скла.
Внутрішні поверхні відділення (де вони
наявні) можуть нагріватися до високих
температур.
Забороняється використання апаратів
для очищення парою або високим
тиском.
Витріть насухо всі наявні на кришці
рідини, перш ніж відкрити її. Не
закривайте скляну кришку (
якщо вона
наявна), якщо газові пальники або
електричні конфорки залишаються
нагрітими.
УВАГА! Щоб запобігти враженню
електричним струмом переконайтеся в
тому, що прилад вимкнений, перш ніж
заміняти лампочку.
УВАГА! Щоб запобігти враженню
електричним струмом переконайтеся в
тому, що прилад
! Під част вставляння решітки слід
переконатися, що стопор повернутий
вгору і всередину
ніші вимкнений,
перш ніж заміняти лампочку.
ATENÞIE: Acest aparat ºi pãrþile sale
accesibile devin foarte calde în timpul
folosirii.
Trebuie sã fi þi atenþi ºi sã nu atingeþi
elementele de încãlzire.
Îndepãrtaþi copiii sub 8 ani dacã nu
sunt supravegheaþi continuu.
Acest aparat poate fi utilizat de co-
piii de peste 8 ani ºi de persoane cu
capacitãþi fi zice, senzoriale sau men-
tale reduse sau fãrã experienþã ºi
cunoºtinþe dacã se afl ã sub o supra-
veghere corespunzãtoare sau dacã
au fost instruiþi cu privire la folosirea
aparatului în mod sigur ºi dacã îºi
dau seama de pericolele corelate.
Copiii nu trebuie sã se joace cu aparatul. Operaþiunile de curãþare ºi de
întreþinere nu trebuie sã fi e efectuate
de copii fãrã supraveghere.
ATENÞIE: Lãsarea unui aragaz nesupravegheat cu grãsimi ºi uleiuri poate
fi periculoasã ºi poate provoca un
incendiu.
Nu trebuie NICIODATÃ sã încercaþi
sã stingeþi o fl acãrã/incendiu cu apã,
ci trebuie sã stingeþi aparatul ºi sã
acoperiþi fl acãra, de exemplu cu un
capac sau cu o pãturã ignifugã.
Nu folosiþi produse abrazive, nici
perii de metal tãioase pentru a curãþa
uºa de sticlã a cuptorului, deoarece
ar putea zgâria suprafaþa, provocând
astfel spargerea geamului.
Suprafeþele interne ale sertarului
(dacã este prezent) se pot încãlzi.
Nu folosiþi niciodatã aparate cu aburi sau sub presiune pentru a curãþa
aparatul.
Eliminaþi eventualele reziduuri de
lichid de pe capac, înainte de a-l
deschide. Nu închideþi capacul
din sticlã (dacã este prezent) cu
arzãtoarele de gaz sau plita electricã
încã calde.
ATENÞIE: Asiguraþi-vã cã aparatul este stins înainte de a înlocui
lampa pentru a evita posibilitatea
electrocutãrilor.
ATENÞIE: folosirea unor protecþii
necorespunzãtoare ale plitei poate
provoca accidente.
ATENbIE: Asiguraci-v c aparatul este
stins înainte de a înlocui lampa pentru a evita posibilitatea electrocutrilor.
!Când introduceţi grătarul, asiguraţi-
-vă că opritorul este îndreptat în sus
şi în partea din spate a cavităţii .
GB
3
Installation
GB
! Before operating your new appliance please read
this instruction booklet carefully. It contains important
information concerning the safe installation and
operation of the appliance.
! Please keep these operating instructions for future
reference. Make sure that the instructions are kept with
the appliance if it is sold, given away or moved.
! The appliance must be installed by a qualified
professional according to the instructions provided.
! Any necessary adjustment or maintenance must be
performed after the cooker has been disconnected
from the electricity supply.
Room ventilation
The appliance may only be installed in permanentlyventilated rooms, according to current national
legislation. The room in which the appliance is installed
must be ventilated adequately so as to provide as
much air as is needed by the normal gas combustion
3
process (the flow of air must not be lower than 2 m
/h
per kW of installed power).
The air inlets, protected by grilles, should have a duct
2
with an inner cross section of at least 100 cm
and
should be positioned so that they are not liable to even
partial obstruction (see figure A).
These inlets should be enlarged by 100% - with a
2
minimum of 200 cm
- whenever the surface of the
hob is not equipped with a flame failure safety device.
When the flow of air is provided in an indirect manner
from adjacent rooms (see figure B), provided that
these are not communal parts of a building, areas with
increased fire hazards or bedrooms, the inlets should
be fitted with a ventilation duct leading outside as
described above.
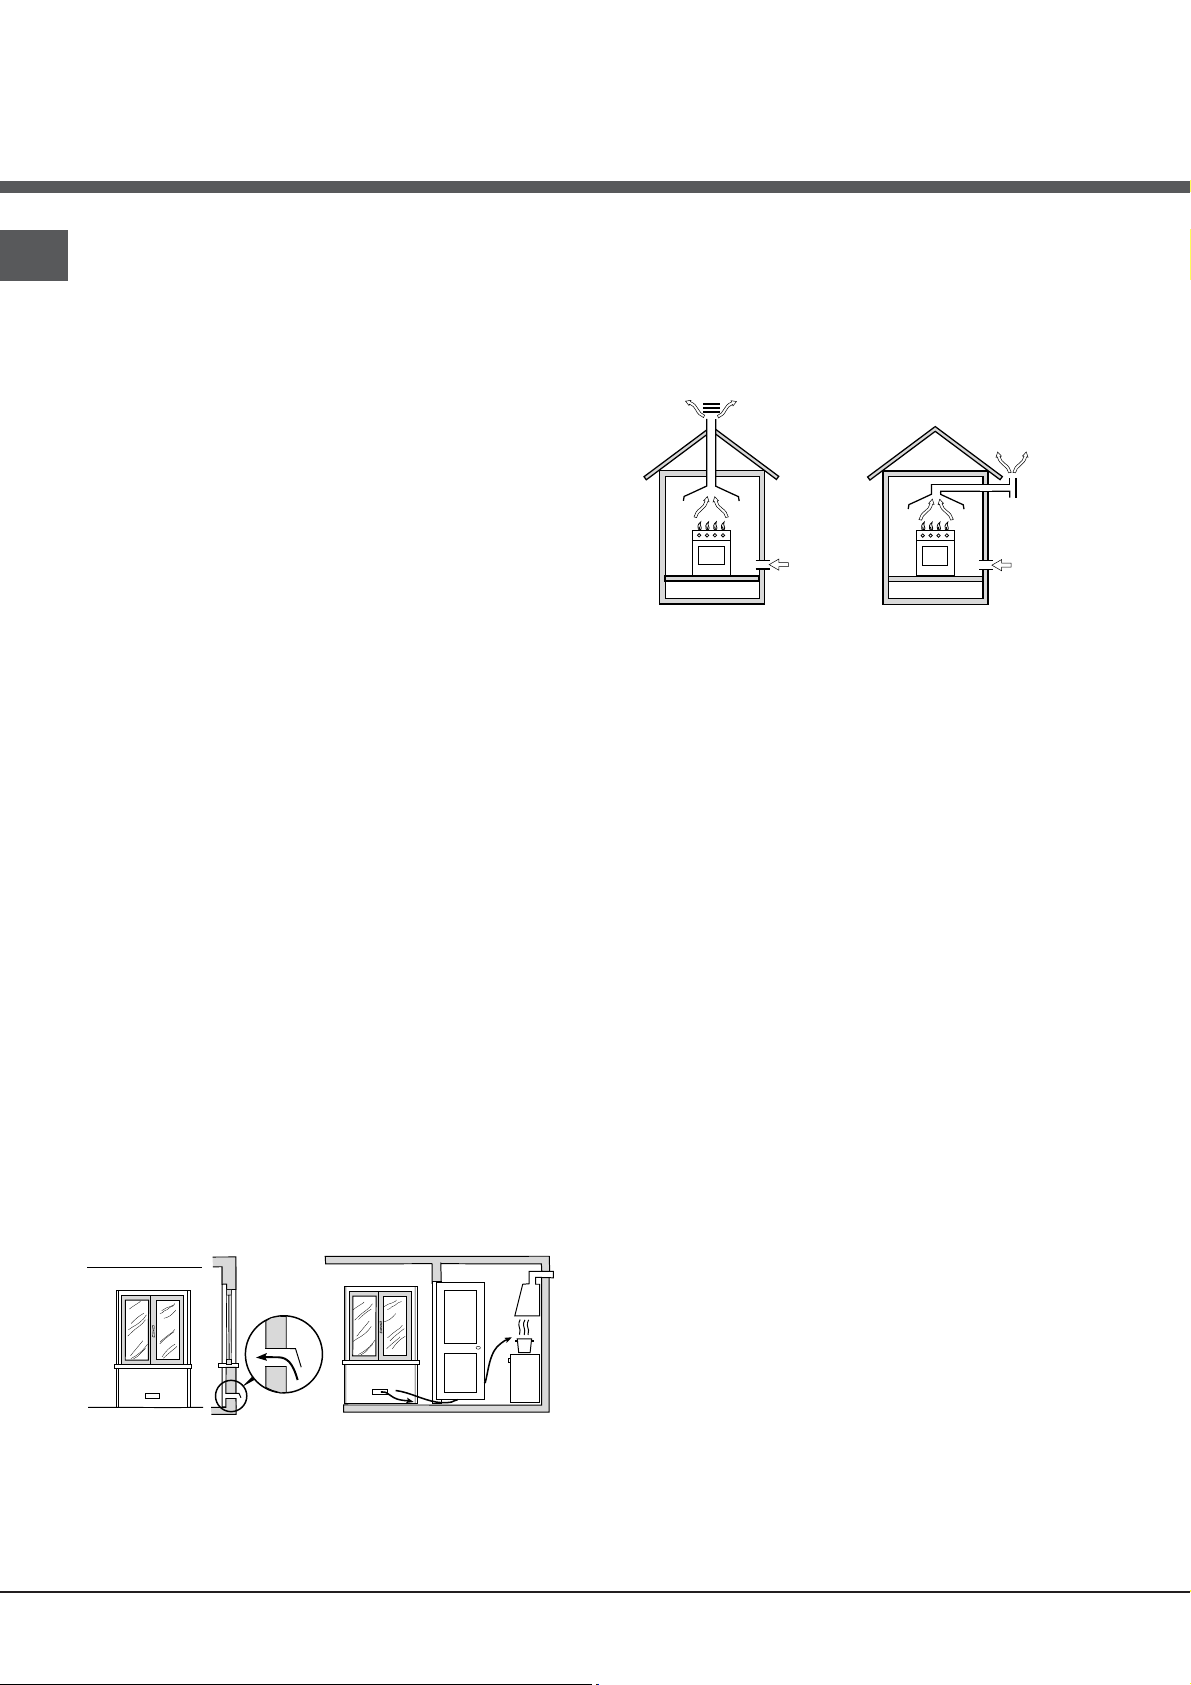
Disposing of combustion fumes
The disposal of combustion fumes should be
guaranteed using a hood connected to a safe and
efficient natural suction chimney, or using an electric
fan that begins to operate automatically every time the
appliance is switched on (see figure).
Fumes channelled
straight outside
Fumes channelled through
a chimney or a branched
flue system (reserved for
cooking appliances)
! The liquefied petroleum gases are heavier than air
and collect by the floor, therefore all rooms containing
LPG cylinders must have openings leading outside so
that any leaked gas can escape easily.
LPG cylinders, therefore, whether partially or
completely full, must not be installed or stored in rooms
or storage areas that are below ground level (cellars,
etc.). Only the cylinder being used should be stored
in the room; this should also be kept well away from
sources of heat (ovens, chimneys, stoves) that may
cause the temperature of the cylinder to rise above
50°C.
Positioning and levelling
! It is possible to install the appliance alongside
cupboards whose height does not exceed that of the
hob surface.
Adjacent room Room
requiring
ventilation
A
Ventilation opening for
comburent air
Increase in the gap between
the door and the flooring
A B
! After prolonged use of the appliance, it is advisable to
open a window or increase the speed of any fans used.
4
! Make sure that the wall in contact with the back of
the appliance is made from a non-flammable, heatresistant material (T 90°C).
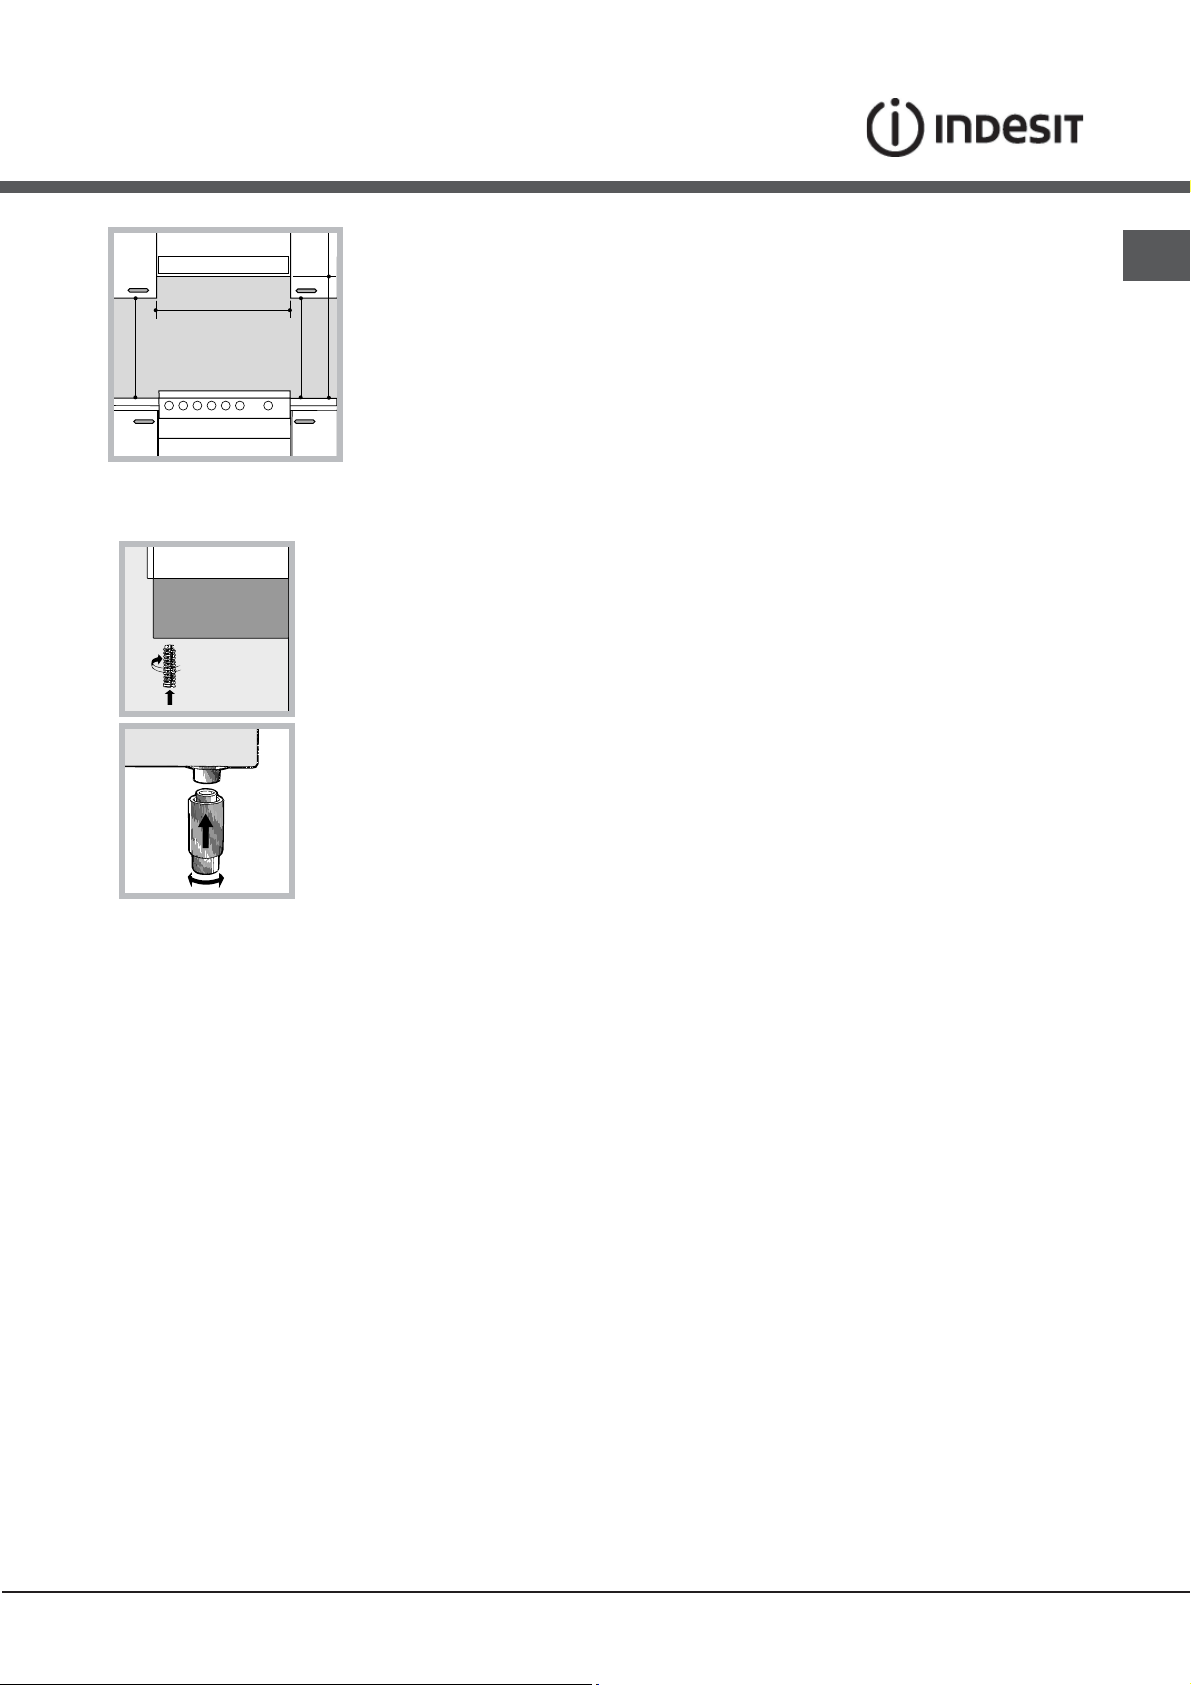
To install the appliance correctly:
• Place it in the kitchen, dining room or the bed-sit (not
in the bathroom).
• If the top of the hob is higher than the cupboards,
the appliance must be installed at least 600 mm away
from them.
• If the cooker is installed underneath a wall cabinet,
there must be a minimum distance of 420 mm
between this cabinet and the top of the hob.
This distance should be increased to 700 mm if the
wall cabinets are flammable (see figure).
• Do not position
HOOD
420
Min.
min.
650
mm. with hood
min.
700
mm. without hood
mm.
600
Min. mm.
420
Min. mm.
blinds behind the cooker
or less than 200 mm
away from its sides.
• Any hoods must be
installed according to
the instructions listed in
the relevant operating
manual.
Levelling
If it is necessary to level the appliance, screw the
adjustable feet into the places
provided on each corner of
the base of the cooker (see
figure).
The legs* fit into the slots on
the underside of the base of
the cooker.
not use extension cords or multiple sockets.
! Once the appliance has been installed, the power
supply cable and the electrical socket must be easily
accessible.
! The cable must not be bent or compressed.
! The cable must be checked regularly and replaced
by authorised technicians only.
! The manufacturer declines any liability should
these safety measures not be observed.
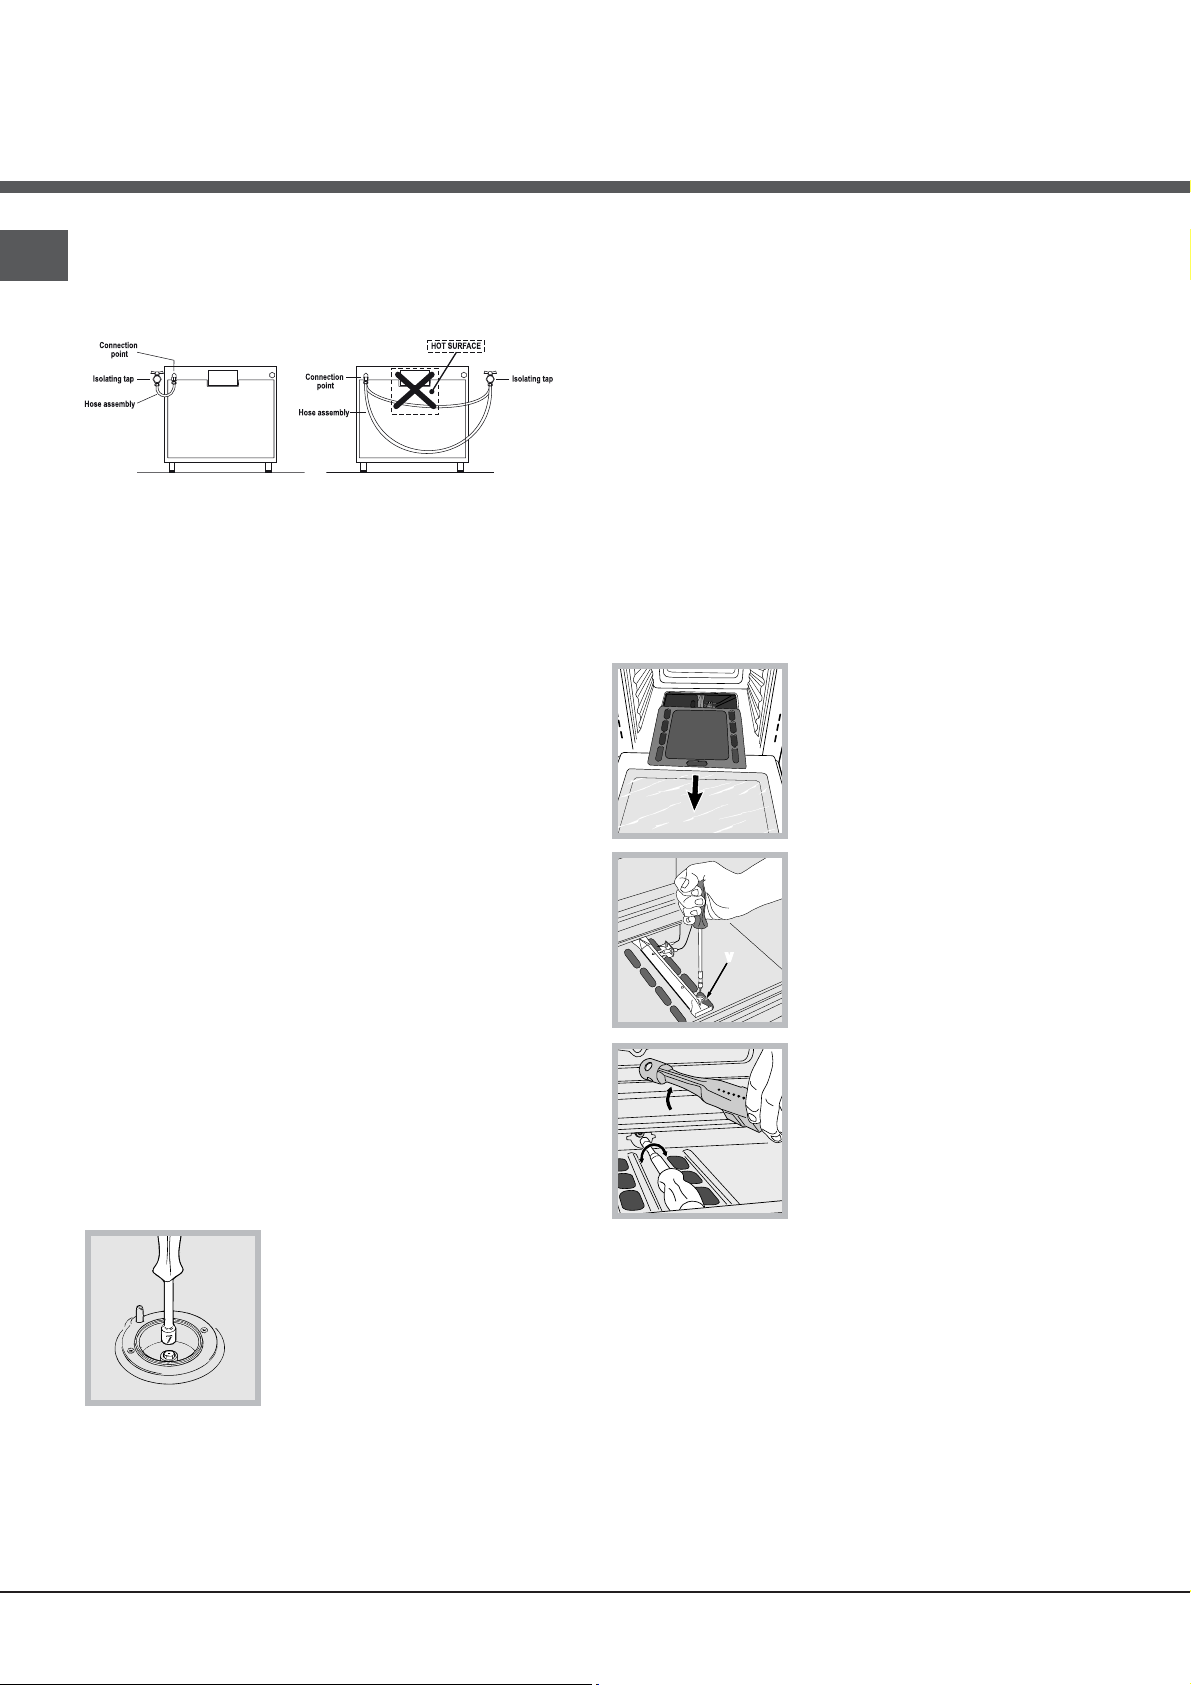
Gas connection
Connection to the gas network or to the gas cylinder
may be carried out using a flexible rubber or steel hose,
in accordance with current national legislation and after
making sure that the appliance is suited to the type of gas
with which it will be supplied (see the rating sticker on
the cover: if this is not the case see below). When using
liquid gas from a cylinder, install a pressure regulator
which complies with current national regulations. To
make connection easier, the gas supply may be turned
sideways*: reverse the position of the hose holder with
that of the cap and replace the gasket that is supplied
with the appliance.
GB
Electrical connection
Install a standardised plug corresponding to the load
indicated on the appliance data plate (see Technical
data table).
The appliance must be directly connected to the mains
using an omnipolar circuit-breaker with a minimum contact
opening of 3 mm installed between the appliance and the
mains. The circuit-breaker must be suitable for the charge
indicated and must comply with current national legislation
(the earthing wire must not be interrupted by the circuitbreaker). The supply cable must be positioned so that it
does not come into contact with temperatures higher than
50°C at any point.
Before connecting the appliance to the power supply,
make sure that:
• The appliance is earthed and the plug is compliant with
the law.
• The socket can withstand the maximum power of the
appliance, which is indicated by the data plate.
• The voltage is in the range between the values
indicated on the data plate.
• The socket is compatible with the plug of the
appliance. If the socket is incompatible with the
plug, ask an authorised technician to replace it. Do
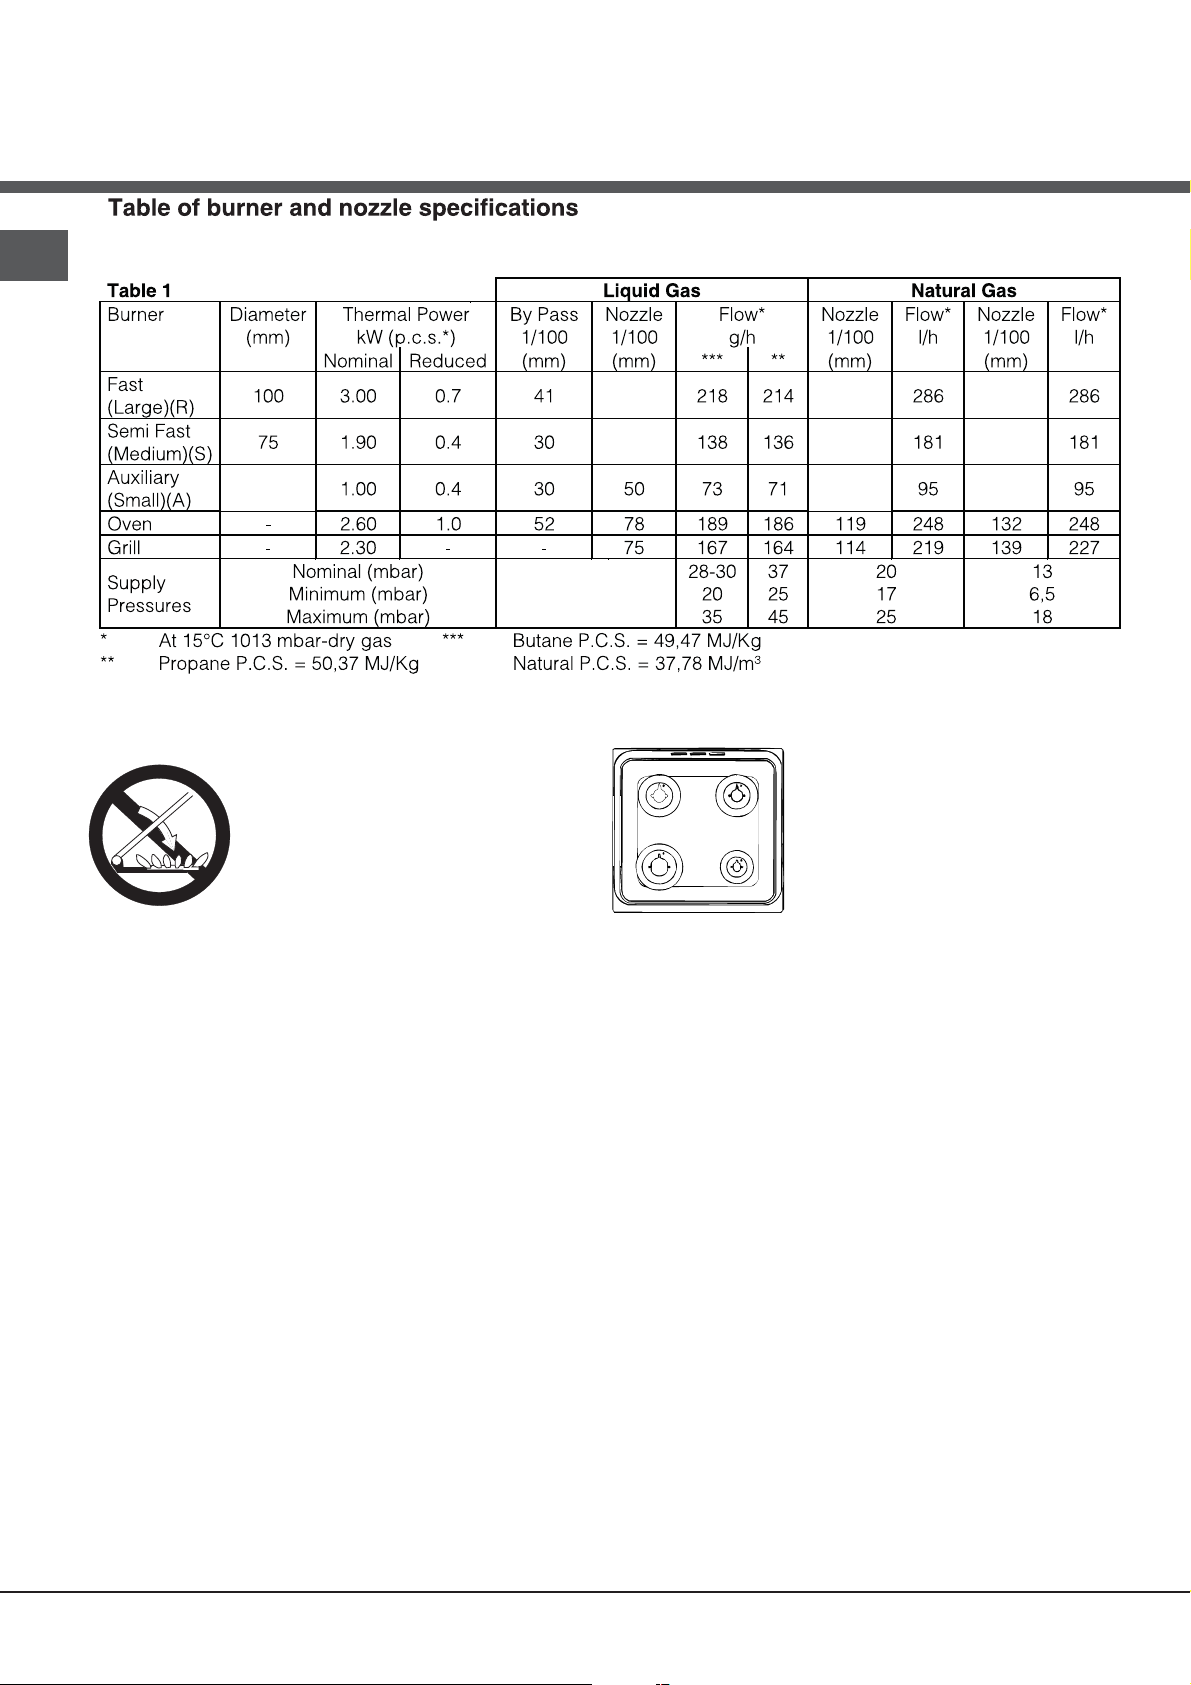
! Check that the pressure of the gas supply is
consistent with the values indicated in the Table
of burner and nozzle specifications (see below).
This will ensure the safe operation and durability of
your appliance while maintaining efficient energy
consumption.
Gas connection using a flexible rubber hose
Make sure that the hose complies with current national
legislation. The internal diameter of the hose must
measure: 8 mm for liquid gas supply; 13 mm for
methane gas supply.
Once the connection has been performed, make sure
that the hose:
• Does not come into contact with any parts that reach
temperatures of over 50°C.
• Is not subject to any pulling or twisting forces and
that it is not kinked or bent.
• Does not come into contact with blades, sharp
corners or moving parts and that it is not
compressed.
5
GB
V
• Is easy to inspect along its whole length so that its
condition may be checked.
• Is shorter than 1500 mm.
• Fits firmly into place at both ends, where it will
be fixed using clamps that comply with current
regulations.
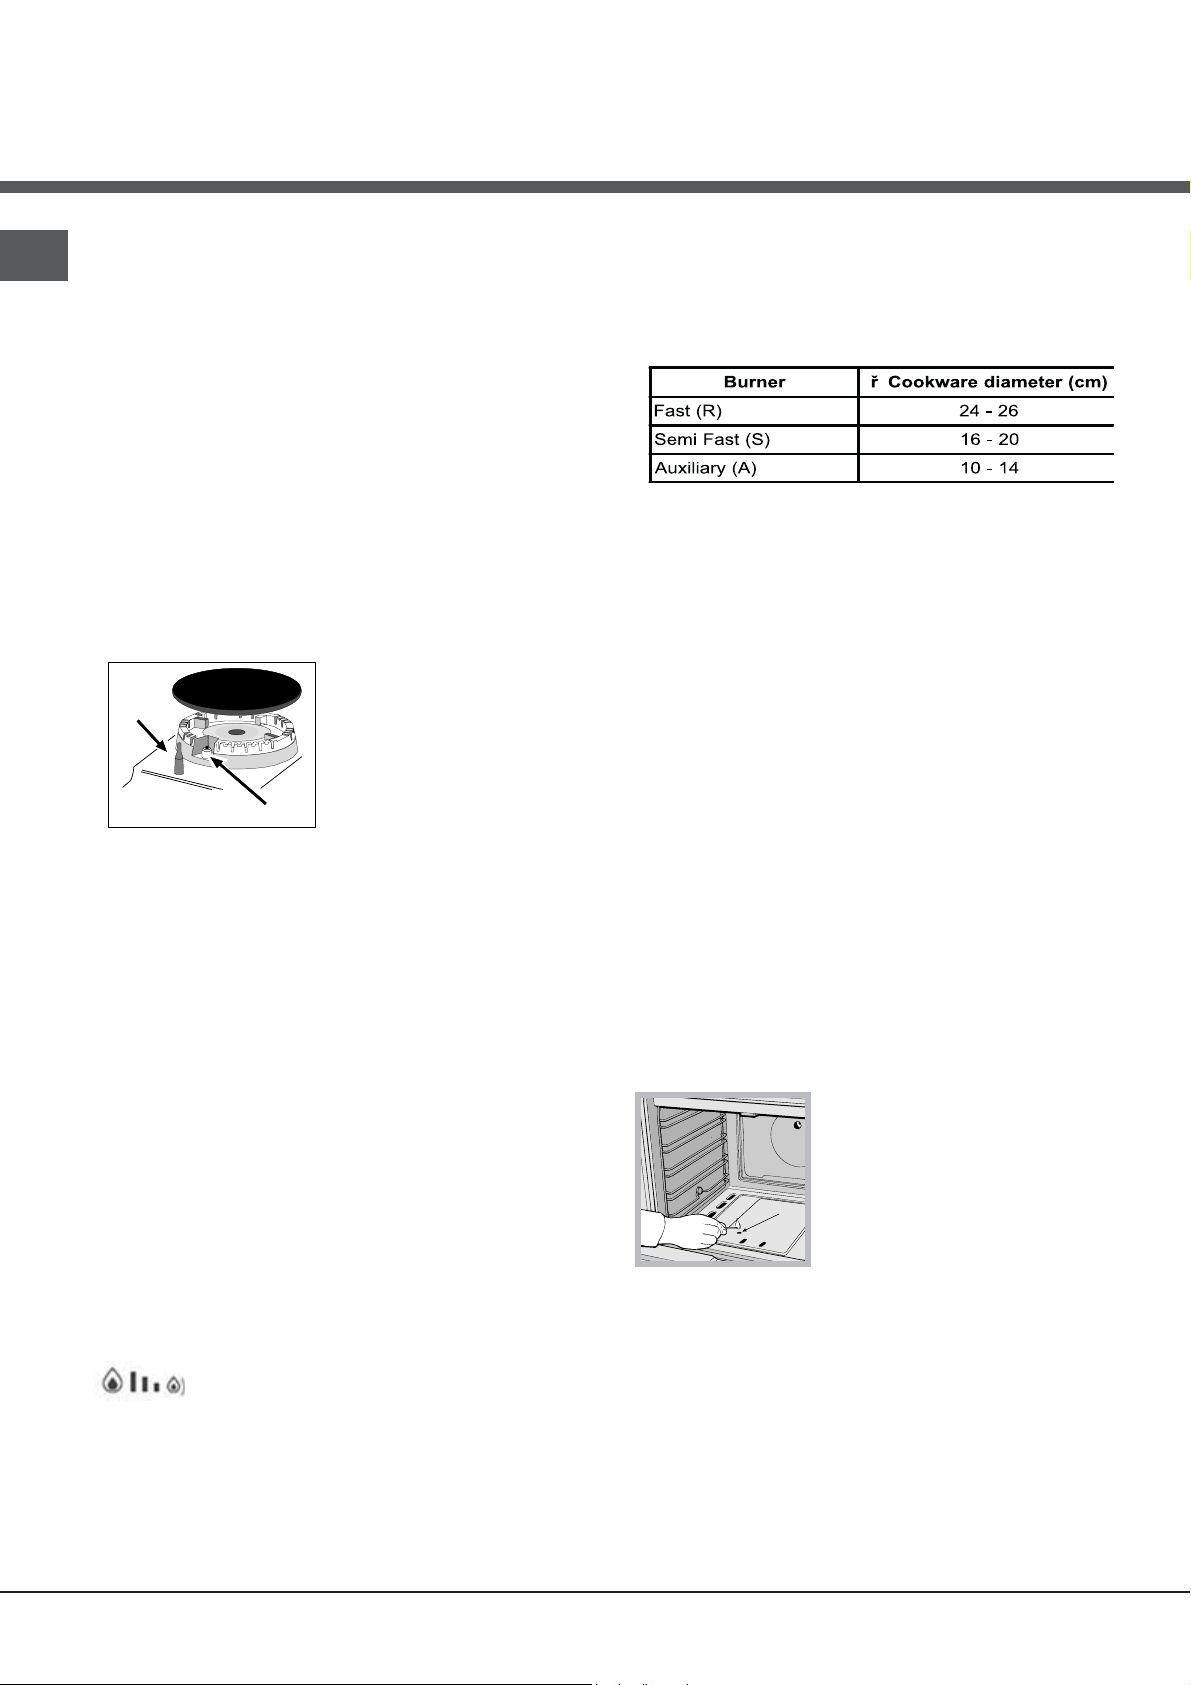
Adjusting the hob burners’ minimum setting:
1. Turn the tap to the minimum position.
2. Remove the knob and adjust the regulatory screw,
which is positioned inside or next to the tap pin, until
the flame is small but steady.
! If the appliance is connected to a liquid gas supply,
the regulatory screw must be fastened as tightly as
possible.
3. While the burner is alight, quickly change the position of
the knob from minimum to maximum and vice versa several
times, checking that the flame is not extinguished.
! If one or more of these conditions is not fulfilled
or if the cooker must be installed according to the
conditions listed for class 2 - subclass 1 appliances
(installed between two cupboards), the flexible steel
hose must be used instead (see below).
Connecting a flexible jointless stainless steel pipe
to a threaded attachment
Make sure that the hose and gaskets comply with
current national legislation.
To begin using the hose, remove the hose holder on
the appliance (the gas supply inlet on the appliance is
a cylindrical threaded 1/2 gas male attachment).
! Perform the connection in such a way that the hose
length does not exceed a maximum of 2 metres,
making sure that the hose is not compressed and does
not come into contact with moving parts.
Checking the tightness of the connection
When the installation process is complete, check the
hose fittings for leaks using a soapy solution. Never
use a flame.
Adapting to different types of gas
It is possible to adapt the appliance to a type of gas
other than the default type (this is indicated on the
rating label on the cover).
! The hob burners do not require primary air
adjustment.
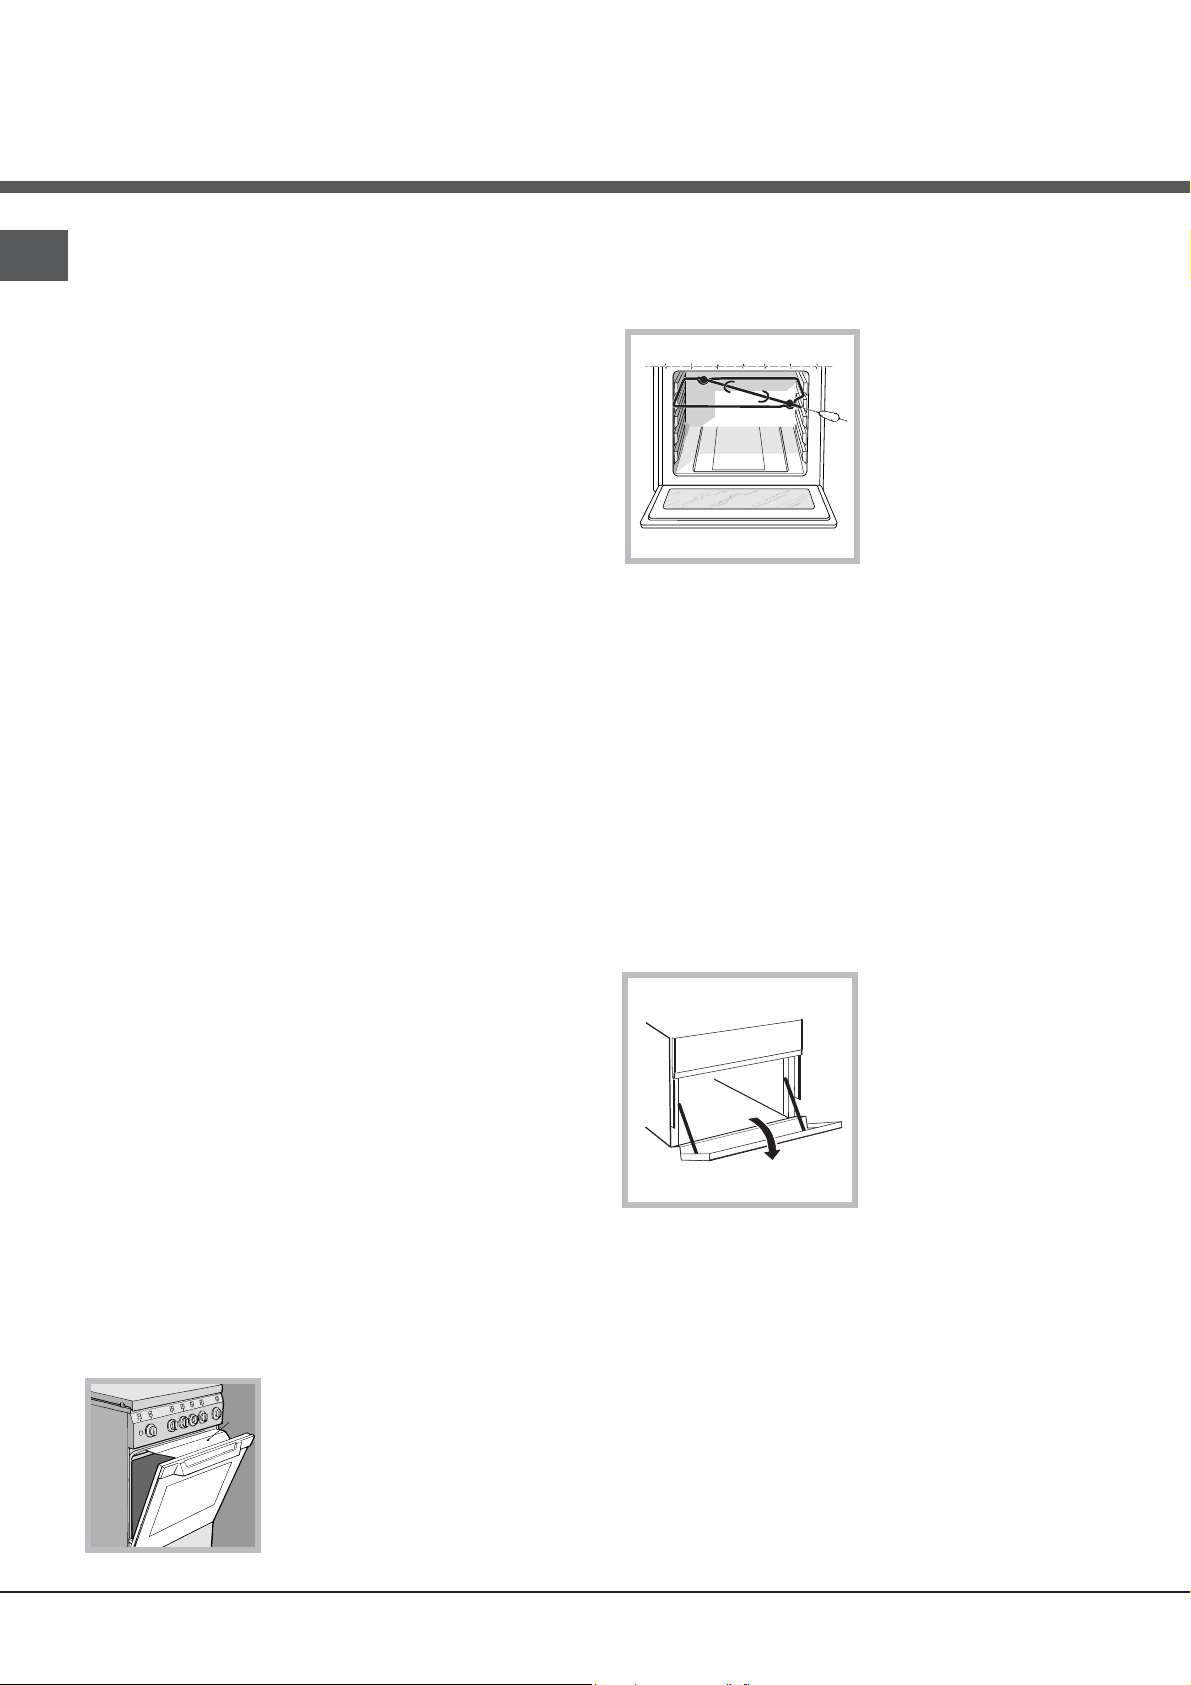
Adapting the oven
Replacing the oven burner nozzle:
1. Open the oven door fully
2. Pull out the sliding oven
bottom (see diagram).
3. Remove the oven burner
after unscrewing the screws V
(see figure).
4. Unscrew the nozzle using a
special nozzle socket spanner
(see figure) or with a 7 mm
socket spanner, and replace it
with a new nozzle that is suited
to the new type of gas (see
Burner and nozzle specifications
table).
Adapting the hob
Replacing the nozzles for the
hob burners:
1. Remove the hob grids and
slide the burners off their seats.
2. Unscrew the nozzles using
a 7 mm socket spanner (see
figure), and replace them with nozzles suited to the
new type of gas (see Burner and nozzle specifications
table).
3. Replace all the components by following the above
instructions in reverse.
6
Adjusting the gas oven burner’s minimum setting:
1. Light the burner (see Start-up and Use).
2. Turn the knob to the minimum position (MIN)
after it has been in the maximum position (MAX) for
approximately 10 minutes.
3. Remove the knob.
4. Tighten or loosen the adjustment screws on the
outside of the thermostat pin (see figure) until the flame
is small but steady.
! In the case of natural gas, the adjustment screw must
be unscrewed by turning it anti-clockwise.
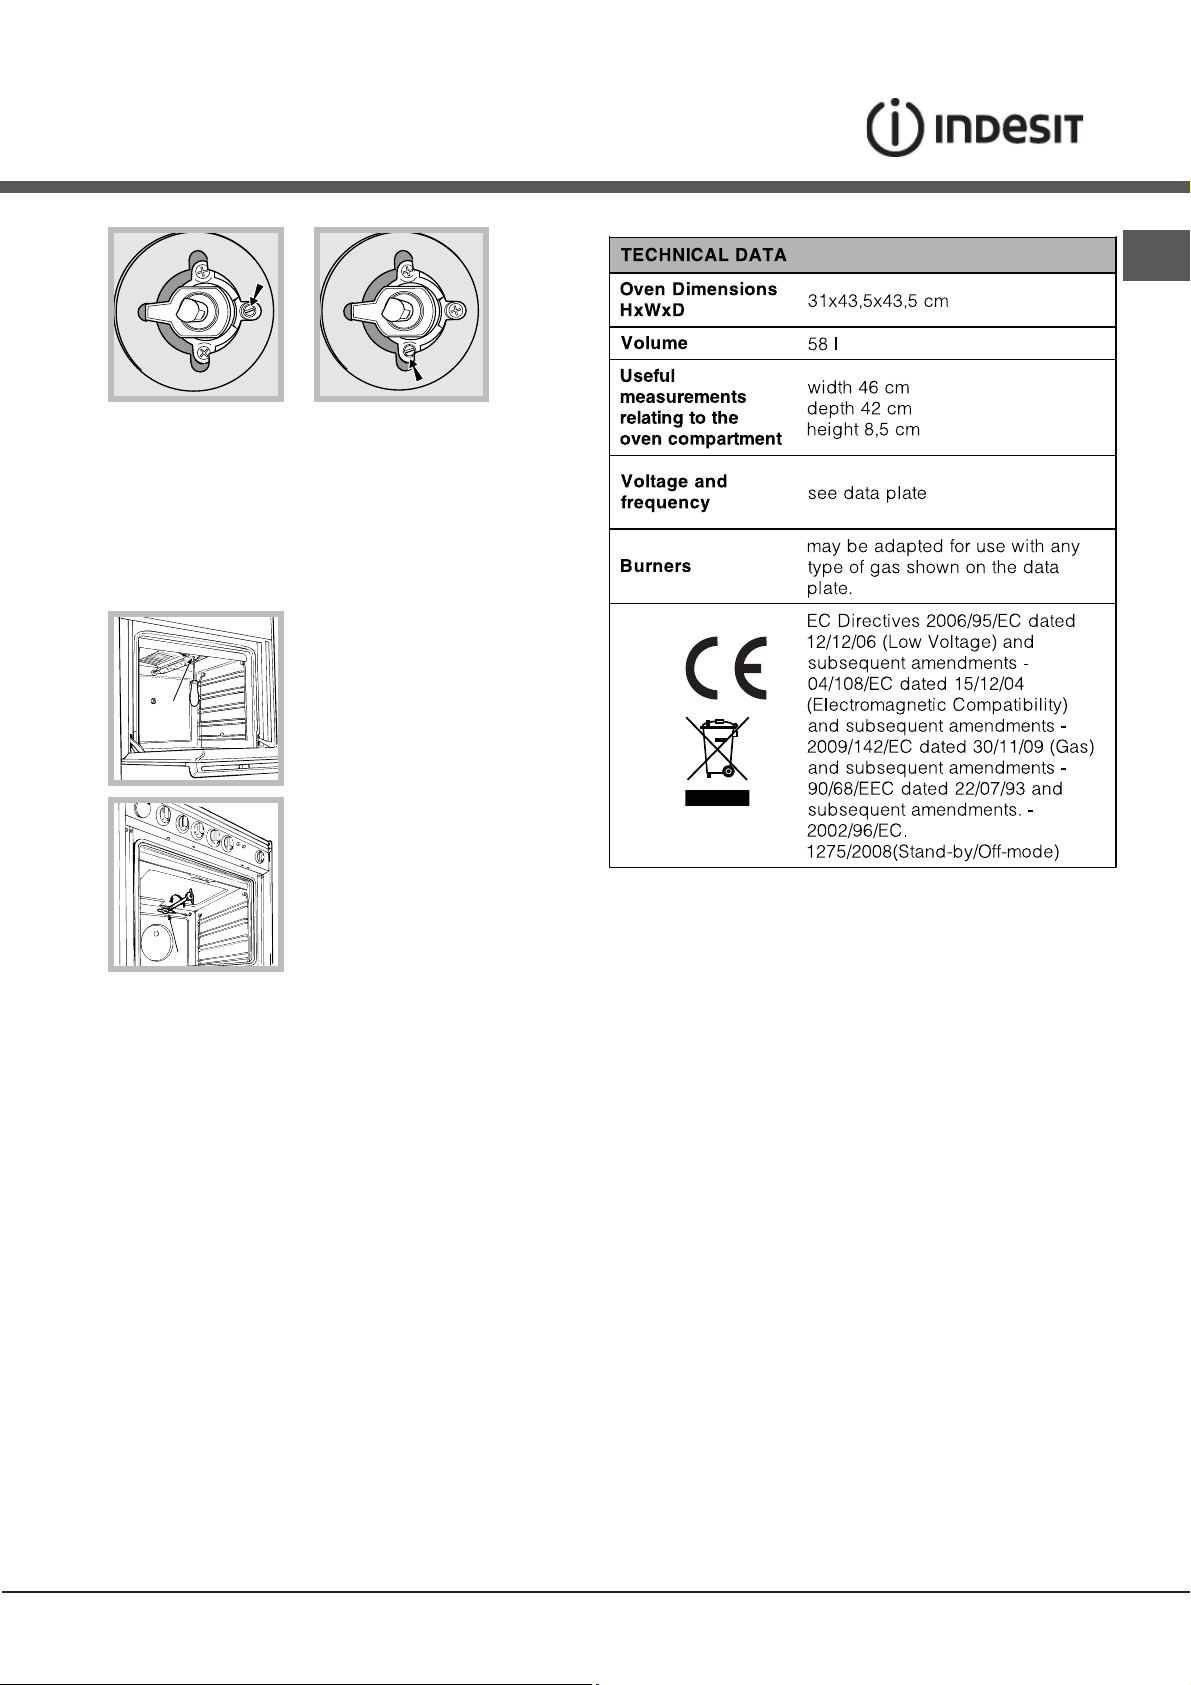
5. Turn the knob from the MAX position to the MIN
V
I
position quickly or open and shut the oven door,
making sure that the burner is not extinguished.
Adapting the grill
Replacing the grill burner nozzle:
1. Remove the oven burner
after loosening screw V (see
figure).
2. Unscrew the grill burner
nozzle using a special nozzle
socket spanner (see figure) or
preferably with a 7 mm socket
spanner, and replace it with a
new nozzle that is suited to the
new type of gas (see Burner
and nozzle specifications
table).
GB
! Be careful of the spark plug wires and the
thermocouple tubes.
! The oven and grill burners do not require primary air
adjustment.
! After adjusting the appliance so it may be used with
a different type of gas, replace the old rating label with
a new one that corresponds to the new type of gas
(these labels are available from Authorised Technical
Assistance Centres).
! Should the gas pressure used be different (or vary
slightly) from the recommended pressure, a suitable
pressure regulator must be fitted to the inlet hose in
accordance with current national regulations relating to
“regulators for channelled gas”.
We recommend cleaning the oven before using it for
the first time, following the instructions provided in the
„Care and maintenance” section.
7
GB
S
S
R
A
51
WARNING! The glass lid can break
in if it is heated up. Turn off all the
burners and the electric plates before
closing the lid. *Applies to the models
with glass cover only.
87
69
128
104
78
I6GG1G/ UA
145
115
85
8
GB
F
X
C
Start-up and use
Using the hob
Lighting the burners
For each BURNER knob there is a complete ring
showing the strength of the flame for the relevant
burner.
To light one of the burners on the hob:
1. Bring a flame or gas lighter close to the burner.
2. Press the BURNER knob and turn it in an
anticlockwise direction so that it is pointing to the
maximum flame setting .
3. Adjust the intensity of the flame to the desired level
by turning the BURNER knob in an anticlockwise
direction. This may be the minimum setting , the
maximum setting or any position in between the two.
Practical advice on using the burners
For the burners to work in the most efficient way
possible and to save on the amount of gas consumed, it
is recommended that only pans that have a lid and a flat
base are used. They should also be suited to the size of
the burner.
To identify the type of burner, please refer to the
diagrams contained in the “Burner and nozzle
specifications”.
If the appliance is fitted with an electronic lighting
device* (C), press the ignition button, marked with the
symbol
BURNER knob down and
turn it in an anticlockwise
direction, towards the
maximum flame setting,
until the burner is lit.
The burner may be
extinguished when the
knob is released. If this occurs, repeat the operation,
holding the knob down for a longer period of time.
! If the flame is accidentally extinguished, switch off the
burner and wait for at least 1 minute before attempting
to relight it.
If the appliance is equipped with a flame failure safety
device (X)*, press and hold the BURNER knob for
approximately 2-3 seconds to keep the flame alight
and to activate the device.
To switch the burner off, turn the knob until it reaches
the stop position
•.
, then hold the
Flame adjustment according to levels
the burner flame intensity can be adjusted with the
knob according to 6 power levels, from maximum
to minimum with 4 intermediate positions:
! On the models supplied with a reducer shelf,
remember that this should be used only for the auxiliary
burner when you use casserole dishes with a diameter
under 12 cm.
Using the oven
! The first time you use your appliance, heat the empty
oven with its door closed at its maximum temperature
for at least half an hour. Ensure that the room is well
ventilated before switching the oven off and opening
the oven door. The appliance may emit a slightly
unpleasant odour caused by protective substances
used during the manufacturing process burning away.
! Before operating the product, remove all plastic film
from the sides of the appliance.
! Never put objects directly on the bottom of the oven;
this will avoid the enamel coating being damaged.
Only use position 1 in the oven when cooking with the
rotisserie spit.
Lighting the oven
To light the oven burner, bring
a flame or gas lighter close to
opening F (see figure) and press
the OVEN control knob while
turning it in an anticlockwise
direction until it reaches the MAX position.
If the appliance is fitted with an electronic lighting
device*, press the ignition button, marked with the
symbol
a click will indicate the change from one level to
another when turning the knob. The system
guarantees a more precise adjustment, allows
to replicate the flame intensity and to identify
easily the preferred level for different cooking
operations.
9
turn it in an anticlockwise direction, towards the MAX
position, until the burner is lit. If, after 15 seconds, the
burner is still not alight, release the knob, open the
oven door and wait for at least 1 minute before trying to
light it again. If there is no electricity the burner may be
lit using a flame or a lighter, as described above.
, then hold the OVEN control knob and
GB
D
! The oven is fitted with a safety device and it is
therefore necessary to hold the OVEN control knob
down for approximately 6 seconds.
! If the flame is accidentally extinguished, switch off the
burner and wait for at least 1 minute before attempting
to relight the oven.
Adjusting the temperature
To set the desired cooking temperature, turn the
OVEN control knob in an anticlockwise direction.
Temperatures are displayed on the control panel and
may vary between MIN (150°C) and MAX (250°C).
Once the set temperature has been reached, the oven
will keep it constant by using its thermostat.
Turnspit
To operate the rotisserie (see diagram) proceed as
follows:
1. Place the dripping pan
in position 1.
2. Place the rotisserie
support in position 4 and
insert the spit in the hole
provided on the back
panel of the oven.
3. Acitvate the function by
pressing the TURNSPIT
button.
Oven light
Grill
To light the grill, bring a flame or gas lighter close to
the burner and press the OVEN control knob while
turning it in a clockwise direction until it reaches the
position. The grill enables the surface of food to be
browned evenly and is particularly suitable for roast
dishes, schnitzel and sausages. Place the rack in
position 4 or 5 and the dripping pan in position 1 to
collect fat and prevent the formation of smoke.
If the appliance is fitted with an electronic lighting
device*, press the ignition button, marked with the
symbol
it in an clockwise direction, towards the position. If,
after 15 seconds, the burner is still not alight, release
the knob, open the oven door and wait for at least
1 minute before trying to light it again. If there is no
electricity the burner may be lit using a flame or a
lighter, as described above.
! The grill is fitted with a safety device and it is
therefore necessary to hold the OVEN control knob
down for approximately 6 seconds.
! If the flame is accidentally extinguished, switch off the
burner and wait for at least 1 minute before attempting
to relight the grill.
, then hold the OVEN control knob and turn
The light may be switched on at any moment by
pressing the OVEN LIGHT button.
Timer
To activate the Timer proceed as follows:
1. Turn the TIMER knob in a clockwise direction for
almost one complete revolution to set the buzzer.
2. Turn the TIMER knob in an anticlockwise direction
to set the desired length of time.
Lower compartment
There is a compartment
underneath the oven that
may be used to store
oven accessories or deep
dishes. To open the door
pull it downwards (see
gure).
! The internal surfaces of the compartment (where
present) may become hot.
! Do not place flammable materials in the lower oven
compartment.
10
! When using the grill, leave
the oven door ajar, positioning
the deflector D between the
door and the control panel (see
figure) in order to prevent the
knobs from overheating.
GB
11
 Loading...