

Indesit HGK.B IB, HGK 2.B IX IB, HGK 2.B IB, HGK.B Z Instructions For Installation And Use Manual

HGK.B IB
HGK 2.B IB
HGK 2.B IX IB
HGK.B Z
Built-in cooker
Installation and use
Cocina empotrable
Instalación y uso

3
13
Built-in electric cooker
Instructions for installation and use
Cocina empotrable eléctrica
Instrucciones para la instalación y uso

3
Congratulations on choosing an Indesit appliance, which you will find is dependable and easy to use. We recommend
that you read the instructions in this owner’ s manual carefully before use for the best perf ormance and to extend the life
of your appliance, as it will provide you with all the instructions you require to ensure its safe installation, use and
maintenance. Always k eep this owner’ s manual close to hand since you may need to ref er to it in the future. Thank you.
Close-up view
A. Control Panel
B. Dripping Pan or Baking Sheet
C. Oven Rack
D. Electric hotplate
E. Cooking temperature selection knob
F. Electric hotplate knobs
G. Electric hotplate indicator light
H. Guides for sliding the racks or dripping pan in and
out
I. Oven indicator light (only on certain models) - When
lit, it indicates the oven is heating up to the temperatu-
re set.
L. Cooking mode selection knob
M. End Cooking Time Knob (only available on certain
models)
C
A
B
H
D
D
LE M
G
F
LE
G
F
I
4
How to use your oven
The various features of this oven are controlled via the
knobs and buttons located on the control panel.
Notice: The first time y ou use your appliance, w e recommend that you set the thermostat to the highest setting
and leave the ov en on f or about half an hour with nothing
in it, with the oven door shut. Then, open the oven door
and let the room air. The odour that is often detected during this initial use is due to the evaporation of substances
used to protect the oven during storage and until it is installed.
Notice: Place the dripping pan provided on the bottom
shelf of the oven to prev ent any sauce and/or grease from
dripping onto the bottom of the oven only when grilling
food or when using the rotisserie (only available on certain models). F or all other types of cooking, ne ver use the
bottom shelf and never place anything on the bottom of
the oven when it is in operation because this could damage the enamel. Alw ays place your cookware (dishes , aluminium foil, etc. etc.) on the grid provided with the appliance inserted especially along the oven guides.
Notice: to use the oven in manual mode (not using the
end cooking time programmer), the 9 symbol must be
aligned with the reference mark on the control panel.
Convection Mode a
Position of thermostat knob “E”: betw een 60°C and Max.
On this setting, the top and bottom heating elements come
on. This is the classic, traditional type of oven which has
been perfected, with exceptional heat distribution and reduced energy consumption. The convection oven is still
unequalled when it comes to cooking dishes made up of
several ing redients, e.g. cabbage with ribs, Spanish style
cod, Ancona style stockfish, tender veal strips with rice,
etc. Excellent results are achieved when preparing veal
or beef-based dishes as well (braised meats, stew, goulash, wild game, ham etc.) which need to cook slowly and
require basting or the addition of liquid. It nonetheless remains the best system for baking cakes as well as fruit
and cooking using covered casserole dishes for o ven baking. When cooking in conv ection mode, only use one dripping pan or cooking rack at a time, otherwise the heat
distribution will be unev en. Using the diff erent rack heights
available, you can balance the amount of heat between
the top and the bottom of the oven. Select from among
the various rack heights based on whether the dish needs
more or less heat from the top.
Pastry Mode y
Position of thermostat knob “E”: Between 60°C and Max.
The bottom heating element comes on.
This mode is ideal for baking and cooking delicate foods especially cakes that need to rise because the heat coming from the bottom helps the leavening process .
Please note that it takes a considerable amount of time
for the higher temperatures to be reached, therefore we
recommend you use the “Convection Mode” in these
cases.
“Top” Oven c
Position of thermostat knob “E”: Between 60°C and Max.
The top heating element comes on.
This mode can be used to brown food at the end of cooking.
Grill
2
Position of thermostat knob “E”: Max
The top central heating element comes on.
The extremely high and direct temperature of the grill
makes it possible to brown the surf ace of meats and roasts
while locking in the juices to keep them tender . The grill is
also highly recommended for dishes that require a high
temperature on the surface: beef steaks, veal, rib steak,
filets, hamburgers etc...
Some grilling examples are included in the “Practical Cooking Advice” paragraph.
The rotisserie (only availab le on certain models)
To start the rotisserie, proceed as follows:
a) place the dripping pan on the 1st rack;
b) insert the special rotisserie suppor t on the 3rd rack
and position the spit by inserting it through the special
hole into the rotisserie at the back of the oven;
c) start the rotisserie using knob “L” to select setting 2.
The oven light
Set knob “L” to the 3 symbol to turn it on. It lights the
oven and stays on when any of the electrical heating
elements in the oven come on.
The control knobs for the hob electric hotplates (F)
The cookers can be equipped with standard, rapid and
automatic electric hotplates in a variety of combinations
(the rapid hotplates can be distinguished from the rest by
the red boss in the centre of the same, and the automatic
hotplates by the smaller circular aluminium plate in their
centre).
To avoid any heat loss and damage to the hotplates, we
advise you to use pans with a flat bottom, whose diameter
is no less than that of the hotplate itself.
The table contains the different settings indicated on the
knobs and the use for which the hotplates are
recommended.

5
Before using the hot plates for the first time, you
should heat them at maximum temperature for
approximately 4 minutes, without any pans. During
this initial stage, their protective coating hardens and
reaches its maximum resistance.
Electric hotplate indicator light (G)
This light comes on when any of the electrical hotplates
on the hob have been turned on.
End Cooking Time Knob (M) (only available on certain
models)
Some models are equipped with a timer program to control
when the oven shuts off during cooking. To use this feature ,
you must wind the “M” knob one full turn in the clockwise
direction 4 ; Then, turn the knob in the counter-clockwise
direction 5, to set the time by matching up the indicator
on the control panel with the number of minutes on the
knob.
At the end of the programmed length of time, the timer will
sound and automatically turn off the oven.
Attention: to use the oven in manual mode without the
cooking control timer, match the indicator on the control
panel with the ( symbol on the timer knob .
When the oven is not in use, the cooking control timer can
be used like a normal timer.
Warnings f or using the glass ceramic hob
T o get the best from your hob , here are a few helpful tips to keep
in mind during cooking or when preparing food.
l Use flat-bottomed pans to ensure the same adhere fully to
the cooking zone.
l Use pans whose diameter is sufficient to cover the hotplate
fully , so as to guarantee the use of all the a vailable heat.
l Make sure the bottom of the pan is always clean and dry , to
ensure correct contact and a long life for y our hotplates and
pans.
l Do not use the same pans you used on gas burners. The
concentration of heat on gas burners may def orm the bottom
of the pan, and so the desired effect will nev er be obtained if
you subsequently use the pan on the glass ceramic hob.
l Never leave a cooking zone on without a pan on it, as the
zone would heat up almost immediately , causing damage to
the heating elements.
l Do not forget that the cooking zone sta ys hot for at least half
an hour after it has been turned off, take care not to
inadvertently place pans or items on the hot zone.
l Do not turn the cooking zones on if there is any aluminium
foil or plastic material on the hob.
l Do not get too close to the hot hob.
l Warnings before using y our hob for the first time:
The glue used for the seals leaves greasy streaks on the
glass during storage. We advise you to remov e these before
using the appliance, using an ordinary detergent (non abrasive cream polish). Y ou ma y detect the smell of rubber upon
first use; this will disappear quic kly .
l The glass ceramic hob can withstand sudden temperature
changes and shocks. Nevertheless, it may break if y ou strike
it with a sharp object. In this case, unplug it immediately and
call for technical assistance to request its repair .
Setting Normal or Fast Plate
0
Off
1 Cooking vegetables, fish
2
Cooking potatoes (usi ng stea m) soup s,
chickpeas, beans.
3
Continuing the cooking of large quant ities
of food, minestrone
4
For roasting (average)
5
For roasting (above average )
6
For browning and reaching a boil in a
short time.
6
How to Keep Your Oven in Shape
Before cleaning your oven, or performing maintenance,
disconnect it from the power supply.
To extend the life of your oven, it must be cleaned
frequently, keeping in mind that:
• Do not use steam equipment to clean the appliance.
• the enamelled or stainless steel parts should be
washed with lukewarm water without using any abrasive powders or corrosiv e substances which could ruin
them; Stainless steel could get stained. If these stains
are difficult to remove, use special products available
on the market. After cleaning, it is advisable to rinse
thoroughly and dry .
• the inside of the oven should preferably be cleaned
immediately after use, when it is still warm, with hot
water and soap; the soap should be rinsed away and
the interior dried thoroughly. Av oid using abrasive detergents (for example cleaning powders, etc…) and
abrasive sponges for dishes or acids (such as
limescale-remover , etc…) as these could damage the
enamel. If the grease spots and dir t are particularly
tough to remove, use a special product f or oven cleaning, following the instructions provided on the pack et.
• if you use your oven for an extended period of time,
condensation may form. Dry it using a soft cloth.
• there is a rubber seal surrounding the oven opening
which guarantees its perfect functioning. Check the
condition of this seal on a regular basis. If necessary,
clean it and avoid using abrasive products or objects
to do so. Should it become damaged, please contact
your nearest After-sales Service Centre. We recommend you avoid using the oven until it has been repaired.
• never line the oven bottom with aluminium foil, as the
consequent accumulation of heat could compromise
the cooking and even damage the enamel.
• clean the glass door using non-abrasive products or
sponges and dry it with a soft cloth.
• the electric hotplates should be cleaned with a damp
cloth and lubricated with a little oil while still warm;
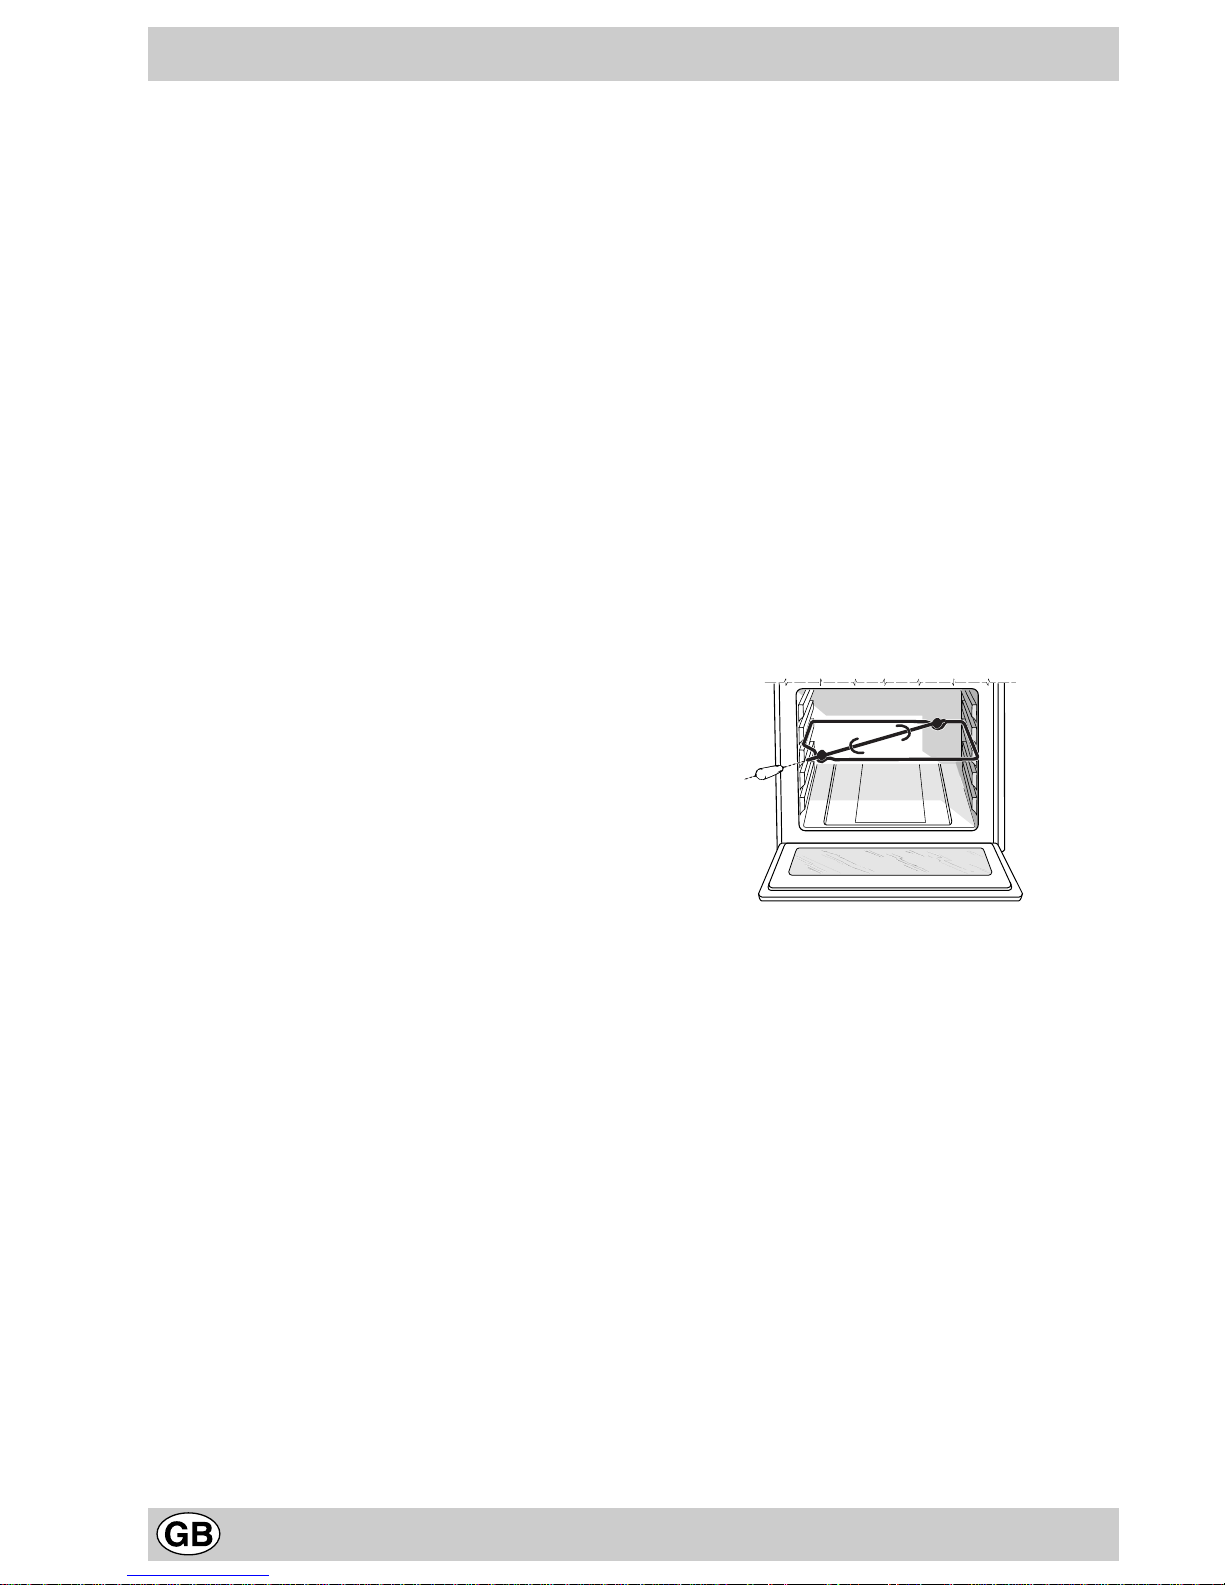
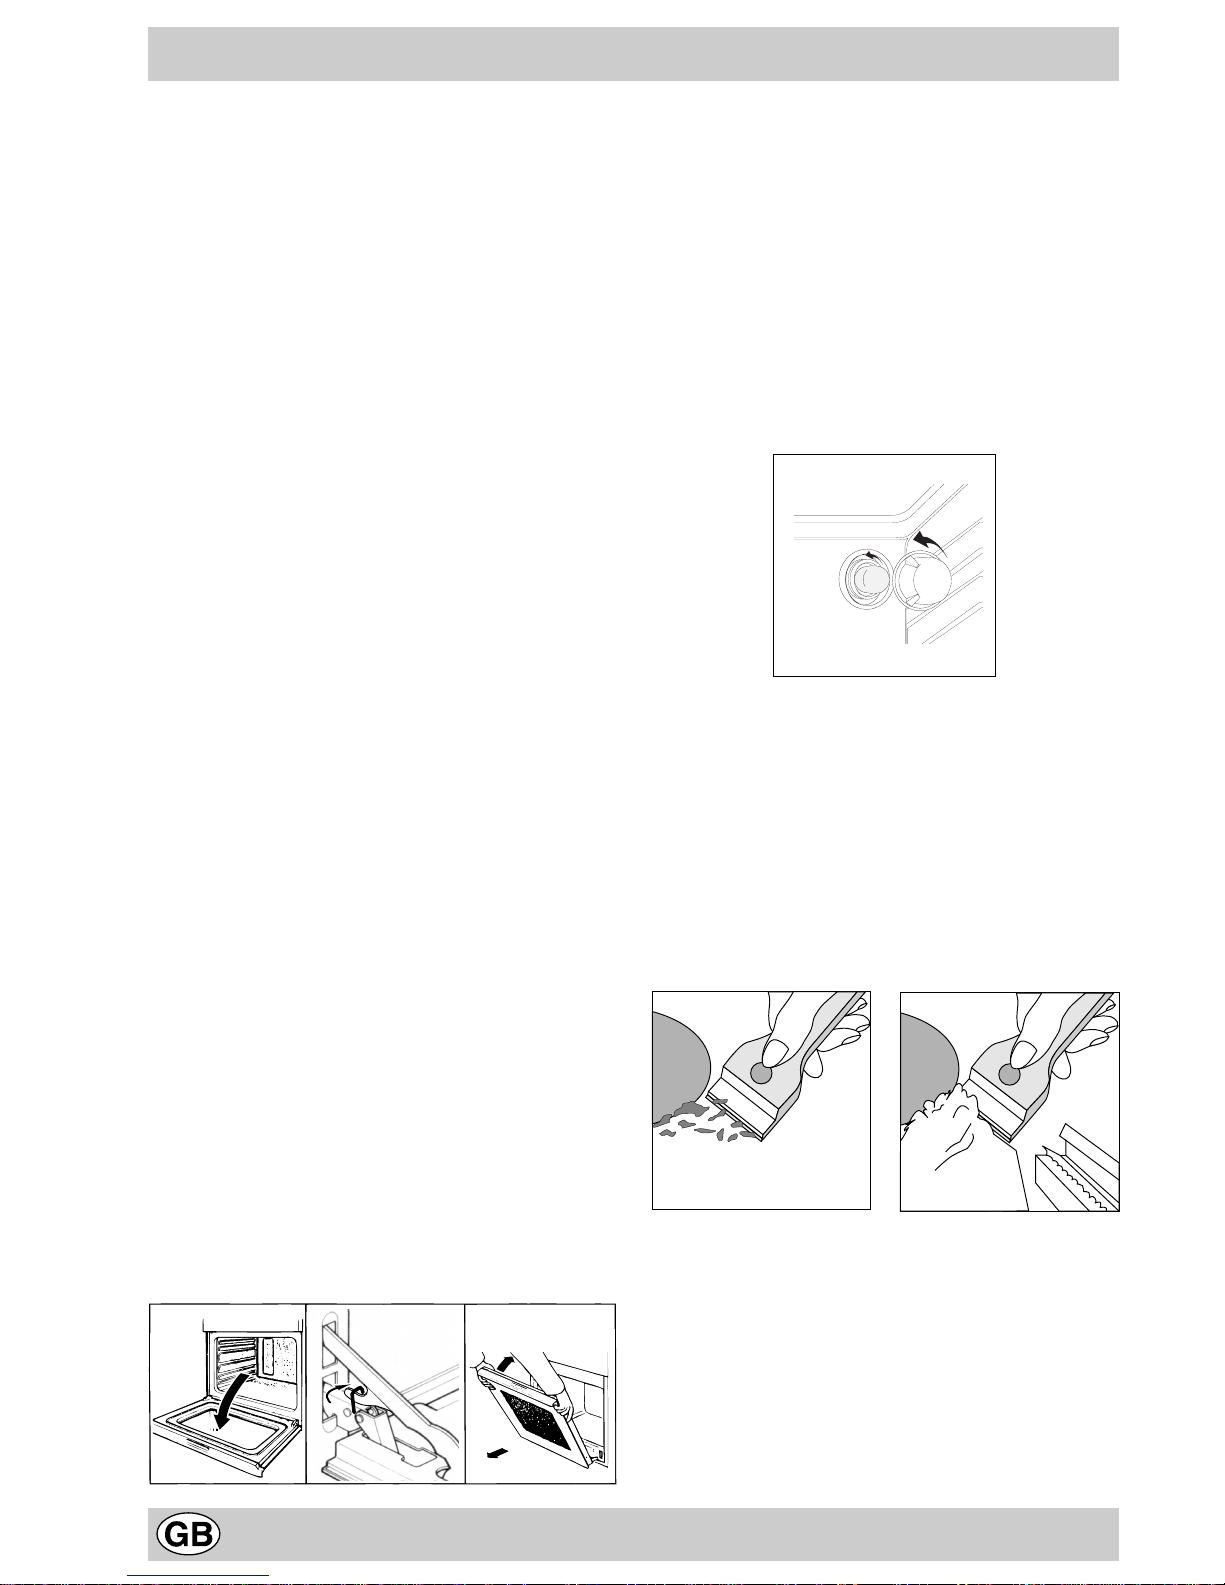
How to remove the oven door
For a more thorough clean, you can remove the oven
door. Proceed as follows:
• open the door fully;
• lift up and tur n the small levers situated on the two
hinges;
• grip the door on the two external sides, shut it slowly
but not completely;
• pull the door towards you, pulling it out of its seat;
Reassemble the door by following the abo ve procedures
backwards.
Replacing the Oven Lamp
• Disconnect the oven from the power supply by means
of the omnipolar switch used to connect the appliance
to the electrical mains; or unplug the appliance if the
plug is accessible;
• Remove the glass cover of the lamp-holder;
• Remove the lamp and replace with a lamp resistant to
high temperatures (300°C) with the following characteristics:
- V oltage: 230/240 V
- Wattage 25W
- Type E14
• Replace the glass cover and reconnect the oven to
the mains power supply.
Cleaning the hob
Before you start cooking, make sure the hob surface is
clean, wiping it with a damp cloth if necessary to remove
any dust or food residue.
The hob surface must be cleaned regularly with a solution
of warm water and a non-abrasive cleaner. You should
clean glass ceramic hob surfaces regularly , using a special
product. First remove all grease and spills from the hob
surface with an appropriate scraper, such as B (see
Fig. A.) (not provided).
Clean the hob while still warm; use a special cleaning
product and some kitchen roll (see Fig. B). Then rub with
a damp cloth and dry thoroughly.
Fig. A Fig. B
Aluminium foil, plastic or synthetic items that may have
been accidentally melted, as well as sugar or highly sugary
food should be removed immediatel y from the hot cooking
zone using a scraper . Special cleaning products leave a
clear surface layer which prevents dirt from adhering to
the hob. This layer also protects the surface from any
damage caused by highly sugary foodstuffs. In no case
whatsoever should abrasiv e sponges or products be used,
nor chemically aggressive cleaning products such as ov en
cleaner sprays or stain remov ers .
132
7
Glass ceramic hob
cleaners
Available from
Window scraper Raz or bl ade
scrapers
DIY Stores
Replacement blades DIY Stores,
supermarkets,
chemists
COLLO luneta
HOB BRITE
Hob Clean
SWISSCLEANER
Boots, Co-op stores,
department sto res, Regi ona l
Electricity Co mpany sho ps,
supermarkets
Practical Cooking Advice
When cooking in the oven, use only one dripping pan or
rack at a time. Select from among the top or bottom rack
heights based on whether the dish needs more or less
heat from the top.
Cooking Fish and Meat
When cooking white meat, fowl and fish, use temperature
settings from 180 °C to 200 °C.
For red meat that should be well done on the outside while
tender and juicy in the inside, it is a good idea to start with
a high temperature setting (200°C-220°C) for a short time,
then turn the oven down afterwards.
In general, the larger the roast, the lower the temperature
setting. Place the meat on the centre of the g rid and place
the dripping pan beneath it to catch the fat.
Make sure that the grid is inserted so that it is in the centre
of the oven. If you would like to increase the amount of
heat from below, use the low rack heights. For savoury
roasts (especially duck and wild game), dress the meat
with lard or bacon on the top.
Baking Cakes
When baking cakes, alwa ys preheat the oven and do not
open the oven door during baking to prev ent the cak e
from dropping. In gener al:
Using the Grill
Use the c “grill” mode, placing the f ood under the centre of the grill (situated on the 3rd or 4th rack form the
bottom) because only the central part of the top heating
element is turned on.
Use the bottom rack (1st from the bottom), placing the
dripping pan provided to collect any sauce and/or grease
and prevent the same from dripping onto the oven bottom.
When using this mode, we recommend you set the thermostat to the highest setting. Ho wev er, this does not mean
you cannot use lower temperatures, simply by adjusting
the thermostat knob to the desired temperature.
Important: always use the grill with the oven door shut.
This will allow you both to obtain e xcellent results and to
save on energy (appro ximately 10%).
Therefore the best results when using the grill modes
are obtained by placing the grid on the lower racks
(see cooking table) then, to prevent fat and grease
from dripping onto the bottom of the oven and smoke
from forming, place a dripping-pan on the 1st oven
rack from the bottom.
Pastry is too dr y
Increase the temper ature by 1 0°C and reduc e the
cooking time.
Pastry dropped
Use less liquid or lower the tem perat ure by 10° C.
Pastry is too dark on top
Place it on a lower rack, lowe r the t emperat ure, a nd
increase the cooki ng time .
Cooked well on the inside but sticky on the
outside
Use less liquid, lower t he tempe rature, and i ncrease
the cooking time.
The pastry sticks to the pan
Grease the pan well and s prinkle it with a du st ing of
flour or use greaseproof paper.
8
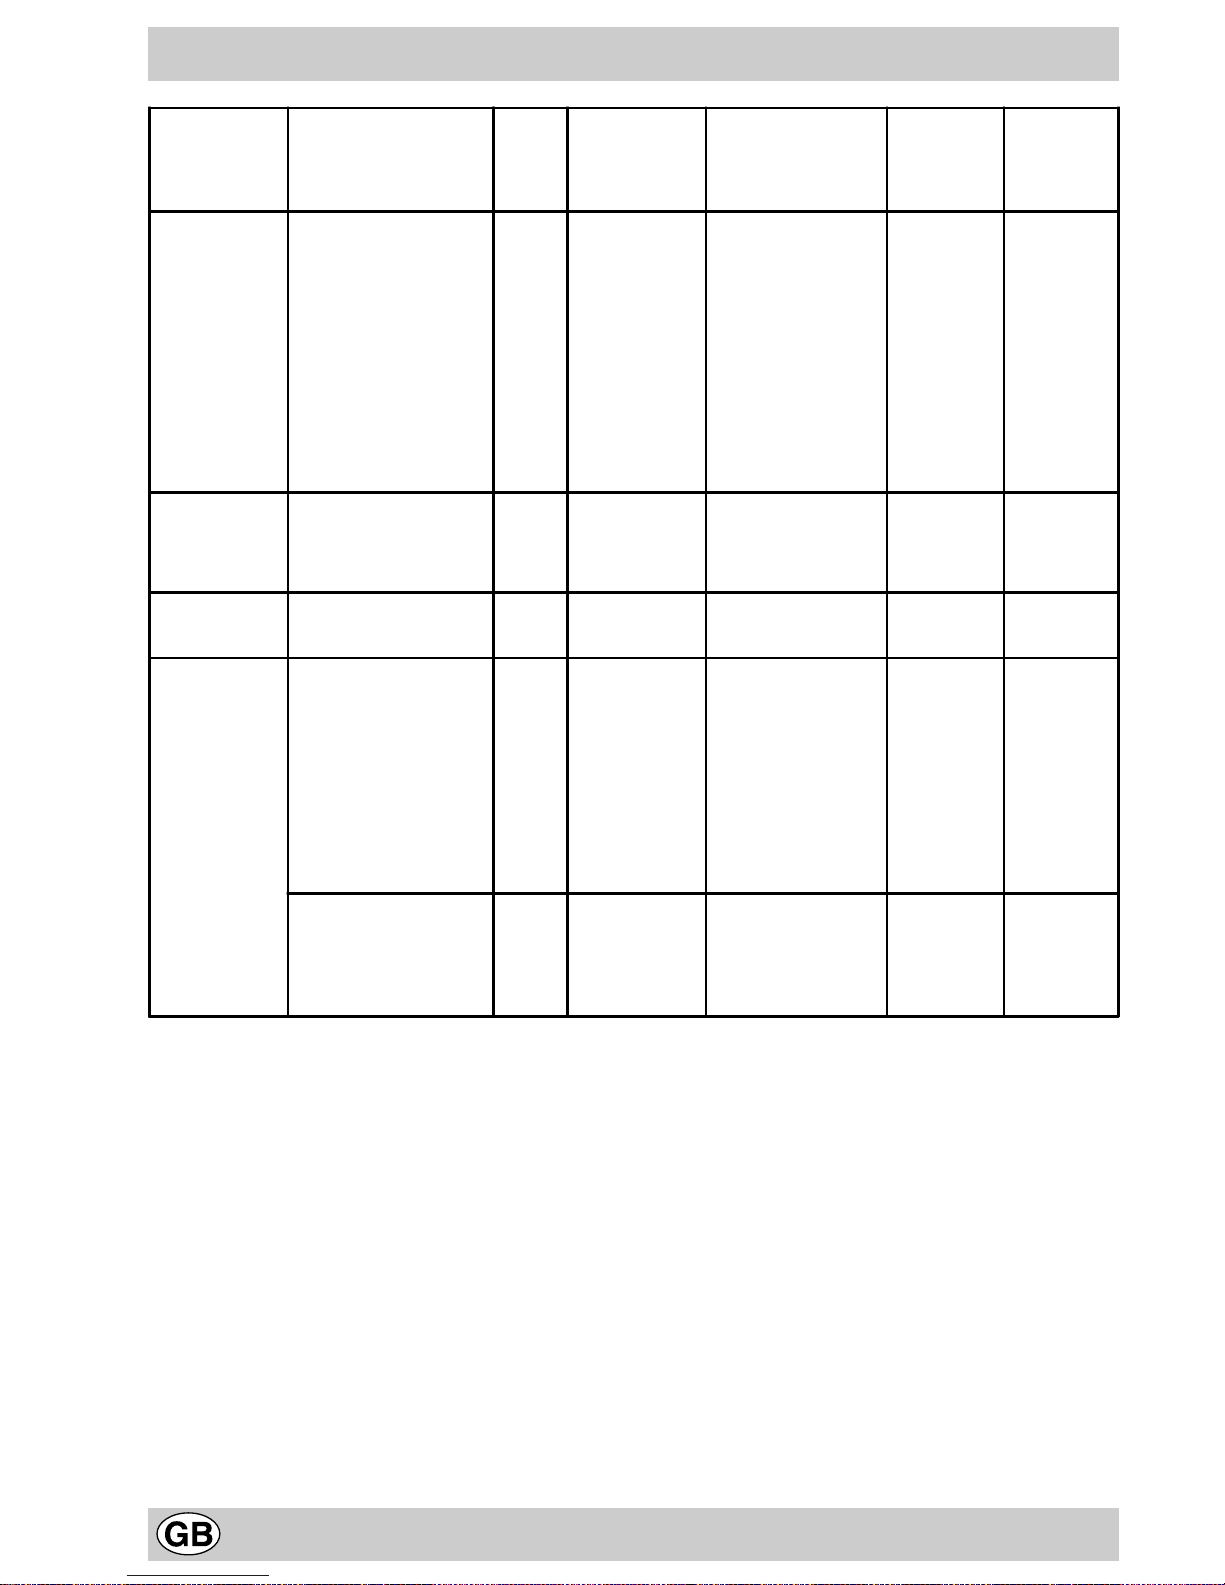
Selector knob
setting
Food to be cooked Weight
(in kg)
Cooking rack
position from
bottom
Preheating time
(minutes)
Thermostat
knob
setting
Cooking
time
(minutes)
1 Convection
a
Duck
Roast veal or beef
Pork roast
Biscuits (short pas try)
Tarts
Lasagne
Lamb
Mackerel
Plum-cake
Cream puffs
Sponge-cake
Savoury pies
1
1
1
1
1
1
1
1
0.3
0.5
1.5
3
3
3
3
3
3
2
2
2
3
3
3
15
15
15
15
15
10
10
10
10
10
10
15
200
200
200
180
180
190
180
180
170
180
170
200
65-75
70-75
70-80
15-20
30-35
35-40
50-60
30-35
40-50
30-35
20-25
30-35
2 Pastry
Mode
y
Raised Cakes
Tarts
Fruit cakes
Brioches
0,5
1
1
0,5
3
3
3
3
15
15
15
15
160
180
180
160
30-40
35-40
50-60
25-30
3 Top Oven
c
Browning food to
perfect cooking
- 3/4 15 220 -
4 Grill
2
Soles and cuttlefis h
Squid and prawn
kebabs
Cod filet
Grilled vegetables
Veal steak
Cutlets
Hamburgers
Mackerels
Toasted sandwiches
1
1
1
1
1
1
1
1
n.° 4
4
4
4
3/4
4
4
4
4
4
5
5
5
5
5
5
5
5
5
Max
Max
Max
Max
Max
Max
Max
Max
Max
8-10
6-8
10
10-15
15-20
15-20
7-10
15-20
2-3
With rotisserie (where
present)
Veal on the spit
Chicken on the spit
Lamb on the spit
1.0
1.5
1.0
-
-
-
5
5
5
Max
Max
Max
80-90
70-80
70-80
NB: cooking times are ap proxim ate a nd may v ary ac cor ding to pe rsonal t as te. Whe n cook ing using th e gril l, the
dripping pan must always b e place d on the 1s t oven r ack fro m the bot tom .
 Loading...