

Page 1

DSR 15M9
English
GB
Operating instructions
DISHWASHER - Contents
Operating instructions,1
Precautions and advice, 2-3
Product Data, 3
Installation, 4-5
Electrical connection, 6
Description of the appliance, 7
Refined salt and rinse aid, 8
Loading the racks, 9-10
Detergent and dishwasher use, 11
Wash cycles, 12
Care and maintenance, 13
Troubleshooting, 14
Guarantee, 15
After-Sales Service, 16
Page 2

Precautions and advice
GB
Precautions and advice
This appliance was designed and
manufactured in compliance with international
safety standards. The following information
has been provided for safety reasons and
should be read carefully.
Keep this instruction manual in a safe place
for future reference. If the appliance is sold,
given away or moved, make sure the manual
is kept with the machine.
Read the instructions carefully, as they
include important information on safe
installation, use and maintenance.
This appliance was designed for domestic
use or similar applications, for example:
- farmhouses;
- use by guests in hotels, motels and other
residential settings;
- bed & breakfasts.
Remove the appliance from all packaging
and make sure it was not damaged during
transportation. If it was damaged, contact
the retailer and do not proceed any further
with the installation process.
General safety
• This appliance should not be operated
by children younger than 8 years, people
with reduced physical, sensory or mental
capacities, or inexperienced people
who are not familiar with the product,
unless they are given close supervision
or instructions on how to use it safely and
are made aware by a responsible person
of the dangers its use might entail.
• Children must not play with the appliance.
• It is the user's responsibility to clean and
maintain the appliance. Children should
never clean or maintain it unless they are
given supervision.
• The appliance was designed for domestic
use inside the home and is not intended
for commercial or industrial use.
• The appliance must be used to wash
domestic crockery in accordance with the
instructions in this manual.
• The appliance must not be installed
outdoors, even in covered areas. It is
extremely dangerous to leave the machine
exposed to rain and storms.
• Do not touch the appliance when barefoot.
• When unplugging the appliance always
pull the plug from the mains socket. Do
not pull on the cable.
• The water supply tap must be shut off
and the plug should be removed from
the electrical socket at the end of every
cycle and before cleaning the appliance
or carrying out any maintenance work.
• The maximum number of place settings is
shown in the product sheet.
• If the appliance breaks down, do not under
any circumstances touch the internal parts
in an attempt to perform the repair work
yourself.
• Do not lean or sit on the open door: this
may cause the appliance to overturn.
• The door should not be left open as it may
create a dangerous obstacle.
• Keep detergent and rinse aid out of reach
of children.
• The packaging material should not be
used as a toy.
• Knives and other utensils with sharp
edges must be placed either with the
points/blades facing downwards in the
cutlery basket or horizontally on the tip-up
compartments or in the tray/third basket,
if available.
• Connect the appliance to the water mains
using the new supply hose provided with
the appliance. Do not re-use the old hose.
• Install the back side of a free-standing
dishwasher against a wall.
Disposal
• To dispose of any packaging materials,
follow local legislation so that the
packagings may be reused.
• The European Directive 2012/19/EU
relating to Waste Electrical and Electronic
Equipment (WEEE) states that household
appliances should not be disposed of
using the normal solid urban waste cycle.
Exhausted appliances should be collected
separately in order to optimise the cost of
reusing and recycling the materials inside
the machine, while preventing potential
damage to the atmosphere and public
health. The crossed-out dustbin symbol
shown on all products reminds the owners
of their obligations regarding separated
waste collection.
For further information relating to the
correct disposal of household appliances,
owners may contact the relevant public
authority or the local appliance dealer.
2
Page 3
Saving energy and respecting the
environment
Saving water and energy
• Only begin a wash cycle when the
dishwasher is full. While waiting for the
dishwasher to be filled, prevent unpleasant
odours with the Soak cycle
Wash Cycles).
• Select a wash cycle that is suited to the
type of crockery and to the soil level using
the Table of Wash Cycles:
- For dishes with a normal soil level, use
the Eco wash cycle, which guarantees low
energy and water consumption levels.
- If the load is smaller than usual activate
the Half Load option
and options, if available).
(see Special wash cycles
• If your electricity supply contract gives
details of electricity-saving time bands, run
the wash cycles when electricity prices are
lower. The Delayed Start option can help
you organise the wash cycles accordingly
(see Special wash cycles and options, if available).
(if available, see
GB
Product Data (product fiche)
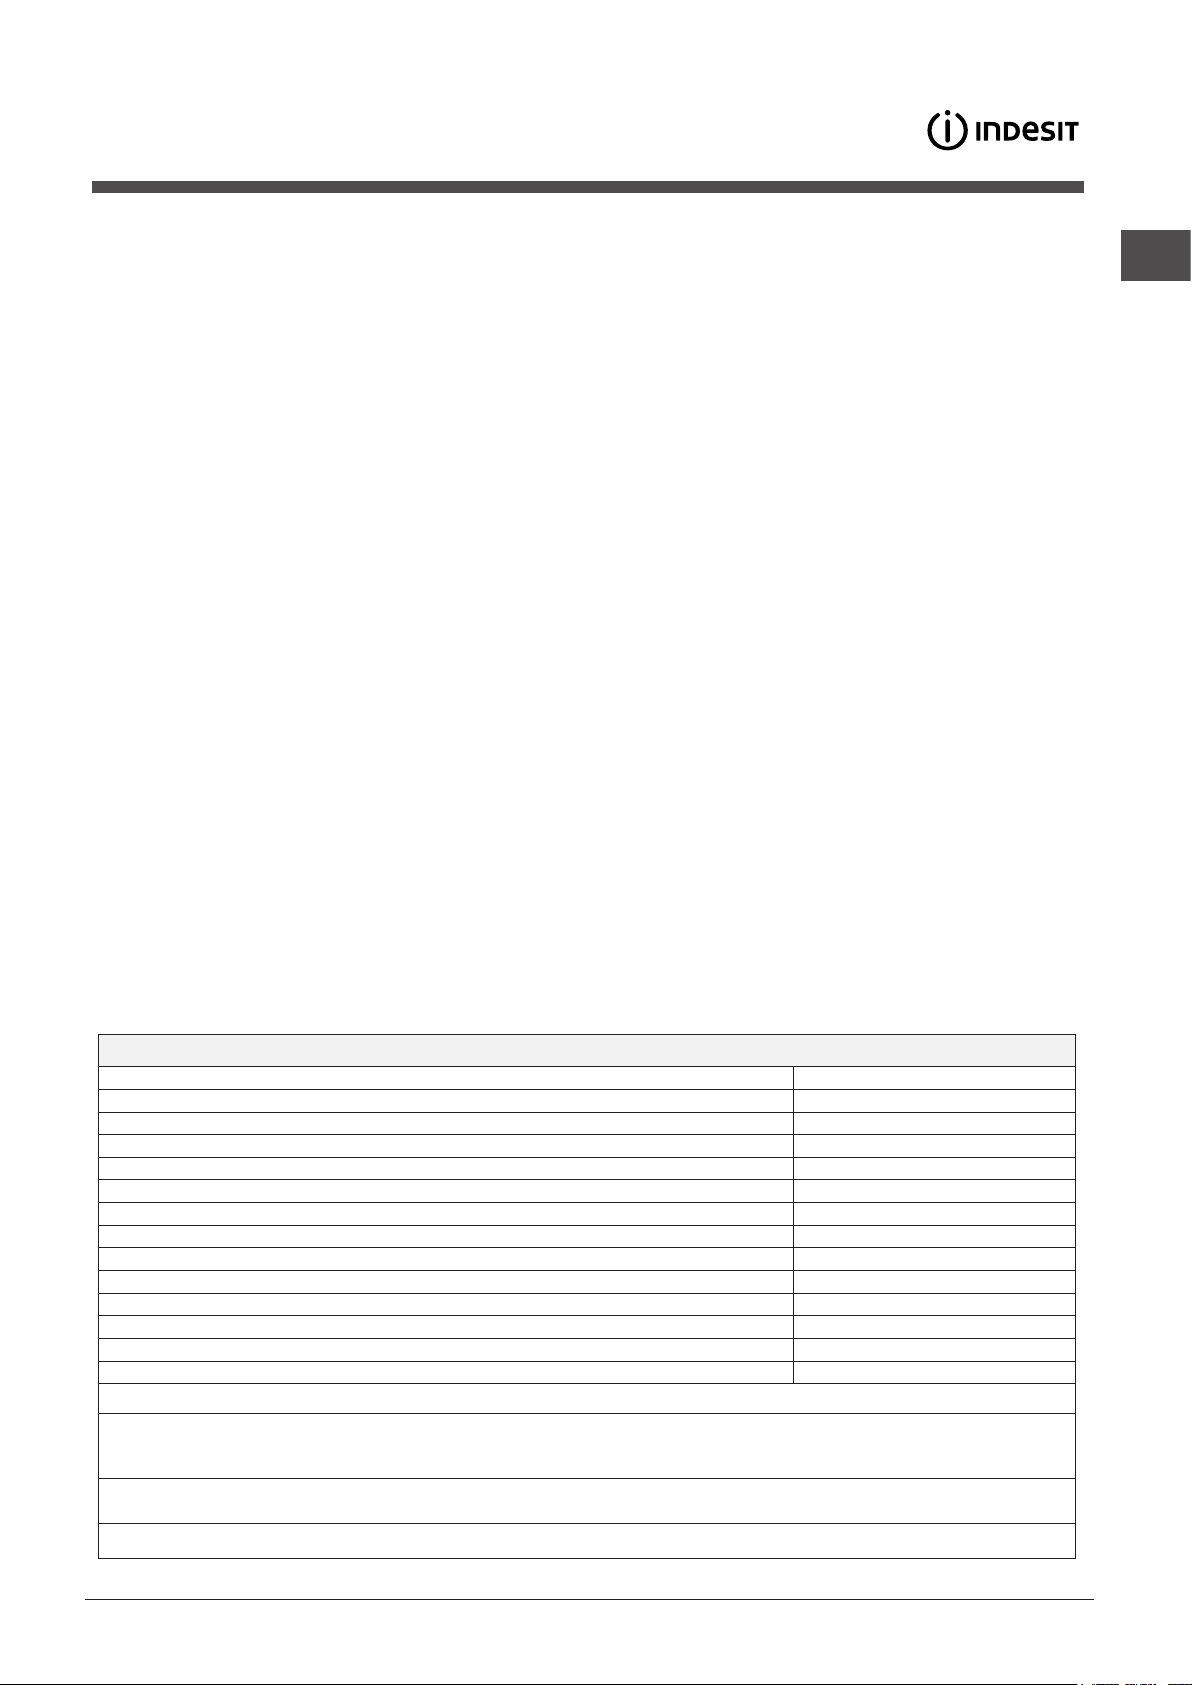
Product Fiche
Brand
Model
Rated capacity in standard place settings (1)
Energy efciency class on a scale from A+++ (low consumption) to D (high consumption)
Energy consumption per year in kWh (2)
Energy consumption of the standard cleaning cycle in kWh
Power consumption of the off-mode in W
Power consumption of the left-on mode in W
Water consumption per year in litres (3)
Drying efcacy class on a scale from G (low efcacy) to A (high efcacy)
Programme time for standard cleaning cycle in minutes
The duration of the left-on mode in minutes
Noise in dB(A) Re 1pW
Built-in model
NOTES
1) The information on the label and che relates to the standard cleaning cycle, this programme is suitable to clean normally soiled
tableware and it is the most efcient programme in terms of combined energy and water consumption. The standard cleaning cycle
corresponds to the Eco cycle.
2) Based on 280 standard cleaning cycles using cold water ll and the consumption of the low power modes. Actual energy
consumption depends on how the appliance is used.
3) Based on 280 standard cleaning cycles. Actual water consumption depends on how the appliance is used.
INDESIT
DSR 15M9
10
A
267
0.94
0.5
5.0
2800
A
180
12
49
No
3
Page 4
Installation
GB
If the appliance must be moved at any time, keep it in an
upright position; if absolutely necessary, it may be tilted onto
its back.
Connecting the water supply
Adaptation of the water supply for installation should only
be performed by a qualified technician.
The water inlet and outlet hoses may be positioned towards
the right or the left in order to achieve the best possible
installation.
Make sure the dishwasher does not bend or squash the
hoses.
Connecting the water inlet hose
• To a 3/4” gas cold or hot water connection point (max.
60°C).
• Run the water until it is perfectly clear.
• Screw the inlet hose tightly into position and turn off the
tap.
If the inlet hose is not long enough, contact a specialist
store or an authorised technician
The water pressure must be within the values indicated
in the Technical Data table - otherwise the dishwasher may
be function properly.
Make sure the hose is not bent or compressed.
(see Assistance)
.
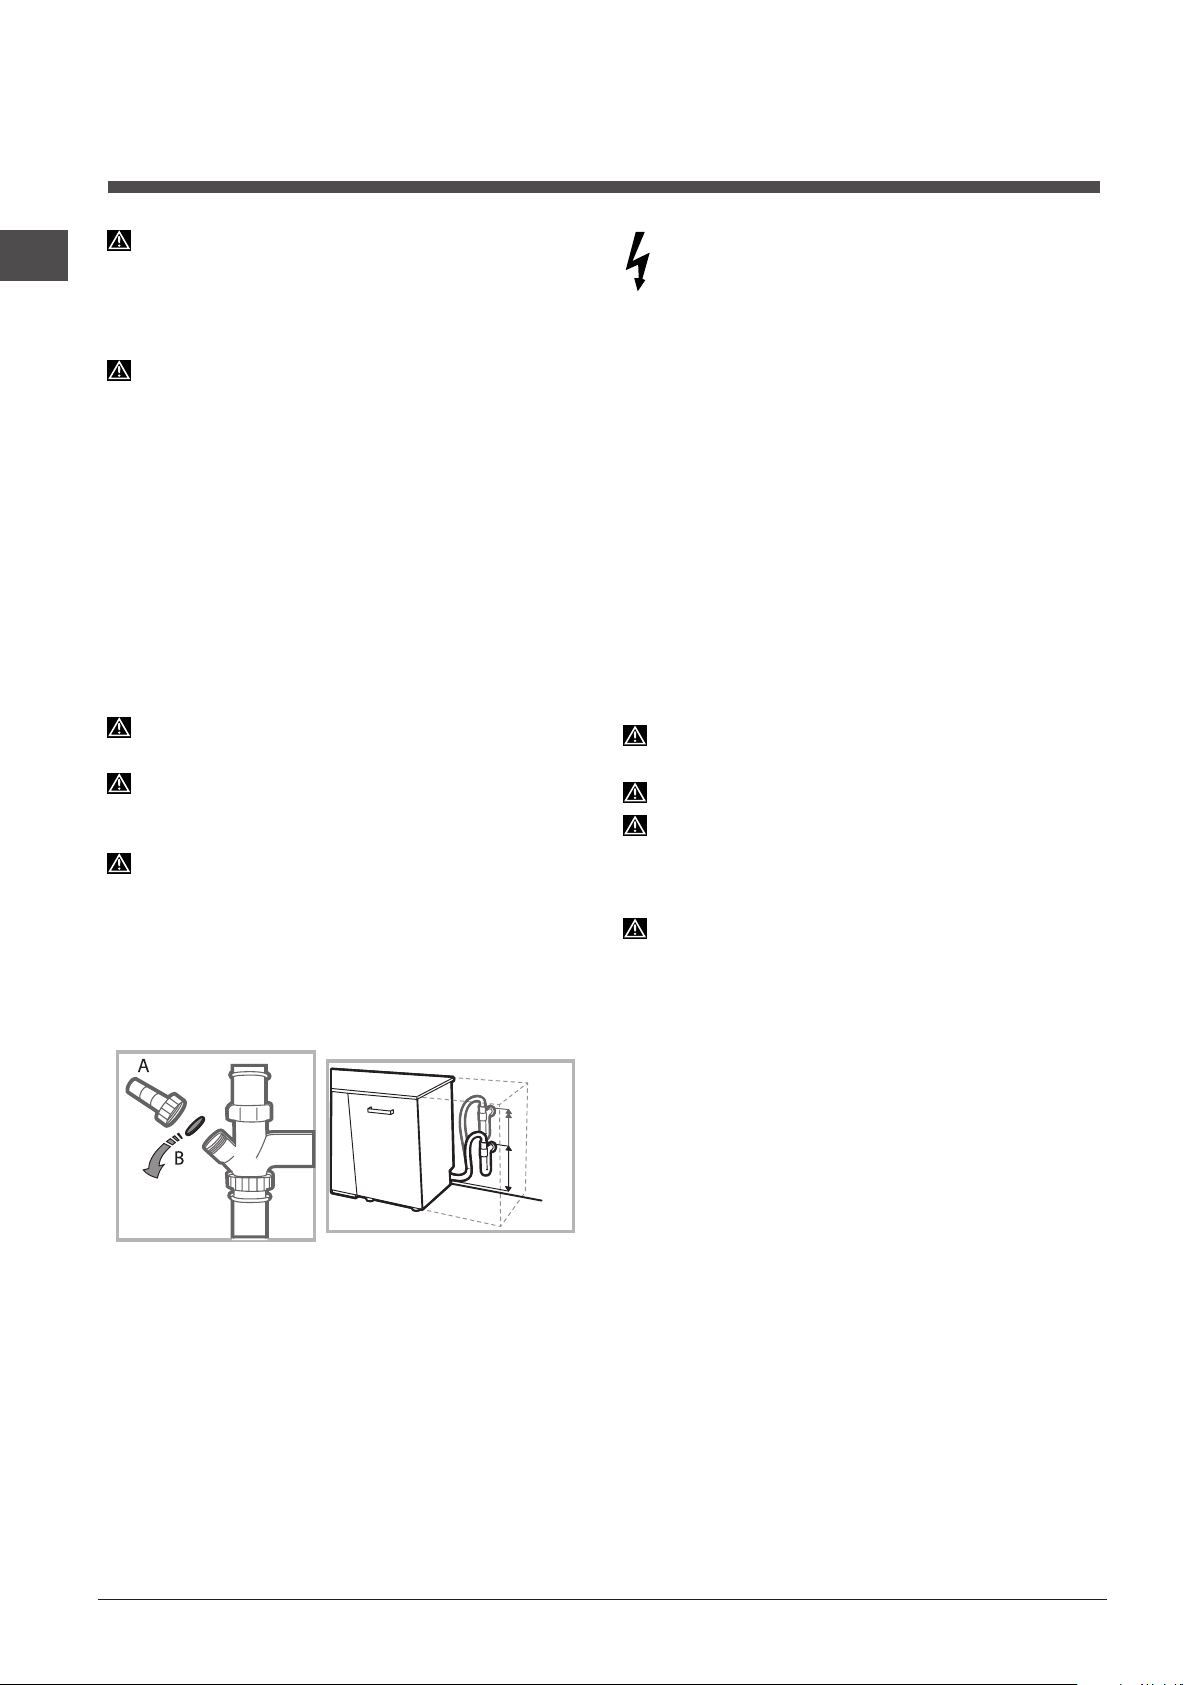
Connecting the water outlet hose
Connect the outlet hose to a drain duct with a minimum
diameter of 2 cm. (A)
The outlet hose connection must be at a height ranging from
40 to 80 cm from the floor or surface where the dishwasher
rests.
MAX 80 cm
MIN 40 cm
Before connecting the water outlet hose to the sink drain,
remove the plastic plug (B).
WARNING: HAZARDOUS VOLTAGE!
Under no circumstances should the water inlet hose be cut
as it contains live electrical parts.
Electrical connection
Before inserting the plug into the electrical socket, make
sure that:
• The socket is earthed and complies with current
regulations;
• the socket can withstand the maximum load of the
appliance as shown on the data plate located on the inside
of the door
(see chapter Description of the appliance);
• The power supply voltage falls within the values indicated
on the data plate on the inside of the door.
• The socket is compatible with the plug of the appliance. If
this is not the case, ask an authorised technician to replace
the plug (
multiple sockets.
Once the appliance has been installed, the power supply
cable and the electrical socket should be easily accessible.
The cable should not be bent or compressed.
If the power supply cable is damaged, have it replaced
by the manufacturer or its authorised Technical Assistance
Service in order to prevent all potential hazards.
see Assistance
). Do not use extension cables or
(See
Assistance)
The Company shall not be held responsible for any
incidents, if these regulations are not observed.
Positioning and levelling
1. Position the dishwasher on a level sturdy floor. If the floor is
uneven, the front feet of the appliance may be adjusted until
it reaches a horizontal position. If the appliance is levelled
correctly, it will be more stable and much less likely to move
or cause vibrations and noise while it is operating.
2. Before recessing the dishwasher, stick the adhesive
transparent strip* under the wooden shelf in order to protect
it from any condensation which may form.
3. Place the dishwasher so that its sides or back panel are in
contact with the adjacent cabinets or the wall. This appliance
can also be recessed under a single worktop*
Assembly instruction sheet)
.
(see the
Anti-flooding protection
To ensure floods do not occur, the dishwasher:
- is provided with a special system which blocks the water
supply in the event of anomalies or leaks from inside the
appliance.
Some models are also equipped with the supplementary
safety device New Acqua Stop*, which guarantees antiflooding protection even in the event of a supply hose rupture.
4
4*. To adjust the height of the rear foot, turn the red hexagonal
bushing on the lower central part at the front of the dishwasher
using a hexagonal spanner with an opening of 8 mm. Turn the
spanner in a clockwise direction to increase the height and
in an anticlockwise direction to decrease it.
(see Building-in
instruction sheet attached to the documentation)
* Only available in selected models.
Page 5
Advice regarding the first wash cycle
After the installation, remove the stoppers from the racks and
the retaining elastic elements from the upper rack
(if any).
Water softener settings
Before starting the first wash cycle, set the hardness level of the water from the mains supply.
(see chapter Rinse
aid and refined salt).
First load the softener tank with water, then introduce about
1 kg of salt. It is perfectly normal for water to flow out.
As soon as this procedure is complete, run a wash cycle.
Only use salt that has been specifically designed for dishwashers.
After the salt has been poured into the machine, the LOW
SALT indicator light* switches off.
If the salt container is not filled, the water softener and
the heating element may be damaged as a result.
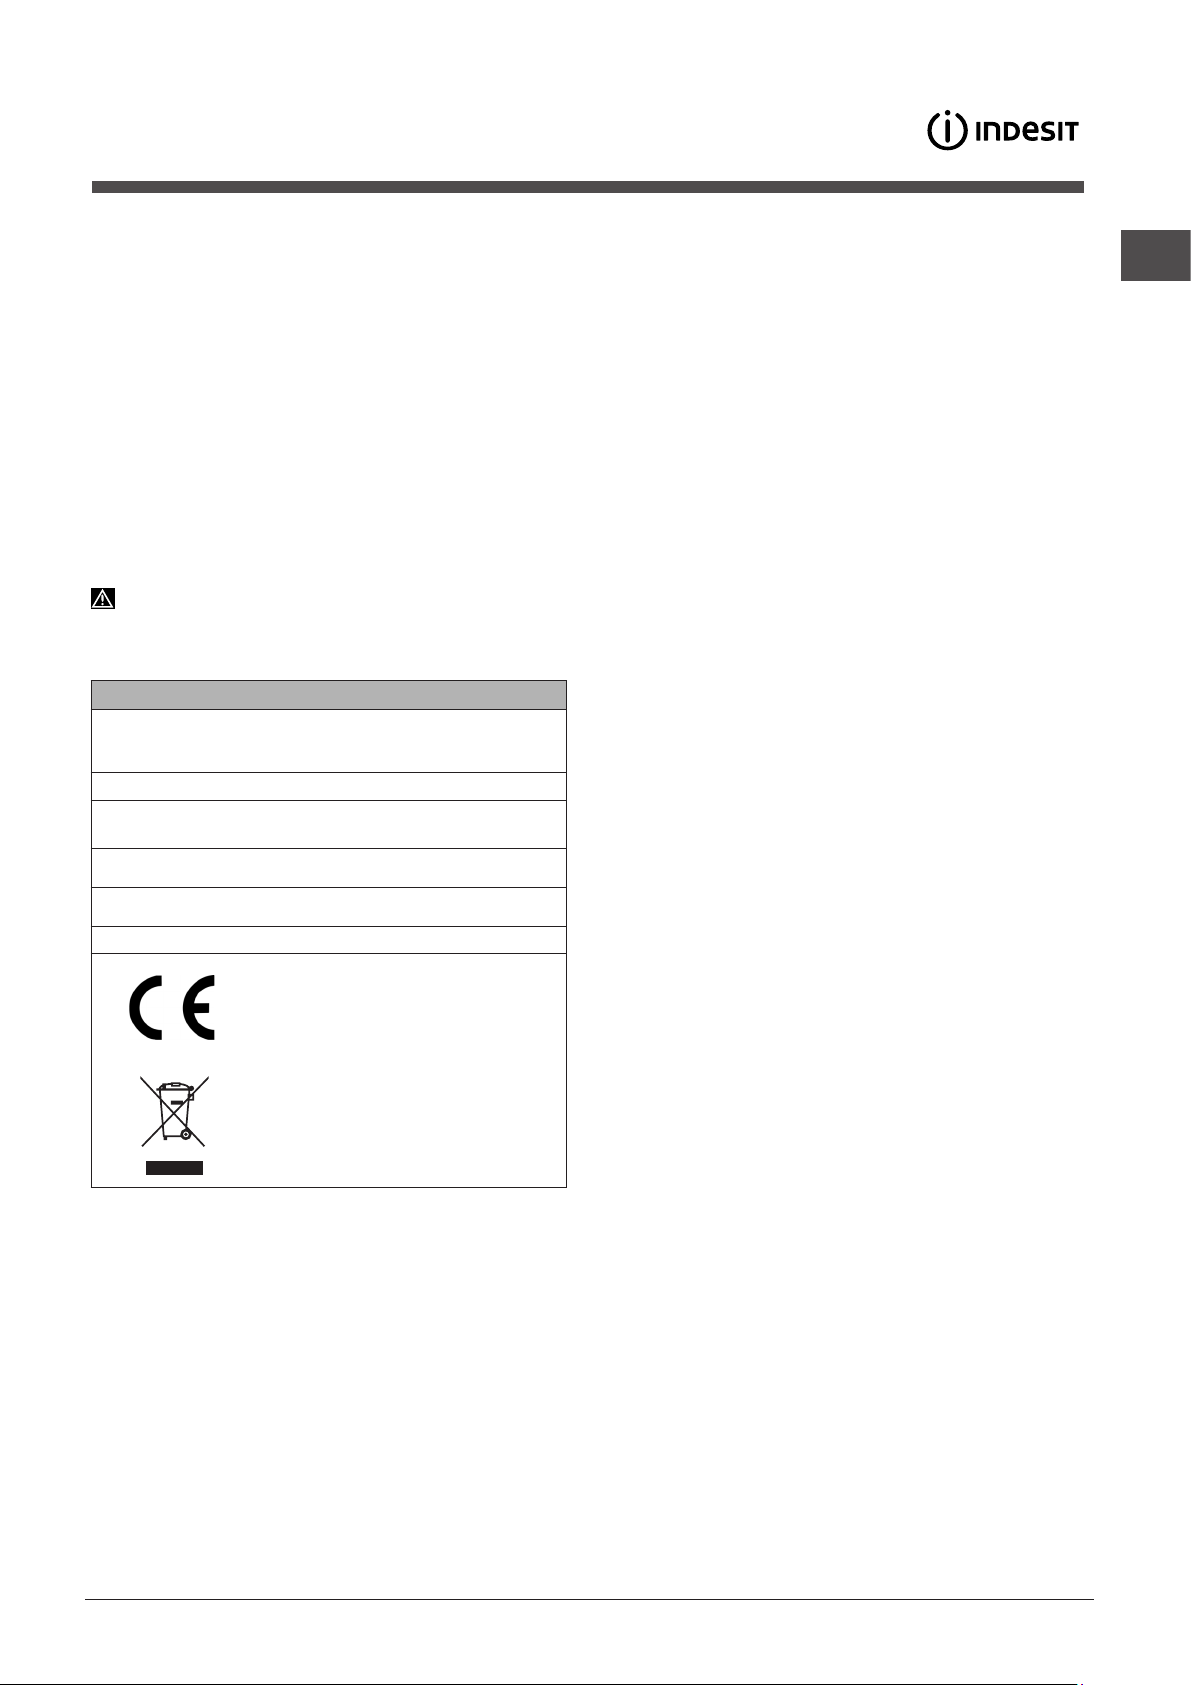
Technical data
width 45cm
Dimensions
Capacity 10 standard place-settings
Water supply pressure
Power supply voltage See appliance data plate
height 85 cm
depth 60 cm
0,05 ÷ 1MPa (0.5 ÷ 10 bar)
7,25 psi – 145 psi
The machine has a buzzer/set of tones
dishwasher model
been implemented: power on, cycle end etc.
The symbols/indicator lights/LEDs on the control panel/
display may vary in colour and may have a flashing or fixed
light
(depending on the dishwasher model)
The display* provides useful information concerning the
type of wash cycle, drying/wash-cycle phase, remaining
time, temperature etc.
) to inform the user that a command has
(depending on the
.
GB
Total absorbed power See appliance data plate
Fuse See appliance data plate
This dishwasher conforms to the
following European Community
Directives:
-2006/95/EC (Low Voltage)
-2004/108/EC (Electromagnetic
Compatibility)
-2009/125/EC (Comm. Reg.
1016/2010) (Ecodesign)
-97/17/EC (Labelling)
-2012/19/CE Waste Electrical
and Electronic Equipment (WEEE)
* Only available in selected models.
5
Page 6
Electrical Connection
GB
Electrical Connection
If your appliance is supplied with a 13 amp. fused plug it can
be plugged into a 13 amp socket for immediate use. Before
using the appliance please read the instruction below.
WARNING: THIS APPLIANCE MUST BE EARTHED.
THE FOLLOWING OPERATIONS SHOULD BE CARRIED
OUT BY A QUALIFIED ELECTRICIAN.
Replacing the fuse:
When replacing a faulty fuse, a 13 amp ASTA approved
fuse to BS 1362 should always be used, and the fuse cover
re-fitted. If the fuse cover is lost, the plug must not be used
until a replacement is obtained.
Replacemente fuse covers:
If a replacement fuse cover is fitted, it must be of the
correct colours as indicated by the coloured marking or the
colour that is embossed in words on the base of the plug.
Replacements can be obtained directly from your nearest
Service Depot.
Removing the plug:
Ifyour appliance has a non-rewireable moulded plug and you
should wish to remove it to re-route the mains cable through
partitions, units etc., please esure that either:
- the plug is replaced by a fused 13 amp re-wireable plug
bearing the BSI mark of approval
- or:
- the mains cable is wired directly into a 13 amp cable
outlet, controlled by a switch, (in compliance
with BS 5733) which is accessible without moving the
appliance.
As the colours of the wires in the mains lead may not
correspond with the coloured markings identifying the
terminal in your plug, proceed as follows:
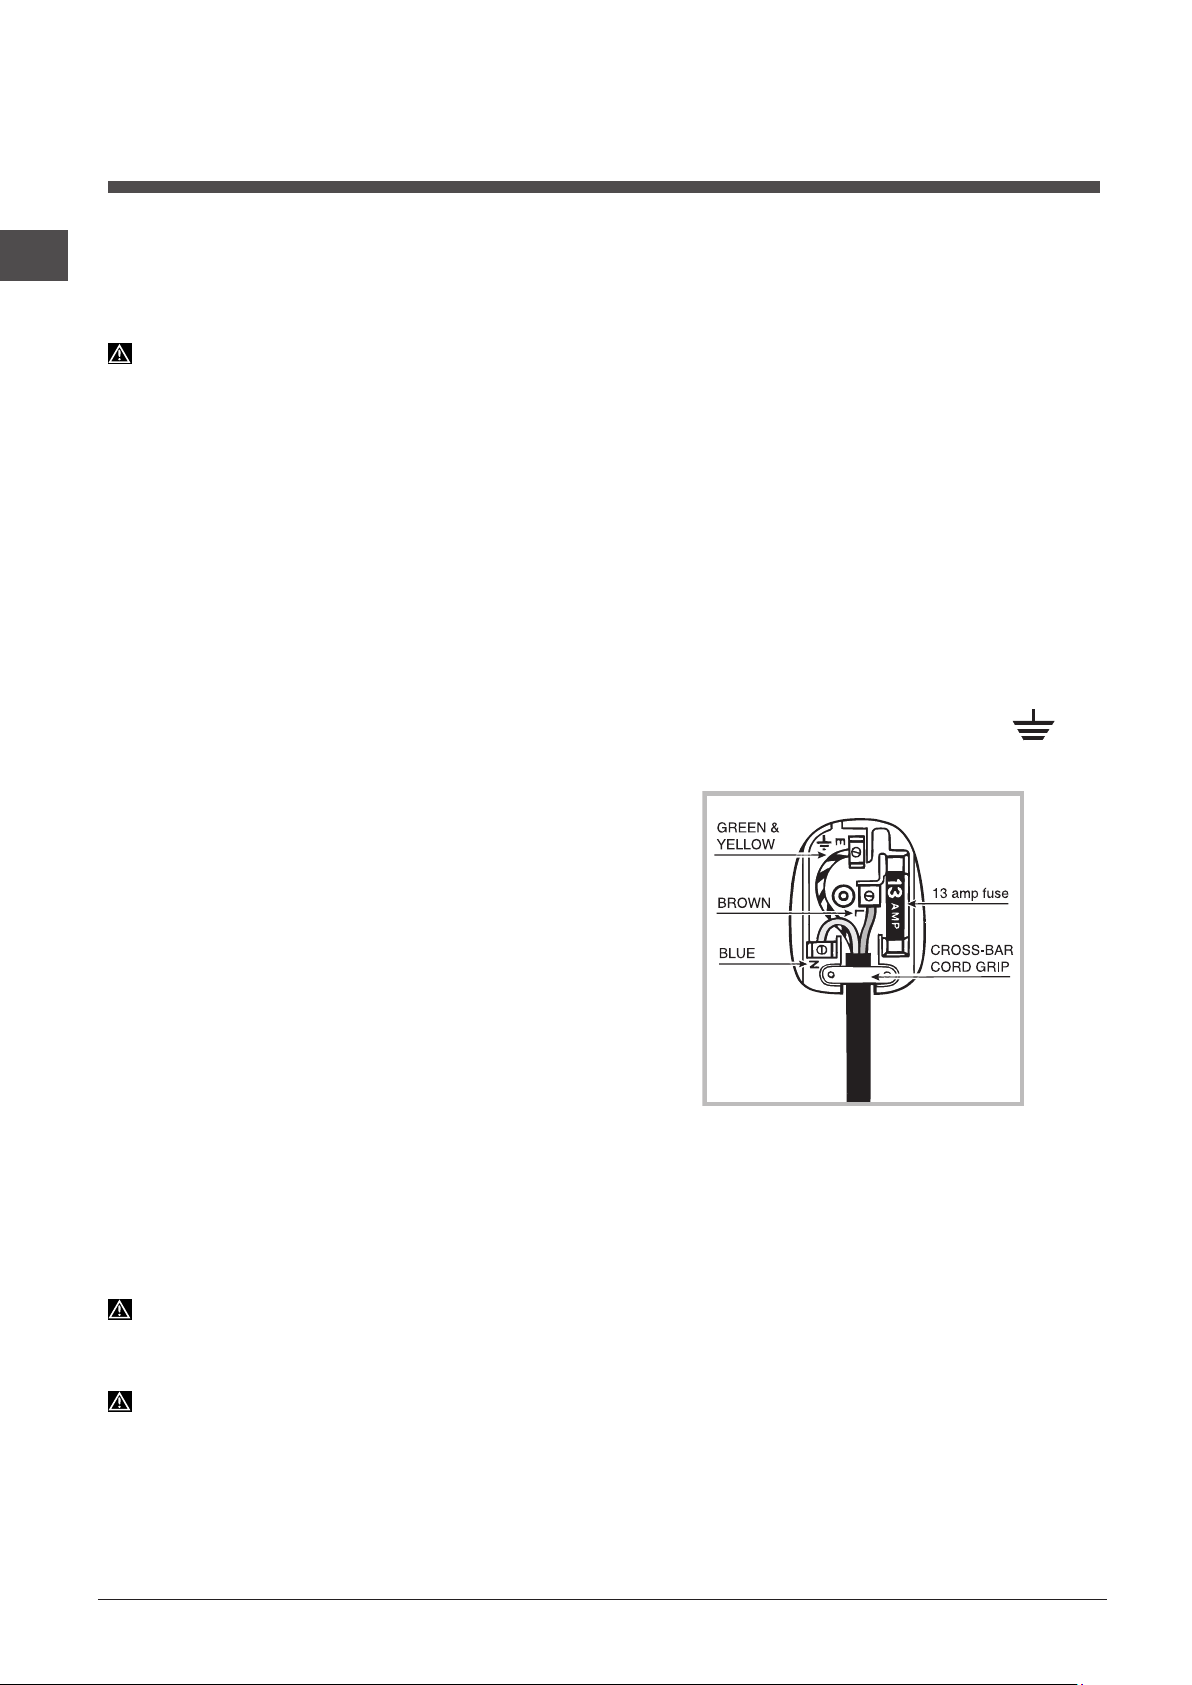
connect Green & Yellow wire to terminal market “E” or
coloured Green or Green & Yellow.
Connect Brown wire to terminal marked “L” or coloured Red.
Connect Blue wire to terminal marked “N” or coloured Black.
If a 13 amp plug (BS 1363) is used it must be fitted with a
13 amp fuse. A15 amp plug must be protected by a 15 amp
fuse, either in the plug or adaptor or at the distribution board.
If you are in any doubt about the electrical supply to your
machine, consult a qualified electrician before use.
How to connect an alternative plug:
The wires in this mains lead are coloured in accordance with
the following code:
BLUE “NEUTRAL” (“N”)
BROWN “LIVE” (“L”)
GREEN AND YELLOW “EARTH” (“E”) or
Disposing of the plug:
Ensure that before disposing of the plug itself, you make
the pins unusable so that it cannot be accidentally inserted
into a socket.
Instruction for connecting cable to an altenative
plug:
Important: the wires in the mains lead are coloured in
accordance with the following code:
Green & Yellow - Earth
Blue - Neutral
Brown - Live
CAUTION:
- Once the appliance has been installed, the electrical plug
and socket should remain accessible.
- The Company shall not be held responsible for any in-
cidents that occur if these regulations are not observed.
Disposing of the appliance:
When disposing of the appliance please remove the plug
by cutting the mains cable as close as possible to the plug
body and dispose of it as described above.
6
Page 7
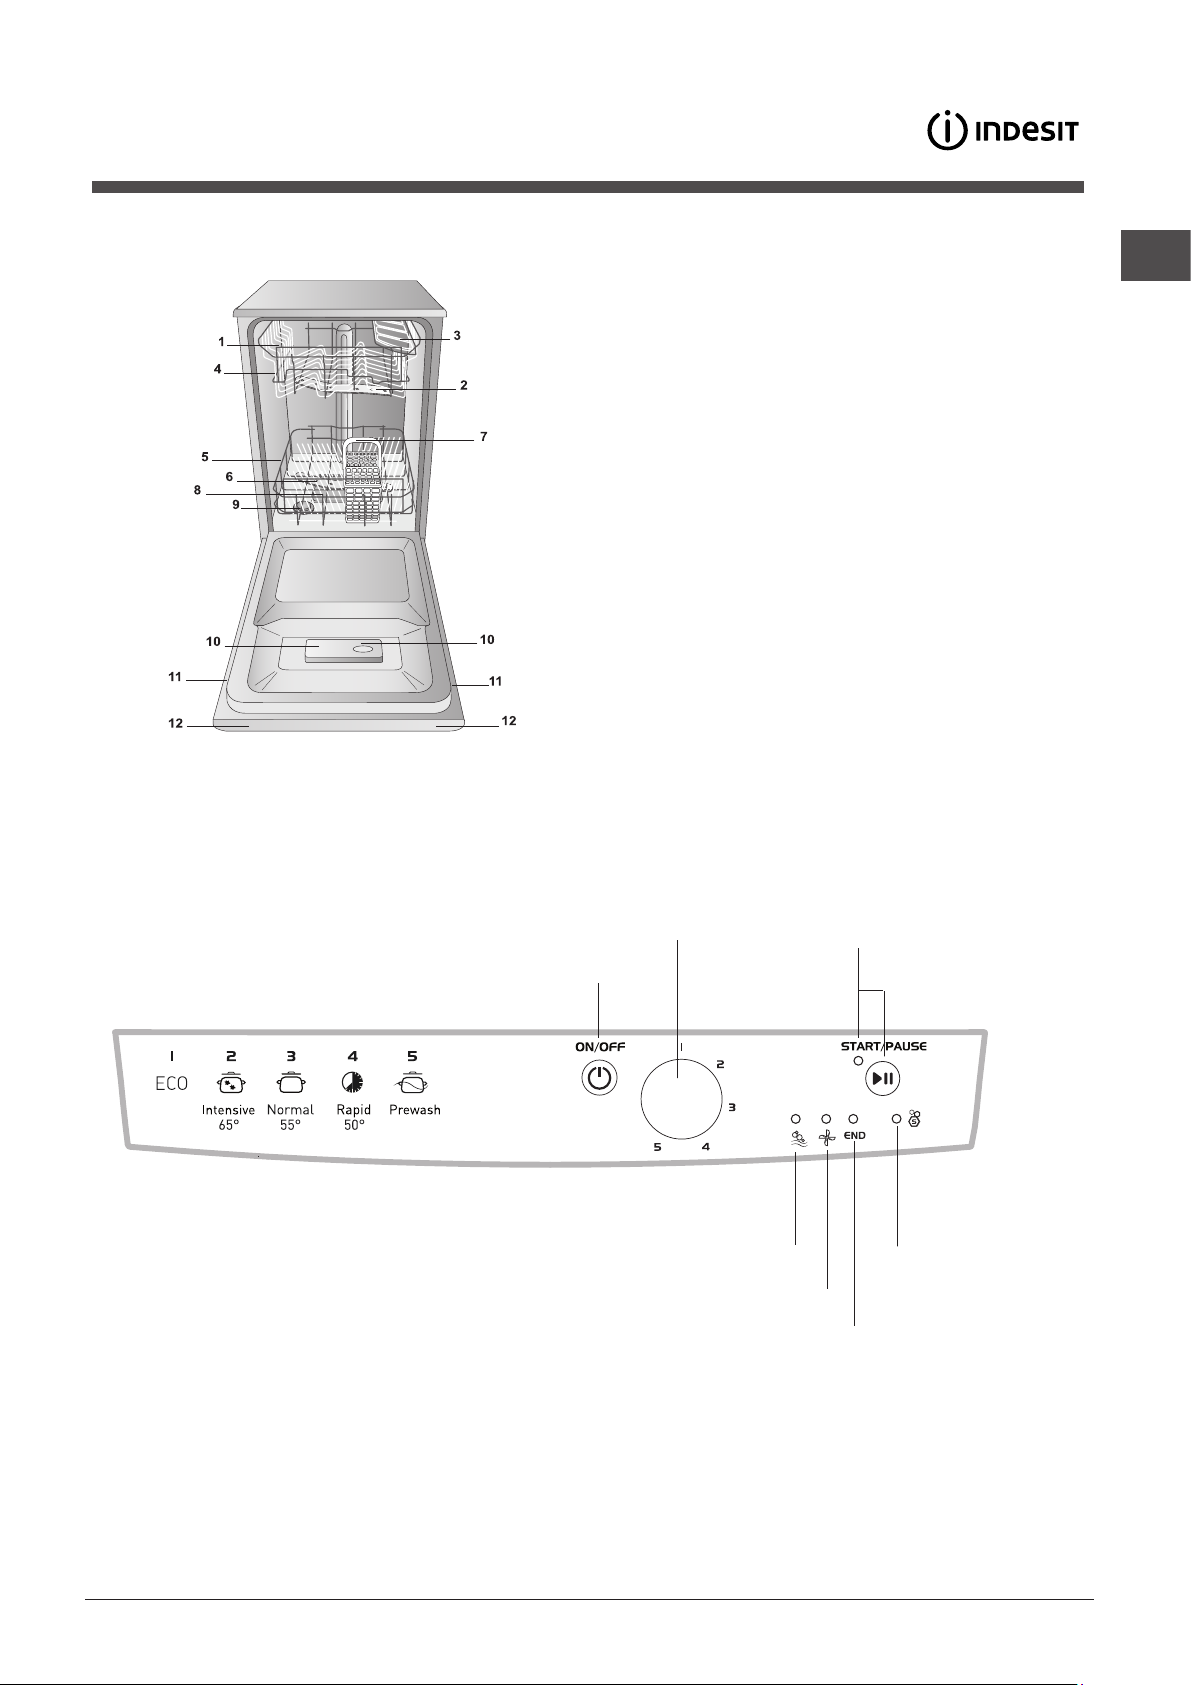
Description of the
appliance
Overall view
GB
1. Upper rack
2. Upper spray arm
3. Tip-up compartments
4. Rack height adjuster
5. Lower rack
6. Lower spray arm
7. Cutlery basket
8. Washing filter
9. Salt dispenser
10. Detergent and rinse aid dispensers
11. Data plate
12. Control Panel***
Control panel
Cycle select knob
ON/OFF/RESET
button
Indicator light Washing
Indicator light Drying
Indicator light Wash Cycle End
Start/Pause button and
indicator light
Low Salt
Indicator light
***Only in completely built-in models.
* Only available in selected models.
The number and type of wash cycles and options may vary depending on the dishwasher model.
7
Page 8
Refined Salt and Rinse Aid
GB
Only use products which have been specifically designed
for dishwashers. Do not use table salt or industrial salt.
Follow the instructions given on the packaging.
If you are using a multi-function product, we recommend
that you add salt in any case, especially if the water is hard
or very hard.
If you do not add salt or rinse aid, the LOW SALT* and
LOW RINSE AID* indicator lights will remain lit.
(Follow the instructions given on the packaging.)
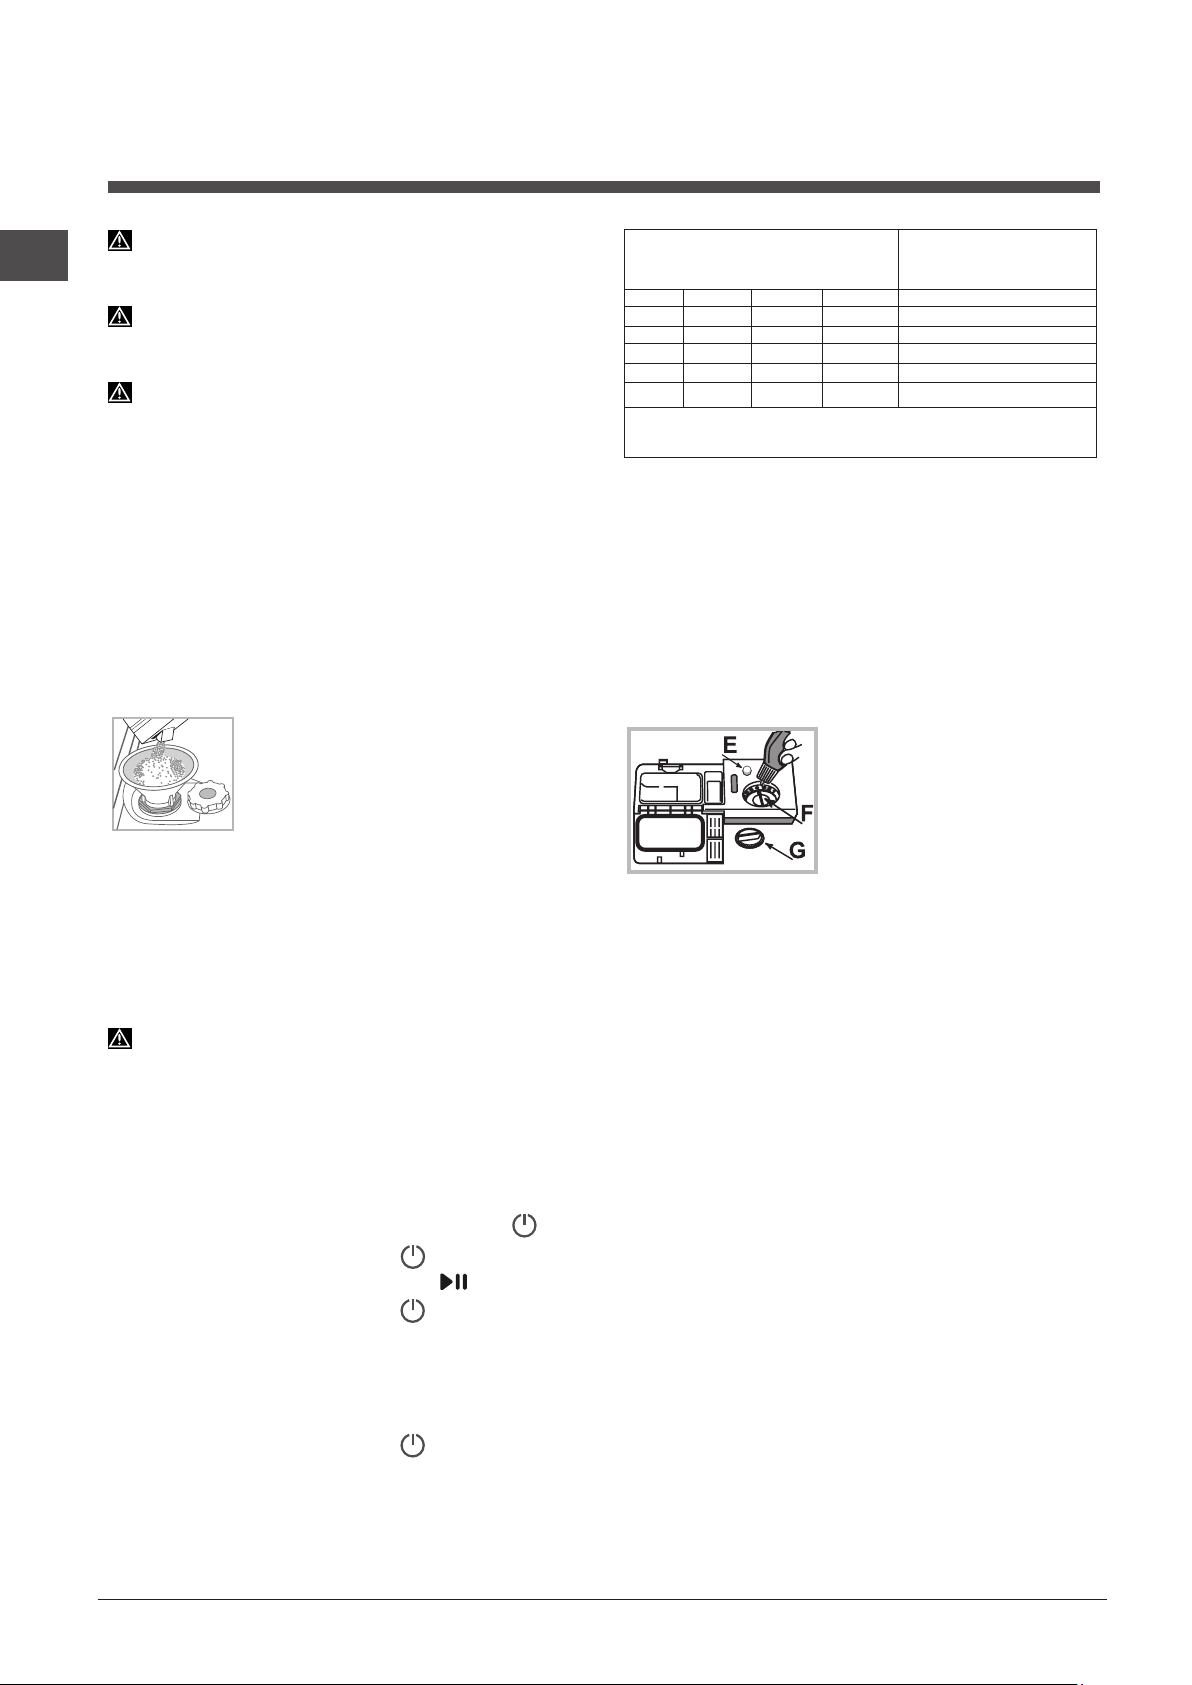
Measuring out the refined salt
The use of salt prevents the formation of LIMESCALE on the
dishes and on the machine's functional components.
• It is important that the salt dispenser be never empty.
• It is important to set the water hardness.
The salt dispenser is located in the lower part of the dishwasher
(see Description)
• When the LOW RINSE AID indicator light in the control panel
is lit *;
• When the green float* on the cap of the salt dispenser is no
longer visible.
• See autonomy in the water hardness table.
(approximately 1 kg); it is not unusual for a little water to leak out.
4. Remove the funnel and wipe any salt residue away from the
opening; rinse the cap under running water and then screw it on.
It is advisable to perform this procedure every time you add salt
to the container.
Make sure the cap is screwed on tightly, so that no detergent can
get into the container during the wash cycle (this could damage
the water softener beyond repair).
Whenever you need to add salt, we recommend carrying out
the procedure before the washing cycle is started.
Setting the water hardness
For perfect water softener operation, it is essential that the
adjustment be based on the water hardness in your house. Ask
your local water supplier for this information. The factory setting
is for medium water hardness.
• Switch the dishwasher on using the On/Off button.
• Switch it off using the On/Off button
• Press and hold the START/PAUSE button for 5 seconds.
• Switch it on using the On/Off button
• The salt indicator light flashes (as many times as the current
selection.)
• Set the knob to the desired hardness level number
on water hardness.)
• Switch it off using the On/Off button
• Setting is complete!
and should be filled:
1. Remove the lower rack and unscrew the
container cap (anticlockwise).
2. Only the first time you do this: fill the water
dispenser up to the edge.
3. Position the funnel
fill the salt container right up to its edge
(see figure)
(see Table
and
Average autonomy
Water Hardness Table
level °dH °fH mmol/l months
1 0 - 6 0 - 10 0 - 1 7 months
2 6 - 11 11 - 20 1.1 - 2 5 months
3 12 - 17 21 - 30 2.1 - 3 3 months
4 17 - 34 31 - 60 3.1 - 6 2 months
34 - 50 61 - 90 6.1 - 9 2/3 weeks
5*
For values between 0°f and 10°f, we do not recommend the use
of salt. A setting of 5 may increase cycle duration.
(°dH = hardness measured in German degrees - °f = hardness
measured in French degrees – mmol/l = millimoles per litre)
salt dispenser with 1
wash cycle per day
Measuring out the rinse aid
Rinse aid makes dish DRYING easier. The rinse aid dispenser
should be filled:
• When the LOW RINSE AID indicator light on the panel/display
is lit *;
• When the dark optical indicator on the dispenser door “E”
becomes transparent.
1. Open the dispenser by turning
the cap "G" in an anticlockwise
direction.
2. Pour in the rinse aid, making
sure it does not overflow from the
dispenser. If this happens, clean
the spill immediately with a dry
cloth.
3. Screw the cap back on.
NEVER pour the rinse aid directly into the tub.
Adjusting the amount of rinse aid
If you are not completely satisfied with the drying results, you
can adjust the quantity of rinse aid used. Turn the adjuster “F”.
A maximum of 4 levels can be set according to the dishwasher
model. The factory setting is for a medium level.
• If you see bluish streaks on the dishes, set a low number (1-2).
• If there are drops of water or limescale marks on the dishes,
set a high number (3-4).
* Only available in selected models.
8
Page 9
Loading the racks
Tips
Before loading the racks, remove all food residues from the
crockery and empty liquids from glasses and containers. No
preventive rinsing is needed under running water.
Arrange the crockery so that it is held in place firmly and does
not tip over; and arrange the containers with the openings facing
downwards and the concave/convex parts placed obliquely,
thus allowing the water to reach every surface and flow freely.
Make sure that the lids, handles, trays and frying pans do not
prevent the spray arms from rotating. Place any small items in
the cutlery basket.
Since plastic dishes and non-stick frying pans usually retain more
water drops, their drying will be not so good as that of ceramic
or stainless-steel dishes.
Lightweight items such as plastic containers should be placed
in the upper rack and arranged so that they cannot move.
After loading the appliance, make sure that the spray arms can
rotate freely.
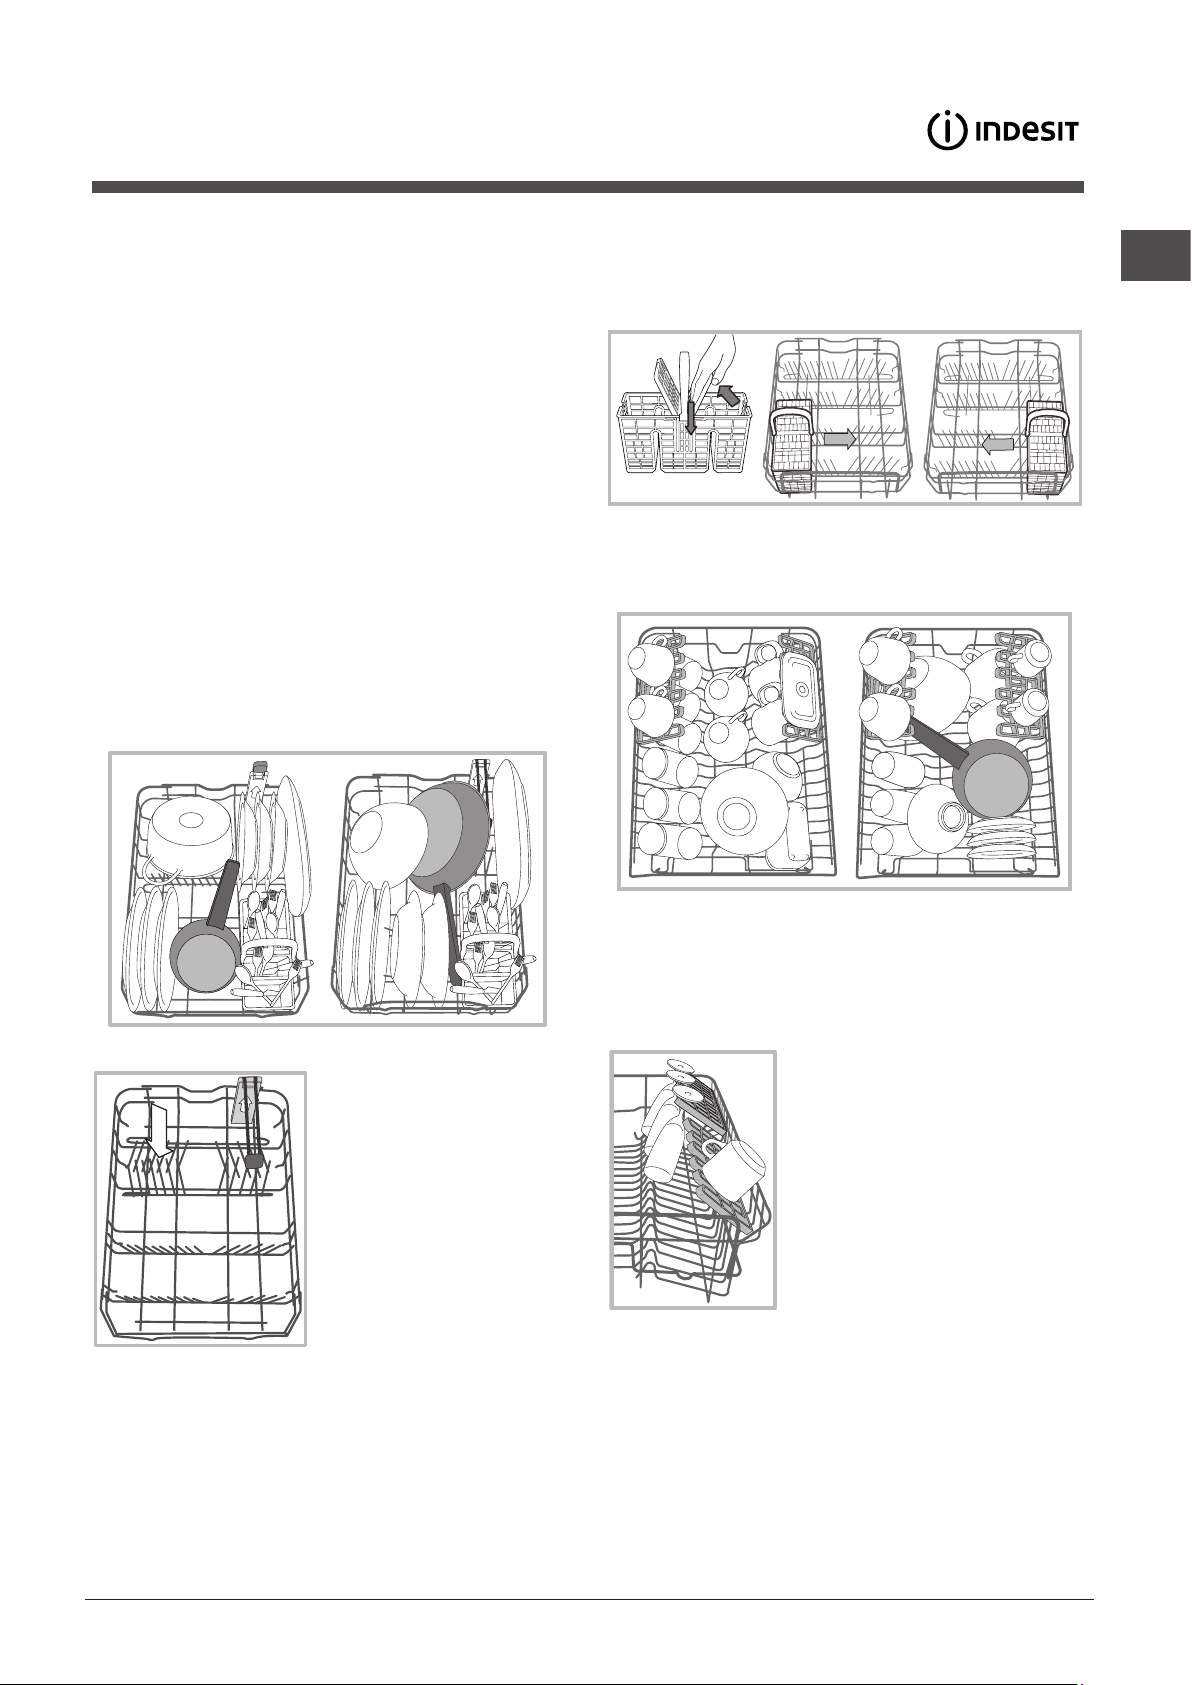
Lower rack
The lower rack can hold pans, lids, dishes, salad bowls, cutlery
etc. Large plates and lids should ideally be placed at the sides.
Cutlery basket
The basket is equipped with top grilles for improved cutlery
arrangement. The cutlery basket should be positioned only at
the front of the lower rack.
Upper rack
Load this rack with delicate and lightweight crockery such as
glasses, cups, saucers and shallow salad bowls.
GB
Several dishwasher models are
fitted with tip-up sectors*.
They can be used in a vertical
position when arranging dishes or
in a horizontal position (lower) to
load pans and salad bowls easily.
Some models are equipped with
Vertical Zone, special pull-out
supports*in the rear of the rack
that can be used to support frying
pans and baking pans in a more
vertical position, thus taking up
less space.
In order to use it, just get hold of the coloured grip and pull it
upwards while rotating it forward. The supports can slide right
and left to fit the size of the crockery.
Very soiled dishes and pans should be placed in the lower rack
because in this sector the water sprays are stronger and allow
a higher washing performance.
Adjustable position tip-up compartments*
The side tip-up compartments can be positioned at three
different heights to optimize the arrangement of the crockery
inside the rack.
Wine glasses can be placed safely in
the tip-up compartments by inserting
the stem of each glass into the
corresponding slot.
For optimum drying results incline
the tip-up compartments more. To
change the inclination, pull up the tipup compartment, slide it slightly and
position it as you wish.
*Only available in selected models with different numbers and
positions.
9
Page 10
GB
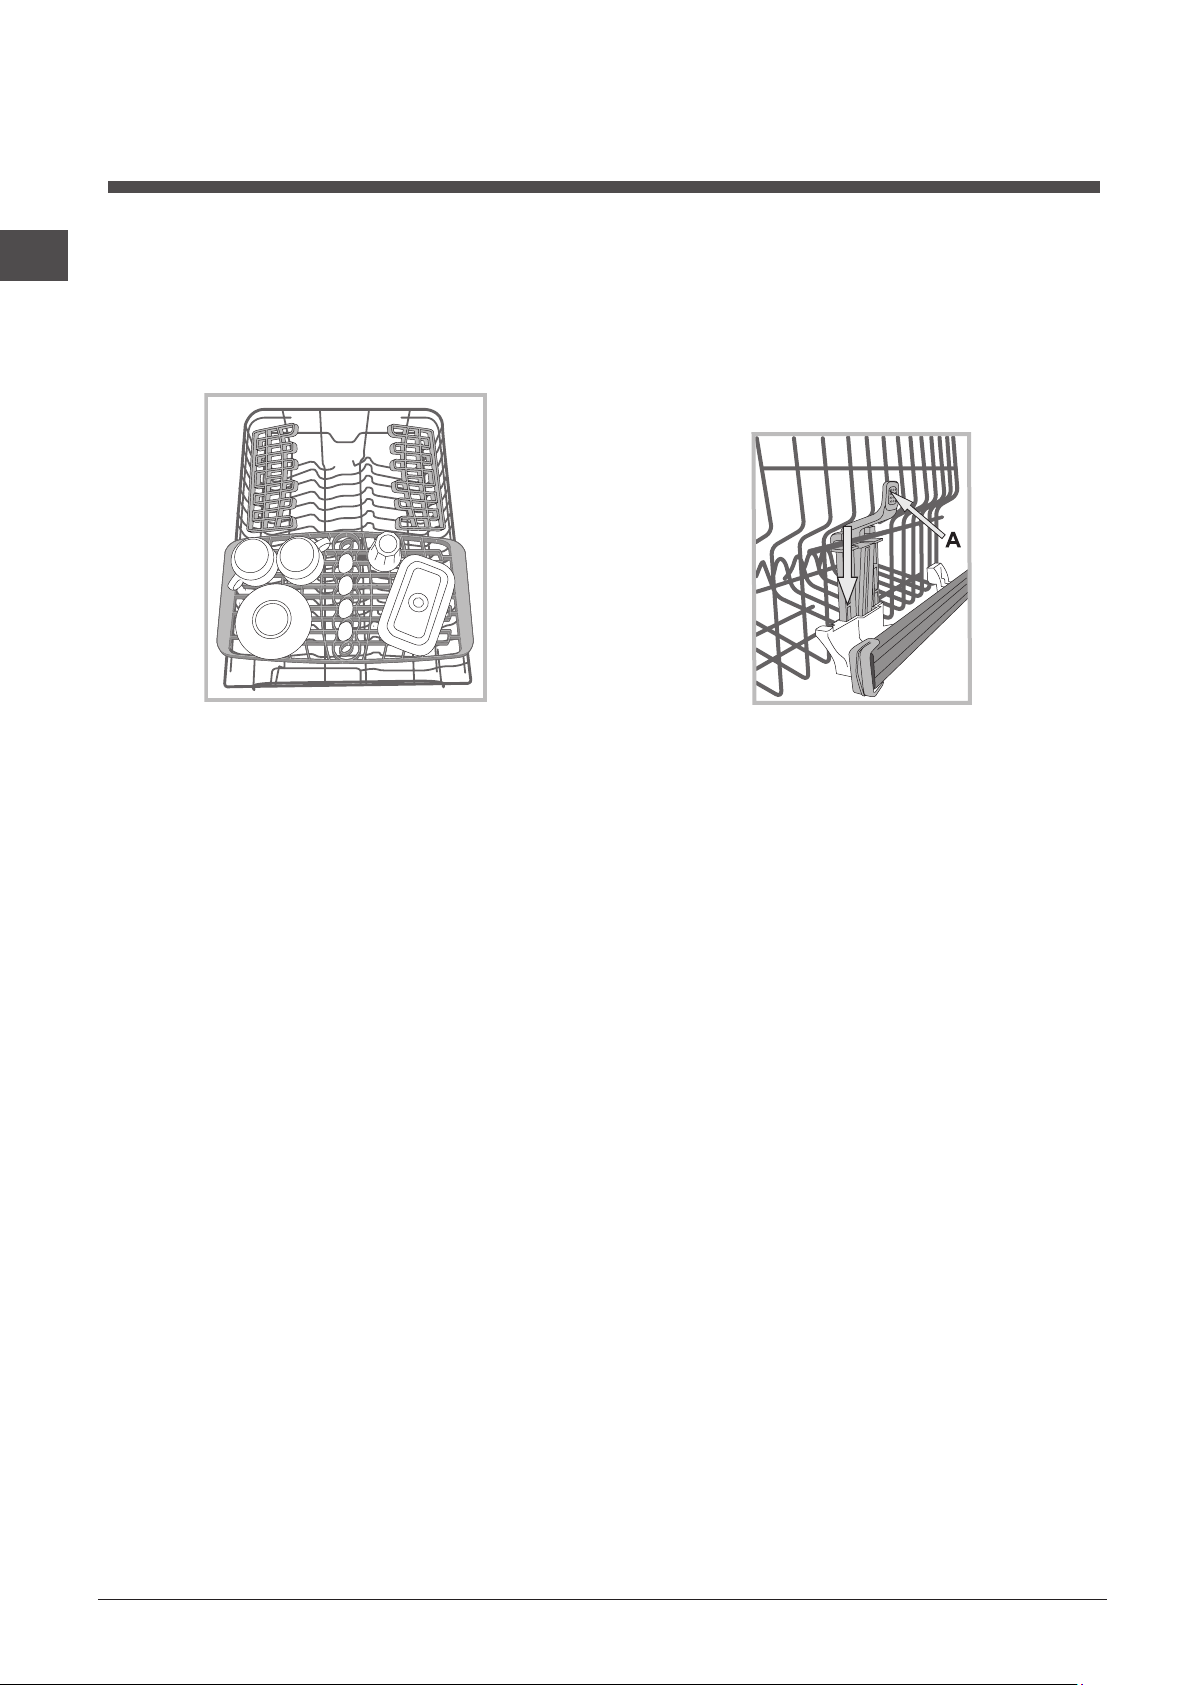
Tray*
Some dishwasher models are fitted with a sliding tray which
can be used to hold small crockery and cutlery.
For optimum washing performance, avoid positioning bulky
crockery directly below the tray. The cutlery tray can be
removed.
(see Figure.)
Adjusting the height of the upper rack
The height of the upper rack can be adjusted: high position
to place bulky crockery in the lower rack and low position to
make the most of the tip-up compartments by creating more
space upwards.
The height of the upper rack should be adjusted WHEN THE
RACK IS EMPTY.
NEVER raise or lower the rack on one side only.
If the rack is equipped with a Lift-Up device*
it up by holding its sides. To restore the lower position, press
the levers (A) at the sides of the rack and follow the rack down.
(see figure)
, lift
Unsuitable crockery
• Wooden crockery and cutlery.
• Delicate decorated glasses, artistic handicraft and antique
crockery. Their decorations are not resistant.
• Parts in synthetic material which do not withstand high
temperatures.
• Copper and tin crockery.
• Crockery soiled with ash, wax, lubricating grease or ink.
The colours of glass decorations and aluminium/silver pieces can
change and fade during the washing process. Some types of
glass (e.g. crystal objects) can become opaque after a number
of wash cycles too.
Damage to glass and crockery
Caused by:
• Type of glass and glass production process.
• Chemical composition of detergent.
• Water temperature of rinse cycle.
Tips:
• Only use glasses and porcelain guaranteed by the
manufacturer as dishwasher safe.
• Use a delicate detergent suitable for crockery.
• Collect glasses and cutlery from the dishwasher as soon as
the wash cycle is over.
* Only available in selected models.
10
Page 11
Detergent and
dishwasher use
Measuring out the detergent
Good washing results also depend on the correct amount of
detergent being used. Exceeding the stated amount does not
result in a more effective wash and increases environmental
pollution.
The amount can be adjusted to the soil level.
In the case of normally soiled items, use approximately either
25g (powder detergent) or 25ml (liquid detergent). If tablets
are used, one tablet will be enough.
If the crockery is only lightly soiled or if it has been rinsed
with water before being placed in the dishwasher, reduce
the amount of detergent used accordingly.
For good washing results also follow the instructions shown
on the detergent box.
For further questions please ask the detergent producers.
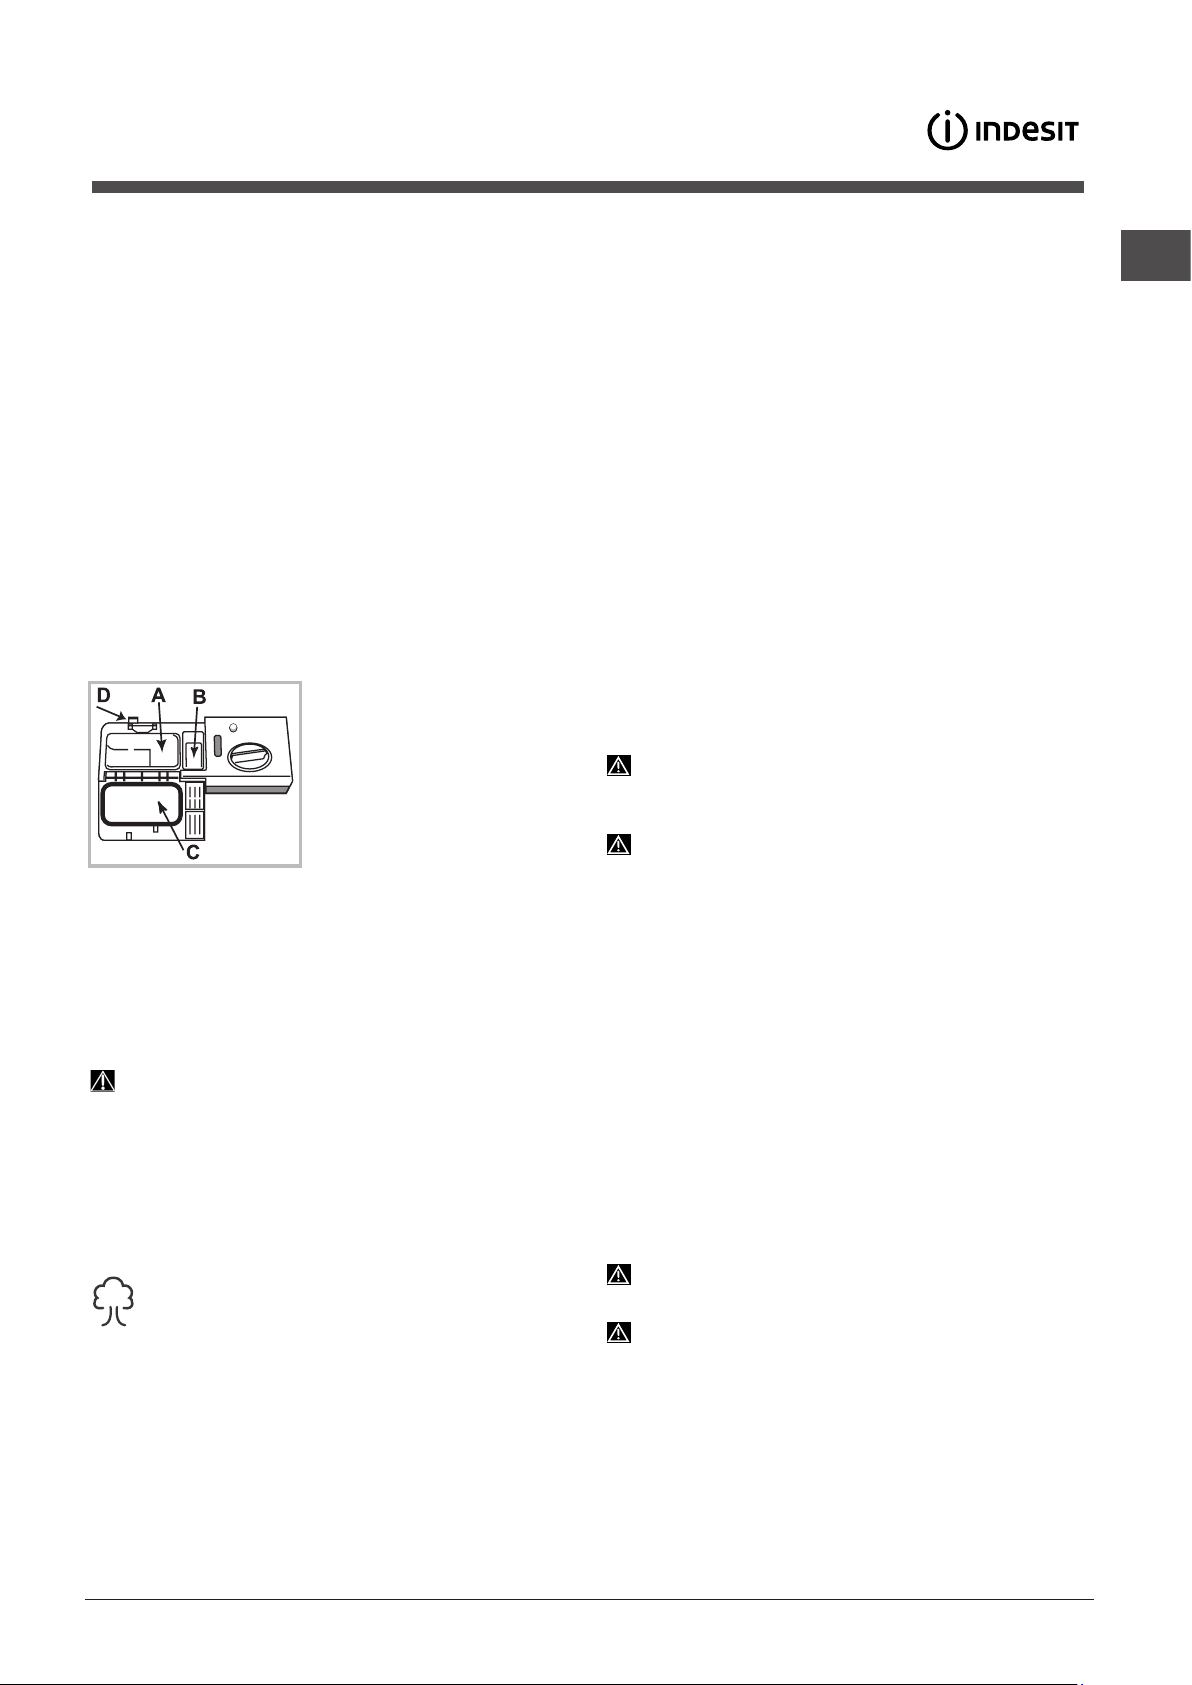
Open the detergent dispenser using button D and measure out
the detergent according to the Table of wash cycles:
• powder or liquid: compartments
A (wash detergent) and B (prewash detergent)
• tablets: when the cycle
requires 1 tablet, place it in
compartment A and close cover
C; when it requires 2 tablets,
place the second tablet on the
bottom of the appliance.
Remove detergent residues
from the edges of the compartment and close cover C until it
clicks.
The detergent dispenser automatically opens up at the right time
according to the wash cycle.
If all-in-one detergents are used, we recommend using the TABS
option, because it adjusts the cycle so that the best washing and
drying results are always achieved.
Only use detergent which has been specifically designed
for dishwashers.
DO NOT USE washing up liquid.
Using excessive detergent may result in foam residues
remaining in the machine after the cycle has ended.
To achieve the best washing and drying results, the combined
use of detergent, rinse aid liquid and refined salt is required.
We recommend using detergents that do not contain
phosphates or chlorine, as these products are harmful
to the environment.
Starting the dishwasher
1. Turn the water tap on.
2. Switch on the appliance by pressing the ON/OFF button.
3. Open the door and pour in a suitable amount of detergent
(see Measuring out the detergent).
4. Load the racks
5. Select the wash cycle by turning the SELECT WASH CYCLE
knob: align the notch on the knob with the number or symbol
representing the desired wash cycle. The START/PAUSE
indicator light will go on.
6. Select the wash options*
Cycles).
7. Start the cycle by pressing the START button; the indicator
light will stop flashing and stay lit (fixed light). The indicator light
corresponding to the wash phase will go on, signalling that the
wash cycle has begun.
8. At the end of the wash cycle the END indicator light will go on
(fixed light). Switch off the appliance by pressing the ON/OFF
button, shut off the water tap and unplug the appliance from the
electricity socket.
9. Wait a few minutes before removing the crockery to avoid
getting burnt. Unload the racks, beginning with the lower level.
- The machine will switch off automatically during long
periods of inactivity in order to minimise electricity
consumption.
AUTO WASH CYCLES*: some models of dishwasher are
equipped with a special sensor which can be used to assess
the level of soiling and automatically select the most efficient and
economic wash cycle accordingly. The duration of the auto wash
cycles may vary due to the operation of the sensor.
Changing a wash cycle in progress
If a mistake was made in the wash-cycle selection process, it is
possible to change the cycle provided that it has only just begun:
once the wash cycle has started, in order to change the wash
cycle switch off the machine by pressing and holding the ON/
OFF/Reset button. Switch it back on using the same button and
select the desired wash cycle and options.
Adding extra crockery
Press the Start/Pause button and open the door, taking care to
avoid the escaping steam, and place the crockery inside the
dishwasher. Press the Start/Pause button: The cycle will start
again after a long beep has been emitted.
If the delayed start has been set, at the end of the countdown
the wash cycle will not start. It will stay in Pause mode.
Press the Start/Pause button to pause the machine; the wash
cycle is stopped.
At this stage the wash cycle cannot be changed.
(see Loading the racks)
(see Options and Special Wash
and shut the door.
GB
* Only available in selected models.
Accidental interruptions
If the door is opened during the wash cycle or there is a power
cut, the cycle stops. It starts again from the point at which it
was interrupted once the door has been shut or the electricity
supply restored.
11
Page 12
Wash cycles
GB
Wash-cycle data is measured under laboratory conditions according to European Standard EN 50242.
Based on the different conditions of use, the wash-cycle duration and data can change.
The number and type of wash cycles and options may vary depending on the dishwasher model.
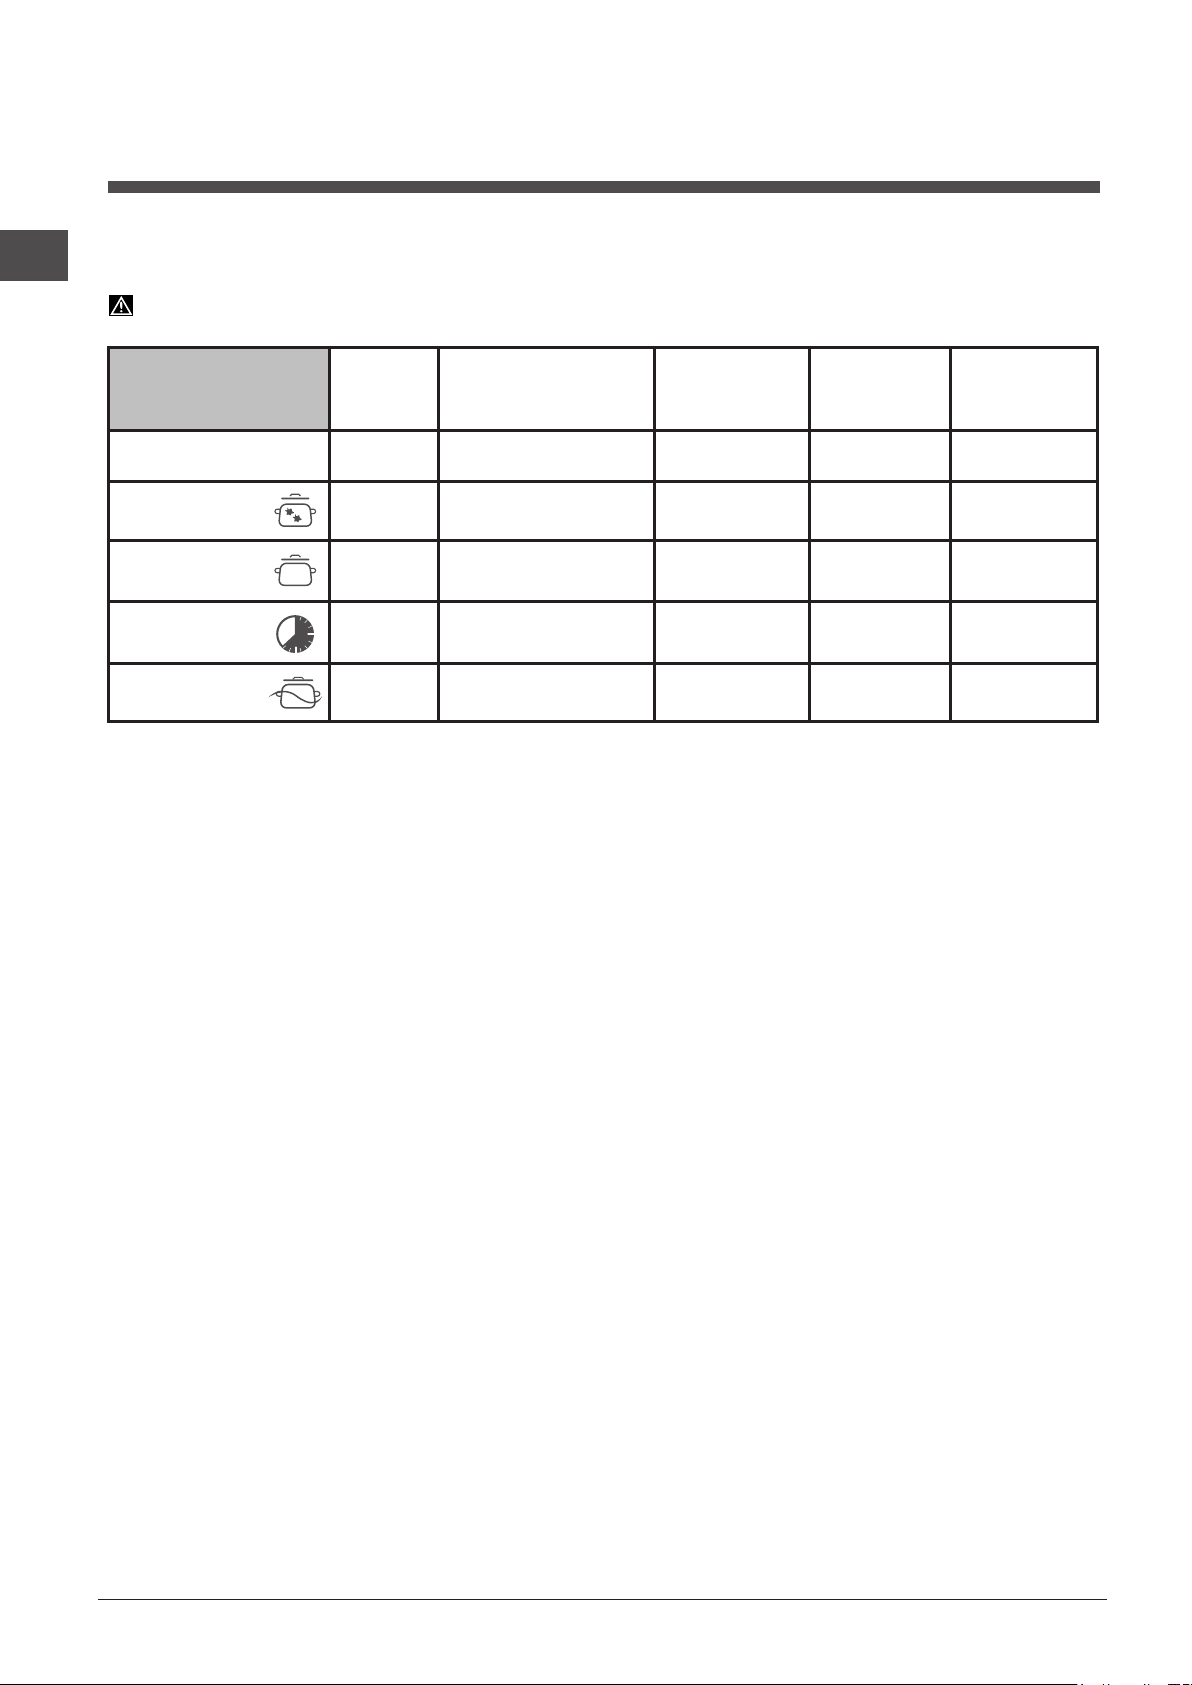
Wash cycle
Wash cycle
1. Eco Yes No 03:00 10 0,9
2. Intensive Yes No 02:30 14 1,3
3. Normal Yes No 02:00 13,5 1,15
4. Rapid 40’ No No 00:40 9 0,85
5. Prewash No No 00:10 4 0,01
Instructions on wash-cycle selection and detergent dosage
which
include
drying
Options
Approximate
duration of wash
cycles
h:min.
Water
consumption
(l/cycle)
Energy
consumption
(KWh/cycle)
1. The ECO wash cycle is the standard cycle to which the energy label data refers. It can be used to wash crockery with a normal
soil level and is the most efficient cycle in terms of energy and water consumption for this type of crockery.
4 gr/ml**+ 21 gr/ml – 1 Tab
2. Heavily soiled dishes and pans (not to be used for delicate items). 25 gr/ml – 1 Tab
3. Normally soiled pans and dishes. 4 gr/ml**+ 21 gr/ml – 1 Tab
4. Fast cycle to be used for slightly dirty dishes (ideal for 2 place settings) 21 gr/ml – 1 Tab
5. Pre-wash while awaiting completion of the load with the dishes from the next meal. No detergent.
Standby consumption: Left-on mode consumption: 5 W - Off mode consumption: 0.5 W.
Notes:
Optimum performance levels when using the “Rapid 40’” cycle can be achieved by respecting the specified number of place
settings.
(**Quantity of pre-washing detergent)
To reduce consumption, only run the dishwasher when it is full.
Note for Test Laboratories: for information on comparative EN testing conditions, please send an email to the following address:
[email protected]
12
Page 13
Care and maintenance
Shutting off the water and electricity supplies
• Turn off the water tap after every wash cycle to avoid leaks.
• Always unplug the appliance when cleaning it and when
performing maintenance work.
Cleaning the dishwasher
• The external surfaces of the machine and the control panel
can be cleaned using a non-abrasive cloth which has been
dampened with water. Do not use solvents or abrasive
products.
• Any marks on the inside of the appliance may be removed
using a cloth dampened with water and a little vinegar.
Preventing unpleasant odours
• Always keep the door of the appliance ajar in order to avoid
moisture from forming and being trapped inside the machine.
• Clean the seals around the door and detergent dispensers
regularly using a damp sponge. This will avoid food becoming
trapped in the seals, which is the main cause behind the
formation of unpleasant odours.
Cleaning the spray arms
Food residue may become encrusted onto the spray arms
and block the holes used to spray the water. It is therefore
recommended that you check the arms from time to time and
clean them with a small non-metallic brush.
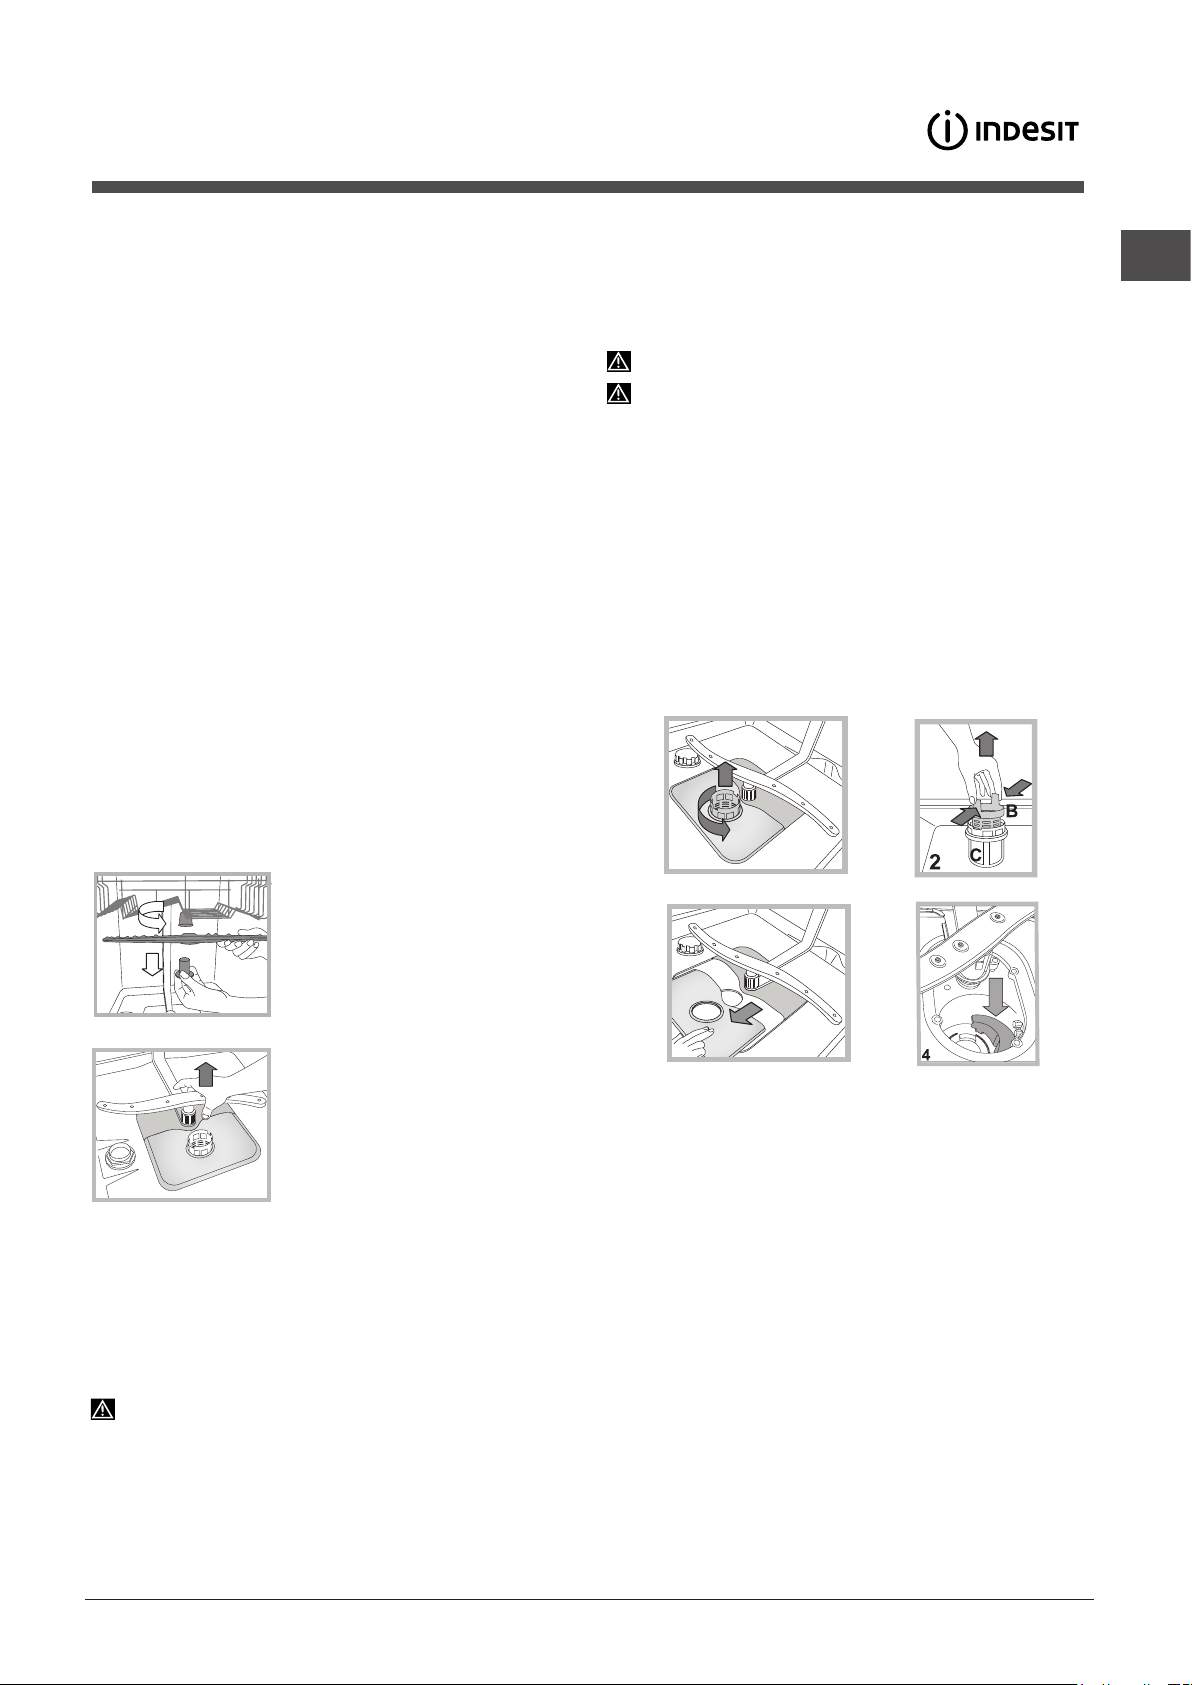
The two spray arms may both be removed.
To remove the upper spray arm,
turn the plastic locking ring in an
anti-clockwise direction. The upper
spray arm should be replaced so
that the side with the greater number
of holes is facing upwards.
Cleaning the filters
The filter assembly consists of three filters which remove food
residues from the washing water and then recirculate the water.
They must be cleaned if you wish to achieve the best results in
every wash.
Clean the filters regularly.
The dishwasher must not be used without filters or if the filter
is loose.
• After several washes, check the filter assembly and if necessary
clean it thoroughly under running water, using a non-metallic
brush and following the instructions below:
1. Turn the cylindrical filter C in an anti-clockwise direction and
pull it out
2. Remove the cup filter B by exerting a slight pressure on the
side flaps
3. Slide out the stainless-steel plate filter A.
4. Inspect the trap and remove any food residues. NEVER
REMOVE the wash-cycle pump protection
(fig. 1).
(fig. 2);
(fig. 3).
(black detail) (fig.4).
C
1
A
GB
The lower spray arm can be removed
by pressing on the side tabs and
pulling it upwards.
Cleaning the water inlet hose*
If the water hoses are new or have not been used for an extended
period of time, let the water run to make sure it is clear and free
of impurities before performing the necessary connections. If this
precaution is not taken, the water inlet could become blocked
and damage the dishwasher.
Clean the water inlet filter at the tap outlet regularly.
- Turn off the water tap.
- Unscrew the end of the water inlet hose, remove the filter and
clean it carefully under running water.
- Re-place the filter and screw the water hose back into position.
3
After cleaning the filters, re-place the filter assembly and fix it in
position correctly; this is essential for maintaining the efficient
operation of the dishwasher.
Leaving the machine unused for extended
periods
• Disconnect the appliance from the electricity supply and shut
off the water tap.
• Leave the door of the appliance ajar.
• When you return, run a wash cycle when the dishwasher is
empty.
* Only available in selected models.
13
Page 14
Troubleshooting
GB
Whenever the appliance fails to work, check for a solution from the following list before calling for Assistance.
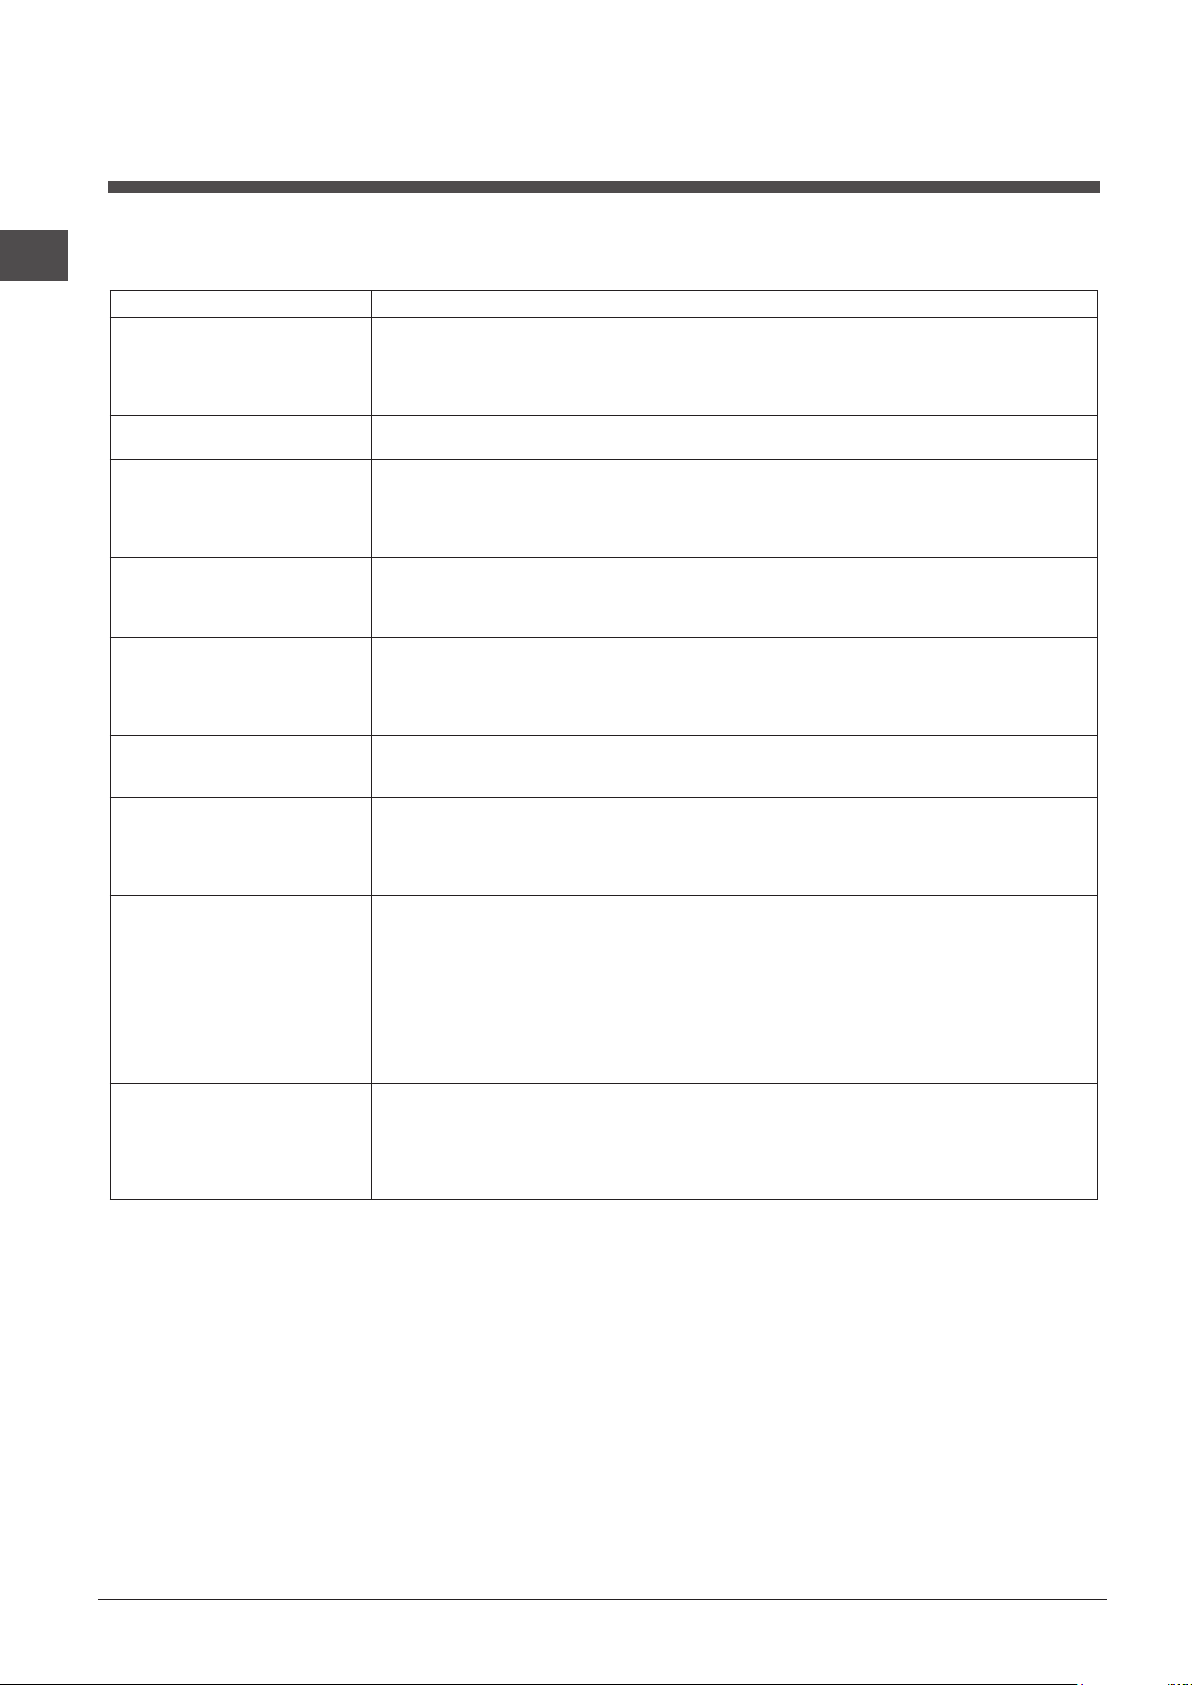
Problem: Possible causes / Solutions:
The dishwasher does not start
or cannot be controlled.
The door won’t close.
No water drain out of the
dishwasher.
The dishwasher makes
excessive noise.
The dishes and glasses are
covered in a white lm or
limescale deposits.
The dishes and glasses are
streaked or have a bluish
tinge.
The crockery has not been
dried properly.
The dishes are not clean. • The crockery has not been arranged properly.
The dishwasher won’t load
any water.
It is blocked with ashing lights.
• The water supply tap is not turned on.
• Switch off the appliance by pressing the ON/OFF button, switch it back on after approximately
one minute and reset the wash cycle.
• The appliance has not been plugged in properly or another electricity socket should be used.
• The dishwasher door has not been closed properly.
• Make sure that the racks were inserted all the way.
• The lock was released. Strongly push the door until a “clacking” noise is heard.
• The wash cycle has not nished yet.
• The water drain hose is bent
• The drain duct is clogged up.
• The lter is clogged up with food residues.
• Check the height of the drain hose.
• The dishes are rattling against each other or against the sprayer arms. Place the dishes
properly and make sure the sprayer arms can rotate freely.
• Too much foam: the detergent has not been measured out correctly or it is not suitable for use
in dishwashers.
• No rened salt.
• Water hardness adjustment is not suitable: increase the relevant values.
and Rinse Aid.)
• The salt and rinse-aid dispenser cap has not been closed properly.
• The rinse aid has been used up or the dosage is too low.
• The rinse aid dosage is too high.
• A wash cycle without a drying programme has been selected.
• The rinse aid has been used up.
• The rinse aid dispenser setting is not suitable.
• The crockery is made from non-stick material or plastic; the presence of water drops is
normal.
• The sprayer arms cannot rotate freely, being hindered by the dishes.
• The wash cycle is too gentle
• Too much foam: the detergent has not been measured out correctly or it is not suitable for use
in dishwashers.
• The lid on the rinse aid compartment has not been closed correctly.
• The lter is dirty or clogged up
• The rened salt level is low
• Make sure that the height of the dishes is compatible with the rack adjustment.
• The holes in the sprayer arms are clogged up.
• There is no water in the mains supply or the tap is shut off.
• The water inlet hose is bent
• The lters are clogged up: they need cleaning.
• The drain duct is clogged up: it needs cleaning.
• After checking and cleaning, switch the dishwasher on and off and start a new wash cycle.
• If the problem persists, turn off the water tap, remove the plug and call the Service Centre.
(See Detergent and dishwasher use.)
(See Detergent and dishwasher use.)
(see Installation).
Do not prewash the dishes by hand.
(See Rened Salt
(See Rened Salt and Rinse Aid.)
(see Wash Cycles).
(see Care and maintenance.)
(See Rened Salt and Rinse Aid.)
(See Care and maintenance.)
(see Installation).
(See Care and maintenance.)
* Only available in selected models.
14
Page 15

Guarantee
Guarantee
12 months Parts and Labour Guarantee
Your appliance has the benefit of our manufacturer’s guarantee, which covers the cost of breakdown repairs for
twelve months from the date of purchase.
This gives you the reassurance that if, within that time, your appliance is proven to be defective because of either
workmanship or materials, we will, at our discretion, either repair or replace the appliance at no cost to you.
This guarantee is subject to the following conditions:
- The appliance has been installed and operated correctly and in accordance with our operating and
maintenance instructions.
- The appliance is used only on the electricity or gas supply printed on the rating plate.
- The appliance has been used for normal domestic purposes only.
- The appliance has not been altered, serviced, maintained, dismantled, or otherwise interfered with by any
person not authorised by us.
- Any repair work must be undertaken by us or our appointed agent.
- Any parts removed during repair work or any appliance that is replaced become our property.
- The appliance is used in the United Kingdom or Republic of Ireland.
The guarantee does not cover:
- Damage resulting from transportation, improper use, neglect or interference or as a result of improper
installation.
- Replacement of any consumable item or accessory. These included but not limited to: plugs, cables, batteries,
light bulbs, fluorescent tubes and starters, covers and filters.
- Replacement of any removable parts made of glass or plastic.
GB
THIS GUARANTEE WILL NOT APPLY IF THE APPLIANCE HAS BEEN USED IN COMMERCIAL OR NONDOMESTIC PREMISES.
5 Year Parts Guarantee
Indesit also offers you a free 5 year parts guarantee. This additional guarantee is conditional on you registering
your appliance with us and the parts being fitted by one of our authorised engineers. There will be a charge for our
engineer’s time. To activate the extra parts warranty on your appliance, simply call our registration line on 08448 24
24 24 (Republic of Ireland 01 230 0800)
Extended Guarantees
We offer a selection of protection plans that enable you to fully cover yourself against the expense of repair bills
for the life of your policy. To find the ideal plan for you please call our advice line on 08448 226 226 (Republic of
Ireland 01 230 0233).
Free Helpdesk Service
We have a dedicated team who can provide free advice and assistance with your appliance if you experience any
technical difficulties within the first 90 days of ownership. Simply call our Indesit Service Hotline on 08448 224 224
(Republic of Ireland 0818 313 413) for telephone assistance, or, where necessary, to arrange for an engineer to
call.
15
Page 16

After Sales Service
195126024.00 - NC
07/2014 jk - Xerox Fabriano
GB
After Sales Service
No one is better placed to care for your Indesit appliance during the course of its working life than us – the
manufacturer.
Essential Contact Information
Indesit Service
We are the largest service team in the UK and Ireland offering you access to 400 skilled telephone advisors and
1000 fully qualified engineers on call to ensure you receive fast, reliable, local service.
UK: 08448 224 224
Republic of Ireland: 0818 313 413
www.indesitservice.co.uk
Please note: Our advisors will require the following information:
Model number:
Serial number:
Parts and Accessories
We supply a full range of genuine replacement parts as well as accessory products that protect and hygienically
clean your appliance to keep it looking good and functioning efficiently throughout its life.
UK: 08448 225 225
Republic of Ireland: 0818 313 413
www.indesitservice.co.uk
Appliance Registration
We want to give you additional benefits of Indesit ownership. To activate your free 5 year parts guarantee you must
register your appliance with us.
UK: 08448 24 24 24
Republic of Ireland: 01 230 0800
www.indesitservice.co.uk
Indesit Company UK Ltd. Morley Way, Peterborough, PE2 9JB
Indesit Company Unit 49 Airways Industrial Estate, Dublin 17
Recycling and Disposal Information
As part of Indesit’s continued commitment to helping the environment, Indesit reserves the right to use quality,
recycled components to keep down customer costs and minimise material wastage.
Please dispose of packaging and old appliances carefully. To minimise the risk of injury to children, remove the
door, plug, and cut the mains cable off flush with the appliance. Dispose of these parts separately to ensure that the
appliance can no longer be plugged into mains socket, and the door cannot be locked shut.
16
 Loading...