


DI 620
DI 620 A
DI 630 A
Lavastoviglie
Installazione e uso
Dishwasher
Installation and use
Lava-vasseille
Installation et emploi
Geschirrspuler
Installations und Gebrauch
Vaatwasser
Installatie en gebruik
Lavavajillas
Instalación y el uso
Máquina de lavar louça
IInstalação e o uso
DI 620
DI 620 A
DI 630 A
Lavastoviglie |
1 |
Istruzioni per l'installazione e l'uso |
|
Dishwasher |
11 |
Instructions for installation and use |
|
Lave-vasseille |
21 |
Instructions pour l'installation et l'emploi |
|
Geschirrspuler |
31 |
Informationen fü r Installation und Gebrauch |
|
Vaatwasser |
41 |
Gebruiksaanwijzingen voor de plaatsing en gebruik |
|
Lavavajillas |
51 |
Instrucciones para la instalació n y el uso |
|
Máquina de lavar louça |
61 |
Instruções para a instalação e o uso |
|
La sicurezza, una buona abitudine
ATTENZIONE
Leggete attentamente le avvertenze contenute nel presente libretto in quanto forniscono importanti indicazioni riguardanti la sicurezza di installazione, d’uso e di manutenzione.
Questa apparecchiatura è conforme alle seguenti Direttive Comunitarie:
-73/23/CEE (Basse Tensioni) e successive modificazioni;
-89/336/CEE (Compatibilità Elettromagnetica) e successive modificazioni.
-97/17 CEE (Etichettatura)
1.Eliminare con cura il materiale dell'imballaggio.
2.Dopo aver tolto l'imballaggio, verificate l'integrità del- l'apparecchio. In caso di dubbio, rivolgetevi a personale professionalmente qualificato.
3.La lavastoviglie deve essere usata esclusivamente da adulti e per il lavaggio di stoviglie di uso domestico. 4.Regole fondamentali da seguire nell'uso:
-non toccate la macchina a piedi nudi o con mani o piedi bagnati,
-sconsigliamo di ricorrere a prolunghe e prese multiple,
-durante l'installazione il cavo di alimentazione non deve subire piegature o compressioni rilevanti e pericolose,
-in caso di funzionamento anomalo o di lavori di manutenzione disinserire l'apparecchio dalla rete elettrica.
5.I bambini vanno tenuti lontano dai detersivi e dalla lavastoviglie quando é aperta.
6.La macchina non va mai installata all'aperto, nemmeno se lo spazio é riparato da una tettoia, ed é molto pericoloso lasciarla esposta a pioggia e temporali.
7.Non toccate la resistenza durante e subito dopo un ciclo di lavaggio.
8.Non appoggiatevi e non sedetevi sullo sportello aperto, potreste ribaltare la lavastoviglie.
9.In caso di guasto, chiudete il rubinetto di entrata acqua ed estraete la spina dalla presa a muro. Poi provate a consultare il capitolo "C'é qualche problema" e se non trovate una soluzione, contattate il centro assistenza.
10.Gli apparecchi fuori uso devono essere resi inutilizzabili, tagliando il cavo di alimentazione e danneggiando il blocco della porta.
Per garantire l’efficienza e la sicurezza di questo elettrodomestico:
λrivolgetevi esclusivamente a centri di assistenza tecnica autorizzata
λrichiedete sempre l’utilizzo di parti di ricambio originali
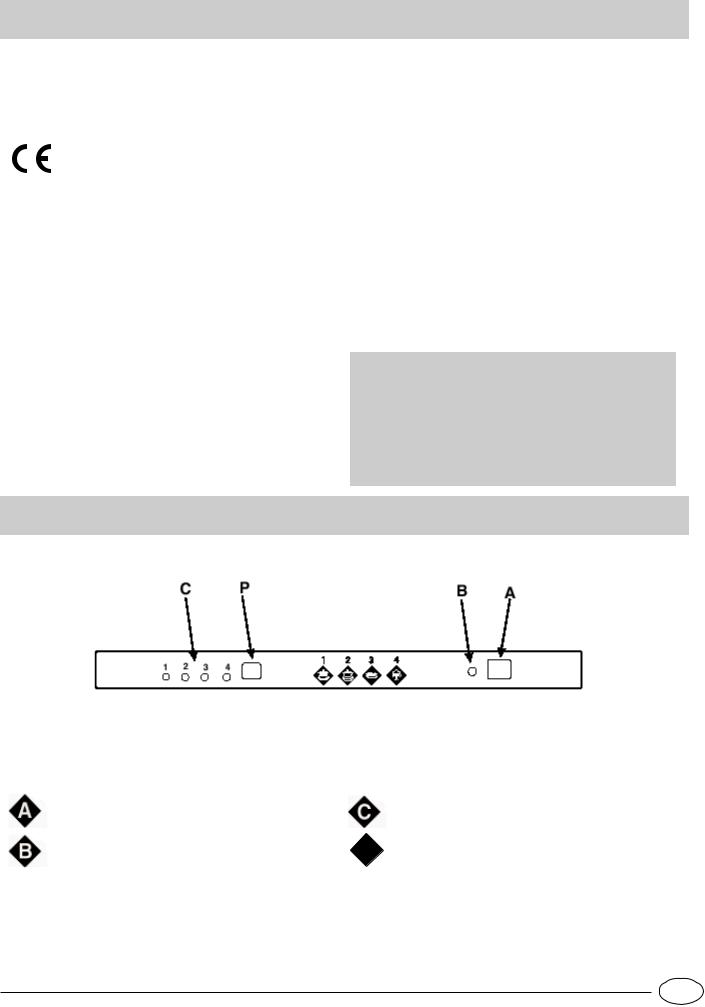
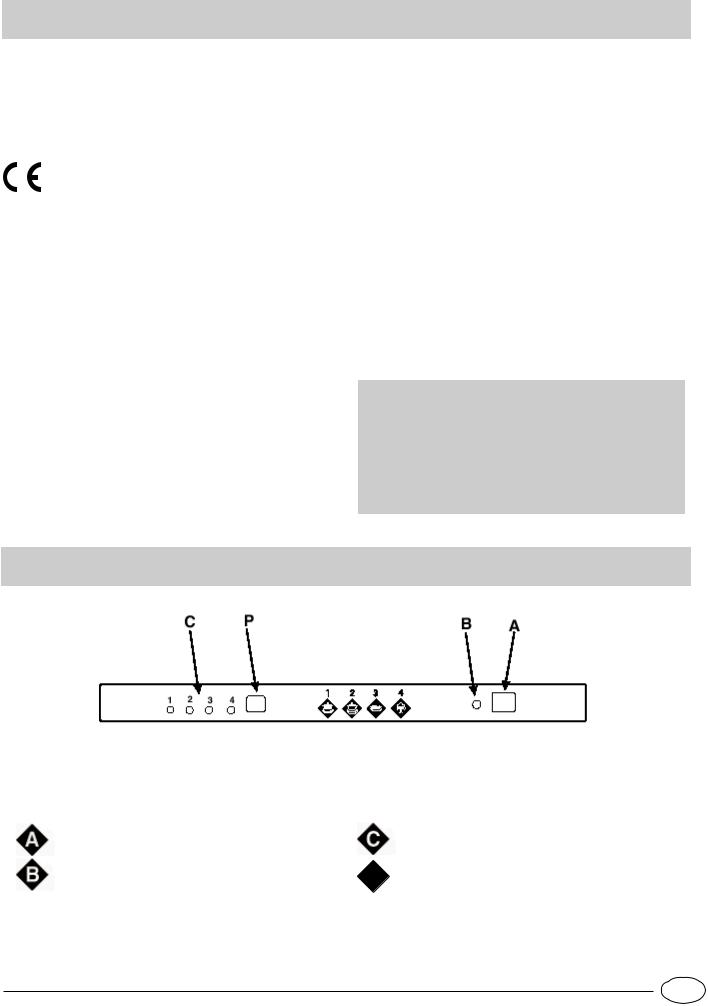
Vista da vicino (quadro comandi)
Pulsante ON - OFF |
Lampade spia programmi |
Lampada spia ON - OFF |
P Pulsante selezione programmi |
1 |
IT |
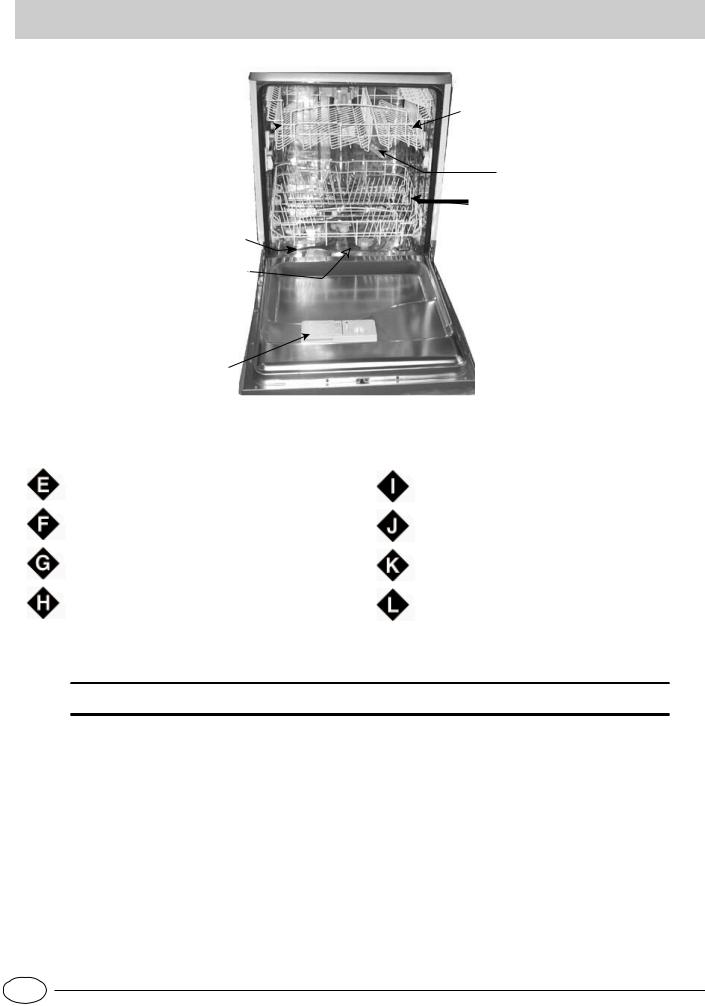
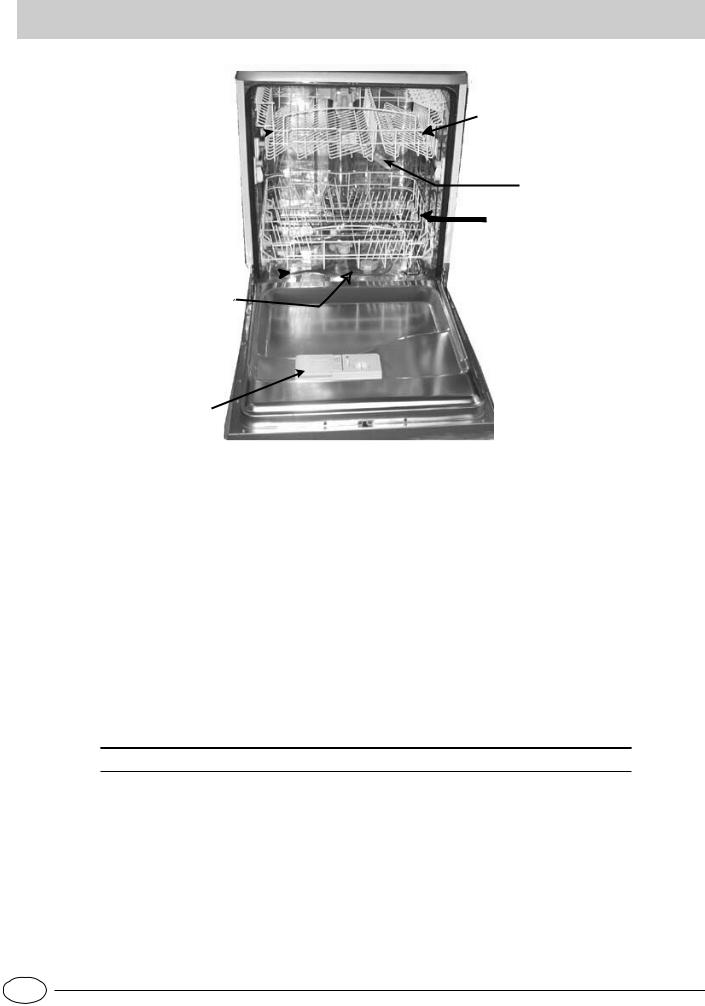
Vista da vicino (interno)
E
G 
F
H
J
 K
K
I
L
Cestello superiore |
Irroratore inferiore |
Irroratore superiore |
Tappo contenitore sale |
Regolazione altezza cestello |
Filtro lavaggio |
Cestello inferiore |
Contenitore detersivo e brillantante |
Caratteristiche tecniche
Larghezza |
cm. 59,5 |
|
|
|
|
Profondità |
cm. |
57 |
|
|
|
Altezza |
cm. |
82 |
|
|
|
Capacità |
12 coperti standard |
|
|
|
|
Pressione acqua alimentazione |
4,3 psi - 145 psi (30 KPa÷ 1MPa) (0,3 ÷10 bar) |
|
|
|
|
Tensione di alimentazione |
Vedi targhetta caratteristiche |
|
|
|
|
Potenza totale assorbita |
Vedi targhetta caratteristiche |
|
|
|
|
Fusibile |
Vedi targhetta caratteristiche |
|
|
|
|
IT |
2 |
Sale .....
Il sale
La durezza dell'acqua varia a seconda delle località. Se nella lavastoviglie entrasse acqua dura, si formerebbero incrostazioni sulle stoviglie.
Grazie ad un decalcificatore che utilizza sale specifico per lavastoviglie, si elimina il calcare dall'acqua.
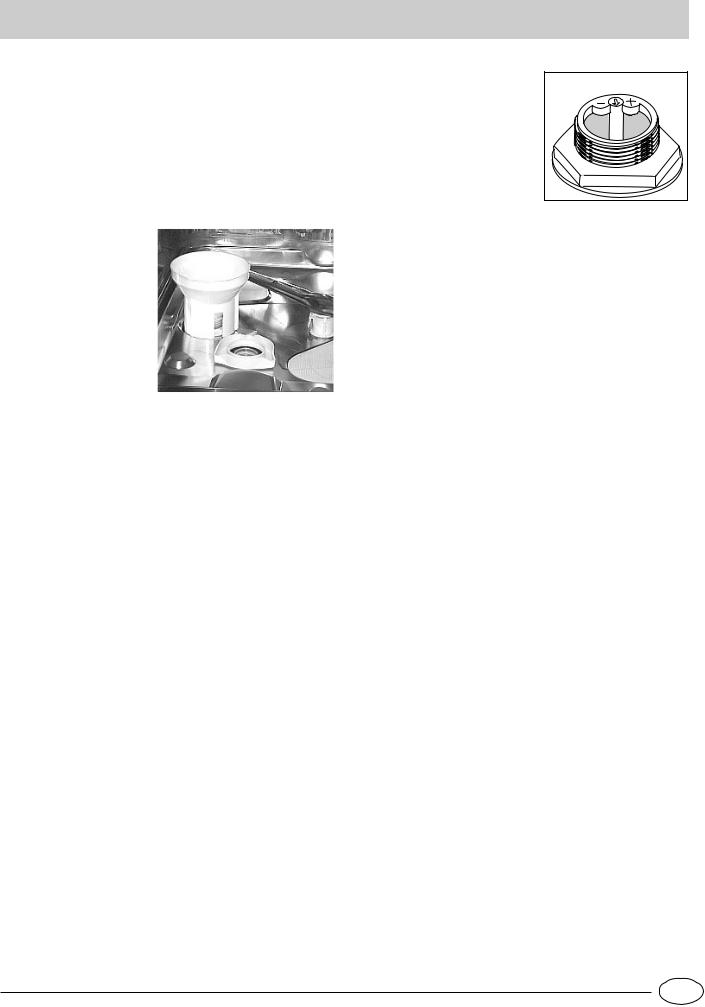
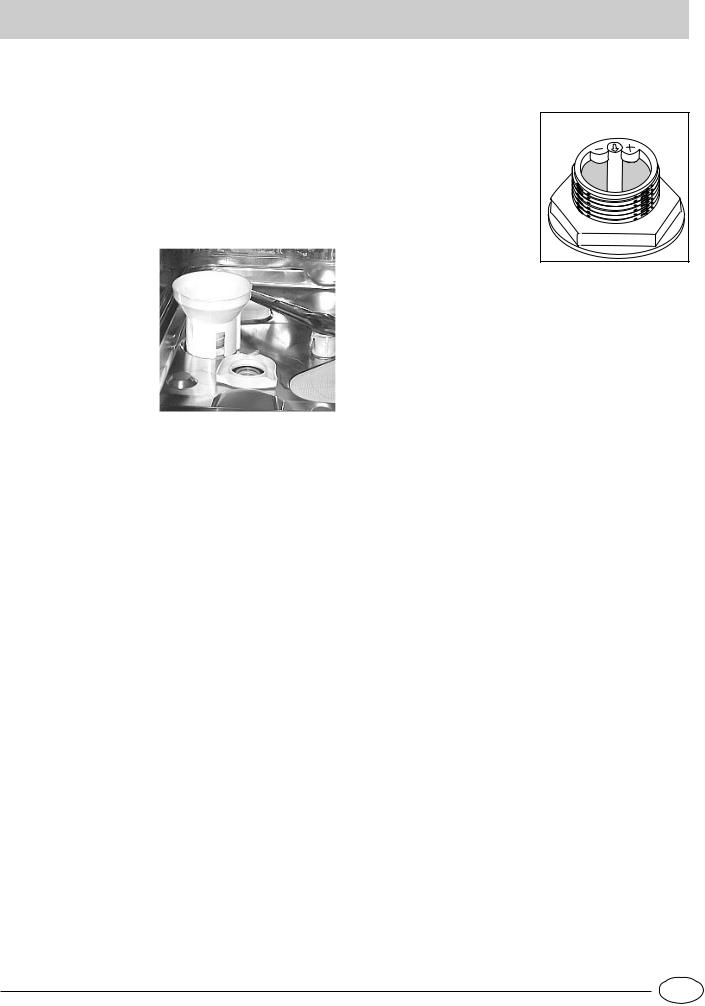
Caricamento del sale nel decalcificatore
Utilizzate sempre sale specifico per lavastoviglie. Il serbatoio del sale é sot-
to il cestello inferiore e va riempito così:
1.Estraete il cesto inferiore, svitate e togliete il tappo del serbatoio.
2.Se state caricando il serbatoio per la prima volta, riempitelo d'acqua.
3.Mettete l'imbuto in dotazione sul foro ed introducete circa 2 Kg di sale. E' normale che un
po'd'acqua fuoriesca dal serbatoio.
4.Riavvitare il tappo con cura.
Il serbatoio del sale va riempito circa ogni 30 cicli di lavaggio.
Per evitare la formazione di ruggine consigliamo di caricare il sale poco prima di iniziare un ciclo di lavaggio.
Regolazione consumo sale
La lavastoviglie è predisposta per la regolazione del consumo di sale in funzione della durezza dell'acqua che si utilizza in modo
da ottimizzare e personalizzare il consumo del sale al livello mi-
nimo necessario.
Potete richiedere il grado di durezza dell’acqua all’Ente
erogatore dell’acqua potabile della vostra zona. Per la regolazione seguire le seguenti istruzioni:
1.svitare il tappo del serbatoio sale
2.sul collare del serbatoio è posta una freccia (vedi fig. accanto) ruotare, se necessario, la freccia dal segno "-" in senso antiorario verso il segno "+" a seconda della durezza dell'acqua di alimentazione.
Si consiglia di effettuare la regolazione secondo lo schema seguente:
Durezza dell’acqua |
|
|
|
||
|
|
|
|
|
|
|
|
|
|
Consumo |
|
°dH |
°fH |
mmol/l |
Posizione |
sale |
Autonomia |
|
|
|
selettore |
(grammi/- |
(cicli\2kg) |
|
|
|
|
ciclo) |
|
|
|
|
|
|
|
0 -10 |
0 - 17 |
0 - 1,7 |
/ |
0 |
/ |
|
|
|
|
|
|
10 - 25 |
18 - 44 |
1,8 - 4,4 |
- |
20 |
60 |
|
|
|
|
|
|
25 - 50 |
45 - 89 |
4,5 - 8,9 |
MED |
40 |
40 |
|
|
|
|
|
|
> 50 |
> 89 |
> 8,9 |
+ |
60 |
25 |
|
|
|
|
|
|
3 |
IT |
Detersivo e brillantante....
Il detersivo
Usare solamente detersivo specifico per lavastoviglie. Il rifornimento del detersivo deve essere effettuato prima dell'inizio di ogni ciclo di lavaggio sulla base delle indicazioni fornite nella "Tabella programmi". Il distributore del detersivo si trova all'interno della porta.
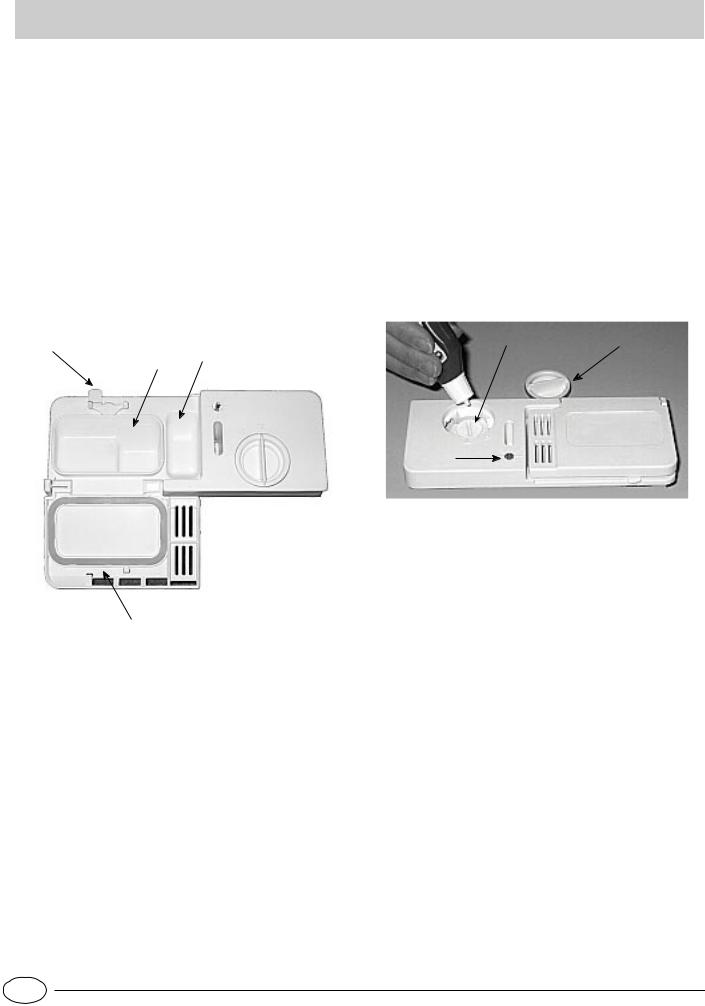
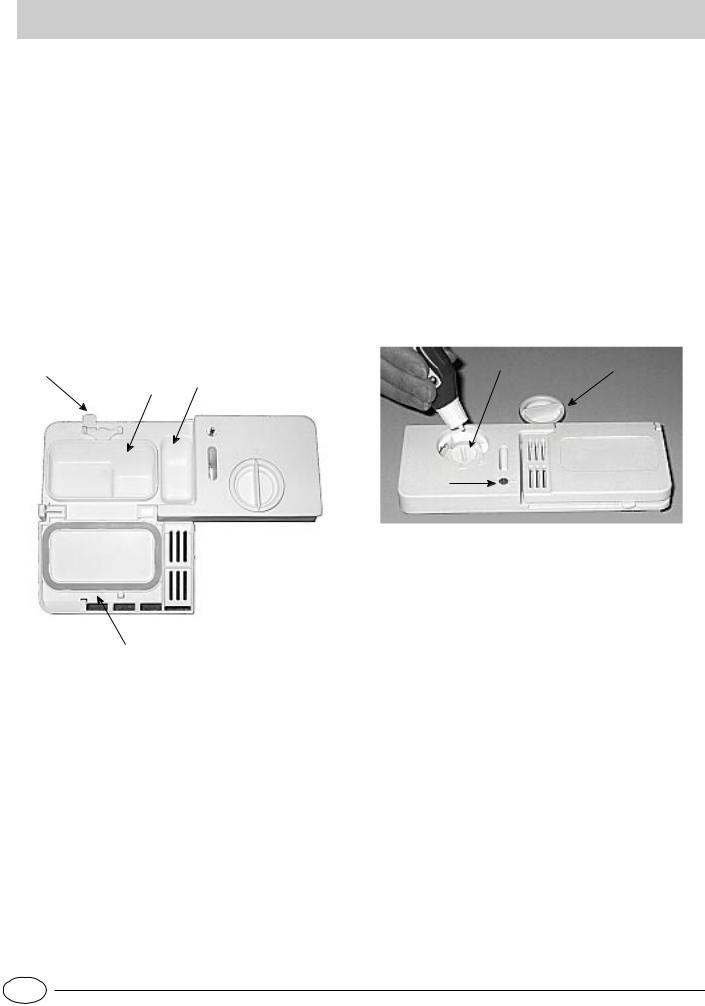
Caricamento del detersivo
Per aprire il coperchio "A" premere il pulsante "B". Il detersivo per il lavaggio va inserito nella vaschetta "C"e"D". Dopo aver versato il detersivo chiudete il coperchio, premendolo fino allo scatto.
Se utilizzate del detersivo per lavastoviglie in compresse, mettete una compressa nella vaschetta "D"e chiudete il coperchio.
Il brillantante
Il brillantante rende le tue stoviglie più brillanti perché ne migliora l’asciugatura. Il serbatoio del brillantante è posto all’interno della porta. Dovrai riempirlo quando vedi il serbatoio vuoto attraverso la spia ottica “D”.
(Se la tua lavastoviglie è provvista di “spia mancanza brillantante”, lo riempirai quando lampeggia o si illumina).
Caricamento del brillantante
Per aprire il contenitore occorre ruotare in senso antiorario il tappo "C" e quando versate il brillantante evitate che questo fuoriesca. E' possibile regolare la quantità di prodotto erogata, agendo con un cacciavite sul regolatore "F" posto sotto il coperchio "C". Vi sono 6 posizioni possibili, normalmente é tarato sul 4.
B F C
D
C
25 gr. |
5 gr. |
D
|
Importante |
|
La regolazione dell'erogazione del brillantante permette di |
|
migliorare l'asciugatura. Se sulle lavastoviglie lavate riman- |
|
gono gocce d'acqua o macchie, è necessario ruotare il |
|
regolatore verso i numeri più alti. Se le stoviglie lavate pre- |
A |
sentano delle striature bianche, ruotare il regolatore verso i |
|
numeri più bassi. |
Attenzione: per facilitare l'aggancio del coperchio, eli- |
|
minate, prima della chiusura, eventuali residui di de- |
|
tersivo caduti sui bordi della vaschetta. |
|
Attenzione
In commercio si possono trovare prodotti per il lavaggio delle stoviglie che contengono detersivo, sale e brillantante (3 in 1). Se l’ acqua è dura o molto dura consigliamo di aggiungere comunque sale nell’apposito dispenser per evitare la formazione di striature bianche sulle stoviglie o sulla vasca.
Se si utilizzano i prodotti 3 in 1 non è più necessario caricare il brillantante nell’apposito serbatoio.
Se si vuole un’asciugatura ancora maggiore è possibile caricare il brillantante, avendo cura però di portare il regolatore sul n° 2.
In ogni caso consultare le istruzioni del produttore sulle confezioni.
IT |
4 |

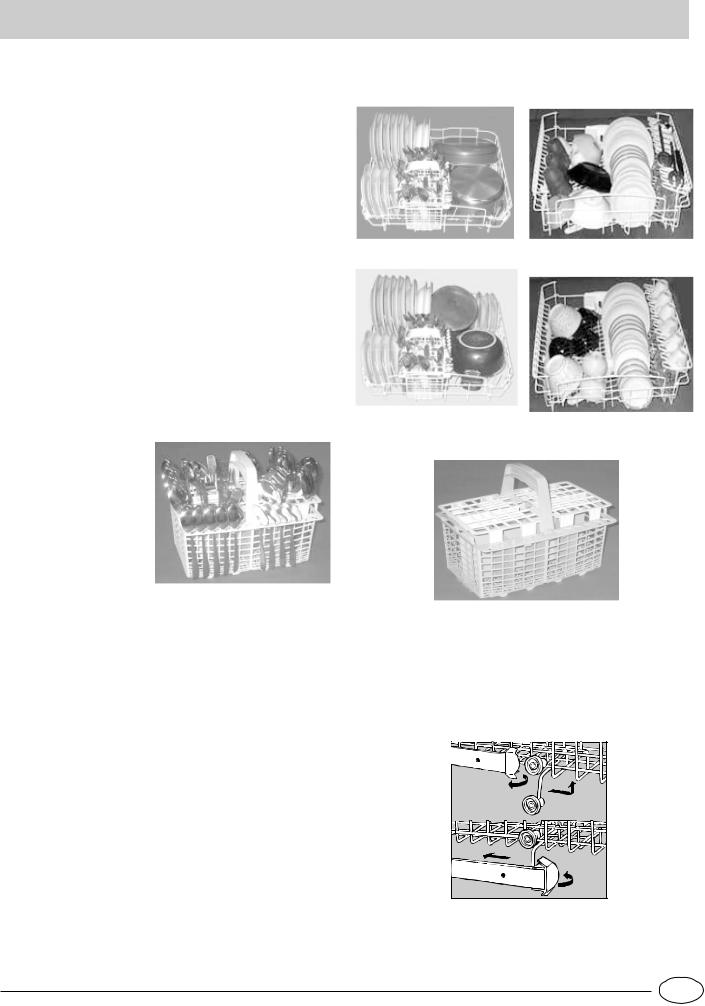
Caricamento delle stoviglie
Prima di disporre le stoviglie nei cestelli, asportate i residui più grossi di cibo per evitare di intasare i filtri con conseguente riduzione dell'efficacia di lavaggio.
Qualora le pentole e le padelle fossero molto incrostate, vi consigliamo di metterle a bagno in attesa del lavaggio. Si eviteranno così ulteriori lavaggi.
Estrarre i cesti per facilitare l'operazione di carico delle stoviglie.
Come utilizzare il cestello inferiore
Nel cestello inferiore vi consigliamo di mettere le stoviglie più difficili:
pentole, coperchi, piatti piani e fondi come indicato nelle figure a lato.
I piatti da portata e coperchi grandi vanno sistemati di preferenza ai lati del cesto, senza però bloccare la rotazione dell'irroratore superiore.
-pentole, insalatiere etc. devono essere sempre capovolte
-stoviglie molto fonde vanno sistemate in posizione obliqua onde consentire all'acqua di defluire.
Questo cestino è dotato di due griglie asportabili: inserisci |
||
le posate ad una ad una |
|
|
nelle feritoie, con i manici |
A |
|
rivolti verso il basso. |
||
|
||
I coltelli e gli utensili con |
|
|
punte taglienti devono es- |
|
|
sere caricati con le punte |
|
|
in basso. |
|
|
Sistema tutte le posate in |
|
|
modo che non si tocchino |
|
|
fra di loro. |
|
|
Se il cestino è dotato di |
|
|
inserti laterali i cucchiaini vanno inseriti singolarmente nelle apposite feritoie (ved.fig. A-B). Posate particolarmente lunghe vanno sistemate in posizione orizzontale nella parte anteriore del cestello superiore.
Esempi di caricamenti
cestello inferiore |
cestello superiore |
B
Come utilizzare il cesto superiore.
Il cestello superiore è adatto a contenere stoviglie delicate e leggere come bicchieri, tazze da the e caffè, piattini, ma anche piatti, insalatiere basse, padelle e tegami bassi poco sporchi.
- Collocare le stoviglie leggere in modo che non vengano spostate dai getti d’acqua.
Come regolare il cestello superiore...
E' possibile regolare il cestello superiore in posizione alta o bassa. Per fare ciò aprire le alette di arresto rotaie e sfilare il cestello; sistemarlo con le rotelle posteriori in posizione alta o bassa quindi farlo scivolare lungo le guide fino a far entrare anche le rotelle anteriori; richiudere le alette per l'arresto (ved.fig. F).
|
1 |
2 |
|
|
|
Fig. F |
|
3 |
|
4 |
|
|
|
5 |
IT |

Come avviare la macchina
Come avviare un programma di lavaggio .....
Dopo aver effettuato tutte le operazioni riportate nei paragrafi precedenti ed aver aperto completamente il rubinetto dell'acqua, aprire parzialmente la porta del lavastoviglie e premere il pulsante ON-OFF "A" posto sul quadro comandi; sentite un breve segnale acustico e la spia "B"si illumina.
A questo punto la macchina è sotto tensione e pronta per essere programmata.
Avviamento ed impostazione del programma.
Selezionare il programma premendo il pulsante “P”. Ad ogni pressione sul pulsante corrisponde un segnale acustico e si accendono in successione le lampade spia “C”: scegliere il programma più indicato al tipo di stoviglie da lavare (a pag.7 trovate la tabella programmi).
Chiudete la porta,un breve segnale acustico indicherà che il ciclo di lavaggio è iniziato e non è più possibile modificarlo, se necessario leggere il paragrafo "Annullare o modificare un programma in corso".
Annullare o modificare un programma in corso.....
Premessa: un programma in corso può essere modificato solo se è iniziato da poco.
Per modificare un programma in corso aprire con cautela la porta per evitare eventuali schizzi di acqua calda quindi tenere premuto per circa 5 secondi il pulsante “P” finchè non sentite 3 brevi segnali acustici. La spia “C”si spegne e a questo punto tutte le impostazioni sono state annullate. Ora potete re-impostare il programma giusto.
Nel caso in cui abbiate dimenticato di inserire una stoviglia...
E' possibile interrompere il ciclo di lavaggio aprendo la porta con cautela per evitare schizzi di acqua calda. Inserite le stoviglie e alla chiusura della porta il ciclo riprenderà dal punto in cui era stato interrotto.
Nel caso di interruzione della corrente elettrica o di apertura della porta....
Il programma si interrompe e poi riprenderà quando torna la luce o alla chiusura della porta.
Alla fine del lavaggio....
La fine del ciclo è segnalata da un doppio segnale acustico e dal lampeggiare della spia programmi "C".
Attenzione!
Aprite la porta, spegnete la macchina premendo il pulsante “A”, staccate la spina dalla presa di corrente per togliere l’alimentazione elettrica; il cavo di alimentazione deve essere perciò facilmente accessibile.
Chiudete il rubinetto dell'acqua e attendete alcuni minuti prima di togliere le stoviglie, eviterete così di maneggiare le stoviglie calde, più sensibili agli urti, ed otterrete una migliore asciugatura.
Svuotate per primo il cesto inferiore.
Accertatevi che il programma sia terminato prima di togliere le stoviglie!
Avvertenza: quando aprite la porta della lavastoviglie, se il ciclo di lavaggio è in corso o è appena terminato, fate attenzione al vapore caldo che fuoriesce, potreste scottarvi.
IT |
6 |

Tabella programmi
Con il lavaggio in lavastoviglie avrete la garanzia di un ambiente igienizzante e di un pulito più sicuro.
|
,QGLFD]LRQL SHU OD |
'HVFUL]LRQH |
'HWHUVLYR |
|
'XUDWD GHO |
|
|
|
SURJUDPPD |
||||
3URJUDPPD |
VFHOWD GHL |
SUHODYDJJLR |
%ULOODQWDQWH |
|||
GHO FLFOR |
WROOHUDQ]D |
|||||
|
SURJUDPPL |
ODYDJJLR |
|
|||
|
|
|
“ |
|||
|
|
|
|
|||
|
|
|
|
|
|
|
|
6WRYLJOLH H SHQWROH |
3UHODYDJJLR FRQ DFTXD FDOGD D ƒ& |
|
|
|
|
|
/DYDJJLR D ƒ& |
|
|
|
||
|
PROWR VSRUFKH GD QRQ |
JU |
|
|
||
|
XVDUH SHU SH]]L |
5LVFLDFTXL FRQ DFTXD IUHGGD |
||||
|
GHOLFDWL |
5LVFLDFTXR FDOGR D ƒ& |
|
|
|
|
|
$VFLXJDWXUD |
|
|
|
||
,QWHQVLYR |
|
|
|
|
||
|
|
|
|
|
||
|
|
|
|
|
|
|
|
6WRYLJOLH H SHQWROH |
/DYDJJLR D ƒ& |
|
|
|
|
|
QRUPDOPHQWH VSRUFKH |
5LVFLDFTXR IUHGGR |
JU |
|
|
|
|
&LFOR VWDQGDUG |
5LVFLDFTXR FDOGR D ƒ& |
||||
|
JLRUQDOLHUR |
$VFLXJDWXUD |
|
|
|
|
1RUPDOH |
|
|
|
|
|
|
|
|
|
|
|
|
|
|
/DYDJJLR SUHOLPLQDUH GL |
|
|
|
|
|
|
SHQWROH H VWRYLJOLH LQ |
%UHYH ODYDJJLR IUHGGR SHU LPSHGLUH |
|
|
|
|
|
DWWHVD GL FRPSOHWDUH LO |
O HVVLFD]LRQH GHL UHVLGXL GL FLER VXOOH |
|
|
||
|
FDULFR DO SDVWR |
VWRYLJOLH |
|
|
|
|
$PPROOR |
VXFFHVVLYR |
|
|
|
|
|
|
|
|
|
|
||
|
|
|
|
|
|
|
|
3URJUDPPD SHU XQ |
|
|
|
|
|
|
ODYDJJLR HFRORJLFR D |
3UHODYDJJL FRQ DFTXD IUHGGD |
|
|
|
|
|
EDVVL FRQVXPL |
/DYDJJLR D ƒ& |
JU |
|
|
|
|
HQHUJHWLFL DGDWWR D |
5LVFLDFTXR FDOGR D ƒ& |
||||
|
VWRYLJOLH H SHQWROH |
$VFLXJDWXUD |
|
|
|
|
(FR |
QRUPDOPHQWH VSRUFKH |
|
|
|
|
|
|
|
|
|
|
||
|
|
|
|
|
|
7 |
IT |
Consigli per risparmiare
-E' importante attivare la lavastoviglie possibilmente a pieno carico per ottimizzare i consumi; per evitare che nel frattempo si formino cattivi odori e incrostazioni, potete utilizzare il ciclo ammollo.
-Scegliete il programma adeguato : la scelta del programma dipende dal tipo di stoviglie da lavare e dal loro grado di sporco.
-Dosate la giusta quantità di detersivo: se eccedete con il quantitativo di detersivo non otterrete stoviglie più pulite, ma solamente un maggiore impatto ambientale.
-E' inutile sciacquare le stoviglie prima di posizionarle nella macchina.
Come tenere in forma la lavastoviglie
Dopo ogni lavaggio
Dopo ogni lavaggio chiudete il rubinetto dell'acqua e lasciate socchiusa la porta in modo che non ristagnino nè umidità, nè cattivi odori
Staccare la spina
Prima di fare qualsiasi pulizia o manutenzione, staccate sempre la spina dalla presa: non correte alcun pericolo.
Niente solventi nè abrasivi
Per pulire l'esterno e le parti in gomma della lavastoviglie non occorre usare nè solventi nè abrasivi ma solo un panno imbevuto di acqua tiepida e sapone.
Per eliminare eventuali macchie sulla superfice della vasca, utilizzare un panno imbevuto di acqua ed un po' di aceto bianco o prodotto specifico per la pulizia della lavastoviglie.
Se partite per le vacanze
Quando andate in vacanza, é consigliabile fare un lavaggio a vuoto, dopodichè staccare la spina, chiudere il rubinetto di ingresso acqua e lasciare socchiusa la porta: le guarnizioni dureranno più a lungo ed all'interno non si formeranno odori sgradevoli.
In caso di trasloco
In caso di trasloco possibilmente mantenete l'apparecchio in posizione verticale; se fosse necessario, inclinatela sul lato posteriore.
Le guarnizioni.
Uno dei fattori responsabili del ristagno di odori all'interno della lavastoviglie é rappresentato dai residui di cibo che rimangono nelle guarnizioni. Basterà pulirle periodicamente con una spugnetta inumidita.
IT |
8 |

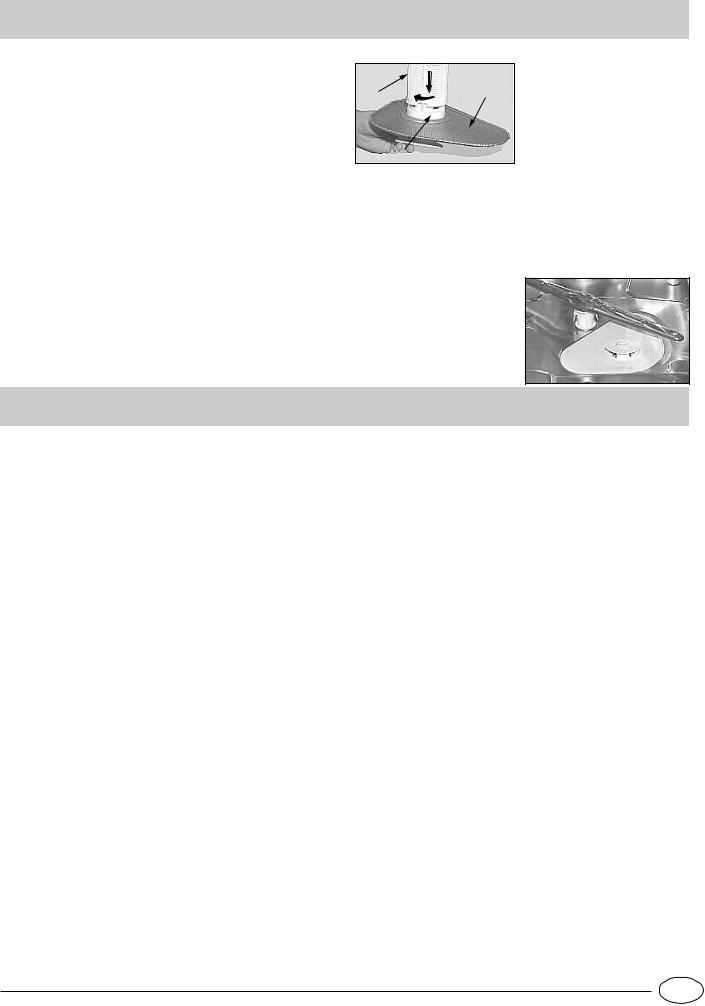
Pulizia e manutenzioni particolari
Il gruppo filtrante
Se vuoi avere sempre buoni risultati di lavaggio, è necessario pulire il gruppo filtrante.
L’acqua di lavaggio viene pulita dai residui di cibo e rimessa in circolo perfettamente filtrata. Per questo, dopo ogni lavaggio, è meglio rimuovere i residui più grossi che trovi trattenuti dal bicchiere “C” e dal filtro semicircolare A; per estrarli tira il manico del bicchere verso l’alto. Basterà sciacquarli sotto l’acqua corrente.
Una volta al mese è necessario pulire accuratamente tutto il gruppo filtrante: bicchiere C + filtro semicircolare A + filtro cilindrico B. Il filtro “B” si estrae ruotandolo in senso antiorario.
Per la pulizia aiutati con uno spazzolino non metallico. Rimetti insieme i pezzi (come indicato nella figura) e reinserisci il gruppo nella lavastoviglie. Posizionalo nel suo alloggiamento facendo una pressione verso il basso.
La lavastoviglie non deve essere usata senza filtri. Se non inserisci correttamente i filtri si ridurrà l’efficacia di lavaggio, e si potrebbe anche danneggiare la lavastoviglie.
|
1 |
|
B |
2 |
A |
C
Pulizia degli irroratori
Può succedere che residui di cibo si attacchino agli irroratori ostruendo i fori; controllarli periodicamente e pulirli (vedere Vista di vicino (interno) alle lettere F-I).
C'é qualche problema ?
Può accadere che la lavastoviglie non funzioni o non funzioni bene. Prima di chiamare l'assistenza, vediamo insieme cosa si può fare: può darsi che abbiate dimenticato di premere qualche tasto o non abbiate fatto, per distrazione, una manovra necessaria affinchè la macchina funzioni.
La lavastoviglie non parte
Avete controllato se:
il rubinetto è aperto e ben collegato al tubo, manca l'acqua in casa oppure non arriva con sufficiente pressione, il tubo è piegato, il filtro del tubo di alimentazione acqua è intasato, la porta è aperta.
Le stoviglie non sono pulite
Avete controllato se:
E' stata messa la giusta dose di detersivo, il programma selezionato è idoneo alle stoviglie che avete caricato, il filtro e microfiltro sono puliti, gli irroratori sono liberi.
La lavastoviglie non scarica
Avete controllato se:
il tubo di scarico è piegato.
Sulle lavastoviglie rimangono depositi calcarei o una patina bianca
Avete controllato se:
il tappo del contenitore sale è chiuso bene, il dosaggio di brillantante è regolato bene.
Messaggi d'errore
La tua lavastoviglie è dotata di un sistema di sicurezza in grado di rilevare eventuali anomalie di funzionamento. Tali anomalie sono segnalate da una o due spie programma “C” lampeggianti a frequenza rapida. Dopo aver preso nota di quali spie lampeggiano spegni la macchina e chiama l’assistenza tecnica.
Allarme rubinetto chiuso
Se hai dimenticato di aprire il rubinetto dell’acqua, la tua macchina te lo segnala per alcuni minuti con brevi segnali acustici. Apri il rubinetto e vedrai che la macchina, dopo alcuni minuti, si riavvia. Nel caso in cui non sei presente quando vengono emessi i segnali acustici, la macchina si blocca e le spie programmi 2 e 3 (normale e ammollo) lampeggiano a frequenza rapida. Spegni con il pulsante di On-Off, apri il rubinetto dell’acqua e dopo aver atteso circa 20 secondi riaccendi la macchina, riseleziona il programma e vedrai che si avvierà regolarmente.
Allarme filtri intasati
Se la macchina è bloccata e lampeggiano a frequenza rapida le spie1(intensivo) e 3 (ammollo) significa che il filtro è intasato da massicci residui di cibo. Spegnete la macchina, pulite accuratamente il filtro e dopo averlo risistemato nella sua sede riaccendete. Riselezionate Il programma ed esso si avvierà regolarmente.
Allarme per guasto all’elettrovalvola di carico dell’acqua.
Se lampeggia a frequenza rapida la spia 2 (normale) SPEGNERE E RIACCENDERE la lavastoviglie dopo un minuto. Se l’allarme permane, per prima cosa chiudere il rubinetto delll’acqua per evitare allagamenti poi togliere corrente e chiamare l’assistenza tecnica.
Se invece lampeggiano a frequenza rapida spie diverse da quelle sopra indicate, spegnete la macchina e chiamate l'assistenza tecnica.
Se nonostante tutti i controlli, la lavastoviglie non funziona e l'inconveniente da voi rilevato continua ad esserci, chiamate il centro assistenza autorizzato più vicino, comunicando le seguenti informazioni:
-il tipo di guasto
-la sigla del modello (Mod. ....) ed il numero di serie(S/N
....) riportati sulla targhetta applicata nella parte laterale delle controporta.
Non ricorrete mai a tecnici non autorizzati e rifiutate sempre l'installazione di pezzi di ricambio non originali.
9 |
IT |

Installazione
Posizionamento
Sistemare la macchina nel punto prescelto. La macchina può essere fatta aderire con i fianchi o con lo schienale ai mobili adiacenti o alla parete. La lavastoviglie é munita di tubi per l'alimentazione e lo scarico dell'acqua che possono essere orientati verso destra o verso sinistra per consentire un'adeguata installazione.
Livellamento
Posizionata la macchina agire sui piedini avvitandoli e svitandoli al fine di regolare, se necessario, l'altezza della macchina e livellarla in modo che venga a trovarsi orizzontale; non deve comunque, in nessun modo, essere inclinata di oltre 2°.
Un buon livellamento assicurerà il corretto funzionamento della lavastoviglie.
Regolazione piedini posteriori (solo per il mod. DI 630 A)
Incassate la macchina nell'apposito vano quindi regolate l'altezza della stessa agendo sulle viti poste nella parte anteriore inferiore. Con un cacciavite ruotate in senso orario le viti per alzare la lavastoviglie e in senso antiorario per abbassarla.
Collegamento alla presa d'acqua fredda.
L’allacciamento dell’elettrodomestico alla rete idrica deve avvenire esclusivamente con il tubo di carico fornito con l’apparecchio, non utilizzare tubi diversi. In caso di sostituzione utilizzare solo ricambi originali.
Allacciare il tubo di carico ad una presa d'acqua fredda con bocca filettata da 3/4 gas avendo cura di avvitarlo strettamente al rubinetto.
Se la tubazione dell'acqua é nuova o é rimasta per lungo inattiva, prima di fare l'allacciamento, assicurarsi, facendola scorrere, che l'acqua diventi limpida e priva di impurità. Senza questa precauzione c'é il rischio che l'entrata d'acqua si intasi, danneggiando la macchina.
Collegamento alla presa d'acqua calda
La macchina può essere alimentata con acqua calda di rete (impianto centralizzato, termosifoni) che non superi la temperatura di 60° C.
In questo caso il tempo di lavaggio sarà abbreviato di circa 15 minuti e l'efficacia del lavaggio lievemente ridotta.
Il collegamento deve essere effettuato alla presa d'acqua calda, con le stesse modalità descritte per il collegamento alla presa d'acqua fredda.
Sicurezza antiallagamento.
La tua lavastoviglie (MOD. DI 620 A - DI 630 A) è dotata di un sistema che interrompe l’ingresso dell’acqua nel caso di perdite all'interno della macchina. E’ provvista inoltre di un tubo entrata acqua che sopporta pressioni molto alte e che in caso di rottura si colora in rosso. La sicurezza in caso di allagamenti è garantita dal secondo tubo trasparente che lo contiene. E’ molto importante controllarlo periodicamente e
se lo vedi di colore rosso sai che devi al più presto cambiarlo. Chiama l’assistenza tecnica autorizzata per l’intervento.
Collegamento al tubo di scarico |
|
Inserire il tubo di scarico in una |
|
conduttura di scarico che abbia un |
A |
diametro minimo di cm. 4 oppure |
|
appoggialo al lavandino. Evitare |
|
strozzature o curvature eccessive. |
|
La parte del tubo contrassegnata |
|
con la lettera A deve essere ad una |
|
altezza compresa tra 40 e 100 cm. |
|
Il tubo non deve essere immerso |
|
nell’acqua. |
|
Collegamento elettrico
Inserire la spina in una presa di corrente munita di un efficiente collegamento a terra (la messa a terra dell'impianto é una garanzia di sicurezza prevista dalla legge), dopo aver verificato che i valori della tensione e della frequenza di rete corrispondano a quelli riportati sulla targhetta situata sulla controporta inox della macchina e che l'impianto elettrico al quale essa va collegata sia dimensionato per la corrente massima indicata su tale targhetta. Se la presa di corrente alla quale va collegata la macchina non corrisponde alla spina, sostituire quest'ultima con una spina adatta, piuttosto che impiegare adattatori o derivatori in quanto essi potrebbero provocare riscaldamenti o bruciature.
ATTENZIONE:
La spina della lavastoviglie deve rimanere accessibile per poter effettuare operazioni di manutenzione in tutta sicurezza.
Striscia anticondensa.
Su alcuni modelli è prevista in dotazione una striscia autoadesiva trasparente.
Deve essere incollata sul lato inferiore del vostro ripiano in legno per proteggerlo dalla condensa.
Ove non prevista in dotazione, può essere richiesta come ricambio ai rivenditori autorizzati.
IT |
10 |
Safety Is a Good Habit to Get Into
NOTICE
Carefully read the instructions contained in this manual, as they provide important information which is essential to safe and proper installation, use and maintenance of the appliance.
This appliance complies with the following EEC directives:
-73/23/EEC (Low Voltage) and subsequent modifications;
-89/336/EEC (Electromagnetic Compatibility) and subsequent modifications.
-97/17/EEC (Labelling)
1.Carefully dispose of the packing material.
2.After removing the packing, check to make sure that the appliance is not damaged. If in doubt, contact a qualified professional.
3.The dishwasher must only be used by adults for the washing of household dishes and cooking utensils. 4.Fundamental rules to follow when using the appliance:
-Never touch the dishwasher when barefoot or with wet hands or feet;
-We discourage the use of extension cords and multiple sockets;
-During installation, the power supply cord must not be excessively or dangerously bent or flattened;
- If the appliance is not operating properly or maintenance must be performed, disconnect the appliance from the power supply.
5.Keep detergents out of the reach of children, who must also be kept away from the dishwasher when it is open. 6.This appliance cannot be installed outdoors, not even if the area in which it is installed is covered by a roof; it is also very dangerous to leave it exposed to the rain and elements. 7.Do not touch the heating element during or after a wash cycle.
8.Do not lean or sit on the door when it is open, as this could overturn the dishwasher.
9.If the appliance malfunctions, turn off water supply to the appliance and disconnect the plug from the wall socket. Then, consult the section entitled, "Troubleshooting." If you cannot resolve the problem, contact a service centre.
10.Appliances which are no longer being used must be made inoperable by cutting the power supply cord and removing the door lock.
To maintain the EFFICIENCY and SAFETY of this appliance, we recommend:
λcall only the Service Centers authorized by the manufacturer
λalways use original Spare Parts
Close-up View (control panel)
ON-OFF Button |
|
Cycles Indicator Lights |
ON - OFF Light |
P |
Cycle select button |
11 |
GB |
Close-up View (Interior)
G 
J
I
L
 Upper Rack
 Top Sprayer Arm
 Rack Height Adjustor
 Lower Rack
E
F
H
 K
K
 Bottom Sprayer Arm
 Salt Container Cap
 Washing Filter
 Detergent and Rinse Aid Dispenser
Technical characteristics
Width |
cm. 59,5 |
|
Depth |
cm. |
57 |
|
|
|
Height |
cm. |
82 |
|
|
|
Capacity |
12 standard place settings |
|
|
|
|
Mains water pressure |
4,3 psi - 145 psi (30 KPa÷ 1MPa )(0,3 ÷10 bar) |
|
|
|
|
Power voltage |
See data plate |
|
Total absorber power |
See data plate |
|
|
|
|
Fuse |
See data plate |
|
|
|
|
GB |
12 |
Salt .......
Salt
The hardness of the water varies from place to place. If hard water is used in the dishwasher, deposits will form on the dishes and utensils.
The appliance is equipped with a special softener that uses a salt specifically designed to eliminate lime and minerals from the water.
Loading the Salt into the Softener
Always use salt intended for use with dishwashers. The salt container is
located beneath the lower rack and should be filled as follows:
1.Remove the lower rack and then unscrew and remove the cap from the salt container;
2.If you are filling the container for the first time, fill it with water;
3.Place the end of the funnel (supplied) into the hole and introduce about
2kg of salt. It is normal for a small amount of water to come out of the salt container.
4.Carefully screw the cap back on.
The salt container should be filled after about every 30 wash cycles.
To prevent the formation of rust, load the salt just before beginning a wash cycle.
Adjusting Salt Consumption
The dishwasher is designed to allow for adjusting the amount of salt consumed based on the
harness of the water used. This is intended to optimize and cus-
tomize the level of salt consumption so that it remains at a minimum.
Your Local Water Board can
supply the degree of hardness of the water
in your area.
To adjust salt consumption, proceed as follows:
1)Unscrew the cap from the salt container.
2)There is a ring on the container with an arrow on it (see figure to the side), if necessary, rotate the ring in the anticlockwise direction from the "_" setting towards the "+" sign, based on the hardness of the water being used.
It is recommended that adjustments be made in accordance with the following schema:
Water Hardness |
|
|
|
|||
|
|
|
|
|
|
|
|
|
|
|
Salt |
Autono- |
|
|
|
|
|
consu- |
||
Clarke |
|
|
Selector |
my |
||
°fH |
mmol/l |
mption |
||||
degrees |
position |
(cycles\2- |
||||
|
|
(grams/- |
||||
|
|
|
|
kg) |
||
|
|
|
|
cycle) |
||
|
|
|
|
|
||
|
|
|
|
|
|
|
0 - 14 |
0 - 17 |
0 -1,7 |
/ |
0 |
/ |
|
|
|
|
|
|
|
|
14 - 36 |
18 - 44 |
1,8 - 4,4 |
"-" |
20 |
60 |
|
|
|
|
|
|
|
|
36 - 71 |
45 - 89 |
4,5 - 8,9 |
MED |
40 |
40 |
|
|
|
|
|
|
|
|
>71 |
> 89 |
> 8,9 |
"+" |
60 |
25 |
|
|
|
|
|
|
|
|
13 |
GB |
Detergent and Rinse Aid ....
Detergent
Detergent specifically intended for use with dishwashers must be used. The dispenser must be refilled before the start of each wash cycle following the instructions provided in the "Wash Cycle Table." The detergent dispenser is located on the inside panel of the door.
Loading the detergent
To open lid "A", press button "B". The cleaning detergent should be introduced into the two containers "C"and "D" up to the rim.
After pouring in the detergent, replace the lid, pressing down until it clicks.
Dishwasher detergent in tablets is now available on the market, in which case you should place one tablet into container "D" and replace the lid.
B C
D
25 gr. |
5 gr. |
A
Notice: To facilitate closing the cover, remove any excess detergent on the edges of the dispenser.
Rinse Aid
This product makes dishes sparkle more as it improves their drying. The rinse aid container is situated on the inside of the appliance door; you should refill it when you see the container is empty by means of indicator “D”.
(If your dishwasher is fitted with a “low rinse aid” indicator light, fill the container up when the indicator light flashes or lights up).
Loading the Rinse Aid
To open the dispenser, turn the "C" cap in the anti-clockwise direction and then pour in the rinse aid, making sure not to overfill. The amount of rinse aid used for each cycle can be regulated by turning the "F" dose adjustor, located beneath the "C" cap, with a screwdriver. There are 6 different settings; the normal dosage setting is 4.
F C
D
Important:
Proper dosage of the rinse aid improves drying.
If drops of water remain on the dishes or spotting occurs, the dosage adjustor should be turned to a higher setting. If the dishes have white streaks, turn the dosage adjustor to a lower setting.
Warning
Three-in-one dishwasher tablets are now available on the market, and combine detergent, salt and rinse aid all in one. If the water in your area is hard or very hard, we still recommend you pour extra salt into the relevant dispenser to prevent the formation of white streaks on your dishes or on the interior of the appliance.
Using a three-in-one product means it is no longer necessary to put rinse aid into the relevant container.
If you want to achieve perfectly dry dishes, you may add rinse aid as long as the dosage adjuster is set to no.2. In any case, please read the manufacturer's instructions on the packet.
GB |
14 |
Loading the Dishwasher
Before placing the dishes in the dishwasher, remove the larger food particles to prevent the filter from becoming clogged, which results in reduced performance.
If the pots and pans have baked-on food that is extremely hard to remove, we recommend that they be allowed to soak before they are washed. This will eliminate the need for extra wash cycles.
Pull out the racks to facilitate loading the dishwasher.
How to Use the Lower Rack
We recommend that you place the most difficult to clean items on the bottom rack: pots, pans, lids, serving dishes and bowls, as shown in the figure to the right.
It is preferable to place serving dishes and lids on the sides of the racks in order to avoid blocking the rotation of the top spray arm.
-Pots, serving bowls, etc. must always be placed top down.
-Deep pots should be slanted to allow the water to flow out.
-This basket is equipped with two removable grids: insert
the cutlery one by one |
|
||
into the slots; knives and |
A |
||
utensils with sharp blades |
|
||
or tips |
should be |
|
|
positioned with the sharp |
|
||
parts at the bottom. |
|
||
Position all cutlery items |
|
||
so that they don't touch. |
|
||
If the rack has side |
|
||
baskets, |
the |
spoons |
|
should |
be |
loaded |
|
individually into the appropriate slots (see fig. A-B).
- Especially long utensils should be placed in the horizontal position at the front of the upper rack.
How to Use the Upper Rack
The upper rack is designed to hold more delicate and lighter dishware, such as glasses, coffee and tea cups and saucers, as well as plates, small bowls and shallow pans (as long as they are not too dirty).
- Position the dishes and cookware so that they do not get moved by the spray of water.
How to adjust the Upper rack ...
The top rack can be adjusted using the two rack heights (top and bottom). To adjust the rack, open up the tabs that lock the guides and pull out the rack. Arrange the rack with the back wheels in either the top or bottom position and then insert it along the guides until the front wheels are on as well. Close the tabs to lock the rack in place (see Fig. F)
Lower Rack |
Upper Rack |
B
|
1 |
2 |
|
|
|
Fig. F |
|
3 |
|
4 |
|
|
|
15 |
GB |

Starting the Appliance
Starting a wash cycle....
After performing all the operations described in the previous paragraphs, turn the water tap on completely, open the appliance door and press ON-OFF button "A": indicator light "B" comes on. Your appliance is now on and awaiting instructions.
Setting and Starting a Wash Cycle
Select the wash cycle by pressing button "P". Each time this button is pressed, one of the indicator lights "C" will come on in sequence, select the wash cycle you deem most suitable for the type of dishes to wash (take a look at page 17, where you will find the wash cycle table). Close the appliance door and after a few seconds, you will hear a short beep: the wash cycle has begun.
Cancelling or modifying a cycle while underway...
Premise: A cycle that is underway can only be modified if it has only been running for a short time.
Open the appliance door carefully to avoid any hot water splashes, then keep button "P" pressed for approximately 5 seconds, until you hear 3 short beeps. Indicator light "C" will come off and at this point, all the settings will have been cancelled. You are now free to re-set the correct wash cycle.
If you forget to load some of the dishes...
Interrupt the wash cycle by opening the appliance door with the utmost care, as usual, then insert the dish you had forgotten. When you shut the appliance door, the cycle will start up from where you interrupted it. restart at the point where it left off.
There's been a power failure? Have you opened the dishwasher door?
The wash cycle stops and then restarts when the electricity comes back on or when you close the door.
At the end of the wash cycle...
The end of the wash cycle is indicated by a double beep and the flashing of the wash cycle indicator light "C".
Warning!
Open the dishwasher door, turn off by pressing button “A”, unplug the appliance from the electricity socket to cut off the power supply; the power supply cable should consequently be easily accessible.
Turn off the water tap.
Wait a few minutes before unloading the dishes: they are very hot! If you wait a little while, they dry better thanks to the steam.
Empty the lower rack first.
Make sure the wash cycle has ended before removing the dishes!
Warning
If opening the door soon after the end of the programme,or during it, stand away from the Dishwasher, to avoid possible injury from hot steam.
GB |
16 |

Wash Cycle Table
Dishwasher washing guarantees your dishes will be cleaned in a hygienic setting for safer, cleaner results.
|
|
|
'HWHUJHQW |
|
:DVK |
|
|
|
|
|
F\FOH |
||
|
&\FOH VHOHFWLRQ |
|
IRU |
5LQVH |
||
&\FOH |
&\FOH GHVFULSWLRQ |
GXUDWLRQ |
||||
LQVWUXFWLRQV |
SUH ZDVK |
$LG |
||||
|
|
WROHUDQFH |
||||
|
|
|
ZDVK |
|
||
|
|
|
|
“ |
||
|
|
|
|
|
||
|
|
|
|
|
|
|
|
9HU\ GLUW\ GLVKHV |
3UH ZDVK ZLWK KRW ZDWHU DW ƒ& |
|
|
|
|
|
:DVK DW ƒ& |
|
|
|
||
|
SRWV DQG SDQV QRW WR |
JU |
|
|
||
|
5LQVHV ZLWK FROG ZDWHU |
|||||
|
EH XVHG ZLWK GHOLFDWH |
|||||
|
5LQVH ZLWK KRW ZDWHU DW ƒ& |
|
|
|
||
,QWHQVLYH |
LWHPV |
|
|
|
||
'U\LQJ |
|
|
|
|||
|
|
|
|
|||
|
|
|
|
|
|
|
|
1RUPDOO\ GLUW\ |
:DVK DW ƒ& |
|
|
|
|
|
GLVKHV SRWV DQG |
5LQVH ZLWK FROG ZDWHU |
JU |
|
|
|
|
SDQV 6WDQGDUG GDLO\ |
5LQVH ZLWK KRW ZDWHU DW ƒ& |
||||
|
|
|
|
|||
|
F\FOH |
'U\LQJ |
|
|
|
|
1RUPDO |
|
|
|
|
|
|
|
|
|
|
|
|
|
|
3UH ZDVK RI GLVKHV |
|
|
|
|
|
|
SRWV DQG SDQV ZKLOH |
6KRUW FROG ZDVK WR SUHYHQW IRRG |
|
|
|
|
|
ZDLWLQJ IRU WKH ORDG |
|
|
|||
|
UHVLGXH IURP GU\LQJ RQ WKH GLVKHV |
|
|
|||
|
WR EH FRPSOHWHG DIWHU |
|
|
|
||
|
|
|
|
|
||
6RDN |
WKH VXEVHTXHQW PHDO |
|
|
|
|
|
|
|
|
|
|
||
|
|
|
|
|
|
|
|
(QYLURQPHQWDOO\ IULHQ |
&ROG SUH ZDVKHV |
|
|
|
|
|
GO\ F\FOH ZLWK ORZ |
|
|
|
||
|
HQHUJ\ FRQVXPSWLRQ |
:DVK DW ƒ& |
J |
|
|
|
|
OHYHOV VXLWDEOH IRU |
+RW ULQVH DW ƒ& |
||||
|
QRUPDOO\ GLUW\ SDQV |
'U\LQJ |
|
|
|
|
(FR |
DQG GLVKHV |
|
|
|
|
|
|
|
|
|
|
||
|
|
|
|
|
|
17 |
GB |
Energy Saving Tips
-It is important to try and run the dishwasher when it is fully loaded in order to save on energy. In order to prevent odors from forming and food from caking onto the dishes, you can run the hold cycle.
-Choose the right wash cycle: the choice of cycle depends on the type of dishware, cookware and utensils being washed and how dirty they are.
-Use the right amount of detergent: if you use too much detergent, the result will not be cleaner dishes, but, rather, a greater negative impact on the environment.
-There is no utility in rinsing dishes, cookware and utensils before placing them in the dishwasher.
How to Keep Your Dishwasher in Shape
After Every Wash
After every wash, turn off the water supply to the appliance and leave the door slightly ajar so that moisture and odors are not trapped inside.
Remove the Plug
Before cleaning or performing maintenance, always remove the plug from the socket. Do not run risks.
No Solvents or Abrasive Cleaning Products
To clean the exterior and rubber parts of the dishwasher, do not use solvents or abrasive cleaning products. Rather, use only a cloth and warm soapy water.
To remove spots or stains from the surface of the interior, use a cloth dampened with water and a little white vinegar, or a cleaning product made specifically for dishwashers.
When You Go on Holiday
When you go on holiday, it is recommended that you run a wash cycle with the dishwasher empty and then remove the plug from the socket, turn off the water supply and leave the door of the appliance slightly ajar. This will help the seals last longer and prevent odors from forming within the appliance.
Moving the Appliance
If the appliance must be moved, try to keep it in the vertical position. If absolutely necessary, it can be positioned on its back.
Seals
One of the factors that cause odors to form in the dishwasher is food that remains trapped in the seals. Periodic cleaning with a damp sponge will prevent this from occuring.
GB |
18 |
Cleaning and Special Maintenance
The filter assembly
If you want consistent good results from your dishwasher, you need to clean the filter assembly.
The food particles are removed from the wash water, allowing it to be recirculated during the cycle, filtered perfectly. For this reason, it is a good idea to remove the larger food particles trapped inside the cup “C” and the semi-circular filter A after each wash; pull the cup handle upwards to remove them. Just rinse them under running water.
The entire filter assembly should be cleaned thoroughly once a month: cup C + semi-circular filter A + cylindrical filter B. Rotate filter “B” anticlockwise to remove it.
For cleaning, use a non metallic brush.
Reassemble the filter parts (as shown in the figure) and reinsert the whole assembly into the dishwasher. Position it into its housing and press downwards.
The dishwasher is not to be used without filters. Improper replacement of the filters may reduce the efficiency of the wash and even damage your dishwasher.
|
1 |
|
B |
2 |
A |
C
Cleaning the Sprayer Arms
It may happen that food particles become encrusted on the sprayer arms and block the holes. Check the sprayer arms periodically and clean them when needed (see “Close-up View [interior]”, letters F-I).
Troubleshooting
It may occur that the dishwasher does not function or does not function properly. Before calling for assistance, let us see what can be done first: have you forgot to press one of the buttons or to perform an essential operation?
The Dishwasher Does Not Start
Have you checked whether:
-the plug is pushed into the socket correctly;
-the power is on in the house;
-the door is closed properly;
-the ON-OFF switch is on "ON";
-the water supply is turned on.
The Dishwasher Does Not Load Water
Have you checked whether:
-the water is turned on and the hose is connected properly;
-the water supply to the house is on and has sufficient pressure;
-the water supply hose is crimped or bent;
-the filter for the water supply hose is clogged.
The Dishes Are Not Clean
Have you put the right amount of detergent into the dispenser?
Is the wash cycle suitable for the dishes you have placed inside the appliance?
Are the filter and microfilter clean? Can the sprayer arms turn freely?
The Dishwasher Does Not Drain
Have you checked whether:
- the drain hose is crimped or bent.
Lime Deposits or a White Film Form on the Dishes
Have you checked whether:
-the lid to the salt container is closed properly;
-the rinse aid dosage is correct.
Error messages.
Your dishwasher is equipped with a safety system which is able to detect any operating anomalies. These anomalies are reported by one or two wash cycle indicator lights "C" flashing rapidly.
Take a note of which lights are flashing, turn the appliance off and call for technical assistance.
Tap off alarm
If you have forgotten to turn the water tap on, your appliance will remind you of this by sounding a few short beeps for a few minutes. Turn the tap on and your appliance will start up again after a few minutes. Were you to be absent when these beeps are sounded, the appliance will be blocked automatically and indicator lights 2 and 3 (Normale and Soak) will flash rapidly. Turn the appliance off at the ON-OFF button, turn on the water tap and wait approximately 20 seconds before turning the appliance back on; repeat the programming operations and the selected wash cycle will start up again.
Clogged filter alarm
If the appliance is blocked and indicator lights 1 (Intensive) and 3 (Soak) flash rapidly, this means the filter is clogged by large particles of food residue. Turn the appliance off, clean the filter thoroughly and reposition it in its seat as illustrated on this page. Then turn it back on. Repeat the programming operations and the selected wash cycle will start up again.
Water load solenoid valve malfunction alarm.
If indicator light 2 (normal) flashes rapidly, TURN the dishwasher OFF AND BACK ON AGAIN after one minute. If the alarm persists, first turn off the water tap to avoid any flooding and then cut off the electricity supply and call for technical assistance.
If any other indicator lights apart from the above-mentioned ones flash rapidly, turn the appliance off and call for technical assistance.
If, despite all these checks, the dishwasher still does not function and/or the problem persists, contact the nearest authorised service centre and provide them with the following information:
-the nature of the problem;
-the model type number (Mod. ...) and the serial number (S/N ....), which are indicated on the plate located on the side of the inner part of the door.
Never call on unauthorised technicians and refuse to allow parts to be installed that are not original spare parts.
19 |
GB |

Installation
Positioning the Appliance
Position the appliance in the desired location. The back should rest against the wall behind it, and the sides, along the adjacent cabinets or wall. The dishwasher is equipped with water supply and drain hoses that can be positioned to the right or the left to facilitate proper installation.
Levelling the Appliance
Once the appliance is positioned, adjust the feet (screwing them in or out) to adjust the height of the dishwasher, making it level. In any case, the appliance should not be inclined more than 2°.
If the appliance is level, it will help ensure proper performance.
Adjusting the Back Feet (only mod. DI 630 A)
Insert the appliance into the cutout and then adjust the height using the screws located on the front bottom part of the machine. Use a screwdriver to turn the screws in the clockwise or anti-clockwise direction to increase or decrease the height respectively.
Cold Water Connection
This electric household appliance should be connected to the water mains using the cold water supply hose provided with the appliance only. Do not use a different hose. In the event of replacements, use original spare parts only.
Connect the cold water supply hose to a 3/4 gas threaded connection, taking care to screw it tightly onto the tap.
If the water hoses are new or have been out of use for an extended period of time, let the water run to make sure it is clear and free of impurities before making the connection. If this precaution is not taken, the water inlet could get blocked, causing damage to your dishwasher.
Hot Water Connection
The water supply to the appliance can also be connected to the house's hot water line (centralised system, heating system), as long as it does not exceed a temperature of 60°C.
In this case, the wash cycle time will be shortened by about 15 minutes and the wash efficiency slightly reduced.
The connection must be made to the hot water line following the same procedures as those for the connection to the cold water line.
Anti-flooding protection
Your dishwasher (Mod. DI 620 A - DI 630 A)is provided with a special system which blocks the water supply in the event of leaks inside the appliance. It is further equipped with a water inlet hose comprising an outer clear hose and an inner red hose, which can both withstand extremely high pressures. Should the inner hose break, the outer hose will consequently turn red. Safety in the event of flooding is ensured by the second clear hose that contains the former. It is vital that you check the outer hose regularly: if you see it has turned bright
red, then you know you have to replace it as soon as possible. Call for an authorised technical engineer to come and replace it.
Drain Hose Connection
Fit the drain pipe into a drain line with a minimum diameter of 4 cm or place it over the sink. Avoid restricting or bending it.
The part of the pipe marked with the letter A should be between 40 and 100 cm above the ground.
The pipe should not be immersed in water.
A |
Electrical Connection
After making sure that the voltage and frequency values for the current in the home correspond to those on the rating plate (located on the stainless steel inner door of the appliance) and that the electrical system is sized for the maximum voltage on the rating plate, insert the plug into an electrical socket which is earthed properly (the earthing of the appliance is a safety requirement mandated by law). If the electrical socket to which the appliance must be connected is not appropriate for the plug, replace the plug, rather than using adpators or the like as they could cause overheating and burns.
Caution: the dishwasher plug must be accessible so that maintenance can be done safely.
Should the electricity supply cable be damaged, we recommend that you only contact authorised Technical Service Centres for the replacement.
Condensation-proof tape.
On some models, a transparent condensation-proof adhesive tape has been provided.
It should be stuck onto the lower side of your wooden worktop to protect it from the formation of condensation.
When not provided, this tape can be requested as a spare part from authorised retailers.
GB |
20 |
 Loading...