


Hello Friend,
Thank you for being one of our customers. We love our customers, if you
need us, we will always be here.
The chair comes with product warranty service. If there is any problem
with the chair, please contact our after-sales service immediately, and
believe that they will provide you with a satisfactory solution. If the
chair meets your needs, welcome to share your feelings on Wayfair.
This assembly guide is equipped with installation instructions in four
languages. To ensure that your assembly process goes smoothly, please
follow the assembly instructions.
If you have any other problem, please contact us ASAP. We will provide
you the best after sales services.
PRODUCT
INSTALLATION
GUIDE
Sincerely,
After-sales Service Team
63*62*119(129)CM
User Manual
Benutzerhandbuch
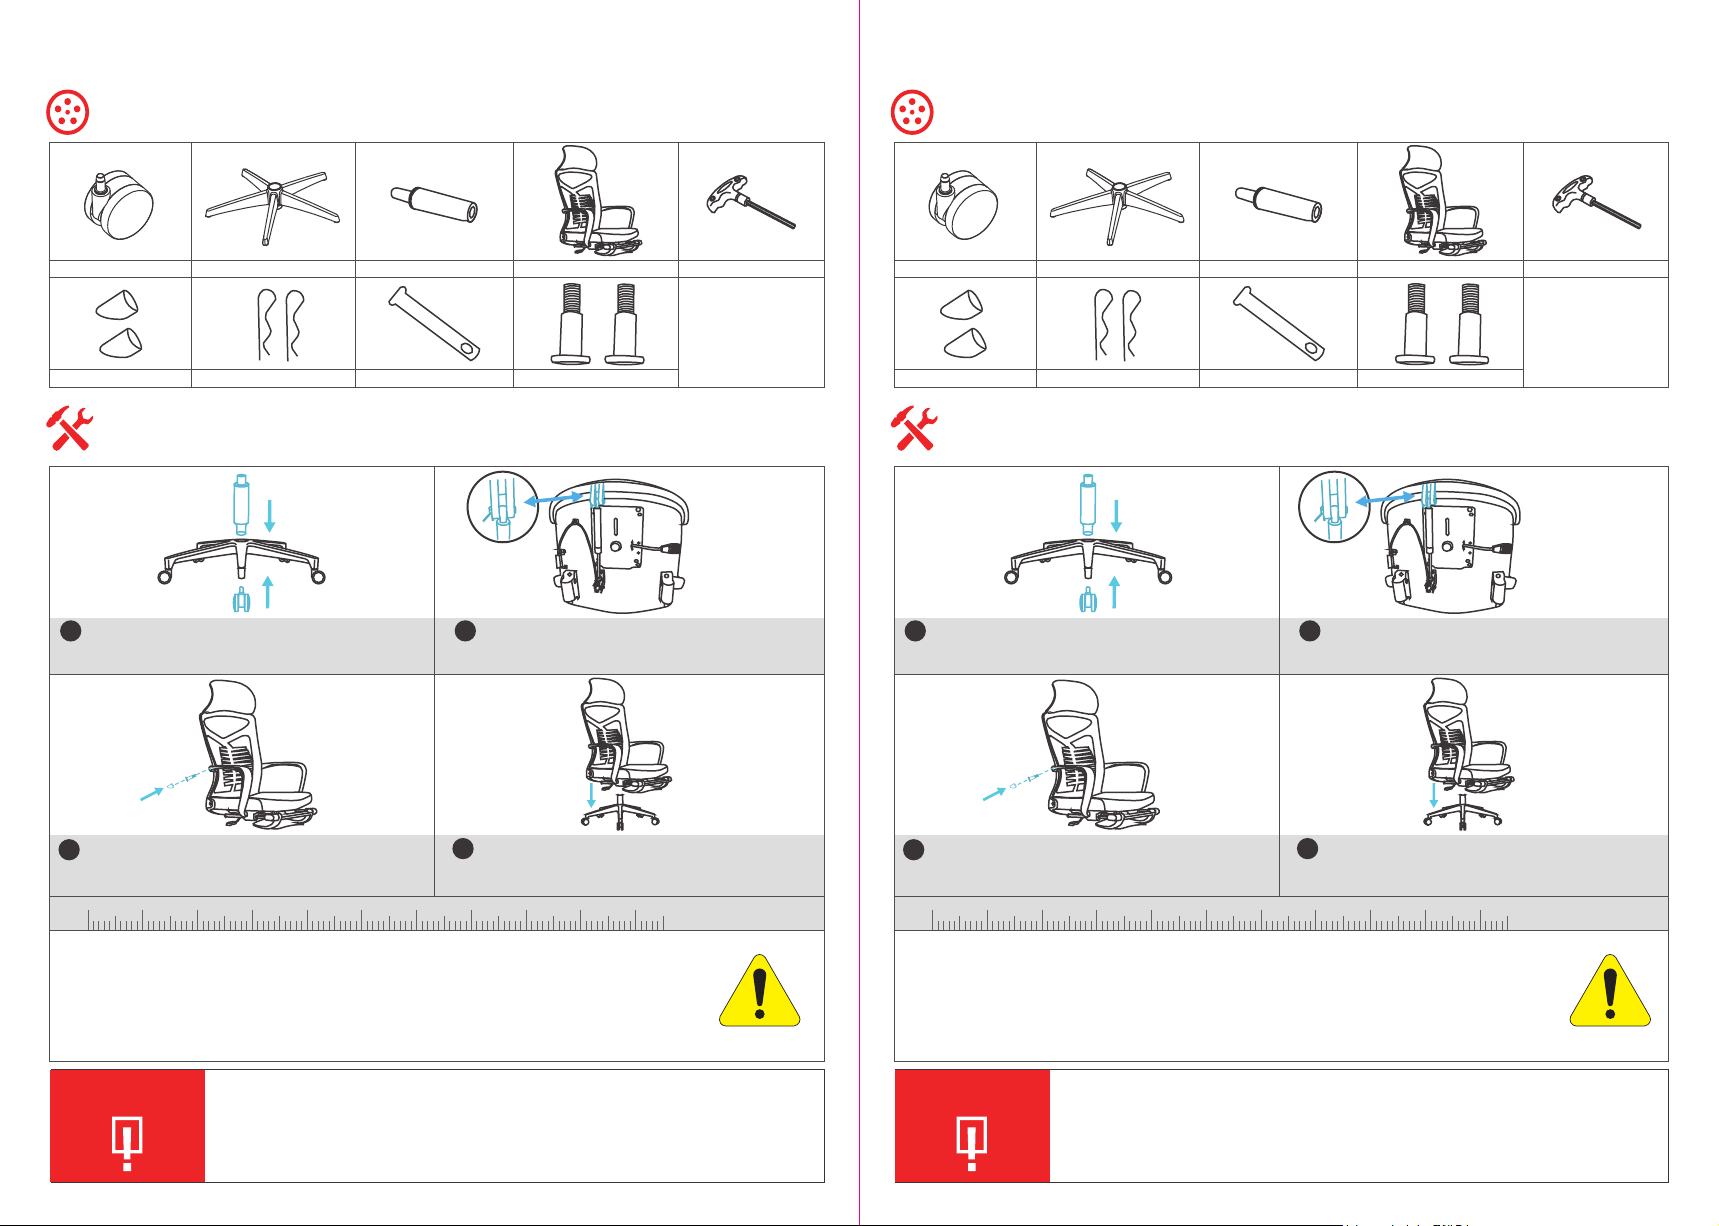
Accessories table (subject to actual size; one for each model of screw and washer)
5 wheels 1 chair leg 1 gas lift 1 connected backrest 1 hex wrench
Note: Before installing
the chair, please
classify the screws
and measure the
length of the screws
2 screw covers 2 pin 1 latch (8 * 45) 2 handrail screws (8 * 36)
for installation.
Installation diagram (subject to actual size)
1.Pres s the wheels into the chair leg;
1
2.Place the gas lift into the middle hole of the chair leg.
1.Connect the backrest to the gas lif t and inser t it with
2
the 8 * 45 latch;
2.Penetrate the latch hole with a pin to fix it.
Teileliste (Die Größe entspricht den regelmäßigen Maßen; eine weitere als Backup)
Castor: 5Stk Basis: 1pc Gaslift: 1pc Rückenlehne: 1pc 1 Inbusschlüssel
Hinweis: Klassifizieren
Sie die Schraube vor
dem Einbau anhand
der Schraubenlänge,
um die Montage zu
2 Schraubenabdeckungen
2 Stich 1 verriegeln (8 * 45)
2 Handlauf Schrauben (8 * 36)
erleichtern.
Installationsanleitung (Die Größe entspricht den regulären Maßen)
1.Setzen Sie die Rolle in die Basis, indem Sie drücken.
1
2.Setzen Sie den Gasheber in die Basis ein.
1.Verbind en Sie die Rückenl ehne mit dem Gasli ft und set zen Sie
2
sie mit de m 8 * 45-Riegel e in.
2.Durc hstechen Sie da s R iegelloch mit eine m Stift, um es zu
befestigen.
1.Connect the armrest to the backres t with 2 (8 * 36)
3
handrail screws;
2.Push the screw cover into the screw hole.
0 1 2 3 4 5 6 7 8 9 10 cm
Align the upper part of the assembled chair with the
4
gas lif t, and the chair is installed.
Installation Precautions
1. Please read the installation instructions (picture) of all accessories carefully before installation, and
master the installation steps and methods.
2. Check whether the accessories are complete and damaged.
3. To avoid injury during installation, it is recommended that you wear gloves.
4. Choose a spacious and clean site when installing. The paper is laid flat on the ground; so as to prevent
the components from colliding with the ground during installation.
Precautions for use
1. Please note that when using it, place it on a flat ground. This product can only be used by one
person and only one person.
2. To avoid using the wrong screws, please fix all the screws before tightening them.
3. Please don't let the child sit on the chair alone if he is under 5 year-old;
4. Please do not sit on the armrests, as it may cause damage and danger to the chair.
5. Please do not stand on the chair or use it as a ladder or step.
1.Verbind en Sie di e Armlehn e mit 2 (8 * 36) Handlaufsch rauben
3
mit der Rü ckenlehne.
2.Sc hieben Sie die Sc hraubenabd eckung in das Sch raubenloch .
0 1 2 3 4 5 6 7 8 9 10 cm
Richten Sie den oberen Teil des zusammengebauten
4
Stuhls auf den Gaslift aus, und der Stuhl ist installier t.
Vorsichtsmaßnahmen bei der Installation
1. Bitte lesen Sie die Installationsanweisungen (Bild) aller Zubehörteile vor der Installation sorgfältig durch und
beherrschen Sie die Installationsschritte und -methoden.
2. Überprüfen Sie, ob das Zubehör vollständig und beschädigt ist.
3. Um Verletzungen während der Installation zu vermeiden, wird empfohlen, Handschuhe zu tragen.
4. Wählen Sie bei der Installation einen geräumigen und sauberen Standort. Das Papier wird flach auf den Boden
gelegt; um zu verhindern, dass die Komponenten während der Installation mit dem Boden kollidieren.
Vorsichtsmaßnahmen
für den Gebrauch
1. Bitte beachten Sie, dass dieses Produkt nur eine Person aufnehmen kann.
Die Verwendung von mehr als 2 Personen beeinträchtigt die Stabilität des Produkts und ist gefährlich. Stellen Sie es auf
einen ebenen Boden.
2. Um die Verwendung falscher Schrauben zu vermeiden, befestigen Sie bitte alle Schrauben, bevor Sie sie festziehen.
3. Kinder unter 5 Jahren sollten es unter Aufsicht eines Erwachsenen verwenden.
4. Bitte setzen Sie sich nicht auf die Armlehnen, da dies den Stuhl beschädigen und gefährden kann.
5. Bitte stellen Sie sich nicht auf den Stuhl und benutzen Sie ihn nicht als Leiter oder Stufe.

Utilisateur Manuel
Manuale dell'utente
Tableau des accessoires (
5 roues 1 pied de chaise 1 élévateur à gaz 1 connecté dossier 1 clé hexagonale
2 cache-vis 2 broche 1 loquet (8 * 45)
selon la taille réelle; un pour chaque modèle de vis et de rondelle
Remarque: Avant
d'installer le fauteuil,
veuillez classer les vis
et mesurer la
longueur des vis pour
2 vis de main courante (8 * 36)
l'installation.
Schéma d'installation (selon la taille réelle)
1.Enfoncez les roues dans le pied du fauteuil;
1
2.Place z le ascenseur de gaz dans le trou central de la
jambe de chaise.
1.Connectez le dossier au ascenseur de gaz et
2
insére z-le avec le loquet (8 * 45);
2.Pénétrez le trou du loquet avec une épingle réparer il.
)
Tabella degli accessori (
5 ruote Una gamba della sedia
2 coperchi a vite
2 pin 1 pin (8 * 45)
in base alle dimensioni effettive; una per ciascun modello di vite e rondella
1 asta della pressione dell'aria
Uno schienale collegato 1 chiave esagonale
Nota: prima di installare
la sedia, classificare le
viti e misurare la
lunghezza delle viti per
2 viti per corrimano (8 * 36)
l'installazione.
)
Schema di installazione (soggetto alle dimensioni effettive)
1.Premere la ruota nel piede della sedia;
1
2.Posizionare l'asta della pressione dell'aria nel foro
centrale della gamba della sedia.
1.Collegare lo schienale all'asta pneumatica e inserirlo
2
con 8 * 45 pin;
2.Pin il foro del perno con un perno per fissarlo.
1.Reliez l'accoudoir au dossier avec 2 (8 * 36) vis de main
3
courante;
2.Poussez le couvercle de vis dans le trou de vis.
0 1 2 3 4 5 6 7 8 9 10 cm
Alignez le plus haut partie de la chaise as semblée avec
4
l'ascenseur à gaz, et la chaise est installée.
Précautions d'installation
1. Veuillez lire attentivement les instructions d'installation (image) de tous les accessoires avant l'installation et maîtrisez les étapes et les méthodes d'installation.
2. Vérifiez qu'il s'agisse les accessoires sont intégré ou endommagé.
3. Pour éviter les blessures lors de l'installation, il est recommandé de porter des gants.
4. Choisissez un site spacieux et propre lors de l'installation. Le papier est posé à plat sur le sol; de
manière à éviter que les composants n'entrent en collision avec le sol lors de l'installation.
Précautions d'emploi
1. Veuillez noter que ce produit est uniquement pour une personne, et uniquement pour une personne
et placé sur un terrain plat.
2. Pour éviter d'utiliser les mauvaises vis, veuillez fixer toutes les vis avant de les serrer.
3. Veuillez ne pas laisser l'enfant s'asseoir seul sur la chaise s'il a moins de 5 ans;
4. Veuillez ne vous asseyez pas sur les accoudoirs, car cela cause dommage et danger pour la chaise.
5. Ne vous tenez pas debout sur la chaise et ne l'utilisez pas comme échelle ou marche.
Collegare il bracciolo allo schienale con le viti 8 * 36 del
3
bracciolo;
2.Spingere il coperchio della vite nel relativo foro.
0 1 2 3 4 5 6 7 8 9 10 cm
Allineare la parte superiore della sedia assemblata con
4
l'asta della pressione dell'aria e la sedia è installata.
Considerazioni sull'installazione
1. Leggere attentamente le istruzioni di installazione (immagine) di tutti gli accessori prima dell'installazione e
seguire i passaggi e i metodi di installazione.
2. Controllare se gli accessori sono completi e danneggiati.
3. Per evitare lesioni durante l'installazione, si consiglia di indossare i guanti.
4. Scegliere un sito spazioso e pulito durante l'installazione. La carta è appoggiata a terra, in modo da evitare
che i componenti si scontrino con il suolo durante l'installazione.
Precauzioni per l'uso
1. Si prega di notare che quando lo si utilizza, posizionarlo su una superficie piana Questo
prodotto è solo per una persona e solo per una persona.
2. Per evitare di utilizzare viti sbagliate, fissare tutte le viti prima di serrarle.
3. Non lasciare che i bambini di età inferiore ai 5 anni siedano da soli sulla sedia.
4. Non sedersi sui braccioli, poiché potrebbero causare danni e pericolo alla sedia.
5. Non salire sulla sedia e utilizzarlo come gradino o scala.
 Loading...