

Page 1

User Guide
P6 Barcode Scanner
English
Page 2
1
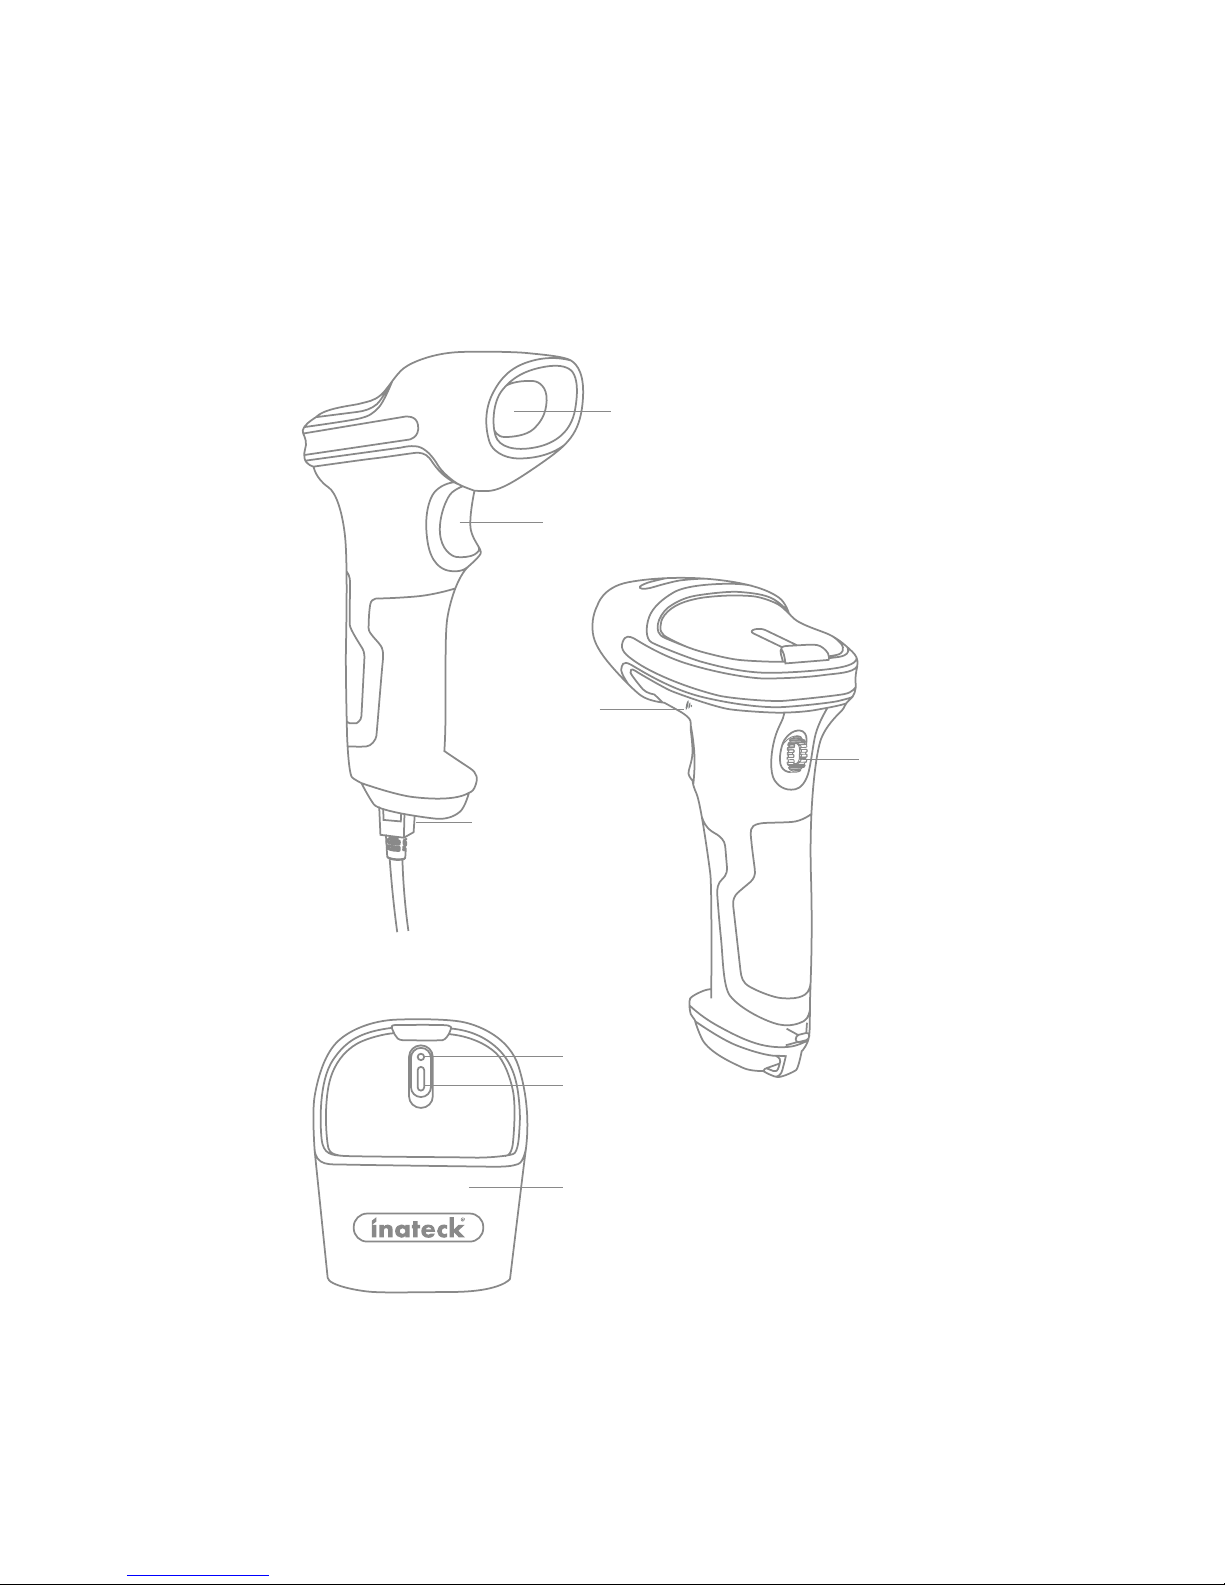
Buzzer
Product Overview
English
Power Switch
Laser Window
Trigger
USB Port
LED1
LED2
Shockproof Cover
Page 3
2
Use of Inateck P6
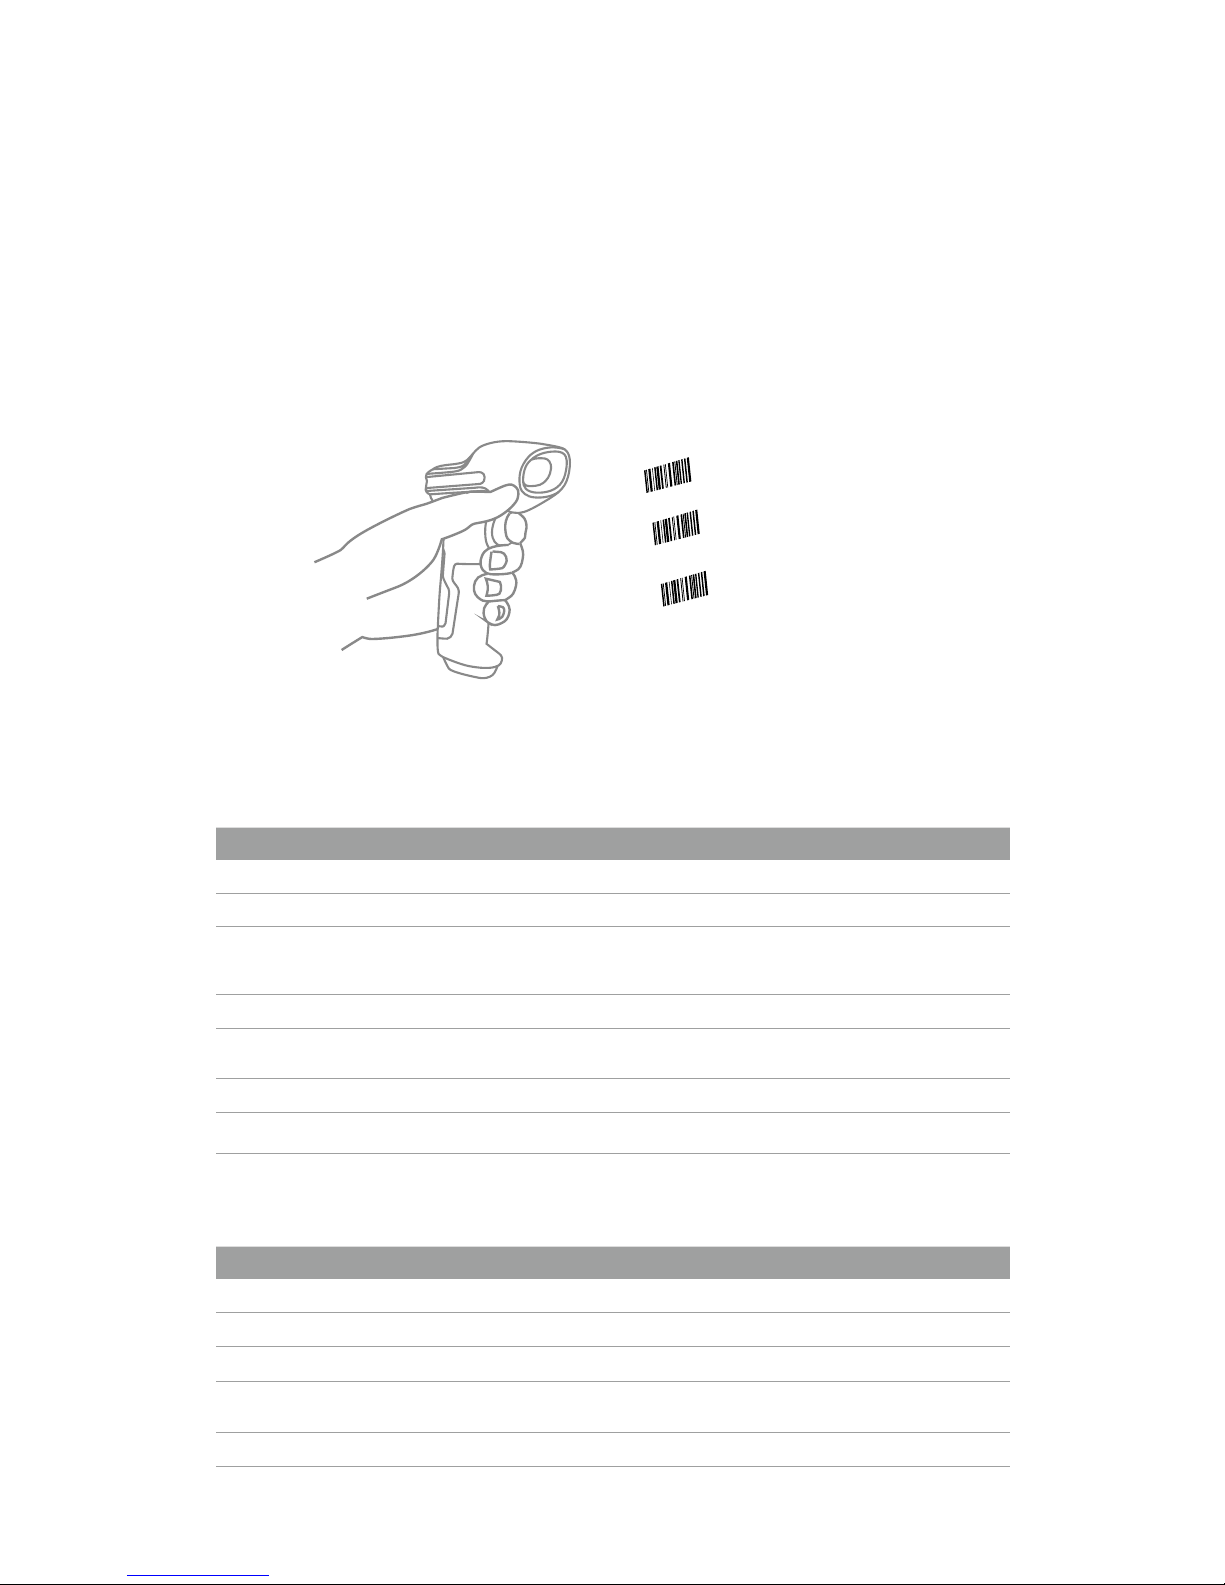
Startup
Note:
1) Inateck P6 will start sleep mode if there is no operation on it over 3 minutes. Short
press on the trigger can wake it up.
2) When the distance between Inateck P6 and its adapter exceeds the eective range,
scanned data will be kept in the buer of Inateck P6. Quickly double press on the
trigger can upload data from buer.
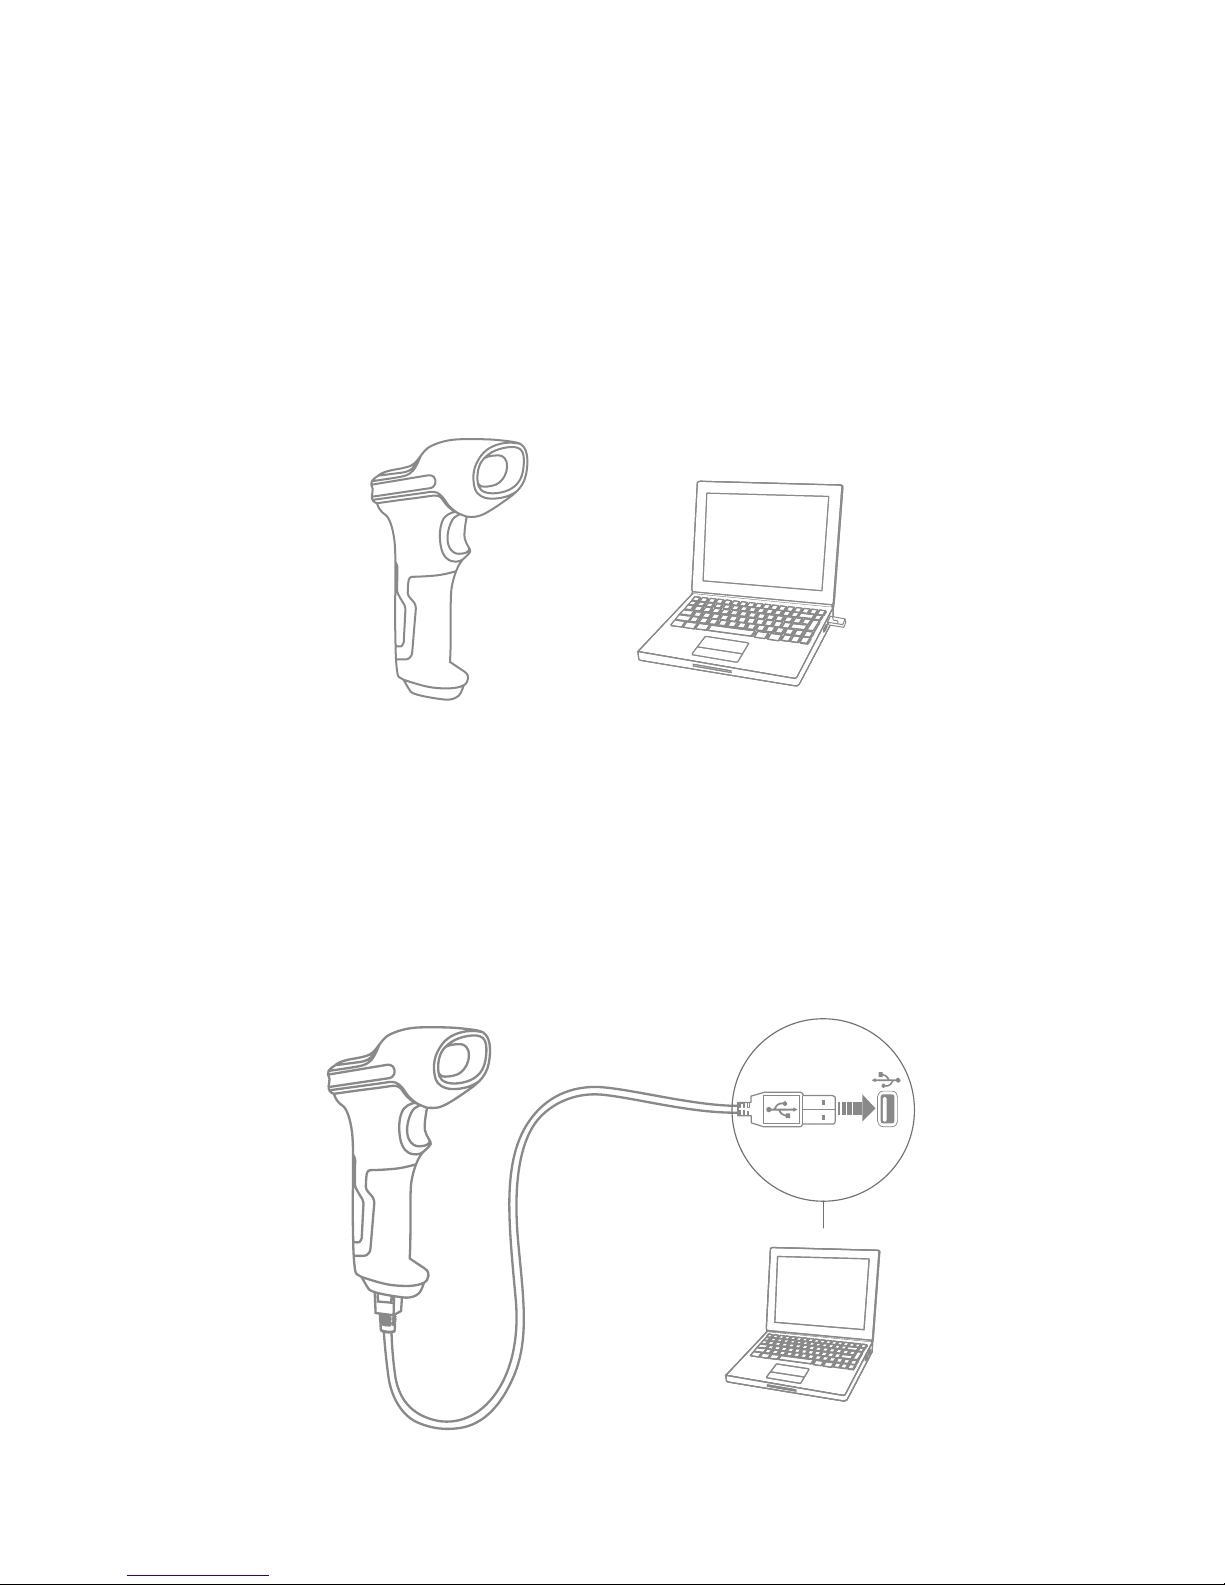
Wireless Mode:
1. Insert the 2.4G USB adapter into the USB port of computer. The initialization is
completed if blue LED on the adapter blinks once.
2. Power on Inateck P6 by toggling switch from OFF to ON. Short press the trigger to
emit red laser beam and scan barcodes.
3. Open a le on computer and move cursor to the blank where scanning output
should be placed. Scanning results can be displayed on computer then.
Wired Mode:
Page 4
3
1. Connect Inateck P6 with computer via USB cable
2. Power on Inateck P6 by toggling switch from OFF to ON and short press the
trigger. Inateck P6 will continuously beep. Beep stops after successful connection.
3. Open a le on computer and move cursor to the blank where scanning output
should be placed. Scanning results can be displayed on computer then.
Function Setup
(Note: The barcode marked by “*”means default setting of Inateck P6.)
Users must read setup barcodes in order to change the default settings in Inateck P6
Barcode Scanner.
Status indication
Buzzer Indication
Scan“Enter setup”barcode;
Scan “Exit with save” barcode
to nish the setup.
Change scanner setting by
scanning certain function
setup barcode;
LED Indication
Beeping Meaning
One short high note(100ms) Read barcode successfully
One short high note(20ms) Data upload from scanner to Computer
One long high note(400ms) Wrong Setup (on setup status, blue LED stays on)
Invalid scanning due to full buer (Scanned barcode not saved.)
Pairing Failure (Occurs only during the pairing process)
One or several long high notes (800ms) USB being congured(It happens when USB cable is inserted)
Three chord sounds Enter setup mode(Blue LED on)
Exit setup mode(Blue LED o)
Two short notes(tone from low to high) Correct Setup
Two short beeps (tone from high to low) The connection between Inateck P6 and computer is disrupted.
Beeping Meaning
Green LED ashes once (LED2) Barcode successfully read and uploaded to computer
Blue LED ashes once (LED2) Barcode successfully read and saved in buer, but not uploaded to computer
Blue LED stays on (LED2) Inateck P6 scanner on setup status
Yellow LED blinks(light/shade ratio0.5s :
0.5s) (LED1)
Low battery
Red LED stays on (LED1) Inateck P6 scanner in charge (Red LED o when battery is full)
Page 5
4
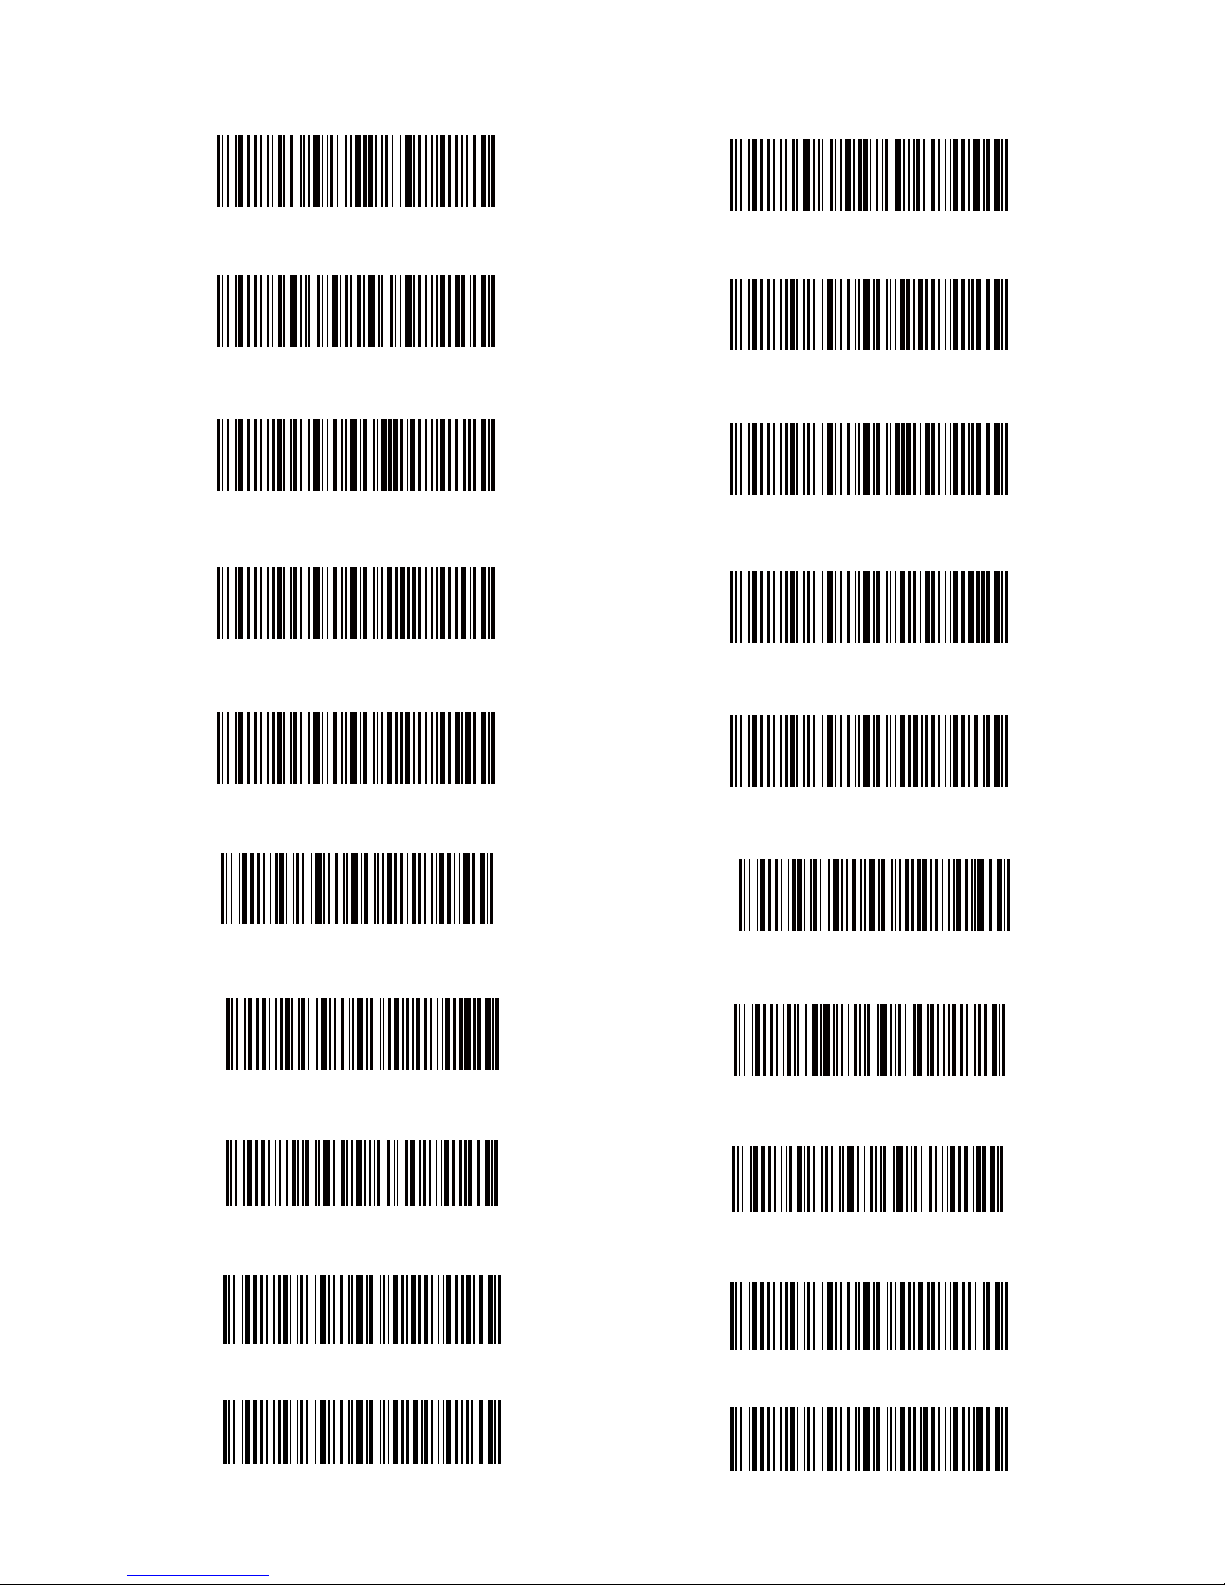
Frequently Used Barcodes
2.4G Paring
(*)Enable Auto Laser-darkening Mode
Exit without Save
Upper case for all letters
Mute
(*)Medium Volume
Enable Continuous Scanning Mode
(*)Enable Auto-sleep Mode
(*)Apply Enter for Sux
Enter Setup
Lower case for all letters
Enable Manual Scanning Mode
Restore Factory Setting
(*)Keep original case
Minimum Volume
Maximum Volume
Enable Auto Induction Mode
Disable Auto-sleep Mode
Do Not Apply Enter for Sux
Exit with Save
Page 6

5
Setting for Keyboard Language
1. Read ’Enter setup’ Barcode
2. Select and Scan your keyboard language Barcode
3. Scan“Exit with Save” Barcode to end language setting
Note: The keyboard language of Inateck P6 should keep consistent with that on
computer, otherwise, garbled might appear in scanning result.
Setting for Prex/Sux
Users can add prex/sux to scanning result. The prex/sux can have 1 to 32 digits.
More details are as below.
1. Scan “Enter setup’” Barcode
Exit with Save
Enter Setup
Enter Setup
French Keyboard
Italian Keyboard
(*)US Keyboard
Spanish Keyboard
English (UK) Keyboard
German Keyboard
Page 7

6
2. Scan “Prex Setting” or “Sux Setting”
3. Scan the character barcode (32 characters at the most). For instance, “H#” is the
prex/sux to be added to the scanning result, scan the character barcode of “H”
and “#” below.
4. Scan “Exit with Save” Barcode to end the setting
Frequently Used Prex/Sux Barcodes
Note:
1) More prex/sux barcodes are available at www.inateck.com. Users can download
them from the site. For any other questions, please send email to support@inateck.
com.
2) Scanning result will come with prex/sux after the setting. Nevertheless, prex/
sux can be hidden or recovered. To hide prex/sux, scan “Enter Setup” barcode,
“Hide Prex/Sux” barcode, and then “Exit with Save” barcode. To recover prex/
sux, scan “Enter Setup” barcode, “Recover Prex/Sux” barcode, and then “Exit
with Save” barcode.
Enter
Tab
Space
Backspace
Exit with Save
Prex Setting Sux Setting
H #
Page 8

7
Delete Character(s) on Output Result
Inateck P6 can help users delete character(s) on output result, either beginning
characters or the ending ones. 0 to 9 digits can be deleted. As default setting, no
character, or say 0 digit is deleted as output result. More details are as below.
1. Scan “Enter Setup” Barcode
2. Scan “Delete Beginning Character(s)” Barcode or “Delete Ending Character(s)”
Barcode
3. Scan the digit(s)barcode to be deleted.
Enter Setup
Delete Beginning Character(s)
(*)0 digit
2 digits
4 digits
6 digits
(*)Recover Sux
(*)Recover Prex
Delete Ending Character(s)
1 digit
3 digits
5 digits
7 digits
Hide Sux
Hide Prex
Page 9

8
8 digits 9 digits
4.Scan “Exit with Save” Barcode to end the setting
Exit with Save
Enter Inventory Mode
(*)Return to Common Mode
Clear Data in Buer(for Inventory Mode only)
Data Upload (for Inventory Mode only)
Note: Refer to the setting of “delete 0 digit character” if no character should be
deleted.
Inventory Mode
Users may use inventory mode to keep scanned barcodes in the buer of Inateck
P6, and upload them to computer in batches. Under inventory mode users are not
restricted to the time and location when upload data. Of course, history data can be
cleared in buer. More details about inventory mode are as below.
1. Scan the barcode to enter Inventory Mode
2. Scan the barcode to return to Common Mode
3. Scan the barcode to clear data in buer (for Inventory Mode only).
4. Scan the barcode to upload data from buer (for Inventory Mode only)
Page 10

9
5. Scan the barcode to upload the number of scanned barcodes (for Inventory Mode
only)
Note:
1) To use inventory mode, users just need scan “Enter Inventory Mode” barcode; and
do not have to scan “Enter Setup” barcode before that.
2) To end inventory mode, users just need scan “Return to Common Mode” barcode.
Function Setup Barcodes
Upload the Number of scanned barcodes
(for Inventory Mode only)
(*)Enable Codabar
Enable Code11
(*)Enable Code 128
(*)Enable Code39
Enable Code 39 Full ASCII
(*)Enable Code93
(*)Enable EAN-8
Disable Codabar
(*)Disable Code11
Disable Code128
Disable Code39
(*)Disable Code 39 Full ASCII
Disable Code93
Disable EAN-8
Page 11

10
(*)Enable EAN-13
Transfer EAN-13 to ISBN
Transfer EAN-13 to ISSN
Enable MSI
(*)Enable UPC-A
(*) Enable UPC-E
Enable UPC-E1
Enable IATA 25
(*)Enable Interleaved 25
Enable Matrix 25
Disable EAN-13
(*)Do not transfer EAN13 to ISBN
(*)Do not transfer EAN-13 to ISSN
(*)Disable MSI
Disable UPC-A
Disable UPC-E
(*) Disable UPC-E1
(*)Disable IATA 25
Disable Interleaved 25
(*)Disable Matrix 25
Page 12

11
Enable Standard 25
Enable China Post Code
Enable EAN-2
Enable EAN-5
Enable VIN
Enable Code 32
Enable rst character of Code 32
Hyphen "-" displayed in
ISBN/ISSN/EAN-2/EAN-5
(*)Disable Standard 25
(*)Disable China Post Code
(*)Disable EAN-2
(*)Disable EAN-5
(*) Disable VIN
(*)Disable Code 32
(*)Disable rst character of Code 32
(*)Without hyphen "-" in
ISBN/ISSN/EAN-2/EAN-5
Page 13

12
Product Specication
Packing list
• Inateck P6*1
• USB Cable*1
• Instruction Manual*1
• 2.4GHz Wireless Adapter*1
FAQs
1. Will settings be kept when Inateck P6 is power o?
Answer: All settings are made by scanning relevant barcodes, and stored in
scanner memory. They are kept even if scanner powers o. They are available to
users if scanner powers on.
2. Garbled or error appears in output result?
Answer: The default keyboard language of Inateck P6 is English. Please refer to the
instruction manual about keyboard language, and set correct one.
3. Is there any barcodes to remove Enter for sux?
Answer: Refer to the “Frequently Used Barcodes” in instruction manual, and use “Do
Not Apply Enter for Sux”.
4. The data cannot be sent to my computer. Why?
a. When the distance between Inateck P6 and its adapter exceeds the eective
range, scanned data will not upload to comupter immediately. Instead, it will be
kept in the buer of Inateck P6. Quickly double press on the trigger can upload
data from buer.
Model Number Inateck P6
Indication Buzzer, LED
Battery Capacity 2600mAh
EEPROM 256K
Light Source Laser LED 650 ± 10nm
Applicable Barcodes Codabar, Code 11, Code 128, Code39, Code 93, EAN-8, EAN-13, ISBN, ISSN, MSI,UPC-A,
UPC-E, IATA 25, Industrial 25 / Standard 25, Interleaved 25,Matrix 25, China Postal Code,
FedEx,USPS, Code 32, VIN
Resolution 3mil
Decode Rate 220 times/s
Decode Mode Single-Line Aiming
Print Contrast 20%
Decode Angles Roll 30º,Pitch 75º,Yaw 80º
Bluetooth Operating
Frequency
2400.0~2483.5MHz
Bluetooth transmission Power -4.36dBm
Page 14

13
b. Under Inventory Mode , scanned data will be kept in the buer of Inateck P6. To
upload data to computer, please refer to the use of ‘Data Upload ’barcode.
5. Some barcodes cannot be read, why?
a. Dirty or unclear barcodes might not be read.
b. Digital barcodes displayed on screen of phones, computers or tablets cannot be
read.
c. It is possible that the setting is off by default for some barcode types which
are not commonly used. You need activate a specific barcode type to get it
working. Please feel free to contact our Customer Service Team for further
assistance if you don't know the exact type of barcode that you are referring to.
6. Is the device compatible with android devices?
Yes,For Android User: an OTG Adapter is needed for devices without standard
USB.
Note: If you receive an error of unable to transfer data via the wireless connection
(Not applicable for the Inventory Mode), please re-pair the scanner using the
following steps. When paring, make sure the distance between Inateck P6 and
2.4G USB adapter is within 2m. Please bear in mind that this process may take 5
seconds.
Support
Please feel free to email support@inateck.com if you have any query regarding
Inateck P6 barcode scanner. We will gladly assist you.
Plug the 2.4G adapter into your PC Read “Enter Setup” Read “2.4G pairing”
2.4G Paring
Enter Setup
Page 15

Contact Information
USA
Tel.: +1 702-445-7528
Phone hours: Weekdays 9 AM to 5 PM (EST)
Email: support@inateck.com
Web: www.inateck.com
Addr.: Inateck Technology Inc, 6045 Harrison Drive Suite 6,
Las Vegas, Nevada 89120
Germany
Tel.: +49 342-07673081 Fax.: +49 342-07673082
Phone hours: Weekdays 9 AM-5 PM (CET)
Email: support@inateck.com
Web: http://www.inateck.com/de/
Addr.: F&M Technology GmbH, Montgolerstraße 6,
04509 Wiedemar
Japan
Email: support@inateck.com
Web: www.inateck.com/jp/
Addr.: F & M 株式会社 東京都昭島市拝島町三丁目 10 番 3 号
Company of License Holder
Shenzhen Licheng Technology Co,.Ltd
Add: Warehouse B, 1F, Building B, Dezhong Industrial Park, No.11 Shibei Road, Bantian Street,
Longgang District, Shenzhen, Guangdong, 518000, China
Tel: (+86)755-23484029
Manufacturer Information
Shenzhen Lixin Technology Co,.Ltd
Add: 1F, Building B , Dezhong Industrial Park, No.11 Shibei Road, Bantian Street, Longgang
District, Shenzhen, Guangdong, 518000, China
Tel: (+86)755-23484029
Made in China
 Loading...