

Page 1
FE3001
USB3.0 3.5” HDD External Enclosure
w w w . i n a t e c k . com
Page 2
- 2 -
FE3001 USB3.0 3.5” HDD Enclosure
Instruction Manual
Standard Superspeed USB 3.0 connections up to 5 Gbps ;Built-in ASM1153E chipset
supports SATA III with 6Gbps Signal bandwidth at most for fast storage backups ;
Support UASP targeted at SSD;
Strong compatibility with Windows XP/Vista/7/8/8.1, Linux/Android, Mac OS 10.3 and
higher. Support all standard 2.5’/3.5’ SATA I/II/III drives (4TB+); Back compatible with
USB 2.0/1.1 connections ;
Plug and Play; Hot-swapping, no reboot and additional drives is needed; 12V/2A power
adapter provides stable power supply; Support sleep-mode;
The durable Aluminum-alloy material promises ultra-light portability and exquisite crafting;
Featured with high effective heat dissipation ; Keep sturdy with the non-slipping rubber
pads on the four corners; The individual LEDs indicate power status (Green) and activity
status (Blue).
Packaging Contents:
USB 3.0 3.5” hard drive enclosure
100cm USB3.0 Cable
Screw driver
Accessories Bag (rubber pads and screws)
12V/2A Power adapter
Instruction manual
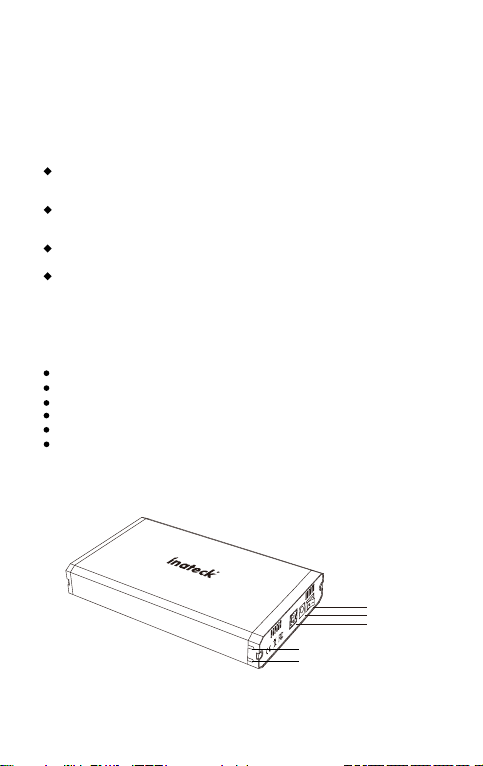
I. Component view
POWER
DC12V
USB3.0
Data transfer LED indicator
Power LED indicator
Power switcher
Power adapter port
USB 3.0 port
Page 3
- 3 -
II. Specification
Product name USB3.0 3.5” HDD External Enclosure
Product type Inateck FE3001
Weight 280g
Colour Bla ck
Supported drives 2.5” SATA I/II/III HDD/ SSD
Host Interface USB 3.0 (Backwards compatible with USB 2.0, USB 1.1)
Power Supply 12V/2.0A
LED Indicator Power supply – green; LED signal – blue
Compatibility Desktop/Laptop/Tablet/TV/Router/Set Top Box and other external
Measurements 190mm length x 112mm width x 32mm height
Operation environment Storage: -40 to 70 °C; Operation: 5 to 55 °C
Supported operating systems Windows XP/Vista/Win7/Win8/Win8.1/Linux/Android/Mac OS10.3
/ 3.5”
hard drive compatible devices
and above
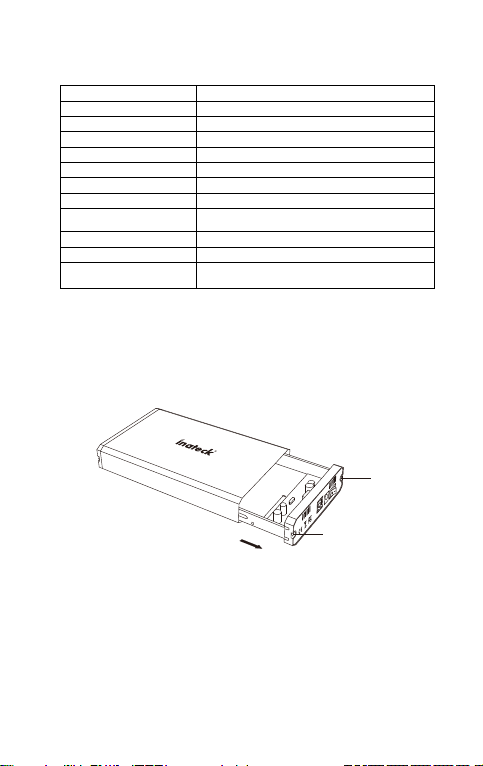
III. How to install
1. Take out the screws and slide the hard drive tray out of the enclosure.
screw
POWER
DC12V
USB3.0
screw
2. Using the included screw driver, connect your SATA SSD/HDD to the SATA
connector and attach it to the drive tray by driving 2 of the installation screws
through the stabilizing holes on the bottom of the drive tray into the bottom
mounting holes on your HDD/SSD.
Page 4

- 4 -
POWER
DC12V
USB3.0
screw hole
3. Slide the hard drive tray back inside the enclosure and drive 2 of the enclosure
installation screws into the side hard drive tray mounting holes on the enclosure.
screw
POWER
DC12V
USB3.0
screw
POWER
DC12V
USB3.0
Page 5

- 5 -
4. Complete installation by connecting your hard drive enclosure to your computer
using the USB 3.0 port and power it up.
IV. Initializing the Hard Drive
Please note this instruction only applies to Windows 2000/Windows XP, your hard drive
may need to be initialized and formatted before use.
1. Boot up your computer, make sure the operating system runs normally.
2. Connect the included USB 3.0 cable from the micro USB port on the hard drive
enclosure to an available USB port on your computer system.
3. LED indicator will illuminate once the enclosure is connected to your computer.
The Found New Hardware dialog window should automatically appear.
4. Right-click on “My Computer” then select Manage to open the Computer
Management window. Select Disk Management from the left window panel.
Page 6

- 6 -
V. Instruction for the removal of drives
Please no te: Before the removal of the data storage device, please stop all data access
and transfer to the device, so that the storage can be normally removed. Forced removal
may lead to damage or loss of crucial data. To prevent any dat a loss, please strictly follow
the steps for remov al below!
a. Removal from Windows systems: Right clic k on the hardwa re or USB de
removal symbol in th e status bar, click on the periphery to be removed . When
the system notification reading “the device can now be safely rem oved.”
shows up, you can re move the data storage.
Another w ay to remove the data storage is through the dev ice manager
(“Computer” -> “Device Manager” -> “Drives” -> Click on “Remove ” for the drive
to be removed, so that the drive can be detached safely.
vice
Page 7

- 7 -
b. Removal from Macintosh system s: Please choose the symbol for “Portable
drives / devices”, choose the menu function “Rem ove” from the drop down menu
by right clicking onto the symbol. You m ay also drag the “Portable device” to the
rubbish bin. Now, the device can be s
afely removed.
Page 8

 Loading...