


|
|
|
|
|
|
|
|
|
|
|
|
|
|
|
|
|
|
|
|
|
|
|
|
|
|
|
|
|
|
|
|
|
|
|
|
|
|
|
|
|
|
|
|
|
|
|
|
|
|
|
|
|
|
|
|
|
|
|
|
|
|
|
|
|
|
|
|
|
|
|
|
|
|
|
|
|
|
|
|
|
|
|
|
|
|
|
|
|
|
|
|
|
|
|
|
|
|
|
|
|
|
|
|
|
|
|
|
|
|
|
|
|
|
|
|
|
|
|
|
|
|
|
|
|
|
|
|
|
|
|
|
|
|
|
|
|
|
|
|
|
|
|
|
|
|
|
|
|
|
|
|
|
|
|
|
|
|
|
|
|
|
|
|
|
|
|
|
|
|
|
|
MODEL CODE/S |
PRODUCT |
DOCUMENT |
|
||||
|
|
IDW6S |
60CM |
USER |
|
||||
|
|
|
|
|
FREE— |
MANUAL |
|
||
|
|
|
|
|
STANDING |
|
|
|
|
|
|
|
|
|
DISHWASHER |
|
|||
|
|
|
|
|
|
|
|
|
|
|
|
|
|
|
|
|
|
|
|
|
|
|
|
|
|
|
|
|
|
|
USER MANUAL |
PAGE 02 |
|
||
|
Dear Customer, |
Congratulations on purchasing your new dishwasher. |
|
The Residentia brand is proudly distributed within |
|
Australia by Residentia Group Pty Ltd. |
|
Please refer to the warranty card at the rear of this |
|
manual for information regarding your product’s |
|
parts and labour warranty, or visit us online at |
|
www.residentiagroup.com.au. |
|
At Residentia Group, we are customer obsessed and |
|
our Support Team are there to ensure you get the most |
|
out of your appliance. Should you want to learn more |
|
about the various washing functions when cleaning or |
|
even the preferred dishwashing powder/tablets, our |
|
Support Team are here to help. |
|
You can use our online Support Centre at anytime by |
|
visiting http://support.residentiagroup.com.au, or you |
|
can contact us via phone by dialling 1300 11 HELP (4357). |
|
It is important that you read through the following use |
|
and care manual thoroughly to familiarise yourself with |
|
the installation and operation requirements of your |
|
appliance to ensure optimum performance. |
|
Again, thank you for choosing a Residentia appliance |
|
and we look forward to being of service to you. |
|
Kind Regards, |
|
The Residentia Team |
T |
1300 11 4357 |
Residentia Group |
E |
info@residentiagroup.com.au |
PO Box 581 |
W residentiagroup.com.au |
Stanhope Gardens |
|
ACN 600 546 656 |
NSW Australia 2768 |
|

PAGE 03
PAGE |
CONTENT |
|
|
04 |
SAFETY |
|
INSTRUCTIONS |
|
|
06 |
YOUR INALTO |
|
DISHWASHER |
|
|
07 |
INSTALLATION |
|
INSTRUCTIONS |
|
|
08 |
OPERATING |
|
YOUR DISHWASHER |
|
|
16 |
CLEANING & |
|
MAINTENANCE |
|
|
18 |
TROUBLESHOOTING |
|
& TECHNICAL DATA |
|
|
21 |
PURCHASE |
|
DETAILS |
|
|
22 |
WARRANTY |
|
INFORMATION |

|
USER MANUAL |
PAGE 04 |
|
||
|
SAFETY INSTRUCTIONS
This dishwasher is intended to be used in domestic environments only, including:
►household kitchen;
►staff/office kitchen;
►hotel/motel kitchens; or
►bed and breakfast type environments.
It has not been designed for use in commercial kitchen environments.
WARNING
Please ensure that you carefully read this user manual before installing and using the dishwasher, as it will help you to use and maintain the dishwasher properly.
►Keep it as a reference for the future as it also contains your product warranty card.
►Pass this user manual on to any subsequent owners of the appliance.
IMPORTANT!
The electricity supply to the dishwasher must be cut off before any adjustments or maintenance work is undertaken.
►This dishwasher must be grounded. In the event of a malfunction or product failure, grounding will reduce the risk of an electric shock by providing a path of least resistance of electric current.
►The plug must be plugged into an appropriate outlet that is installed and grounded in accordance with all local codes.
WARNING
Improper connection of the equipment-grounding conductor can result in the risk of an electric shock. Check with a qualified electrician or service representative if you are in doubt as to whether your dishwasher is grounded properly. Never modify the plug supplied with the appliance. If the plug doesn't fit the outlet, have a licenced and suitably qualified electrician install the correct outlet.
►Do not abuse, sit on, or stand on the door or dish rack of the dishwasher.
►Do not touch the heating element during or immediately after use. (This instruction is only applicable to machines with a visual heating element.)
►Do not operate your dishwasher unless all enclosure panels are properly in place. Open the door very carefully if the dishwasher is operating, there is a risk of water squirting out.
►Do not place any heavy objects on or stand on the door when it is open. The appliance could tip forward.
►When loading items to be washed:
1)Locate sharp items so that they are not likely to damage the door seal;
2)Warning: Knives and other utensils with sharp points must be loaded in the basket with their points down or placed in a horizontal position.
►When using your dishwasher, you should prevent plastic items from coming into contact with the heating element.(This instruction is only applicable to machines with a visual heating element.)
►Check that the detergent compartment is empty after completion of the wash cycle.
►Do not wash plastic items unless they are marked dishwasher safe or the equivalent. For plastic items not so marked, check the manufacturer's recommendations.
►Use only detergent and rinse additives designed for an automatic dishwasher.
►Never use soap, laundry detergent, or hand-washing detergent in your dishwasher. Keep these products out of the reach of children.
►Keep children away from detergent and rinse. Always be sure to keep the dishwasher door closed with children around, as there may still be residual detergent inside.

PAGE 05
►This appliance is not intended for use by persons (including children with reduced physical, sensory or mental capabilities, or lack of experience and
knowledge, unless they have been given supervision or instruction concerning use of the appliance by a person responsible for their safety.)
►Children should be supervised to ensure that they do not play with the appliance.
►The door should not be left open, since this could increase the risk of tripping.
►If the supply cord is damaged, it must be replaced by the manufacturer or its service agent or a similarly qualified person in order to avoid a hazard.
►Remove the door to the washing compartment when removing an old dishwasher from service or discarding it.
►During installation, the power supply must not be excessively or dangerously bent or flattened.
►The appliance is to be connected to the water mains using new hose sets and that old hose-sets should not be reused.
►The maximum number of place settings to be washed is 14.
UNPACKING
During transportation, protective packaging was used to protect the appliance against any damage. After unpacking, please dispose of all elements of packaging in a way that will not cause damage to the environment. All materials used for packaging the appliance are environmentally friendly; they are 100% recyclable and are marked with the appropriate symbol.
►During unpacking, the packaging materials (polythene bags, polystyrene pieces, etc.) should be kept out of reach of children.
DISPOSAL OF THE APPLIANCE
Old appliances should not simply be disposed of with normal household waste, but should be delivered to a collection and recycling centre for electric and electronic equipment. A symbol shown on the product, the instruction manual or the packaging shows that it is suitable for recycling.
Materials used inside the appliance are recyclable and are
►The maximum permissible inlet water pressure is 1Mpa. labelled with information concerning this. By recycling
►The minimum permissible inlet water pressure is 0.04Mpa.
►Never use an extension cord.
►It's recommended to provide a separate circuit to serve your dishwasher alone and you should use the required 10 amp fuse.
►An extension hose can be used but should be no longer than 4 meters, otherwise the performance of the dishwasher will be effected.
DECLARATION OF CONFORMITY
The manufacturer declares that the dishwasher is built using certified materials and requires the appliance to be installed in accordance with the standards currently in force. This appliance must be used by a trained person for domestic purposes only.
materials or other parts from used devices you are making a significant contribution to the protection of our environment.
Information on appropriate disposal centres for used devices can be provided by your local authority.
|
USER MANUAL |
PAGE 06 |
|
||
|
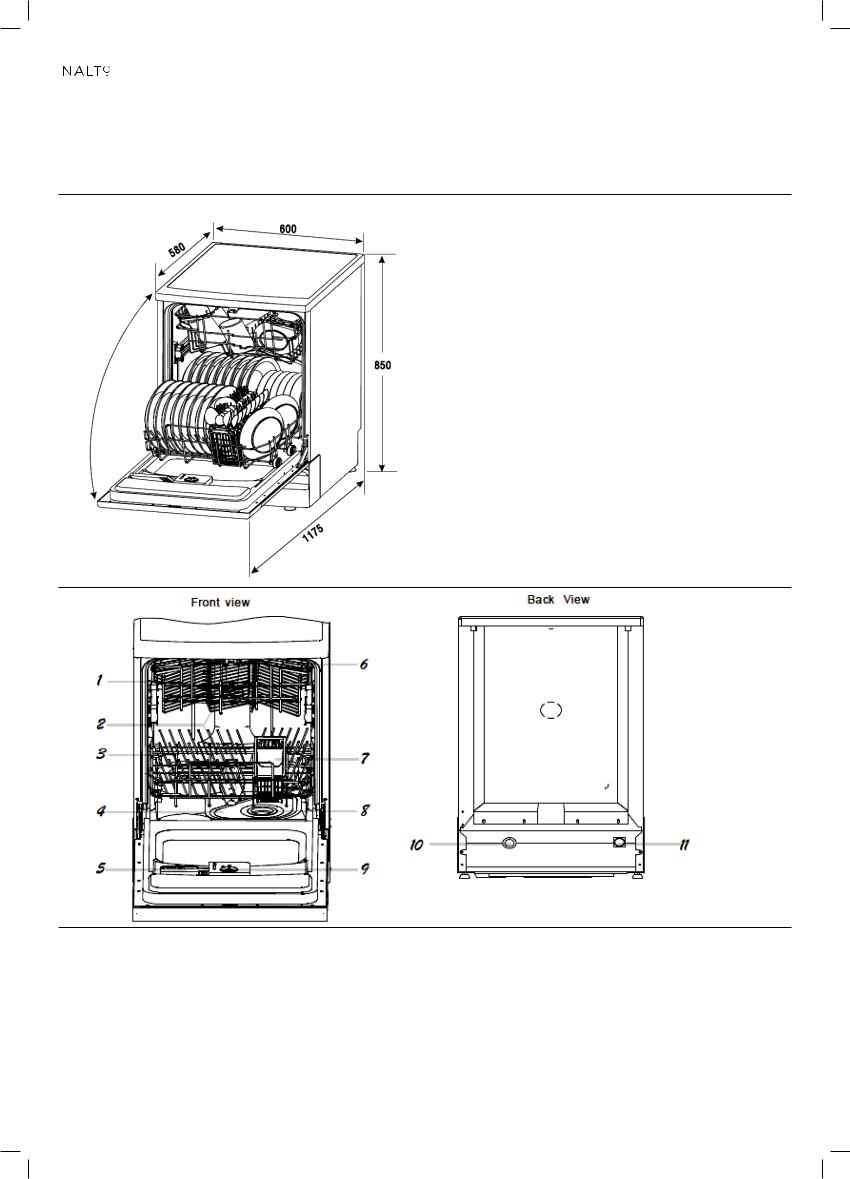
YOUR INALTO DISHWASHER
SPECIFICATIONS
1 |
Upper Basket |
2 |
Spray Arms |
|
3 |
Lower Basket |
4 |
Main Filter |
5 |
Detergent Dispenser |
6 |
Cup Shelf |
|
7 |
Cutlery Basket |
8 |
Coarse Filter |
|
9 |
Rinse Aid Dispenser |
10 |
Drain Pipe |
11 |
Inlet pipe connector |
|
|
|
|
|
|
|
|||
MODEL |
PRODUCT DIMENSIONS (W×D×H) |
PRODUCT FEATURES |
|
|||
|
|
|
||||
IDW6S |
600mm, 580-1175mm, 850mm |
► 12 Place Setting capacity |
||||
|
|
|
|
► Removable cutlery basket |
||
|
|
|
|
|
|
|
PAGE 07
INSTALLATION INSTRUCTIONS
It’s important to carefully read the following installation instructions before beginning the installation of your dishwasher.
IMPORTANT! The installation of the pipes and electrical outlets should be completed by suitably licensed and qualified persons.
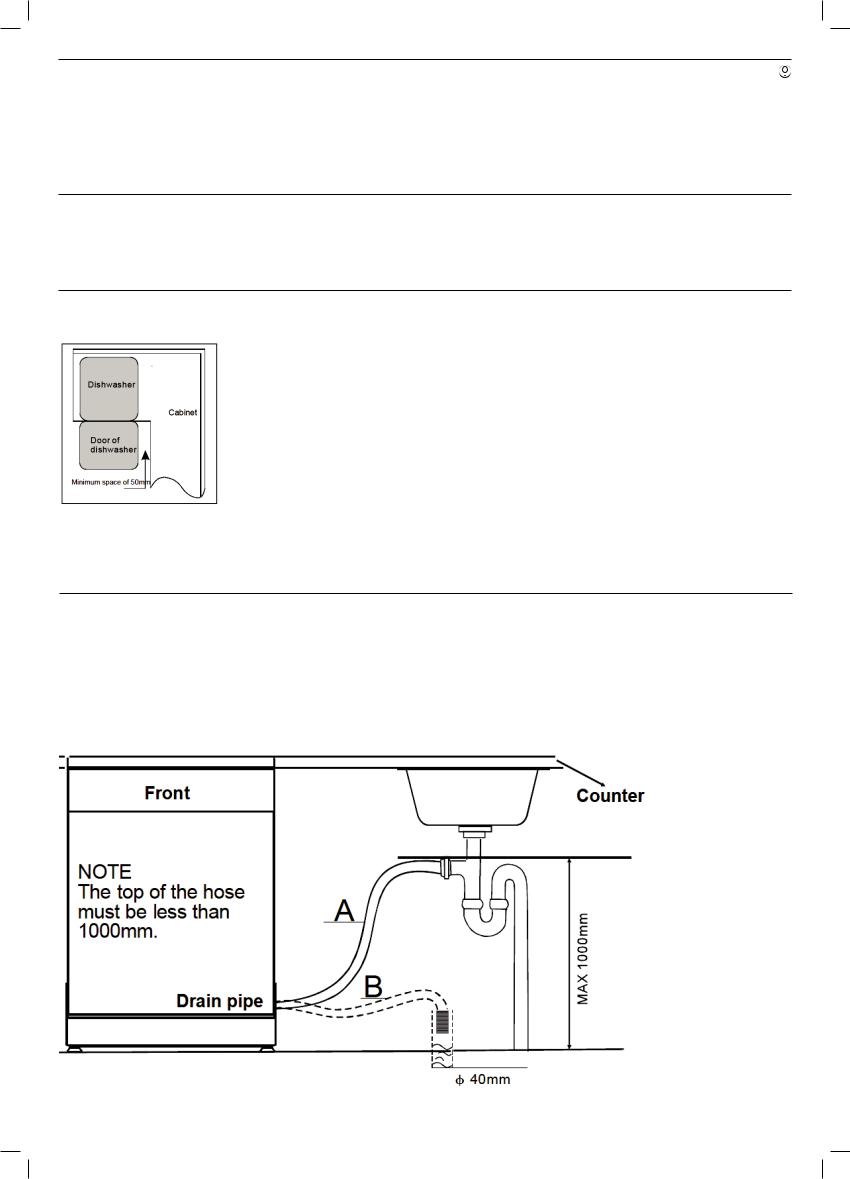
POSITIONING |
The installation position of the dishwasher should be near the existing inlet, |
|
drainage wastepipe and power outlet. |
|
► Choose a position near your sink to facilitate the installation of inlet and drain |
|
hoses (refer to figure one). |
|
► If the dishwasher is installed in the corner of your kitchen cabinetry, make |
|
sure an allowance is made to ensure your dishwasher door can freely open |
|
without obstruction from other cabinetry/door handles. |
|
► The dishwasher back should rest against the wall behind, whilst the sides |
|
should rest against the adjacent cabinets or walls. |
|
► The dishwasher is equipped with water supply and drain hoses that can be |
|
positioned either to the right or left hand sides, dependent on your required |
|
installation. |
|
► As per the diagram (left), ensure that when you are installing your dishwasher |
|
in a corner situation, adequate space is left to allow the door to open without |
|
hitting other cabinetry or handles. |
DRAIN HOSE CONNECTION
Insert the drain hose into a drain pipe with a minimum diarmeter of 40mm, or connect it onto the trap of your sink where a dishwasher connection is present.
IMPORTANT! The top of the hose must be less than 1000mm high, as illustrated below.

|
USER MANUAL |
PAGE 08 |
|
||
|
INSTALLATION INSTRUCTIONS
LEVELLING THE DISHWASHER Once you have positioned the dishwasher in your desired location, it needs to be levelled correctly. Using a spirit level, you can wind each of the feet to ensure the dishwasher is stable and level.
IMPORTANT! Your dishwasher must be level for it's proper operation and wash performance. Use a spirit level to ensure this is the case.
DISHWASHER INSTALLATION STEPS Now that your dishwasher is level and in position, you can finalise the installation of the dishwasher.
►Connect the inlet hose to the cold water supply .
►Connect the drain hose as per the instructions on page 9 of this user manual.
►Plug in the power cord to your desired outlet.
OPERATING YOUR DISHWASHER
Starting a washing program
 Loading...