

Page 1

MODEL CODE/S
IDO68S
PRODUCT
Double
Oven
DOCUMENT
User
Manual
Page 2
USER MANUAL
PAGE 02
Dear Customer, Congratulations on purchasing your new oven. The
Inalto brand is proudly distributed within Australia by
Residentia Group Pty Ltd.
Please refer to the warranty card at the rear of this
manual for information regarding your product’s
parts and labour warranty, or visit us online at
www.residentiagroup.com.au.
At Residentia Group, we are customer obsessed and
our Support Team are there to ensure you get the most
out of your appliance. Should you want to learn more
about recommended cooking temperatures, the various
cooking functions available, how to set and program
your LED clock, and importantly taking care of your
appliance when cleaning, our Support Team are here to
help. You can use our online Support Centre at anytime
by visiting http://support.residentiagroup.com.au, or you
can contact us via phone by dialling 1300 11 HELP (4357).
It is important that you read through the following use
and care manual thoroughly to familiarise yourself with
the installation and operation requirements of your
appliance to ensure optimum performance.
Again, thank you for choosing an Inalto appliance and
we look forward to being of service to you.
Kind Regards,
The Residentia Team
600 546 656
Residentia Group
PO Box 581
Stanhope Gardens
NSW Australia 2768
Page 3
PAGE 03
PAGE CONTENT
04 General Warnings & Safety
06 Your InAlto Oven
07 Installation
09 Control Panel Key
09 Operating Your Oven
12 Technical Data
13 Cooking Guides
15 Maintenance & Cleaning
17 Troubleshooting
18 Warranty Information
19 Purchase Details
Page 4

USER MANUAL
PAGE 04
GENERAL WARNINGS
It is important that you read all the information within this user
instruction and installation manual. It provides you with important
information regarding the safe installation, use and maintenance
of this appliance as well as useful advise for getting the best out of
your double oven.
Keep this user instruction and installation manual in a safe place
for future reference.
After removing all of the packaging check the appliance is not
damaged or marked in any way. Do not leave packaging materials
such as plastic, polystyrene and so forth where children can get
access to them as they are dangerous.
IMPORTANT
DO NOT USE THE OVEN DOOR HANDLE TO MOVE THE
APPLIANCE OR TO USE IT TO LIFT THE APPLIANCE OUT
OF THE PACKAGING.
ATTENTION
¬ The oven is an appliance which becomes hot when in use
¬ The glass doors will become hot when in use
¬ Children should stay clear from the oven and grill when it is in
use to avoid injury
The first time you use your oven there will be a smell and some
smoke may be present. The smell and smoke is caused by the
heating of the adhesive used on the insulation panels surrounding
the oven. This is typical for an ovens first use. If this occurs on
your first use wait until the smell and smoke disappears before
putting any food in the oven. You must never bake or roast on the
oven base.
SAFETY
¬ This appliance is designed for household use only and not
suitable for commercial use.
¬ The functions of the oven must not be modified or changed
¬ This appliance must be earthed and installed by a licenced
electrician in accordance with the rules and regulations in
effect
¬ The manufacturer will not be held liable for any damages that
is caused due to Incorrect installation or improper, incorrect or
unreasonable use of this appliance
The following items are potentially dangerous, and therefore,
appropriate measures must be taken to prevent children and the
disabled from coming into contact with them:
¬ Controls and the appliance in general
¬ Packaging (bags, polystyrene, nails, etc.)
¬ The appliance immediately after use of the oven or grill due to
the heat generated
¬ The appliance when no longer in use (potentially dangerous
parts must be made safe)
Avoid the following:
¬ Touching the appliance with wet hands
¬ Using the appliance when barefoot
¬ Pulling on the appliance or the supply cord to unplug it from
the electrical outlet
¬ Obstructing the ventilation or heat dissipation slots
¬ Allowing power supply cords for small appliances to come into
contact with hot parts of the appliance
¬ Exposing the appliance to atmospheric conditions (rain, sun)
¬ Using the oven for storage purposes
¬ Using flammable liquids near the appliance
¬ Using adaptors, multiple sockets and/or extension cords
¬ Attempt to install or repair the appliance
WARNING
¬ Accessible parts will become hot when in use. To avoid burns
and scalds children should be away
¬ During usage, the appliance becomes hot, care should be taken
to avoid touching heating elements inside the oven
Licenced Electricians or Authorised Service Agents must be
contacted in the following circumstances:
¬ Installation (the manufacturer’s instructions must be followed);
¬ When in doubt about operating the appliance;
¬ Replacing the electrical outlet when it is not compatible with
the plug for the appliance
Licenced Electricians or Authorised Service Agents must be
contacted must be contacted in the following circumstances:
¬ If in doubt about the soundness of the appliance after removing
it from the packaging
¬ If the power supply cord has been damaged or needs to be
replaced
¬ If the appliance breaks down or functions poorly; ask for
original spare parts
General Warnings & Safety
Page 5

PAGE 05
For long life and good cooking practices please adhere to the
following:
¬ Only use the appliance to cook food
¬ Check the soundness of the appliance after it has been
unpacked
¬ Unplug the appliance from the electrical mains if it is not
functioning properly and before cleaning or performing
maintenance
¬ When the appliance is not used for an extended period of time,
unplug the appliance
¬ Use cooking gloves to place cookware in the oven or when
removing it;
¬ Open the oven door from the centre of the handle
¬ Make sure that the control knobs are on the “O”setting (off
setting) when the appliance is not in use
¬ Unplug the appliance when you decide not to use the appliance
any longer
The manufacturer will not be held responsible for any damage
due to incorrect installation, improper, incorrect and not fit for
purpose use.
INDICATOR LIGHTS
When the oven or grill is in use the indicator lamps on the
control panel will light up. The indicator lamps represent the
elements cycling on and off to reach and maintain the desired set
temperature.
The oven light is considered a function. It signals that the oven is
in use.
During operation, the oven glass door and adjacent parts of the
appliance become hot. Make sure that children do not touch the
appliance.
WARNING
¬ The appliance and its accessible parts become hot during
use. Care should be taken to avoid touching heating elements.
Children less than 8 years of age shall be kept away unless
continuously supervised.
This appliance can be used by children aged from 8 years and
above and persons with reduced physical, sensory or mental
capabilities or lack of experience and knowledge if they have been
given supervision or instruction concerning use of the appliance in
a safe way and understand the hazards involved. Children shall not
play with the appliance. Cleaning and user maintenance shall not
be made by children without supervision.
Children should be supervised to ensure that they do not play with
the appliance.
General Warnings & Safety Continued
Page 6
USER MANUAL PAGE 06
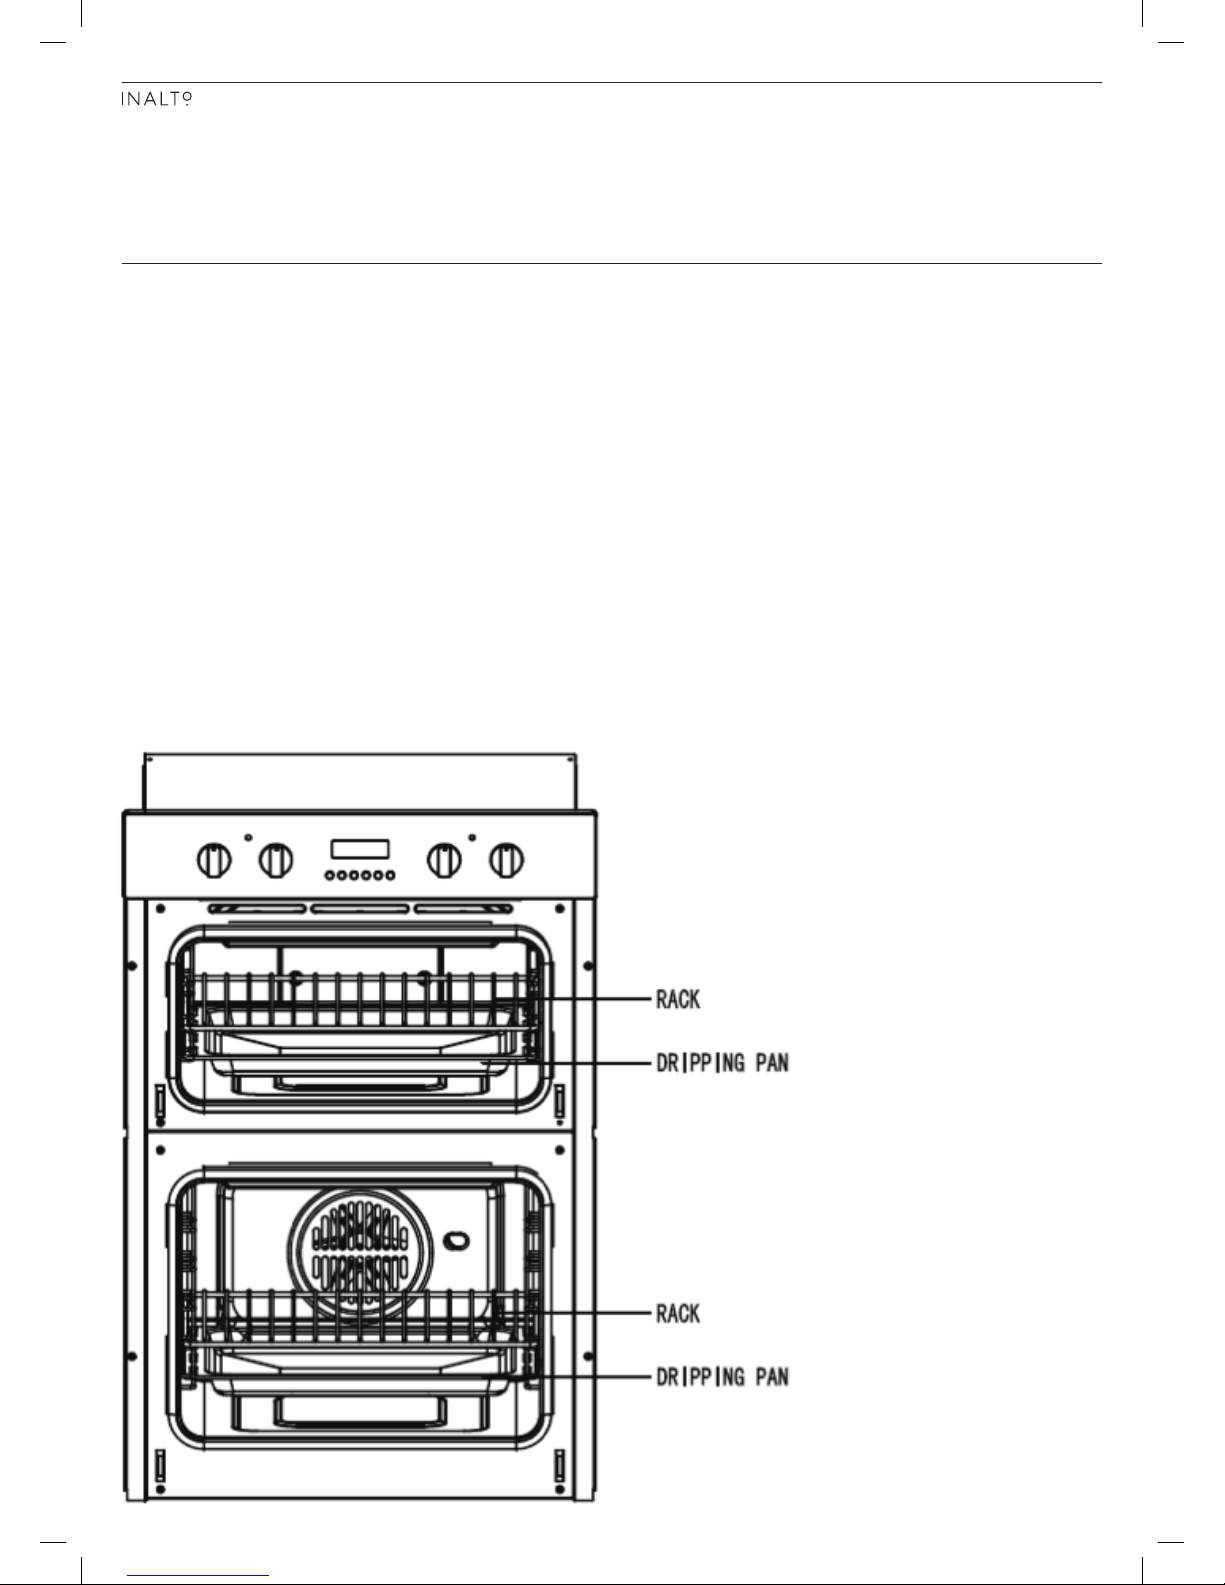
OVEN DETAILS
The top oven has a 43 litre capacity and the
bottom oven has a 60 litre capacity and off ers
you the option of cooking in either the top,
bottom or both at the same time.
The fi rst time you use your appliance, heat the empty oven with
the door closed at its maximum temperature for at least half an
hour. Make sure that the room is well ventilated before switching
the oven off and opening the oven door. The appliance may emit
a slightly unpleasant odour caused by protective substances used
during the manufacturing process burning away.
Never put objects directly on the bottom of the oven, this will
prevent the enamel coating from being damaged.
Always place cookware on the rack/s provided.
We suggest not opening the door when cooking foodstuff s so that
you do not compromise cooking results.
Your InAlto Oven
Fig. 1
Page 7
PAGE 07
IMPORTANT
Unplug your oven before installing or for maintenance
Installation should be carried out according to these instructions
by a licenced electrician or an authorised service agent. The
manufacturer is not responsible for any damage to persons,
animals or other due to incorrect installation.
Fitting the Appliance
¬ Fit the appliance into its surround (beneath a work-top or
above another appliance)
¬ Insert screws into the 4 holes that can be seen in the frame
of the oven when the door is opened
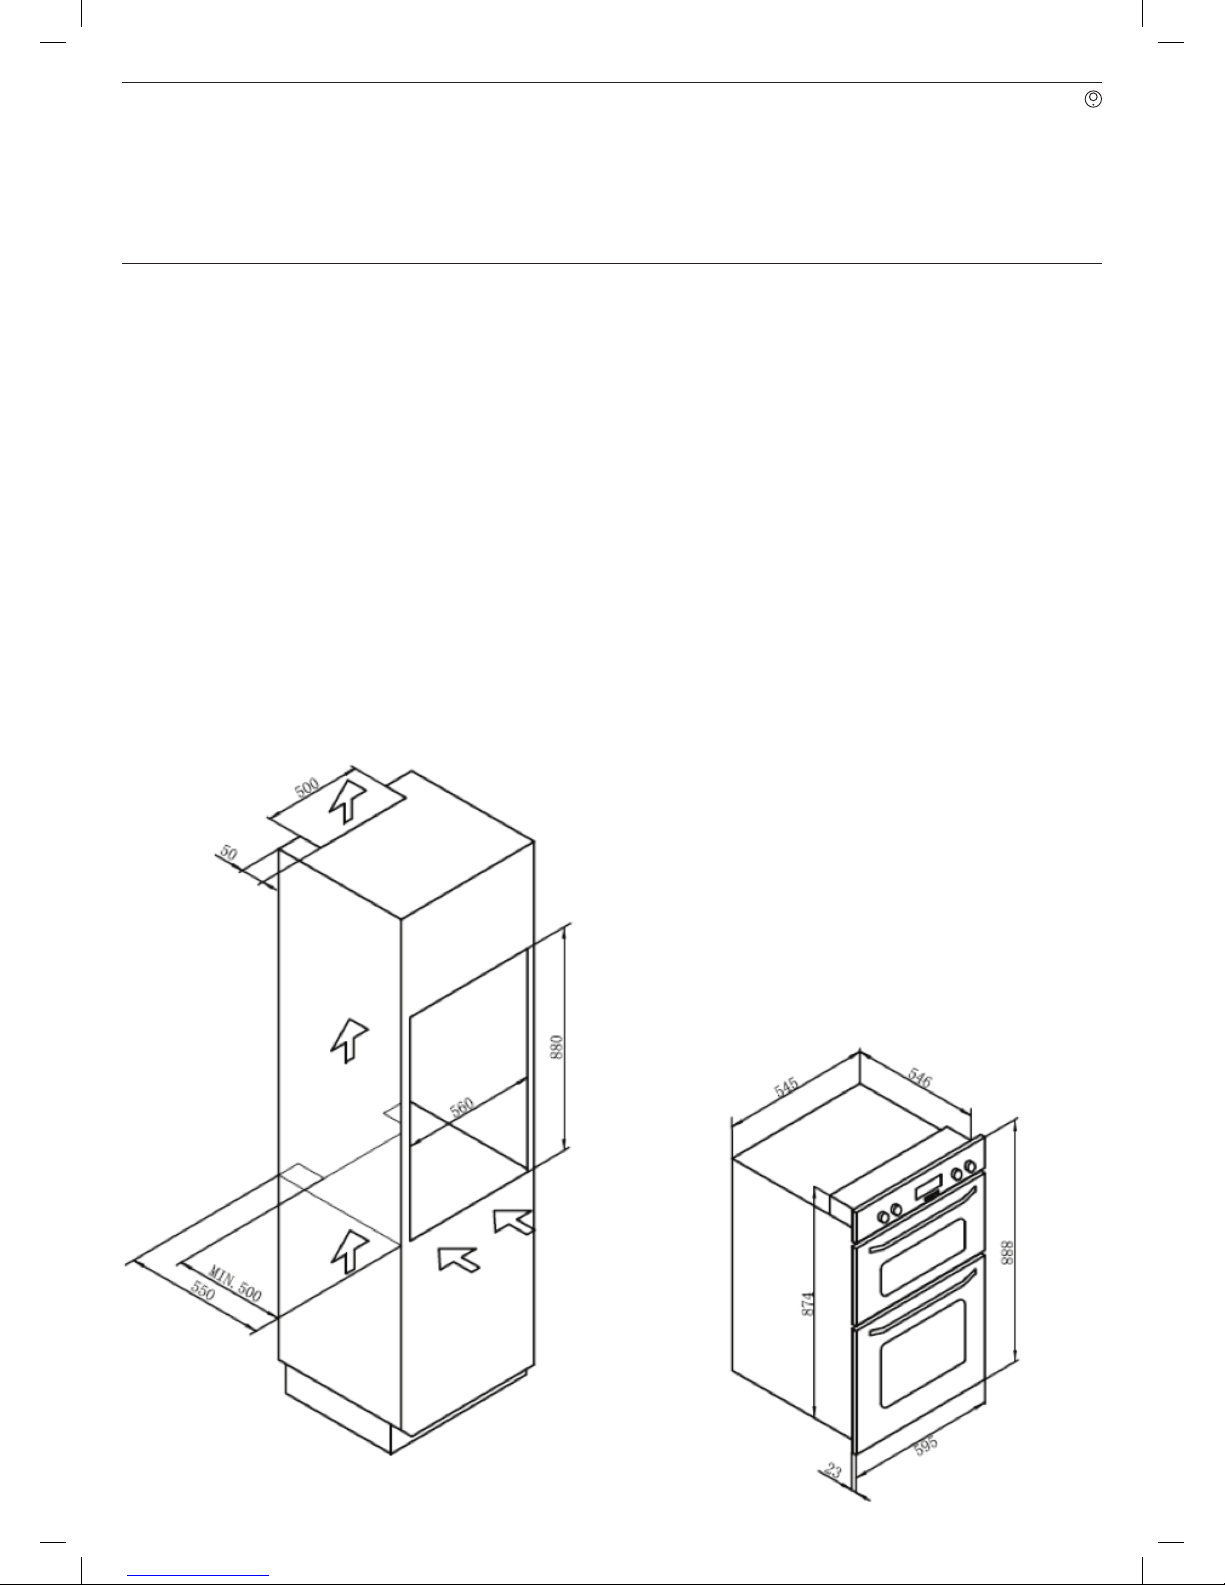
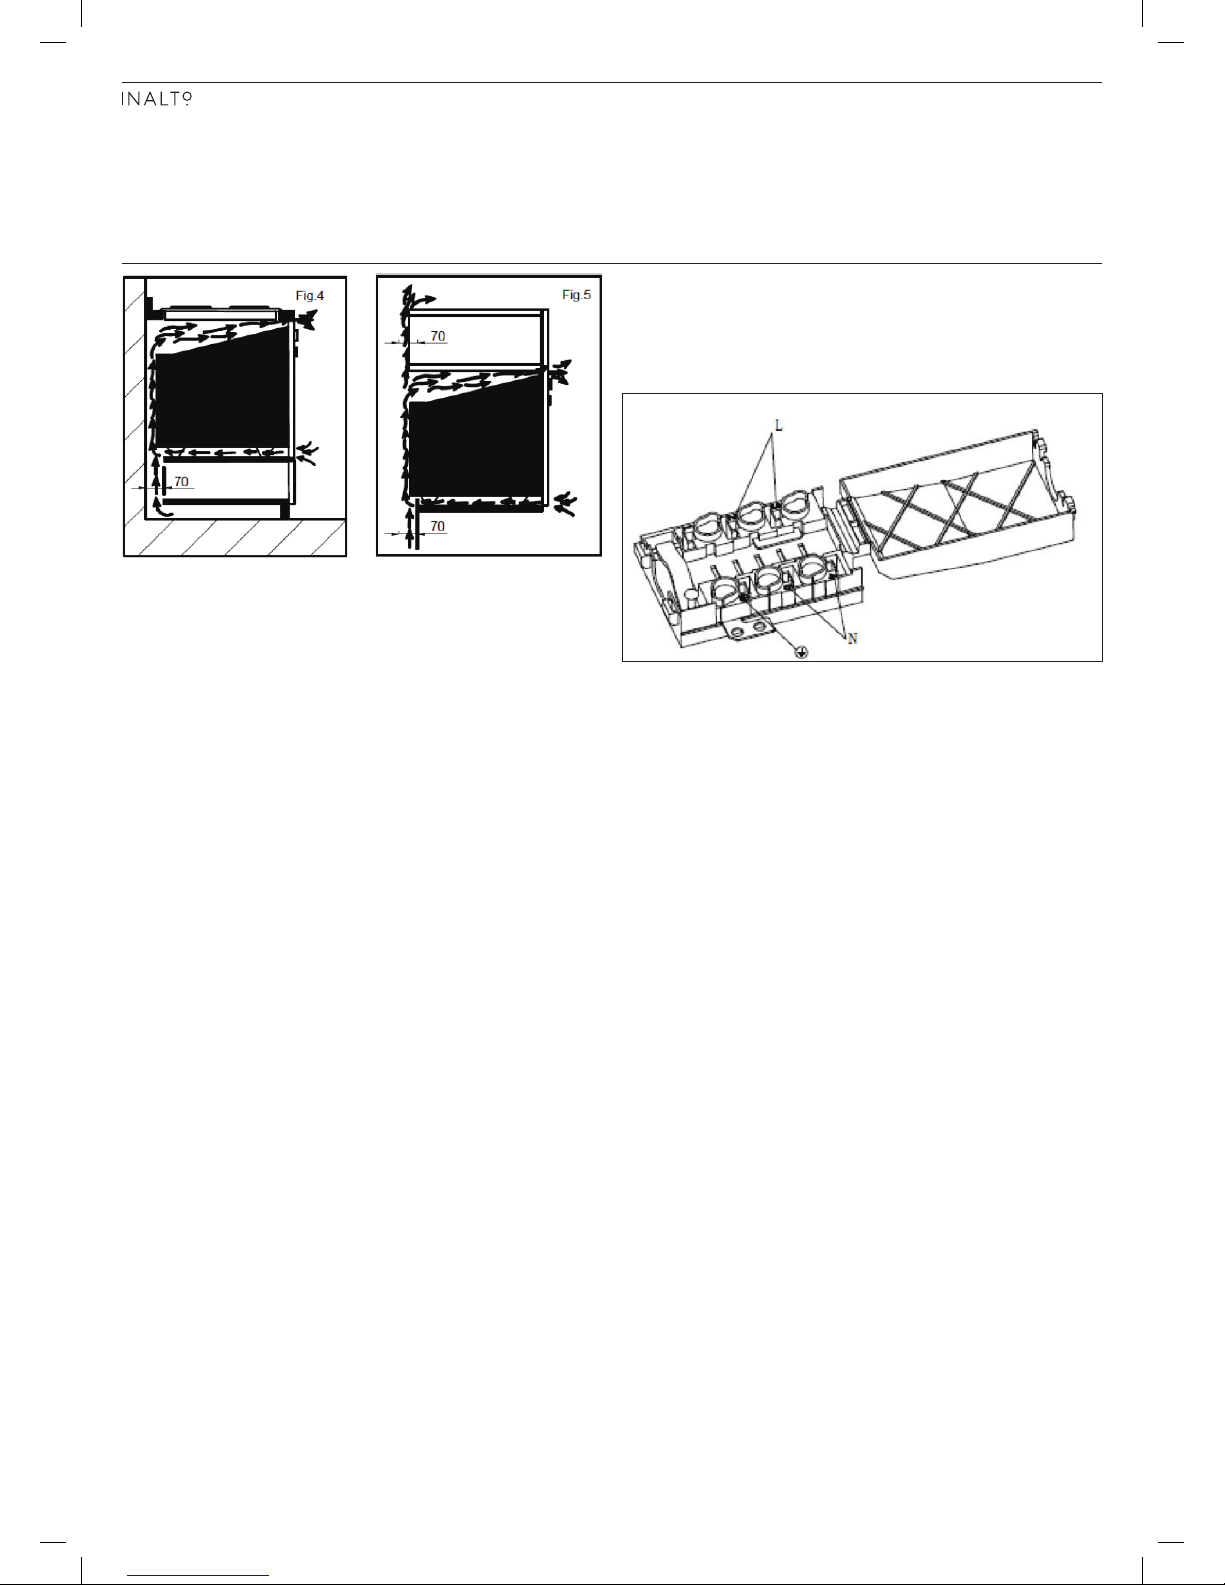
¬ The ventilation for the oven should be in accordance to the
dimensions shown in Fig. 2 & 3
¬ The rear panel of the cabinet must have a gap cut of at least
50mm at the rear as shown in Fig. 2 & 3 to ensure adequate
ventilation.
NOTE: Where ovens are to be installed with hobs, it is essential to
follow the instructions contained in the booklet supplied with the
other appliance.
IMPORTANT
¬ During use the appliance becomes hot, Care should be taken
to avoid touching heating elements inside the oven.
¬ Accessible parts may become hot during use. Yong children
should be kept away.
¬ Do not use harsh abrasive cleaners or sharp metal scrapers to
clean the oven door glass since they can scratch the surface,
which may result in shattering of the glass.
For a built-in oven to work well the cabinet must be of the
right type. The panels of the adjoining furniture should be heat
resistant. Particularly when the adjoining furniture is made of
veneered wood, the adhesives should be able to withstand a
temperature of 120�. Plastic materials or adhesive which cannot
withstand this temperature will become deformed, unstuck and/or
discoloured.
To comply with safety regulations, once the appliance has been
fi tted it should not be possible to make contact with the electrical
parts. All parts which off er protection should be fi xed in such a
way that they cannot be removed without the use of a tool.
Installation
Fig. 2 Fig. 3
Page 8
USER MANUAL PAGE 08
Installation Continued
Ensure that the appliance is switched off before replacing the lamp
to avoid the possibility of electric shock.
WARNING
Check that the power rating of the mains supply and of the
sockets to ensure they are suitable for the maximum power of the
appliance as indicated on the rating plate.
¬ If a plug comes with the appliance it should be accessible after
installation.
¬ Ensure that the plug is fi tted into an earthed socket.
¬ If the appliance has no plug and cord hard wiring is undertaken
as follows:
○ The “yellow/green” earth wire, must be connected to the
terminal fi rst and be about 10mm longer than the neutral
“blue” wire
○ The neutral “blue” wire has to be connected to the terminal
marked with letter N.
○ “Black, brown, red” live wire/s have to be connected to
terminal L.
○ Mains connection can also be made by fi tting a double
pole switch with a minimum gap between the contacts of
3mm, proportionate to the load and complying with the
regulations in force.
The yellow/green earth wire should not be controlled by the
switch.
The plug or a double pole switch used for mains supply connection
should be easily accessible once the appliance is in position.
IMPORTANT:
¬ Position the mains supply cable so that it is never subjected
to a temperature which is more than 50� above ambient
temperature.
¬ The electrical safety of the appliance can only be guaranteed
when it has been correctly connected to an earthed power
supply, and installed as per the regulations for electrical safety.
¬ The manufacturer cannot be held responsible for any damage
to persons or objects due to an earth connection not been
used.
ELECTRICAL CONNECTION
Ovens equipped with a three-power supply cable are designed
to operate with alternating current at the voltage and frequency
indicated on the data plate located on the appliance (see below).
Fitting the power supply cable
Fig. 6
The following steps refer to Fig. 6.
1. Open the terminal board by inserting a screwdriver into the
side tabs of the cover.
2. Use the screwdriver as a lever by pushing it down to open the
cover.
3. Install the power supply cable by loosening the cable clamp
screw and the three wire contact screws L N
4. Connect the wires to the corresponding terminals the Blue wire
to the terminal marked (N), the Brown wire to the terminal
marked (L) and the Yellow/Green wire to the terminal marked
with the earth symbol.
5. Secure the cable by fastening the clamp screw.
6. Close the cover of the terminal board.
Connecting the electricity supply cable to the mains
1. Cable must be connected to power supply cable through power
switch.
2. Rated current of power switch must be higher than 16A.
3. Ambient temperature of power supply cable cannot exceed 50
degrees.
4. Once oven is installed, power switch should be cut off easily.
5. The cable must not be bent or compressed.
6. The cable must be checked regularly and replaced by
authorised technicians only (see Assistance).
You can only disconnect the appliance if a plug and cord is
installed.
Page 9
PAGE 09
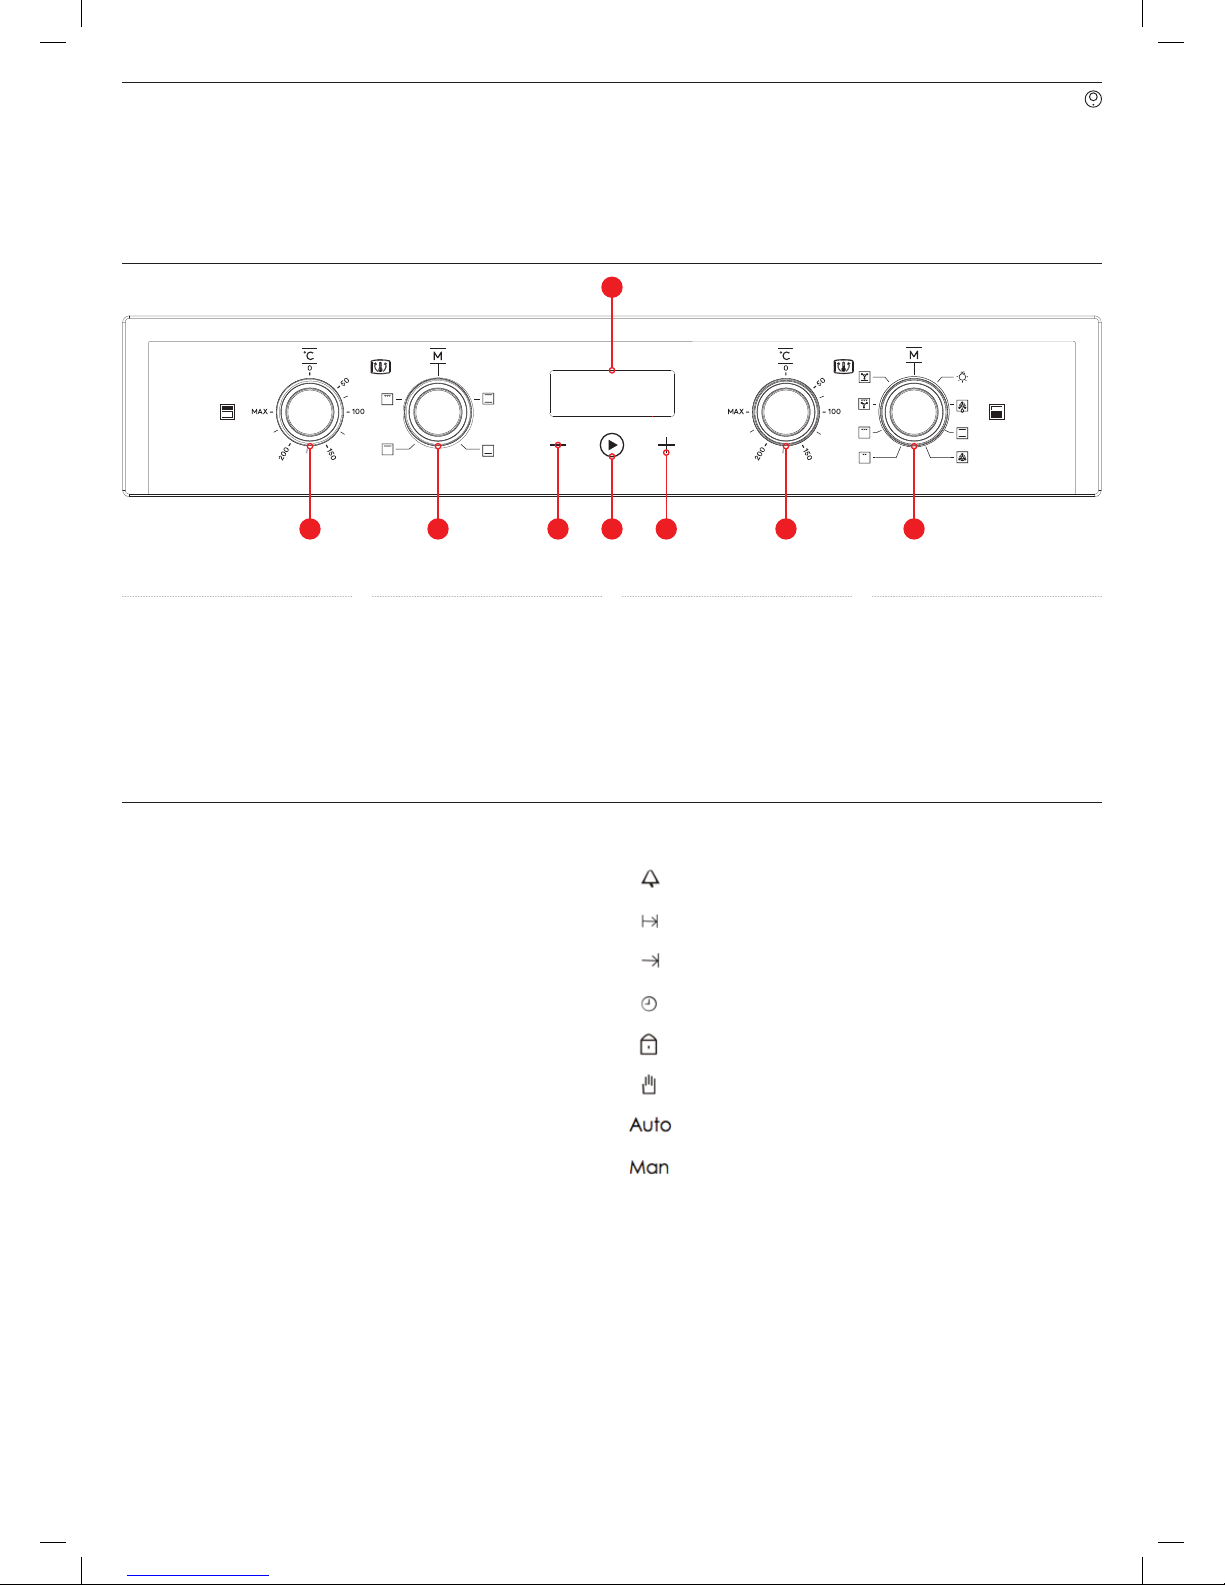
TOP OVEN CONTROLS
1 Temperature Control
2 Cooking Mode Selector
DISPLAY
3 Display
TOUCH CONTROLS
4 Decrease Button
5 Confi rm/Set Button
6 Increase Button
BOTTOM OVEN CONTROLS
6 Temperature Control
7 Cooking Mode Selector
Control Panel Key
Operating Your Oven
1 2 4 5
3
6 7 8
BEFORE THE OVEN’S FIRST USE
¬ Remove all packaging and clean the interior of the oven.
¬ Take out and wash the oven fi ttings with warm soapy water.
¬ Switch on any ventilation within the room (such as a
rangehood), or open any windows.
¬ Heat the oven to a temperature of 250°C for approximately
30–45 minutes.
Note: There may be strong odour during the fi rst use, which
is the burning off of any chemical residues from its
construction. This is normal for all ovens.
Important!
The inside of the oven should only be washed with warm water
and a small amount of washing up liquid.
OVEN FUNCTIONS & OPERATION
Your InAlto Double Oven combines the advantages of
traditional convection ovens with those of modern fan forced
air ventilation ovens.
It is an extremely versatile appliance that allows you to easily
and safely choose between 9 diff erent cooking functions. The
selection of the various functions can be obtained by putting the
programmer into the manual mode or by setting a beginning/end
of cooking program and then by turning the Cooking Mode Selector
(4) and Temperature selector (2) knobs on the control panel.
WARNING!
Baking trays, dishes or aluminium foil must not be placed on the
base of the oven cavity, as heat from the base heating element in
contact with such items can cause damage to the enamel surface.
All pans and trays should only be placed on the chrome shelves
and side oven racks supplied with the oven.
PROGRAMMABLE TIMER
Overview of the functions and symbols
MINUTE MINDER
COOKING DURATION
END OF COOKING TIME
TIME of DAY
CHILD LOCK
COOKING
AUTOMATIC Mode
MANUAL Mode
L1 L2 L3 Audible Tone Volume
Manual Mode
Your oven will remain in Manual mode if you have no COOKING
DURATION or END OF COOKING TIME programmed in your timer.
The symbol “Man” will be displayed on your LED display below
the time.
Automatic Mode
If a COOKING DURATION or a COOKING END TIME is selected,
your oven switches to AUTOMATIC mode and will display the
‘Auto’ symbol. Once the set cooking time expires, the ‘Auto’
symbol will disappear.
Page 10
USER MANUAL
PAGE 10
Operating Your Oven Continued
TOUCH CONTROLS
¬ The programmable timer features 3 touch control buttons;
Left to right: Decrease, Confirm/Set and Increase.
¬ Holding the decrease or increase buttons will change the
time faster.
¬ The centre Confirm/Set button allows you to cycle through
a function sequence (with each press), as outlined below:
► Display TIME OF DAY
► MINUTE MINDER setting
► COOKING DURATION setting
► END OF COOKING TIME setting
► TIME OF DAY setting
► Setting value of ACOUSTIC SIGNAL
Note: 5 seconds after selecting a Program setting, the display
will return to the TIME OF DAY, except in the case of a
MINUTE MINDER being set. In this case it will show the
remaining time for the MINUTE MINDER.
SETTING THE TIME
When your oven is turned on for the first time (or after a power
outage) the time will show 12:00 flashing. Touching any of the
buttons will stop the flashing and 12:00 will be the set time.
You can now set the time by pressing the centre Confirm/Set
button 4 times until you see the TIME OF DAY setting.
The clock icon will be flashing.
¬ Use the Increase and Decrease buttons to adjust the time
(Note: hours are displayed in 24 hour time format).
¬ Use the centre Confirm/Set button to confirm your selections.
SETTING THE AUDIBLE TONE VOLUME
¬ Press the centre Confirm/Set button 5 times until you see the
ACOUSTIC SIGNAL setting.
¬ Use the Increase and Decrease buttons to adjust the volume.
L1 = Low / L2 = Medium / L3 = Loud
¬ Use the centre Confirm/Set button to confirm your selection.
USING THE MINUTE MINDER TIMER
¬ Press the Confirm/Set button and cycle through to the MINUTE
MINDER setting. The bell icon will be flashing.
¬ Use the Increase and Decrease buttons to set your desired
timer upto a maximum of 99 minutes.
¬ The display will show the remaining time for your timer and
begin to countdown. You can alter the timer by using the
Increase and Decrease buttons at any time.
¬ To delete the Minute Minder timer, simply use the Decrease
button to set it to 0:00.
¬ When the timer is complete, an Audible Tone will sound and
the bell icon will flash. To silence this, simply press any key and
the oven will display the current TIME OF DAY.
USING THE COOKING DURATION FUNCTION
¬ Press the Confirm/Set button until the Cooking Duration icon
(page 11) is displayed and flashing.
¬ Now set the cooking duration hours by using the Increase and
Decrease buttons. Note: The maximum time is 23:59 hr:min.
¬ 5 seconds after setting your Cooking Duration, the oven will
change to Auto mode and display the Cooking Pot symbol,
along with the current Time of Day. The Cooking Duration will
count down, despite not displaying the remaining time on your
display.
¬ You can modify your Cooking Duration at any time by
repeating the steps above and altering the set time.
¬ To delete the Cooking Duration timer, simply use the Decrease
button to set it to 0:00.
¬ Once the cooking duration is complete, an Audible Tone will
sound and the Man symbol will flash. Simply press any button
to stop the audible tone. The Man symbol will continue to flash,
however pressing the Confirm/Set button will switch the oven
into Manual Mode.
Note: The audible tone will automatically cut off after seven
minutes, if not cancelled earlier.
USING THE END OF COOKING TIME FUNCTION
¬ Press the Confirm/Set button until the End of Cooking Time
icon (page 11) is displayed and flashing.
¬ Now set the time that you would like the cooking to be
completed by, using the Increase and Decrease buttons.
Note: The latest time that can be set is the current TIME OF
DAY plus 23:59 hr:min.
¬ 5 seconds after setting your End of Cooking Time, the oven
will change to Auto mode and display the Cooking Pot symbol,
along with the current Time of Day.
¬ You can modify your End of Cooking Time at any time by
repeating the steps above and altering the set time.
¬ To delete the End of Cooking Time setting, simply use the
Decrease button to set it to 0:00.
¬ Once the End of Cooking Time is complete, an Audible Tone
will sound and the Man symbol will flash. Simply press any
button to stop the audible tone. The Man symbol will continue
to flash, however pressing the Confirm/Set button will switch
the oven into Manual Mode.
Note: The audible tone will automatically cut off after seven
minutes, if not cancelled earlier.
Page 11
PAGE 11
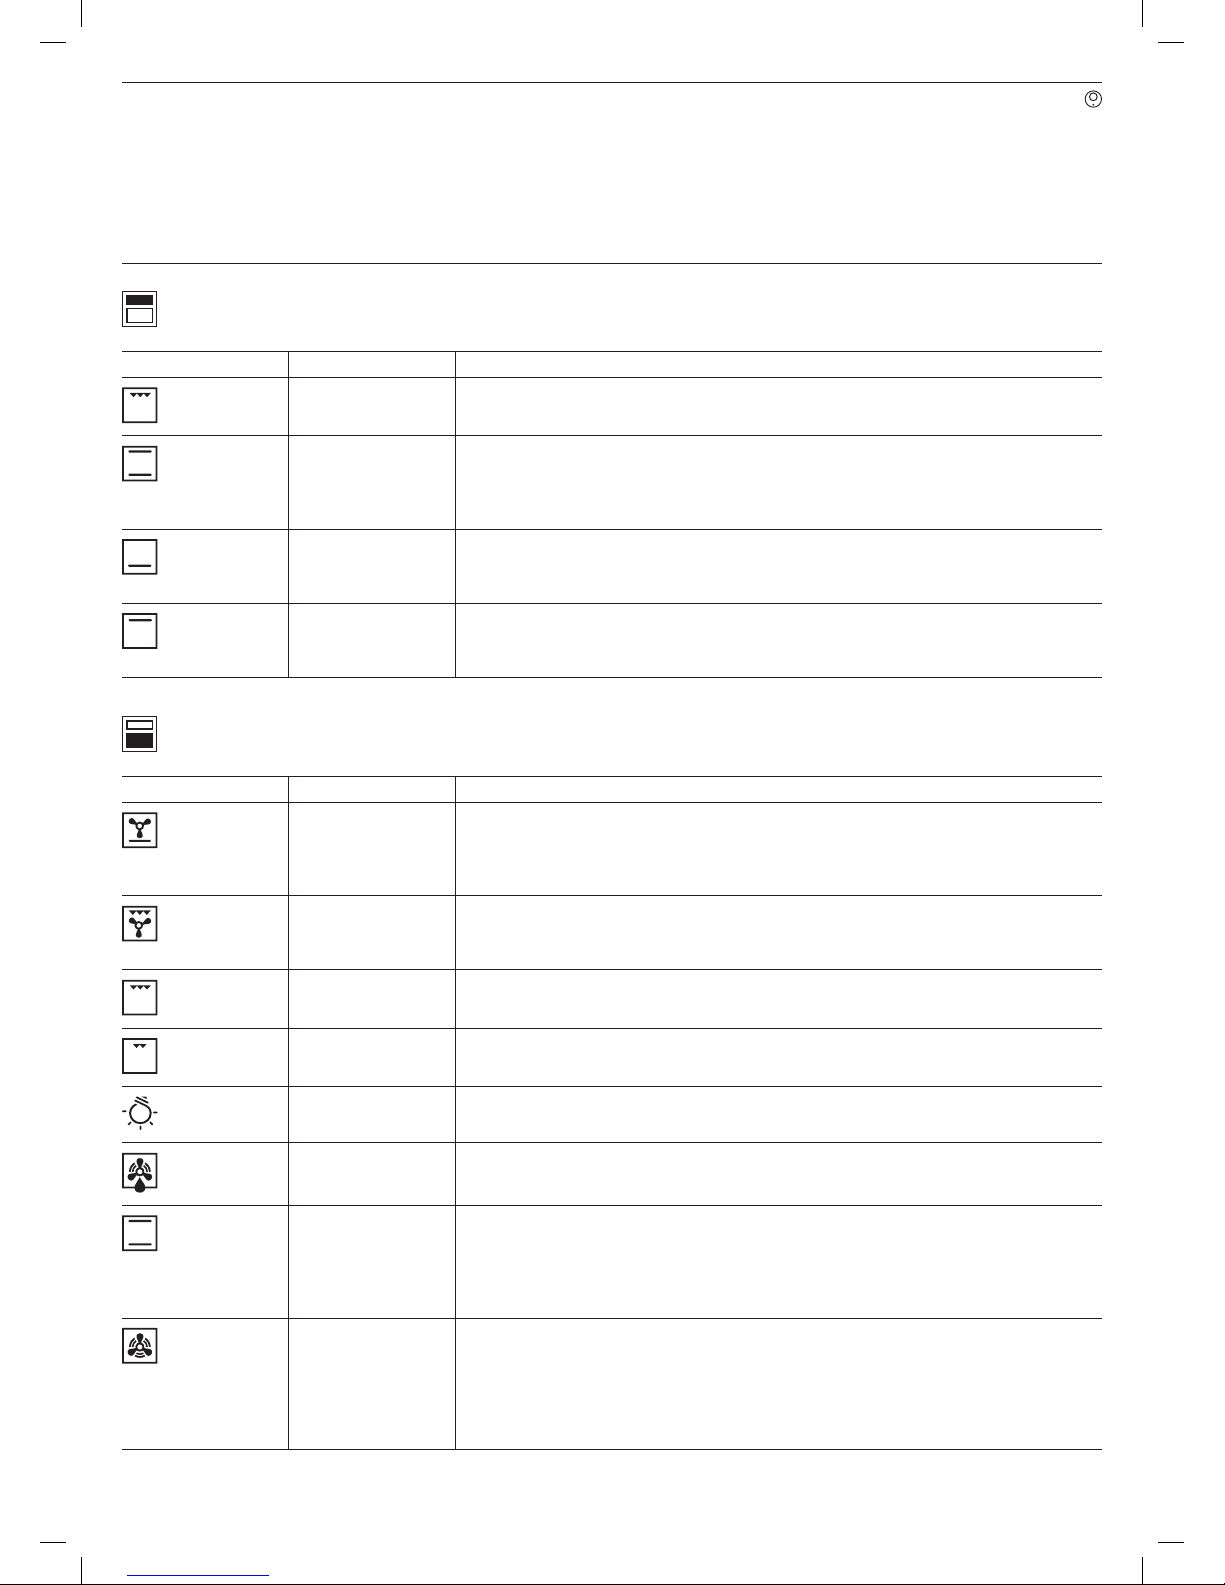
TOP OVEN FUNCTIONS
FUNCTION SYMBOL FUNCTION TYPE FUNCTION DESCRIPTION
Grill Top Heat/Grill Element
For grilling and toasting bread, open sandwiches etc. and browning baked dishes.
Conventional Heat Heat/Grill Element + Bottom Heat Element
For baking and roasting traditional recipes, preparing soufflés and cooking at low
temperatures. If using an older recipe or cookbook, set the oven temperature for
Conventional Heat 10 °C lower than that recommended. This won't change cooking times.
Bottom Heat Bottom Heat Element
Use this function towards the end of cooking to reheat or brown the base of a cake, quiche
or pizza.
Top Heat Top Outside Heating Element
For warming up pre-cooked food when placing on the second shelf from the top, or for
defrosting pastry placing on the first shelf from the bottom.
BOTTOM OVEN FUNCTIONS
FUNCTION SYMBOL FUNCTION TYPE FUNCTION DESCRIPTION
Intensive Bake Ring Heat Element + Fan + Bottom Heat Element
For baking cakes, tarts, pies, quiches and pizzas that require a crisper base or moist
toppings. Intensive Bake is not suitable for baking thin biscuits or for roasting as the juices
will become too dark.
Fan Grill Top Heat/Grill Element + Fan
For grilling thicker cuts of meat (e.g. roulades, chicken). Lower temperatures can be used
than when using the Grill function, as the fan distributes the heat to the food straight away.
Grill Top Heat/Grill Element
For grilling and toasting bread, open sandwiches etc. and browning baked dishes.
Half Grill Centre Top Heat/Grill Element
For grilling and toasting bread, open sandwiches etc. and browning baked dishes.
Oven Light Oven light illuminates cavity
Defrost Fan
For the gentle defrosting of frozen food.
Conventional Heat Heat/Grill Element + Bottom Heat Element
For baking and roasting traditional recipes, preparing soufflés and cooking at low
temperatures.
If using an older recipe or cookbook, set the oven temperature for Conventional Heat 10 °C
lower than that recommended. This won't change cooking times.
Fan Forced Rear Element and Fan
Heat comes from the element surrounding the fan. This fan circulates the hot air around
the oven cavity so that you can put your food in different places in the oven and still cook
them at the same time. You can use the this function for multi-shelf cooking, reheating
cooked foods, pastries and complete oven meals. It will cook at a lower temperature and be
faster than baking. Please note that some variation in browning is normal."
Operating Your Oven Continued
Page 12
USER MANUAL
PAGE 12
CHILD LOCK
To avoid an unwanted selection or tampering, your InAlto
oven features a Child Lock.
To activate the Child Lock whilst cooking in Manual
cooking mode:
¬ Whilst the current TIME of DAY is displayed on screen, press
and hold the Confirm/Set button for a minimum of 5 seconds
until the Child Lock symbol (page 11) is displayed. From this
moment onwards, all other functions are locked.
To activate the Child Lock whilst cooking in Automatic cooking
mode:
¬ Whilst the Time is counting down on screen, press and hold
the Confirm/Set button for a minimum of 5 seconds until the
Child Lock symbol (page 11) is displayed. From this moment
onwards, all other functions are locked.
Note: If a COOKING DURATION or MINUTE MINDER timer
has been set and the audible tone is sounding due to
completion, you can still press any button to terminate
the tone.
To disable your Child Lock:
¬ Press and hold the Confirm/Set button for a minimum of
5 seconds until the Child Lock symbol (page 11) switches off.
From this moment onwards, all other functions are available
for selection again.
IMPORTANT!
Should your oven experience a power outage whilst Child Lock
is engaged, your oven will be in Child Lock when the power
resumes. You will need to deactive Child Lock (as explained
above) before using your oven once again.
Operating Your Oven Continued
Technical Data
Height 888mm
Width 595mm
Depth 546mm
Usable Volume 42 + 60 litres
Model Multifunction oven
Rated Voltage 220–240V
TOP OVEN
Nominal electrical input in W (toll. +5 / -10%)
Top Heating Element 750W
Top Combined Heating Element 1000W
Bottom Heating Element 1050W
Light 15/25W
Maximum Electrical Input 1820W/230V
BOTTOM OVEN
Nominal electrical input in W (toll. +5 / -10%)
Top Heating Element 1000W
Top Combined Heating Element 1900W
Fan Forced heating element 2100W
Bottom Heating Element 1200W
Fan 25W
Light 15/25W
Maximum Electrical Input 2950W/230V
Page 13
PAGE 13
COOKING TABLE FOR TOP OVEN: CONVENTIONAL COOKING
It is recommended to preheat the oven 10 minutes.
DISHES LEVEL TEMPERATURE COOKING TIME
Yorkshire Pudding 1 200°C 30–40 min.
Fatless Sponge Cake 1 180ºC 25–30 min.
Small Cakes 2 190ºC 15–20 min.
Fruit Plate Tart 1 200ºC 40–45 min.
Scones 2 220ºC 10–15 min.
Rich Fruit Cake 1 140ºC 2–3 hours
COOKING TABLE FOR TOP OVEN: WITH GRILL ELEMENT OPERATING
Grilling is carried out with the door closed. Preheat for 5 minutes. Settings from 50 — max (250)°C.
The baking pan and wire grill are used for grilling.
DISHES LEVEL TEMPERATURE COOKING TIME
SIDE 1 SIDE 2
Pork steaks, Chops (4 pcs) 3 225°C 15 min. 10 min.
Grilled Sausages (6 pcs) 3 225°C 6 min. 5 min.
Toast (6 pcs) 3 225°C 1 min. + 25 sec. 1 min. + 10sec.
COOKING TABLE FOR MAIN OVEN: WITH GRILL ELEMENT OPERATING
Grilling is carried out with the door closed. Preheat for 5 minutes. Settings from 50 — max (250)°C.
The baking pan and wire grill are used for grilling.
DISHES LEVEL TEMPERATURE COOKING TIME
SIDE 1 SIDE 2
Pork steaks, Chops (4 pcs) 5 250°C 15 min. 10 min.
Grilled Sausages (6 pcs) 5 250°C 9 min. 5 min.
Toast (6 pcs) 5 250°C 1 min. + 50 sec. 1 min. + 30sec.
Cooking Guides
Page 14
USER MANUAL
PAGE 14
Using the selector switch select the function for the type of
cooking required. Preheat the oven, setting the thermostat to the
required temperature. Once the oven has heated to the selected
temperature, the orange warning light will go out. This same light
will appear again automatically during operation of the oven to
indicate that the heating elements are on.
Remove the drip tray when using the oven for conventional baking
or roasting. The tray should be left in place only when using
the grill, as its purpose is to catch falling droplets of fat. Food
should be placed in oven dishes with raised edges and positioned
centrally under the grill. If fan-forced operation is selected, foods
of different types can be cooked simultaneously (e.g. meat and
fish), although in this case the respective cooking time must be
observed.
If selecting the
position, temperatures must be set 10 to 20°C
lower than indicated in the table.
COOKING TEMPERATURES AND TIMES
DISH TEMP. (ºC)
/
COOKING*
TIME (MIN)
Sweets
Short pastry flan base
Fruit pie/tart
White leavened bread per 1 kg flour
Shortcake biscuits
Savoury biscuits
Lasagne
Meat
(Cooking time based on thickness)
Slow roast
Quick roast
Meat loaf
Poultry
Duck 1.5 -2 kg
Goose 3 kg
Roast chicken
Turkey 5 kg
Game
Hare
Leg of roebuck
Haunch of venison
Vegetable soufflé
Fish
Pizza
Grills
Pork chop
Sausage
Grilled chicken
175 160
200 190
200 190
200 190
200 190
200 190
225 210
175 170
200 190
200 190
200 170
200 180
200 190
175 150
200 180
200 180
175 175
200 180
180 170
210 200
55–65
8–10
25–35
30–50
10–15
15–20
40–50
12–15
12–15
30–40
120–180
150–210
60–90
240 ca.
60–90
90–150
90–180
40–45
40–45
20–25
8–12
10–12
25–35
* Approximate cooking time
ROASTING GUIDE
¬ Frozen meat should be thoroughly thawed before cooking.
For large pieces of frozen meat it is advisable to thaw overnight.
¬ Frozen poultry should be thoroughly thawed before cooking,
the time required depends on the size of the bird e.g. a large
turkey may take up to 48 hours to thaw.
¬ Adjust the shelf position so the meat or poultry will be in the
centre of the oven.
The TIMES given in the ROASTING GUIDE are only approximate
because the size and age of the bird will influence cooking times
as will the shape and the proportion of bone.
COOK IN OVEN FINISH
OF MEAT
COOKING
TIME
Beef
180°C (Fan oven)
200°C (Conventional oven)
Rare 20 minutes
per 450g. (1lb)
Plus 20 minutes
Medium 25 minutes
per 450 g (1 lb)
Plus 20 minutes
Well
Done
30 minutes
per 450 g (1 lb)
Plus 30 minutes
Lamb
180°C (Fan oven)
200°C (Conventional oven)
Medium 25 minutes
per 450 g (1 lb)
Plus 25 minutes
Well
Done
30 minutes
per 450 g (1 lb)
Plus 30 minutes
Pork
180°C (Fan oven)
200°C (Conventional oven)
N/A 35 minutes
per 450 g (1 lb)
Plus 35 minutes
Fowl
180°C (Fan oven)
200°C (Conventional oven)
N/A 20 minutes
per 450 g (1 lb)
Plus 20 minutes
NOTES:
¬ If you are cooking a very large turkey e.g. over 6kg, we
recommend that it is turned around halfway through cooking,
so that both legs will be cooked evenly.
¬ Remove any excess fat from the tin before turning, to prevent
any fat splashing.
¬ When cooking stuffed meat or poultry calculate the cooking
time from the total weight of the meat plus the stuffing.
¬ For meat cooked in foil or covered roasters, and for lidded
casseroles, add 5 minutes per 450g to the calculated cooking
time.
¬ Smaller meats weighing less than 1.25 k.g. may require 5
minutes per 450g. extra cooking time.
Cooking Guides Continued
Page 15
PAGE 15
This appliance is for household use only, it is not for outdoor use!
IMPORTANT
Unplug your oven before cleaning, or performing maintenance!
To extend the life of your oven, it must be cleaned frequently,
keeping in mind that:
¬ Do not uses steam equipment to clean the appliance.
¬ To protect against the risk of electrical shock, do not immerse
the unit, cord or plug in water or other liquid or sprinkle water
to clean the appliance!
¬ Don’t clean the appliance when it still hot! The inside and
external surface of the oven should preferably be cleaned by
damp cloth when it is cooled down.
¬ Wash all accessories in hot sudsy water or in a dishwasher,
wipe dry with a paper or cloth towel.
¬ If you use your oven for an extended period of time,
condensation may form. Dry it using a soft cloth.
¬ There is a rubber seal surrounding the oven opening which
guarantees its perfect functioning. Check the condition of
this seal on a regular basis. If necessary, clean it and avoid
using abrasive products or objects to do so. Should it become
damaged, please contact your nearest After-sales Service
Centre. We recommend you avoid using the oven until it has
been repaired.
¬ Never line the oven bottom with aluminium foil, as the
consequent accumulation of heat could compromise the
cooking and even damage the enamel.
¬ Clear the glass door using damp cloth and dry it with a soft
cloth.
Do not use harsh abrasive cleaners or sharp metal scrapers to
clean the oven door glass since they can scratch the surface, which
may result in shattering of the glass.
REPLACING THE LAMP IN THE OVEN
1. Unplug the appliance or turn off the appliance by isolating
from your power board.
µ This will avoid burns or electrical shock!
2. Unscrew the glass cover attached to the lamp holder.
3. Unscrew the lamp and replace it with another hightemperature lamp (300 ) with the following characteristics:
— Voltage: AC220V-240V
— Wattage: 15W
— Socket: E 14
4. Remount the glass cover and reconnect the appliance to the
power supply.
WARNING
Ensure that the appliance is unplugged before replacing the lamp
to avoid the possibility of electric shock.
WARNING
Do not operate appliance with damaged cord or plug or after
the apliance malfunctions, or has been damaged in any manner,
return appliance to the nearest Authorized Service Center for
exanmination.
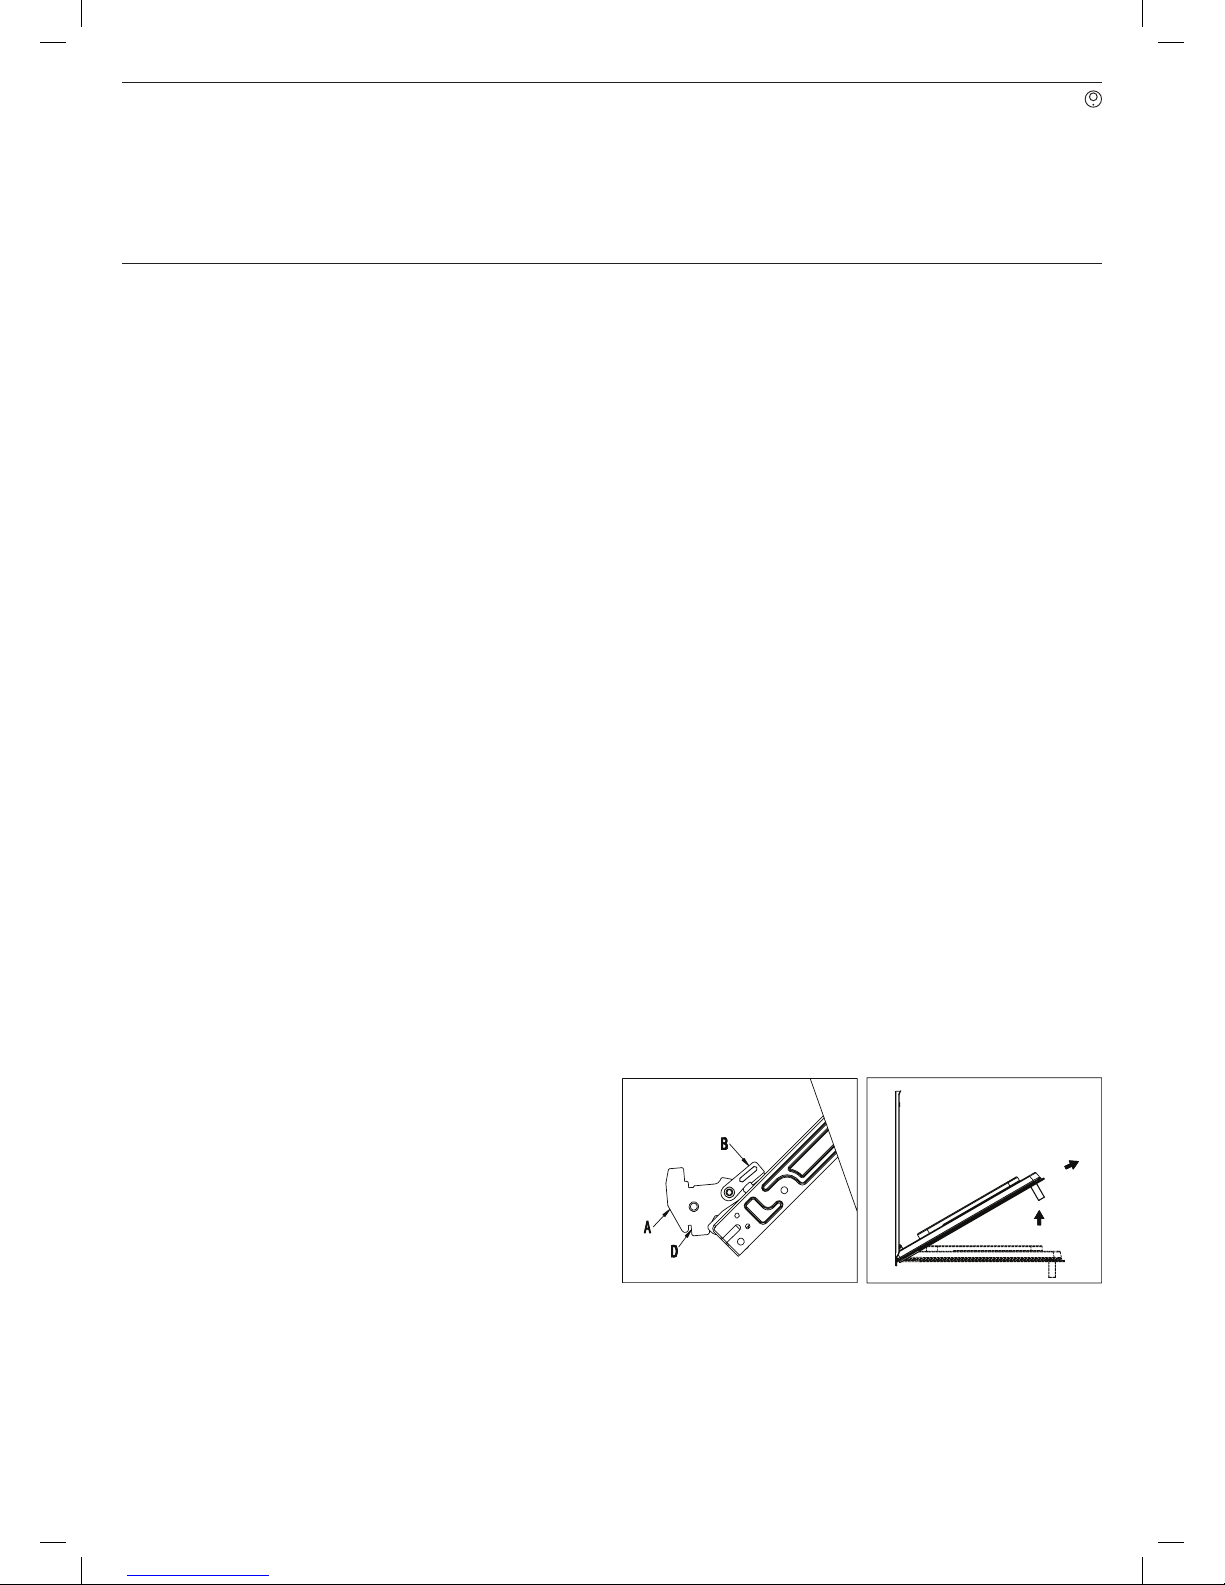
DISASSEMBLING/ASSEMBLING THE OVEN DOOR
To make it easier to clean the inside of your oven, the oven door
can be removed, by proceeding as follows (See illustration below):
¬ Open the door completely and lift the 2 levers “B” (fig.11-1);
¬ Now, shutting the door slightly, you can lift it out by pulling out
the hooks “A” as shown in figure 2.
TO REASSEMBLE THE DOOR:
¬ With the door in a vertical position, insert the two hooks “A”
into the slots;
¬ Ensure that seat “D” is hooked perfectly onto the edge of the
slot (move the oven door backwards and forward slightly);
¬ Keep the oven door open fully, unhook the 2 levers “B”
downwards and then shut the door again.
Maintenance & Cleaning
Page 16
USER MANUAL
PAGE 16
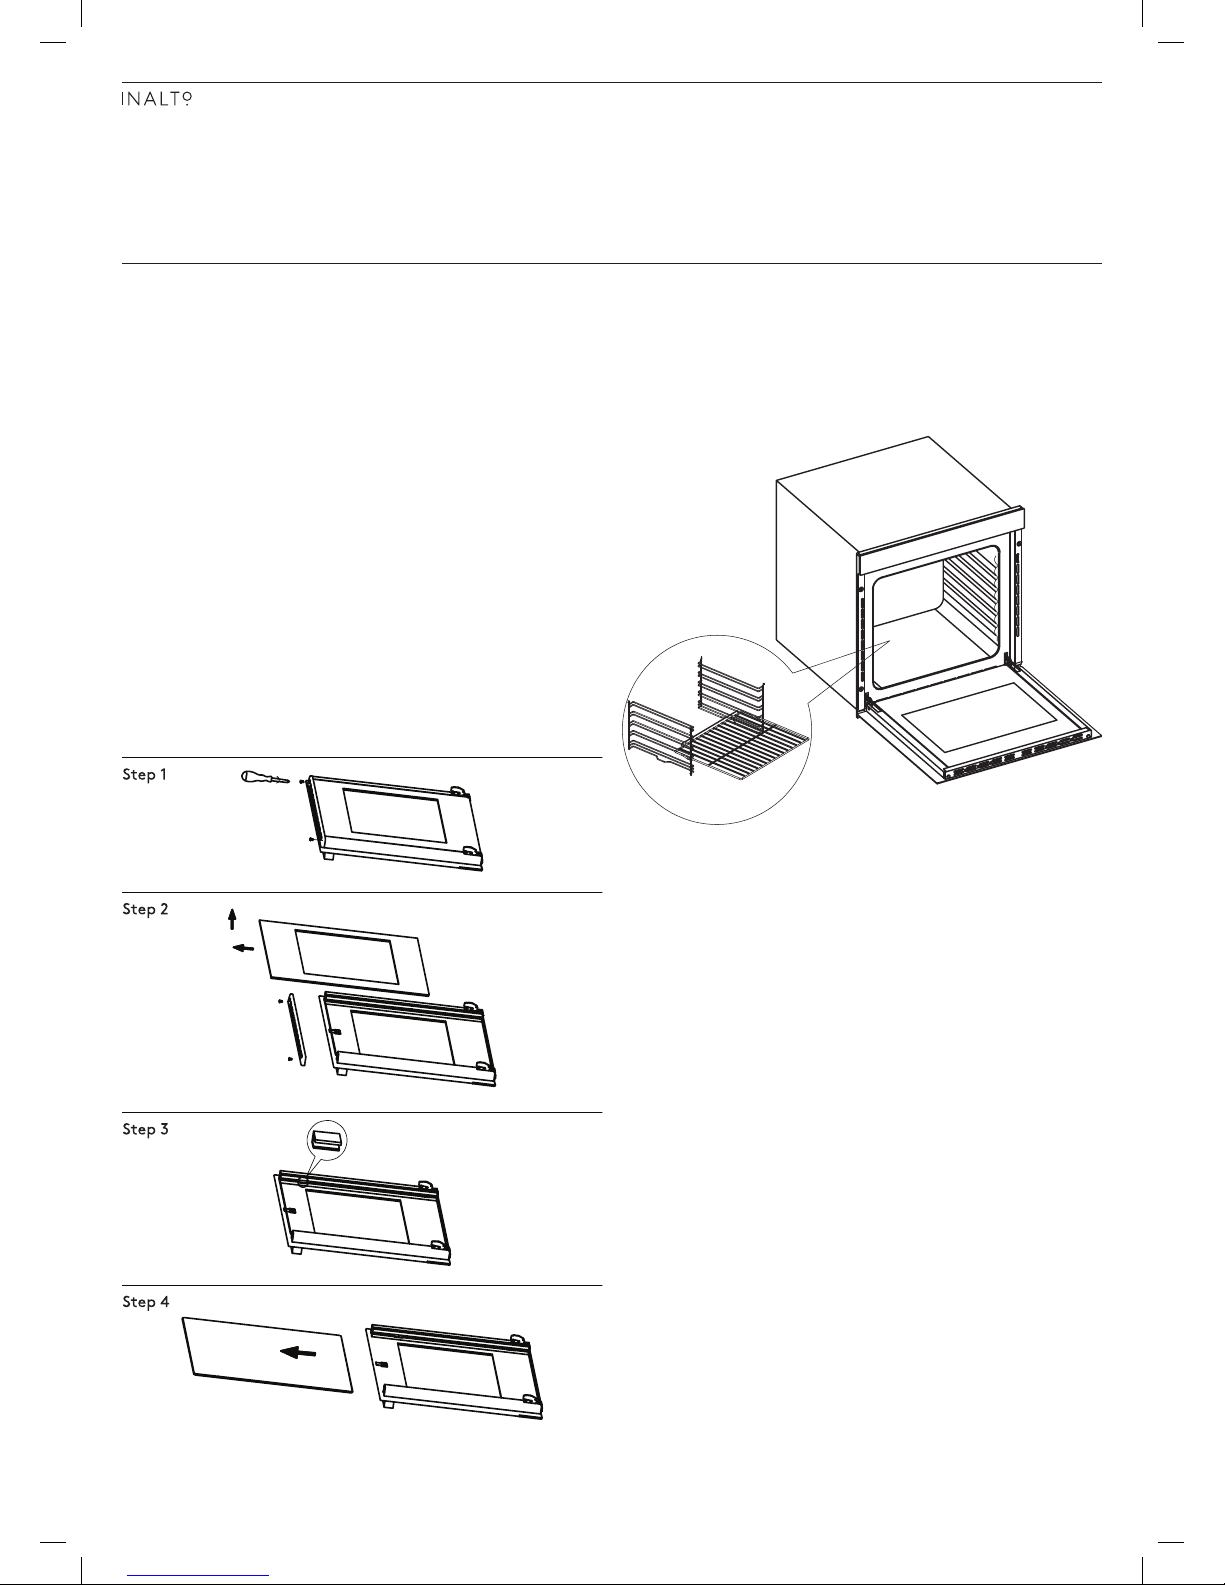
REMOVING THE GLASS DOOR PANES
The oven door is made up of 3 panes of glass and has vents at
the top and bottom. When the oven is operating, air is circulated
through the door to keep the outer pane cool. If condensation has
entered in between the glass panes, the door can be dismantled in
order to clean the glass panes.
Remove the door as per above instruction and place it on a
protective surface (e.g. on a table cloth) to prevent it getting
scratched. The door handle should line up with the edge of the
table.
Make sure the glass lies flat to avoid breakage of glass during
cleaning.
1. Undo the 2 screws on upper bracket.
2. Take out upper bracket and first pane of glass.
3. Loosen the 4 clips.
4. Slide out middle pane of glass carefully. Clean the glass panes
and other parts with a damp microfibre cloth or a clean sponge
and a solution of hot water with a little washing-up liquid. Wipe
dry using a soft cloth.
FITTING OVEN SHELVES
1. Ensure shelf orientation is correct (refer picture to the right)
2. Slide into oven at an angle until raised back of shelf is past the
stop on side runners.
3. Lower front of shelf and push in until stop is reached.
4. To remove oven shelves, withdraw to the stop and raise the
front of shelf to clear the stop.
Maintenance & Cleaning Continued
Page 17
PAGE 17
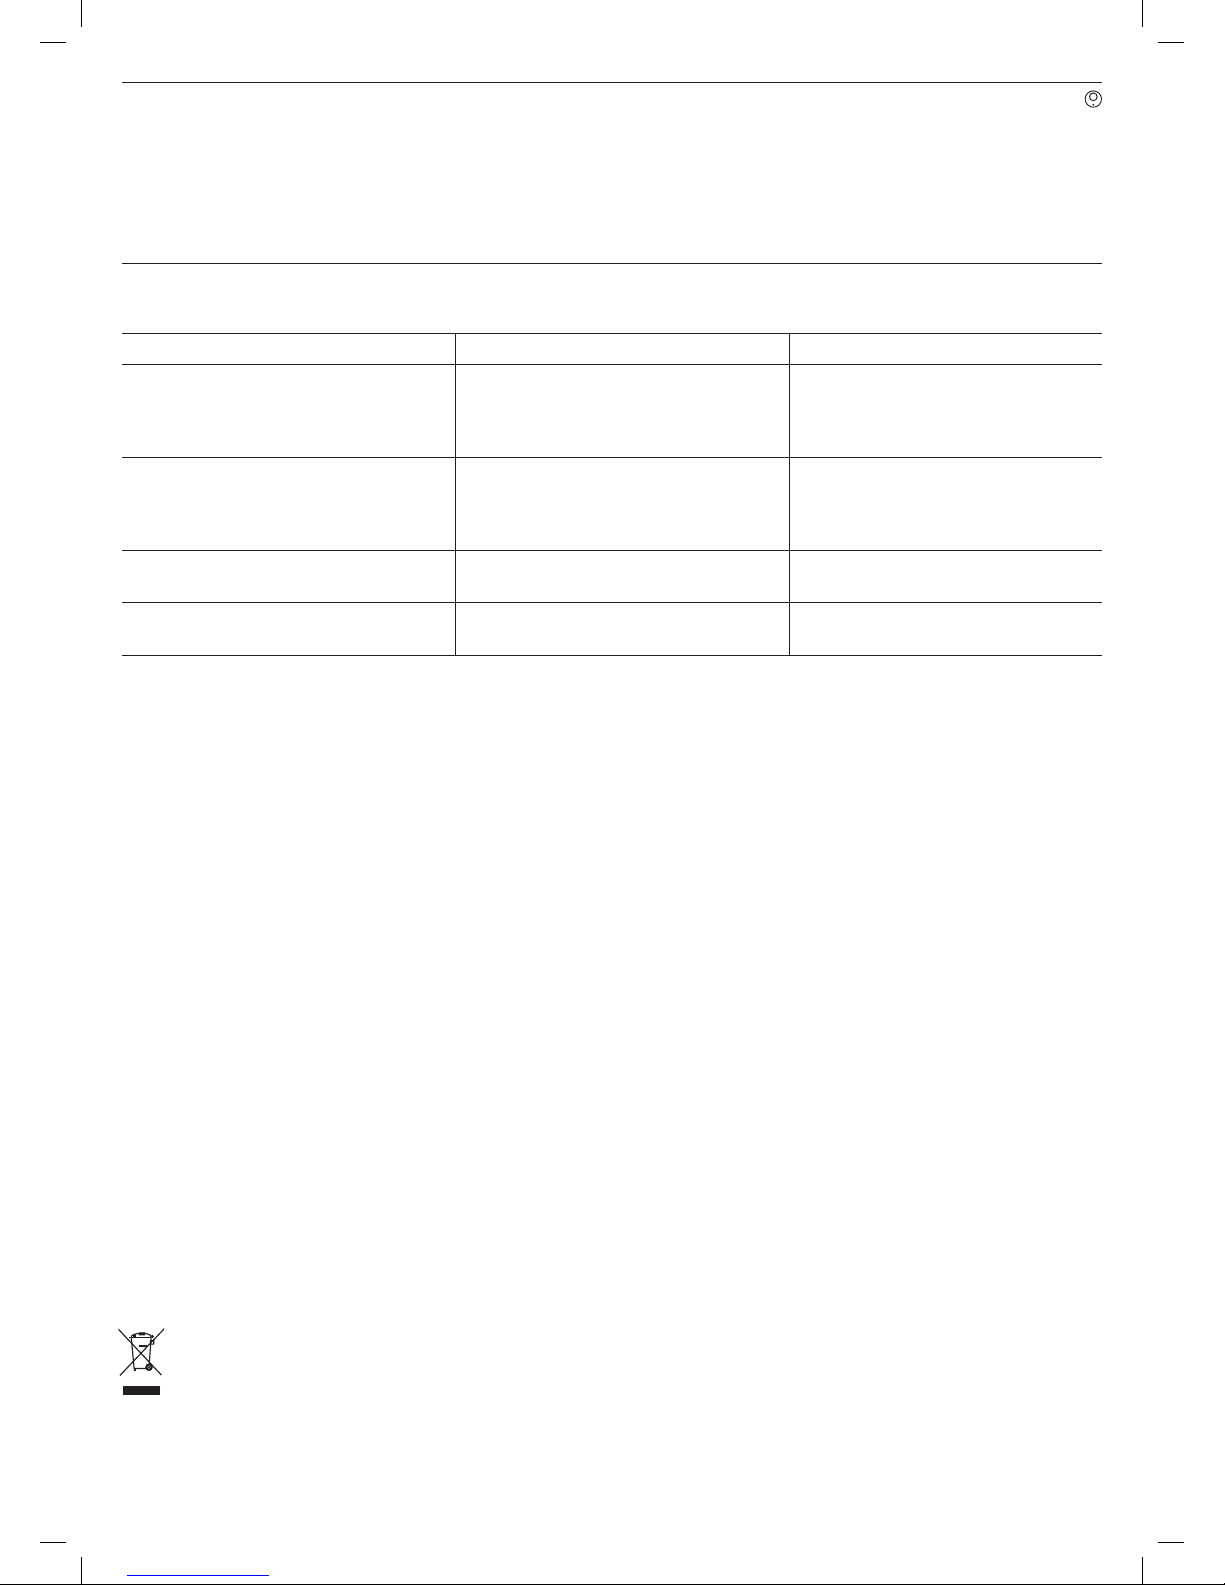
USEFUL NOTES FOR COOKING
In the following table, some indicative hints for cooking:
FAULTS CAUSES REMEDIES
The upper crust is dark and the lower part
too pale
Not enough heat from the bottom • Use the centre convection position
• Use deeper cake tins
• Lower the temperature
• Put the cake on a lower shelf
The lower part is dark and the upper crust
too pale
Excessive heat from the bottom • Use the centre convection position
• Use lower side tins
• Lower the temperature
• Put the cake on a higher shelf
The outside is too cooked and the inside not
cooked enough
Too high temperature • Lower the temperature and increase the
cooking time
The outside is too dry even though of the
right color
Too low temperature • Increase the temperature
and reduce the cooking time
WARNING
During operation, the oven glass door and
adjacent parts of the appliance become
hot. Make sure children do not touch the
appliance.
This appliance is not intended for use by
persons (including children) with reduced
physical, sensory or mental capabilities
or lack of experience and knowledge,
unless they have been given supervision or
instruction concerning use of the appliance
by a person responsible for their safety.
Children should be supervised to ensure
that they do not play with the appliance.
Troubleshooting
This product must not be disposed together with the
domestic waste. This product has to be disposed at
an authorized place for recycling of electrical and
electronic appliances.
By collecting and recycling waste, you help save natural
resources, and make sure the product is disposed in an
environmental friendly and healthy way.
Important: if you decide not to use the oven any more,
it should be made inoperable by cutting the power
supply cable, after unplugging it from the power supply.
Disused appliances can be a safety risk as children often
play with them. For this reason it is advisable to make
the oven safe.
Page 18

USER MANUAL
PAGE 18
WARRANTY TERMS & CONDITIONS
COOKING APPLIANCES
(BUILT-IN OVENS, COOKTOPS)
This document sets out the terms and conditions of the
product warranties for Residentia Group Appliances. It is
an important document. Please keep it with your proof of
purchase documents in a safe place for future reference
should you require service for your Appliance.
1. IN THIS WARRANTY
(a) ‘acceptable quality’ as referred to in clause 10 of this
warranty has the same meaning referred to in the ACL;
(b) ‘ACL’ means Trade Practices Amendment (Australian
Consumer Law) Act (No.2) 2010;
(c) ‘Appliance’ means any Residentia Group product
purchased by you accompanied by this document;
(d) ‘ASR’ means Residentia Group authorised service
representative;
(e) ‘Residentia Group’ means Residentia Group Pty Ltd
of 20 Yaltara Avenue, Bundoora Victoria 3083,
ACN 600 546 656 in respect of Appliances purchased
in Australia;
(f ) ‘major failure’ as referred to in clause 10 of this
warranty has the same meaning referred to in the ACL
and includes a situation when an Appliance cannot
be repaired or it is uneconomic for Residentia Group,
at its discretion, to repair an Appliance during the
Warranty Period;
(g) ‘Warranty Period’ means:
(i) where the Appliance is used for personal,
domestic or household use (i.e. normal
single family use) as set out in the instruction
manual, the Appliance is warranted against
manufacturing defects for 24 months, following
the date of original purchase of the Appliance;
(h) ‘you’ means the purchaser of the Appliance not having
purchased the Appliance for re-sale, and ‘your’ has a
corresponding meaning.
2. This warranty only applies to Appliances purchased
and used in Australia and is in addition to (and does
not exclude, restrict, or modify in any way) any non-
excludable statutory warranties in Australia.
3. During the Warranty Period Residentia Group or its
ASR will, at no extra charge if your Appliance is readily
accessible for service, without special equipment
and subject to these terms and conditions, repair or
replace any parts which it considers to be defective.
Residentia Group or its ASR may use remanufactured
parts to repair your Appliance. You agree that any
replaced Appliances or parts become the property
of Residentia Group. This warranty does not apply
to light globes, batteries, filters or similar perishable
parts.
4. Parts and Appliances not supplied by Residentia Group
are not covered by this warranty.
5. You will bear the cost of transportation, travel and
delivery of the Appliance to and from Residentia
Group or its ASR. If you reside outside of the service
area, you will bear the cost of:
(a) travel of an authorised representative;
(b) transportation and delivery of the Appliance to and
from Residentia Group or its ASR, in all instances,
unless the Appliance is transported by Residentia
Group or its ASR, the Appliance is transported at the
owner’s cost and risk while in transit to and from
Residentia Group or its ASR.
6. Proof of purchase is required before you can make a
claim under this warranty.
7. You may not make a claim under this warranty unless
the defect claimed is due to faulty or defective parts
or workmanship. Residentia Group is not liable in the
following situations (which are not exhaustive):
(a) the Appliance is damaged by:
(i) accident
(ii) misuse or abuse, including failure to properly
maintain or service
(iii) normal wear and tear
(iv) power surges, electrical storm damage or
incorrect power supply
(v) incomplete or improper installation
(vi) incorrect, improper or inappropriate operation
(vii) insect or vermin infestation
(viii) failure to comply with any additional instructions
supplied with the Appliance;
(b) the Appliance is modified without authority from
Residentia Group in writing;
(c) the Appliance’s serial number or warranty seal has
been removed or defaced;
(d) the Appliance was serviced or repaired by anyone
other than Residentia Group, an authorised repairer or
ASR.
8. This warranty, the contract to which it relates and the
relationship between you and Residentia Group are
governed by the law applicable where the Appliance
was purchased.
9. To the extent permitted by law, Residentia Group
excludes all warranties and liabilities (other than as
contained in this document) including liability for any
loss or damage whether direct or indirect arising from
your purchase, use or non use of the Appliance.
Warranty Information
Page 19
PAGE 19
10. For Appliances and services provided by Residentia
Group in Australia, the Appliances come with a
guarantee by Residentia Group that cannot be
excluded under the Australian Consumer Law.
You are entitled to a replacement or refund for a
major failure and for compensation for any other
reasonably foreseeable loss or damage. You are also
entitled to have the Appliance repaired or replaced
if the Appliance fails to be of acceptable quality and
the failure does not amount to a major failure. The
benefits to you given by this warranty are in addition
to your other rights and remedies under a law in
relation to the Appliances or services to which the
warranty relates.
11. At all times during the Warranty Period, Residentia
Group shall, at its discretion, determine whether
repair, replacement or refund will apply if an
Appliance has a valid warranty claim applicable to it.
12. To enquire about claiming under this warranty, please
follow these steps:
(a) carefully check the operating instructions, user
manual and the terms of this warranty;
(b) have the model and serial number of the Appliance
available;
(c) have the proof of purchase (e.g. an invoice) available;
(d) telephone the numbers shown below.
13. You accept that if you make a warranty claim,
Residentia Group and its ASR may exchange
information in relation to you to enable Residentia
Group to meet its obligations under this warranty.
IMPORTANT
Before calling for service, please ensure that the steps in
point 12 have been followed.
Telephone contacts
¬ Service: Please call 1300 11 HELP (4357)
¬ Spare Parts: Please call 1300 11 SPARE (7727)
Warranty Information Continued
RECEIPT
Our goods come with guarantees that cannot be excluded under the Australian Consumer Law.
You are entitled to a replacement or refund for a major failure and for compensation for any other
reasonably foreseeable loss or damage. You are also entitled to have the goods repaired or replaced if
the goods fail to be of acceptable quality and the failure does not amount to a major failure.
The Australian Consumer Law requires the
inclusion of the following statement with
this warranty:
Purchase Details
For your records, please record details of your purchase below and staple your receipt to this page.
STORE DETAILS
STORE NAME
|
ADDRESS
|
TELEPHONE
|
PURCHASE DATE
|
PRODUCT DETAILS
MODEL NO.
|
SERIAL NO.*
|
* Note. Your serial number can be found on the underside of the cooktop.
Page 20
MODEL CODE/S
IDO68S
 Loading...