

Page 1

MODEL CODE/S
ICG6F, ICGW61F, ICGW60S
60cm
Gas Cooktops
—
USER MANUAL INALTO.COM.AU
A HIGHER LEVEL OF COOKING
Page 2
USER MANUAL
PAGE 02
Congratulations on purchasing your new gas cooktop. The InAlto brand is proudly
distributed within Australia by esidentia Group Pty Ltd.
Please refer to the warranty card at the rear of this manual for information regarding
your product’s parts and labour warranty, or visit us online at www. residentia.group
At esidentia Group, we are customer obsessed and our Support Team are there
to ensure you get the most out of your appliance. Should you want to learn more
about recommended cooking temperatures, the various features of your cooktop,
and importantly taking care of your appliance when cleaning, our Support Team
are here to help. You can use our online Support Centre at anytime by visiting
http://support.residentiagroup.com.au, or you can contact us via calling us on
1300 11 HELP (4357).
It is important that you read through the following use and care manual thoroughly to
familiarise yourself with the installation and operation requirements of your appliance
to ensure optimum performance.
Again, thank you for choosing an InAlto appliance and we look forward to being of
service to you.
Kind Regards,
The esidentia Team
Residentia Group
—
Head Office.
118 Campbell Street
Collingwood, VIC
Australia 3066
—
ACN.
600 546 656
—
Online.
residentia.group
Postage.
PO Box 341, Mt Eliza
Victoria Australia 3930
Telephone.
1300 11 4357
Email.
[email protected]
Page 3

02
WELCOME
04
SAFETY
INSTRUCTIONS
06
YOUR INALTO
COOKTOP
08
INSTALLATION
INSTRUCTIONS
14
TECHNICAL
DATA
15
CLEANING &
MAINTENANCE
16
TROUBLESHOOTING
17
PURCHASE
DETAILS
18
WARRANTY
INFORMATION
CONTENTS
Page 4

USER MANUAL
PAGE 04
Your safety is of the utmost importance to us.
Please make sure that you read this instruction
booklet before attempting to install or use the appliance.
If you are unsure of any of the information contained
in this booklet, please contact the Retailer where
you purchased your unit from.
The appliance should only be installed and connected
by a suitably qualified and authorised person, strictly
in accordance with the manufacturer's instructions.
Please see the specific section of this user manual that
refers to installation.
IMPORTANT!
The gas supply to the cooktop must be cut off before
any adjustments or maintenance work is undertaken.
WARNING
When using this product, basic precautions should always
be taken including the following:
► The appliance is designed for domestic household
use and for the cooking and frying of domestic
foodstuffs.
► Care should be taken to ensure that the units and
work surfaces that you build the appliance into,
meet with the relevant standards.
► Do not spray aerosols in the vicinity of this
appliance while it is in operation.
► Do not use or store flammable materials in the
appliance storage drawer or near this appliance.
► Do not modify this appliance.
► Do not use this appliance as a space heater.
IMPORTANT!
The adjacent furniture and all materials used in the
installation must be able to withstand a minimum
temperature of 65°C above the ambient temperature
of the room it is located in, whilst in use.
► Certain types of vinyl or laminate kitchen cabinetry
are particularly prone to heat damage or discolouration
at temperatures above the guidelines given.
► Any damage caused by the cooktop being installed
in contravention of this temperature limit, will be the
liability of the owner.
► Your new cooktop is guaranteed against electrical or
mechanical defects, subject to certain exclusions that
are noted in the Warranty Terms and Conditions (at the
rear of this user manual). The foregoing does not affect
your statutory rights.
► The use of this cooktop for any other purpose or in
any other environment, without the express agreement
of Residentia Group, will invalidate any warranty or
liability claim.
► You should not use this appliance to store items on
or as a work surface.
► No modifications to the appliance are permitted by
Residentia Group.
► You should not store or place flammable or highly
flammable liquids/materials on top of or near the
appliance. Items made from aluminium, plastic
or plastic film should also be kept away from the
appliance, as they may fuse to the surface.
► Repairs may only be carried out by authorised
service agents.
► Your Inalto cooktop is not to be used by children or
persons with reduced physical, sensory or mental
capabilities, or lack of experience and knowledge,
unless they have been given supervision or instruction.
► Any film or stickers that are present on the cooktop
when it is delivered should be removed before use.
► Care should be used when utilising the cooktop,
otherwise there is a risk of burns being caused.
► You should not allow the electrical connection cables
to come into contact with the cooktop surface when
it is hot or any hot cookware.
► If fat and oil overheats, then it can ignite extremely
quickly. For this reason, when cooking with fat and
oil the appliance should not be left unattended.
► Make sure that all of the cooking zones are switched
off after use.
► Cleaning of the cooktop should be carried out on a
regular basis, once the cooktop has cooled down.
► Great care should be taken whilst using this appliance
and when following the cleaning procedure.
► You should not use a steam jet or any other high
pressure cleaning equipment to clean the appliance.
Safety Instructions
Page 5

INALTO.COM.AU
PAGE 05
DECLARATION OF CONFORMITY
This appliance complies with the following
European Directives and Australian Standards:
— 2006/95/CE General regulations / Low tension
— 2009/142/CE Concerning gas appliances
— 1935/2004/CE 90/128/EEC This appliance is suitable
to come in contact with food
— 2004/108/CE Electromagnetic compatibility
— AS4551, AS/NZS 5263.0, AS/NZS 5263.1.1: Domestic gas
cooking appliances
— Low voltage: 73/23
— Safety standards: EN 60335-1, EN30-1-1,
AS/NZS 3350-1,3350-2-6
The manufacturer declares that the cooktop is built using
certified materials and requires the appliance to be installed
in accordance with the standards currently in force. This
cooktop should only be used by a trained person and for
domestic purposes only.
UNPACKING
During transportation, protective packaging was used to
protect the appliance against any damage. After unpacking,
please dispose of all elements of packaging in a way that will
not cause damage to the environment. All materials used for
packaging the appliance are environmentally friendly; they
are 100% recyclable and are marked with the appropriate
symbol.
► During unpacking, the packaging materials (polythene
bags, polystyrene pieces, etc.) should be kept out of
reach of children.
DISPOSAL OF THE APPLIANCE
Old appliances should not simply be disposed of with
normal household waste, but should be delivered to a
collection and recycling centre for electric and electronic
equipment. A symbol shown on the product, the instruction
manual or the packaging shows that it is suitable for
recycling.
Materials used inside the appliance are recyclable and are
labelled with information concerning this. By recycling
materials or other parts from used devices you are
making a significant contribution to the protection of our
environment.
Information on appropriate disposal centres for used
devices can be provided by your local authority.
Page 6
USER MANUAL
PAGE 06
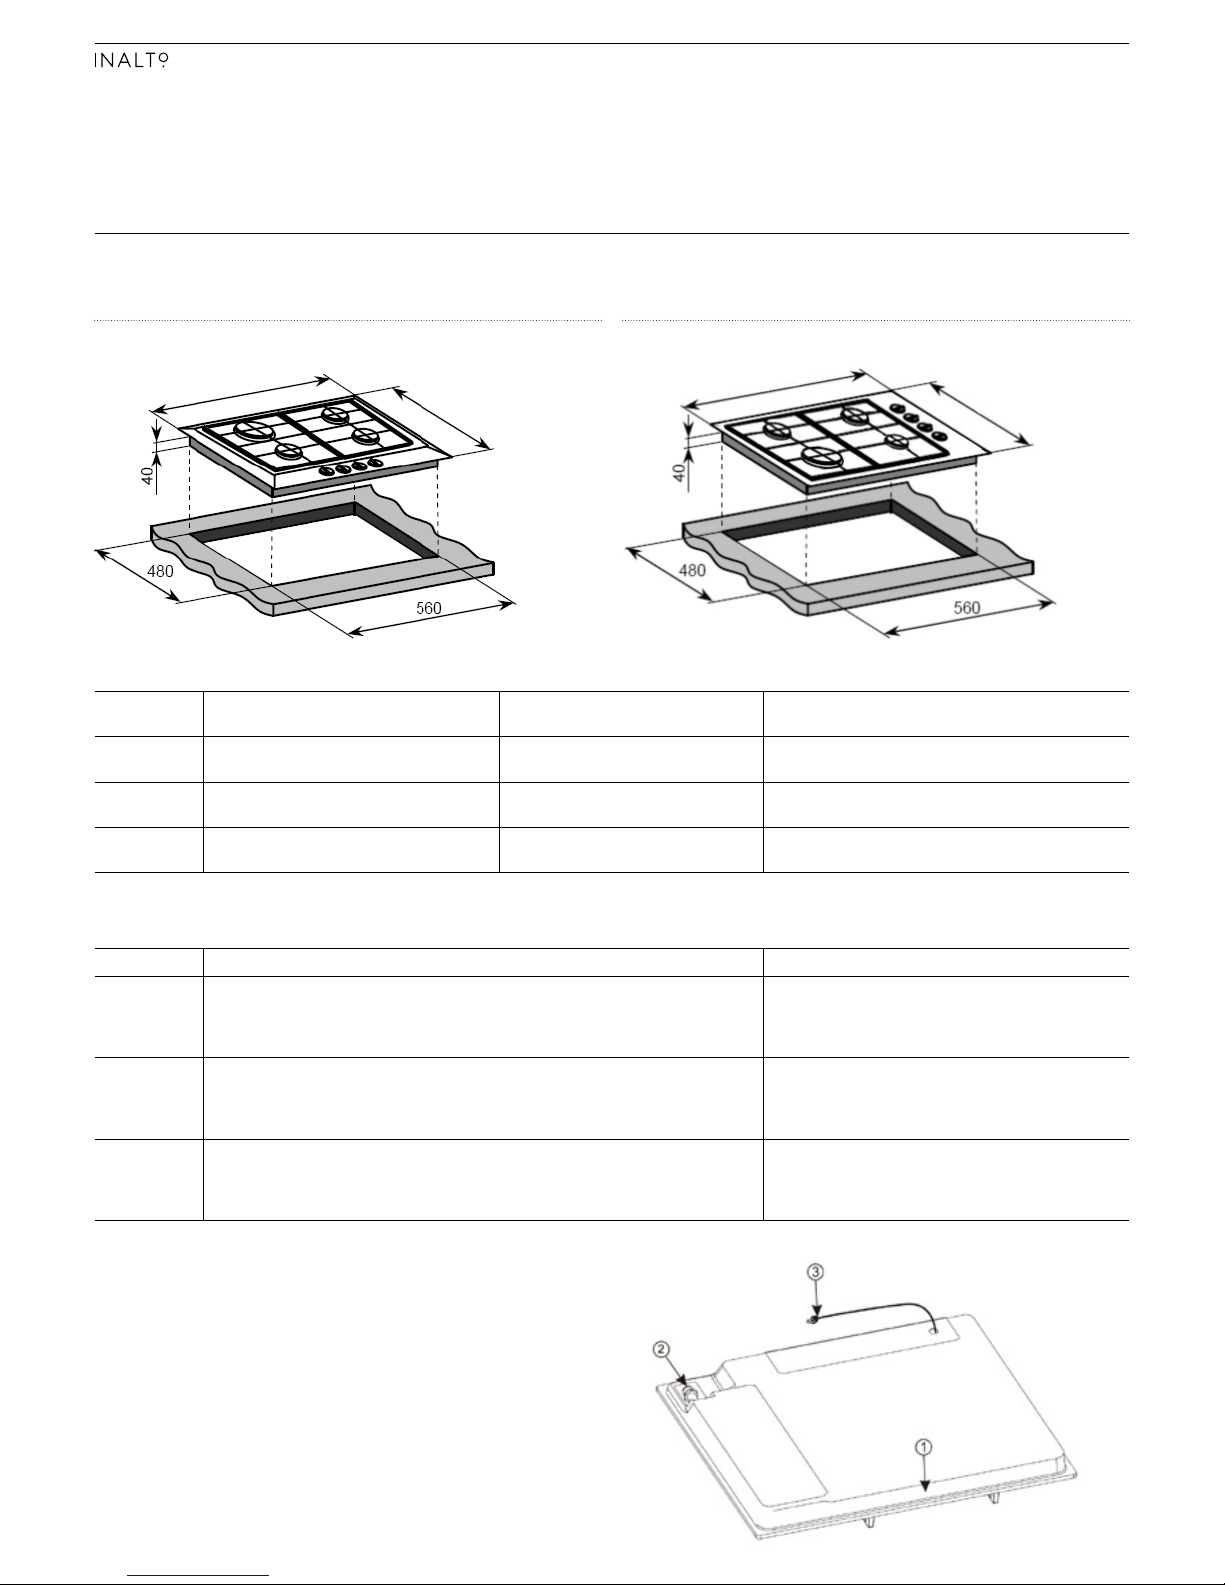
MODEL PRODUCT DIMENSIONS
W×D×H
CUTOUT DIMENSIONS
W×D
CONNECTION POINT LOCATIONS
DIAGRAM ABOVE
ICG6F 600mm, 510mm, 40mm 560mm x 480mm
Gas: XXmm (from left), XXmm (from rear)
Electrical: XXmm (from right), XXmm (from rear)
ICGW61F 580mm, 500mm, 40mm 560mm x 480mm
Gas: XXmm (from left), XXmm (from rear)
Electrical: XXmm (from right), XXmm (from rear)
ICGW60S 580mm, 500mm, 40mm 560mm x 480mm
Gas: XXmm (from left), XXmm (from rear)
Electrical: XXmm (from right), XXmm (from rear)
MODEL BURNERS NG OTHER
ICG6F
1 x 10.8 MJ/h rapid burner
2 x 6.5 MJ/h semi-rapid burners
1 x 3.6 MJ/h auxiliary burner
Front control operation
Automatic ignition
Enamel trivets
Flame failure safety device on each burner
ICGW61F
1 x 14.4 MJ/h triple crown (wok) burner
2 x 6.5 MJ/h semi-rapid burners
1 x 3.6 MJ/h auxiliary burner
Side control operation
Automatic ignition
Heavy duty cast iron pan stands
Flame failure safety device on each burner
ICGW60S
1 x 14.4 MJ/h triple crown (wok) burner
2 x 6.5 MJ/h semi-rapid burners
1 x 3.6 MJ/h auxiliary burner
Front control operation
Automatic ignition
Heavy duty cast iron pan stands
Flame failure safety device on each burner
SPECIFICATIONS
ICG6F ICGW61F, ICGW60S
Your InAlto Cooktop
Connection points diagram (right):
1. Front of cooktop
2. Gas connection point
3. Electrical connection point.
W W
D D
Page 7
INALTO.COM.AU
PAGE 07
COOKTOP COMPONENTS
Your InAlto cooktop is supplied with:
► LPG conversion jets (optional use)
► Regulator
► Sealing strip
CONTROLS
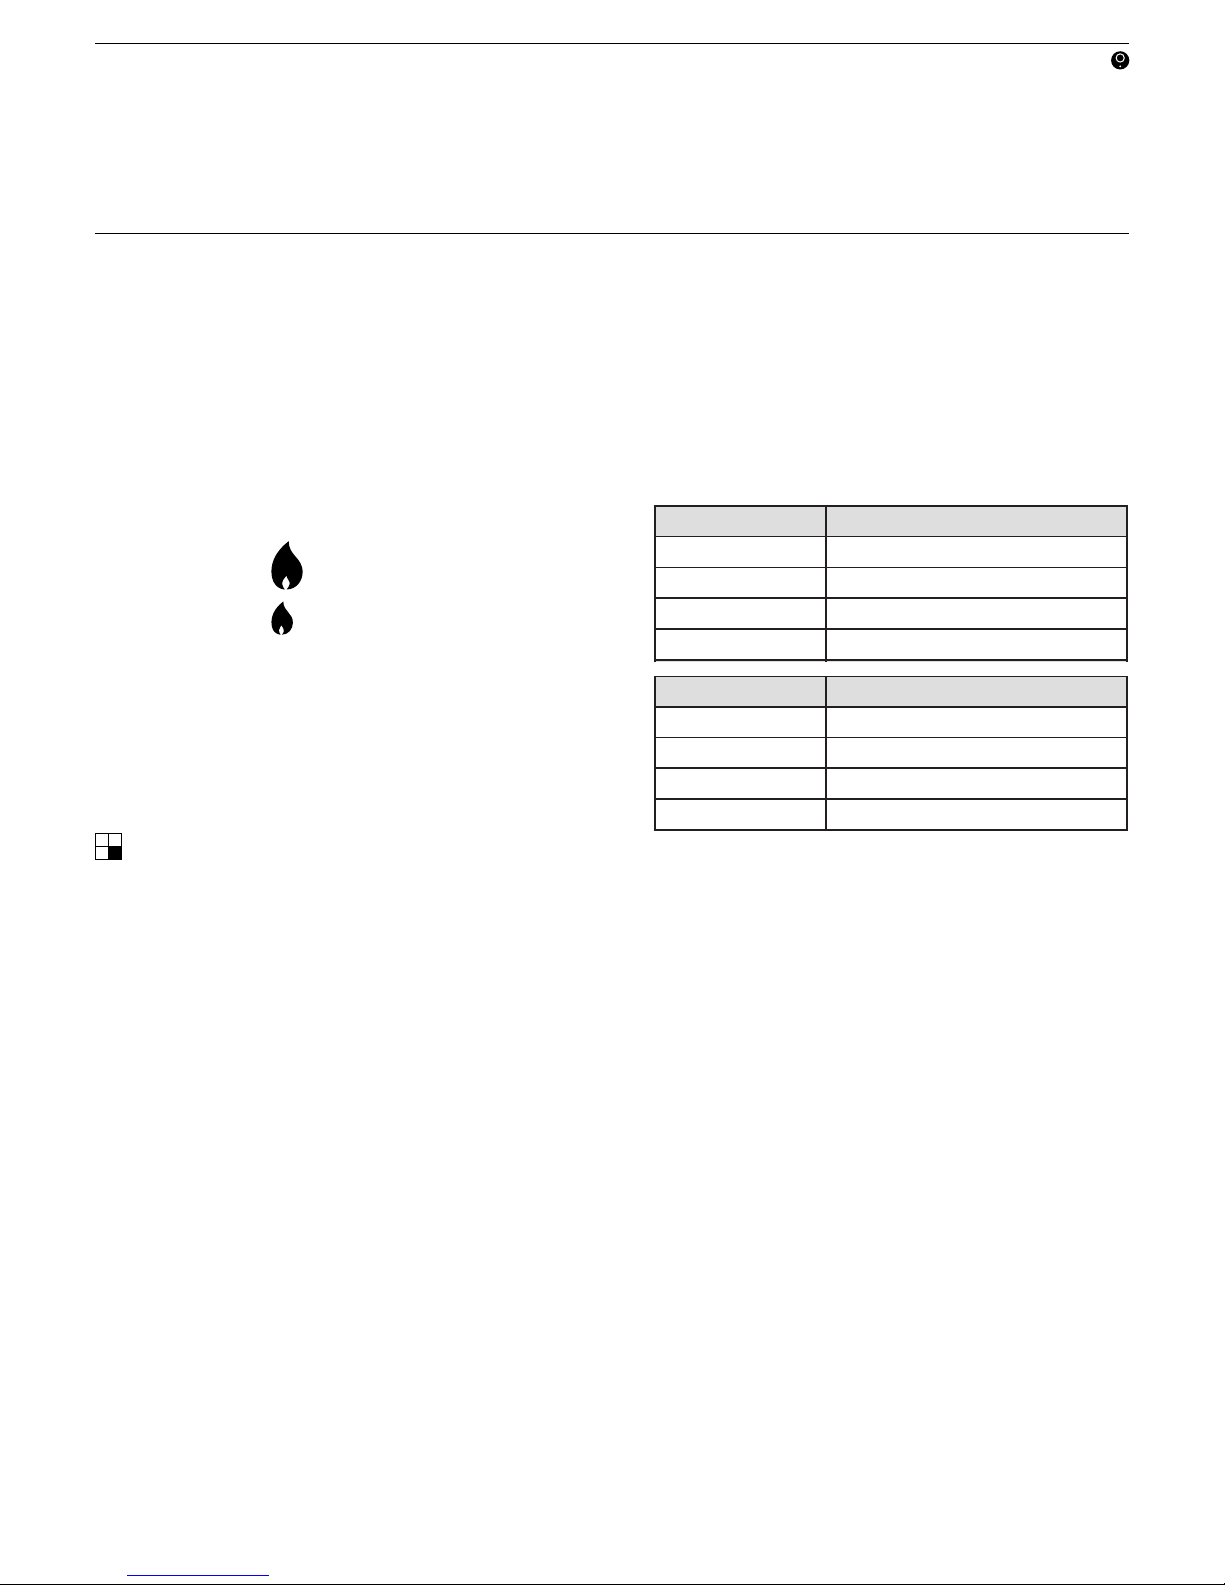
The following symbols will appear on the control panel,
next to each control knob:
¬ Gas off Large flame: maximum setting
Small flame: minimum setting
► The minimum setting is at the end of the anti-clockwise
rotation of the control knob.
► All operation positions must be selected between the
maximum and minimum position.
► Never select a knob position between the maximum
and off position.
Burner indicator
► The symbol above indicates which gas burner the
knob operates.
AUTOMATIC IGNITION WITH
FLAME FAILURE SAFETY DEVICE
Your Inalto cooktop is fitted with a flame failure safety device
on each burner, which is designed to stop the flow of gas to
the burner head in the event of the flame going out.
To ignite a burner:
► Press in the control knob of the burner that you wish
to light and turn it anti-clockwise to the maximum
position.
► If you keep the control knob depressed, the automatic
ignition for the burner will operate.
► You should hold down the control knob for 10 seconds
after the flame on the burner has lit.
► After this 10-second interval, turn the control knob
to your required setting between the maximum and
minimum setting symbols.
► To switch the burner off, turn the control knob fully
clockwise to the gas off position.
► In case of power failure, the burners can be lit by
carefully using a match.
SUITABLE PANS
► Refer to the chart below and ensure that the pan
diameter falls within the minimum and maximum
diameters given for the burner to you using. A pan base
which is too small will be unstable on the pan support.
If the pan diameter is too large, flames can spread out
to the sides and damage or burn the worktop, wall
claddings or surrounding units and also parts of the
cooktop. The manufacturer cannot be held liable for
this type of damage.
▷ Wide, shallow pans are preferable to tall, narrow ones.
They will heat up faster.
▷ Select pans which are suitable for the burner they are
to be used on. In general: use larger diameter pans on
the large burners, and smaller diameter pans on the
small burners.
▷ Pans with thick bases are preferable as these distribute
heat more evenly. With thin bases, there is a danger of
food overheating in places. Stir the food frequently.
▷ Any heat-resistant pans can be used on a gas burner.
▷ Always place the pan on the pan support supplied with
the cooktop. Do not place a pan directly on top of the
burner.
▷ Remember when purchasing new pans that
manufacturers usually refer to the diameter at the top
of the pan in their documentation.
▷ Use a lid whenever possible to minimise heat loss.
▷ When using a wok make sure that the base does
not touch the burner. A distance of 1 cm should be
maintained between the burner and the base of the
wok pan above it.
WARNING
Place pots and pans flat on the cooktop trivets to ensure they
do not tip over. Slight tilting cannot always be avoided.
BurnerMin.panbasediameterincm
Smallburner
10
Mediumburner
12
Largeburner
14
Wokburner
14
BurnerMin.panbasediameterincm
Smallburner
10
Mediumburner
12
Largeburner
14
Wokburner
14
Max.diameterattopofpanincm
Smallburner
22
Mediumburner
22
Largeburner
24
Wokburner
24
Page 8
USER MANUAL
PAGE 08
INSTALLATION INSTRUCTIONS
It’s important to carefully read the following
installation instructions before beginning the installation
of your cooktop.
IMPORTANT!
The installation must be carried out by a suitably qualified
and authorised person, in accordance with the current
version of the following:
► AS/NZS5601.1 Gas Installations: current edition
► NZS 5261: Code of Practice for the Installation of Gas
Burning Appliances and Equipment (New Zealand)
► Local gas fitting regulations
► AS/NZS 3000: Electrical Installations (Wiring Rules)
► Building codes
► Installation Instructions
POSITIONING
The adjacent cabinetry and wall materials must be able
to withstand a minimum temperature rise of 65° C above
the ambient temperature of the room.
► This appliance has been designed for use within
a kitchen.
IMPORTANT!
The cooktop must not be installed in a bathroom or
shower room.
This appliance is classified as Class 3 and therefore is to
be built into a kitchen unit (depending on size) or 600mm
deep worktop, providing the minimum distances in the
following list are allowed.
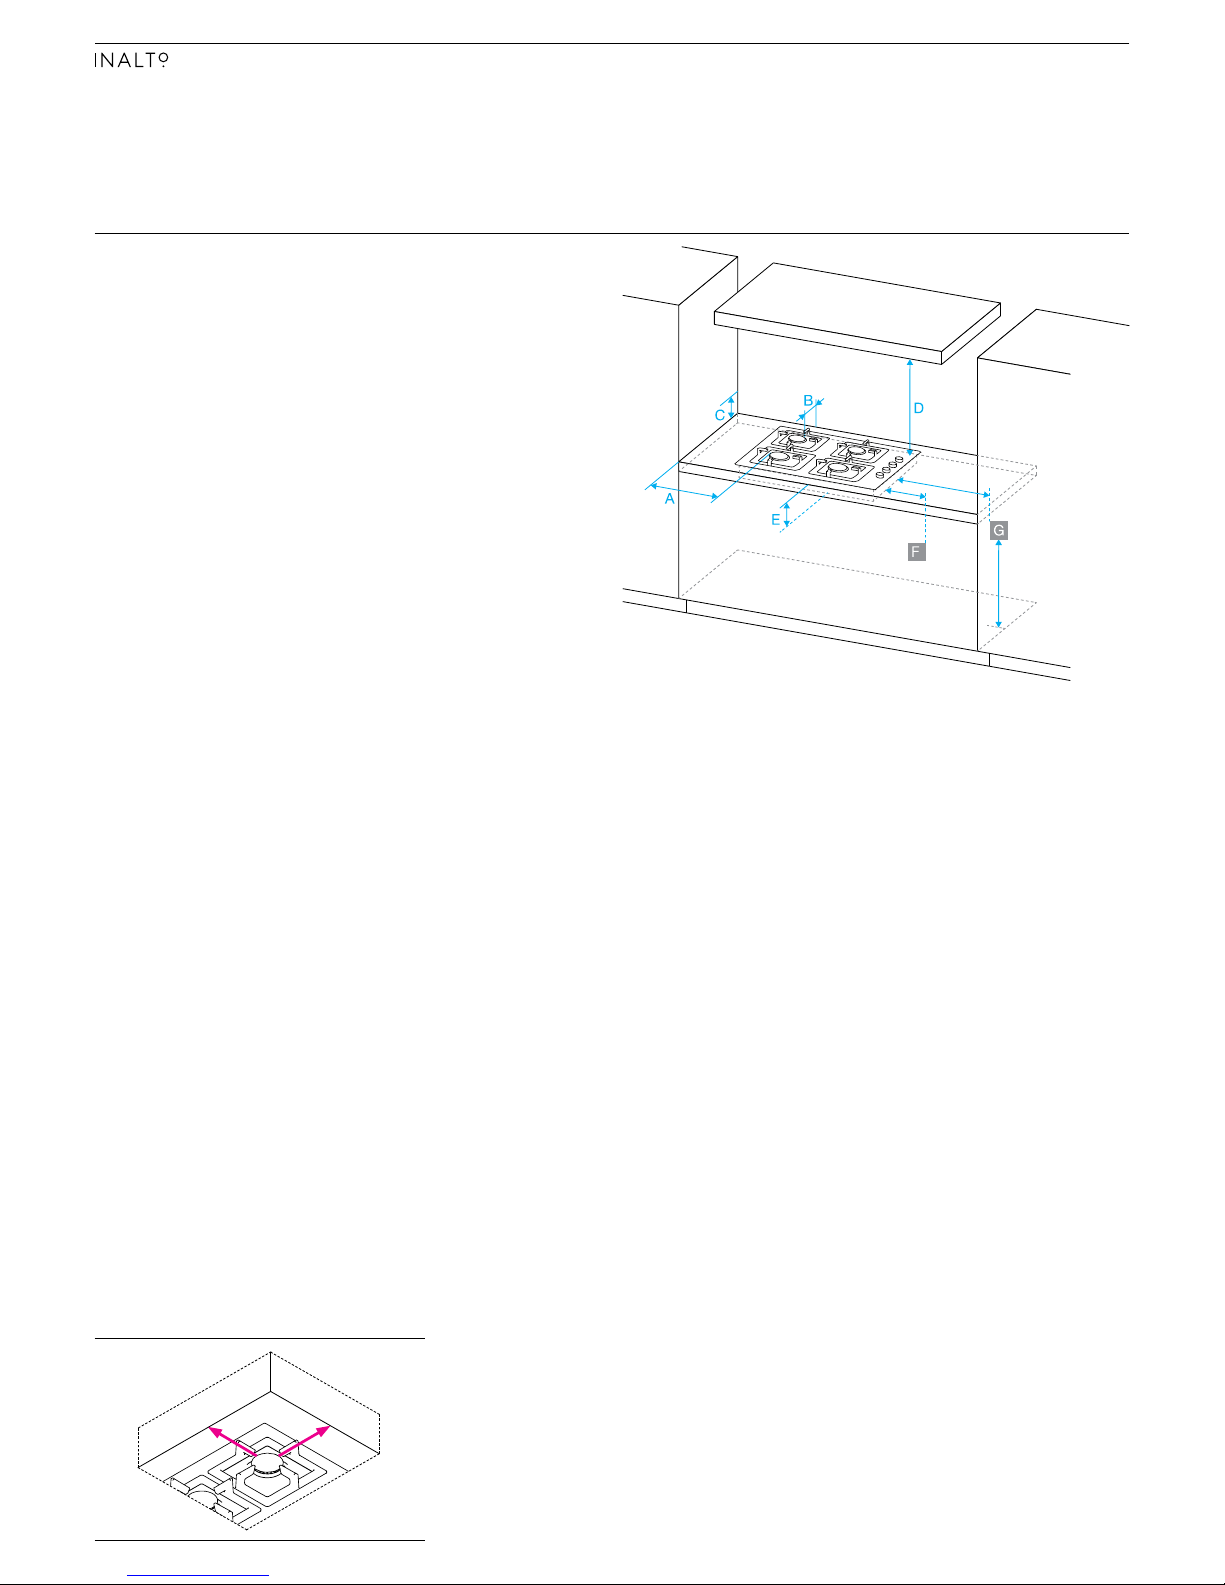
A Minimum distance from the edge of the closest
burner (left and/or right side) to the nearest vertical
combustible surface: 200mm*
B Minimum distance from the edge of the closest rear
burner to the combustible vertical surface: 200mm*
C Minimum height of noncombustible material when
used on adjacent walls: 200mm
D Minimum clearance from top of highest burner cap
to rangehood: 600mm**
E Minimum clearance below top of bench top to nearest
combustible surface: 70mm
F Ensure there is an earthed power outlet within 900mm
of the rear right-hand corner of the cooktop. The outlet
should be accessible with the cooktop installed.
G If connecting the cooktop to the gas supply with a
flexible hose, the connector on the wall should be
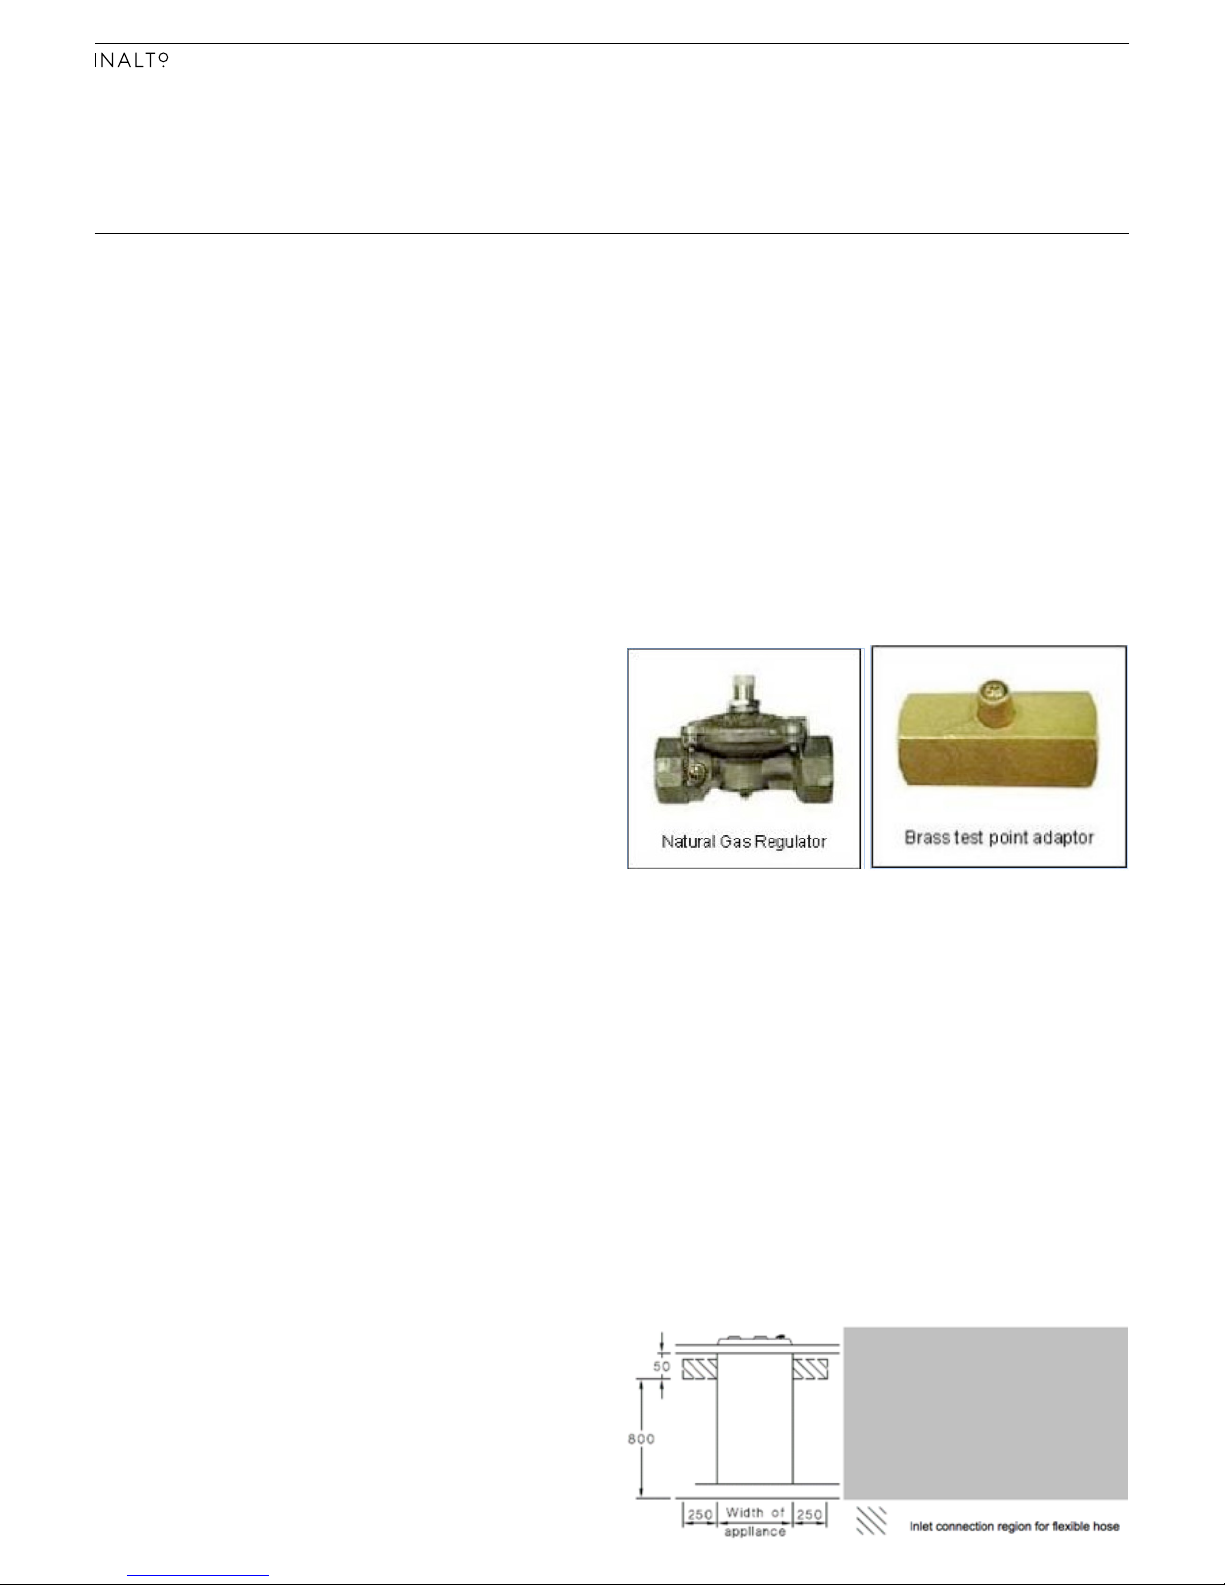
between 800–850mm above the floor and to a distance
of at least 250mm outside the width of the cooktop.
The connector should be accessible with the cooktop
installed.
* Where the clearance is less than 200mm the surface
must be protected by a non-combustible material
(I.e. ceramic tiles) for a minimum height of 200mm
(see Fig. 1).
** For any flammable objects (I.e. utensil rails, wall
cabinets, shelves, etc.) a minimum clearance of at least
600mm above the burner cap must be maintained
between them and the cooktop below.
Installation Instructions
FIG. 1
Page 9
INALTO.COM.AU
PAGE 09
INSTALLING THE COOKTOP
Cut a hole in your benchtop that corresponds with the
relevant cut-out size for your Inalto Cooktop model. Refer to
the “Your Inalto Cooktop” section of this user manual.
IMPORTANT!
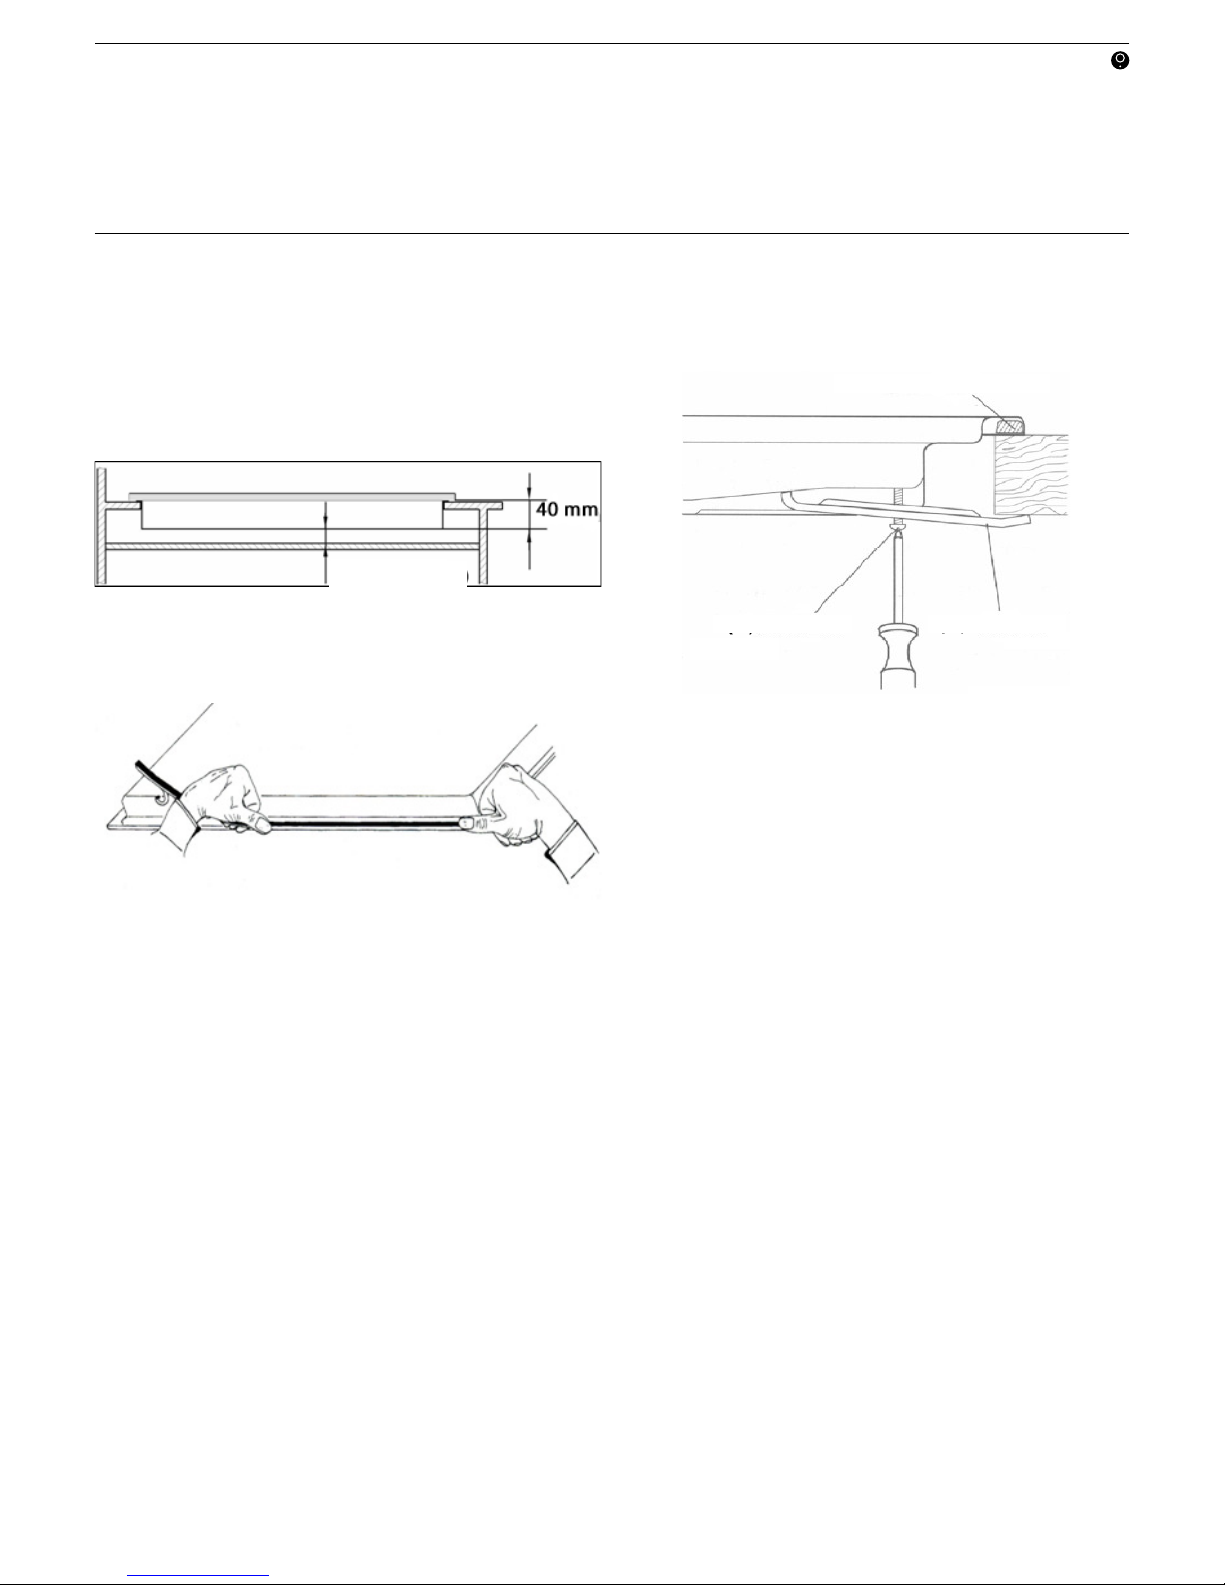
You must have a gap of at least 30mm between the
underside of the cooktop and any surface below.
30mm Min.
► Carefully turn the cooktop upside down and place it on
a cushioned mat.
► Apply the sealing strip provided, around the edge of the
appliance, and remove the protective covering.
Note: It’s important not to leave a gap in the sealing
strip, whilst at the same time ensuring that no sections
overlap.
IMPORTANT!
Don’t use a silicone sealant to seal the appliance against the
benchtop. This will make it difficult to remove the cooktop
in the future should it require servicing.
► With the cooktop still upside down, place the clamps
supplied over the holes that match the size of the
screws. There are a set of screw holes in each corner
of the cooktop. Slightly tighten each screw through the
clamp, so that the clamp is attached to the cooktop, but
loose enough that you can still adjust it’s position.
► Now carefully turn the cooktop back over and gently
lower it into the cut-out.
► On the underside of the cooktop, adjust the clamps into
a position that is suitable to secure it to your benchtop.
Now you can fully tighten the screws to secure the
cooktop into position.
A SEALING STRIP
B CLAMPC SCREW
IMPORTANT!
This appliance must be installed by a licenced and
authorised person and in compliance with the current
standards.
IMPORTANT!
This hob is supplied to run on natural gas only and cannot
be used on any other type of gas without modification.
Refer to the LPG conversion section within this manual.
► A regulator is required and supplied with the Cooktop
for natural gas.
► Conversion for use on LPG and other gases must only
be undertaken by a qualified and authorised person.
For information on the use of other gases, please
contact the Customer Care department. Test point
adaptor is required for LPG.
► The hob must be installed by a qualified and authorised
person, in accordance with the current edition of the
AS/NZS5601.1 Gas Installations.
► Failure to install the appliance correctly could
invalidate guarantee and lead to prosecution under the
regulations quoted above.
Page 10
USER MANUAL
PAGE 10
VENTILATION REQUIREMENTS
► The room containing the hob should have an air supply
in accordance with AS/NZS5601.1 Gas Installations.
► The room must have opening windows or equivalent;
some rooms may also require a permanent vent.
► It will require an air vent of 300 mm² per MJ/h (effective
area) to outside, or 600 mm² per MJ/h (effective area) to
adjacent room. (See total gas consumption in MJ/h on
the appliance rating plate).
► If there are any other fuel burning appliances in
the same room the standardAS/NZS5601.1 Gas
Installations: should be consulted to determine air vent
requirements.
► Ensure that the room containing the hob is well
ventilated, keep natural ventilation holes or install
a mechanical ventilation device (mechanical cooker
hood).
► Prolonged intensive use of the appliance may call
for additional ventilation, either by the opening of a
window, or by increasing the level of the mechanical
ventilation device (where present).
► This hob is not fitted with a device for discharging the
products of combustion. Ensure that the ventilation
rules and regulations are followed.
► The walls behind and near the hob should be resistant
to heat, steam and condensation.
GAS CONNECTION
Install in accordance with relevant gas standards and/or
codes of practice applicable.
Connect the elbow fitting to the appliance gas manifold
connection, and check that seals between the elbow and
manifold connection are in place and in good condition.
► For Natural gas: connect the natural gas appliance
regulator (pictured below) with integral test point using
approved gas thread tape or compound to the elbow
fitting.
► For Universal LPG: connect the brass test point adaptor
(pictured below) using approved gas thread tape or
compound to the elbow fitting.
Ensure the supply connection point, test point and natural
gas regulator adjustment screw (for Natural gas installation)
are accessible for testing and/or adjustment with the
hotplate in the installed position.
Where a flexible hose assembly is used, ensure it is
approved to AS/NZS 1869, Class B or D and the maximum
length is 1.5m. Any hose assembly used must be restrained
from accidental contact with the flue outlet of an under
bench oven. This hose assembly shall be suitable for
connection to a fixed consumer piping outlet located as
follows:
► Hotplates at a point 800 mm to 850 mm above the floor
and in the region outside the width of the appliance to a
distance of 250 mm.
Page 11

PAGE 11
INALTO.COM.AU
► After connecting to gas, check for leaks using soapy
solution, never a naked flame.
► Gas pressure may be checked by test point located on
regulator or LPG test point adaptor. Adjust regulator
to the required pressure as shown on data plate, check
burner ignition & and the flame is burning correctly.
► If, after installation and checking the appliance
operation, the hotplate is not working correctly,
contact the Residentia Support team on 1300 11 4357 for
assistance.
► Fit the duplicate data plate (supplied in separate bag)
on a surface adjacent to the hotplate, for example, the
inside of the cupboard door so it is clearly visible for
any service technician.
CHECKING THE GAS SUPPLY
1 Check the manometer zero point is correct.
2 Connect the manometer to the cooktop pressure point
(located on the regulator).
3 Turn on the gas supply and electricity and try to ignite
the gas burner.
Note: It will take additional time to light the gas for the
first time as air needs to be purged from the pipes.
4 With the appliance operating check the outlet pressure
► When all burners of the appliance are operating at
maximum,
► When the smallest burner of the appliance is
operating at minimum.
▷ Under these conditions the outlet pressure
should not vary from the nominal outlet
pressure of 1.00kPa by more than ±0.20kPa.
If the regulator appears to not be performing satisfactorily,
then check the following points:
1. If the outlet pressure is consistently too low then the
inlet pressure may be too low and adjustment of an
upstream regulator may be needed, or an upstream
regulator or valve with insufficient flow capacity may be
present in the gas supply line. If this is suspected then it
may be necessary to repeat the checks whilst measuring
both the inlet and outlet pressure to determine if the
inlet pressure is in the range 1.13 – 5kPa.
2. Check that the regulator has been fitted to the gas
supply line in the correct orientation, the arrow on the
base of the body indicates the direction of gas flow.
Once these checks have been completed, if the
regulator still fails to perform in a satisfactory manner
it should be replaced. Please contact the Residentia
Support Team on 1300 11 4357.
Page 12
USER MANUAL
PAGE 12
GAS ADJUSTMENT (CONVERSION TO LPG)
IMPORTANT!
e conversion work must be carried out by a registered
gas tter and in accordance with the current standards.
WARNING
Always isolate the cooktop from the electricity supply
before changing the injectors and/or adjusting the
minimum ow of the burners.
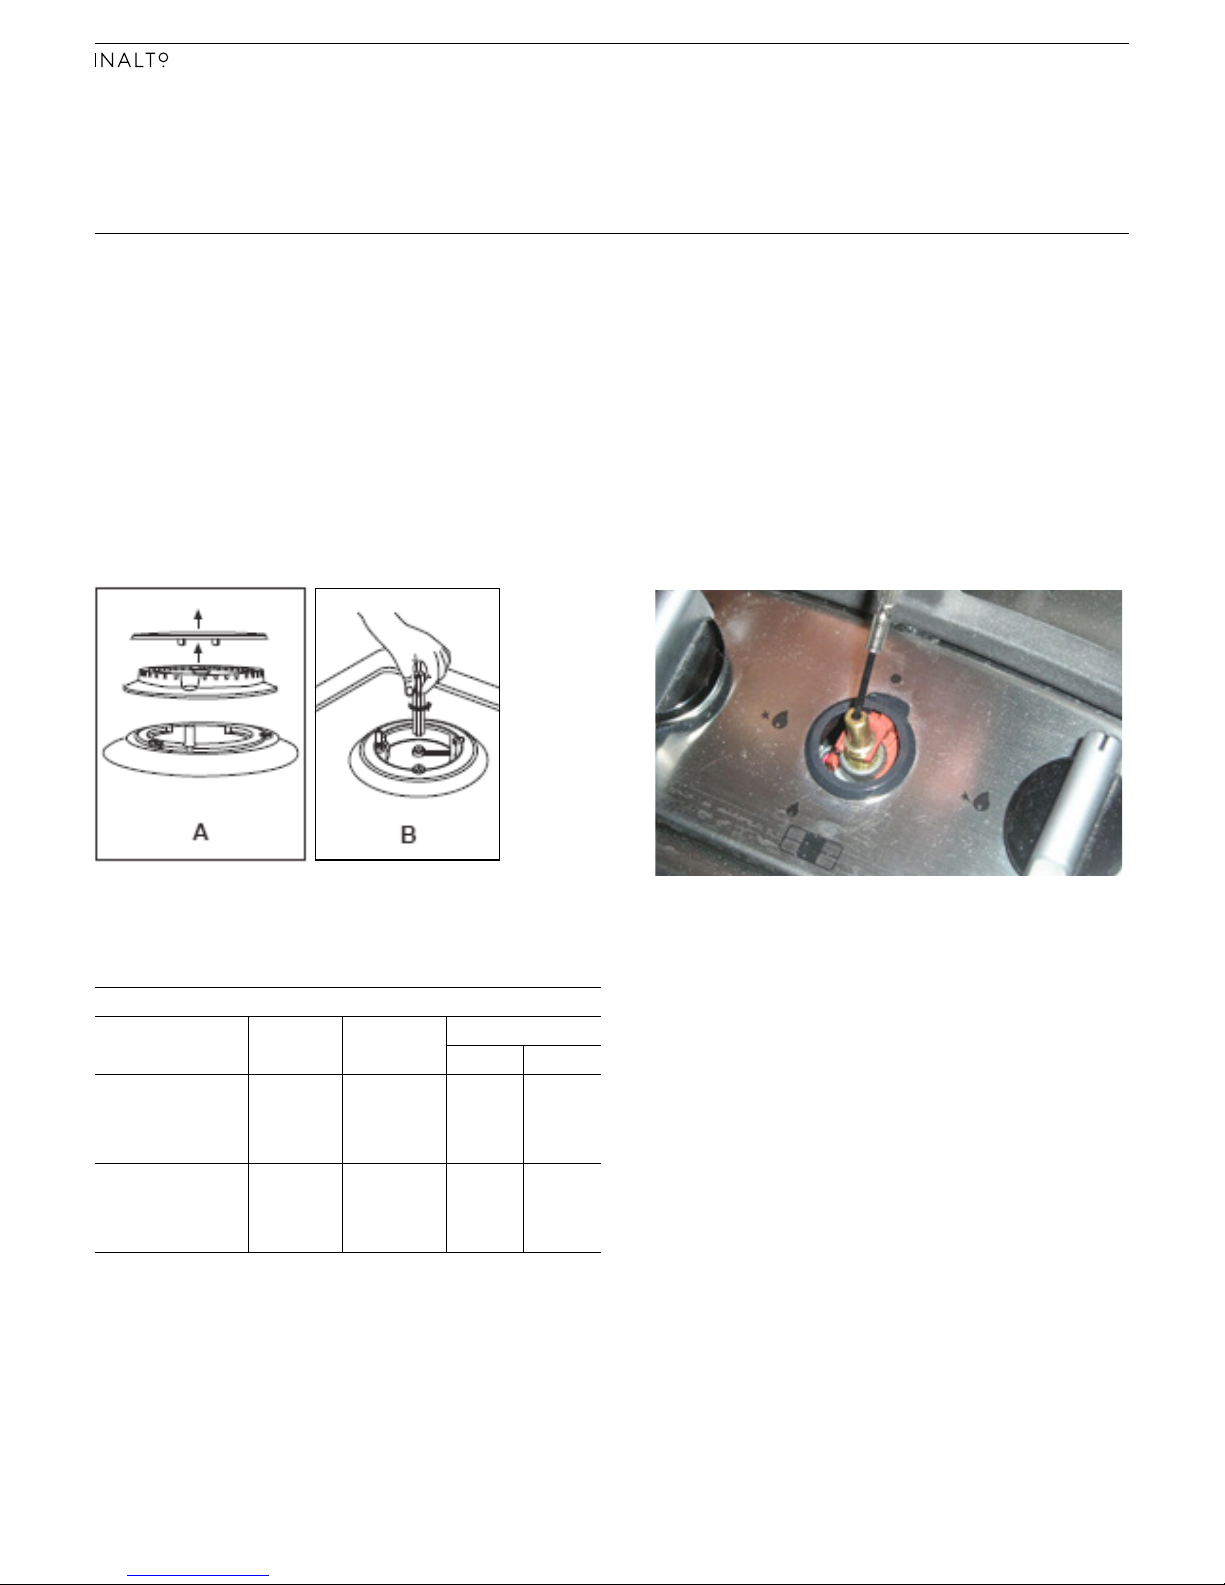
► Remove the pan-stands, burners and flame
spreaders (A).
► Unscrew the injector (B) and replace it with the
stipulated injector for the new gas supply (see table
below).
GENERAL INJECTORS TABLE
KIND OF GAS NOZZLEMMBURNERS POWER MJ/H
MAX. MIN.
NATURAL
1.80
1.49
1.16
0.85
Wok
Rapid
Semi-rapid
Auxiliary
14.4
10.8
6.5
3.8
6.3
5.4
3.24
1.8
L. P. G.
BUTANE
PROPANE
1.07
0.93
0.72
0.53
Wok
Rapid
Semi-rapid
Auxiliary
14.7
11.0
6.6
3.7
6.3
5.4
3.24
1.8
► Reassemble all the burners carefully; in particular you
should make sure that the flame spreader is correctly
placed on the burner.
IMPORTANT!
The minimum flow adjustment process must be completed
before the appliance is next used.
MINIMUM FLOW ADJUSTMENT FOR COOKTOP GAS TAPS
IMPORTANT!
All work must be carried out by a registered gas fitter and in
accordance with the current standards.
WARNING
Always isolate the cooktop from the electricity and gas
supply before changing the injectors and/or adjusting the
minimum flow of the burners.
► Switch the burner on and set the knob at the minimum
position.
► Remove the knob from the tap and place a small bladed
screwdriver in the centre of the tap shaft.
► Unscrew the adjusting screw, in order to increase the
gas flow or tighten the adjusting screw to decrease the
gas flow.
► The correct adjustment is obtained when the flame has
a length of about 3–4 mm.
► For ULP gas, the adjusting screw must be tightly
screwed in.
► Refit the control knob.
► Make sure that the flame does not go out by quickly
turning from maximum flow to minimum flow. If it
does then remove the control knob and make further
adjustments to the gas flow, testing it again once the
adjustment has been made.
► Repeat this process for each one of the gas taps.
► When converting from Natural Gas to ULP gas ensure
that the NG regulator is removed and replaced with
the Test Point Assembly. A gas regulator suitable for a
supply pressure of 2.75kPa should be at the inlet to the
appliance. Replace the old data plate with one which is
suitable for the type of gas for which the appliance has
been regulated.
IMPORTANT!
Where this appliance is installed in marine craft or in
caravans, it shall not be used as a space heater.
Page 13

PAGE 13
INALTO.COM.AU
GAS TAP MAINTENANCE
IMPORTANT!
The installation must be carried out by a suitably qualified
and licensed gas fitter and in accordance with the current
standards.
WARNING
Before carrying out any maintenance operations, always
isolate the cooktop from the electricity and gas supplies.
If a gas tap becomes stiff to operate, then you should
proceed as follows:
► Remove the control knobs, pan supports, burners, hob
fixing screws and clamps.
► Remove the hob from the worktop and remove any
underside protective covers.
► Disconnect the fixings holding the tap to the fascia
panel and separate the assembly. Then clean the cone
and seating, with a cloth dampened with solvent.
► Lightly smear the cone with high temperature grease,
reassemble into position and rotate a few times.
► Remove the cone again and remove any excess grease,
making sure that the gas ducts are not obstructed with
grease.
► Carefully reassemble the components and perform a
gas soundness test.
If it becomes necessary to replace a gas tap, then you should
proceed as follows:
► Remove the control knobs, pan supports, burners, hob
fixing screws and clamps.
► Remove the hob from the worktop and remove any
underside protective covers.
► Disconnect the fixings holding the tap to the fascia
panel and separate the assembly.
► Disconnect the gas pipe from the gas tap, and then
disassemble them from the gas rail by removing the
fixing screws.
► When fitting a new tap, ensure that a new gasket is
used.
► Reconnect the gas tap, perform a gas soundness test,
and then reassemble the hob.
ELECTRICAL CONNECTION
IMPORTANT!
The installation must be carried out by a suitably qualified
and licensed person and in accordance with the latest
edition of the AS/NZS 3000 Wiring Regulations and in
compliance with the instructions outlined within this user
manual.
WARNING
240 Volts. Disconnect power before servicing the cooktop.
Before connecting the appliance, make sure that the supply
voltage marked on the rating plate corresponds with your
mains supply voltage.
► Cable type: H05 RRF 3 core x 0.75 mm³ (Type RR-F
<HAR> marked).
► The mains supply cable is supplied with this product.
If the mains supply cable is damaged, then it must be
replaced by an appropriate replacement, which can be
obtained from Residentia Group, or an authorised service
agent.
The mains supply cable should be replaced in accordance
with the following instructions and by suitably qualified and
licenced person:
► Switch the appliance off at your mains supply.
► Open the box of the supply board.
► Unscrew the clamp fixing the cable.
► Replace the cable with one of the same length and in
accordance with the specification given above.
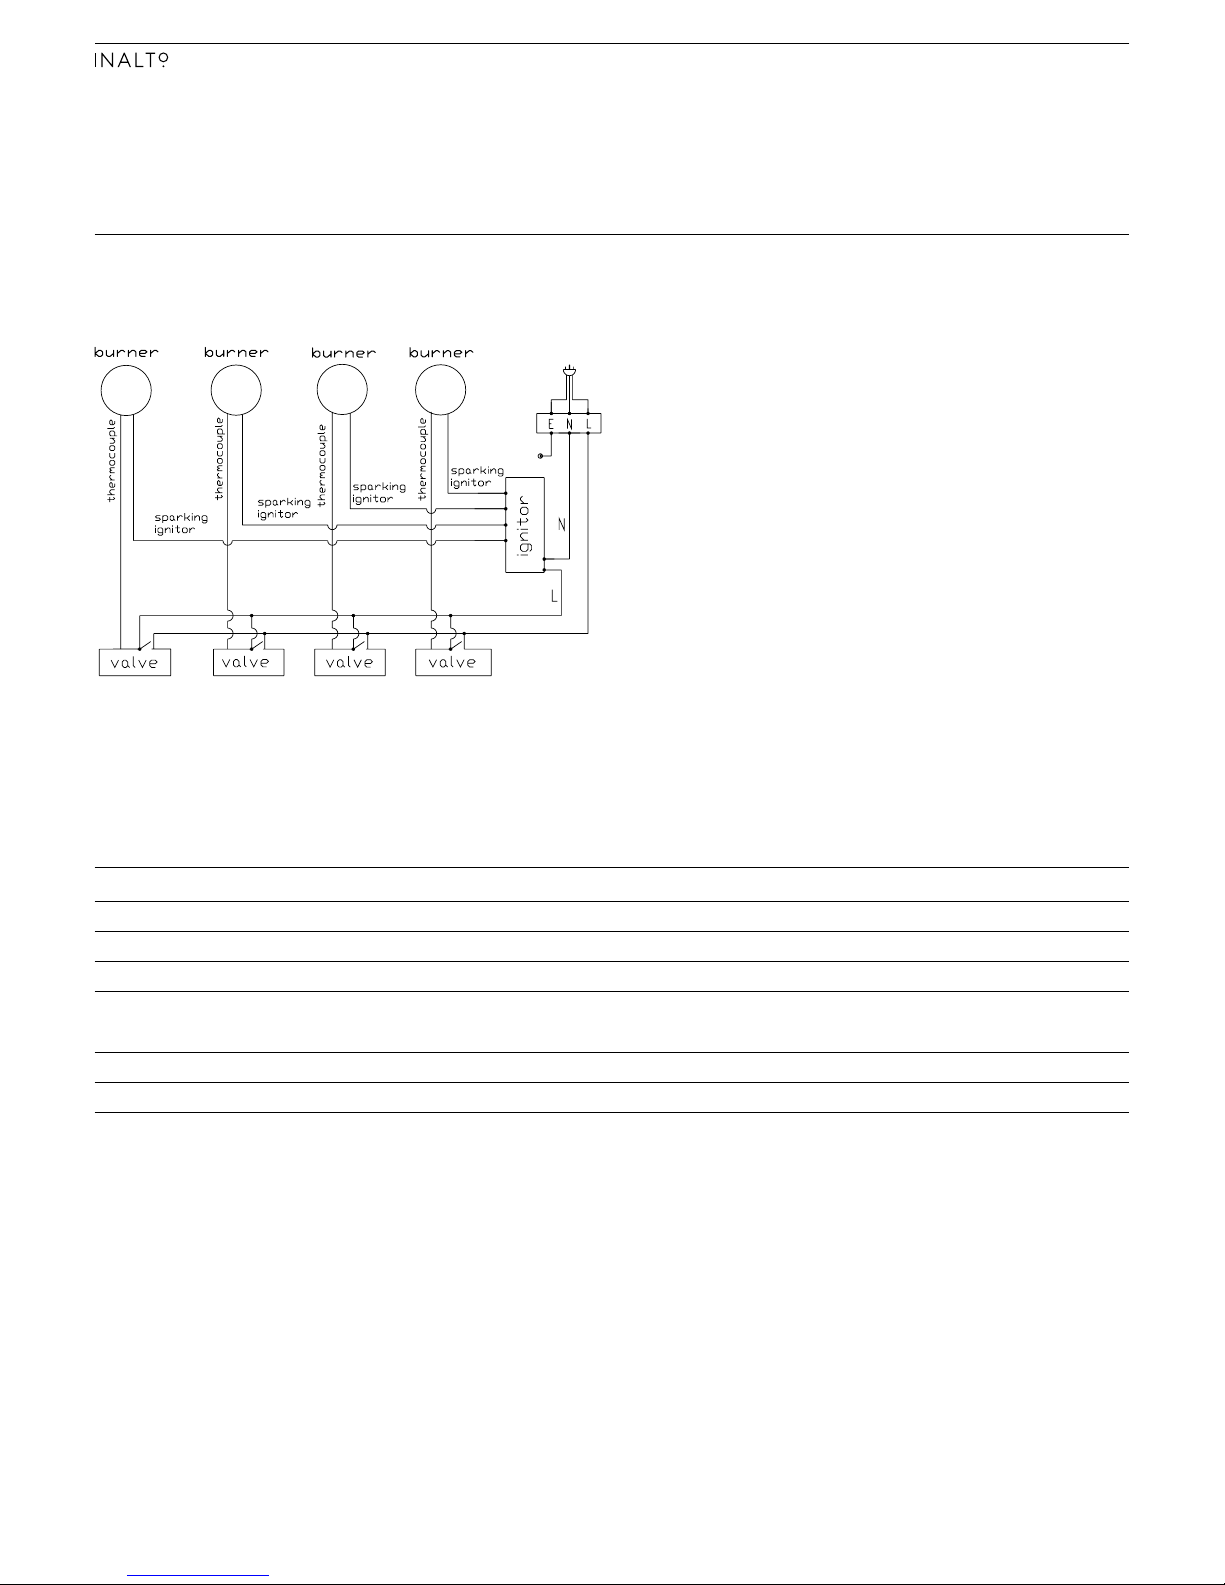
► The “green-yellow” earth wire must be connected to
the terminal marked . It must be about 10 mm longer
than the live and neutral wires.
► The “blue” neutral wire must be connected to the
terminal marked with letter (N) - the live wire must be
connec
ted to the terminal marked with letter (L).
► Note: Electrical diagram on the following page.
Page 14
USER MANUAL
PAGE 14
POWER CABLE
220V240V~ 50/60Hz
ICG6F, ICGW61F, ICGW60S
ELECTRICAL DETAILS Rated Voltage: 220 - 240 Vac 50 / 60 Hz
Supply Connection: 3A
Max Rated Inputs: 0.8 W
Mains Supply Lead: 3 core x 0.75mm² (Type RR-F <HAR> marked)
GAS TYPE & OPERATING PRESSURE Connection: Rp ½ (ISO R7)
Type: Natural Gas (1.0 KPa)
ULPG (2.75 KPa)
Technical Data
Page 15

PAGE 15
INALTO.COM.AU
By ensuring proper cleaning and maintenance of your
InAlto cooktop, you can ensure that it will have a long and
fault free operation.
WARNING!
Do not start cleaning the cooktop until it has
completely cooled.
► Typically you should only ever need to clean your
cooktop with warm soapy water, or light cleaning
products to assist with the removal of fat or oil
emulsions (such as general cleaning sprays).
► Your cooktop should be cleaned after every use.
► After cleaning the burners, you should ensure they
are dried properly before replacing on the cooktop.
► Avoid any harsh scourer pads or steel wool, as these
can scratch the stainless steel.
OPERATION IN CASE OF EMERGENCY
In the event of an emergency you should:
► Switch off all cooktop controls.
► Switch the gas off at the isolation switch
or at the gas meter.
► Call the Residentia Support Team on
1300 11 HELP (4357).
Some minor faults can be fixed by referring to the
instructions given in the Troubleshooting section
below. There is also a self-help section online at
http://www.residentiagroup.com.au.
IMPORTANT!
If your appliance appears to be operating incorrectly, then
you should disconnect it from your mains gas and electrical
supply and then contact the Residentia Group Support
team on 1300 11 HELP (4357).
WARNING!
DO NOT ATTEMPT TO REPAIR THE COOKTOP YOURSELF.
Please note that if an engineer is asked to attend whilst the
product is under warranty and finds that the problem is
not the result of an appliance fault, then you may be liable
for the cost of the call out charge.
The appliance must be accessible for the engineer to perform
any necessary repair. If your appliance is installed in such
a way that an engineer is concerned that damage will be
caused to the appliance or your kitchen, then they will not
complete a repair. This includes situations where appliances
have been tiled in or sealed in with sealant.
Please refer to the conditions of that appear on the warranty
card at the rear of this user manual.
Cleaning & Maintenance
Page 16
USER MANUAL
PAGE 16
Troubleshooting
Tips & Hints
Please read the issues below carefully and try all relevant steps.
If none of this helps, please contact us on 1300 11 4357 for further advice
or to schedule a technician to inspect your cooktop.
THE COOKTOP WON'T LIGHT
Please check...
That your cooktop is plugged in and there is
power to the wall socket.
That the gas supply valve is turned on and
the gas supply to your house is working.
Hint: If you listen closely, you should be able
to hear the gas coming out of a burner when
it is turned on. Due to flame failure safety, the
knob must be pressed down once it is turned
on — this initiates the ignition and allows the
gas to come out.
That the gas igniters are clean.
Hint: If in doubt, use a toothbrush and a
heavy duty cleaner or methylated spirits to
remove any potential build-up or blockage.
That the cooktop has been installed and
assembled correctly and the burner cap is
sitting flat.
THE BURNER FLAMES ARE SLOW
OR YELLOW TO START
Please check...
That the cooktop has been installed and
assembled correctly and the burner cap
is sitting flat.
The burner parts may be blocked with water
or another substance. Please contact our
Support Team on 1300 11 4357 for advice.
If connected to a gas bottle, this may be
running low. Check and refill if required.
The gas pressure may not be set at the correct
level. Please contact our Support Team on
1300 11 4357 for advice.
THE COOKTOP IS DIRTY
AFTER COOKING
Please note...
Once it has cooled down, your cooktop
should be cleaned after every use.
Typically you should only ever need to clean
your cooktop with warm soapy water, or light
cleaning products to assist with the removal
of fat or oil emulsions (such as general
cleaning sprays).
After cleaning the burners, you should ensure
they are dried properly before replacing on
the cooktop.
Avoid any harsh scourer pads or steel wool,
as these can scratch the stainless steel.
THE BURNER GOES OUT WHEN
THE KNOB IS RELEASED
Please note...
All InAlto cooktops are fitted with Flame
Failure safety. This cuts the gas when no heat
is detected, and may not have been activated.
Hint: Hold down the knob for five seconds
when lighting a burner to ensure it is properly
engaged.
ONE OF THE BURNERS
HAS AN UNEVEN FLAME
Please check...
That the cooktop has been installed and
assembled correctly and the burner cap is
sitting flat.
That the burners are clean.
Hint: Please ensure the burner parts are dried
properly before replacing on the cooktop.
OPERATION IN CASE
OF EMERGENCY
Please note, in the event of an emergency you
should:
► Switch off all cooktop controls.
► Switch the gas off at the isolation switch or
at the gas meter.
► Call our Support Team on 1300 11 4357.
Please note that if an engineer is asked to attend whilst the product is under warranty and finds that the problem
is not the result of an appliance fault, then you may be liable for the cost of the call out charge.
Page 17
PAGE 17
INALTO.COM.AU
Purchase Details
For future reference, please record the following
information which can be found on the rating plate and the
date of purchase which can be found on your sales invoice.
The rating plate of your hob is located on the underneath
of the appliance. Therefore please fit the duplicate data
plates or label on the outside of the cupboard to sure that
the label can be easily seen during operation.
STORE DETAILS
STORE NAME
|
ADDRESS
|
TELEPHONE
|
PURCHASE DATE
|
PRODUCT DETAILS
MODEL NO.
|
SERIAL NO.*
|
* Your serial number can be found on the underside of the cooktop.
RECEIPT
Page 18

USER MANUAL
PAGE 18
WARRANTY TERMS & CONDITIONS
COOKING APPLIANCES
(BUILT-IN OVENS, COOKTOPS)
This document sets out the terms and conditions of the
product warranties for Residentia Group Appliances. It is
an important document. Please keep it with your proof of
purchase documents in a safe place for future reference
should you require service for your Appliance.
1. IN THIS WARRANTY
(a) ‘acceptable quality’ as referred to in clause 10 of this
warranty has the same meaning referred to in the ACL;
(b) ‘ACL’ means Trade Practices Amendment (Australian
Consumer Law) Act (No.2) 2010;
(c) ‘Appliance’ means any Residentia Group product
purchased by you accompanied by this document;
(d) ‘ASR’ means Residentia Group authorised service
representative;
(e) ‘Residentia Group’ means Residentia Group Pty Ltd
of 118 Campbell St, Collingwood VIC, ACN 600 546 656
in respect of Appliances purchased in Australia;
(f ) ‘major failure’ as referred to in clause 10 of this
warranty has the same meaning referred to in the ACL
and includes a situation when an Appliance cannot
be repaired or it is uneconomic for Residentia Group,
at its discretion, to repair an Appliance during the
Warranty Period;
(g) ‘Warranty Period’ means:
(i) where the Appliance is used for personal,
domestic or household use (i.e. normal
single family use) as set out in the instruction
manual, the Appliance is warranted against
manufacturing defects for 24 months, following
the date of original purchase of the Appliance;
(h) ‘you’ means the purchaser of the Appliance not having
purchased the Appliance for re-sale, and ‘your’ has a
corresponding meaning.
2. This warranty only applies to Appliances purchased
and used in Australia and is in addition to (and does
not exclude, restrict, or modify in any way) any non-
excludable statutory warranties in Australia.
3. During the Warranty Period Residentia Group or its
ASR will, at no extra charge if your Appliance is readily
accessible for service, without special equipment
and subject to these terms and conditions, repair or
replace any parts which it considers to be defective.
Residentia Group or its ASR may use remanufactured
parts to repair your Appliance. You agree that any
replaced Appliances or parts become the property
of Residentia Group. This warranty does not apply
to light globes, batteries, filters or similar perishable
parts.
4. Parts and Appliances not supplied by Residentia Group
are not covered by this warranty.
Warranty Information
Page 19

PAGE 19
INALTO.COM.AU
5. You will bear the cost of transportation, travel and
delivery of the Appliance to and from Residentia
Group or its ASR. If you reside outside of the service
area, you will bear the cost of:
(a) travel of an authorised representative;
(b) transportation and delivery of the Appliance to and
from Residentia Group or its ASR, in all instances,
unless the Appliance is transported by Residentia
Group or its ASR, the Appliance is transported at the
owner’s cost and risk while in transit to and from
Residentia Group or its ASR.
6. Proof of purchase is required before you can make a
claim under this warranty.
7. You may not make a claim under this warranty unless
the defect claimed is due to faulty or defective parts
or workmanship. Residentia Group is not liable in the
following situations (which are not exhaustive):
(a) the Appliance is damaged by:
(i) accident
(ii) misuse or abuse, including failure to properly
maintain or service
(iii) normal wear and tear
(iv) power surges, electrical storm damage or
incorrect power supply
(v) incomplete or improper installation
(vi) incorrect, improper or inappropriate operation
(vii) insect or vermin infestation
(viii) failure to comply with any additional instructions
supplied with the Appliance;
(b) the Appliance is modified without authority from
Residentia Group in writing;
(c) the Appliance’s serial number or warranty seal has
been removed or defaced;
(d) the Appliance was serviced or repaired by anyone
other than Residentia Group, an authorised repairer or
ASR.
8. This warranty, the contract to which it relates and the
relationship between you and Residentia Group are
governed by the law applicable where the Appliance
was purchased.
9. To the extent permitted by law, Residentia Group
excludes all warranties and liabilities (other than as
contained in this document) including liability for any
loss or damage whether direct or indirect arising from
your purchase, use or non use of the Appliance.
10. For Appliances and services provided by Residentia
Group in Australia, the Appliances come with a
guarantee by Residentia Group that cannot be
excluded under the Australian Consumer Law.
You are entitled to a replacement or refund for a
major failure and for compensation for any other
reasonably foreseeable loss or damage. You are also
entitled to have the Appliance repaired or replaced
if the Appliance fails to be of acceptable quality and
the failure does not amount to a major failure. The
benefits to you given by this warranty are in addition
to your other rights and remedies under a law in
relation to the Appliances or services to which the
warranty relates.
11. At all times during the Warranty Period, Residentia
Group shall, at its discretion, determine whether
repair, replacement or refund will apply if an
Appliance has a valid warranty claim applicable to it.
12. To enquire about claiming under this warranty, please
follow these steps:
(a) carefully check the operating instructions, user
manual and the terms of this warranty;
(b) have the model and serial number of the Appliance
available;
(c) have the proof of purchase (e.g. an invoice) available;
(d) telephone the numbers shown below.
13. You accept that if you make a warranty claim,
Residentia Group and its ASR may exchange
information in relation to you to enable Residentia
Group to meet its obligations under this warranty.
IMPORTANT
Before calling for service, please ensure that the steps in
point 12 have been followed.
Telephone contacts
► Service: Please call 1300 11 HELP (4357)
► Spare Parts: Please call 1300 11 SPARE (7727)
Our goods come with guarantees that cannot be excluded under the Australian Consumer Law.
You are entitled to a replacement or refund for a major failure and for compensation for any other
reasonably foreseeable loss or damage. You are also entitled to have the goods repaired or replaced if
the goods fail to be of acceptable quality and the failure does not amount to a major failure.
The Australian Consumer Law requires the
inclusion of the following statement with
this warranty:
Page 20
A HIGHER LEVEL OF COOKING
WWW.RESIDENTIA.GROUP
 Loading...