

Page 1
USER MANUAL INALTO.HOUSE
93L
Bar Fridge
MODEL CODE/S
IBF95BG
IBF95W
FOR ALL AUSTRALIAN HOMES
V 3.3 | 0423
Page 2
Welcome
Congratulations on purchasing
Residentia Group Pty Ltd
ACN. 600 546 656
165 Barkly Avenue
Burnley, Victoria 3121
Australia
—
Applico Ltd
635 Great South Road
Penrose, Auckland 1061
New Zealand
—
InAlto
www.inalto.house
/ inalto.house
/ inalto.house
your new Bar Fridge!
The InAlto brand is proudly distributed within Australia by
Residentia Group Pty Ltd and within New Zealand by Applico Ltd.
Please refer to the warranty card at the rear of this manual for information
regarding your product’s parts and labour warranty, or visit online at:
→ www.residentia.group
→ www.applico.co.nz
→ www.inalto.house
Both Residentia Group & Applico are customer obsessed and our Support
Teams are there to ensure you get the most out of your appliance. Should
you want to learn more about recommended usage, the various features of
your appliance, and importantly taking care of the unit when cleaning, our
Support Teams are here to help.
Telephone Contacts:
→ AU: 1300 11 4357
→ NZ: 0800 763 448
It is important that you read through the following use and care manual
thoroughly to familiarise yourself with the installation and operation
requirements of your appliance to ensure optimum performance.
Again, thank you for choosing an InAlto appliance and we look forward to
being of service to you.
2
Page 3
Contents
2 Welcome
4 Safety Instructions
8 Installation
10 Your Bar Fridge
11 Getting Started
12 Using Your Bar Fridge
13 Energy Saving Tips
14 Maintenance and Cleaning
16 FAQs & Troubleshooting
17 Technical Specifications
Customer Care
18 Your Receipt
19 Purchase Details
20 Warranty Information
InAlto recommends the use of original spare parts.
When contacting our customer service team on 1300 11 4357,
please ensure that you have the following information at hand
(which can be found on your appliances’ rating plate).
• Model Number
• Serial Number
3
Page 4
Safety Instructions
IMPORTANT SAFETY INSTRUCTIONS
READ CAREFULLY AND KEEP FOR FUTURE REFERENCE
Read this manual thoroughly before first use, even if you are familiar with this type of product.
The safety precautions enclosed herein reduce the risk of fire, electric shock and injury when correctly
adhered to. Make sure you understand all instructions and warnings.
Keep the manual in a safe place for future reference, along with the completed warranty card
and purchase receipt. If you sell or transfer ownership of this product, pass on these instructions
to the new owner.
Always follow basic safety precautions and accident prevention measures when using an electrical
appliance, including the following:
IMPORTANT: Pay particular attention to messages that contain the words DANGER, WARNING or
CAUTION. These words are used to alert you to a potential hazard that can seriously injure you and
others. The instructions will tell you how to reduce the chance of injury and let you know what can
happen if the instructions are not followed.
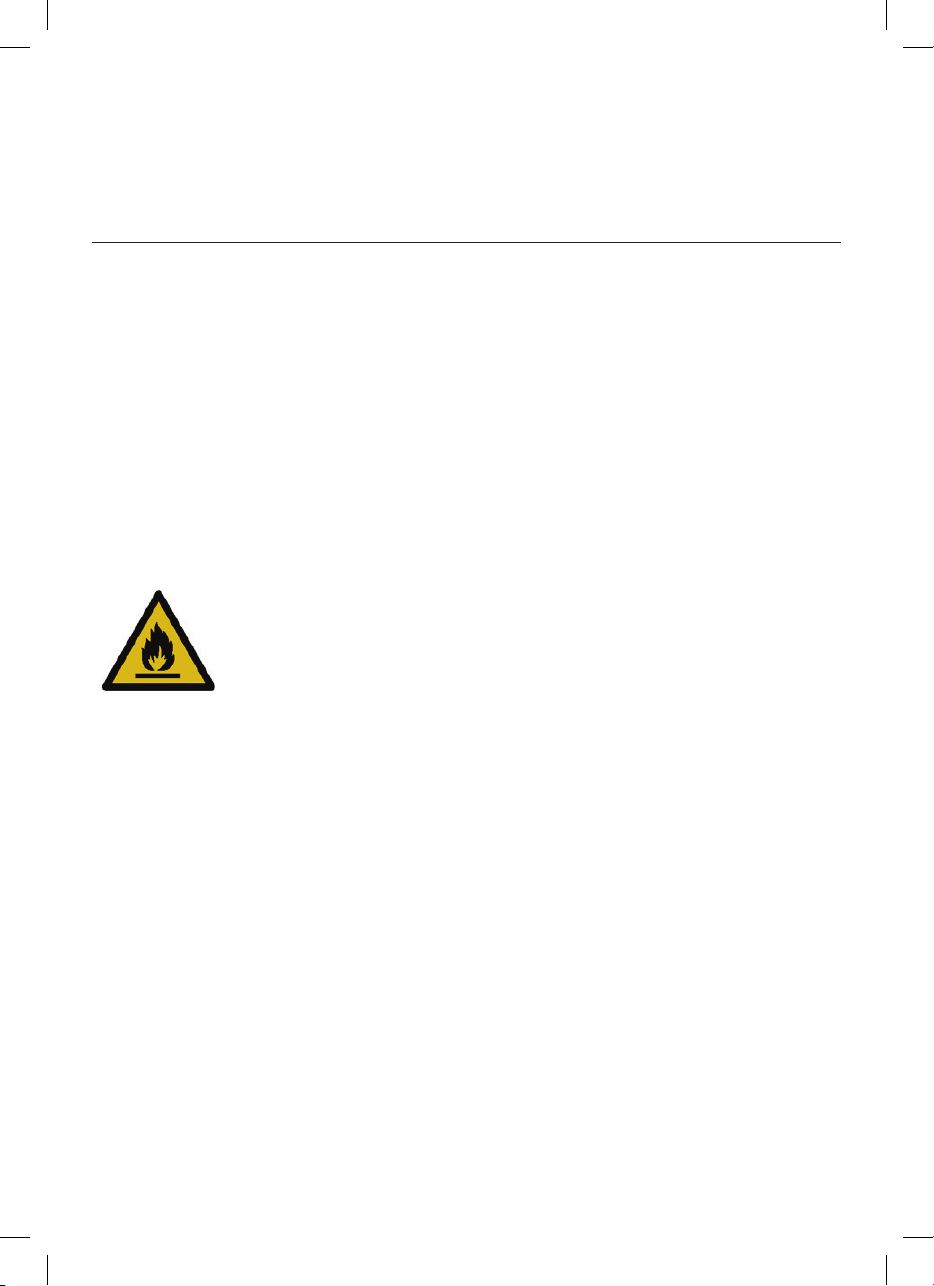
This symbol alerts you to take care as this appliance contains a flammable
refrigerant (isobutane) and insulation blowing gas (cyclopentane). Do not
expose it to high heat, sparks and open flames.
The refrigerant isobutane (R600a) is contained within the refrigerant
circuit of the appliance, a gas with a high level of environmental
compatibility, which is nevertheless flammable. During transportation and
CAUTION
RISK OF FIRE
installation of the appliance, ensure that none of the components of the
refrigerant circuit become damaged.
WARNING Do not damage the refrigerant circuit! Never use an appliance with a damaged
refrigerant circuit! If the refrigerant circuit becomes damaged, avoid proximity to open fires and all
types of heat and ignition sources. Thoroughly ventilate the room in which the appliance is located.
DANGER It is hazardous for anyone other than an authorised service person to service this
appliance. In Queensland, the authorised service person MUST hold a Gas Work Authorisation for
hydrocarbon refrigerants to carry out servicing or repairs which involve the removal of covers.
The room for installing the appliance must be at least 1m³ per 8g of refrigerant. The amount and type of
refrigerant in the appliance can be found in the Technical Specifications on page 17 and on the rating
plate, found on the appliance.
Usage Conditions and Restrictions
• Domestic use only: This appliance is intended for indoor household use only. It is not intended for
commercial, industrial or outdoor use. It is not intended for use in a recreational vehicle.
• Purpose: Do not use this appliance for anything other than its intended purpose. Other uses are not
recommended and may cause fire, electric shock or personal injury.
• Attachments: The use of attachments is not recommended by the appliance manufacturer and
distributor as they may be hazardous.
• Improper use: Damage due to improper use, or repairs made by unqualified personnel will void your
warranty. We assume no liability for any eventual damages caused by misuse of the product or
noncompliance with these instructions.
4
Page 5
• WARNING Do not use mechanical devices or other means to accelerate the defrosting
process, other than those recommended by the manufacturer.
• Usage restriction: This appliance is not intended for use by persons (including children) with
reduced physical, sensory or mental capabilities, or lack of experience and knowledge, unless they
have been given supervision or instructions concerning use of the appliance by a person responsible
for their safety.
• Children: Supervise young children to ensure they do not play with the appliance. Never allow
children to operate, play with or crawl inside the appliance.
•
WARNING Do not use electrical appliances inside the appliance, unless they are of the type
recommended by the manufacturer.
• Explosive or flammable substances: Do not store explosive substances such as aerosol cans with a
flammable propellant in this appliance. Do not store or use petrol or any other flammable vapours
and liquids in the vicinity of this or any other appliance. Do not use such substances for cleaning the
appliance. The fumes can create a fire hazard or an explosion.
• Damage: Do not use the appliance if the power cord, plug or the appliance itself is damaged.
If the cord is damaged, contact the after sales support line and have the cord replaced by qualified
personnel in order to avoid a hazard.
•
WARNING Do not damage the refrigerant circuit.
• Do not modify: Do not attempt to alter or modify this appliance in any way.
• Repair: Do not attempt to repair or replace any part of this appliance unless it is specifically
recommended in this manual. All other servicing should be referred to a qualified technician.
Contact the after sales support line for advice.
•
WARNING Do not locate multiple portable socket-outlets or portable power supplies
at the rear of the appliance
5
Page 6
Safety Instructions (Cont.)
Electrical Safety
• Voltage: Before connecting and turning on the appliance, ensure the electrical voltage and circuit
frequency correspond to that indicated on the appliance rating label.
• Earthing: This appliance should be properly earthed for your safety. The power cord of this appliance
is equipped with a three-prong plug for use in standard wall outlets to minimise the possibility of
electrical shock. Do not modify the cord and/or plug provided with the appliance. Improper use of the
earthed plug can result in the risk of electric shock.
• Connection: This appliance requires a standard 220-240 V AC 50Hz electrical outlet. Do not overload the
electrical circuit.
• Power cord: Do not kink or damage the power cord; do not leave it exposed or dangling. Secure it at the
back of the appliance so no one steps on or places anything on the cord or against it. Keep the cord out
of reach of children. When moving the appliance, make sure not to damage the power cord.
•
WARNING When positioning the appliance, ensure the supply cord is not trapped or damaged.
• Auxiliary Items: Do not use an inverter, adaptor or extension cord with this appliance. If the cord is too
short, have a qualified electrician install an outlet near the appliance. Use of an extension cord and an
inverter can negatively aect the performance of the unit.
• Protect from moisture: To protect against the risk of electric shock, do not immerse the unit, cord or
plug in water or spray it with any other liquid. Do not connect or disconnect the electric plug when your
hands are wet. Turn the power switch o before removing the plug from the socket.
•
WARNING Disconnect! To reduce the risk of fire, electric shock or personal injury, always unplug
the appliance from the socket when not in use, when moving and before cleaning or servicing. Never
unplug the unit by pulling the power cord. Always grip the plug firmly and pull straight out from the
power point.
• Electrical work: Any electrical work required for the installation of this appliance should be carried out
by a qualified electrician.
Never use this appliance with a damaged refrigerant circuit! If the coolant circuit becomes damaged,
avoid proximity to open fires and all types of heat sources. The room in which the appliance is located
should be ventilated for a few minutes.
Installation
Heavy: This appliance is heavy, take care when moving it. To avoid back or other injury, consider a two
person lift or mechanical aid when installing it. Failure to do so can result in back or other injury.
Damage: When unpacking, check the appliance carefully for damage. If it is damaged, do not install
the appliance. Contact our after sales support centre on 1300 11 43 57 for advice on examination or return
of the damaged appliance.
Protect from moisture: Install the appliance in an indoor area protected from wind, rain,
water spray or drips.
Protect from heat: Do not install the appliance next to an oven, grill or other source of high heat, or where
it will be exposed to direct sunlight for prolonged periods of time.
Level: Install the appliance level in order to ensure proper operation.
WARNING
Ventilation: To ensure proper ventilation, keep any ventilation openings, in the appliance enclosure or
in the built-in structure, clear of obstructions. Ensure adequate air circulation around the appliance to
prevent overheating.
6
Page 7
Cleaning and Maintenance
Disconnect: Unplug the appliance before cleaning or servicing. Failure to do so can result in electric shock,
injury or death. Do not connect or disconnect the plug when your hands are wet.
Flames: Do not let open flames or ignition sources enter the appliance.
Flammable/explosive substances: Never clean this appliance with flammable fluids. Do not store or use
volatile, flammable or explosive propellants or liquids in or close to this or any other appliance. The fumes
can create a fire hazard or explosion.
Solvents: Do not use solvent based cleaning agents or abrasives on the interior as these may damage or
discolour the surfaces of the appliances.
WARNING
Do not use mechanical devices or other means to accelerate the defrosting process. Never use a sharp or
metal instrument to remove frost or clean the appliance. Use a plastic scraper, if necessary.
Service: Do not attempt to repair, modify or replace any part of the appliance unless specifically
recommended in this manual. Refer all other servicing to a qualified technician, or contact the after sales
support line for advice on examination or repair of the appliance.
Responsible disposal
Note: At the end of its working life, do not throw this appliance out with your household rubbish. Electrical
and electronic products contain substances that can have a detrimental eect on the environment and
human health if disposed of inappropriately. Observe any local regulations regarding the disposal of
electrical consumer goods and dispose of it appropriately for recycling and recovery of the refrigerant and
blowing agent. Contact your municipal authorities for advice on recycling facilities in your area.
WARNING
This refrigeration appliance contains flammable refrigerants and insulation blowing gases, which must be
removed before disposal. Contact your municipal authorities for any codes or regulations concerning the
disposal of such materials.
7
Page 8
Installation
• Freestanding design: This appliance is designed to be freestanding only, and should not be recessed
or built-in.
• Floor surface: This appliance must be properly positioned on a dry, sturdy, level surface that is strong
enough to support it when it is fully loaded.
• Ambient temperature: The ambient temperatures must correspond to the climate class ( T ) indicated
on the rating plate of the appliance: 16° C – 38° C
• Clearances: Ensure that air can circulate freely around the back of the cabinet, which is necessary to
cool the compressor and condenser. Allow at least 10cm clear space at the back and 30cm at the top of
the unit. If you are installing your bar fridge next to a fixed wall, leave sucient space on the hinge side
to allow for the door to swing open.
Do NOT install/use the appliance in the following locations/situations:
• When selecting a position for your bar fridge you should make sure that the floor is level, and that the
room is well ventilated with an average room temperature of between 16° and 35°.
• Always avoid locating your bar fridge near a heat source, such as a heater.
• In moist areas or areas of high humidity.
• In a recreational vehicle, or for use with an inverter.
• In direct sunlight, near heat sources, next to an open flame, cooking or heating appliance, or near any
other source of high heat.
• Direct sunlight may aect the acrylic coating and heat sources may increase the unit’s power
consumption. For best energy eciency install the appliance in the coolest area of the room.
• In an area with extreme cold ambient temperatures.
• In an area with excessive moisture and high humidity. Make sure it is protected from elements such as
wind, rain, water spray or drips.
• In an area where petrol or other explosive and/or flammable liquids or fumes are used or stored. The
fumes can create a fire hazard or explosion.
Electrical connection
WARNING It must be possible to disconnect the appliance from the mains power supply;
the plug must therefore be easily accessible after installation.
• Before plugging in your new bar fridge, let it stand upright for at least 1 hour. This will allow the
refrigerant gases to settle into the compressor and reduce the possibility of a malfunction in the
cooling system.
• The appliance must be earthed. The plug of the power supply cord is equipped with a contact for this
purpose. Do not under any circumstances cut or remove the third (earth) prong from the power cord.
If the plug does not fit your outlet, consult a licensed electrician for advice to have the outlet changed.
• Plug the unit into a dedicated, properly earthed wall outlet. Ensure that your outlet voltage and circuit
frequency correspond to the voltage stated on the rating label.
• Secure the bar fridge’s supply cord behind the unit. Do not leave it exposed or dangling to prevent injury
and accidental disconnection from the power supply.
• Adjust the temperature control as described below.
• When first starting up, and after a period out of use, allow the unit to cool down for at least 2–3 hours
(4 hours if starting up during warm weather in summer) before placing food in the bar fridge.
8
Page 9
6
something solid to prevent it from slipping whilst removing the door.
they are all kept safe .
the opposite side. Place this to one side.
the door away from the fridge.
screws on to the opposite side. Note: You will need to remove the plastic cover caps from
the opposite side rst.
Then screw the bottom hinge bracket into place, securing the door in place.
horizontally, before tightening the bottom hinge. Re-adjust the levelling feet.
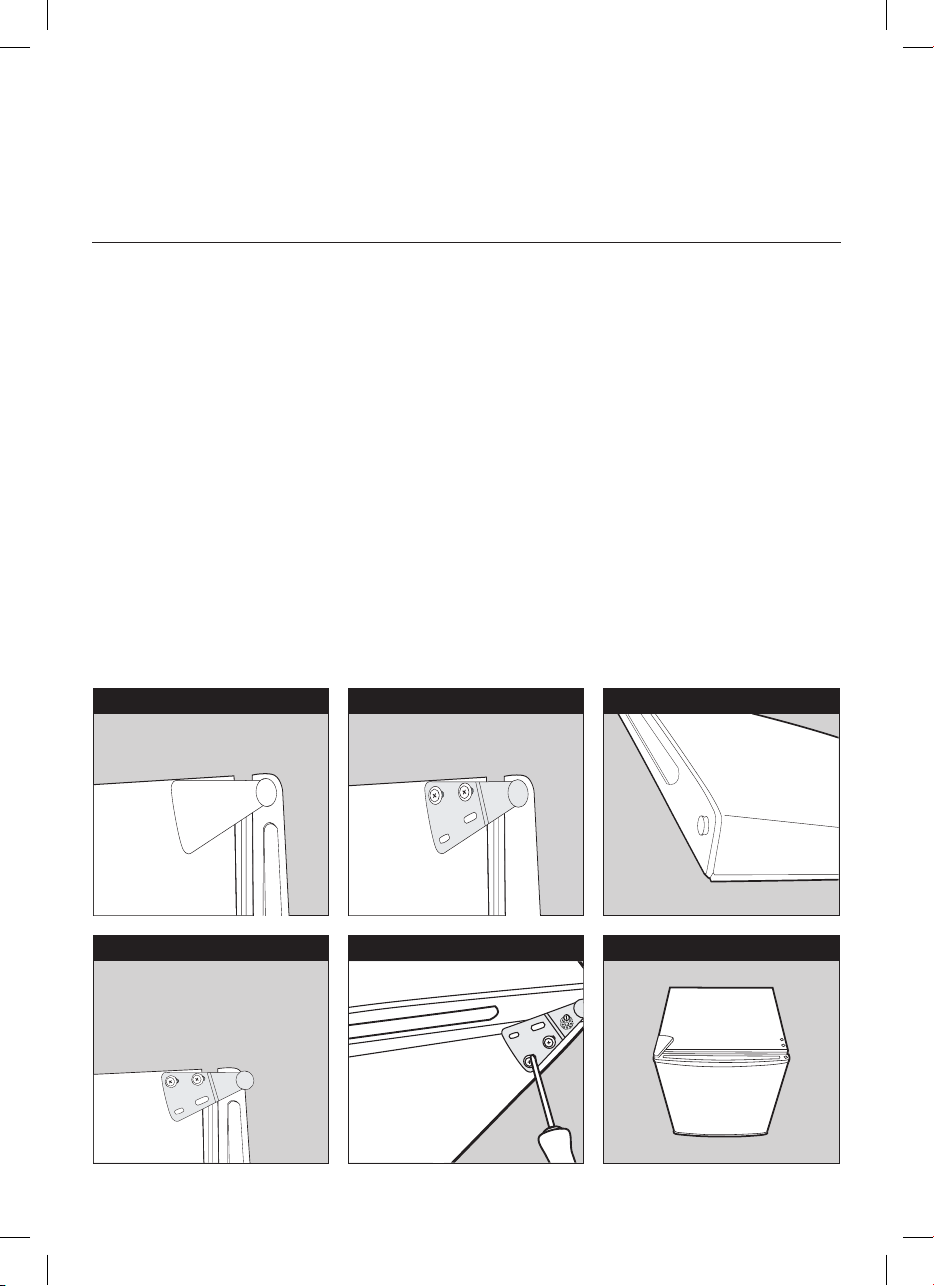
Reversing the door
• Tools Required: Phillips head screwdriver.
• Start by ensuring the bar fridge is unplugged and empty.
• Adjust the two levelling feet to their highest position.
• To remove the door it is necessary to tilt the bar fridge backwards. Rest the fridge against something
solid to prevent it from slipping whilst removing the door.
• All parts that are removed will be used when re-assembling the door hinge, so ensure they are all
kept safe.
• DO NOT lay the bar fridge on its back or sides as this may damage the coolant system.
• We recommend that this is a two person procedure.
1. Remove the plastic cover from the top door hinge.
2. Unscrew the three screws from the bottom bracket and remove the hinge bracket from the opposite
side. Place this to one side.
3. Slide the fridge door down approximately 15cm and remove from the top hinge, lifting the door away
from the fridge.
4. Remove the two screws from the top bracket and replace the bracket using
the same screws on to the opposite side.
Note: You will need to remove the plastic cover caps from the opposite side first.
5. Slide the fridge door back onto the top hinge, ensuring that it is the correct way up.
Then screw the bottom hinge bracket into place, securing the door in place.
6. Fit the plastic cover caps and ensure that the door is aligned both vertically and horizontally,
before tightening the bottom hinge. Re-adjust the levelling feet.
1 3
2
4 5 5
9
Page 10
Your Bar Fridge
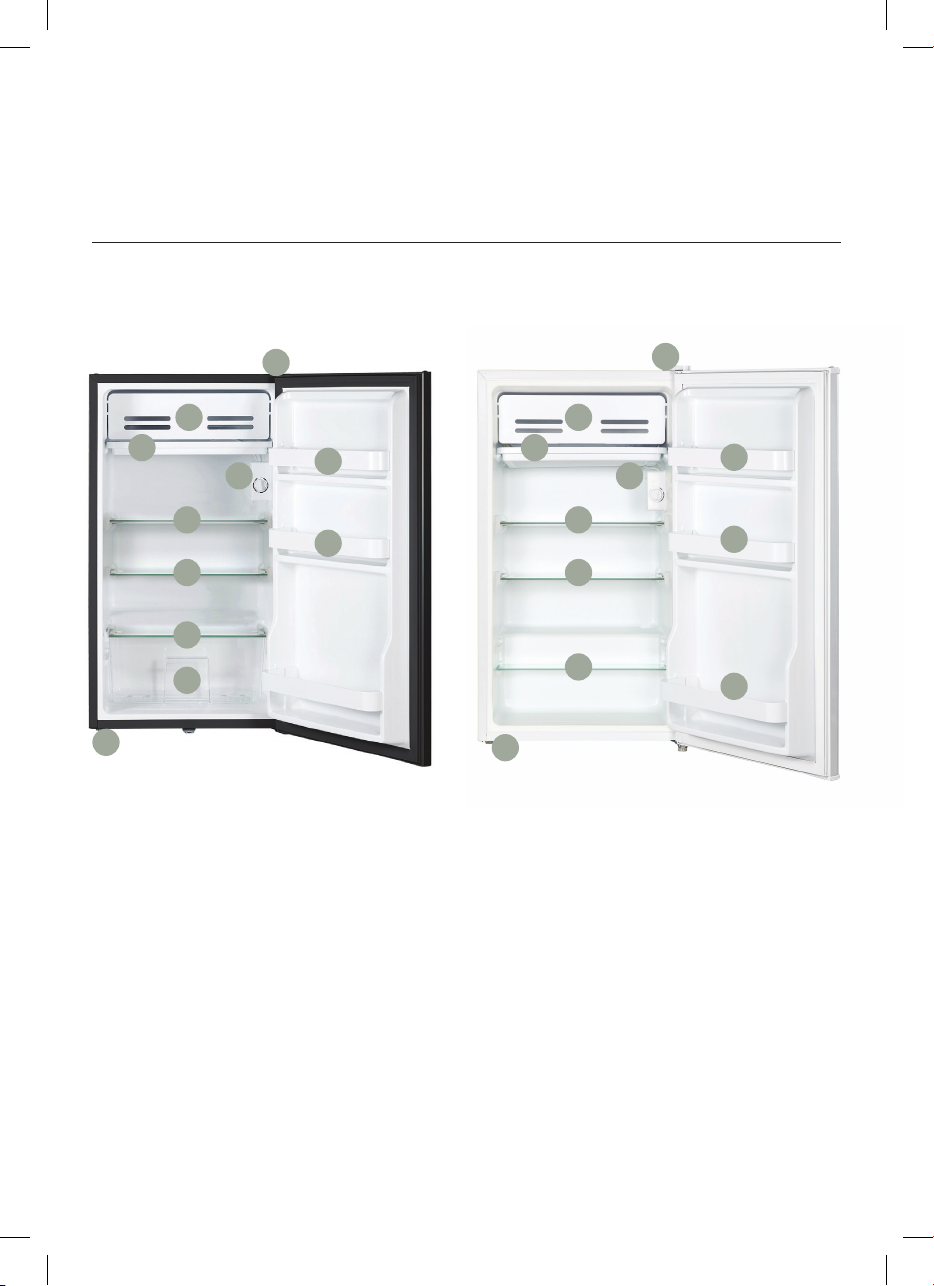
IBF95BG IBF95W
8
1 1
2 2
5 5
3 3
3 3
3
7
4
6
6
8
6
6
3
6
4
Key:
1. Chiller compartment
2. Defrost tray
3. 3 Glass shelves
4. Adjustable feet
The images in this user manual are for demonstration purposes only. Your bar fridge may appear dierently.
5. Thermostat
6. 3 Door storage
7. Vegetable crisper
8. Reversible door hinge
10
Page 11
Getting Started
Unpacking
• Packaging materials: This appliance has been packaged to protect it against transportation damage.
Remove all packaging materials from around and inside the appliance and keep the original packaging
carton and materials in a safe place. It will help prevent any damage if the product needs to be
transported in the future, and you can use it to store the appliance when it is not in use. In the event
the carton is to be disposed of, please recycle all packaging materials where possible.
• Suocation: Plastic wrapping can be a suocation hazard for babies and young children, so ensure all
packaging materials are out of their reach and disposed of safely.
• Power cord: Unwind the power cord to its full length and inspect it for damage. Do not use the
appliance if it or its cord have been damaged or are not working properly. In case of damage, contact
our after sales support line for advice on examination, repair or return of the damaged product.
• Read the manual: Read this manual to familiarise yourself with the appliance.
Pay particular attention to the Safety Instructions section.
• Clean: To remove any dust from transit and storage, clean the interior and exterior surfaces of the
appliance with lukewarm water and a soft cloth. Dry thoroughly. Important: do not use harsh or
abrasive detergents or powders as these will damage the finish.
• Settling: Before connecting the bar fridge to the power source, let it stand upright for
approximately 1 hour. This will reduce the possibility of a malfunction in the cooling system from
handling during transportation.
11
Page 12
Using Your Bar Fridge
Temperature Control
• Your fridge has one control for regulating the temperature. The temperature control is located on the
right hand side below the chiller compartment.
• Depending on your room’s ambient temperature, you may need to adjust the temperature setting to
achieve your desired temperature.
• The temperature options are as follows
→ Dial position "OFF" will power the unit off.
→ Dial position "Min" provides a cool temperature.
→ Dial position "Med" is suitable for normal operation, suitable for most situations.
→ Dial position "Max" provides the coolest temperature.
IMPORTANT: If the unit is unplugged, lost power, or turned o, you must wait 3 to 5 minutes before
restarting the unit.
If you choose to change the thermostat setting, adjust the thermostat control by one numerical
increment at a time. Allow several hours for temperature to stabilize between adjustments.
Using for the First Time
When you install your appliance, set the thermostat knob to position "Med" for the first 24 hours,
after which you can set it to the level that best suites your needs. It is the best to wait 24 hours before
adding food.
IMPORTANT: Once the unit has started, continuous operation is recommended. Please try and avoid
turning the unit o and on as this may aect the service life.
Noise From Your Bar Fridge
• You may notice that your bar fridge makes some unusual noises from time to time.
Most of these are perfectly normal, but you should be aware of them!
• These noises are caused by the circulation of the refrigerant liquid in the cooling system.
This is not a fault and will not aect the performance of your unit and is common with all
modern fridges.
12
Page 13
Energy Saving Tips
• The appliance should be placed in the coolest area of the room, away from heat producing appliances
or heating ducts. Please avoid placement in direct sunlight.
• Let hot foods cool to room temperature before placing them in the appliance.
• Do not overload the appliance with unfrozen food as this may cause it to freeze slowly and risk
food spoilage.
• Be sure to wrap foods properly and wipe containers dry before placing them in the appliance. This cuts
down on frost building up inside in the unit.
• Please do not wrap items in aluminium foil, wax paper or paper towel. This materials interfere with cold
air circulation, making the appliance less ecient.
• Liners interfere with cold air circulation, making the fridge less ecient.
• Organise and label food to reduce door openings and extended searches. Remove as many items as
needed at one time, ensuring the unit is opened as few times as possible.
13
Page 14
Maintenance and Cleaning
Defrosting
Defrost the freezing compartment whenever the layer of frost on the surface of the evaporator reaches
3 or 4 mm.
Important! Do not use boiling water because it may damage the plastic parts. In addition, never use a
sharp or metallic instrument to remove frost as it may damage the cooling coils and will void the warranty.
We recommend using a plastic scraper.
• When defrosting, remove all food and set the thermostat at the “OFF” position.
• Put the drip tray under the evaporator to collect melted water.
• After the frost has melted, discard the melted water and dry up the interior of refrigerator.
• The refrigerator can now be restarted by turning its thermostat to the desired setting.
Helpful Tip: Defrosting usually takes a few hours. Leaving the door open will help speed the process.
Also, pouring warm water (not boiling) on the ice/frost will help speed melting. If you must use a scraper,
please use caution—it is very easy to damage the internal compartment and void your warranty.
Cleaning
WARNING
Before cleaning the appliance, make sure it is switched o and disconnected from the power supply.
Failure to do so can result in electric shock or serious injury.
CAUTION: Before using any cleaning products, please read and follow the manufacturer’s instructions
and warnings to avoid any damage to your Bar Fridge or personal injury.
• Upon installation of your new appliance, it is recommended that it be cleaned thoroughly.
• Dust behind the refrigerator and on the ground should be cleaned regularly to improve the cooling eect
and energy saving.
• The interior of the refrigerator should be cleaned regularly to avoid odour.
• Soft towels or sponge dipped in water and non-corrosive neutral detergents are suggested for cleaning.
• The bar fridge should be cleaned with clean water and a dry cloth. Open the door for natural drying
before the power is turned on.
WARNING
Never clean the unit with an abrasive, acid, oil or solvent based cleaning agent. Never use flammable
fluids or sprays for cleaning as the fumes from these substances can create a fire hazard or Explosion.
Service, repair and spare parts
Do not attempt to alter or modify this appliance in any way, or to repair or replace any part unless it is
specifically recommended in this manual. All other servicing should be referred to a qualified technician.
Contact our after sales support on 1300 11 43 57 for advice.
Our after sales support centre stocks a selection of spare parts for the InAlto 93L Bar Fridge.
To enquire about purchasing a part, call us on 1300 11 43 57 or email [email protected]
Power Failure
Foods can be preserved for a couple of hours even in summer in case of power failure; it is recommended
to reduce the frequency of opening door and do not put fresh foods into the bar fridge.
14
Page 15
VACATION OR LONG TERM NON-USE
• Remove all the food.
• Unplug the bar fridge.
• Clean the bar fridge using the instructions above.
• Leave the door open slightly to avoid possible formation of condensation, mould, or odours.
• Use extreme caution in the case of children. The unit should not be accessible to children.
• Short vacations: Leave the bar fridge operating during vacations of less than three weeks.
• Long vacations: If the bar fridge will not be used for several months, remove all food and unplug the
power cord. Clean and dry the interior thoroughly. To prevent odour and mould growth, leave the
door open slightly blocking it open if necessary or have the door removed.
MOVING YOUR BAR FRIDGE
• Remove all the food.
• Securely tape down all loose items inside your fridge.
• Remove the rollers to prevent damage.
• Tape the doors shut.
• Be sure the fridge stays in the upright position during transportation. Do not turn upside, horizontally
place or vibrate the refrigerator, the carrying angle can not be greater than 45º.
Note: Continuous operation is recommended when the refrigerator is started. Please do not move
the refrigerator under normal circumstances so as not to aect the refrigerator's service life.
OPERATION IN CASE OF EMERGENCY
In the event of an emergency you should:
• Switch o the bar fridge at the thermostat and then unplug the fridge at the power outlet.
• Call the Residentia Support Team on:
1300 11 HELP (4357).
• Some minor faults can be fixed by referring to the instructions given in the Troubleshooting section.
15
Page 16
Page:
10
User Manual:
Troubleshooting
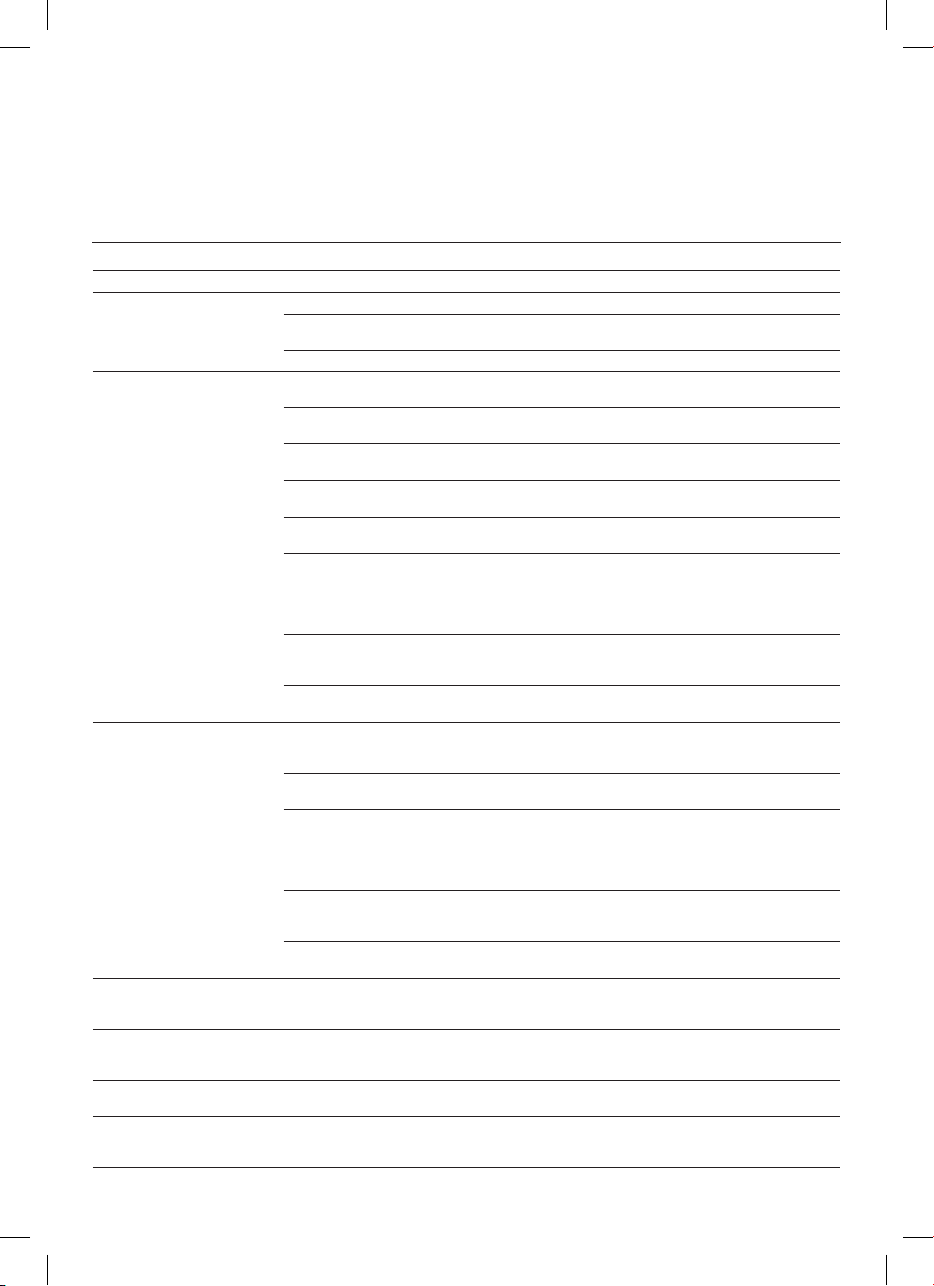
The following simple issues can be handled by the user.
Please call the after-sale service department if the issues are not settled.
Fault
The Bar Fridge doesn’t operate.
Replace any blown fuses or reset tripped circuit
The compressor turns on
and o frequently.
Change the temperature control to your desired
soapy water. If this still doesn’t improve the seal,
The temperature inside the
Bar Fridge is too warm.
soapy water. If this still doesn’t improve the seal,
The temperature inside
the Bar Fridge is too cold.
There is a popping or cracking
sound when the compressor
comes on.
There is a bubbling or gurgling
sound like water boiling.
Odor
FAQs and Troubleshooting
Possible Cause Solution
Not plugged in. Plug the Bar Fridge in.
The circuit breaker has tripped,
or a fuse blown.
The fridge temperature is set at “OFF”. Increase the fridge temperature setting.
The room temperature is hotter than normal. Try to bring the room temperature down.
A large amount of food has been added to the
fridge.
The door is left open too often. Try to minimise the door being opened for
The door is not closed completely. Close the door completely and ensure a
The temperature control is not set properly.
The door gasket doesn’t seal properly. Try cleaning the door gasket seals with warm
The fridge doesn’t have the correct clearances. Ensure your Bar Fridge has been installed
There has been a recent power outage. Give the fridge a few hours to return to the
The temperature control is set too warm. Turn the temperature control down to a cooler
The door is kept open too long is opened too
frequently.
The door gasket doesn’t seal properly. Try cleaning the door gasket seals with warm
The bar fridge doesn’t have the correct
clearances.
There has been a recent power outage. Give the fridge a few hours to return to the
The temperature control is set too cold. Turn the temperature control to a warmer
Metal parts undergo expansion and contraction,
as in hot water pipes.
The refrigerant (used to cool the fridge) is
circulating throughout the system.
Odorous foods are not sealed.
Foods have become rotten.
The interior is dirty.
breakers.
Give the Bar Fridge time to return back to your
desired temperature setting.
sometime.
complete seal.
setting.
you may need replacement gasket seals from
either a refrigeration specialist or Residentia
Group.
in an appropriate space and has the correct
clearances (as per this instruction manual).
desired temperature setting.
setting and leave for several hours for the
temperature to stabilise.
Try to minimise the door being opened for
sometime.
you may need replacement gasket seals from
either a refrigeration specialist or Residentia
Group.
Ensure your Bar Fridge has been installed
in an appropriate space and has the correct
clearances (as per this instruction manual).
desired temperature setting.
setting and allow several hours for the
temperature to stabilise.
This is normal and the sound will level o or
disappear as the fridge continues to run.
This is normal.
Odorous foods should be closely wrapped.
Rotten foods should be thrown out.
Ensure the interior is clean.
16
Page 17
Technical Specifications
Model: IBF95BG
Product Dimensions: W: 472mm, D: 450mm, H: 870mm
Weight (Net/Gross): 23.3kg/24.9kg
Refrigerator Capacity: 93L
Energy Rating: 3 Stars MEPS
Refrigerant: R600a, 24g
Model: IBF95W
Product Dimensions: W: 472mm, D: 450mm, H: 860mm
Weight (Net/Gross): 21kg/22.6kg
Refrigerator Capacity: 93L
Energy Rating: 3 Stars MEPS
Refrigerant: R600a, 24g
Standards
This product complies with AS/NZS IEC 62552.1/2/3:2018 electrical safety,
and with EN 55014-1:2006+A1:2009 A2:2011 for electromagnetic compatibility.
17
Page 18
Attach Your Receipt Here
18
Page 19
Purchase Details
For your records, please record details of your purchase
below and staple your receipt on the opposite page.
STORE DETAILS
STORE NAME
ADDRESS
TELEPHONE
PRODUCT DETAILS
MODEL NO.
SERIAL NO.*
PURCHASE DATE
Your serial number can be found
on the rear of your bar fridge.
19
Page 20
Warranty Information
WARRANTY TERMS AND CONDITIONS
REFRIGERATION APPLIANCES
This document sets out the terms and conditions of the
product warranties for Residentia Group Appliances. It is
an important document. Please keep it with your proof of
purchase documents in a safe place for future reference
should you require service for your Appliance.
1. IN THIS WARRANTY
(a) ‘acceptable quality’ as referred to in clause 10 of
this warranty has the same meaning referred to in
the ACL;
(b) ‘ACL’ means Trade Practices Amendment (Australian
Consumer Law) Act (No.2) 2010;
(c) ‘Appliance’ means any Residentia Group product
purchased by you accompanied by this document;
(d) ‘ASR’ means Residentia Group authorised service
representative;
(e) ‘Residentia Group’ means Residentia Group Pty Ltd
of 165 Barkly Ave, Burnley VIC 3121, ACN 600 546 656
in respect of Appliances purchased in Australia;
(f ) ‘major failure’ as referred to in clause 10 of this
warranty has the same meaning referred to
in the ACL and includes a situation when an
Appliance cannot be repaired or it is uneconomic
for Residentia Group, at its discretion, to repair an
Appliance during the Warranty Period;
(g) ‘Warranty Period’ means:
(i) where the Appliance is used for personal,
domestic or household use (i.e. normal single
family use) as set out in the instruction
manual, the Appliance is warranted against
manufacturing defects for 24 months,
following the date of original purchase of the
Appliance;
(h) ‘you’ means the purchaser of the Appliance not
having purchased the Appliance for re-sale, and
‘your’ has a corresponding meaning.
2. This warranty only applies to Appliances purchased
and used in Australia and is in addition to (and does
not exclude, restrict, or modify in any way) any
non-excludable statutory warranties in Australia.
3. During the Warranty Period Residentia Group or
its ASR will, at no extra charge if your Appliance
is readily accessible for service, without special
equipment and subject to these terms and
conditions, repair or replace any parts which it
considers to be defective. Residentia Group or its
ASR may use remanufactured parts to repair your
Appliance. You agree that any replaced Appliances
or parts become the property of Residentia Group.
This warranty does not apply to light globes,
batteries, seals, filters or similar perishable parts.
4. Parts and Appliances not supplied by Residentia
Group are not covered by this warranty.
20
Page 21
5. You will bear the cost of transportation, travel and
delivery of the Appliance to and from Residentia
Group or its ASR. If you reside outside of the service
area, you will bear the cost of:
(a) travel of an authorised representative;
(b) transportation and delivery of the Appliance to and
from Residentia Group or its ASR, in all instances,
unless the Appliance is transported by Residentia
Group or its ASR, the Appliance is transported at the
owner’s cost and risk while in transit to and from
Residentia Group or its ASR.
6. Proof of purchase is required before you can make
a claim under this warranty.
7. You may not make a claim under this warranty
unless the defect claimed is due to faulty or
defective parts or workmanship. Residentia Group
is not liable in the following situations (which are
not exhaustive):
(a) the Appliance is damaged by:
(i) accident
(ii) misuse or abuse, including failure to properly
maintain or service
(iii) normal wear and tear
(iv) power surges, electrical storm damage or
incorrect power supply
(v) incomplete or improper installation
(vi) incorrect, improper or inappropriate operation
(vii) insect or vermin infestation
(viii) failure to comply with any additional
instructions supplied with the Appliance;
(b) the Appliance is modified without authority from
Residentia Group in writing;
(c) the Appliance’s serial number or warranty seal has
been removed or defaced;
(d) the Appliance was serviced or repaired by anyone
other than Residentia Group, an authorised repairer
or ASR.
8. This warranty, the contract to which it relates and
the relationship between you and Residentia Group
are governed by the law applicable where the
Appliance was purchased.
9. To the extent permitted by law, Residentia Group
excludes all warranties and liabilities (other than as
contained in this document) including liability for
any loss or damage whether direct or indirect arising
from your purchase, use or non use of the Appliance.
10. For Appliances and services provided by Residentia
Group in Australia, the Appliances come with a
guarantee by Residentia Group that cannot be
excluded under the Australian Consumer Law.
You are entitled to a replacement or refund for a
major failure and for compensation for any other
reasonably foreseeable loss or damage. You are also
entitled to have the Appliance repaired or replaced
if the Appliance fails to be of acceptable quality
and the failure does not amount to a major failure.
The benefits to you given by this warranty are in
addition to your other rights and remedies under a
law in relation to the Appliances or services to which
the warranty relates.
11. At all times during the Warranty Period, Residentia
Group shall, at its discretion, determine whether
repair, replacement or refund will apply if an
Appliance has a valid warranty claim applicable
to it.
12. Missing parts are not covered by warranty.
Residentia Group reserves the right to assess each
request for missing parts in a case by case basis.
Any parts that are not reported missing in the first
week after purchase will not provide free of charge.
13. To enquire about claiming under this warranty,
please follow these steps:
(a) carefully check the operating instructions,
user manual and the terms of this warranty;
(b) have the model and serial number
of the Appliance available;
(c) have the proof of purchase (e.g. an invoice)
available;
(d) telephone the numbers shown below.
14. You accept that if you make a warranty claim,
Residentia Group and its ASR may exchange
information in relation to you to enable Residentia
Group to meet its obligations under this warranty.
IMPORTANT
Before calling for service, please ensure that the steps
in point 13 have been followed.
CONTACT SERVICE
→ Please call 1300 11 HELP (4357)
The Australian Consumer Law requires the inclusion of the following statement with this warranty:
Our goods come with guarantees that cannot be excluded under the Australian Consumer Law. You are
entitled to a replacement or refund for a major failure and for compensation for any other reasonably
foreseeable loss or damage. You are also entitled to have the goods repaired or replaced if the goods fail
to be of acceptable quality and the failure does not amount to a major failure.
Page 22
THIS PAGE IS INTENTIONALLY LEFT BLANK
22
Page 23
Warranty Information(Cont.)
NEW ZEALAND WARRANTY TERMS & CONDITIONS
REFRIGERATION APPLIANCES
To help care for your investment, be sure to register
your appliance online. Registration will help you if you
need to arrange service in the future, and serves as a
record of your purchase – including critical information
like model number and serial number – that you can
refer to at any time.
Simply visit the below website, or ask your retailer
for help: www.inalto.co.nz/register
WARRANTY:
These products are covered by a warranty for a period
of 12 months from the date of purchase, subject to the
following conditions*. The warranty covers rectification
free of charge of any fault arising from defective
materials or components, or faulty workmanship or
assembly.
* The conditions above mentioned are:
1. That the purchaser carefully follows all
instructions packed with the product;
2. That the purchaser and/or installer carefully
follows the installation instructions provided and
complies with electrical wiring regulations, gas
and/or plumbing codes;
3. That the purchaser carefully follows instructions
provided in the owner’s handbook relating to the
proper use and care of the product and does not
use the product for any purpose other than the
domestic use for which it has been designed;
4. Commercial use of the product for professional or
industrial purposes will void this warranty.;
5. That the product was purchased and installed in
New Zealand;
6. That this warranty does not extend to:
a) optional glass lids for hobs apart from claims
which relate to mechanical or physical
damage thereof at the date of purchase;
b) ‘consumable’ parts such as light bulbs or
filters;
c) damage to ceramic glass caused by liquid
or solid spill-overs, lack of maintenance,
or impact;
d) damage to surface coatings caused by
cleaning or maintenance using products not
recommended by the owner’s handbook;
e) defects caused by normal wear and tear,
accident, negligence, alteration, misuse or
incorrect installations;
f) a product dismantled, repaired or serviced
by any serviceman other than an authorised
service agent;
g) a product not in possession of the original
purchaser;
h) damage caused by power outages or surges
i) damage caused by pests (eg. rats,
cockroaches etc.)
7. That if the product is a freestanding microwave
oven or small appliance it must be returned to
the dealer/ retailer for servicing. These products,
unless stated otherwise, have a 12 month
warranty from original date of purchase with
24 months on the microwave magnetron; Waste
disposers have a 12 month warranty.
8. The provision of service under this warranty is
limited by a 25km boundary from the retailer
where the product was purchased except for
microwaves. Such travelling outside of these limits
will incur commercial cost to be paid by you,
regulated by the number of kilometres travelled
beyond the 25km limit (50km return trip).
Microwaves are to be delivered to the nearest
authorised service agent by the customer.
Please refer to your user manual for any further
conditions that may apply to your specific model.
Nothing herein contained shall be construed in any
way as excluding or limiting your rights under the
Consumer Guarantees Acts 1993.
For Service please visit www.applico.co.nz/service or
contact the dealer/retailer from whom you purchased
the product from or call the 0800 number listed below.
If you are unable to establish the date of purchase,
or the fault is not covered by this warranty, or if the
product is found to be in working order, you will be
required to bear all service call charges.
Registration of this warranty constitutes acceptance of
the terms and conditions of this warranty.
Should you require any assistance, please call Customer
Services on 0800 763 448.
Distributed by Applico Ltd.
www.applico.co.nz
July 2019
After registering your appliance online, we recommend
you fill out the below information for your reference
and keep this warranty card in a
safe place.
THIS WARRANTY IS VALID IN NEW ZEALAND ONLY.
23
Page 24
DESIGNED IN MELBOURNE FOR ALL AUSTRALIAN HOMES
WWW.INALTO.HOUSE
 Loading...