

Page 1

impact
lighting equipment and accessories
LiteTrek 4.0 Monolight
INSTRUCTIONS
Page 2

Congratulations on your purchase of the Impact LiteTrek 4.0 Portable
Monolight. Enjoy the many benets of a por table strobe light, such as
shooting on location or anywhere a portable compact lighting solution is
required. The LiteTrek Portable Monolight was designed to work in
conjunction with our power pack system. With a fully-charged power pack,
you can achieve 650* ashes at full power, and 3500* ashes at the lowest
power setting. And the swappable battery pack allows you to continue
shooting with fresh power. Please read these operating instructions and
safety precautions before operating this equipment.
Features
• 400 watt /seconds of port able power • Full to 1/64 power con trol
• Digi tall y cont rolled • Full manual control
• Stroboscopic Mode • Counter-balanced s tand mount
Warning
• Do not disassemble the LiteTrek 4. 0 Monolight or any included acces sories
• Only use the LiteTrek Power Pack as the power source
• Unplug from power source when not in use
• Do not allow moist ure or liquids to come in contac t with the monolight,
bat ter y pack, charger, or cables
• Keep away from heat , re, dust , and ammable oil and gases
• To avoid damage to the ashtube, mount light accessories, such as sof tboxes and
reectors, before turning on the unit.
• Speedrings, grids, reectors, ash tubes, modeling lights, and other accessories heat up
during long periods of use. Wait unt il par ts have cooled off before touching these parts.
• Damaged ashtubes can pose serious risk of injur y and electric shock . If the ashtube is
damaged, turn the power pack of f immediately. Replacement ashtubes can be purchased
from your Impact retailer.
• Never touch the ashtube when the light is connected to a power source.
• Ensure there is sufcient air ow while operating the ash unit.
• Do not place metal objects near the power input jack .
• Do not use damaged cables.
Replacement s are available for purchase from an Impact dealer.
• Keep out of reach of children
*Numb er of ashes varies a ccording to charge sta te, temperature, a nd maintenanc e
Page 3
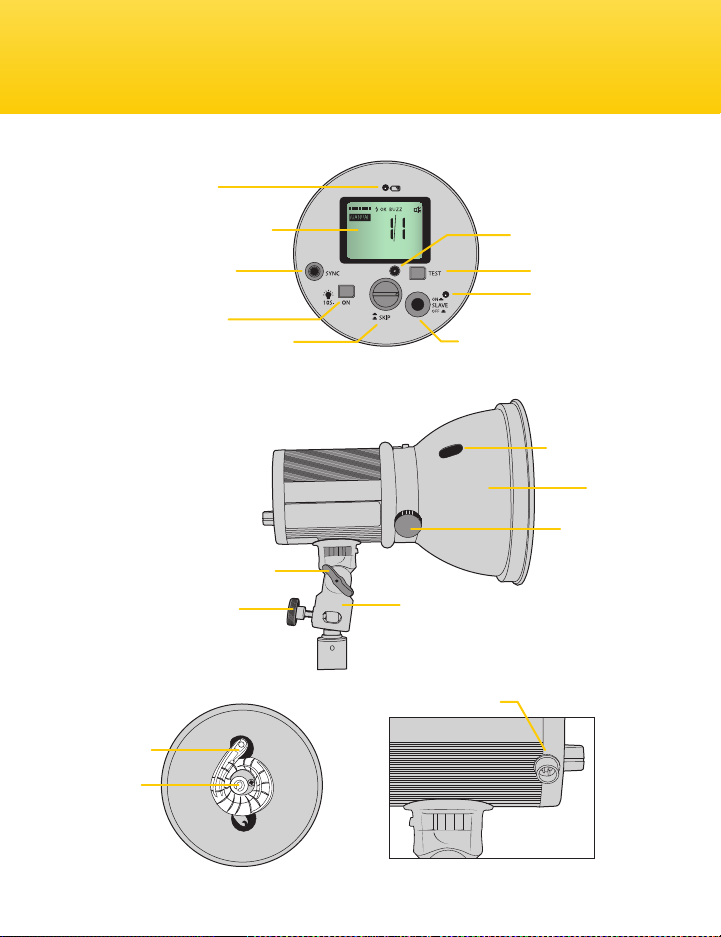
OverviewTroubleshooting
Low Battery Indicator
LCD Screen
Sync Input Jack
Modeling Lamp Switch
Tilt Tension Knob
Ligh t Stand
Locking Knob
Fl ash Tube
Modeling
Lamp
Menu Dial
Optical Slave Sensor
Tes t Butto n
Optical Slave
Indicator
Optical Slave Swi tch
Umbrella Insert
Reector
Reector
Locking Knob
Ligh t Stand Mount
Power Input Jack
Page 4
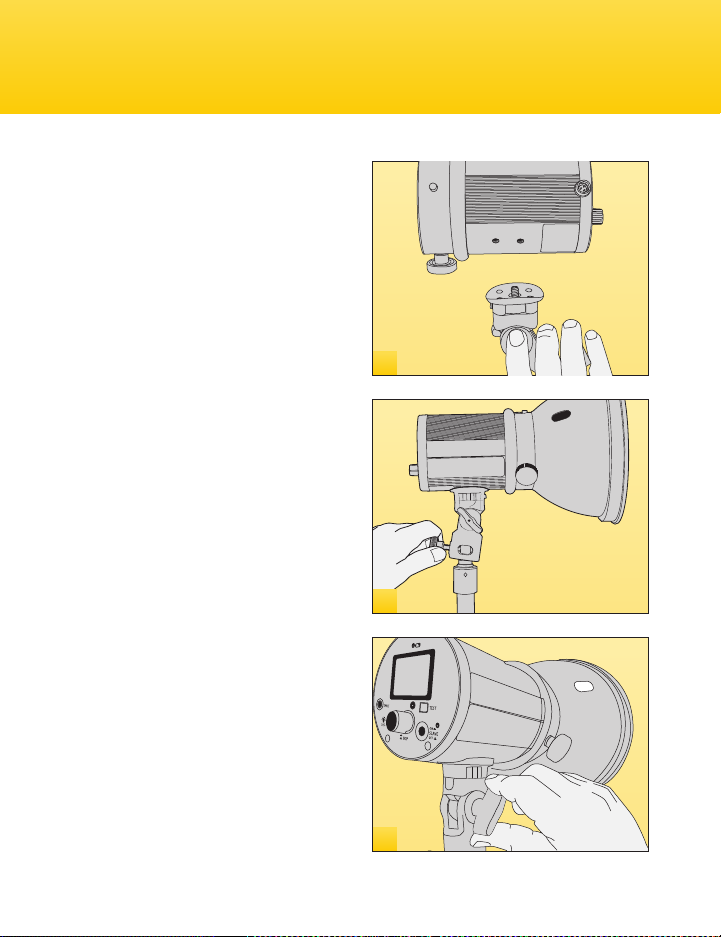
Attach the light stand mount to the
bottom of the monolight using either
one of the two counter-balancing
holes. Tighten the thumbscrew on
the light stand mount until it sits
securely on the LiteTrek.
Loosen the stand mount knob and
place the light onto a light stand with a
5/8˝ stud. Tighten the knob until the
LiteTrek is secure on the light stand.
Adjust the tilt of the light by loosening
the tension knob on the side and
re-tighten when a suitable angle is
found.
1
2
3
Page 5
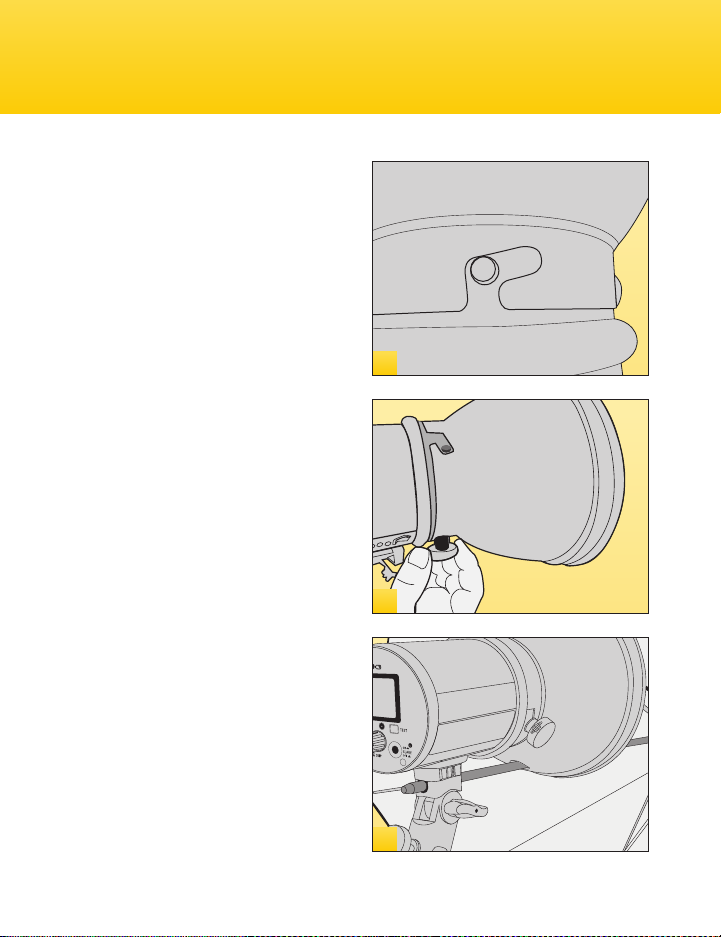
Attach the reector by loosening the
knob on the side of the reector, and
inserting the reector so that the
notches slide around the pins on the
light head. Make certain that the
hole for the umbrella shaf t is
positioned on the bottom of the
reector.
Twist the reector clockwise until the
pins are seated all the way into the
notches, and then tighten the reector
locking knob to secure the reector.
Impact also makes an adapter that will
accommodate Bowens-mount
reectors (see your Impact dealer).
If an umbrella is to be used, insert the
umbrella’s shaft through the umbrella
mounting hole on the reector and
then through the hole on the light
stand mount.
4
5
6
Page 6
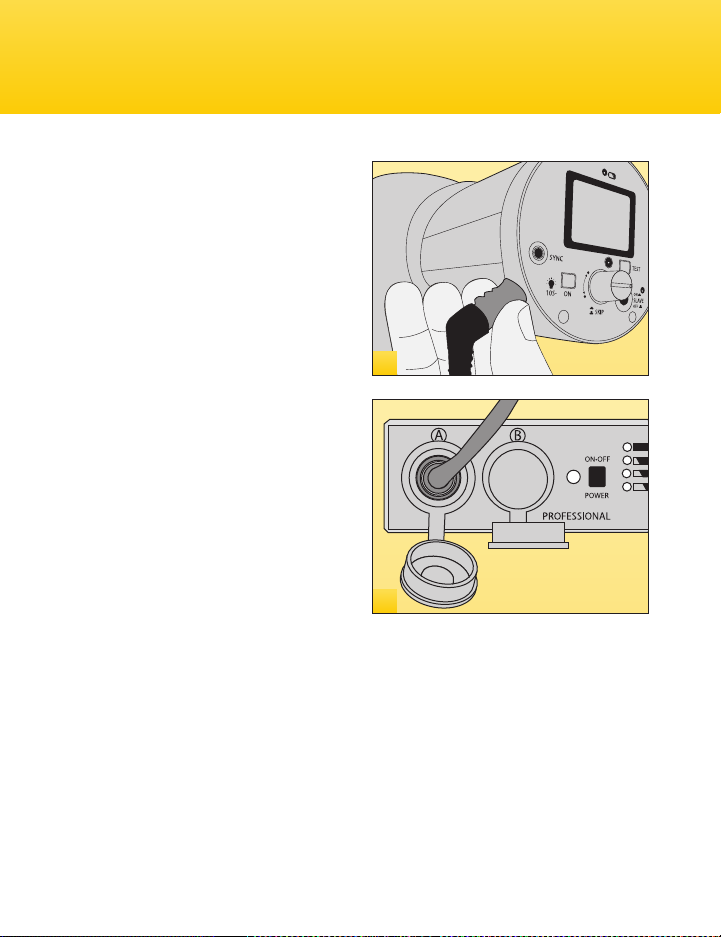
Make sure the power pack is turned
off. Insert the power cable into the
ash head power jack.
Plug the other end of the power cable
into the power pack (outlet A). Outlet
A on the Mini LT Power Pack is for
connecting to the LiteTrek 4.0
Monolight. Outlet B is for connecting
to compatible portable ash units. The
Power Pack will not turn on unless a
power cable is securely connected.
This prevents the battery from
discharging when the power pack is
not in use. Turn the power pack on by
pressing the power button. You’re
ready to begin shooting.
7
8
Page 7

Operating InstructionsFlash Tube Replacement
Turn the modeling light on for an
indication of how the light will fall.
The light will automatically shut off
after 10 seconds in order to conserve
battery power.
1
Set the power setting according to the
required exposure by pressing the
menu dial once, and then rotating the
dial to the desired power settings.
2
As you turn the menu dial, the display
will display the chosen power setting:
1/1: 40 0 wat t/seconds*
1/2: 200 wat t/seconds
1/4: 100 watt/seconds
1/8: 50 watt/seconds
1/16: 25 watt/seconds
1/3 2: 12 wat t/seconds
1/6 4: 6 watt /seconds
*Watt /second output gures are approxima tes and may vary accordi ng to various set tings and condi tions
3
Page 8

Wait for the monolight to recycle
before the nex t picture is taken. An
audible beep may sound when the
monolight has fully recharged and
ready to re again. If the audible
beep function has been turned off, a
visual indicator on the top left of the
LCD panel also indicates the recycle
progress.
4
Page 9

Quick ModeAudible Beep
The monolight offers ve levels of sync speeds in Quick Mode:
FP, F2, F3, F4 and F5.
FP, for “focal plane,” produces a succession of ashes at a very fast speed in
order to illuminate the sensor as evenly as possible when shooting with fast
shut ter speeds (t ypically above 1/250s). This series of ashes is usually not
noticeable with the naked eye. When using the FP settings, be aware that the
ash will output at its lowest power setting to compensate for the fast burst
speeds.
Press the Menu Dial until the “QUICK”
label is displayed on the lef t side of the
screen.
1
Rotate the Menu Dial to select the
desired focal plane (FP) shutter speed:
FP: 1/13000s (50w/s)*
F2: 1/11000s (60w/s)
F3: 1/9000s (70w/s)
F4: 1/6000s (80w/s)
F5: 1/4000s (90w/s)
2
*Watt /second output gures are approxima tes and may vary accordi ng to various set tings and condi tions
Page 10

Multi Mode
Multi Mode produces a series of continuous ashes for a single exposure.
These pulses of light allow you to freeze several moments of action in a single
image. This mode is great for sports or when capturing movement is critical.
Page 11

1 2
Press the Menu Dial until the “QUICK” label
is displayed, as well as the “CONT ” label in
the center of the screen.
Press the Menu Dial again. “MULTI” will be
displayed below “CONT.”
Choose the desired interval speed between
each pulse of ligh t from 1-10 by rotating the
Menu Dial.
43
Rotate the Menu Dial to select t he amount of
ashes that will re in the sequence. Options
are 5, 10, 15 and 20.
Page 12

After every ash, the power needs to be recycled or recharged before the
next ash can be red. The LiteTrek Monolight provides a visual indicator at
the top left corner of the LCD where a progress bar animates until the
recycling is complete. An audible beep is sounded when the ash has nished
recycling. To disable the beep, press the Menu Dial until only the speaker icon
is shown. Turn the menu dial to either disable it (the speaker will appear with a
line across it), or to turn it on (the speaker will appear without a line across it).
1 2
Press the Menu Dial un til t he screen displays
only t he top menu bar as shown above. Note
the speaker symbol in the top right corner.
Rot ate the Menu Dial to toggle bet ween ON
and OFF for the audible beep indicator.
Page 13

Triggering the MonolightOperating Instructions (continued)
The simplest way to tr igger the ash is to
pres s the T EST button. This is useful when
you need to discharge the power built up
in the ash unit, for example just before
replacing the ash tube (more on t hat later).
The monolight has an on-board light
sensitive sensor, known as an optical slave,
that reacts to ashes that re nearby. The
optical slave sensor is located on t he back
panel of the light.
The sync jack on the Monolight may be used
for direct connect ion to a camera PC Sync
connection. A radio slave receiver can also
be plugged into this socket.
To set the Monolight to ash in slave mode,
press the SL AVE but ton on the back of t he
ligh t. The slave in dica tor L ED will light to
conrm you are in slave mode. Make sure
that the primary ash that res is in the
line-of-sight of the optical slave, or it may
not t rigger.
Page 14

The charge in the flash unit must be discharged before removing the flash
tube, or there is a risk of electrical shock. Make sure the flash unit is on.
Push the TEST button on the rear panel of the flash. The unit will flash,
discharging the power. Immediately turn of f the power switch on the rear
panel. Unplug the power cord from the power source. Never touch the ash
tube immediately af ter use. Wait at least 30 minutes for the tube to cool
down. Only use ash tubes designed specically for the LiteTrek 4.0.
1
Turn of f and disconnect
ligh t from the power suppl y.
Remove the reector.
2 3
Using needle-nose pliers,
unwrap the retention wire
that is wrapped around the
hook below the ashtube .
4 5 6
Insert a new ash tube by
aligning the tube’s pins with
the light’s socket.
Push the pins of t he ash
tube into the sockets using
rm but even pressure.
Using cot ton gloves, gent ly
lif t and remo ve the old ash
tube from its socket wi th
one hand, while holding the
light with the other hand.
With needle-nose pliers,
hook the retention spr ing
over t he hook below the
flash tube.
Page 15

Modeling Lamp ReplacementAssembly (continued)
1
Turn of f and disconnect
ligh t from the power suppl y.
Remove the reector.
2 3
Using cotton gloves, gently
lif t and remove the modeling
lamp from its socket.
Gent ly insert the new
modeling lamp wit h rm and
even pressure until it sits
securely in the socket.
Page 16

Specications
Total Power 40 0 w/s
Stops of Power 5 Stop Range
Recycle Time 1 Second (1/ 64 Power)
2 Seconds (Full Power)
Flashes per Full Charge 650 (Full Power)
3500 (1/64 Power) approx.
Flash Duration/Sync Speeds 1/2 200s - 1/1400 0s
Full Power (1/1): 400w/s 1/2200s
1/2 Power: 200w/s 1/2800s
1/4 Power: 100w/s 1/3400s
1/8 Power: 50w/s 1/6500s
1/16 Power: 25w/s 1/9000s
1/3 2 Power: 12w/s 1/12 500s
1/6 4 Power: 6w/s 1/14000s
Sync Circuit Voltage 5VDC
Flash Tube Rating 400w/s
Flash Tube Color Temperature 5500°K ±100°K
Modeling Light Rating Model #BRL 50 w
Modeling Light Color Temp. 2900 °K ±20 0°K
Modeling Light Life ±100 Hours
Dimensions (light head only) 3.5 x 3.5 x 5.5˝
90 x 90 x 140 mm
Weight 1.98lb (900g)
Page 17

Power SettingsAssembly
POWER SETTING 1/1 1/2 1/4 1/8 1/16 1/32 1/64
Guide Number* 56 40 28 20 14 9 6
f/2.8 20m 14m 10m 7m 5m 3.5m 2.5m
f/4 14m 10m 7m 5m 3.5m 2.5m 1.7m
f/5.6 10m 7m 5m 3.5m 2.5m 1.7m 1.2m
f/8 7m 5m 3.5m 2.5m 1.7m 1.2m 0.8m
f/11 5m 3.5m 2.5m 1.7m 1.2m 0.8m 0.6m
f/16 3.5m 2.5m 1.7m 1.2m 0.8m 0.5m 0.3m
f/Stop
*This char t represents approx imate measurem ents that are relati ve to varying sit uations.
Metering
When using ex ternal non-dedicated ashes , the camera may not be able to properly gauge
exposure. T he bes t way to set exposure is by setting the camera to manual and using an
external light meter.
Autodump
If the power level is turned down after recycling, the autodump feature will automatically
“bleed” of f the excess power wi thout having to manually dump the charge.
Page 18

Symptom
Modeling light does not work.
.
The slave sensor
does not trigger the light.
Flash does not trigger
Solution
The modeling light automatically shu ts
off aft er ten seconds to save battery
power. When necessar y, press the
modeling light but ton located on the
LiteTrek control panel.
Make sure that the “slave” but ton
located behind the light is turned on.
An LED will turn red when it is turned on.
The slave function uses a light sensor
on the back of the light . Make sure that
there is not any obstruction be tween
the primar y ash and this sensor.
The slave function may take 15 seconds
to st art up.
Ensure ash tube is seated properly.
Replace the ash tube if there are signs
of scorching, blistering, or cracks
on the tube.
Page 19

Warranty
Impact provides a limited warranty that this product is free from defects in
materials and workmanship to the original purchaser under normal use for a
period of one (1) year from the original purchase date. Impact’s responsibility
with respect to this limited warranty shall be limited solely to repair or
replacement, at its option, of any product which fails during normal consumer
use. This warranty does not extend to damage or failure which results from
misuse, neglect, accident, alteration, abuse, improper installation or
maintenance. To obtain a replacement during the time of this warranty, please
return the defective item with proof of purchase along with an RMA number to
the place of purchase. This warrant y gives you specic legal rights, and you
may also have other rights which vary from state to state.
©Copyright 2 010 Impact
Page 20

To see all of our lighting equipment,
please visit our Web site.
impact
www.impactstudiolighting.com
 Loading...