

IMG STAGE LINE DP-120 Instruction Manual
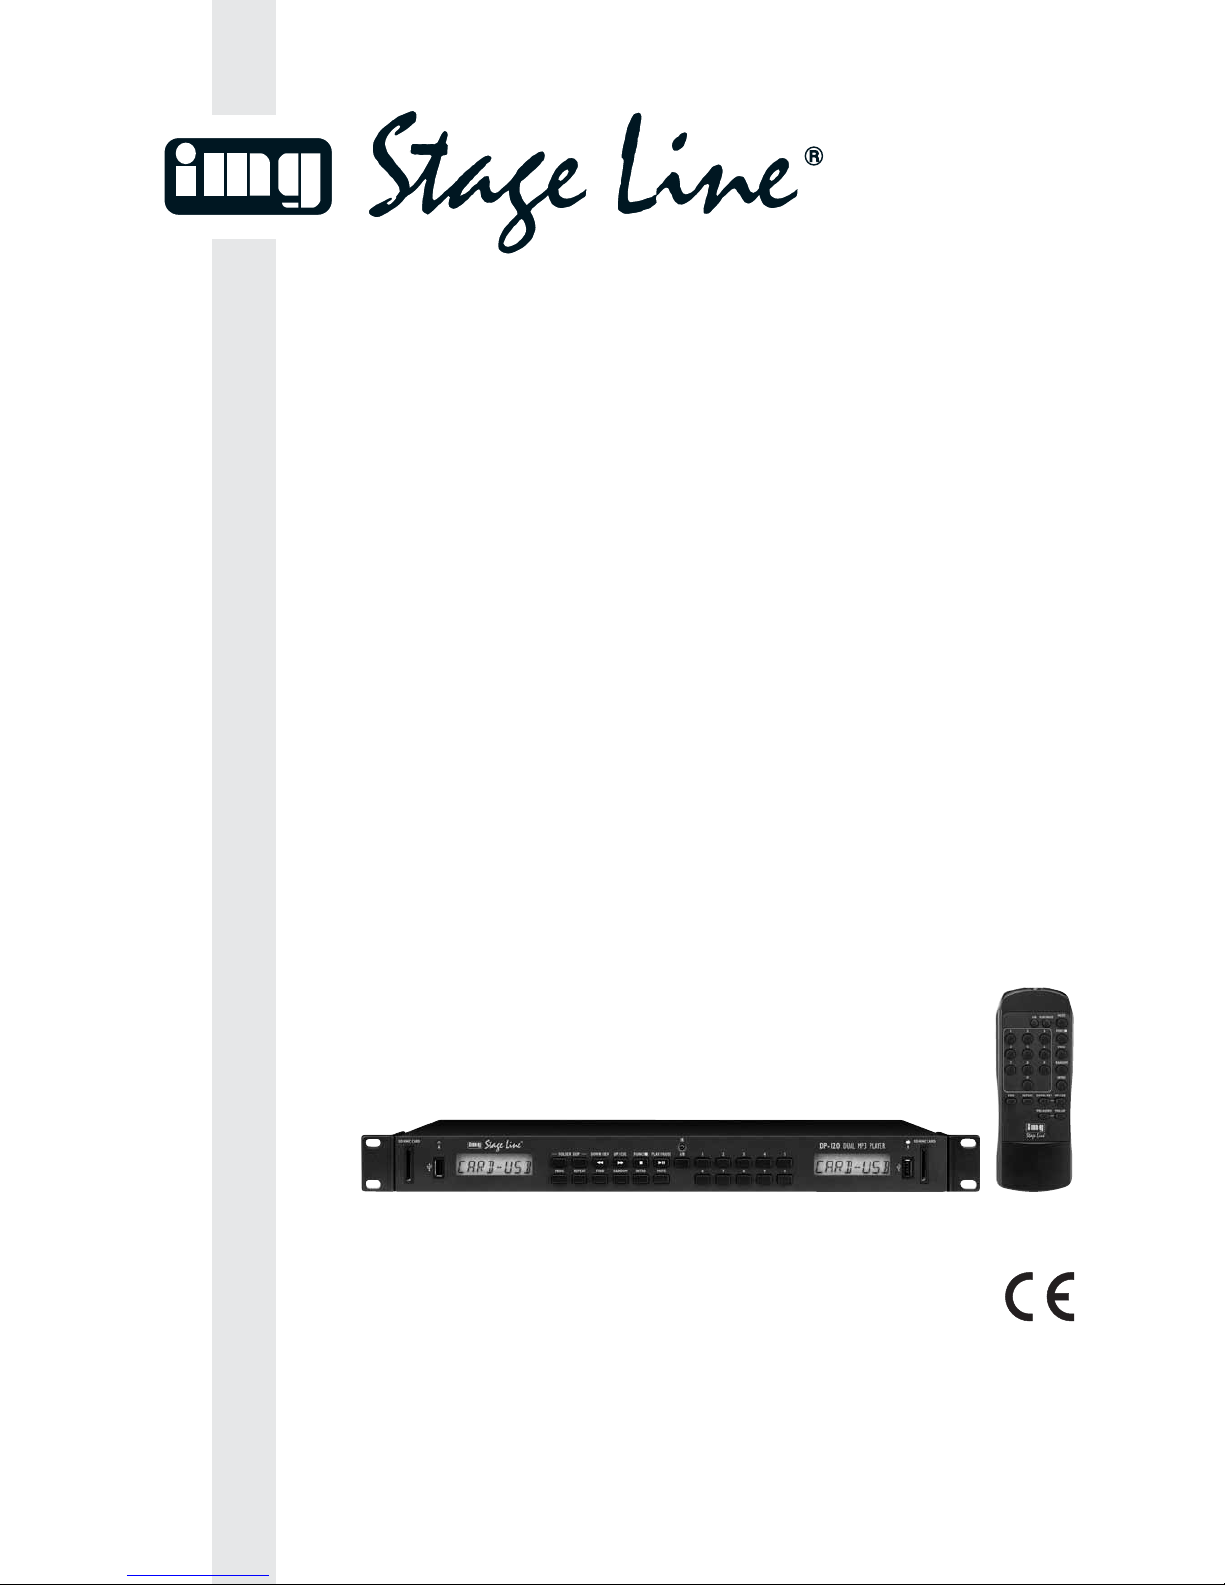
DUAL-MP3-PLAYER
DUAL MP3 PLAYER
LECTEUR MP3 DOUBLE
LETTORE MP3 DOPPIO
DP-120 Best.-Nr. 21.2310
BEDIENUNGSANLEITUNG • INSTRUCTION MANUAL • MODE D’EMPLOI • ISTRUZIONI PER L’USO
GEBRUIKSAANWIJZING • MANUAL DE INSTRUCCIONES • INSTRUKCJA OBSŁUGI • BRUGSANVISNING
SÄKERHETSFÖRESKRIFTER • TURVALLISUUDESTA

Bevor Sie einschalten …
Wir wünschen Ihnen viel Spaß mit Ihrem neuen Gerät
von „img Stage Line”. Bitte lesen Sie diese Bedienungsanleitung vor dem Betrieb gründlich durch. Nur so lernen
Sie alle Funk tionsmöglichkeiten kennen, ver meiden
Fehlbedienungen und schützen sich und Ihr Gerät vor
eventuellen Schäden durch unsachge mäßen Ge brauch.
Heben Sie die Anleitung für ein späteres Nachlesen auf.
Der deutsche Text beginnt auf der Seite 4.
Before you switch on …
We wish you much pleasure with your new “img Stage
Line” unit. Please read these operating instructions carefully prior to operating the unit. Thus, you will get to know
all functions of the unit, operating errors will be prevented, and yourself and the unit will be protected
against any damage caused by improper use. Please
keep the oper ating instructions for later use.
The English text starts on page 4.
D
A
CH
GB
Avant toute installation …
Nous vous souhaitons beaucoup de plaisir à utiliser cet
ap pareil “img Stage Line”. Lisez ce mode dʼemploi enti è re ment avant toute utilisation. Uniquement ainsi, vous
pourrez apprendre lʼensemble des possibilités de fonc tion nement de lʼappareil, éviter toute manipulation erro née
et vous protéger, ainsi que lʼappareil, de dommages éven tuels engendrés par une utilisation inadaptée. Conservez
la notice pour pouvoir vous y reporter ultérieurement.
La version française se trouve page 8.
Prima di accendere …
Vi auguriamo buon divertimento con il vostro nuovo ap pa recchio di “img Stage Line”. Leggete attentamente le
istruzioni prima di mettere in funzione lʼapparecchio.
Solo così potete conoscere tutte le funzionalità, evitare
co m an di sbagliati e proteggere voi stessi e lʼapparecchio
da eventuali danni in seguito ad un uso improprio. Conservate le istruzioni per poterle consultare anche in
futuro.
Il testo italiano inizia a pagina 8.
F
B
CH
I
Voor u inschakelt …
Wij wensen u veel plezier met uw nieuwe apparaat van
“img Stage Line”. Lees deze gebruikershandleiding
grondig door, alvorens het apparaat in gebruik te nemen.
Alleen zo leert u alle functies kennen, vermijdt u foutieve
bediening en behoedt u zichzelf en het apparaat voor
eventuele schade door ondeskundig gebruik. Bewaar de
handleiding voor latere raadpleging.
De Nederlandstalige tekst vindt u op pagina 12.
Antes de la utilización …
Le deseamos una buena utilización para su nue vo aparato “img Stage Line”. Por favor, lea estas in s trucciones
de uso atentamente antes de ha cer funcionar el aparato.
De esta manera conocerá todas las funciones de la unidad, se pre vendrán errores de operación, usted y el apa rato estarán protegidos en contra de todo daño cau sado
por un uso inadecuado. Por favor, guarde las instrucciones para una futura utilización.
La versión española comienza en la página 12.
NL
B
E
Før du tænder …
Vi håber, du bliver glad for dit nye “img Stage Line” produkt. Læs venligst betjeningsmanualen grundigt igennem, inden du tager produktet i brug. På denne måde
lærer du alle funktioner at kende, og undgår betjeningsfejl, der kan skade produktet. Gem venligst betjeningsmanualen til senere brug.
Den danske vejledning finder du på side 16.
Ennen kytkemistä …
Toivomme Sinulle paljon miellyttäviä hetkiä uuden “img
Stage Line” laitteen kanssa. Ennen laitteen käyttöä pyydämme Sinua huolellisesti tutustumaan turvallisuusohjeisiin. Näin vältyt vahingoilta, joita virheellinen laitteen
käyttö saattaa aiheuttaa. Ole hyvä ja säilytä käyttöohjeet
myöhempää tarvetta varten.
Turvallisuusohjeet löytyvät sivulta 20.
DK
FIN
Innan du slår på enheten …
Vi önskar dig mycket glädje med din nya “img Stage
Line” produkt. Läs igenom säkerhetsföreskrifterna noga
innan enheten tas i bruk. Detta kan förhindra att problem
eller fara för dig eller enheten uppstår vid användning.
Spara instruktionerna för framtida användning.
Säkerhetsföreskrifterna återfinns på sidan 20.
S
Przed uruchomieniem …
Życzymy zadowolenia z nowego produktu “img Stage
Line”. Dzięki tej instrukcji obsługi będą państwo w stanie
poznać wszystkie funkcje tego urządzenia. Stosując się
do instrukcji unikną państwo błędów i ewentualnego
uszkodzenia urządzenia na skutek nieprawidłowego
użytkowania. Prosimy zachować instrukcję.
Tekst polski zaczyna się na stronie 16.
PL
wwwwww..iimmggssttaaggeelliinnee..ccoomm
2
0
8
5
2
7
4
1
9
6
3
RANDOM
PROG
FUNC/
INTRO
PLAY/PAUSE
A/B
FIND DOWN/REV UP/CUE
MUTE
REPEAT
FOLDER SKIP
USE ONLY WITH A 250V FUSE
DP-120
WWW.IMGSTAGELINE.COM
DUAL MP3 PLAYER
POWER
RL RL
AUDIO OUT B AUDIO OUT A
230V~/50Hz
T630mAL
3
12 3 4 5678
22 23 24 25 26
IR
PROG REPEAT FIND RANDOM INTRO MUTE
DOWN/ REV UP/ CUE
FUNC/
PLAY/PAUSE A/BFOLDER SKIP
2
6
1
7839
5
0
4
910111213
14 15 16 17 18 19 20 21
20
21
12
19
10
9
11
14
17
18
A
SDMMC CARD
B
SDMMC CARD
DP-120
DUAL MP3 PLAYER
IR
PROG REPEAT FIND RANDOM INTRO MUTE
DOWN/REV UP/ CUE
FUNC/
PLAY/PAUSE A/BFOLDER SKIP
261
783950
4
REPEAT
16
15
4
GB
D
A
CH
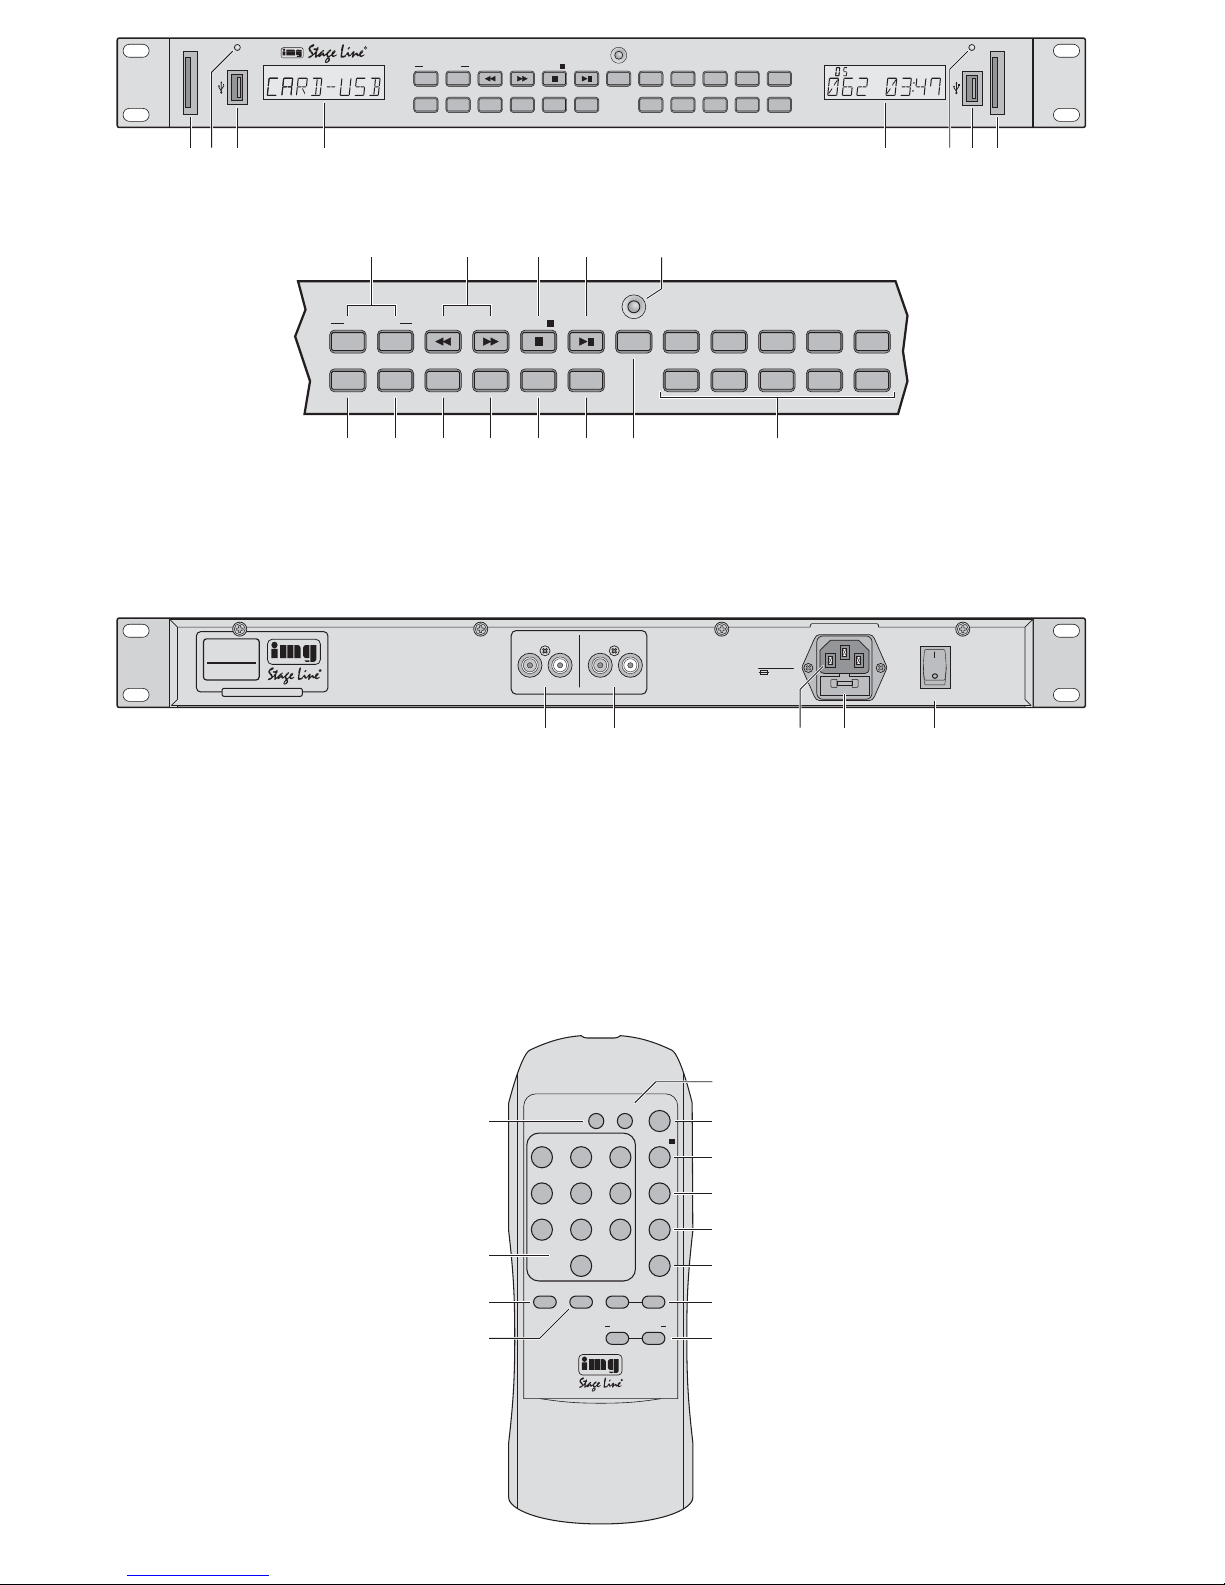
Please unfold page 3. Then you can always see
the operating elements and connections de scribed.
1 Operating Elements
and Connections
1.1 Front side and remote control
1 Slot for inserting an SD/MMC card into player A
2 Indication A: lights up when player A can be con-
trolled; also see item 20, button A/B
3 USB interface of player A for inserting a USB
stick or for connecting a hard disk
4 Display of player A
5 Display of player B
6 Indication B: lights up when player B can be con-
trolled; also see item 20, button A/B
7 USB interface of player B for inserting a USB
stick or for connecting a hard disk
8 Slot for inserting an SD/MMC card into player B
9 Buttons FOLDER SKIP for selecting the first title
in another folder and for further title selection:
With the left button the unit goes to the first title
of the previous folder and with the right button to
the first title of the next folder. While replaying it
is possible to go to the following or previous titles
by keeping a button pressed.
10 Buttons DOWN/REV and UP/CUE for the title
selection and the fast forward or reverse
– Title selection
Each time the button UP/CUE is pressed, the
unit will advance one title; when the button
DOWN/REV is pressed, the unit will go to the
title beginning, and with each further actuation
the unit will go back one title.
– Fast forward/reverse
For the fast forward keep the button UP/CUE
pressed, for the reverse the button DOWN/
REV.
11 Button FUNC/
– While replaying, press the button: The player
is set to stop.
– If the player is set to stop, keep the button
pressed for 3 seconds: switching between
memory card and USB connection.
12 Button PLAY/PAUSE to switch between replay
and pause
13 Infrared sensor for the remote control signals
14 Button PROG to switch to the programming
mode for compiling an individual title sequence
(
chapter 5.11)
15 Button REPEAT for the repeat functions
1
st
pressing of button (indication REPEAT)
The present title is continuously repeated.
2
nd
pressing of button (indication REPEAT ALL)
All titles on the storage medium are continuously repeated.
3
rd
pressing of button
(indication REPEAT ALBUM)
All titles in the selected folder are continuously repeated.
4
th
pressing of button
(indication REPEAT is extinguished)
The repeat function is switched off.
16 Button FIND
– Press shortly: to switch the folder search func-
tion on or off (
chapter 5.5.3)
– Keep it pressed for 1 sec.: to switch the display
between indication of title information (file,
title, artist, album) and playing time (title No.,
min. : sec.)
17 Button RANDOM to replay the titles in a random
order (indication RANDOM)
18 Button INTRO to replay each title beginning for
10 sec. respectively (indication INTRO)
19 Button MUTE to mute the player
20 Button A/B to switch the control
to player A [indication A (2) lights up] or
to player B [indication B (6) lights up]
21 Numerical keys for direct selection of a title, e. g.:
Title No. Buttons
4 4, PLAY/PAUSE
27 2, 7, PLAY/PAUSE
135 1, 3, 5, PLAY/PAUSE
1.2 Rear side
22 Audio output of player B
23 Audio output of player A
24 Mains jack for connection to a socket (230 V~/
50 Hz) via the supplied mains cable
25 Mains fuse
Only replace a blown fuse by one of the same
type.
26 POWER switch
2 Safety Notes
The unit corresponds to all required directives of the
EU and is therefore marked with .
It is essential to observe the following items:
The unit is suitable for indoor use only. Protect it
against dripping water and splash water, high air
humidity, and heat (admissible ambient temperature range 0 – 40 °C).
Do not place any vessels filled with liquid, e. g.
drinking glasses, on the unit.
Do not set the unit into operation, or immediately
disconnect the mains plug from the mains socket if
WARNING The unit is supplied with hazardous
mains voltage (230 V~). Leave servicing to skilled personnel only. Inexpert handling or modification of the
unit may cause an electric shock
hazard.
Bitte klappen Sie die Seite 3 heraus. Sie sehen
dann im mer die beschriebenen Bedien elemente
und Anschlüsse.
1 Übersicht der Bedienelemente
und Anschlüsse
1.1 Frontseite und Fernbedienung
1 Schlitz zum Einstecken einer SD/MMC-Karte in
den Player A
2 Anzeige A: leuchtet, wenn sich der Player A steu-
ern lässt; siehe auch Position 20, Taste A/B
3 USB-Schnittstelle des Players A zum Einstecken
eines USB-Sticks oder zum Anschluss einer
Festplatte
4 Display des Players A
5 Display des Players B
6 Anzeige B: leuchtet, wenn sich der Player B
steuern lässt; siehe auch Position 20, Taste A/B
7 USB-Schnittstelle des Players B zum Einstecken
eines USB-Sticks oder zum Anschluss einer
Festplatte
8 Schlitz zum Einstecken einer SD/MMC-Karte in
den Player B
9 Tasten FOLDER SKIP zur Anwahl des ersten
Titels in einem anderen Ordner und zur weiteren
Titelauswahl:
Mit der linken Taste wird auf den ersten Titel des
vorherigen Ordners gesprungen und mit der rechten Taste auf den ersten Titel des nächsten Ordners. Während der Wiedergabe kann durch Ge drückthalten einer Taste auf die folgenden oder
auf die davor liegenden Titel gesprungen werden.
10 Tasten DOWN/REV und UP/CUE für die Titelan-
wahl sowie den schnellen Vor- und Rücklauf
– Titelanwahl
Mit jedem Drücken der Taste UP/CUE wird ein
Titel vorgesprungen; durch Drücken der Taste
DOWN/REV wird an den Titelanfang gesprungen und mit jedem weiteren Drücken ein Titel
zurück.
– schneller Vor-/Rücklauf
Für den Vorlauf die Taste UP/CUE ge drückt
halten, für den Rücklauf die Taste DOWN/REV.
11 Taste FUNC/
– Während des Abspielens die Taste drücken:
Der Player schaltet auf Stopp.
– Steht der Player auf Stopp, die Taste 3 Sek.
gedrückt halten: Umschalten zwischen Speicher-Karte und USB-Anschluss.
12 Taste PLAY/PAUSE zum Umschalten zwischen
Wiedergabe und Pause
13 Infrarotsensor für die Fernbedienungssignale
14 Taste PROG, um zum Zusammenstellen einer
eigenen Titelfolge in den Programmiermodus zu
schalten (
Kap. 5.11)
15 Taste REPEAT für die Wiederholfunktionen
1. Tastendruck (Anzeige REPEAT)
Der momentane Titel wird ständig wiederholt.
2. Tastendruck (Anzeige REPEAT ALL)
Alle Titel auf dem Speichermedium werden
ständig wiederholt.
3. Tastendruck (Anzeige REPEAT ALBUM)
Alle Titel im angewählten Ordner werden ständig wiederholt.
4. Tastendruck (Anzeige REPEAT erlischt)
Die Wiederholfunktion ist ausgeschaltet.
16 Taste FIND
– Kurz drücken: Ordnersuchfunktion ein- oder
ausschalten (
Kap. 5.5.3)
– 1 Sek. gedrückt halten: Umschalten des Dis-
plays zwischen der Anzeige von Titelinformationen (File, Title, Artist, Album) und der Laufzeit (Titel-Nr., Min. : Sek.)
17 Taste RANDOM zum Abspielen der Titel in zufäl-
liger Reihenfolge (Anzeige RANDOM)
18 Taste INTRO zum Anspielen der Titel für jeweils
10 Sek. (Anzeige INTRO)
19 Taste MUTE zum Stummschalten des Players
20 Taste A/B zum Umschalten der Steuerung
auf den Player A [Anzeige A (2) leuchtet] oder
auf den Player B [Anzeige B (6) leuchtet]
21 Zifferntasten zur Direktanwahl eines Titels, z.B.:
Titelnr. Tasten
4 4, PLAY/PAUSE
27 2, 7, PLAY/PAUSE
135 1, 3, 5, PLAY/PAUSE
1.2 Rückseite
22 Audioausgang des Players B
23 Audioausgang des Players A
24 Netzbuchse zum Anschluss an eine Steckdose
(230 V~/50 Hz) über das beiliegende Netzkabel
25 Netzsicherung
Eine durchgebrannte Sicherung nur durch eine
gleichen Typs ersetzen.
26 Ein-/Ausschalter
2 Hinweise für den sicheren Gebrauch
Das Gerät entspricht allen erforderlichen Richtlinien
der EU und ist deshalb mit gekennzeichnet.
Beachten Sie auch unbedingt die folgenden Punkte:
Das Gerät ist nur zur Verwendung im Innenbereich geeignet. Schützen Sie es vor Tropf- und
Spritz wasser, hoher Luftfeuchtigkeit und Hit ze
(zulässiger Einsatztemperaturbereich 0 – 40 °C).
WARNUNG Das Gerät wird mit lebensgefährli-
cher Netzspannung (230 V~) versorgt. Nehmen Sie deshalb nie selbst
Eingriffe am Gerät vor. Durch un sachgemäßes Vorgehen besteht die
Gefahr eines elektrischen Schlages.
1. there is visible damage to the unit or to the
mains cable,
2. a defect might have occurred after a drop or
similar accident,
3. malfunctions occur.
The unit must in any case be repaired by skilled
personnel.
Never pull the mains cable to disconnect the
mains plug from the mains socket, always seize
the plug.
For cleaning only use a dry, soft cloth, never use
chemicals or water.
No guarantee claims for the unit and no liability for
any resulting personal damage or material damage will be accepted if the unit is used for other
purposes than originally intended, if it is not correctly connected or operated, or not repaired in an
expert way.
Important for U. K. Customers!
The wires in this mains lead are coloured in ac cord ance with the follow ing code:
green/yellow = earth
blue = neutral
brown = live
As the colours of the wires in the mains lead of this
appliance may not correspond with the coloured
markings identifying the terminals in your plug,
proceed as follows:
1. The wire which is coloured green and yellow
must be connected to the terminal in the plug
which is marked with the letter E or by the earth
symbol , or coloured green or green and yellow.
2. The wire which is coloured blue must be con nected to the terminal which is marked with the
letter N or coloured black.
3. The wire which is coloured brown must be con nected to the terminal which is marked with the
letter L or coloured red.
Warning – This appliance must be earthed.
3 Applications
The unit DP-120 is a combination of two MP3 players capable of replaying MP3 and WMA files (data
rate 256 kb/s max.) of USB storage media (e. g.
USB hard disk, USB stick) and SD/MMC cards (up
to 4 GB, FAT32). The DP-120 is suitable for versatile PA applications (e. g. in the theatre, in pubs, in
waiting rooms) and offers numerous functions, e. g.
continuous repeat, random replay, short replaying of
each title beginning, and programming of an individual title sequence.
4 Setting-up and Connecting the Unit
The unit is provided for mounting into a rack
(482 mm/ 19") but it can also be used as a tabletop
unit. For the installation into a rack 1 rack space is
required (1 rack space = 44.45 mm).
Prior to the connection or changing the connections switch off the DP-120 and the units to be connected.
1) Connect the jacks AUDIO OUT A and B (22, 23)
of players A and B via cables with phono connec-
tors to two CD player inputs e. g. at a mixer or at
an amplifier (L = left channel, R = right channel).
2) Connect the supplied mains cable to the mains
jack (24) first and then to a socket (230 V~/
50 Hz).
5 Operation
Switch on the unit with the mains switch (26) on the
rear side. HELLO is shortly shown on the displays
(4, 5) as a welcome. If neither an SD/MMC card is
inserted nor a USB storage medium is connected to
a player, the display shows CARD – USB.
5.1 Remote control
1) To insert the batteries (2 × 1.5 V, size AAA), press
the arrow of the cover on the rear side of the
remote control and slide the cover downwards.
Insert the batteries as indicated in the battery compartment. Close the compartment with the cover.
Remove the batteries if the remote control will
not be used for a longer period of time so that it
will not be damaged in case the batteries should
leak.
2) Always hold the remote control in the direction of
the sensor IR (13) when pressing a button. There
must be no obstacles between the remote control
and the sensor.
3) If the range of the remote control decreases, the
batteries are almost exhausted and have to be
replaced.
5.2 Switching between player A and player B
With the remote control and the buttons at the unit
either player A or player B can be controlled. After
switching-on always player A is ready for being operated: The indication A (2) lights up. With button A/B
(20) the control between the two players can be
switched. If the control is switched to player B, the
indication B (6) lights up.
By switching the control from one player to the
other, the replay of titles will not be interrupted.
Do not put exhausted batteries into the
household rubbish. Always take them to a
special waste disposal (e. g. collecting container at your retailer).
If the unit is to be put out of operation definitively, take it to a local recycling plant for a
disposal which is not harmful to the environment.
5
GB
D
A
CH
Stellen Sie keine mit Flüssigkeit gefüllten Gefäße,
z. B. Trinkgläser, auf das Gerät.
Nehmen Sie das Gerät nicht in Betrieb und ziehen
Sie sofort den Netzstecker aus der Steckdose:
1. wenn sichtbare Schäden am Gerät oder an der
Netz anschlussleitung vorhanden sind,
2. wenn nach einem Sturz oder Ähnlichem der
Verdacht auf einen Defekt besteht,
3. wenn Funktionsstörungen auftreten.
Lassen Sie das Gerät in jedem Fall in einer Fachwerkstatt reparieren.
Ziehen Sie den Netzstecker nie am Kabel aus der
Steckdose, fassen Sie immer am Stecker an.
Verwenden Sie zum Reinigen nur ein trockenes,
weiches Tuch, niemals Wasser oder Chemikalien.
Wird das Gerät zweckentfremdet, nicht richtig
angeschlossen, falsch bedient oder nicht fachge recht repariert, kann keine Garantie für das Gerät
und keine Haftung für daraus resultierende Sachoder Personenschäden übernommen werden.
3 Einsatzmöglichkeiten
Das Gerät DP-120 ist eine Kombination aus zwei
MP3-Playern, auf denen sich MP3- und WMADateien (Datenrate max. 256 kb/s) von USB-Speichermedien (z. B. USB-Festplatte, USB-Stick) und
SD/MMC-Karten (bis 4 GB, FAT32) abspielen lassen. Der DP-120 ist für vielfältige Be schallungsaufgaben geeignet (z. B. im Theater, in Gaststätten, in
Warte räumen) und bietet zahlreiche Funktionen, wie
z. B. Endloswiederholung, Zufallswiedergabe, An spielen aller Titel und Programmierung einer eigenen Titelfolge.
4 Gerät aufstellen und anschließen
Das Gerät ist für die Montage in ein Rack (482 mm/
19") vorgesehen, kann aber auch als frei stehendes
Tischgerät verwendet werden. Für den Einbau in ein
Rack wird 1 HE benötigt (HE = Höheneinheit =
44,45 mm).
Vor dem Anschluss bzw. vor dem Verändern von
An schlüssen den DP-120 und die anzuschließenden Geräte ausschalten.
1) Die Buchsen AUDIO OUT A und B (22, 23) der
Player A und B über Cinch-Kabel mit zwei CD-
Player-Eingängen z. B. an einem Misch pult oder
an einem Verstärker verbinden (L = linker Kanal,
R = rechter Kanal).
2) Das beiliegende Netzkabel zuerst in die Netz-
buchse (24) und dann in eine Steckdose (230 V~/
50 Hz) stecken.
5 Bedienung
Das Gerät mit dem Netzschalter (26) auf der Rückseite einschalten. Zur Begrüßung erscheint auf den
Displays (4, 5) kurz HELLO. Ist bei einem Player
weder eine SD/MMC-Karte eingesteckt noch ein
USB-Speichermedium angeschlossen, zeigt das
Display CARD – USB.
5.1 Fernbedienung
1) Zum Einsetzen der Batterien (2 × 1,5 V, Größe
AAA = Mikro) auf der Rückseite der Fernbedie-
nung auf den Pfeil des Deckels drücken und den
Deckel nach unten schieben. Die Batterien, wie
im Batteriefach angegeben, einsetzen. Das Fach
mit dem Deckel wieder schließen.
Bei längerem Nichtgebrauch die Batte rien
herausnehmen, damit die Fernbedienung bei
einem eventuellen Auslaufen der Batterien nicht
beschädigt wird.
2) Die Fernbedienung beim Betätigen einer Taste
immer in Richtung des Sensors IR (13) halten.
Dabei muss Sichtverbindung zwischen der Fernbedienung und dem Sensor bestehen.
3) Lässt die Reichweite der Fernbedienung nach,
sind die Batterien fast verbraucht und müssen
ausgewechselt werden.
5.2 Umschalten zwischen Player A und B
Mit der Fernbedienung und mit den Tasten am Gerät
lässt sich entweder der Player A oder B steuern.
Nach dem Einschalten ist immer der Player A zum
Bedienen bereit: Die Anzeige A (2) leuchtet. Mit der
Taste A/B (20) kann die Steuerung zwischen den
beiden Playern umgeschaltet werden. Ist die Steuerung auf den Player B umgeschaltet, leuchtet die
Anzeige B (6).
Durch das Umschalten der Steuerung von einem
zum anderen Player wird das Abspielen von Titeln
nicht unterbrochen.
5.3 Speichermedium anschließen
und anwählen
1) Zum Abspielen von Audio-Dateien auf SD/MMCKarten kann an jedem Player eine Karte in den
Schlitz SD MMC CARD (1, 8) gesteckt werden.
Dabei müssen die Kontakte der Karte zum Gerät
zeigen und die abgeschrägte Ecke der Karte
nach oben.
2) Zum Abspielen von Audio-Dateien auf einem
USB-Speichermedium kann an jedem Player z. B.
ein USB-Stick in den USB-Anschluss (3, 7) ge steckt oder eine USB-Festplatte mit dem An schluss verbunden werden.
3) Ist an einem Player nur ein Speichermedium an geschlossen, wird dieses automatisch angewählt. Das zugehörige Display signalisiert dabei:
Werfen Sie verbrauchte Batterien nicht in
den Hausmüll, sondern geben Sie sie nur
in den Sondermüll (z. B. Sammelbehälter
bei Ihrem Einzelhändler).
Soll das Gerät endgültig aus dem Betrieb
genommen werden, übergeben Sie es zur
umweltgerechten Entsorgung einem ört lichen Recyclingbetrieb.

6
5.3 Connecting and selecting
the storage medium
1) To replay audio files on SD/MMC cards, it is pos-
sible to insert a card into the slot SD MMC CARD
(1, 8) of each player. The contacts of the card
must point to the unit and the bevelled corner of
the card upwards.
2) To replay audio files on a USB storage medium, it
is possible to connect to each player e. g. a USB
stick to the USB connection (3, 7) or a USB
hard disk to the connection .
3) If only one storage medium is connected to a
player, this is automatically selected. Then the
corresponding display indicates:
CARD with a memory card or
USB when using the USB connection
The upper, small number in the display indicates
the number of folders on the storage medium and
the large, lower number the number of audio files.
4) If a memory card is inserted and a USB memory
is connected to the player, the unit always selects
the memory card after switching-on. To switch
between memory card and USB memory, keep
the button FUNC/ (11) pressed for 3 sec. until
the display shows the desired storage medium.
Note: To switch to the other storage medium, the
player must be set to stop, first shortly press the button
FUNC/ once, if required.
5.4 Replaying of audio files
1) Start the replay of the first title with the button
PLAY/PAUSE (12). To select another title, see
chapter 5.5.
While replaying, the display (4, 5) continuously
shows information about the title, if available:
FILE*
TITLE
ARTIST
ALBUM
*Only shown when starting the replay.
2) To interrupt the replay, set the unit to pause with
the button PLAY/PAUSE. During the pause the
display shows the title number and the time
already played of the title (min. : sec.) in a flashing way. To continue the replay, press the button
PLAY/PAUSE again.
3) For displaying the title number and the time already
played while replaying, keep the button FIND (16)
pressed for 1 sec. until the display is switched to
the time indication. It is possible to switch back to
the previous display in the same way.
4) To stop the playing, press the button FUNC/
(11). The player is switched to stop. The display
is switched to the indication of the number of folders (upper, small number), the number of titles
(large number), and the indication of the selected
storage medium (CARD or USB).
5.5 Title selection
5.5.1 Direct selection of the title number
It is possible to directly select a title by entering its
number with the numerical keys (21). To start the
title, press the button PLAY/PAUSE (12). Examples:
Title No. Buttons
4 4, PLAY/PAUSE
27 2, 7, PLAY/PAUSE
135 1, 3, 5, PLAY/PAUSE
Note: The titles are consecutively numbered by the unit as
follows:
1. all titles without folder in the ROOT directory
2. all titles in folders on the root directory
3. all titles in subfolders, etc.
The folders are not numbered in alphabetic order but the
number of the folder can easily be found with the folder
search function (
chapter 5.5.3).
5.5.2 Advancing or reversing titles
To advance or reverse one or several titles, shortly
press the button UP/CUE or DOWN/REV (10).
Button UP/CUE: Advance to the next title
Button DOWN/REV: Return to the beginning of the
present title. Each time the button DOWN/REV is
pressed, the unit will go back one more title.
Note: Press the buttons DOWN/REV and UP/CUE only
shortly, otherwise this will result in fast reverse or forward.
5.5.3 Folder selection and folder search function
With the buttons FOLDER SKIP (9) it is possible to
go to the first title of the next folder (right button) and
to the first title of the previous folder (left button).
However, a certain folder can be found easier and
quicker with the search function:
1) Shortly press the button FIND (16) so that the
indication
ALBUM and the name of the present
folder are displayed.
Note: If the button is pressed for more than a second,
the display is switched between title indication and
time indication (
chapter 5.4, operating step 3).
2) Look for the desired folder with the buttons
UP/CUE and DOWN/REV (10). The display
shows the first eight letters of the folder name.
The corresponding folder number appears on the
top left of the display as a small number.
3) If the desired folder has been found, press the
button PLAY/PAUSE. The first title in this folder is
started.
4) To select another title, press the button UP/ CUE
or DOWN/REV (
chapter 5.5.2). With the button UP/ CUE it is possible to go from the last title
in a folder to the first title of the next folder and
with the button DOWN/REV from the first title in a
folder to the last title of the previous folder.
CARD bei einer Speicherkarte oder
USB bei Verwendung des USB-Anschlusses
Die obere, kleine Zahl im Display gibt die Anzahl
der Ordner auf dem Speichermedium an und die
große, untere Zahl die Anzahl der Audio-Dateien.
4) Sind an einem Player eine Speicherkarte eingesteckt und ein USB-Speicher angeschlossen,
wählt das Gerät nach dem Einschalten immer die
Speicherkarte an. Zum Umschalten zwischen
Speicherkarte und USB-Speicher die Taste
FUNC/ (11) 3 Sek. gedrückt halten, bis das Display das gewünschte Speiche rmedium an zeigt.
Hinweis: Zum Umschalten auf das andere Speichermedium muss der Player auf Stopp stehen, ggf. zuerst
die Taste
FUNC/ einmal kurz drücken.
5.4 Abspielen von Audio-Dateien
1) Mit der Taste PLAY/PAUSE (12) die Wiedergabe
des ersten Titels starten. Zum Anwählen eines
anderen Titels siehe Kapitel 5.5.
Während des Abspielens erscheinen im Display (4, 5) durchlaufend Informationen zum Titel,
falls vorhanden:
FILE* = Dateiname
TITLE = Titelname
ARTIST = Name des Künstlers
ALBUM = Name des Albums
*Wird nur beim Starten der Wiedergabe angezeigt.
2) Zum Unterbrechen der Wiedergabe mit der Taste
PLAY/PAUSE auf Pause schalten. Während der
Pause zeigt das Display die Titelnummer an und
blinkend die bereits gespielte Zeit des Titels
(Min. : Sek.). Zum Fortsetzen der Wiedergabe
die Taste PLAY/PAUSE erneut drücken.
3) Soll auch während des Abspielens die Titelnummer und die bereits gespielte Zeit angezeigt werden, die Taste FIND (16) 1 Sek. gedrückt halten,
bis das Display auf die Zeitanzeige umschaltet.
Genauso kann auch auf die vorherige Anzeige
zurückgeschaltet werden.
4) Zum Beenden des Abspielens die Taste FUNC/
(11) drücken. Der Player schaltet auf Stopp. Das
Display schaltet um auf die Anzeige der Anzahl
der Ordner (obere, kleine Zahl), der Anzahl der
Titel (große Zahl) und auf die Anzeige des angewählten Speichermediums (CARD oder USB).
5.5 Titelanwahl
5.5.1 Direktwahl der Titelnummer
Mit den Zifferntasten (21) lässt sich ein Titel durch
Eingabe seiner Nummer direkt anwählen. Zum Starten des Titels anschließend die Taste PLAY/PAUSE
(12) drücken. Beispiele:
Titelnr. Tasten
4 4, PLAY/PAUSE
27 2, 7, PLAY/PAUSE
135 1, 3, 5, PLAY/PAUSE
Hinweis: Die Titel werden vom Gerät wie folgt durchnummeriert:
1. alle Titel ohne Ordner im Hauptverzeichnis ROOT
2. alle Titel in Ordnern auf dem Hauptverzeichnis
3. alle Titel in Unterordnern usw.
Die Nummerierung der Ordner erfolgt nicht in alphabetischer Reihenfolge, lässt sich jedoch mit der Ordnersuchfunktion (
Kap. 5.5.3) schnell feststellen.
5.5.2 Titel vor- oder zurückspringen
Um einen oder mehrere Titel vor- oder zurückzuspringen, die Taste UP/CUE bzw. DOWN/REV (10)
kurz drücken.
Taste UP/CUE: zum nächsten Titel springen
Taste DOWN/REV: an den Anfang des gerade lau-
fenden Titels springen. Durch weiteres Drücken der
Taste DOWN/REV wird immer ein Titel weiter
zurückgesprungen.
Hinweis: Die Tasten DOWN/REV und UP/CUE nur kurz
drücken, sonst erfolgt ein schneller Rück- bzw. Vorlauf.
5.5.3 Ordneranwahl und Ordnersuchfunktion
Mit den Tasten FOLDER SKIP (9) kann auf den ersten Titel des nächsten Ordners (rechte Taste) und
auf den ersten Titel des vorherigen Ordners (linke
Taste) gesprungen werden. Ein bestimmter Ordner
lässt sich aber einfacher und schneller mit der Suchfunktion finden:
1) Die Taste FIND (16) kurz drücken, sodass im Display die Anzeige
ALBUM und der Name des
momentanen Ordners erscheint.
Hinweis: Wird die Taste länger als eine Sekunde ge drückt, schaltet das Display zwischen Titelanzeige und
Zeitanzeige um (
Kap. 5.4, Bedienschritt 3).
2) Mit den Tasten UP/CUE und DOWN/REV (10)
den gewünschten Ordner suchen. Das Display
zeigt die ersten acht Buchstaben des Ordner namens an. Die zugehörige Ordnernummer er scheint oben links als kleine Zahl im Display.
3) Ist der gewünschte Ordner gefunden, die Taste
PLAY/PAUSE drücken. Der erste Titel in diesem
Ordner wird gestartet.
4) Zum Anwählen eines anderen Titels die Taste UP/
CUE oder DOWN/REV betätigen (
Kap. 5.5.2).
Vom letzten Titel in einem Ordner kann mit der
Taste UP/CUE auch auf den ersten Titel des
nächsten Ordners gesprungen werden und vom
ersten Titel in einem Ordner mit der Taste
DOWN/REV auf den letzten Titel des vorherigen
Ordners.
5.6 Schneller Vor- /Rücklauf
Innerhalb eines Titels kann mit dem Vor-/Rücklauf
schnell eine andere Stelle angefahren werden: Für
den schnellen Vorlauf die Taste UP/CUE (10) ge drückt halten, für den schnellen Rücklauf die Taste
DOWN/REV. Weil der Vor-/Rücklauf akustisch nicht
verfolgt werden kann, ggf. das Display auf die An zeige der Laufzeit umschalten. [Die Taste FIND (16)
eine Sekunde gedrückt halten.]
D
A
CH
GB

7
5.6 Fast forward/ reverse
Within a title it is possible to quickly go to another
spot with the fast forward/reverse: For the fast forward keep the button UP/CUE (10) pressed, for the
fast reverse the button DOWN/REV. As the fast forward/reverse cannot be followed acoustically,
switch the display to the indication of the playing
time, if required. [Keep the button FIND (16) pressed
for one second.]
5.7 Repeat functions
One of the three repeat functions can be selected
with the button REPEAT (15):
1
st
pressing of button (indication REPEAT)
The present title is repeated continuously.
2
nd
pressing of button (indication REPEAT ALL)
All titles on the storage medium are repeated
continuously.
3
rd
pressing of button (indication REPEAT ALBUM)
All titles in the selected folder are repeated continuously.
4
th
pressing of button (indication REPEAT is extinguished)
The repeat function is switched off.
5.8 Random replay
For playing the titles in a random order, press the button RANDOM (17). The player goes to a title selected
at random and RANDOM is shown in the display. To
switch off the function, press the button again.
5.9 Short playing of a title beginning
Press the button INTRO (18). The unit replays each
of the following titles for 10 seconds (indication:
INTRO). After shortly replaying the beginning of the
last title, the player will be switched to stop and the
indication INTRO will be extinguished. To switch off
the function before all titles have been replayed,
press the button INTRO again.
5.10 Muting the sound
To mute the sound of a player, press the button
MUTE (19). To switch the sound on again, press the
button once more.
5.11 Compiling an individual title sequence
For playing only a selection of titles in a certain
order, a sequence of 64 titles as a maximum can be
programmed. For programming, the numbering of
the folders should be known because the corresponding number of the folder has to be entered for
each title to be programmed (chapter 5.5.3).
1) The player has to be set to stop, press the button
FUNC/ (11), if required.
2) Switch on the programming mode with the button
PROG (14). The display shows “000 P-01”.
3) First select the number of the folder containing the
first desired title for the title sequence. This is also
required if all titles are in the ROOT directory without folder. The main directory has the number 1.
Select the folder number with the buttons
DOWN/REV and UP/CUE (10) or with the numerical keys (21). To memorize, press the button
PROG. The three zeroes in front of the indication
“P-01” flash as a request to enter the title number.
4) Select the number of the first title for the title
sequence with the buttons DOWN/REV and UP/
CUE or enter it with the numerical keys. Please
observe for titles in folders that not all titles are
consecutively numbered on the storage medium
but that the first title in a folder has the number 1
in each case.
5) To memorize, press the button PROG. The display
goes to the next memory location number “P-02”.
6) Repeat the operating steps 3 to 5 for all further
desired titles until the complete title sequence will
be programmed.
7) To start the title sequence, press the button
PLAY/ PAUSE (12). The indication PROGRAM is
shown in the upper display line and the title
sequence is replayed.
8) With the buttons DOWN/REV and UP/CUE each
title of the title sequence can be selected or, by
keeping the respective button pressed, the fast
forward/reverse within a title can be activated.
9) After playing the title sequence or with pressing
the button FUNC/ the player is set to stop and
the indication PROGRAM will be extinguished. For
starting the title sequence again, first press the
button PROG and then the button PLAY/ PAUSE.
Note: A programmed title sequence is deleted when
switching to another storage medium, when pressing the
button FUNC/ in the programming mode, or when
switching the unit off.
6 Specifications
Frequency response:. . . . . . 20 –20 000Hz
THD: . . . . . . . . . . . . . . . . . . < 0.3 %
Channel separation:. . . . . . . > 60 dB
Dynamic range: . . . . . . . . . . > 96 dB
S/N ratio: . . . . . . . . . . . . . . . > 60 dB
Audio output: . . . . . . . . . . . . 1.2 V
Power supply: . . . . . . . . . . . 230 V~/50 Hz/50 VA
Ambient temperature: . . . . . 0 – 40°C
Dimensions (W × H × D):. . . 482 × 44 × 265 mm,
1 rack space
Weight:. . . . . . . . . . . . . . . . . 3.9 kg
Subject to technical modification.
GB
CH
A
D
5.7 Wiederholfunktionen
Mit der Taste REPEAT (15) kann eine der drei Wiederholfunktionen ausgewählt werden:
1. Tastendruck (Anzeige REPEAT)
Der momentane Titel wird ständig wiederholt.
2. Tastendruck (Anzeige REPEAT ALL)
Alle Titel auf dem Speichermedium werden ständig wiederholt.
3. Tastendruck (Anzeige REPEAT ALBUM)
Alle Titel im angewählten Ordner werden ständig
wiederholt.
4. Tastendruck (Anzeige REPEAT erlischt)
Die Wiederholfunktion ist ausgeschaltet.
5.8 Zufallswiedergabe
Sollen die Titel in zufälliger Reihenfolge abgespielt
werden, die Taste RANDOM (17) drücken. Der
Player springt auf einen zufällig ausgewählten Titel
und im Display wird RANDOM angezeigt. Zum Ausschalten der Funktion die Taste erneut be tätigen.
5.9 Titel anspielen
Die Taste INTRO (18) drücken. Das Gerät spielt
alle folgenden Titel für 10 Sekunden an (Anzeige:
INTRO). Nach dem Anspielen des letzten Titels
schaltet der Player auf Stopp und die Anzeige
INTRO erlischt. Zum vorzeitigen Ausschalten der
Funktion die Taste INTRO erneut betätigen.
5.10 Ton stumm schalten
Um den Ton eines Players stumm zu schalten, die
Taste MUTE (19) drücken. Zum Wiedereinschalten
des Tons die Taste erneut drücken.
5.11 Eigene Titelfolge zusammenstellen
Soll nur eine Auswahl von Titeln in einer bestimmten
Reihenfolge abgespielt werden, kann eine Folge
von max. 64 Titeln programmiert werden. Zum Programmieren sollte die Nummerierung der Ordner
bekannt sein, denn für jeden zu programmierenden
Titel muss die zugehörige Nummer des Ordners eingegeben werden (
Kap. 5.5.3).
1) Der Player muss auf Stopp geschaltet sein, ggf.
die Taste FUNC/ (11) drücken.
2) Mit der Taste PROG (14) den Programmier modus einschalten. Das Display zeigt „000 P-01“.
3) Zuerst die Nummer des Ordners wählen, in dem
sich der erste gewün schte Titel für die Titelfolge
befindet. Dieses ist auch erforderlich, wenn sich
alle Titel im Hauptverzeichnis ROOT ohne Ordner befinden. Das Hauptverzeichnis hat die
Nummer 1.
Die Ordnernummer mit den Tasten DOWN/
REV und UP/CUE (10) wählen oder mit den Zifferntasten (21) eingeben. Zum Speichern dann
die Taste PROG drücken. Die drei Nullen vor der
Anzeige „P-01“ blinken als Aufforderung, die
Titelnummer einzugeben.
4) Die Nummer des ersten Titels für die Titelfolge
mit den Tasten DOWN/REV und UP/ CUE wählen
oder mit den Zifferntasten eingeben. Bitte bei
Titeln in Ordnern beachten, dass jetzt nicht alle
Titel auf dem Speichermedium durchnummeriert
sind, sondern dass jeweils der erste Titel in
einem Ordner die Nummer 1 hat.
5) Zum Speichern die Taste PROG drücken. Das
Display springt auf die nächste Speicherplatznummer „P-02“.
6) Die Bedienschritte 3 – 5 für alle weiteren ge wünschten Titel wiederholen, bis die gesamte
Titelfolge programmiert ist.
7) Zum Starten der Titelfolge die Taste PLAY/
PAUSE (12) drücken. In der oberen Displayzeile
erscheint die Anzeige PROGRAM und die Titelfolge wird abgespielt.
8) Mit den Tasten DOWN/REV und UP/CUE kann
jeder Titel der Titelfolge angewählt oder durch
Gedrückt hal ten der jeweiligen Taste der schnelle
Vor-/Rücklauf innerhalb eines Titels aktiviert werden.
9) Nach dem Abspielen der Titelfolge oder beim
Drücken der Taste FUNC/ schaltet der Player
auf Stopp und die Anzeige PROGRAM erlischt.
Soll die Titelfolge erneut gestartet werden, zuerst
die Taste PROG und dann die Taste PLAY/PAUSE
drücken.
Hinweis: Eine programmierte Titelfolge wird beim Um schalten auf ein anderes Speichermedium, beim Drücken
der Taste FUNC/ im Programmiermodus und beim Ausschalten des Gerätes gelöscht.
6 Technische Daten
Frequenzgang:. . . . . . . . . . . 20 –20 000 Hz
Klirrfaktor: . . . . . . . . . . . . . . < 0,3 %
Kanaltrennung: . . . . . . . . . . > 60 dB
Dynamikumfang: . . . . . . . . . > 96 dB
Störabstand: . . . . . . . . . . . . > 60 dB
Audioausgang:. . . . . . . . . . . 1,2 V
Stromversorgung: . . . . . . . . 230 V~/50 Hz/50 VA
Einsatztemperatur:. . . . . . . . 0 –40 °C
Abmessungen (B × H × T): . 482 × 44 × 265 mm,
1 HE (Höheneinheit)
Gewicht:. . . . . . . . . . . . . . . . 3,9 kg
Änderungen vorbehalten.
Diese Bedienungsanleitung ist urheberrechtlich für MONACOR®INTERNATIONAL GmbH & Co. KG
geschützt. Eine Reproduktion für eigene kommerzielle Zwecke – auch auszugsweise – ist untersagt.
All rights reserved by MONACOR®INTERNATIONAL GmbH & Co. KG. No part of this instruction manual
may be reproduced in any form or by any means for any commercial use.
 Loading...