

IMG STAGE LINE DMP-100T Operating Instructions Manual
Audiospieler-Einbaumodul mit FM-Tuner
Bitte lesen Sie diese Anleitung vor dem Betrieb
gründlich durch und heben Sie sie für ein späteres
Nachlesen auf.
1 Verwendungsmöglichkeiten
Dieses kompakte Audiospieler-Modul mit UKWEmpfänger ist zum Einbau in ein vorhandenes Gerät
oder in ein eigenes Gehäuse vorgesehen. Es wird
mit einer Gleichspannung von 12 V versorgt.
Mit dem Audiospieler lassen sich Audiodateien
im Format MP3 abspielen von:
– USB-Speicher-Sticks
– USB-Festplatten mit eigener Stromversorgung
– SD/SDHC/ MMC-Speicherkarten
Hinweis: Aufgrund der Vielfalt von Speicher-Herstellern
und Gerätetreibern kann nicht garantiert werden, dass alle
Speichermedien mit dem DMP-100T kompatibel sind.
2 Wichtige Hinweise
für den Gebrauch
Das Modul entspricht allen relevanten Richtlinien
der EU und ist deshalb mit
gekennzeichnet.
G
Das Modul ist nur zur Verwendung im Innenbereich geeignet. Schützen Sie es vor Tropf- und
Spritzwasser, hoher Luftfeuchtigkeit und Hitze
(zulässiger Einsatztemperaturbereich 0 – 40 °C).
G
Verwenden Sie zum Reinigen nur ein trockenes,
weiches Tuch, nie Wasser oder Chemikalien.
G
Wird das Modul zweckentfremdet, nicht richtig
angeschlossen, falsch bedient oder nicht fachgerecht repariert, kann keine Haftung für daraus
resultierende Sach- oder Personenschäden und
keine Garantie für das Modul übernommen
werden.
3 Einbau und Anschluss
1) Wenn das Gerät, in welches das Modul eingebaut werden soll, mit Netzspannung versorgt
wird, das Gerät unbedingt vom 230-V-Strom netz
trennen.
2) Für die Aufnahme des Moduls ist ein Ausschnitt
von 106 mm × 19 mm erforderlich. Die Einbautiefe beträgt 55 mm. Das Modul in die Einbauöffnung schieben und über seine Frontplatte mit
vier Schrauben befestigen.
3) Der elektrische Anschluss erfolgt über die zwei
Stiftleisten CN1 (2-polig) und CN2 (5-polig). Die
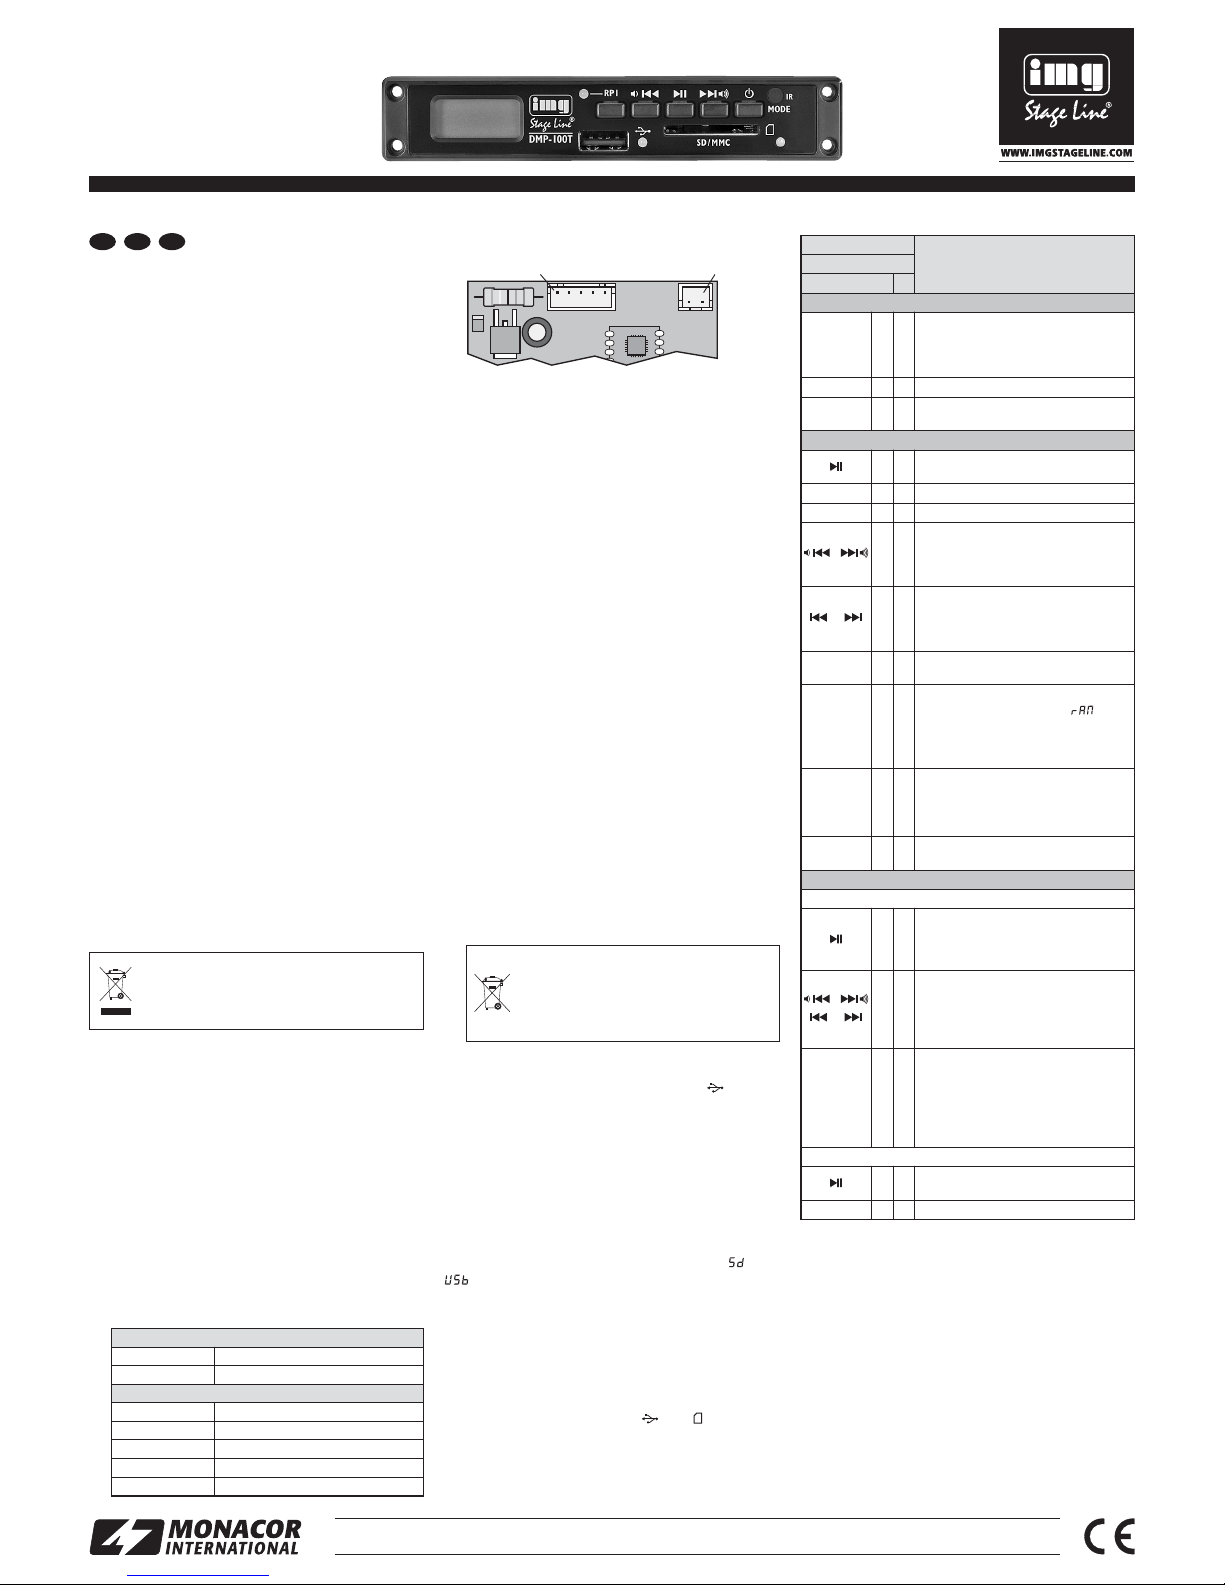
Kontaktbelegung ist auf der Unterseite der Leiterplatte angegeben:
Leiterplatte mit den Anschlüssen
Dem Modul liegen ein 38-cm-Anschlusskabel mit
5-poligen Steckern und eine UKW-Drahtantenne
bei. Alternativ zum Anschlusskabel kann auch
das als Zubehör erhältliche Adapterkabel DMP12CC verwendet werden. Es ist mit zwei CinchKupplungen und einer Kleinspannungskupplung
(5,5 mm / 2,1mm, Pluspol = Mittelkontakt) konfektioniert.
4 Bedienung
4.1 Fernbedienung
1) Zum Einsetzen der Batterien (2 × 1,5 V, Größe
AAA = Micro) auf der Rückseite der Fernbedienung den Batteriefachdeckel abnehmen. Die
Batterien, wie im Batteriefach angegeben, einsetzen. Das Fach mit dem Deckel wieder schließen.
Bei längerem Nichtgebrauch die Batterien
herausnehmen, damit die Fernbedienung bei
einem eventuellen Auslaufen der Batterien nicht
beschädigt wird.
2) Die Fernbedienung beim Drücken einer Taste
immer in Richtung des Moduls halten. Dabei
muss Sichtverbindung zwischen der Fernbedienung und dem Modul bestehen.
3) Lässt die Reichweite der Fernbedienung nach,
sind die Batterien verbraucht und müssen ausgewechselt werden.
4.2 Audiospieler
Einen USB-Stick in den USB-Anschluss stecken
oder eine Festplatte mit eigener Stromversorgung
mit dem USB-Anschluss verbinden und / oder
eine Speicherkarte in den Steckplatz SD/ MMC stecken. Dabei muss die abgeschrägte Ecke der Karte
nach links und zum Gerät zeigen. Soll die Karte wieder entnommen werden, sie etwas hineindrücken,
sodass sie ausrastet.
Zum Einschalten des Audiospielers die Taste
am Modul oder die Taste MODE auf der Fernbedienung so oft drücken, bis das Display kurz oder
anzeigt. Nach dem Einschalten startet automatisch der zuletzt gespielte Titel. Alle weiteren Bedienmöglichkeiten sind in der folgenden Tabelle aufgeführt.
4.3 FM-Tuner
Zum Einschalten des Tuners die Taste am Modul
oder die Taste MODE auf der Fernbedienung so oft
drücken, bis die beiden LEDs und gleichzeitig
leuchten. Der Tuner ist automatisch angewähIt,
wenn keine Speicherkarte und kein USB-Speicher
eingesteckt ist. Alle weiteren Bedienmöglichkeiten
sind in der folgenden Tabelle aufgeführt.
5 Technische Daten
Audiospieler
Frequenzgang: . . . . . . . 20 – 20 000Hz
Klirrfaktor: . . . . . . . . . . . < 0,2%
Kanaltrennung: . . . . . . . > 60dB
Störabstand: . . . . . . . . . > 75dB (A-bewertet)
Tuner
Empfangsfrequenz: . . . . 87,5 – 108 MHz
Abstimmschritt: . . . . . . . 50 kHz
Allgemeine Daten
Ausgangspegel: . . . . . . 500mV
Stromversorgung: . . . . . 12 V
± 2 V, 100 mA
Maße, Gewicht: . . . . . . . 120 × 22 × 58 mm, 48g
Änderungen vorbehalten.
Verbrauchte Batterien dürfen nicht in
den Hausmüll geworfen werden. Ge ben
Sie sie zur umweltgerechten Entsorgung nur in den Sondermüll (z. B. Sammelbehälter im Einzelhandel).
CN 1 Anschluss für die beiliegende Antenne
FM-ANT Antennensignal
FM-GND Masse
CN 2 Signalausgang und Stromversorgung
+12V Betriebsspannung 12 V, 100mA
GND Masse
L-CH Ausgang linker Kanal
S-GND Masse
R-CH Ausgang rechter Kanal
5807P
+12V
CN2
R-CH
GND
L-CH
S-GND
100
6V
78M05
0X1301
CN1
FM-ANT
FM-GND
Soll das Modul endgültig aus dem Betrieb
genommen werden, übergeben Sie es zur
umweltgerechten Entsorgung einem örtlichen Recyclingbetrieb.
MONACOR INTERNATIONAL GmbH & Co. KG • Zum Falsch 36 • 28307 Bremen • Germany
Copyright
©
by MONACOR INTERNATIONAL. All rights reserved. A-1582.99.01.06.2014
®
DMP-100T
Bestellnummer 17.3520
ELECTRONICS FOR SPECIALISTS ELECTRONICS FOR SPECIALISTS ELECTRONICS FOR SPECIALISTS ELECTRONICS FOR SPECIALISTS ELECTRONICS FOR SPECIALISTS ELECTRONICS FOR SPECIALISTS ELECTRONICS FOR SPECIALISTS
D A CH
Taste
Funktion
Fernbedienung
am Gerät
Ein- /Ausschalten, Betriebsmodus
MODE
Einschalten, Umschalten zwischen
USB-Anschluss, Speicherkarte und
Tuner;
Ausschalten: 3 s gedrückt halten
Ein- und Ausschalten
MODE
Umschalten zwischen USB-Anschluss,
Speicherkarte und Tuner
Audiospieler
Wiedergabe starten und Umschalten
zwischen Wiedergabe und Pause
0…9
Direktwahl eines Titels
+10
10 Titel weiterspringen
vorheriger / nächster Titel:
Taste kurz drücken
Lautstärke verringern / erhöhen:
Taste gedrückt halten
vorheriger / nächster Titel:
Taste kurz drücken
schneller Vor-/ Rücklauf: Taste
gedrückt halten (Ton dabei stumm)
VOL+
VOL−
Lautstärke erhöhen / verringern:
Taste (mehrfach) kurz drücken
RAND
Abspielen in zufälliger Reihenfolge
– einschalten, Anzeige kurz ,
REPEAT 1 / ALL wird ausgeblendet
– ausschalten, REPEAT 1 / ALL ist wieder
eingeblendet
RP1
REPEAT
Den laufenden Titel endlos wieder holen
– einschalten, Anzeige: REPEAT 1
– ausschalten, Anzeige: REPEAT ALL
Wiedergabe beenden; das Display
zeigt die Anzahl der Titel an
Tuner
Sender speichern
Alle Sender suchen und nacheinander
automatisch speichern:
Taste 2 s gedrückt halten, bis die Zahlen im Display durchlaufen
Sendersuchlauf:
Taste gedrückt halten, bis die Zahlen
im Display durchlaufen
Feinabstimmung:
Taste (mehrfach) kurz drücken
RP1
REPEAT
Sender manuell speichern:
1. freie Stationsnummer wählen
(
Gespeicherte Sender aufrufen)
2. Sender einstellen (
Sendersuch-
lauf und Feinabstimmung)
3. Taste RP1 bzw. REPEAT drücken
Gespeicherte Sender aufrufen
Zur nächsten Stationsnummer
springen: Taste kurz drücken
0…9
Direktwahl der Stationsnummer

Audio Player Insertion Module
with FM Tuner
Please read these operating instructions carefully
prior to operation and keep them for later reference.
1 Applications
This compact audio player module with FM receiver
is designed for installation into an existing unit or into
a separate housing. It is supplied with 12 V DC voltage.
The audio player is able to replay audio files in
MP3 format from:
– USB flash drives
– USB hard disks with separate power supply
– SD/SDHC/ MMC memory cards
Note: Due to the large number of storage device manufacturers and device drivers, it cannot be guaranteed that
all storage media are compatible with the DMP-100T.
2 Important Notes
The module corresponds to all relevant directives of
the EU and is therefore marked with
.
G
The module is suitable for indoor use only. Protect
it against dripping water and splash water, high air
humidity and heat (admissible ambient temperature range: 0 – 40 °C).
G
For cleaning only use a dry, soft cloth; never use
water or chemicals.
G
No guarantee claims for the module and no liability for any resulting personal damage or material
damage will be accepted if the module is used for
other purposes than originally intended, if it is not
correctly connected or operated, or if it is not
repaired in an expert way.
3 Installation and Connection
1) If the unit into which the module is to be installed
is supplied with mains voltage, disconnect the
unit from the 230 V mains.
2) To install the module, a cutout of 106 mm ×
19 mm is required. The installation depth is
55 mm. Push the module into the cutout and fasten it via its front panel using four screws.
3) Electrical connection is made via the two pin connectors CN1 (2 poles) and CN2 (5 poles). The pin
configuration can be found on the lower side of
the PCB:
PCB with connectors
The module is supplied with a 38 cm connection
cable with 5-pole plugs and an FM wire antenna.
As an alternative, use the adapter cable DMP12CC available as an accessory. The adapter
cable is fitted with two RCA inline jacks and a lowvoltage inline jack (5.5 mm / 2.1 mm, positive pole
= centre contact).
4 Operation
4.1 Remote control
1) To insert the batteries (2 × 1.5 V, size AAA), re move the battery compartment cover on the rear
of the remote control. Insert the batteries as indicated in the compartment, and then close the
compartment with the cover.
If the remote control is not to be used for a
longer period of time, remove the batteries to prevent damage due to battery leakage.
2) When you press a button on the remote control,
always point the remote control at the module.
Make sure that there are no obstacles between
the remote control and the module.
3) If the operating range of the remote control
decreases, the batteries are discharged and
must be replaced.
4.2 Audio player
Connect a USB flash drive or a hard disk with separate power supply to the USB port and / or insert a
memory card into the slot SD/ MMC (notched corner
pointing to the left and facing the unit). To remove the
card, push the card into the slot until it disengages.
To switch on the audio player, press the
button on the module or the button MODE on the
remote control repeatedly until or briefly
appears on the display. When the audio player is
switched on, the first title will start automatically. All
the other operating options can be found in the following table.
4.3 FM tuner
To switch on the tuner, press the button on the
module or the button MODE on the remote control
repeatedly until the two LEDs and light up at
the same time. The tuner will be automatically
selected when no memory card is inserted and no
USB storage device is connected. All the other operating options can be found in the following table.
5 Specifications
Audio player
Frequency range: . . . . . 20 – 20 000Hz
THD: . . . . . . . . . . . . . . . < 0.2%
Channel separation: . . . > 60 dB
S / N ratio: . . . . . . . . . . . . 75 dB (A weighted)
Tuner
Received frequency: . . 87.5– 108MHz
Tuning increment: . . . . . 50 kHz
General information
Output level: . . . . . . . . . 500 mV
Power supply: . . . . . . . . 12 V
± 2 V, 100 mA
Dimensions, weight: . . . 120 × 22 × 58 mm, 48 g
Subject to technical modification.
Never put discharged batteries in the
household waste; always take them to a
special waste disposal, e. g. collection
container at your retailer.
5807P
+12V
CN2
R-CH
GND
L-CH
S-GND
100
6V
78M05
0X1301
CN1
FM-ANT
FM-GND
CN 1 connection for antenna supplied
FM-ANT antenna signal
FM-GND ground
CN 2 signal output and power supply
+12V 12 V operating voltage, 100mA
GND ground
L-CH output left channel
S-GND ground
R-CH output right channel
If the module is to be put out of operation
definitively, take it to a local recycling plant
for a disposal which is not harmful to the
environment.
MONACOR INTERNATIONAL GmbH & Co. KG • Zum Falsch 36 • 28307 Bremen • Germany
Copyright
©
by MONACOR INTERNATIONAL. All rights reserved. A-1582.99.01.06.2014
®
DMP-100T
Order number 17.3520
ELECTRONICS FOR SPECIALISTS ELECTRONICS FOR SPECIALISTS ELECTRONICS FOR SPECIALISTS ELECTRONICS FOR SPECIALISTS ELECTRONICS FOR SPECIALISTS ELECTRONICS FOR SPECIALISTS ELECTRONICS FOR SPECIALISTS
GB
Button
Function
remote control
on the unit
Switching on / off, operating mode
MODE
to switch on, to switch between USB
port, memory card and tuner;
to switch off: keep button pressed for
3 seconds
to switch on and off
MODE
to switch between USB port,
memory card and tuner
Audio player
to start the replay and to switch
between replay and pause
0…9
direct title selection
+10
to skip 10 titles
previous / next title:
Press button briefly.
to increase / decrease the volume:
Keep button pressed.
previous / next title: Press button briefly.
fast forward / reverse:
Keep button pressed (sound muted
during the process).
VOL+
VOL−
to increase / decrease the volume:
Press button briefly (repeatedly).
RAND
replay in random order
– when activated, brief indication ,
REPEAT 1 / ALL will disappear
– when deactivated, REPEAT 1 / ALL will
reappear
RP1
REPEAT
continuous repeat of the current title
– when activated, indication REPEAT 1
– when deactivated,
indication REPEAT ALL
to stop the replay; the display will indicate the number of titles
Tuner
Storing stations
to scan all stations and automatically
store them one after the other: Keep button pressed for 2 s until the figures start
to appear on the frequency indication.
station scan:
Keep button pressed until the figures start
to appear on the frequency indication.
fine tuning:
Briefly press button (repeatedly).
RP1
REPEAT
to store the stations manually:
1. Select an available station number
(
Calling up stored stations).
2. Set the stations (
Station scan-
ning and Fine tuning).
3. Press the button RP1 or REPEAT.
Calling up stored stations
to go to the next station number:
Press button briefly.
0…9
direct selection of the station number
 Loading...