

IMG STAGE LINE DJP-106SD Instruction Manual
DJP-106SD Best.-Nr. 21.2520
BEDIENUNGSANLEITUNG • INSTRUCTION MANUAL • MODE D’EMPLOI
ISTRUZIONI PER L’USO • GEBRUIKSAANWIJZING • MANUAL DE INSTRUCCIONES • INSTRUKCJA OBSŁUGI
SIKKERHEDSOPLYSNINGER • SÄKERHETSFÖRESKRIFTER • TURVALLISUUDESTA
DJ-/HIFI-PLATTENSPIELER
MIT MP3-REKORDER
DJ/HIFI TURNTABLE WITH MP3 RECORDER
PLATINE DISQUE DJ HI-FI AVEC ENREGISTREUR MP3
GIRADISCHI HIFI PER DJ CON REGISTRATORE MP3

2
wwwwww..iimmggssttaaggeelliinnee..ccoomm
Bevor Sie einschalten …
Wir wünschen Ihnen viel Spaß mit Ihrem neuen Gerät
von „img Stage Line“. Bitte lesen Sie diese Bedienungsanleitung vor dem Betrieb gründlich durch. Nur so lernen
Sie alle Funktionsmöglichkeiten kennen, vermeiden
Fehlbedienungen und schützen sich und Ihr Gerät vor
eventuellen Schäden durch unsachgemäßen Gebrauch.
Heben Sie die Anleitung für ein späteres Nachlesen auf.
Der deutsche Text beginnt auf der Seite 4.
Before switching on …
We wish you much pleasure with your new “img Stage
Line” unit. Please read these operating instructions carefully prior to operating the unit. Thus, you will get to know
all functions of the unit, operating errors will be prevented, and yourself and the unit will be protected
against any damage caused by improper use. Please
keep the oper ating instructions for later use.
The English text starts on page 4.
Avant toute installation …
Nous vous souhaitons beaucoup de plaisir à utiliser cet
appareil “img Stage Line”. Lisez ce mode dʼemploi entièrement avant toute utilisation. Uniquement ainsi, vous
pourrez apprendre lʼensemble des possibilités de fonctionnement de lʼappareil, éviter toute manipulation erronée
et vous protéger, ainsi que lʼappareil, de dommages éventuels engendrés par une utilisation inadaptée. Conservez la notice pour pouvoir vous y reporter ultérieurement.
La version française se trouve page 8.
Prima di accendere …
Vi auguriamo buon divertimento con il vostro nuovo
apparecchio di “img Stage Line”. Leggete attentamente
le istruzioni prima di mettere in funzione lʼapparecchio.
Solo così potete conoscere tutte le funzionalità, evitare
comandi sbagliati e proteggere voi stessi e lʼapparecchio
da eventuali danni in seguito ad un uso improprio. Conservate le istruzioni per poterle consultare anche in
futuro.
Il testo italiano inizia a pagina 8.
D
A
CH
GB
Antes de la utilización …
Le deseamos una buena utilización para su nue vo aparato “img Stage Line”. Por favor, lea estas in s trucciones
de uso atentamente antes de ha cer funcionar el aparato.
De esta manera conocerá todas las funciones de la unidad, se pre vendrán errores de operación, usted y el apa rato estarán protegidos en contra de todo daño cau sado
por un uso inadecuado. Por favor, guarde las instrucciones para una futura utilización.
La versión española comienza en la página 12.
Voor u inschakelt …
Wij wensen u veel plezier met uw nieuwe apparaat van
“img Stage Line”. Lees deze gebruikershandleiding grondig door, alvorens het apparaat in gebruik te nemen.
Alleen zo leert u alle functies kennen, vermijdt u foutieve
bediening en behoedt u zichzelf en het apparaat voor
eventuele schade door ondeskundig gebruik. Bewaar de
handleiding voor latere raadpleging.
De Nederlandstalige tekst vindt u op pagina 12.
Przed uruchomieniem …
Życzymy zadowolenia z nowego produktu “img Stage
Line”. Dzięki tej instrukcji obsługi będą państwo w stanie
poznać wszystkie funkcje tego urządzenia. Stosując się
do instrukcji unikną państwo błędów i ewentualnego
uszkodzenia urządzenia na skutek nieprawidłowego
użytkowania. Prosimy zachować instrukcję.
Tekst polski zaczyna się na stronie 16.
Før du tænder …
Tillykke med dit nye “img Stage Line” produkt. Læs sikkerhedsanvisningerne nøje før ibrugtagning, for at
beskytte Dem og enheden mod skader, der skyldes forkert brug. Gem venligst denne betjeningsvejledning til
senere brug.
Sikkerhedsanvisningerne findes på side 18.
Innan du slår på enheten …
Vi önskar dig mycket glädje med din nya “img Stage
Line” produkt. Läs igenom säkerhetsföre skrifterna innan
en heten tas i bruk för att undvika skador till följd av
felaktig hantering. Behåll instruktionerna för framtida
bruk.
Säkerhetsföreskrifterna återfinns på sidan 18.
Ennen kytkemistä …
Toivomme Sinulle paljon miellyttäviä hetkiä uuden “img
Stage Line” laitteen kanssa. Ennen laitteen käyttöä pyydämme Sinua huolellisesti tutustumaan turvallisuusohjeisiin. Näin vältyt vahingoilta, joita virheellinen laitteen
käyttö saattaa aiheuttaa. Ole hyvä ja säilytä käyttöohjeet
myöhempää tarvetta varten.
Turvallisuusohjeet löytyvät sivulta 19.
F
B
CH
I
ENL
PL DK
S FIN
B
3
DJP-106SD
BELT DRIVE TURNTABLE
SD CARD
USB
USB
USBREC CARD
REPEAT ALL FOLDER RANDOM
1
8
9
10
11
12
13
POWER
OFF ON
17
2
3
4
5
6
7
14
15
16
18
19
abc de f
gh i j k l
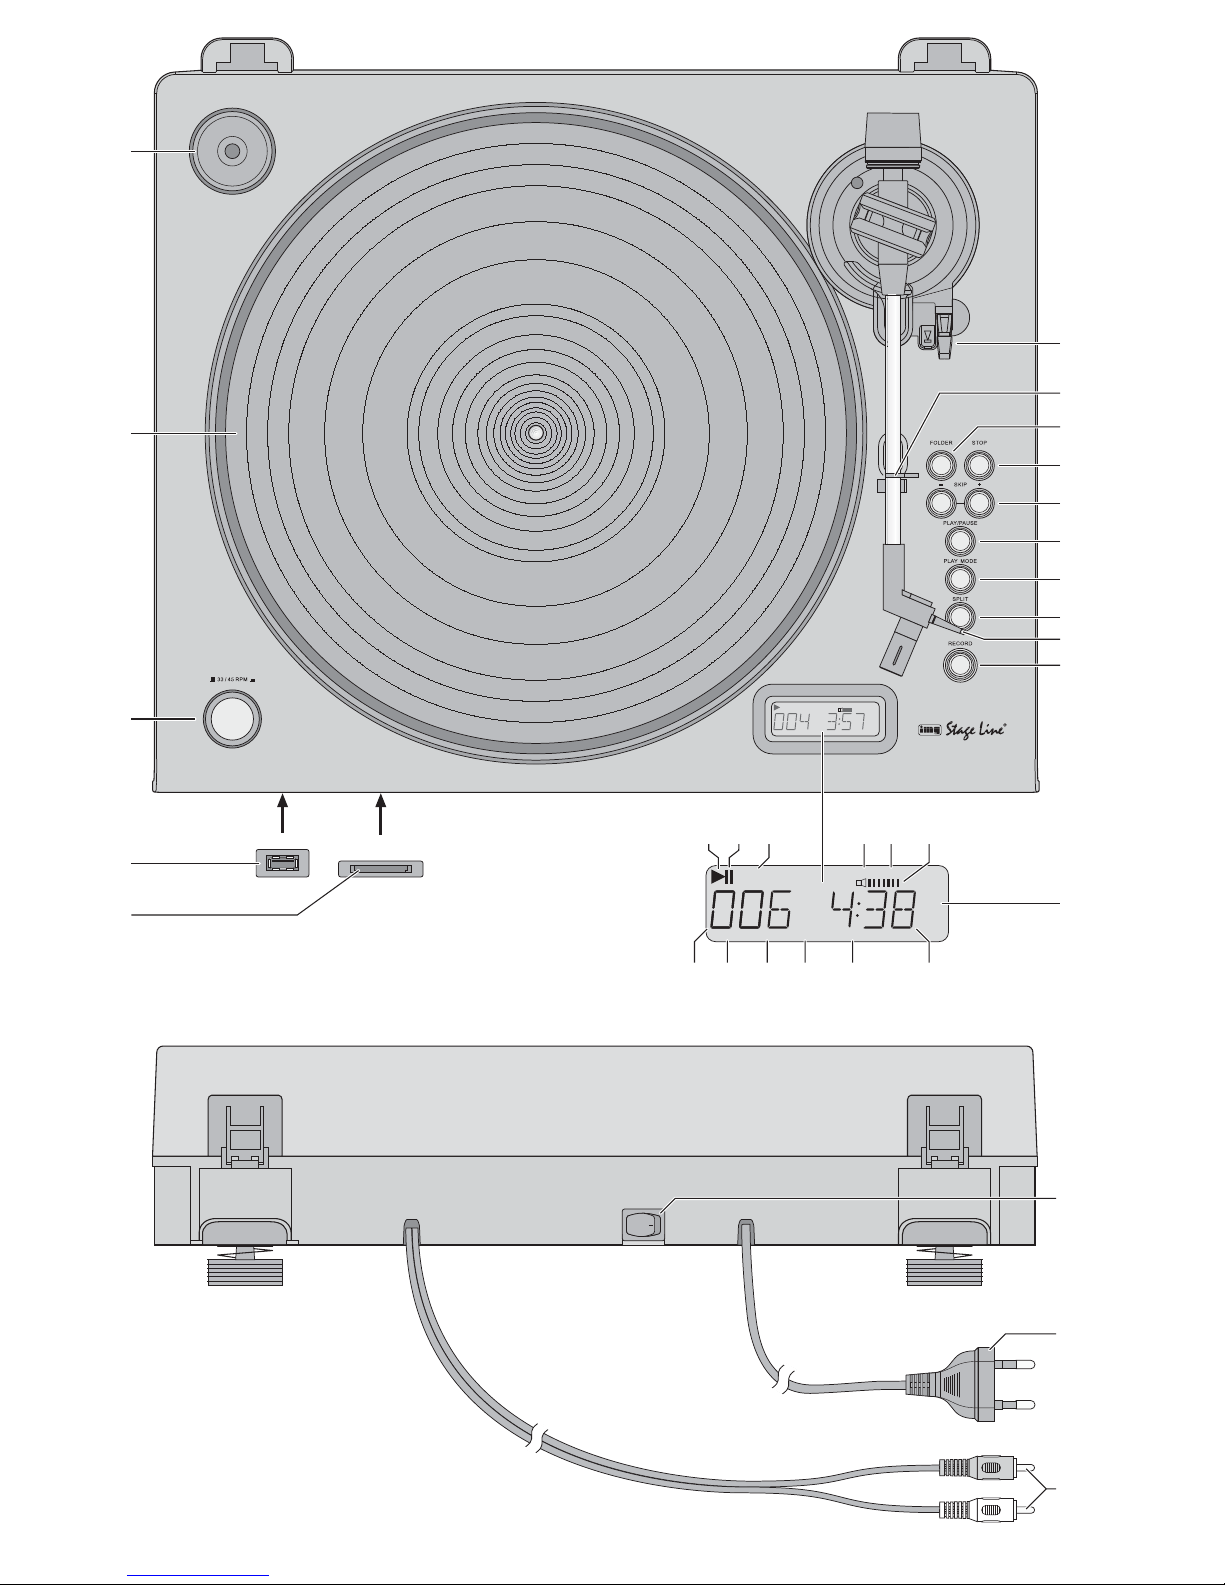
Auf der ausklappbaren Seite 3 finden Sie
alle beschriebenen Bedienelemente und An schlüsse.
1 Übersicht der Bedienelemente
und Anschlüsse
1 Adapter für Single-Platten
2 Plattenteller mit Gummimatte
3 Umschalttaste für die Geschwindigkeit
33
1
⁄3 oder 45 U / min
4 USB-Anschluss
5 Schlitz zum Einstecken einer SD- oder SDHC-
Karte
6 Hebel für den Tonarm-Lift
7 Verriegelungsbügel für den Tonarm
8 Taste FOLDER zum Anwählen des nächsten
Ordners auf einer SD-Karte oder einem USBSpeicher
9 Taste STOP beendet eine MP3-Aufnahme
oder das Abspielen von MP3-Dateien
10 Tasten SKIP zur Titelanwahl auf einer SD-
Karte oder einem USB-Speicher
SKIP + zum Vorspringen auf den nächsten
Titel
SKIP
-
zum Zurückspringen auf den Titelanfang; durch mehrfaches Drücken wird
immer ein Titel weiter zurückgesprungen
11 Taste PLAY/ PAUSE zum Starten und Unter-
brechen der Wiedergabe oder Starten einer
Aufnahme
12 Taste PLAY MODE für die Wiederholfunktio-
nen und das Abspielen in zufälliger Reihenfolge
1.Tastendruck (Anzeige REPEAT)
Der momentane Titel wird ständig wiederholt
2.Tastendruck (Anzeige REPEAT ALL)
Alle Titel auf dem Speichermedium werden
ständig wiederholt
3.Tastendruck (Anzeige REPEAT FOLDER)
Alle Titel im angewählten Ordner werden
ständig wiederholt
4.Tastendruck (Anzeige RANDOM)
Die Titel werden in zufälliger Reihenfolge
abgespielt
5.Tastendruck (Anzeige RANDOM erlischt)
Normale Wiedergabe ohne Wiederholung
13 Taste SPLIT zum Unterteilen einer MP3-Auf-
nahme in mehrere Titel
14 Tonarmgriff
15 Taste RECORD für die Aufnahmefunktion
16 Display für den MP3-Rekorder
a Wiedergabesymbol
b Pausensymbol
c Anzeige „REC“: signalisiert zusammen mit
dem Symbol (a), dass eine Aufnahme
erfolgt
d Anzeige „USB“: signalisiert, dass ein USB-
Speicher mit dem USB-Anschluss (4) verbunden ist
e Anzeige „CARD“: signalisiert, dass sich
eine SD- oder SDHC-Karte im Schlitz SD
CARD (5) befindet
f Audiopegelanzeige des MP3-Rekorders
g Anzeige der Ordneranzahl; während der
Wiedergabe oder Aufnahme Anzeige der
Titelnummer
h Anzeige „REPEAT“: eine der Wiederhol-
funktionen ist eingeschaltet
i Anzeige „ALL“: signalisiert zusammen mit
„REPEAT“, dass alle Titel endlos wiederholt werden
j Anzeige „FOLDER“: signalisiert zusammen
mit „REPEAT“, dass alle Titel eines Ordners endlos wiederholt werden
k Anzeige „RANDOM“: signalisiert, dass die
Titel in zufälliger Reihenfolge abgespielt
werden
l Anzeige der Titelnummer; während der
Wiedergabe oder Aufnahme Anzeige der
Titellaufzeit
17 Ein- und Ausschalter POWER
18 Netzstecker zum Anschluss an eine Steck-
dose (230 V~ / 50 Hz)
19 Audio-Ausgang über Cinch-Stecker zum An -
schluss an den Line-Eingang z. B. eines Verstärkers oder Mischpults
2 Hinweise für den
sicheren Gebrauch
Das Gerät entspricht allen erforderlichen Richt linien der EU und ist deshalb mit gekennzeichnet.
Beachten Sie auch unbedingt die folgenden
Punkte:
G
Verwenden Sie das Gerät nur im Innen bereich
und schützen Sie es vor Tropf- und Spritzwas-
WARNUNG Das Gerät wird mit lebensgefähr -
licher Netzspannung versorgt. Nehmen Sie deshalb niemals selbst
Eingriffe am Gerät vor. Es besteht
die Gefahr eines elektrischen
Schlages.
All operating elements and connections can
be found on the fold-out page 3.
1 Operating Elements
and Connections
1 Adapter for single records
2 Turntable platter with rubber mat
3 Selector switch for the speed
33
1
⁄3 or 45 rpm
4 USB port
5 Slot for inserting an SD or SDHC card
6 Lever for lifting the tone arm
7 Locking bracket for the tone arm
8 Button FOLDER to select the next folder on
an SD card or a USB memory
9 Button STOP to stop an MP3 recording or the
replay of MP3 files
10 Buttons SKIP for selecting titles on an SD
card or a USB memory
SKIP + to go to the next title
SKIP
-
to return to the beginning of the title;
each time the button is pressed, the
unit will go back another title
11 Button PLAY/ PAUSE to start and interrupt the
replay or to start a recording
12 Button PLAY MODE for the repeat functions
and for random replay
1
st
actuation of button (indication REPEAT)
The current title will be repeated continuously
2
nd
actuation of button
(indication REPEAT ALL)
All titles on the storage medium will be
repeated continuously
3
rd
actuation of button
(indication REPEAT FOLDER)
All titles in the folder selected will be repeated continuously
4
th
actuation of button
(indication RANDOM)
The titles will be replayed in a random
order
5
th
actuation of button
(indication RANDOM will disappear)
Standard replay without repeat
13 Button SPLIT to subdivide an MP3 recording
into several titles
14 Handle of tone arm
15 Button RECORD for the recording function
16 Display for the MP3 recorder
a replay symbol
b pause symbol
c
indication “REC”: to indicate together with the
symbol (a) that a recording is being made
d indication “USB”: to indicate that a USB
memory has been connected to the USB
port (4)
e indication “CARD”: to indicate that an SC or
SDHC card has been inserted into the slot
SD CARD (5)
f audio level indication of the MP3 recorder
g indication of folder number; during replay or
recording: indication of title number
h indication “REPEAT”: one of the repeat
functions has been activated
i indication “ALL”: to indicate together with
“REPEAT” that all titles will be repeated
continuously.
j indication “FOLDER”: to indicate together
with “REPEAT” that all titles of a folder will
be repeated continuously
k indication “RANDOM”: to indicate that the
titles will be replayed in a random order
l indication of title number; during replay or
recording: indication of playing time of a
title
17 POWER switch
18
Mains plug for connection to a socket (230 V~ /
50 Hz)
19 Audio output via RCA plug for connection to
the line input e. g. of an amplifier or mixer
2 Safety Notes
This unit corresponds to all required directives of
the EU and is therefore marked with .
Please observe the following items in any case:
G
The unit is suitable for indoor use only. Protect
it against dripping water and splash water, high
air humidity and heat (admissible ambient temperature range 0 – 40 °C).
G
Do not place any vessel filled with liquid on the
unit, e. g. a drinking glass.
G
Do not operate the unit and immediately disconnect the mains plug from the socket
1. if the unit or the mains cable is visibly damaged,
2. if a defect might have occurred after the unit
was dropped or suffered a similar accident,
3. if malfunctions occur.
In any case the unit must be repaired by skilled
personnel.
WARNING The unit uses dangerous mains
voltage. Leave servicing to skilled
personnel only. Inexpert handling
or modification of the unit may
result in electric shock.
D
A
CH
4
GB
ser, hoher Luftfeuchtigkeit und Hitze (zulässiger Einsatztemperaturbereich 0 – 40 °C).
G
Stellen Sie keine mit Flüssigkeit gefüllten Ge fäße, z. B. Trinkgläser, auf das Gerät.
G
Nehmen Sie das Gerät nicht in Betrieb und ziehen Sie sofort den Netzstecker aus der Steckdose,
1. wenn sichtbare Schäden am Gerät oder am
Netzkabel vorhanden sind,
2. wenn nach einem Sturz oder Ähnlichem der
Verdacht auf einen Defekt besteht,
3. wenn Funktionsstörungen auftreten.
Geben Sie das Gerät in jedem Fall zur Reparatur in eine Fachwerkstatt.
G
Ein beschädigtes Netzkabel darf nur durch
eine Fachwerkstatt ersetzt werden.
G
Ziehen Sie den Netzstecker nie am Kabel aus
der Steckdose, fassen Sie immer am Stecker an.
G
Verwenden Sie für die Reinigung nur ein trockenes, weiches Tuch, niemals Wasser oder
Chemikalien.
G
Wird das Gerät zweckentfremdet, nicht richtig
angeschlossen, falsch be dient oder nicht fach gerecht repariert, kann keine Haftung für
daraus resultierende Sach- oder Personenschäden und keine Garantie für das Gerät
übernommen werden. Ebenso kann keine Haftung für durch Fehlbedienung oder durch einen
Defekt entstandene Datenverluste und deren
Folgeschäden übernommen werden.
3 Einsatzmöglichkeiten
Der Plattenspieler DJP-106SD eignet sich so wohl für den Einsatz im privaten Bereich als auch
für den professionellen DJ-Betrieb. Er ist mit
einem Phono-Vorverstärker ausgestattet und
kann deshalb direkt an den Line-Eingang z. B.
eines Verstärkers oder Mischpults angeschlossen werden.
Mit dem integrierten MP3-Rekorder lassen
sich Titel von einer Schallplatte auf einen USBSpeicher, eine SD- oder SDHC-Karte aufnehmen sowie Titel im MP3-Format wiedergeben.
4 Geräteteile zusammensetzen
Die Abdeckhaube und die Gummimatte sind einzeln verpackt, damit sie und der Plattenspieler
beim Transport nicht beschädigt werden. Nach
dem Auspacken aller Geräteteile sollte die Originalverpackung für weitere Transporte aufbewahrt werden (Kap. 7.2).
1) Den Plattenspieler auf einer ebenen, waage-
rechten Fläche aufstellen.
2) Die beiliegende Gummimatte auf den Platten-
teller legen. Zum Erzeugen von ScratchEffekten alternativ eine Filzmatte (Slipmat)
auf legen, z. B. DJP-1M von „img Stage Line“.
3) Die zwei Scharniere für die Abdeckhaube aus
den Hartschaum-Verpackungsteilen herausnehmen und auf die Abdeckhaube stecken.
Die Abdeckhaube mit den Scharnieren auf den
Plattenspieler aufsetzen (Abb. 3). Sie kann
jederzeit wieder abgenommen werden, wenn
sie beim Betrieb stört, z. B. beim Disco-Betrieb.
5 Plattenspieler anschließen
Vor dem Anschließen von Geräten oder dem
Ändern bestehender Anschlüsse den Plattenspieler und die anzuschließenden Geräte ausschalten.
1) Das Anschlusskabel mit den Cinch-Steckern
(19) an einen Eingang mit Line-Pegel an schließen (mögliche Beschriftung: Line, CD,
Aux).
2) Zur Aufnahme im MP3-Format von Titeln
einer Schallplatte oder zur Wiedergabe von
MP3-Dateien lässt sich z. B. ein USB-Stick in
den USB-Anschluss (4) stecken oder eine
Festplatte (ggf. mit eigener Stromversorgung)
mit dem USB-Anschluss verbinden.
Alternativ kann auch eine SD- oder SDHCKarte in den Schlitz SD CARD (5) eingesteckt
werden. Dazu die Karte mit der abgeschrägten Ecke nach rechts zeigend soweit hineinstecken, bis sie einrastet. Zum Herausnehmen der Karte auf deren Hinterkante drücken,
sodass die Karte wieder ausrastet und entnommen werden kann.
3) Den Netzstecker (18) in eine Steckdose
(230 V~ / 50 Hz) stecken.
6 Bedienung
6.1 Schallplatte abspielen
1) Den Plattenspieler mit dem Schalter POWER
(17) auf der Rückseite einschalten. Das Display (16) leuchtet und zeigt kurz die Version
der Firmware an (z. B. „VER – 1.19“). Wenn
keine SD-Karte eingesteckt oder kein USBSpeicher angeschlossen ist, zeigt es danach
„NO dEV“ an (no device = kein Gerät).
Soll das Gerät endgültig aus dem
Betrieb genommen werden, übergeben
Sie es zur umweltgerechten Entsorgung
einem örtlichen Recyclingbetrieb.
G
A damaged mains cable must be replaced by
skilled personnel only.
G
Never pull the mains cable for disconnecting
the mains plug from the socket, always seize
the plug.
G
For cleaning only use a dry, soft cloth; never
use water or chemicals.
G
No guarantee claims for the unit and no liability
for any resulting personal damage or material
damage will be accepted if the unit is used for
other purposes than originally intended, if it is
not correctly connected or operated, or if it is
not repaired in an expert way. Likewise, no liability will be accepted for operating errors or for
data loss caused by a defect and for consequential damage of this data loss.
G
Important for U. K. Customers!
The wires in this mains lead are coloured in ac cord ance with the following code:
blue = neutral
brown = live
As the colours of the wires in the mains lead of
this appliance may not correspond with the
coloured markings identifying the terminals in
your plug, proceed as follows:
1. The wire which is coloured blue must be connected to the terminal which is marked with
the letter N or coloured black.
2. The wire which is coloured brown must be
connected to the terminal which is marked
with the letter L or coloured red.
3 Applications
The turntable DJP-106SD is suitable both for private applications and professional DJ applications. It is equipped with a phono preamplifier
and therefore allows direct connection to the line
input e. g. of an amplifier or mixer.
With the integrated MP3 recorder it is possible to record titles from a record on a USB memory, an SD card or SDHC card and to replay titles
in MP3 format.
4 Assembling the Parts
The cover and the rubber mat are packed separately to prevent damage to these parts and to
the turntable during transport. After unpacking all
parts of the unit, save the original packing material for future transport (
chapter 7.2).
1) Set up the turntable on an even, horizontal
surface.
2) Place the rubber mat provided on the turn-
table platter. To create scratch effects, alternatively use a felt mat (slipmat), e. g. DJP-1M
from “img Stage Line”.
3) Remove the two hinges for the cover from
their polystyrene wrappings and insert them
into the cover. Place the cover with the hinges
on the turntable (fig. 3). It will be possible to
remove it any time if it interferes with the operation, e. g. in discotheques.
5 Connecting the Turntable
Prior to connecting units or to changing any existing connections, switch off the turntable and the
units to be connected.
1) Connect the cable with RCA plugs (19) to an
input with line level (possible marking: Line,
CD, Aux).
2) For recording titles from a record in MP3 format or for replaying MP3 files, it will be possible to connect e. g. a USB memory stick to the
USB port (4) or a hard disk (with separate
power supply, if required) to the USB port.
Alternatively, insert an SD card or SDHC
card into the slot SC CARD (5). For this purpose, insert the card with the notched corner
showing to the right into the slot until it
engages. To remove the card, push its rear
edge so that the card will disengage and can
be removed.
3) Connect the mains plug (18) to the socket
(230 V~ / 50 Hz).
6 Operation
6.1 Replaying records
1) Switch on the turntable with the POWER
switch (17) on its rear side. The display (16)
will light up and shortly show the firmware version (e. g. “VER – 1.19”). If no SD card has
been inserted or if no USB memory has been
connected, it will then show “NO dEV“ (no
device).
2) Pull the protection for the stylus downwards
and remove it.
3) Put on a record. Use the adapter (1) for single
records.
If the unit is to be put out of operation
definitively, take it to a local recycling
plant for a disposal which will not be
harmful to the environment.
D
A
CH
5
GB

4) Open the locking bracket (7) for the tone arm
to the right.
5) Put the lever for lifting the tone arm (6) into the
rear position so that the tone arm will slightly
be lifted.
6) Seize the handle (14) of the tone arm and
position the stylus above the beginning of the
record or above the beginning of the desired
title. The platter will start rotating.
7) Select the speed with button 33 /45RMP (3):
For long-playing records disengage the but-
ton = 33
1
⁄3 rotations per minute
For single records press down the button =
45 rpm
8) For replay, put the lever for lifting the tone arm
into the front position. The tone arm is slowly
lowered onto the record.
9) At the end of the record the tone arm will automatically be put back onto the tone arm support and the turntable stops. To stop the
replay before the end, raise the tone arm with
the lever for lifting (put the lever into the rear
position). Seize the tone arm at the handle
and put it back onto the tone arm support.
10) After operation, secure the tone arm with the
locking bracket (7) and switch off the unit with
the mains switch POWER (17). Close the
cover as a protection against dust.
6.2 MP3 recording
1) Connect a USB memory to the jack USB (4) or
insert an SD card or SDHC card into the slot
SD CARD (5), chapter 5. If both a USB
memory has been connected and a memory
card has been inserted, the USB memory is
automatically selected. The display (16)
shows the selected storage medium: “USB”
(d) or “CARD” (e).
2) The turntable platter must rotate, otherwise
the recording function cannot be activated.
For this purpose seize the tone arm at the
handle (14) and position the stylus above the
beginning of the title to be recorded.
3) Activate the recording function with the button
RECORD (15). The display shows “LOAdING” first. Then it shows that it is ready for
recording by flashing of indications (a, b,
c) and “000” (l).
4) Play the record. For the start of the recording,
press the button PLAY/PAUSE (11). The current recording is displayed with and
with the indication of the recording time (l)
[min. : sec.]. On the left of the recording time
the number of the recording is indicated (g)
[000 – 999].
5) If a title has been played and recorded,
press the button SPLIT (13) during the pause
until the next title is being played. Thus, a
new file is created for the next title (e. g.
REC_002.mp3).
If the button SPLIT is not pressed between
the titles, the unit creates a large MP3 file
including all titles of a recording.
Hint:
If the last title of the first side of the record
has been recorded, press the button SPLIT.
Then flip the record over and press the button
SPLIT again at the beginning of the first title of
the second side. Thus, all titles of the record
are contained in one folder and the time of flipping over the record is memorized in a separate MP3 file. This file can be skipped when
replaying or be cancelled on a PC.
6) To stop a recording, press the button STOP
(9). Then the display shows the number of
folders on the left and the number of all MP3
files on the right on the memory (e. g.
“03 – 024” = 3 folders with a total of 24 files).
Each time a recording is started, the unit creates
a new folder on the storage medium: ALBUM_01
up to max. ALBUM_99. In each folder the MP3
files which result from actuating the button SPLIT
are consecutively numbered from REC_001.mp3
to max. REC_999.mp3.
6.3 Replay of MP3 files
1) Connect a USB memory to the jack USB (4) or
insert an SD or SDHC card into the slot SD
CARD (5),
chapter 5. If both a USB memory has been connected and a memory card
has been inserted, the USB memory is automatically selected. The display (16) shows
the selected storage medium: “USB” (d) or
“CARD” (e).
After reading in (indication “REAd”) the
number of folders (g) appears on the left of the
display and the number of MP3 files (l) on the
right.
2) To start the first title, press the button
PLAY/PAUSE (11). The display goes to the
indication of the title number (g) and the time
replayed of the title (l).
REC
REC
D
A
CH
6
GB
2) Die Schutzkappe für die Abtastnadel nach
unten abnehmen.
3) Eine Schallplatte auflegen. Bei Single-Platten
den Adapter (1) mit auflegen.
4) Den Verriegelungsbügel (7) für den Tonarm
nach rechts öffnen.
5) Den Hebel für den Tonarm-Lift (6) in die hintere Position stellen, sodass der Tonarm
etwas angehoben wird.
6) Den Tonarm am Griff (14) anfassen und die
Abtastnadel über den Anfang der Schallplatte
oder über den Anfang des gewünschten Titels
positionieren. Der Plattenteller beginnt zu
rotieren.
7) Mit der Taste 33 / 45 RMP (3) die Geschwindigkeit wählen:
Für Langspielplatten die Taste ausrasten =
33
1
⁄3 Umdrehungen pro Minute
Für Single-Platten die Taste hineindrücken =
45 U / min
8) Zum Abspielen den Hebel für den Tonarm-Lift
in die vordere Position stellen. Der Tonarm
senkt sich langsam auf die Schallplatte.
9) Am Ende der Schallplatte wird der Tonarm
automatisch zurück auf den Tonarm-Halter
gefahren und der Plattenteller stoppt. Zum
vorzeitigen Beenden des Abspielens den
Tonarm mit dem Hebel für den Lift anheben
(Hebel in die hintere Position stellen). Den
Tonarm am Griff fassen und zurück auf die
Tonarm-Halterung legen.
10) Nach dem Betrieb den Tonarm mit dem Verriegelungsbügel (7) sichern und das Gerät mit
dem Netzschalter POWER (17) ausschalten.
Die Abdeckhaube zum Schutz gegen Staub
herunterklappen.
6.2 MP3-Aufnahme
1) Einen USB-Speicher an die Buchse USB (4)
anschließen oder eine SD- bzw. SDHC-Karte in
den Schlitz SD CARD (5) stecken, Kap. 5.
Ist sowohl ein USB-Speicher an geschlossen
als auch eine Speicherkarte eingesteckt, wird
automatisch der USB-Speicher angewählt.
Das Display (16) zeigt das angewählte Speicher medium an: „USB“ (d) oder „CARD“ (e).
2) Der Plattenteller muss rotieren, anderenfalls
kann die Aufnahmefunktion nicht aktiviert
werden. Dazu den Tonarm am Griff (14) an fassen und die Abtastnadel über den Anfang
des aufzunehmenden Titels positionieren.
3) Die Aufnahmefunktion mit der Taste RE CORD (15) aktivieren. Das Display zeigt zu erst „LOAdING“ an. Danach signalisiert es die
Aufnahmebereitschaft durch Blinken der An zeigen (a, b, c) und „000“ (l).
4) Die Schallplatte abspielen. Wenn die Aufnahme starten soll, die Taste PLAY/ PAUSE
(11) drücken. Die laufende Aufnahme signalisiert das Display mit und mit der
Anzeige der Aufnahmezeit (l) [Min. : Sek.].
Links von der Aufnahmezeit wird die Nummer
der Aufnahme angegeben (g) [000 – 999].
5) Ist ein Titel abgespielt und aufgenommen,
während der Pause zum nächsten Titel die
Taste SPLIT (13) drücken. Damit wird für den
nächsten Titel eine neue Datei angelegt (z. B.
REC_002.mp3).
Wird die Taste SPLIT zwischen den Titeln
nicht gedrückt, erzeugt das Gerät eine große
MP3-Datei, in der alle Titel einer Aufnahme
enthalten sind.
Tipp: Ist der letzte Titel der ersten Schallplattenseite aufgenommen, die Taste SPLIT drü-
cken. Dann die Platte umdrehen und am Be ginn des ersten Titels der zweiten Seite die
Taste SPLIT erneut drücken. So sind alle Titel
der Platte in einem Ordner enthalten und die
Zeit des Umdrehen der Platte ist in einer
separaten MP3-Datei gespeichert. Diese
Datei kann beim Abspielen übersprungen
oder auf einem PC gelöscht werden.
6) Zum Beenden einer Aufnahme die Taste
STOP (9) drücken. Das Display zeigt danach
links die Anzahl der Ordner und rechts die
Anzahl aller MP3-Dateien auf dem Speicher
an (z. B. „03 – 024“ = 3 Ordner mit insgesamt
24 Dateien).
Das Gerät erzeugt bei jedem Starten einer Aufnahme einen neuen Ordner auf dem Speichermedium: ALBUM_01 bis max. ALBUM_99. In
jedem Ordner werden die MP3-Dateien, die durch
das Betätigen der Taste SPLIT entstehen, von
REC_001.mp3 bis max. REC_999.mp3 durchnummeriert.
6.3 Wiedergabe von MP3-Dateien
1) Einen USB-Speicher an die Buchse USB (4)
anschließen oder eine SD- bzw. SDHC-Karte in
den Schlitz SD CARD (5) stecken, Kap. 5.
Ist sowohl ein USB-Speicher angeschlossen
als auch eine Speicherkarte eingesteckt, wird
automatisch der USB-Speicher angewählt. Das
Display (16) zeigt das angewählte Speicher medium an: „USB“ (d) oder „CARD“ (e).
Nach dem Einlesen (Anzeige „REAd“) er scheint links im Display die Anzahl der Ordner
(g) und rechts die Anzahl der MP3-Dateien (l).
2) Zum Starten des ersten Titels die Taste PLAY/
PAUSE (11) drücken. Das Display springt auf
die Anzeige der Titelnummer (g) und der ge spielten Zeit des Titels (l) um.
REC
REC
 Loading...