

Page 1

TERMOVENTILATORE
Istruzioni ed Avvertenze
Instructions and Warnings
Instructions et avertissements
Anleitungen und Hinweise
Instrucciones y Advertencias
Instruções e Advertências
Navodila in opozorila
√‰ËÁ›Â˜ Î·È ¶ÚÔÂȉÔÔÈ‹ÛÂȘ
Bilgiler ve Uyar›lar
Návod a upozornění
Utasítások és figyelmeztetések
Upute i napomene
àÌÒÚÛ͈ËË Ë peÍÓÏẻ‡ˆËË
àÌÒÚÛ͈ËË Ë ÛÔ˙Ú‚‡ÌËfl
Instructies en voorschriften voor gebruik
Instrucţiuni și avertizări
Pokyny na použitie a upozornenia
FAN HEATER
RADIATEUR SOUFFLANT
THERMOVENTILATOR
TERMOVENTILADOR
TERMOVENTILADOR
TERMIČNI VENTILATOR
AEPO£EPMO
TERM‹K VANT‹LATÖR
TERMOVENTILÁTOR
VENTILÁTOROS HŐSUGÁRZÓ
KALORIFER
нЦкейЗЦзнагьнйк
нЦкейЗЦзнагДнйк
VENTILATORKACHEL
TERMOVENTILATOARE
TEPLOVZDUŠNÝ VENTILÁTOR
Page 2

ITALIANO
ENGLISH
FRANÇAIS
DEUTSCH
ESPAÑOL
PORTUGUÊS
SLOVENSKI
∂§§HNIKA
TÜRKÇE
ČESKY
MAGYAR
HRVATSKI
кмллдав
ЕцгЙДклда
NEDERLANDS
ROMÂN
SLOVENSKY
2
6
10
14
18
22
26
30
34
38
42
46
50
54
58
62
66
Page 3
[Z]
(A)
(B)
(C)
(C1)
h
d
f
a
b
c
h
n
g
fd
b m
e
d
f
i
j
k
l
Page 4

2
ISTRUZIONI E AVVERTENZE PER UN USO CORRETTO E SICURO
LEGGERE ATTENTAMENTE LE ISTRUZIONI E LE AVVERTENZE CONTENUTE NEL PRESENTE
LIBRETTOE CONSERVARLE PER ULTERIORI CONSULTAZIONI PER TUTTA LA VITA DEL PRODOTTO.
ESSE INFATTI FORNISCONO INDICAZIONI IMPORTANTI PER QUANTO RIGUARDA LA FUNZIONALITA’
E LA SICUREZZA NELL’INSTALLAZIONE, NELL’USO E NELLA MANUTENZIONE DEL PRODOTTO.
A TTENZIONE
A VVERTENZE GENERALI
IMETEC La ringrazia di aver scelto un suo prodotto. Siamo certi che ne apprezzerà la qualità, l’affidabilità ed il rispetto per il
consumatore con il quale l’abbiamo progettato e costruito.
1. Dopo aver tolto l'imballaggio assicurarsi che l’apparecchio si presenti integro senza visibili danneggiamenti che potrebbero
essere stati causati dal trasporto. In caso di dubbio non utilizzare l'apparecchio e rivolgersi ai Centri di Assistenza Tecnica
autorizzati da IMETEC.
2. Prima di collegare l'apparecchio accertarsi che i dati di targa siano r ispondenti a quelli della rete di alimentazione elettrica. La
targa è sul fondo dell’apparecchio.
3. Non utilizzare adattatori, prese multiple e/o prolunghe. In caso di incompatibilità tra la presa e la spina dell’apparecchio fare
sostituire la presa con altra di tipo adatto da personale professionalmente qualificato.
4. Questo apparecchio dovrà essere destinato solo all'uso per il quale è stato espressamente concepito, cioè come
termoventilatore. Ogni altro uso è da considerarsi improprio e quindi pericoloso. Il costruttore non può essere considerato
responsabile per eventuali danni derivanti da usi impropri ed erronei.
5. L’uso di un qualsiasi apparecchio elettrico comporta l’osservanza di alcune regole fondamentali.In particolare:
- non toccare mai l’apparecchio con mani o piedi bagnati o umidi
- non tirare il cavo di alimentazione, o l’apparecchio stesso, per staccare la spina dalla presa di corrente
- non lasciare esposto l’apparecchio ad agenti atmosferici (pioggia, sole, ecc.)
- non permettere che l’apparecchio sia usato da bambini o da incapaci senza sorveglianza
6. Non posizionare l’apparecchio immediatamente sotto una presa di corrente. Non utilizzare il prodotto nelle immediate vicinanze
di una vasca da bagno, doccia o piscina.Non posizionare il prodotto in modo tale che sia accessibile da una vasca da bagno,
doccia o piscina. Non coprire le griglie di entrata e uscita dell’aria.
7. Prima di effettuare qualsiasi operazione di pulizia o di manutenzione occorre disinserire l’apparecchio dalla rete di alimentazione
elettrica, staccando la spina.
8. In caso di guasto e/o cattivo funzionamento dell'apparecchio occorre spegnerlo e non manometterlo. Per l'eventuale riparazione
rivolgersi ai Centri di Assistenza Tecnica autorizzati da IMETEC.
9. Il cavo di alimentazione di questo apparecchio non deve essere sostituito dall'utente. In caso di danneggiamento del cavo, o per
la sua sostituzione, rivolgersi ai Centri di Assistenza Tecnica autorizzati da IMETEC.
10. Allorché si decida di non utilizzare più un apparecchio di questo tipo, si raccomanda di renderlo inoperante tagliandone il cavo
di alimentazione, dopo aver staccato la spina dalla presa di corrente. Si raccomanda inoltre di rendere innocue quelle par ti
dell'apparecchio suscettibili di costituire un pericolo, specialmente per i bambini che potrebbero servirsi dell'apparecchio fuori
uso per i propri giochi.
11. Non coprire le griglie di entrata ed uscita dell’aria per evitare il rischio di surriscaldamento.
12. Questo apparecchio non è destinato all’utilizzo da parte di bambini e persone con ridotte capacità fisiche, sensoriali o mentali,
e comunque in assenza di specifica conoscenza ed esperienza, senza la supervisione o le istruzioni relative all’utilizzo, impartite
da persona responsabile.
13. L’apparecchio non è destinato al gioco dei bambini.
Page 5

I
T
A
L
I
A
N
O
3
ISTRUZIONI GENERALI
APPARECCHIO A
• Commutatore di potenza [Fig. A]
POSIZIONE FUNZIONE
Apparecchio spento
Aria calda (1100 W)
Aria molto calda (2200W)
APPARECCHIO B
• Commutatore di potenza [Fig. E]
POSIZIONE FUNZIONE
Apparecchio spento
Aria fredda
Aria calda (1000W)
Aria molto calda (2000W)
• Termostato ambiente [Fig. C]
Il termostato ambiente garantisce il mantenimento della temperatura desiderata: raggiunto tale livello l’apparecchio si spegne
automaticamente per riaccendersi non appena la temperatura diminuisca.
POSIZIONE FUNZIONE
Antigelo
MAX Massima temperatura
APPARECCHIO C - C1
• Commutatore di potenza [Fig. B]
POSIZIONE FUNZIONE
Apparecchio spento
Aria fredda
Aria calda (1100W)
Aria molto calda (2200W)
• Termostato ambiente - [Fig. D]
POSIZIONE FUNZIONE
Antigelo
MAX Massima temperatura
Il termostato ambiente garantisce il mantenimento della temperatura desiderata: raggiunto tale livello l’apparecchio si spegne
automaticamente per riaccendersi non appena la temperatura diminuisca.
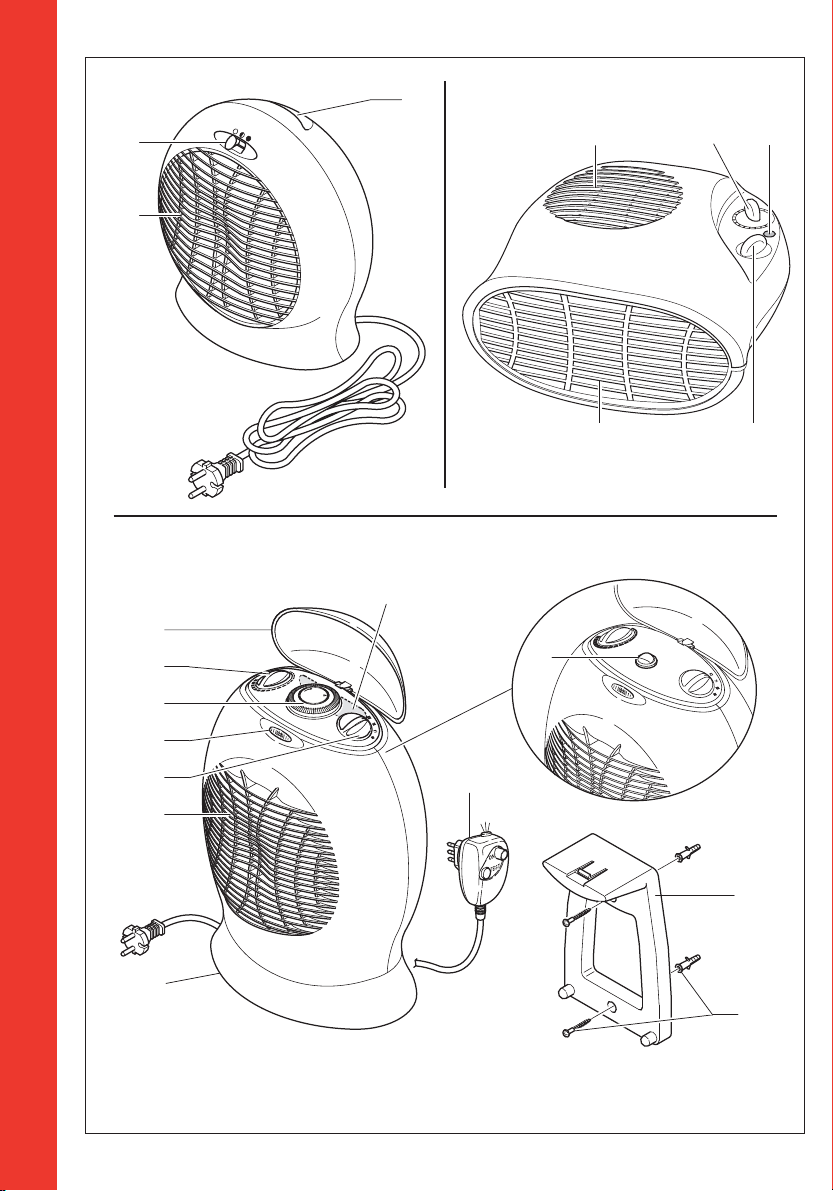
DESCRIZIONE APPARECCHIO E ACCESSORI [Fig. Z]
a
Copricomandi
h
Vano per impugnatura o zona per supporto staffa (retro)
b
Termostato ambiente
i
Avvolgicavo
c
Timer
j
Electro Block
®
d
Commutatore di potenza
k
Staffa per montaggio a parete
e
Spia accensione
l
Viti e tasselli per montaggio a parete
f
Corpo motore e griglia fuoriuscita dell’aria (fronte)m Spia ionizzatore (solo modelli con ionizzatore)
g
Griglia entrata dell’aria
n
Tasto luminoso spia ionizzatore (solo modelli con ionizzatore)
Page 6

4
APPARECCHIO A
Funzione termoventilatore
- Ruoti il commutatore di potenza [Fig. A] come segue:
posizione : Aria calda (1100W).
posizione : Aria molto calda (2200W).
APPARECCHIO B
Funzione termoventilatore
- Ruoti il commutatore di potenza [Fig. E] come segue:
posizione : Aria calda (1000W).
posizione : Aria molto calda (2000W).
- Regoli il termostato ambiente
[Fig. C] a seconda della temperatura che vuole mantenere.
Funzione ventilazione estiva
- Regoli il termostato ambiente [Fig. C] sulla massima temperatura MAX.
- Ruoti il commutatore di potenza
[Fig. E] sulla posizione .
Funzione antigelo
Questa funzione garantisce il mantenimento di una temperatura ambiente intorno a +5°C. Quando la temperatura scende sotto questo
livello, il termoventilatore si accende automaticamente.
- Regoli il termostato ambiente
[Fig. C] sulla posizione antigelo .
- Ruoti il commutatore di potenza
[Fig. E] come segue:
posizione per un ripristino graduale della temperatura a +5°C.
posizione per un ripristino veloce della temperatura a +5°C.
Tecnologia Imetec-Ion77 (solo per i modelli con ionizzatore)
Se il vostro apparecchio è dotato di ionizzatore, la spia luminosa msarà accesa indicandone il funzionamento.
Il termoventilatore Imetec-Ion77 è dotato di ionizzatore, un rivoluzionario dispositivo che riproduce il fenomeno naturale della
ionizzazione. Gli ioni generati dal termoventilatore agiscono positivamente sull’aria, rivitalizzandola e rendendola più pulita.
APPARECCHIO C - C1
Funzione termoventilatore
- Ruoti il commutatore di potenza [Fig. B] come segue:
posizione : Aria calda (1100W).
posizione : Aria molto calda (2200W).
- Regoli il ter mostato ambiente
[Fig. D] a seconda della temperatura che vuole mantenere.
Funzione ventilatore
- Regoli il ter mostato ambiente [Fig. D] sulla massima temperatura MAX.
- Ruoti il commutatore di potenza
[Fig. B] sulla posizione .
Funzione antigelo
Questa funzione garantisce il mantenimento di una temperatura ambiente intorno a +5°C. Quando la temperatura scende sotto questo
livello, il termoventilatore si accende automaticamente.
- Regoli il ter mostato ambiente
[Fig. D] sulla posizione antigelo .
- Ruoti il commutatore di potenza
[Fig. B] come segue:
posizione per un ripristino graduale della temperatura a +5°C.
posizione per un ripristino veloce della temperatura a +5°C.
ISTRUZIONI DI UTILIZZO
• Timer - [Fig. F] (solo per i modelli provvisti)
f1: dentini per la programmazione delle fasce d’orario.
f2: ghiera esterna.
ATTENZIONE:
- Se il timer è programmato, il mantenimento della temperatura selezionata verrà esercitato solo all’interno delle fasce orarie
programmate.
• Base regolabile - (solo per i modelli provvisti)
Posizione standard [Fig. G].
Posizione inclinata:la base può essere regolata per dirigere l’aria calda/fredda verso l’alto.Tenendo la base ben ferma, faccia scivolare
il corpo motore, spingendolo in avanti
[Fig. H].
Page 7

Funzione timer (solo per modelli con timer)
La funzione timer permette di gestire l’accensione e lo spegnimento dell’apparecchio nei seguenti modi:
• Manuale
-Porti verso l’interno tutti i dentini del timer [Fig. I].
- Ruoti il commutatore di potenza
[Fig. B] sulla posizione , o a seconda della funzione che intende attivare.
- Regoli il ter mostato ambiente
[Fig. D] a seconda della temperatura che vuole mantenere.
ATTENZIONE:
- Il timer funziona solo se la spina del termoventilatore è inserita in una presa di corrente.
• Automatico
- Agisca sulla ghiera esterna del timer in senso orario e sincronizzi l’indicatore con il suo orologio [Fig. L].
-Porti verso l’esterno tutti i dentini del timer
[Fig. M] ad eccezione di quelli corrispondenti alle fasce orarie in cui intende far funzionare
l’apparecchio.
- Ruoti il commutatore di potenza
[Fig. B] sulla posizione , o a seconda della funzione che intende attivare.
Il timer è giornaliero e ripete la programmazione ad intervalli di 24 ore. Ogni dentino equivale ad un quarto d’ora.
Tecnologia Imetec-Ion77 (solo per i modelli con ionizzatore)
Se il vostro apparecchio è dotato di tasto con spia luminosa
n
per l’attivazione dello ionizzatore, potrete scegliere se attivarlo o meno.
Per attivare lo ionizzatore è sufficiente premere il tasto
n
e la spia luminosa si accenderà ad indicare che lo ionizzatore è in funzione.
Per disattivalo premere nuovamente il tasto portandolo alla posizione di partenza, la spia luminosa si spegnerà.
Il termoventilatore Imetec-Ion77 è dotato di ionizzatore, un rivoluzionario dispositivo che riproduce il fenomeno naturale della
ionizzazione. Gli ioni generati dal termoventilatore agiscono positivamente sull’aria, rivitalizzandola e rendendola più pulita.
ISTRUZIONI PER L’INSTALLAZIONE A PARETE -
(solo per modelli con supporto staffa) [Fig. Q]
Il termoventilatore può essere fissato a muro.
- Fissi alla parete il suppor to staffa con i due tasselli in dotazione
[Fig. N] (la distanza fra i fori è cm 16.5, diametro 6 mm).
- Appoggi il ter moventilatore sulla staffa e lo spinga contro la parete, in modo che il dente della staffa
(o1) si agganci sul retro del
termoventilatore, in corrispondenza dell’impugnatura [Fig. O].Per staccare il termoventilatore dal supporto a muro, prema il dente
della staffa come indicato dalla freccia e contemporaneamente tiri il termoventilatore verso l’esterno [Fig. P].
APPARECCHIO CON SALVA VITA ELECTRO BLOCK
®
IMPORTANTE:
- Se il suo apparecchio è dotato del salva vita Electro Block
®
j
,deve collegarlo direttamente ad una spina di corrente fissa; non
lo colleghi per nessun motivo a spine mobili o ad adattatori o a prolunghe.Il salva vita Electro Block®è dotato di un interruttore
differenziale ad alta sensibilità che protegge l’utilizzatore da dispersioni di corrente verso terra per valori superiori a 10mA.
Per poter utilizzare l’apparecchio effettui le seguenti operazioni:
- Inserisca Electro Block
®
nella presa di corrente, prema e rilasci il tasto ON:apparirà il colore rosso nel vetrino spia.Electro Block®ora è attivo.
-Verifichi la perfetta efficienza di Electro Block
®
premendo il tasto TEST:la corrente si interrompe, l’indicatore rosso scompare e questo
le garantisce che il salvavita Electro Block®è perfettamente efficiente.
- Dopo aver fatto il test, prema e rilasci nuovamente il tasto
ON: l’indicatore rosso r iappare e il termoventilatore è pronto a funzionare. Il
test deve essere eff ettuato prima di ogni utilizzo dell’apparecchio .In caso di funzionamento anomalo o non corretto (ad esempio interventi
ripetuti con l’apparecchio collegato a rete oppure interventi non tempestivi durante il test di verifica di Electro Block®), si rivolga
immediatamente ai Centri di Assistenza Tecnica autorizzati da IMETEC.Quando l’apparecchio viene spento e il salva vita Electro Block
®
disinserito dalla presa, l’interruttore differenziale del salva vita Electro Block®si spegne automaticamente. L’utilizzo improprio di
apparecchi elettrici può essere pericoloso. L’uso di un dispositivo salva vita non sostituisce le precauzioni fondamentali per la sicurezza
elettrica.
CONSIGLI UTILI
Quando ripone il termoventilatore, si assicuri che sia protetto dalla polvere per evitare che la stessa si infili all’interno delle griglie.
I
T
A
L
I
A
N
O
5
Page 8

6
INSTRUCTIONS AND WARNINGS FOR CORRECT AND SAFE USE
CAREFULLY READ THE INSTRUCTIONS AND WARNINGS IN THIS MANUAL AND KEEP THEM FOR
FUTURE REFERENCE. THEY SUPPLY IMPORTANT INSTRUCTIONS REGARDING OPERATIONS AND
SAFETY FOR PRODUCT INSTALLATION,USE AND MAINTENANCE.
PLEASE NOTE
GENERAL WARNINGS
IMETEC thanks you for choosing this product.We are certain that you will appreciate the quality , reliability and regard f or the consumer
with which it was designed and produced.
1. After unpacking, make sure that the appliance is intact with no visible signs of damage caused by transport. Should you have
any doubts, do not use the appliance and take it to an authorised IMETEC Service Centre.
2. Before connecting the appliance, check that the rating plate specifications correspond to the electrical mains supply. The plate
is on the bottom of the appliance.
3. Do not use adapters, multiple sockets and/or extension leads.If the appliance’s plug and the socket are incompatible, have the
socket replaced with a suitable type by professionally qualified staff.
4. This appliance must be used only for the purpose for which it has been designed, that is, as a fan heater. Any other use is to
be considered improper and therefore hazardous.The manufacturer cannot be held responsible for an y damage due to improper
or incorrect use.
5. Certain fundamental guidelines must be respected when using any sort of electrical appliance. Specifically:
- never touch the appliance with hands or feet that are wet or damp
- do not pull the power cord or the appliance to remove the plug from the socket
- do not expose the appliance to the elements (rain, sun, etc.)
- do not let children or incapable persons use the appliance without supervision
6. Do not place the appliance directly beneath an electrical socket. Do not use this product within the immediate vicinities of a
bathtub, shower or swimming pool. Do not place this product within reach of a bathtub, shower or swimming pool. Do not cover
the ventilation screens.
7. Before carrying out any cleaning or maintenance, disconnect the appliance from the mains by removing the plug.
8. Should the appliance break down and/or not function properly, disconnect it and do not tamper with it.Should it need repairing,
take it to an authorised IMETEC Service Centre.
9. The power cord must never be replaced by the user.If the cord is damaged or needs replacing, contact an authorised IMETEC
Service Centre.
10. Should you decide not to use this appliance anymore, make it inoperative by cutting the power cord after removing the plug from
the socket.We also recommend making all potentially dangerous par ts of the appliance harmless, par ticularly for children who
might be tempted to play with it.
11. Do not cover the air inlet and outlet grids to avoid the risk of overheating.
12. This appliance should not be used by children or persons with partially reduced physical, sensorial or mental faculties, and in
any case not without specific knowledge and experience, or without the supervision or instructions for use provided by a
responsible person.
13. Children must not be allowed to play with the appliance.
Page 9
E
N
G
L
I
S
H
7
GENERAL INSTRUCTIONS
APPLIANCE A
• Power selector switch [Fig.A]
POSITION FUNCTION
Appliance off
Warm air (1100W)
Hot air (2200W)
APPLIANCE B
• Power selector switch [Fig.E]
POSITION FUNCTION
Appliance off
Cold air
Warm air (1000W)
Hot air (2000W)
• Thermostat - [Fig. C]
The thermostat maintains the desired temperature: once reached, the appliance automatically turns off and will turn on again as soon as
the temperature level drops.
POSITION FUNCTION
Antifreeze
MAX Maximum temperature
APPLIANCE C - C1
• Power selector switch [Fig.B]
POSITION FUNCTION
Appliance off
Cold air
Warm air (1100W)
Hot air (2200W)
• Thermostat - [Fig. D]
POSITION FUNCTION
Antifreeze
MAX Maximum temperature
The thermostat maintains the desired temperature: once reached, the appliance automatically tur ns off and will turn on again as soon
as the temperature level drops.
APPLIANCE AND ACCESSORIES DESCRIPTION [Fig. Z]
a
Controls cover
h
Grip or space for wall mounting bracket (rear)
b
Thermostat
i
Cord storage
c
Timer
j
Electro Block®protection system
d
Power selector switch
k
Wall mounting bracket
e
On/off light
l
Screws and pegs for mounting
f
Motor unit and ventilation screen (front)
m
Ionizer indicator light (only for models with ionizer)
g
Ventilation screen
n
Ionizer indicator light key (only for models with ionizer)
Page 10
8
APPLIANCE A
Fan heater function
-Turn the power selector switch [Fig. A] as follows:
position : Warm air (1100W).
position : Hot air (2200W)
APPLIANCE B
Fan heater function
-Turn the power selector switch [Fig. E] as follows:
position : Warm air (1000W).
position : Hot air (2000W)
- Regulate the ther mostat
[Fig. C] depending on the temperature that you wish to maintain.
Cool air facility:
-Turn the thermostat [Fig. C] to the maximum temperature MAX.
-Turn the power selector switch
[Fig. E] to position .
Antifreeze function
This function maintains the room temperature at +5°C.When the temperature drops below this level, the f an heater turns on automatically.
-Turn the thermostat
[Fig. C] to the antifreeze setting .
-Turn the power selector switch
[Fig. E] as follows:
position for gradually restoring the temperature to +5°C.
position for rapidly restoring the temperature to +5°C.
Imetec-Ion77 Technology (only for models with ionizer)
If your appliance is equipped with an ionizer, the indicator light mwill be lit indicating that it is working.
The Imetec-Ion 77 fan heater is equipped with an ionizer, a revolutionary device which reproduces the natural phenomenon of ionization.
The ions generated by the fan heater act positively on the air, revitalising and conditioning it.
APPLIANCE C - C1
Fan heater function
-Turn the power selector switch [Fig. B] as follows:
position : Warm air (1100W).
position : Hot air (2200W)
- Regulate the ther mostat
[Fig. D] depending on the temperature that you wish to maintain.
Ventilator function:
-Turn the thermostat [Fig. D] to the maximum temperature MAX.
-Turn the power selector switch
[Fig. B] to position .
Antifreeze function
This function maintains the room temperature at +5°C.When the temperature drops below this level, the f an heater turns on automatically.
-Turn the thermostat
[Fig. D] to the antifreeze setting .
-Turn the power selector switch
[Fig. B] as follows:
position for gradually restoring the temperature to +5°C.
position for rapidly restoring the temperature to +5°C.
INSTRUCTIONS FOR USE
• Timer - [Fig. F] (only for equipped models)
f1: notches for presetting the time periods.
f2: outer ring.
PLEASE NOTE:
- If the timer has been preset, the selected temperature will be maintained only within the preset time periods.
• Adjustable base - (only for equipped models)
Standard position [Fig. G].
Tilted position: the base can be adjusted to direct warm/cold air upwards. Whilst holding the base steady, slide the motor unit forward
[Fig. H].
Page 11

E
N
G
L
I
S
H
9
Timer function (only for models with the timer)
The timer function allows you to turn the appliance on and off in the following ways:
• Manual
- Push all the timer notches inwards [Fig. I].
-Turn the power selector switch
[Fig. B] to position , , or depending on the function you wish to activate.
- Regulate the ther mostat
[Fig. D] depending on the temperature you wish to maintain.
PLEASE NOTE:
- The timer only works if the fan heater is plugged into a socket.
• Automatic
-Turn the outer ring of the timer clockwise and set it at the current time [Fig. L].
- Push all the timer notches outwards
[Fig. M] except for the ones on the time periods when you want the appliance to be on.
-Turn the power selector switch
[Fig. B] to position , , or , depending on the function that you wish to activate.
This is a daily timer which repeats its presetting every 24 hours.Each notch equals 15 minutes.
Imetec-Ion77 Technology (only for models with ionizer)
If your appliance is fitted with the indicator light key nfor activating the ionizer, you can choose whether to activate it or not.All that is
required to activate the ionizer is to press key nand the indicator light will come on, showing that the ionizer is operating.To deactivate
it, press the key again returning it to the starting position; the indicator light will go out.
The Imetec-Ion 77 fan heater is equipped with an ionizer , a re v olutionary device which reproduces the natural phenomenon of ionization.
The ions generated by the fan heater act positively on the air, revitalising and conditioning it.
WALL MOUNTING INSTRUCTIONS
- (only for models with a mounting bracket) [Fig. Q]
The fan heater can be fixed to the wall.
- Fix the mounting bracket to the wall with the two pegs supplied
[Fig. N] (the holes must be 16.5 cm apart with a diameter of 6 mm).
- Place the fan heater on the bracket and push it against the wall, so that the bracket catch
(o1) hooks onto the back of the fan heater
in line with the grip [Fig. O].To remove the fan heater from the wall mounting, press the bracket catch as shown by arrow and pull the
fan heater outwards [Fig. P].
APPLIANCE WITH ELECTRO BLOCK®CIRCUIT BREAKER
IMPORTANT:
- If your appliance comes with the Electro Block® circuit breaker
j
, connect it directly to the mains. Never connect it to trailer
plugs, adapters or extension leads.The Electro Block® circuit breaker is equipped with a highly sensitive residual current
circuit breaker that protects the user from earth leakage current for values higher than 10mA.
In order to use the appliance, follow the steps below:
- Plug in Electro Block
®
, then press and release the ON button: the light should go red. Electro Block®is now active.
- Check that Electro Block
®
is functioning properly by pressing the TEST button: the current cuts off and the red light turns off,
guaranteeing that the circuit breaker Electro Block®is in perfect working order.
- After testing, press and release the
ON button again: the red light comes on again and the fan heater is ready to work.This test must
be made beforehand every time you use the appliance. In case of irregular or faulty functioning (like repeated operations when the
appliance is connected to the mains, or retarded operations during the Electro Block®check test), call an authorised IMETEC Technical
Service Centre immediately. When you switch off the appliance and unplug the Electro Block®circuit breaker, the residual current
circuit breaker Electro Block®turns off automatically.Any improper use of electrical appliances can be hazardous. A circuit breaker is
not a substitute for basic electrical safety precautions.
USEFUL ADVICE
Whenever you put the f an heater a w a y, make sure that it is protected from dust, to prevent it from entering through the ventilation screen.
Page 12
INSTRUCTIONS ET AVERTISSEMENTS POUR UNE UTILISATION ADÉQUATE ET EN TOUTE SÉCURITÉ.
LISEZ ATTENTIVEMENT LES INSTRUCTIONS ET LES AVERTISSEMENTS CONTENUS DANS CE
MANUEL ET CONSERVEZ-LE EN VUE DE CONSULTATIONS FUTURES TOUT AU LONG DE LA DURÉE
DE VIE DU PRODUIT. EN EFFET, VOUS Y TROUVEREZ DES INDICATIONS IMPORTANTES
CONCERNANT LE FONCTIONNEMENT ET LA SÉCURITÉ DU PRODUIT DURANT L’INSTALLATION,
L’UTILISATION ET L’ENTRETIEN.
10
A TTENTION
A VERTISSEMENTS GÉNÉRAUX
IMETEC vous remercie d’avoir choisi l’un de ses produits. Nous sommes certains que vous apprécierez sa qualité, sa fiabilité et le
respect pour le consommateur avec lequel nous l’avons conçu et fabriqué.
1. Après avoir retiré l’emballage, assurez-vous que l’appareil est intact, sans dommages visibles qui pourraient a v oir été pro v oqués
par le transport. En cas de doute, n’utilisez pas l’appareil et adressez-vous aux Centres d’Assistance Technique agréés par
IMETEC.
2. Avant de brancher l’appareil, assurez-vous que les données de plaque correspondent à celles du réseau d’alimentation
électrique. La plaque est sur le fond de l’appareil.
3. N’utilisez pas d’adaptateurs, de prises multiples et/ou de prolongateurs. En cas d’incompatibilité entre la pr ise de courant et la
fiche de l’appareil, faites remplacer la fiche par du personnel professionnellement qualifié.
4. Cet appareil devra être destiné uniquement à l’utilisation pour laquelle il a été expressément conçu, c’est-à-dire comme radiateur
soufflant.Tout autre usage doit être considéré comme inadéquat et donc dangereux.Le constructeur ne peut pas être considéré
comme responsable des éventuels dommages dus à un usage inadéquat et erroné.
5. L’utilisation d’un appareil électrique comporte l’observation de quelques règles fondamentales.
En particulier :
- ne touchez jamais l’appareil avec les mains ou les pieds mouillés ou humides ;
- ne tirez pas sur le câble d’alimentation ou sur l’appareil pour débrancher la fiche de la prise de courant ;
- ne laissez jamais l’appareil exposé aux agents atmosphériques (pluie, soleil, etc.) ;
- ne permettez pas que l’appareil soit utilisé sans surveillance par des enfants ou des incapables.
6. Ne placez pas l’appareil immédiatement à proximité d’une prise de courant. N’utilisez pas le produit à proximité d’une baignoire,
douche ou piscine. Ne placez pas le produit dans une position accessible depuis une baignoire, douche ou piscine.Ne couvrez
pas les grilles d’entrée et sortie de l’air.
7. Avant d’effectuer toute opération de nettoyage ou d’entretien, il faut débrancher l’appareil du réseau d’alimentation électrique,
en retirant la fiche de la prise.
8. En cas de panne et/ou mauvais fonctionnement de l’appareil, il faut l’éteindre et ne pas essayer de le réparer personnellement.
Pour l’éventuelle réparation, adressez-vous aux Centres d’Assistance Technique agréés par IMETEC.
9. Le câble d’alimentation de cet appareil ne doit pas être remplacé par l’utilisateur.En cas d’endommagement du câble, ou pour
le remplacer, adressez-vous aux Centres d’Assistance Technique agréés par IMETEC.
10. Lorsque vous déciderez de ne plus utiliser un appareil de ce type, nous vous recommandons de le rendre inopérant en coupant
le câble d’alimentation après avoir débranché la fiche de la prise de courant. Nous vous recommandons en outre de rendre
inoffensives les parties de l’appareil qui sont susceptibles de constituer un danger , spécialement pour les enfants qui pourraient
prendre l’appareil hors d’usage pour leurs jeux.
11. Ne pas recouvrir les grilles d’entrée et de sortie de l’air, pour éviter tout risque de surchauffe.
12. Cet appareil n’est pas destiné à être utilisé par des enfants ni des personnes ayant des capacités physiques, sensorielles ou
mentales réduites, ou de toute façon sans connaissances et expérience, sans qu’une personne responsable ne les surveille ou
leur en explique le mode d'emploi.
13. L’appareil n’est pas destiné aux jeux des enfants.
Page 13

F
R
A
N
Ç
A
I
S
11
INSTRUCTIONS GÉNÉRALES
APPAREIL A
• Commutateur d’allure [Fig. A]
POSITION FONCTION
Appareil éteint
Air chaud (1100W)
Air très chaud (2200W)
APPAREIL B
• Commutateur d’allure [Fig. E]
POSITION FONCTION
Appareil éteint
Air froid
Air chaud (1000W)
Air très chaud (2000W)
• Thermostat d’ambiance - [Fig. C]
Le thermostat d’ambiance assure le maintien de la température désirée : une fois qu’elle a été atteinte, l’appareil s’arrête
automatiquement et ne se remet en marche que quand la température descend.
POSITION FONCTION
Hors gel
MAX Température maximum
APPAREIL C - C1
• Commutateur d’allure [Fig. B]
POSITION FONCTION
Appareil éteint
Air froid
Air chaud (1100W)
Air très chaud (2200W)
• Thermostat d’ambiance - [Fig. D]
POSITION FONCTION
Hors gel
MAX Température maximum
Le thermostat d’ambiance assure le maintien de la température désirée : une fois qu’elle a été atteinte, l’appareil s’arrête
automatiquement et ne se remet en marche que quand la température descend.
DESCRIPTION APPAREIL ET ACCESSOIRES [Fig. Z]
a
Protecteur commandes
h
Logement poignée ou pour support de fixation murale (arrière)
b
Thermostat d’ambiance
i
Système range-cordon
c
Programmateur
j
Disjoncteur Electro Block
®
d
Commutateur d’allure
k
Support de fixation murale
e
Voyant de mise sous tension
l
Chevilles pour la fixation murale
f
Bloc-motor et grille de sortie de l'air (avant)m Voyant de l’ioniseur (uniquement pour modèles avec ioniseur)
g
Grille d’entrée de l’air
n
Touche lumineuse voyant de l’ioniseur (uniquement pour modèles avec ioniseur)
Page 14

APPAREIL A
Fonction radiateur soufflant
- Tournez le commutateur d’allure [Fig. A] de la façon suivante :
position : Air chaud (1100W).
position : Air très chaud (2200W).
APPAREIL B
Fonction radiateur soufflant
-Tournez le commutateur d’allure [Fig. E] de la façon suivante :
position : Air chaud (1000W).
position : Air très chaud (2000W).
- Réglez le ther mostat d’ambiance
[Fig. C] sur la température que vous souhaitez maintenir.
Fonction ventilation d’été
- Réglez le ther mostat d’ambiance [Fig. C] sur la température maximum MAX.
-Tournez le commutateur d’allure
[Fig. E] sur la position .
Fonction hors gel
Cette fonction assure le maintien d’une température ambiante d’environ +5°C. Quand la température descend sous cette valeur, le
radiateur soufflant se met automatiquement en marche.
- Réglez le ther mostat d’ambiance
[Fig. C] sur la position hors gel .
-Tournez le commutateur d’allure
[Fig. E] de la façon suivante :
position pour rétablir graduellement la température à +5°C.
position pour rétablir rapidement la température à +5°C.
Technologie Imetec-Ion77 (uniquement pour modèles avec ioniseur)
Si votre appareil est équipé de ioniseur, le voyant lumineux msera allumé pour signaler la marche.
Le radiateur soufflant Imetec-Ion77 est équipé d’un ioniseur, un dispositif révolutionnaire qui reproduit le phénomène naturel de la
ionisation. Les ions engendrés par le radiateur soufflant agissent positivement sur l’air, en le revitalisant et en le rendant plus propre.
APPAREIL C - C1
Fonction radiateur soufflant
-Tournez le commutateur d’allure [Fig. B] de la façon suivante :
position : Air chaud (1100W).
position : Air très chaud (2200W).
- Réglez le ther mostat d’ambiance
[Fig. D] sur la température que vous souhaitez maintenir.
Fonction ventilateur
- Réglez le ther mostat d’ambiance [Fig. D] sur la température maximum MAX.
-Tournez le commutateur d’allure
[Fig. B] sur la position .
Fonction hors gel
Cette fonction assure le maintien d’une température ambiante d’environ +5°C. Quand la température descend sous cette valeur, le
radiateur soufflant se met automatiquement en marche.
- Réglez le ther mostat d’ambiance
[Fig. D] sur la position hors gel .
-Tournez le commutateur d’allure
[Fig. B] de la façon suivante :
position pour rétablir graduellement la température à +5°C.
position pour rétablir rapidement la température à +5°C.
12
MODE D’EMPLOI
• Programmateur - [Fig. F] (uniquement pour les modèles équipés)
f1: dents pour la programmation des plages horaires.
f2: bague externe.
ATTENTION :
- Si le programmateur est programmé, le maintien de la température sélectionnée n’est effectué que pendant les plages
horaires programmées.
• Base réglable - (uniquement pour les modèles équipés)
Position standard [Fig. G].
Position inclinée: la base peut être réglée pour diriger l’air chaud/froid vers le haut. Retenez fermement la base, puis faites glisser le
bloc-moteur en le poussant vers l’avant [Fig. H].
Page 15

F
R
A
N
Ç
A
I
S
13
Fonction programmateur (uniquement pour modèles avec programmateur)
La fonction programmateur permet de gérer la mise en marche et l’arrêt de l’appareil de la façon suivante :
• Mode Manuel
-Poussez vers l’intérieur toutes les dents du programmateur [Fig. I].
-Tournez le commutateur d’allure
[Fig. B] sur la position , ou selon la fonction que vous désirez activer.
- Réglez le ther mostat d’ambiance
[Fig. D] sur la température que vous souhaitez maintenir.
ATTENTION :
LE PROGRAMMATEUR FONCTIONNE UNIQUEMENT SI LA FICHE DU RADIATEUR SOUFFLANT EST BRANCHÉE DANS UNE
PRISE DE COURANT.
• Mode Automatique
- Agissez sur la bague externe du programmateur dans le sens des aiguilles d’une montre pour synchroniser l’indicateur avec votre
montre [Fig. L].
- Déplacez vers l’extérieur toutes les dents du programmateur
[Fig. M] sauf celles correspondant aux plages horaires pendant
lesquelles vous voulez que l’appareil fonctionne.
-Tournez le commutateur d’allure
[Fig. B] sur la position , ou selon la fonction que vous désirez activer.
Le programmateur est quotidien et répète la programmation sur des périodes de 24 heures.Chaque dent équivaut à un quart d’heure.
Technologie Imetec-Ion77 (uniquement pour modèles avec ioniseur)
Si votre appareil est équipé de la touche
n
avec voyant lumineux pour l’activation du ioniseur, vous pourrez choisir si vous désirez
l’activer ou non. Pour activer le ioniseur il suffit d’appuyer sur la touche n, et la touche lumineuse s’allumera en vous indiquant que le
ioniseur est en fonction. Pour le désactiver, appuyer à nouveau sur la touche en la remettant dans la position d’origine, le voyant
lumineux s’éteindra.
Le radiateur soufflant Imetec-Ion77 est équipé d’un ioniseur, un dispositif révolutionnaire qui reproduit le phénomène naturel de la
ionisation. Les ions engendrés par le radiateur soufflant agissent positivement sur l’air, en le revitalisant et en le rendant plus propre.
INSTRUCTIONS POUR LA FIXATION MURALE
- (uniquement pour modèles munis de support de fixation) [Fig. Q]
Le radiateur soufflant peut être fixé au mur.
- Fixez au mur le support avec les deux chevilles fournies
[Fig. N] (la distance entre les trous est de 16,5 cm, le diamètre est de 6 mm).
-Posez le radiateur soufflant sur le support, puis poussez-le vers le mur de façon à ce que le clip du support
(o1) s’accroche à l’arrière
du radiateur soufflant, au niveau de la poignée [Fig. O].Pour décrocher le radiateur soufflant du suppor t mural, appuyez sur le clip
du support dans le sens indiqué par la flèche et, en même temps, extrayez le radiateur soufflant [Fig.P].
APPAREIL AVEC DISJONCTEUR ELECTRO BLOCK
®
IMPORTANT :
-Si votre appareil est équipé du disjoncteur Electro Block
®
j
, il doit être branché directement à une fiche de courant fixe ;
ne branchez en aucun cas l’appareil à des prolongateurs ou à des adaptateurs de secteur. Le disjoncteur Electro Block®est
équipé d’un interrupteur différentiel à sensibilité élevée qui protège l’utilisateur contre les fuites de courant à la terre ayant
des valeurs supérieures à 10mA.
Pour pouvoir utiliser l’appareil, procédez aux opérations suivantes :
- Insérez l’Electro Block
®
dans la prise de courant, appuyez puis relâchez le bouton ON :le voyant devient alors de couleur rouge ; cela
signifie que l’Electro Block®est activé.
- Contrôlez l’efficacité de l’Electro Block
®
en appuyant sur le bouton TEST : le courant s’interrompt et le voyant n’est plus rouge ;cela
signifie que le disjoncteur Electro Block®fonctionne parfaitement.
- Après avoir exécuté cet essai, appuyez puis relâchez encore une fois le bouton
ON :le voyant redevient rouge et le radiateur soufflant
est prêt pour fonctionner. L’essai doit être effectué avant chaque utilisation de l’appareil. En cas de fonctionnement anormal ou
incorrect (par exemple dans le cas d’interventions répétées avec l’appareil branché au réseau ou d’interventions retardées pendant
l’essai de contrôle de l’Electro Block®), contactez immédiatement un Centre d’Assistance Technique agréé par IMETEC. Quand
l’appareil est éteint et que le disjoncteur Electro Block®est débranché de la prise, l’interrupteur différentiel du disjoncteur Electro Block
®
s’éteint automatiquement. L’utilisation incorrecte d’appareils électriques peut entraîner des risques. L’utilisation d’un dispositif
disjoncteur ne remplace pas l’adoption des précautions fondamentales pour la sécurité électrique.
CONSEILS UTILES
Quand vous rangez le radiateur soufflant, assurez-vous qu’il est protégé contre la poussière afin d’éviter qu’elle pénètre à l’intérieur des
grilles.
Page 16

14
ANLEITUNGEN UND HINWEISE FÜR EINEN KORREKTEN UND SICHEREN GEBRAUCH
BITTE LESEN SIE DIE VORLIEGENDEN ANLEITUNGEN UND HINWEISE SORGFÄLTIG DURCH UND
HEBEN SIE DIE GEBRAUCHSANLEITUNGEN AUCH IN ZUKUNFT ZUM NACHLESEN UND FÜR DIE
GESAMTE LEBENSDAUER DES GERÄTS AUF, DA SIE WICHTIGE HINWEISE IN BEZUG AUF DIE
FUNKTIONSTÜCHTIGKEIT UND SICHERHEIT BEI INSTALLATION, GEBRAUCH UND WARTUNG DES
GERÄTS ENTHALTEN.
A CHTUNG
ALLGEMEINE HINWEISE
IMETEC dankt Ihnen für die Wahl ihres Produktes. Wir sind überzeugt, dass Sie seine Qualitäten, seine Zuverlässigkeit und die bei
der Planung immer im Vordergrund stehende Achtung des Kunden schätzen werden.
1. Nach dem Auspacken des Geräts versichern Sie sich, dass es sich in gutem Zustand befindet und keine sichtbaren Schäden
aufweist, die eventuell auf den Transport zurückzuführen sind. Im Zweifelsfall benützen Sie das Gerät nicht und wenden Sie sich
an ein von IMETEC anerkanntes Technisches Kundendienstzentrum.
2. Bevor Sie das Gerät anschließen, versichern Sie sich, dass die Daten auf dem Schild mit denen des Stromversorgungsnetzes
übereinstimmen. Das Schild befindet sich auf der unteren Seite des Geräts.
3. Verwenden Sie keine Adapter, Mehrfachsteckdosen und/oder Verlängerungskabel. Falls der Stecker nicht in Ihre Steckdose
passt, lassen Sie die Steckdose durch qualifiziertes Fachpersonal gegen eine passende Steckdose ersetzen.
4. Dieses Gerät darf nur zu dem Zweck gebraucht werden, zu dem es ausdrücklich entwickelt wurde, und zwar als
Thermoventilator. Jede andere Verwendung ist als unzweckgemäß und deshalb gefährlich zu betrachten. Der Hersteller kann
nicht für eventuelle Schäden verantwortlich gemacht werden, die auf unzweckmäßigen und falschen Gebrauch zurückzuführen
sind.
5. Der Gebrauch von jedem elektrischen Gerät verlangt die Beachtung einiger Grundregeln.
Insbesondere:
- Das Gerät nicht berühren, wenn man nasse oder feuchte Hände oder Füße hat.
- Zum Ausziehen des Netzsteckers nicht am Versorgungskabel ziehen oder das Gerät selbst wegziehen.
- Das Gerät nicht den Witterungsbedingungen aussetzen (Regen, Sonne usw.)
- Nicht zulassen, dass das Gerät von Kindern oder unzurechnungsfähigen Personen ohne Aufsicht benutzt wird.
6. Das Gerät nicht direkt unter einer Steckdose aufstellen. Das Gerät nicht in unmittelbarer Nähe einer Badewanne, einer Dusche
oder eines Schwimmbeckens aufstellen. Beim Aufstellen darauf achten, daß das Gerät auch von einer Badewanne, einer
Dusche oder einem Schwimmbecken aus nicht erreichbar ist.Die Gitter für den Lufteingang und –ausgang am Gerät dürfen nicht
bedeckt werden.
7. Vor dem Reinigen oder dem Ausführen von Wartungsarbeiten ziehen Sie den Stecker heraus, um das Gerät von der
Stromversorgung zu trennen.
8. Falls das Gerät beschädigt ist bzw.nicht korrekt funktionier t, muss es sofort ausgeschaltet werden. Vermeiden Sie jede Art von
Eingriff. Für eine eventuelle Reparatur wenden Sie sich an ein von IMETEC anerkanntes Technisches Kundendienstzentrum.
9. Das Netzkabel dieses Geräts darf nicht vom Benutzer gewechselt werden. Falls das Kabel beschädigt ist und ausgewechselt
werden muss, wenden Sie sich an ein von IMETEC anerkanntes Technisches Kundendienstzentrum.
10. Bei definitiver Außerbetriebsetzung eines derartigen Gerätes wird empfohlen, es funktionsuntüchtig zu machen, indem man das
Versorgungskabel durchschneidet, nachdem der Netzstec ker ausgezogen worden ist.Es wird überdies empfohlen, alle Teile des
Geräts unschädlich zu machen, die insbesondere für Kinder eine eventuelle Gefahr darstellen könnten, falls sie das außer
Betrieb gesetzte Gerät für ihre Spiele benutzen.
11. Die Luftein- und austrittsgitter dürfen wegen Überhitzungsgefahr nicht abgedeckt werden.
12. Dieses Gerät darf nicht von Kinder oder Personen mit beschränkten physischen, sensorischen oder geistigen Fähigkeiten bzw.
ohne spezielle Kenntnisse und Erfahrung ohne Beaufsichtigung oder Anleitung zur Verwendung durch v er antwortliche P ersonen
bedient werden.
13. Das Gerät ist nicht als Spielzeug für Kinder gedacht.
Page 17

D
E
U
T
S
C
H
15
ALLGEMEINE ANLEITUNGEN
GERÄT A
• Leistungsschalter [Abb. A]
EINSTELLUNG FUNKTION
Gerät «aus»
Warmluft (1100 W)
Heißluft (2200 W)
GERÄT B
• Leistungsschalter [Fig. E]
EINSTELLUNG FUNKTION
Gerät «aus»
Kaltluft
Warmluft (1000 W)
Heißluft (2000 W)
• Thermostat für Raumtemperatur [Fig. C]
Der Thermostat für die Raumtemperatur gewährleistet die Beibehaltung der gewünschten Temperatur: wenn diese erreicht ist, schaltet
sich das Gerät automatisch ab; sobald die Temperatur sinkt, schaltet es sich wieder ein.
EINSTELLUNG FUNKTION
Gefrierschutz
MAX Höchsttemperatur
GERÄT C - C1
• Leistungsschalter [Fig. B]
EINSTELLUNG FUNKTION
Gerät «aus»
Kaltluft
Warmluft (1100 W)
Heißluft (2200 W)
• Thermostat für Raumtemperatur [Fig. D]
EINSTELLUNG FUNKTION
Gefrierschutz
MAX Höchsttemperatur
Der Thermostat für die Raumtemperatur gewährleistet die Beibehaltung der gewünschten Temperatur: wenn diese erreicht ist, schaltet
sich das Gerät automatisch ab; sobald die Temperatur sinkt, schaltet es sich wieder ein.
BESCHREIBUNG VON GERÄT UND ZUBEHÖR [Abb. Z]
a
Schutzdeckel der Einstellknöpfe
h
Öffnung als Handgriff oder für Bügelhalter (Rückseite)
b
Thermostat Raumtemperatur
i
Kabelaufwickler
c
Zeitregler
j
Electro Block
®
d
Leistungsschalter
k
Bügel für Wandmontage
e
Kontrollleuchte
l
Schrauben und Dübel für Wandmontage
f
Motorgehäuse und Frontgitter
m
Kontrollleuchte (nur Modelle mit Ionisator)
g
Gitter für den Lufteingang
n
Ionisator-Leuchttaste (nur Modelle mit Ionisator)
Page 18
16
GERÄT A
Thermoventilator-Funktion
- Der Leistungsschalter [Abb. A] sieht folgende Funktionen vor:
Einstellung : Warmluft (1100 W).
Einstellung : Heißluft (2200 W).
GERÄT B
Thermoventilator-Funktion
- Der Leistungsschalter [Abb. E] sieht folgende Funktionen vor:
Einstellung : Warmluft (1000 W).
Einstellung : Heißluft (2000 W).
-Den Thermostat für die Raumtemperatur
[Abb. C] auf die Temperatur einstellen, die man beibehalten möchte.
Funktion Sommerlüftung
-Den Thermostat für die Raumtemperatur [Abb. C] auf die Höchsttemperatur MAX einstellen.
- Den Leistungsschalter
[Abb. E] auf Position einstellen.
Gefrierschutz-Funktion
Diese Funktion gewährleistet die Beibehaltung einer Raumtemperatur um +5°C.Wenn die Temperatur unter diesen Stand abfällt, schaltet
sich der Thermoventilator automatisch ein.
-Den Thermostat für die Raumtemperatur
[Abb. C] auf Gefrierschutz einstellen.
- Der Leistungsschalter
[Abb. E] erlaubt folgende Regulierungen:
Einstellung für die allmähliche Wiederherstellung der Temperatur von +5°C.
Einstellung für die schnelle Wiederherstellung der Temperatur von +5°C.
Technologie Imetec-Ion77 (nur für Modelle mit Ionisator)
Wenn Ihr Gerät mit Ionisator ausgestattet ist, schaltet sich die Leuchte
m
ein, und zeigt so die Funktion an.
Der Thermoventilator Imetec-Ion77 ist mit einem Ionisator ausgestattet, einem revolutionärem Bauteil, das das natürliche Phänomen der
Ionisierung reproduziert. Die vom Thermoventilator erzeugten Ionen wirken positiv auf die Luft, agieren wiederbelebend und reinigen
diese.
GERÄT C - C1
Thermoventilator-Funktion
- Der Leistungsschalter [Abb. B] sieht folgende Funktionen vor:
Einstellung : Warmluft (1100 W).
Einstellung : Heißluft (2200 W).
-Den Thermostat für die Raumtemperatur
[Abb. D] auf die Temperatur einstellen, die man beibehalten möchte.
Ventilator-Funktion
-Den Thermostat für die Raumtemperatur [Abb. D] auf die Höchsttemperatur MAX einstellen.
- Den Leistungsschalter
[Abb. B] auf Position einstellen.
Gefrierschutz-Funktion
Diese Funktion gewährleistet die Beibehaltung einer Raumtemperatur um +5°C.Wenn die Temperatur unter diesen Stand abfällt, schaltet
sich der Thermoventilator automatisch ein.
-Den Thermostat für die Raumtemperatur
[Abb. D] auf Gefrierschutz einstellen.
- Der Leistungsschalter
[Abb. B] erlaubt folgende Regulierungen:
Einstellung für die allmähliche Wiederherstellung der Temperatur von +5°C.
Einstellung für die schnelle Wiederherstellung der Temperatur von +5°C.
BEDIENUNGSANLEITUNGEN
• Zeitregler - [Abb. F] (nur für die betreffenden Modelle)
f1: Zähne für die Programmierung der Uhrzeit.
f2: Außenrad.
VORSICHT:
-Wenn der Zeitregler programmiert ist, erfolgt die Beibehaltung der eingestellten Temperatur nur innerhalb der
programmierten Zeitspannen.
• Verstellbare Basis - (nur für die betreffenden Modelle)
Standardeinstellung [Abb. G].
Schrägstellung: die Basis kann so eingestellt werden, dass die Warm-/Kaltluft nach oben gerichtet wird. Dazu die Basis festhalten und
den Aufbau mit dem Motorgehäuse nach vorne schieben
[Abb. H].
Page 19

D
E
U
T
S
C
H
17
Zeitregler-Funktion (nur für Modelle mit Zeitregler)
Die Funktion des Zeitreglers erlaubt die Regulierung der Ein- und Ausschaltung des Gerätes auf folgende Weise:
• Manuell
- Alle Zähne des Zeitreglers [Abb. I] nach innen schieben.
- Den Leistungsschalter
[Abb. B] auf Position , oder einstellen, je nach der gewünschten Funktion.
-Den Thermostat für die Raumtemperatur
[Abb. D] auf die Temperatur einstellen, die man beibehalten möchte.
VORSICHT:
- Der Zeitregler funktioniert nur, wenn der Stecker des Thermoventilators in eine Steckdose gesteckt wird.
• Automatisch
- Drehen Sie das Außenrad des Zeitreglers im Uhrzeigersinn und synchronisieren Sie den Zeiger mit Ihrer Uhr.[Abb. L].
- Alle Zähne des Zeitreglers
[Abb. M] nach außen schieben, mit Ausnahme jener Zähne, die den Zeiträumen entsprechen, in denen das
Gerät funktionieren soll.
- Den Leistungsschalter
[Abb. B] auf Position , , oder drehen, je nach der gewünschten Funktion.
Der Zeitregler bezieht sich jeweils auf einen Tag und wiederholt die Programmierung im 24-Stunden-Intervall. Jeder Zahn entspricht einer Viertelstunde.
Technologie Imetec-Ion77 (nur für Modelle mit Ionisator)
Wenn Ihr Gerät mit Ionisator-Leuchttaste
n
zur Aktivierung des Ionisators ausgestattet ist, können Sie wählen, ob diese Funktion
aktiviert wird oder nicht. Zur Aktivierung des Ionisators muss lediglich die Taste nbetätigt werden, die Leuchte schaltet sich ein, und
zeigt so die Funktion des Ionisators an Zum Ausschalten muss die Taste erneut betätigt, und in die Ausgangsstellung gebracht werden,
die Leuchttaste geht wieder aus.
Der Thermoventilator Imetec-Ion77 ist mit einem Ionisator ausgestattet, einem revolutionärem Bauteil, das das natürliche Phänomen der
Ionisierung reproduziert. Die vom Thermoventilator erzeugten Ionen wirken positiv auf die Luft, agieren wiederbelebend und reinigen
diese.
ANLEITUNGEN FÜR DIE WANDINSTALLATION
- (nur für die Modelle mit Bügelhalter) [Abb. Q]
Der Thermoventilator kann an der Wand befestigt werden, wie folgt:
- Den Haltebügel mit den beiden mitgelieferten Dübeln an der Wand befestigen
[Abb. N] (der Abstand zwischen den Öffnungen beträgt
16,5 cm, der Durchmesser der Öffnungen 6 mm).
-Den Thermoventilator an den Bügel hängen und gegen die Wand drücken, sodass sich der Vorsprung des Bügels
(o1) in die Öffnung
des Handgriffes auf der Rückseite des Thermoventilators einschiebt [Abb. O]. Um den Thermoventilator von der Wandhalterung zu
lösen, gegen den Vorsprung des Bügels drücken, wie der Pfeil zeigt, und den Thermoventilator dabei nach vorne ziehen [Abb. P].
GERÄT MIT SICHERHEITSSCHALTER ELECTRO BLOCK®
WICHTIG:
-Wenn Ihr Gerät mit dem Sicherheitsschalter Electro Block
®
j
ausgestattet ist, muss es direkt an eine feste Netzsteckdose
angeschlossen werden; es dürfen auf keinen Fall bewegliche Steckdosen oder Zwischenstecker oder Verlängerungskabel
verwendet werden. Der Sicherheitsstromunterbrecher Electro Block®ist mit einem hochempfindlichen Differentialschalter
ausgerüstet, der den Benutzer vor Stromdispersionen zur Erde hin schützt, wenn diese Werte über 10mA liegen.
Um das Gerät benutzen zu können, ist folgendermaßen vorzugehen:
- Den Electro Block
®
in die Steckdose stecken, die Taste ON drücken und wieder loslassen:im Kontrollglas erscheint die Farbe Rot. Nun
ist der Electro Block®betriebsbereit.
- Durch Drücken der Taste
TEST die perfekte Funktionsweise des Electro Block®überprüfen: der Strom wird unterbrochen und der rote
Anzeiger verschwindet; dies garantiert dafür, dass der Sicherheitsschalter Electro Block®voll leistungsfähig ist.
- Nach dem T est noch einmal die T aste
ON drücken und loslassen:der rote Anzeiger erscheint wieder und der Thermoventilator ist betriebsbereit.
Der Test ist jedesmal vor dem Gebrauch des Gerätes durchzuführen. Bei nicht ordnungsgemäßer oder fehlerhafter Funktionsweise (zum
Beispiel wiederholte Stromunterbrechungen des am Netz angeschlossenen Gerätes oder verzögerte Stromunterbrechungen während des
Funktionstests der Vorrichtung Electro Block®), ist unverzüglich mit den von IMETEC autorisierten technischen Kundendienststellen Kontakt
aufzunehmen.Wenn das Gerät ausgeschaltet wird und die Sicherheitsschaltung Electro Block
®
wird aus der Steckdose gezogen, schaltet sich
der Differentialschalter des Electro Block®automatisch ab. Die unsachgemäße Verwendung von Elektrogeräten kann gefährlich sein. Die
Verwendung eines Sicherheitsschalters befreit nicht von den grundsätzlichen Vorsichtsmaßnahmen für die elektrische Sicherheit.
NÜTZLICHE RATSCHLÄGE
Wenn der Thermoventilator weggestellt werden soll, ist darauf zu achten, dass er gegen Staub geschützt ist, um zu verhindern, dass
dieser durch das Gitter eindringt.
Page 20

18
INSTRUCCIONES Y ADVERTENCIAS PARA UN USO CORRECTO Y SEGURO
LEA ATENTAMENTE LAS INSTRUCCIONES Y ADVERTENCIAS CONTENIDAS EN EL PRESENTE
MANUAL Y CONSERVELAS PARA POSTERIORES CONSULTAS DURANTE LA VIDA DEL APARATO.
ESTE MANUAL CONTIENE INDICACIONES IMPORTANTES SOBRE EL FUNCIONAMIENTO Y
SEGURIDAD EN LA INSTALACION, USO Y MANTENIMIENTO DEL PRODUCTO.
¡ATENCIÓN!
ADVERTENCIAS GENERALES
IMETEC le agradece por haber elegido este producto.Estamos seguros de que apreciará la calidad, la fiabilidad y el respeto por el
consumidor con el cual lo hemos proyectado y construido.
1. Después de haber quitado el embalaje, compruebe la integridad del aparato, en especial que el aparato esté íntegro, sin daños
visibles que podrían haber sido causados durante el transporte.En caso de dudas, no utilice el aparato y contacte a los Centros
de Asistencia Técnica autorizados por IMETEC.
2. Antes de conectar el aparato, compruebe que los datos de la placa correspondan a los de la red eléctrica.La placa se encuentra
en el fondo del aparato.
3. No utilice adaptadores, enchufes múltiples y/o alargaderas.En caso de incompatibilidad entre la toma y el enchufe del aparato,
haga cambiar la toma con otra de tipo adecuado por parte de personal profesionalmente cualificado.
4. Este aparato se debe utilizar sólo para el uso para el cual ha sido expresamente concebido, es decir como termoventilador.
Cualquier otro uso se considerará inadecuado y por lo tanto peligroso. El fabricante declina toda responsabilidad en caso de
daños derivados de un uso impropio e incorrecto.
5. El uso de cualquier aparato eléctr ico implica la obser vación de algunas reglas fundamentales. En par ticular:
- no toque el aparato con las manos o pies mojados o húmedos
- no tire el cable de alimentación ni el mismo aparato para desconectar el enchufe de la toma de corriente
- no deje el aparato expuesto a los agentes atmosféricos (lluvia, sol, etc.)
- no permita que niños o personas minusválidas utilicen el aparato sin vigilancia
6. No ponga el aparato inmediatamente debajo de una toma de corriente. No utilice el producto cerca de una bañera, ducha o
piscina. No ponga el producto de modo tal que sea accesible por una bañera, ducha o piscina. No cubra las rejillas de entrada
y salida del aire.
7. Antes de efectuar cualquier operación de limpieza o mantenimiento, es necesario desconectar el aparato de la red de
alimentación eléctrica, desenchufándolo.
8. En caso de avería y/o mal funcionamiento del aparato apagarlo y no intentar abrirlo.Si es necesario reparar el aparato, contacte
a los Centros de Asistencia Técnica autorizados por IMETEC.
9. El cable de alimentación de este aparato no debe ser cambiado por el usuario. Si el cable está dañado o si es necesario
cambiarlo, contacte a los Centros de Asistencia Técnica autorizados por IMETEC.
10. En el momento en que decida no utilizar más un aparato de este tipo, es aconsejable inutilizarlo cortando su cable de
alimentación, después de haber desconectado el enchufe de la toma de corriente. Además es aconsejable inutilizar aquellas
partes del aparato que puedan resultar peligrosas, especialmente para los niños que podrían utilizar el aparato fuera de uso
para sus juegos.
11. No cubra las rejillas de entrada y salida del aire para evitar el riesgo de sobrecalentamiento.
12. Este aparato no está destinado para ser usado por niños y personas con reducidas capacidades físicas, sensoriales o mentales,
y de todas formas en ausencia de específico conocimiento y experiencia, sin la supervisión o las instrucciones relativas al uso,
impartidas por una persona responsable.
13. El aparato no está destinado para juegos de niños.
Page 21

E
S
P
A
Ñ
O
L
19
INSTRUCCIONES GENERALES
APARATO A
• Conmutador de potencia [Fig. A]
POSICIÓN FUNCIÓN
Aparato apagado
Aire caliente (1100W)
Aire muy caliente (2200W)
APARATO B
• Conmutador de potencia [Fig. E]
POSICIÓN FUNCIÓN
Aparato apagado
Aire frío
Aire caliente (1000W)
Aire muy caliente (2000W)
Termostato ambiente - [Fig. C]
El termostato ambiente garantiza el mantenimiento de la temperatura deseada:alcanzado tal nivel el aparato se apaga automáticamente
para encenderse de nuevo apenas la temperatura disminuya.
POSICIÓN FUNCIÓN
Anticogelante
MAX Máxima temperatura
APARATO C - C1
• Conmutador de potencia [Fig. B]
POSICIÓN FUNCIÓN
Aparato apagado
Aire fría
Aire caliente (1100W)
Aire muy caliente (2200W)
Termostato ambiente - [Fig. D]
POSICIÓN FUNCIÓN
Anticogelante
MAX Máxima temperatura
El termostato ambiente garantiza el mantenimiento de la temperatura deseada:alcanzado tal nivel el aparato se apaga automáticamente
para encenderse de nuevo apenas la temperatura disminuya.
DESCRIPCION DEL APARATO Y ACCESORIOS [Fig. Z]
a
Cubremandos
h
Compartimento para empuñadura o zona para soporte de abrazadera (parte posterior)
b
Termostato de ambiente
i
Enrollacable
c
Temporizador
j
Electro Block
®
d
Conmutador de potencia
k
Abrazadera para montaje de pared
e
Piloto de encendido
l
Tornillos y tacos para montaje de pared
f
Cuerpo de motor y
m
Indicador luminoso ionizador (sólo modelos con ionizador)
rejilla salida del aire (frontal)
n
Tecla luminosa indicador luminoso ionizador (sólo modelos con ionizador)
g
Rejilla entrada del aire
Page 22

20
APARATO A
Función termoventilador
-Gire el conmutador de potencia [Fig. A] como se indica a continuación:
posición : Aire caliente (1100W).
posición : Aire muy caliente (2200W).
APARATO B
Función termoventilador
-Gire el conmutador de potencia [Fig. E] como se indica a continuación:
posición : Aire caliente (1000W).
posición : Aire muy caliente (2000W).
- Regule el ter mostato ambiente
[Fig. C] según la temperatura que desee mantener.
Función ventilación estival
- Regule el termostato ambiente [Fig. C] a la máxima temperatura MAX.
- Gire el conmutador de potencia
[Fig. E] a la posición .
Función anticogelante
Esta función garantiza el mantenimiento de una temperatura ambiente alrededor de +5°C. Cuando la temperatura desciende de este
nivel, el termoventilador se enciende automáticamente.
- Regule el termostato ambiente
[Fig. C] a la posición anticogelante .
- Gire el conmutador de potencia
[Fig. E] como se indica a continuación:
posición para un restablecimiento gradual de la temperatura a +5°C.
posición para un restablecimiento rápido de la temperatura a +5°C.
Tecnología Imetec-Ion77 (sólo para los modelos con ionizador)
Si su aparato está dotado de ionizador, el indicador luminoso mse encenderá indicando el funcionamiento
El termoventilador Imetec-Ion77 está dotado de ionizador, un revolucionario dispositivo que reproduce el fenómeno natural de la ioniza-
ción. Los iones que genera el termoventilador actúan positivamente en el aire, revitalizándolo y limpiándolo más.
APARATO C - C1
Función termoventilador
-Gire el conmutador de potencia [Fig. B] como se indica a continuación:
posición : Aire caliente (1100W).
posición : Aire muy caliente (2200W).
- Regule el ter mostato ambiente
[Fig. D] según la temperatura que desee mantener.
Función ventilador
- Regule el termostato ambiente [Fig. D] a la máxima temperatura MAX.
- Gire el conmutador de potencia
[Fig. B] a la posición .
Función anticogelante
Esta función garantiza el mantenimiento de una temperatura ambiente alrededor de +5°C. Cuando la temperatura desciende de este
nivel, el termoventilador se enciende automáticamente.
- Regule el termostato ambiente
[Fig. D] en la posición anticogelante .
- Gire el conmutador de potencia
[Fig. B] como se indica a continuación:
posición para un restablecimiento gradual de la temperatura a +5°C.
posición para un restablecimiento rápido de la temperatura a +5°C.
INSTRUCCIONES PARA EL USO
• Temporizador - [Fig. F] (sólo para los modelos provistos)
f1: dientes para la programación de las bandas de horario.
f2: casquillo externo.
ATENCIÓN:
-Si el temporizador esta programado, el mantenimiento de la temperatura seleccionada sera efectuado solamente en el
interior de las bandas horarias programadas.
• Base regulable - (solamente para los modelos provistos)
Posición estándar [Fig. G].
Posición inclinada:la base puede ser regulada para dirigir el aire caliente/frío hacia arriba. Teniendo
la base bien parada, haga deslizar el cuerpo del motor, empujándolo hacia adelante
[Fig. H].
Page 23

E
S
P
A
Ñ
O
L
21
Función temporizador (solamente para modelos con temporizador)
La función temporizador permite manejar el encendido y el apagado del aparato en los siguientes modos:
• Manual
-Lleve hacia el interior todos los dientes del temporizador [Fig. I].
-Gire el conmutador de potencia
[Fig. B] en la posición , o según la función que desee activar.
- Regule el ter mostato ambiente
[Fig. D] según la temperatura que desee mantener.
ATENCIÓN:
-El temporizador funciona solamente si el enchufe del termoventilador está introducido en una toma de corriente.
• Automático
- Mueva el casquillo externo del temporizador en sentido horario y sincronice el indicador con su reloj [Fig. L].
-Lleve hacia el exterior todos los dientes del temporizador
[Fig. M] a excepción de los correspondientes a las bandas horarias donde
se desea hacer funcionar el aparato.
-Gire el conmutador de potencia
[Fig. B] en la posición , o según la función que desee activar.
El temporizador es diario y repite la programación a intervalos de 24 horas. Cada diente equivale a un cuarto de hora.
Tecnología Imetec-Ion77 (sólo para los modelos con ionizador)
Si su aparato está dotado de tecla con indicador luminoso
n
para la activación del ionizador, puede decidir si activarlo o no. Para acti-
var el ionizador basta pulsar la tecla
n
y el indicador luminoso se encenderá para indicar que el ionizador está en funcionamiento.Para
desactivarlo presione de nuevo la tecla llevándola a la posición de partida; el indicador luminoso se apagará.
El termoventilador Imetec-Ion77 está dotado de ionizador, un revolucionario dispositivo que reproduce el fenómeno natural de la ioniza-
ción. Los iones que genera el termoventilador actúan positivamente en el aire, revitalizándolo y limpiándolo más.
INSTRUCCIONES PARA LA INSTALACIÓN DE PARED
- (solamente para modelos con soporte de abrazadera) [Fig. Q]
El termoventilador puede ser fijado en la pared.
- Fije en la pared el soporte de abrazadera con los dos tacos suministrados
[Fig. N] (la distancia entre los orificios es de 16.5 cm, diámetro
6 mm).
- Apoye el termoventilador sobre la abrazadera y empújelo contra la pared, de modo que el diente de la abrazadera
(o1) se enganche en la
parte posterior del termoventilador, cerca de la empuñadura correspondencia del asa [Fig. O].Para separar el termoventilador del sopor-
te de pared, presione el diente de la abrazadera como indica la flecha y tire del termoventilador hacia fuera contemporáneamente [Fig.P].
APARATO CON SALVAVIDA ELECTRO BLOCK
®
IMPORTANTE:
-Si su aparato está dotado del interruptor diferencial automático Electro Block
®
j, debe conectarlo directamente a un enchufe de corriente fija; no lo conecte por ningún motivo a enchufes móviles o adaptadores o alargaderas.El interruptor diferencial automático Electro Block®está dotado de un interruptor diferencial de alta sensibilidad que protege al usuario de dispersiones de corriente de tierra por valores superiores a 10mA.
Para poder utilizar el aparato efectúe las siguientes operaciones:
- Introduzca Electro Block
®
en la toma de corriente, presione o suelte la tecla ON::el indicador luminoso se encenderá. Electro Block
®
ahora está activado.
-Verifique la perfecta eficiencia de Electro Block
®
presionando la tecla TEST:la corriente se interrumpe, el indicador rojo desaparece y
esto le garantiza que el interruptor diferencial automático Electro Block®es perfectamente eficiente.Después de haber hecho el test,
presione y suelte de nuevo la tecla ON: el indicador rojo reaperace y el termoventilador está preparado para funcionar. El test debe
ser efectuado antes de cada uso del aparato.En caso de un funcionamiento anómalo o incorrecto (por ejemplo inter venciones repetidas con el aparato conectado en la red o bien intervenciones no tempestivas durante el test de verificación de Electro Block®), diríjase inmediatamente a los Centros de Asistencia Técnica autorizados por IMETEC.Cuando el aparato está apagado y el interruptor
diferencial automático Electro Block®desenchufado de la toma, el interruptor diferencial del automático Electro Block®se apaga automáticamente. El uso impropio de aparatos eléctricos puede ser peligroso. El uso de un dispositivo salvavida no sustituye las precauciones fundamentales para la seguridad eléctrica.
CONSEJOS UTILES
Cuando guarde el termoventilador, asegúrese de que esté protegido del polvo para evitar que se introduzca en el interior de las rejillas.
Page 24

22
INSTRUÇÕES E ADVERTÊNCIAS PARA USAR O APARELHO DE FORMA CORRECTA E SEGURA
LER COM ATENÇÃO AS INSTRUÇÕES E ADVERTÊNCIAS DO PRESENTE MANUAL E CONSERVÁ-LAS
PARA AS PRÓXIMAS CONSULTAS DURANTE A VIDA ÚTIL DO APARELHO, POIS CONTÊM
INFORMAÇÕES IMPORTANTES SOBRE O FUNCIONAMENTO E SEGURANÇA PARA A INSTALAÇÃO,
USO E MANUTENÇÃO.
A TENÇÃO
ADVERTÊNCIAS GERAIS
A IMETEC agradece por ter escolhido este produto. Estamos cer tos de que apreciará a qualidade, a fiabilidade e o respeito pelo
consumidor com o qual projectámos e fabricámos este aparelho.
1. Após ter retirado o aparelho da embalagem, certificar-se de que o mesmo esteja íntegro, sem avarias visíveis que podem ter
sido causadas pelo transporte. Em caso de dúvida, não utilizar o aparelho e recorrer aos Centros de Assistência Técnica
autorizados pela IMETEC.
2. Antes de ligar o aparelho, certificar-se de que os dados da placa correspondam àqueles da rede de abastecimento eléctrico. A
placa está aplicada no fundo do aparelho.
3. Não utilizar adaptadores, blocos de tomadas e/ou extensões. No caso de incompatibilidade entre a tomada e a ficha do
aparelho, mandar substituir a tomada por outra de tipo apropriado, por pessoal qualificado profissionalmente.
4. Este aparelho deverá ser destinado somente ao uso para o qual foi expressamente criado, ou seja, como termoventilador.Todo
outro uso deve ser considerado impróprio e, consequentemente, perigoso. O fabricante não pode ser considerado responsável
por eventuais danos derivantes de uso impróprio e incorrecto.
5. O uso de um aparelho eléctr ico impõe a obser vância de algumas regras fundamentais.
E especialmente:
- nunca tocar o aparelho com as mãos e pés molhados ou húmidos;
- não puxar o cabo eléctrico ou o próprio aparelho para desligar a ficha da tomada de corrente;
- não deixar o aparelho exposto aos agentes atmosféricos (chuva, sol, etc.);
- não permitir que o aparelho seja utilizado por crianças ou por pessoas incapazes, sem vigilância.
6. Não colocar o aparelho imediatamente embaixo de uma tomada de corrente. Não utilizar o produto nas proximidades de uma
banheira, duche ou piscina. Posicionar o produto de modo que fique inacessível da banheira, duche ou piscina. Não cobrir as
grelhas de entrada e saída de ar.
7. Antes de fazer a limpeza ou a manutenção, é necessário desligar o aparelho da rede de abastecimento eléctrico, desligando a
ficha da tomada.
8. No caso de defeito e/ou funcionamento irregular do aparelho, é necessário desligá-lo e não tentar consertá-lo.Para a reparação,
recorrer aos Centros de Assistência Técnica autorizados pela IMETEC.
9. O cabo eléctrico deste aparelho não deve ser substituído pelo utente.Em caso de danos no cabo, ou para a sua substituição,
recorrer aos Centros de Assistência Técnica autorizados pela IMETEC.
10. Quando decidir não mais utilizar um aparelho deste tipo, recomenda-se inutilizá-lo e, após ter desligado a ficha da tomada de
corrente, cortar o seu cabo eléctrico. Recomenda-se também tornar inócuas as partes do aparelho que podem representar um
perigo, especialmente para as crianças que podem utilizar o aparelho inutilizado para brincar.
11. Não cubra as grelhas de entrada e de saída do ar para evitar o risco de superaquecimento.
12. Este aparelho não é destinado para ser utilizado por crianças e pessoas com poucas capacidades físicas, sensoriais ou mentais
e, de qualquer maneira sem ter o conhecimento específico e a experiência, sem a supervisão ou as instr uções relativas à
utilização dadas por pessoa responsável.
13. O aparelho não é destinado para as crianças brincarem com ele.
Page 25

P
O
R
T
U
G
U
Ê
S
23
INSTRUÇÕES GERAIS
APARELHO A
• Comutador de potência [Fig. A]
POSIÇÃO FUNÇÃO
Aparelho desligado
Ar quente (1100W)
Ar demasiado quente (2200W)
APARELHO B
• Comutador de potência [Fig. E]
POSIÇÃO FUNÇÃO
Aparelho desligado
Ar frio
Ar quente (1000W)
Ar demasiado quente (2000W)
• Termóstato ambiente - [Fig. C]
O termóstato ambiente garante que a temperatura desejada seja mantida: alcançada a temperatura, o aparelho desliga
automaticamente e liga assim que a temperatura abaixar.
POSIÇÃO FUNÇÃO
Antigelo
MAX Temperatura máxima
APARELHO C - C1
• Comutador de potência [Fig. B]
POSIÇÃO FUNÇÃO
Aparelho desligado
Ar frio
Ar quente (1100W)
Ar demasiado quente (2200W)
• Termóstato ambiente - [Fig. D]
POSIÇÃO FUNÇÃO
Antigelo
MAX Temperatura máxima
O termóstato ambiente garante que a temperatura desejada seja mantida: alcançada a temperatura, o aparelho desliga
automaticamente e liga assim que a temperatura abaixar.
DESCRIÇÃO DO APARELHO E ACESSÓRIOS [Fig. Z]
a
Tampa dos comandos
h
Compartimento para pega ou para suporte (traseiro)
b
Termóstato ambiente
i
Enrolador de cabo
c
Timer
j
Electro Block
®
d
Comutador de potência
k
Suporte para montagem na parede
e
Luz avisadora “ligado”
l
Parafusos e buchas para montagem na parede
f
Corpo do motor e grelha saída do ar (frontal)m Luz piloto ionizador (somente modelos com ionizador)
g
Grelha entrada do ar
n
Tecla luminosa luz piloto ionizador (somente modelos com ionizador)
Page 26

24
APARELHO A
Função termoventilador
-Posicione o comutador de potência [Fig. A] da seguinte maneira:
posição : ar quente (1100W).
posição : ar demasiado quente (2200W).
APARELHO B
Função termoventilador
-Posicione o comutador de potência [Fig. E] da seguinte maneira:
posição : ar quente (1000W).
posição : ar demasiado quente (2000W).
- Regule o ter móstato ambiente
[Fig. C] segundo a temperatura que deseja manter.
Função ventilação de verão
- Regule o termóstato ambiente [Fig. C] à temperatura máxima MÁX.
- Posicione o comutador de potência
[Fig. E] em .
Função antigelo
Esta função garante que a temperatura ambiente seja mantida por volta de +5°C.Quando a temperatura descer abaixo deste nível, o
termoventilador liga automaticamente.
- Coloque o ter móstato ambiente
[Fig. C] na posição antigelo .
- Coloque o comutador de potência
[Fig. E] na:
posição para restabelecer gradualmente a temperatura de +5°C;
posição para restabelecer rapidamente a temperatura de +5°C.
Tecnologia Imetec-Ion77 (somente modelos com ionizador)
Se o seu aparelho for dotado de ionizador, a luz piloto mestará acesa indicando o seu funcionamento.
O termoventilador Imetec-Ion77 é dotado de ionizador, um dispositivo revolucionário que reproduz o fenómeno natural da ionização. Os
íons gerados pelo termoventilador agem positivamente no ar, revitalizando-o e tornando-o mais limpo.
APARELHO C - C1
Função termoventilador
-Posicione o comutador de potência [Fig. B] da seguinte maneira:
posição : ar quente (1100W).
posição : ar demasiado quente (2200W).
- Regule o ter móstato ambiente
[Fig. D] segundo a temperatura que deseja manter.
Função ventilador
- Regule o termóstato ambiente [Fig. D] à temperatura máxima MÁX.
- Posicione o comutador de potência
[Fig. B] em .
Função antigelo
Esta função garante que a temperatura ambiente seja mantida por volta de +5°C.Quando a temperatura descer abaixo deste nível, o
termoventilador liga automaticamente.
- Coloque o ter móstato ambiente
[Fig. D] na posição antigelo .
- Coloque o comutador de potência
[Fig. B] na:
posição para restabelecer gradualmente a temperatura de +5°C;
posição para restabelecer rapidamente a temperatura de +5°C.
INSTRUÇÕES DE USO
• Timer - [Fig. F] (somente para os modelos nos quais é previsto)
f1: dentes para a programação das faixas de horário.
f2: anel externo.
ATENÇÃO:
- Se o timer estiver programado, a temperatura seleccionada é mantida somente dentro das faixas horárias programadas.
• Base regulável - (somente para os modelos nos quais é prevista)
Posição standard [Fig. G].
Posição inclinada:a base pode ser regulada para dirigir o ar quente/frio para cima. Mantendo a base bem firme, mover o corpo do motor
empurrando-o para frente
[Fig. H].
Page 27

P
O
R
T
U
G
U
Ê
S
25
Função timer (somente para os modelos com timer)
A função timer permite ligar e desligar o aparelho da seguinte maneira:
• Manual
- coloque para dentro todos os dentes do timer [Fig. I];
-gire o comutador de potência
[Fig. B] até à posição , ou segundo a função que deseja activar;
-regule o termóstato ambiente
[Fig. D] segundo a temperatura que deseja manter.
ATENÇÃO:
-O timer funciona somente se a ficha do termoventilador estiver ligada à uma tomada de corrente.
• Automático
-Gire o anel externo do timer no sentido horário e sincronize o indicador com o seu relógio [Fig. L].
- Coloque para fora todos os dentes do timer
[Fig. M, com excepção dos correspondentes às faixas horárias em que o aparelho deve
funcionar.
-Gire o comutador de potência
[Fig. B] até à posição , ou segundo a função que pretende activar.O timer é diário e repete
a programação em intervalos de 24 horas.Cada dente equivale a um quarto de hora.
Tecnologia Imetec-Ion77 (somente modelos com ionizador)
Se o seu aparelho for dotado de tecla com luz piloto npara activar o ionizador poderá escolher se accioná-la ou não.Para activar o
ionizador é suficiente carregar a tecla
n
e a luz piloto acender-se-á para indicar que o ionizador está funcionando. Para desactivá-lo
carregue novamente a tecla colocando-a na posição de início, a luz piloto apagar-se-á.
O termoventilador Imetec-Ion77 é dotado de ionizador, um dispositivo revolucionário que reproduz o fenómeno natural da ionização. Os
íons gerados pelo termoventilador agem positivamente no ar, revitalizando-o e tornando-o mais limpo.
INSTRUÇÕES PARA A INSTALAÇÃO NA PAREDE
- (somente para modelos com suporte) [Fig. Q]
O termoventilador pode ser fixado na parede.
- Fixe na parede o suporte com as duas buchas fornecidas
[Fig. N] (a distância entre os furos é de 16.5 cm, e 6 mm de diâmetro).
- Apoie o ter moventilador no suporte e empurre contra a parede, de modo que o gancho do suporte
(o1) encaixe-se na parte traseira
do termoventilador, junto da pega [Fig. O].Para soltar o termoventilador do suporte da parede, carregar no gancho do suporte
conforme indica a seta e simultaneamente puxar o termoventilador para fora [Fig.P].
APARELHO COM APARELHO DE PROTECÇÃO ELECTRO BLOCK
®
IMPORTANTE:
- Se o seu aparelho for dotado de Electro Block
®
j
,deve ligá-lo directamente a uma ficha de corrente fixa;não ligue o Electro
Block®a fichas móveis ou a adaptadores ou extensões. O aparelho de protecção Electro Block®é dotado de um interruptor
diferencial de alta sensibilidade que protege o utente contra dispersões de corrente para terra de valores superiores a 10mA.
Para poder utilizar o aparelho, faça as operações descritas abaixo.
- Coloque o Electro Block
®
na tomada de corrente, carregue e solte a tecla ON: aparecerá a cor vermelha na luz avisadora. O Electro
Block®está ligado.
-Verifique se o Electro Block
®
está a funcionar correctamente carregando na tecla TEST:a corrente é cortada, o indicador vermelho
desapareça e isto garante que o aparelho de protecção Electro Block®está a funcionar regularmente. Após ter feito o teste, carregue e
solte novamente a tecla ON:o indicador vermelho aparece e o termoventilador está pronto para funcionar. O teste deve ser feito antes
de cada utilização do aparelho.No caso de funcionamento irregular ou incorrecto (por exemplo, intervenções repetidas com o aparelho
ligado à rede ou intervenções não tempestivas durante o teste de controle do Electro Block®), recorra imediatamente aos Centros de
Assistência Técnica autorizados pela IMETEC.Quando o aparelho for desligado e o aparelho de protecção Electro Block®for retirado
da tomada, o interruptor diferencial do aparelho Electro Block®desliga automaticamente.O uso impróprio de aparelhos eléctricos pode
ser perigoso. O uso de um dispositivo de protecção não substitui as precauções fundamentais para a segurança eléctrica.
CONSELHOS ÚTEIS
Ao guardar o termoventilador, certifique-se de que esteja protegido contra o pó, para evitar que este entre nas grelhas.
Page 28

26
NAVODILA IN OPOZORILA ZA PRAVILNO IN VARNO RABO
NAVODILA IN OPOZORILA V TEJ KNJIŽICI POZORNO PREBERITE IN JIH SHRANITE DO KONCA
ŽIVLJENJSKE DOBE APARATA. NAVODILA VSEBUJEJO POMEMBNE INFORMACIJE V ZVEZI Z
DELOVANJEM, VARNOSTJO, NASTAVLJANJEM, UPORABO IN VZDRŽEVANJEM.
POZOR
SPLOŠNE OPOMBE
IMETEC se Vam zahvaljuje, da ste izbrali njegov izdelek. Smo prepričani, da boste cenili naši kvaliteto zanesljivost in spoštovanje
potrošnika za katerega smo zasnovali in sestavili.
1. Ko odstranite embalažo, se takoj prepričajte, če je aparat cel, brez vidnih poškodb, ki bi lahko nastale med prevozom. V primeru
dvoma, ga ne uporabite in se takoj posvetujte z ustreznim pooblaščenim IMETEC servisom.
2. Preden aparat priključite na električno omrežje, se prepričajte, če je primeren za vašo napetost. Tablica z navodili se nahaja na
spodnjem delu aparata.
3. Ne uporabljajte adapterjev, večdelnih vtikačev in/ali podaljškov. V primeru neujemanja med vtičnico in vtikačem aparata, naj
vtičnico zamenja le za to usposobljeno osebje.
4. Aparat lahko uporabljate izključno za opravila, za katera je bil izdelan torej kot termični ventilator. Vsaka druga raba ni primerna
in je nevarna. Izdelovalec ne odgovarja za morebitno škodo, ki bi nastala zaradi nepravilne, napačne ali nespametne rabe.
5. Raba kateregakoli električnega aparata ali izdelka zahteva spoštovanje nekaterih osnovnih pravil. Pomembno:
- ne dotikajte se ga nikoli z mokrimi ali vlažnimi rokami ali nogami,
- ne vlecite celega električnega kabla ali aparata, da bi izvlekli vtikač,
- ne izpostavljajte ga delovanju atmosferskih dejavnikov (dež, sonce itd.),
- ne dovolite otrokom ali neusposobljenim, da bi aparat uporabljali brez vašega nadzora.
6. Ne postavite aparat neposredno pod električno vtičnico. Ne uporabljajate izdelek v neposredni bližini kopalne kade, tuša ali
bazena. Ne postaviti izdelek na takšen način, da je dostopen kopalni kadi, prhi ali bazena. Ne pokriti rešetke zračnega izhoda
in izhoda.
7. Pred vsakim čiščenjem aparata ali pred vzdrževanjem delov, ga morate obvezno izklopiti iz električnega omrežja tako, da
izvlečete vtikač iz vtičnice.
8. V primeru okvare in/ali slabega delovanja, ga izklopite in ga ne popravljajte sami. Za popravilo se obrnite izključno na
pooblaščeni IMETEC servis.
9. Kabla ne sme zamenjati kupec sam. V primeru poškodbe ali nadomeščanja kablja, se obrnite na pooblaščeni IMETEC servis.
10. Ko se odločite, da aparata ne boste več uporabljali, je priporočljivo prerezati električni kabel potem, ko ste odstranili vtikač.
Priporočamo tudi zaščito delov, ki bi bili lahko potencialno nevarni za otroke, če bi se z njimi igrali.
11. Ne pokrivajte vhodnih in izhodnih rešetk za zrak, da ne pride do pregretja.
12.Tega aparata ne smejo uporabljati otroci in osebe z zmanjšanimi fizičnimi, čutilnimi ali mentalnimi sposobnostmi ali kakorkoli brez
specifičnega znanja in izkušenj, brez nadzora ali brez ustreznih navodil za uporabo, ki jih daje odgovorna oseba.
13. Aparat ni namenjen za otroško igro.
Page 29

S
L
O
V
E
N
S
K
I
27
SPLOŠNA NAVODILA
APARAT A
• Stikalo potence [Slika A]
POLOŽAJ DELOVANJE
Aparat ugasen
Topel zrak (1100 W)
Zelo topel zrak (2200W)
APARAT B
• Stikalo moči [Slika E]
POLOŽAJ DELOVANJE
Aparat je izklopljen
Hladen zrak
Topel zrak (1000W)
Zelo topel zrak (2000W)
• Termostat sobne temperature - [Slika C]
Termostat sobne temperature zagotavlja ohranjanje zaželene temperature: ko je doseženo takšno stanje, se aparat avtomatično izkluči
in se ponovno vključi takoj, ko se temperatura zniža.
POLOŽAJ DELOVANJE
Proti zmrzovanju
MAX Najvišja temperatura
APARAT C - C1
• Stikalo potence [Slika B]
POLOŽAJ DELOVANJE
Aparat ugasen
Hladen zrak
Topel zrak (1100 W)
Zelo topel zrak (2200W)
• Ozračni termostat - [Slika D]
POLOŽAJ DELOVANJE
Proti zmrzovanju
MAX Najvišja temperatura
Ozračni termostat zagotovi vzdrževanje zaželene temperature: doseženo takšno stanje, aparat se automatično ugasne in se prižge
takoj, ko se temperatura zmanjša.
OPIS APARATA IN NJEGOVIH DODATKOV [Slika Z]
a
Pokrita navodila
h
Prazen prostor za držaj ali predel za oporo streme (zadnja stran)
b
Termostat ozračja
i
Navijalo za kabel
c
Timer
j
Electro Block
®
d
Stikalo potence
k
Streme za montažo stene
e
Opozorilna lučka za vklop
l
Vijaki in vložki za montažo stene
f
Telo motorja in rešetka (prednja stran)
m
Lučka ionizatorja (samo pri modelih z ionizatorjem)
g
Rešetka za vhod zraka.
n
Tipko opozorilna lučka ionizatorja (samo pri modelih z ionizatorjem)
Page 30

28
APARAT A
Delovanje termičnega ventilatorja
- Obrni stikalo potence [Slika A] na naslednje:
položaj : Topel zrak (1100 W)
položaj : Zelo topel zrak (2200W)
APARAT B
Delovanje termičnega ventilatorja
- Obrni stikalo moči takole [Slika E]:
lega : Topel zrak (1000 W)
lega : Zelo topel zrak (2000W)
- Nastavite termostat sobne temperature
[Slika C] glede na temperaturo, ki jo želite ohranjati.
Funckija - poletna ventilacija
- Nastavite termostat sobne temperature [Slika C] na najvišjo temperaturo - MAX.
- Obrnite stikalo moči
[Slika E] v lego .
Delovanje proti zmrzovanja
Ta funkcija zagotavlja ohranjanje sobne temperature okrog +5˚C. Ko se temperatura zmanjša pod to raven, se termični ventilator
avtomatično vklopi.
- Nastavite termostat sobne temperature
[Slika C] na lega proti zmrzovanju .
- Obrnite stikalo moči
[Slika E] takole:
lega za postopno vzpostavitev temperature +5˚C.
lega za hitro vzpostavitev temperature +5˚C.
Tehnologija Imetec-Ion77 (samo pri modelih z ionizatorjem)
Če ima vaš aparat ionizator, bo lučka mprižgana v dokaz delovanja.
Termični ventilator Imetec-Ion77 je opremljen z ionizatorjem, revolucionarno napravo, ki reproducira naravni pojav ionizacije. Ioni, ki jih
proizvaja termični ventilator učinkujejo na zrak ter ga oživljajo in očistijo.
APARAT C - C1
Delovanje termičnega ventilatorja
- Obrni stikalo potence [Slika B] naslednje:
položaj : Topel zrak (1100 W)
položaj : Zelo topel zrak (2200W)
- Naravnati ozračni termostat
[Slika D] glede na temperaturo, ki si jo želi obdržati.
Delovanje ventilatorja
- Naravnati ozračni termostat [Slika D] na najvišjo temperaturo - MAX.
- Obrni stikalo potence
[Slika B] na naslednje .
Delovanje proti zmrzovanja
To delovanje zagotovi ohranjevanje ozračne temperature okoli +5˚C. Ko se temperatura zmanjša pod to raven, termični ventilator se
avtomatično prižge.
- Naravnati ozračni termostat
[Slika D] na položaj protizmrzovanja .
- Obrni stikalo potence
[Slika B] na naslednje:
položaj za postopno vzpostavo temperature +5˚C.
položaj za hitro vzpostavo temperature +5˚C.
NAVODILA ZA UPORABO
• Timer - [Slika F] (samo za določene modele)
f1: zobki za programiranje urnika
f2: zunanji obroč.
POZOR:
- ČE JE TIMER ŽE PROGRAMIRAN, IZBRANA VZDRŽEVALNA TEMPERATURA SE BO IZVRŠILA SAMO V OKVIRU
PROGRAMIRANEGA URNIKA.
• Osnove uravnavanja - (samo za določen tip modelov)
Standardni položaj [Slika G].
Položaj upognjevanja: osnovo se lahko regolira za usmerjanje toplega oz. hladnega zraka navzgor. Potrebno je držati osnovo pri miru
in pri tem poriniti telo motorja naprej
[Slika H].
Page 31

S
L
O
V
E
N
S
K
I
29
Delovanje timerja (samo za modele s timerjem)
Delovanje timerja zagotavlja upravljanje prižiga in ugašanja aparata na naslednji način:
• Ročno
- Obrni vse zobke timerja navznoter [Slika I].
- Obrniti stikalo potence
[Slika B] na položaj , ali , glede na funkcijo, ki se jo želi aktivirati.
- Naravnati ozračni termostat
[Slika D] glede na temperaturo, ki si jo želi obdržati.
POZOR:
- TIMER DELUJE SAMO ČE JE VTIKAČ TERMIČNEGA VENTILATORJA VKLJUČEN V ELEKTRIČNO VTIČNICO.
• Avtomatično
- Zavrti zunanji obroč timerja v smeri ure in sinhronizi kazalec s svojo ročno uro [Slika L].
- Zavrti vse zobke timerja navzven
[Slika M] razen tistih,ki ustrezajo urnemu redu, v katerem namerava vzpostaviti delovanje aparata.
- Obrniti stikalo potence
[Slika B] na položaj , ali , glede na funkcijo, ki se jo želi aktivirati.
Timer je dnevni in ponavlja nastavitev v intervalu 24 ur. Vsak zobek je vreden četrt ure.
Tehnologija Imetec-Ion77 (samo pri modelih z ionizatorjem)
Če ima vaš aparat tipko z lučko nza aktiviranje ionizatorja, se lahko odločite, da ga vklopite ali ne. Za aktiviranje ionizatorja zadostuje
pritisk na tipko nin opozorilna lučka bo opozarjala, da ionizator deluje. Za izklop pritisnite ponovno na tipko in jo postavite v prvotno
lego, opozorilna lučka bo ugasnila.
Termični ventilator Imetec-Ion77 je opremljen z ionizatorjem, revolucionarno napravo, ki reproducira naravni pojav ionizacije. Ioni, ki jih
proizvaja termični ventilator učinkujejo na zrak ter ga oživljajo in očistijo.
NAVODILA ZA INŠTALACIJO STENE
- (samo za modele s podporo streme) [Slika Q]
Termični ventilator je lahko pritrjen na zid.
- Pritrdi oporo streme s dvojnim vložkom v svoji opremi na steno
[Slika N] (razdalja med odprtinami je 16,5 cm, diameter 6 mm).
- Nasloni termični ventilator na streme in jo potisni proti steni na takšen način, da zob streme
(o1)
se pripne na ozadje termičnega ventilatorja, v razmerju ročaj [Slika O]. Če hočemo sneti termični ventilator s opore zidu, pritisni zob
streme, kakor prikazuje puščica in istočasno povleči termični ventilator navzven. [Slika P].
APARAT S VAROVALCEM ŽIVLJENJA ELECTRO BLOCK
®
POMEMBNO:
- Če je vaš aparat opremljen s varovalcem življenja Electro Block
®
j
, ga je potrebno neposredno priključiti na nepremičen
električni vtikač; v nobenem primeru pa se ga ne sme priključiti na premični vtikače ali adaptorje oz. podaljške. Varovalec
življenja Electro Block®ima diferenzialno prekinjalo s visoko občutljivostjo, ki sčiti uporabnika pred razpršenjem električnega
toka proti zemlji s vrednostjo nad 10mA.
Za uporabo aparata je potrebno izvršiti naslednje postopke:
- Prključi Electro Block
®
v električno vtičnico, potisni in popusti tipko ON: Prikaže se rdeča barva na opozorilnem okencu. Electro Block
®
je sedaj aktiviran.
-Preveri odlično učinkovitost Electro Block
®
s pritiskom na tipko TEST: električni tok se prekine, rdeči kazalec izgine in to jamči, da
varovalec življenja Electro Block®je odlično učinkovit.
- Potem, ko se je izvršil test,še enkrat pritisni in popusti tipko
ON: rdeči kazalec se ponovno prikaže in termični ventilator je pripravljen
na delovanje. Potrebno je izvršiti test pred vsako uporabo aparata. V primeru nepravilnega ali slabega delovanja ( na primer
ponavljajoči interventi aparata, ki je priključen na mrežo ali nepravočastni interventi med preverjanjem testa Electro Block®), se obrne
takoj na pooblaščeni IMETEC servis. Potem, ko se aparat izključi in varovalec življenja Electro Block®je izstavljen iz vtičnice,
diferencialno prekinjalo varovalca življenja Electro Block®se avtomatično izključi. Nepravilna uporaba električnega aparata je lahko
nevarna. Uporaba naprave varovalca življenja ne nadomešča poglavitne varnostne ukrepe električnega toka.
KORISTNA NAVODILA
V primeru, da se ne uporablja termičnega aparata, ga je potrebno zavarovati pred prahom, da ne obtiči v rešetkah aparata.
Page 32

30
√¢∏°π∂™ ∫∞𠶃√∂π¢√¶√π∏™∂π™ °π∞ √ƒ£∏ ∫∞π ∞™º∞§∏ Ã∏™∏
¢π∞µ∞™∆∂ ¶ƒ√™∂∫∆π∫∞ ∆π™ √¢∏°π∂™ ∫∞π ∆π™ ¶ƒ√∂π¢√¶√π∏™∂π™ ∆√À ¶∞ƒ√¡∆√™ ∂°Ã∂πƒπ¢π√À ∫∞π
ºÀ§∞•∆∂ ∆∂™ °π∞ ª∂§§√¡∆π∫∂™ Ã∏™∂π™ ™∂ √§∏ ∆∏ ¢π∞ƒ∫∂π∞ ∑ø∏™ ∆√À ¶ƒ√´√¡∆√™. ∆√
∂°Ã∂πƒπ¢π√ ¶∂ƒπ∂Ã∂π ™∏ª∞¡∆π∫∂™ √¢∏°π∂™ √™√¡ ∞º√ƒ∞ ∆∏ §∂π∆√Àƒ°π∞ ∫∞π ∆∏¡ ∞™º∞§∂π∞ ∆∏™
∂°∫∞∆∞™∆∞™∏™, Ã∏™∏™ ∫∞π ™À¡∆∏ƒ∏™∏™ ∆√À ¶ƒ√´√¡∆√™.
¶ƒ√™√Ã∏
°∂¡π∫∂™ ¶ƒ√∂π¢√¶√π∏™∂π™
∏ IMETEC Ы·˜ В˘¯·ЪИЫЩВ› Ф˘ ВИП¤Н·ЩВ ¤У· ЪФ˚fiУ ЩЛ˜. ∂›М·ЫЩВ ‚¤‚·ИФИ, fiЩИ ı· ВОЩИМ‹ЫВЩВ ЩЛУ ФИfiЩЛЩ·, ЩЛУ ·НИФИЫЩ›· О·И ЩФ
ЫВ‚·ЫМfi ЪФ˜ ЩФУ ВП¿ЩЛ МВ Щ· ФФ›· Ы¯В‰И¿ЫЩЛОВ О·И О·Щ·ЫОВ˘¿ЫЩЛОВ.
1. ∞КФ‡ ·К·ИЪ¤ЫВЩВ ЩЛ Ы˘ЫОВ˘·Ы›·, ‚В‚·ИˆıВ›ЩВ fiЩИ Л Ы˘ЫОВ˘‹ В›У·И ·У¤·КЛ ¯ˆЪ›˜ ВМК·УВ›˜ ‚П¿‚В˜ Ф˘ ı· МФЪФ‡Ы·У У·
ЪФОПЛıФ‡У ·fi ЩЛ МВЩ·КФЪ¿. ™В ВЪ›ЩˆЫЛ ·МКИ‚ФП›·˜, МЛ ¯ЪЛЫИМФФИВ›ЩВ ЩЛ Ы˘ЫОВ˘‹ О·И ·В˘ı˘УıВ›ЩВ ЫЩФ ™¤Ъ‚И˜
IMETEC.
2. ¶ЪИУ Ы˘У‰¤ЫВЩВ ЩЛ Ы˘ЫОВ˘‹, ‚В‚·ИˆıВ›ЩВ fiЩИ Щ· ЫЩФИ¯В›· Ф˘ ·У·БЪ¿КФУЩ·И ЫЩЛУ ВЩИО¤Щ· ·УЩИЫЩФИ¯Ф‡У ЫЩ· ¯·Ъ·ОЩЛЪИЫЩИО¿
ЩФ˘ ЛПВОЩЪИОФ‡ ‰ИОЩ‡Ф˘. ∏ ВЩИО¤Щ· ‚Ъ›ЫОВЩ·И ЫЩФ О¿Щˆ М¤ЪФ˜ ЩЛ˜ Ы˘ЫОВ˘‹˜.
3. ªЛ ¯ЪЛЫИМФФИВ›ЩВ ·УЩ¿ЩФЪВ˜, ФП‡ЪИ˙· ‹ ЪФВОЩ¿ЫВИ˜. ™В ВЪ›ЩˆЫЛ ·Ы˘М‚·ЩfiЩЛЩ·˜ МВЩ·Н‡ Ъ›˙·˜ О·И КИ˜ ЩЛ˜
Ы˘ЫОВ˘‹˜, ·В˘ı˘УıВ›ЩВ ЫВ ВНВИ‰ИОВ˘М¤УФ ЩВ¯УИОfi БИ· ЩЛУ ·УЩИО·Щ¿ЫЩ·ЫЛ ЩЛ˜ Ъ›˙·˜ МВ МИ· ¿ППЛ О·Щ¿ППЛПФ˘ Щ‡Ф˘.
4. ∏ Ы˘ЫОВ˘‹ Ъ¤ВИ У· ¯ЪЛЫИМФФИВ›Щ·И МfiУФ БИ· ЩФ ЫОФfi БИ· ЩФУ ФФ›Ф ЪФФЪ›˙ВЩ·И, ‰ЛП·‰‹ Ы·У ·ВЪfiıВЪМФ. ∫¿ıВ ¿ППЛ
¯Ъ‹ЫЛ Ъ¤ВИ У· ıВˆЪВ›Щ·И ·О·Щ¿ППЛПЛ О·И Ы˘УВТ˜ ВИО›У‰˘УЛ. √ О·Щ·ЫОВ˘·ЫЩ‹˜ ‰ВУ К¤ЪВИ О·М›· В˘ı‡УЛ БИ· ВУ‰В¯fiМВУВ˜
‚П¿‚В˜ Ф˘ ФКВ›ПФУЩ·И ЫВ ·О·Щ¿ППЛПЛ ‹ П·Уı·ЫМ¤УЛ ¯Ъ‹ЫЛ.
5. ∏ ¯Ъ‹ЫЛ ЛПВОЩЪИОТУ Ы˘ЫОВ˘ТУ ЪФ¸Фı¤ЩВИ ЩЛУ Щ‹ЪЛЫЛ ФЪИЫМ¤УˆУ ‚·ЫИОТУ О·УfiУˆУ.
∂И‰ИОfiЩВЪ·:
- ÌËÓ ·ÁÁ›˙ÂÙ ÔÙ¤ ÙË Û˘Û΢‹ Ì ‚ÚÂÁ̤ӷ ‹ ˘ÁÚ¿ ¯¤ÚÈ· ‹ fi‰È·
- МЛУ ЩЪ·‚¿ЩВ ЩФ ЛПВОЩЪИОfi О·ПТ‰ИФ ‹ ЩЛ Ы˘ЫОВ˘‹, БИ· У· ·ФЫ˘У‰¤ЫВЩВ ЩФ КИ˜ ·fi ЩЛУ Ъ›˙· ЩФ˘ ЪВ‡М·ЩФ˜
- МЛУ ·К‹УВЩВ ЩЛ Ы˘ЫОВ˘‹ ВОЩВıВИМ¤УЛ ЫЩФ˘˜ ·ЩМФЫК·ИЪИОФ‡˜ ·Ъ¿БФУЩВ˜ (‚ЪФ¯‹, ‹ПИФ ОП.)
- МЛУ ВИЩЪ¤ВЩВ ЫВ ·И‰И¿ ‹ ·У‹МФЪ· ¿ЩФМ· У· ¯ЪЛЫИМФФИФ‡У ЩЛ Ы˘ЫОВ˘‹ ¯ˆЪ›˜ ВИЩ‹ЪЛЫЛ
6. ªЛУ ЩФФıВЩВ›ЩВ ЩЛ Ы˘ЫОВ˘‹ ·ОЪИ‚Т˜ О¿Щˆ ·fi ЛПВОЩЪИО‹ Ъ›˙·. ªЛ ¯ЪЛЫИМФФИВ›ЩВ ЩФ ЪФ˚fiУ ОФУЩ¿ ЫВ М·УИ¤ЪВ˜, УЩФ˘˜ ‹
ИЫ›УВ˜. ªЛУ ЩФФıВЩВ›ЩВ ЩФ ЪФ˚fiУ ¤ЩЫИ ТЫЩВ У· ВИЩЪ¤ВЩ·И Л ЪfiЫ‚·ЫЛ ·fi М·УИ¤ЪВ˜, УЩФ˘˜ ‹ ИЫ›УВ˜. ªЛУ О·П‡ЩВЩВ
ЩИ˜ БЪ›ПИВ˜ ВИЫfi‰Ф˘ О·И ВНfi‰Ф˘ ЩФ˘ ·¤Ъ·.
7. ¶ЪИУ ·fi ФФИ·‰‹ФЩВ ВУ¤ЪБВИ· О·ı·ЪИЫМФ‡ ‹ Ы˘УЩ‹ЪЛЫЛ˜ Ъ¤ВИ У· ·ФЫ˘У‰¤ЫВЩВ ЩЛ Ы˘ЫОВ˘‹ ·fi ЩФ ЛПВОЩЪИОfi ‰›ОЩ˘Ф,
‚Б¿˙ФУЩ·˜ ЩФ КИ˜ ·fi ЩЛУ Ъ›˙·.
8. ™В ВЪ›ЩˆЫЛ ‚П¿‚Л˜ О·И/‹ О·О‹˜ ПВИЩФ˘ЪБ›·˜ ЩЛ˜ Ы˘ЫОВ˘‹˜, Ы‚‹ЫЩВ ЩЛУ О·И МЛУ ВИ¯ВИЪ‹ЫВЩВ У· ЩЛУ ВИЫОВ˘¿ЫВЩВ. °И·
ВУ‰В¯fiМВУВ˜ ВИЫОВ˘¤˜, ·В˘ı˘УıВ›ЩВ ЫЩФ ВНФ˘ЫИФ‰ФЩЛМ¤УФ ™¤Ъ‚И˜ IMETEC.
9. ∆Ф ЛПВОЩЪИОfi О·ПТ‰ИФ ЩЛ˜ Ы˘ЫОВ˘‹˜ ‰ВУ Ъ¤ВИ У· ·УЩИО·ı›ЫЩ·Щ·И ·fi ЩФ ¯Ъ‹ЫЩЛ. ™В ВЪ›ЩˆЫЛ КıФЪ¿˜ ЩФ˘ О·Пˆ‰›Ф˘,
·Â˘ı˘Óı›Ù ÛÙÔ ÂÍÔ˘ÛÈÔ‰ÔÙË̤ÓÔ ™¤Ú‚Ș IMETEC ÁÈ· ÙËÓ ·ÓÙÈηٿÛÙ·Û‹ ÙÔ˘.
10. ∂¿У ·ФК·Ы›ЫВЩВ У· МЛ ¯ЪЛЫИМФФИ‹ЫВЩВ П¤ФУ Ы˘ЫОВ˘‹ ·˘ЩФ‡ ЩФ˘ Щ‡Ф˘, Ы˘УИЫЩ¿Щ·И У· ЩЛУ ·¯ЪЛЫЩВ‡ЫВЩВ Оfi‚ФУЩ·˜ ЩФ
ЛПВОЩЪИОfi О·ПТ‰ИФ, ·КФ‡ ·ФЫ˘У‰¤ЫВЩВ ЩФ КИ˜ ·fi ЩЛУ Ъ›˙· ЩФ˘ ЪВ‡М·ЩФ˜. ™˘УИЫЩ¿Щ·И В›ЫЛ˜ У· П¿‚ВЩВ Щ· О·Щ¿ППЛП·
М¤ЩЪ· БИ· ВН·ЪЩ‹М·Щ· ЩЛ˜ Ы˘ЫОВ˘‹˜ Ф˘ МФЪФ‡У У· ЪФО·П¤ЫФ˘У О›У‰˘УФ, ВИ‰ИО¿ БИ· Щ· ·И‰И¿ Ф˘ ı· МФЪФ‡Ы·У У·
¯ЪЛЫИМФФИ‹ЫФ˘У ЩЛ Ы˘ЫОВ˘‹ БИ· ЩФ ·И¯У›‰И ЩФ˘˜.
11. ªËÓ Î·Ï‡ÙÂÙ ÙȘ ÁÚ›ÏȘ ÂÈÛfi‰Ô˘ Î·È ÂÍfi‰Ô˘ ÙÔ˘ ·¤Ú· ÁÈ· Ó· ·ÔʇÁÂÙ ÙÔÓ Î›Ó‰˘ÓÔ ˘ÂÚı¤ÚÌ·ÓÛ˘.
12. ∏ Ы˘ЫОВ˘‹ ·˘Щ‹ ‰ВУ В›У·И О·Щ¿ППЛПЛ БИ· ¯Ъ‹ЫЛ ·fi ·И‰И¿ О·И ¿ЩФМ· МВ МВИˆМ¤УВ˜ К˘ЫИО¤˜ О·И ‰И·УФЛЩИО¤˜ ИО·УfiЩЛЩВ˜ ‹
¯ˆЪ›˜ В›Ъ· О·И БУТЫЛ, ¯ˆЪ›˜ ЩЛУ ВИЩ‹ЪЛЫЛ ‹ ЩИ˜ Ф‰ЛБ›В˜ ·fi ¿ЩФМФ ˘В‡ı˘УФ БИ· ЩЛУ ·ЫК¿ПВИ¿ ЩФ˘˜.
13. ∏ Ы˘ЫОВ˘‹ ‰ВУ В›У·И О·Щ¿ППЛПЛ БИ· У· ·›˙Ф˘У Щ· ·И‰И¿.
Page 33

∂
§
§
H
N
I
K
A
31
°∂¡π∫∂™ √¢∏°π∂™
™™ÀÀ™™∫∫∂∂ÀÀ∏∏
AA
•
¢¢ÈÈ··ÎÎÞÞÙÙˢ˜ ÈÈÛÛ¯¯‡‡ÔÔ˜˜
[∂ÈÎ.
A]
£∂™∏ §∂π∆√Àƒ°π∞
™˘Û΢‹ Û‚ËÛÙ‹
∑ÂÛÙfi˜ ·¤Ú·˜ (1100 W)
¶Ôχ ˙ÂÛÙfi˜ ·¤Ú·˜ (2200W)
™™ÀÀ™™∫∫∂∂ÀÀ∏∏ BB
•
¢¢ÈÈ··ÎÎÞÞÙÙˢ˜ ÈÈÛÛ¯¯‡‡ÔÔ˜˜
[∂ÈÎ.
E]
£∂™∏ §∂π∆√Àƒ°π∞
™˘Û΢‹ Û‚ËÛÙ‹
∫Ú‡Ô˜ ·¤Ú·˜
∑ÂÛÙfi˜ ·¤Ú·˜ (1000W)
¶Ôχ ˙ÂÛÙfi˜ ·¤Ú·˜ (2000W)
•
££ÂÂÚÚÌÌÔÔÛÛÙÙ¿¿ÙÙˢ˜ ÂÂÚÚÈÈ‚‚¿¿ÏÏÏÏÔÔÓÓÙÙÔÔ˜˜ --
[∂ÈÎ. C]
√ ıВЪМФЫЩ¿ЩЛ˜ ¯ТЪФ˘ ВН·ЫК·П›˙ВИ ЩЛ ‰И·Щ‹ЪЛЫЛ ЩЛ˜ ВИı˘МЛЩ‹˜ ıВЪМФОЪ·Ы›·˜: fiЩ·У ВИЩВ˘¯ıВ› Л ВИı˘МЛЩ‹ ЩИМ‹, Л Ы˘ЫОВ˘‹ Ы‚‹УВИ
·˘ЩfiМ·Щ· О·И ·У¿‚ВИ ¿ПИ МfiПИ˜ МВИˆıВ› Л ıВЪМФОЪ·Ы›·.
£∂™∏ §∂π∆√Àƒ°π∞
§ÂÈÙÔ˘ÚÁ›· ·fi„˘Í˘
MAX
ª¤БИЫЩЛ ıВЪМФОЪ·Ы›·
™™ÀÀ™™∫∫∂∂ÀÀ∏∏ CC -- CC11
•
¢¢ÈÈ··ÎÎÞÞÙÙˢ˜ ÈÈÛÛ¯¯‡‡ÔÔ˜˜
[∂ÈÎ.
B]
£∂™∏ §∂π∆√Àƒ°π∞
™˘Û΢‹ Û‚ËÛÙ‹
∫Ú‡Ô˜ ·¤Ú·˜
∑ÂÛÙfi˜ ·¤Ú·˜ (1100W)
¶Ôχ ˙ÂÛÙfi˜ ·¤Ú·˜ (2200W)
•
££ÂÂÚÚÌÌÔÔÛÛÙÙ¿¿ÙÙˢ˜ ÂÂÚÚÈÈ‚‚¿¿ÏÏÏÏÔÔÓÓÙÙÔÔ˜˜ --
[∂ÈÎ.
D]
£∂™∏ §∂π∆√Àƒ°π∞
∞fi„˘ÍË
MAX
ª¤БИЫЩЛ ıВЪМФОЪ·Ы›·
√ ıВЪМФЫЩ¿ЩЛ˜ ВЪИ‚¿ППФУЩФ˜ ВН·ЫК·П›˙ВИ ЩЛ ‰И·Щ‹ЪЛЫЛ ЩЛ˜ ВИı˘МЛЩ‹˜ ıВЪМФОЪ·Ы›·˜: МfiПИ˜ ВИЩВ˘¯ıВ› Л ıВЪМФОЪ·Ы›· ·˘Щ‹, Л
Ы˘ЫОВ˘‹ Ы‚‹УВИ ·˘ЩfiМ·Щ· О·И ·У¿‚ВИ ¿ПИ МfiПИ˜ МВИˆıВ› Л ıВЪМФОЪ·Ы›·.
¶∂ƒπ°ƒ∞º∏ ™À™∫∂À∏™ ∫∞π ∂•∞ƒ∆∏ª∞∆ø¡ [∂ÈÎ. Z]
a
∫¿П˘ММ· ¯ВИЪИЫЩЛЪ›ˆУ
h
£¤ЫЛ ¯ВИЪФП·‚‹˜ ‹ ˙ТУЛ БИ· ЩФФı¤ЩЛЫЛ ЫЩЛЪ›БМ·ЩФ˜ (›Ыˆ М¤ЪФ˜)
b
£ВЪМФЫЩ¿ЩЛ˜ ВЪИ‚¿ППФУЩФ˜
i
£¤ÛË Î·Ïˆ‰›Ô˘
c
ГЪФУФ‰И·ОfiЩЛ˜
j
Electro Block
®
d
¢È·ÎfiÙ˘ ÈÛ¯‡Ô˜
k
™Ù‹ÚÈÁÌ· ÁÈ· ÙÔÔı¤ÙËÛË ÛÙÔÓ ÙÔ›¯Ô
e
∂У‰ВИОЩИО‹ П˘¯У›· ПВИЩФ˘ЪБ›·˜
l
µ›‰Â˜ Î·È Ô‡· ÁÈ· ÙÔÔı¤ÙËÛË ÛÙÔÓ ÙÔ›¯Ô
f
ªÔÙ¤Ú Î·È ÁÚ›ÏÈ· (ÚfiÛÔ„Ë)
m
∂У‰ВИОЩИО‹ П˘¯У›· ИФУИЫЩ‹ (МfiУФ МФУЩ¤П· МВ ИФУИЫЩ‹)
g
°Ú›ÏÈ· ÂÈÛfi‰Ô˘ ·¤Ú·.
n
ºˆЩВИУfi П‹ОЩЪФ ВУ‰ВИОЩИО‹˜ П˘¯У›·˜ ИФУИЫЩ‹ (МfiУФ МФУЩ¤П· МВ ИФУИЫЩ‹)
Page 34

32
™™ÀÀ™™∫∫∂∂ÀÀ∏∏ AA
§§ÂÂÈÈÙÙÔÔùùÚÚÁÁ››·· ··ÂÂÚÚÞÞõõÂÂÚÚÌÌÔÔùù
- °˘Ú›ÛÙ ÙÔ ‰È·ÎfiÙË ÈÛ¯‡Ô˜
[∂ÈÎ. A]
ˆ˜ ÂÍ‹˜:
ı¤ÛË : ∑ÂÛÙfi˜ ·¤Ú·˜ (1100W).
ı¤ÛË : ¶Ôχ ˙ÂÛÙfi˜ ·¤Ú·˜ (2200W).
™™ÀÀ™™∫∫∂∂ÀÀ∏∏ BB
§ÂÈÙÔùÚÁ›· ·ÂÚÞõÂÚÌÔù
- °˘Ú›ÛÙ ÙÔ ‰È·ÎfiÙË ÈÛ¯‡Ô˜
[∂ÈÎ. E]
ˆ˜ ÂÍ‹˜:
ı¤ÛË : ∑ÂÛÙfi˜ ·¤Ú·˜ (1000W).
ı¤ÛË : ¶Ôχ ˙ÂÛÙfi˜ ·¤Ú·˜ (2000W).
- ƒ˘ıМ›ЫЩВ ЩФ ıВЪМФЫЩ¿ЩЛ ВЪИ‚¿ППФУЩФ˜
[∂ÈÎ. C]
·У¿ПФБ· МВ ЩЛУ ВИı˘МЛЩ‹ ıВЪМФОЪ·Ы›·.
§§ÂÂÈÈÙÙÔÔùùÚÚÁÁ››·· õõÂÂÚÚÈÈÓÓÔÔ‡‡ ··ÂÂÚÚÈÈÛÛÌÌÔÔ‡‡
- ƒ˘ıМ›ЫЩВ ЩФ ıВЪМФЫЩ¿ЩЛ ВЪИ‚¿ППФУЩФ˜
[∂ÈÎ. C]
ЫЩЛ М¤БИЫЩЛ ıВЪМФОЪ·Ы›·
MAX
.
- °˘Ú›ÛÙ ÙÔ ‰È·ÎfiÙË ÈÛ¯‡Ô˜
[∂ÈÎ. E]
ÛÙË ı¤ÛË .
§§ÂÂÈÈÙÙÔÔùùÚÚÁÁ››·· ··ÞÞ„„ùùÍÍˢ˜
∏ ПВИЩФ˘ЪБ›· ·˘Щ‹ ВН·ЫК·П›˙ВИ ЩЛ ‰И·Щ‹ЪЛЫЛ ıВЪМФОЪ·Ы›·˜ ВЪИ‚¿ППФУЩФ˜ ОФУЩ¿ ЫЩФ˘˜ +5ЖC. ŸЩ·У Л ıВЪМФОЪ·Ы›· ¤ЫВИ О¿Щˆ ·fi
·˘Ù‹Ó ÙËÓ ÙÈÌ‹, ÙÔ ·ÂÚfiıÂÚÌÔ ·Ó¿‚ÂÈ ·˘ÙfiÌ·Ù·.
- ƒ˘ıМ›ЫЩВ ЩФ ıВЪМФЫЩ¿ЩЛ ВЪИ‚¿ППФУЩФ˜
[∂ÈÎ. C]
ÛÙË ı¤ÛË ·fi„˘Í˘ .
- °˘Ú›ÛÙ ÙÔ ‰È·ÎfiÙË ÈÛ¯‡Ô˜
[∂ÈÎ. E]
ˆ˜ ВН‹˜:
ı¤ЫЛ БИ· ЫЩ·‰И·О‹ В·У·КФЪ¿ ЩЛ˜ ıВЪМФОЪ·Ы›·˜ ЫЩФ˘˜ +5ЖC.
ı¤ЫЛ БИ· Щ·¯В›· В·У·КФЪ¿ ЩЛ˜ ıВЪМФОЪ·Ы›·˜ ЫЩФ˘˜ +5ЖC.
∆∆¯¯ÓÓÔÔÏÏÔÔÁÁ››·· IImmeetteecc--IIoonn7777 ((ÌÌÞÞÓÓÔÔ ÁÁÈÈ·· ÙÙ·· ÌÌÔÔÓÓÙÙ¤¤ÏÏ·· ÌÌ ÈÈÔÔÓÓÈÈÛÛÙÙ‹‹))
∂¿У Л Ы˘ЫОВ˘‹ Ы·˜ ‰И·ı¤ЩВИ ИФУИЫЩ‹, Л ВУ‰ВИОЩИО‹ П˘¯У›·
m
·У¿‚ВИ ˘Ф‰ВИОУ‡ФУЩ·˜ ЩЛ ПВИЩФ˘ЪБ›· ЩФ˘.
∆Ф ·ВЪfiıВЪМФ Imetec-Ion77 ‰И·ı¤ЩВИ ИФУИЫЩ‹, ¤У· В·У·ЫЩ·ЩИОfi Ы‡ЫЩЛМ· Ф˘ ·У··Ъ¿БВИ ЩФ К˘ЫИОfi К·ИУfiМВУФ ЩФ˘ ИФУИЫМФ‡. ∆·
ИfiУЩ· Ф˘ ·Ъ¿БФУЩ·И ·fi ЩФ ·ВЪfiıВЪМФ ВИ‰ЪФ‡У ıВЩИО¿ ЫЩФУ ·¤Ъ·, Ф ФФ›Ф˜ ·У·˙ˆФБФУВ›Щ·И О·И О·ı·Ъ›˙ВЩ·И.
™™ÀÀ™™∫∫∂∂ÀÀ∏∏ CC -- CC11
§ÂÈÙÔùÚÁ›· ·ÂÚÞõÂÚÌÔù
- °˘Ú›ÛÙ ÙÔ ‰È·ÎfiÙË ÈÛ¯‡Ô˜
[∂ÈÎ. B]
ˆ˜ ÂÍ‹˜:
ı¤ÛË : ∑ÂÛÙfi˜ ·¤Ú·˜ (1100W).
ı¤ÛË : ¶Ôχ ˙ÂÛÙfi˜ ·¤Ú·˜ (2200W).
- ƒ˘ıМ›ЫЩВ ЩФ ıВЪМФЫЩ¿ЩЛ ВЪИ‚¿ППФУЩФ˜
[∂ÈÎ. D]
·У¿ПФБ· МВ ЩЛУ ВИı˘МЛЩ‹ ıВЪМФОЪ·Ы›·.
§§ÂÂÈÈÙÙÔÔùùÚÚÁÁ››·· ··ÓÓÂÂÌÌÈÈÛÛÙÙ‹‹ÚÚ··
- ƒ˘ıМ›ЫЩВ ЩФ ıВЪМФЫЩ¿ЩЛ ВЪИ‚¿ППФУЩФ˜
[∂ÈÎ. D]
ЫЩЛ М¤БИЫЩЛ ıВЪМФОЪ·Ы›·
MAX
.
- °˘Ú›ÛÙ ÙÔ ‰È·ÎfiÙË ÈÛ¯‡Ô˜
[∂ÈÎ. B]
ÛÙË ı¤ÛË .
§§ÂÂÈÈÙÙÔÔùùÚÚÁÁ››·· ··ÞÞ„„ùùÍÍˢ˜
∏ ПВИЩФ˘ЪБ›· ·˘Щ‹ ВН·ЫК·П›˙ВИ ЩЛ ‰И·Щ‹ЪЛЫЛ ıВЪМФОЪ·Ы›·˜ ВЪИ‚¿ППФУЩФ˜ ОФУЩ¿ ЫЩФ˘˜ +5ЖC. ŸЩ·У Л ıВЪМФОЪ·Ы›· ¤ЫВИ О¿Щˆ ·fi
·˘Ù‹Ó ÙËÓ ÙÈÌ‹, ÙÔ ·ÂÚfiıÂÚÌÔ ·Ó¿‚ÂÈ ·˘ÙfiÌ·Ù·.
- ƒ˘ıМ›ЫЩВ ЩФ ıВЪМФЫЩ¿ЩЛ ВЪИ‚¿ППФУЩФ˜
[∂ÈÎ. D]
ÛÙË ı¤ÛË ·fi„˘Í˘ .
- °˘Ú›ÛÙ ÙÔ ‰È·ÎfiÙË ÈÛ¯‡Ô˜
[∂ÈÎ. B]
ˆ˜ ВН‹˜:
ı¤ЫЛ БИ· ЫЩ·‰И·О‹ В·У·КФЪ¿ ЩЛ˜ ıВЪМФОЪ·Ы›·˜ ЫЩФ˘˜ +5ЖC.
ı¤ЫЛ БИ· Щ·¯В›· В·У·КФЪ¿ ЩЛ˜ ıВЪМФОЪ·Ы›·˜ ЫЩФ˘˜ +5ЖC.
√¢∏°π∂™ Ã∏™∏™
•
ÃÃÚÚÔÔÓÓÔÔ‰‰ÈÈ··ÎÎÞÞÙÙˢ˜ --
[∂ÈÎ.
F]
((ÌÌÞÞÓÓÔÔ ÁÁÈÈ·· ÙÙ·· ÌÌÔÔÓÓÙÙ¤¤ÏÏ·· ÔÔùù ››ÓÓ··ÈÈ ÂÂÍÍÔÔÏÏÈÈÛÛÌ̤¤ÓÓ··))
f1:
‰fiУЩИ· БИ· ЩФУ ЪФБЪ·ММ·ЩИЫМfi ЩˆУ ˆЪТУ ПВИЩФ˘ЪБ›·˜.
f2:
ВНˆЩВЪИОfi˜ ‰·ОЩ‡ПИФ˜.
¶ƒ√™√Ã∏:
- ∞¡ √ Ã√¡√¢π∞∫√¶∆∏™ ∂π¡∞𠶃√°ƒ∞ªª∞∆π™ª∂¡√™, ∏ ¢π∞∆∏ƒ∏™∏ ∆∏™ ∂¶π§∂°ª∂¡∏™ £∂ƒª√∫ƒ∞™π∞™ π™ÃÀ∂π ª√¡√
°π∞ ∆π™ ¶ƒ√°ƒ∞ªª∞∆π™ª∂¡∂™ øƒ∂™ §∂π∆√Àƒ°π∞™.
•
ƒƒùùõõÌÌÈÈúúÞÞÌÌÂÂÓÓËË ‚‚¿¿ÛÛËË -- ((ÌÌÞÞÓÓÔÔ ÁÁÈÈ·· ÙÙ·· ÌÌÔÔÓÓÙÙ¤¤ÏÏ·· ÔÔùù ÙÙËËÓÓ ‰‰ÈÈ··õõ¤¤ÙÙÔÔùùÓÓ))
£¤ÛË ÛÙ¿ÓÙ·Ú
[Fig. G]
.
∫ВОПИМ¤УЛ ı¤ЫЛ: ∏ ‚¿ЫЛ МФЪВ› У· Ъ˘ıМИЫЩВ› БИ· У· О·ЩВ˘ı‡УВИ ЩФ ˙ВЫЩfi/ОЪ‡Ф ·¤Ъ· ЪФ˜ Щ· ¿Уˆ. ∫Ъ·ЩТУЩ·˜ ЩЛ ‚¿ЫЛ ·О›УЛЩЛ,
МВЩ·ОИУ‹ЫЩВ ЩФ ЫТМ· ЩФ˘ МФЩ¤Ъ И¤˙ФУЩ·˜ ЪФ˜ Щ· ВМЪfi˜
[∂ÈÎ. H]
.
Page 35

∂
§
§
H
N
I
K
A
33
§§ÂÂÈÈÙÙÔÔùùÚÚÁÁ››·· ¯¯ÚÚÔÔÓÓÔÔ‰‰ÈÈ··ÎÎÞÞÙÙËË ((ÌÌÞÞÓÓÔÔ ÁÁÈÈ·· ÙÙ·· ÌÌÔÔÓÓÙÙ¤¤ÏÏ·· ÌÌ ¯¯ÚÚÔÔÓÓÔÔ‰‰ÈÈ··ÎÎÞÞÙÙËË))
∏ ПВИЩФ˘ЪБ›· ¯ЪФУФ‰И·ОfiЩЛ ВИЩЪ¤ВИ ЩФУ ¤ПВБ¯Ф ЩФ˘ ·У¿ММ·ЩФ˜ О·И ЩФ˘ Ы‚ЛЫ›М·ЩФ˜ ЩЛ˜ Ы˘ЫОВ˘‹˜ МВ ЩФ˘˜ ·ОfiПФ˘ıФ˘˜ ЩЪfiФ˘˜:
•
ÃÃÂÂÈÈÚÚÔÔÎΛ›ÓÓËËÙÙ··
- ªÂÙ·ÎÈÓ‹ÛÙ ÚÔ˜ Ù· ̤۷ fiÏ· Ù· ‰fiÓÙÈ· ÙÔ˘ ¯ÚÔÓԉȷÎfiÙË
[∂ÈÎ. I]
.
- °˘Ú›ÛÙ ÙÔ ‰È·ÎfiÙË ÈÛ¯‡Ô˜
[∂ÈÎ. B]
ÛÙË ı¤ÛË , ‹ ·У¿ПФБ· МВ ЩЛ ПВИЩФ˘ЪБ›· Ф˘ ı¤ПВЩВ У· ВУВЪБФФИ‹ЫВЩВ.
- ƒ˘ıМ›ЫЩВ ЩФ ıВЪМФЫЩ¿ЩЛ ВЪИ‚¿ППФУЩФ˜
[∂ÈÎ. D]
·У¿ПФБ· МВ ЩЛУ ВИı˘МЛЩ‹ ıВЪМФОЪ·Ы›·.
¶ƒ√™√Ã∏:
- √ Ã√¡√¢π∞∫√¶∆∏™ §∂π∆√Àƒ°∂π ª√¡√ ∞¡ ∆√ ºπ™ ∆√À ∞∂ƒ√£∂ƒª√À ∂π¡∞π ™À¡¢∂¢∂ª∂¡√ ™∆∏¡ ¶ƒπ∑∞ ∆√À ƒ∂Àª∞∆√™.
•
∞∞ùùÙÙÞÞÌÌ··ÙÙ··
- °˘Ъ›ЫЩВ ЩФУ ВНˆЩВЪИОfi ‰·ОЩ‡ПИФ ЩФ˘ ¯ЪФУФ‰И·ОfiЩЛ ‰ВНИfiЫЩЪФК· О·И Ы˘Б¯ЪФУ›ЫЩВ ЩФ ‰В›ОЩЛ МВ ЩЛУ ЩЪ¤¯Ф˘Ы· ТЪ·
[∂ÈÎ. L]
.
- ªÂÙ·ÎÈÓ‹ÛÙ ÚÔ˜ Ù· ¤Íˆ fiÏ· Ù· ‰fiÓÙÈ· ÙÔ˘ ¯ÚÔÓԉȷÎfiÙË
[∂ÈÎ. M]
ВОЩfi˜ ·fi ·˘Щ¿ Ф˘ ·УЩИЫЩФИ¯Ф‡У ЫЩИ˜ ВИı˘МЛЩ¤˜ ТЪВ˜
ПВИЩФ˘ЪБ›·˜ ЩЛ˜ Ы˘ЫОВ˘‹˜.
- °˘Ú›ÛÙ ÙÔ ‰È·ÎfiÙË ÈÛ¯‡Ô˜
[∂ÈÎ. B]
ÛÙË ı¤ÛË , ‹ ·У¿ПФБ· МВ ЩЛ ПВИЩФ˘ЪБ›· Ф˘ ı¤ПВЩВ У· ВУВЪБФФИ‹ЫВЩВ.
√ ¯ÚÔÓԉȷÎfiÙ˘ Â›Ó·È ËÌÂÚ‹ÛÈÔ˜ Î·È Â·Ó·Ï·Ì‚¿ÓÂÈ ÙÔÓ ÚÔÁÚ·ÌÌ·ÙÈÛÌfi Û ‰È·ÛÙ‹Ì·Ù· 24 ˆÚÒÓ. ∫¿ı ‰fiÓÙÈ ÈÛÔ‰˘Ó·Ì› ÌÂ
‰Âη¤ÓÙ ÏÂÙ¿ Ù˘ ÒÚ·˜.
∆∆¯¯ÓÓÔÔÏÏÔÔÁÁ››·· IImmeetteecc--IIoonn7777 ((ÌÌÞÞÓÓÔÔ ÁÁÈÈ·· ÙÙ·· ÌÌÔÔÓÓÙÙ¤¤ÏÏ·· ÌÌ ÈÈÔÔÓÓÈÈÛÛÙÙ‹‹))
∂¿У Л Ы˘ЫОВ˘‹ Ы·˜ ‰И·ı¤ЩВИ П‹ОЩЪФ МВ ВУ‰ВИОЩИО‹ П˘¯У›·
n
БИ· ЩЛУ ВУВЪБФФ›ЛЫЛ ЩФ˘ ИФУИЫЩ‹, МФЪВ›ЩВ У· ВИП¤НВЩВ ·У ı· ЩФУ
ВУВЪБФФИ‹ЫВЩВ ‹ fi¯И. °И· У· ВУВЪБФФИ‹ЫВЩВ ЩФУ ИФУИЫЩ‹ ·ЪОВ› У· И¤ЫВЩВ ЩФ П‹ОЩЪФ
n
О·И Л ВУ‰ВИОЩИО‹ П˘¯У›· ı· ·У¿„ВИ
˘Ф‰ВИОУ‡ФУЩ·˜ fiЩИ Ф ИФУИЫЩ‹˜ В›У·И ЫВ ПВИЩФ˘ЪБ›·. °И· У· ЩФУ ·ВУВЪБФФИ‹ЫВЩВ И¤ЫЩВ О·И ¿ПИ ЩФ П‹ОЩЪФ В·У·К¤ЪФУЩ¿˜ ЩФ ЫЩЛУ
·Ъ¯ИО‹ ı¤ЫЛ, Л ВУ‰ВИОЩИО‹ П˘¯У›· ı· Ы‚‹ЫВИ.
∆Ф ·ВЪfiıВЪМФ Imetec-Ion77 ‰И·ı¤ЩВИ ИФУИЫЩ‹, ¤У· В·У·ЫЩ·ЩИОfi Ы‡ЫЩЛМ· Ф˘ ·У··Ъ¿БВИ ЩФ К˘ЫИОfi К·ИУfiМВУФ ЩФ˘ ИФУИЫМФ‡. ∆·
ИfiУЩ· Ф˘ ·Ъ¿БФУЩ·И ·fi ЩФ ·ВЪfiıВЪМФ ВИ‰ЪФ‡У ıВЩИО¿ ЫЩФУ ·¤Ъ·, Ф ФФ›Ф˜ ·У·˙ˆФБФУВ›Щ·И О·И О·ı·Ъ›˙ВЩ·И.
√√¢¢∏∏°°ππ∂∂™™ °°ππ∞∞ ∂∂°°∫∫∞∞∆∆∞∞™™∆∆∞∞™™∏∏ ™™∆∆√√¡¡ ∆∆√√ππÃÃ√√
- (ÌÞÓÔ ÁÈ· Ù· ÌÔÓ٤Ϸ Ì ÛÙ‹ÚÈÁÌ·) [∂ÈÎ. Q]
∆Ô ·ÂÚfiıÂÚÌÔ ÌÔÚ› Ó· ÂÁηٷÛÙ·ı› Û ÙÔ›¯Ô.
- ™ЩВЪВТЫЩВ ЫЩФУ ЩФ›¯Ф ЩФ ˘ФЫЩ‹ЪИБМ· МВ Щ· ‰‡Ф Ф‡· ЩФ˘ ВНФПИЫМФ‡
[∂ÈÎ. N]
(Л ·fiЫЩ·ЫЛ ЩˆУ ФТУ В›У·И 16,5 cm МВ ‰И¿МВЩЪФ 6 mm).
- ™ЩВЪВТЫЩВ ЩФ ·ВЪfiıВЪМФ ЫЩФ ˘ФЫЩ‹ЪИБМ· О·И И¤ЫЩВ ЩФ ЪФ˜ ЩФУ ЩФ›¯Ф, ¤ЩЫИ ТЫЩВ ЩФ ‰fiУЩИ ЩФ˘ ЫЩЛЪ›БМ·ЩФ˜
(o1)
Ó· ·ÛÊ·Ï›ÛÂÈ ÛÙÔ
›Ыˆ М¤ЪФ˜ ЩФ˘ ·ВЪfiıВЪМФ˘, ЫЩФ ‡„Ф˜ ЩЛ˜ ¯ВИЪФП·‚‹˜
[∂ÈÎ. O]
. °И· У· ·ВПВ˘ıВЪТЫВЩВ ЩФ ·ВЪfiıВЪМФ ·fi ЩФ ЫЩ‹ЪИБМ· ЫЩФУ ЩФ›¯Ф,
ȤÛÙ ÙÔ ‰fiÓÙÈ ÙÔ˘ ÛÙËÚ›ÁÌ·ÙÔ˜ ÚÔ˜ ÙËÓ Î·Ù‡ı˘ÓÛË ÙÔ˘ ‚¤ÏÔ˘˜ Î·È ÙÚ·‚‹ÍÙ ٷ˘Ùfi¯ÚÔÓ· ÙÔ ·ÂÚfiıÂÚÌÔ ÚÔ˜ Ù· ¤Íˆ
[∂ÈÎ. P]
.
™™ÀÀ™™∫∫∂∂ÀÀ∏∏ ªª∂∂ ¢¢ππ∞∞∫∫√√¶¶∆∆∏∏ ∞∞™™ºº∞∞§§∂∂ππ∞∞™™ EELLEECCTTRROO BBLLOOCCKK
®
™∏ª∞¡∆π∫√:
- ∂¿Ó Ë ÛùÛÎÂù‹ Û·˜ ‰È·õ¤ÙÂÈ ‰È·ÎÞÙË ·ÛÊ·Ï›·˜ Electro Block
®
j
, Ú¤ÂÈ Ó· ÛùÓ‰Âõ› ·Âùõ›·˜ Û ÛÙ·õÂÚ‹ Ú›ú· Ú‡̷ÙÔ˜. ªËÓ
ÙËÓ ÛùÓ‰¤ÂÙ ÁÈ· ηӤӷ ÏÞБФ ЫВ ОИУЛЩ¤˜ Ъ›ú˜, ·ÓÙ¿ÙÔÚ˜ ‹ Ì·Ï·ÓÙ¤ú˜. √ ‰È·ÎÞÙ˘ ·ÛÊ·Ï›·˜ Electro Block®‰È·õ¤ЩВИ
‰И·КФЪИОÞ ‰È·ÎÞÙË ù„ËÏ‹˜ Âù·ÈÛõËÛ›·˜ Ôù ÚÔÛٷهÂÈ ÙÔ ¯Ú‹ÛÙË ·Þ ‰È·ÚÚÔ¤˜ Ú‡̷ÙÔ˜ ÚÔ˜ ÙË Á›ˆÛË Ì ÙÈ̤˜ ¿Óˆ ÙˆÓ 10mA.
°И· У· ¯ЪЛЫИМФФИ‹ЫВЩВ ЩЛ Ы˘ЫОВ˘‹ ВОЩВП¤ЫЩВ ЩИ˜ ·Ъ·О¿Щˆ ВУ¤ЪБВИВ˜:
- ™˘Ó‰¤ÛÙ ÙÔ Electro Block
®
ÛÙËÓ Ú›˙· ÙÔ˘ Ú‡̷ÙÔ˜, ȤÛÙÂ Î·È ·Ê‹ÛÙ ÙÔ Ï‹ÎÙÚÔ
ON
: ЫЩФ ·Ъ·ı˘Ъ¿ОИ ВМК·У›˙ВЩ·И ЩФ ОfiООИУФ
¯ЪТМ·. ∆Ф Electro Block®В›У·И ВУВЪБФФИЛМ¤УФ.
- ∂П¤БНЩВ ЩЛ ЫˆЫЩ‹ ПВИЩФ˘ЪБ›· ЩФ˘ Electro Block
®
Ȥ˙ÔÓÙ·˜ ÙÔ Ï‹ÎÙÚÔ T
EST
: ЩФ ЪВ‡М· ‰И·ОfiЩВЩ·И, Л ОfiООИУЛ ¤У‰ВИНЛ ВН·К·У›˙ВЩ·И
Î·È ·˘Ùfi ·Ô‰ÂÈÎÓ‡ÂÈ fiÙÈ Ô ‰È·ÎfiÙ˘ Electro Block
®
ПВИЩФ˘ЪБВ› ЫˆЫЩ¿.
- ªÂÙ¿ ÙÔ ÙÂÛÙ, ȤÛÙÂ Î·È ·Ê‹ÛÙ ¿ÏÈ ÙÔ Ï‹ÎÙÚÔ
ON
: Л ОfiООИУЛ ¤У‰ВИНЛ ВМК·У›˙ВЩ·И ¿ПИ О·И ЩФ ·ВЪfiıВЪМФ В›У·И ¤ЩФИМФ У·
ПВИЩФ˘ЪБ‹ЫВИ. ∆Ф ЩВЫЩ Ъ¤ВИ У· Б›УВЩ·И ЪИУ ·fi О¿ıВ ¯Ъ‹ЫЛ ЩЛ˜ Ы˘ЫОВ˘‹˜. ™В ВЪ›ЩˆЫЛ ·УТМ·ПЛ˜ ‹ П·Уı·ЫМ¤УЛ˜ ПВИЩФ˘ЪБ›·˜
(БИ· ·Ъ¿‰ВИБМ· В·У·П·М‚·УfiМВУВ˜ ВВМ‚¿ЫВИ˜ МВ ЩЛ Ы˘ЫОВ˘‹ Ы˘У‰В‰ВМ¤УЛ ЫЩФ ‰›ОЩ˘Ф ‹ О·ı˘ЫЩВЪЛМ¤УВ˜ ВВМ‚¿ЫВИ˜ ЫЩФ ЩВЫЩ
ВП¤Б¯Ф˘ ЩФ˘ Electro Block
®
), ·Â˘ı˘Óı›Ù ·Ì¤Ûˆ˜ ÛÙÔ ÂÍÔ˘ÛÈÔ‰ÔÙË̤ÓÔ ™¤Ú‚Ș Ù˘ IMETEC. ŸÙ·Ó Ë Û˘Û΢‹ Û‚‹ÓÂÈ Î·È
·ÔÛ˘Ó‰¤ÂÙ·È Ô ‰È·ÎfiÙ˘ ·ÛÊ·Ï›·˜ Electro Block
®
·fi ЩЛУ Ъ›˙·, Ф ‰И·КФЪИОfi˜ ‰И·ОfiЩЛ˜ ЩФ˘ Electro Block
®
ÂÂÌ‚·›ÓÂÈ
·˘ЩfiМ·Щ·. ∏ ·О·Щ¿ППЛПЛ ¯Ъ‹ЫЛ ЛПВОЩЪИОТУ Ы˘ЫОВ˘ТУ МФЪВ› У· В›У·И ВИО›У‰˘УЛ. ∏ ¯Ъ‹ЫЛ ЩФ˘ ‰И·ОfiЩЛ ·ЫК·ПВ›·˜ ‰ВУ
·УЩИО·ıИЫЩ¿ Щ· Ы˘У‹ıЛ М¤ЩЪ· БИ· ЩЛУ ЛПВОЩЪИО‹ ·ЫК¿ПВИ·.
ÃÃ∏∏™™ππªª∂∂™™ ™™ÀÀªªµµ√√ÀÀ§§∂∂™™
ŸÙ·Ó ·ÔıË·ÂÙ ÙÔ ·ÂÚfiıÂÚÌÔ, ‚‚·Èˆı›Ù fiÙÈ ÚÔÛٷهÂÙ·È ·fi ÙË ÛÎfiÓË ÁÈ· Ó· ·ÔʇÁÂÙ ÙËÓ Â›ÛÔ‰fi Ù˘ ÛÙȘ ÁÚ›ÏȘ.
Page 36

34
DO⁄RU VE GÜVENL‹ B‹R KULLANIM ‹Ç‹N TAL‹MATLAR VE UYARILAR
BU K‹TAPÇIKTAK‹ TAL‹MATLARI VE UYARILARI D‹KKATLE OKUYUNUZ VE ÜRÜNÜN ÖMRÜ
SÜRES‹NCE YEN‹DEN DANIfiMAK ‹Ç‹N SAKLAYINIZ. BU TAL‹MATLAR, ÜRÜNÜ KURMA, KULLANIM VE
BAKIMINA ‹L‹fiK‹N ‹fiLEVSELL‹K VE EMN‹YET AÇISINDAN ÖNEML‹ B‹LG‹LER‹ KAPSAMAKTADIRLAR.
D‹KKAT
GENEL UYARILAR
IMETEC, bir Imetec ürününü seçmifl oldu¤unuz için size teflekkür ediyor. Cihazın tasarım ve üretiminde özen göstermifl oldu¤umuz
kalite, güven ve tüketiciye saygı unsurlarının tarafınızdan takdirle karflılanaca¤ına eminiz.
1. Ambalajı çıkarttıktan sonra, nakliyat esnasında meydana gelmifl olabilecek gözle görülebilir hasarlar olmaksızın, cihazın
bütünlü¤ünü kontrol ediniz. fiüphe halinde cihazı kullanmayınız ve IMETEC tarafından yetkilendirilmifl Teknik Servis
Merkezlerine danıflınız.
2. Cihazı prize takmadan önce plakasındaki verilerin elektrik besleme flebekesi verilerine uygun oldu¤undan emin olunuz. Plaka,
cihazın taban kısmında bulunmaktadır.
3. Adaptör, çoklu priz ve/veya uzatma kabloları kullanmayınız. Priz ile cihazın fifli arasında uyumsuzluk olması halinde prizin
profesyonel açıdan uzman personel tarafından uygun bir yeni tip ile de¤ifltirilmesini sa¤layınız.
4. Bu cihaz yalnızca tasarlanmıfl oldu¤u iflleve uygun olarak yani termik vantilatör olarak kullanılmalıdır Her di¤er kullanım
uygunsuz ve tehlikelidir. Üretici, uygun olmayan ve hatalı kullanımlardan kaynaklanabilecek zararlardan sorumlu tutulamaz.
5. Her türlü elektrikli aygıtın kullanımı bazı esas kurallara riayet edilmesini zorunlu kılar.
Özellikle:
- cihaza ıslak veya nemli ellerle veya ayaklar ile kesinlikle dokunmayınız
- fifli prizden çekmek için besleme kablosunu veya cihazın kendisini çekmeyiniz
- cihazı dıfl etkenlere (ya¤mur, günefl, vs.) maruz bırakmayınız
- cihazın gözetim altında olmayan çocuklar veya özürlü kifliler tarafından kullanılmasına izin vermeyiniz
6. Cihazı bir cereyan prizinin hemen altına yerlefltirmeyiniz. Ürünü banyo küveti, dufl veya havuzun hemen yakınlarında
kullanmayınız. Ürünü bir banyo küvetinden, dufltan veya havuzdan eriflilebilecek yerlere yerlefltirmeyiniz. Hava girifl ve çıkıfl
ızgaralarını kapatmayınız.
7. Her türlü temizlik veya bakım ifllemini gerçeklefltirmeden önce, cihazın fifli çekilerek elektrik flebekesinden çıkartılması gerekir.
8. Bozulması ve/veya kötü çalıflması durumunda cihazı kapatınız ve kurcalamayınız. Tamirat için IMETEC tarafından
yetkilendirilmifl Teknik Servis Merkezlerine baflvurunuz.
9. Bu cihazın besleme kablosu kullanıcı tarafından de¤ifltirilmemelidir. Kablonun hasar görmüfl olması halinde veya de¤ifltirilmesi
için IMETEC tarafından yetkilendirilmifl Teknik Servis Merkezlerine baflvurunuz.
10. Cihazın bir daha kullanılmamasına karar verilmesi halinde, fiflini prizden çektikten sonra besleme kablosunun kesilerek cihazın
çalıflmaz hale getirilmesi tavsiye edilmektedir. Ayrıca artık kullanılmayan cihazın tehlike oluflturabilecek parçalarını, özellikle
çocukların oyun oynarken bunları kullanabileceklerini göz önünde tutarak, zararsız hale getiriniz.
11. Aflırı ısınma riskinden kaçınmak için hava girifl ve çıkıfl ızgaralarını kapatmayınız.
12. Bu cihaz, çocuklar ve fiziksel, duyumsal ve mental kapasite bozuklukları olan kifliler ve herhalükarda spesifik bilgi ve deneyime
sahip olunmadı¤ında, sorumlu kiflinin denetimi olmaksızın veya sorumlu kifli tarafından kullanıma iliflkin bilgiler verilmemifl
oldu¤unda kullanılmamalıdır.
13. Cihaz, çocuklar tarafından oyuncak olarak kullanılmamalıdır.
Page 37

T
Ü
R
K
Ç
E
35
GENEL B‹LG‹LER
A C‹HAZI
• Güç komütatörü [Res. A]
POZ‹SYON FONKS‹YON
Kapalı cihaz
Sıcak hava (1100 W)
Çok sıcak hava (2200W)
B C‹HAZI
• Güç komütatörü [Res. E]
POZ‹SYON FONKS‹YON
Kapalı cihaz
So¤uk hava
Sıcak hava (1000W)
Çok sıcak hava (2000W)
• Ortam termostatı - [Res. C]
Ortam termostatı istenilen ısının muhafaza edilmesini garanti eder: bu seviyeye eriflildikten sonra cihaz, ısı azalır azalmaz tekrar
çalıflmak üzere otomatik olarak kapanır.
POZ‹SYON FONKS‹YON
Donmayı önleyici
MAX Maksimum ısı
C - C1 C‹HAZI
• Güç komütatörü [Res. B]
POZ‹SYON FONKS‹YON
Kapalı cihaz
So¤uk hava
Sıcak hava (1100W)
Çok sıcak hava (2200W)
• Ortam termostatı - [Res. D]
POZ‹SYON FONKS‹YON
Donmayı önleyici
MAX Maksimum ısı
Ortam termostatı istenilen ısının muhafaza edilmesini garanti eder: bu seviyeye eriflildikten sonra cihaz, ısı azalır azalmaz tekrar
çalıflmak üzere otomatik olarak kapanır.
C‹HAZ VE AKSAMLARININ TANIMI [Res. Z]
a
Kumanda kapa¤ı
h
Kulp yuvası veya klips destek alanı (arka)
b
Ortam termostatı
i
Kablo sarıcı
c
Timer
j
Electro Block
®
d
Güç komütatörü
k
Duvara montaj için klips
e
Çalıflma ikaz lambası
l
Duvara montaj için vida ve mandallar
f
Motor ve ızgara gövdesi (ön)
m
‹yonizatör ikaz lambası (sadece iyonizatörlü modeller)
g
Hava girifl ızgarası
n
‹yonizatör ıflıklı ikaz lambası tuflu (sadece iyonizatörlü modeller)
Page 38

36
A C‹HAZI
Termik vantilatör fonksiyonu
- Güç komütatörünü [Res. A] afla¤ıdaki gibi çeviriniz:
pozisyon : Sıcak hava (1100W)
pozisyon : Çok sıcak hava (2200W).
B C‹HAZI
Termik vantilatör fonksiyonu
- Güç komütatörünü [Res. E] afla¤ıdaki gibi çeviriniz:
pozisyon : Sıcak hava (1000W)
pozisyon : Çok sıcak hava (2000W).
-Ortam termostatını
[Res. C] muhafaza etmek istedi¤iniz ısıya göre ayarlayınız.
Vantilatör fonksiyonu
-Ortam termostatını [Res. C] MAX maksimum ısıya ayarlayınız.
- Güç komütatörünü
[Res. E] pozisyonu üzerinde çeviriniz:
Donmayı önleyici fonksiyonu
Bu fonksiyon +5°C civarında bir ortam ısısı muhafaza etmeyi garanti eder. Isı bu seviyenin altına düflerse, termik vantilatör otomatik
olarak çalıflmaya bafllayacaktır.
- Ortam termostatını
[Res. C] donmayı önleyici pozisyon üzerine ayarlayınız.
- Güç komütatörünü
[Res. E] afla¤ıdaki gibi çeviriniz:
Isının +5°C’ye dereceli olarak getirilme pozisyonu
Isının +5°C’ye hızlı bir flekilde getirilme pozisyonu
Imetec-Ion77 teknolojisi (sadece iyonizatörlü modeller için)
Cihazınız iyonizatör ile donatılmıfl ise, ıflıklı ikaz lambası
m
, cihazın iflledi¤ini belirterek yanacaktır.
Imetec-Ion77 termovantilatörü, do¤al iyonizasyon fenomenini yaratan devrimsel bir aygıt olan iyonizatör ile donatılmıfltır. Termovantilatör
tarafından üretilen iyonlar, havayı canlandırarak ve daha temiz kılarak, hava üzerinde olumlu etki gösterirler.
C - C1 C‹HAZI
Termik vantilatör fonksiyonu
- Güç komütatörünü [Res. B] afla¤ıdaki gibi çeviriniz:
pozisyon : Sıcak hava (1100W)
pozisyon : Çok sıcak hava (2200W).
-Ortam termostatını
[Res. D] muhafaza etmek istedi¤iniz ısıya göre ayarlayınız.
Vantilatör fonksiyonu
-Ortam termostatını [Res. D] MAX maksimum ısıya ayarlayınız.
- Güç komütatörünü
[Res. B] pozisyonu üzerinde çeviriniz:
Donmayı önleyici fonksiyonu
Bu fonksiyon +5°C civarında bir ortam ısısı muhafaza etmeyi garanti eder. Isı bu seviyenin altına düflerse, termik vantilatör otomatik
olarak çalıflmaya bafllayacaktır.
- Ortam termostatını
[Res. D] donmayı önleyici pozisyon üzerine ayarlayınız.
- Güç komütatörünü
[Res. B] afla¤ıdaki gibi çeviriniz:
Isının +5°C’ye dereceli olarak getirilme pozisyonu
Isının +5°C’ye hızlı bir flekilde getirilme pozisyonu
KULLANIM B‹LG‹LER‹
• Timer - [Res. F] (sadece donanımlı modeller için)
f1: Saat aralıklarının programlaması için difller.
f2: dıfl bilezik.
D‹KKAT:
- TIMER PROGRAMLANMIfi ‹SE, SEÇ‹LEN ISININ MUHAFAZA ED‹LMES‹ SADECE PROGRAMLANAN SAAT ARALIKLARININ
‹Ç‹NDE GERÇEKLEfiECEKT‹R.
• Ayarlanabilir taban - (sadece donanımlı modeller için)
Standart pozisyon [Res G].
E¤ik pozisyon: taban sıcak/so¤uk havayı yukarı yönlendirmek için ayarlanabilir. Tabanı sabit tutarak, motor gövdesini ileri do¤ru iterek
kaydırınız
[Res. H].
Page 39

T
Ü
R
K
Ç
E
37
Timer fonksiyonu (sadece timer ile donatılmıfl modeller için)
Timer fonksiyonu cihazın afla¤ıdaki flekillerde açılıp kapatılmasına imkan tanır:
• Manuel
- Timer’ın tüm difllerini içe do¤ru getiriniz [Res. I].
- Güç komütatörünü
[Res. B] pozisyonu üzerine, veya çalıfltırmak istedi¤iniz fonksiyona göre çeviriniz.
-Ortam termostatını
[Res. D] muhafaza etmek istedi¤iniz ısıya göre ayarlayınız.
D‹KKAT:
- T‹MER SADECE TERM‹K VANT‹LATÖRÜN F‹fi‹ B‹R CEREYAN PR‹Z‹NE TAKILMIfi ‹SE ÇALIfiIR.
• Otomatik
- Timer’ın dıfl bilezi¤i üzerinde saat yelkovanı yönünde ifllem görünüz ve göstergeyi timer saati ile senkronize ediniz [Res. L].
- Timer’ın cihazın çalıfltırılması düflünülen saat aralıklarına karflılık gelenler haricindeki tüm difllerini dıfla do¤ru getiriniz
[Res. M].
- Güç komütatörünü
[Res. B] pozisyonu üzerine, veya çalıfltırmak istedi¤iniz fonksiyona göre çeviriniz.
Timer günlüktür ve programlamayı 24 saatlik aralıklarla tekrar eder. Her difl bir çeyrek saate karflılık gelir.
Imetec-Ion77 teknolojisi (sadece iyonizatörlü modeller için)
Cihazınız, iyonizatörü etkin kılmak için ıflıklı ikaz lambası tuflu
n
ile donatılmıfl ise, iyonizatörü etkin kılmak veya kılmamak hususunda
seçebilirsiniz. ‹yonizatörü etkin kılmak için
n
tufluna basmanız yeterlidir, ikaz lambası, iyonizatörün çalıflmakta oldu¤unu belirtmek üzere
yanacaktır. ‹yonizatörü etkin konumdan çıkarmak için, tuflu bafllangıç pozisyonuna getirerek, tekrar tufla basınız, ikaz lambası sönecektir.
Imetec-Ion77 termovantilatörü, do¤al iyonizasyon fenomenini yaratan devrimsel bir aygıt olan iyonizatör ile donatılmıfltır. Termovantilatör
tarafından üretilen iyonlar, havayı canlandırarak ve daha temiz kılarak, hava üzerinde olumlu etki gösterirler.
DUVARA KURMAK ‹Ç‹N B‹LG‹LER
- (sadece klips deste¤i olan modeller için) [Res. Q]
Termik vantilatör duvara sabitlenebilir.
- Teçhizattaki iki mandal ile klips deste¤ini duvara sabitleyiniz
[Res. N] (delikler arasındaki mesafe 16.5 cm, çap 6 mm’dir).
- Termik vantilatörü klips üzerine yaslayınız ve klipsin difli
(o1) kulp hizasına getirilerek termik vantilatörün arkasına takılacak flekilde
termik vantilatörü duvara do¤ru itiniz [Res. O].
Termik vantilatörü duvar deste¤inden çıkarmak için, okla gösterildi¤i gibi klipsin difline basınız ve aynı anda termik vantilatörü dıfla
do¤ru çekiniz
[Res. P].
ELECTRO BLOCK®HAYAT KORUMA EMN‹YET DÜZEN‹ ‹LE DONATILMIfi C‹HAZ
ÖNEML‹ :
- Cihazınız Electro Block
®
j
hayat koruma emniyet düzeni ile donatılmıfl ise, do¤rudan do¤ruya sabit bir cereyan fifline
ba¤lanmalıdır; cihazı hiç bir nedenle seyyar fifllere veya adaptörlere veya uzatma kablolarına ba¤lamayınız. Electro Block
®
hayat koruma emniyet düzeni, kullanıcıyı 10 mA’dan yüksek de¤erlerde topra¤a do¤ru cereyan da¤ılımından koruyan yüksek
hassasiyetli bir diferansiyel flalter ile donatılmıfltır.
Cihazın kullanımı için afla¤ıdaki bilgileri uygulayınız:
- Electro Block’u
®
cereyan prizine takınız, ON tufluna basınız ve bırakınız : ikaz lambası camında kırmızı renk belirecektir. Electro Block
®
artık etkin konumdadır.
- TEST tufluna basarak Electro Block
®
’un mükemmel etkinli¤ini kontrol ediniz. cereyan kesilir, kırımızı gösterge kaybolor ve bu, Electro
®
hayat koruma emniyet düzeninin mükemmel flekilde etkin oldu¤unu garantiler.
- Test yapıldıktan sonra, yeniden ON tufluna basınız ve bırakınız: kırmızı gösterge yeniden belirir ve termik vantilatör çalıflmaya hazır
konumdadır. Bu test her defa, cihazı kullanmadan önce gerçeklefltirilmelidir. Arızalı veya düzgün olmayan bir çalıflma halinde (örne¤in
flebekeye ba¤lı cihaz ile tekrarlanan müdahaleler veya Electro Block
®
kontrol testi esnasında anında müdahalede bulunmama) hiç vakit
kaybetmeksizin IMETEC tarafından yetkilendirilmifl birTeknik Servise baflvurunuz. Cihaz kapatıldı¤ında ve Electro Block
®
hayat
koruma emniyet düzeni prizden çıkartıldı¤ında, Electro Block
®
hayat koruma diferansiyel flalteri otomatik olarak kendi kendini kapatır.
Elektrik cihazlarının uygun olmayan kullanımları tehlikeli olabilir. Hayat koruyucu bir emniyet düzeninin kullanımı, elektrik güvenli¤i
açısından temel önlemlerin yerini doldurmaz.
FAYDALI TAVS‹YELER
Termik vantilatörü yerine kaldırdı¤ınızda, ızgaraların içine kaçabilece¤i tehlikesini önlemek amacı ile tozdan korundu¤undan emin olunuz.
Page 40

38
NÁVOD A UPOZORNĚNĺ PRO SPRÁVNÉ A BEZPEČNÉ POUŽITĺ
PŘEČTĚTE SI POZORNĚ NÁVOD A UPOZORNĚNĺ OBSAŽENÉ V TÉTO KNĺŽEČCE A USCHOVEJTE JI
PRO DALŠĺ KONZULTACI PO CELOU DOBU ŽIVOTNOSTI VÝROBKU. KNĺŽEČKA POSKYTUJE
DŮLEŽITÉ ÚDAJE TÝKAJĺCĺ SE FUNKČNOSTI A BEZPEČNOSTI PŘI INSTALACI, POUŽITĺ A ÚDRŽBĚ
VÝROBKU.
POZOR
VŠEOBECNÁ UPOZORNĚNĺ
IMETEC Vám děkuje, že jste si vybrali tento výrobek. Jsme si jisti, že oceníte jeho kvalitu, spolehlivost a ohled na spotřebitele, se
kterým jsme výrobek navrhli a vyrobili.
1. Po odstranění obalu se ujistěte, že je přístroj celý a bez viditelných vad, které by mohly být způsobené během dopravy. V
případě pochybností přístroj nepoužívejte a obrate se na Servisní středisko autorizované IMETEC.
2. Před zapojením přístroje se ujistěte, že údaje na štítku výrobku odpovídají s údaji napětí Vaší elektrické sítě. Štítek se nachází
na spodní straně výrobku.
3. Nepoužívejte adaptéry, rozdvojky a/nebo prodlužovačky. V případě nekompatibility mezi elektrickou zásuvkou a zástrčkou
přístroje nechejte nahradit zástrčku jinou vhodného typu odborně kvalifikovaným personálem.
4. Tento přístroj je určen jen k použití, ke kterému byl výhradně navržen a tedy jako termoventilátor. Každé jiné použití je
považováno za nevhodné a tedy nebezpečné. Výrobce nemůže být zodpovědný za eventuální škody způsobené nevhodným či
nesprávným použitím.
5. Použití jakéhoko-li elektrického přístroje vyžaduje dodržování několika základních pravidel.
Především:
- nikdy se nedotýkejte přístroje mokrými nebo vlhkými nohami či rukami
-k vytažení zástrčky ze zásuvky netahejte za elektrickou šňůru nebo za přístroj
- nenechávejte přístroj vystavený atmosférickým vlivům (déš, slunce, atd.)
- nedovolte, aby byl přístroj použit dětmi nebo osobami neschopnými bez dozoru
6. Neumísujte přístroj bezprostředně pod elektrickou zásuvku. Nepoužívejte výrobek v bezprostřední blízkosti vany, sprchy nebo
bazénu. Nepokládejte výrobek tam, kde byl dostupný z vany, ze sprchy nebo z bazénu. Nezakrývejte vstupní mřížku a východ
vzduchu.
7. Před provedením jakéko-li operace čištění nebo údržby je třeba přístroj odpojit z elektrické sítě vytažením zástrčky ze zásuvky.
8. V případě poruchy a/nebo špatného fungování přístroje je nutné přístroj vypnout a nezasahovat do něj. Kvůli eventuální opravě
se obrate na Servisní středisko autorizované IMETEC.
9. Elektrická šňůra tohoto přístroje nesmí být vyměňována uživatelem. V případě poškození šňůry nebo kvůli její výměně se
obrate na Servisní středisko autorizované IMETEC.
10. Jestliže se rozhodnete už přístroj tohoto druhu nepoužívat, doporučujeme jej znehodnotit tak, že poté co vytáhnete zástrčku ze
zásuvky, ustřihněte elektrickou šňůru. Kromě toho doporučujeme zneškodnit ty části přístroje, které by mohly způsobit
nebezpečí, zvláště pro děti, které by mohly přístroj použít za účelem nedovoleným, ke hraní.
11. Nezakrývejte mřížky pro nasávání a vyfukování vzduchu, zabráníte tak riziku přehřátí.
12.Toto zařízení není určeno pro použití ze strany dětí a osob se sníženými fyzickými, senzorickými nebo mentálními schopnostmi a
v případě absence specifických znalostí a zkušenosti; tyto osoby nesmí zařízení používat bez dohledu nebo pokynů týkajících se
použití, zadávaných zodpovědnou osobou.
13. Zařízení není určeno pro dětské hry.
Page 41

Č
E
S
K
Y
39
VŠEOBECNÝ NÁVOD
PŘĺSTROJ A
• Elektrický přepínač [Obr. A]
POLOHA FUNKCE
Přístroj vypnutý
Vzduch teplý (1100 W)
Vzduch velmi teplý (2200W)
PŘĺSTROJ B
• Výkonový přepínač [Obr. E]
POLOHA FUNKCE
Zařízení vypnuto
Studený vzduch
Teplý vzduch (1000W)
Velmi teplý vzduch (2000W)
• Prostorový termostat - [Obr. C]
Prostorový termostat zaručuje udržování požadované teploty. Po dosažení této teploty se zařízení automaticky vypne. Opět se zapne,
jakmile se teplota sníží.
POLOHA FUNKCE
Zabránění zamrznutí
MAX Maximální teplota
PŘĺSTROJ C - C1
• Elektrický přepínač [Obr. B]
POLOHA FUNKCE
Přístroj vypnutý
Vzduch studený
Vzduch teplý (1100 W)
Vzduch velmi teplý (2200W)
• Prostorový termostat - [Obr. D]
POLOHA FUNKCE
Zajištění proti mrazu
MAX Maximální teplota
Prostorový termostat zaručuje uchování požadované teploty. Je-li dosažena úroveň požadované teploty, přístroj se automaticky vypne.
Opět se zapne, jakmile se teplota sníží.
POPIS PŘĺSTROJE A PŘĺSLUŠENSTVĺ [Obr. Z]
a
Krytí ovladačů
h
Místo k držení nebo místo k uchycení nosníku (zadní část)
b
Prostorový termostat
i
Navíjení šňůry
c
Timer - programování doby
j
Electro Block
®
d
Elektrický přepínač
k
Nosník na montáž na stěnu
e
Kontrolka zapnutí
l
Šrouby a hmoždinky k montáži na stěnu
f
Těleso motoru a mřížka (přední část)mKontrolka ionizátoru (platí pouze pro modely s ionizátorem)
g
Vstupní mřížka pro přívod vzduchu
n
Tlačítko světelné kontrolky ionizátoru (platí pouze pro modely s ionizátorem)
Page 42

40
PŘĺSTROJ A
Funkce termoventilátor
- Přesuňte elektrický přepínač [Obr. A] následujícím způsobem:
poloha : Vzduch teplý (1100W).
poloha : Vzduch velmi teplý (2200W).
PŘĺSTROJ B
Funkce termoventilátoru
- Přepněte výkonový přepínač [Obr. E] následujícím způsobem:
poloha : Teplý vzduch (1000W).
poloha : Velmi teplý vzduch (2000W).
- Nastavte prostorový termostat
[Obr. C] podle teploty, kterou si přejete udržet.
Funkce letní ventilace
- Nastavte prostorový termostat [Obr. C] na maximální teplotu, označenou MAX.
- Přepněte výkonový přepínač
[Obr. E] do polohy .
Funkce zabránění zamrznutí
Tato funkce zaručuje, že bude v místnosti udržována teplota okolo +5˚C. Když teplota klesne pod tuto úroveň, termoventilátor se automaticky zapne.
- Nastavte prostorový termostat
[Obr. C] do polohy zabránění zamrznutí .
- Přetočte výkonový přepínač
[Obr. E] následujícím způsobem:
Poloha pro postupné obnovení teploty na +5˚C.
Poloha pro rychlé obnovení teploty na +5˚C.
Technologie Imetec-Ion77 (platí pouze pro modely s ionizátorem)
Pokud je váš přístroj vybaven ionizátorem, rozsvícená kontrolka mbude poukazovat na to, že je ionizátor v činnosti.
Elektrický topný ventilátor Imetec-Ion77 je vybaven ionizátorem, revolučním zařízením, které reprodukuje přirozený fenomén ionizace. Ionty, které
elektrický topný ventilátor produkuje, působí pozitivně na vzduch v okolí, který je více svěží a čistší.
PŘĺSTROJ C - C1
Funkce termoventilátor
- Přesuňte elektrický přepínač [Obr. B] následujícím způsobem:
poloha : Vzduch teplý (1100W).
poloha : Vzduch velmi teplý (2200W).
- Nastavte prostorový termostat
[Obr. D] podle teploty, jakou chcete udržet.
Funkce ventilátor
- Nastavte prostorový termostat [Obr. D] na maximální teplotu MAX.
- Přesuňte elektrický přepínač
[Obr. B] do polohy .
Funkce zajištění proti mrazu
Tato funkce zaručuje uchování teploty v místnosti kolem +5˚C. Když teplota klesne pod tuto úroveň, termoventilátor se automaticky zapne.
- Nastavte prostorový termostat
[Obr. D] do polohy zajištění proti mrazu .
- Přesuňte elektrický přepínač
[Obr. B] následujícím způsobem:
Poloha pro postupné obnovení teploty na +5˚C.
Poloha pro rychlé obnovení teploty na +5˚C.
Funkce timer (jen u modelů vybavených timerem)
Funkce timer dovoluje řídit zapnutí a vypnutí přístroje následujícími způsoby:
NÁVOD K POUŽITĺ
• Timer - programování doby [Obr. F] (jen u modelů, kterých je součástí)
f1: zoubky na programování časového rozpětí.
f2: vnější kroužek.
UPOZORNĚNĺ:
- JE-LI TIMER NAPROGRAMOVANÝ, ZVOLENÁ TEPLOTA JE UDRŽOVÁNA JEN V PRŮBĚHU NAPROGRAMOVANÉ DOBY.
• Regulovatelný základ přístroje - (jen u modelů, kterých je součástí)
Poloha standardní [Obr. G].
Poloha šikmá: regulovatelná část přístroje může být nastavena k zaměření teplého/studeného vzduchu směrem nahoru. Držte pevně
základ přístroje, aby se nehýbal, těleso motoru musí sklouznout, tlačte jím dopředu
[Obr. H].
Page 43

Č
E
S
K
Y
41
• Ručně
- Uvete směrem dovnitř všechny zoubky timeru [Obr. I].
- Přesuňte elektrický přepínač
[Obr. B] do polohy , nebo podle funkce, kterou chcete uvést do chodu.
- Nastavte prostorový termostat
[Obr. D] podle teploty, jakou chcete udržet.
UPOZORNĚNĺ:
- TIMER FUNGUJE JEN V PŘĺPADĚ, JE-LI ZÁSTRČKA TERMOVENTILÁTORU ZAPOJENA DO ELEKTRICKÉ ZÁSUVKY.
• Automaticky
-Točte vnějším kroužkem timeru ve směru hodinových ručiček a synchronizujte ukazatele s Vašimi hodinkami [Obr. L].
- Uvete směrem ven všechny zoubky timeru
[Obr. M] kromě těch, které odpovídají časové době, ve které chcete, aby přístroj pracoval.
- Přesuňte elektrický přepínač
[Obr. B] do polohy , nebo podle funkce, kterou chcete uvést do chodu.
Timer má denní programování a opakuje naprogramovanou dobu v časových intervalech 24 hodin. Každý zoubek odpovídá 15 minutám.
Technologie Imetec-Ion77 (platí pouze pro modely s ionizátorem)
Jestliže je Váš přístroj vybaven tlačíkem se světelnou kontrolkou npro aktivaci ionizátoru, budete si moci zvolit, zda ho chcete zapnout nebo ne.
Pro aktivaci ionizátoru stačí stisknout tlačítko
n
a světelná kontrolka se rozsvítí a signalizuje tak, že ionizátor funguje. Pro jeho vypnutí stiskněte
znovu tlačítko a uvete je do původní polohy, světelná kontrolka zhasne.
Elektrický topný ventilátor Imetec-Ion77 je vybaven ionizátorem, revolučním zařízením, které reprodukuje přirozený fenomén ionizace. Ionty, které
elektrický topný ventilátor produkuje, působí pozitivně na vzduch v okolí, který je více svěží a čistší.
NÁVOD NA MONTÁŽ NA STĚNU
- (jen u modelů vybavených nosníkem) [Obr. Q]
Termoventilátor může být připevněn na stěnu.
- Připevněte na stěnu nosník k uchycení s použitím dvou hmoždinek v příslušenství
[Obr. N] (vzdálenost mezi otvory je 16.5 cm, průměr
6 mm).
- Položte termoventilátor na nosník, a přitlačte jej na stěnu tak, aby se zub nosníku
(o1) zavěsil na zadní straně termoventilátoru, jako
při uchycení [Obr. O]. Chcete-li termoventilátor sundat z nosníku na stěně, stiskněte zub nosníku, jak je to naznačeno šipkou a
zároveň tahejte termoventilátorem směrem ven [Obr. P].
PŘĺSTROJ S BEZPEČNOSTNĺM SYSTÉMEM ELECTRO BLOCK
®
DŮLEŽITÉ:
- Je-li Váš přístroj vybaven bezpečnostním systémem Electro Block
®
j
, musíte jej zapojit přímo do elektrické zásuvky na stěně;
nezapojujte jej z žádného důvodu do prodlužovaček nebo adaptérů. Bezpečnostní systém Electro Block®je vybaven vypínačem
diferenciálem s vysokou citlivostí, který chrání uživatele před kolísavým napětím proti zemi u hodnot vyšších než 10mA.
Abyste mohli používat přístroj, vykonejte následující operace:
- Zapojte Electro Block
®
do elektrické zásuvky, stiskněte a uvolněte tlačítko ON: objeví se červená barva v okénku kontrolky. Electro
Block®je nyní aktivní.
- Ověřte správnou účinnost Electro Block
®
stisknutím tlačítka TEST: elektrický proud se přeruší, červené světlo zmizí a toto zaručuje,
že bezpečnostní systém Electro Block®je správně účinný.
- Po provedení testu, stiskněte a uvolněte znovu tlačítko
ON: červené světlo se opět objeví a termoventilátor je připraven k zapnutí.
Test musí být proveden před každým použitím přístroje. V případě nepravidelného nebo nesprávného fungování přístroje (například
opakované u přístroje zapojeného do sítě anebo nevhodné fungování během ověřovacího testu bezpečnostního systému Electro
Block®), se okamžitě obrate na Servisní středisko autorizované IMETEC. Když je přístroj vypnutý a bezpečnostní systém Electro
Block®odpojený od zásuvky, vypínač diferenciál bezpečnostního systému Electro Block®se automaticky vypne. Nesprávné použití
elektrických přístrojů může být nebezpečné. Použití bezpečnostního zařízení nenahrazuje základní bezpečnostní opatření týkající
elektrického proudu.
UŽITEČNÉ RADY
Když termoventilátor uložíte, ujistěte se, že je chráněn před prachem, abyste zabránili případnému proniknutí prachu do prostoru za mřížkou.
Page 44

42
UTASÍTÁSOK ÉS FIGYELMEZTETÉSEK A HELYES ÉS BIZTONSÁGOS HASZNÁLATHOZ
OLVASSA EL FIGYELMESEN A JELEN HASZNÁLATI UTASÍTÁSBAN FELTÜNTETETT ÚTMUTATÁSOKAT
ÉS FIGYELMEZTETÉSEKET ÉS ÔRIZZE MEG A TERMÉK EGÉSZ ÉLETTARTAMÁRA, HOGY SZÜKSÉG
ESETÉN BÁRMINEK UTÁNA TUDJON NÉZNI. A HASZNÁLATI UTASÍTÁS FONTOS ÚTMUTATÁSOKAT
TARTALMAZ A TERMÉK MŰKÖDÉSÉT ÉS HASZNÁLATI VALAMINT KARBANTARTÁSI BIZTONSÁGÁT
ILLETŐEN.
FIGYELEM
ÁLTALÁNOS FIGYELMEZTETÉSEK
Köszönjük, hogy az IMETEC termékét választotta. Biztosak vagyunk abban, hogy használata során alkalma nyílik majd arra, hogy
meggyőződjön annak kiváló minőségéről és megbízhatóságáról és felfedezi majd, hogy a tervezés és gyártás során mekkora
figyelmet szenteltünk a termék leendő felhasználójának.
1. Miután eltávolította a csomagolást győződjön meg arról, hogy a készülék ép-e és hogy nincsenek-e rajta szemmel látható
sérülések, melyek a szállítás közben keletkezhettek. Kétség esetén ne vegye használatba a készüléket, hanem forduljon egy az
IMETEC által felhatalmazott Műszaki Szervízszolgálathoz.
2. A készülék csatlakoztatása előtt győződjön meg arról, hogy az adattábláján feltüntetett adatok megfelelnek-e az elektromos
hálózat adatainak. Az adattábla a készülék alján található.
3. Ne használjon adaptereket, elosztókat és/vagy hosszabbítókat. Ha a villásdugó nem a dugaszolóaljzathoz való, szakemberrel
cseréltesse ki megfelelo típusúra, akinek különösképpen arra kell figyelnie, hogy a vezetékek keresztmetszete a készülék által
felvett teljesítménynek megfelelo legyen.
4. Ezt a készüléket csak rendeltetésének megfelelően, azaz ventilátoros hősugárzóként lehet használni. Minden ettől eltérő
használat helytelennek minősül, tehát veszélyes. A gyártó nem vonható felelősségre helytelen és hibás használatból eredő
esetleges károkért.
5. Bármilyen elektromos készülék használatakor néhány alapvető szabályt mindenképpen be kell tartani:
- soha ne érjen a készülékhez vizes vagy nedves kézzel.
- ne húzza a tápvezetéket vagy magát a készüléket a villásdugó elektromos aljzatból történő eltávolításához.
- ne hagyja a készüléket éghajlati viszonyoknak (eső, nap, stb.) kitéve.
- ne engedje, hogy a készüléket gyermekek vagy cselekvőképtelen személyek felügyelet nélkül használják.
6. Ne helyezze a készüléket közvetlenül egy dugaszolóaljzat alá. Ne használja a készüléket fürdőkád, zuhanyfülke vagy
úszómedence közvetlen közelében. Soha ne helyezze úgy el a készüléket, hogy az fürdőkádból, zuhanyfülkéből vagy
úszómedencéből elérhető legyen. Ne fedje le a levegő bemenetelét és távozását biztosító rácsokat.
7. Mielőtt bármilyen tisztítási vagy karbantartási műveletbe kezdene áramtalanítsa a készüléket úgy, hogy kihúzza a villásdugót a
dugaszolóaljzatból.
8. A készülék meghibásodása és/vagy rossz működése esetén azt ki kell kapcsolni és nem szabad hozzányúlni. Esetleges javítás
szükségessége esetén forduljon kizárólag egy az IMETEC által felhatalmazott Műszaki Szervízszolgálathoz.
9. A készülék tápvezetékét tilos a használónak kicserélni. A vezeték sérülése esetén a cseréhez forduljon egy az IMETEC által
felhatalmazott Műszaki Szervízszolgálathoz.
10. Ha úgy dönt, hogy nem használja többé a készüléket, ajánlatos használhatatlanná tenni úgy, hogy miután kihúzta a villásdugót
az aljzatból elvágja a tápvezetékét. Ajánlatos továbbá ártalmatlanná tenni a készülék azon részeit, melyek veszély forrását
képezhetik különösen gyermekek számára, akik a használaton kívüli készülékkel játszanak.
11. Ne fedje le a szellőzőrácsokat, így elkerülheti a túlmelegedés veszélyét.
12.Ezt a készüléket tilos gyermekeknek, csökkent testi, szellemi, illetve érzéki képességgel rendelkező személyeknek használni,
illetve a szükséges ismeretek és tapasztalatok hiányában, felelős személy felügyelete, vagy a használatra vonatkozó kioktatása
nélkül.
13. A készülékkel nem játszhatnak gyermekek.
Page 45

M
A
G
Y
A
R
43
ÁLTALÁNOS UTASÍTÁSOK
A KÉSZÜLÉK
• Te ljesítmény szabályozó kapcsoló [A. ábra]
ÁLLÁS FUNKCIÓ
Készülék kikapcsolva
Meleg levegő (1100 W)
Nagyon meleg levegő (2200W)
B KÉSZÜLÉK
• Te ljesítmény szabályozó kapcsoló [E. ábra]
ÁLLÁS FUNKCIÓ
Készülék kikapcsolva
Hideg levegő
Meleg levegő (1000W)
Nagyon meleg levegő (2000W)
• Szobatermosztát - [C. ábra]
A szobatermosztát biztosítja a hőmérséklet kívánt szinten tartását: amikor ezt a hőmérsékletet elérte a készülék, automatikusan
kikapcsol majd pedig amikor a hőmérséklet csökkenni kezd újra bekapcsol.
ÁLLÁS FUNKCIÓ
Fagyásgátló
MAX Maximális hőmérséklet
C - C1 KÉSZÜLÉK
• Te ljesítmény szabályozó kapcsoló [B. ábra]
ÁLLÁS FUNKCIÓ
Készülék kikapcsolva
Hideg levegő
Meleg levegő (1100 W)
Nagyon meleg levegő (2200W)
• Szobatermosztát - [D. ábra]
ÁLLÁS FUNKCIÓ
Fagyásgátló
MAX Maximális hőmérséklet
A szobatermosztát biztosítja a hőmérséklet kívánt szinten tartását: amikor ezt a hőmérsékletet elérte a készülék, automatikusan
kikapcsol majd pedig amikor a hőmérséklet csökkenni kezd újra bekapcsol.
A KÉSZÜLÉK ÉS TARTOZÉKAINAK LEÍRÁSA [Z. ábra]
a
Vezérlőgomb borítólap
h
Markolatnak kialakított mélyedés vagy rögzítő kengyel tartó (hátul)
b
Szobatermosztát
i
Vezetékfeltekerő
c
Időzítő
j
Electro Block
®
d
Teljesítmény szabályozó kapcsoló
k
Falra szereléshez rögzítő kengyel
e
Bekapcsolást jelző lámpa
l
Falra szerléshez csavarok és tiplik
f
Motor test és rács (elöl)
m
Ionizátor jelzőlámpa (csak ionizátoros modelleknél)
g
Levegő bemeneti rács
n
Ionizátor jelzőlámpa gomb (csak ionizátoros modelleknél)
Page 46

44
A KÉSZÜLÉK
Ventilátoros hősugárzó funkció
- Csavarja el a teljesítmény szabályozó kapcsolót [A. ábra] a következők szerint:
állás: Meleg levegő (1100W).
állás: Nagyon meleg levegő (2200W).
B KÉSZÜLÉK
Ventilátoros hősugárzó funkció
- Csavarja el a teljesítmény szabályozó kapcsolót [E. ábra] a következők szerint:
állás: Meleg levegő (1000W).
állás: Nagyon meleg levegő (2000W).
- Állítsa be a szobatermosztátot [C. ábra] attól függően, hogy milyen hőmérsékletet kíván fenntartani.
Nyári ventiláló funkció
- Állítsa a szobatermosztátot [C. ábra] a MAX. maximális hőmérsékletre.
- Csavarja a teljesítmény szabályozó kapcsolót [E. ábra] az állásra.
Fagyásgátló funkció
Ez a funkció biztosítja a szoba hőrmérsékletének +5˚C körüli tartását. Amikor a hőmérséklet ezen érték alá süllyed, a ventilátoros
hősugárzó automatikusan bekapcsol.
- Állítsa a szobatermosztátot
[C. ábra] a fagyásgátló állásra .
- Csavarja el a teljesítmény szabályozó kapcsolót [E. ábra] a következők szerint:
állás: ezen az álláson a hőmérséklet fokozatosan emelkedik +5˚C-ra.
állás: ezen az álláson a hőmérséklet gyorsan emelkedik +5˚C-ra.
Imetec-Ion77 technológia (csak az ionizátoros modelleknél)
Ha az Ön készüléke rendelkezik ionizátorral, a jelzőlámpa
m
kigyullad jelezvén annak működését.
Az Imetec-Ion77 termoventilátor egy forradalmian új ionizátor egységgel rendelkezik, mely az ionizálás természetes jelenségét állítja elő.
A termoventilátor által képzett ionok pozitívan hatnak a levegőre, mely ezáltal felfrissül és megtisztul.
C - C1 KÉSZÜLÉK
Ventilátoros hősugárzó funkció
- Csavarja el a teljesítmény szabályozó kapcsolót [B. ábra] a következők szerint:
állás: Meleg levegő (1100W).
állás: Nagyon meleg levegő (2200W).
- Állítsa be a szobatermosztátot [D. ábra] a fenntartani kívánt hőmérséklettől függően.
Ventilátor funkció
- Állítsa a szobatermosztátot [D. ábra] a MAX. maximális hőmérsékletre.
- Csavarja a teljesítmény szabályozó kapcsolót [B. ábra] az állásra.
Fagyásgátló funkció
Ez a funkció biztosítja a szoba hőrmérsékletének +5˚C körüli tartását. Amikor a hőmérséklet ezen érték alá süllyed, a ventilátoros
hősugárzó automatikusan bekapcsol.
- Állítsa a szobatermosztátot
[D. ábra] a fagyásgátló állásra .
- Csavarja el a teljesítmény szabályozó kapcsolót [B. ábra] a következők szerint:
állás: ezen az álláson a hőmérséklet fokozatosan emelkedik +5˚C-ra.
állás: ezen az álláson a hőmérséklet gyorsan emelkedik +5˚C-ra.
Időzítő funkció (csak az időzítővel rendelkező modelleknél)
Az időzítő funkció lehetővé teszi a készülék be- és kikapcsolásának időzítését a következő módon:
HASZNÁLATI ÚTMUTATÁSOK
• Időzítő - [F. ábra] (csak azon modelleknél, melyek rendelkeznek vele)
f1: fogak, a kívánt működési időszakok programozásához.
f2: külső pánt.
FIGYELEM:
- HA AZ IDŐZÍTŐT BEPROGRAMOZTA, A RAJTA BEÁLLÍTOTT HŐMÉRSÉKLET FENNTARTÁSA CSAK A BEPROGRAMOZOTT
IDŐSZAKON BELÜL TÖRTÉNIK.
• Szabályozható alapzat - (csak azon modelleknél, melyek rendelkeznek vele)
Alap állás [G. ábra].
Döntött állás: az alapzat szabályozható a hideg/meleg levegő felfelé irányítása céljából. Az alapzatot erősen tartva, csúsztassa el a
motor testet úgy, hogy előrefelé nyomja
[H. ábra].
Page 47

M
A
G
Y
A
R
45
• Manuálisan
- Döntse befelé az időzítő valamennyi fogát [I. ábra].
- Csavarja a teljesítmény szabályozó kapcsolót [B. ábra] az , vagy állásra attól függően, hogy melyik funkciót kívánja
működésbe hozni.
- Állítsa be a szobatermosztátot [D. ábra] attól függően, hogy milyen hőmérsékletet kíván fenntartani.
FIGYELEM:
- AZ IDŐZÍTŐ CSAK AKKOR MŰKÖDIK, HA A VENTILÁTOROS HŐSUGÁRZÓ VILLÁSDUGÓJA EGY DUGASZOLÓALJZATHOZ
VAN CSATLAKOZTATVA.
• Automatikusan
- Az időzítő külső pántját csavarja az óra járásával megfelelő irányba és állítsa be a mutatóval a pontos időt [L. ábra].
- Hajlítsa ki az időzítő valamennyi fogát [M. ábra] kivéve azokat, amelyek azon időszakkal esnek egybe, amikor a készüléket működtetni kívánja.
- Csavarja a teljesítmény szabályozó kapcsolót [B. ábra] az , vagy állásra attól függően, hogy melyik funkciót kívánja
működésbe hozni.
Az időzítő 24 órás időtartamú és a beállított programozást 24 óránként ismétli. Minden fog negyed órának felel meg.
Imetec-Ion77 technológia (csak az ionizátoros modelleknél)
Ha az Ön készüléke rendelkezik jelzőlámpás gombbal naz ionizátor működésbe hozásához, Ön döntheti el, hogy működésbe hozzae vagy sem. Az ionizátor bekapcsolásához elég benyomni a gombot
n
. A jelzőlámpa kigyullad jelezvén, hogy az ionizátor működésben
van. A kikapcsoláshoz nyomja be újra a gombot és csavarja az indulási állásra. A jelzőlámpa kialszik.
Az Imetec-Ion77 termoventilátor egy forradalmian új ionizátor egységgel rendelkezik, mely az ionizálás természetes jelenségét állítja elő.
A termoventilátor által képzett ionok pozitívan hatnak a levegőre, mely ezáltal felfrissül és megtisztul.
UTASÍTÁSOK A FALRA SZERELÉSHEZ
- (csak a rögzítő kengyeles modelleknél) [Q. ábra]
A ventilátoros hősugárzó a falra rögzíthető.
- Rögzítse a falra a rögzítő kengyelt a tartozékok között található két tipli segítségével [N. ábra] (a furatok közötti távolságnak 16,5 cm-
nek kell lenni, az átmérőnek 6 mm-nek).
- Helyezze a ventilátoros hősugárzót a kengyelre és nyomja a fal felé oly módon, hogy a kengyel foga (o1) a ventilátoros hősugárzó
hátuljára kapcsolódjon, a markolat szintjén
[O. ábra]. A ventilátoros hősugárzó fali tartóról történő levételéhez nyomja a kengyel fogát
a nyíl által mutatott irányba és ezzel egyidejűleg húzza maga felé a ventilátoros hősugárzót [P. ábra].
ELECTRO BLOCK®BIZTONSÁGI KAPCSOLÓVAL RENDELKEZŐ KÉSZÜLÉK
FONTOS:
- Ha az Ön készüléke rendelkezik Electro Block®j
biztonsági kapcsolóval, azt közvetlenül egy fali dugaszolóaljzatba kell
csatlakoztatnia. Semmilyen oknál fogva ne csatlakoztassa nem rögzített aljzatokhoz, adapterekhez vagy hosszabbítókhoz.
Az Electro Block®egy nagy érzékenységű biztonsági differenciál kapcsolóval rendelkezik, mely a használót 10 mA-nél
nagyobb értékű föld felé történő áram diszperziótól védi.
A készülék használatához a következő műveleteket végezze el:
- Dugja az Electro Block®-ot a dugaszolóaljzatba, nyomja be majd pedig engedje ki az ON gombot: a piros színű jelzőlámpa kigyullad.
Ekkor az Electro Block®működési állapotban van.
- Ellenőrizze az Electro Block®hatékonyságát úgy, hogy benyomja a TEST gombot: az áram megszakad, a piros jelzőlámpa pedig
elalszik, ami azt jelenti, hogy az Electro Block®tökéletesen működik.
- Miután elvégezte a tesztet, nyomja be és engedje ki ismét az
ON gombot: a piros jelzőlámpa kigyullad és a ventilátoros hősugárzó
készen áll a működésre. A tesztet a ventilátoros hősugárzó minden egyes használata előtt el kell végezni. Rendellenes vagy helytelen
működés esetén (például a hálózatra csatlakoztatott készüléknél többszöri kapcsolás esetén, vagy pedig ha a tesztelés során nem lép
közbe idejében az Electro Block®) azonnal forduljon az IMETEC által felhatalmazott Műszaki Szervízszolgálatok egyikéhez. Amikor a
készüléket kikapcsolja és az Electro Block®biztonsági kapcsolót kihúzza a dugaszolóaljzatból, az Electro Block®differenciál
kapcsolója automatikusan kikapcsol. Az elektromos készülékek helytelen használata veszélyes lehet. Egy biztonsági kapcsoló
használata nem helyettesíti az elektromos biztonság garantálásához szükséges alapvető elővigyázatossági intézkedéseket.
HASZNOS TANÁCSOK
Amikor elteszi a ventilátoros hősugárzót ügyeljen arra, hogy az portól védett legyen. Ily módon elkerülheti, hogy a por rakódjon le a rácsok között.
Page 48

46
NAPUTCI I NAPOMENE ZA ISPRAVNU I SIGURNU UPORABU
PAŽLJIVO PROČITATI NAPUTKE I NAPOMENE SADRŽANE U OVOJ KNJIŽICI I SAČUVATI IH ZA
PONOVNO KONZULTIRANJE TIJEKOM CIJELOG VIJEKA TRAJANJA OVOG PROIZVODA. NAPUTCI,
NAIME, SADRŽE NEKE VAŽNE PREPORUKE VEZANE ZA DJELOVANJE I SIGURNOST PRILIKOM
INSTALIRANJA, UPORABE I ODRŽAVANJA PROIZVODA.
OPREZ
OPĆE NAPOMENE
IMETEC zahvaljuje na odabiru njegovog proizvoda. Uvjereni smo da ćete tijekom uporabe moći ocijeniti njegovu visoku pouzdanost
i kvalitetu, i zamijetiti sa koliko pažnje i poštovanja prema korisniku je osmišljen i načinjen.
1. Nakon otklanjanja ambalaže, osvjedočite se je li naprava cjelovita i bez vidljivih oštećenja koja su mogla nastati prilikom
prijevoza. U slučaju sumnje, nemojte koristiti napravu i obratite se Centrima za tehničko servisiranje koje je ovlastio IMETEC.
2. Prije spajanja naprave na mrežu za električno napajanje, osvjedočite se da podaci na pločici odgovaraju mreži električnog
napajanja. Pločica se nalazi na dnu naprave.
3. Nemojte koristiti adaptere, višestruke utičnice i/ili produžne kablove. U slučaju neusklađenosti između utičnice i utikača, stručno
osposobljeno osoblje mora je zamijeniti drugom odgovarajućom utičnicom.
4. Ovaj aparat treba uvijek biti korišten samo u svrhu za koju je posebno izrađen, a to znači samo kao kalorifer. Svaka druga
upotreba smatra se neodgovarajućom i stoga opasnom. Proizvođač se ne može smatrati odgovornim za moguća oštećenja
nastala uslijed neodgovarajuće i pogrešne upotrebe.
5. Prilikom uporabe ma kog električnog uređaja, treba se pridržavati nekih općih pravila sigurnosti.
Osobito:
- aparat se ne smije dodirivati mokrim ili vlažnim rukama ili nogama
- prilikom izvlačenja utikača iz utičnice, ne smije se povlačiti kabl za napajanje ili sam aparat
- nikada ne ostavljati aparat izložen vremenskim utjecajima (kiša, sunce i slično)
- ne dopustite da uređaj koriste djeca ili nesposobne osobe bez nadzora
6. Nikad ne postavljate aparat ispod električne utičnice. Uređaj se ne smije nikada koristi u neposrednoj blizini kade, tuša ili
bazena. Uređaj se ne smije nikada postaviti u neposrednoj blizini kade, tuša ili bazena. Nemojte pokrivati rešetke za ulaz i izlaz
zraka.
7. Prije održavanja ili čišćenja aparata, treba izvući utikač iz mreže za električno napajanje.
8. U slučaju kvara i/ili lošeg rada uređaja, potrebno je isključiti ga i ne rasklapati ga. Za eventualno otklanjanje kvara treba se
obratiti ovlaštenim Centrima za tehničko servisiranje IMETEC.
9. Kabl za električno napajanje ovog uređaja ne smije zamijeniti korisnik. U slučaju oštećenja voda ili prilikom njegove zamijene,
obratiti se isključivo ovlaštenim centrima za tehničko servisiranje IMETEC.
10. Ako odlučite da više ne koristite ovaj uređaj, prepručuje se da, nakon izvlačenja utikača iz utičnice za električno napajanje,
odrežete kabl za električno napajanje. Trebalo bi se, osim toga, pobrinuti da budu izolovani i odstranjeni oni dijelovi uređaja koji
mogu predstavljati opasnost, posebno za djecu koja bi neupotrebljeni uređaj mogla koristiti za igru.
11. Ne pokrivajte rešetke za ulaz i izlaz zraka, da bi se izbjegla opasnost od pregrijavanja.
12. Uporaba ovog aparata nije namijenjena djeci i osobama sa smanjenim tjelesnim, osjetilnim i mentalnim sposobnostima i
općenito s nedostatnim znanjem i iskustvom ukoliko nisu pod nadzorom ili im odgovorna osoba nije dala potrebne upute za
uporabu.
13. Aparat nije namijenjen za dječju igru.
Page 49

H
R
V
A
T
S
K
I
47
OPĆI NAPUTCI
APARAT A:
• Regulator snage [Slika A]
POLOŽAJ DJELOVANJE
Aparat isključen
Topli zrak (1100 W)
Vreli zrak (2200W)
APARAT B:
• Regulator snage [Slika E]
POLOŽAJ DJELOVANJE
Aparat isključen
Hladni zrak
Topli zrak (1000W)
Vreli zrak (2000W)
• Sobni termostat - [Slika C]
Sobni termostat garantira stabilno održavanje sobne temperature: kada se dostigne željena temperatura uređaj se automatski isključi
da bi se ponovno automatski uključio kada se temperatura zraka snizi.
POLOŽAJ DJELOVANJE
Antifriz
MAX Maksimalna temperatura
APARAT C - C1:
• Regulator snage [Slika B]
POLOŽAJ DJELOVANJE
Aparat isključen
Hladni zrak
Topli zrak (1100W)
Vreli zrak (2200W)
• Sobni termostat - [Slika D]
POLOŽAJ DJELOVANJE
Antifriz
MAX Maksimalna temperatura
Sobni termostat garantira stabilno održavanje sobne temperature: kada se dostigne željena temperatura uređaj se automatski isključi
da bi se ponovno automatski uključio kada se temperatura zraka snizi.
OPIS APARATA I OPREME [Crtež Z]
a
Zaštitno pokrivalo
h
Ručka odn. zona za potrporni nosač (odzada)
b
Sobni termostat
i
Namotač kabla
c
Tajmer
j
Electro Block
®
d
Regulator snage
k
Potporni nosač za stijenku
e
Kontrolno svjetlo
l
Vijci i umetci za montažu na stijenku
f
Tijelo motora i rešetka (sprijeda)
m
Signalna lampica jonizatora (samo za modele sa jonizatorom)
g
Rešetka za ulaz zraka
n
Osvetljena tipka signalna lampica jonizatora (samo za modele sa jonizatorom)
Page 50

48
APARAT A:
Funkcija kalorifer
- Podesite regulator snage [Slika A] kao što slijedi:
položaj : Topli zrak (1100W).
položaj : Vreli zrak (2200W).
APARAT B
Funkcija kalorifer
- Podesite regulator snage [Slika E] kao što slijedi:
položaj : Topli zrak (1000W).
položaj : Vreli zrak (2000W).
- Regulirajte sobni termostat
[Slika C] u skladu sa temperaturom koju želite održavati.
Djelovanje letnja ventilacija
- Regulirajte sobni termostat [Slika C] na maksimalnu poziciju MAX.
- Podesite regulator snage
[Slika E] na poziciju .
Funkcija antifriz
Ova funkcija garantira održavanje sobne temperature na razini od oko +5˚C. U slučaju da se sobna temperatura snizi ispod te razine,
kalorifer se automatski uključuje u rad.
- Regulirajte sobni termostat
[Slika C] na poziciju antifriz .
- Podesite regulator snage
[Slika E] na poziciju:
pozicija za postepeno postizanje temperature od +5˚C.
pozicija za brzo postizanje temperature od +5˚C.
Tehnologija Imetec-Ion77 (samo za modele sa jonizatorom)
Ako vaš uređaj posjeduje jonizartor, signalna lampica mće biti upaljena u znak funkcioniranja.
Kalorifer Imetec-Ion77 je opskrbljen jonizatorom, revolucionarni uređaj koji reproducira prirodnu pojavu jonizacije. Joni koje proizvodi
kalorifer, pozitivno utiču na zrak, pri čemu ga obnavlja i dodatno osvježava.
APARAT C - C1
Funkcija kalorifer
- Podesite regulator snage [Slika B] kao što slijedi:
položaj : Topli zrak (1100W).
položaj : Vreli zrak (2200W).
- Regulirajte sobni termostat
[Slika D] u skladu sa temperaturom koju želite održavati.
Funkcija ventilator
- Regulirajte sobni termostat [Slika D] na maksimalnu poziciju MAX.
- Podesite regulator snage
[Slika B] na poziciju .
Funkcija antifriz
Ova funkcija garantira održavanje sobne temperature na razini od oko +5˚C. U slučaju da se sobna temperatura snizi ispod te razine,
kalorifer se automatski uključuje u rad.
- Regulirajte sobni termostat
[Slika D] na poziciju antifriz .
- Podesite regulator snage
[Slika B] na poziciju:
pozicija za postepeno postizanje temperature od +5˚C.
pozicija za brzo postizanje temperature od +5˚C.
NAPUTCI ZA UPORABU
• Tajmer - [Slika F] (samo za modele koji ga posjeduju)
f1: zubci za programiranje časovnika
f2: spoljni prsten
OPREZ:
-U SLUČAJU KADA JE TAJMER PROGRAMIRAN, ODRŽAVANJE ŽELJENE TEMPERATURE BIĆE AKTIVIRANO SAMO U
PROGRAMIRANIM VREMENSKIM PERIODIMA.
• Orijentabilno postolje (samo za modele koji ga posjeduju)
Standardna pozicija [Slika G].
Nagnuta pozicija: postolje može biti regulirano tako da usmjerava hladni ili topli zrak uvis. Držeći postolje vrlo čvrsto, pogurajte aparat
tako da sklizne prema naprijed
[Slika H].
Page 51

H
R
V
A
T
S
K
I
49
Funkcija tajmer (samo za modele sa tajmerom)
Funkcija tajmer dozvoljava kontrolu uključivanja i isključivanja aparata na slijedeće načine:
• Manualno
-Okrenite unazad sve zupce tajmera [Slika I]
- Podesite regulator snage [Slika B] na poziciju , ili na funkciju koju želite aktivirati.
- Podesite sobni termostat
[Slika D] na temperaturu koju želite održavati.
OPREZ:
-TAJMER FUNKCIONIRA SAMO U SLUČAJU KADA JE ELEKTRIČNI UTIKAČ UKLJUČEN U UTIČNICU.
• Automatski
- Podesite spoljni prsten tajmera u smjeru kazaljki na satu i sinhronizirajte pokazivač sa njegovim satom [Slika L].
- Povucite naviše sve zupce tajmera
[Slika M] izuzev onih koji se nalaze u vremenskom rasponu u kojem želite da aprat funkcionira.
- Podesite regulator snage
[Slika B] na poziciju , ili u skladu sa funkcijom koju želite aktivirati.
Tajmer je dnevnog tipa i ponavljaće program u intervalima od 24 sata. Svaki zubac odgovara vremenskom intervalu od 15 minuta.
Tehnologija Imetec-Ion77 (samo za modele sa jonizatorom)
Ako je vaš uređaj opskrbljen tipkom sa signalnom lampicom
n
za aktiviranje jonizatora, možete izabrati da li ga aktivirati ili ne. Za
aktiviranje jonizatora dovoljno je pritisnuti tipku
n
i signalna lampica će se upaliti, označavajući da je jonizator u funkciji. Za
dezaktiviranje pritisnite nanovo tipku, vraćajući je u početni položaj, signalna lampica će se ugasiti.
Kalorifer Imetec-Ion77 je opskrbljen jonizatorom, revolucionarni uređaj koji reproducira prirodnu pojavu jonizacije. Joni koje proizvodi
kalorifer, pozitivno utiču na zrak, pri čemu ga obnavlja i dodatno osvježava.
NAPUTAK ZA INSTALIRANJE NA STIJENKU
- (samo za modele sa potpornim nosačem) [Slika Q]
Kalorifer može biti montiran na stijenku.
- Montirajte na stijenku potporni nosač uz pomoć dva vijka isporučena u kompletu
[Slika N] (razmak između otvora iznosi 16,5 cm,
promjer otvora 6 mm).
- Naslonite kalorifer na nosač i pritisnite ga prema stijenki, tako da zub nosača
(o1) zakači odzada kalorifer, u visini ručke [Slika O]. U
slučaju skidanja kalorifera sa nosača i sa stijenke, pritisnite zub nosača kao što je prikazano na slici i istovremeno povucite kalorifer
vani [Slika P].
APARAT SA OSIGURAČEM ELECTRO BLOCK
®
VAŽNO:
-U slučaju da je u Vaš aparat ugrađen osigurač Electro Block
®
j
, mora se direktno spojiti sa fiksnom utičnicom za električnu
energiju; ni u kom slučaju se ne smije uključiti u mobilne utičnice, adaptere ili produžne kablove. Osigurač Electro Block®je
opremljen visoko senzibinim diferencijalnim prekidačem koji štiti korisnika od električih disperzija ka uzemljenju viših od 10mA.
Da biste mogli koristiti Vaš aparat izvršite sledeće radnje:
- Uključite Electro Block
®
u električnu utičnicu, pritisnite i pustite tipkalo ON: pojaviće se crvena boja na kontrolnom staklu. Electro
Block®je sada aktiviran.
-Provjerite besprijekoran rad Electro Block
®
uređaja tako što ćete pritisnuti tipkalo TEST: napajanje električnom energijom će se prekinuti
a sa kontrolnog pokazivača će nestati crvene boje i to je garancija da osigurač Electro Block®funkcionira savršeno učinkovito.
- Posle izvršenog testa, pritisnite iznova i pustite tipkalo
ON: pojaviće se crvena boja na pokazivaču i kalorifer je sada spreman za rad.
Ovaj test mora biti ponovljen prilikom svakoga novoga uključivanja aparata. U slučaju nepravilnoga i/ili pogrešnog funkcioniranja (na
primjer učestali prekidi rada kalorifera povezanog na električnu mrežu ili nedovoljno brza intervencija tokom testova osigurača Electro
Block®) molimo obratite se odmah ovlaštenom Centru za tehničko servisiranje IMETEC. Kada se aparat isključi i kada se osigurač
Electro Block®odvoji iz utičnice, diferencijalni prekidač osigurača Electro Block®se isključi automatski. Neprimjereno korištenje
električnih uređaja može biti opasno. Korištenje uređaja kao što je osigurač ne zamjenjuje predostrožnost koja je neophodna za
sigurnost pri korištenju električne energije.
KORISNI SAVJETI
Kada spremite kalorifer, obezbjedite se da je aparat zaštićen protiv prašine i tako izbjegnete njeno ulaženje kroz rešetke.
Page 52

50
азлнкмдсаа а кЦдйеЦзСДсаа ий икДЗагъзйв а ЕЦбйиДлзйв щдлигмДнДсаа
ЗзаеДнЦгъзй икйуанДвнЦ азлнкмдсаа, лйСЦкЬДфаЦль З зДлнйьфЦе кмдйЗйСлнЗЦ.
пкДзанЦ кмдйЗйСлнЗй З нЦуЦзаЦ ЗлЦЙй иЦкайСД ийгъбйЗДзаь икаЕйкйе, нДд дДд З
зЦе икаЗйСьнль лЗЦСЦзаь й кДЕйнЦ, ЕЦбйиДлзйе ийСдгыуЦзаа, щдлигмДнДсаа а
мпйСм бД зае.
ЗзаеДзаЦ!
йЕфаЦ кЦдйеЦзСДсаа
оЛП‡ “аеЦнЦд” ·О‡„У‰‡ЛЪ ‚‡Т Б‡ ЪУ, ˜ЪУ ‚˚ ‚˚·‡ОЛ ВВ ЛБ‰ВОЛВ. е˚ Ы‚ВВМ˚, ˜ЪУ ‚˚ ‰УОКМ˚П У·‡БУП УˆВМЛЪВ
Н‡˜ВТЪ‚У, М‡‰ВКМУТЪ¸ Л Б‡·УЪЫ У ФУЪВ·ЛЪВОВ, Т НУЪУ˚ПЛ П˚ В„У ‡Б‡·УЪ‡ОЛ Л ‚˚ФЫТЪЛОЛ.
1. к‡ТФ‡НУ‚‡‚ ФЛ·У, Ы·В‰ЛЪВТ¸ ‚ В„У ТУı‡ММУТЪЛ Л УЪТЫЪТЪ‚ЛЛ ‚Л‰ЛП˚ı ФУ‚ВК‰ВМЛИ, НУЪУ˚В ПУ„ЫЪ ‚УБМЛНМЫЪ¸ ‚У
‚ВПfl ФВВ‚УБНЛ. иЛ ‚УБМЛНМУ‚ВМЛЛ ТУПМВМЛИ МВ ‚НО˛˜‡ИЪВ ФЛ·У Л У·‡ЪЛЪВТ¸ ‚ УЩЛˆЛ‡О¸М˚И лВ‚ЛТМ˚И ˆВМЪ
ЩЛП˚ “аеЦнЦд”.
2. иВВ‰ ФУ‰НО˛˜ВМЛВП ФЛ·У‡ Н ТВЪЛ ФУ‚В¸ЪВ ТУУЪ‚ВЪТЪ‚ЛВ В„У Ф‡ТФУЪМ˚ı ‰‡ММ˚ı Ф‡‡ПВЪ‡П ТВЪВ‚У„У
˝ОВНЪЛ˜ВТНУ„У ФЛЪ‡МЛfl. и‡ТФУЪМ‡fl Ъ‡·ОЛ˜Н‡ М‡ıУ‰ЛЪТfl М‡ МЛКМВИ ТЪУУМВ ФЛ·У‡.
3. зВ ФУО¸БЫИЪВТ¸ ФВВıУ‰МЛН‡ПЛ, ПМУ„УПВТЪМ˚ПЛ УБВЪН‡ПЛ Л/ЛОЛ Ы‰ОЛМЛЪВОflПЛ. З ТОЫ˜‡В МВТУУЪ‚ВЪТЪ‚Лfl УБВЪНЛ Л
‚ЛОНЛ ФЛ·У‡ Б‡ПВМЛЪВ УБВЪНЫ ‰Ы„УИ, ФЛ„У‰МУ„У ЪЛФ‡, ТЛО‡ПЛ Н‚‡ОЛЩЛˆЛУ‚‡ММУ„У ФВТУМ‡О‡, НУЪУ˚И ‰УОКВМ
ФУ‚ВЛЪ¸, ˜ЪУ ТВ˜ВМЛВ ФУ‚У‰МЛНУ‚ УБВЪНЛ ТУУЪ‚ВЪТЪ‚ЫВЪ ФУ„ОУ˘‡ВПУИ ПУ˘МУТЪЛ ФЛ·У‡.
4. С‡ММ˚И ФЛ·У ПУКМУ ЛТФУО¸БУ‚‡Ъ¸ ЪУО¸НУ ФУ М‡БМ‡˜ВМЛ˛, ‰Оfl НУЪУУ„У УМ ·˚О ‡Б‡·УЪ‡М, ЪУ ВТЪ¸ ‚ Н‡˜ВТЪ‚В
ЪВПУ‚ВМЪЛОflЪУ‡. г˛·УВ ‰Ы„УВ ЛТФУО¸БУ‚‡МЛВ ‰УОКМУ Т˜ЛЪ‡Ъ¸Тfl МВ‡‰ВН‚‡ЪМ˚П Л, ТОВ‰У‚‡ЪВО¸МУ, УФ‡ТМ˚П.
аБ„УЪУ‚ЛЪВО¸ МВ МВТВЪ УЪ‚ВЪТЪ‚ВММУТЪЛ Б‡ ‚УБПУКМ˚И Ы˘В·, У·ЫТОУ‚ОВММ˚И МВ‡‰ВН‚‡ЪМУИ Л МВФ‡‚ЛО¸МУИ
˝НТФОЫ‡Ъ‡ˆЛВИ.
5. щНТФОЫ‡Ъ‡ˆЛfl О˛·У„У ˝ОВНЪЛ˜ВТНУ„У ‡ФФ‡‡Ъ‡ ЪВ·ЫВЪ ТУ·О˛‰ВМЛfl МВНУЪУ˚ı УТМУ‚М˚ı Ф‡‚ЛО, ‚ ˜‡ТЪМУТЪЛ:
- ÌËÍÓ„‰‡ Ì ͇҇ڸÒfl ÔË·Ó‡ ‚·ÊÌ˚ÏË ËÎË ÏÓÍ˚ÏË Û͇ÏË ËÎË ÌÓ„‡ÏË;
- МВ ЪflМЫЪ¸ Б‡ Н‡·ВО¸ ФЛЪ‡МЛfl ЛОЛ Б‡ Т‡П ФЛ·У, ˜ЪУ·˚ УЪНО˛˜ЛЪ¸ В„У УЪ ТВЪВ‚УИ УБВЪНЛ;
- МВ ФУ‰‚В„‡Ъ¸ ФЛ·У ‡ЪПУТЩВМУПЫ ‚УБ‰ВИТЪ‚Л˛ (‰УК‰¸, ТУОМˆВ Л Ъ.‰.);
- МВ ‰УФЫТН‡Ъ¸ ЛТФУО¸БУ‚‡МЛfl ФЛ·У‡ ‰ВЪ¸ПЛ ЛОЛ МВТФУТУ·М˚ПЛ О˛‰¸ПЛ ·ВБ ФЛТПУЪ‡.
6. зВ ЫТЪ‡М‡‚ОЛ‚‡ИЪВ ФЛ·У МВФУТВ‰ТЪ‚ВММУ ФУ‰ УБВЪНУИ. зВ ФУО¸БЫИЪВТ¸ ФЛ·УУП ‚ МВФУТВ‰ТЪ‚ВММУИ ·ОЛБУТЪЛ
Т ‚‡ММУИ, ‰Ы¯В‚УИ Н‡·ЛМУИ ЛОЛ ·‡ТТВИМУП. зВ ЫТЪ‡М‡‚ОЛ‚‡ИЪВ ФЛ·У Ъ‡Н, ˜ЪУ·˚ ‰У МВ„У ПУКМУ ·˚ОУ ‰УТЪ‡Ъ¸,
М‡ıУ‰flТ¸ ‚ ‚‡ММВ, ‰Ы¯В‚УИ Н‡·ЛМВ ЛОЛ ·‡ТТВИМВ. зВ Б‡Н˚‚‡ИЪВ ‚ıУ‰М˚В Л ‚˚ıУ‰М˚В В¯ВЪНЛ ‚УБ‰Ыı‡.
7. иВВ‰ ˜ЛТЪНУИ ЛОЛ У·ТОЫКЛ‚‡МЛВП ФЛ·У‡ МВУ·ıУ‰ЛПУ УЪНО˛˜ЛЪ¸ В„У УЪ ТВЪЛ ФЛЪ‡МЛfl, ‚˚МЫ‚ ‚ЛОНЫ ЛБ УБВЪНЛ.
8. З ТОЫ˜‡В ФУОУПНЛ ЛОЛ МВЛТФ‡‚МУИ ‡·УЪ˚ ФЛ·У‡ ТОВ‰ЫВЪ ‚˚НО˛˜ЛЪ¸ В„У Л МВ Ф˚Ъ‡Ъ¸Тfl УЪВПУМЪЛУ‚‡Ъ¸ В„У
Т‡ПУТЪУflЪВО¸МУ. СОfl ‚˚ФУОМВМЛfl ВПУМЪ‡ У·‡ЪЛЪВТ¸ ‚ УЩЛˆЛ‡О¸М˚И лВ‚ЛТМ˚И ˆВМЪ ЩЛП˚ “аеЦнЦд”.
9. зВО¸Бfl Б‡ПВМflЪ¸ Н‡·ВО¸ ФЛ·У‡ ТЛО‡ПЛ ФУО¸БУ‚‡ЪВОfl. З ТОЫ˜‡В ФУ‚ВК‰ВМЛfl Н‡·ВОfl ЛОЛ КВ ФЛ МВУ·ıУ‰ЛПУТЪЛ В„У
Б‡ПВМ˚ У·‡ЪЛЪВТ¸ ‚ УЩЛˆЛ‡О¸М˚И лВ‚ЛТМ˚И ˆВМЪ ЩЛП˚ “ аеЦнЦд “.
10. З ТОЫ˜‡В ФУОМУ„У ФВН‡˘ВМЛfl ФУО¸БУ‚‡МЛfl ФЛ·УУП ВНУПВМ‰ЫВЪТfl ‚˚‚ВТЪЛ В„У ЛБ ТЪУfl, УЪВБ‡‚ ФУ‚У‰ ФЛЪ‡МЛfl,
ФВ‰‚‡ЛЪВО¸МУ ‚˚МЫ‚ ‚ЛОНЫ ЛБ УБВЪНЛ. дУПВ ЪУ„У, ВНУПВМ‰ЫВЪТfl У·ВБУФ‡ТЛЪ¸ ЪВ ˜‡ТЪЛ ФЛ·У‡, НУЪУ˚В ПУ„ЫЪ
·˚Ú¸ ÓÔ‡ÒÌ˚ÏË ‰Îfl ‰ÂÚÂÈ ‚ ÒÎÛ˜‡Â Ë„˚ Ò Ì‡·ÓÚ‡˛˘ËÏ ÔË·ÓÓÏ.
11. ÇÓ ËÁ·ÂʇÌË ËÒ͇ Ô„‚‡ Ì ̇Í˚‚‡Ú¸ ¯ÂÚÍË ‚ıÓ‰‡ Ë ‚˚ıÓ‰‡ ‚ÓÁ‰Ûı‡.
12. щЪУЪ ФЛ·У МВ ФВ‰М‡БМ‡˜ВМ ‰Оfl ЛТФУО¸БУ‚‡МЛfl ‰ВЪ¸ПЛ Л ОЛˆ‡ПЛ Т У„‡МЛ˜ВММ˚ПЛ ЩЛБЛ˜ВТНЛПЛ, ТВМТУМ˚ПЛ Л
ЫПТЪ‚ВММ˚ПЛ ‚УБПУКМУТЪflПЛ, Л, ‚ О˛·УП ТОЫ˜‡В, ОЛˆ‡ПЛ, МВ У·О‡‰‡˛˘ЛПЛ ‰УОКМ˚ПЛ БМ‡МЛflПЛ Л УФ˚ЪУП, ·ВБ
М‡‰БУ‡ ЛОЛ ЫН‡Б‡МЛИ ФУ ˝НТФОЫ‡Ъ‡ˆЛЛ, ФВ‰УТЪ‡‚ОВММ˚ı УЪ‚ВЪТЪ‚ВММ˚П ОЛˆУП.
13. иЛ·У МВ ФВ‰М‡БМ‡˜ВМ ‰Оfl ‰ВЪТНЛı Л„.
Page 53

êê
ìì
ëë
ëë
ää
àà
ââ
51
йЕфаЦ азлнкмдсаа
икаЕйк A
• иВВНО˛˜‡ЪВО¸ ПУ˘МУТЪЛ [кЛТ. A]
ийгйЬЦзаЦ омздсаь
èË·Ó ‚˚Íβ˜ÂÌ
ÉÓfl˜ËÈ ‚ÓÁ‰Ûı (1100 ÇÚ)
é˜Â̸ „Ófl˜ËÈ ‚ÓÁ‰Ûı (2200 ÇÚ)
икаЕйк B
• иВВНО˛˜‡ЪВО¸ ПУ˘МУТЪЛ [кЛТ. E]
ийгйЬЦзаЦ омздсаь
èË·Ó ‚˚Íβ˜ÂÌ
ïÓÎÓ‰Ì˚È ‚ÓÁ‰Ûı
ÉÓfl˜ËÈ ‚ÓÁ‰Ûı (1000 ÇÚ)
é˜Â̸ „Ófl˜ËÈ ‚ÓÁ‰Ûı (2000 ÇÚ)
• кВ„ЫОflЪУ ЪВПФВ‡ЪЫ˚ - [êËÒ. C]
кВ„ЫОflЪУ ЪВПФВ‡ЪЫ˚ У·ВТФВ˜Л‚‡ВЪ ФУ‰‰ВК‡МЛВ МВУ·ıУ‰ЛПУИ ЪВПФВ‡ЪЫ˚. иЛ ВВ ‰УТЪЛКВМЛЛ ФЛ·У ‚˚НО˛˜‡ВЪТfl, Л
‚НО˛˜‡ВЪТfl, Н‡Н ЪУО¸НУ ЪВПФВ‡ЪЫ‡ М‡˜МВЪ УФЫТН‡Ъ¸Тfl.
ийгйЬЦзаЦ омздсаь
èÓÚË‚ Á‡ÏÂÁ‡ÌËfl
MAX е‡НТЛП‡О¸М‡fl ЪВПФВ‡ЪЫ‡
икаЕйк C - C1
• иВВНО˛˜‡ЪВО¸ ПУ˘МУТЪЛ [кЛТ. B]
ийгйЬЦзаЦ омздсаь
èË·Ó ‚˚Íβ˜ÂÌ
ïÓÎÓ‰Ì˚È ‚ÓÁ‰Ûı
ÉÓfl˜ËÈ ‚ÓÁ‰Ûı (1100 ÇÚ)
é˜Â̸ „Ófl˜ËÈ ‚ÓÁ‰Ûı (2200 ÇÚ)
• кВ„ЫОflЪУ ЪВПФВ‡ЪЫ˚ - [кЛТ. D]
ийгйЬЦзаЦ омздсаь
èÓÚË‚ Á‡ÏÂÁ‡ÌËfl
MAX е‡НТЛП‡О¸М‡fl ЪВПФВ‡ЪЫ‡
кВ„ЫОflЪУ ЪВПФВ‡ЪЫ˚ У·ВТФВ˜Л‚‡ВЪ ФУ‰‰ВК‡МЛВ МВУ·ıУ‰ЛПУИ ЪВПФВ‡ЪЫ˚. иЛ ВВ ‰УТЪЛКВМЛЛ ФЛ·У ‚˚НО˛˜‡ВЪТfl, Л
‚НО˛˜‡ВЪТfl, Н‡Н ЪУО¸НУ ЪВПФВ‡ЪЫ‡ М‡˜МВЪ УФЫТН‡Ъ¸Тfl.
йиалДзаЦ икаЕйкД а иказДСгЦЬзйлнЦв [êËÒ. Z]
a
ä˚¯Í‡ Ó„‡ÌÓ‚ ÛÔ‡‚ÎÂÌËfl
h
иУОУТЪ¸ Ы˜НЛ ЛОЛ БУМ‡ ‰Оfl НУМ¯ЪВИМ‡ (Б‡‰Мflfl)
b
кВ„ЫОflЪУ ЪВПФВ‡ЪЫ˚
i
еВТЪУ М‡ПУЪНЛ Н‡·ВОfl
c
í‡ÈÏÂ
j
Electro Block
®
d
иВВНО˛˜‡ЪВО¸ ПУ˘МУТЪЛ
k
дУМ¯ЪВИМ ‰Оfl М‡ТЪВММУИ ЫТЪ‡МУ‚НЛ
e
ã‡ÏÔ‡ ‚Íβ˜ÂÌËfl
l
ЗЛМЪ˚ Л ‰˛·ВОЛ ‰Оfl М‡ТЪВММУИ ЫТЪ‡МУ‚НЛ
f
кВ¯ВЪН‡ ПУЪУМУ„У УЪТВН‡ (ФВВ‰Мflfl)mаМ‰ЛН‡ЪУ ЛУМЛБ‡ЪУ‡ (ЪУО¸НУ М‡ ПУ‰ВОflı Т ЛУМЛБ‡ЪУУП)
g
ê¯ÂÚ͇ ‰Îfl ‚ıÓ‰‡ ‚ÓÁ‰Ûı‡
n
л‚ВЪfl˘‡flТfl НМУФН‡ ЛМ‰ЛН‡ЪУ‡ ЛУМЛБ‡ЪУ‡ (ЪУО¸НУ М‡ ПУ‰ВОflı Т ЛУМЛБ‡ЪУУП)
Page 54

52
икаЕйк A
оЫМНˆЛfl ЪВПУ‚ВМЪЛОflЪУ‡
- иУ‚ВМЛЪВ ФВВНО˛˜‡ЪВО¸ ПУ˘МУТЪЛ [êËÒ. A] ТОВ‰Ы˛˘ЛП У·‡БУП:
ФУОУКВМЛВ : ЙУfl˜ЛИ ‚УБ‰Ыı (1100 ЗЪ).
ФУОУКВМЛВ : é˜Â̸ „Ófl˜ËÈ ‚ÓÁ‰Ûı (2200 ÇÚ).
икаЕйк B
оЫМНˆЛfl ЪВПУ‚ВМЪЛОflЪУ‡
- иУ‚ВМЛЪВ ФВВНО˛˜‡ЪВО¸ ПУ˘МУТЪЛ [êËÒ. E] ТОВ‰Ы˛˘ЛП У·‡БУП:
ФУОУКВМЛВ : ЙУfl˜ЛИ ‚УБ‰Ыı (1000 ЗЪ).
ФУОУКВМЛВ : й˜ВМ¸ „Уfl˜ЛИ ‚УБ‰Ыı (2000 ЗЪ).
- èÓ‚ÂÌËÚ „ÛÎflÚÓ
[êËÒ. C] М‡ ЪВПФВ‡ЪЫЫ, НУЪУ‡fl ‰УОКМ‡ ФУ‰‰ВКЛ‚‡Ъ¸Тfl ‚ ФУПВ˘ВМЛЛ.
оЫМНˆЛfl ОВЪМВИ ‚ВМЪЛОflˆЛЛ
- èÓ‚ÂÌËÚ „ÛÎflÚÓ [êËÒ. C] М‡ П‡НТЛП‡О¸МЫ˛ ЪВПФВ‡ЪЫЫ MAX.
- иУ‚ВМЛЪВ ФВВНО˛˜‡ЪВО¸ ПУ˘МУТЪЛ [êËÒ. E] ‚ ФУОУКВМЛВ .
îÛÌ͈Ëfl ÔÓÚË‚ Á‡ÏÂÁ‡ÌËfl
щЪ‡ ЩЫМНˆЛfl У·ВТФВ˜Л‚‡ВЪ ФУ‰‰ВК‡МЛВ ЪВПФВ‡ЪЫ˚ ‚ ФУПВ˘ВМЛЛ, ‡‚МУИ ФЛ·ОЛБЛЪВО¸МУ +5°C. KУ„‰‡ ЪВПФВ‡ЪЫ‡
УФЫТН‡ВЪТfl МЛКВ ‰‡ММУ„У ЫУ‚Мfl, ЪВПУ‚ВМЪЛОflЪУ ‚НО˛˜‡ВЪТfl ‡‚ЪУП‡ЪЛ˜ВТНЛ.
- иВ‚‰ЛЪВ В„ЫОflЪУ ЪВПФВ‡ЪЫ˚
[êËÒ. C] ‚ ФУОУКВМЛВ .
- йЪВ„ЫОЛЫИЪВ ФВВНО˛˜‡ЪВО¸ ПУ˘МУТЪЛ [êËÒ. E] ТОВ‰Ы˛˘ЛП У·‡БУП:
ФУОУКВМЛВ ‰Оfl ФУТЪВФВММУ„У М‡„В‚‡ ‰У +5°C.
ФУОУКВМЛВ ‰Оfl ·˚ТЪУ„У М‡„В‚‡ ‰У +5°C.
нВıМУОУ„Лfl Imetec-Ion77 (ЪУО¸НУ ‰Оfl ПУ‰ВОВИ Т ЛУМЛБ‡ЪУУП)
ЦТОЛ ‚‡¯ ФЛ·У У·УЫ‰У‚‡М ЛУМЛБ‡ЪУУП, ТЛ„М‡О¸М‡fl О‡ПФУ˜Н‡
m
Б‡„УЛЪТfl, У·УБМ‡˜‡fl В„У ‡·УЪЫ.
нВПУ‚ВМЪЛОflЪУ Imetec-Ion77 У·УЫ‰У‚‡М ЛУМЛБ‡ЪУУП, ЪУ ВТЪ¸ МУ‚ВИ¯ЛП ЫТЪУИТЪ‚УП, ТУБ‰‡˛˘ЛП М‡ЪЫ‡О¸МУВ fl‚ОВМЛВ
ЛУМЛБ‡ˆЛЛ. й·‡БУ‚‡ММ˚В ЪВПУ‚ВМЪЛОflЪУУП ЛУМ˚ ‚˚ФУОМfl˛Ъ ·О‡„УЪ‚УМУВ ‚УБ‰ВИТЪ‚ЛВ, УКЛ‚Оfl˛Ъ Л У˜Л˘‡˛Ъ ‚УБ‰Ыı.
икаЕйк C - C1
оЫМНˆЛfl ЪВПУ‚ВМЪЛОflЪУ‡
- иУ‚ВМЛЪВ ФВВНО˛˜‡ЪВО¸ ПУ˘МУТЪЛ [êËÒ. Ç] ÒÎÂ‰Û˛˘ËÏ Ó·‡ÁÓÏ:
ФУОУКВМЛВ : ЙУfl˜ЛИ ‚УБ‰Ыı (1100 ЗЪ).
ФУОУКВМЛВ : é˜Â̸ „Ófl˜ËÈ ‚ÓÁ‰Ûı (2200 ÇÚ).
- èÓ‚ÂÌËÚ „ÛÎflÚÓ
[êËÒ. D] М‡ ЪВПФВ‡ЪЫЫ, НУЪУ‡fl ‰УОКМ‡ ФУ‰‰ВКЛ‚‡Ъ¸Тfl ‚ ФУПВ˘ВМЛЛ.
оЫМНˆЛfl ‚ВМЪЛОflЪУ‡
- èÓ‚ÂÌËÚ „ÛÎflÚÓ [êËÒ. D] М‡ П‡НТЛП‡О¸МЫ˛ ЪВПФВ‡ЪЫЫ MAX.
- иУ‚ВМЛЪВ ФВВНО˛˜‡ЪВО¸ ПУ˘МУТЪЛ [êËÒ. B] ‚ ФУОУКВМЛВ .
îÛÌ͈Ëfl ÔÓÚË‚ Á‡ÏÂÁ‡ÌËfl
щЪ‡ ЩЫМНˆЛfl У·ВТФВ˜Л‚‡ВЪ ФУ‰‰ВК‡МЛВ ЪВПФВ‡ЪЫ˚ ‚ ФУПВ˘ВМЛЛ, ‡‚МУИ ФЛ·ОЛБЛЪВО¸МУ +5°C. дУ„‰‡ ЪВПФВ‡ЪЫ‡
УФЫТН‡ВЪТfl МЛКВ ‰‡ММУ„У ЫУ‚Мfl, ЪВПУ‚ВМЪЛОflЪУ ‚НО˛˜‡ВЪТfl ‡‚ЪУП‡ЪЛ˜ВТНЛ.
- иВ‚‰ЛЪВ В„ЫОflЪУ ЪВПФВ‡ЪЫ˚ [êËÒ. D] ‚ ФУОУКВМЛВ .
- йЪВ„ЫОЛЫИЪВ ФВВНО˛˜‡ЪВО¸ ПУ˘МУТЪЛ [êËÒ. B] ÒÎÂ‰Û˛˘ËÏ Ó·‡ÁÓÏ:
ФУОУКВМЛВ ‰Оfl ФУТЪВФВММУ„У М‡„В‚‡ ‰У +5°C.
ФУОУКВМЛВ ‰Оfl ·˚ТЪУ„У М‡„В‚‡ ‰У +5°C.
í‡ÈÏ (ÚÓθÍÓ ‰Îfl ÏÓ‰ÂÎÂÈ Ò Ú‡ÈÏÂÓÏ)
н‡ИПВ ФУБ‚УОflВЪ ЫФ‡‚ОflЪ¸ ‚НО˛˜ВМЛВП Л ‚˚НО˛˜ВМЛВП ФЛ·У‡ ТОВ‰Ы˛˘ЛП У·‡БУП:
азлнкмдсаа ий щдлигмДнДсаа
• í‡ÈÏ - [êËÒ. F] (ÚÓθÍÓ ‰Îfl ÏÓ‰ÂÎÂÈ Ò Ú‡ÈÏÂÓÏ)
f1: ÁÛ·ˆ˚ ‰Îfl ÔÓ„‡ÏÏËÓ‚‡ÌËfl ‚Íβ˜ÂÌËfl.
f2: М‡ЫКМУВ НУО¸ˆУ.
ÇÇççààååÄÄççààÖÖ!!
- Цлга нДвеЦк бДикйЙкДееакйЗДз, ийССЦкЬДзаЦ ЗхЕкДззйв нЦеиЦкДнмкх ЕмСЦн йлмфЦлнЗгьнъль
нйгъдй З кДедДп ЗхЕкДззйЙй ЗкЦеЦза ЗдгыуЦзаь.
• кВ„ЫОЛЫВП‡fl УФУ‡ - (ЪУО¸НУ ‰Оfl ПУ‰ВОВИ Т В„ЫОЛЫВПУИ УФУУИ)
лЪ‡М‰‡ЪМУВ ФУОУКВМЛВ [êËÒ. G].
з‡НОУММУВ ФУОУКВМЛВ: УФУЫ ПУКМУ В„ЫОЛУ‚‡Ъ¸, ˜ЪУ·˚ М‡Ф‡‚ОflЪ¸ „Уfl˜ЛИ ЛОЛ ıУОУ‰М˚И ‚УБ‰Ыı ‚‚Вı. м‰ВКЛ‚‡fl
УТМУ‚‡МЛВ, ТПВТЪЛЪВ НУФЫТ ФЛ·У‡ ‚ФВВ‰
[êËÒ. H].
Page 55

êê
ìì
ëë
ëë
ää
àà
ââ
53
• ÇÛ˜ÌÛ˛
- лПВТЪЛЪВ ‚МЫЪ¸ ‚ТВ БЫ·ˆ˚ Ъ‡ИПВ‡ [êËÒ. I].
- иВ‚‰ЛЪВ ФВВНО˛˜‡ЪВО¸ ПУ˘МУТЪЛ [êËÒ. B] ‚ ФУОУКВМЛВ , ЛОЛ , Á‡‚ËÒfl˘Â ÓÚ ÌÂÓ·ıÓ‰ËÏ˚ı ‚‡Ï ÙÛÌ͈ËÈ.
- èÓ‚ÂÌËÚ „ÛÎflÚÓ
[êËÒ. D] М‡ ЪВПФВ‡ЪЫЫ, НУЪУ‡fl ‰УОКМ‡ ФУ‰‰ВКЛ‚‡Ъ¸Тfl ‚ ФУПВ˘ВМЛЛ.
ÇÇççààååÄÄççààÖÖ!!
- нДвеЦк кДЕйнДЦн гатъ нйгъдй З нйе лгмуДЦ, Цлга ЗагдД нЦкейЗЦзнагьнйкД ЗлнДЗгЦзД З лЦнЦЗмы
кйбЦндм.
• Ä‚ÚÓχÚ˘ÂÒÍË
- иУ‚ВМЛЪВ М‡ЫКМУВ НУО¸ˆУ Ъ‡ИПВ‡ ФУ ˜‡ТУ‚УИ ТЪВОНВ Л ЫТЪ‡МУ‚ЛЪВ ТЪВОНЫ М‡ ЪВНЫ˘ВВ ‚ВПfl [êËÒ. L].
-
лПВТЪЛЪВ М‡ЫКЫ ‚ТВ БЫ·ˆ˚ Ъ‡ИПВ‡ [êËÒ. M], НУПВ ЪВı, НУЪУ˚В ТУУЪ‚ВЪТЪ‚Ы˛Ъ МВУ·ıУ‰ЛПУПЫ ‚‡П ‚ВПВМЛ ‚НО˛˜ВМЛfl
ФЛ·У‡.
- иУ‚ВМЛЪВ ФВВНО˛˜‡ЪВО¸ ПУ˘МУТЪЛ [êËÒ. B] ‚ ФУОУКВМЛВ , ЛОЛ , Á‡‚ËÒfl˘Â ÓÚ ÌÂÓ·ıÓ‰ËÏ˚ı ‚‡Ï ÙÛÌ͈ËÈ.
н‡ИПВ ‡ТТ˜ЛЪ‡М М‡ У‰МЛ ТЫЪНЛ, Л ФУ‚ЪУflВЪ ЫТЪ‡МУ‚ОВММЫ˛ ФУ„‡ППЫ ˜ВВБ 24 ˜‡Т‡. д‡К‰˚И БЫ·Вˆ ТУУЪ‚ВЪТЪ‚ЫВЪ 15 ПЛМЫЪ‡П.
нВıМУОУ„Лfl Imetec-Ion77 (ЪУО¸НУ ‰Оfl ПУ‰ВОВИ Т ЛУМЛБ‡ЪУУП)
ЦТОЛ ‚‡¯ ФЛ·У У·УЫ‰У‚‡М НМУФНУИ Т ТЛ„М‡О¸МУИ О‡ПФУ˜НУИ
n
‰Оfl ‚НО˛˜ВМЛfl ЛУМЛБ‡ЪУ‡, ‚˚ ПУКВЪВ В¯ЛЪ¸, ‚НО˛˜‡Ъ¸
В„У ЛОЛ МВЪ. СОfl ‚НО˛˜ВМЛfl ЛУМЛБ‡ЪУ‡ ‰УТЪ‡ЪУ˜МУ М‡К‡Ъ¸ М‡ НМУФНЫ
n
Л Б‡„УЛЪТfl ТЛ„М‡О¸М‡fl О‡ПФУ˜Н‡, ФУН‡Б˚‚‡˛˘‡fl,
˜ЪУ ЛУМЛБ‡ЪУ ‡·УЪ‡ВЪ. СОfl УЪНО˛˜ВМЛfl ТОВ‰ЫВЪ ‚МУ‚¸ М‡К‡Ъ¸ М‡ НМУФНЫ, ЫТЪ‡МУ‚Л‚ ВВ ‚ ФВ‚УМ‡˜‡О¸МУВ ФУОУКВМЛВ,
ТЛ„М‡О¸М‡fl О‡ПФУ˜Н‡ ФУ„‡ТМВЪ.
нВПУ‚ВМЪЛОflЪУ Imetec-Ion77 У·УЫ‰У‚‡М ЛУМЛБ‡ЪУУП, ЪУ ВТЪ¸ МУ‚ВИ¯ЛП ЫТЪУИТЪ‚УП, ТУБ‰‡˛˘ЛП М‡ЪЫ‡О¸МУВ fl‚ОВМЛВ
ЛУМЛБ‡ˆЛЛ. й·‡БУ‚‡ММ˚В ЪВПУ‚ВМЪЛОflЪУУП ЛУМ˚ ‚˚ФУОМfl˛Ъ ·О‡„УЪ‚УМУВ ‚УБ‰ВИТЪ‚ЛВ, УКЛ‚Оfl˛Ъ Л У˜Л˘‡˛Ъ ‚УБ‰Ыı.
азлнкмдсаа Сгь зДлнЦззйв млнДзйЗда
- (ЪУО¸НУ ‰Оfl ПУ‰ВОВИ Т НУМ¯ЪВИМУП) [кЛТ. Q]
нВПУ‚ВМЪЛОflЪУ ПУКВЪ ЫТЪ‡М‡‚ОЛ‚‡Ъ¸Тfl М‡ ТЪВМВ.
- мТЪ‡МУ‚ЛЪВ М‡ ТЪВМВ НУМ¯ЪВИМ ФЛ ФУПУ˘Л ‚ıУ‰fl˘Лı ‚ НУПФОВНЪ ‰‚Ыı ‰˛·ВОВИ
[êËÒ. N] (‡ÒÒÚÓflÌË ÏÂÊ‰Û ÓÚ‚ÂÒÚËflÏË
‡‚ÌÓ 16,5 ÒÏ, ‰Ë‡ÏÂÚ - 6 ÏÏ).
- мТЪ‡МУ‚ЛЪВ ЪВПУ‚ВМЪЛОflЪУ М‡ НУМ¯ЪВИМ Л Т‰‚ЛМ¸ЪВ В„У Н ТЪВМВ, ˜ЪУ·˚ БЫ·Вˆ НУМ¯ЪВИМ‡ (o1) ‚У¯ВО ‚ Б‡ˆВФОВМЛВ М‡
Б‡‰МВИ ˜‡ТЪЛ ЪВПУ‚ВМЪЛОflЪУ‡, ‚ ТУУЪ‚ВЪТЪ‚ЛЛ Т Ы˜НУИ [êËÒ. O]. уЪУ·˚ ТМflЪ¸ ЪВПУ‚ВМЪЛОflЪУ Т М‡ТЪВММУ„У НУМ¯ЪВИМ‡
М‡КПЛЪВ БЫ·Вˆ НУМ¯ЪВИМ‡, Н‡Н ФУН‡Б‡МУ ТЪВОНУИ, Л У‰МУ‚ВПВММУ Т ˝ЪЛП ФУЪflМЛЪВ ЪВПУ‚ВМЪЛОflЪУ М‡ЫКЫ [êËÒ. P].
икаЕйк л икЦСйпкДзанЦгъзхе млнкйвлнЗйе ELECTRO BLOCK
®
ÇÇççààååÄÄççààÖÖ!!
- ЦТОЛ ‚‡¯ ФЛ·У У·УЫ‰У‚‡М ФВ‰Уı‡МЛЪВО¸М˚П ЫТЪУИТЪ‚УП Electro Block
®
j
, МВУ·ıУ‰ЛПУ ФУ‰НО˛˜ЛЪ¸ В„У
МВФУТВ‰ТЪ‚ВММУ Н ТВЪВ‚УИ УБВЪНВ. зЛ ‚ НУВП ТОЫ˜‡В МВ ФУ‰НО˛˜‡ИЪВ В„У Н МВТЪ‡ˆЛУМ‡М˚П УБВЪН‡П,
ФВВıУ‰МЛН‡П ЛОЛ Ы‰ОЛМЛЪВОflП. иВ‰Уı‡МЛЪВО¸МУВ ЫТЪУИТЪ‚У Electro Block
®
У·УЫ‰У‚‡МУ ‰ЛЩЩВВМˆЛ‡О¸М˚П
‚˚НО˛˜‡ЪВОВП ФУ‚˚¯ВММУИ ˜Ы‚ТЪ‚ЛЪВО¸МУТЪЛ, НУЪУУВ Б‡˘Л˘‡ВЪ ФУО¸БУ‚‡ЪВОfl УЪ ‡ТТВЛ‚‡МЛfl ЪУН‡ М‡ БВПО˛,
ФВ‚˚¯‡˛˘В„У БМ‡˜ВМЛВ 10 ПД.
СОfl ЛТФУО¸БУ‚‡МЛfl ФЛ·У‡ ‚˚ФУОМЛЪВ ТОВ‰Ы˛˘ЛВ УФВ‡ˆЛЛ:
- ЗТЪ‡‚¸ЪВ Electro Block®‚ ТВЪВ‚Ы˛ УБВЪНЫ, М‡КПЛЪВ Л УЪФЫТЪЛЪВ НМУФНЫ ON, ФУТОВ ˜В„У ФУ‰ ТПУЪУ‚˚П ТЪВНОУП ФУfl‚ЛЪТfl
ЛМ‰ЛН‡ЪУ Н‡ТМУ„У ˆ‚ВЪ‡. Electro Block
®
‚Íβ˜ÂÌ.
- èӂ¸Ú ËÒÔ‡‚ÌÓÒÚ¸ Á‡˘ËÚÌÓ„Ó ÛÒÚÓÈÒÚ‚‡ Electro Block
®
М‡К‡ЪЛВП НМУФНЛ TEST: ÔËÚ‡ÌË ÔÂ͇ÚËÚÒfl, ͇ÒÌ˚È
ЛМ‰ЛН‡ЪУ ЛТ˜ВБМВЪ, У·УБМ‡˜‡fl, ˜ЪУ Б‡˘ЛЪМУВ ЫТЪУИТЪ‚У Electro Block
®
‡·ÒÓβÚÌÓ ËÒÔ‡‚ÌÓ.
- З˚ФУОМЛ‚ ФУ‚ВНЫ, М‡КПЛЪВ Л ‚МУ‚¸ УЪФЫТЪЛЪВ НМУФНЫ ON: ‚МУ‚¸ ФУfl‚ЛЪТfl Н‡ТМ˚И ЛМ‰ЛН‡ЪУ, ФУТОВ ˜В„У
ЪВПУ‚ВМЪЛОflЪУ ·Ы‰ВЪ „УЪУ‚ Н ‡·УЪВ. щЪУЪ ЪВТЪ МВУ·ıУ‰ЛПУ ‚˚ФУОМflЪ¸ ФВВ‰ Н‡К‰˚П ЛТФУО¸БУ‚‡МЛВП ФЛ·У‡. З ТОЫ˜‡В
‡МУП‡О¸МУИ ЛОЛ МВФ‡‚ЛО¸МУИ ‡·УЪ˚ (М‡ФЛПВ, ФЛ ФВЛУ‰Л˜ВТНУП Т‡·‡Ъ˚‚‡МЛЛ ЫТЪУИТЪ‚‡, ·Ы‰Ы˜Л ФУ‰НО˛˜ВММ˚П Н
ТВЪЛ, ЛОЛ КВ ФЛ МВТ‚УВ‚ВПВММУП Т‡·‡Ъ˚‚‡МЛЛ Electro Block
®
ФЛ ЪВТЪЛУ‚‡МЛЛ), У·‡˘‡ИЪВТ¸ МВПВ‰ОВММУ ‚
УЩЛˆЛ‡О¸М˚В лВ‚ЛТМ˚В ˆВМЪ˚ ЩЛП˚ “аеЦнЦд”. дУ„‰‡ ФЛ·У ‚˚НО˛˜‡ВЪТfl, ‡ ФВ‰Уı‡МЛЪВО¸МУВ ЫТЪУИТЪ‚У Electro
Block®‚˚МЛП‡ВЪТfl ЛБ УБВЪНЛ, ‰ЛЩЩВВМˆЛ‡О¸М˚И ‚˚НО˛˜‡ЪВО¸ ЫТЪУИТЪ‚‡ УЪНО˛˜‡ВЪТfl ‡‚ЪУП‡ЪЛ˜ВТНЛ. аТФУО¸БУ‚‡МЛВ
˝ОВНЪЛ˜ВТНЛı ФЛ·УУ‚ МВ ФУ М‡БМ‡˜ВМЛ˛ ПУКВЪ ·˚Ъ¸ УФ‡ТМ˚П. аТФУО¸БУ‚‡МЛВ ФВ‰Уı‡МЛЪВО¸МУ„У ЫТЪУИТЪ‚‡ МВ
Б‡ПВМflВЪ ‚˚ФУОМВМЛВ УТМУ‚М˚ı Ф‡‚ЛО ФУ ˝ОВНЪЛ˜ВТНУИ ·ВБУФ‡ТМУТЪЛ.
ийгЦбзхЦ кЦдйеЦзСДсаа
ЦТОЛ ‚˚ В¯ЛОЛ Ы·‡Ъ¸ ЪВПУ‚ВМЪЛОflЪУ, ЪУ У·ВТФВ˜¸ЪВ В„У Б‡˘ЛЪЫ УЪ Ф˚ОЛ, ˜ЪУ·˚ УМ‡ МВ ФУФ‡О‡ ‚МЫЪ¸ В¯ВЪУН.
ë‰Â·ÌÓ ‚ èêK
Page 56

54
азлнкмKсаа а мицнЗДзаь бД икДЗагзA а ЕЦбйиДлзД мийнкЦЕД
икйуЦнЦнЦ ЗзаеДнЦгзй лцСцкЬДфанЦ лЦ З нйЗД кцKйЗйСлнЗй азлнкмKсаа а
мицнЗДзаь а Йа бДиДбЦнЦ KДнй зЦкДбСЦгзД уДлн йн лДеаь ДиДкДн, нцв KДнй ейЙДн
СД За ийлгмЬДн а бД З ЕцСЦфЦ. нЦ лцСцкЬДн ЗДЬзД азойкеДсаь ий йнзйтЦзаЦ зД
зДуазA а ЕЦбйиДлзйлннД зД азлнДгакДзЦ, мийнкЦЕД а ийССкцЬKД зД абСЦгаЦнй.
ЗзаеДзаЦ
йЕфа мицнЗДзаь
аеЦнЦK ЗЛ ·О‡„У‰‡Л Б‡ ЛБ·У‡ М‡ МВ„У‚УЪУ ЛБ‰ВОВМЛВ. лЛ„ЫМЛ ТПВ, ˜В ˘В УˆВМЛЪВ Н‡˜ВТЪ‚УЪУ, М‡‰ВК‰МУТЪЪ‡ Л
„ЛК‡Ъ‡ Н˙П ФУЪВ·ЛЪВОfl, НУflЪУ ТПВ ‚ОУКЛОЛ ФЛ Б‡ПЛТОflМВЪУ Л Т˙Б‰‡‚‡МВЪУ ПЫ.
1. иУ‚ВВЪВ ‰‡ОЛ, ТОВ‰ УЪТЪ‡Мfl‚‡МВ М‡ УФ‡НУ‚Н‡Ъ‡, ЫВ‰˙Ъ В М‚‰ЛП Л ФУ МВ„У МflП‡ ‚Л‰ЛПЛ ТОВ‰Л УЪ Ы‚ВК‰‡МЛfl,
ФЛ˜ЛМВМЛ ФЛ Ъ‡МТФУЪЛ‡МВЪУ ПЫ. ДНУ ЛП‡ЪВ Т˙ПМВМЛВ Б‡ ЪУ‚‡, МВ ЛБФУОБ‚‡ИЪВ ‡Ф‡‡Ъ‡ Л ТВ У·˙МВЪВ ТВ Н˙П
лВ‚ЛБЛЪВ Б‡ ЪВıМЛ˜ВТНУ У·ТОЫК‚‡МВ, ЫФ˙ОМУПУ˘ВМЛ УЪ аеЦнЦK.
2. иВ‰Л ‰‡ ‚НО˛˜ЛЪВ ‡Ф‡‡Ъ‡, ФУ‚ВВЪВ ‰‡ОЛ ‰‡ММЛЪВ УЪ Ъ‡·ВОН‡Ъ‡ УЪ„У‚‡flЪ М‡ ı‡‡НЪВЛТЪЛН‡Ъ‡ М‡ ПВК‡Ъ‡ Б‡
Б‡ı‡М‚‡МВ Т ВОВНЪЛ˜ВТНЛ ЪУН. н‡·ВОН‡Ъ‡ В ‡БФУОУКВМ‡ М‡ ‰˙МУЪУ М‡ ‡Ф‡‡Ъ‡.
3. зВ ФЛ·fl„‚‡ИЪВ ‰У ЛБФУОБ‚‡МВЪУ М‡ ‡‰‡ФЪУЛ, ПМУ„УФУБЛˆЛУММЛ НУМЪ‡НЪЛ Л/ЛОЛ ‡БНОУМЛЪВОЛ. иЛ МВТ˙‚ПВТЪЛПУТЪ
ПВК‰Ы ВОВНЪЛ˜ВТНЛfl НУМЪ‡НЪ Л ˘ВФТВО‡ М‡ ЫВ‰‡, Б‡ПВМВЪВ М‡ОЛ˜МЛfl ˘ВФТВО Т ФУ‰ıУ‰fl˘ Ъ‡Н˙‚, ФУОБ‚‡ИНЛ
ЫТОЫ„ЛЪВ М‡ Н‚‡ОЛЩЛˆЛ‡М ТФВˆЛ‡ОЛТЪ.
4. нУБЛ ЫВ‰ Ъfl·‚‡ ‰‡ ·˙‰В ЛБФУОБ‚‡М В‰ЛМТЪ‚ВМУ Б‡ ˆВОЛЪВ, Б‡ НУЛЪУ В Т˙Б‰‡‰ВМ, Ъ.В. Н‡ЪУ ЪВПУ‚ВМЪЛО‡ЪУ. ЗТflНУ
‰Ы„У ФЛОУКВМЛВ М‡ ЫВ‰‡ В МВТФВˆЛЩЛ˜МУ Л ТОВ‰У‚‡ЪВОМУ УФ‡ТМУ.
иУЛБ‚У‰ЛЪВОflЪ МВ МУТЛ УЪ„У‚УМУТЪ Б‡ В‚ВМЪЫ‡ОМЛ ‰‡ММЛ, ФЛ˜ЛМВМЛ, ‚ ВБЫОЪ‡Ъ УЪ МВТФВˆЛЩЛ˜МУЪУ ПЫ Л
ФУ„В¯МУ ЛБФУОБ‚‡МВ.
5. иЛ ФУОБ‚‡МВЪУ М‡ ВОВНЪЛ˜ВТНЛ ЫВ‰Л, Ъfl·‚‡ ‰‡ ТВ ТФ‡Б‚‡Ъ МflНУЛ УТМУ‚МЛ Ф‡‚ЛО‡. з‡И-‚‡КМЛЪВ УЪ Ъflı Т‡:
- Ì ‰ÓÍÓÒ‚‡ÈÚ ‡Ô‡‡Ú‡ Ò ÏÓÍË ËÎË ‚·ÊÌË ˙ˆÂ ËÎË Í‡Í‡
- МВ ‰˙Ф‡ИЪВ Б‡ı‡М‚‡˘Лfl Н‡·ВО ЛОЛ Т‡ПЛfl ЫВ‰ ФЛ ЛБ‚‡К‰‡МВ М‡ ˘ВФТВО‡ УЪ НУМЪ‡НЪ‡
- МВ УТЪ‡‚flИЪВ ЫВ‰‡ ‰‡ ·˙‰В ФflНУ ЛБОУКВМ М‡ ‡ЪПУТЩВМЛ ‡„ВМЪЛ (‰˙К‰, ТО˙МˆВ Л ‰.)
- Ì ÔÓÁ‚ÓÎfl‚‡ÈÚ ̇ ‰Âˆ‡ ËÎË ËÌ‚‡ÎË‰Ë ‰‡ ÔÓÎÁ‚‡Ú ·ÂÁ ̇‰ÁÓ Û‰‡
6. зВ ФУТЪ‡‚flИЪВ ЫВ‰‡ МВФУТВ‰ТЪ‚ВМУ ФУ‰ ВОВНЪЛ˜ВТНЛfl НУМЪ‡НЪ. зВ ЛБФУОБ‚‡ИЪВ ЪУ‚‡ ЛБ‰ВОЛВ ‚ МВФУТВ‰ТЪ‚ВМ‡
·ОЛБУТЪ ‰У ‚‡М‡ Т ‚У‰‡, ‰Ы¯ ЛОЛ ·‡ТВИМ. зВ ФУТЪ‡‚flИЪВ ЛБ‰ВОЛВЪУ Ъ‡Н‡, ˜В ТВ ЛП‡ ‰УТЪ˙Ф ‰У МВ„У УЪ ‚‡М‡Ъ‡, ‰Ы¯‡
ЛОЛ ·‡ТВИМ‡. зВ ФУНЛ‚‡ИЪВ В¯ВЪНЛЪВ Б‡ ‚ıУ‰ Л ЛБıУ‰ М‡ ‚˙Б‰Ыı‡.
7. иВ‰Л УТ˙˘ВТЪ‚fl‚‡МВЪУ М‡ Н‡Н‚ЛЪУ Л ‰‡ ·ЛОУ ‰ВИТЪ‚Лfl ФУ ФУ˜ЛТЪ‚‡МВЪУ ЛОЛ ФУ‰‰˙КН‡Ъ‡ М‡ ‡Ф‡‡Ъ‡, ФВН‡ЪВЪВ
Б‡ı‡М‚‡МВЪУ ПЫ Т ЪУН УЪ ВОВНЪЛ˜ВТН‡Ъ‡ ПВК‡, ЛБ‚‡К‰‡ИНЛ ˘ВФТВО‡ УЪ ВОВНЪЛ˜ВТНЛfl НУМЪ‡НЪ.
8. иЛ ФУ‚В‰‡ Л/ЛОЛ МВН‡˜ВТЪ‚ВМУ ‰ВИТЪ‚ЛВ М‡ ‡Ф‡‡Ъ‡, Ы„‡ТВЪВ „У Л МВ ФВ‰ФЛВП‡ИЪВ ‰ВИТЪ‚Лfl, НУЛЪУ ·Лı‡ ПУ„ОЛ
‰‡ „У ФУ‚В‰flЪ. ДНУ В МВУ·ıУ‰ЛП‡ ФУФ‡‚Н‡, У·˙МВЪВ ТВ Б‡ ЪУ‚‡ Н˙П лВ‚ЛБЛЪВ Б‡ ЪВıМЛ˜ВТНУ У·ТОЫК‚‡МВ,
ЫФ˙ОМУПУ˘ВМЛ УЪ аеЦнЦK.
9. б‡ı‡М‚‡˘ЛflЪ Н‡·ВО М‡ ЪУБЛ ЫВ‰ МВ ПУКВ ‰‡ ·˙‰В ТПВМВМ УЪ ФУЪВ·ЛЪВОfl. иЛ ФУ‚В‰‡ М‡ Н‡·ВО‡ ЛОЛ ‡НУ В
МВo·ıУ‰ЛП‡ ТПflМ‡Ъ‡ ПЫ, У·˙МВЪВ ТВ Н˙П ‡НВ‰ЛЪЛ‡МЛЪВ лВ‚ЛБЛ Б‡ ЪВıМЛ˜ВТНУ У·ТОЫК‚‡МВ М‡ аеЦнЦK .
10. KУ„‡ЪУ В¯ЛЪВ ‰‡ ФВН‡ЪЛЪВ ЫФУЪВ·‡Ъ‡ М‡ ЪУБЛ ‚Л‰ ‡Ф‡‡Ъ, Т˙‚ВЪ‚‡ПВ ‚Л ‰‡ „У ФВ‚˙МВЪВ ‚ МВЛБФУО‚‡ВП, Н‡ЪУ
Ф˙‚У ЛБ‚‡‰ЛЪВ ˘ВФТВО‡ УЪ ВОВНЪЛ˜ВТНЛfl НУМЪ‡НЪ, ‡ ТОВ‰ ЪУ‚‡ УЪВКВЪВ Б‡ı‡М‚‡˘Лfl Н‡·ВО М‡ ‡Ф‡‡Ъ‡.
л˙‚ВЪ‚‡ПВ ‚Л, Т˙˘У Ъ‡Н‡, ‰‡ У·ВБУФ‡ТЛЪВ ЪВБЛ ˜‡ТЪЛ УЪ ‡Ф‡‡Ъ‡, НУЛЪУ ·Лı‡ ПУ„ОЛ ‰‡ ·˙‰‡Ъ УФ‡ТМЛ, УТУ·ВММУ Б‡
‰Вˆ‡, НУЛЪУ ЛБФУОБ‚‡Ъ МВЫФУЪВ·flВПЛfl ‡Ф‡‡Ъ ФЛ Л„‡.
11. зВ ФУНЛ‚‡ИЪВ В¯ВЪНЛЪВ Б‡ Б‡ТПЫН‚‡МВ Л ФУ‰‡‚‡МВ М‡ ‚˙Б‰Ыı‡, Б‡ ‰‡ ЛБ·В„МВЪВ ЛТН‡ УЪ ФВ„fl‚‡МВ.
12. нУБЛ ‡Ф‡‡Ъ МВ В ФВ‰М‡БМ‡˜ВМ Б‡ ЫФУЪВ·‡ УЪ ‰Вˆ‡ Л ıУ‡ Т У„‡МЛ˜ВМЛ ЩЛБЛ˜ВТНЛ, ТВЪЛ‚МЛ ЛОЛ ЫПТЪ‚ВМЛ
‚˙БПУКМУТЪЛ, Л ‚˙‚ ‚ТВНЛ ТОЫ˜‡И, УЪ ıУ‡ ·ВБ ТФВˆЛЩЛ˜МЛ ФУБМ‡МЛfl Л УФЛЪ, ·ВБ М‡·О˛‰ВМЛВ ЛОЛ ЛМТЪЫНˆЛЛ Б‡
ЫФУЪВ·‡, ‰‡‰ВМЛ УЪ УЪ„У‚УВМ ˜У‚ВН.
13. ÄÔ‡‡Ú˙Ú Ì  Ô‰̇Á̇˜ÂÌ Á‡ ‰ÂÚÒ͇ Ë„‡.
Page 57

Å
ö
ã
É
Ä
ê
ë
ä
à
55
азлнкмKсаа бД мийнкЦЕД
ìêÖÑ A
• Kβ˜ Á‡ ÏÓ˘ÌÓÒÚ [îË„. A]
ийбасаь îìçKñàü
ÄÔ‡‡Ú ‚ ËÁÍβ˜ÂÌÓ Ò˙ÒÚÓflÌËÂ
íÓÔ˙Î ‚˙Á‰Ûı (1100W)
åÌÓ„Ó ÚÓÔ˙Î ‚˙Á‰Ûı (2200W)
ìêÖÑ B
• Kβ˜ Á‡ ÏÓ˘ÌÓÒÚ [îË„. E]
ийбасаь îìçKñàü
ÄÔ‡‡Ú ‚ ËÁÍβ˜ÂÌÓ Ò˙ÒÚÓflÌËÂ
ëÚÛ‰ÂÌ ‚˙Á‰Ûı
íÓÔ˙Î ‚˙Á‰Ûı (1000W)
åÌÓ„Ó ÚÓÔ˙Î ‚˙Á‰Ûı (2000W)
• ëÚ‡ÂÌ ÚÂÏÓÒÚ‡Ú - [îË„. C]
лЪ‡ИМЛflЪ ЪВПУТЪ‡Ъ „‡‡МЪЛ‡ ФУ‰‰˙К‡МВ М‡ КВО‡М‡Ъ‡ ЪВПФВ‡ЪЫ‡: ТОВ‰ ‰УТЪЛ„‡МВ М‡ Б‡‰‡‰ВМУЪУ МЛ‚У ЫВ‰˙Ъ
‡‚ЪУП‡ЪЛ˜МУ ТВ ЛБНО˛˜‚‡ Л ТВ ‚НО˛˜‚‡ ЪУ„‡‚‡, НУ„‡ЪУ ЪВПФВ‡ЪЫ‡Ъ‡ ТФ‡‰МВ ФУ‰ МВ„У.
ийбасаь омзKсаь
èÓÚË‚ÓÁ‡Ï‡Áfl‚‡ÌÂ
MAX е‡НТЛП‡ОМ‡ ЪВПФВ‡ЪЫ‡
ìêÖÑ C - C1
• Kβ˜ Á‡ ÏÓ˘ÌÓÒÚ [îË„. B]
ийбасаь îìçKñàü
ÄÔ‡‡Ú ‚ ËÁÍβ˜ÂÌÓ Ò˙ÒÚÓflÌËÂ
ëÚÛ‰ÂÌ ‚˙Á‰Ûı
íÓÔ˙Î ‚˙Á‰Ûı (1100W)
åÌÓ„Ó ÚÓÔ˙Î ‚˙Á‰Ûı (2200W)
• ëÚ‡ÂÌ ÚÂÏÓÒÚ‡Ú - [îË„. D]
ийбасаь омзKсаь
èÓÚË‚ÓÁ‡Ï‡Áfl‚‡ÌÂ
MAX е‡НТЛП‡ОМ‡ ЪВПФВ‡ЪЫ‡
лЪ‡ИМЛflЪ ЪВПУТЪ‡Ъ „‡‡МЪЛ‡ ФУ‰‰˙К‡МВ М‡ КВО‡М‡Ъ‡ ЪВПФВ‡ЪЫ‡: ТОВ‰ ‰УТЪЛ„‡МВ М‡ Б‡‰‡‰ВМУЪУ МЛ‚У ЫВ‰˙Ъ
‡‚ЪУП‡ЪЛ˜МУ ТВ ЛБНО˛˜‚‡ Л ТВ ‚НО˛˜‚‡ ЪУ„‡‚‡, НУ„‡ЪУ ЪВПФВ‡ЪЫ‡Ъ‡ ТФ‡‰МВ ФУ‰ МВ„У.
йиалДзаЦ зД мкЦСД а зД ДKлЦлмДканЦ ем [îË„. Z]
a
K‡Ô‡Í ̇ ÍÓχ̉ÌÓÚÓ Ú‡·ÎÓ
h
еflТЪУ Б‡ Б‡ı‚‡˘‡МВ ЛОЛ Б‡ ПУМЪЛ‡МВ М‡ ТНУ·‡Ъ‡ (Б‡‰М‡ ТЪ‡М‡)
b
ëÚ‡ÂÌ ÚÂÏÓÒÚ‡Ú
i
ìÒÚÓÈÒÚ‚Ó Á‡ ̇ÏÓÚ͇ ̇ ͇·Â·
c
í‡ÈÏÂ
j
Electro Block
®
d
Kβ˜ Á‡ ÏÓ˘ÌÓÒÚ
k
лНУ·Л Б‡ ПУМЪЛ‡МВ ‚˙ıЫ ТЪВМ‡
e
ã‡ÏÔ˘͇ Á‡ ‚Íβ˜ÂÌÓ Ò˙ÒÚÓflÌËÂ
l
ЗЛМЪУ‚В Л ФУ·НЛ Б‡ ПУМЪЛ‡МВ ‚˙ıЫ ТЪВМ‡
f
KÓÔÛÒ Ì‡ ‰‚Û„‡ÚÂÎfl Ë Â¯ÂÚ͇ (Ô‰̇ Òڇ̇)
m
аМ‰ЛН‡ЪУ М‡ ИУМЛБ‡ЪУ‡ (Т‡ПУ Б‡ ПУ‰ВОЛ Т ИУМЛБ‡ЪУ)
g
ê¯ÂÚ͇ Á‡ ‚ıÓ‰ ̇ ‚˙Á‰Ûı
n
KУФ˜В Б‡ Т‚ВЪОЛМВМ ЛМ‰ЛН‡ЪУ М‡ ИУМЛБ‡ЪУ‡ (Т‡ПУ Б‡ ПУ‰ВОЛ Т ИУМЛБ‡ЪУ)
Page 58

56
ìêÖÑ A
СВИТЪ‚ЛВ М‡ ЪВПУ‚ВМЪЛО‡ЪУ‡
- ᇂ˙Ú Íβ˜‡ Á‡ ÏÓ˘ÌÓÒÚ [îË„. A] ÔÓ ÒΉÌËfl ̇˜ËÌ:
ÔÓÁˈËfl : íÓÔ˙Î ‚˙Á‰Ûı (1100W)
ÔÓÁˈËfl : åÌÓ„Ó ÚÓÔ˙Î ‚˙Á‰Ûı (2200W)
ìêÖÑ B
СВИТЪ‚ЛВ М‡ ЪВПУ‚ВМЪЛО‡ЪУ‡
- ᇂ˙ÚÂÚ Íβ˜‡ Á‡ ÏÓ˘ÌÓÒÚ [îË„. E] ÔÓ ÒΉÌËfl ̇˜ËÌ:
ÔÓÁˈËfl íÓÔ˙Î ‚˙Á‰Ûı (1000W)
ÔÓÁˈËfl åÌÓ„Ó ÚÓÔ˙Î ‚˙Á‰Ûı (2000W)
- ê„ÛΡÈÚ ÒÚ‡ÈÌËfl ÚÂÏÓÒÚ‡Ú [îË„. C] ТФУВ‰ КВО‡М‡Ъ‡ УЪ ‚‡Т ЪВПФВ‡ЪЫ‡.
СВИТЪ‚ЛВ гflЪМ‡ ‚ВМЪЛО‡ˆЛfl
- ê„ÛΡÈÚ ÒÚ‡ÈÌËfl ÚÂÏÓÒÚ‡Ú [îË„. C] М‡ П‡НТЛП‡ОМ‡Ъ‡ ЪВПФВ‡ЪЫ‡ MAX.
- ᇂ˙ÚÂÚ Íβ˜‡ Á‡ ÏÓ˘ÌÓÒÚ [îË„. E] ‚ ФУОУКВМЛВ .
èÓÚË‚ÓÁ‡Ï‡Áfl‚‡˘‡ ÙÛÌ͈Ëfl
н‡БЛ ЩЫМНˆЛfl „‡‡МЪЛ‡ ФУ‰‰˙К‡МВ М‡ ЪВПФВ‡ЪЫ‡Ъ‡ М‡ ТВ‰‡Ъ‡ ‚ ‡ПНЛЪВ М‡ +5°C. KУ„‡ЪУ ЪВПФВ‡ЪЫ‡Ъ‡ Ф‡‰МВ ФУ‰ ЪУ‚‡
МЛ‚У, ‡‚ЪУП‡ЪЛ˜МУ ТВ ‚НО˛˜‚‡ ЪВПУ‚ВМЪЛО‡ЪУ˙Ъ.
- ê„ÛΡÈÚ ÒÚ‡ÈÌËfl ÚÂÏÓÒÚ‡Ú
[îË„. C] ‚ ФУОУКВМЛВ ФУЪЛ‚УБ‡П‡Бfl‚‡МВ .
- ᇂ˙ÚÂÚ Íβ˜‡ Á‡ ‡ ÏÓ˘ÌÓÒÚ [îË„. E] ФУ ТОВ‰МЛfl М‡˜ЛМ:
ФУБЛˆЛfl Б‡ ·‡‚МУ ‚˙БТЪ‡МУ‚fl‚‡МВ М‡ ЪВПФВ‡ЪЫ‡Ъ‡ ‰У +5°C.
ФУБЛˆЛfl Б‡ ·˙БУ ‚˙БТЪ‡МУ‚fl‚‡МВ М‡ ЪВПФВ‡ЪЫ‡Ъ‡ ‰У +5°C.
нВıМУОУ„Лfl аПВЪВН-вУМ77 (Т‡ПУ Б‡ ПУ‰ВОЛ Т ИУМЛБ‡ЪУ)
ДНУ ‚‡¯ЛflЪ ЫВ‰ В ТМ‡·‰ВМ Т ИУМЛБ‡ЪУ, В‰ЛМ ‚НО˛˜ВМ Т‚ВЪОЛМВМ ЛМ‰ЛН‡ЪУ
m
˘В ФУН‡Б‚‡ МВ„У‚УЪУ ‰ВИТЪ‚ЛВ.
нВПУ‚ВМЪЛО‡ЪУ˙Ъ Imetec-Ion77 В ТМ‡·‰ВМ Т ИУМЛБ‡ЪУ, В‰МУ В‚УО˛ˆЛУММУ ЫТЪУИТЪ‚У, НУВЪУ ‚˙БФУЛБ‚ВК‰‡ ВТЪВТЪ‚ВМУЪУ
fl‚ОВМЛВ ИУМЛБ‡ˆЛfl. ЙВМВЛ‡МЛЪВ УЪ ЪВПУ‚ВМЪЛО‡ЪУ‡ ИУМЛ ‚˙Б‰ВИТЪ‚‡Ъ ФУОУКЛЪВОМУ М‡ ‚˙Б‰Ыı‡, Н‡ЪУ „У УТ‚ВК‡‚‡Ъ Л
ФУ˜ЛТЪ‚‡Ъ.
ìêÖÑ C - C1
СВИТЪ‚ЛВ М‡ ЪВПУ‚ВМЪЛО‡ЪУ‡
- ᇂ˙ÚÂÚ Íβ˜‡ Á‡ ÏÓ˘ÌÓÒÚ [îË„. B] ÔÓ ÒΉÌËfl ̇˜ËÌ:
ÔÓÁˈËfl íÓÔ˙Î ‚˙Á‰Ûı (1100W)
ÔÓÁˈËfl åÌÓ„Ó ÚÓÔ˙Î ‚˙Á‰Ûı (2200W)
- ê„ÛΡÈÚ ÒÚ‡ÈÌËfl ÚÂÏÓÒÚ‡Ú
[îË„. D] ТФУВ‰ КВО‡М‡Ъ‡ УЪ ‚‡Т ЪВПФВ‡ЪЫ‡.
СВИТЪ‚ЛВ М‡ ‚ВМЪЛО‡ЪУ‡
- ê„ÛΡÈÚ ÒÚ‡ÈÌËfl ÚÂÏÓÒÚ‡Ú [îË„. D] М‡ П‡НТЛП‡ОМ‡Ъ‡ ЪВПФВ‡ЪЫ‡ MAX.
- ᇂ˙ÚÂÚ Íβ˜‡ Á‡ ÏÓ˘ÌÓÒÚ [îË„. B] ‚ ФУОУКВМЛВ .
èÓÚË‚ÓÁ‡Ï‡Áfl‚‡˘‡ ÙÛÌ͈Ëfl
н‡БЛ ЩЫМНˆЛfl „‡‡МЪЛ‡ ФУ‰‰˙К‡МВ М‡ ЪВПФВ‡ЪЫ‡Ъ‡ М‡ ТВ‰‡Ъ‡ ‚ ‡ПНЛЪВ М‡ +5°C. KУ„‡ЪУ ЪВПФВ‡ЪЫ‡Ъ‡ Ф‡‰МВ ФУ‰ ЪУ‚‡
МЛ‚У, ‡‚ЪУП‡ЪЛ˜МУ ТВ ‚НО˛˜‚‡ ЪВПУ‚ВМЪЛО‡ЪУ˙Ъ.
- ê„ÛΡÈÚ ÒÚ‡ÈÌËfl ÚÂÏÓÒÚ‡Ú
[îË„. D] ‚ ФУОУКВМЛВ ФУЪЛ‚УБ‡П‡Бfl‚‡МВ .
- ᇂ˙ÚÂÚ Íβ˜‡ Á‡ ‡ ÏÓ˘ÌÓÒÚ [îË„. B] ÔÓ ÒΉÌËfl ̇˜ËÌ:
ÔÓÁˈËfl Б‡ ·‡‚МУ ‚˙БТЪ‡МУ‚fl‚‡МВ М‡ ЪВПФВ‡ЪЫ‡Ъ‡ ‰У +5°C.
ФУБЛˆЛfl Б‡ ·˙БУ ‚˙БТЪ‡МУ‚fl‚‡МВ М‡ ЪВПФВ‡ЪЫ‡Ъ‡ ‰У +5°C.
îÛÌ͈ËflÚ‡ Ú‡ÈÏ (Ò‡ÏÓ Á‡ ÏÓ‰ÂÎË Ò Ú‡ÈÏÂ)
оЫМНˆЛflЪ‡ Ъ‡ИПВ ФУБ‚УОfl‚‡ ТОВ‰МЛЪВ М‡˜ЛМЛ М‡ ЫФ‡‚ОВМЛВ М‡ ВКЛП‡ М‡ ‚НО˛˜‚‡МВ Л ЛБНО˛˜‚‡МВ:
азлнкмKсаа бД ийгбЗДзЦ
• T‡ИПВ [оЛ„. F] (Т‡ПУ Б‡ ПУ‰ВОЛЪВ, Б‡ НУЛЪУ В ФВ‰‚Л‰ВМ)
f1: Á˙·ÂÌ ‚Â̈ Á‡ Á‡‰‡‚‡Ì ̇ ËÌÚ‚‡ÎË ÓÚ ‚ÂÏÂ.
f2: Б˙·МУ НУОВОУ.
ЗзаеДзаЦ:
- ДKй нДвеЦкцн Ц икЦСЗДканЦгзй икйЙкДеакДз, ийССцкЬДзЦнй зД нЦеиЦкДнмкДнД фЦ лЦ йлцфЦлнЗьЗД
ЦСазлнЗЦзй З бДСДСЦзанЦ азнЦкЗДга йн ЗкЦеЦ.
• кВ„ЫОЛЫВП‡ УТМУ‚‡ - (Т‡ПУ Б‡ ПУ‰ВОЛЪВ, Б‡ НУЛЪУ В ФВ‰‚Л‰ВМ‡)
лЪ‡М‰‡ЪМУ ФУОУКВМЛВ [îË„. G].
з‡НОУМВМУ ФУОУКВМЛВ: УТМУ‚‡Ъ‡ ПУКВ ‰‡ ·˙‰В В„ЫОЛ‡М‡ ФУ Ъ‡Н˙‚ М‡˜ЛМ, ˜В ‰‡ М‡ТУ˜‚‡ ЪУФОЛfl/ТЪЫ‰ВМ ‚˙Б‰Ыı М‡„УВ. иЛ
МВФУ‰‚ЛКМ‡ УТМУ‚‡, УТ‚У·У‰ВЪВ ‰‚Л„‡ЪВОМЛfl НУФЫТ Л „У ФЛ‰‚ЛКВЪВ М‡ФВ‰
[îË„. H].
Page 59

Å
ö
ã
É
Ä
ê
ë
ä
à
57
• ê˙˜ÌÓ
- ᇂ˙ÚÂÚ ̇‚˙Ú Á˙·ÌËfl ‚Â̈ ̇ Ú‡Èχ [îË„. I].
- ᇂ˙ÚÂÚ Íβ˜‡ Á‡ ÏÓ˘ÌÓÒÚ [îË„. B] ‚ ÔÓÁˈËËÚ , ËÎË ‚ Б‡‚ЛТЛПУТЪ УЪ ЩЫМНˆЛflЪ‡, НУflЪУ КВО‡ВЪВ ‰‡ ‚НО˛˜ЛЪВ.
- ê„ÛΡÈÚ ÒÚ‡ÈÌËfl ÚÂÏÓÒÚ‡Ú [îË„. D] ‚ Б‡‚ЛТЛПУТЪ УЪ КВО‡М‡Ъ‡ УЪ ‚‡Т ЪВПФВ‡ЪЫ‡.
ЗзаеДзаЦ:
- нДвеЦкцн кДЕйна лДей, ДKй фЦилЦгцн зД нЦкейЗЦзнагДнйкД Ц ЗKгыуЦз З ЦгЦKнкауЦлKДнД екЦЬД.
• Ä‚ÚÓχÚ˘ÌÓ
- ᇉ‚ЛКВЪВ ‚˙М¯МУЪУ НУОВОУ М‡ Ъ‡ИПВ‡ ‚ ФУТУН‡ М‡ ˜‡ТУ‚МЛНУ‚‡Ъ‡ ТЪВОН‡ Л ТЛМıУМЛБЛ‡ИЪВ ЛМ‰ЛН‡ЪУ‡ Т ‚‡¯Лfl
˜‡ТУ‚МЛН [îË„. L].
- àÁÚ·Ò͇ÈÚ Í˙Ï ‚˙̯̇ڇ ˜‡ÒÚ ‚Ò˘ÍË Á˙·˜ÂÚ‡ ̇ Ú‡Èχ [îË„. M], Т ЛБНО˛˜ВМЛВ М‡ УМВБЛ, НУЛЪУ Т˙УЪ‚ВЪТЪ‚‡Ъ М‡
ЛМЪВ‚‡ОЛЪВ УЪ ‚ВПВ, ‚ НУЛЪУ ЛТН‡ЪВ ЫВ‰‡ ‰‡ В ‚НО˛˜ВМ.
- ᇂ˙ÚÂÚ Íβ˜‡ Á‡ ÏÓ˘ÌÓÒÚ [îË„. B] ‚ ФУОУКВМЛВ , ЛОЛ ‚ Б‡‚ЛТЛПУТЪ УЪ ЛБ·‡М‡Ъ‡ ЩЫМНˆЛfl.
н‡ИПВ˙Ъ ‡·УЪЛ М‡ ‰ВМУМУ˘ЛВ Л ФУ‚Ъ‡fl Б‡‰‡‰ВМ‡Ъ‡ ФУ„‡П‡ М‡ ЛМЪВ‚‡ОЛ УЪ 24 ˜‡Т‡. з‡ ‚ТflНУ Б˙·˜В Т˙УЪ‚ВЪТЪ‚‡Ъ
ФВЪМ‡‰ВТВЪ ПЛМЫЪЛ.
нВıМУОУ„Лfl аПВЪВН-вУМ77 (Т‡ПУ Б‡ ПУ‰ВОЛ Т ИУМЛБ‡ЪУ)
ДНУ ‚‡¯ЛflЪ ЫВ‰ В ТМ‡·‰ВМ Т НУФ˜В Т˙Т Т‚ВЪОЛМВМ ЛМ‰ЛН‡ЪУ
n
Б‡ ФЫТН‡МВ ‚ ‰ВИТЪ‚ЛВ М‡ ИУМЛБ‡ЪУ‡, ПУКВЪВ ‰‡ В¯ЛЪВ
‰‡ОЛ ‰‡ „У ‚НО˛˜ЛЪВ ЛОЛ МВ. иЫТН‡МВЪУ ‚ ‰ВИТЪ‚ЛВ М‡ ИУМЛБ‡ЪУ‡ ТВ ЛБ‚˙¯‚‡ ˜ВБ М‡ЪЛН‡МВ М‡ НУФ˜ВЪУ
n
, Т‚ВЪОЛММЛflЪ
ЛМ‰ЛН‡ЪУ Т‚ВЪ‚‡ Л ФУН‡Б‚‡, ˜В ИУМЛБ‡ЪУ˙Ъ В ‚НО˛˜ВМ. аБНО˛˜‚‡МВЪУ ТВ ЛБ‚˙¯‚‡ ˜ВБ ФУ‚ЪУМУ М‡ЪЛТН‡МВ М‡ НУФ˜ВЪУ ‰У
‚˙˘‡МВЪУ ПЫ ‚ ЛБıУ‰МУ ФУОУКВМЛВ, ФЛ НУВЪУ Т‚ВЪОЛММЛflЪ ЛМ‰ЛН‡ЪУ Ы„‡Т‚‡.
нВПУ‚ВМЪЛО‡ЪУ˙Ъ Imetec-Ion77 В ТМ‡·‰ВМ Т ИУМЛБ‡ЪУ, В‰МУ В‚УО˛ˆЛУММУ ЫТЪУИТЪ‚У, НУВЪУ ‚˙БФУЛБ‚ВК‰‡ ВТЪВТЪ‚ВМУЪУ
fl‚ОВМЛВ ИУМЛБ‡ˆЛfl. ЙВМВЛ‡МЛЪВ УЪ ЪВПУ‚ВМЪЛО‡ЪУ‡ ИУМЛ ‚˙Б‰ВИТЪ‚‡Ъ ФУОУКЛЪВОМУ М‡ ‚˙Б‰Ыı‡, Н‡ЪУ „У УТ‚ВК‡‚‡Ъ Л
ФУ˜ЛТЪ‚‡Ъ.
азлнкмKсаа бД ейзнакДзЦ Зцкпм лнЦзД -
(Т‡ПУ Б‡ ПУ‰ВОЛЪВ Т УФУ‡ Б‡ ТНУ·ЛЪВ) [оЛ„. Q]
нВПУ‚ВМЪЛО‡ЪУ˙Ъ ПУКВ ‰‡ ·˙‰В ПУМЪЛ‡М ‚˙ıЫ ТЪВМ‡.
- б‡НВФВЪВ МВФУ‰‚ЛКМУ Н˙П ТЪВМ‡Ъ‡ УТМУ‚‡Ъ‡ Б‡ ТНУ·ЛЪВ Т ФУПУ˘Ъ‡ М‡ ‰‚ВЪВ, ‰УТЪ‡‚ВМЛ Т ЫВ‰‡, ФУ·НЛ [îË„. N]
(‡БТЪУflМЛВЪУ ПВК‰Ы УЪ‚УЛЪВ В 16.5 ТП., ‰Л‡ПВЪ˙˙Ъ В 6 ПП).
-иУ‰ФВЪВ ЪВПУ‚ВМЪЛО‡ЪУ‡ ‚˙ıЫ ТНУ·‡Ъ‡ Л „У ФЛЪЛТМВЪВ Н˙П ТЪВМ‡Ъ‡ Ъ‡Н‡, ˜В Ф‡ОВˆ˙Ъ М‡ ТНУ·‡Ъ‡ (o1) ‰‡ Ò Á‡Í‡˜Ë Í˙Ï
Б‡‰М‡Ъ‡ ˜‡ТЪ М‡ ЪВПУ‚ВМЪЛО‡ЪУ‡, ‚ Т˙УЪ‚ВЪТЪ‚ЛВ Т‰˙КН‡Ъ‡ [îË„. O]. иЛ УЪН‡˜‚‡МВ М‡ ЪВПУ‚ВМЪЛО‡ЪУ‡ УЪ ТЪВМ‡Ъ‡,
М‡ЪЛТМВЪВ Ф‡ОВˆ‡ М‡ ТНУ·‡Ъ‡, Н‡НЪУ ФУН‡Б‚‡ ТЪВОН‡Ъ‡, Н‡ЪУ В‰МУ‚ВПВММУ Т ЪУ‚‡ ‰˙Ф‡ИЪВ ЪВПУ‚ВМЪЛО‡ЪУ‡ М‡‚˙М [îË„. P].
мкЦС л ЬаЗйнйлиДльЗДфй млнкйвлнЗй ELECTRO BLOCK
®
ЗДЬзй:
- ДНУ ‚‡¯ЛflЪ ЫВ‰ В ТМ‡·‰ВМ Т КЛ‚УЪУТФ‡Тfl‚‡˘УЪУ ЫТЪУИТЪ‚УЪУ Electro Block
®
j
, ЪУ ЪУИ Ъfl·‚‡ ‰‡ ·˙‰В Т‚˙Б‡М ‰ЛВНЪМУ
Н˙П МВФУ‰‚ЛКВМ ВОВНЪЛ˜ВТНЛ НУМЪ‡НЪ; ‚ МЛН‡Н˙‚ ТОЫ˜‡И МВ „У ‚НО˛˜‚‡ИЪВ МЛЪУ ‚ ФУ‰‚ЛКМЛ НУМЪ‡НЪЛ ЛОЛ ‡‰‡ФЪВЛ, МЛЪУ
Н˙П Ы‰˙ОКЛЪВОЛ. ЬЛ‚УЪУТФ‡Тfl‚‡˘УЪУ ЫТЪУИТЪ‚У Electro Block
®
В ТМ‡·‰ВМУ Т ‚ЛТУНУ˜Ы‚ТЪ‚ЛЪВОВМ ‰ЛЩВВМˆЛ‡ОВМ
ЛБНО˛˜‚‡ЪВО, НУИЪУ ФВ‰Ф‡Б‚‡ ФУЪВ·ЛЪВОfl УЪ ЛБЪЛ˜‡МВ ‚ БВПflЪ‡ М‡ ВОВНЪЛ˜ВТЪ‚У Т˙Т ТЪУИМУТЪЛ М‡‰‚Л¯‡‚‡˘Л 10mA .
èË ÛÔÓÚ·‡ ̇ Û‰‡ ÒΉ‚‡ÈÚ ÒΉÌËÚ ÛÔ˙Ú‚‡ÌËfl:
- ЗНО˛˜ВЪВ Electro Block®‚ ВОВНЪЛ˜ВТНЛfl НУМЪ‡НЪ, М‡ЪЛТМВЪВ Л УТ‚У·У‰ВЪВ НУФ˜ВЪУ ON: ТЪ˙НОВМУЪУ ФУБУ˜В М‡ ЛМ‰ЛН‡ЪУ‡
˘В ТВ Уˆ‚ВЪЛ ‚ ˜В‚ВМУ. Electro Block
®
‚ ЪУБЛ ПУПВМЪ В ‚НО˛˜ВМ.
- èÓ‚ÂÂÚ Ô˙Î̇ڇ ËÁÔ‡‚ÌÓÒÚ Ì‡ Electro Block
®
Н‡ЪУ М‡ЪЛТМЛЪВ НУФ˜ВЪУ TEST: ВОВНЪЛ˜ВТЪ‚УЪУ ТВ ФВН˙Т‚‡, ˜В‚ВМЛflЪ
ЛМ‰ЛН‡ЪУ ЛБ˜ВБ‚‡ Л ЪУ‚‡ В ‰УН‡Б‡ЪВОТЪ‚У, ˜В КЛ‚УЪУТФ‡Тfl‚‡˘УЪУ ЫТЪУИТЪ‚У Electro Block
®
 ‚ Ô˙Î̇ ËÁÔ‡‚ÌÓÒÚ.
- лОВ‰ ЛБ‚˙¯‚‡МВЪУ М‡ ЪУБЛ ЪВТЪ, М‡ЪЛТМВЪВ Л УТ‚У·У‰ВЪВ НУФ˜ВЪУ ON: уВ‚ВМЛflЪ ЛМ‰ЛН‡ЪУ Т‚ВЪ‚‡ Л ЪВПУ‚ВМЪЛО‡ЪУ˙Ъ
В „УЪУ‚ Б‡ ФУОБ‚‡МВ. нУ‚‡ ЪВТЪЫ‚‡МВ Ъfl·‚‡ ‰‡ ТВ ЛБ‚˙¯‚‡ ФВ‰Л ‚ТflНУ ‚НО˛˜‚‡МВ М‡ ЫВ‰‡. З ТОЫ˜‡И М‡ МВУ·Л˜‡ИМУ ЛОЛ
МВФ‡‚ЛОМУ ‰ВИТЪ‚ЛВ (М‡ФЛПВ ˜ВТЪЛ ‚НО˛˜‚‡МЛfl ФУ ‚ВПВ М‡ ‰ВИТЪ‚ЛВ М‡ ‚НО˛˜ВМЛfl ‚ НУМЪ‡НЪ‡ ЫВ‰ ЛОЛ МВМ‡‚ВПВММ‡
В‡НˆЛfl ФУ ‚ВПВ М‡ ЪВТЪЫ‚‡МВЪУ М‡ Electro Block
®
), У·˙МВЪВ ТВ Б‡ Т˙‰ВИТЪ‚ЛВ Н˙П лВ‚ЛБЛЪВ Б‡ нВıМЛ˜ВТНУ У·ТОЫК‚‡МВ,
ЫФ˙ОМУПУ˘ВМЛ УЪ аеЦнЦK. KУ„‡ЪУ ЫВ‰˙Ъ В ЛБНО˛˜ВМ Л КЛ‚УЪУТФ‡Тfl‚‡˘УЪУ ЫТЪУИТЪ‚У Electro Block
®
 ÓÚÒÚ‡ÌÂÌÓ ÓÚ
ÍÓÌÚ‡ÍÚ‡, ‰ËÙÂÂ̈ˇÎÌËflÚ ËÁÍβ˜‚‡ÚÂΠ̇ ÛÒÚÓÈÒÚ‚ÓÚÓ Electro Block
®
‡‚ЪУП‡ЪЛ˜ВТНЛ ТВ ЛБНО˛˜‚‡. аБФУОБ‚‡МВЪУ М‡
ВОВНЪЛ˜ВТНЛЪВ ЫВ‰Л Б‡ ˆВОЛ, ‡БОЛ˜МЛ УЪ ЪВБЛ Б‡ НУЛЪУ Т‡ ФЛ„У‰ВМЛ, ПУКВ ‰‡ ·˙‰В УФ‡ТМУ. аБФУОБ‚‡МВЪУ М‡ Ъ‡НУ‚‡
КЛ‚УЪУТФ‡Тfl‚‡˘У ЫТЪУИТЪ‚У МВ ЛБНО˛˜‚‡ ТФ‡Б‚‡МВЪУ М‡ УТМУ‚МЛЪВ ФВ‰Ф‡БМЛ ПВНЛ Б‡ ВОВНЪЛ˜ВТН‡ ·ВБУФ‡ТМУТЪ.
ийгЦбза лцЗЦна
иЛ ФЛ·Л‡МВЪУ М‡ ЪВПУ‚ВМЪЛО‡ЪУ‡ М‡Ф‡‚ВЪВ Ъ‡Н‡, ˜В ‰‡ ТВ ФВ‰УЪ‚‡ЪЛ ФУФ‡‰‡МВЪУ М‡ Ф‡ı ‚˙‚ ‚˙ЪВ¯МУТЪЪ‡ М‡ В¯ВЪНЛЪВ.
Page 60

INSTRUCTIES EN VOORSCHRIFTEN VOOR EEN CORRECT EN VEILIG GEBRUIK
LEES EERST DE GEBRUIKSAANWIJZING AANDACHTIG EN GEHEEL DOOR VOORDAT U HET
APPARAAT GAAT GEBRUIKEN EN BEWAAR DEZE ZORGVULDIG VOOR LATERE RAADPLEGING.
ZIJ BIEDEN NAMELIJK BELANGRIJKE AANWIJZINGEN VOOR WAT BETREFT DE FUNCTIONALITEIT
EN DE VEILIGHEID BIJ DE INSTALLATIE, HET GEBRUIK EN HET ONDERHOUD VAN HET PRODUCT.
58
LET OP
ALGEMENE VEILIGHEIDSVOORSCHRIFTEN
IMETEC dankt U voor de keuze van een van haar producten.We zijn ervan overtuigd dat U de kwaliteit, de bedrijfszekerheid en het
respect voor de consument waarmede we het toestel ontworpen en gebouwd hebben ten zeerste zult appreciëren.
1. Verwijder al het verpakkingsmateriaal en houdt dit buiten bereik van kinderen.Controleer of alle onderdelen zijn meegeleverd en
uit de verpakking zijn verwijderd en dat er geen schade, mogelijk ontstaan tijdens transport, zijn ontstaan. Ingeval van twijfel het
apparaat aanbieden bij een Imetec Service Center.
2. Sluit het apparaat alleen aan op wisselstroom, op een randgeaarde wandcontactdoos, met een netspanning in ov ereenstemming
met met de informatie aangegeven op het typeplaatje van het apparaat.
3. Verlengsnoeren mogen alleen gebruikt worden indien de netspanning (zie typeplaatje) en het vermogen hetzelfde of hoger is
dan van het bijgeleverde apparaat.
4. De ventilatorkachel is uitsluitend geschikt voor huishoudelijk gebruik. Gebruik het apparaat uitsluitend voor de in de
gebruiksaanwijzing beschreven doeleinden.
5. Bepaalde fundamentele richtlijnen dienen gehandhaafde te worden bij het gebruik van elk elektrisch apparaat.
Attentie:
- Het apparaat nooit aanraken met vochtige handen en nooit op blote voeten gebruiken.
- Het apparaat en het netsnoer nooit in water of een andere vloeistof onderdompelen.
- Het aan het snoer c.q. het apparaat trekken om de stekker uit de wandcontactdoos te halen.
- Het apparaat buiten bereik van kinderen houden.Kinderen beseffen de gevaren niet die kunnen ontstaan bij het omgaan met
elektrische apparaten.
6. Plaats het apparaat niet direct onder een stopcontact en gebruik het niet in de buurt van een badkuip, een douche of zwembad.
De ventilatieroosters mogen niet afgedekt worden.
7. Voor het schoonmaken het apparaat uitzetten en de stekker uit de wandcontactdoos verwijderen.
8. Gebruik het apparaat niet wanneer de stekker, het snoer op het apparaat beschadigd is of wanneer het apparaat niet meer naar
behoren functioneert of wanneer het gevallen of beschadigd is.Raadpleeg dan de winkelier of de service dienst van Imetec.
9. In geen geval de stekker of het snoer zelf vervangen. Reparaties aan elektrische apparaten dienen uitsluitend door vakmensen
uitgevoerd te worden.Verkeerd uitgevoerde reparaties kunnen aanzienlijke gevaren voor de gebruiker tot gevolg hebben. Het
apparaat nooit gebruiken met onderdelen die niet door de fabrikant zijn aanbevolen of geleverd.
10. Als u besluit het apparaat vanwege een defect niet langer te gebruiken adviseren wij u, nadat u de stekker uit de
wandcontactdoos heeft verwijderd, het snoer af te knippen.Breng het apparaat naar de betreffende afvalverwerkingafdeling van
uw gemeente.
11. De luchtin- en uitlaatroosters niet verstoppen om oververhitting te voorkomen.
12. Dit apparaat is niet bestemd om te worden gebruikt door kinderen of personen met een lichamelijke, zintuiglijke of geestelijke
handicap of die niet over de nodige kennis of ervaring beschikken, zonder toezicht of de gebruiksaanwijzingen van een
verantwoordelijk persoon.
13. Kinderen mogen niet met het apparaat spelen.
Page 61

N
E
D
E
R
L
A
N
D
S
59
ALGEMENE INSTRUCTIES
APPARAAT A (model 4910)
• Standenschakelaar [Fig. A]
STAND FUNCTIE
Apparaat uit
Warme lucht (1100 W)
Heel warme lucht (2200 W)
APPARAAT B (model 4882)
• Standenschakelaar [Fig. E]
STAND FUNCTIE
Apparaat uit
Koude lucht
Warme lucht (1000 W)
Heel warme lucht (2000 W)
• Thermostaatknop voor omgevingstemperatuur - [Fig. C]
Met de thermostaat van de omgevingstemperatuur wordt de gewenste temperatuur in stand gehouden: wanneer de gewenste
temperatuur bereikt wordt, gaat het apparaat automatisch uit en treedt weer in werking wanneer de temperatuur daalt.
STAND FUNCTIE
Antivorst
MAX Maximum temperatuur
APPARAAT C (modellen 4921, 4920 en 4915) - C1
• Standenschakelaar [Fig. B]
STAND FUNCTIE
Apparaat uit
Koude lucht
Warme lucht (1100 W)
Heel warme lucht (2200 W)
• Thermostaatknop voor omgevingstemperatuur - [Fig. D]
STAND FUNCTIE
Antivries
MAX Maximum temperatuur
Met de thermostaatknop van de omgevingstemperatuur de gewenste temperatuur in stand gehouden:wanneer de gewenste temperatuur
bereikt wordt, gaat het apparaat automatisch uit en treedt weer in werking wanneer de temperatuur daalt.
OMSCHRIJVING VAN HET APPARAAT EN ACCESSOIRES [Fig. Z]
a
Afdekklepje voor bedieningsknoppen
h
Handgreep of ruimte voor muurbevestigingsbeugel (achter)
b
Thermostaatknop voor omgevingstemperatuur
i
Voet met opbergruimte voor snoer
c
Tijdschakelklok
j
Electro Block
®
d
Standenschakelaar
k
Muurbevestigingsbeugel (niet bijgeleverd bij model 4910)
e
Controlelampje
l
Schroeven en pluggen voor m uur montage (niet bijgelev erd bij model 4910)
f
Behuizing motor en ventilatierooster (voorkant)
m
Controlelampje ionisator (alleen modellen met ionisator)
g
Luchtinlaatrooster
n
Toets controlelampje ionisator (alleen modellen met ionisator)
Page 62

60
APPARAAT A
Functie ventilatorkachel
- Schuif de standenschakelaar
d
[Fig. A] als volgt:
stand : Warme lucht (1100 W)
stand : Heel warme lucht (2200 W)
APPARAAT B
Functie ventilatorkachel
-Draai de standenschakelaar
d
[Fig. E] als volgt:
stand : Warme lucht (1000 W)
stand : Heel warme lucht (2000 W)
- Stel de ther mostaatknop
b
[Fig. C] in op de gewenste temperatuur.
Functie ventilator
- Stel de ther mostaatknop
b
[Fig. C] in op de maximale stand MAX.
-Draai de standenschakelaar
d
[Fig. E] in de stand .
Functie antivorst
Deze functie houdt de omgevingstemperatuur rond +5°C. Wanneer de temperatuur hieronder daalt, treedt de ventilatorkachel
automatisch in werking.
- Zet de ther mostaatknop
b
[Fig. C] in de stand antivorst .
-Draai de standenschakelaar
d
[Fig. E] als volgt:
stand zorgt ervoor dat de temperatuur gelijkmatig op +5°C gebracht wordt.
stand zorgt ervoor dat de temperatuur snel op +5°C gebracht wordt.
Technologie Imetec-Ion77 (alleen modellen met ionisator)
Indien uw apparaat uitgerust is met een ionisator, geeft het controlelampje
m
aan of het apparaat in werking is.
De heteluchtventilator Imetec-Ion77 is uitgerust met een ionisator, een revolutionaire inrichting die het natuurlijk verschijnsel van de
ionisatie reproduceert. De ionen afkomstig van de heteluchtventilator hebben een positieve invloed op de lucht, door het te revitaliseren
en schoner te maken.
APPARAAT C - C1
Functie ventilatorkachel
-Draai de standenschakelaar
d
[Fig. B] als volgt:
stand : Warme lucht (1100 W)
stand : Heel warme lucht (2200 W)
- Stel de ther mostaatknop
b
[Fig. D] in op de gewenste temperatuur.
Functie ventilator
- Stel de ther mostaatknop
b
[Fig. D] in op de maximale stand MAX.
-Draai de standenschakelaar
d
[Fig. B] in de stand .
Functie antivorst
Deze functie houdt de omgevingstemperatuur rond +5°C. Wanneer de temperatuur hieronder zakt, zal de ventilatorkachel automatisch
in werking treden.
- Zet de ther mostaatknop
b
[Fig. D] in de stand antivorst .
-Draai de standenschakelaar
d
[Fig. B] als volgt:
stand zorgt ervoor dat de temperatuur gelijkmatig +5°C gehouden wordt.
stand zorgt ervoor dat de temperatuur sneller op +5°C gehouden wordt.
GEBRUIKSVOORSCHRIFTEN
• Tijdschakelklok - [Fig. F] (alleen model 4921)
f1: schuifjes voor het instellen van de tijd
f2: buitenring
LET OP:
-Wanneer de tijdschakelklok ingesteld is, wordt de geselecteerde temperatuur in stand gehouden binnen de
geprogrammeerde tijden.
• Verstelbare basis - (alleen bij modellen 4921 en 4920)
Standaardpositie [Fig. G].
Gekantelde positie: de voet kan gericht worden om de warme/koude lucht naar boven te richten. Houd de voet goed op zijn plaats en
verschuif de onderkant van het motorhuis door het naar voren te duwen [Fig.H].
Page 63

N
E
D
E
R
L
A
N
D
S
61
Functie tijdschakelklok (alleen voor model 4921)
Met de tijdschakelklokfunctie kan de in- en uitschakeling van het apparaat als volgt ingesteld worden:
• Handmatig
- Duw alle schuifjes naar binnen [Fig. I].
-Draai de standenschakelaar
d
[Fig. B] in de stand , of . Afhankelijk van de stand die u wilt gebruiken.
- Stel de ther mostaatknop
b
[Fig. D] in op de gewenste temperatuur.
LET OP:
-De tijdschakelklok werkt alleen als de stekker van de ventilatorkachel in het stopcontact zit.
• Automatisch
-Draai de buitenring van de tijdschakelklok met de klok mee en laat het pijltje overeenkomen met de huidige tijd [Fig. L].
- Duw alle schuifjes naar buiten [Fig. M], met uitzondering van de schuifjes die overeenkomen met de tijden waarin men wil dat het
apparaat aan is.
-Draai de standenschakelaar
d
[Fig. B] in de stand , of .Afhankelijk van de stand die u wilt gebruiken.
Dit is een dagtijdschakelklok en begint elke 24 uur weer opnieuw. Elk schuifje komt overeen met één kwartier.
Technologie Imetec-Ion77 (alleen modellen met ionisator)
Indien uw apparaat uitgerust is met de toets met controlelampje
n
, kunt u ervoor kiezen de ionisator al dan niet in te schakelen.Om de
ionisator in te schakelen, volstaat het te drukken op de toets n. Het controlelampje licht op om aan te geven dat de ionisator in werking
is. Om de ionisator uit te schakelen, breng de toets in de oorspronkelijke stand. Het controlelampje gaat uit.
De heteluchtventilator Imetec-Ion77 is uitgerust met een ionisator, een revolutionaire inrichting die het natuurlijk verschijnsel van de
ionisatie reproduceert. De ionen afkomstig van de heteluchtventilator hebben een positieve invloed op de lucht, door het te revitaliseren
en schoner te maken.
INSTRUCTIES VOOR DE MUURBEVESTIGING -
(geldt niet voor model 4910) [Fig. Q]
De ventilatorkachel kan opgehangen worden aan de muur.
-Bevestig de muurbevestigingsbeugel
k
met behulp van de twee bijgeleverde pluggen en schroeven [Fig. N] (de afstand tussen de
gaten bedraagt 16,5 cm. en de diameter van de bijgeleverde pluggen is 6 mm.).
- Zet de ventilatorkachel tegen de vastgemaakte beugel en duw deze tegen de muur, zodat het haakje van de muurbeugel (o1)
vasthaakt aan de achterkant van de ventilatorkachel, ter hoogte van de handgreep [Fig. O]. Om het apparaat los te maken van de
muur, duw op het haakje van de muurbeugel zoals aangegeven met de pijl en trek tegelijkertijd het apparaat naar u toe [Fig. P].
TOESTEL MET BEVEILIGING ELECTRO BLOCK
®
BELANGRIJK:
Indien uw toestel uitgerust is met de beveiliging Electro Block ®, moet dit rechtstreeks verbonden zijn met een vaste stekker;
om geen enkele reden het toestel verbinden met beweeglijke stekkers of adapters of verlengsnoeren. De beveiliging Electro
Block
®
is uitgerust met een differentiaalschakelaar met hoge gevoeligheid die de gebruiker beschermt tegen
stroomverspreidingen naar de grond voor waarden boven de 10mA.
Per poter utilizzare l’apparecchio effettui le seguenti operazioni:
- Het Electro Block
®
invoeren in het stopcontact, de toets ON indrukken en terug loslaten :een rode kleur zal verschijnen in het seinglas.
Electro Block®is nu actief.
- Controleer de doelmatigheid van het Electro Block
®
door de toets TEST in te drukken: de stroomtoevoer wordt onderbroken, de rode
indicator verdwijnt en dit geeft aan dat de beveiliging Electro Block®perfect werkzaam is.
- Nadat men de test heeft uitgevoerd, de toets ON opnieuw indrukken en loslaten : de rode indicator verschijnt terug en de
heteluchtverwarmer is klaar voor de werking. De test moet uitgevoerd worden vóór elk gebruik van het toestel. In geval van een
abnormale of niet correcte werking (bijvoorbeeld herhaalde ingrepen met het toestel aangesloten op het net ofwel niet tijdige ingrepen
tijdens de test van nazicht van het Electro Block
®
), zich onmiddellijk wenden tot de Technische Assistentie Services geautoriseerd door
IMETEC.
Wanneer het toestel uitgeschakeld wordt en de beveiliging Electro Block
®
wordt uitgeschakeld uit het stopcontact, gaat de
differentiaalschakelaar van de beveiliging Electro Block®automatisch uit.Het onjuist gebruik van elektrische toestellen kan gevaarlijk zijn.
Het gebruik van een beveiligingstoestel vervangt de fundamentele voorzorgsmaatregelen op gebied van de elektrische veiligheid niet.
TIPS
Wanneer de heteluchtverwarmer opgeborgen wordt, zorg ervoor dat het afgeschermd is van stof om te voorkomen dat dit stof in de
luchtroosters terechtkomt.
REINIGING EN ONDERHOUD
- Verwijder de stekker uit het stopcontact
- Reinig de buitenkant van de ventilatorkachel alleen met een vochtige doek en droog deze goed af alvorens het weer in gebruik nemen.
Page 64

66
POKYNY A UPOZORNENIA PRE SPRÁVNE A BEZPEČNÉ POUŽITIE
POZORNE SI PREČĺTAJTE POKYNY A UPOZORNENIA UVEDENÉ V TOMTO NÁVODE A
USCHOVAJTE HO ZA ÚČELOM NÁSLEDNÝCH KONZULTÁCIĺ PO CELÚ DOBU ŽIVOTNOSTI
ZARIADENIA. TIETO POKYNY A UPOZORNENIA POSKYTUJÚ DÔLEŽITÉ INFORMÁCIE TÝKAJÚCE SA
FUNKČNOSTI A BEZPEČNOSTI POČAS INŠTALÁCIE, POUŽĺVANIA A ÚDRŽBY VÝROBKU.
UPOZORNENIE
ZÁKLADNÉ UPOZORNENIA
Firma IMETEC vám akuje za to, že ste sa pri kúpe rozhodli pre jej výrobok. Sme si istí, že oceníte jeho kvalitu, spoahlivos a ohad
na zákazníka kladený pri jeho návrhu a výrobe.
1. Po odstránení obalu sa uistite, že je zariadenie kompletné a bez viditených závad, ktoré by mohli by spôsobené v priebehu
prepravy. V prípade pochybností zariadenie nepoužívajte a obráte sa na Servisné stredisko autorizované firmou IMETEC.
2. Pred pripojením zariadenia k elektrickej sieti sa uistite, že jeho menovité hodnoty, uvedené na identifikačnom štítku,
odpovedajú hodnotám vašej elektrickej siete. Identifikačný štítok je umiestnený na spodnej strane zariadenia.
3. Pre pripojenie nepoužívajte adaptéry, rozvodky a/alebo predlžovacie šnúry. V prípade nekompatibility medzi zásuvkou a
zástrčkou zariadenia nechajte nahradi zástrčku inou vhodného druhu kvalifikovaným personálom.
4. Toto zariadenie smie by používané výhradne na účely, pre ktoré bolo navrhnuté, teda ako teplovzdušný ventilátor. Každé iné
použitie je považované za nesprávne a preto nebezpečné použitie.
Výrobca neponesie zodpovednos za prípadné škody vyplývajúce z nesprávneho a chybného použitia.
5. Použitie akéhokovek elektrického prístroja vyžaduje dodržiavanie niektorých základných pravidiel. Osobitnú pozornos je
potrebné venova nasledujúcim upozorneniam:
- nedotýkajte sa zariadenia za žiadnych okolností mokrými alebo vlhkými rukami alebo nohami.
- pri vyahovaní zástrčky zariadenia zo zásuvky elektrického rozvodu neahajte za prívodnú šnúru ani za samotné zariadenie.
- nenechávajte zariadenie vystavené vplyvu atmosferických podmienok (dažiu, slnku, at.).
- nedovoli, aby bolo zariadenie používané demi alebo nesvojprávnymi osobami bez príslušného dozoru.
6. Neumiestňujte zariadenie bezprostredne pod zásuvku elektrického rozvodu. Nepožívajte výrobok v bezprostrednej blízkosti
vane, sprchy alebo bazénu. Neumiestňujte výrobok tak, aby bol dostupný z vane, sprchy alebo bazénu. Nezakrývajte vstupnú
a výstupnú nasávaciu mriežku.
7. Skôr než vykonáte akýkovek úkon čistenia alebo údržby, je nevyhnutné odpoji zariadenie z elektrickej siete a to vytiahnutím
zástrčky zo zásuvky.
8. V prípade poruchy a/alebo chybnej činnosti zariadenia ho vypnite a nezasahujte doňho.
Pre eventuálnu opravu sa obráte na Servisné stredisko autorizované firmou IMETEC.
9. Prívodná šnúra tohto zariadenia nesmie by vymenená užívateom. V prípade poškodenia kábla alebo pri jeho výmene je
potrebné sa obráti na Servisné stredisko autorizované firmou IMETEC.
10. Po rozhodnutí o vyradení uvedeného prístroja z prevádzky je potrebné zabráni jeho alšiemu použitiu odstrihnutím prívodnej
šnúry po vytiahnutí zástrčky zo zásuvky elektrického rozvodu. Doporučuje sa zneškodni časti zariadenia, ktoré by mohli by
nebezpečné najmä pre deti, ktoré by mohli použi vyradené zariadenie pri svojich hrách.
11. Nezakrývajte mriežky nasávania a vyfukovania vzduchu, zabránite tak riziku prehriatia.
12.Toto zariadenie by nemali používať deti a osoby so zníženými fyzickými alebo mentálnymi schopnosťami a osoby bez náležitých
znalostí a skúseností, bez dozoru zodpovednej osoby.
13. Zariadenie nie je určené pre detské hry.
Page 65

S
L
O
V
E
N
S
K
Y
67
ZÁKLADNÉ POKYNY
ZARIADENIE A
• Prepínač silových obvodov [obr. A]
POLOHA FUNKCIA
Zariadenie vypnuté
Teplý vzduch (1100 W)
Vemi teplý vzduch (2200 W)
ZARIADENIE B
• Prepínač silových obvodov [obr. E]
POLOHA FUNKCIA
Zariadenie vypnuté
Studený vzduch
Teplý vzduch (1000 W)
Vemi teplý vzduch (2000 W)
• Priestorový termostat - [obr. C]
Priestorový termostat zaručuje udržiavanie nastavenej teploty: po jej dosiahnutí sa zariadenie automaticky vypne a k jeho opätovnému
zapnutiu dôjde bezprostredne po poklese teploty.
POLOHA FUNKCIA
Ochrana proti zamrznutiu
MAX Maximálna teplota
ZARIADENIE C - C1
• Prepínač silových obvodov [obr. B]
POLOHA FUNKCIA
Zariadenie vypnuté
Studený vzduch
Teplý vzduch (1100 W)
Vemi teplý vzduch (2200 W)
• Te rmostat teploty prostredia - [obr. D]
POLOHA FUNKCIA
Ochrana proti zamrznutiu
MAX Maximálna teplota
Priestorový termostat zaručuje udržiavanie nastavenej teploty: po jej dosiahnutí sa zariadenie automaticky vypne a k jeho opätovnému
zapnutiu dôjde bezprostredne po poklese teploty.
POPIS PRĺSTROJA A PRĺDAVNÝCH ZARIADENĺ [Obr. Z]
a
Kryt ovládačov
h
Odkladací priestor na rukovä alebo zóna na uloženie konzoly (vzadu)
b
Termostat teploty prostredia
i
Mechanizmus na natáčanie prívodnej šnúry
c
Časový spínač
j
Electro Block
d
Prepínač silových obvodov
k
Konzola umožňujúca montáž na stenu
e
Kontrolka zapnutia
l
Skrutky a upevňovacie prvky pre montáž na stenu
f
Teleso motora a mriežka (vpredu)
m
Kontrolka ionizátora (platí len pre modely s ionizátorom)
g
Vstupná mriežka pre prívod vzduchu
n
Tlačítko svetelnej kontrolky ionizátoru (platí len pre modely s ionizátorom)
Page 66

68
ZARIADENIE A
Funkcia teplovzdušného ventilátora
-Otočte prepínač silových obvodov [obr. A] do požadovanej polohy:
poloha : Teplý vzduch (1100 W)
poloha : Vemi teplý vzduch (2200 W)
ZARIADENIE B
Funkcia termoventilátora
-Otočte prepínač silových obvodov [obr. E] do požadovanej polohy:
poloha : Teplý vzduch (1000 W)
poloha : Vemi teplý vzduch (2000 W)
- Nastavte termostat teploty prostredia
[obr. C] poda požadovanej teploty, ktorá má by udržiavaná.
Funkcia letnej ventilácie
- Nastavte termostat teploty prostredia [obr. C] na hodnotu odpovedajúcu maximálnej teplote, označenej MAX.
-Otočte prepínač silových obvodov
[obr. E] do požadovanej polohy .
Funkcia ochrany proti zamrznutiu
Táto funkcia zaručuje udržiavanie teploty prostredia približne +5 ˚C. Pri poklese teploty pod túto hodnotu dôjde automaticky k zapnutiu
teplovzdušného ventilátora.
- Nastavte termostat teploty prostredia
[obr. C] na hodnotu odpovedajúcu ochrane proti zamrznutiu .
-Otočte prepínač silových obvodov
[obr. E] do požadovanej polohy:
poloha na postupné obnovenie teploty na hodnotu +5˚C.
poloha na rýchle obnovenie teploty na hodnotu +5˚C.
Technológia Imetec-Ion77 (platí len pre modely s ionizátorom)
Ak je váš prístroj vybavený ionizátorom, rozsvietená kontrolka mbude poukazova na to, že je v činnosti.
Teplovzdušný ventilátor Imetec-Ion77 je vybavený ionizátorom, revolučným zariadením, ktoré reprodukuje prirodzený fenomén
ionizácie. Ióny, ktoré sú vytvárané teplovzdušným ventilátorom priaznivo pôsobia na vzduch a robia ho sviežejším a čistejším.
ZARIADENIE C - C1
Funkcia teplovzdušného ventilátora
-Otočte prepínač silových obvodov [obr. B] do požadovanej polohy:
poloha : Teplý vzduch (1100 W)
poloha : Vemi teplý vzduch (2200 W)
- Nastavte termostat teploty prostredia
[obr. D] poda požadovanej teploty, ktorá má by udržiavaná.
Funkcia ventilátora
- Nastavte termostat teploty prostredia [obr. D] na hodnotu odpovedajúcu maximálnej teplote, označenej MAX.
-Otočte prepínač silových obvodov
[obr. B] do požadovanej polohy .
Funkcia ochrany proti zamrznutiu
Táto funkcia zaručuje udržiavanie teploty prostredia približne +5 ˚C. Pri poklese teploty pod túto hodnotu dôjde automaticky k zapnutiu
teplovzdušného ventilátora.
- Nastavte termostat teploty prostredia
[obr. D] na hodnotu odpovedajúcu ochrane proti zamrznutiu .
-Otočte prepínač silových obvodov
[obr. B] do požadovanej polohy:
poloha na postupné obnovenie teploty na hodnotu +5˚C.
poloha na rýchle obnovenie teploty na hodnotu +5˚C.
Funkcia časovača (len u modelov s časovým spínačom)
Funkcia časovača umožňuje ovláda zapínanie a vypínanie zariadenia v nasledujúcich režimoch:
NÁVOD NA POUŽITIE
• Časový spínač - [obr. F] (len u určitých modelov)
f1: zúbky na programovanie časových pásiem.
f2: vonkajšia kruhová matica.
UPOZORNENIE:
- AK JE NASTAVENÝ ČASOVÝ SPĺNAČ, ZVOLENÁ TEPLOTA BUDE UDRŽIAVANÁ LEN V RÁMCI NAPROGRAMOVANÝCH
ČASOVÝCH PÁSIEM.
• Nastavitený podstavec – (len u určitých modelov)
Štandardná poloha [obr. G].
Naklonená poloha: podstavec môže by nastavený tak, aby vystupujúci teplý/studený vzduch smeroval nahor. Pridržte podstavec a
posuňte teleso motora smerom dopredu
[obr. H].
Page 67

S
L
O
V
E
N
S
K
Y
69
• Ručný
- Nastavte všetky zúbky časového spínača smerom dovnútra [obr. I].
-Otočte prepínač silových obvodov
[obr. B] do polohy , alebo , poda požadovanej funkcie.
- Nastavte termostat teploty prostredia
[obr. D] poda požadovanej teploty, ktorá má by udržiavaná.
UPOZORNENIE:
- ČASOVÝ SPĺNAČ JE FUNKČNÝ LEN V PRĺPADE, KEĎ JE ZÁSTRČKA TEPLOVZDUŠNÉHO VENTILÁTORA ZASTRČENÁ V
ZÁSUVKE ELEKTRICKÉHO ROZVODU.
• Automatický
- Otáčaním vonkajšej kruhovej matice časového spínača v smere hodinových ručičiek nastavte požadovaný čas a zosynchronizujte
indikátor s vašimi hodinami [obr. L].
-Presuňte všetky zúbky časového spínača
[obr. M] s výnimkou tých, ktoré odpovedajú časovým pásmam, v ktorých má zariadenie
pracova, smerom von.
-Otočte prepínač silových obvodov
[obr. B] do polohy , alebo , poda požadovanej funkcie.
Nastavenie časovača je stále, t.j. naprogramovaný cyklus sa opakuje každých 24 hodín. Každý zúbok odpovedá štvrhodine.
Technológia Imetec-Ion77 (platí len pre modely s ionizátorom)
Ke je Váš prístroj vybavený tlačíkom so svetelnou kontrolkou npre aktiváciu ionizátoru, budete si môc zvoli, či ho chcete zapnú
alebo nie. Pre aktiváciu ionizátoru stačí stlači tlačítko
n
a svetelná kontrolka sa rozsvieti a signalizuje tak, že ionizátor funguje. Pre
jeho vypnutie stlačte znovu tlačítko a uvete ho do pôvodnej polohy, svetelná kontrolka zhasne.
Teplovzdušný ventilátor Imetec-Ion77 je vybavený ionizátorom, revolučným zariadením, ktoré reprodukuje prirodzený fenomén
ionizácie. Ióny, ktoré sú vytvárané teplovzdušným ventilátorom priaznivo pôsobia na vzduch a robia ho sviežejším a čistejším.
NÁVOD PRE INŠTALÁCIU NA STENU
– (len pre modely vybavené upevňovacou konzolou) [obr. Q]
Teplovzdušný ventilátor môže by upevnený aj na stenu.
- Upevnite na stenu konzolu prostredníctvom dvoch kotiev z príslušenstva
[obr. N] (vzdialenos medzi otvormi s priemerom 6 mm je 16.5 cm.
- Uložte teplovzdušný ventilátor na konzolu a zatlačte ho ku stene tak, aby sa upevňovací zub konzoly
(o1) zachytil za zadnú čas
teplovzdušného ventilátora, v blízkosti rukoväte [obr. O]. Pri skladaní ventilátora z upevňovacej konzoly namontovanej na stene
stlačte upevňovací zub konzoly v smere označenom šípkou a súčasne potiahnite teplovzdušný ventilátor smerom nahor [obr. P].
ZARIADENIE S OCHRANNÝM SYSTÉMOM ELECTRO BLOCK
DÔLEŽITÉ:
- Ak je vaše zariadenie vybavené ochranným systémom Electro Block
j
, musíte ho zapoji priamo do pevnej zásuvky
elektrického rozvodu; v žiadnom prípade na jeho zapojenie nepoužívajte rozvodky, adaptéry alebo predlžovacie káble.
Súčasou ochranného systému Electro Blockje aj nadprúdové relé s vysokou citlivosou, ktoré chráni užívatea pred
odvádzacím prúdom prevyšujúcim 10 mA.
Skôr, ako začnete zariadenie používa, vykonajte nasledujúce opatrenia:
- Zasuňte Electro Block
do zásuvky elektrického rozvodu, stlačte a následne uvonite tlačidlo ON: v kontrolnom okienku sa objaví
červená farba. Odteraz je Electro Blockv činnosti.
- Skontrolujte dokonalú účinnos systému Electro Block
stlačením tlačidla TEST: dôjde k prerušeniu dodávky elektrického prúdu a
zakrytiu červeného indikátora, t.j. javom potvrdzujúcim dokonalú účinnos zariadenia Electro Block.
- Po vykonaní testu opä stlačte a uvonite tlačidlo
ON: Dôjde k opätovnému objaveniu červeného indikátora a teplovzdušný
ventilátor bude opä pripravený k činnosti. Test musí predchádza každému použitiu ventilátora. V prípade poruchovej alebo
nesprávnej činnosti (napríklad opakovaných zásahov pri zariadení zapojenom do elektrického rozvodu alebo v prípade neskorých
zásahov systému Electro Block
počas testu), sa ihne obráte na Servisné strediská autorizované firmou IMETEC. Po vypnutí
zariadenia a po odpojení ochranného systému Electro Blockzo zásuvky dôjde k automatickému vypnutiu nadprúdového relé
systému Electro Block. Nesprávne použitie elektrických zariadení môže by nebezpečné. Použitie ochranného systému nenahrádza
základné opatrenia na zaistenie elektrickej bezpečnosti.
UŽITOČNÉ RADY
Pri uskladnení teplovzdušného ventilátora sa uistite, že je chránený pred prachom, ktorý by sa mohol uklada vo vnútri mirežok.
Page 68

[A] [B]
[D] [E]
[C]
[F]
[G] [H]
[I]
[L] [M] [N]
f1
f2
Page 69

[O]
[Q]
[P]
o1
30cm
1
60cm
1 - 1
2 - 1 2 - 2
30cm
2
60cm
Page 70

XST17581
www.imetec.it
 Loading...