

Page 1

Before you can use the machine, you must set up the hardware and install the driver.
Please read this “Quick Setup Guide” for proper set up and installation instructions.
Imagistics fx2100
Step 1
Setting Up the Machine
Setting Up
®
Windows
®
the Machine
USB
Step 2
Installing the Driver & Software
Setup is Complete!
Keep this “Quick Setup Guide”, User’s Guide and supplied CD-ROM in a convenient place for
quick and easy reference at all times.
Installing the Driver & Software
Parallel
Windows
4.0
®
NT
Windows
®
Network
Windows
®
USB
Macintosh
Parallel
Quick Setup Guide
®
For
Macintosh
Network
Administrators
Page 2

Page 3
■ Getting Started
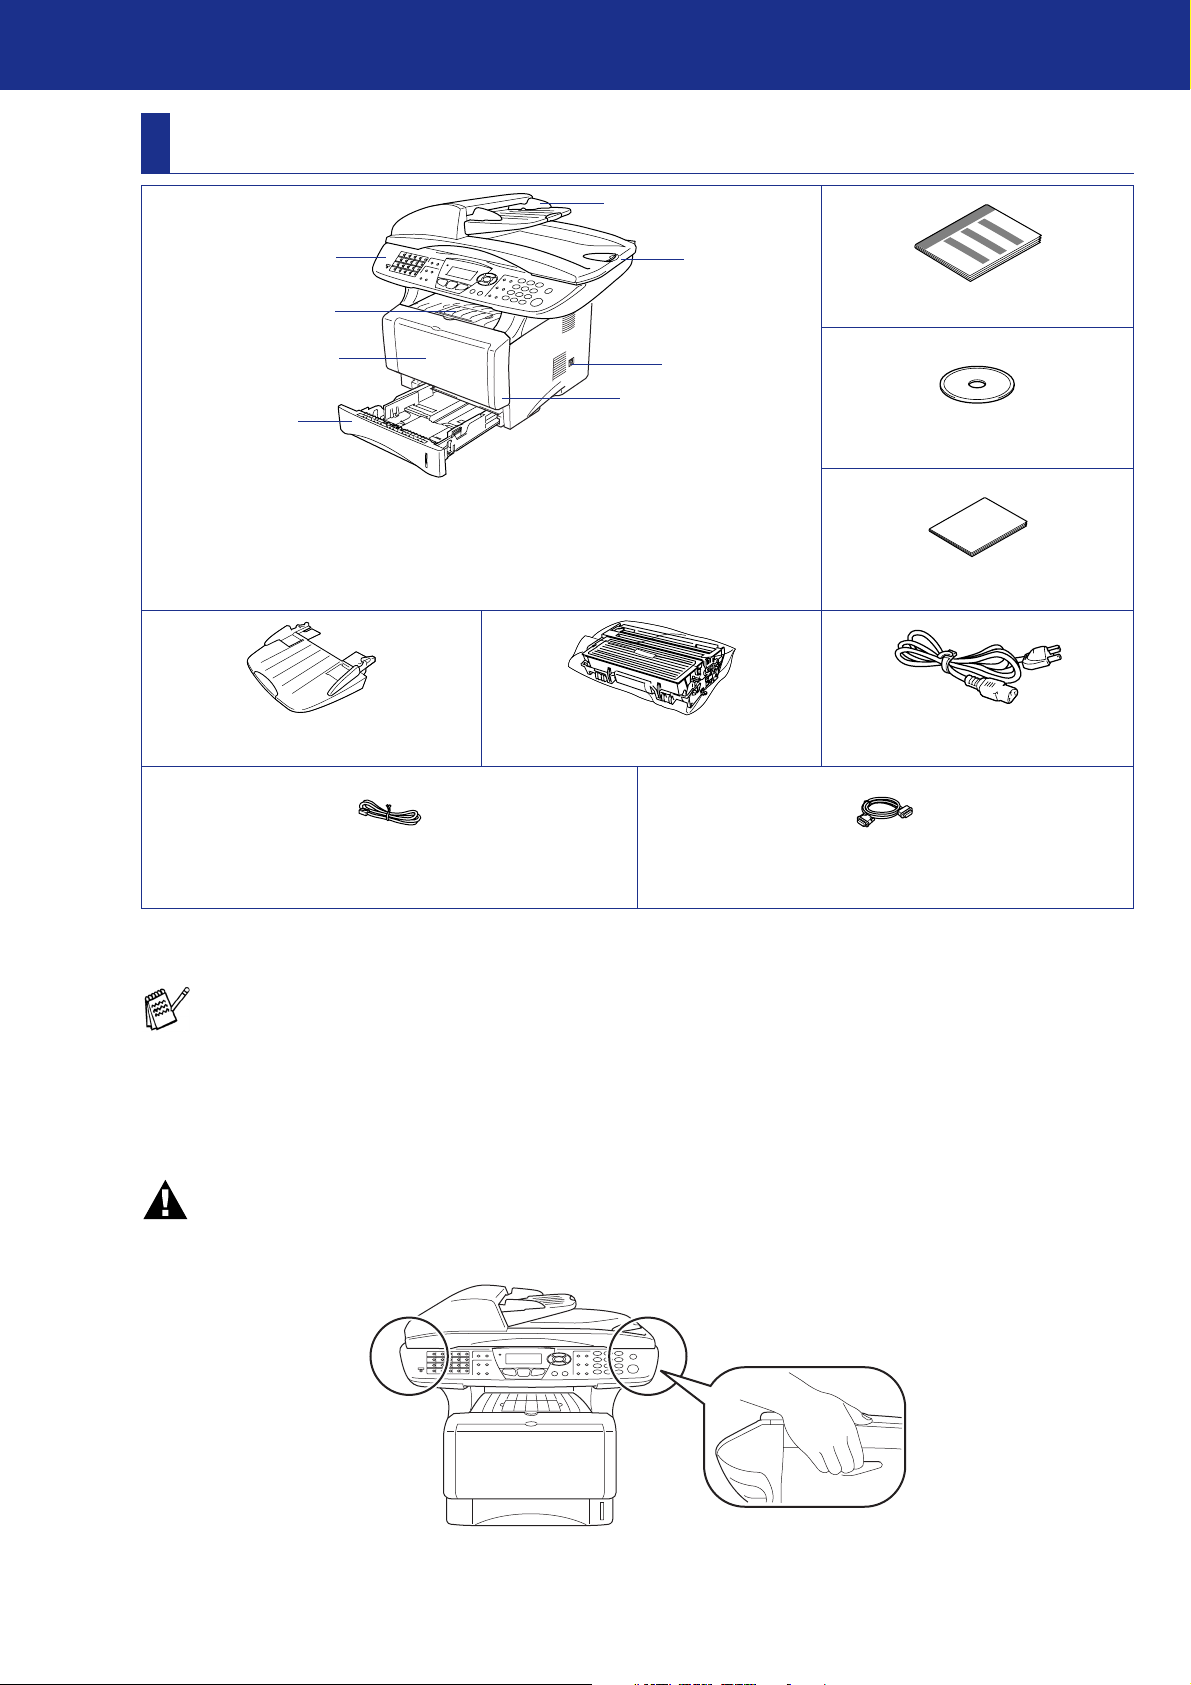
Carton Components
8
1
2
3
4
. Control Panel
1
2. Face-down Output Tray
Support Flap with Extension
(Support Flap)
3. Multi-purpose Tray (MP Tray)
ADF Support Drum Unit Assembly
7
6
5
. Paper Tray
4
5. Front Cover
6. Power Switch
7. Document Cover
8.
Automatic Document Feeder (ADF)
(including Toner Cartridge)
Quick Setup Guide
CD-ROM
User’s Guide
AC Power Cord
Telephone Line Cord IEEE 1284 Compliant
Carton components may differ from one country to another.
Save all packing materials and the carton.
■ The USB interface cable is not a standard accessory. Please purchase the USB interface cable if you intend to
use it.
■ For Parallel use a bi-directional shield interface cable that is IEEE 1284-compliant, and not longer than 6 feet
(2 meters).
■ For USB: use a Hi-Speed USB 2.0 interface cable that is not longer than 6 feet (2 meters).
■ Please make sure that you use a Hi-Speed USB 2.0 certified cable if your computer uses a Hi-Speed USB 2.0
interface.
■ Even if your computer has a USB 1.1 interface, you can connect the machine.
Warning
■ When you move the machine, grasp the side handholds that are under the scanner. Do NOT carry the machine by
holding it at the bottom.
Bi-directioned Cable
1
Page 4
Control Panel
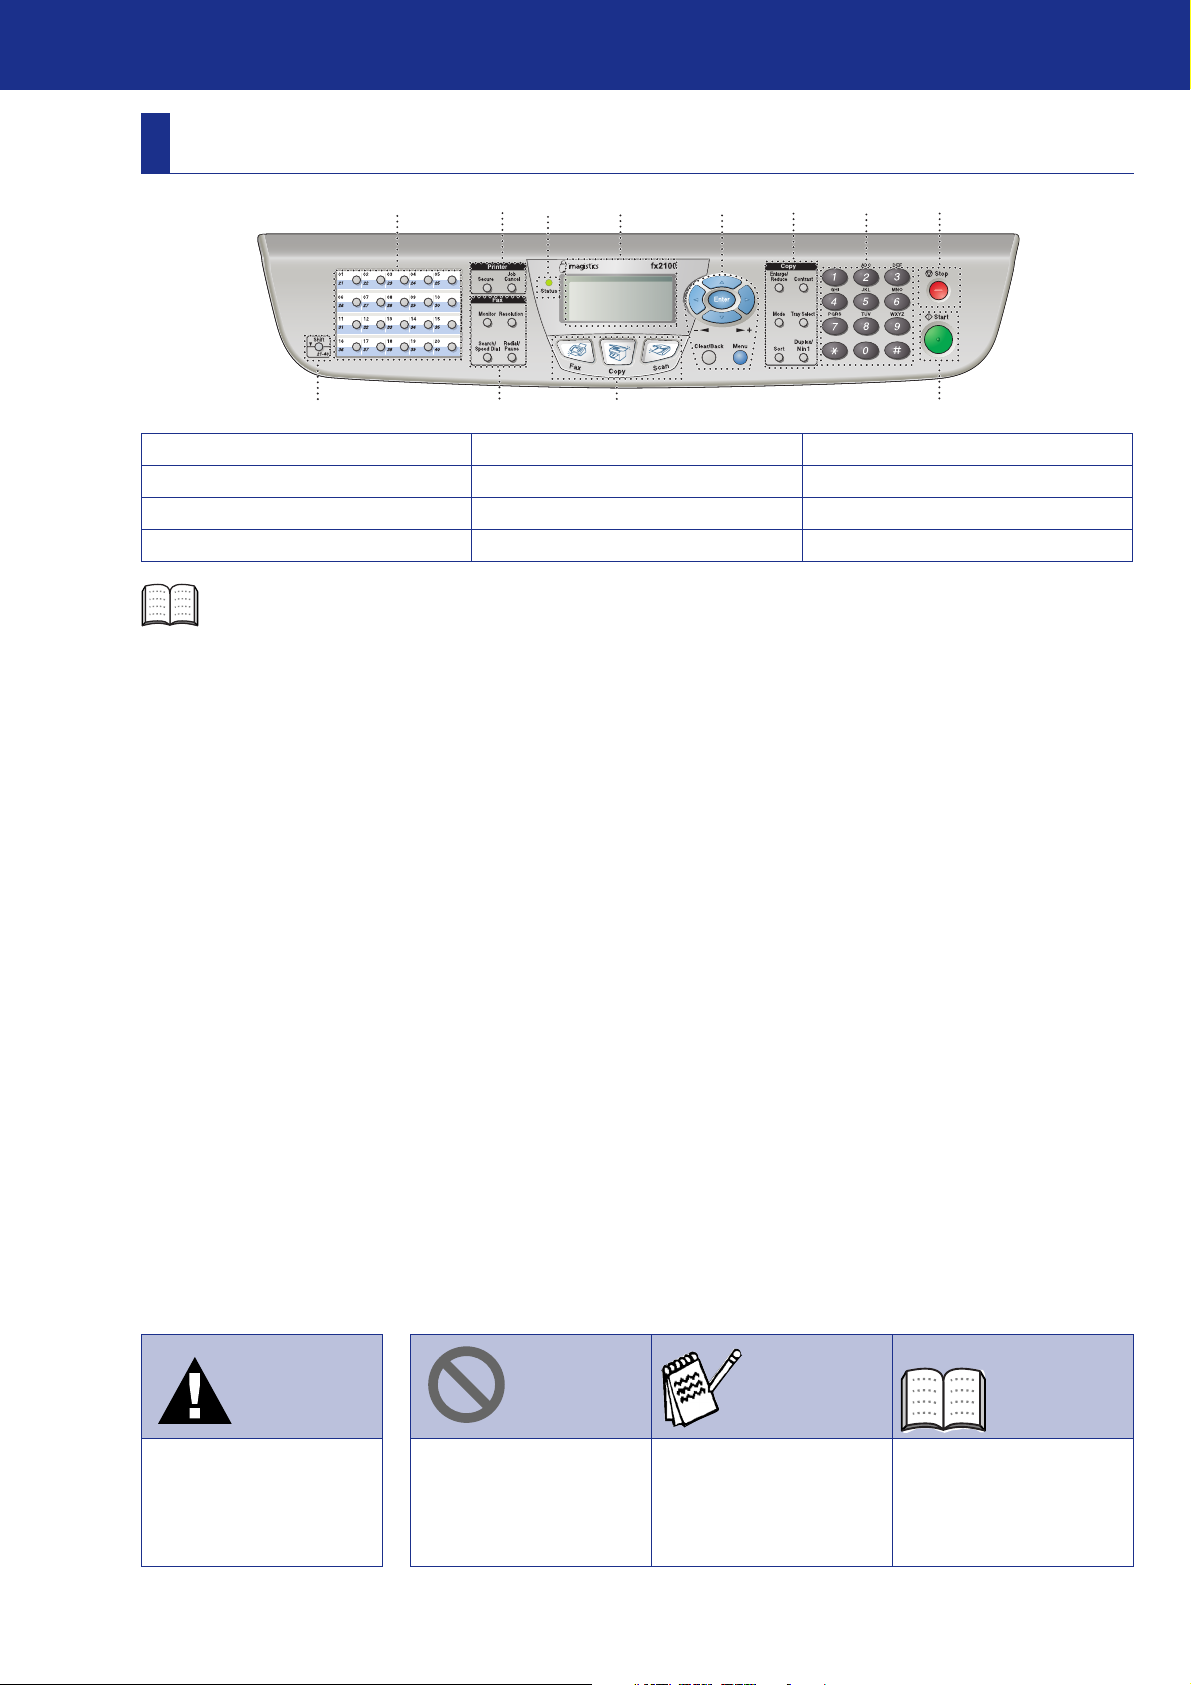
1
234
1. One Touch keys 5. Print keys 9. Copy keys (Temporary Settings)
2. Shift 6. Status LED (Light-Emitting Diode) 10. Dial Pad
3. Fax and telephone keys
4. Mode keys 8. Navigation keys 12. Start
For the details of the control panel, see "Control panel overview" in Chapter 1 of the User’s Guide.
56 8791011
12
7
. 5-Line Liquid Crystal Display (LCD)
11. Stop
Warning Hint User’s Guide
Indicates warnings that
must be observed to
prevent possible
personal injury.
2
Indicates cautions that
must be observed to use
the machine properly or
to prevent damage to the
machine.
Indicates notes and
useful tips to remember
when using the machine.
Indicates reference to the
User’s Guide.
Page 5

Table of Contents
Step 1
Step 2
Setting Up the Machine
1. Install the Automatic Document Feed (ADF) Support ....................................4
2. Install the Drum Unit Assembly ........................................................................ 4
3. Load Paper in the Paper Tray ...........................................................................5
4. Release the Scanner Lock.................................................................................6
5. Install Power Cord and Phone Line..................................................................7
6. Selecting an Answer Mode................................................................................8
7. Setting the Date and Time .................................................................................9
8. Setting Your Machine ID..................................................................................10
9. Selecting Your Language................................................................................11
Installing the Driver & Software
Supplied CD-ROM “Multi-Function Suite” ........................................................ 12
For USB Interface Cable Users
(For Windows
■ For Windows® 98/98SE/Me Users Only ............................................................17
■ For Windows
■ For Windows
For Parallel Interface Cable Users
(For Windows® 98/98SE/Me/2000 Professional/XP)........................................ 25
■ For Windows® 98/98SE/Me Users Only ............................................................28
■ For Windows
■ For Windows
For Windows NT® Workstation Version 4.0 Users ................................. 35
For Network Interface Cable Users
(For Windows® 98/98SE/Me/NT/2000 Professional/XP).................................. 38
®
98/98SE/Me/2000 Professional/XP)........................................ 14
®
2000 Professional Users Only..................................................19
®
XP Users Only ...........................................................................22
®
2000 Professional Users Only..................................................29
®
XP Users Only ...........................................................................32
For USB Interface Cable Users................................................................. 42
■ For Mac OS® 8.6 to 9.2 .......................................................................................42
■ For Mac OS
®
X 10.1/10.2.1 or greater................................................................44
For Network Interface Cable Users .......................................................... 46
■ For Mac OS® 8.6 to 9.2 .......................................................................................46
■ For Mac OS
®
X 10.1/10.2.1 or greater................................................................48
■ For Administrators
Network User's Guide Chapter Map .................................................................. 50
Installing the BRAdmin Professional Configuration Utility
(Windows® Users Only) .................................................................................... 51
Setting your IP Address, Subnet Mask and Gateway using
BRAdmin Professional (Windows® Users Only)............................................. 52
■ Other Information
Options................................................................................................................. 53
Replacement Consumables................................................................................ 53
3
Page 6
Step 1
Setting Up the Machine
Install the Automatic
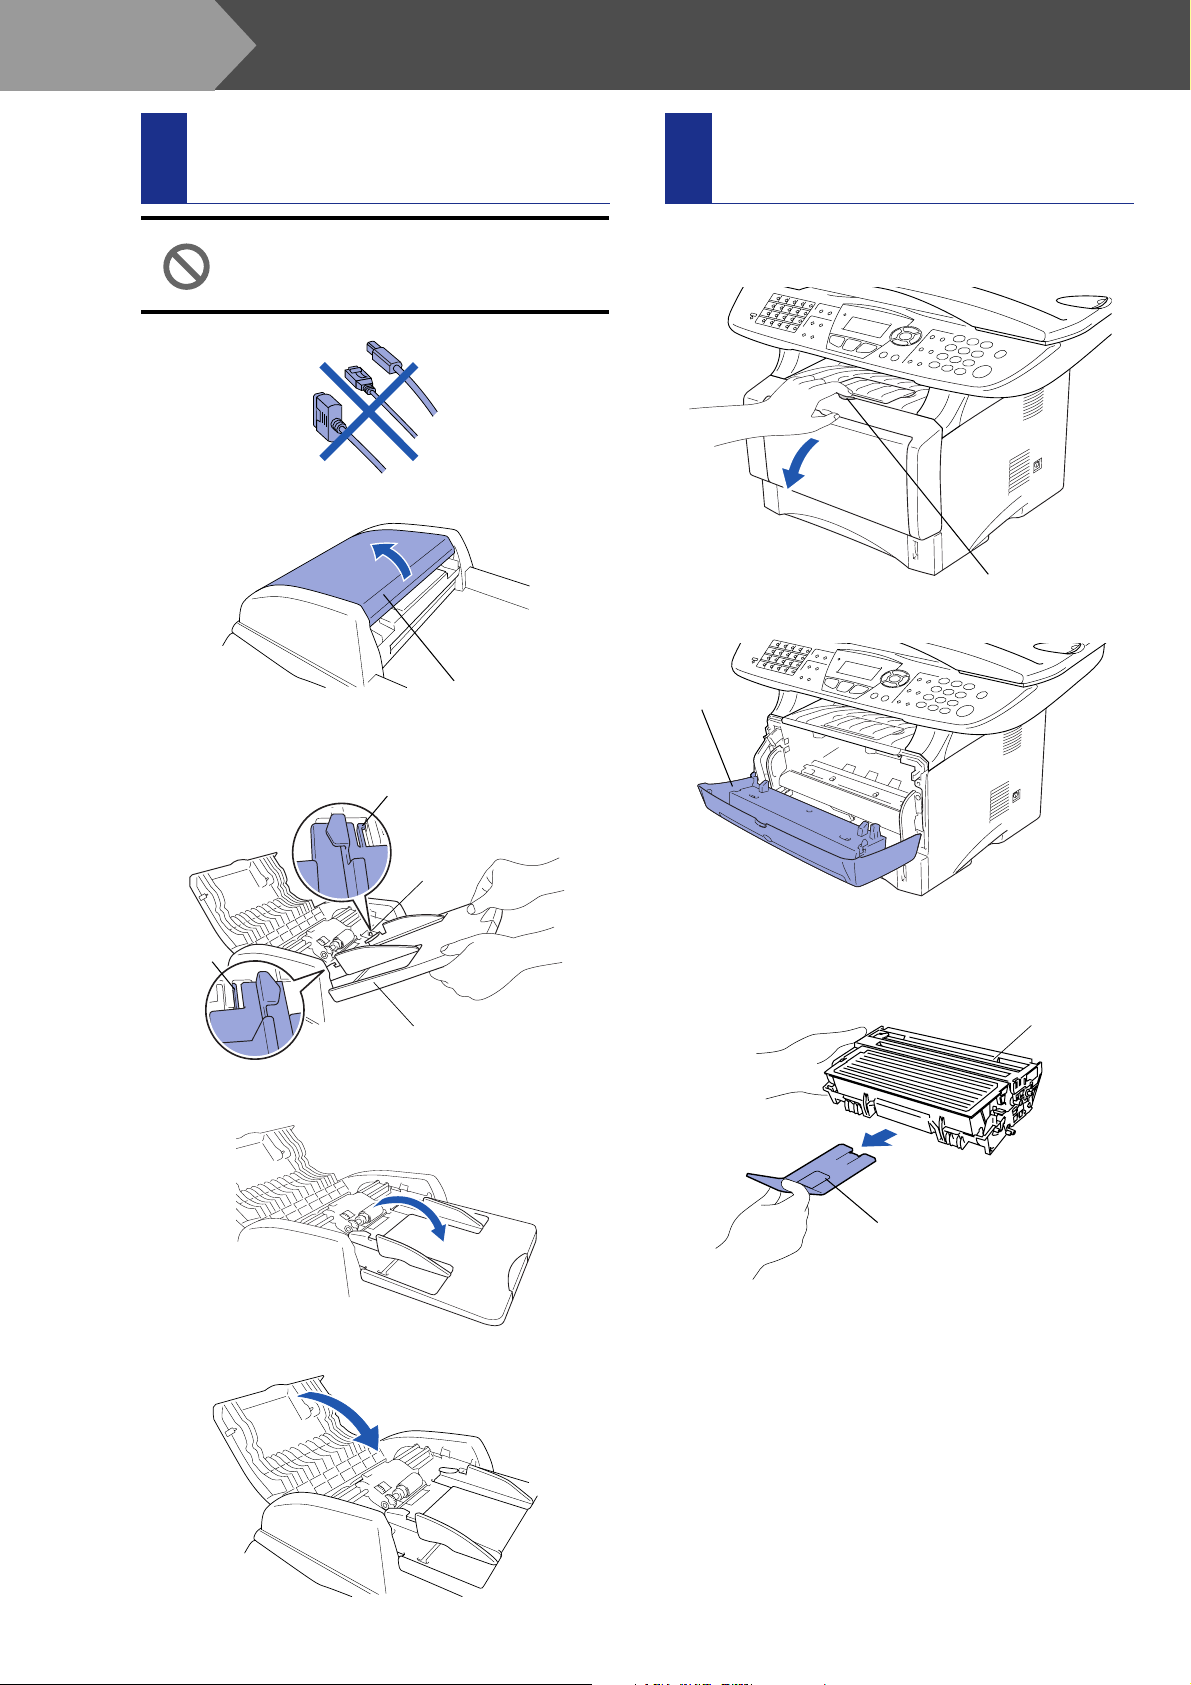
1
Document Feed (ADF) Support
Do NOT connect the interface cable.
Connecting the interface cable is
done when installing the driver.
1 Open the ADF cover.
ADF Cover
Install the Drum Unit
2
Assembly
1 Open the front cover by pressing the front
cover release button.
Front Cover
Release Button
Front Cover
2 Insert the tabs of ADF support into the holes
of the ADF one side at a time.
Tab
Hole
Tab
ADF Support
3
Push ADF Support down until it latches in place.
2 Unpack the drum unit assembly.
Remove the protective part.
Drum Unit
Assembly
Protective Part
4 Close the ADF cover.
4
Page 7
Load Paper in the Paper
3
Tray
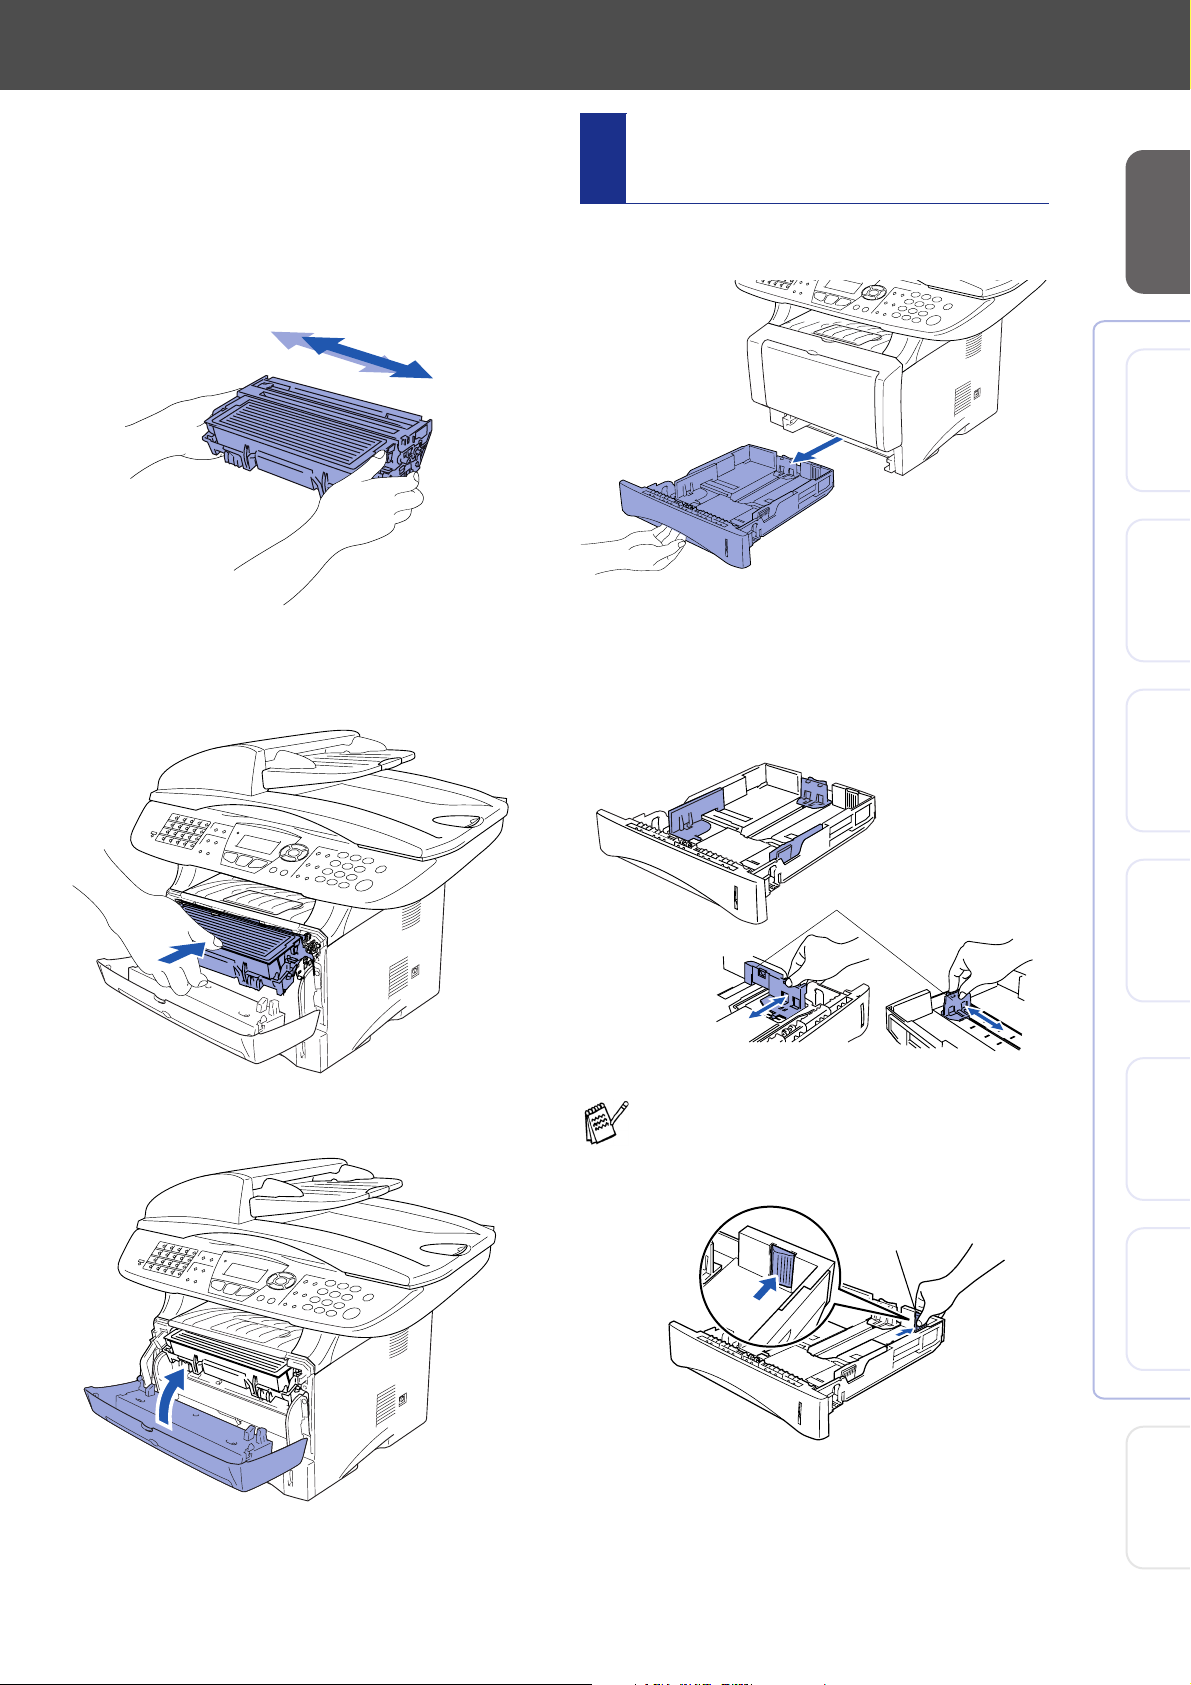
3 Rock it from side to side several times to
distribute the toner evenly inside the
assembly.
4
Push the drum unit assembly into the
machine (until it snaps into place).
1 Pull the paper tray completely out of the
machine.
2 While pressing the paper guide release lever,
slide the adjusters to fit the paper size.
Check that the guides are firmly in the slots
on the tray.
Setting Up
the Machine
®
USB
Windows
®
Parallel
Windows
4.0
®
NT
Windows
Parallel
5 Close the front cover of the machine.
Paper Guide
Release Lever
For Legal size paper, press the universal
guide release button and pull out the rear of
the paper tray.
Universal Guide
Release Button
®
Windows
®
Macintosh
®
Macintosh
Network
USB
Network
For
Administrators
5
Page 8
Step 1
Setting Up the Machine
Release the Scanner
4
Lock
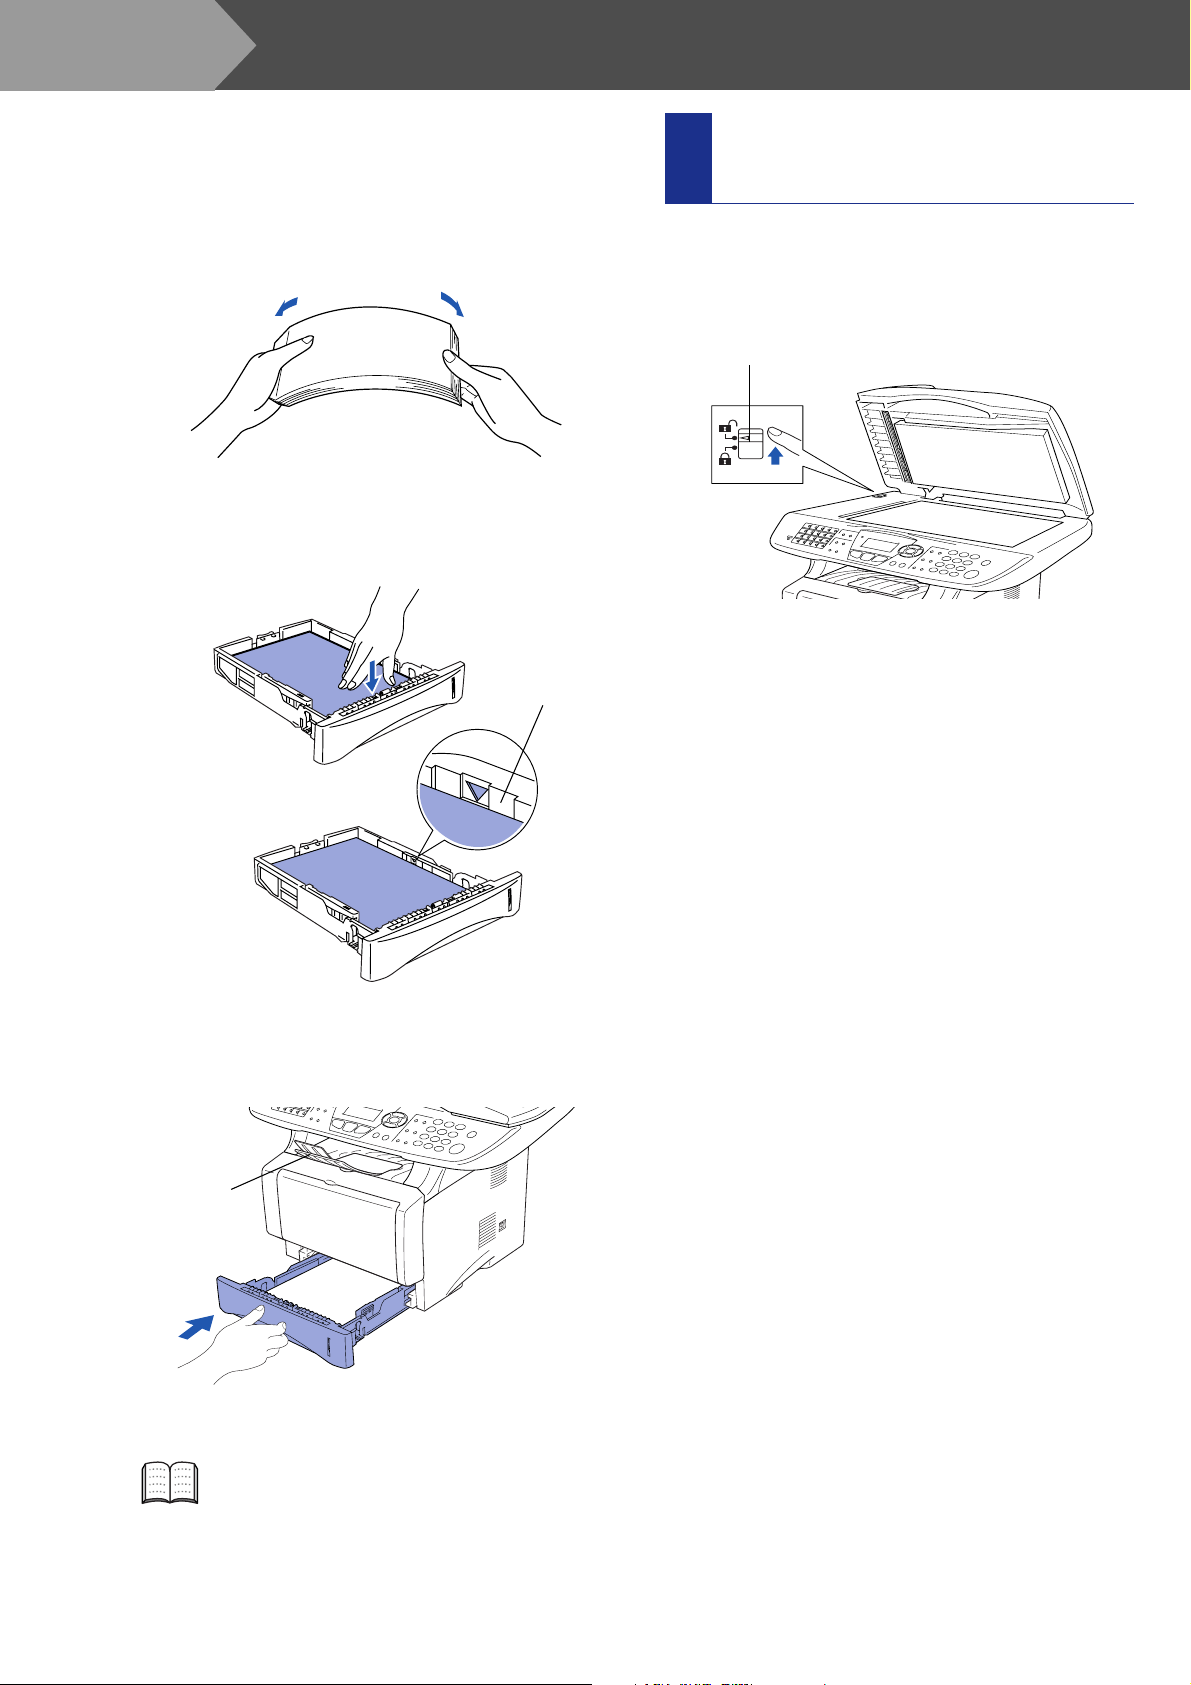
3 Fan the stack of paper well to avoid paper
jams and misfeeds.
4 Put paper in the paper tray.
Check that the paper is flat in the tray and
below the maximum paper mark.
Up to here.
1 Push the lever up to unlock the scanner.
(The gray scanner lock lever is located at
the back left under side of the document
cover.)
Scanner Lock Lever
5
Put the paper tray firmly back in the machine
and unfold the support flap before you use
the machine.
Support
Flap
For details on supported paper
specifications, see “Paper” in Chapter 2
(User’s Guide).
6
Page 9
Install Power Cord and
5
Phone Line
Do not connect the Parallel or USB
cable yet.
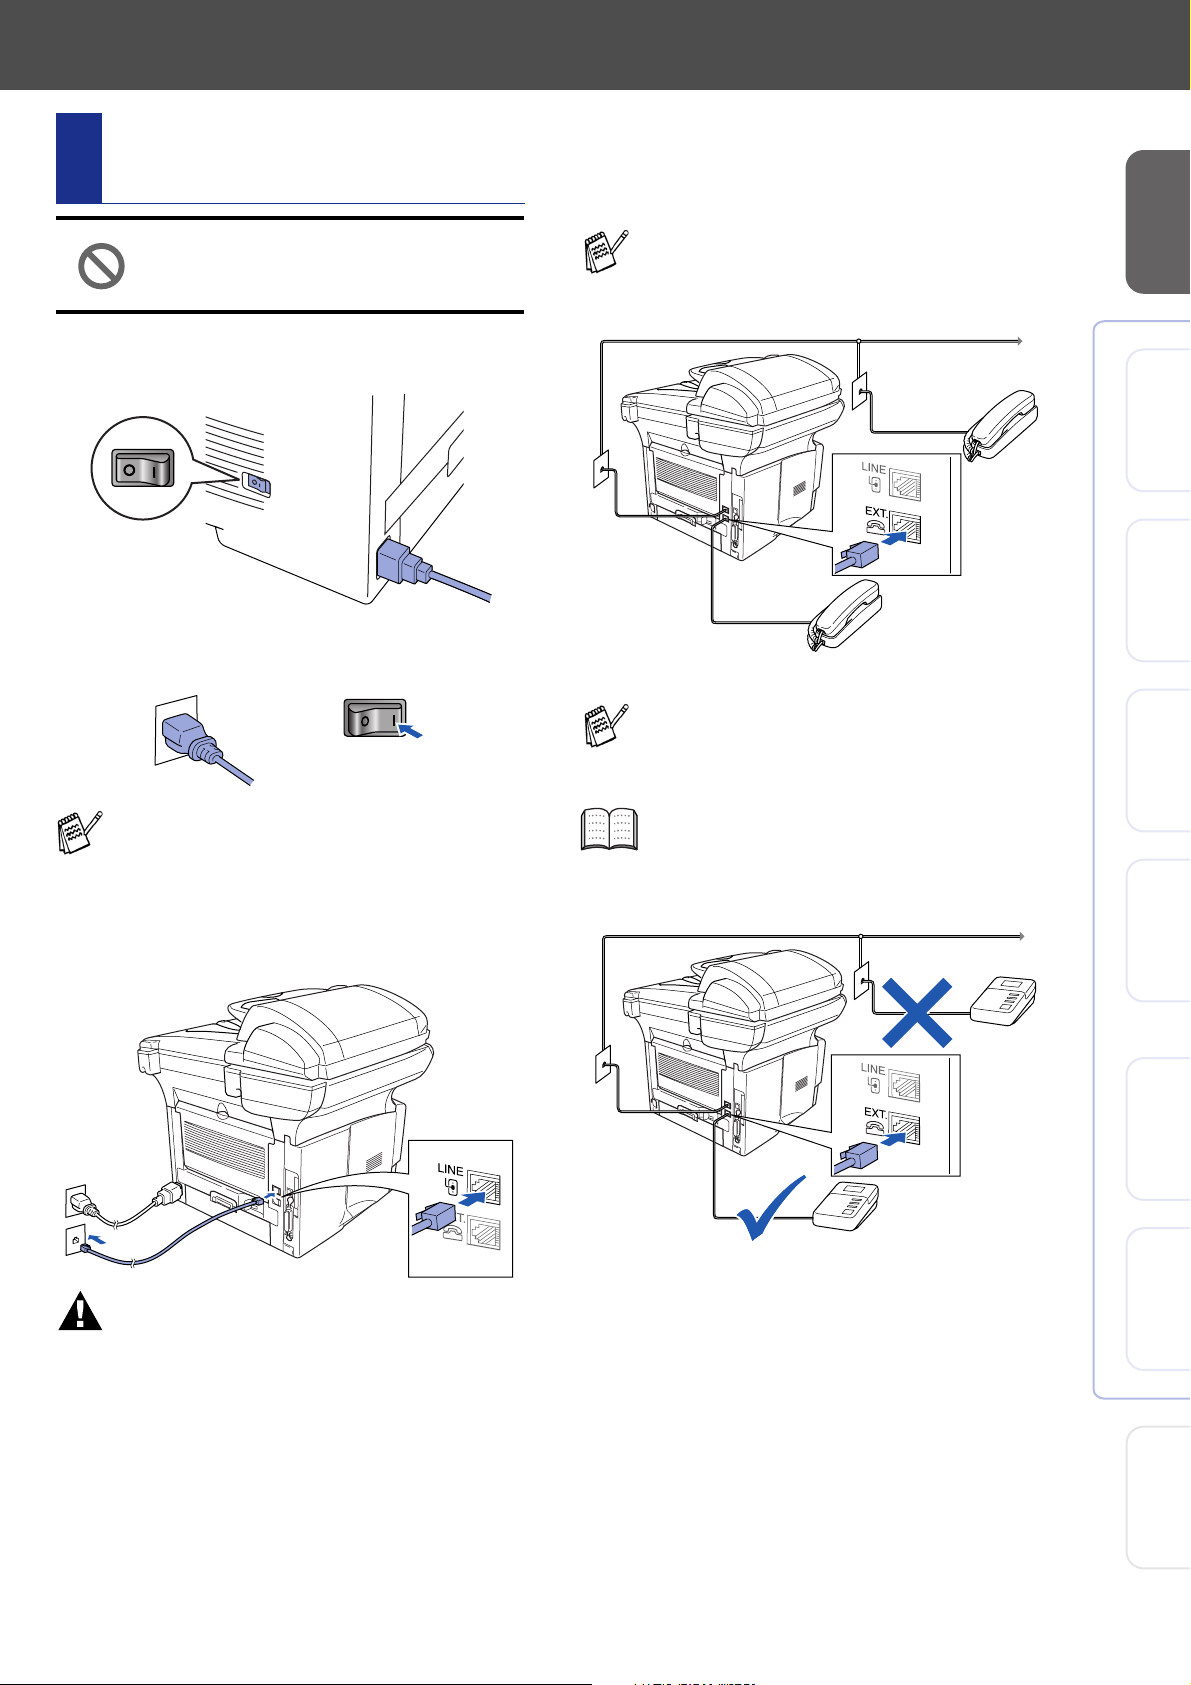
1 Make sure that the power switch is off.
Connect the AC power cord to the machine.
2 Plug the AC power cord into an AC outlet.
Turn the power switch on.
If Check Scan Lock appears on the LCD,
immediately release the scanner lock and
press Stop.
3 Connect one end of the telephone line cord
to the jack on the machine marked LINE
and the other end to a modular wall jack.
If you are sharing one phone line with an
external telephone, connect it as shown
below.
If you are sharing one phone line with an
external telephone answering device,
connect it as shown below.
Please set the receive mode to External
TAM.
For more details, see “Connecting the
machine” in Chapter 1 of the User’s Guide.
TAM
Setting Up
the Machine
®
USB
Windows
®
Parallel
Windows
4.0
®
NT
Windows
®
Network
Windows
Parallel
Warning
■ The machine must be grounded using a 3-prong
plug.
■ Since the machine is grounded through the power
outlet, you can protect yourself from potentially
hazardous electrical conditions on the telephone
network by keeping the power to your machine on
when you connect it to a telephone line. Similarly,
you can protect yourself when you want to move
your machine by disconnecting the telephone line
first and then the power cord.
TAM
®
USB
Macintosh
®
Network
Macintosh
For
Administrators
7
Page 10
Step 1
Setting Up the Machine
6 Selecting an Answer Mode
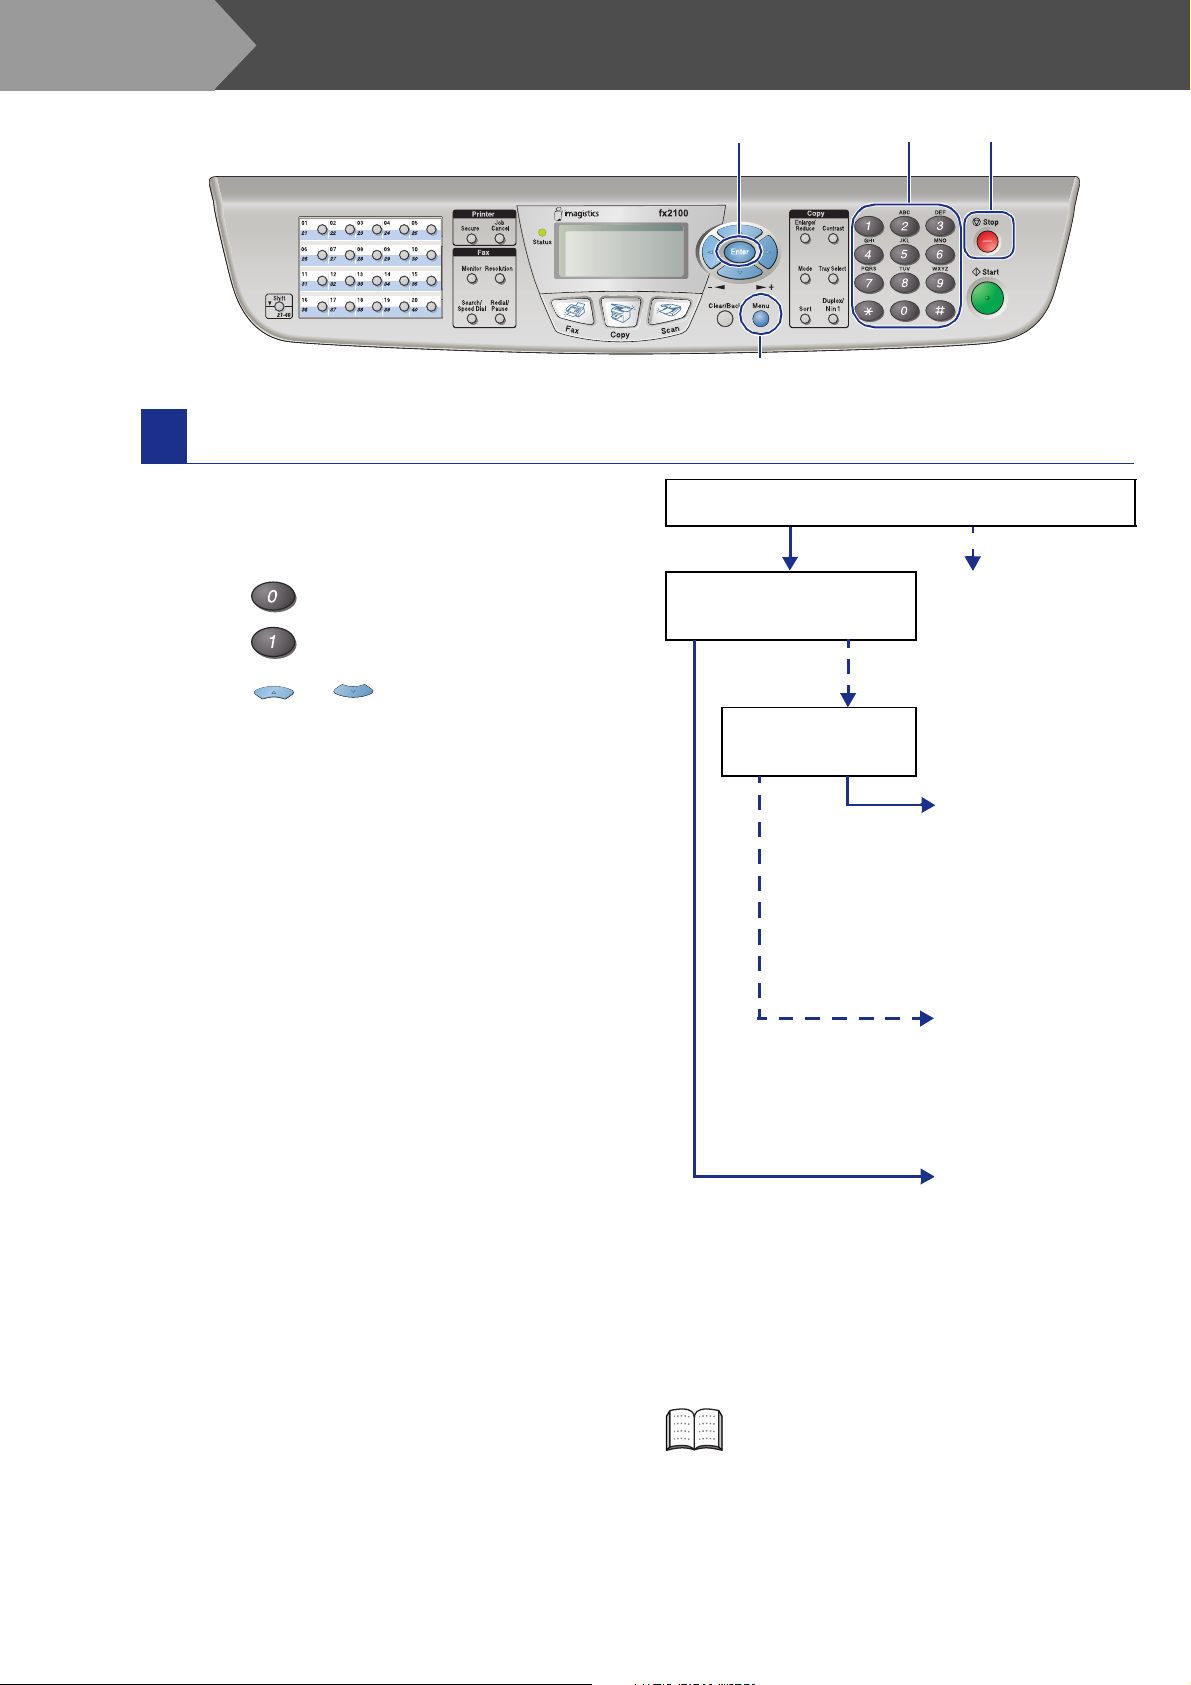
Choose the Answer mode which best suits your
needs.
1 Press the Menu key.
2 Press key.
3 Press key.
4 Press or to select the mode.
5 Press the Enter key.
6 Press the Stop key.
Enter
Menu
Are you connecting an external telephone or external
telephone answering device to the machine?
Yes No
Are you using the voice message
function of your external
telephone answering device?
No
Do you want the machine to
answer fax and telephone
calls automatically?
Yes
StopDial pad
Fax Only
The machine
automatically answers
every call as a fax.
Fax/Tel
The machine controls
the line and
automatically answers
every call. If the call is not
a fax, the phone will ring
for you to pick up the call.
No
Manual
You control the phone
line and must answer
every call yourself.
Yes
For more details, see “RX Settings” in
Chapter 5 of the User’s Guide.
External TAM
Your external telephone
answering machine
(TAM) automatically
answers every call.
Voice messages are
stored on the external
TAM. Fax messages
are printed.
8
Page 11
7 Setting the Date and Time
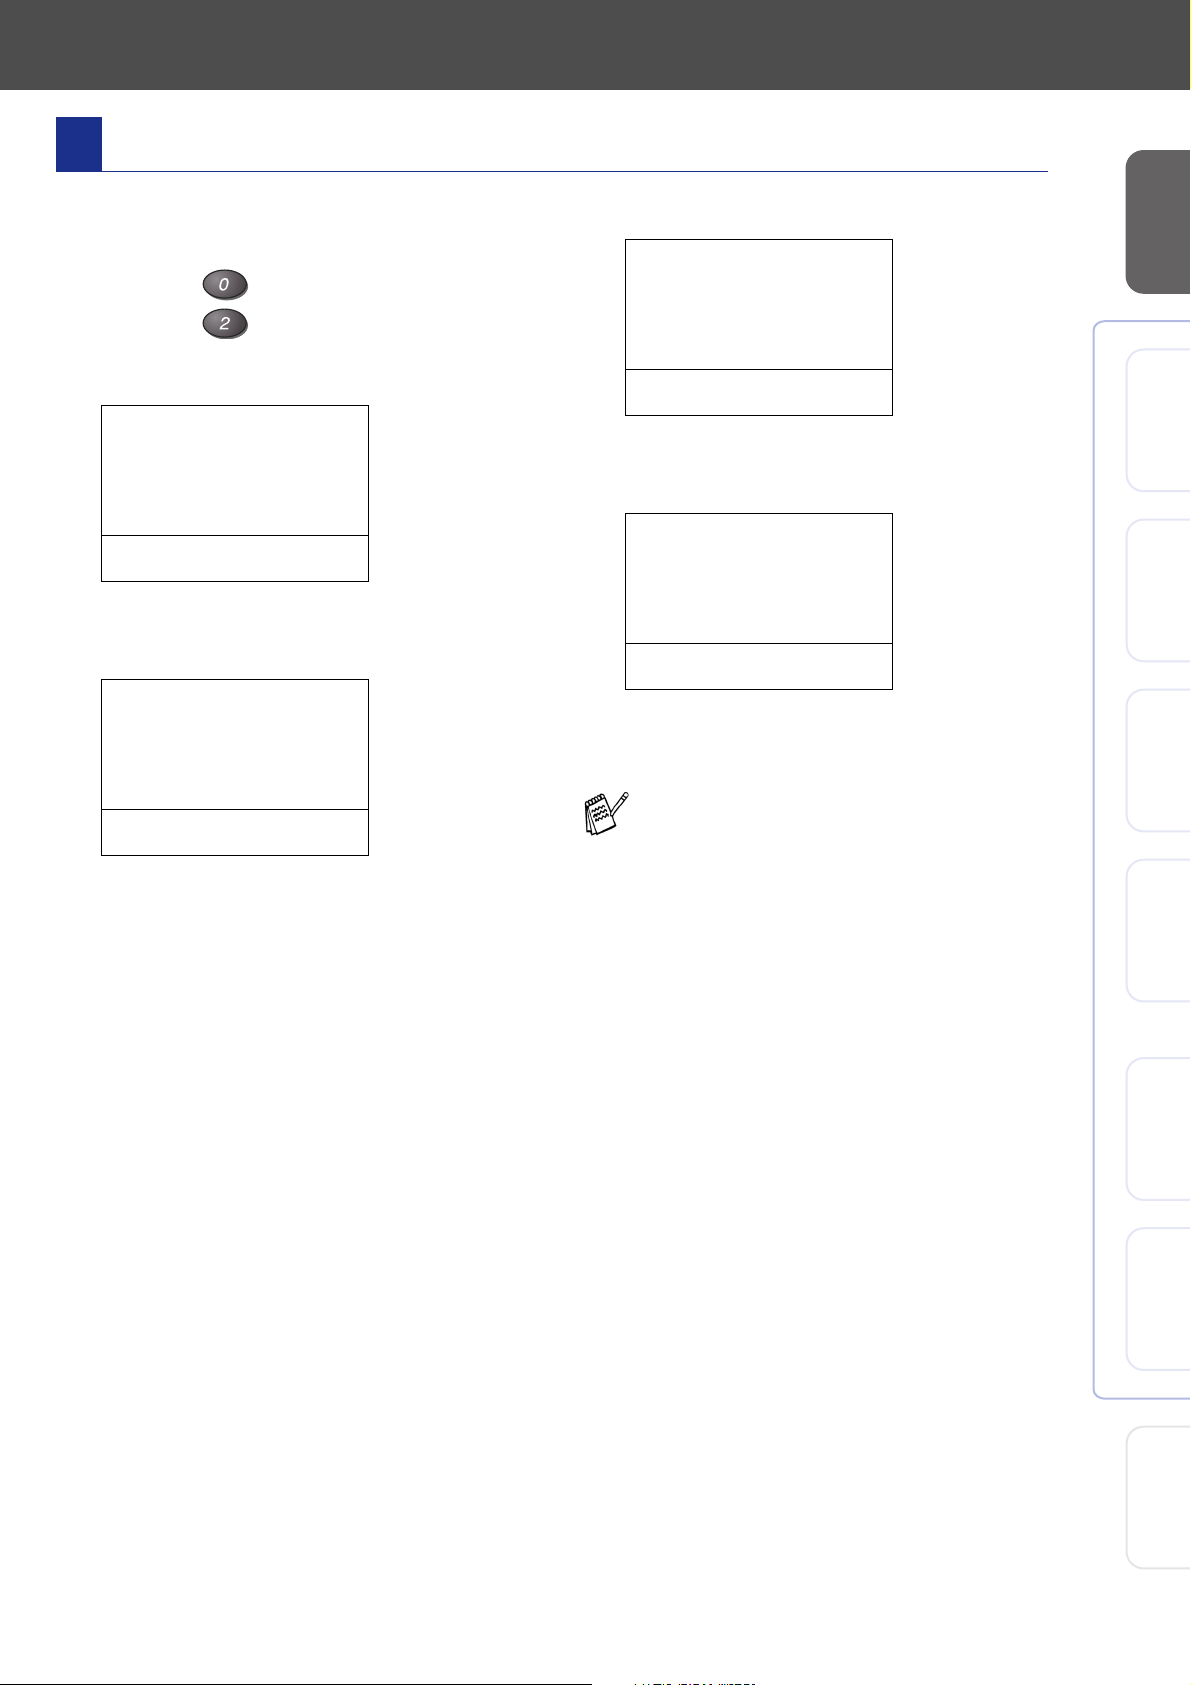
The machine displays the date and time, and prints it
on every fax you send.
1 Press the Menu key.
2 Press the key.
3 Press the key.
4 Enter the last two digits of the year on the
dial pad, and then press the Enter key.
02.Date/Time
Year:2005
_
Set & Enter
(e.g. Enter 0, 5 for 2005.)
5 Enter the two digits for the month on the dial
pad, and then press the Enter key.
02.Date/Time
XX/XX/2005
Month:03
Set & Enter
_
6 Enter the two digits for the day on the dial
pad, and then press the Enter key.
02.Date/Time
03/XX/2005
Day:01
_
Set & Enter
(e.g. Enter 0, 1.)
7 Enter the time in 24-hour format on the dial
pad, and then press the Enter key.
02.Date/Time
03/01/2005
Time:15:25
_
Set & Enter
(e.g. Enter 1, 5, 2, 5 for 3:25 P.M.)
8 Press the Stop key.
If you want to repeat from step1, press the
Stop key.
Setting Up
the Machine
®
USB
Windows
®
Parallel
Windows
4.0
®
NT
Windows
Parallel
(e.g. Enter 0, 3 for March.)
®
Windows
®
Macintosh
®
Macintosh
Network
USB
Network
For
Administrators
9
Page 12
Step 1
Setting Up the Machine
8 Setting Your Machine ID
You should store your name and fax number to be
printed on all fax pages that you send.
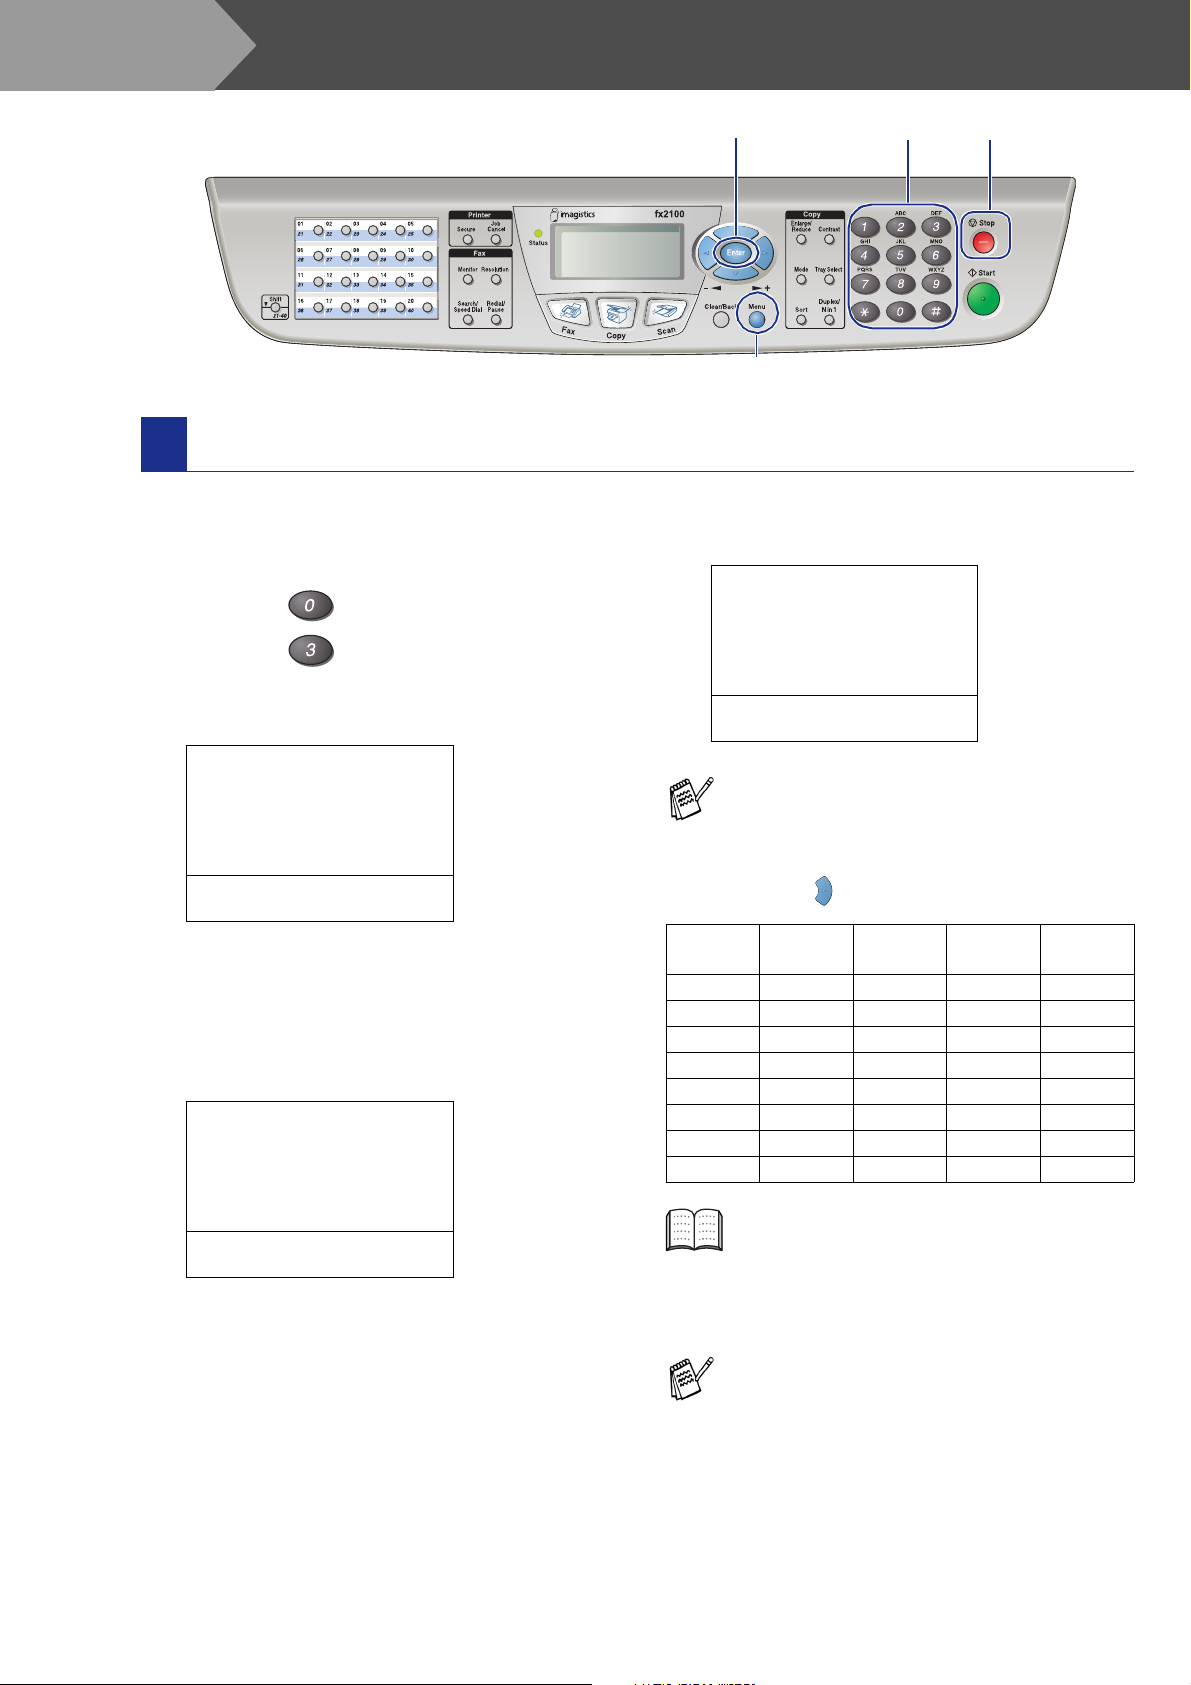
1 Press the Menu key.
2 Press the key.
3 Press the key.
4 Enter your fax number (up to 20 digits) on
the dial pad, and then press the Enter key.
Enter
Menu
StopDial pad
6 Use the dial pad to enter your name (up to
20 characters), and then press the Enter
key.
03.Machine ID
Fax:908XXXXXXXX
Tel:908XXXXXXXX
Name:_
Set & Enter
03.Machine ID
Fax:_
Set & Enter
5 Enter your telephone number (up to 20
digits) on the dial pad, and then press the
Enter key.
(If your telephone number and fax number
are the same, enter the same number
again.)
03.Machine ID
Fax:908XXXXXXXX
Tel:_
Set & Enter
■ Refer to the following chart for entering
your name.
■ If you need to enter a character that is on
the same key as the previous character,
press to move the cursor to the right.
Press
key
2 ABC2
3 DEF 3
4 GH I 4
5 JKL5
6 MNO 6
7 PQRS
8 TUV8
9 WX Y Z
One
time
For more details, see “Setting the Machine
ID” in Chapter 4 of the User's Guide.
Two
times
Three
times
Four
times
7 Press the Stop key.
10
If you want to repeat from step1, press the
Stop key.
Page 13
Selecting Your
9
Language
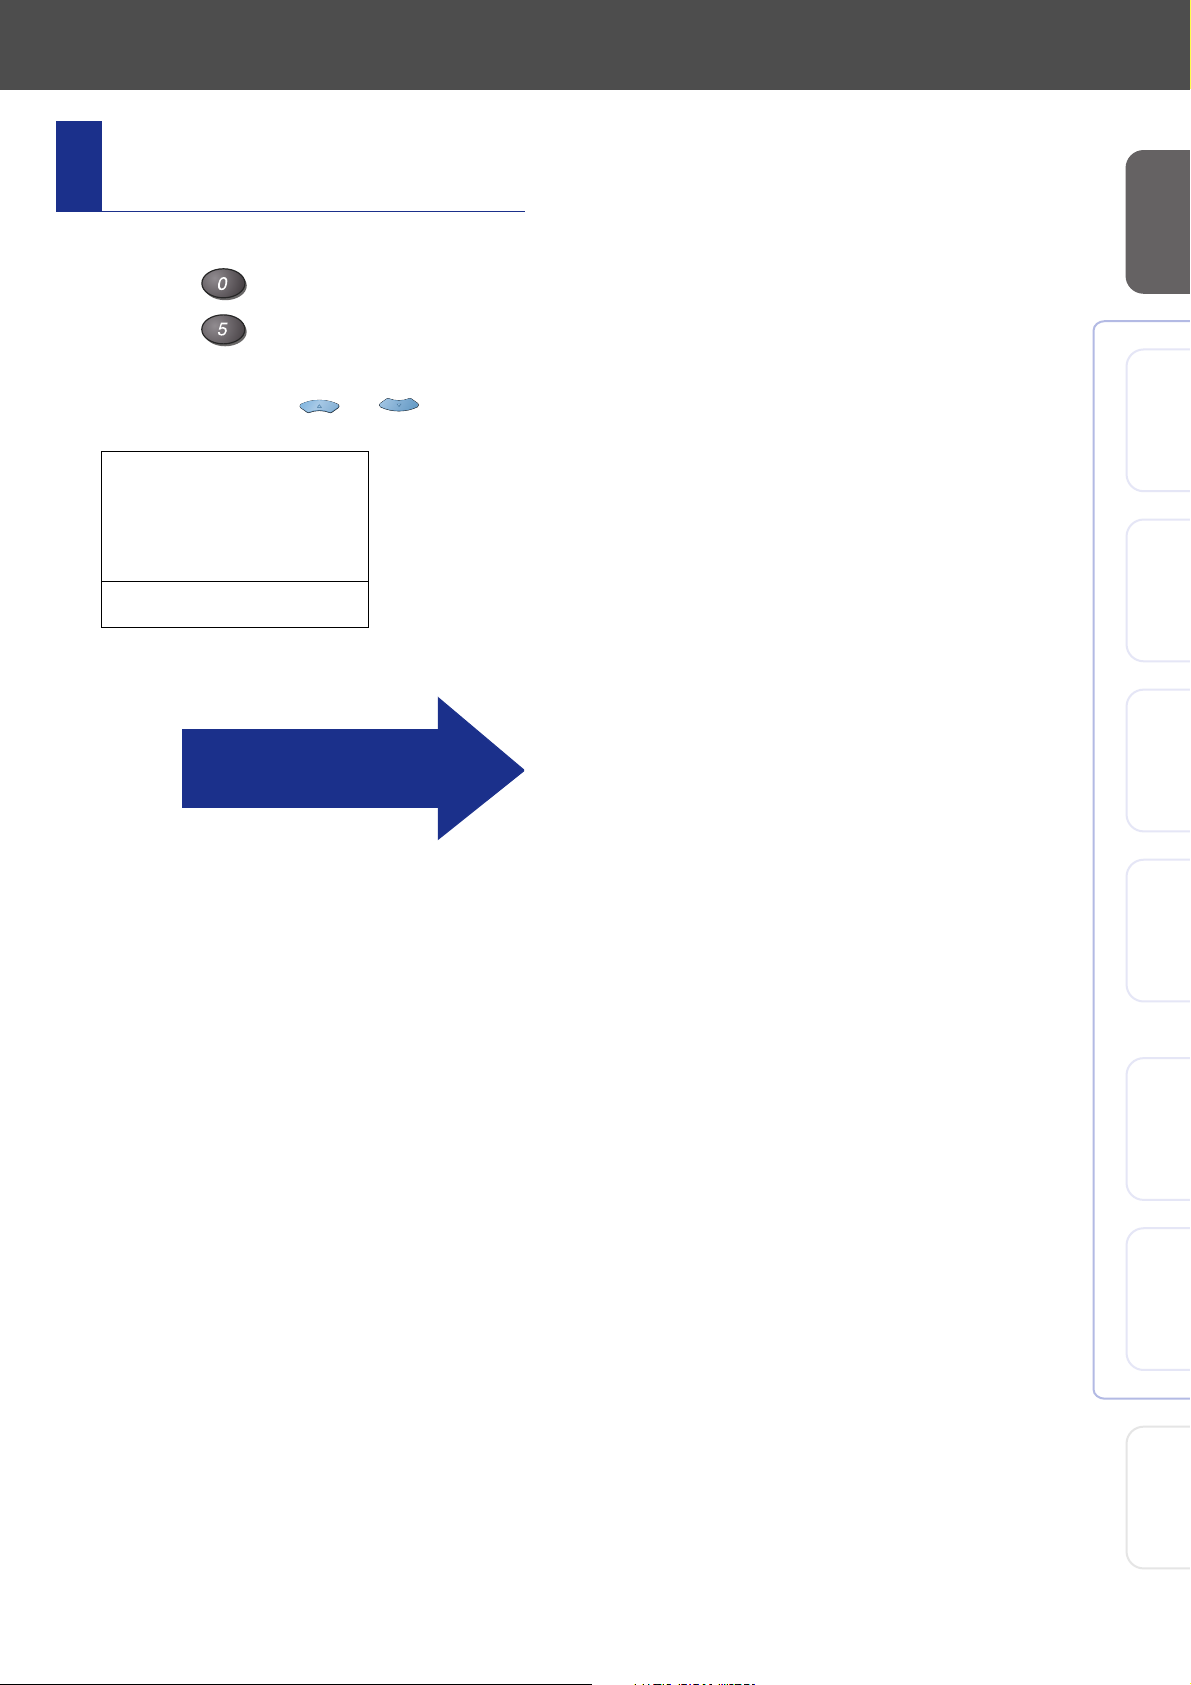
1 Press the Menu key.
2 Press the key.
3 Press the key.
4 Select your language (ENGLISH or
FRENCH) by using or , and
then press the Enter key.
05.Language
▲ English *
▼ French
Set ▲ ▼ & Enter
5 Press the Stop key.
Go to page 12 to
install the driver
Setting Up
the Machine
®
USB
Windows
®
Parallel
Windows
4.0
®
NT
Windows
Parallel
®
Windows
®
Macintosh
®
Macintosh
Network
USB
Network
11
For
Administrators
Page 14
Step 2
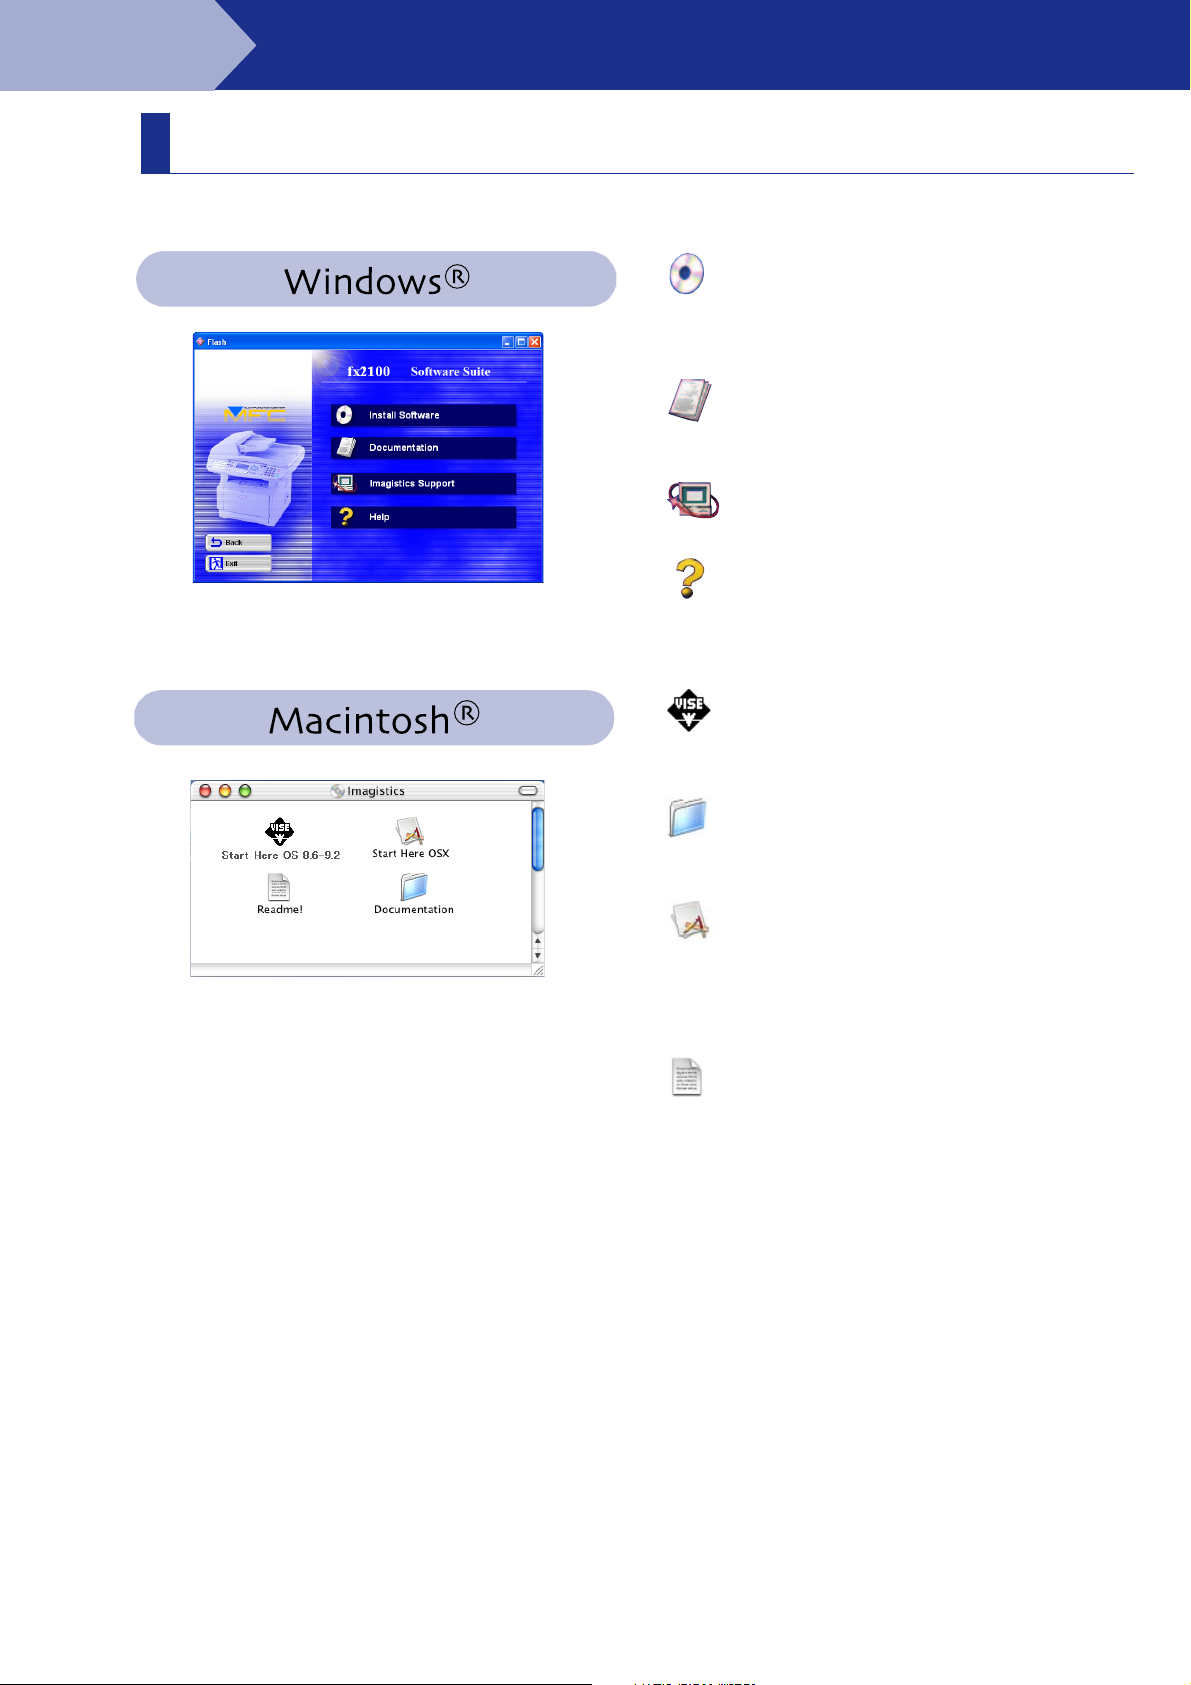
You can find a variety of information on the CD-ROM.
Installing the Driver & Software
Supplied CD-ROM “Multi-Function Suite”
Install Software
You can install printer, PC-FAX Send/Receive,
scanner drivers and the various utility items, including
PaperPort
View the User’s Guide and other documentation in
PDF format (Viewer included).
You can access the Imagistics Home Page.
Helpful hints.
®
and OmniPage® OCR.
Documentation
Imagistics Support
Help
Start Here OS 8.6 - 9.2
You can install the printer driver, scanner driver and
PC-FAX Send for Mac OS
Documentation
View the User’s Guide and other documentations in
PDF format.
Start Here OSX
You can install the printer driver, scanner driver,
PC-Fax Send and remote setup program for
Mac OS
supported in Mac OS
You can get important information and
troubleshooting tips.
®
10.1/10.2.1 or greater (Scanning is not
ReadMe!
®
10.1).
®
8.6 - 9.2.
12
Page 15

Step 2
Installing the Driver & Software
Follow the instructions on this page for your operating system and interface cable.
Setting Up
the Machine
USB Interface Cable Users .................................. Go to page 14
(For Windows
®
98/98SE/Me/2000 Professional/XP)
Parallel Interface Cable Users............................. Go to page 25
(For Windows
Windows NT
®
98/98SE/Me/2000 Professional/XP)
®
Workstation Version 4.0 Users... Go to page 35
Network Interface Cable Users ........................... Go to page 38
(For Windows
®
98/98SE/Me/NT/2000 Professional/XP)
®
USB
Windows
®
Parallel
Windows
4.0
®
NT
Windows
®
Network
Windows
Parallel
USB Interface Cable Users
■ For Mac OS
■ For Mac OS
®
8.6 to 9.2 .................................... Go to page 42
®
X 10.1/10.2.1 or greater ............ Go to page 44
Network Interface Cable Users
®
■ For Mac OS
■ For Mac OS
8.6 to 9.2 .................................... Go to page 46
®
X 10.1/10.2.1 or greater ............ Go to page 48
For Administrators............................................... Go to page 50
13
®
®
For
Macintosh
Macintosh
USB
Network
Administrators
Page 16
Step 2
For USB Interface Cable Users
(For Windows
Make sure that you have completed the instructions from Step 1 “Setting Up
the Machine” on pages 4 - 11.
Installing the Driver & Software
®
98/98SE/Me/2000 Professional/XP)
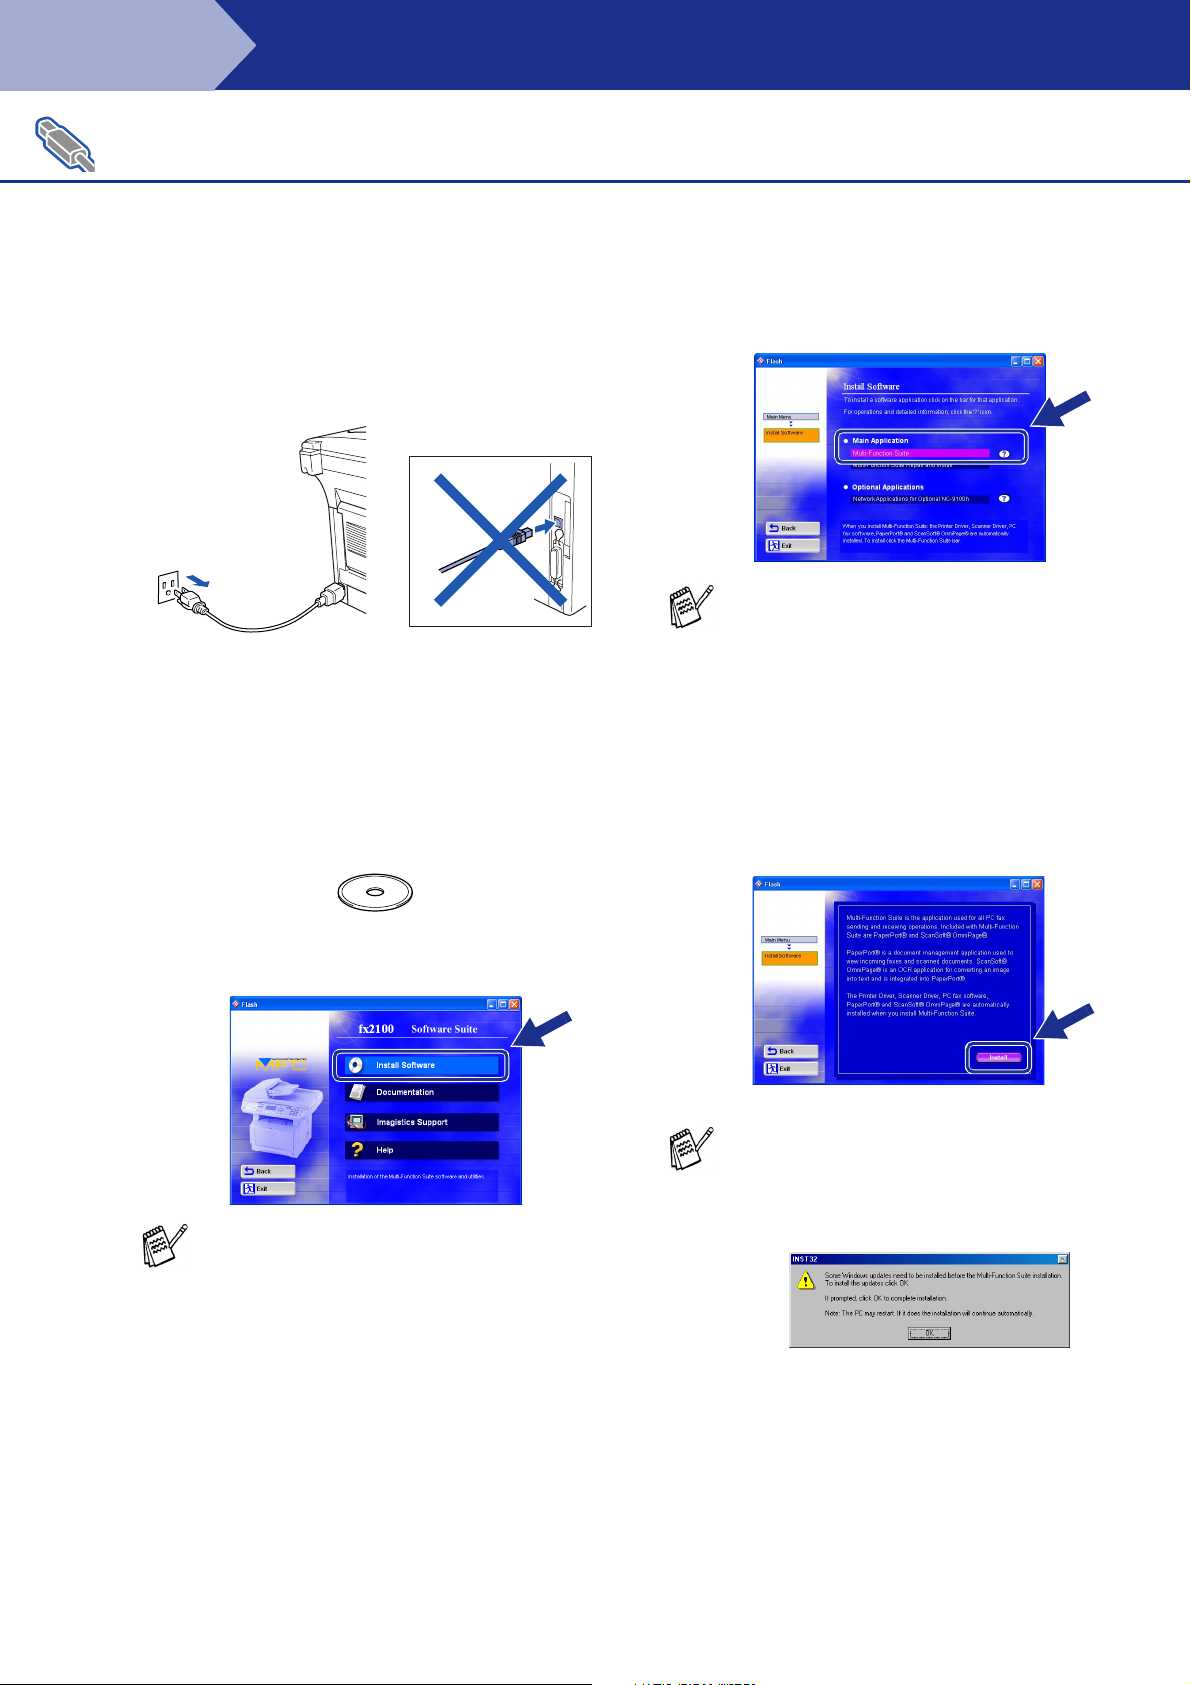
1 Switch off and unplug the machine from the
AC outlet and disconnect it from your
computer, if you already connected an
interface cable.
2 Turn on your computer.
(For Windows® 2000 Professional/XP, you
must be logged on as the administrator.)
3 Insert the supplied CD-ROM into your
CD-ROM drive. When the language screen
appears, select your language.
5 Click Multi-Function Suite in Main
Application.
Multi-Function Suite includes Printer Driver,
Scanner Driver, ScanSoft
ScanSoft
Remote Setup and True Type fonts.
PaperPort
application for viewing scanned documents.
ScanSoft
into PaperPort
converts an image into text and inserts it into
your default word processor.
®
OmniPage®, PC-FAX software,
®
is a document management
®
OmniPage®, which is integrated
®
, is an OCR application that
®
PaperPort®,
6 Click Install.
4 The CD-ROM main menu will appear.
Click Install Software.
If this window does not appear, use Windows®
Explore to run the setup.exe program from
the root directory of the CD-ROM.
If you see the following screen, click OK to
install the Windows
updates are installed your PC may restart.
Note: If it does the installation will
automatically continue.
If the installation does not continue
automatically, please open the installer
menu again by double-clicking the
setup.exe program from the root directory of
the CD-ROM, and continue from Step
®
updates. After the
4.
14
Page 17
Step 2
Setting Up
the Machine
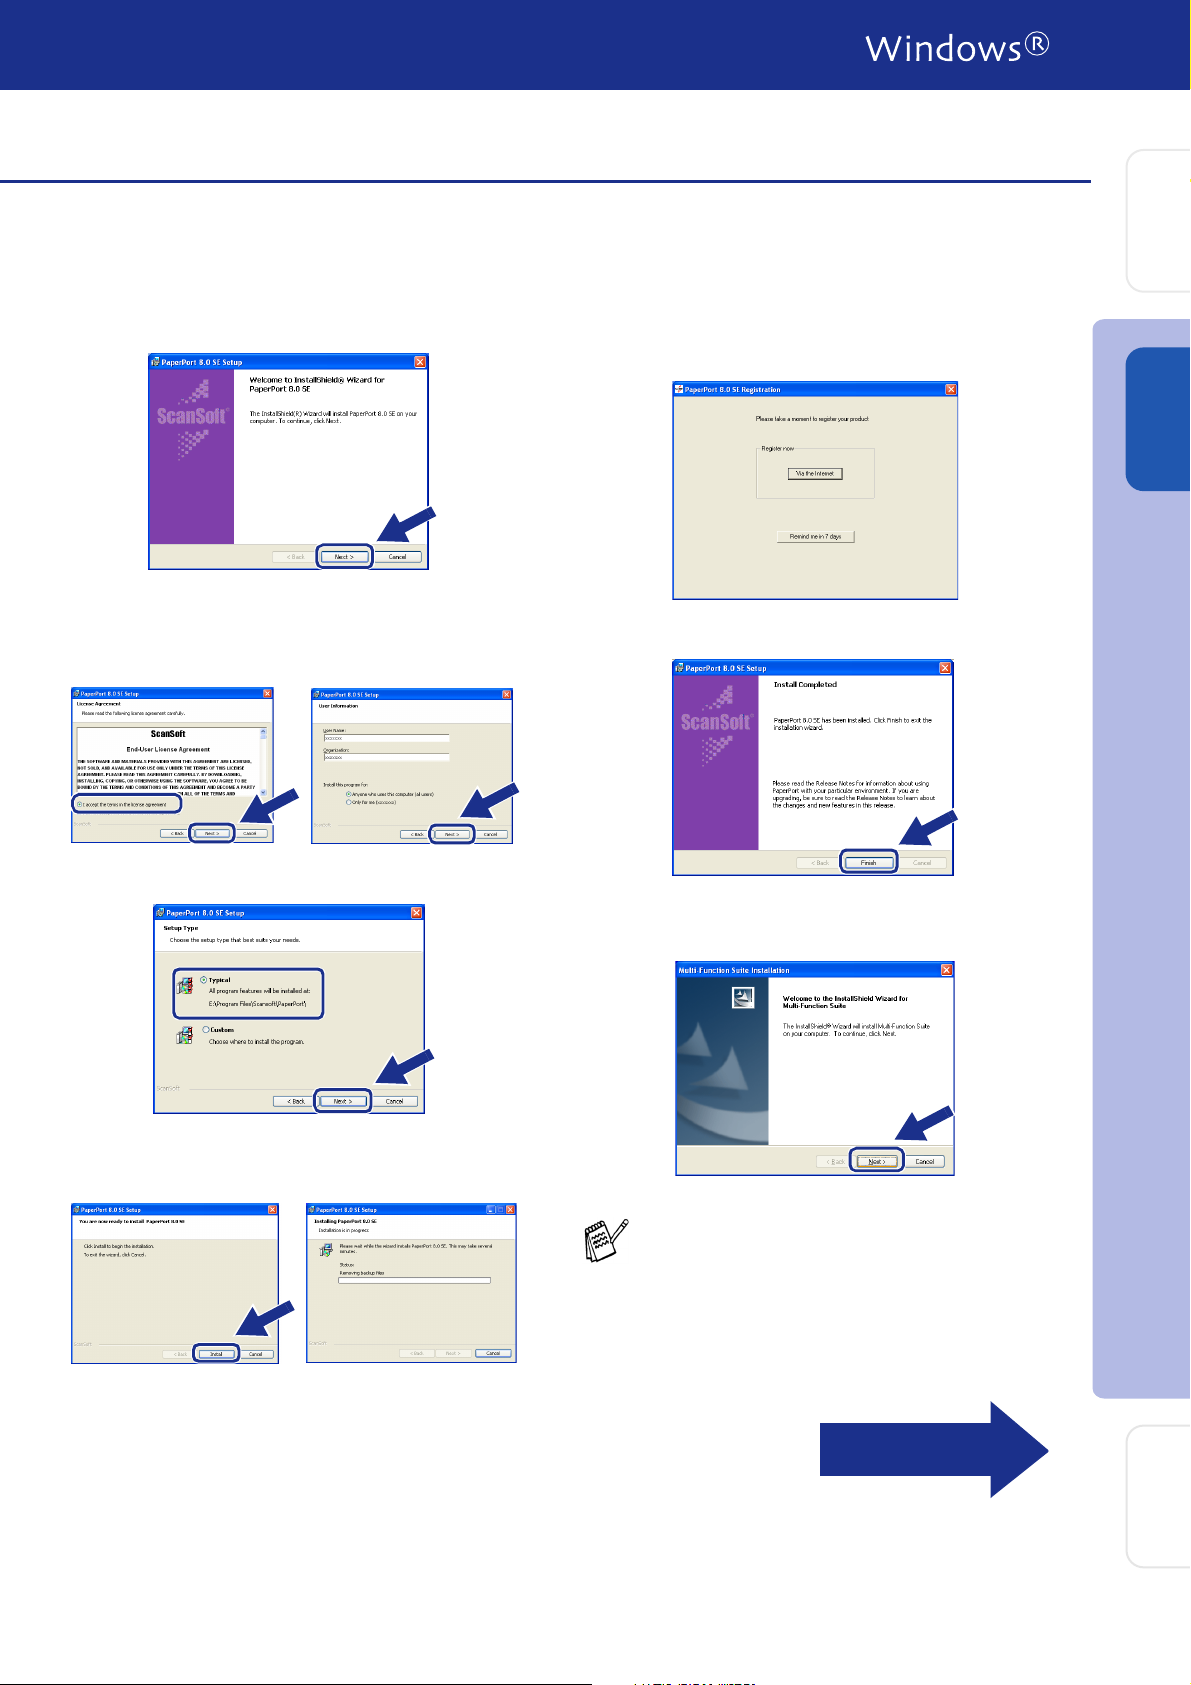
7 When the PaperPort
is displayed, click Next.
®
8.0 SE Setup window
8 After reading and accepting the ScanSoft
License Agreement, enter your user
information and click Next.
A When the ScanSoft
displayed, make your selection and follow
the on-screen instructions.
®
®
Registration screen is
®
USB
Windows
B Click Finish to complete installation.
9 Select Typical and click Next.
0 Click Install and PaperPort
installing on your computer.
®
will start
C When the Multi-Function Suite Installation
window appears, click Next.
Installing the Driver & Software
If you have previously installed the MultiFunction Suite, you will first have to uninstall
it. From the Start menu, select Programs,
Imagistics, Multi-Function Suite,
Uninstall, and then follow the instructions on
the screen.
Continued...
15
For
Administrators
Page 18
Step 2
For USB Interface Cable Users
(For Windows
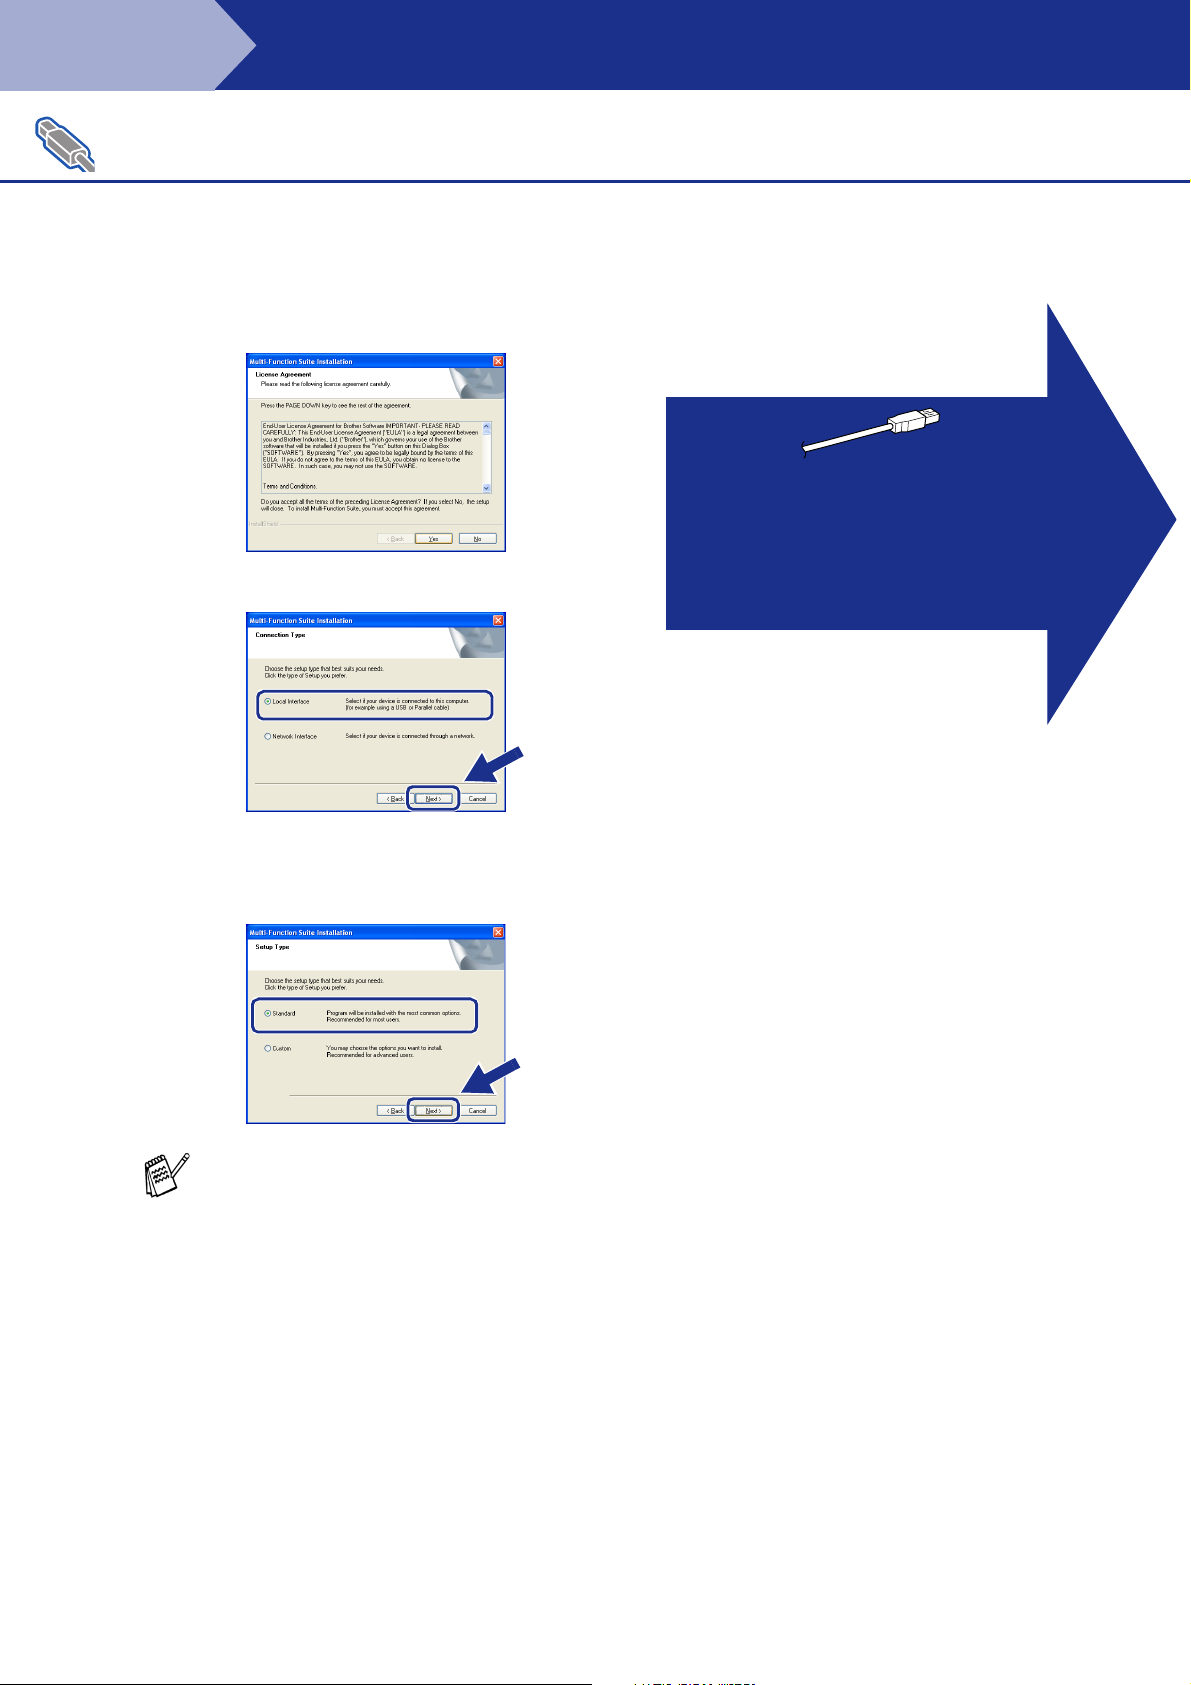
D When the Software License Agreement
E Select Local Interface, and then click Next.
Installing the Driver & Software
®
98/98SE/Me/2000 Professional/XP)
window appears, click Yes.
Windows® 98/98SE/Me Users
➝ Go to page 17
Windows® 2000 Professional Users
➝ Go to page 19
Windows
®
XP Users
➝ Go to page 22
F Select Standard, and then click Next.
The application files will be copied and
installed to your computer.
If you want to install the PS driver, select
Custom and then follow the on-screen
instructions. When the Select Components
screen appears, check PS Printer Driver,
and then continue following the on-screen
instructions.
16
Page 19
Step 2
For Windows® 98/98SE/Me Users Only
Make sure that you followed the instructions in 1 to F on pages 14 - 16.
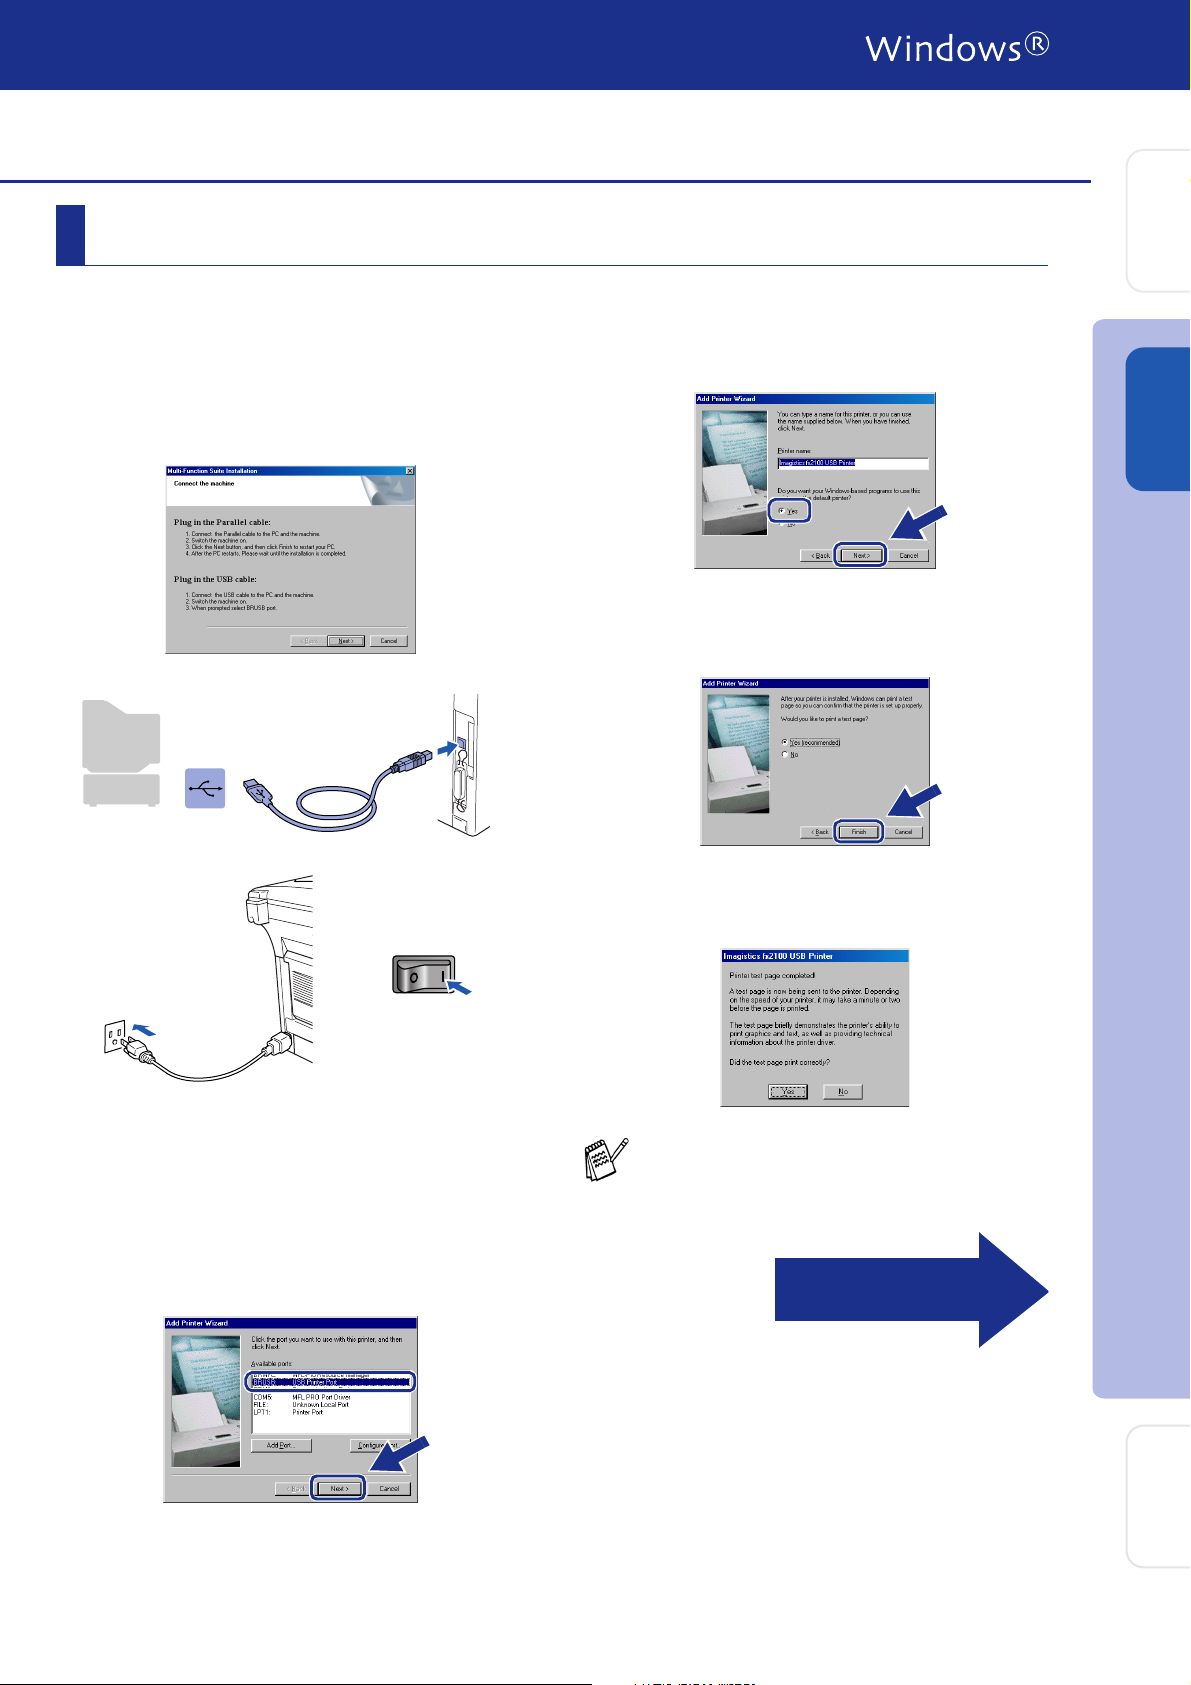
G When this screen appears, connect the
USB interface cable to your PC, and then
connect it to the machine.
Turn on the machine by plugging in the
power cord. Turn the power switch on.
I Accept the default Printer name by selecting
Yes, and then click Next.
J Select Yes (recommended), and then click
Finish. A test page will be printed so you
can check the print quality.
Setting Up
®
Windows
the Machine
USB
It will take a few seconds for the installation
screen to appear.
The installation of the drivers will
automatically start. Follow the instructions
on the screen.
H Select BRUSB: USB Printer Port, and then
click Next.
K If the test page is printed correctly, click
Yes. If you click No, follow the prompts on
the screen to correct the problem.
Installing the Driver & Software
If the README file shown in step L
appears, close the README file and then
click Finish after printing the page.
Continued...
17
For
Administrators
Page 20
Step 2
For USB Interface Cable Users
(For Windows
Installing the Driver & Software
®
98/98SE/Me/2000 Professional/XP)
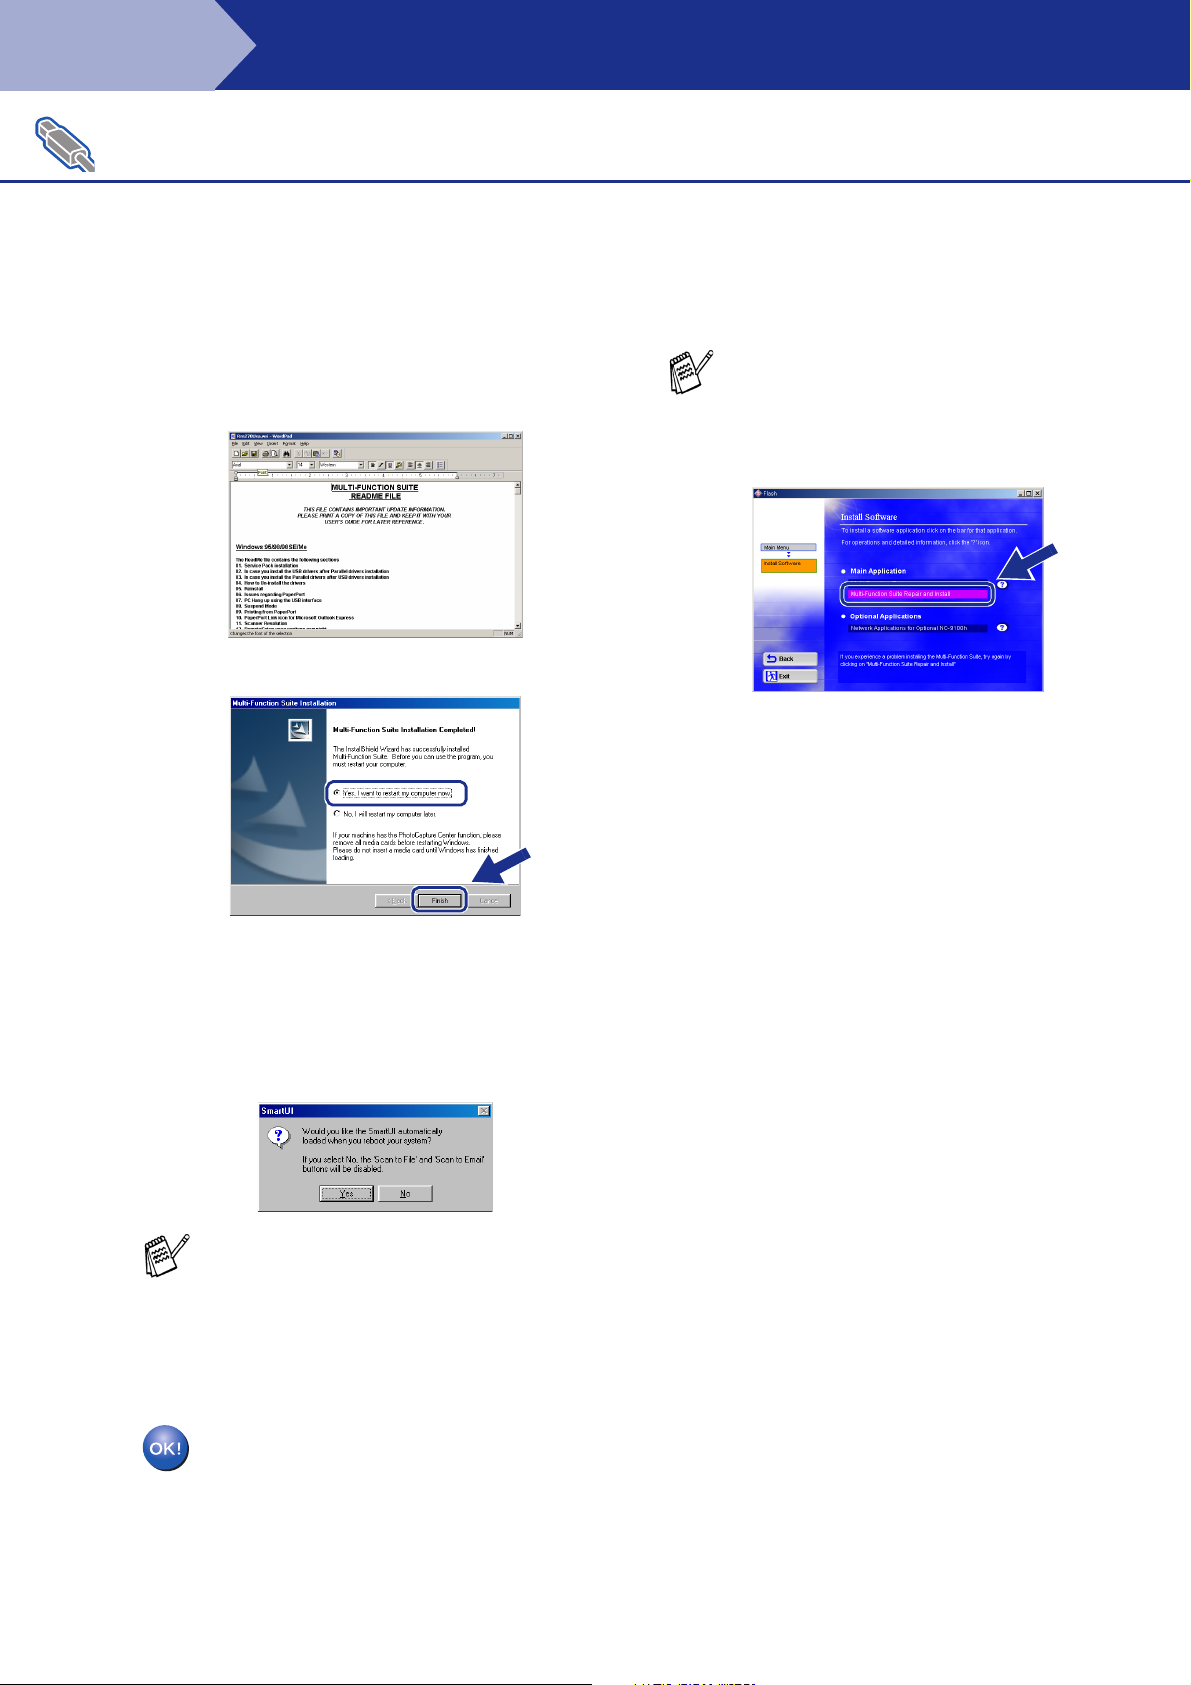
L The README file will be displayed.
Please read this file for troubleshooting
information and then close the file to
continue installation.
M Click Finish to restart your computer.
If the Multi-Function Suite doesn’t work after
the installation, you will have to repair it.
From the Main Menu, select Install
Software, Multi-Function Suite Repair
and Install, and then follow the instructions.
N After the computer restarts, click Yes to
have the SmartUI load each time Windows®
is started. The SmartUI will appear as an
icon in the task tray.
If you click No the Scan keys on the
machine will be disabled.
Even if you select No, you will be able to
launch the SmartUI later to use the Scan to
key by double clicking the SmartUI icon on
the desktop. This loads the SmartUI to the
task tray. See AutoLoad the SmartUI,
Chapter 4 in the Documentation (Software
User’s Guide) located on the CD-ROM.
The PC-FAX, Printer and Scanner
drivers have been installed and the
installation is now complete.
18
Page 21
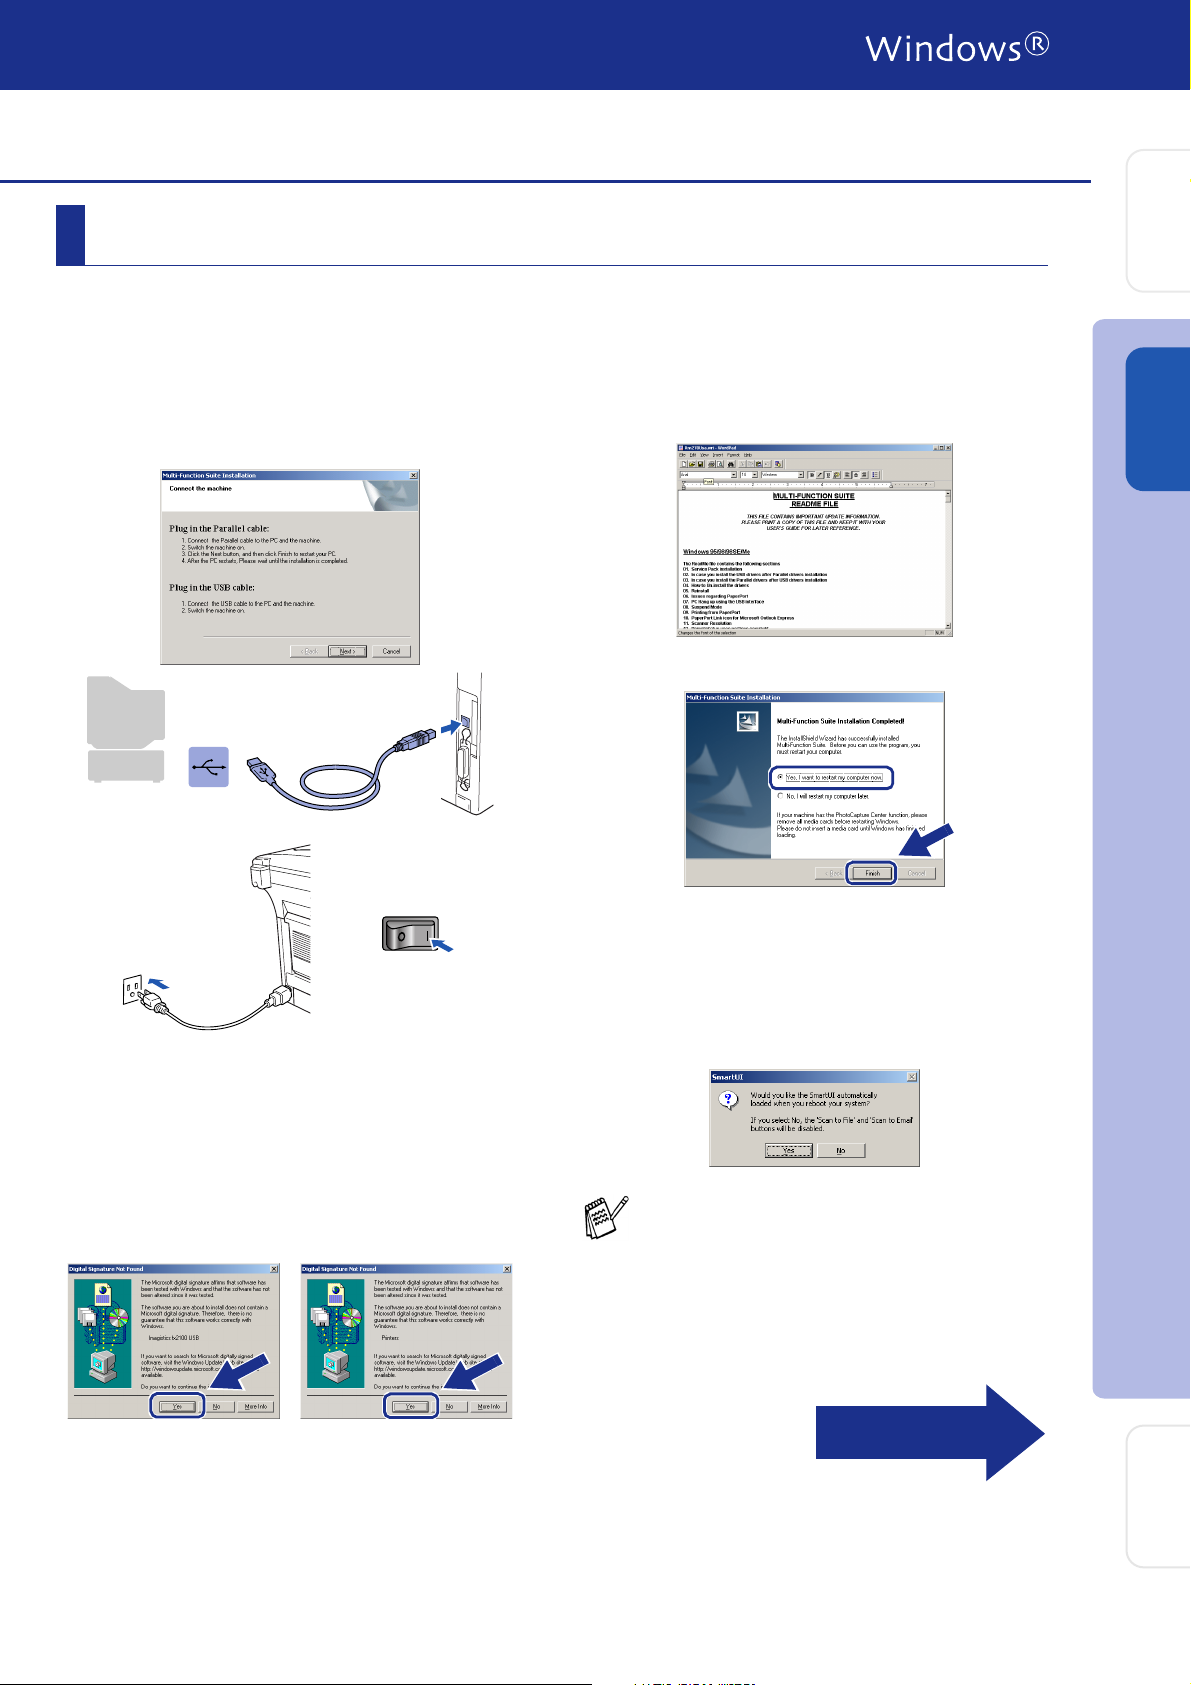
For Windows® 2000 Professional Users Only
Make sure that you followed the instructions in 1 to F on pages 14 - 16.
Setting Up
the Machine
G When this screen appears, connect the
USB interface cable to your PC, and then
connect it to the machine.
Turn on the machine by plugging in the
power cord. Turn the power switch on.
It will take a few seconds for the installation
screen to appear.
The installation of the drivers will
automatically start. Follow the instructions
on the screen.
H If the Digital Signature Not Found dialog
boxes appear, click Yes to install the driver.
.
I The README file will be displayed.
Please read this file for troubleshooting
information and then close the file to
continue installation.
J Click Finish to restart your computer.
K After the computer restarts, click Yes to
have the SmartUI load each time Windows
is started. The SmartUI will appear as an
icon in the task tray.
If you click No the Scan keys on the
machine will be disabled.
Even if you select No, you will be able to
launch the SmartUI later to use the Scan to
key by double clicking the SmartUI icon on
the desktop. This loads the SmartUI to the
task tray. See AutoLoad the SmartUI,
Chapter 4 in the Documentation (Software
User’s Guide) located on the CD-ROM.
®
USB
Windows
®
Installing the Driver & Software
Continued...
For
Administrators
19
Page 22
Step 2
For USB Interface Cable Users
(For Windows
Installing the Driver & Software
®
98/98SE/Me/2000 Professional/XP)
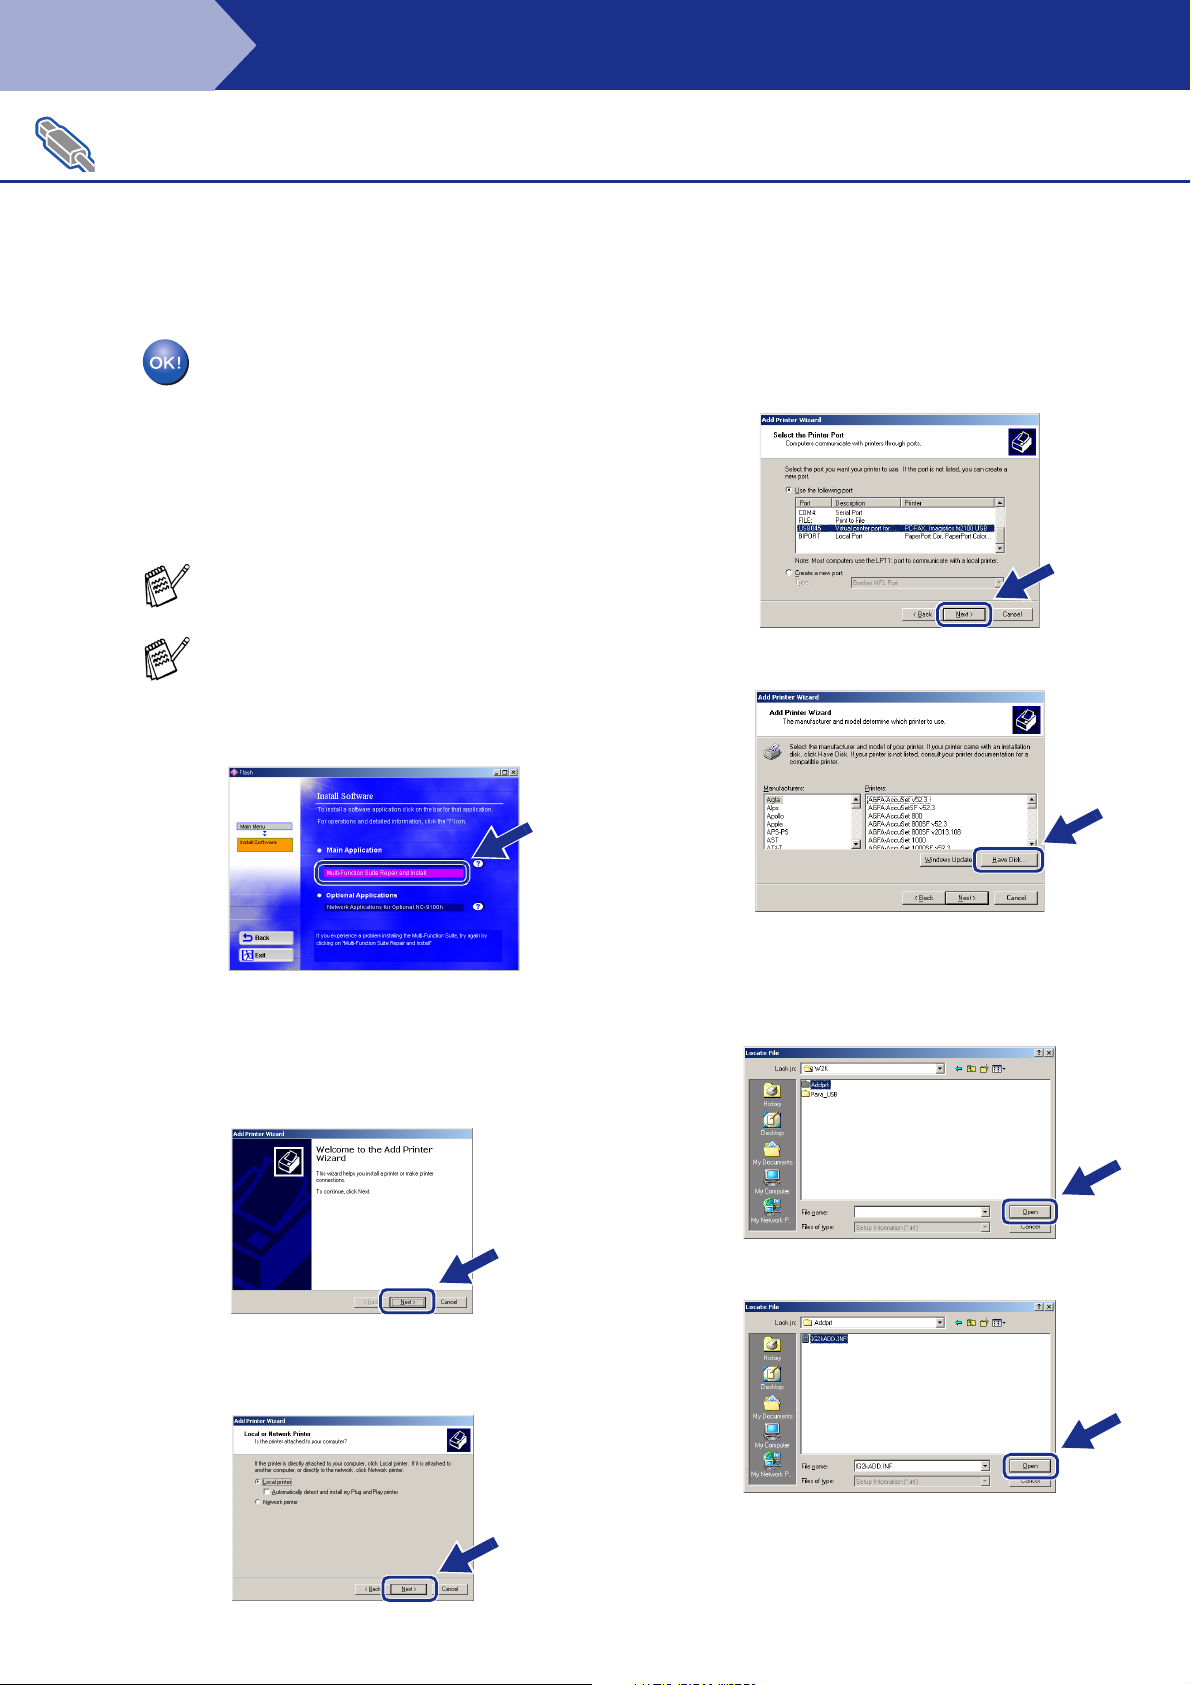
A Basic Universal printer driver was
installed with the Multi-Function Suite.
Imagistics also offers a full featured
printer driver (Native driver) that
includes more features than the Basic
Universal driver. To install the Native
driver proceed to step L.
For details on what features are available
see chapter 2 of the Software User's Guide.
N Select USBXXX from the pull down window
for the Printer Port Selection and then click
Next.
If the Multi-Function Suite doesn’t work after
the installation, you will have to repair it.
From the Main Menu, select Install
Software, Multi-Function Suite Repair
and Install, and then follow the instructions.
Native driver Installation
L Click Start and select Settings and then
Printers. Click on Add a printer and the
Add Printer Wizard will start.
When this screen appears, click Next.
O Click on Have Disk.
P Browse the CD-ROM and highlight ENG
folder and click Open. Highlight the W2K
folder and click Open. Highlight the Addprt
folder and click Open.
M Un-check the Automatically detect and
install my Plug and Play printer selection
and then click Next.
20
Q Click Open.
Page 23
Setting Up
the Machine
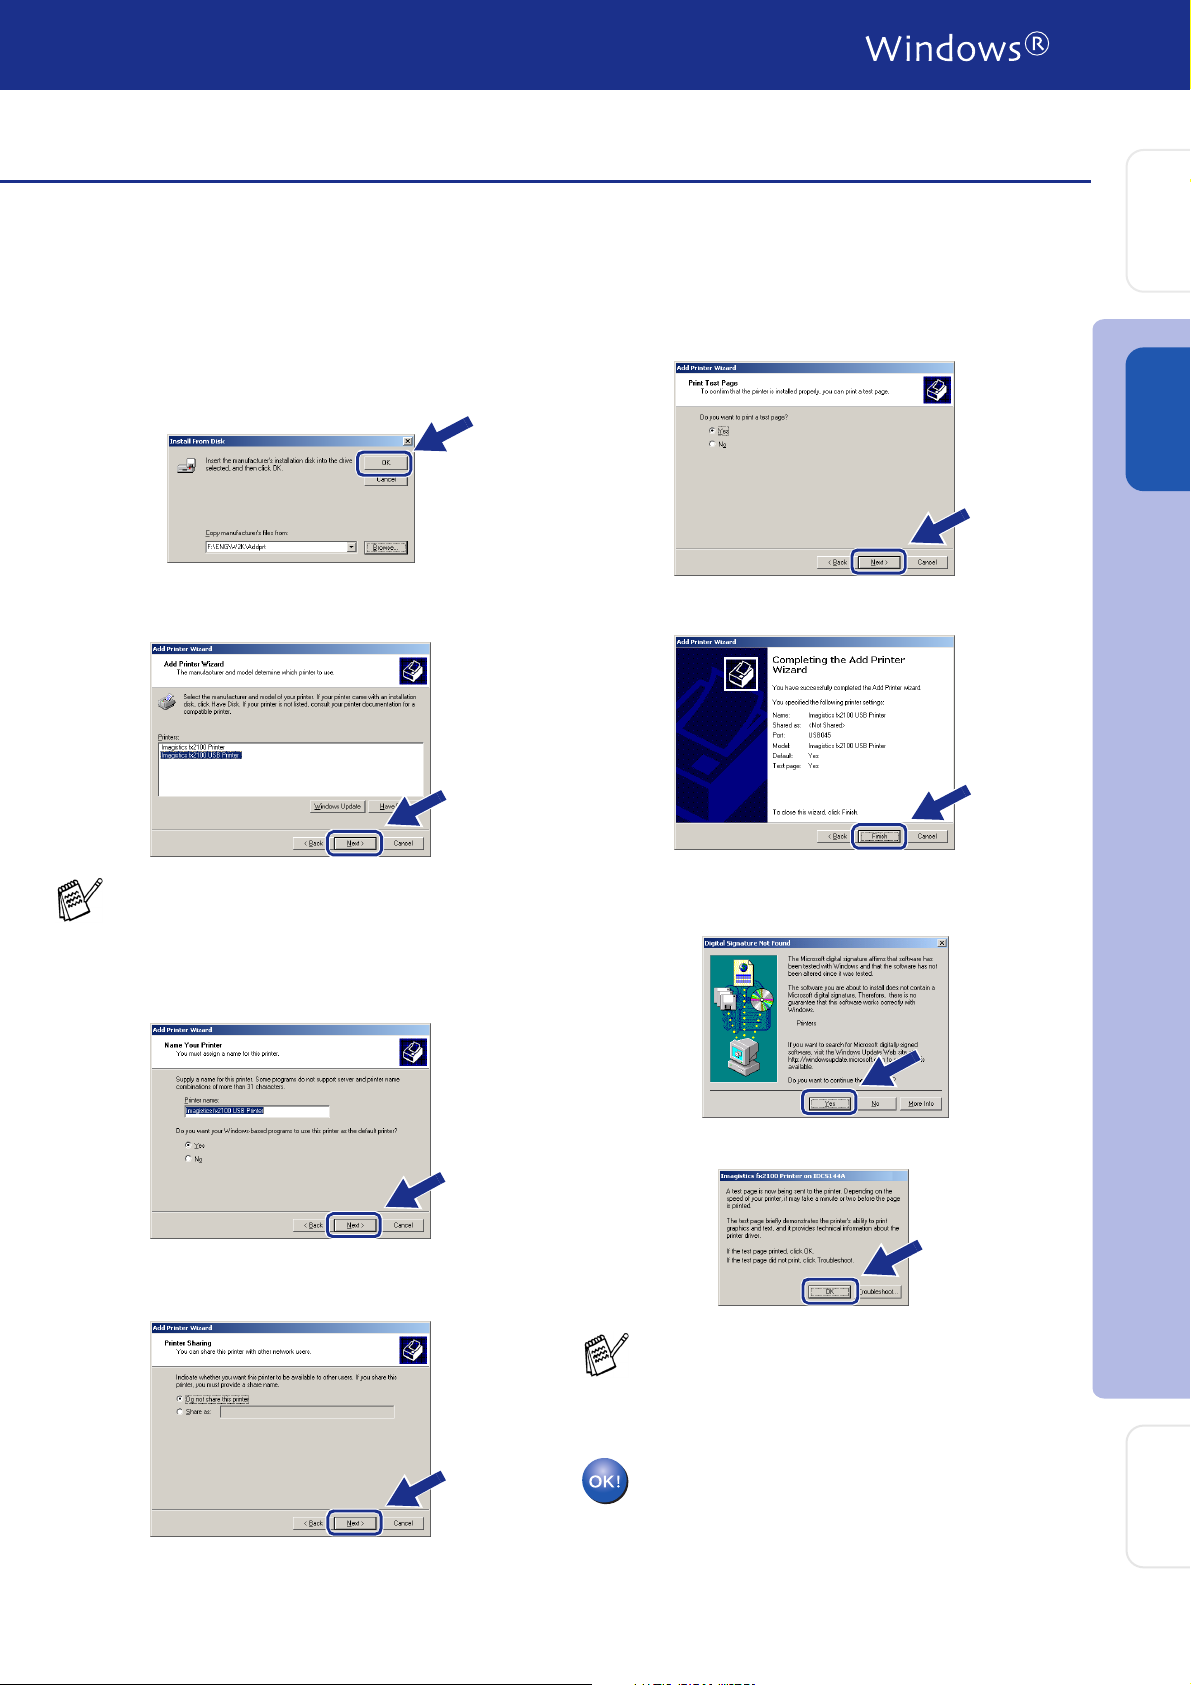
R Make sure X:\ENG\W2K\Addprt is
displayed in the window and click OK (X:\ is
the drive letter of your CD-ROM).
S Highlight the model you are installing from
the list of machines and click Next.
Make sure you select a USB printer.
V Select Yes and Next to print a test page.
®
USB
Windows
W When this screen appears, click Finish.
X If the Digital Signature Not Found dialog box
appears, click Yes.
T The model you are installing will be listed in
the window. Select Yes or No if you want
this driver to be your default printer.
U If this screen appears, select Do not share
this printer and Next.
Y If the test page printed, click OK.
There will be two printer drivers listed in the
Printers selection.
The driver with "Printer" after the model
name (ex. Imagistics fx2100 Printer) is the
Native Driver.
The Native Drivers have been installed
and the installation is now complete.
Installing the Driver & Software
For
21
Administrators
Page 24
Step 2
For USB Interface Cable Users
(For Windows
Make sure that you followed the instructions in 1 to F on pages 14 - 16.
Installing the Driver & Software
®
98/98SE/Me/2000 Professional/XP)
For Windows® XP Users Only
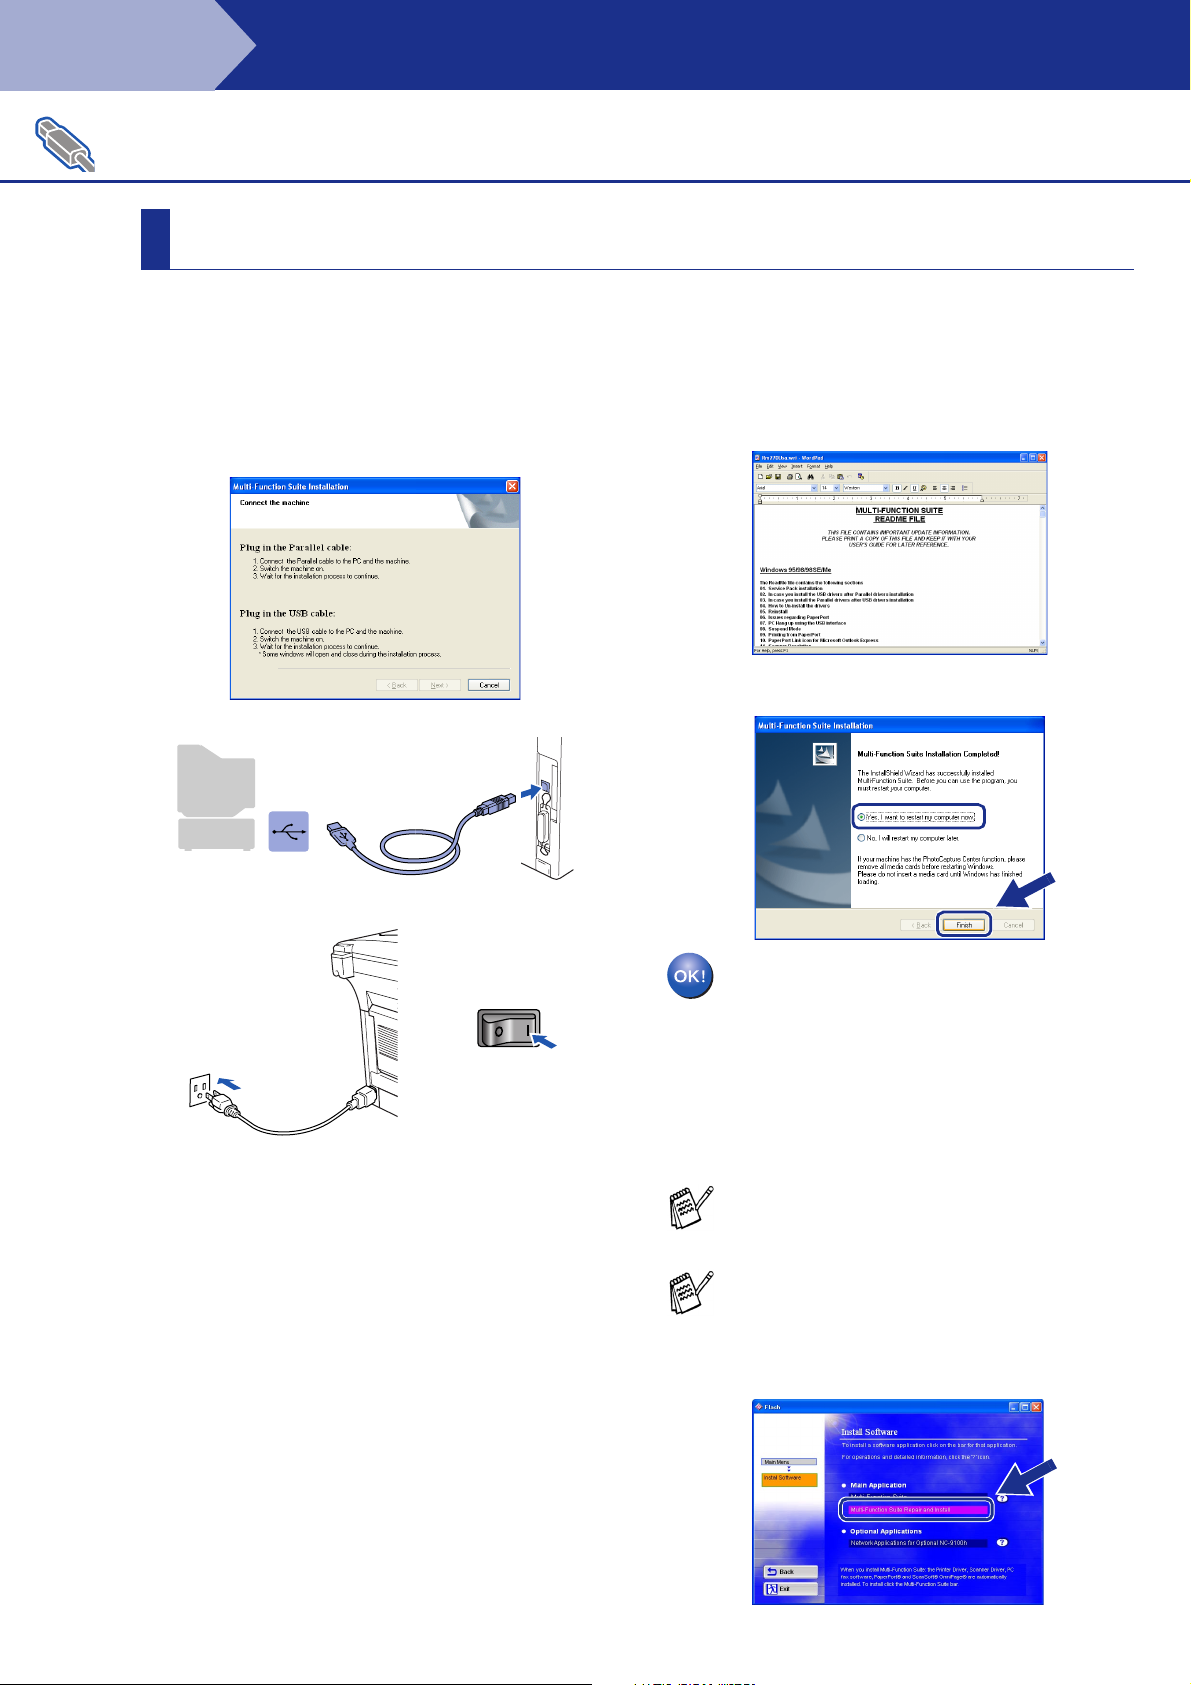
G When this screen appears, connect the
USB interface cable to your PC, and then
connect it to the machine.
Turn on the machine by plugging in the
power cord. Turn the power switch on.
H The README file will be displayed.
Please read this file for troubleshooting
information and then close the file to
continue installation.
I Click Finish to restart your computer.
It will take a few seconds for the installation
screen to appear.
The installation of the drivers will
automatically start. The screens appear one
after another, please wait for a while.
A Basic Universal printer driver was
installed with the Multi-Function Suite.
Imagistics also offers a full featured
printer driver (Native driver) that
includes more features than the Basic
Universal driver. To install the Native
driver proceed to step J.
For details on what features are available
see chapter 2 of the Software User's Guide.
If the Multi-Function Suite doesn’t work after
the installation, you will have to repair it.
From the Main Menu, select Install
Software, Multi-Function Suite Repair
and Install, and then follow the instructions.
22
Page 25
Setting Up
the Machine
Native driver Installation
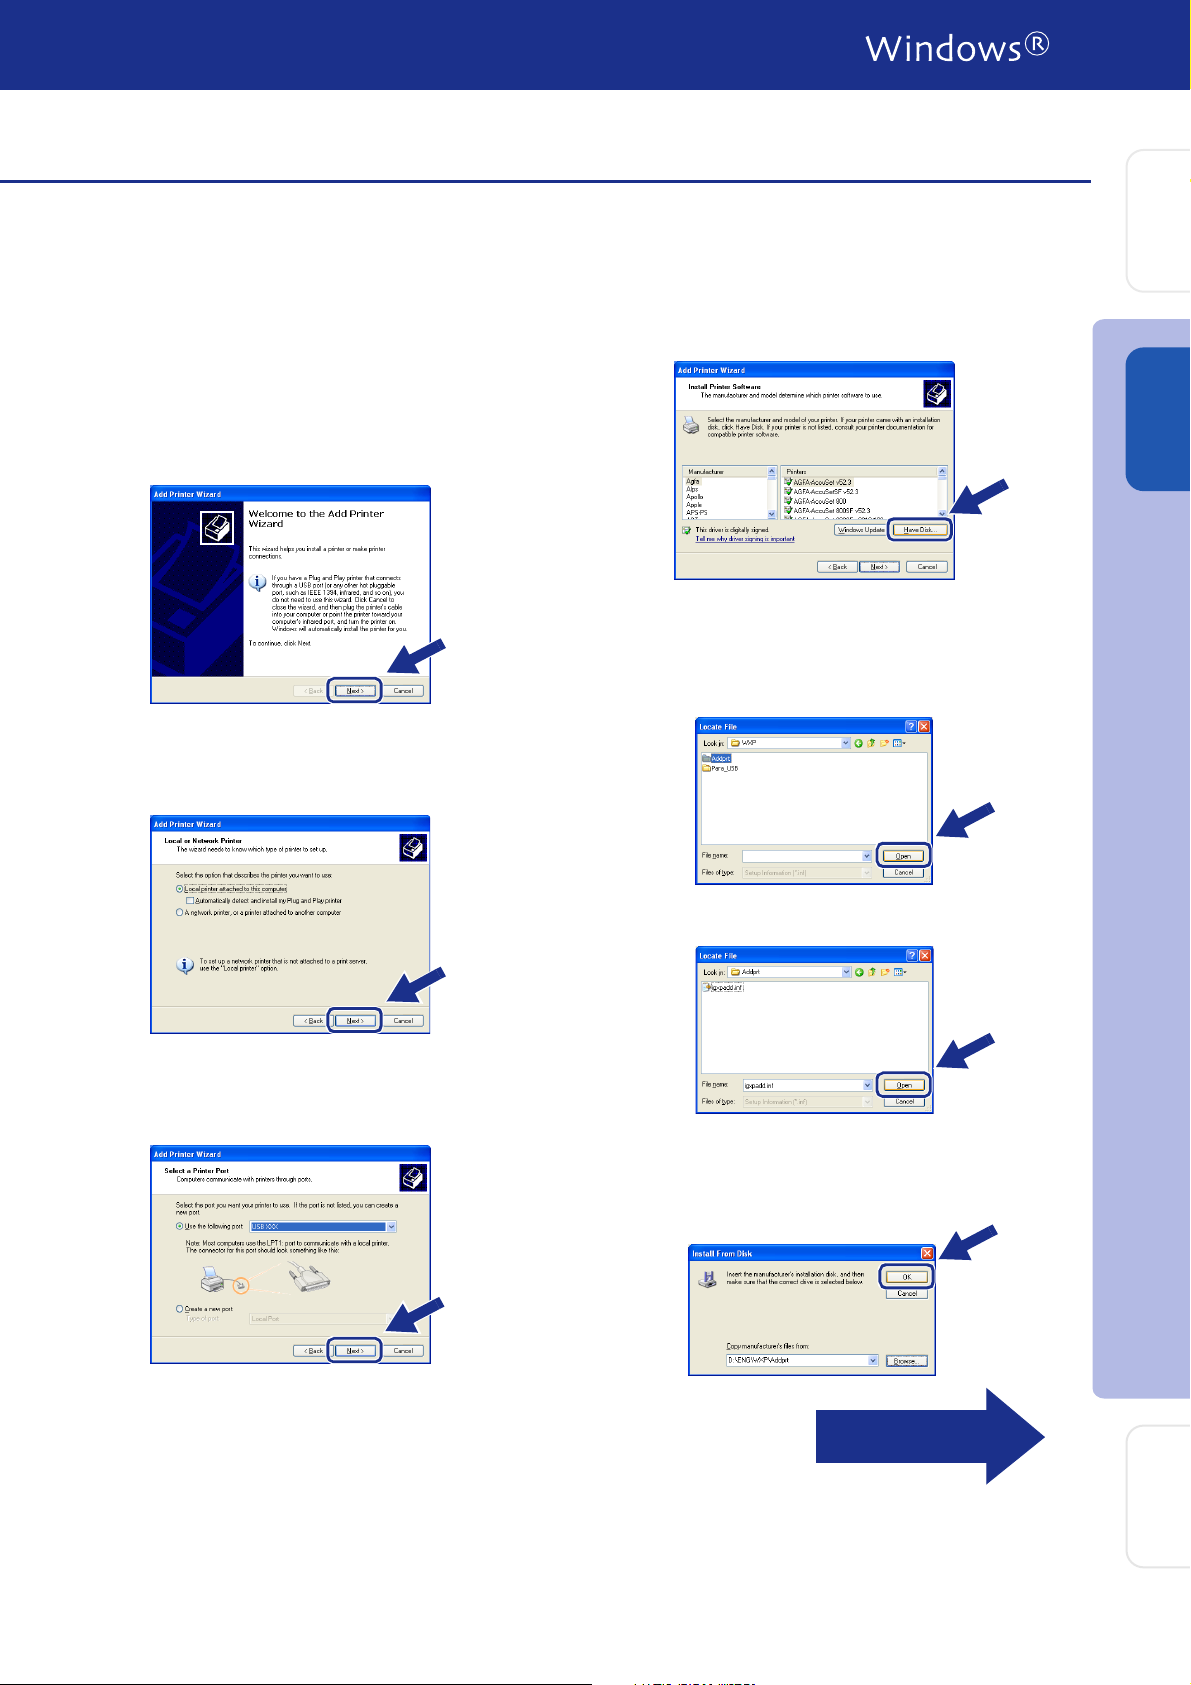
J Click Start and select Printers and Faxes.
Click on Add a printer and the Add Printer
Wizard will start.
When this screen appears, click Next.
K Un-check the Automatically detect and
install my Plug and Play printer selection
and then click Next.
M Click on Have Disk.
®
USB
Windows
N Browse the CD-ROM and highlight ENG
folder and click Open. Highlight the WXP
folder and click Open. Highlight the Addprt
folder and click Open.
L Select USBXXX from the pull down window
for the Printer Port Selection and then click
Next.
O Click Open.
Installing the Driver & Software
P Make sure X:\ENG\WXP\Addprt is
displayed in the window and click OK (X:\ is
the drive letter of your CD-ROM).
Continued...
23
For
Administrators
Page 26
Step 2
For USB Interface Cable Users
(For Windows
Installing the Driver & Software
®
98/98SE/Me/2000 Professional/XP)
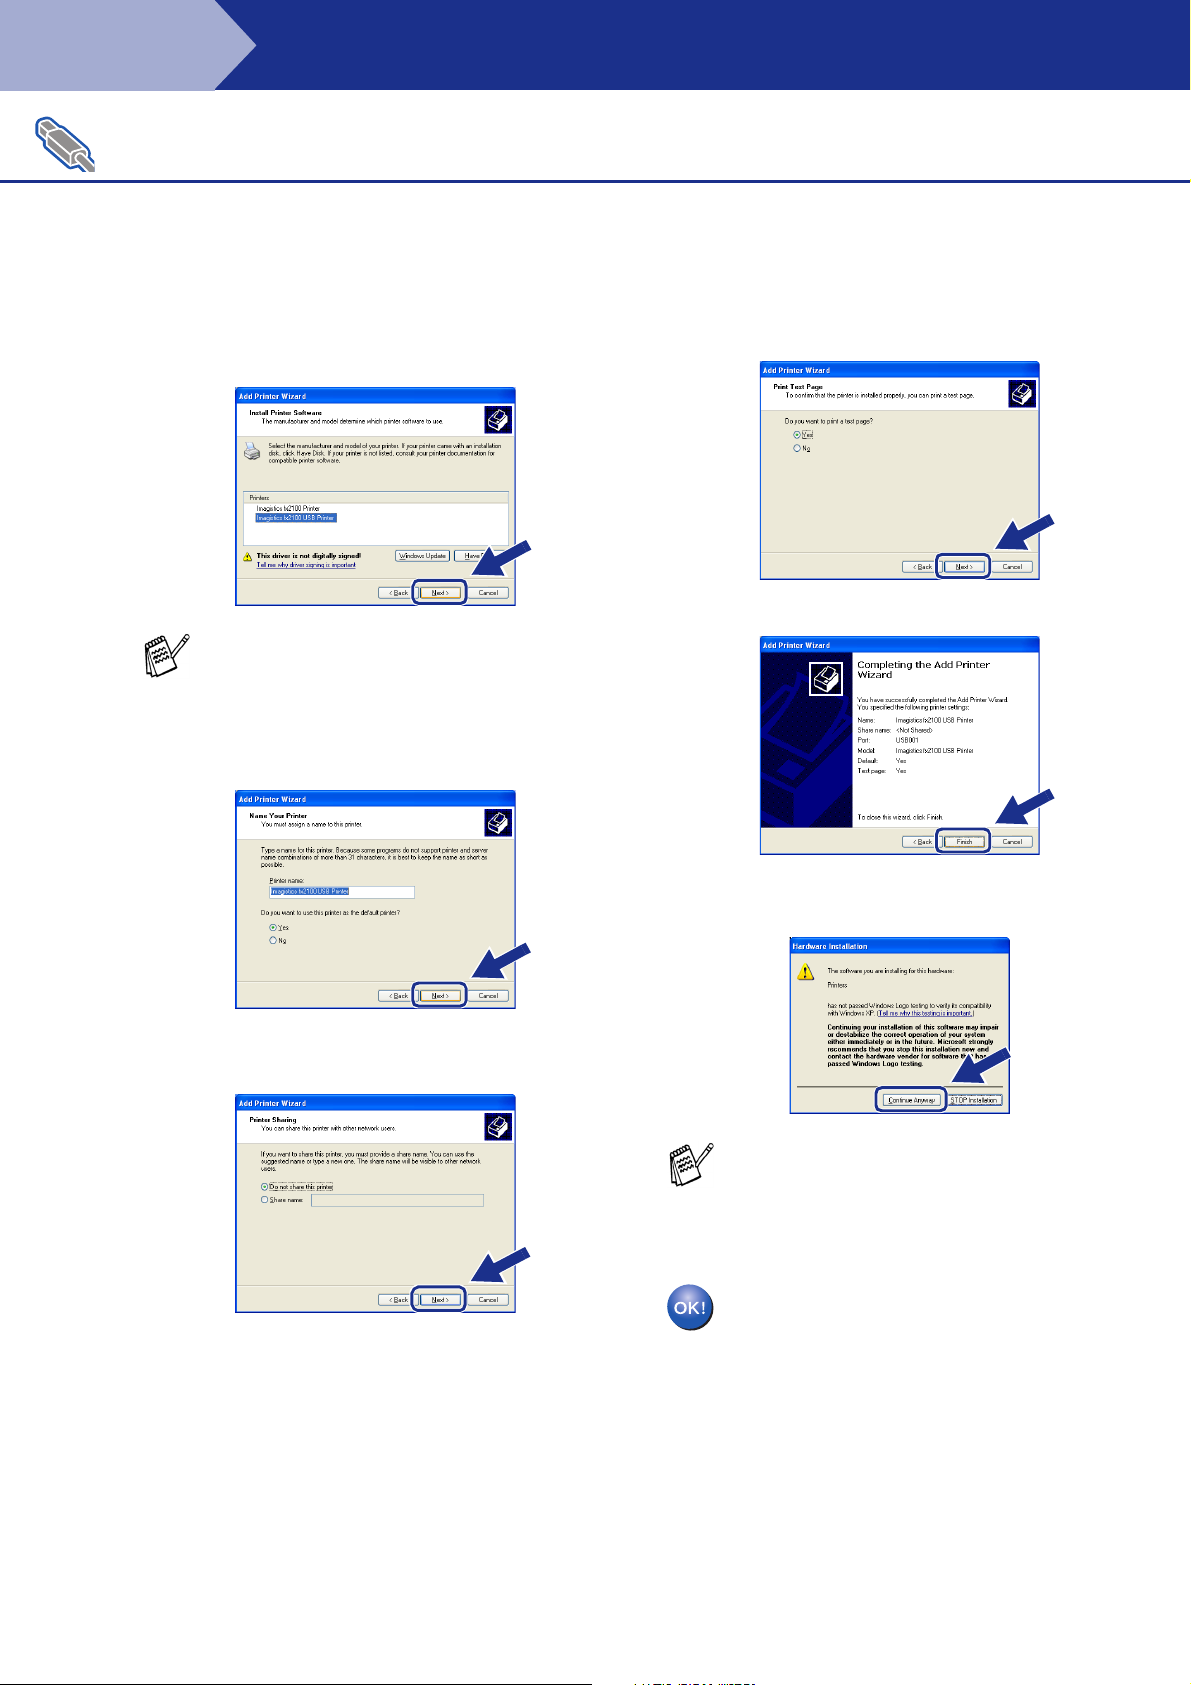
Q Highlight the model you are installing from
the list of machines and click Next.
Make sure you select a USB printer.
R The model you are installing will be listed in
the window. Select Yes or No if you want
this driver to be your default printer.
T Select Yes and Next to print a test page.
U When this screen appears, click Finish.
V When the Windows Logo testing screen
appears, click Continue Anyway.
S If this screen appears, select Do not share
this printer and Next.
24
There will be two printer drivers listed in the
"Printers" selection.
The driver with Printer after the model name
(ex. Imagistics fx2100 Printer) is the Native
Driver.
The Native Drivers have been installed
and the installation is now complete.
Page 27
For Parallel Interface Cable Users
(For Windows
Make sure that you have completed the instructions from Step 1 “Setting Up
®
98/98SE/Me/2000 Professional/XP)
the Machine” on pages 4 - 11.
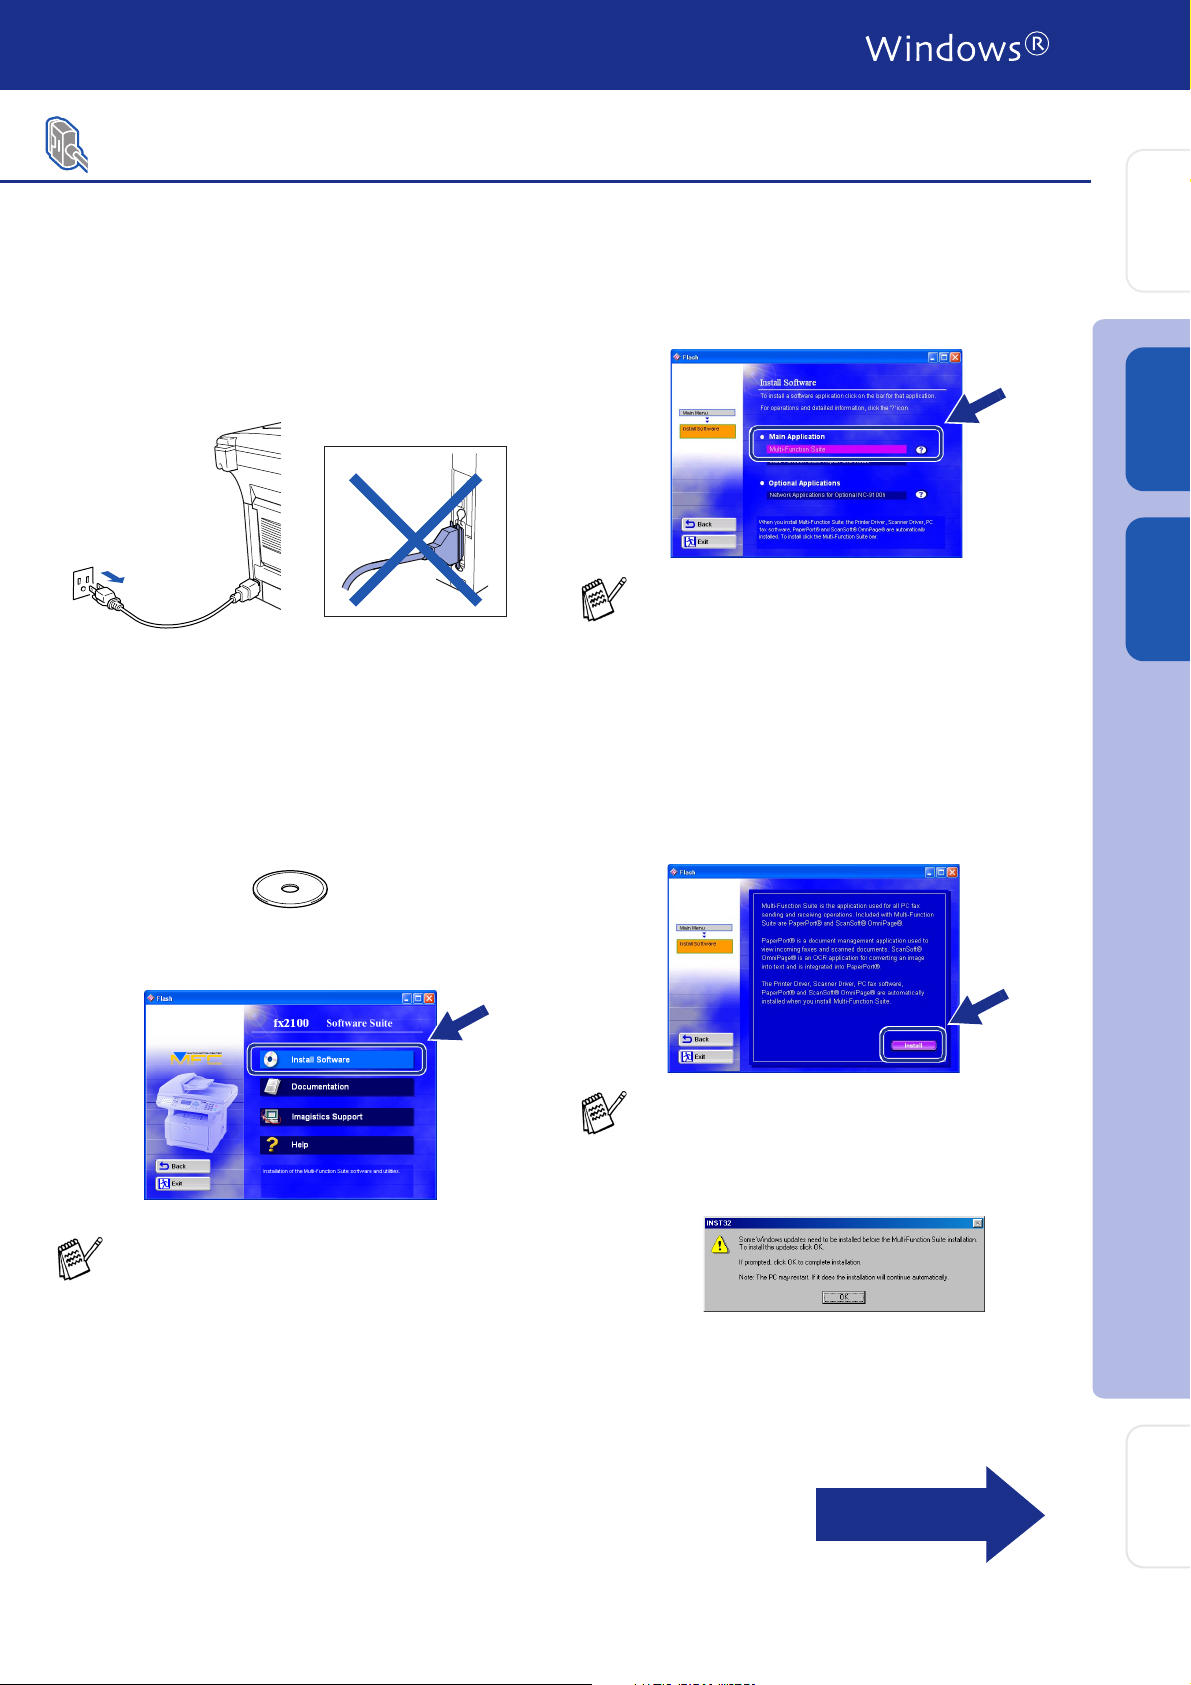
1 Switch off and unplug the machine from the
AC outlet and disconnect it from your
computer, if you already connected an
interface cable.
2 Turn on your computer.
(For Windows
must be logged on as the administrator.)
®
2000 Professional/XP, you
3 Insert the supplied CD-ROM into your
CD-ROM drive. When the language screen
appears, select your language.
5 Click Multi-Function Suite in Main
Application.
Multi-Function Suite includes Printer Driver,
Scanner Driver, ScanSoft
ScanSoft
Remote Setup and True Type fonts.
PaperPort
application for viewing scanned documents.
ScanSoft
into PaperPort
converts an image into text and inserts it into
your default word processor.
®
OmniPage®, PC-FAX software,
®
is a document management
®
OmniPage®, which is integrated
®
, is an OCR application that
®
PaperPort®,
6 Click Install.
Setting Up
the Machine
®
USB
Windows
®
Parallel
Windows
4 The CD-ROM main menu will appear.
Click Install Software.
If this window does not appear, use Windows®
Explore to run the setup.exe program from
the root directory of the CD-ROM.
If you see the following screen, click OK to.
install the Windows
updates are installed your PC may restart.
Note: If it does the installation will
automatically continue.
If the installation does not continue
automatically, please open the installer menu
again by double-clicking the setup.exe
program from the root directory of the
CD-ROM, and continue from Step
®
updates. After the
4.
Continued...
Installing the Driver & Software
For
25
Administrators
Page 28
Step 2
For Parallel Interface Cable Users
(For Windows
Installing the Driver & Software
®
98/98SE/Me/2000 Professional/XP)
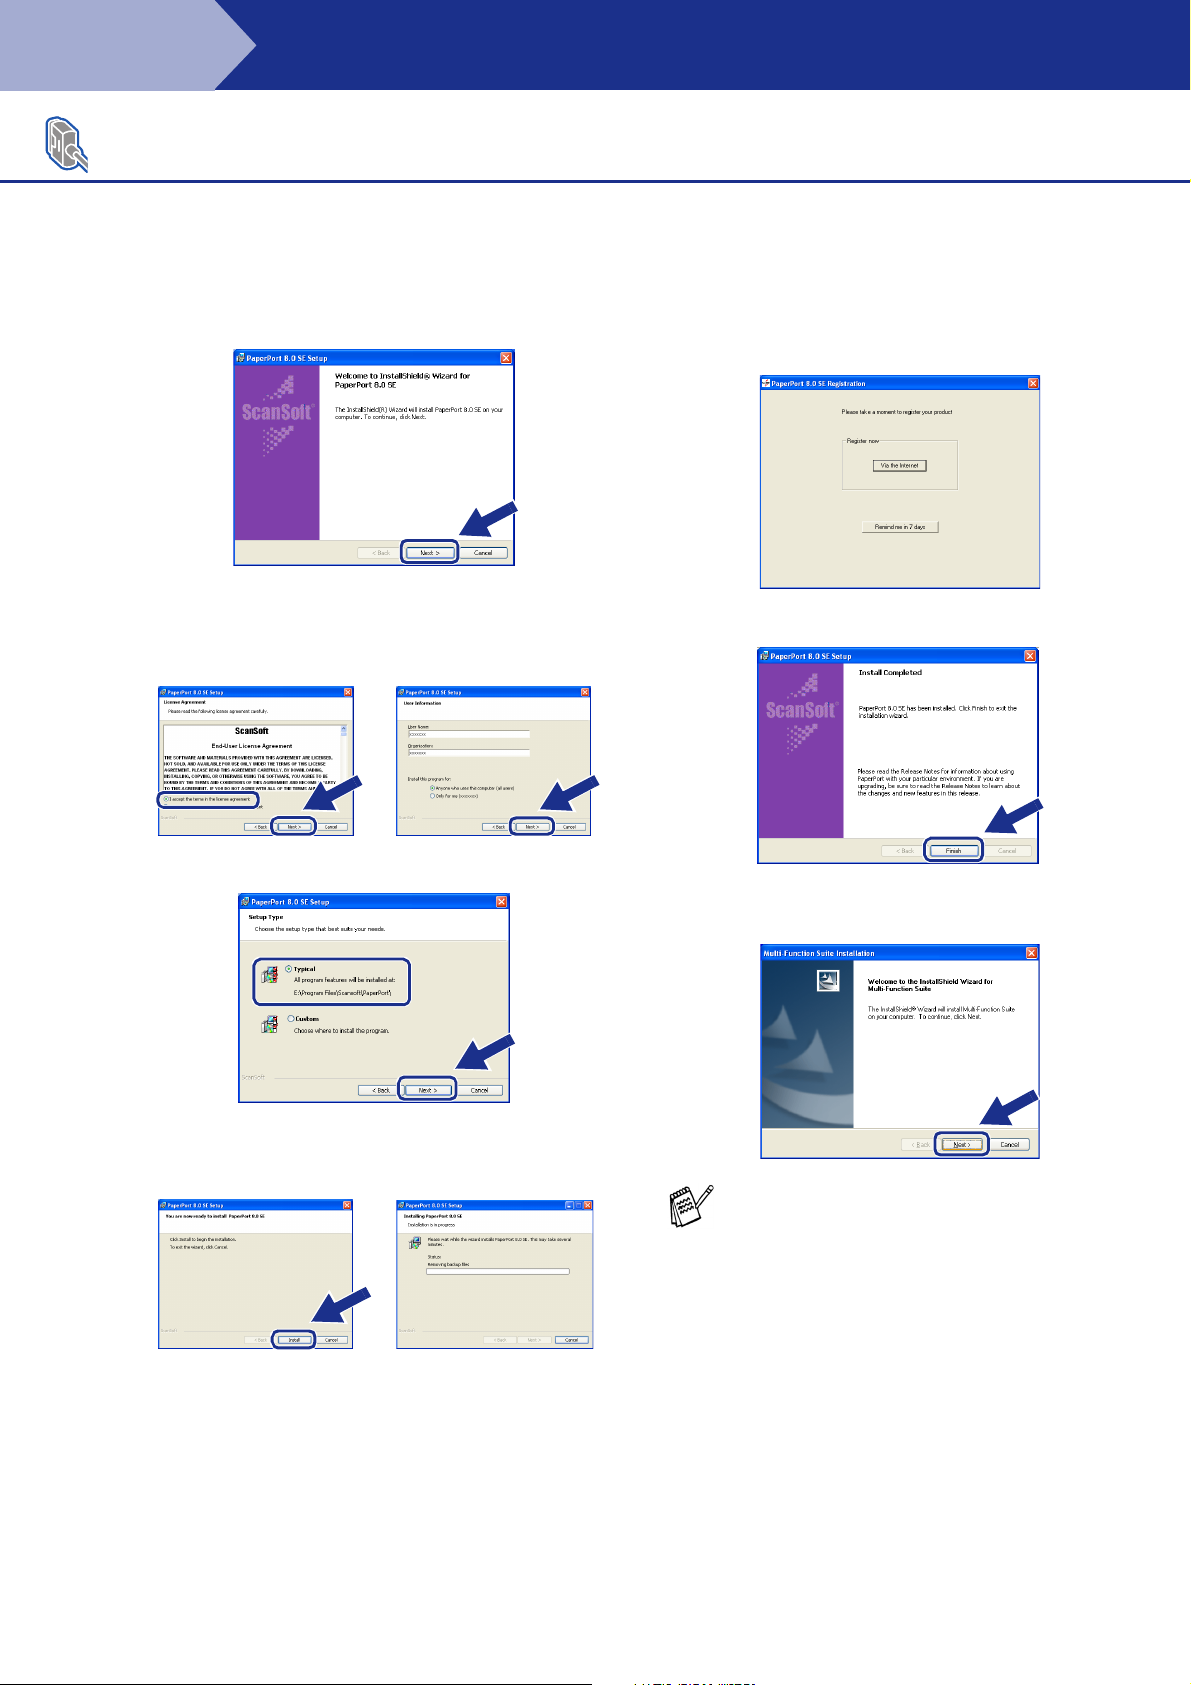
7 When the PaperPort
is displayed, click Next.
®
8.0 SE Setup window
8 After reading and accepting the ScanSoft
License Agreement, enter your user
information and click Next.
9 Select Typical and click Next.
A When the ScanSoft
displayed, make your selection and follow
the on- screen instructions.
®
®
Registration screen is
B Click Finish to complete installation.
C When the Multi-Function Suite Installation
window appears, click Next.
0 Click Install and PaperPort
installing on your computer.
26
®
will start
If you have previously installed the MultiFunction Suite, you will first have to uninstall
it. From the Start menu, select Programs,
Imagistics, Multi-Function Suite,
Uninstall, and then follow the instructions on
the screen.
Page 29
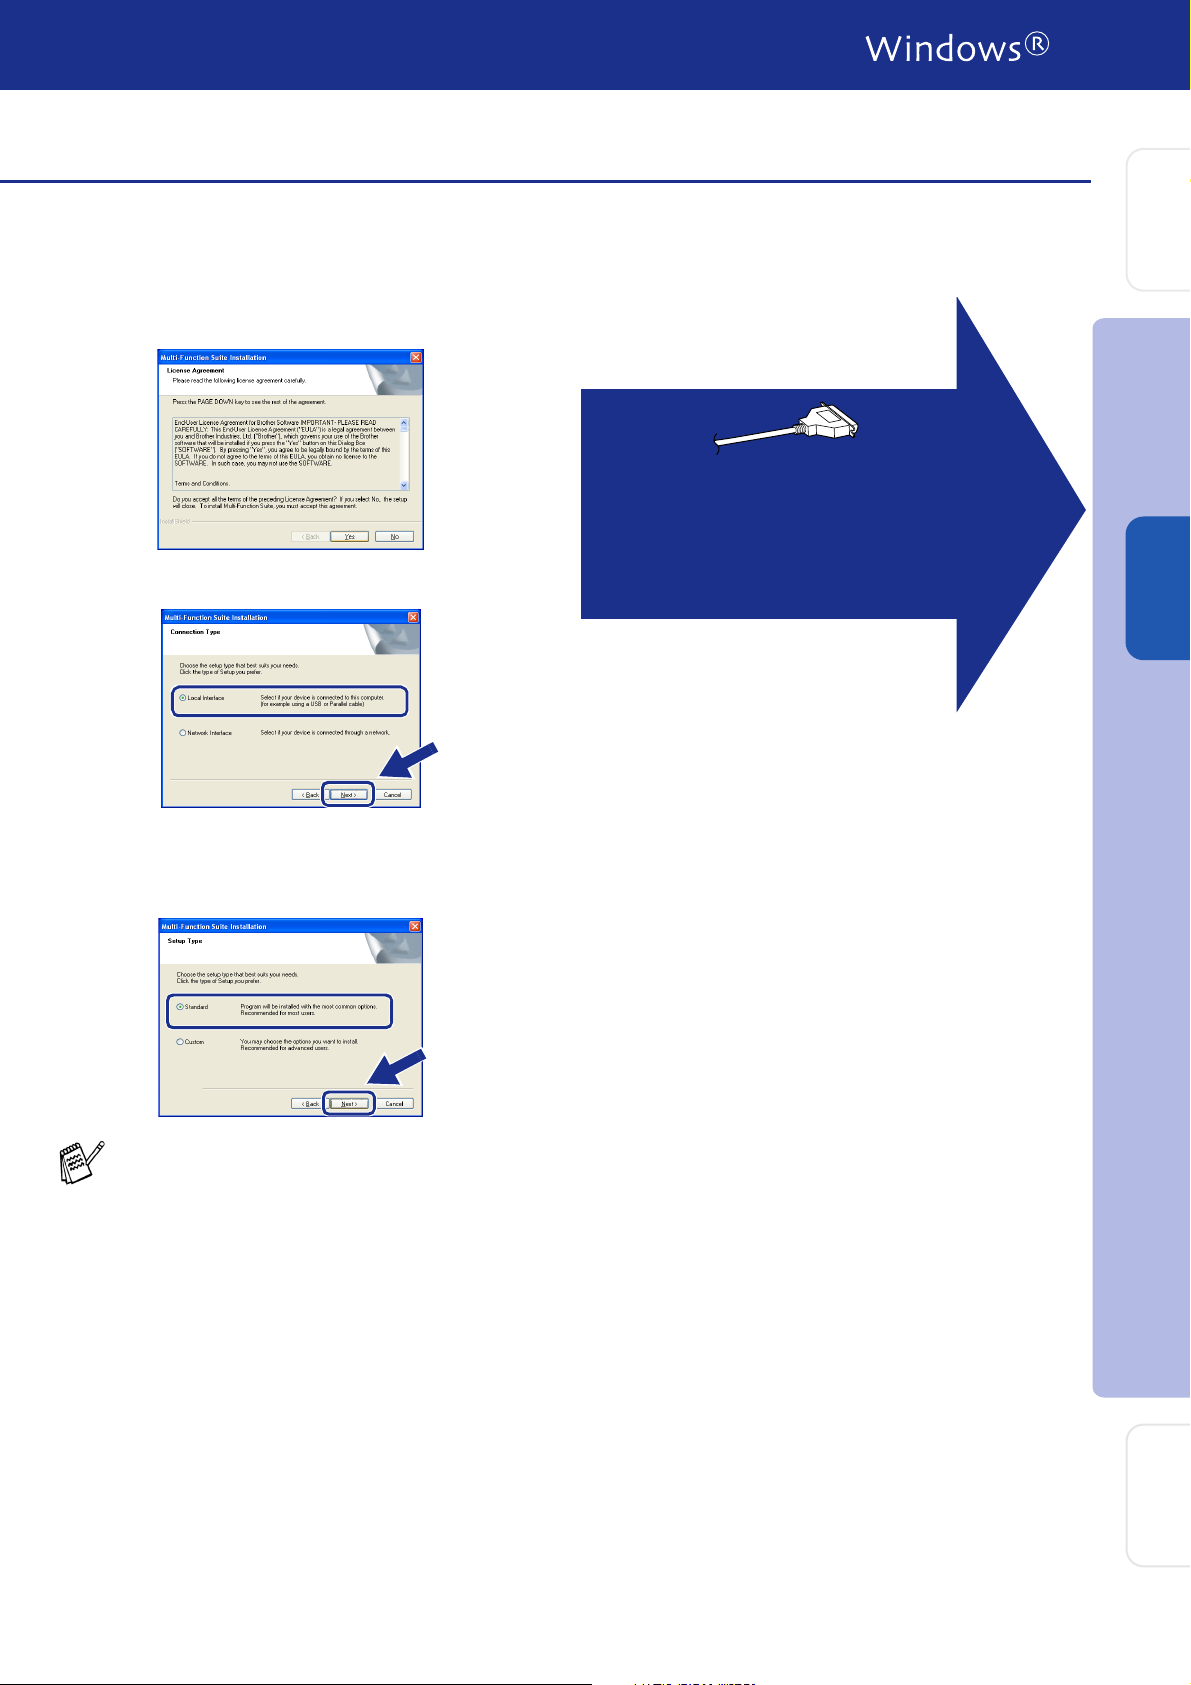
D When the Software License Agreement
window appears, click Yes.
E Select Local Interface, and then click Next.
Windows® 98/98SE/Me Users
➝ Go to page 28
®
Windows
2000 Professional Users
➝ Go to page 29
Windows
®
XP Users
➝ Go to page 32
Setting Up
the Machine
®
Parallel
Windows
F Select Standard, and then click Next.
The application files will be copied to your
computer.
If you want to install the PS driver, select
Custom and then follow the on-screen
instructions. When the Select Components
screen appears, check PS Printer Driver,
and then continue following the on-screen
instructions.
Installing the Driver & Software
27
For
Administrators
Page 30
Step 2
For Parallel Interface Cable Users
(For Windows
Make sure that you followed the instructions in 1 to F on pages 25 - 27.
Installing the Driver & Software
®
98/98SE/Me/2000 Professional/XP)
For Windows® 98/98SE/Me Users Only
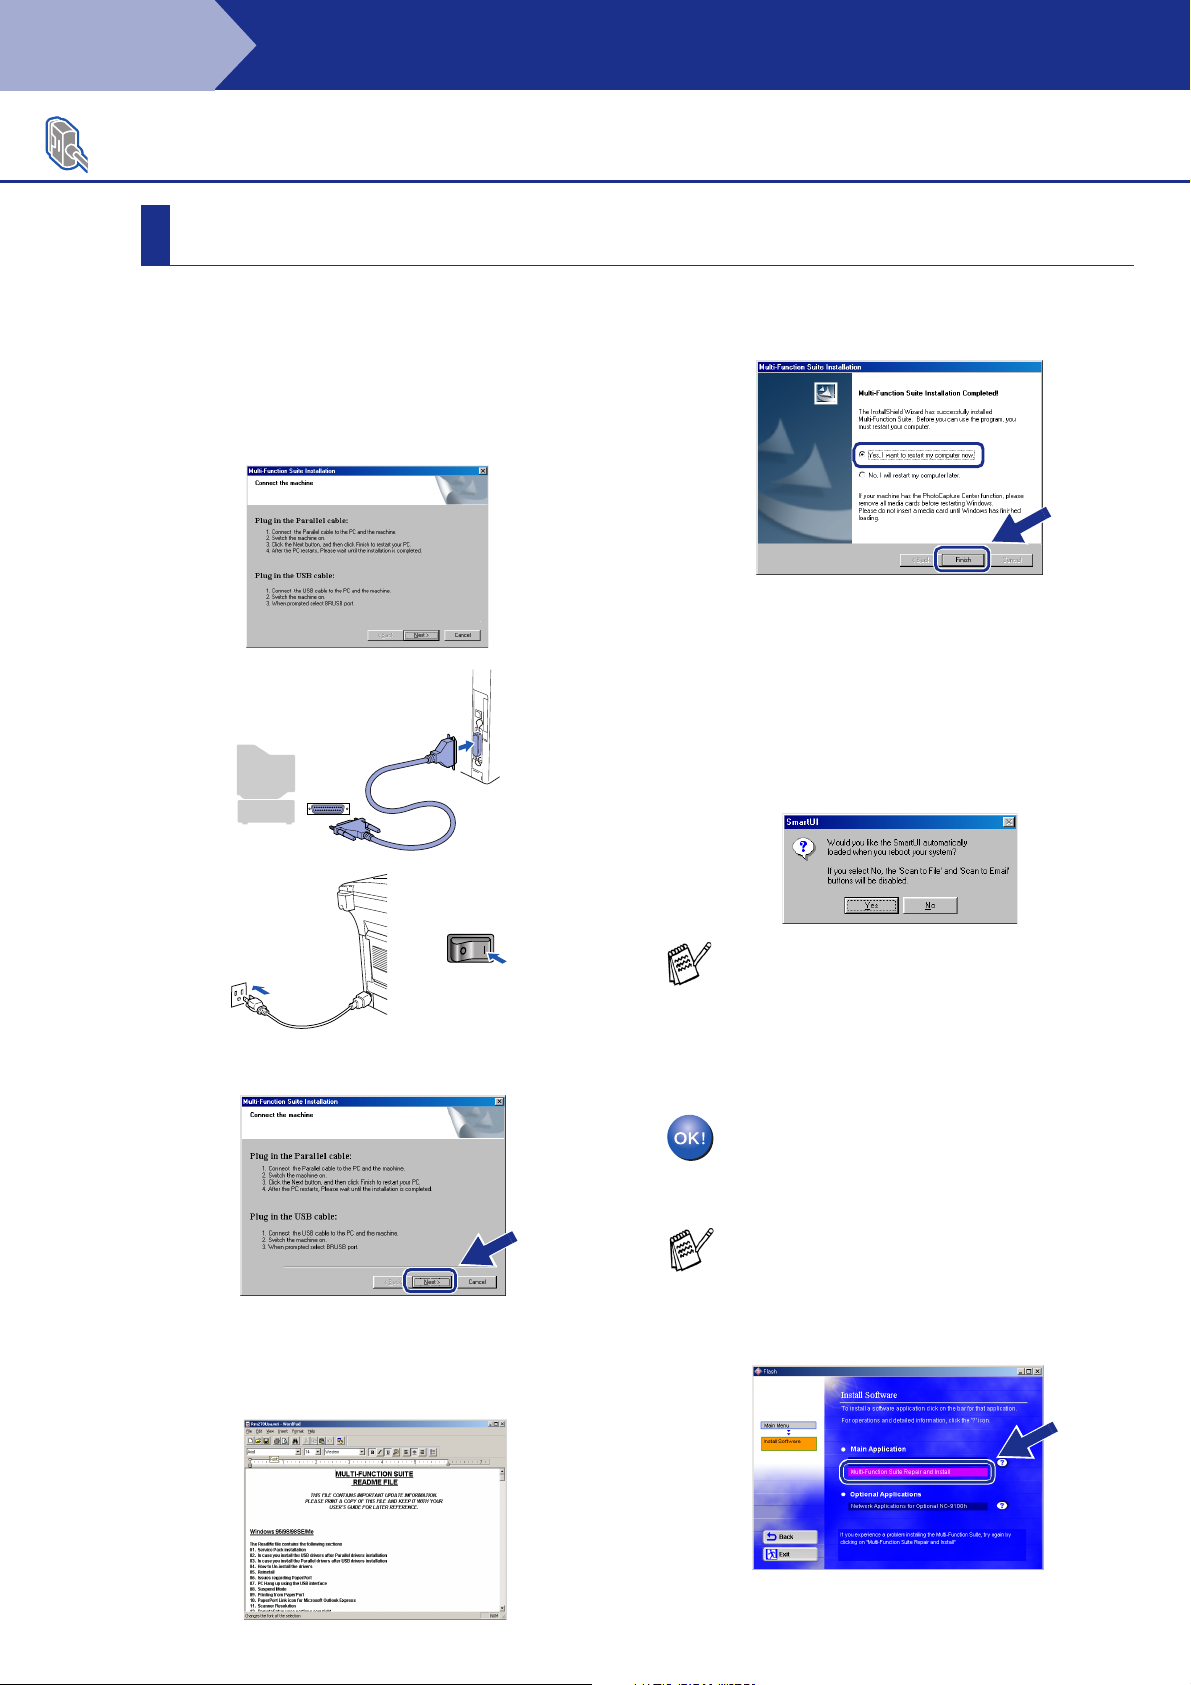
G When this screen appears, connect the
parallel interface cable to your PC, and then
connect it to the machine.
Turn on the machine by plugging in the
power cord. Turn the power switch on.
.
J Click Finish to restart your computer.
K After the computer restarts, the installation
of the drivers will automatically start.
Follow the instructions on the screen.
L Click Yes to have the SmartUI load each
time Windows
appear as an icon in the task tray.
If you click No the Scan keys on the
machine will be disabled.
®
is started. The SmartUI will
H Click Next.
I The README file will be displayed.
Please read this file for troubleshooting
information and then close the file to
continue installation.
Even if you select No, you will be able to
launch the SmartUI later to use the Scan to
key by double clicking the SmartUI icon on
the desktop. This loads the SmartUI to the
task tray. See AutoLoad the SmartUI,
Chapter 4 in the Documentation (Software
User’s Guide) located on the CD-ROM.
The PC-FAX, Printer and Scanner
drivers have been installed and the
installation is now complete.
If the Multi-Function Suite doesn’t work after
the installation, you will have to repair it.
From the Main Menu, select Install
Software, Multi-Function Suite Repair
and Install, and then follow the instructions.
28
Page 31
For Windows® 2000 Professional Users Only
Make sure that you followed the instructions in 1 to F on pages 25 - 27.
Setting Up
the Machine
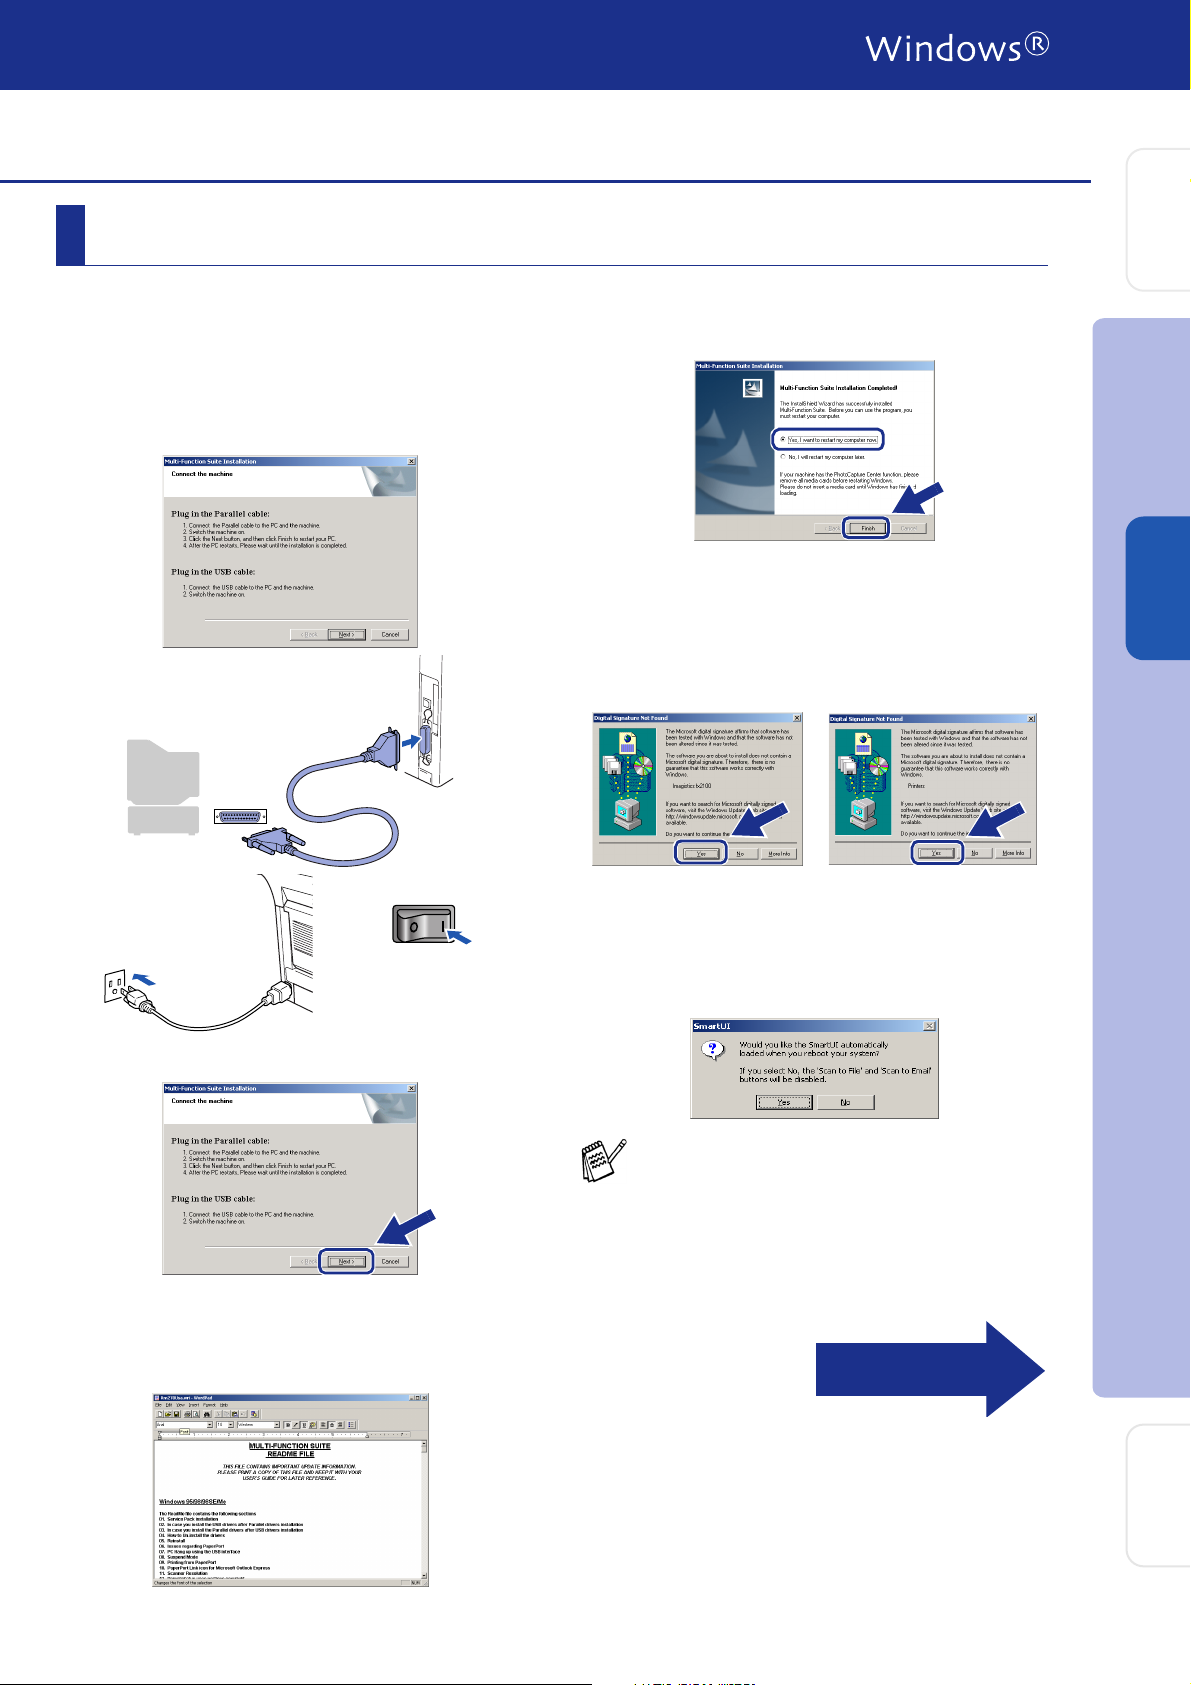
G When this screen appears, connect the
parallel interface cable to your PC, and then
connect it to the machine.
Turn on the machine by plugging in the
power cord. Turn the power switch on.
.
J Click Finish to restart your computer.
K After the computer restarts, the installation
of the drivers will automatically start. Follow
the instructions on the screen.
L If the Digital Signature Not Found dialog
boxes appear, click Yes to install the driver.
M Click Yes to have the SmartUI loaded each
®
time Windows
appear as an icon in the task tray.
If you click No the Scan keys on the machine
will be disabled.
is started. The SmartUI will
Installing the Driver & Software
®
Parallel
Windows
H Click the Next.
I The README file will be displayed.
Please read this file for troubleshooting
information and then close the file to
continue installation.
Even if you select No, you will be able to
launch the SmartUI later to use the Scan to
key by double clicking the SmartUI icon on
the desktop. This loads the SmartUI to the
task tray. See AutoLoad the SmartUI,
Chapter 4 in the Dcumentation (Software
User’s Guide) located on the CD-ROM.
Continued...
For
Administrators
29
Page 32
Step 2
For Parallel Interface Cable Users
(For Windows
Installing the Driver & Software
®
98/98SE/Me/2000 Professional/XP)
A Basic Universal printer driver was
installed with the Multi-Function Suite.
Imagistics also offers a full featured
printer driver (Native driver) that
includes more features than the Basic
Universal driver. To install the Native
driver proceed to step N.
For details on what features are available
see chapter 2 of the Software User's Guide.
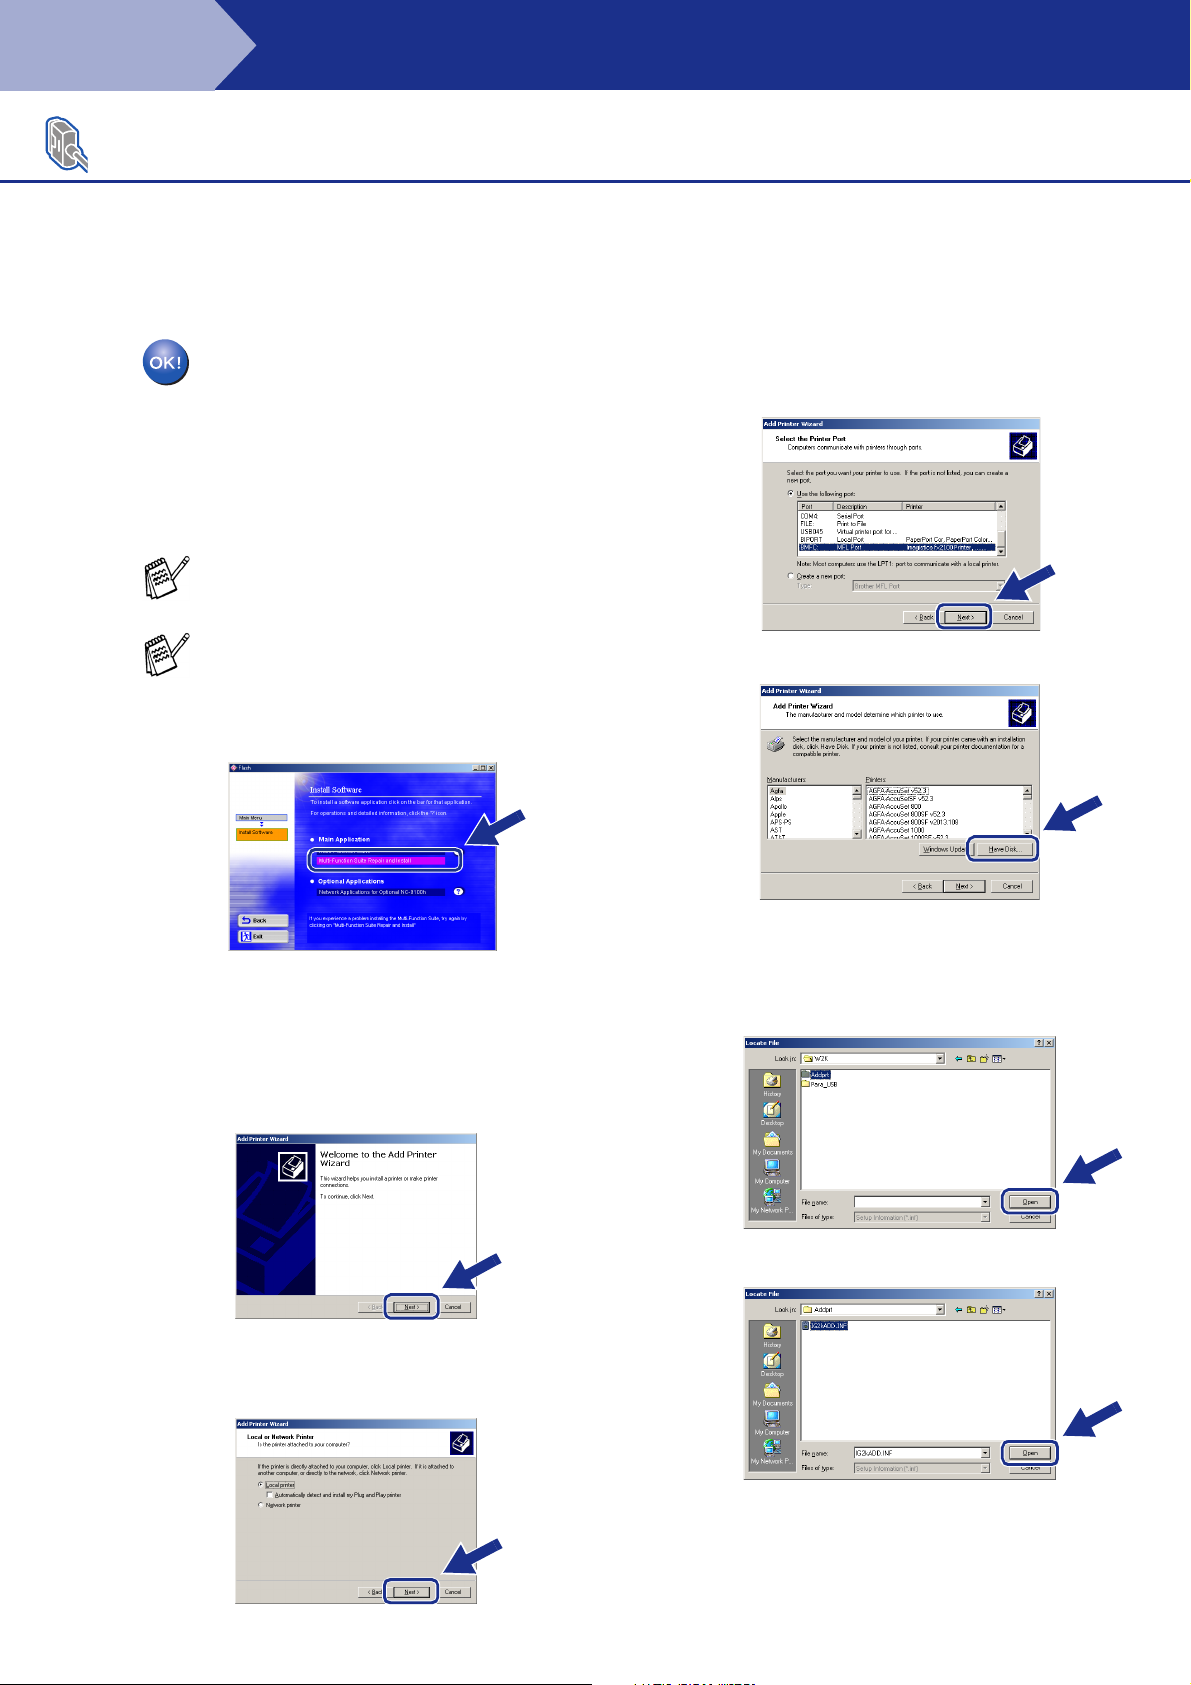
P Select BMFC (MFL Port) from the pull down
window for the Printer Port Selection and
then click Next.
If the Multi-Function Suite doesn’t work after
the installation, you will have to repair it.
From the Main Menu, select Install
Software, Multi-Function Suite Repair
and Install, and then follow the instructions.
Native driver Installation
N Click Start and select Settings and then
Printers. Click on Add a printer and the
Add Printer Wizard will start.
When this screen appears, click Next.
Q Click on Have Disk.
R Browse the CD-ROM and highlight ENG
folder and click Open. Highlight the W2K
folder and click Open. Highlight the Addprt
folder and click Open.
O Un-check the Automatically detect and
install my Plug and Play printer selection
and then click Next.
30
S Click Open.
Page 33
Setting Up
the Machine
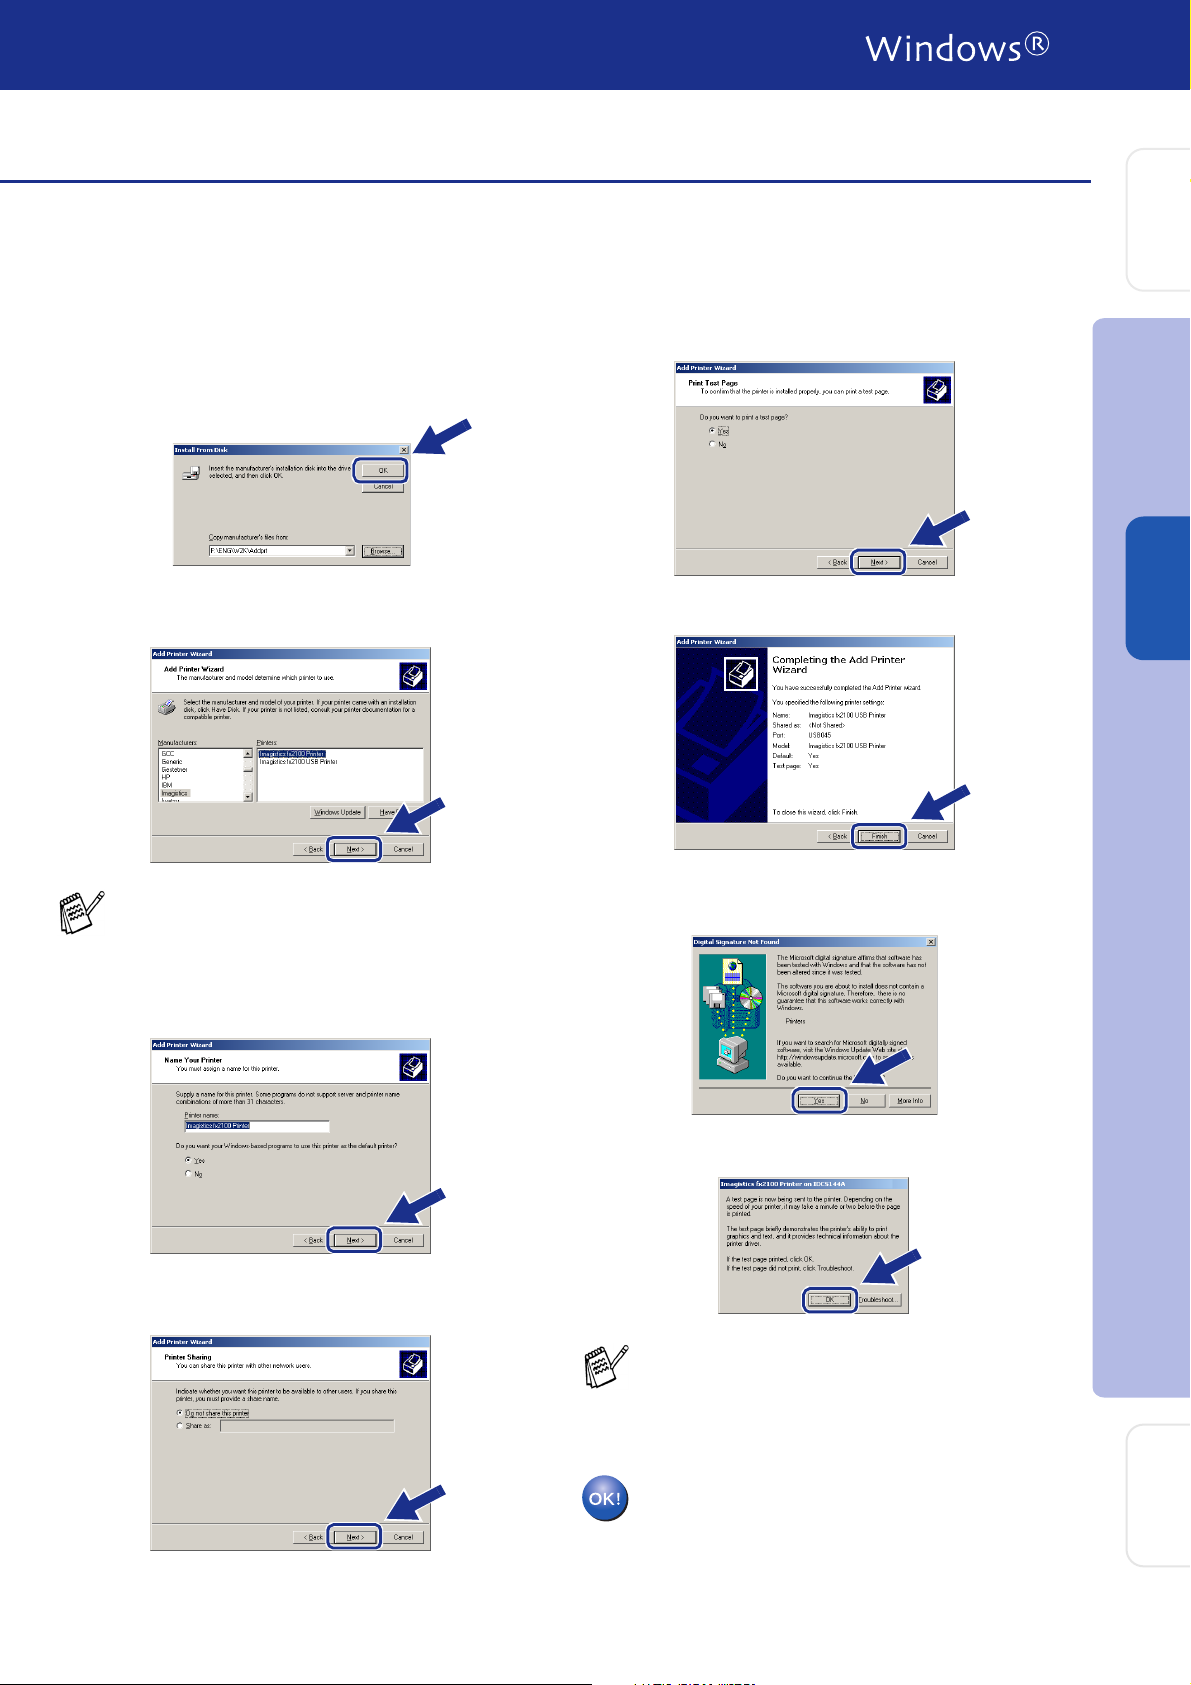
T Make sure X:\ENG\W2K\Addprt is
displayed in the window and click OK (X:\ is
the drive letter of your CD-ROM).
U Highlight the model you are installing from
the list of machines and click Next.
Make sure you do not select a USB printer.
X Select Yes and Next to print a test page.
Y When this screen appears, click Finish.
Z If the Digital Signature Not Found dialog box
appears, click Yes.
®
Parallel
Windows
V The model you are installing will be listed in
the window. Select Yes or No if you want
this driver to be your default printer.
W If this screen appears, select Do not share
this printer and Next.
[ If the test page printed, click OK.
There will be two printer drivers listed in the
Printers selection.
The driver with "Printer" after the model
name (ex. Imagistics fx2100 Printer) is the
Native Driver.
The Native Drivers have been installed
and the installation is now complete.
Installing the Driver & Software
For
Administrators
31
Page 34
Step 2
For Parallel Interface Cable Users
(For Windows
Make sure that you followed the instructions in 1 to F on pages 25 - 27.
Installing the Driver & Software
®
98/98SE/Me/2000 Professional/XP)
For Windows® XP Users Only
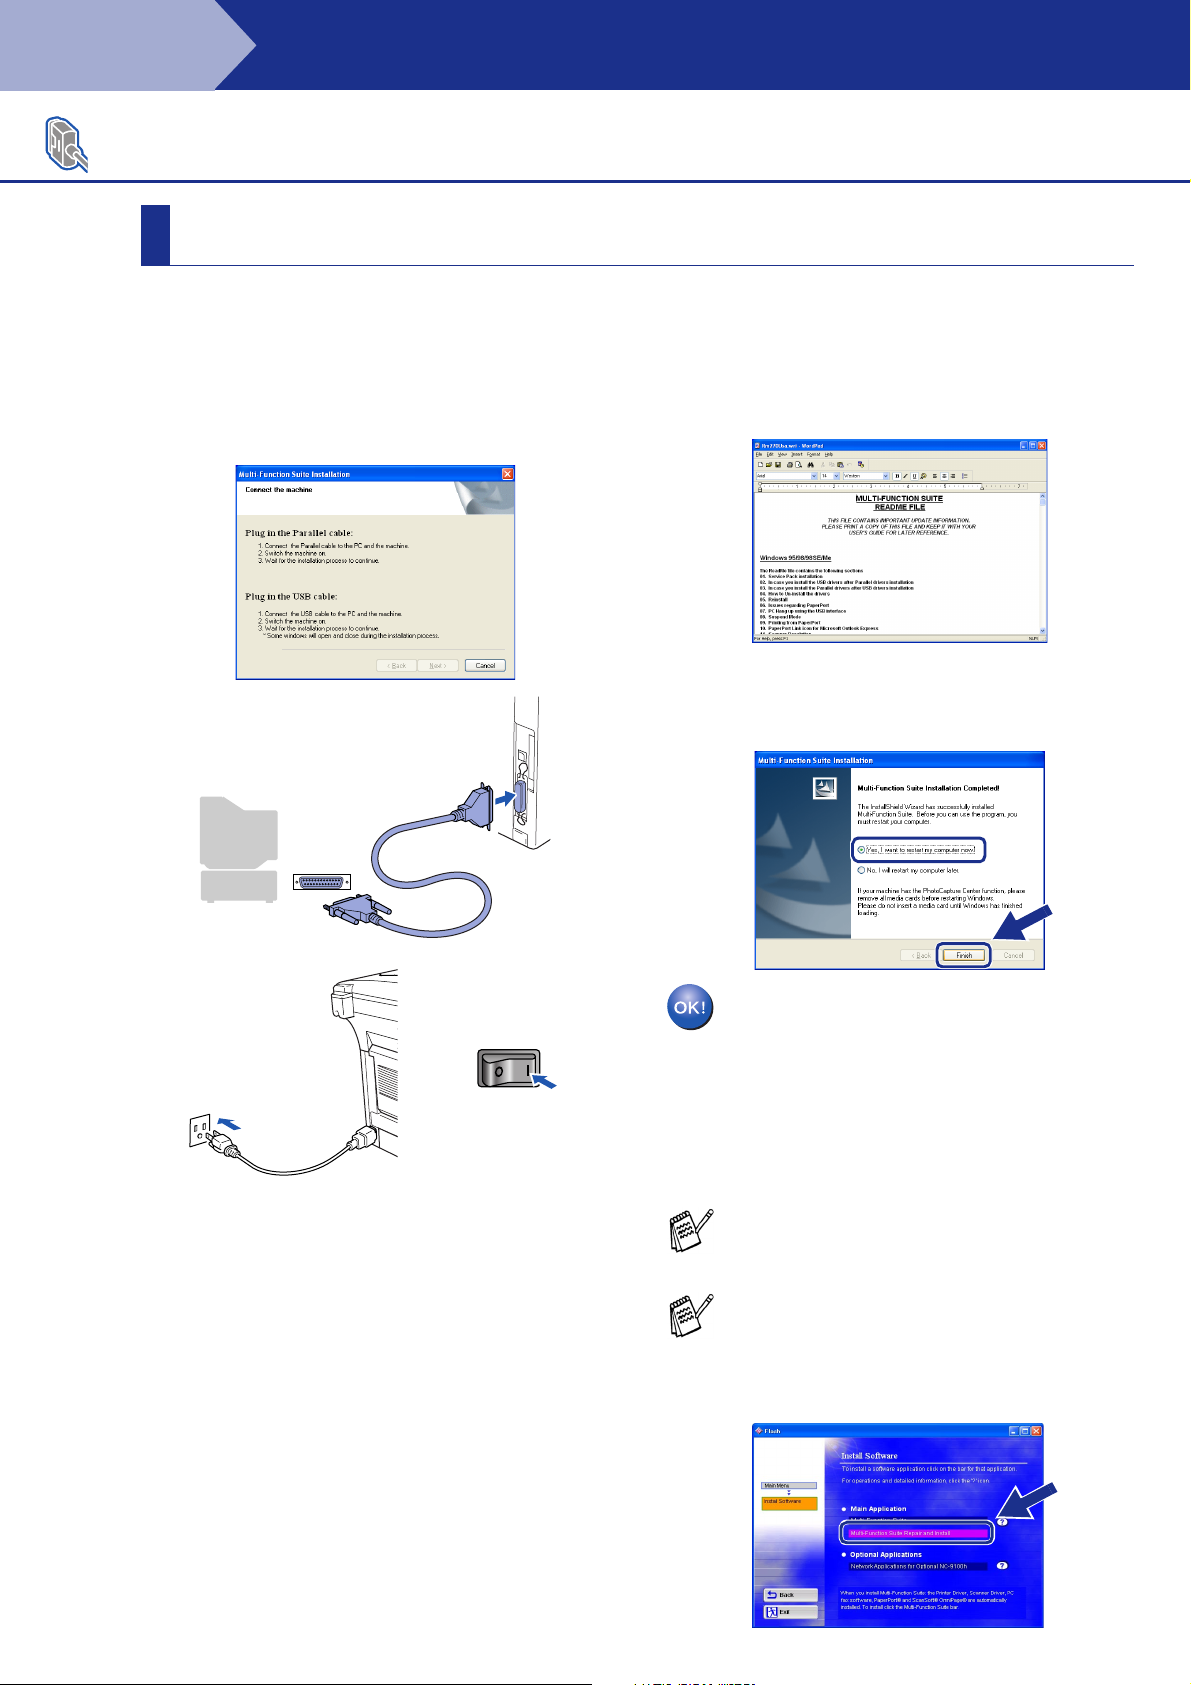
G When this screen appears, connect the
parallel interface cable to your PC, and then
connect it to the machine.
Turn on the machine by plugging in the
power cord. Turn the power switch on.
H The README file will be displayed.
Please read this file for troubleshooting
information and then close the file to
continue installation.
I When the following screen appears, click
Finish and wait as the PC restarts Windows
and continues the installation.
.
The installation of the drivers will
automatically start. The screen appears one
after another, please wait for a while.
A Basic Universal printer driver was
installed with the Multi-Function Suite.
Imagistics also offers a full featured
printer driver (Native driver) that
includes more features than the Basic
Universal driver. To install the Native
driver proceed to step J.
For details on what features are available
see chapter 2 of the Software User's Guide.
If the Multi-Function Suite doesn’t work after
the installation, you will have to repair it.
From the Main Menu, select Install
Software, Multi-Function Suite Repair
and Install, and then follow the instructions.
32
Page 35
Setting Up
the Machine
Native driver Installation
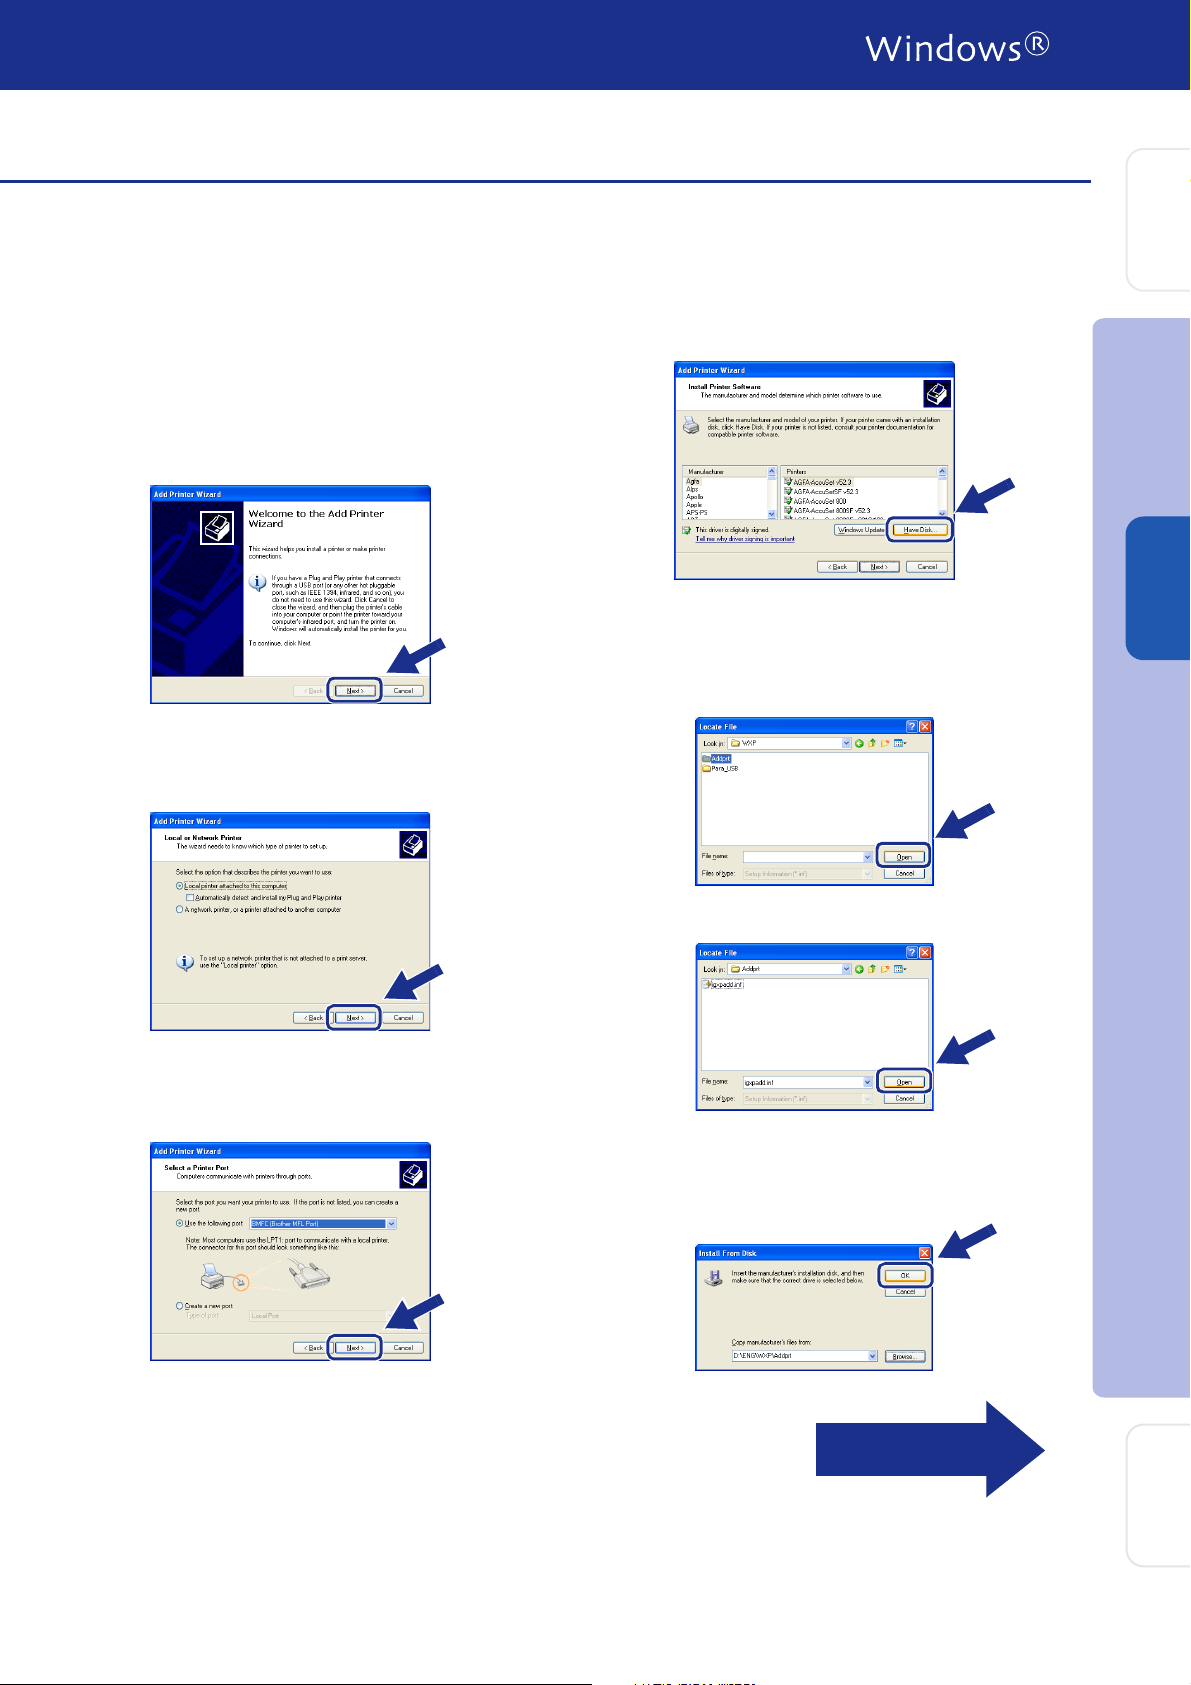
J Click Start and select Printers and Faxes.
Click on Add a printer and the Add Printer
Wizard will start.
When this screen appears, click Next.
K Un-check the Automatically detect and
install my Plug and Play printer selection
and then click Next.
M Click on Have Disk.
N Browse the CD-ROM and highlight ENG
folder and click Open. Highlight the WXP
folder and click Open. Highlight the Addprt
folder and click Open.
®
Parallel
Windows
L Select BMFC (MFL Port) from the pull down
window for the Printer Port Selection and
then click Next.
O Click Open.
Installing the Driver & Software
P Make sure X:\ENG\WXP\Addprt is
displayed in the window and click OK (X:\ is
the drive letter of your CD-ROM).
Continued...
33
For
Administrators
Page 36
Step 2
For Parallel Interface Cable Users
(For Windows
Installing the Driver & Software
®
98/98SE/Me/2000 Professional/XP)
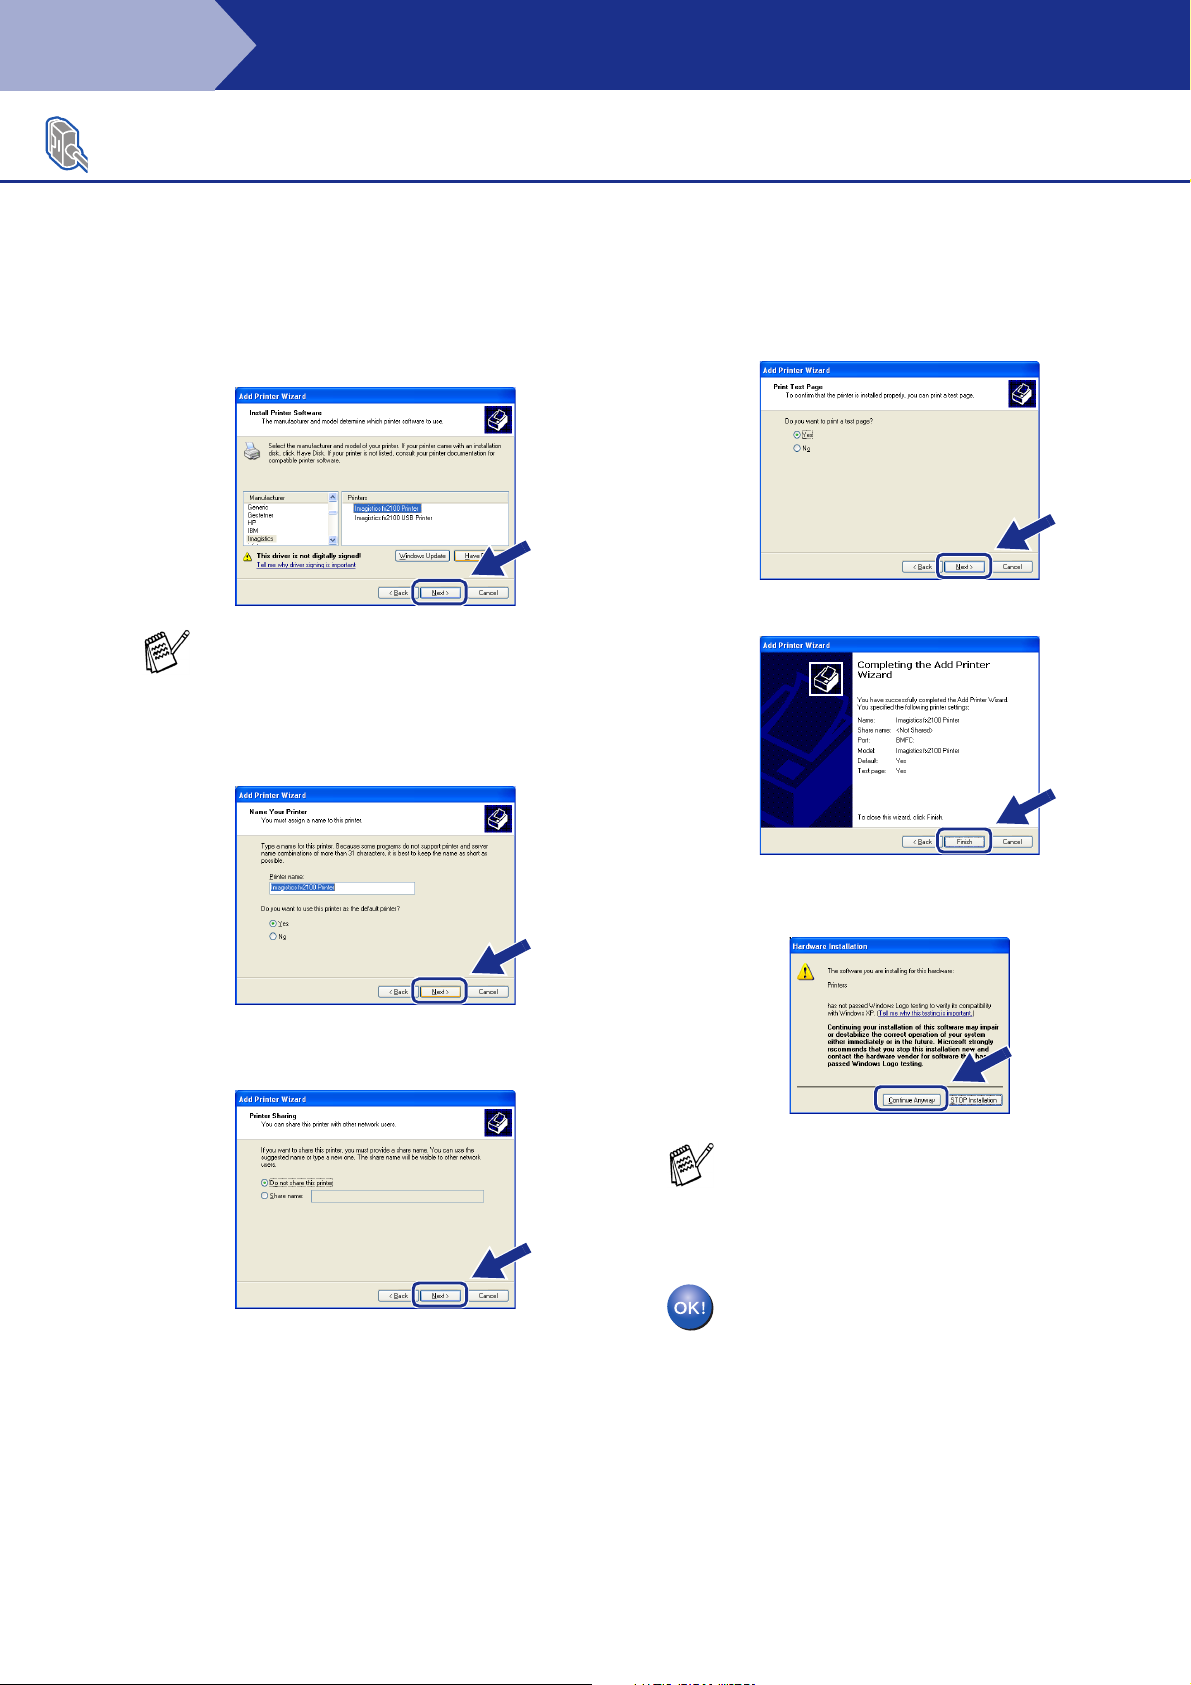
Q Highlight the model you are installing from
the list of machines and click Next.
Make sure you do not select a USB printer.
R The model you are installing will be listed in
the window. Select Yes or No if you want
this driver to be your default printer.
T Select Yes and Next to print a test page.
U When this screen appears, click Finish.
V When the Windows Logo testing screen
appears, click Continue Anyway.
S If this screen appears, select Do not share
this printer and Next.
There will be two printer drivers listed in the
Printers selection.
The driver with "Printer" after the model
name (ex. Imagistics fx2100 Printer) is the
Native Driver.
The Native Drivers have been installed
and the installation is now complete.
34
Page 37
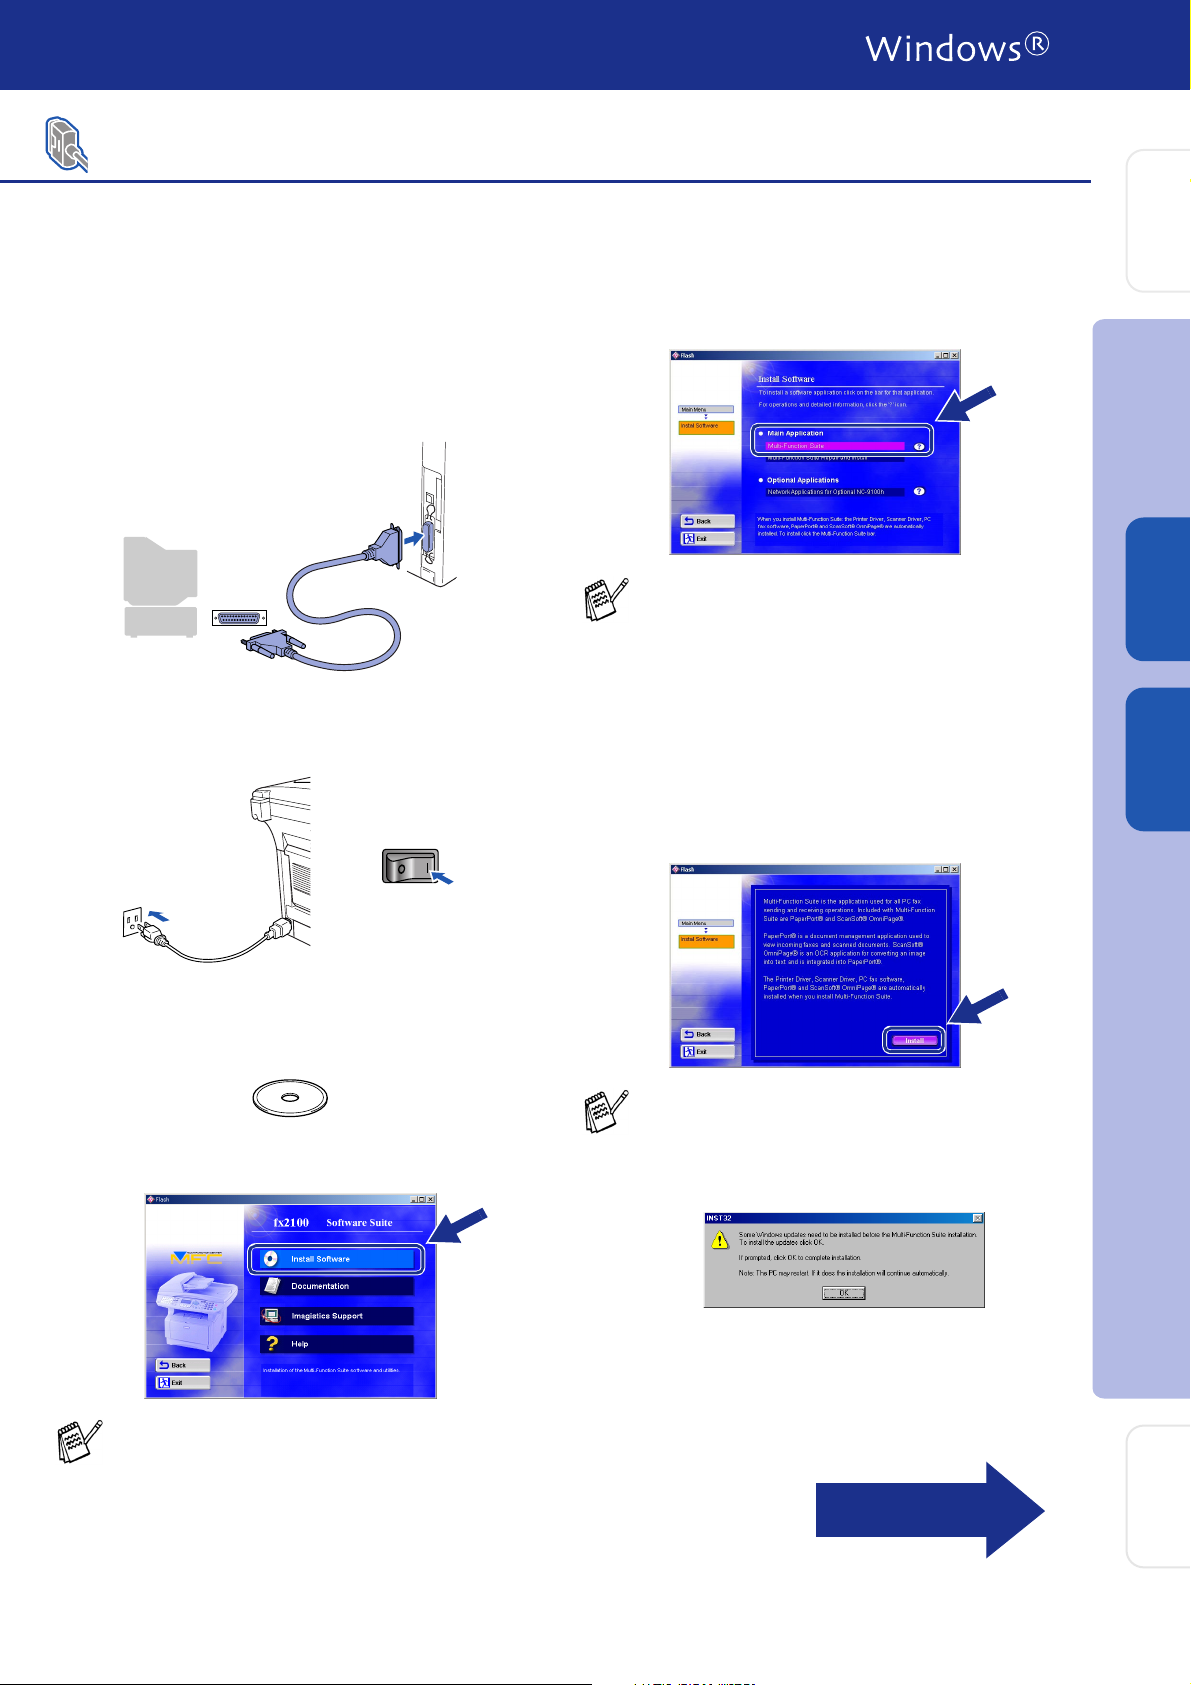
For Windows NT® Workstation Version 4.0 Users
Make sure that you followed the instructions from Step 1 “Setting Up the
Machine” on pages 4 - 11.
1
Turn on your computer.
You must be logged on as the Administrator.
2 Connect the parallel interface cable to your
computer, and then connect it to the
machine.
3 Make sure you turn on the machine by
plugging in the power cord, and turning the
power switch on.
6 Click Multi-Function Suite in Main
Application.
Multi-Function Suite includes Printer Driver,
Scanner Driver, ScanSoft
ScanSoft
Remote Setup and True Type fonts.
PaperPort
application for viewing scanned documents.
ScanSoft
into PaperPort
converts an image into text and inserts it into
your default word processor.
®
, OmniPage®, PC-FAX software,
®
is a document management
®
OmniPage®, which is integrated
®
, is an OCR application that
®
PaperPort®,
Setting Up
the Machine
®
Parallel
Windows
4.0
®
NT
Windows
Parallel
4 Insert the supplied CD-ROM into your
CD-ROM drive. When the language screen
appears, select your language.
5 The CD-ROM main menu will appear.
Click Install Software.
If this window does not appear, use Windows®
Explore to run the
the root directory of the CD-ROM.
setup.exe
program from
7 Click Install.
If you see the following screen, click OK to
install the Windows
updates are installed your PC may restart.
Note: If it does the installation will
automatically continue.
If the installation does not continue
automatically, please open the installer
menu again by double-clicking the
setup.exe program on the CD-ROM, and
continue from Step
®
updates. After the
5.
Installing the Driver & Software
Continued...
For
Administrators
35
Page 38
Step 2
For Windows NT® Workstation Version 4.0 Users
Installing the Driver & Software
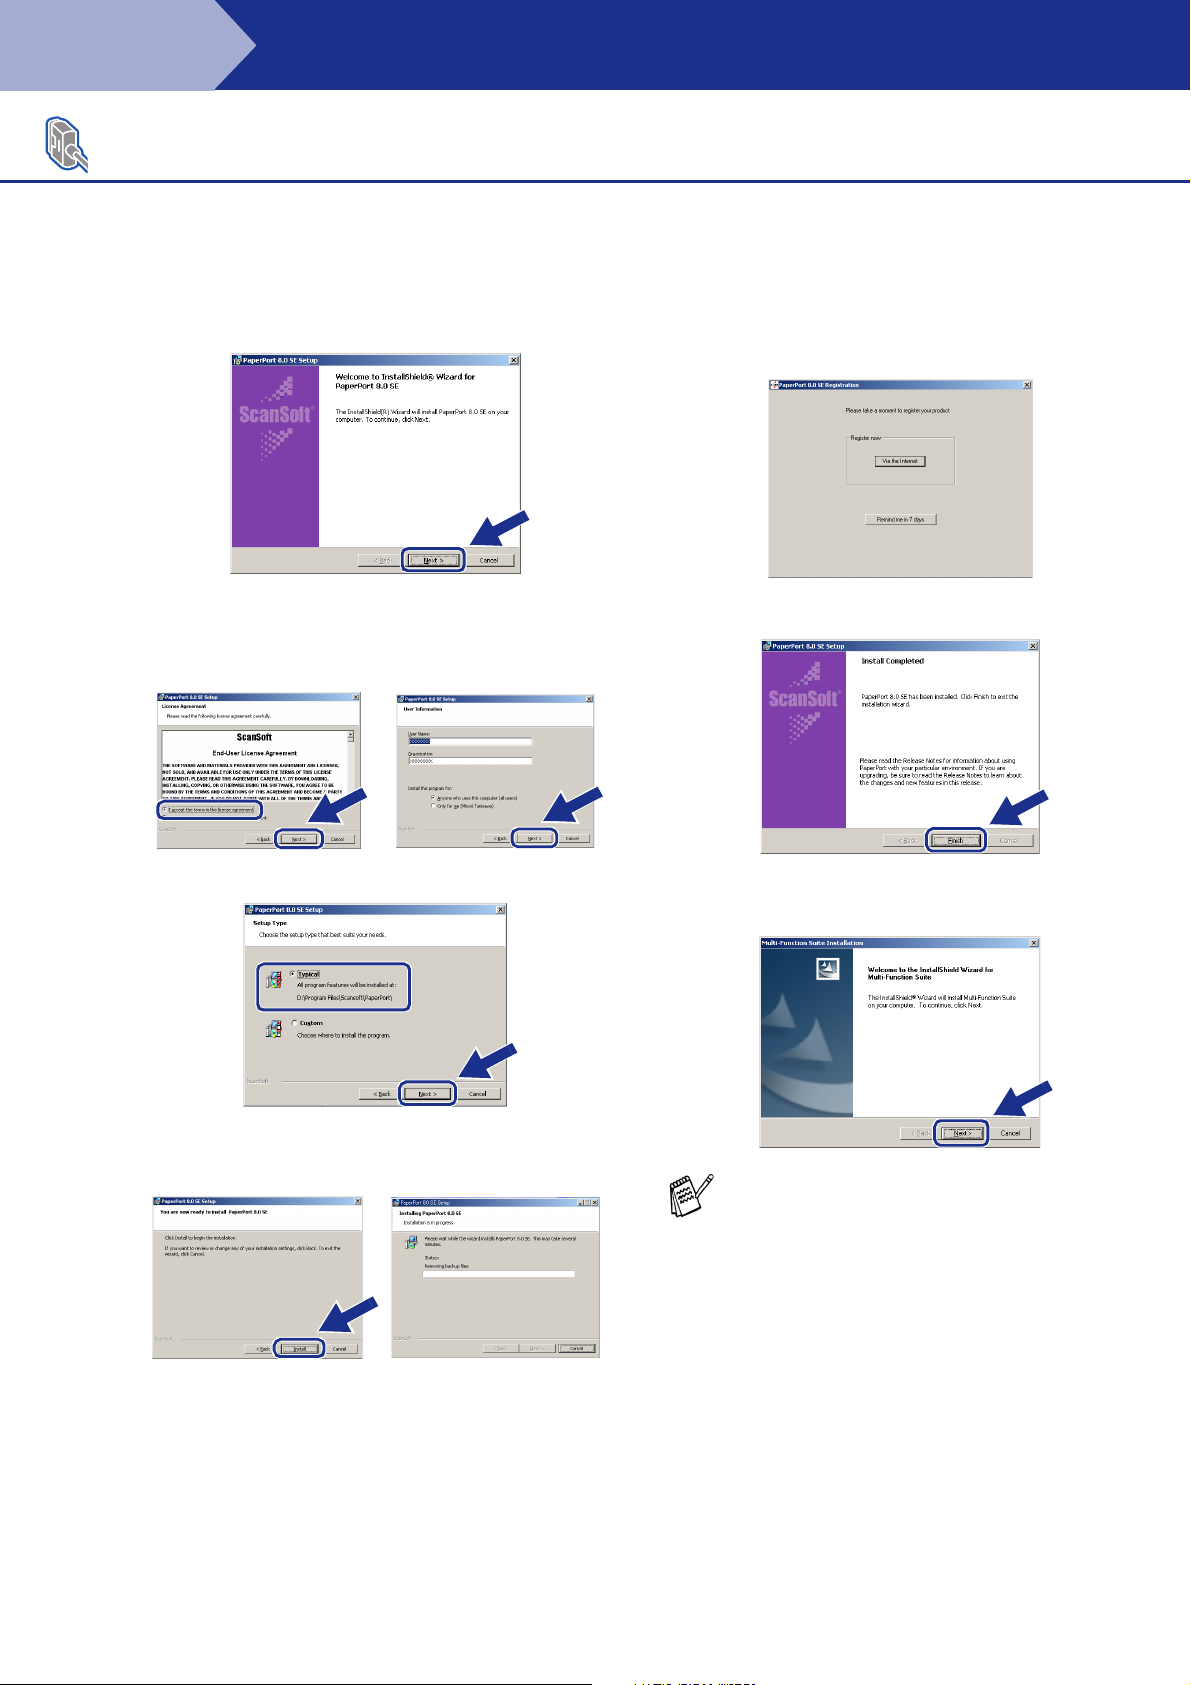
8 When the PaperPort
is displayed, click Next.
®
8.0 SE Setup window
9 After reading and accepting the ScanSoft
License Agreement, enter your user
information and click Next.
B When the ScanSoft
displayed, make your selection and follow
the on- screen instructions.
®
C Click Finish to complete installation.
®
Registration screen is
0 Select Typical and click Next.
A Click Install and PaperPort
installing on your computer.
®
D When the Multi-Function Suite Installation
window appears, click Next.
will start
You have previously installed MultiFunction Suite, you will first have to
uninstall it. From the Start menu, select
Programs, Imagistics, Multi-Function
Suite, Uninstall, and then follow the
instructions on the screen.
36
Page 39
Setting Up
the Machine
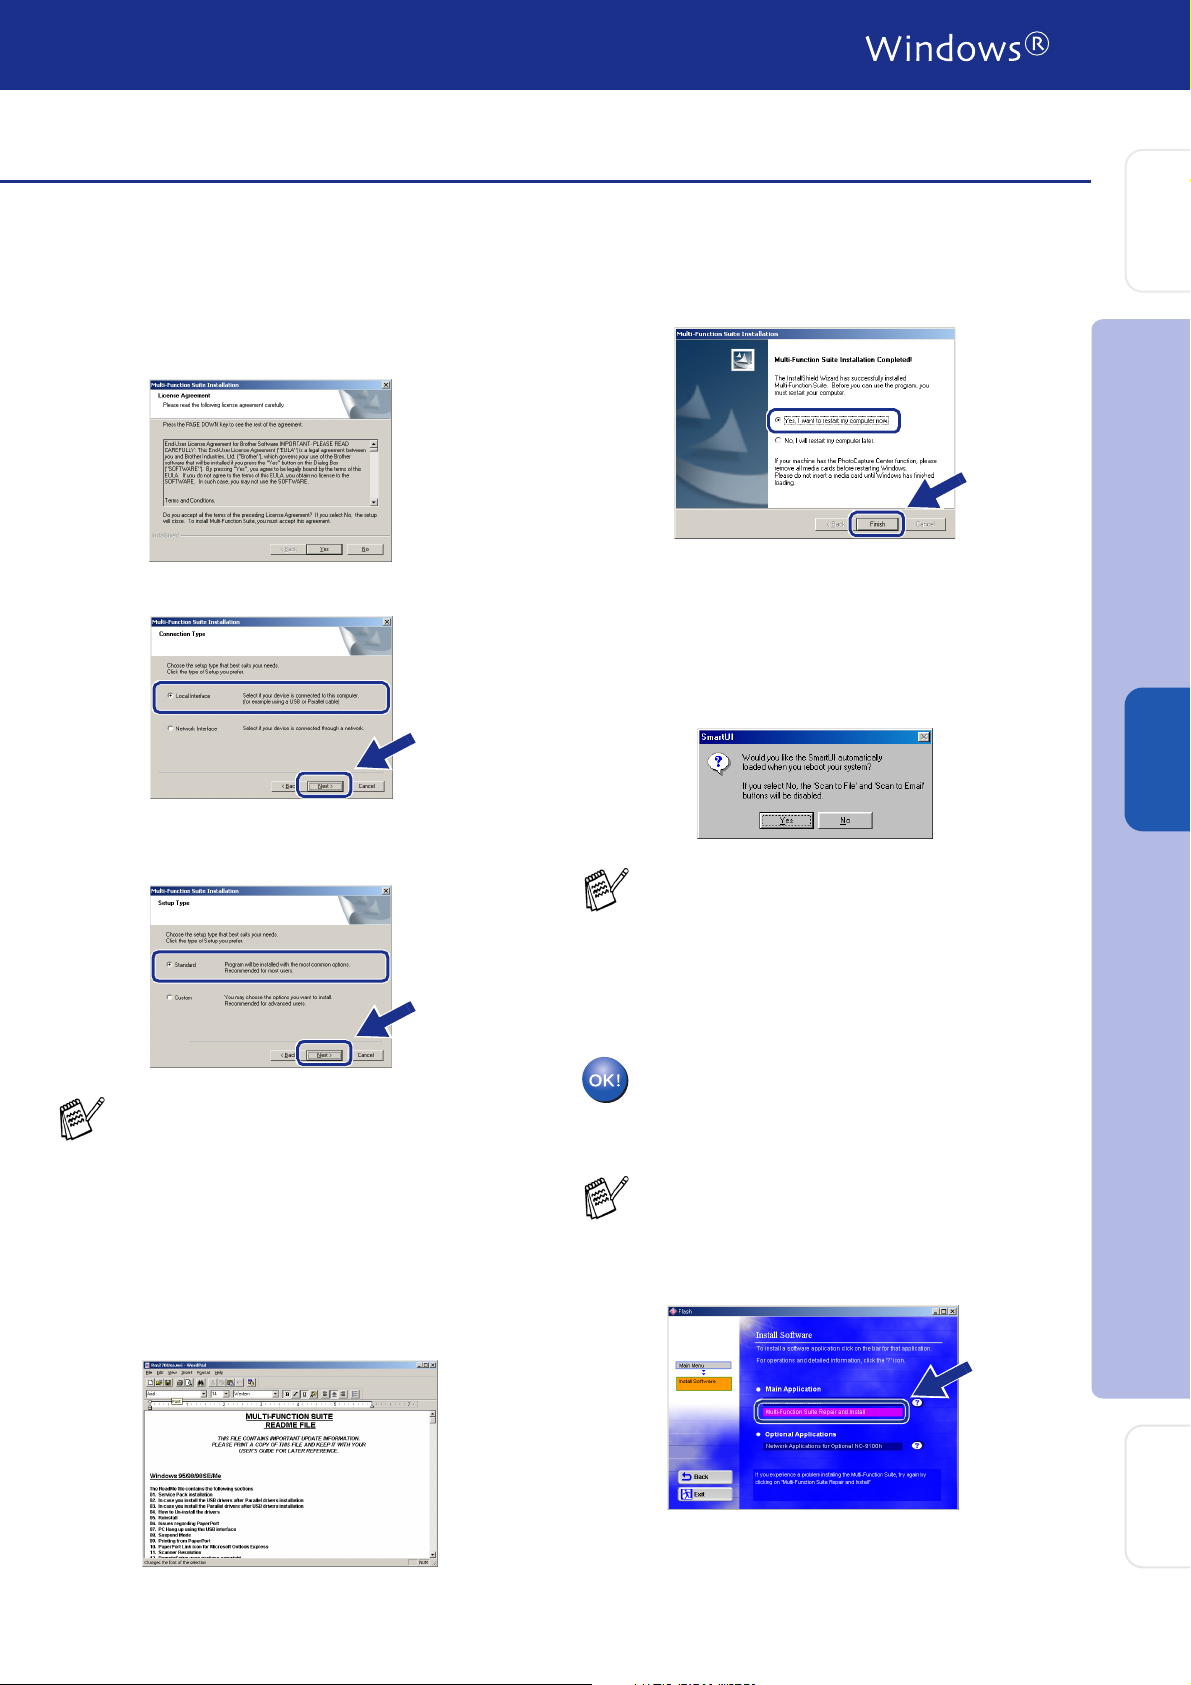
E When the Software License Agreement
window appears, click Yes If you agree to it
and go to next screen.
F Select Local Interface, and then click Next.
G When the Setup Type window appears,
select Standard, and then click Next.
I Click Finish to restart your computer.
J After the computer restarts, click Yes to
have the SmartUI load each time Windows®
is started. The SmartUI will appear as an
icon in the task tray.
If you click No the Scan keys on the
machine will be disabled.
Even if you select No, you will be able to
launch the SmartUI later to use the Scan to
key by double clicking the SmartUI icon on
the desktop. This loads the SmartUI to the
task tray. See AutoLoad the SmartUI,
Chapter 4 in the Documentation (Software
User’s Guide) located on the CD-ROM.
Installing the Driver & Software
4.0
®
Parallel
NT
Windows
If you want to install the PS driver, select
Custom and then follow the on-screen
instructions. When the Select Components
screen appears, check PS Printer Driver,
and then continue following the on-screen
instructions.
H The README file will be displayed.
Please read this file for troubleshooting
information and then close the file to
continue installation.
The PC-FAX, Printer and Scanner
drivers have been installed and the
installation is now complete.
If the Multi-Function Suite doesn’t work after
the installation, you will have to repair it.
From the Main Menu, select Install
Software, Multi-Function Suite Repair
and Install, and then follow the instructions.
For
Administrators
37
Page 40
Step 2
For Network Interface Cable Users
(For Windows
Make sure that you have completed the instructions from Step 1 “Setting Up
the Machine” on pages 4 - 11.
Installing the Driver & Software
®
98/98SE/Me/NT/2000 Professional/XP)
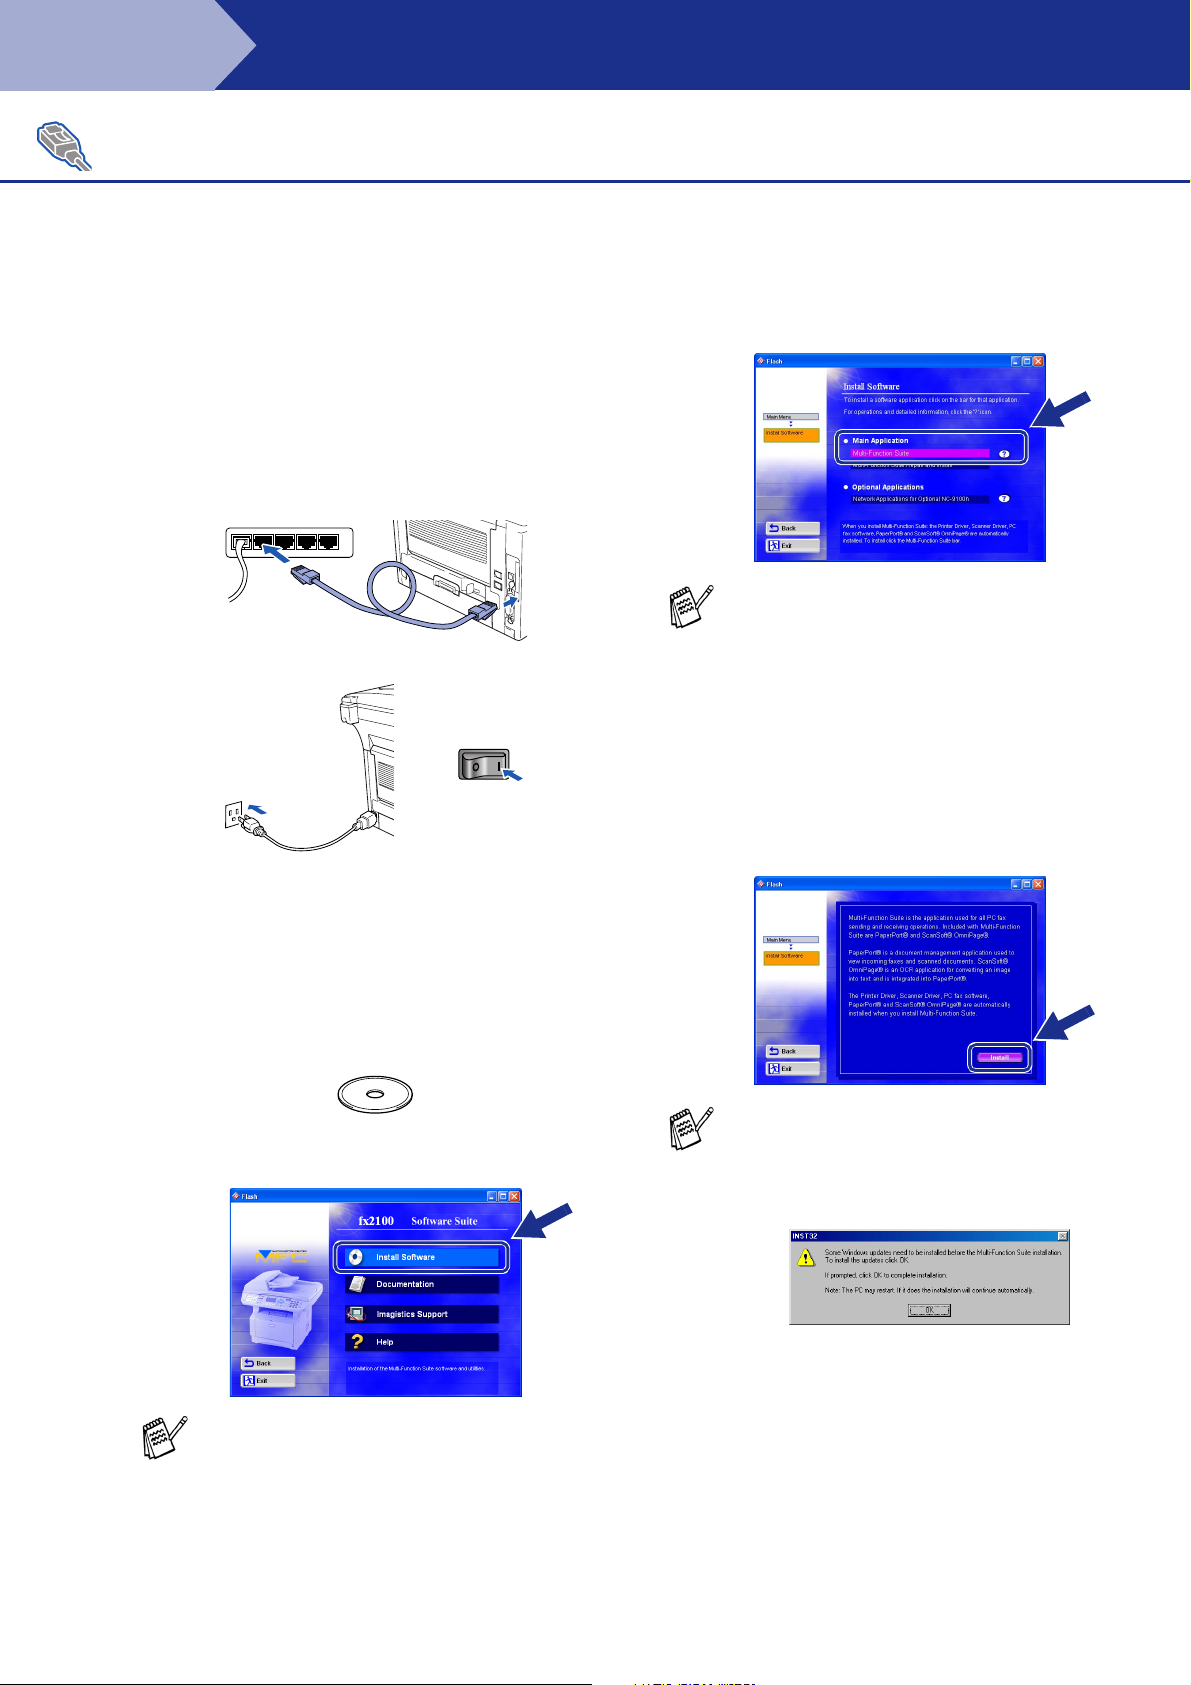
1 Make sure that the Network Board is
installed into the machine. (See "Optional
accessories" in Chapter 13 of the User's
Guide.)
2 Connect the network cable to the machine,
and then connect it to a free port on your
hub. Turn on the machine by plugging in the
power cord. Turn the power switch on.
6 Click Multi-Function Suite in Main
Application.
Multi-Function Suite includes Printer Driver,
Scanner Driver, ScanSoft
ScanSoft
and True Type fonts. PaperPort
document management application for
viewing scanned documents. ScanSoft
OmniPage
PaperPort
converts an image into text and inserts it into
your default word processor.
®
OmniPage®, PC-FAX software
®
, which is integrated into
®
, is an OCR application that
®
PaperPort®,
®
is a
7 Click Install.
®
3 Turn on your computer.
®
(For Windows
Windows NT
as the administrator.)
2000 Professional/XP and
®
4.0, you must be logged on
4 Insert the supplied CD-ROM into your
CD-ROM drive. When the language screen
appears, select your language.
5 The CD-ROM main menu will appear.
Click Install Software.
If this window does not appear, use Windows®
Explore to run the
root directory of the CD-ROM.
setup.exe
program from the
If you see the following screen, click OK to
install the Windows
updates are installed your PC may restart.
Note: If it does the installation will
automatically continue.
If the installation does not continue
automatically, please open the installer
menu again by double-clicking the
setup.exe program from the root directory of
the CD-ROM, and continue from Step
®
updates. After the
5.
38
Page 41
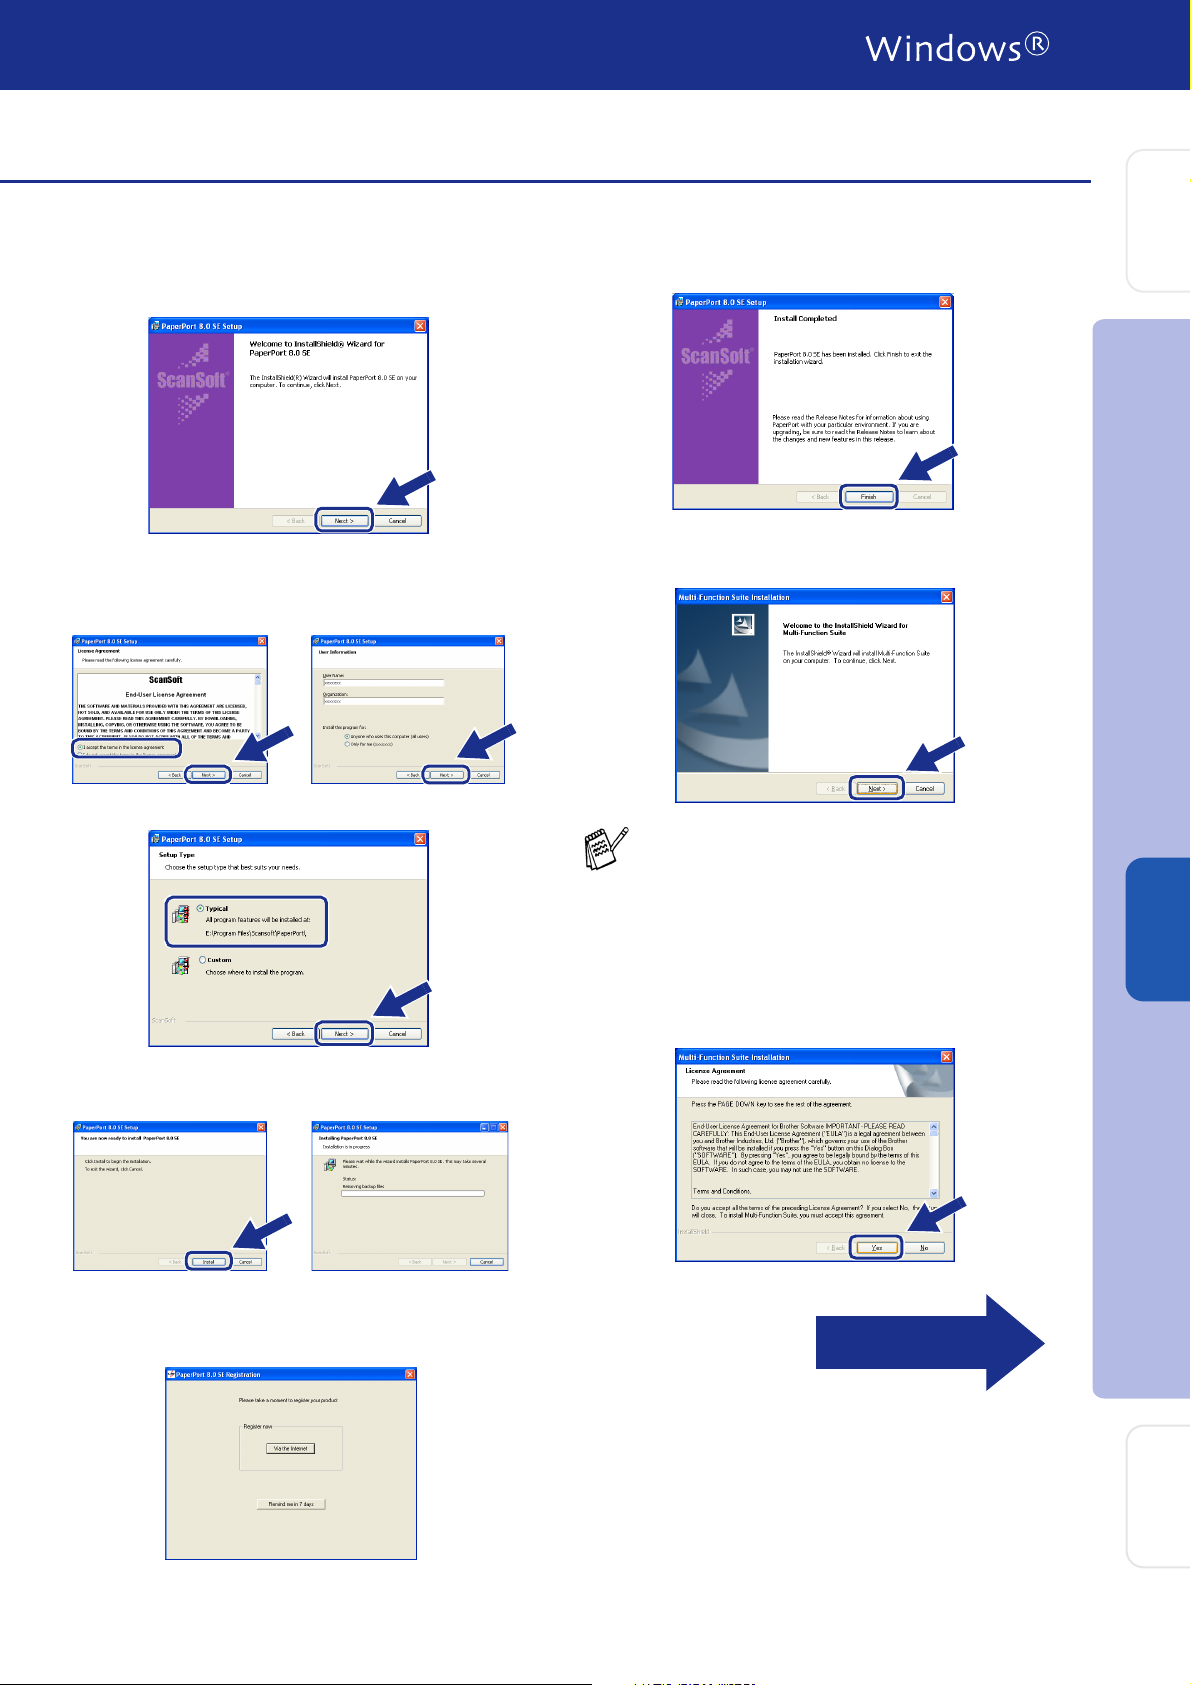
8 When the PaperPort
is displayed, click Next.
®
8.0 SE Setup window
C Click Finish to complete installation.
Setting Up
the Machine
9 After reading and accepting the ScanSoft
License Agreement, enter your user
information and click Next.
0 Select Typical and click Next.
A Click Install and PaperPort
installing on your computer.
®
will start
®
D When the Multi-Function Suite Installation
window appears, click Next.
If an error message appears at this point in
the installation process, you will first have to
uninstall Multi-Function Suite. From the
Start menu, select Programs, Imagistics,
Multi-Function Suite, Uninstall, and then
follow the instructions on the screen.
Installing the Driver & Software
®
Windows
Network
E When the Software License Agreement
window appears, click Yes.
B When the ScanSoft
displayed, make your selection and follow
the on- screen instructions.
®
Registration screen is
Continued...
For
Administrators
39
Page 42
Step 2
For Network Interface Cable Users
(For Windows
Installing the Driver & Software
®
98/98SE/Me/NT/2000 Professional/XP)
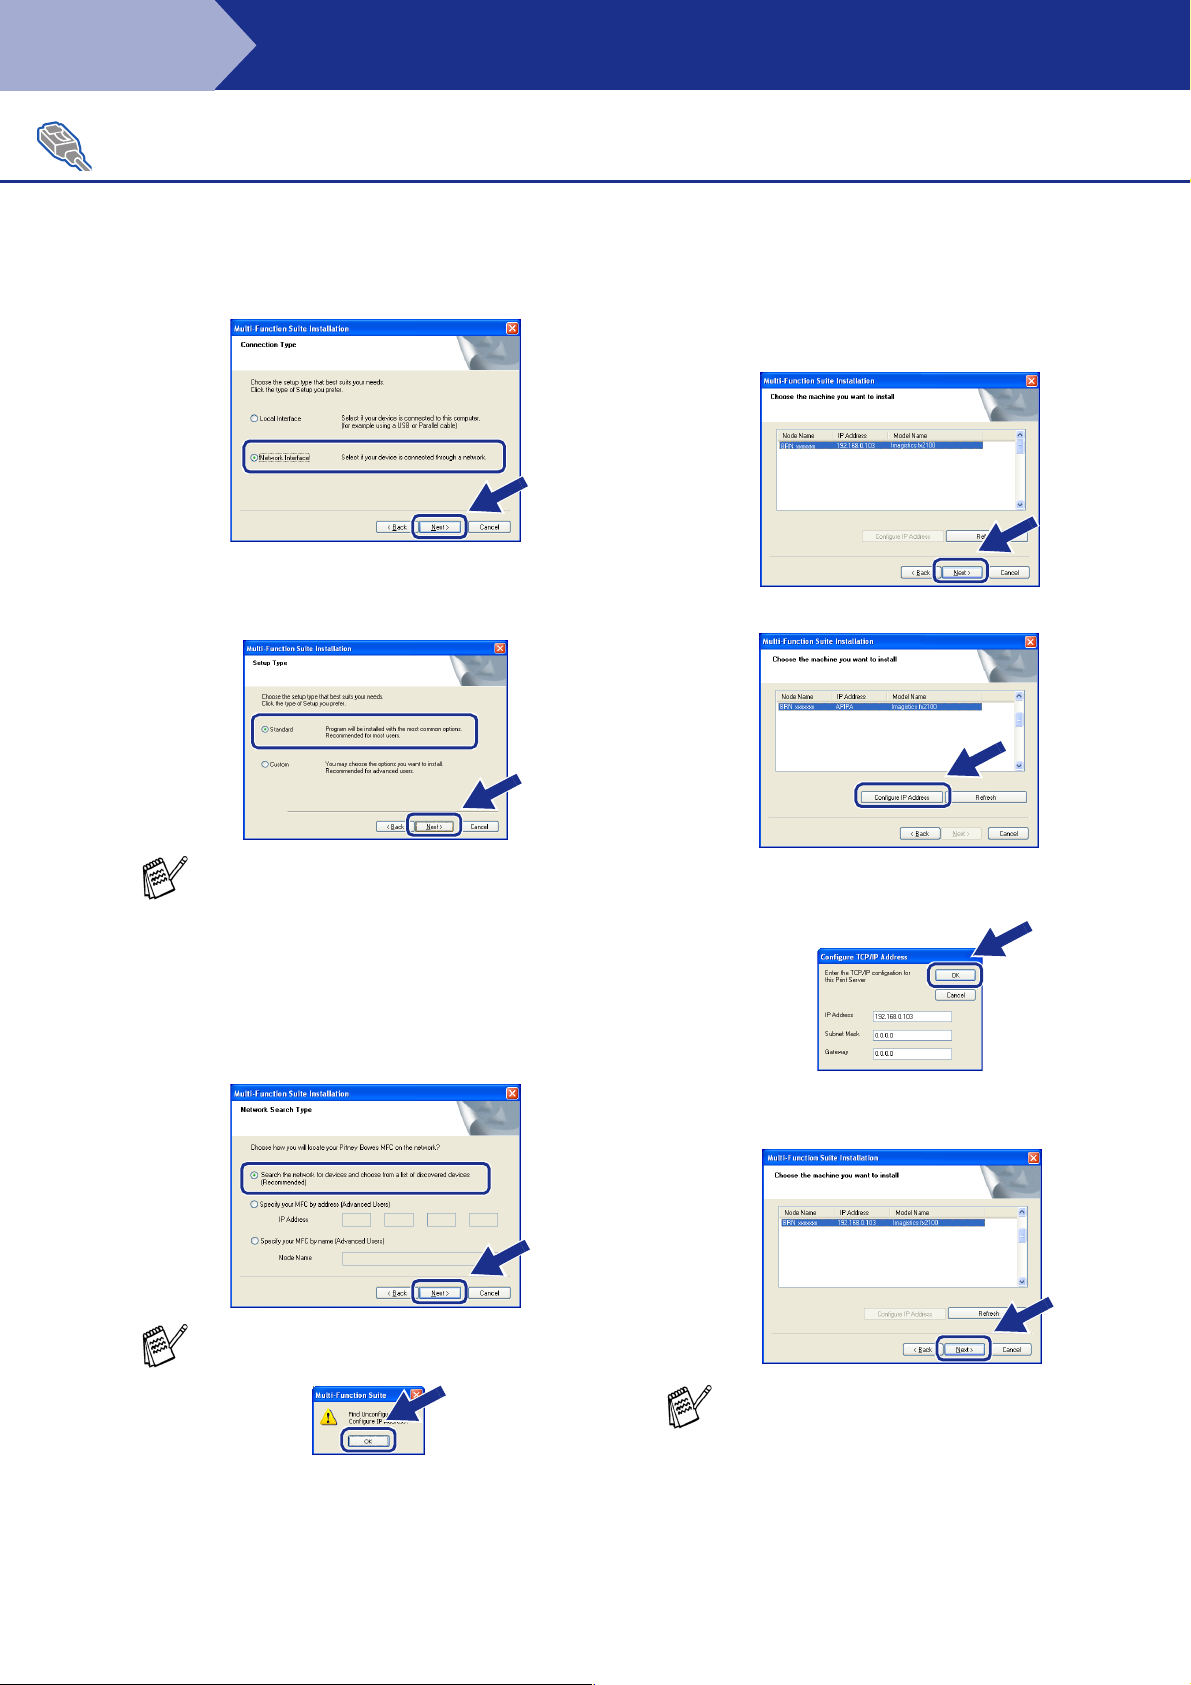
F Select Network Interface, and then click
Next.
G Select Standard, and then click Next.
The application files will be copied to your
computer.
If the machine is configured for your network:
Select the machine from the list and then
click Next.
→ Go to M
J Click Configure IP Address.
If you want to install the PS driver, select
Custom and then follow the on-screen
instructions. When the Select Components
screen appears, check PS Printer Driver,
and then continue following the on-screen
instructions.
H
Select
choose from a list of discovered devices
(Recommended)
Search the network for devices and
, and then click
If you see the following screen, click OK.
Next
.
I If the machine is un-configured for your
network:
Select the APIPA or un-configured device
from the list and then click Next. → Go to J
K Enter the proper IP Address information for
your network, and then click OK.
(e.g. Enter 192.168.0.103 for IP Address)
L Click Next.
See the For Administrator section of this guide
or the Network User's Guide located on the
CD-ROM for more network configuration
information.
®
Windows
Windows NT
98/98SE/Me/2000/XP Users
➝ Go to N
®
Users
➝ Go to P
40
Page 43

M Select yes and then click Next.
P Click Finish restart your computer.
Setting Up
the Machine
N Click Next or enter the name you want
displayed on the LCD for your PC and then
click Next. The default name is the name of
your PC.
You can avoid receiving unwanted
documents by setting a 4-digit PIN Number.
Please wait for the window to open.
O The README file will be displayed. Please
read this file for trouble shooting information
and then close the file to continue
installation.
Windows
®
98/98SE/Me/NT/2000 Users
follow step Q.
The Network Scanning feature is not
supported in Windows NT
For Windows
®
XP Users Only
®
.
The PC-FAX, Printer and Scanner
drivers have been installed and the
installation is now complete.
Q After the computer restarts, click Yes to
have the SmartUI load each time Windows
is started. The SmartUI will appear as an
icon in the task tray.
If you click No the Scan keys on the
machine will be disabled.
Even if you select No, you will be able to
launch the SmartUI later to use the Scan to
key by double clicking the SmartUI icon on
the desktop. This loads the SmartUI to the
task tray. See AutoLoad the SmartUI,
Chapter 4 in the Documentation (Software
User’s Guide) located on the CD-ROM.
®
®
Network
Windows
Installing the Driver & Software
®
For Windows
98/98SE/Me/2000 Users
The PC-FAX, Printer and Scanner
drivers have been installed and the
installation is now complete.
For Windows NT® Users
The PC-FAX and Printer drivers have
been installed and the installation is
now complete.
For
Administrators
41
Page 44
Step 2
For USB Interface Cable Users
Make sure that you have completed the instructions from Step 1 “Setting Up
the Machine” on pages 4 - 11.
Installing the Driver & Software
For Mac OS® 8.6 to 9.2
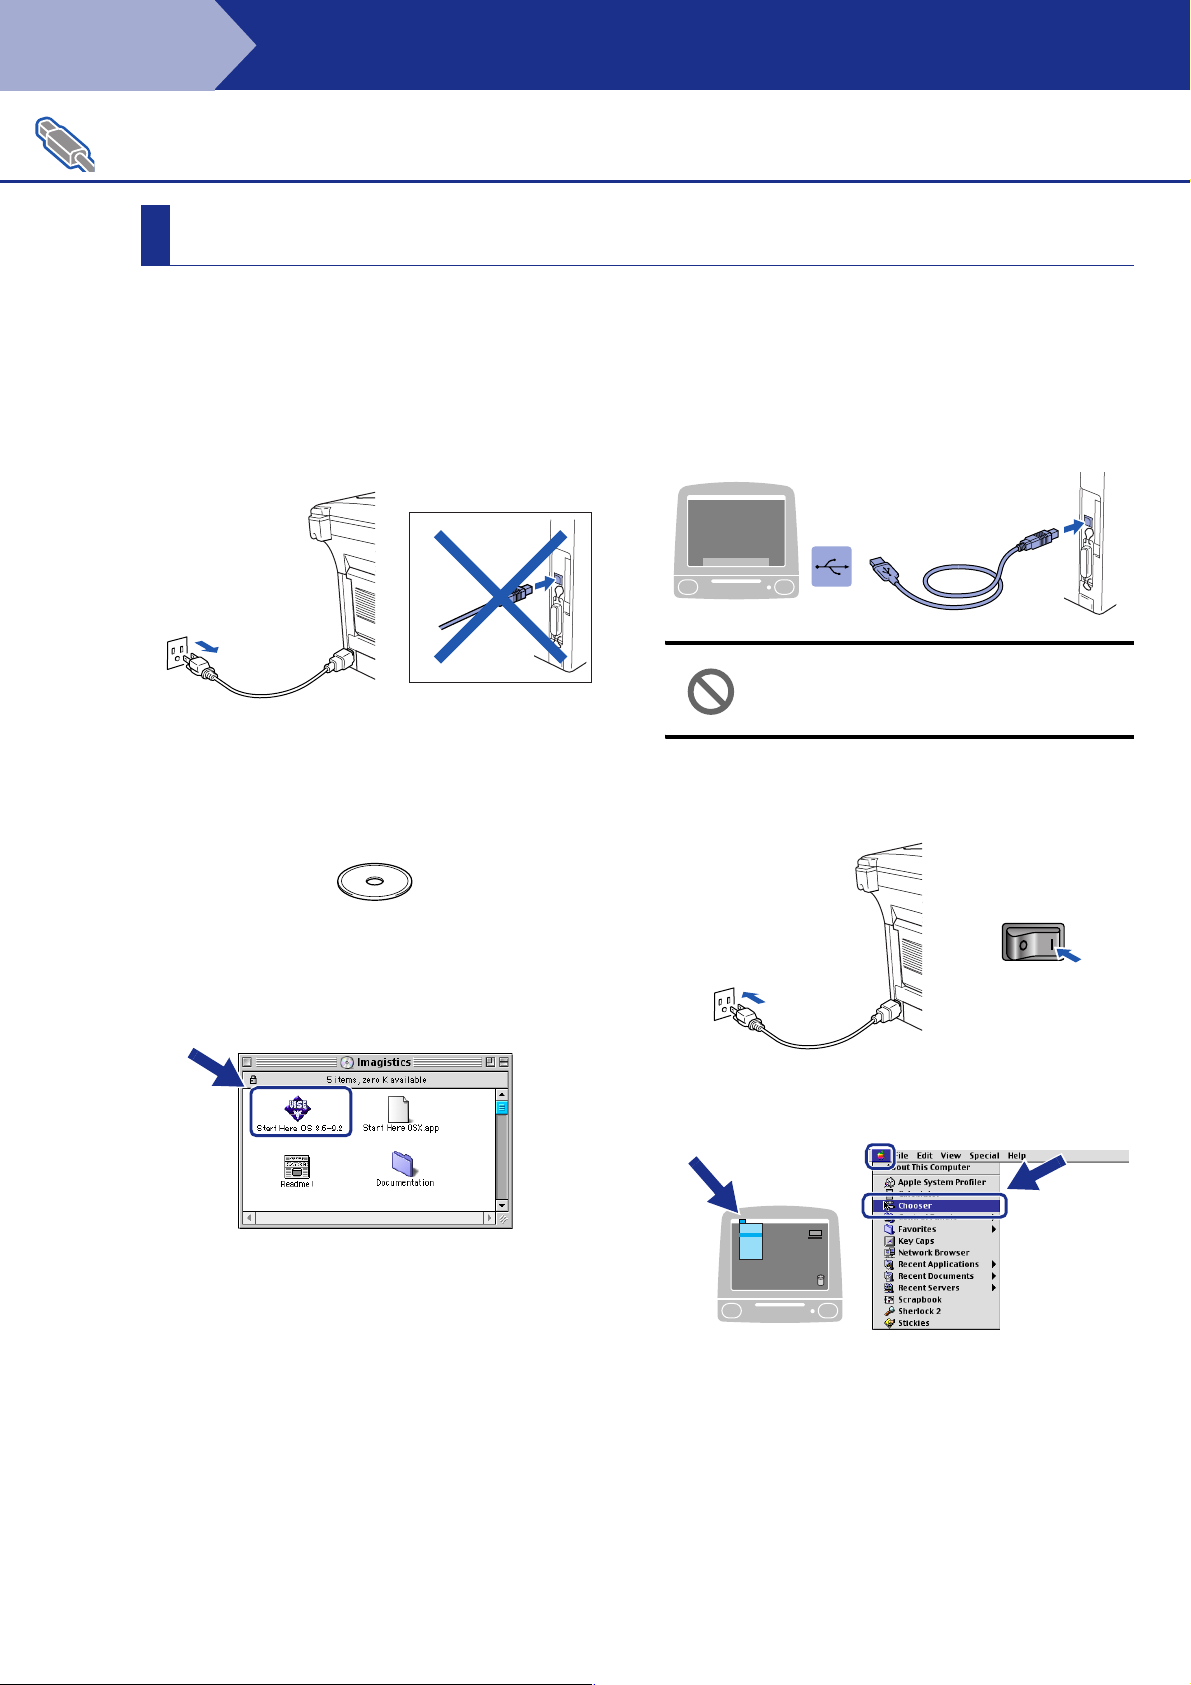
1 Switch off and unplug the machine from the
AC outlet and disconnect it from your
Macintosh if you already connected an
interface cable.
2 Turn on your Macintosh
®
.
3 Insert the supplied CD-ROM into your
CD-ROM drive.
4 Double-click the Start Here OS 8.6 - 9.2
icon to install the printer, scanner and PCFAX Send drivers. When the language
screen appears, select your language.
7 Connect the USB interface cable to your
Macintosh®, and then connect it to the
machine.
Do not connect the machine to a
USB port on a keyboard or a non
powered USB hub.
8 Turn on the machine by plugging in the
power cord. Turn the power switch on.
5
Select
USB Interface
, and then click
6 After the installation is completed, restart
your Macintosh®.
42
Install
9 From the Apple
.
®
menu, open the Chooser.
Page 45
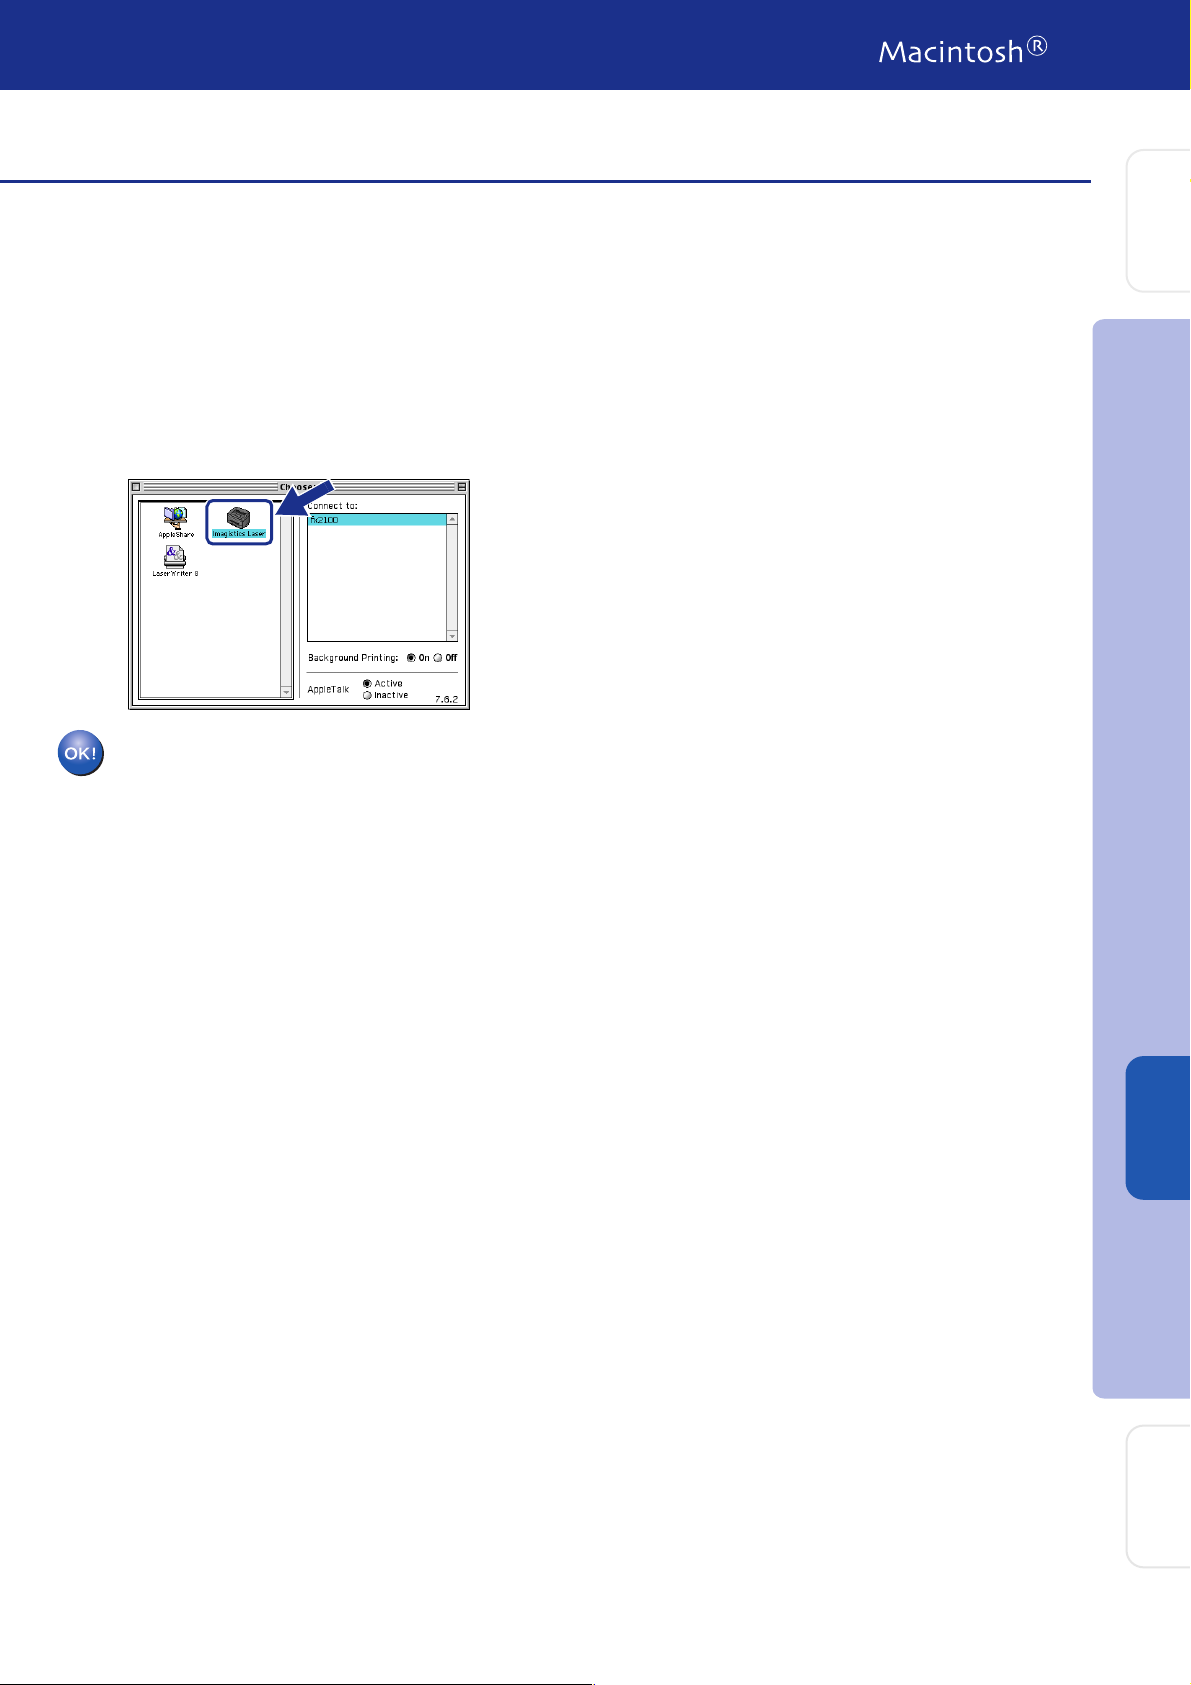
0 Click the Imagistics Laser icon you
installed. On the right side of the Chooser,
select the printer to which you want to print.
Close the Chooser.
The PC-FAX Send, Printer and Scanner
drivers have been installed.
Setting Up
the Machine
Installing the Driver & Software
®
USB
Macintosh
For
Administrators
43
Page 46
Step 2
For USB Interface Cable Users
Make sure that you have completed the instructions from Step 1 “Setting Up
the Machine” on pages 4 - 11.
Installing the Driver & Software
For Mac OS® X 10.1/10.2.1 or greater
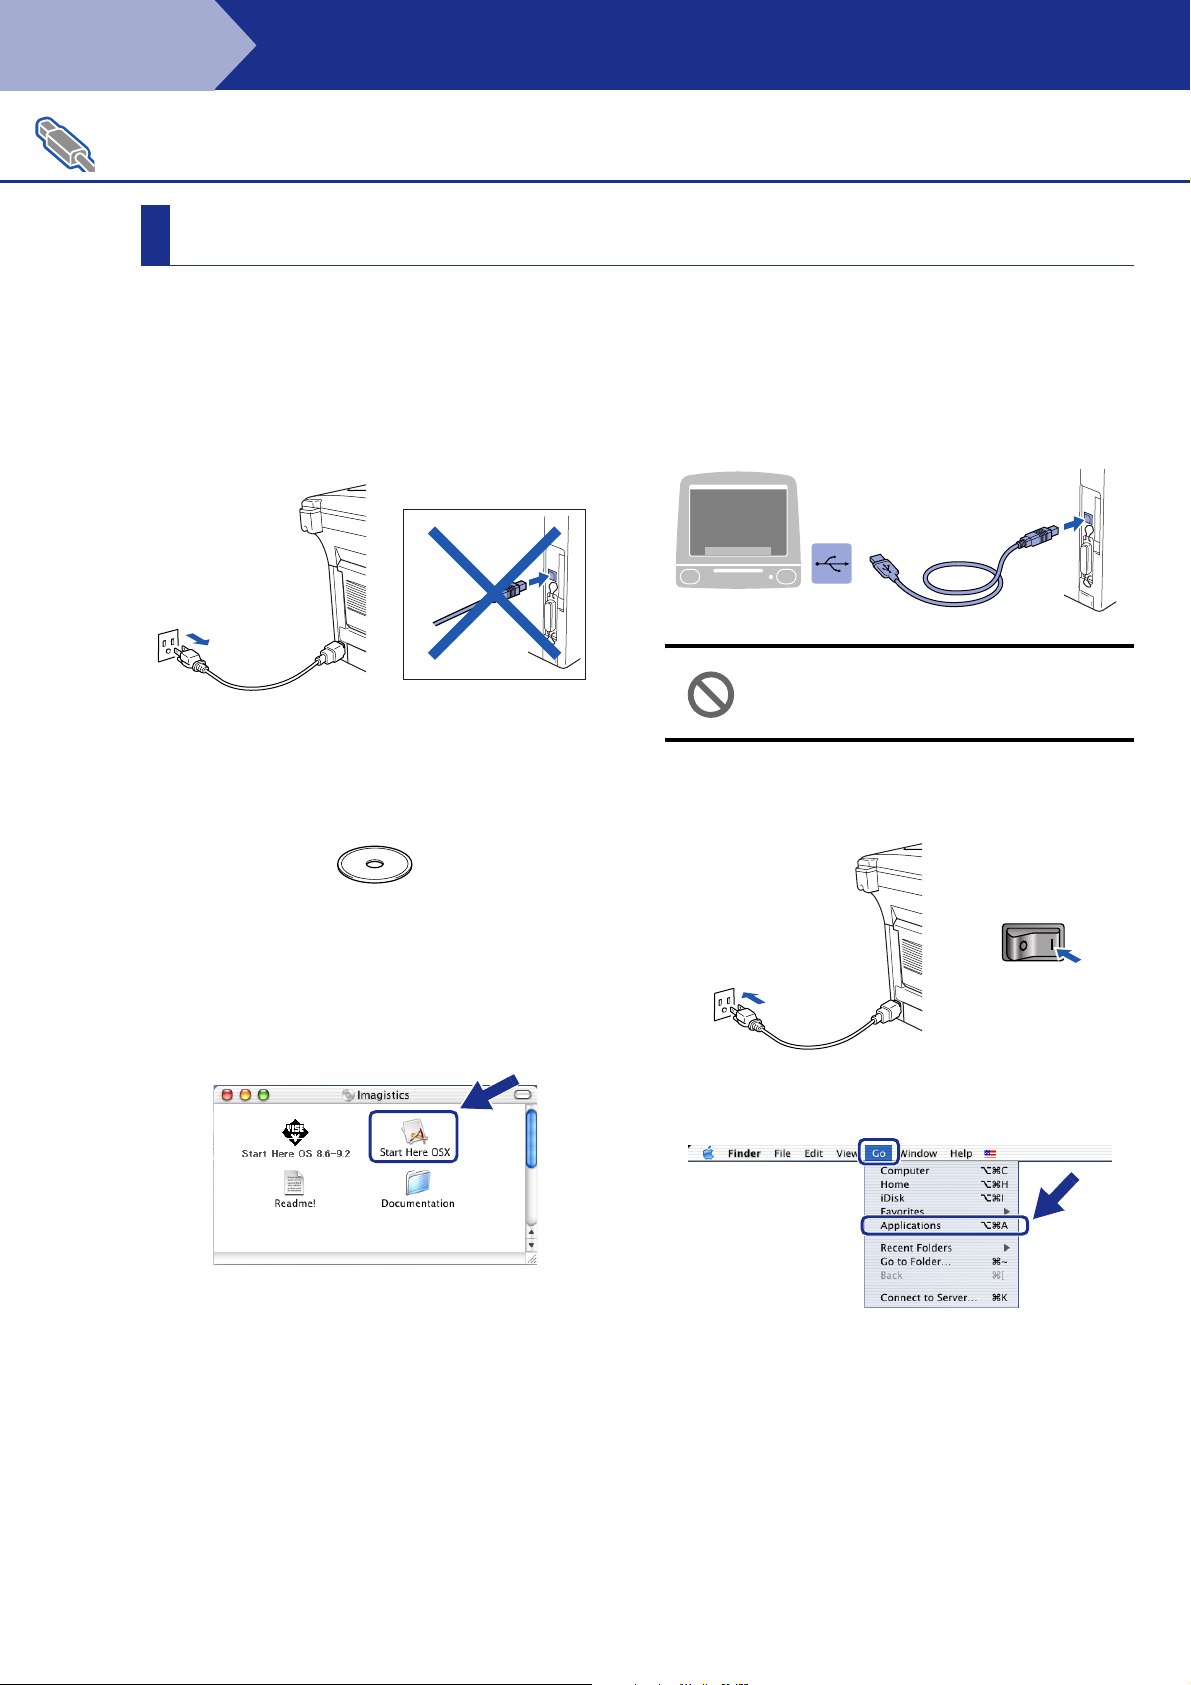
1 Switch off and unplug the machine from the
AC outlet and disconnect it from your
Macintosh if you already connected an
interface cable.
2 Turn on your Macintosh
®
.
3 Insert the supplied CD-ROM into your
CD-ROM drive.
4 Double-click the Start Here OSX icon to
install the printer driver, Scanner driver,
PC-FAX Send and Remote Setup program.
When the language screen appears, select
your language. (Scanning is not supported
in Mac OS
®
10.1.)
6 Connect the USB interface cable to your
Macintosh
machine.
®
, and then connect it to the
Do not connect the machine to a
USB port on a keyboard or a non
powered USB hub.
7 Turn on the machine by plugging in the
power cord. Turn the power switch on.
5 Select USB Interface, and then click
Install.
44
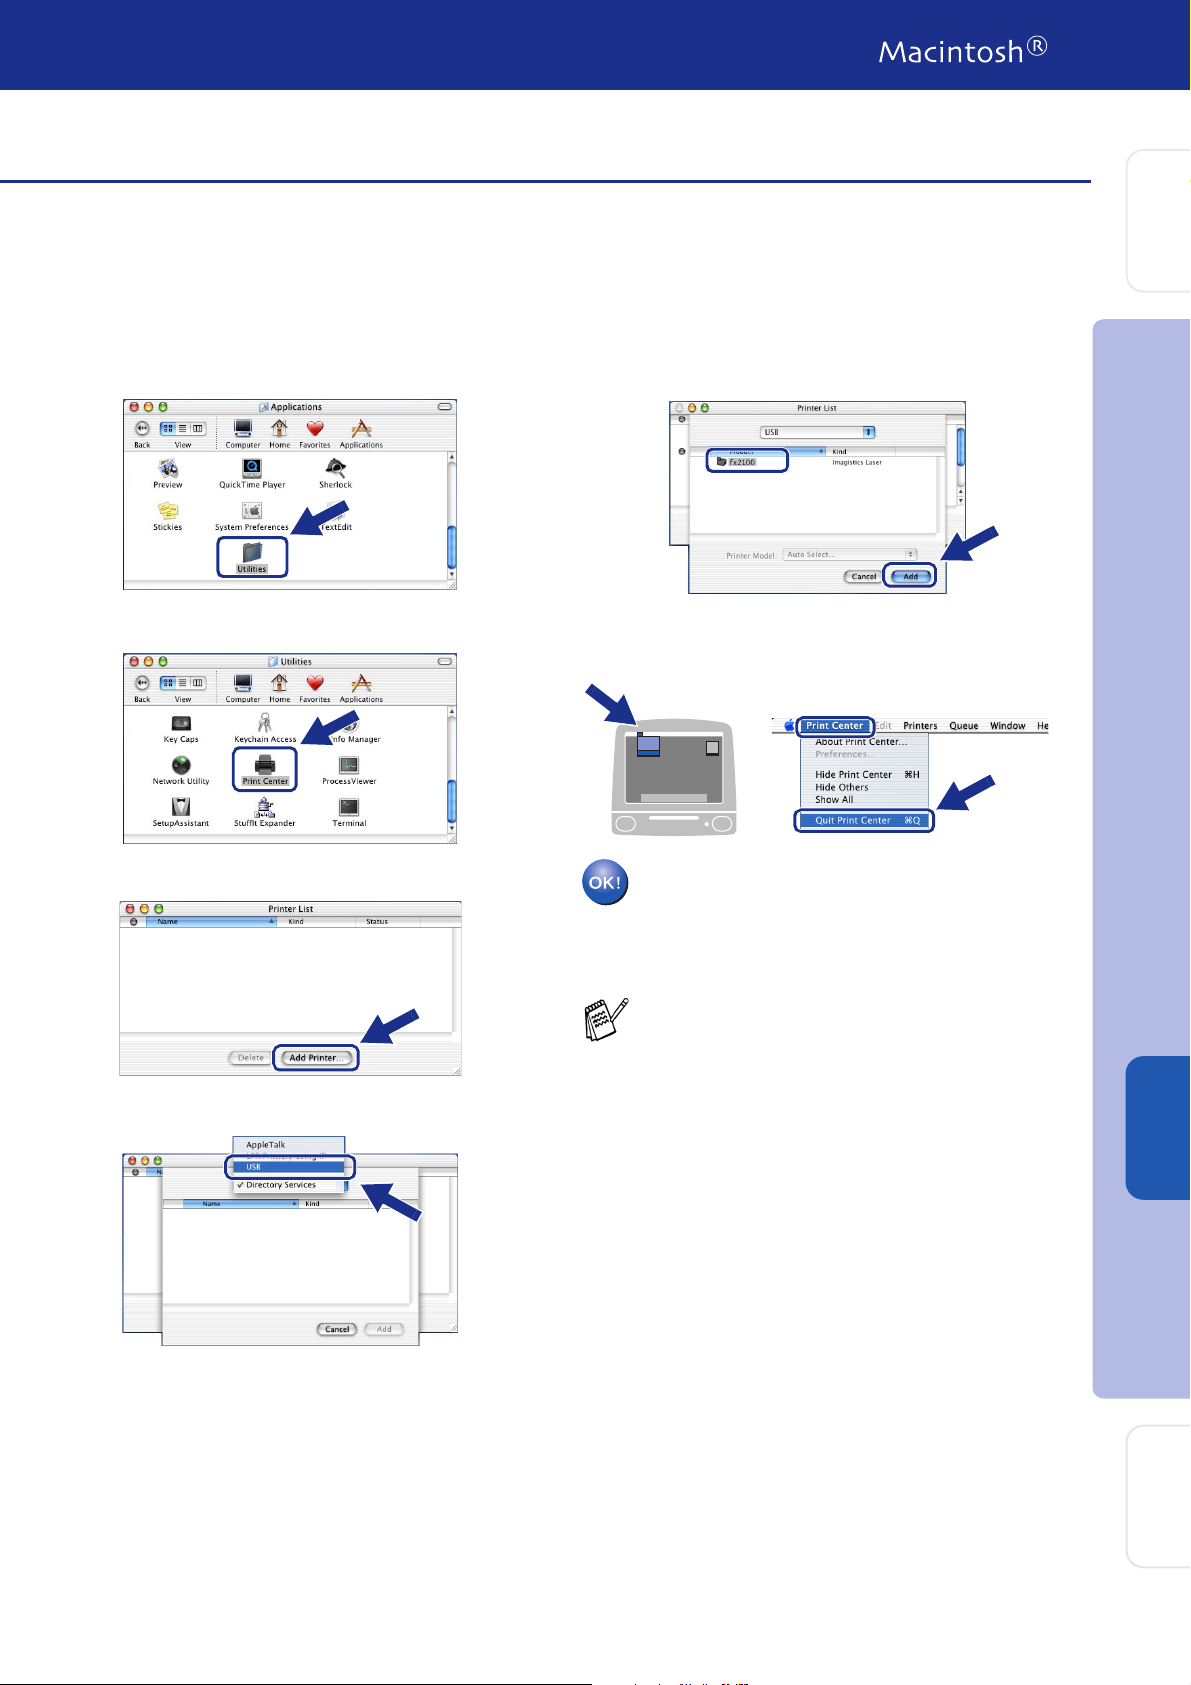
8 Select Applications from the Go menu.
Page 47
Setting Up
the Machine
9 Open the Utilities folder.
0 Open the Printer Center icon.
A Click Add Printer....
C Select your machine, and then click Add.
D Select Quit Printer Center from the Printer
Center menu.
The Printer driver, Scanner driver,
PC-FAX Send and Remote Setup
Program have been installed and the
installation is now complete.
Scanning is not supported on Mac OS® 10.1.
Installing the Driver & Software
B Select USB.
®
USB
Macintosh
For
Administrators
45
Page 48
Step 2
For Network Interface Cable Users
Make sure that you have completed the instructions from Step 1 “Setting Up
the Machine” on pages 4 - 11.
Installing the Driver & Software
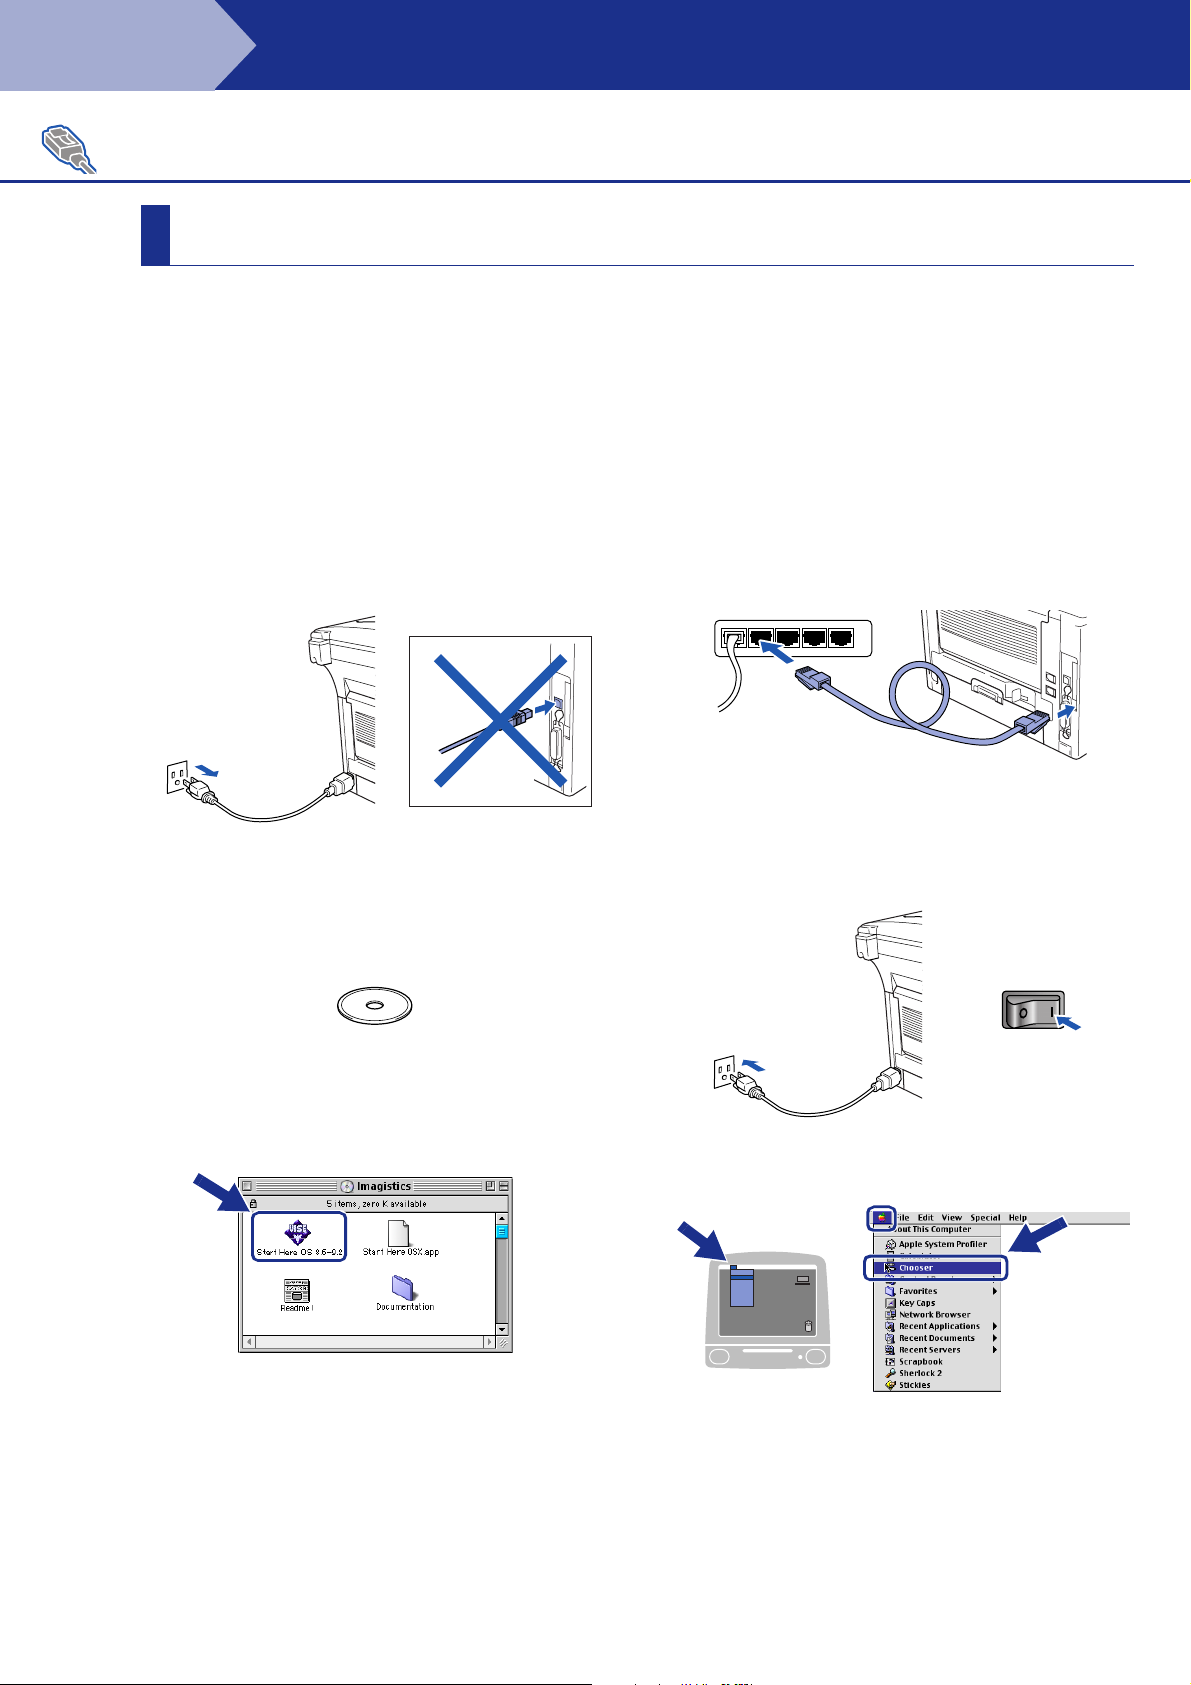
For Mac OS® 8.6 to 9.2
1 Make sure that the Network board is
installed into the machine. (See "Optional
accessories" in Chapter 13 of the User's
Guide.)
2 Switch off and unplug the machine from the
AC outlet and disconnect it from your
Macintosh if you already connected an
interface cable.
3 Turn on your Macintosh
®
.
4 Insert the supplied CD-ROM into your
CD-ROM drive.
6 Select Network Interface, and then click
Install.
7 After the installation is completed, restart
your Macintosh
®
.
8 Connect the network interface cable to the
printer, and then connect it to a free port on
your hub.
9 Turn on the machine by plugging in the
power cord. Turn the power switch on.
5 Double-click the Start Here OS 8.6 - 9.2
icon to install the printer, scanner and PCFAX Send drivers. Follow the on-screen
instructions.
46
0 Open the Chooser from the Apple menu.
Page 49
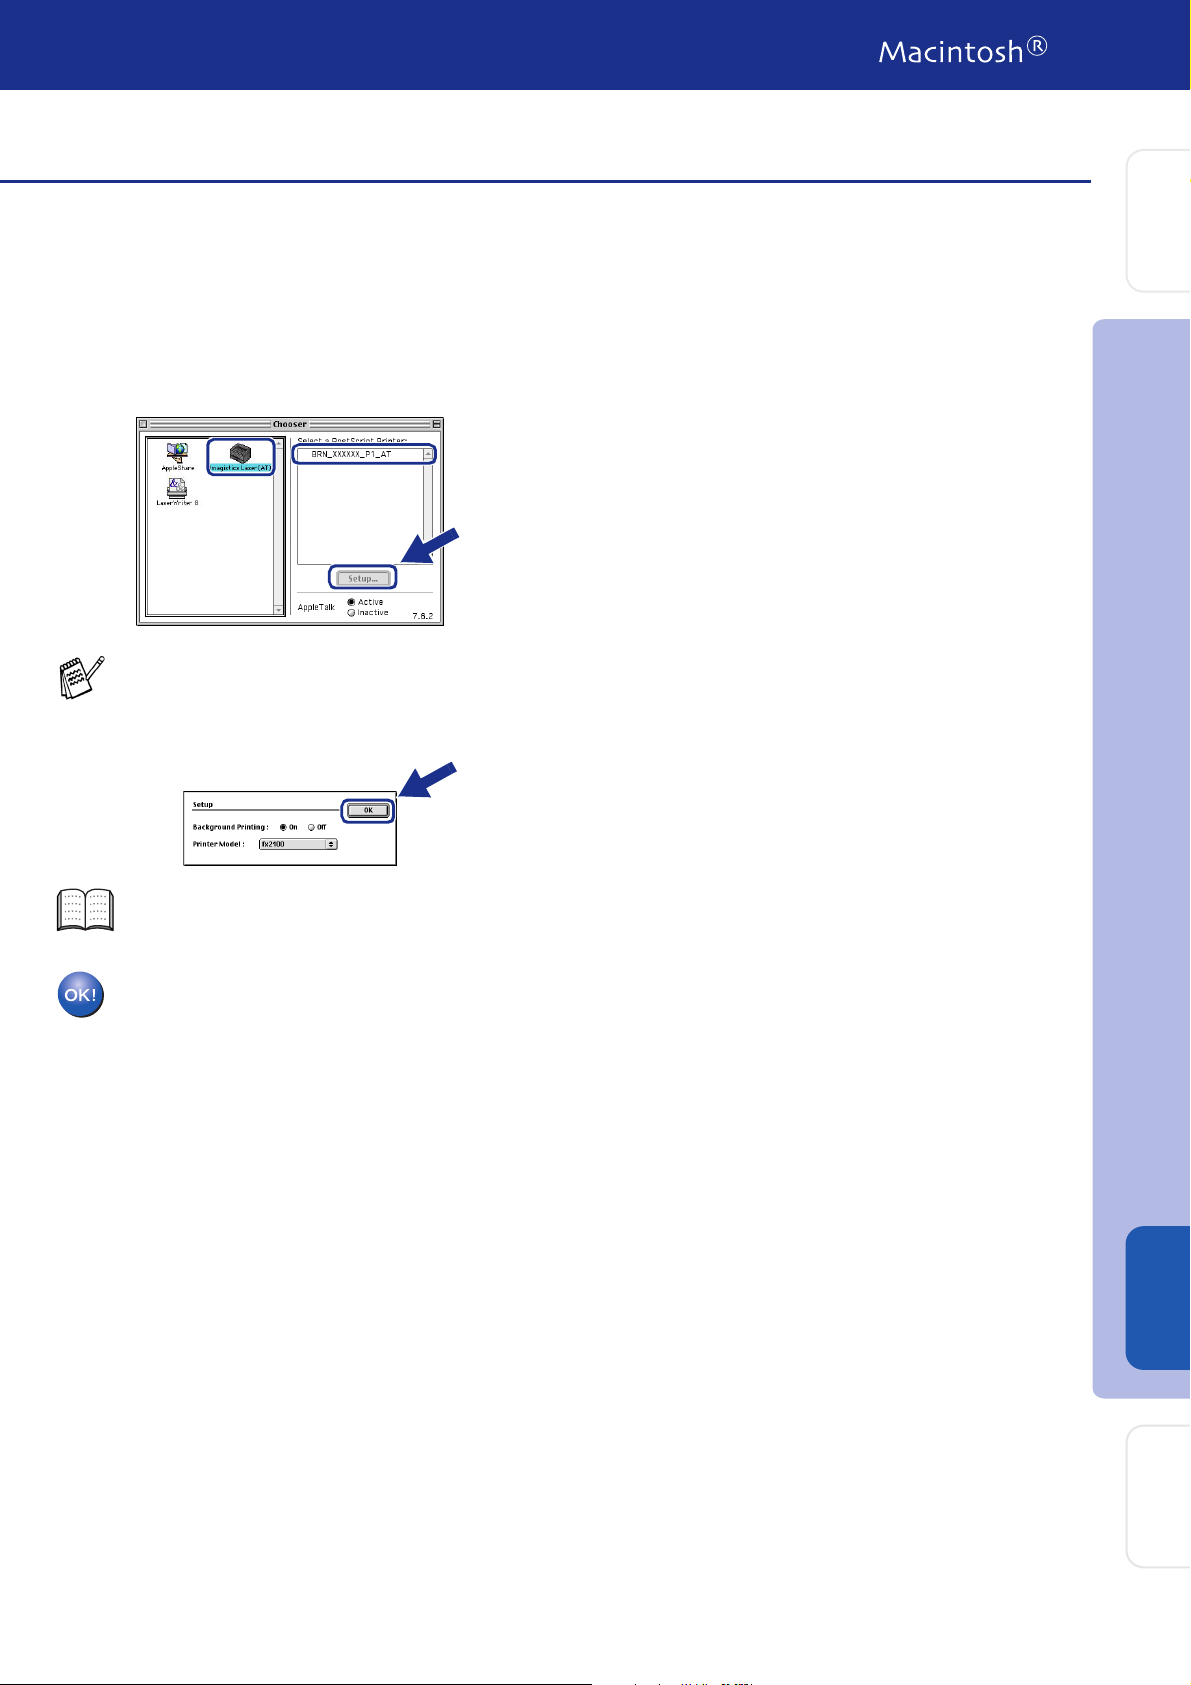
A Click the PB Laser (AT) icon, and then
select BRN_xxxxxx_P1.
Click Setup.
xxxxxx are the last six digits of the Ethernet
address.
B Click OK, and then close the Chooser.
Setting Up
the Machine
Network User's Guide Chapter 7 on the
CD-ROM.
The setup is now complete.
Installing the Driver & Software
®
Macintosh
Network
47
For
Administrators
Page 50
Step 2
For Network Interface Cable Users
Make sure that you have completed the instructions from Step 1 “Setting Up
the Machine” on pages 4 - 11.
Installing the Driver & Software
For Mac OS® X 10.1/10.2.1 or greater
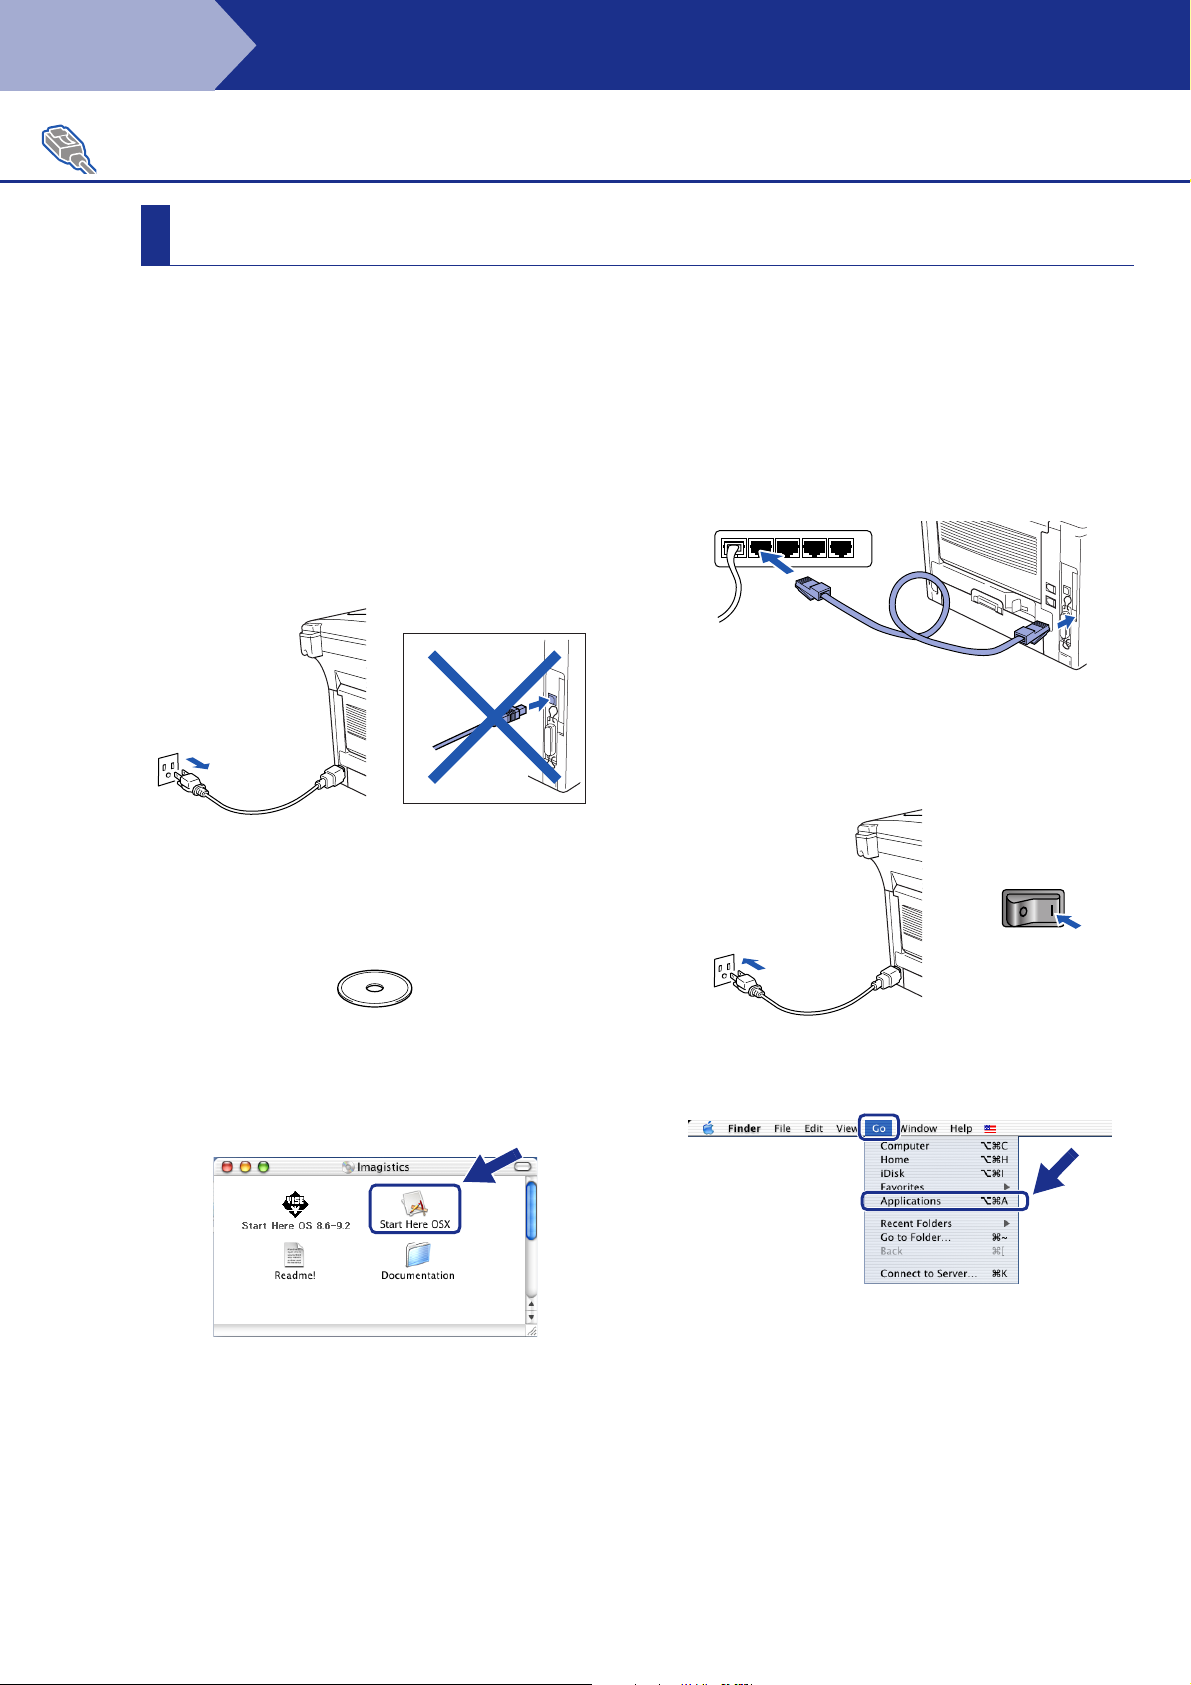
1 Make sure that the Network board is
installed into the machine. (See "Optional
accessories" in Chapter 13 of the User's
Guide.)
2 Switch off and unplug the machine from the
AC outlet and disconnect it from your
Macintosh if you already connected an
interface cable.
3 Turn on your Macintosh
®
.
4 Insert the supplied CD-ROM into your
CD-ROM drive.
6 Select Network Interface, and then click
Install.
7 Connect the network interface cable to the
printer, and then connect it to a free port on
your hub.
8 Turn on the machine by plugging in the
power cord. Turn the power switch on.
5 Double-click the Start Here OSX folder to
install the printer driver and Remote Setup
program. (Scanning is not supported in
®
OS
X 10.1.)
9 Select Applications from the Go menu.
48
Page 51
Setting Up
the Machine
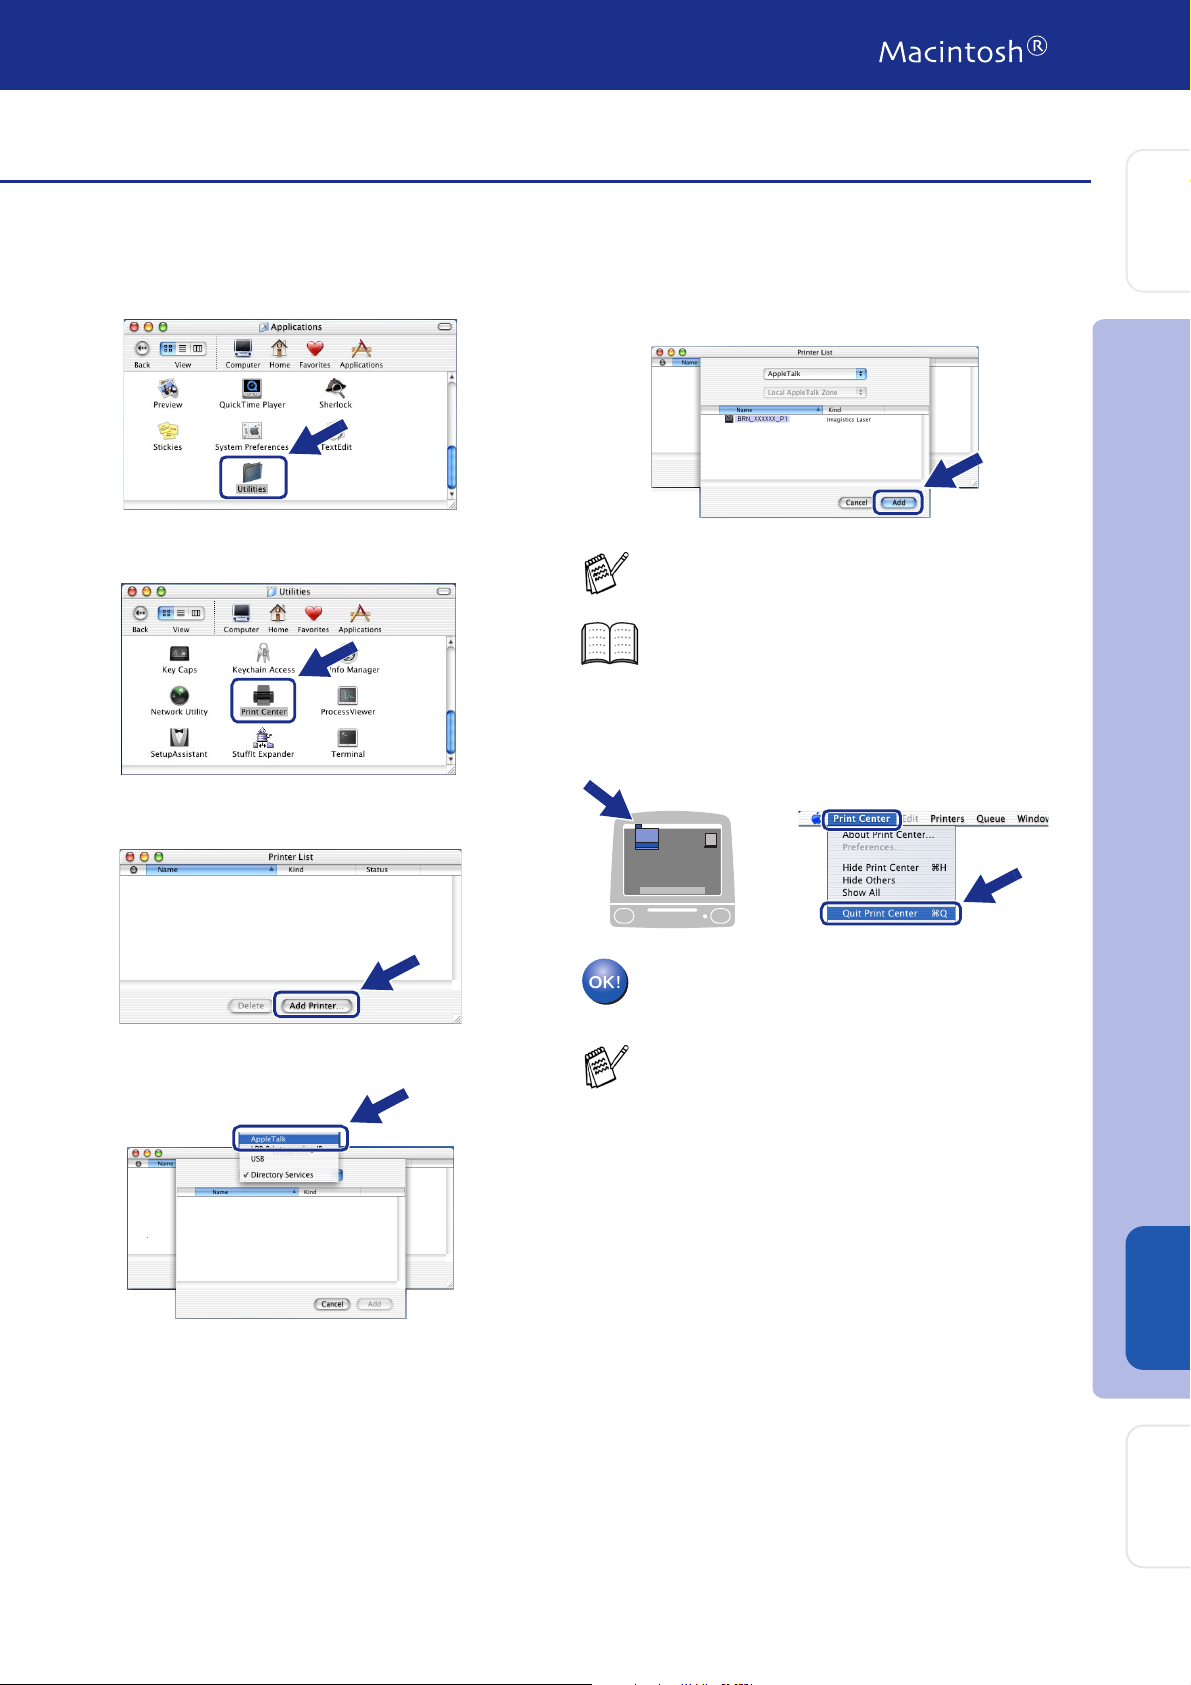
0 Open the Utilities folder.
A Open the Print Center icon.
B Click the Add Printer... button.
D Select BRN_xxxxxx_P1, and then click the
Add button.
xxxxxx are the last six digits of the Ethernet
address.
Network User's Guide Chapter 7 on the
CD-ROM.
E Select Quit Printer Center from the Printer
Center menu.
C Select AppleTalk.
The setup is now complete.
For users of Mac OS® 10.2.2 or greater
Please see Network User’s Guide Chapter 7
on the CD-ROM for information about using
Simple Network Configuration.
Installing the Driver & Software
®
For
Macintosh
Network
Administrators
49
Page 52
■ For Administrators
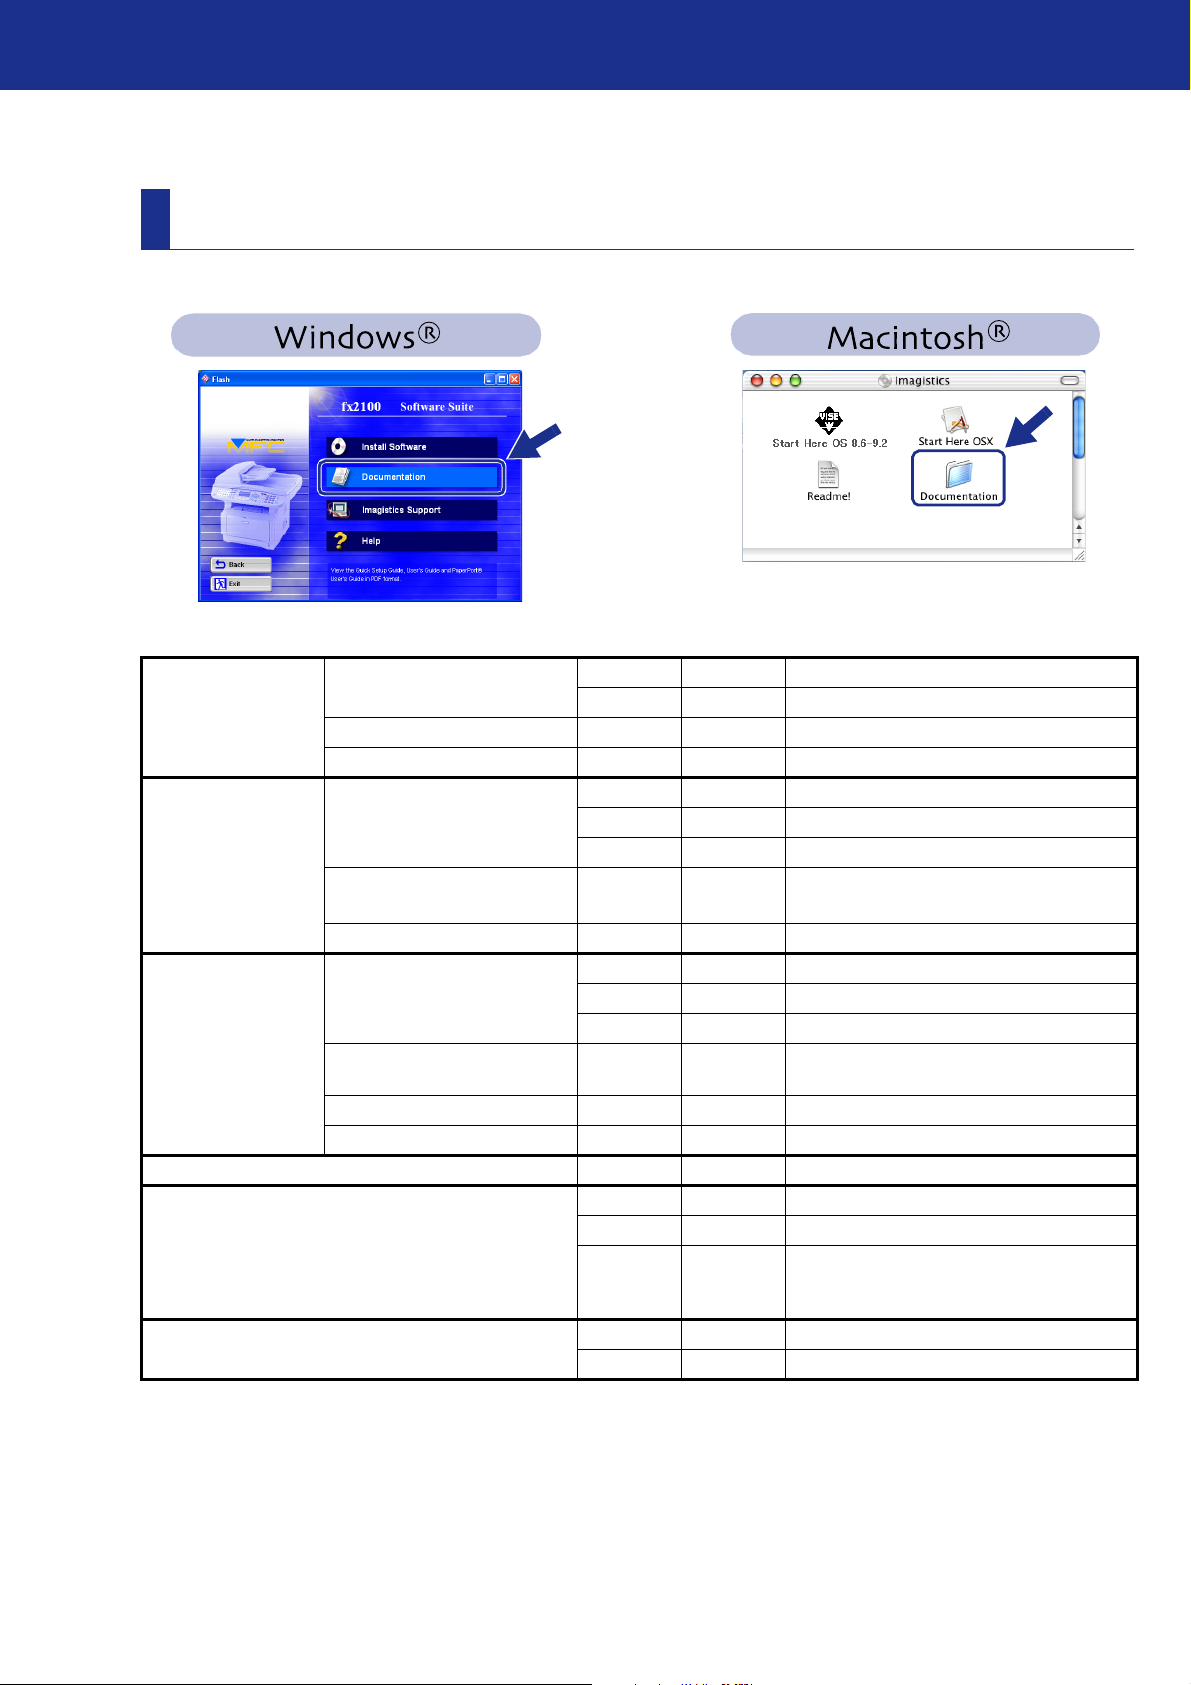
This section is for using the printer on a network. An administrator should set up the printer
using the following steps.
Network User's Guide Chapter Map
Windows® 98/Me
Windows NT
Windows
UNIX/Linux TCP/IP Chapter 1 UNIX Printing
Macintosh
OS2 Warp Server
LAN Server
®
®
2000/XP
®
Peer-to-Peer TCP/IP Chapter 3 Peer-to-Peer Printing
NetBIOS Chapter 4 NetBIOS Peer-to-Peer Printing
Imagistics Internet Print TCP/IP Chapter 5 Configuring Internet Print for Windows
Netware IPX/SPX Chapter 6 Novell Netware Printing
Peer-to-Peer TCP/IP Chapter 2 TCP/IP Printing
NetBIOS Chapter 4 NetBIOS Peer-to-Peer Printing
DLC/LLC Chapter 8 DLC Printing
Imagistics Internet Print
®
4.0 only)
(NT
Netware IPX/SPX Chapter 6 Novell Netware Printing
Peer-to-Peer TCP/IP Chapter 2 TCP/IP Printing
®
(Windows
IPP
(Internet Printing Protocol)
Imagistics Internet Print TCP/IP Chapter 5 Configuring Internet Print for Windows
Netware IPX/SPX Chapter 6 Novell Netware Printing
2000 only) DLC/LLC Chapter 8 DLC Printing
TCP/IP Chapter 5 Configuring Internet Print for Windows
NetBIOS Chapter 4 NetBIOS Peer-to-Peer Printing
TCP/IP Chapter 2 TCP/IP Printing
AppleTalk Chapter 7 AppleTalk (EtherTalk) and TCP/IP Printing
TCP/IP Chapter 7 AppleTalk (EtherTalk) and TCP/IP Printing
Simple
Network
Configuration
TCP/IP Chapter 2 TCP/IP Printing
NetBIOS Chapter 4 NetBIOS Peer-to-Peer Printing
Chapter 7 AppleTalk (EtherTalk) and TCP/IP Printing
®
®
®
50
Page 53
Installing the BRAdmin Professional Configuration Utility (Windows® Users Only)
The BRAdmin Professional software utility is designed to manage your network connected
devices such as network-ready printers and/or network-ready Multifunction devices in a Local
Area Network (LAN) environment.
BRAdmin Professional can also be used to manage devices from other manufacturers whose
products support SNMP (Simple Network Management Protocol).
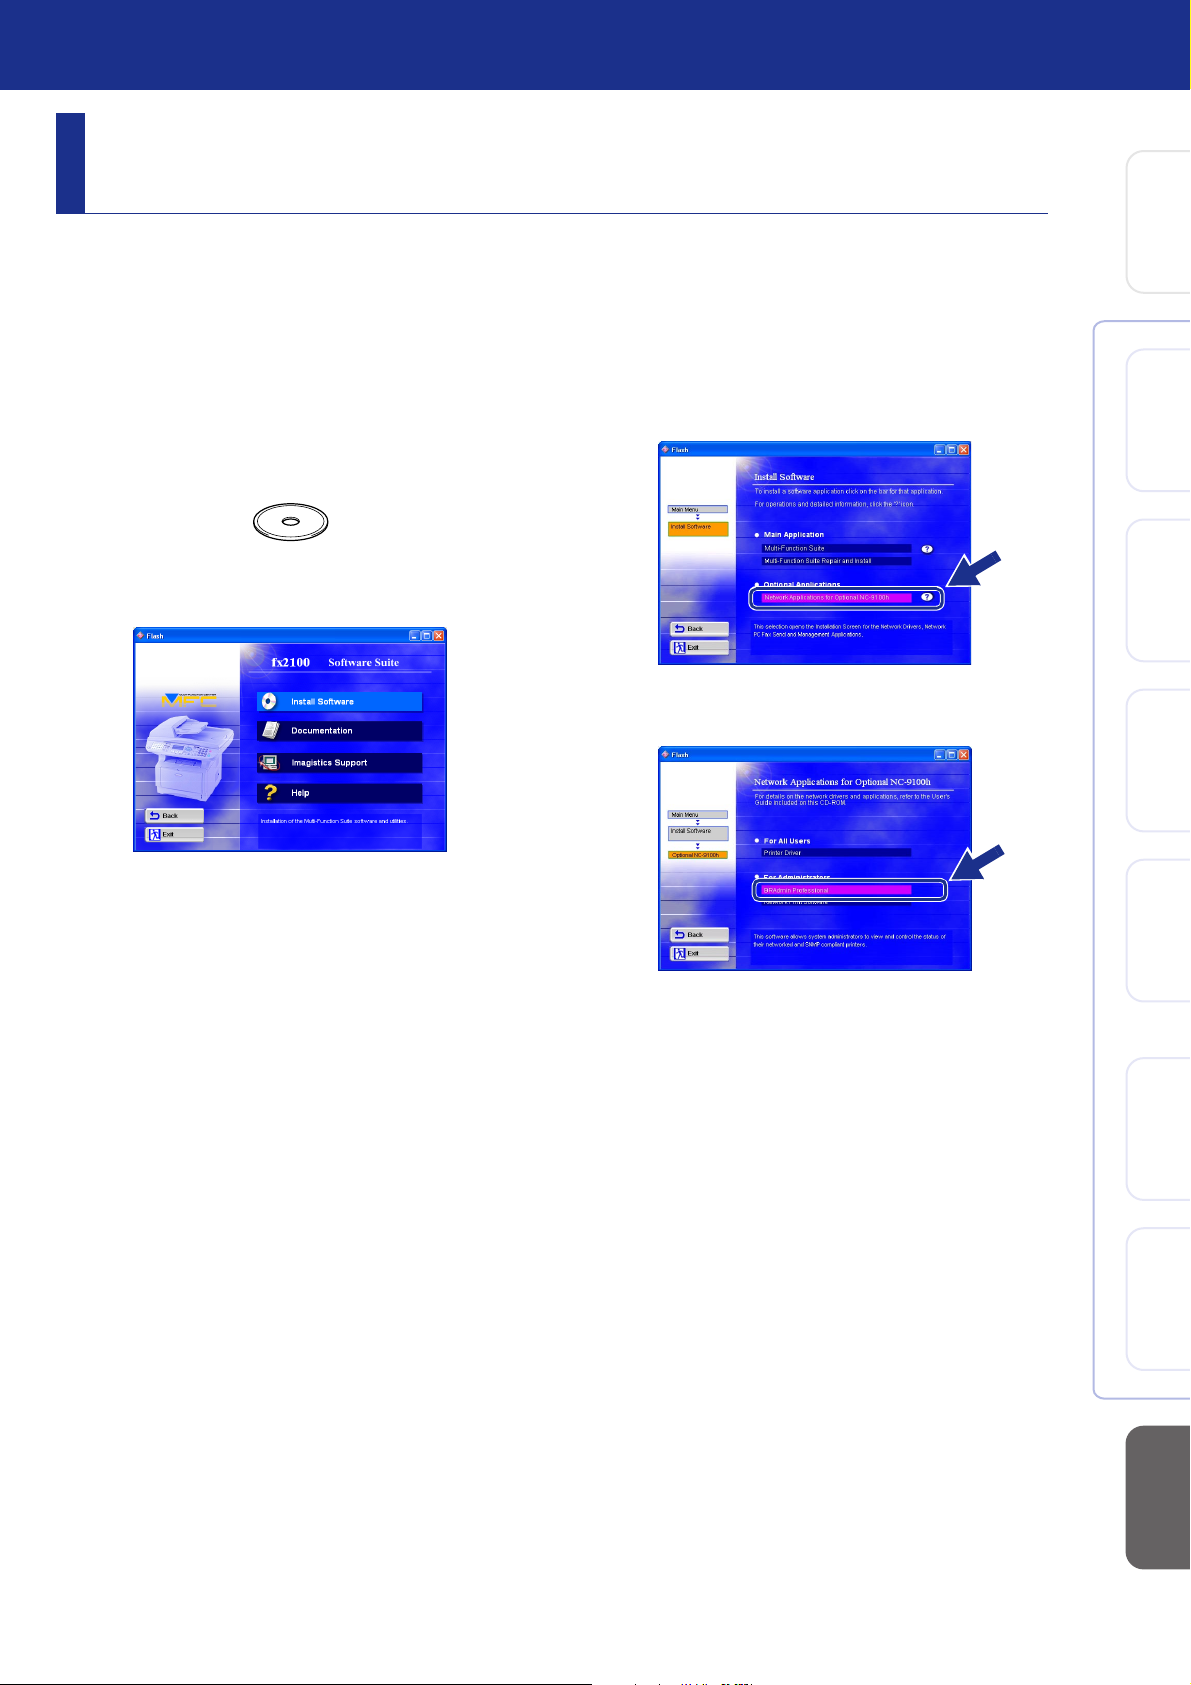
1 Insert the supplied CD-ROM into your
CD-ROM drive. The opening screen will
appear automatically.
Follow the on-screen instructions.
3 Click Network Applications for Optional
NC-9100h.
2 Click the Install Software icon on the menu
screen.
4 Click BRAdmin Professional and follow
the on-screen instructions.
Setting Up
the Machine
®
USB
Windows
®
Parallel
Windows
4.0
®
NT
Windows
Parallel
®
Windows
®
Macintosh
®
Macintosh
Network
USB
Network
51
For
Administrators
Page 54
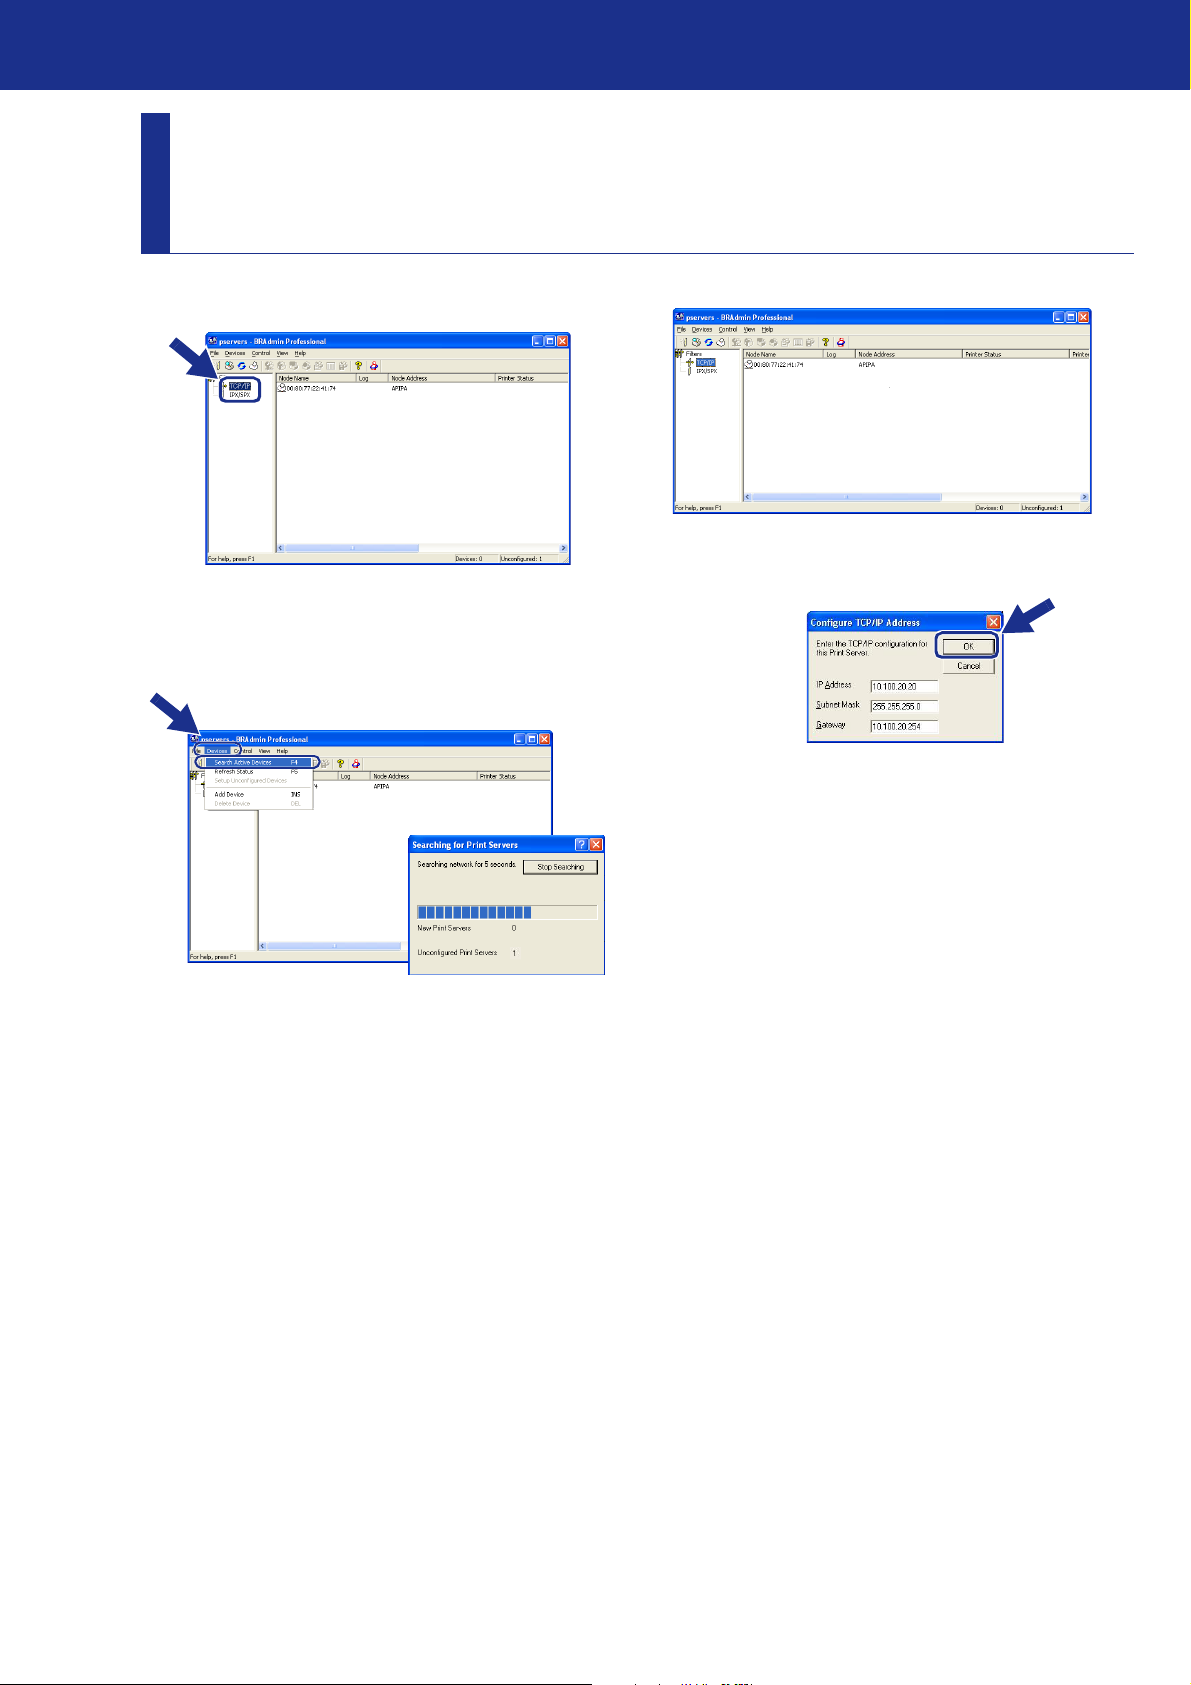
Setting your IP Address, Subnet Mask and
Gateway using BRAdmin Professional
®
(Windows
Users Only)
1 Start BRAdmin Professional, and select
TCP/IP.
2 Select Search Active Devices from the
Devices menu.
BRAdmin will search for new devices
automatically.
3 Double-click the new device.
4 Enter the IP Address, Subnet Mask and
Gateway, and then click the OK button.
5 The address information will be saved to the
printer.
52
Page 55
■ Other Information
Options
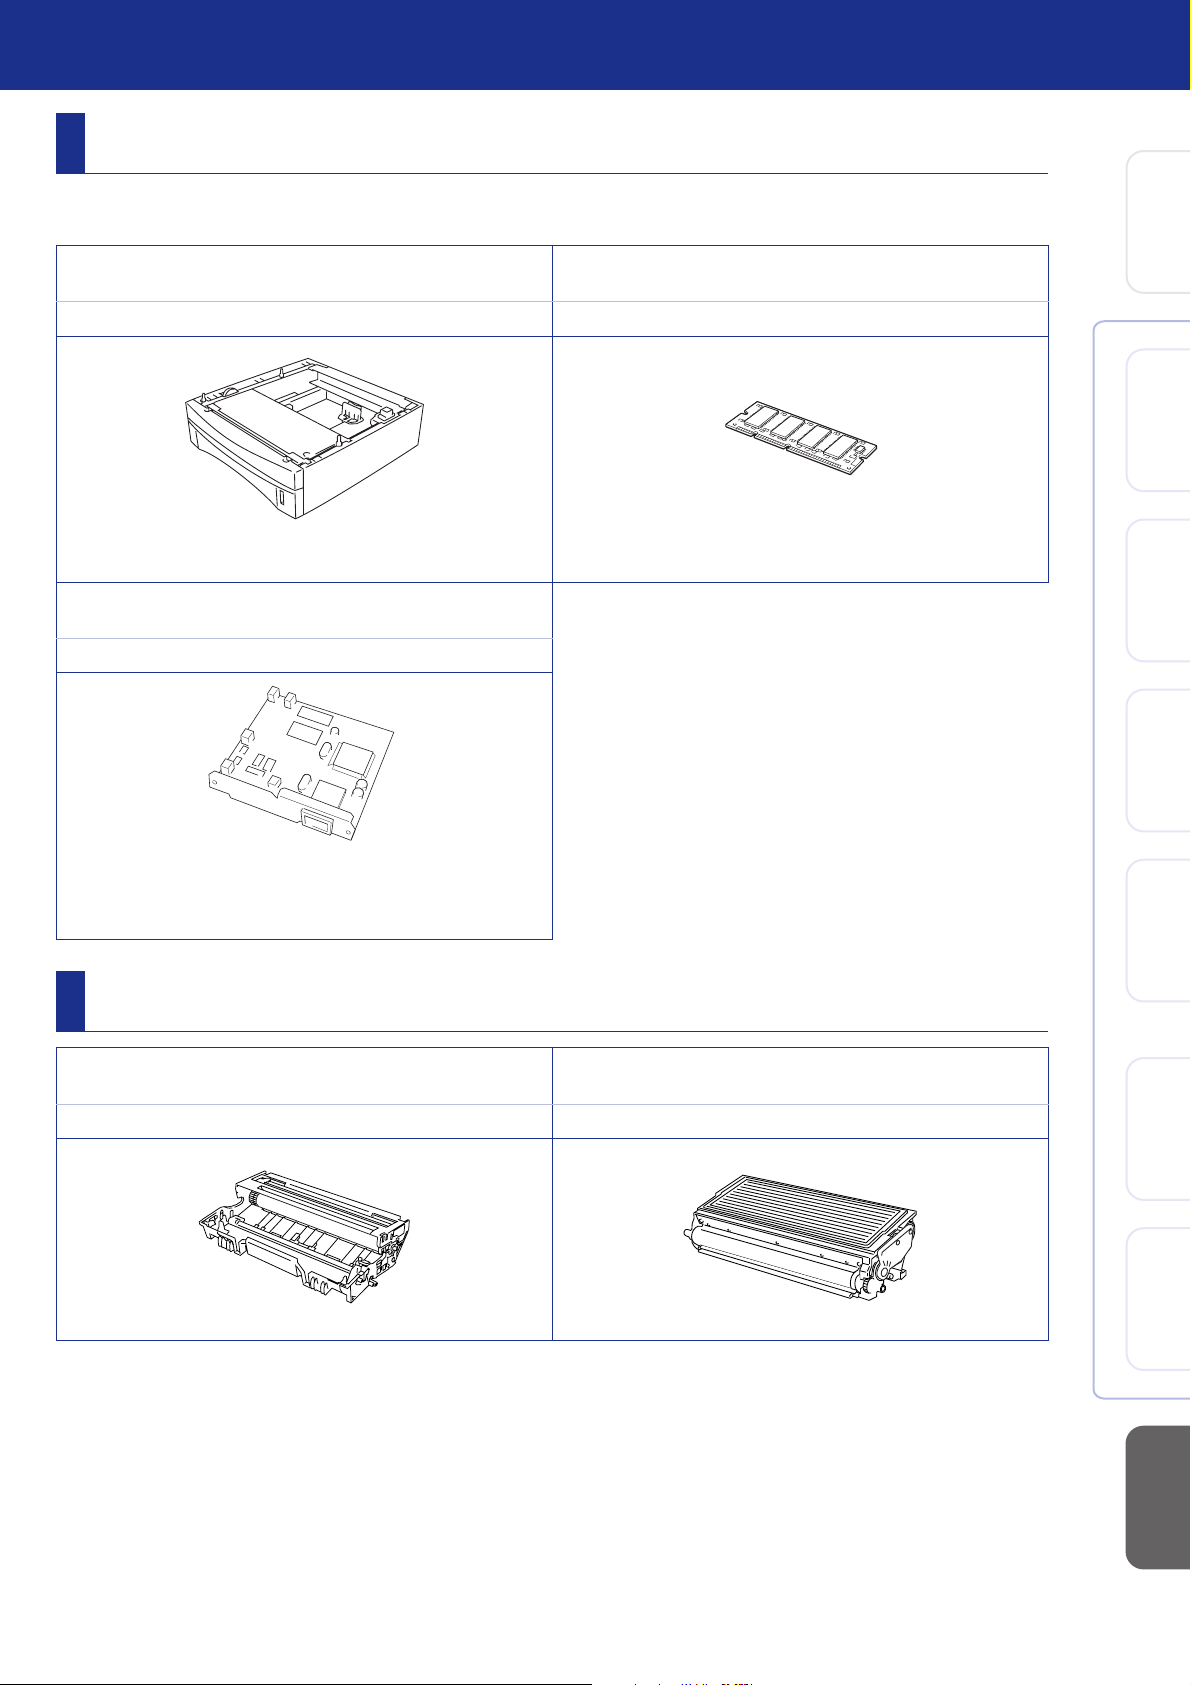
The machine has the following optional accessories. You can expand the capabilities of the
machine by adding these items.
Lower Tray Unit DIMM Memory
6429779
Setting Up
®
Windows
the Machine
USB
Second lower paper tray expands total input capacity by
another 250 sheets to a total input capacity of 500 sheets.
Network Print/Fax Server
6429880
The optional Network Print/FAX Server transforms your
machine into a network multi function machine, offering
Network Printing / Network PC-FAX and Network Scanning
capability.
Replacement Consumables
Drum Unit Toner
484-4 484-5
For more details, see “Memory Board” in Chapter 13 (User’s
Guide).
®
Parallel
Windows
4.0
®
NT
Windows
®
Network
Windows
®
USB
Macintosh
Parallel
53
®
For
Macintosh
Network
Administrators
Page 56

Trademarks
Windows, Microsoft and Windows NT are registered trademarks of Microsoft in the U.S. and other countries.
Macintosh, QuickDraw, iMac and iBook are trademarks or registered trademarks of Apple Computer, Inc.
Postscript and Postscript Level 3 are registered trademarks or trademarks of Adobe Systems Incorporated.
PaperPort and OmniPage are registered trademarks of ScanSoft, Inc.
Each company whose software title is mentioned in this manual has a Software License Agreement specific to its
proprietary programs.
All other brand and product names mentioned in this manual are registered trademarks of their respective
companies.
Page 57

 Loading...