

Page 1

W
WiiddeeTTEE
K
K
W
WTT4422 //
W
WTT4488
Keyboard Operation Manual
Page 2

For your notes
File: WT48_Keyboard_en.doc
Page 3

WideTEK WT42 / WT48
Version history:
Version Published in Content/Changes/Supplements
A December 2004 Description of the elements of the keyboard, the content
displayed in the TFT color display and how to control and
setup the WideTEK 48 by the keyboard.
B January 2005 Minor changes in description of details.
C May 2005 Minor changes in parts of the text.
WideTEK WT42 / WT48 Keyboard Operation Manual, Version C, May 2005
Valid for devices with software version 4.00.
Printed in Germany. All rights reserved.
Copying in any form, including electronically, is prohibited.
The producer reserves the right to make changes or improvements in the product
described in this document or in the manual at any time and without notice, if necessar
y
for the technical progress.
© 2004 – 2006 by Image Access Computer GmbH, Hatzfelder Strasse 161-163
42281 Wuppertal, Germany
Keyboard Operation Manual Page 3
Page 4

WideTEK WT42 / WT48
Table of Contents
1 Names, used in the Manual ------------------------------------------------ 9
2 The Keyboard in General --------------------------------------------------- 9
3 Section Overview ------------------------------------------------------------ 10
3.1 START / STOP Buttons ........................................................................... 11
3.1.1 Switching from Stand-by Mode to Operating Mode 11
3.1.2 Switching from Operating Mode to Stand-by Mode 11
3.1.3 Switching from Stand-By Mode to Setup Mode 12
3.1.4 Switching from Setup Mode to Stand-by Mode 13
3.2 TFT Color Display with Function Keys ..................................................... 14
3.3 Cursor Keys with ENTER button.............................................................. 15
3.4 Numeric Keypad ...................................................................................... 16
3.4.1 Decimal point 17
3.4.2 CLEAR button 17
4 The Status Screen Information ----------------------------------------- 18
4.1 Status Information.................................................................................... 18
4.2 Scan Mode............................................................................................... 18
4.3 Settings .................................................................................................... 19
4.3.1 Color Mode 19
4.3.2 Document Size 19
4.3.3 Preview 20
4.3.4 Scan Resolution 20
4.3.5 Print Resolution (only displayed in scan mode “Scan2Copy”) 20
4.3.6 Printer (only displayed in scan mode “Scan2Copy”) 20
4.4 Slider........................................................................................................ 20
4.5 Copy Counter (only displayed in scan mode “Scan2Copy”) .......................... 20
Page 4 Keyboard Operation Manual
Page 5

WideTEK WT42 / WT48
Table of Contents, Part 2
5 First Step: Setting the Network Parameters ------------------------ 21
5.1 Starting Setup Mode .................................................................................21
5.2 Selecting Parameters ...............................................................................22
5.3 Network Parameters Entry Criteria ...........................................................22
5.4 Entering New Values ................................................................................22
5.5 Reset Values ............................................................................................23
5.6 Saving New Values...................................................................................23
5.7 Exiting Setup Mode...................................................................................24
6 Scan2File Mode -------------------------------------------------------------- 25
6.1.1 Definition of directories for scanned images 25
6.2 Key Function Overview.............................................................................25
6.3 Setting General Parameters .....................................................................26
6.3.1 Brightness 26
6.3.2 Contrast 27
6.3.3 Gamma (color mode “Color” and “Gray”) 27
6.3.4 Invert (with all “Bitonal” and “Photo” color modes) 28
6.3.5 Blackpoint 28
6.3.6 Whitepoint 28
6.4 Selecting Scan2File Color Mode...............................................................29
6.5 Scan2File Parameter Menu ......................................................................30
6.5.1 Document Size 30
6.5.2 Resolution 31
6.5.3 Data Format 32
6.5.4 Sharpness 33
6.5.5 Margins 34
6.5.6 Mirror 35
6.5.7 ICC Profile 36
Keyboard Operation Manual Page 5
Page 6

WideTEK WT42 / WT48
Table of Contents, Part 3
7 Scan2Copy Mode ------------------------------------------------------------ 37
7.1 Scan2Copy Status Screen ....................................................................... 39
7.2 Key Function Overview ............................................................................ 39
7.3 Setting General Parameters .................................................................... 40
7.4 Scan2Copy Parameter Menu................................................................... 40
7.4.1 Color Mode 41
7.4.2 Document 41
7.4.3 Print 43
7.4.4 Sharpness 45
7.4.5 Margins 46
7.4.6 Mirror 47
7.4.7 Config.1 Printer (available with Postscript PJL and HP Designjet printer) 48
7.4.8 Config.2 Printer (available with Postscript PJL printer) 50
8 Configuration ----------------------------------------------------------------- 51
8.1 Preview .................................................................................................... 52
8.2 Language ................................................................................................. 53
8.3 Units......................................................................................................... 54
8.4 Smooth Scan ........................................................................................... 55
8.5 Paper Feed Delay .................................................................................... 56
8.6 Backlight .................................................................................................. 57
Page 6 Keyboard Operation Manual
Page 7

WideTEK WT42 / WT48
Table of Pictures
Picture 1: WideTEK WT42 / WT48 keyboard with S2N start screen .................................10
Picture 2: START / STOP buttons on WideTEK WT42 / WT48 keyboard .........................11
Picture 3: S2N start screen................................................................................................ 12
Picture 4: Setup mask for network parameters..................................................................12
Picture 5: TFT color display with Scan2File status screen ................................................14
Picture 6: 4-way cursor keys and ENTER button ..............................................................15
Picture 7: Numeric keypad with “CLEAR” button and decimal point..................................16
Picture 8: Available color modes for “Scan2File”...............................................................16
Picture 9: Slider for brightness setting ...............................................................................17
Picture 10: Information in the status screen ......................................................................18
Picture 11: Document width displayed in Document Size ”Auto”.......................................19
Picture 12: Setup mode screen .........................................................................................21
Picture 13: Status message after saving new values ........................................................23
Picture 14: Scan2File status screen ..................................................................................25
Picture 15: Brightness slider..............................................................................................26
Picture 16: Contrast slider .................................................................................................27
Picture 17: Gamma slider ..................................................................................................27
Picture 18: Invert is selected..............................................................................................28
Picture 19: Blackpoint slider ..............................................................................................28
Picture 20: Whitepoint slider..............................................................................................28
Picture 21: Scan2File Color Modes menu .........................................................................29
Picture 22: Parameter menu, Document Size ...................................................................30
Picture 23: Available scan resolutions...............................................................................31
Picture 24: List of data formats..........................................................................................32
Picture 25: Sharpness slider.............................................................................................. 33
Picture 26: Margins available with document size AUTO ..................................................34
Picture 27: Margins available with fixed formats................................................................34
Picture 28: Mirror function..................................................................................................35
Picture 29: ICC Profile function..........................................................................................36
Keyboard Operation Manual Page 7
Page 8

WideTEK WT42 / WT48
Table of Pictures, part 2
Picture 30: Available printers in Scan2Copy ..................................................................... 37
Picture 31: IP address of the printer.................................................................................. 37
Picture 32: Color Modes in Scan2Copy ............................................................................ 38
Picture 33: Scan2Copy status screen ............................................................................... 39
Picture 34: Document parameters..................................................................................... 41
Picture 35: Scan2Copy, Document Size ........................................................................... 42
Picture 36: Scan2Copy, Resolution................................................................................... 42
Picture 37: Print parameters.............................................................................................. 43
Picture 38: HP Designjet settings..................................................................................... 43
Picture 39: Paper formats for output ................................................................................. 43
Picture 40: Print quality slider............................................................................................ 44
Picture 41: Print resolution ................................................................................................ 44
Picture 42: Sharpness slider ............................................................................................. 45
Picture 43: Margins available with AUTO document size.................................................. 46
Picture 44: Margins available with fixed formats ............................................................... 46
Picture 45: Mirror function ................................................................................................. 47
Picture 46: Configuration menu 1 for printer output .......................................................... 48
Picture 47: Paper sources ................................................................................................. 48
Picture 48: Color Matching method ................................................................................... 49
Picture 49: Antialiasing...................................................................................................... 49
Picture 50: Configuration menu 2 for printer output .......................................................... 50
Picture 51: Configuration menu, initial screen................................................................... 51
Picture 52: Slider for preview quality ................................................................................. 52
Picture 53: Language selector........................................................................................... 53
Picture 54: Available units of measurements .................................................................... 54
Picture 55: Smooth scan ................................................................................................... 55
Picture 56: Slider for paper feed delay .............................................................................. 56
Picture 57: Backlight slider ................................................................................................ 57
Page 8 Keyboard Operation Manual
Page 9

WideTEK WT42 / WT48
1 Names, used in the Manual
In the manual the WideTEK WT42 / WT48 Large Format Scanner will be referred to as
WideTEK WT42 / WT48.
All other trademarks and product names used in this manual belong to their respective
owners.
2 The Keyboard in General
This manual describes the functions and settings that are controlled by the keyboard of
the WideTEK WT42 / WT48. On the 6.4” wide TFT color display, the current settings are
displayed while using the scanner.
The keyboard and display can be shifted on the scanner housing to provide the most
favorable viewing angle for each operator.
The keyboard consists of four sections. The uses of a keyboard section may change to
support the scanner’s current operating mode.
The definitions of the six function keys below and to the right of the TFT color display are
always displayed next to the function keys. Pressing a function key repeatedly will cycle
through the available selections.
Keyboard Operation Manual Page 9
Page 10

WideTEK WT42 / WT48
3 Section Overview
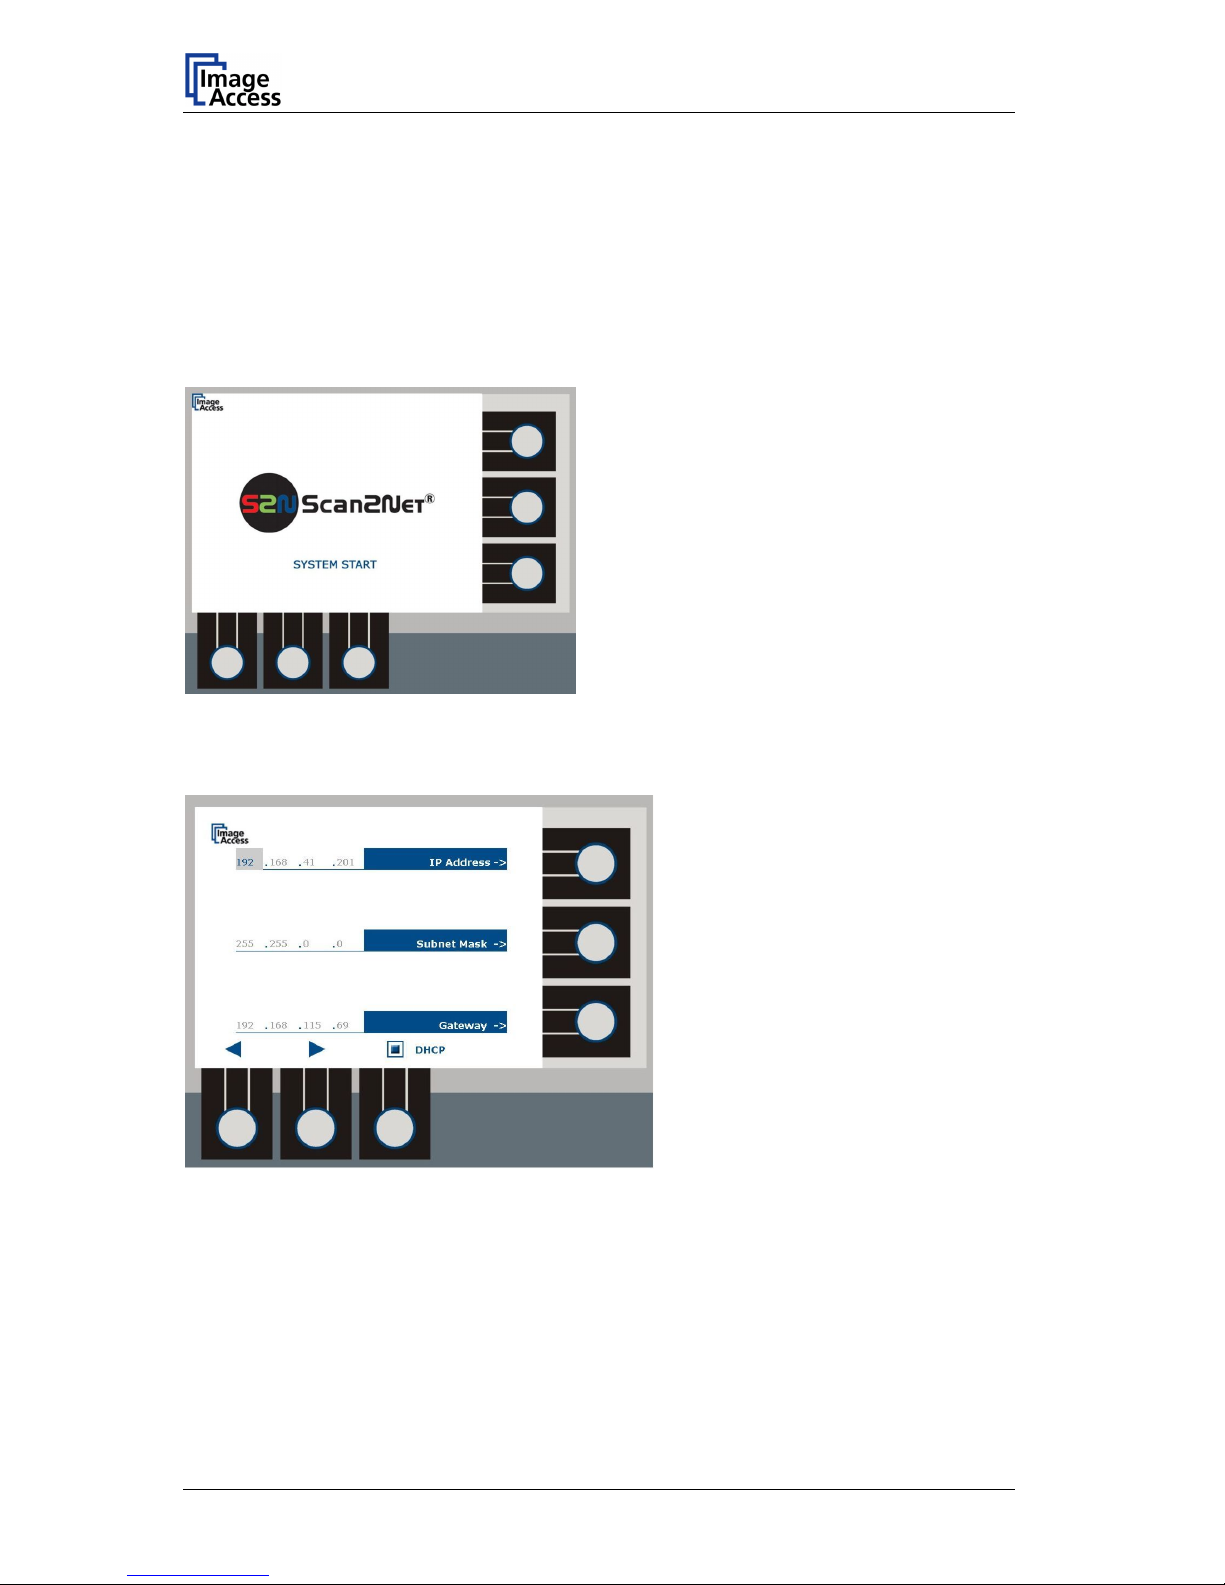
Picture 1: WideTEK WT42 / WT48 keyboard with S2N start screen
Picture 1 shows the keyboard with the start screen. The TFT color display shows the start
screen during the start-up sequence of the WideTEK WT42 / WT48 scanner.
The four sections are:
— START / STOP buttons
— TFT color display with function keys below and right beside the display
— Cursor keys with the ENTER button in the middle
— Numeric keypad with “CLEAR” button and decimal point.
Page 10 Keyboard Operation Manual
Page 11

WideTEK WT42 / WT48
3.1 START / STOP Buttons
Picture 2: START / STOP buttons on WideTEK WT42 / WT48 keyboard
The START and STOP buttons perform several functions. Depending on the
WideTEK WT42 / WT48 mode, they are used to:
— switch from stand-by mode to operating mode
— switch from operating mode to stand-by mode
— switch from stand-by mode to setup mode
— switch from setup mode to stand-by mode.
3.1.1 Switching from Stand-by Mode to Operating Mode
Press the START button. The green LED beside the button starts blinking.
The start sequence lasts approx. 45 seconds.
During the startup sequence, the hardware and the software of the scanner is tested
internally. At the end of the start sequence the TFT color display shows the animated S2N
start screen and the green LED stops blinking. After a short moment the TFT color display
changes to the status screen (see Picture 5) and the WideTEK WT42 / WT48 is ready to
use.
3.1.2 Switching from Operating Mode to Stand-by Mode
Press the STOP button for at least three seconds to switch the device from operating
mode to stand-by mode. Release the STOP button when the TFT color display switches
off.
The green LED blinks while the internal system terminates all functions. If the green LED
lights continuously the device is in stand-by mode.
Keyboard Operation Manual Page 11
Page 12
WideTEK WT42 / WT48
3.1.3 Switching from Stand-By Mode to Setup Mode
Press and hold the STOP button, then while the stop button is pressed, press the START
button. The green LED starts flashing rapidly.
The start sequence lasts approx. 45 seconds. At the beginning of the start sequence, the
TFT color display turns on and rapidly cycles through various system messages.
After the test sequence has completed, the TFT color display switches to the S2N start
screen and displays the SYSTEM START message.
Picture 3: S2N start screen
The S2N SYSTEM START screen is followed by the setup mode screen. The setup mode
screen displays the IP address, the subnet mask and the gateway address.
Picture 4: Setup mask for network parameters
While the WideTEK WT42 / WT48 is in setup mode the green LED beside the START
button lights up when keys are is pressed.
To close the setup mode, press and hold the STOP button until the TFT color display
turns off.
Page 12 Keyboard Operation Manual
Page 13

WideTEK WT42 / WT48
3.1.4 Switching from Setup Mode to Stand-by Mode
Press the STOP button for at least three seconds to switch the device from setup mode to
stand-by mode. Release the STOP button when the TFT color display switches off.
The green LED blinks while the internal system terminates all functions. If the green LED
lights continuously the device is in stand-by mode.
Keyboard Operation Manual Page 13
Page 14

WideTEK WT42 / WT48
3.2 TFT Color Display with Function Keys
Picture 5: TFT color display with Scan2File status screen
The TFT color display has three function keys (FK) on its right side and three function
keys on its bottom side. In this manual, the function keys are referred as FK1 through
FK6.
The TFT color display shows the status screen (Picture 5) while the scanner is in normal
operating mode. Depending on the scanners mode the content, of screens may vary.
Typical uses of the function keys:
FK1 / FK2: These keys are used to move a slider which is displayed on the TFT.
Sliders are displayed when a range of values is available.
FK3: If the status screen is displayed, this key is used to open a menu with three
items:
— Scan2File
— Scan2Copy
— Configuration
FK4 to FK6: These keys vary in use. Their function is always displayed on the TFT color
display beside the function key.
In normal scanning mode, FK4 starts preview scanning.
FK6 switches the preview mode off and on. If the preview mode is off, the
menu item “Preview Scan” will not be displayed beside FK4.
Page 14 Keyboard Operation Manual
Page 15
WideTEK WT42 / WT48
3.3 Cursor Keys with ENTER button
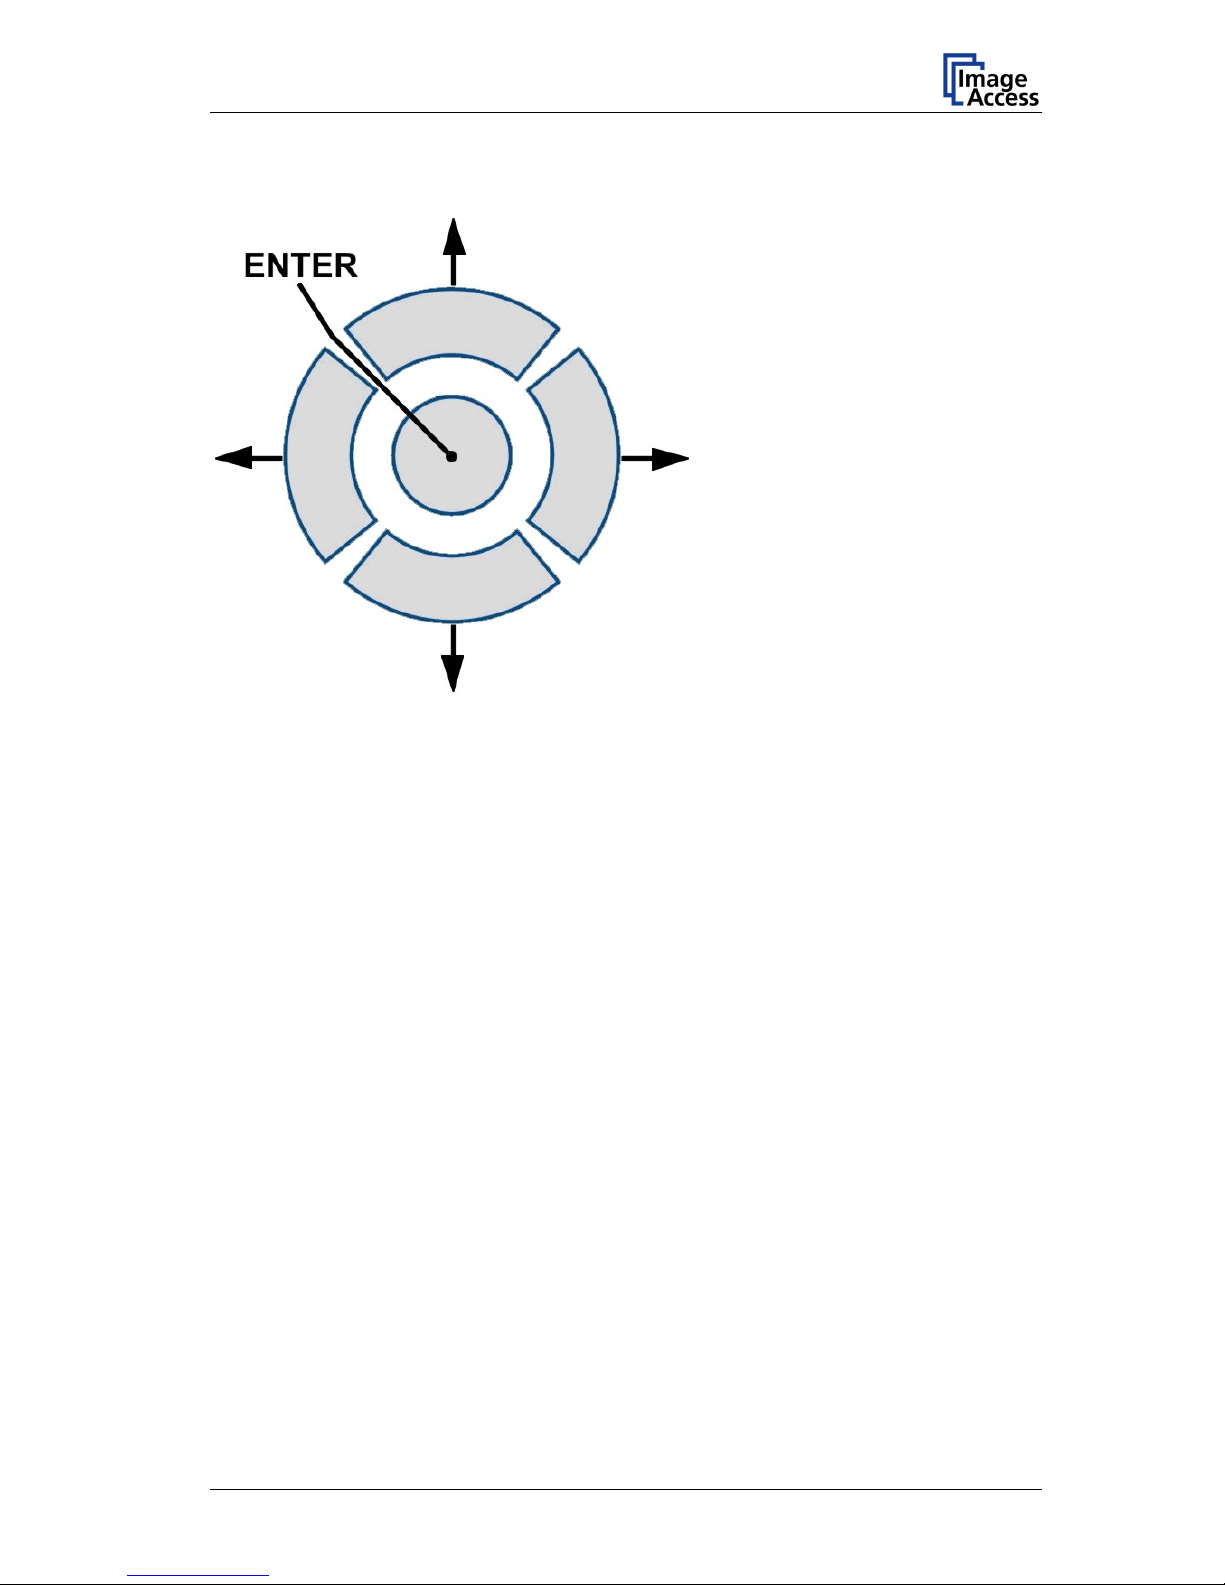
Picture 6: 4-way cursor keys and ENTER button
ENTER button
Operating mode:
The ENTER button starts the scan sequence using the selected settings.
Setup mode:
In setup mode, the ENTER button saves the settings for IP address, subnet mask and
gateway.
Cursor keys
The functions that these keys perform depends on the current mode of the
WideTEK WT42 / WT48 scanner.
1. Before scanning a document. The document to be scanned is inserted:
The upper button (↑) will transport the document forward in scanning direction.
The lower button (↓) will transport the document reverse to scanning direction.
2. After scanning a document, “Preview” is active and the TFT color display will show a
preview of the scanned document.
Depending on the document size and the selected preview scaling, the TFT color
display may show only a part of the complete image. The four cursor keys (up / down /
left / right) move the preview window across the document’s preview.
Keyboard Operation Manual Page 15
Page 16
WideTEK WT42 / WT48
3.4 Numeric Keypad
Decimal point.
See chapter 3.4.1
CLEAR button.
See chapter 3.4.2
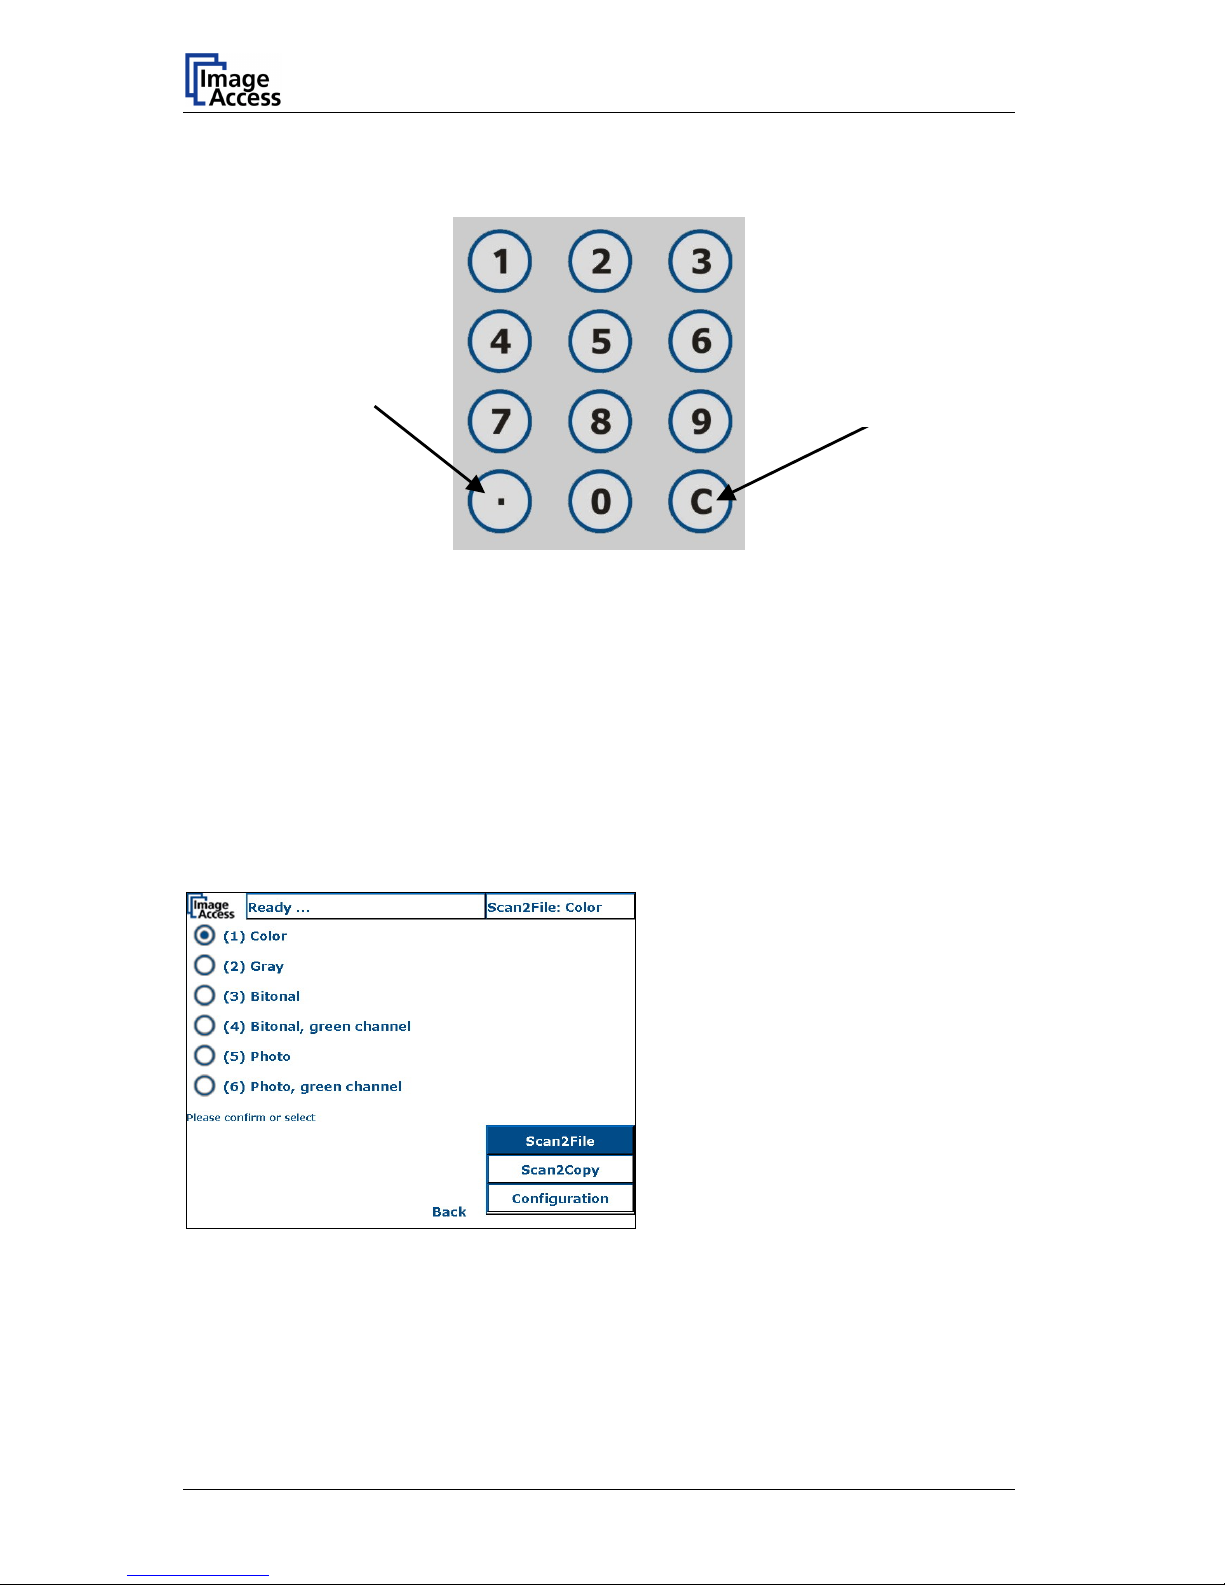
Picture 7: Numeric keypad with “CLEAR” button and decimal point
The purpose of the numeric keypad also depends on the WideTEK WT42 / WT48
operating mode.
Numeric keypad in Setup mode:
The numeric keypad is used to enter the values for IP address, subnet mask and
gateway. If a valid value is entered in the fields, pressing the decimal point will move the
cursor to the next field to the right.
Numeric keypad in Operating mode:
The numeric keys are used to select an item from the menu list. All available settings in
the menu lists are marked with a number in brackets. Pressing the corresponding numeric
key selects the setting.
Picture 8: Available color modes for “Scan2File”
Picture 8 shows as an example the list
of available “Scan2File” color modes.
The keys “1” to “6” on the numeric
keypad select the desired mode.
Page 16 Keyboard Operation Manual
Page 17
WideTEK WT42 / WT48
3.4.1 Decimal point
When a slider is used to set a value, pressing the decimal point key toggles an accelerator
function on/off.
The slider is controlled with FK1 and FK2, two of the function keys below the TFT color
display. See Picture 9.
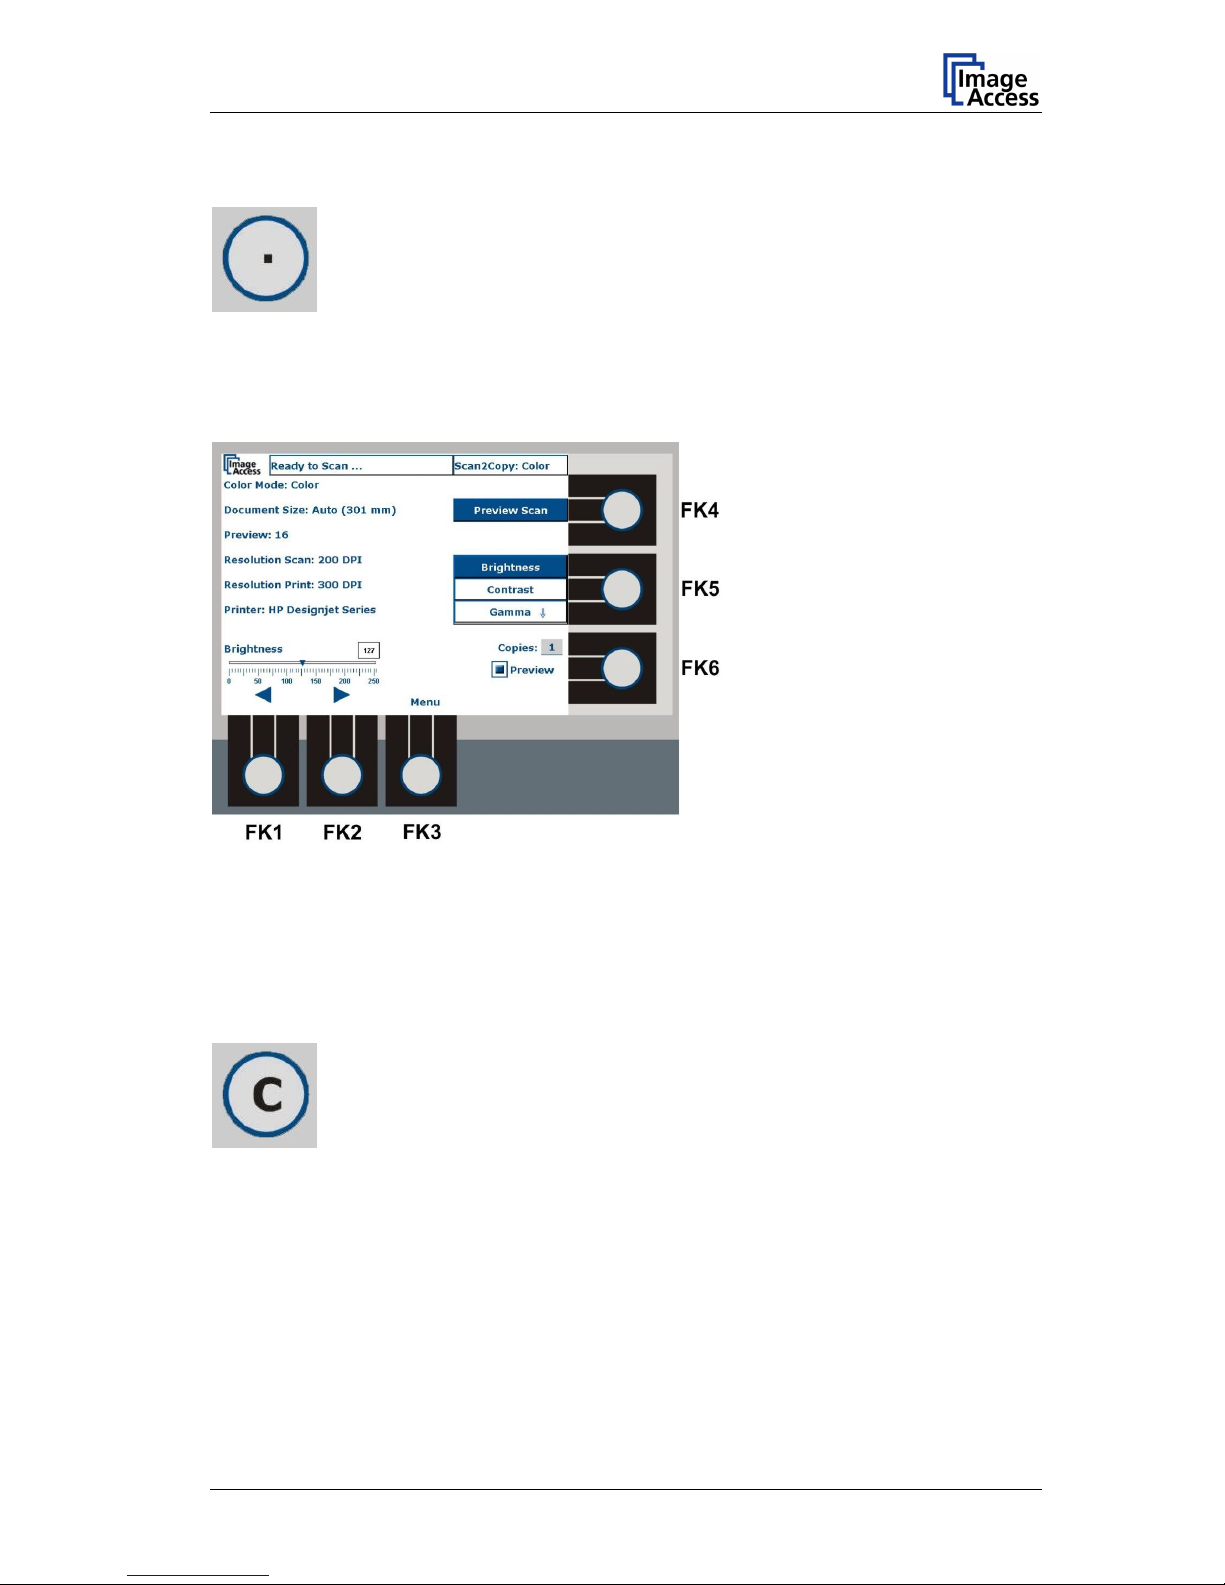
Picture 9: Slider for brightness setting
If the accelerator function is off, pressing FK1 or FK2 moves the slider one unit to the left
or to the right. If the accelerator function is active, each keystroke moves the slider ten
units to the left or to the right.
3.4.2 CLEAR button
The CLEAR button “C” on the numeric keypad is used to clear entry fields or to return to
an initial value.
Keyboard Operation Manual Page 17
Page 18

WideTEK WT42 / WT48
4 The Status Screen Information
Picture 10: Information in the status screen
The WideTEK WT42 / WT48 status screen shows information while the scanner is in
operation mode.
4.1 Status Information
Ready to Scan … The scanner is ready to scan. Documents can be inserted. If a
document is inserted into the paper transport, the scanner will retract
it and position it at the start position.
Ready … The scanner is ready to accept settings such as scan mode,
document size, resolution and many more.
ERROR <xxx> Error messages. The error messages contain an error number <xxx>
or a normal text message.
4.2 Scan Mode
The scan mode section indicates the selected output method for the scanned images.
Additionally it shows some information about the selected color mode.
Scan2File Scans the document and saves the image to the selected directory.
Scan2Copy Scans the document and print it on the selected printer.
Postscript and Postscript PJL printer as well as HP Designjet® Series
printers are supported.
Page 18 Keyboard Operation Manual
Page 19

WideTEK WT42 / WT48
4.3 Settings
This part of the status screen provides information about the main settings.
4.3.1 Color Mode
This section shows the selected color mode. The color modes are:
— Color
— Gray
— Bitonal
— Bitonal, green channel
— Photo
— Photo, green channel
4.3.2 Document Size
This section shows the maximum document width.
The selectable document widths are:
— DIN A5 … DIN A0
— 36 inch
— 42 inch (optional)
— 48 inch (optional)
— Auto. If a document is inserted, the document’s width is displayed in the chosen unit
of measurement. See Picture 11.
Picture 11: Document width displayed in Document Size ”Auto”
Keyboard Operation Manual Page 19
Page 20

WideTEK WT42 / WT48
4.3.3 Preview
This section informs the user about the selected preview scaling. The default preview
scaling is 16.
If the preview function is active (toggled on and off using FK6), a preview scan can be
started by pressing FK4. Following the preview scan, the TFT color display shows the
scan result.
The higher the value for the preview scaling is, the smaller the picture size in the TFT
color display.
The preview scaling can be set from 3 (Auto) to 16. If the preview scaling is set to 3 the
preview image is scaled to the size of the TFT color display.
If the preview image exceeds the size of the TFT color display, the image can be scrolled
using the four cursor keys (up / down / left / right). Refer to chapter 3.3.
4.3.4 Scan Resolution
This section shows the selected scan resolution.
4.3.5 Print Resolution (only displayed in scan mode “Scan2Copy”)
This section shows the selected print resolution.
The available resolutions depend on the selected printer.
4.3.6 Printer (only displayed in scan mode “Scan2Copy”)
This section shows the name of the selected printer.
4.4 Slider
A slider is always displayed when a range of values is available.
Above the slider, a small window shows the decimal value. The slider is controlled by the
function keys FK1 and FK2.
4.5 Copy Counter (only displayed in scan mode “Scan2Copy”)
The number of copies is set by the numeric keypad.
The maximum value is 10.
Page 20 Keyboard Operation Manual
Page 21

WideTEK WT42 / WT48
5 First Step: Setting the Network Parameters
The WideTEK WT42 / WT48 can be integrated into virtually every existing network. A
network device is defined in the network by its IP address.
The default IP address of the WideTEK WT42 / WT48 is 192.168.1.50.
The default value for the subnet mask is 255.255.255.0.
The IP address and subnet mask, gateway and DHCP network parameters are set in the
setup mode.
5.1 Starting Setup Mode
Press and hold the STOP button, then while holding the STOP button, press the START
button. The green LED will start flashing rapidly, indicating the start sequence has begun.
The start sequence lasts for approx. 45 seconds. At the beginning of the start sequence,
the TFT color display turns on and rapidly cycles through some system messages.
At the end of the start sequence, the TFT color display shows the S2N start screen
followed by the setup mode screen.
Picture 12: Setup mode screen
Picture 12 shows the setup mode screen. The active field is indicated by a light gray
background.
Keyboard Operation Manual Page 21
Page 22

WideTEK WT42 / WT48
5.2 Selecting Parameters
The function keys FK1 and FK2 move the active field position horizontally in the selected
parameter row. The arrow symbols above the keys show the direction of movement.
The function key FK3 switches the DHCP function off and on.
The function keys FK4 to FK6 select the desired parameter line.
5.3 Network Parameters Entry Criteria
An IP address as well as a subnet mask and gateway consists of four values, each
separated by a decimal point.
If the values are changed or entered, the following criteria must be considered:
— If an active field is empty, it is not possible to move to another field.
— If a value is invalid (e.g. higher than 255), it is not possible to move to another field.
— After setting a new valid value, pressing the decimal point button in the numeric
keypad moves the active field position to the next field to the right.
— After entering a valid value, the function keys FK1 and FK2 allow movement
horizontally in the desired direction.
— The previous value is deleted by the input of a new value.
5.4 Entering New Values
Start the WideTEK WT42 / WT48 as described in chapter 5.1.
When the setup mode screen is displayed, press one of the function keys FK4 to FK6 to
select the desired row.
After selecting a row, the left most field is selected for editing, as indicated by a light gray
background.
Enter a value with the numeric keypad. The “C” button in the numeric keypad erases the
value in the active field.
Press the decimal point button to move to next field to the right.
After all values in a row are entered, move to the next row and repeat the steps as
described above.
Page 22 Keyboard Operation Manual
Page 23

WideTEK WT42 / WT48
5.5 Reset Values
The green START button resets the values for IP address, subnet mask and gateway to
the initial start values.
The active field remains in its last position.
Resetting to the initial values is also possible after saving new values.
Resetting the values is not possible after leaving the setup mode.
5.6 Saving New Values
The ENTER button saves the changes for IP
address, subnet mask and gateway.
After saving new values, the message “Changed parameters saved” is displayed in the
status information line of the TFT color display.
Picture 13: Status message after saving new values
Keyboard Operation Manual Page 23
Page 24

WideTEK WT42 / WT48
5.7 Exiting Setup Mode
Press the STOP button for at least three seconds to exit the setup mode. Release the
STOP button when the TFT color display switches off.
The green LED blinks while the internal system terminates all functions. If the green LED
lights continuously the device is in stand-by mode.
To exit the setup mode press and hold the red STOP button until the TFT color display
turns off.
The internal system terminates all functions and switches the WideTEK WT42 / WT48 off.
Page 24 Keyboard Operation Manual
Page 25

WideTEK WT42 / WT48
6 Scan2File Mode
Picture 14: Scan2File status screen
Scan2File enables the user to scan documents and store the images on a local or network
computer. Picture 14 shows the status screen after starting the WideTEK WT42 / WT48 in
Scan2File mode.
6.1.1 Definition of directories for scanned images
To define the directory on your local computer or to define a directory in a network, refer
to WideTEK WT42 / WT48 Installation and Setup Manual, chapter 10.6.5 FTP Upload.
6.2 Key Function Overview
The function keys FK1 and FK2 control the slider.
FK3 switches to the scan mode selection and configuration menu.
FK5 selects the most frequently used parameters. The slider title and scale change
according to the selected parameter.
FK6 turns the preview function on and off. If the preview function is on, "Preview Scan" is
displayed beside FK4. Pressing FK4 starts the preview scan.
The ENTER button starts the scan sequence (see chapter 3.3). After scanning, the image
is displayed in the TFT color display.
Keyboard Operation Manual Page 25
Page 26

WideTEK WT42 / WT48
6.3 Setting General Parameters
While the status screen is displayed, some parameters can be set.
The arrow beside “Gamma”/”Inverse” indicates that two more parameters follow. Pressing
the FK5 function key cycles through the parameters.
The parameters that are valid with “Color” and “Gray” modes are:
Brightness Î Contrast Î Gamma Î Blackpoint Î Whitepoint
The parameters valid with all “Bitonal” and “Photo” modes:
Brightness Î Contrast Î Invers Î Blackpoint Î Whitepoint
6.3.1 Brightness
Picture 15: Brightness slider
Brightness values range from 0 to 255.
Use FK5 to select “Brightness”, as indicated above the slider. The slider position and the
decimal value show the current setting. FK1 decreases and FK2 increases the brightness
value.
The slider can be moved with two speeds. The default speed moves the slider with an
increment of one. The decimal point button in the numeric keypad toggles the accelerator
function on/off. If the accelerator function is on, the slider moves with an increment of ten.
Selecting another parameter with the FK5 key turns the accelerator function off.
Page 26 Keyboard Operation Manual
Page 27

WideTEK WT42 / WT48
6.3.2 Contrast
Picture 16: Contrast slider
Contrast values range from 0 to 255.
Use FK5 to select “Contrast”, as indicated above the slider. The slider position and the
decimal value show the current setting. FK1 decrease and FK2 increase the contrast
value.
The slider can be moved with two speeds. The default speed moves the slider with an
increment of one. The decimal point button in the numeric keypad toggles the accelerator
function on/off. If the accelerator function is active, the slider moves with an increment of
ten.
Selecting another parameter with the FK5 key turns the accelerator function off.
6.3.3 Gamma (color mode “Color” and “Gray”)
Picture 17: Gamma slider
Gamma value range: 1.0 to 2.5
Use FK5 to select “Gamma”, as indicated above the slider. The slider position and the
decimal value show the current setting. FK1 decrease and FK2 increase the gamma
value.
The slider can be moved with two speeds. The default speed moves the slider with an
increment of one. The decimal point button in the numeric keypad toggles the accelerator
function on/off. If the accelerator function is active, the slider moves with an increment of
ten.
Selecting another parameter with the FK5 key turns the accelerator function off.
Keyboard Operation Manual Page 27
Page 28

WideTEK WT42 / WT48
6.3.4 Invert (with all “Bitonal” and “Photo” color modes)
Picture 18: Invert is selected
FK1 switches the “Invert” function on and off.
6.3.5 Blackpoint
Picture 19: Blackpoint slider
Blackpoint values range from 0 to 127.
Use FK5 to select “Blackpoint”, as indicated above the slider. The slider position and the
decimal value show the current setting. FK1 decrease and FK2 increase the blackpoint
value.
The slider can be moved with two speeds. The default speed moves the slider with an
increment of one. The decimal point button in the numeric keypad toggles the accelerator
function on/off. If the accelerator function is active, the slider moves with an increment of
ten.
Selecting another parameter with the FK5 key turns the accelerator function off.
6.3.6 Whitepoint
Picture 20: Whitepoint slider
Whitepoint values range from 128 to 255.
Use FK5 to select “Whitepoint”, as indicated above the slider. The slider position and the
decimal value show the current setting. FK1 decrease and FK2 increase the whitepoint
value.
The slider can be moved with two speeds. The default speed moves the slider with an
increment of one. The decimal point button in the numeric keypad toggles the accelerator
function on/off. If the accelerator function is active, the slider moves with an increment of
ten.
Selecting another parameter with the FK5 key turns the accelerator function off.
Page 28 Keyboard Operation Manual
Page 29

WideTEK WT42 / WT48
6.4 Selecting Scan2File Color Mode
In the Scan2File mode, six color modes are available. They are selectable from the
Scan2File selection menu.
Press FK3 to open the selection menu.
Picture 21: Scan2File Color Modes menu
Note the number next to the desired color and use the corresponding key of the numeric
keypad to select the color mode.
The following color modes use the camera’s green channel only: Bitonal, green channel
and Photo, green channel.
Keyboard Operation Manual Page 29
Page 30

WideTEK WT42 / WT48
6.5 Scan2File Parameter Menu
After selecting or confirming the color mode, the screen changes to the parameter menu,
with Document Size selected initially.
Use the function keys FK4 to FK6 select the menu items displayed beside the keys.
Pressing the keys repeatedly rotates through the available menu items.
6.5.1 Document Size
Picture 22: Parameter menu, Document Size
All document sizes in the menu refer to the maximum width to be scanned. The maximum
scan length depends on the combination of color mode, resolution and the size of memory
installed in the WideTEK WT42 / WT48.
The available document widths depend on the options installed in the
WideTEK WT42 / WT48. The basic version of the WideTEK WT42 / WT48 is able to scan
documents up to a width of 42 inch. Picture 22 shows all available sizes up to 48 inch.
Use the corresponding keys of the numeric keypad to select the desired document size.
Press FK4 to select another item from the menu list.
Press FK5 or FK6 to select an item from the other menu lists.
Press FK3 once to return to the color modes menu, press FK3 twice to return to the status
screen.
Page 30 Keyboard Operation Manual
Page 31

WideTEK WT42 / WT48
6.5.2 Resolution
Press FK4 to select the Resolution menu.
Picture 23: Available scan resolutions
Use the corresponding keys of the numeric keypad to select the desired resolution.
Press FK4 to select another item from the menu list.
Press FK5 or FK6 to select an item from the other menu lists.
Press FK3 once to return to the color modes menu, press FK3 twice to return to the status
screen.
Keyboard Operation Manual Page 31
Page 32

WideTEK WT42 / WT48
6.5.3 Data Format
Press FK4 to select the Data Format menu.
Picture 24: List of data formats
Use the corresponding keys of the numeric keypad to select the desired data format.
If the data format JPG is selected, the quality can be set from 0 (zero) to 100. The slider is
moved with FK1 and FK2.
The PNM data format provides raw image data of the scanned document.
The TIFF data format has a G4 compression option, which reduces the resulting image
size. The compression is switched on/off by FK1.
Press FK4 to select another item from the FK4 menu list.
Press FK5 or FK6 to select an item from the other menu lists.
Press FK3 once to return to the color modes menu, press FK3 twice to return to the status
screen.
Page 32 Keyboard Operation Manual
Page 33

WideTEK WT42 / WT48
6.5.4 Sharpness
Press FK5 to select Sharpness.
Picture 25: Sharpness slider
Use FK1 and FK2 to move the slider.
The Sharpness function increases the detail sharpness. The higher the numeric value, the
more sharply details appear in the image.
Press FK5 to select another item from the menu list.
Press FK4 or FK6 to select an item from the other menu lists.
Press FK3 once to return to the color modes menu, press FK3 twice to return to the status
screen.
Keyboard Operation Manual Page 33
Page 34

WideTEK WT42 / WT48
6.5.5 Margins
Press FK5 to select Margins.
Picture 26: Margins available with document size AUTO
The Margins function has five settings. Use the corresponding keys of the numeric keypad
to select the desired margin.
Use FK1 and FK2 to move the slider.
The unit of measurement can be changed from Inch to millimeter (mm).
The four margins and the symmetry are only available with document size AUTO
selected.
If a fixed format is selected, only upper margin and lower margin settings are available.
The other menu items are grayed, as illustrated in Picture 27.
Picture 27: Margins available with fixed formats
Press FK5 to select another item from the menu list.
Press FK4 or FK6 to select an item from the other menu lists.
Press FK3 once to return to the color modes menu, press FK3 twice to return to the status
screen.
Page 34 Keyboard Operation Manual
Page 35

WideTEK WT42 / WT48
6.5.6 Mirror
Press FK5 to select Mirror.
Picture 28: Mirror function
The mirror function has two settings: off and horizontal.
Use the corresponding keys of the numeric keypad to select the mirror function.
Press FK5 to select another item from the menu list.
Press FK4 or FK6 to select an item from the other menu lists.
Press FK3 once to return to the color modes menu, press FK3 twice to return to the status
screen.
Keyboard Operation Manual Page 35
Page 36

WideTEK WT42 / WT48
6.5.7 ICC Profile
Press FK6 to select ICC Profile.
Picture 29: ICC Profile function
The ICC Profile function has two settings: off and on.
Use the corresponding keys of the numeric keypad to select the integration of an ICC
profile.
Press FK4 or FK5 to select an item from the other menu lists.
Press FK3 once to return to the color modes menu, press FK3 twice to return to the status
screen.
Page 36 Keyboard Operation Manual
Page 37

WideTEK WT42 / WT48
7 Scan2Copy Mode
Scan2Copy enables the user to scan documents and print the images directly on a
network printer.
The WideTEK WT42 / WT48 scanner starts in Scan2File mode. To change to Scan2Copy
mode, press FK3 to open the mode selection menu. Then press FK6 to change to
Scan2Copy mode.
The Scan2Copy mode has three
selections:
• Postscript
• Postscript PJL
• HP Designjet Series.
Picture 30: Available printers in Scan2Copy
Use the corresponding keys of the numeric keypad to select a printer type. After selecting
the desired printer type, a mask opens to select the IP address of the printer. This is
necessary to locate the printer in your network.
Picture 31: IP address of the printer
Use the numeric keypad to enter the IP address.
Information on setting IP addresses can be found in chapter 5.3. Chapter 5.5 describes
how to reset to the starting values.
Save the printers’ IP address by pressing the ENTER key in the numeric keypad.
Pressing FK3 once returns to the printer selection menu. Pressing FK3 twice returns to
the status screen.
Keyboard Operation Manual Page 37
Page 38

WideTEK WT42 / WT48
After saving the IP address, the TFT color display shows the color mode selection screen.
The content beside FK4 to FK6 depends on the selected printer type.
Picture 32: Color Modes in Scan2Copy
Use the corresponding keys of the numeric keypad to select one of the six color modes for
scanning documents. Continue with other settings, selected with FK4 to FK6, or return to
the Scan2Copy status screen.
Press FK3 once to return to the printer list, press FK3 twice to return to the status screen.
Page 38 Keyboard Operation Manual
Page 39

WideTEK WT42 / WT48
7.1 Scan2Copy Status Screen
Picture 33: Scan2Copy status screen
The status screen provides information about the selected settings. For a detailed
description of all elements of the status screen, refer to chapter 4.
7.2 Key Function Overview
The function keys FK1 and FK2 control the slider.
FK3 switches to the scan mode selection and configuration menu.
FK5 selects the most frequently used parameters. The title and scale of the slider
changes according to the selected parameter.
FK6 turns the preview function on and off. If the preview function is on, "Preview Scan" is
displayed beside FK4. Pressing FK4 starts the preview scan.
The ENTER button (see chapter 3.3) starts the scan sequence. After scanning, the image
is displayed in the TFT color display.
Keyboard Operation Manual Page 39
Page 40

WideTEK WT42 / WT48
7.3 Setting General Parameters
While the status screen is displayed, some parameters can be set.
The arrow beside “Gamma”/”Inverse” indicates that two more parameters follow. Pressing
the FK5 function key cycles through the parameters.
The parameters valid with color mode “Color” and “Gray” are:
Brightness Î Contrast Î Gamma Î Blackpoint Î Whitepoint
The parameters valid with all “Bitonal” and “Photo” color modes:
Brightness Î Contrast Î Invers Î Blackpoint Î Whitepoint
Refer to chapters 6.3.1 through 6.3.6 for detailed information.
7.4 Scan2Copy Parameter Menu
Press FK3 to select the parameter menu. Initially, the display shows the list of available
printers. The selected printer must be confirmed or another printer must be selected.
The next step is to confirm the IP address – press the ENTER button - or enter another IP
address. For details concerning the input of an IP address see chapters 5.3 through 5.6.
The parameter menu starts with Color Mode. The items available in the parameter menu
depends on the selected printer.
Page 40 Keyboard Operation Manual
Page 41

WideTEK WT42 / WT48
7.4.1 Color Mode
Picture 32 shows the available color modes.
Beside each color mode a number in brackets stands for the key on the numeric keypad
that must be pressed to select the mode.
Use the corresponding keys of the numeric keypad to select the desired document size.
Press FK4 to select another item from the menu list.
Press FK5 or FK6 to select an item from the other menu lists.
Press FK3 once to return to the printer selection menu, press FK3 twice to return to the
status screen.
7.4.2 Document
Picture 34: Document parameters
The settings Document Size and Resolution refer to the document to be scanned. All
document sizes refer to the maximum width. The maximum scan length depends on the
combination of color mode, resolution and available memory in the
WideTEK WT42 / WT48.
After selecting an item from the list, the selected item is displayed.
Keyboard Operation Manual Page 41
Page 42

WideTEK WT42 / WT48
7.4.2.1 Document Size
Use the corresponding keys of
the numeric keypad to select the
desired document size.
Press FK3 once to return to the
former list, press FK3 twice to
return to the list of available
printers or press it three times to
return to the status screen.
Press FK4 to select another
item from the menu list.
Press FK5 or FK6 to select an
item from the other menu lists.
Picture 35: Scan2Copy, Document Size
7.4.2.2 Resolution
Use the corresponding keys of
the numeric keypad to select the
desired scan resolution.
Press FK3 once to return to the
former list, press FK3 twice to
return to the list of available
printers or press it three times to
return to the status screen.
Press FK4 to select another
item from the menu list.
Press FK5 or FK6 to select an
item from the other menu lists.
Picture 36: Scan2Copy, Resolution
Page 42 Keyboard Operation Manual
Page 43

WideTEK WT42 / WT48
7.4.3 Print
Picture 37: Print parameters
Picture 38:
HP Designjet settings
The items in the list refer to the print output. The available items depend on the printer
type. With printer type HP Designjet Series, menu item (1) changes as illustrated in
Picture 38.
7.4.3.1 Paper Format
Picture 39: Paper formats for output
Use the corresponding keys of the numeric keypad to select the desired scan resolution.
Press FK3 once to return to the former list, press FK3 twice to return to the list of available
printers or press it three times to return to the status screen.
Press FK4 to select another item from the menu list.
Press FK5 or FK6 to select an item from the other menu lists.
Keyboard Operation Manual Page 43
Page 44

WideTEK WT42 / WT48
7.4.3.2 Quality
Use FK1 and FK2 to move the
slider.
Press FK3 once to return to the
former list, press FK3 twice to
return to the list of available
printers or press it three times to
return to the status screen.
Press FK4 to select another
item from the menu list.
Press FK5 or FK6 to select an
item from the other menu lists.
Picture 40: Print quality slider
7.4.3.3 Resolution
Use the corresponding keys of
the numeric keypad to select the
desired print resolution.
Press FK3 once to return to the
former list, press FK3 twice to
return to the list of available
printers or press it three times to
return to the status screen.
Press FK4 to select another
item from the menu list.
Press FK5 or FK6 to select an
item from the other menu lists.
Picture 41: Print resolution
Page 44 Keyboard Operation Manual
Page 45

WideTEK WT42 / WT48
7.4.4 Sharpness
Press FK5 to select Sharpness.
Picture 42: Sharpness slider
This function increases the detail sharpness of the image. The higher the numeric value,
the more sharply details are displayed in the image.
Use FK1 and FK2 to move the slider.
Press FK3 once to return to the former list, press FK3 twice to return to the list of available
printers or press it three times to return to the status screen.
Press FK5 to select another item from the menu list.
Press FK4 or FK6 to select an item from the other menu lists.
Keyboard Operation Manual Page 45
Page 46

WideTEK WT42 / WT48
7.4.5 Margins
Press FK5 to select Margins.
Picture 43: Margins available with AUTO document size
Use the corresponding keys of the numeric keypad to select the desired margin.
Use FK1 and FK2 to move the slider.
The unit of measurement can be changed from Inch to millimeter (mm).
The four margins and the symmetry setting are only available with document size AUTO
selected.
If a fixed format is selected, only upper and lower margin are available. The other menu
items are grayed as illustrated in Picture 44.
Picture 44: Margins available with fixed formats
Press FK3 once to return to the former list, press FK3 twice to return to the list of available
printers or press it three times to return to the status screen.
Press FK5 to select another item from the menu list.
Press FK4 or FK6 to select an item from the other menu lists.
Page 46 Keyboard Operation Manual
Page 47

WideTEK WT42 / WT48
7.4.6 Mirror
Press FK5 to select Mirror.
Picture 45: Mirror function
Use the corresponding keys of the numeric keypad to select the mirror function.
Press FK3 once to return to the former list, press FK3 twice to return to the list of available
printers or press it three times to return to the status screen.
Press FK5 to select another item from the menu list.
Press FK4 or FK6 to select an item from the other menu lists.
Keyboard Operation Manual Page 47
Page 48

WideTEK WT42 / WT48
7.4.7 Config.1 Printer (available with Postscript PJL and HP Designjet printer)
Picture 46: Configuration menu 1 for printer output
Use the corresponding keys of the numeric keypad to select a submenu from the list.
Press FK3 once to return to the former list, press FK3 twice to return to the list of available
printers or press it three times to return to the status screen.
Press FK6 to select another item from the menu list.
Press FK4 or FK5 to select an item from the other menu lists.
7.4.7.1 Paper source
Use the corresponding keys of
the numeric keypad to select the
paper source. Some printers do
not offer all listed paper
sources.
Press FK3 once to return to the
former list, press FK3 twice to
return to the list of available
printers or press it three times to
return to the status screen.
Press FK6 to select another
item from the menu list.
Press FK4 or FK5 to select an
item from the other menu lists.
Picture 47: Paper sources
Page 48 Keyboard Operation Manual
Page 49

WideTEK WT42 / WT48
7.4.7.2 Color Matching
Use the corresponding keys of
the numeric keypad to select the
color matching method.
Press FK3 once to return to the
former list, press FK3 twice to
return to the list of available
printers or press it three times to
return to the status screen.
Press FK6 to select another
item from the menu list.
Press FK4 or FK5 to select an
item from the other menu lists.
Picture 48: Color Matching method
7.4.7.3 Antialiasing
Use the corresponding keys of
the numeric keypad to select the
antialiasing function.
Press FK3 once to return to the
former list, press FK3 twice to
return to the list of available
printers or press it three times to
return to the status screen.
Press FK6 to select another
item from the menu list.
Press FK4 or FK5 to select an
item from the other menu lists.
Picture 49: Antialiasing
Keyboard Operation Manual Page 49
Page 50

WideTEK WT42 / WT48
7.4.8 Config.2 Printer (available with Postscript PJL printer)
Picture 50: Configuration menu 2 for printer output
The parameters that are selectable in this submenu apply to the print quality.
Use the corresponding keys of the numeric keypad to select a submenu from the list.
Use FK1 and FK2 to move the slider.
Press FK3 once to return to the former list, press FK3 twice to return to the list of available
printers or press it three times to return to the status screen.
Press FK6 to select another item from the menu list.
Press FK4 or FK5 to select an item from the other menu lists.
Page 50 Keyboard Operation Manual
Page 51

WideTEK WT42 / WT48
8 Configuration
Coming from the status screen press FK3 to open the menu beside FK6.
Now press FK6 until Configuration is inverted. The TFT color display shows the first
screen of the configuration menu.
Picture 51: Configuration menu, initial screen
Use the corresponding keys of the numeric keypad to switch the stitching function on or
off.
Press FK3 once to return to the status screen.
The menus beside FK4 and FK5 show the available configuration items.
Press FK4 or FK5 to select an item from the other menu lists.
All selections and/or settings made in the configuration menu are directly active.
Keyboard Operation Manual Page 51
Page 52

WideTEK WT42 / WT48
8.1 Preview
Picture 52: Slider for preview quality
This setting controls the preview quality. Use FK1 and FK2 to move the slider.
Preview scale values range from 6 to 20. AUTO is selected by choosing a setting of 6.
If the slider is moved to min, the automatic scaling for the preview screen is active and the
TFT color display will show a preview of the complete document after scanning. With a
large document, e.g. a narrow but long drawing, the preview only shows a small “strip”. In
this case it is recommended to select a fixed preview scale to see more details.
If the preview size exceeds the size of the TFT color display, the preview window can be
moved across the preview. Use the cursor keys to move the preview window. See chapter
3.3 for preview image scrolling instructions.
Press FK3 once to return to the status screen.
Press FK4 or FK5 to select another item from the menu lists.
All selections and/or settings made in the configuration menu are directly active.
Page 52 Keyboard Operation Manual
Page 53

WideTEK WT42 / WT48
8.2 Language
Picture 53: Language selector
Use the corresponding keys of the numeric keypad to select the desired language.
After selecting the language, all menu text changes immediately.
Press FK3 once to return to the status screen.
Press FK4 or FK5 to select another item from the menu lists.
Keyboard Operation Manual Page 53
Page 54

WideTEK WT42 / WT48
8.3 Units
Picture 54: Available units of measurements
This setting has two values: millimeters and inches.
Use the corresponding keys of the numeric keypad to select the desired unit of
measurement.
Press FK3 once to return to the status screen.
Press FK4 or FK5 to select another item from the menu lists.
Page 54 Keyboard Operation Manual
Page 55

WideTEK WT42 / WT48
8.4 Smooth Scan
Picture 55: Smooth scan
Use the corresponding keys of the numeric keypad to switch the smooth scan function to
on or off.
Turning smooth scan on reduces the transport speed while inserting and scanning the
document. Turn smooth scan on when scanning sensitive, old, or brittle drawings to avoid
damage.
Press FK3 once to return to the status screen.
Press FK4 or FK5 to select another item from the menu lists.
Keyboard Operation Manual Page 55
Page 56

WideTEK WT42 / WT48
8.5 Paper Feed Delay
Picture 56: Slider for paper feed delay
Value range: 0 to 5 seconds, steps of 0.1 second
Use FK1 and FK2 to move the slider.
When a document is inserted, it will be pulled into the paper transport directly. The
document’s width is detected and the document is moved back to the start position.
The paper feed delay time helps the user to position the document correctly along the
transport rollers. This is always recommended when scanning wide documents.
Press FK3 once to return to the status screen.
Press FK4 or FK5 to select another item from the other menu lists.
Page 56 Keyboard Operation Manual
Page 57

WideTEK WT42 / WT48
8.6 Backlight
Picture 57: Backlight slider
The backlight slider turns the backlight feature off and on and controls its brightness.
Valid values range from 0 to 100.
Use FK1 and FK2 to move the slider.
Using backlight illumination is recommended while scanning translucent documents. The
back light lamp increases the contrast between background and information in the
document.
Press FK3 once to return to the status screen.
Press FK4 or FK5 to select another item from the menu lists.
Keyboard Operation Manual Page 57
 Loading...