

Page 1

Dishwasher Operating
& Installation Manual
ILVE Dishwasher Installation and Operating Instructions template pages.indd 1 1/05/2015 9:16 am
Page 2
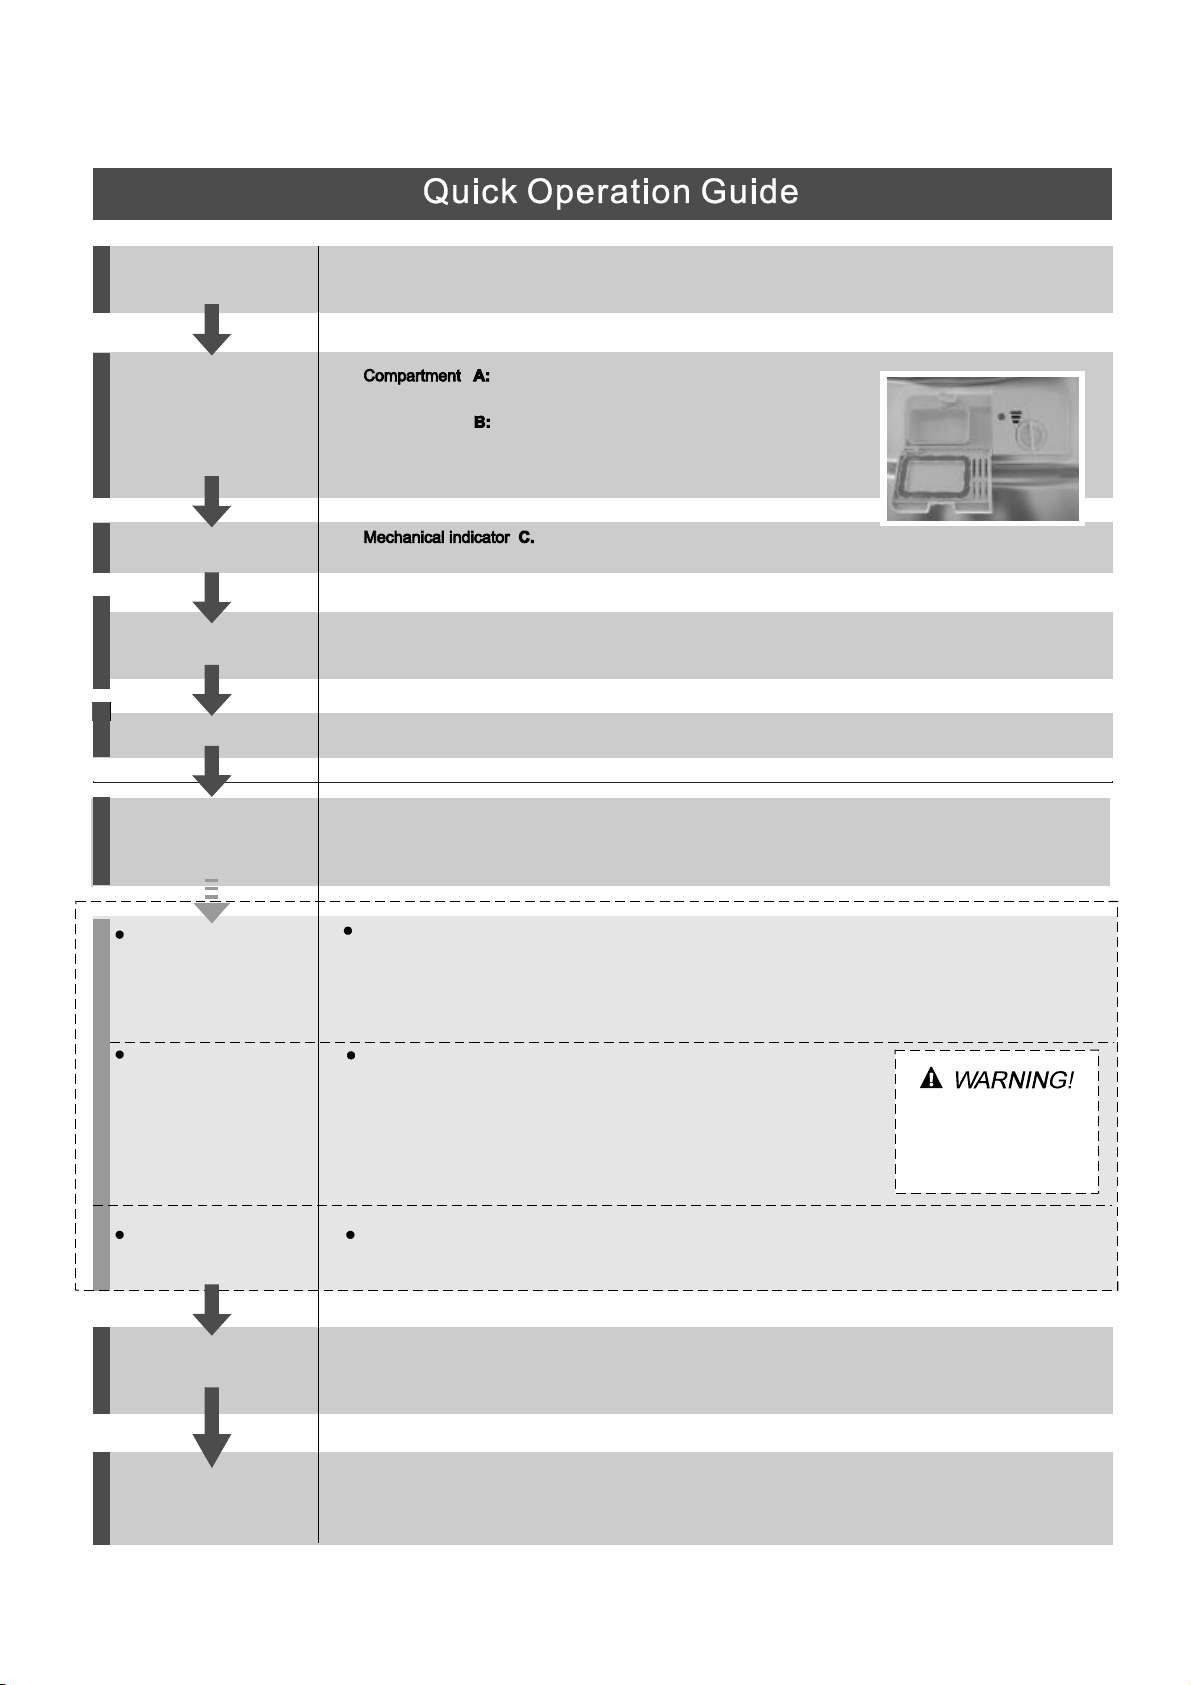
Fo r d etailed ope rating metho d read the corr e spond ing con tent on the i nstruction manual.
Switch on the appliance
Fill the detergent dispenser
Check the rinse aid level
Load the baskets
Select a programme
Running the dishwasher
Open the door, p ress the On/Off button to switch on the appliance.
For each wash cycle.
Compartment
For programs with pre-wash only.
(Follow the user instructions)
Electric indicator on control panel (if provided).
Scrape off any large food particles. Soften remnants of burnt food in pans,
then load the baskets. Refer to the dishwasher loading instructions.
Close the door, press the Program Button until the selected program lights up.
( See the section entitled Operation instruction )o p
Turn on the water tap and close the door. The machine will start working
after about 10 seconds.
C
B
A
Changing the programme
Add forgotten dishes in the
dishwasher.
If the appliance is switched
off during a wash cycle.
Switch off the appliance
Turn off the water tap,
unload the baskets
1. A running cycle can only be modified if it has been running for a short time. Otherwise the detergent
ma
y have already been released and the water already drained. If this is the case, the detergent
dispenser must be refilled.
2. Open the door. Press the program button more than 3s to cancel the current program.
3. After cancel the current program, press the program button again to select a new program.
4. Close the door, then the dishwasher will start work again.
1.Open the door a little to stop the dishwasher.
2.After the spray arms stop working, you can open the door completely.
3.Add the for
4.Close the door, the dishwasher will start running again after 10 seconds.
If the appliance is switched off during a wash cycle, when switched
on again, please re-select the washing cycle and operate the dishwasher
according to the original Power-on state ).
When the working cycle is finished, the buzzer of the
dishwasher will sound 8 times, then stop.
Turn off the appliance using the On/Off Button.
If the appiance was under standby mode, it will be power off automaticly after 30 minutes without any
operation.
Warning: wait a few minutes (about 15 minutes) before unloading the dishwasher to avoid scald,as
the dishes and utensils are still hot and more susceptible to break.
They could also dry better.Unload the appliance, starting from the lower basket.
gotten dishes.
Op en th e door carefu l l y.
Ho t s team m a y esc ape
wh en th e door is o pen e d !
Page 3
Dear Customer,
This appliance is i nte nded to be us e d in household
and si milar applications su ch as :
-staff k itchen areas in sho ps, office s and other
working envi ronments;
-farm house s;
-by cl ients in hotels, motels and o ther res idential
type environments;
-bed and b rea kfa st type env iro nme nts.
Please c are fully rea d thi s manual befo re u sin g the
dishwasher, it will help you t o use and maintain the
dishwasher proper ly.
Keep it fo r referen ce in future .
Pass it on to any subseque nt o wne r of the appliance.
This manual contains se cti ons on safety In struc tio ns ,
Operating Instruc tions,
Trouble sho oting Tips etc.
Installati on I nstru ction s and
Co nt rol Pan el.... ..... . . . .......... . ...... .......... ................2
Dishwas her Features... ............... ....... ...... ..... . ......2
A Fill t he Rinse Aid Dispenser.. ......... .. .. ... ...3q ..... ...
q
B Fu nctio n of Deter gent .......... ................ ...4
Attention before or aft e r l o ading the D ishwas her
Bask ets....... . ............. . ....... ...... . ...... ...... . ....... ...... 6
The Met hod Loading Norm al D ishware
Wash Cycle Table.................................... .............8
Turning on the Appliance.............. ................ ........8
Change the Progra mme......... ..... .............. ........9....
At the En d of the Wash C ycle......... ................ ........9
Filtering System..................................... ............10
Carin g for th e Dishw as h er...... ............... ........ ..... 11.
...... ..
...................7
To revie w the secti on on troub leshooting Tips
will help you to solve som e co mmo n probl ems
by you rse lf .
If you ca n not solve th e proble ms by yo u rse lf ,
please a sk for the h elp fro m professional te chnicians.
The manufa cturer, follow ing a policy of co nstant
dev elop men t and updating of the p r oduct , ma y
make modifications without g ivi ng p rio r notice.
Positioning t he App lia nce.... . .............. ........... . ..12..
Abou t Pow er Co nnec tion... . ....... ...... . ...... . ........ ..12.
Water Conne cti o n..................... . ....... ... .. ..... .13......
Start of dish washer... .. ..................... .... .. ..... .....14..
Be fo re c alling for servi ce....... ........ . ..... ...... .... ..... 15.
Er ror c odes...... ......... ......... ......... ... .. ......... .......16.
Technic al in for mation.. .............................. . . .....17..
Page 4

When using your dishwasher, fo llow the precautions listed below:
This appliance must be grounded. In the event ofa
malfunction or breakdown, grounding will reduce
the risk of anelectric shock by providing a path of
least resistance of electric current. This appliance
is equipped with a cord having an equipmentgrounding conductor and a grounding plug.
The plug must be plugged into an appropriate outlet
that is installed and grounded in accordance with
all local codes and ordinances.
Do not abuse, sit on, or stand on the door or dish
rack of the dishwasher.
Do not touch the heating element during or
immediately after use.
(This instruction is only applicable to machines
withavisual heating element.)
Do not operate your dishwasher unless all
enclosure panels are properly in place. Open
the door very carefully if the dishwasher is
operating, there is a risk of water squirting out.
Do not place any heavy objects the
door when it is open. The appliance could tip
forward.
When loading items to be wa shed:
1) Loc ate sharp items so that they are no t likely
to damage the door seal;
2 War ning: Knives and other utensils wi th
)
sharp points m ust be loaded in the bask et
wi th thei r points dow n or placed i na
horizontal position.
When using your dishw asher, you should
prevent plastic items from com ing into c ontact
with the heating element.(This instruction is only
applicable to machines with a visual heating
element.)
Check that t he deter gent comparm ent is empty
after completion of the wash c ycle.
Do not wash plastic items unless they are marked
dishwasher safe or the equivalent. For plastic items
n
ot so marked, check the manufacturer's
recommendations.
Use only detergent and rinse additives
designed for an automatic dishw asher.
Never use soap, laundry detergent, or hand
washing detergent in y our dishwasher. Keep
these products o ut o f the reac h of children.
on or stand on
Improper connection of the equipment-grounding
conductor can result in the risk of an electric shock.
Check with a qualified electrician or service
representative if you are in doubt whether the
appliance is properly grounded. Do not modify the
plug provided with the appliance; If it does not fit
the outlet. Have a proper outlet installed bya
qualified electrician.
Keep children away from detergent and rinse aid, keep
child away from the open door of the dishwasher,
ren
there could still be some detergent left inside.
This appliance is not intended for use by persons
(including children with reduced physical, sensory or
mental capabilities, or lack of experience and
knowledge ,unless they have been given supervision
or instruction concerning use of the appliance bya
person responsible for their safety.
Children should be supervised to ensure that they do
not play with the appliance.
Dishwasher detergents ar e strongl y alk aline, they
can be extremely danger ou s i f swallowe d. Avoid
contact wit h skin and eyes and keep children away
from the dishwa sher when the door is open.
The door should not be left open,
since thi s could increase the ris k of tripping.
If the supply cord is damaged, it m ust be replaced
by the ma n ufacturer or its se r vice agent ora
similarly qualified person in o rder to avoida
hazar d.
Remove the door to the washing compartment when
removing an old dishwasher from service or discarding it.
Please dispose of packing materials properly.
Use the dishwasher only for its intended function.
During installation, the power supply must not
be excessively or danger ously bent or flattened.
Do not tamper with controls.
The appliance i s to be connec ted to the water
ma ins using new hose sets and that old hose-sets
should n ot be reused.
The maximum numbe r of place s ettings to be
washed is 14.
The maximum permi ssible inlet water pressu re is
1M pa.
The minimum permi ssible inlet water pre ssu re is
0.04Mpa.
)
Page 5

To get the b est pe rforma nce from you r dish washer, read all o p erating instructions
befor e usin g it for the fir st time.
1.Power indicator: To show when t he pow er i s on.
2.On/Off Button: To turn on/off the power supply.
3. Program Button:To press the button to selecta
wa sh Progr am.
4.Program indicator: To show w hich program you have
chosen.
5.Extra dr ying indicator
Fron t view
1
5
2
3
6
7
6.Extra dr ying button:
Extra dry functi on
7.Cycle finish and rinse aid warning indicators: To
sh o w when the was hing program is finished, the
dispenser nee d to be refilled.
8.Dis pla y screen: to show runni ng state
Was hin g state
Drying state
Program is end
Press the button to select the
.
Back View
4
9
Uppe r B as ket
1
In ne r pipe
2
Lowe r B as ket
Disp enser
4
Cup Shelf
5
Spra y arms
6
8
Filt er asse mbly
7
Inle t pip e c onnector
8
Drai n pipe
93
Page 6
Befor e using y ou r dish was her for t he f irst time:
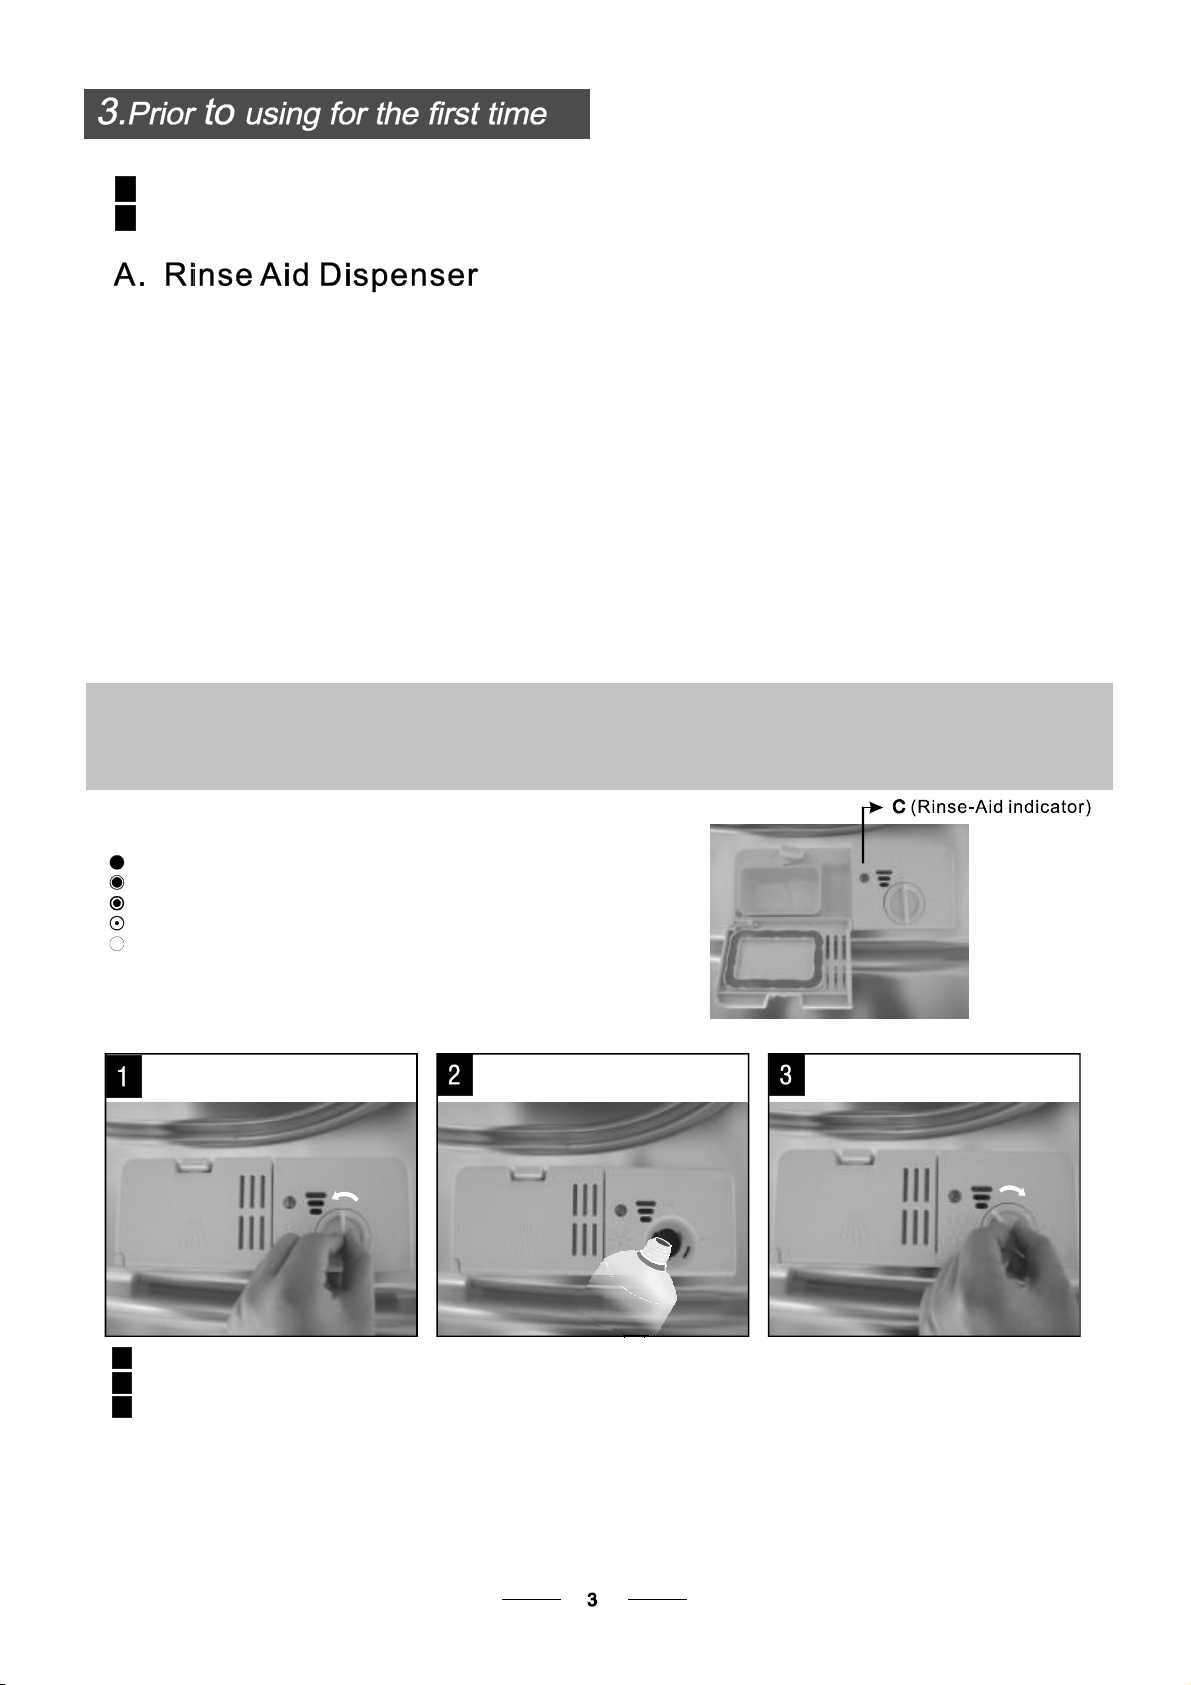
A. Fill the rinse aid d ispen ser
B. Fill in dete rgent
Rinse Aid Dispenser
The rinse aid is rel eased d uri ng the final rinse to prevent water from fo rming drop lets o n your dishes, w h ich can
leav e sp ot s and strea ks. It also improves drying by allowi n g water to roll off the dishes. You r dishw asher is
desi gned to use li quid ri nse aids. The rin se a id d is pen ser is l ocate d inside the do or n ext to the detergent dispenser.
To fill the dis pense r, op en the c ap and pour the rin se a id into the dis pe nse r until the level ind ica tor tur ns completely
black. The volume of the rin se ai
d container is about 110ml .
Function of Rinse Aid
Rinse ai d is a uto mat ica lly added during t he last rin se, ens uring th oroug h rins ing , and spot and str e ak f ree dry ing .
Attention!
Only use b randed rinse ai d for di shwashe r. Never fill the rinse ai d dispe n s e r wit h any oth er s ubs t ances
(e.g. Dishwasher c le a nin g agent , liquid deterg e nt). Th i s would da ma g e the appliance .
When to Refill the Rinse Aid Dispenser
If there is no rinse-aid warnin g light in the control panel, you can judge the amount of rinse-aid by the color of the
optical leve l,
dark .As the
1/4full.
As the r inse aid di minishes, the size of th e black dot
on th e r inse a id level indicato r changes , as illus trated below.
Ful
3 / 4 full
1 / 2 full
1 / 4 ful l - Sh ould refill to elim inate s potting
Empty
indicator "C" located next to the cap. When the rinse-aid c ontainer is full, the whole indicator will be
rinse-aid
l
diminishes, the size of the dark dot decreases. You should neve r let the rinse aid get below
How to fill the Rinse Aid Dispens er
To open the dispe ns er, turn the cap to t he " open" (left) arrow and lift it out.
1
Pour the r inse a id i nto the dispenser, being caref ul not to overfill.
2
Replace the cap by i nserting it a li g ned with "ope n" a rrow and turning it to the close d (right) arrow.
3
Be caref ul not to over fill th e dispenser, because this co uld cau se ove r s udsing . W i pe awa y any spills
with a damp c lot h. Don't fo rget to replace t he cap b efore you close dish was he r door.
Atte nti on!
Clean up any ri
duri ng t he nex t wash.
nse a id s pil l du ring fi lli ng with an absorbent cloth t o avoid excess f o ami ng
Page 7
Clean up any rinse aid spille d while during filling with an absorben t cloth to a void e xce ssive foaming
during the ne xt wash. Don't forget to replac e the ca p before yo u clo s e dishwasher door.
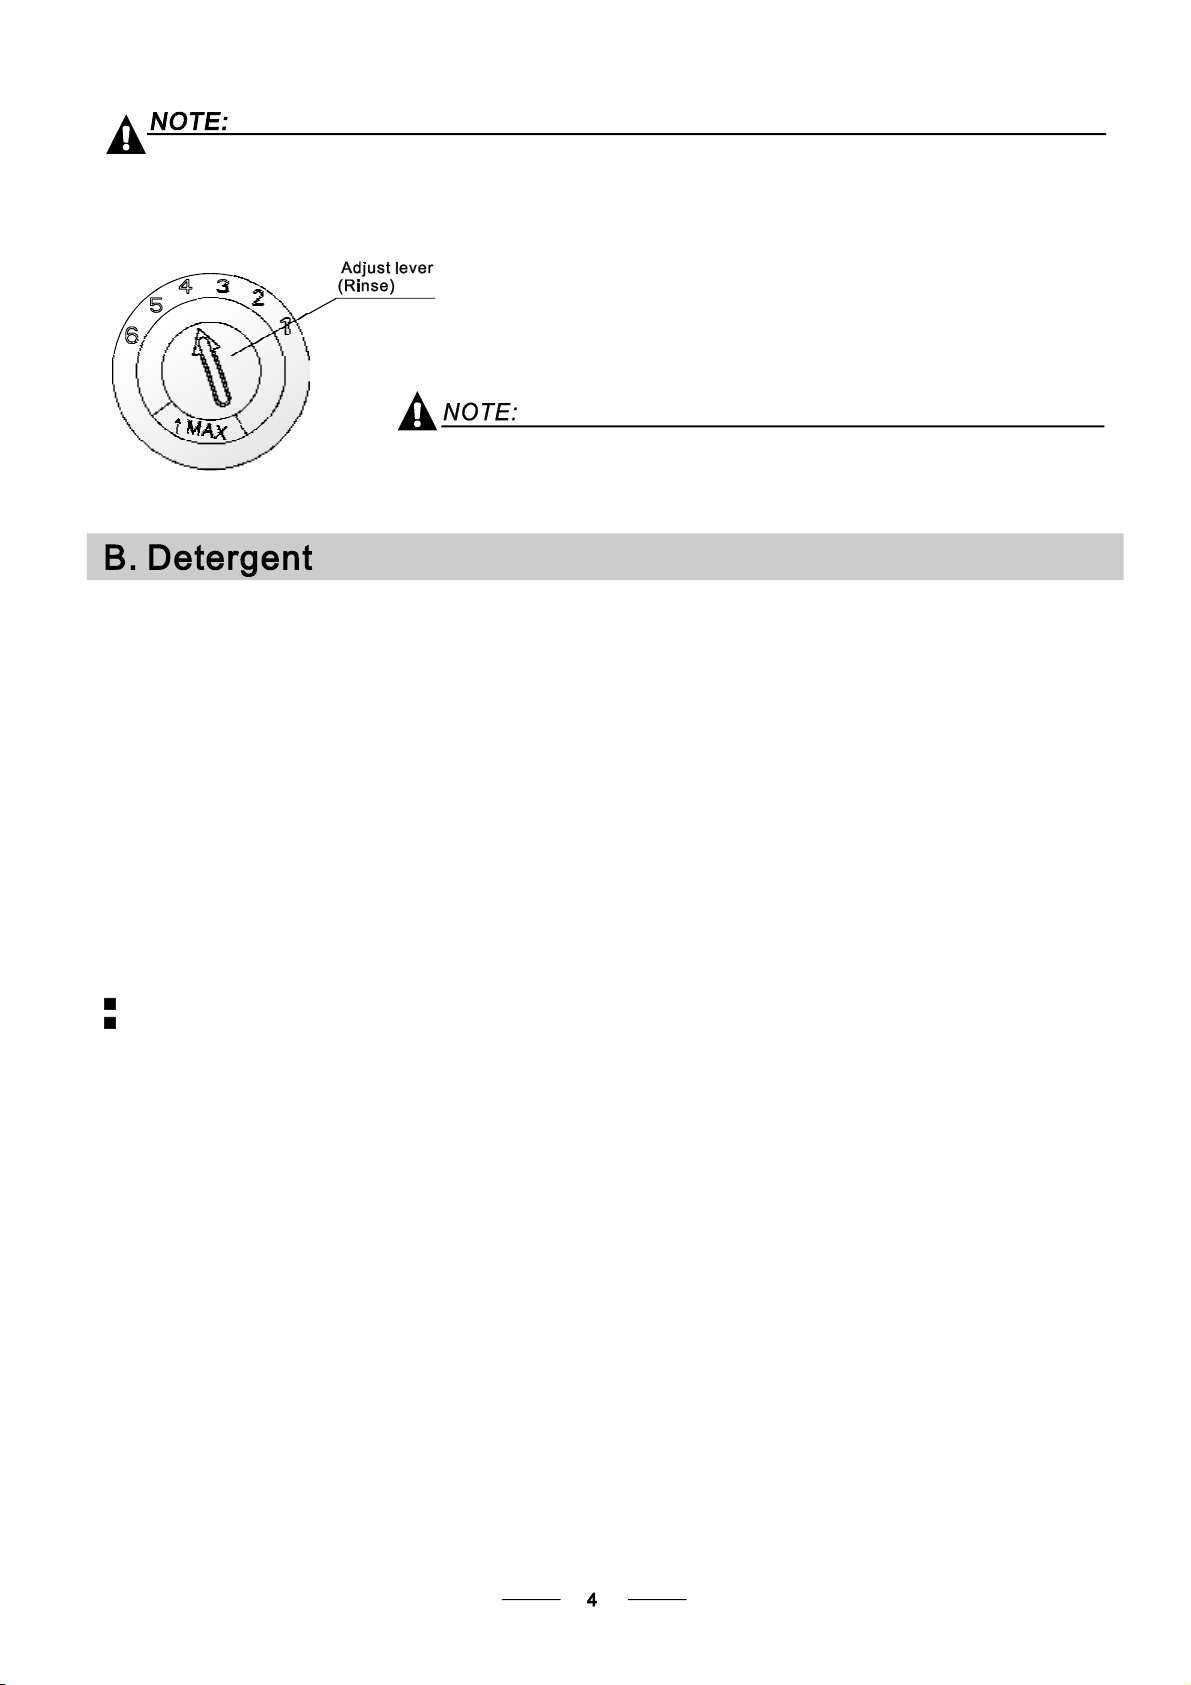
Adjusting Rinse Aid Dispenser
Th e rinse ai d dis penser has six o r fo ur set tin gs. Al way s s ta rt with th e di s p ens er
set on " 4". I f sp ots an d poo r drying a reaproble m, increa s e the am ount of r i nse
aid dispense d by r emo v ing the d ispe nse r lid and rotating the dial to "5". If the
dishes s til l are not d ryin g p r ope rly o r are show s pots, a dju st the dia l to the next
highe r le v er un til y our dishe s are spo t-f ree. Th e recomme nde d setting is "4".
(F actory value i s "4" .)
Incre ase t he d ose if the re are drops of w ater or lime spots on the dishes af t er w ashing.
Reduce it if ther e are s t i cky whitis h sta i ns on you r d ish es or a blui sh f ilm on g las s war e or
kn ife bla des.
De tergent s hav e che mical ingre d ients t hat are necessary to re m o ve d irt , crus h d i rt a nd tr ansport i t out of th e dishwasher.
Most of t he commercial qua lity deter gent s are suitable for t his p urpose.
Detergents
There are3sorts of detergents
1.With phosphate and with chlorine
2.With ph osph ate and withou t chl o rine
3.Without phosphate and w ithout chlorine
Normally new pulverised detergent is without phos phate. Thus the water softener funct ion of
phosphate is n ot given. If deter gents w ithout phosphate are used in the case of har d water
often white s p ots appear on dis hes and glass es. In this cas e please add more deter gent t o reach
better results. Detergents w i thout chlor ine do only bleac h a little. St ron g and co loured s pots w ill not
be rem ove d completely. In this cas e pleas e choos e a program with a higher tempe rature.
Concentrated Detergent
Based on their ch emical composition, d etergents c an b e split in two basic t ypes:
Co nventional, alkaline detergents with caust ic c omponents
Low alkaline conc entrated detergents w i th natur al enz ymes
The use of nor mal was hing pr ogram s in combination with concentr ated detergents
reduce s p ollution and is g ood for your dishes; these wash p rogram s ar e specifically matc hed
to the dirt-diss olving p roperties of the enz ymes of the concentrated deter gent. For thi s reason
norma l wash program s in which c onc entrated detergents ar e us ed c an ac hieve the same
results that ca n otherwise only be achiev ed u sin g intensive programs.
Detergent Tablets
Detergent tablets of different b rands disso lve at different speeds. F or thi s r eas on so me
detergent tablets cannot dissolve and dev elop t heir full cleaning po wer during short
programs. Therefore please u se long pr o grams w hen using detergent tablets, to
ensur e the co m plete removal of deter gen t residuals.
Detergent Dispenser
The dispens er must b e refilled before the start o f each wa sh c ycle following the ins tructions
provided in the wash cycle table.Your dishw asher uses less detergent and rinse aid than
Conventional dishwasher. Generally, onl y one tables poon of detergent is needed for
a normal w ash load. More heavil y s oiled items need mor e detergent. A lways add the
detergent just before starting the dishwasher, otherwise it could get damp and will not
dissolve p roperly.
Page 8
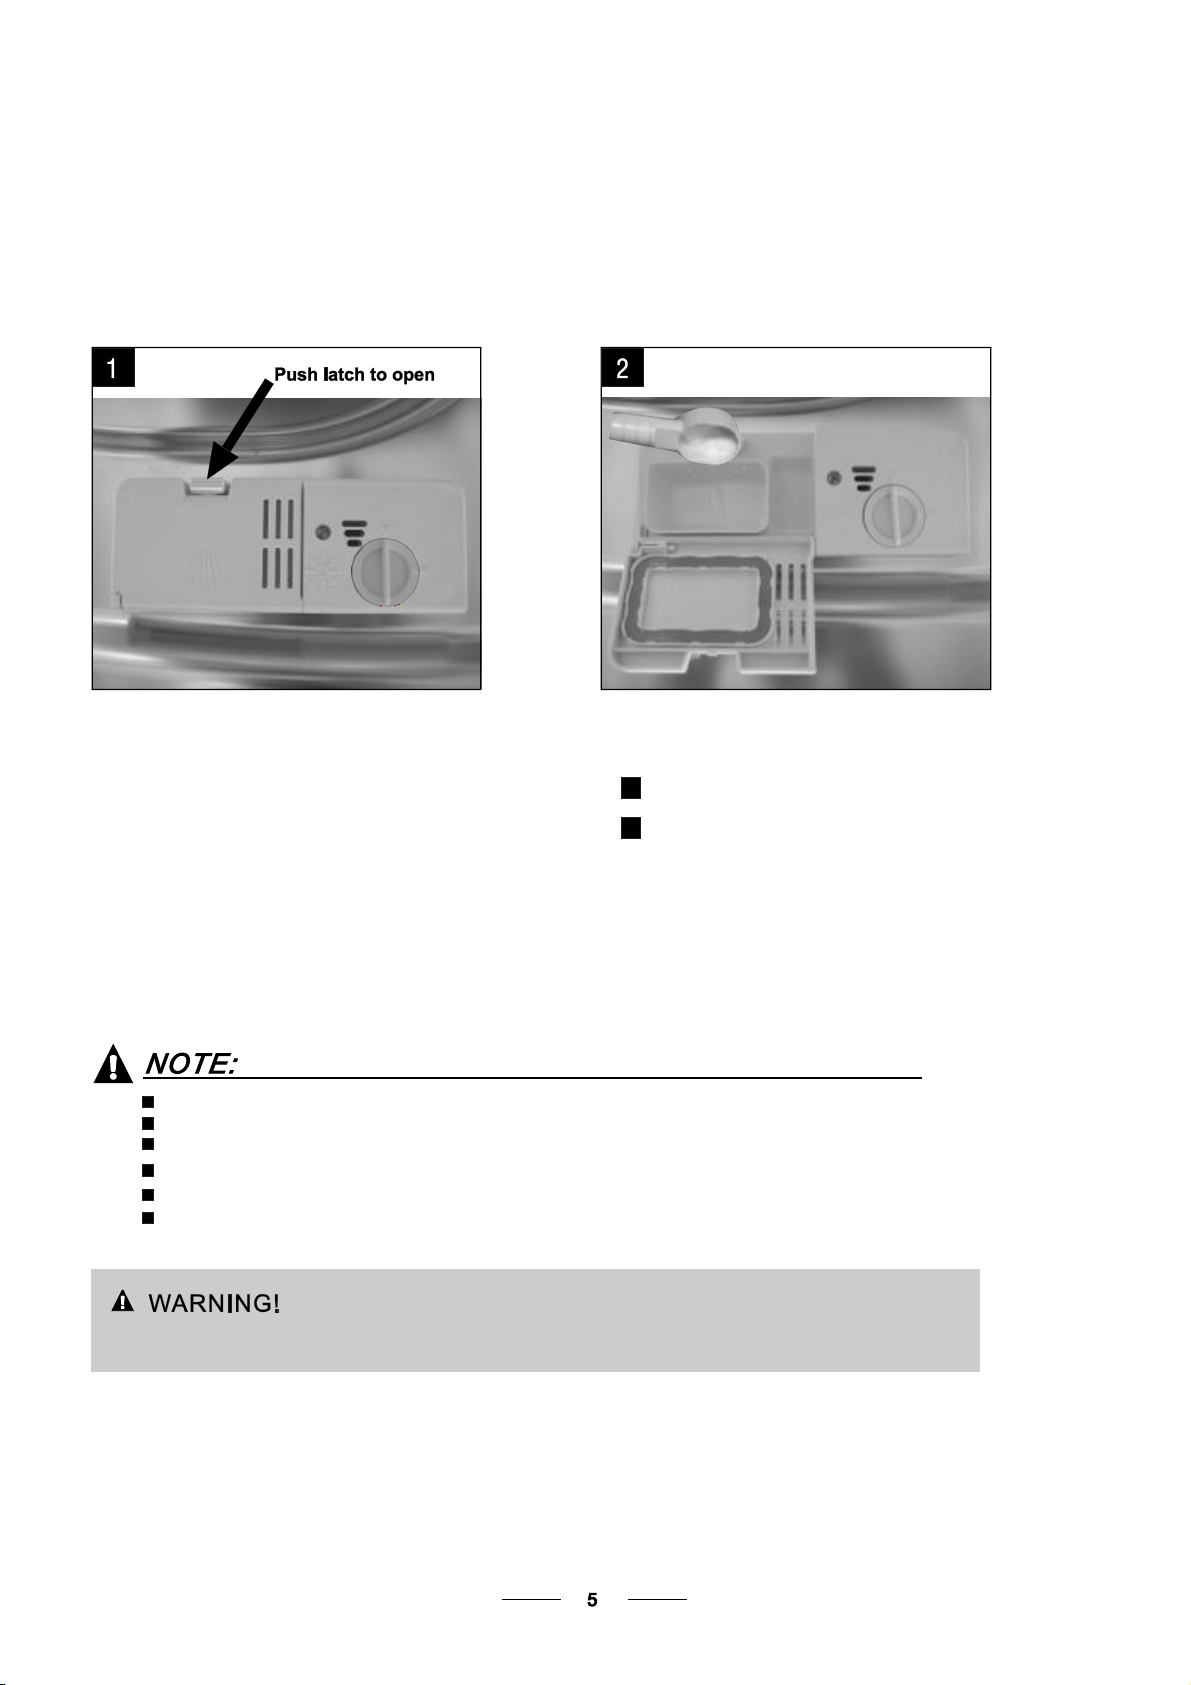
Proper Use of Detergent
Use only detergent specifically made for the use in dish was hers. Ke ep yo ur detergent fre sh an d dry.
Don't put powde red detergent into the dispenser unti l you 're ready to wash dishes.
Adding detergent to dispenser
A
B
Fill in Detergent
Fill the detergent dis pense r wit h deter gent.
The marking indicates the dosing leve ls , as
illustrated on the right:
Please observe the manufacturers dosing and storage
Recommendations as stated on the detergent packaging.
Close the lid and press until it locks in place.
If the dishes are heavily soiled, place an additional
detergent dose in the pre-wash detergent chamber. This detergen t will take effect during the pre-wash phase.
For main wash detergent.
A
For pre-wash detergent.
B
If the lid is closed: push the latch to open.
Always add the detergent just before starting each wash cycle.
Only use bra nded detergent and rinse aid for dishwasher.
You se e information about the amount of detergent for t he singl e pro gra mme page 8.
Please be aware that soiling level s and water hardness can effect wash results.
Please observe the manufacturer's recommendations on the detergent packaging.
Dishwasher detergent is corrosive!
Take care to keep it out of reach of children.
Page 9
Consider buying utensils which are identified a s dishwasher- proof.
Use a mild deter gent that is desc ribed as 'kind to dishes'. If nece ssa ry, see k further
information from the detergent manufacturers.
For particular items, select a program with as low temperatur e as possible.
To pr event dam age, do n ot tak e glass and cutlery out of the dishwasher immediately
after the p rogram has ended.
Not suitable for use
Cutlery wi th wooden, ho rn ch ina or
mother-of-pearl handles.
Plastic i tems that a re not heat resistant.
Older cutlery with glued parts t hat are not
temperature re sis tant.
Bonded cutlery items or dishes.
Pewter or cooper items.
Crystal glass.
Steel items subje ct to rus ting.
Wooden p latters.
Items mad e from synthetic fibr es.
(For the best performance of the dishwasher, follow these loading guidelines.
Features and appearance o f baskets and cutlery ba skets ma y vary from yo ur m odel.)
Scrape off an y large food particles. Soften remnants o f burnt food in pans.
It is not necessary to r inse the dishes under running water.
Place objects in the dishwasher in following w ay:
1.Items su ch a s cups, glasses, pots/pans, etc. ar e fac e d dow nwa rds.
2.Curved items, or ones wit h re cesses, should be loaded asla nt so that water can r un o ff.
3.All utensi l s are stack ed s ecurely and can not tip ove r.
4.All utensils are placed i n the way that t he s pra y arms can rotate freely during wa shing.
Very small i te ms should not b e wa shed i n the dishwasher as they could easily fall ou t of t he basket.
Limited suitability
Some types of glasses ca n become
dull after a larg e number of washes.
Silver and aluminum p art s havea
tendency to discolour during washing.
Glazed pattern s may fade if machine
washed frequently.
Load hollow i tems su ch a s cups, glasses, pans etc. With the opening facing downw ard s so that
water cannot collect in the container o r a deep bas e.
Di shes and items of cutlery mu st not lie inside o ne another, or cover each other.
To av oid damage t o glasses, they mus t not be touched.
Load large items which are most diff icult to clean into the lower bas ket.
The upper basket is de signe d to hold mo re delicate and lighter dishw are s uch as glasses, coffee
and tea cups.
Long bladed knives stored in an upright posit ion are a potential haz ard!
Long and/or sharp items o f cutlery such a s carving knives must be posit ioned
horizontally in the upper basket.
Please do not o verloa d your dis h was her. Thi s is important for good results and for
reasonable consumption of energy.
To prevent water dripping from the upp er bas ket into the lowe r basket, we r eco mmend that you
em pty the lowe r basket fi rst and then the upper basket.
Page 10

The upper basket is de signe d to hold mo re delicate
and lighter dishware such as glas ses , coffee and
tea cups and s aucer s, a s well a s plates , sm all bowls
and shallo w pans (a s long as they a re not too dirty ).
Position the dis hes and c ookware so that they will
not get mov ed b y the sp ray of water.
Please be rem inded that:
Pots, se rving bowls, etc , mu st always be plac ed top down.
Deep pots should be sl anted to allow w ater to flow out.
The B ottom Basket features folding spikes so that larger o r more pots and pans can be loaded.
We sugges t that yo u place large items and the most
difficult t o clean items are t o be placed into the lower
bask et: suc h as pots, pans , lids, serving dishes and
bowls, as s hown in the figure below. It i s pr eferable to
place s ervin g dishes and lids on the side of the rac ks
in order to avoid bloc king t he r otation of the top spray
arm.
Adjusting the Upper Basket
The height of the upper basket c an b e adjusted in order to
create mo re s pace for large utensils both for the upper
/lower basket. The height of the upper ba sket c an be
adjusted by placing the wheels o n differe n t height of the
rails. Long items, ser ving cutlery, salad se rve rs and knives
sh ould b e placed on the shelf so that they do not obs truct
the r otation of the spray arm s..
Folding back the cup shelves
For b etter s tacking of pots and pans,
the spikes can be folded down as
sh ow in the pic tur e right.
Folding Spikes of Lower Basket
For b etter s tacking of pots and pans,
the spikes can be folded down as
sh ow in the pic tur e right.
Cutlery should be placed in t he c utlery basket w ith the handles at the bottom. If the rac k has side baskets , the
sp oons should be loaded separately into the appropriat e slots, especially long utensils s hould b e plac e d in the
horizontal position at the front of the upper basket as s hown i n the picture.
Do not let any item extend through the bottom.
Always load sharp utensils with the sharp
point down!
Page 11

( )
Means: need to fil l rin s e aid i nto the Ri nse-Aid Dispen ser.
Inten siv e
*AS /N ZS 20 07.1
Rapid
So ak
For he avi est so i l ed c rockery,
such as pots, pan s,c a ss e role
di shes and di shes tha t ha ve
been s itting wit h dried fo o d on
them for a while.
For no rmally soil ed l oads,
such as po ts, plates, glasses
and ligh tly soile d pans.
standard da ily cyc le.
For lightly s oiled p lat es and
pans that nee d qu ick was h.
A short er wash for light ly
so iled lo ads t hat do not
need drying.
To rinse dishes that you plan
to w as h lat er that day..
Pre-wash(5 0 )
Was h (60 )
r
r
Rinse
Rinse
Rinse(65 )
r
Drying
Prewash
Was h (45 )
Rinse(50 )
Drying
Was h(65 )
r
Rinse
Rinse (65 )
r
Drying
Was h (40 )
Rinse
Rinse (45 )rr
Pre-wash
5/ 27 . 5g
( )Or all in 1
5/ 27 . 5g
( )Or all in 1
25g
(Or all in 1)
170
175
90 11.51.2
30
8 0. 02 4
1.6
0.78
0.6
18.5
12 .3
11.525g
AS/NZ S 2007. 1
* : This progra m is t he t est cycle. The information f or c omparability te st
in acc ordance with , as follows :
AS/NZS 2007.1
Capacity: 14 setti ng
Posit ion Upper ba s ket: upper wheels on r ails
Rinse ai d setting : 6
Open the door sligh tl y 50mm to assist in dr yin g of the d ishes afte r every was h
Starting a cycle w ash
1
Dr aw out t he l owe r and upper b ask et, load the dishes and push them back. It is commended to load the l owe r
basket first , then the upper on e (see the section en titled Loading th e Dishwashe r ba ske t).
2
Pour i n th e detergent (s ee t he s ection entitled De te r gent a nd Rinse A id).
3
Insert th e plug in to t he socket. The power supply is 220-240 VAC /50 HZ, the specificat ion
o
o
of the socket is 10 A 250 VAC . Mak e sure that the w ater suppl y is t urn ed o n to full pre ssu re.
4
Close the door, press the On/Off butt
Press the program button , the was h program wi ll b e changed as following dire cti on:
5
EC O->90mins->Rapid->Soak Intensive
If a program is selected, the re sponding l igh t will be on.
Then c lose the door,
on to s witch on t he m achine.
->
If a progra m is selected, th e re sponse light w ill light on.
. I f yo u want to improv e the dry ing
you ca n press the Option button to select ext ra d rying fu nct ion before the dishwasher begin s to start.
(Exclude
Rapid and Soak)
efficie ncy,
Page 12

Prem ise:
1 A c ycle that is under w ay c an onl y be m odifie d if it ha s only bee n runni n g for a short tim e . Otherwise, t he
detergent may have already been re lea sed, and th e appliance may have already dra i n ed the wa sh w ater.
In t his case, the de t erg ent dispenser m ust be re fille d ( see the s ection entitle d " Deter gent " ) .
2 Op en the door, pre ss the Program b u tton more t han 3 sec onds , t he m ac hin e will be in standb y state,
then yo u can change the prog ram to the desired cycle s etting ( s ee t he se ction entitled " Starti ng a
wa sh cy
cle ).
If you ope n the door during a wa sh cycle , the machine will pause. The pro gram light will
stop blin king and the buzzer will m o oin g every minut e unless y ou clos e t he doo r . After
yo u close the door ,the machine will keep on working af ter 10 sec onds .
A forgotten dish can be added any time before the detergent cup opens.
Open the door a little .
1
Close the door
4
After the spray arms stop working, you can open the door
2
completely.
Add forgotten dishes.
3
When the work ing cyc le has finis hed , the buz zer of th e di shw ash er will sound for 8 second s, th en s top. Turn off
the appliance u sin g the ON/ OFF button, shut off the water supply and open th e door of the dishwasher.
Wai t for a few minut es befo re unloadi ng the dish was her to avoid scald the di she s and utensils
are st ill hot and m ore su s ceptible to br eak age. They will also dry better.
The dishwasher will run after 10 seconds.
5
Switch Off the Dishwasher
The Le d sc reen is o n but the col on icon i s not blinking, on ly in thi s case th e pr ogr amme has ended.
1.Switch off th e d ishwas her by pr essing the ON/OFF b utton.
2.Tu rn o ff t he water tap.
Open the door careful ly.
Hot di she s a r e sensit ive to knocks. The dishes s hould b e allowed t o cool down a roun d 1 5 m i nutes
before remov ing from th e applian ce.
Open the dishwasher's doo r, leave it ajar a nd w ait a few minutes before remov ing the dishes. In t his way they
will be cooler a nd t he dr ying w i ll be imp rov ed.
Unloading the dishwasher
It is n orm al that the dis hwa sher is w et insi de.
Empty the lower ba ske t first and then th e upper on e . Th is will avoid wate r dripping from t he uppe r Basket onto
the di she s in the l owe r one.
Was h the arm s in soapy and warm wate r an d use a soft brush to
clean the jets. Replace them afte r rin sing them thoroughly.
When following this procedure from step1 to step 3, the filter system will be removed;
when following it from Step 3 to Step 1, the filter system will be installed.
It is d ang ero us t o open the d oor wh en washing, becaus e the hot water m ay s cal d y ou.
Page 13

The filter pr events larger r emnants of food or other objects from getting inside the pum.
The r esidues may b loc k the fi lter, i n this case they must be removed.
The filter system consists of a c oar se fi lter,aflat ( Mai n filter)
and a microfilter(Fine f ilter).
1
2
3
2
1
3
Ma in fil ter
Food and soil particles trapped in this filter are pulver ized bya
special jet on the lower s pra y arm and washed down to drain.
Coarse filter
Larger items, s uch as pieces o f bone s or glass, that could block
the drain a re trapped in the coarse filter. To re m ove the items
caught by this fi lter, gentl y s queez e the tap o n the top of this
filter and li ft i t out.
Fine filter
This filter holds soil and food r esidues in the sump are a and
prevents it from being redeposit on the dishes during was h cycle.
Filter assembly
The filter efficiently
For b est perform ance and results, the f ilter must be cleaned regularly. this reason, i t i s a good idea to
remove the lar ger food particles tr apped in the filter after each wash cycle by rinsing the se micir c ular f ilter and
cup under r unning w ater. To remove the f ilter device, pull the cup handle in the upw ard direc tion.
rem o ves food particle s from the wash water, al low ing it to be recyc led during the cycle.
For
The dishwasher m ust never be us ed w ithou t the filters.
Impro per replace ment o f the filter may reduce t he perfo rmance level of the appliance
and damage di shes and utensils.
2
1
Step 1 Turn the filter in anti-clockwise direc tion.:
Step 2 Lift the f ilter assy up.:
When following this procedure from step1 to step 2, the filter system wil l be removed;
when following it from Step 2 to Step 1, the filter syste m will be installed.
Page 14

Notes:
- Inspect the filte r s for blocki ng afte r every time the dishwasher has bee n used.
- By un scr ew i ng the co ars e filter, you can r emove the f ilt er s yst em. Remove any food remnants and
clean the fi lters under runnin g water.
The entire filter assembly shou ld be cleaned once a week.
Cleaning the Filter
To cl ean the coarse filt er and t he f ine filter, u se a cleaning b rush. Reas sem ble th e f ilter p arts as shown in the figures
on the last page a nd r einser t th e entire ass emb ly in the dishwa sher, pos itioning it in its seat and pressing do wnw ar d s.
When cleaning the filters , don't knock on them. Otherw i se, the fi lters c ould be
contorted an d the performance of the dishwasher could be decre ased.
The cont rol panel c an be cleane d by u sing a lightly dam pened c loth.
After cleaning, m ake sure to d ry i t thoroughly.
For the exter ior, use a goo d appliance polish wax .
Never use sharp ob jec ts, scouri ng pa ds o r harsh cleaners on a ny part of th e dishwasher.
Cleaning The Door
To cl ean the edge ar oun d the door, you s hould u se onl y a soft war m , damp cloth.
To av oid penetra tio n of w ater in to the door lock a nd ele ctrica l com ponents, do not
use a spray cleaner of an y k i nd.
Never use a sp ray cleaner to cl e an t he door pane l as it may dam age the doo r lock
and electrica l components.
Abrasive agent s or s ome paper t owels should no t be used because of the risk of
scratching or l eav in g spots on the stainless st eel sur fac e.
Protect Against Freezing
Please take frost prote ction measures on the di shw ash er i n winter. Every fter washing c ycles,
Please ope rat e as f ollow s
1.Cut off the elect ri c al power to th e di shwash er.
2.Tu rn o ff t he water s upp ly a nd di sconnect t he water inl et pip e fro m t he water v alv e.
3.Drain the w ate r from t he i nlet p ipe and water v alve. ( Use a pan to gather the w ater)
4.Reconnect the water i nlet
5.Remove t he filt er at t h e bottom of th e tub and use a sponge to so ak u p water in the sump.
!
pip e t o the water valve.
If you r dishwash er cann ot w ork becaus e of the i ce,
pleas e co nta ct professio nal service persons.
time a
Cleaning the Spray Arms
It is n ece ssary t o cl ean the sp ray arms regularly for hard
water chemicals wi ll c log the sp ray arm jets and bearings .
To remove th e upper spray ar m, hol d the nut, rotate th e arm
clockwise to remove it.
To remove th e lower s pra y ar m, pul l out the spray arm up ward.
Was h the arm s in soapy and warm wate r an d use a soft brush to
clean the jets. Replace them afte r rin sing them thoroughly.
Page 15

After Every Wash
After eve ry w ash, turn off the w ater supply to the
appliance and leave the door slig htly open so that
mo isture and odours are not trapped inside.
Remove the Plug
Before cleaning or per forming maintenance, al ways
remove the plug from the s o cket.
No Solvents or Abrasive Cle aning
To clean the e xterior a nd r ubber parts of the dishw asher,
do not use solvents or abrasive cleaning p roducts.
Only use a cloth wi th wa rm s oapy water.
To remove spots o r stains from the su rface of the
interior, u se a cloth d ampened with water analittle
vinegar, or a cleaning product made specifically for
dishwashers.
Position the appliance in the desired location. The back should rest against the wall behind it, and the sides,
along the adjacent c abinet s or walls. The dishwasher is equipped with water supply and drain hose s that can
be positioned ei ther to th e right or the left s ides to facilitate proper i nstall ation.
When not in Use for a LongTime
It is r ecommend that you ru n a was h cycle with the
dishwasher empty and then re move the plug from the
socket, turn off the water supply and leave the door of
the appliance slightly open. This will help the door
seals to last longer and pr event odours from forming
within the appliance.
Moving the Appliance
If the applianc e must be mov ed, try to keep it in the
vertical po sition. If absolutely necessary, it can be
positioned on it s back.
Seals
One of the factors that cau s e odour s to form in the
dishwasher is food that remains trapped in the seals.
Periodic cleaning with a dam p sponge w ill prevent this
from occur ring.
Once the appliance i s positioned fo r levelling, the height of the dishwasher
may be altered via adjustment of the sc rewing level of the feet.
For personal safety:
DO NOT USE AN EXTENSION CORD OR AN ADAPTER PLUG WITH THIS APPLIANCE.
DO NOT, UNDER ANY CIRCUMSTANCES, CUT OR REMOVE THE EARTHING
CONNECTION FROM THE POWER CORD.
Please look a t the rating label to know the rating voltage and c onnect the dishw asher t o the appropr iate power s upply.
Use th e required fuse 10 amp, time delay fus e or circuit br eaker recommended and pr ovide separate circuit ser ving
only this appliance.
Ensure the voltage and frequency o f the powe r being corresponds to
those on the rating plate. Only inse rt t he plug into an electr ic al s ocket whic h is earthed
properl y. If the electrical socke t to which the appliance m ust be c onnected is not
appropriate for the plug , replace the sock et, rather tha n using a adaptors or the like as
they could cause overheating and burns.
This appliance must be earthed. In the event of a malfunction or breakdown, earthing will reduce the risk of
electric shock by providing a path of least resistance for the electric current. This appliance is equipped witha
cord having an equipment-earthing conductor and an earthing plug. The plug must be plugged into an
appropriate outlet that is installed and earthed in accordance with all local standards and requirements.
Page 16

Improper connection of the equipment earthing conductor can result in the risk of an
electric shock.
Check with a qualified electrician or service representative if you are in doubt whether the
appliance is properly earthed.
Do not modify the plug provided with the appliance. If the plug does not fit properly to the
outlet, please have a qualified electrician to install a proper outlet.
for personal safety:
DO NOT USE AN EXTENSION CORD OR AN ADAPTER PLUG WITH THIS APPLIANCE.
DO NOT, UNDER ANY CIRCUMSTANCES, CUT OR REMOVE THE
CONNECTION
Connect the cold water supply hose to a thr eaded 3/4(inc h) c onnec tor a n d mak e sure
that it i s fastened tightly in place.
If the water pipes ar e new or have not been us ed for an ex tended period of ti me, let the
water run to ma ke sure that the water i s clear. This precaution is needed to avoi d the
risk of t he w ater inle t to b e blocke d and damage the appliance.
Please close t he hydrant after using.
FROM THE POWER CORD.
EARTHING
Insert the dra in hos e into a dra in pipe wit h a minim um diam eter o f 40mm, or let it run into the sink, mak ing s u re to
avoid bending or c r imping it. The top o f the hose must be less than 1000mm.
Front
Counter
NOTE
The top of the hose
must be less than
A
1000mm.
Drain pipe
B
40mm
Page 17

How to Drain Exces s Water From Hoses
If the sink is mo re than 1000mm higher than the floor, the exce ss w ater in hoses cannot be drained directly
into the sink. It will be nec essar y to drain ex ces s water from hoses into a bowl or suitable
container tha t i s held outsid e and low er than the sin k.
Water Outlet
Connect the w ater drain hose. The dra in hose must be corre ctly fitted to avoid water leaks.
Ensure that the wa ter drain hose is not kinked or squashed.
Extension Hose
If you needadr ain hose extension , make su re to use a similar d rain hose.
It mus t be no longer t han 4 metres, otherwise the cleaning effect of the dishwasher could be reduced.
Syphon Connection
The waste connecti on m ust be at a height less than 1000 mm ( maximum) from the bottom of the dis h.
The water drain hose should b e fixed.
The following things should be checked b efore starting the dishwasher.
1 The dishwasher is l evel and fixed properly.
2 The inlet valve is open.
3 There is a leakage at the connections of the conducts.
4
The wires are tightly connected.
5 The power is switched on.
6
The inlet and drain h oses are knotted.
All packing and print materials should be taken out of the dishwasher.
7
After installation, ple ase make sure to keep this manua l.
The content of this manual is very helpf ul to the users.
Page 18

Fuse blown, or the
circuit breaker acted
Replace fuse or reset circuit breaker. Remove any other
appliances sharing the same circuit with the dishwasher
Power supply is not
turned on
Error code:E1;
Water pressure is low
Door of dishwasher
not properly closed.
Kink in drain hose
Filter clogged
Kitchen sink clogged
Improper detergent
Spilled rinse-aid
Make sure the dishwasher is turned on and the door is
closed securely.
Make sure the power cord is properly plugged into the
wall socket.
Check that the water supply is connected properly and
the water is turned on.
Make sure to close the door properly and latch it.
Check drain hose.
Check coarse filter
the
(see section titled)
Check the kitchen sink to make sure it is draining well.
If the problem is the kitchen sink not draining ,you may
need a plumber rather than a serviceman for dishwashers.
Use only the special dishwasher detergent to avoid suds.
If this occurred, open the dishwasher and let suds evaporate.
Add 1 gallon of cold water to the tub. Close and latch the
dishwasher, then select any cycle. Dishwasher will drain
out the water at the first step. Open the door after draining
is stop and check if the suds is disappeared.
Repeat if necessary.
Always wipe up rinse-aid spills immediately.
" Cleaning The Filter"
Detergent with
colourant was used
Hard water minerals
The affected items are
not corrosion resistant.
A sp ay arm is
r
knocking against
an item in a basket
Items of crockery
are loose in the
wash cabinet
This may be caused
by on-site installation
or the cross-section of
the piping.
Make sure that the detergent is the one without
colourant.
To clean the interior, use a damp sponge with
dishwasher detergent and wear rubber gloves.
Never use any other cleaner than dishwasher
detergent for the risk of foaming or suds.
The items should be corrosion resistant.
Interrupt the program, and rearrange the items
which are obstructing the sp ay arm.r
Interrupt the program,
and rearrange the items of crockery.
This has no influence on the dishwasher function.
if in doubt, contact a suitably qualified plumber.
Page 19

Problem Possible Causes What To Do
The dishes
are not clean
The dishes were not
loaded correctly.
The program was
not powerful enough.
Not enough detergent
was dispensed.
Items are blocking
the path of spray arms.
See notes in " Loading the Dishwasher Baskets ".
Select a more intensive programme.
See" Wash Cycle Table ".
Use more detergent, or change your detergent.
Rearrange the items so that the sprayer can rotate freely.
Unsatis
-factory
washing
result
Unsatis
-factory
drying
result
Cloudiness
on glassware
Black or gray
marks on dishes
Detergent left in
dispenser cups
The dishes
are not drying
The filter combination
is not clean or
is not correctly fitted.
This may cause
the spray arm jets
get blocked.
Combination of soft
water and too much
detergent.
Aluminum utensils
have rubbed against
dishes.
Dishes block
detergent cup opens.
Improper loading
Too little rinse-aid
Dishes are removed
too soon
Wrong program
has been selected
Use of cutlery with
a low-quality coating
Clean and/or fit the filter combination correctly.
Clean the spray arm jets. See "Cleaning the Spray
Arms".
Use less detergent if you have soft water and select
a shortest cycle to wash the glassware and to get
them clean.
Use a mild abrasive cleaner to eliminate those marks.
Re-loading the dishes properly.
Load the dishwasher as suggested in the directions.
Increase the amount of rinse-aid/refill the rinse-aid
dispenser.
Do not empty your dishwasher immediately after
washing. Open the door slightly so that the steam can
escape. Begin unloading the dishwasher only once the
dishes are barely warm by touching. Empty the low
basket first. This prevents water form dropping off
dishes in the upper basket.
In short program the rinse temperature is lower.
This also lowers cleaning performance. Choose
a program with a long high rinse temperature.
Water drainage is more difficult with these items.
Cutlery or dishes of this type are not suitable for
washing in the dishwasher.
Error CodesError Codes
When some malfunctions occur, the appliance will display error codes to warn you:
Codes
Soak
Soak+Rapid
90mins
WARNING! WARNING!
Meanings
Longer inlet time.
Not reaching required temperature
Overflow.
If overflow occurs, turn off the main water supply before calling a service.
If there is water in the base pan because of an overfill or small leak,
the water should be removed before restarting the dishwasher.
Possible Causes
Faucet is not opened, or water intake is
restricted,or water pressure is too low.
Malfunction of heating element.
Some element of dishwasher leaks.
1616
Page 20

If overflow occurs, turn off the main water supply before calling a service.
WARNING! WARNING!
If there is water in the base pan because of an overfill or small leaks,
the water should be removed before restarting the dishwasher.
Technical InformationTechnical Information
)
)
d
d
e
e
s
s
lo
lo
c
c
r
r
o
o
o
o
d
d
e
e
h
h
t
t
h
h
it
it
w
w
(
(
0
0
0
0
6
6
5
5
9
9
8
8
845845
5
5
7
7
1
1
1
1
Height : 845mm
Width : 598m m
Depth : 600mm(with the door closed)
Water pressure: 0.04-1.0MPa
Power supply: see rating label
Capacity: 14 place settings
1717
Page 21

Page 22

ILVE Dishwasher Installation and Operating Instructions template pages.indd 2 1/05/2015 9:16 am
Page 23

OPEN 24
ILVE ACCESSORIES ONLINE SHOP
/
7
For a wide range of coee machines, pods, and other ILVE
accessories at the click of a button shop.ilve.com.au
ILVE Dishwasher Installation and Operating Instructions template pages.indd 3 1/05/2015 9:16 am
Page 24

ILVE LIMITED WARRANTY
Eurolinx Pty Limited A.B.N. 50 001 473 347 trading
as ILVE (“ILVE”)
Oce: 48-50 Moore Street, Leichhardt N.S.W 2040
Post: Locked Bag 3000, Annandale, N.S.W 2038
P: 1300 MY ILVE (694 583)
WARRANT Y REGISTRATION
Your ongoing satisfaction with your ILVE product is
important to us. We ask that you complete the enclosed
Warranty Registration Card and return it to us so that
we have a record of the ILVE products you purchased.
Alternatively you can register on line (see registration
card for details)
PRIVACY
ILVE respects your privacy and is committed to
handling your personal information in accordance with
the National Privacy Principles and the Privacy Act 1988
(Cth). A copy of the ILVE Privacy Policy is available at
www.ilve.com.au. ILVE will not disclose any personal
information set out in the Warranty Registration Card
(“Personal Information”) without your consent unless
required by:
1. law;
2. any ILVE related company;
3. any service provider which provide services to ILVE
or assist ILVE in providing services (including repair
and warranty services) to customers. Our purpose in
collecting the Personal Information is
to keep a record of the ILVE product purchased by you,
in order to provide a better warranty service to you in
the unlikely event that there is a problem with your ILVE
product. ILVE may contact you at any one or more of
the address, email address or telephone numbers set
out in the Warranty Registration Card. Please contact
ILVE on 1300 694 583 should you not wish to be
contacted by ILVE.
WARRANT Y
1. Warranty
ILVE warrants that each ILVE product will remain, for
a period of twenty four (24) months computed from
the date of purchase of the ILVE product, free from
defects arising in the manufacture of the ILVE product
(“Warranty”). Except for consumer guarantees set
out in the Competition and Consumer Act 2010 (Cth)
(“Act”), ILVE does not make any further warranties or
representations in relation to ILVE products.
2. What is not Covered by the Warranty.
The Warranty does not apply if an ILVE product is
defective by a factor other than a defect arising in the
manufacture of the ILVE product, including but not
limited to:
(a) damage through misuse (including failure to
maintain, service or use with proper care), neglect,
accident or ordinary wear and tear (including
deterioration of parts and accessories and glass
breakage);
(b) use for purpose for which the ILVE product was not
sold or designed;
(c) use or installation which is not in accordance with
any specied instructions for use or installation;
(d) use or operation after a defect has occurred or been
discovered;
(e) damage through freight, transportation or handling in
transit (other than when ILVE is responsible);
(f ) damage through exposure to chemicals, dusts,
residues, excessive voltage, heat, atmospheric
conditions or other forces or environmental factors
outside the control or ILVE;
(g) repair, modication or tampering by the purchaser or
any person other than ILVE, an employee of ILVE or an
authorised ILVE service contractor;
(h) use of parts, components or accessories which have
not been supplied or specically approved by ILVE.
(i) damage to surface coatings caused by cleaning or
maintenance using products not recommended in the
ILVE product handbook provided to the purchaser upon
purchase of the ILVE product;
(j) damage to the base of an electric oven due to items
having been placed on the base of the oven cavity or
covering the base, such as aluminium foil (this impedes
the transfer of heat from the element to the oven cavity
and can result in irreparable damage); or
(k) damages, dents or other cosmetic imperfections not
aecting the performance of the ILVE in respect of an
ILVE product purchased as a “factory second” or from
display. The Warranty does not extend to light globes
used in ILVE products.
3. Domestic Use
Each ILVE product is made for domestic use. This
Warranty may not extend to ILVE products used for
commercial purposes; under those circumstances the
warranty period is limited to 3 month.
4. Time for Claim under the Warranty
You must make any claim under this Warranty within
twenty eight (28) days after the occurrence of an event
which gives rise to a claim pursuant to the Warranty, by
booking a service call on the telephone number below.
5. Proof of Purchase
Customers must retain proof of purchase in order to be
eligible to make a warranty claim in respect of an ILVE
product.
Continued over...
Page 25

ILVE LIMITED WARRANTY
6. Claiming under the Warranty
Customers will bear the cost of claiming under this
Warranty unless ILVE determines the expenses are
reasonable, in which case the customer must claim
those expenses by providing written evidence of
each expense to ILVE at the address on the Warranty
Registration Card.
7. Sta t uto r y R i ght s
(a) These terms and conditions do not a ect your
statutory rights.
(b) The limitations on the Warranty set out in this
document do not exclude or limit the application of the
consumer guarantees set out in the Act or any other
equivalent or corresponding legislation in the relevant
jurisdiction where to do so would:
(i) contravene the law of the relevant jurisdiction; or
(ii) cause any part of the Warranty to be void.
(c) ILVE excludes indirect or consequential loss of any
kind (including, without limitation, loss of use of the
ILVE product) and (other than expressly provided for in
these terms and conditions) subject to all terms,
conditions and warranties implied by custom, the
general law, the Act or other statute.
(d) The liability of ILVE to you for a breach of any
express or non-excludable implied term, condition or
warranty is limited at the option of ILVE to:
(i) replacing or repairing the defective part of the ILVE
product;
(ii) paying the cost of replacing or repairing the defective
part of the ILVE product;
(iii) replacing the ILVE product; or
(iv) paying the cost of replacing the ILVE product.
(e) Our goods come with guarantees that cannot be
excluded under the Australian Consumer Law.
You are entitled to a replacement or refund for a major
failure and for compensation for any other reasonably
foreseeable loss or damage. You are also entitled to
have the goods repaired or replaced if the goods fail
to be of acceptable quality and the failure does not
amount to a major failure.
8. Defects
Any part of an ILVE product deemed to be defective and
replaced by ILVE is the property of ILVE. ILVE reserves
the right to inspect and test ILVE products in order to
determine the extent of any defect and the validity of a
claim under the Warranty.
*To locate your closest ILVE authorised service agent
please contact ILVE on 1300 649 583, customercare@
eurolinx.com.au or visit
http://ilve.com.au/support/service/
IMPORTANT!
All warranty service calls must be booked via
the customer care department. The team can
be contacted on 1 300 85 64 11 option 1 or
customercare@eurolinx.com.au
Service is delivered through a network of Service
Agents. If the Appliance is located outside our
normal Service Area of our agents you, t he
Customer will need to bear the cost of travel outside
that area.
If you are unable to provide proof of purchase, the
fault is not covered under warranty or the product
is found to be working to specication you may be
required to bear the full cost of the service visit
08042016
WARRANTY REGISTRATION CARD
Please complete and send to ilve at: REPLY PAID 83617
08042016
Last Name: First Name:
Address:
State: Postcode: Email:
Home Phone: Mobile:
Purchase Date:
MODEL NUMBER
1
2
3
4
/ / (Please attach proof of purchase to validate warranty)
SERIAL NUMBER
(if you cannot locate the serial number please call ILVE on 1300 85 64 11)
LEICHHARDT NSW
2040
Page 26

01052015
NOTES
ILVE.COM.AU
You ca n now fi nd us on:
facebook.com/ILVEappliances
twitter.com/ILVE_appliances
youtube.com/ILVEappliances
livewithilve.com
ILVE Dishwasher Installation and Operating Instructions template pages.indd 7 1/05/2015 9:16 am
Page 27

Australia National Telephone Number 1300 MYILVE (694 583)
New Zealand Telephone Number 0508 458 369
ILVE showrooms are open daily from 9am-5pm and Saturdays 10am-4pm
(WA by appointment only on Saturdays)
ilve.com.au
NSW & ACT (Head Oce)
48-50 Moore Street
Leichhardt
F 02 8569 4699
ILVE Dishwasher Installation and Operating Instructions template pages.indd 8 1/05/2015 9:16 am
VIC, TAS & SA
1211 Toorak Road
Camberwell
F 03 9809 2155
QLD
1/42 Cavendish Road
Coorparoo
F 07 3397 0850
WA & NT
Unit 10/55 Howe Street
Osborne Park
F 08 9201 9188
New Zealand
PO Box 11.160
Sockburn Christchurch
F 03 344 5906
 Loading...