

Page 1

Dishwasher Operating
& Installation Manual
ILVE Dishwasher Installation and Operating Instructions template pages.indd 1 1/05/2015 9:16 am
Page 2
ILVE Dishwasher Installation and Operating Instructions template pages.indd 2 1/05/2015 9:16 am
Page 3

OPEN 24
ILVE ACCESSORIES ONLINE SHOP
/
7
For a wide range of coee machines, pods, and other ILVE
accessories at the click of a button shop.ilve.com.au
ILVE Dishwasher Installation and Operating Instructions template pages.indd 3 1/05/2015 9:16 am
Page 4
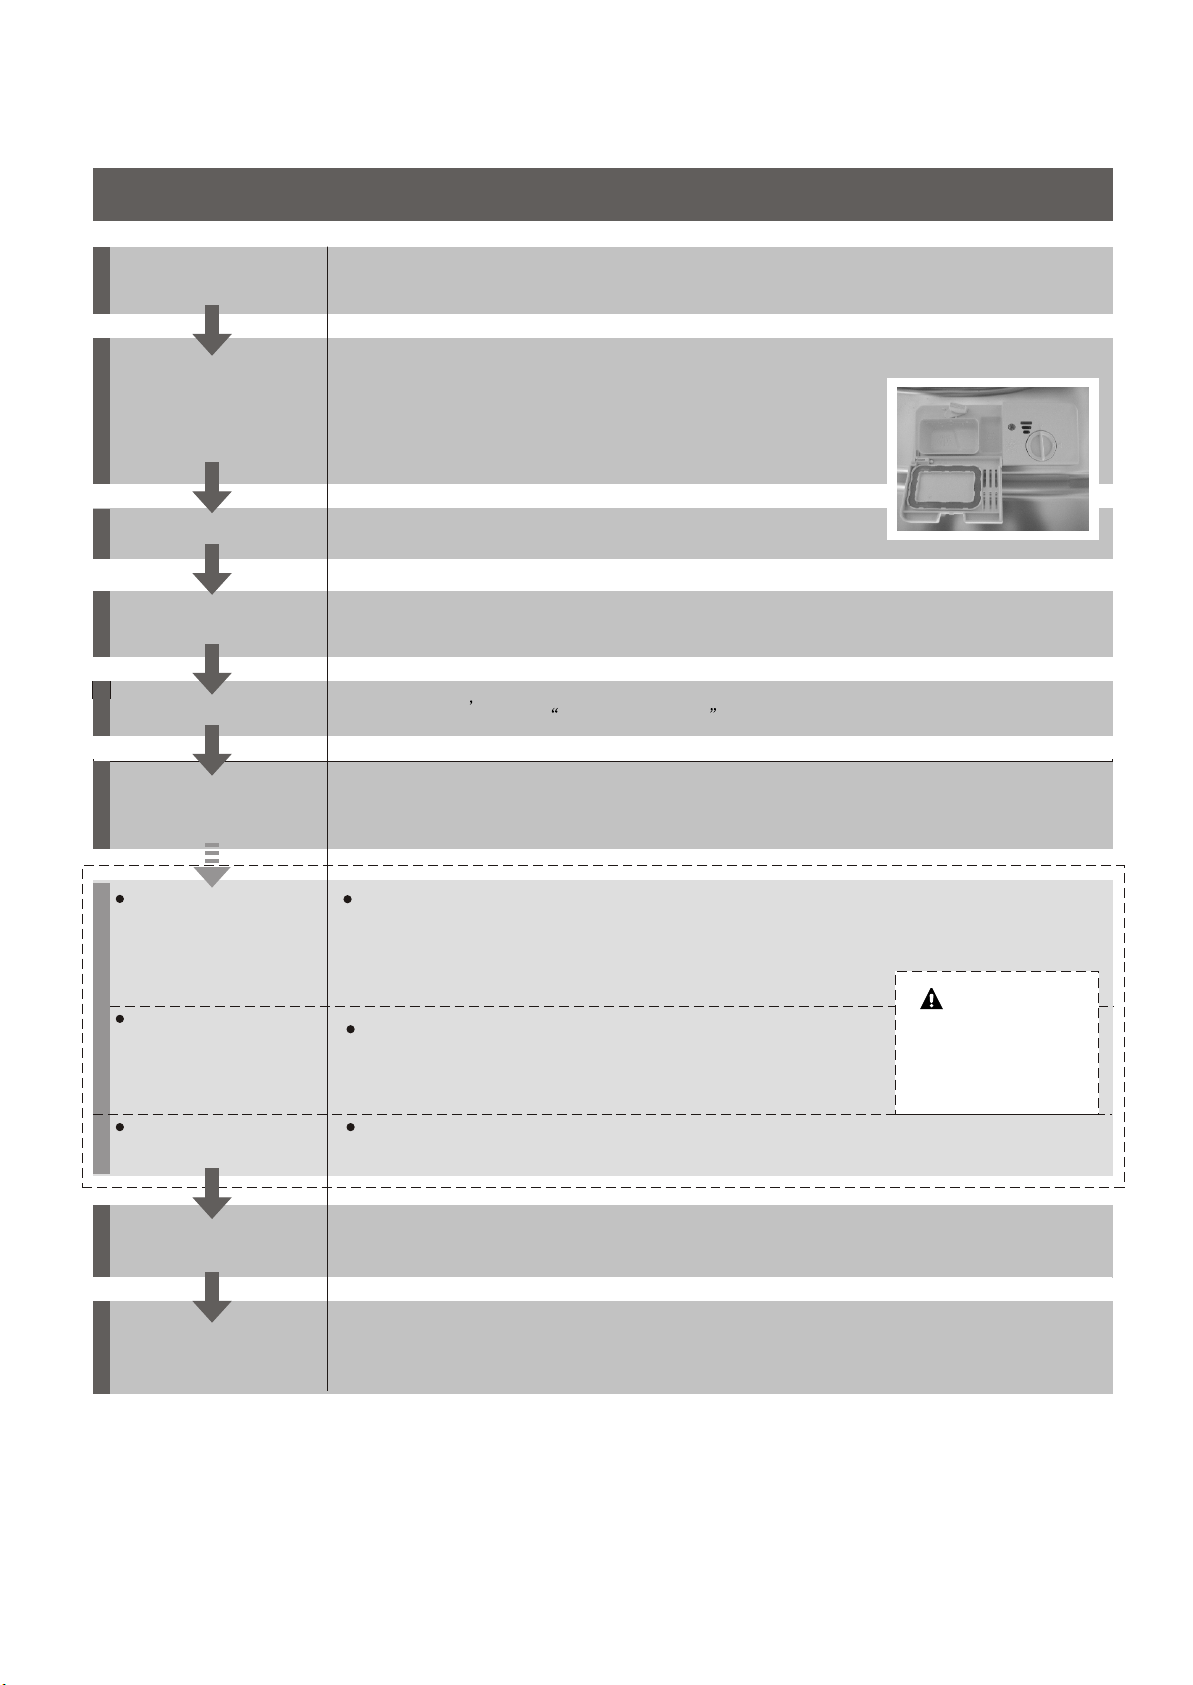
Quick Operation GuideQuick Operation Guide
For detailed operating metho d read the corre sponding conte nt on the instruction manual.
Switch on the appliance
Fill the detergent dispenser
Press the Power switch button to switch on the appliance, Open the door.
Compartment A:Compartment A:
For each wash cycle.
Compartment B:B:
For programs with pre-wash only.
(Follow the user instructions)
C
B
A
Check the rinse aid level
Load the baskets
Select a programme
Running the dishwasher
Changing the programme
Add forgotten dishes in the
dishwasher.
If the appliance is switched
off during a wash cycle.
Mechanical indicator C. Mechanical indicator C.
Electric indicator on control panel (if provided).
Scrape off any large food particles. Soften remnants of burnt food in pans,
then load the baskets. Refer to the dishwasher loading instructions.
Close the door Press the program button until the selected program lights up.
( See the section entitled Operation instruction )
T urn on the water tap and press the Start/Pause button. The machine will start working
after about 10 seconds.
1. A running cycle can only be modified if it has been running for a short time. Otherwise the detergent
may have already been released and the water already drained. If this is the case, the detergent
dispenser must be refilled.
2. Press the Start/Pause button ,then press the program button more than 3 seconds to cancel the
running programme. .
3. Select a new programme.
4. Restart the dishwasher.
1.Press the start/pause button to stop the machine.
2.Open the door.
3.Add the forgotten dishes.
4.Close the door, then press the start/pause button, the dishwasher will
start running again after 10 seconds.
If the appliance was switched off during a wash cycle, when switch
on again, please re-select the washing cycle and operate the dishwasher from the beginning.
WARNING!
Open the door carefully .
Hot steam may esca pe
when the door is op ene d!
Switch off the appliance
Turn off the water tap,
unload the baskets
When the working cycle is finished, the buzzer of the dishwasher will sound 8 times, then stop.
Turn off the appliance using the Power button.
Since the appliance is standing by, it will power off automaticly after 30 minutes without any operation.
Warning: wait a few minutes (about 15 minutes) before unloading the dishwasher to avoid scald,
as the dishes and utensils are still hot and more susceptible to break.
They also could dry better.
Page 5
Page 6

1.IMPORTANT SAFETY INFORMATION1.IMPORTANT SAFETY INFORMATION
WARNING! WARNING!
When using your dishwasher,
follow the precautions listed below:
This appliance is intended to be used in household and similar
applications such as:
-staff kitchen areas in shops, offices and other working environments;
-farm houses;
-by clients in hotels, motels and other residential type environments;
-bed and breakfast type environments.
This appliance can be used by children aged from 8 years and above and
persons with reduced physical, sensory or mental capabilities or lack of
experience and knowledge if they have been given supervision or
instruction concerning use of the appliance in a safe way and understand
the hazards involved. Children shall not play with the appliance. Cleaning
and user maintenance shall not be made by children without supervision.
(For EN60335-1)
This appliance is not intended for use by persons(including children )with
reduced physical, sensory or mental capabilities, or lack of experience and
knowledge ,unless they have been given supervision or instruction
concerning use of the appliance by a person responsible for their safety.
(For IEC60335-1)
This appliance is for indoor use only, for household use only. To protect
against the risk of electrical shock, do not immerse the unit, cord or plug in
water or other liquid.
Please unplug before cleaning and maintenance the appliance .Use a soft
cloth moisten with mild soap, and then use a dry cloth to wipe it again.
EARTHING INSTRUCTIONS
This appliance must be earthed. In the event of a malfunction or breakdown,
earthing will r e d u c e the r i s k o f an electric s h o c k b y p r o v i d i n g a p a t h o f l e a s t
resistance o f e l e c t r i c c u r r e n t . T h i s appliance is e q u i p p e d w i t h a c o r d h a v i n g
an equipment-earthing conductor and a earthing plug.
The plug must be plugged into an appropriate outlet that is installed and
earth ed in accordance with all local codes and ordinances.
Improper connection of the equipment-earthing conductor can result
in the risk of an electric shock. Check with a qualified electrician or service
representative if you are in doubt whether the appliance is properly earthed.
Do not modify the plug provided with the appliance; If it does not fit the outlet.
Have a proper outlet installed by a qualified electrician.
1-11-1
Page 7

Do not abuse, sit on, or stand on the door or dish rack of the dishwasher.
Do not operate your dishwasher unless all enclosure panels are properly in place.
Open the door very carefully if the dishwasher is operating, there is a risk of water
squirting out.
Do not place any heavy objects on or stand on the door when it is open. The
appliance could tip forward.
When loading items to be washed:
1) Locate sharp items so that they are not likely to damage the door seal;
2) Warning: Knives and other utensils with sharp points must be loaded in the
basket with their points down or placed in a horizontal position.
Check that the detergent powder is empty after completion of the wash cycle.
Do not wash plastic items unless they are marked dishwasher safe or the
equivalent. For plastic it ems n check th e m anufacturer's
ot so marked,
recommendations.
Use only det ergent and rins e add itives des igned for a n a u t o m a t i c dish washer.
Never use soap, laundry detergent, or hand washing detergent in your dishwasher.
Children should be supervised to ensure that they do not play with the appliance.
The door should not be left open, since this could increase the risk of tripping.
If the supply cord is damaged, it must be replaced by the manufacturer or
its service agent or a similarly qualified person in order to avoid a hazard.
During installation, the power supply must not be excessively or dangerously
bent or flattened.
Do not tamper with controls.
The appliance is to be connected to the water mains using new hose sets and
that old hose-sets should not be reused.
The maximum number of place settings to be washed is 6.
The maximum permissible inlet water pressure is 1MPa.
The minimum permissible inlet water pressure is 0.04MPa.
1-21-2
Page 8

2.Disposal2.Disposal
Dispose of the dishwasher packaging material correctly.
All packaging materials can be recycled.
Plastic parts are marked with the standard international
abbreviations:
PE for polyethylene, e.g. sheet wrapping material
PS for polystyrene, e.g. padding material
POM polyoxymethylene, e.g. plastic clips
PP polypropylene, e.g. Salt filler
ABS Acrylonitrile Butadiene Styrene, e.g. Control Panel .
WARNING! WARNING!
Packaging material could be dangerous for children!
For disposing of package and the appliance please go to a
recycling centre. Therefore cut off the power supply cable
and make the door closing device unusable.
Cardboard packaging is manufactured from recycled paper
and should be disposed in the waste paper collection for
recycling.
By ensuring this product is disposed of correctly, you will
help prevent potential negative consequences for the
environment and human health, which could otherwise be
caused by inappropriate waste handling of this product.
For more detailed information about recycling of this
product, please contact your local city office and your
household waste disposal service.
DISPOSAL: Do not dispose this product as unsorted
municipal waste. Collection of such waste separately for
special treatment is necessary.
22
Page 9
3.Operation Instruction3.Operation Instruction
IMPORTANTIMPORTANT
To ge t the best performance from you r dishwasher, read a ll operating instructions
before using it for the first time.
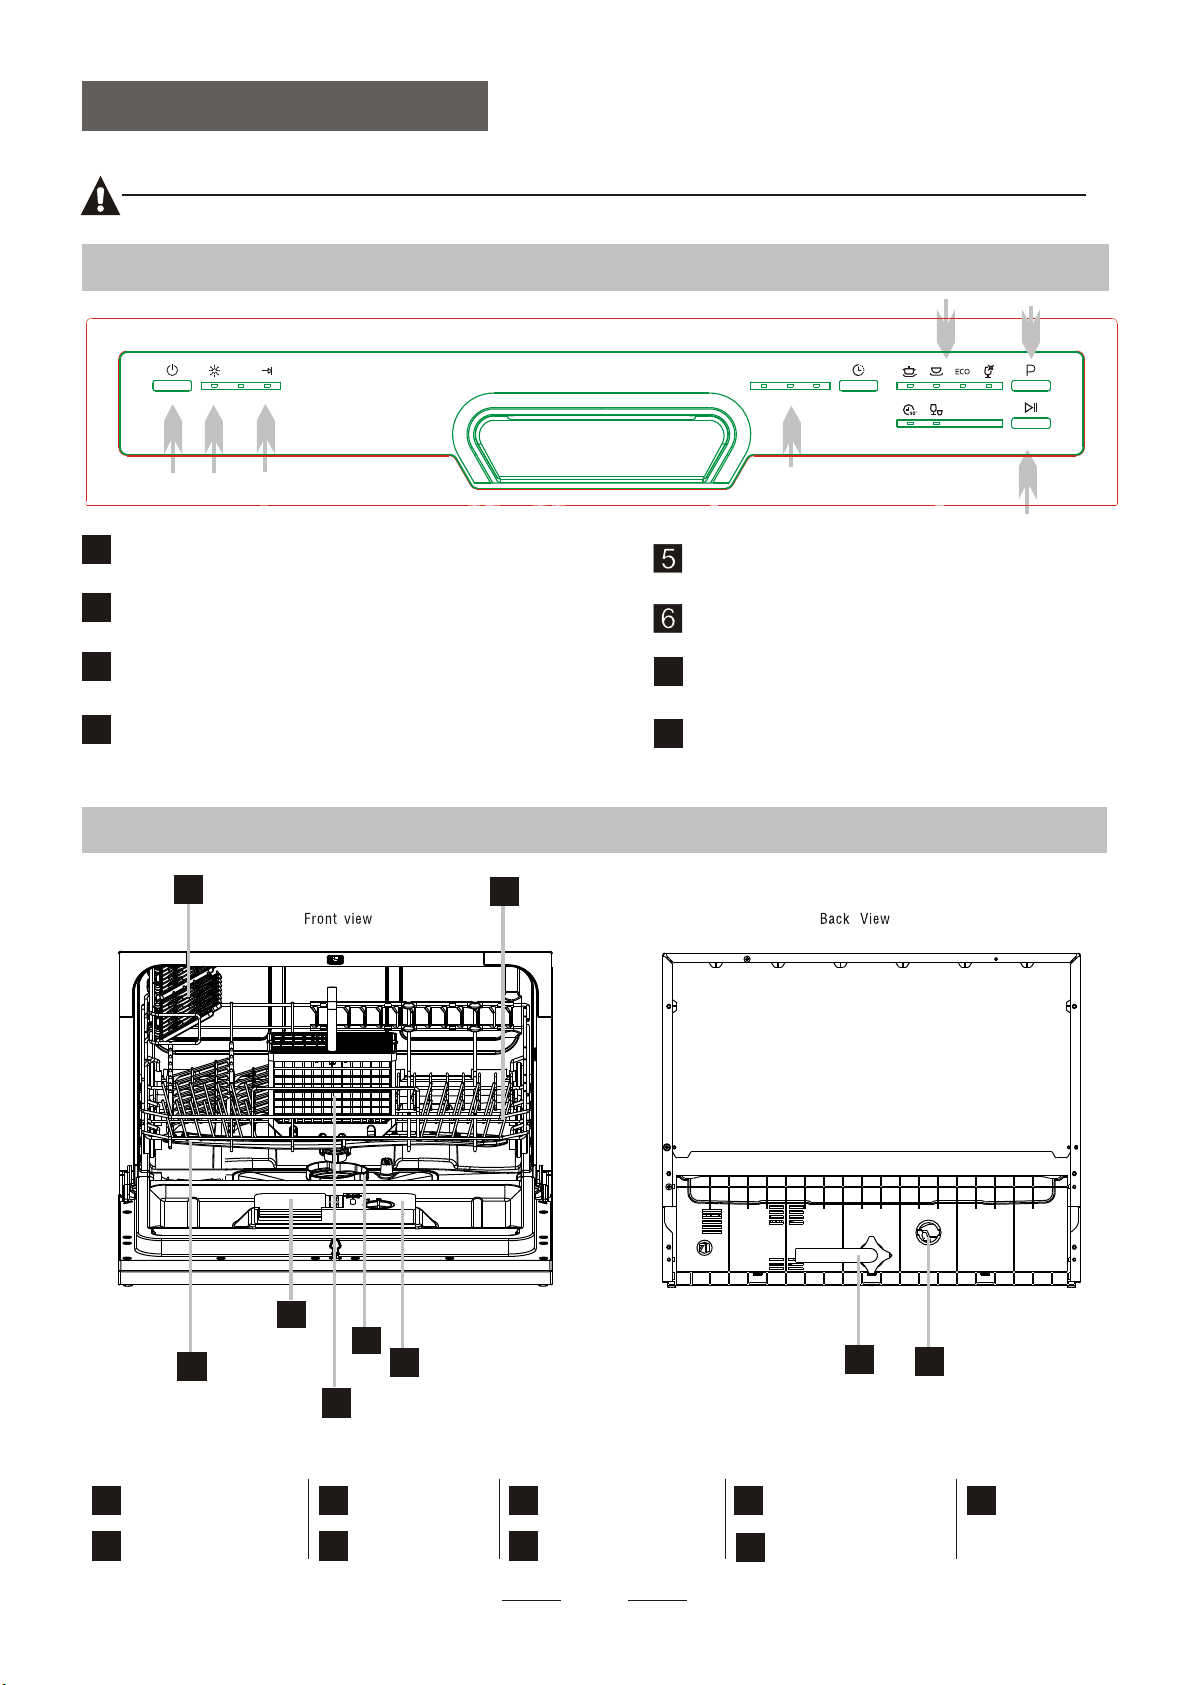
Control PanelControl Panel
1
2
3
Power Button: To turn on/off the power supply.
11
Rinse Aid War ning Light : To be on whe n the
2
rinse aid dispenser n eeds to be refilled ..
Program ending indicator: To be on when the
3
washing has been f inished.
Delay time:2/4/6/8 hours option .
4
(6h:the 2h an d 4h li ghts on at the sam e ti me).
46
8h8h
2h2h 4h4h
4
Delay Button : To select the delay tim e.
Program indicator light
Program Button : To select the wash cycl es
7
Start/Pause Button: Press this button to start
8
or pause the di shwasher.
47
8
Dishwasher FeaturesDishwasher Features
7
2
4
1
3
5
6
8
9
Spray Arms
1
2
Cutlery Basket
3
Filter assembly Detergent Dispenser
4
Rinse Aid Di sp en se r
5
Basket
6
3
Cup Shelf
7
Inlet pipe co nne ctor
8
Drain pipe
9
connector
Page 10

4.Prior to using for the first time4.Prior to using for the first time
A. Rinse Aid DispenserA. Rinse Aid Dispenser
Rinse Aid D i sp en s er
The rinse aid is r eleased during the fi nal rinse to pre vent water forming droplets on your dishes, which can leave
spots and stre aks. It also im proves drying by allo wing water to rol l off the dishes. Your dishwasher is designed t o
use liquid rin se aids. The rinse aid di spenser is located inside the doo r next to the detergent dispenser. To fill t he
dispenser, open the c ap an d pour the rins e aid into the dispenser unt il the level indicator tur ns completely black.
The volume of the r ins e aid container is about 110ml.
Function of Rinse Aid
Rinse aid is automatically added during the last rinse, ensuring thorough r insing, spot and st reak fr ee help the drying.
Attention!
Only use branded rinse a id for dishwasher. Never fill the ri nse aid dispenser with any other sub stances
(e.g. Dishwasher c leaning agent, liquid detergent). This would damage the appliance.
When to Refill the Rinse Aid Dispenser
If there is no r inse-aid warning l ight in t he c ontrol pane l, you c an judge the amo unt of rins e-aid by the col or
of the optical l evel indica tor C located next t o the ca p. When t he rinse-ai d co ntainer is full , the whole
indicator will be d ark. As t he r inse-aid di minishes, t he size of the dark d ot decr eases. You should never le t
the rinse aid g et below 1 / 4 full.
As the ri nse aid dimini she s, the size of the black dot
on the ri nse aid level i ndi cator chan ges , as illust rat ed below.
Full
3 / 4 ful l
1 / 2 ful l
1 / 4 full - S hou ld refill to elim inate spott ing
Empty
C
C (Rinse-Aid ind icato r)C
How to fill the Rinse Aid Dispenser
To open the dispenser, turn the c ap to the "open" (lef t) arrow and lift it out.
1
Pour the ri nse aid into th e dis penser, being careful not t o overfill.
2
Replace the cap by ins erting it aligned with "open" arrow and turning it t o the closed (right) arr ow.
3
NOTE:NOTE:
Clean up any r inse aid spill dur ing fillin g wi th an absorben t clot h to avoid exce ssive foaming
during the ne xt w ash. Don't forget to rep lac e the cap before y ou clo se dishw ash er door.
4
Page 11

Adjusting Rinse Aid Dispenser
Ad j us t l ev er
Ad j us t l ev er
(Rinse)
(Rinse)
The rinse aid dispenser has six or four set tings. Always start with the dispenser
set on "4". If spots and p oor drying are a problem, inc rease the a mount of rinse
aid dispensed by removing the di spenser lid and rotating the d ial t o "5". If the
dishes still ar e not d rying properly or are sp otted, ad just the dial to t he ne xt
higher number un til your dish es are sp ot-free. The reco mmended setting is "4".
(Factory value is "4".)
MAXMAX
NOTE:NOTE:
Increase the dose if there are d rops of water or lime sp ots on the dis hes aft er washing.
Reduce it if there ar e sti cky whitish stains o n you r dishes or a bluis h film on glassware or
knife blades.
B. DetergentB. Detergent
Detergents have chemical ingredients th at are necessary to remove dir t, crush dirt and t ransport it out of t he di shwasher.
Most of the commercial quality detergents are su itable for this purp ose.
Normally new pu lve rised deter gent is withou t phos phate,thus the wa ter softene r func tion of
phosphate is no t gi ven. If deterg ent s without phos phate were use d in ca se of hard water
often white spots a ppear at dis hes and glasses . In thi s case pleas e add mo re detergen t to rea ch
better results. De ter gents witho ut chl orine do only b leach a little . Stro ng and coloure d spots will no t
removed completely. In this case pl eas e choose a prog ram with highe r temp erature.
Concentrated Detergent
Based on their c hemical com pos ition, d ete rgents can b e sp lit in tw o ba sic type s:
Conve nti onal, alkal ine deterge nts wit h caustic co mpo nents.
Low al kal ine concent rated detergents w ith natural enzyme s.
The use of Nor mal washing pr ogr am in combi nat ion with conce ntr ated detergen t reduces poll uti on and is
good for your d ishes.
Detergent Tablets
Detergent tablets of d ifferent br and s dissolv e at different speeds. For this reason so me
detergent tablets cannot d issolve and dev elop their full cle aning power dur ing short
Program. Therefore please use lo ng prog ram when usi ng d etergen t ta blets, to
ensure the complete r emoval of de ter gent residuals .
Detergent Dispenser
The dispenser mu st b e refilled bef ore th e start of each wa sh c ycle followin g th e instruction s
provided in th e Wa sh Cycle Table. Your dishwasher use s less deterge nt a nd rinse aid then
conventional dishwasher. Generally, only one ta ble spoon of deter gent is needed for
a normal wa sh l oad. More heav ily so iled items nee d mo re detergent. Always add the
detergent just be for e starting the dis hwasher, otherwise it cou ld get damp and wi ll n ot
dissolve properly.
5
Page 12

Adding detergent to dispenser
Push latch to openPush latch to open
NOTE:NOTE:
If the lid is cl osed: push the lat ch to open.
Always add th e de tergent just b efo re starting ea ch was h cycle.
Only use br and ed detergen t and r inse aid for dish washer.
AA BB
WARNING! WARNING!
Dishwasher detergent is corrosive!
Take care to keep it out of reach of children.
Proper Use of Detergent
Use only detergent s pecificall y ma de for use in dis hwa shers. K eep your deterg ent fres h an d dry.
Don't put powder d etergent in to t he dispenser un til you're r ead y to wash dishes .
Fill in detergent dispenser
Fill the detergent d ispense r wi th detergen t.
The marking in dic ates the dosin g levels, as
illustrated on right:
Locat ion of main w ash cycle de ter gent.
A
Locat ion of pre-wash cyc le d etergen t.
B
Please observe th e ma nufactu rer s dosing and stor age
Recommendations as st ate d on the det erg ent packaging .
Close the li d an d press until it l ock s in place.
If the di she s are heavily s oil ed, place a n addi tional
detergent dose in the pr e-wash d ete rgent chamber . This deterge nt will take eff ect during the pr e-wash phase.
BA
NOTE:NOTE:
You see inf orm ation about th e amou nt of deter gen t for the singl e prog ram on the p age 9.
Please be aware t hat soiling lev els and w ate r hardne ss can e ffe ct wash re sul ts.
Please observe th e ma nufacturer 's rec ommendatio ns on the deter gen t packaging.
6
Page 13

5.Loading the Dishwasher Baskets5.Loading the Dishwasher Baskets
RecommendationRecommendation
Consi der buying uten sils which are i den tified a s di shwasher-p roof.
Use a mil d de tergent that i s desc ribed as 'k ind of dishes'. If ne ces sary, see k fu rther
infor mat ion from det ergent manu fac turers.
For pa rti cular items, s ele ct a programme wi th as low a temper atu re.
To prevent damage, do not ta ke glass and cutl ery out of the dishwa sher immedi ate ly
after the pr ogramme has en ded .
Suitability of use in the dishwasherSuitability of use in the dishwasher
Not suitable for use
Cutlery with wo ode n, horn china o r
mother-of-pearl handles.
Plastic items that a re not
Older cutlery with g lued parts tha t is no t
temperature resistant.
Bonded cutlery items o r di shes.
Pewter or items .
Crystal glass .
Steel items subje ct to rusting
Wooden platters.
Items made from s ynt hetic fi bre s.
Attention before or after loading the Dishwasher BasketsAttention before or after loading the Dishwasher Baskets
For th e be st performance of t he dishwash er, follow t hese loadin g gu ideline s.
Featu res and appear anc e of basket s an d cutlery b ask ets may var y from your model .
Scrape off any food part icles. S often remna nts of burnt food in pan s.
It is no t ne cessary to rin se the dish es und er runni ng wat er.
Place objects in t he dishw ash er in follow ing way:
1.Items s uch as cups, gla sse s, pots/pan s, etc. a re f ace down war ds.
2.Curved items, or t hose wit h reces ses, sho uld be loaded at asl ant so th at w ater can run off.
3.All u ten sils are st ack ed securely an d can not ti p over .
4.All u ten sils are pl ace d in the way th at t he spray ar ms can rotated fr eel y during wa shi ng.
copper
heat r esi stant.
Limited suitability
Some t ype s of glasses can become
dull a fte r a larg e number of w ashes.
Silve r an d aluminium parts h ave a
tende ncy to dis colour duri ng was hing.
Glaze d pa tterns may fade if ma chi ne
washe d fr equently.
NOTE:NOTE:
Load hollow items such as cups, glass es, pans etc, w ith the openin g facing downw ard s so that
water cannot co lle ct in the co nta iner or a deep bas e.
Dishe s an d items of cutler y mu st not lie ins ide one another, or c ove r each othe r.
To avoid damage to glasse s, they must no t to be to uched.
Long b lad ed knives stor ed in a n upright p osi tion are a potent ial hazard!
Long a nd/ or sharp items of cut lery such a s carv ing knives mus t be po sitioned
horiz ont ally in the b asket.
Pleas e do no t overload you r di shwashe r. This is im por tant for go od res ults and for
reaso nab le energy cons ump tion.
Very small ite ms shoul d no t be washed in the dishw asher as they co uld easily f all out of the baske t.
7
Page 14

Loading the BasketLoading the Basket
Position the di she s and cookware so tha t they do not get m oved by the spray of wat er.
IN
11
22
Cutlery BasketCutlery Basket
33
77
66
44
55
1
Cups
3
Glasses
5
Dinner plates
Cutlery basket
2
Saucers
4
Dessert dishes
6
Soup plates
7
Cutlery should be p laced into t he cutl ery basket w ith han dles at the b ottom.
Soup spoons
1
IN
2
Forks
Knives
3
Tea spoons
4
Dessert spoons
5
WARNING!
Do not let any item extend through bottom.
Always load sharp utensils with the sharp point down!
For personal safety a nd a top q ual ity clean, m ake sure pla ce the silverware i n the basket as f oll ows:For personal safety a nd a top q ual ity clean, m ake sure pla ce the silverware i n the basket as f oll ows:
They do no t ne st together.They do not nes t together .
Place silverware wi th h andles-dow n.Place silverware wi th h andles-dow n.
But place kn ive s and other pot ent ially dangero us utensils ha ndl es-up. But place kn ive s and other pot ent ially dangero us utensils ha ndl es-up.
8
Page 15

6.Starting a washing programme6.Starting a washing programme
Wash Cycle TableWash Cycle Table
Program
Intensive
Heavy
(* AS/NZS 200 7. 1)
Glass
90 min
Cycle Selection
Information
For heaviest soil ed crockery,
and normally soi led pots
pans dishes etc with dri ed
on soiling.
For heavily soiled loads,
such as pots, plates, glasses
and lightly soiled p ans .
For normally soi led loads,
such as pots, plates, glasses
and lightly soiled pans.
standard daily cy cle.
For lightly soiled loads,
such as glasses, cr ystal an d
fine china.
For lightly soiled crockery
and glass.
Description
o f Cycle
Pre-wash(50 )
Wash (55 )
Rinse
Rinse
Rinse(70 )
Drying
Pre-wash
Wash (60 )
Rinse
Rinse (70 )
Drying
Pre-wash
Wash (47 )
Rinse
Rinse(50 )
Drying
wash(45 )
Rinse
Rinse(60 )
Drying
Wash(65 )
Rinse(70 )
Drying
Detergent
pre/main
5/17.5g
(1or2 pieces)
5/17.5g
(1or2 pieces)
5/17.5g
(1 pieces)
22.5g
(1 pieces)
22.5g
(1 pieces)
Running
time(min)
140
120
135
70
90
Energy
(Kwh)
0.85
0.65
0.45
0.45 6
0.65
Water
(l)
Rinse
Aid
9.7
7.8
7.4
7
A shorter was h for lightly soiled
Rapid
NOTE:NOTE:
* : This pr ogr am is the test cy cle . The informat ion for comp arability t est
in acc ord ance with AS/NZ S 20 07.1, as follows:
loads and qu ick wash.
( )
Means: need to fil l rinse aid into t he Rin se-Aid D isp enser.
Capacity: 6 se tti ng
Rinse aid se tti ng: 6
Open the do or s lightly 50mm t o assi st in dryin g of th e dishes after eve ry wash
Wash (40 )
Rinse
Rinse
15g
30
Turning On the ApplianceTurning On the Appliance
Start ing a wash cycle
1. Dra w ou t the basket(se e the section en tit led Loading the Dishwasher bas ket ).
2. Pou r in th e detergent (se e th e sectio n entit led Detergen t an d Rinse A id ).
3. Ins ert th e plug into the so cke t. The pow er supply is 22 0-2 40
VAC 50 H Z, the specifi cat ion of the socket is 10 A 250 VAC.
4. Mak e sure that the water su ppl y is turned on to f ull pressure.
5.Press the pr ogr am button, the was h program w ill be changed as fol lowing direct ion:
ECO->Glass->90 min->Rapid->Intensive->Heavy;
If a pr ogr am is selected , th e correspondi ng light will b e on. T hen press the
Start/Pause button, the di shwasher be gin s to start.
0.32
5.8
NOTE:NOTE:
When yo u press the Start/Pa use button to pause during wash ing,
the pro gram light will stop blinking and the dishwasher wi ll sound
every m inute unless you pre ss the Start/ Pause button to st art.
9
Page 16

Change the ProgramChange the Program
Premise:
worked for a short time.
released, and the appliance may have already drain ed the wash water. In this
case, the detergent dispenser must be refilled (see the section entitled
"Detergent " ).
Press Start/Pause Button, then press the Program button more th an three seconds the machine
will be in stand by state ,then you can change the p rogram to the desired cycle setting (see
the section entitled " Star ting a wash program ).
NOTE:NOTE:
You can modify the washing program, If the di shwasher just
Otherwise, the detergent may have already been
If you open the door during washing, the machi ne will pause. When you close the door
, the machine will keep on working after 10 se conds.
Forget to Add a Dish?Forget to Add a Dish?
A forgotten dish can be added any time before the detergent cup opens.
Press the start/pause button.
1
Open the door a little to stop the washing.
2
After the spray arms stop working, you can open the door
3
completely.
Add forgotten dishes.
4
Close the door
5
Press the start/pause button, the dishwasher will run
6
after 10 seconds.
At the end of the Wash CycleAt the end of the Wash Cycle
When t he wor kin g cycle has fin ish ed, the buzzer of dis hwasher will s oun d 8 seconds, then sto p. Turn off
the ap pli ance using the Power but ton, shut off the water supply and op en the door of the dis hwasher.
Wait a few minutes be for e unloading th e di shwasher to av oid sc ald, the dishe s an d utensils are st ill hot
and mo re sus ceptible to break age . They wil l al so dry better.
Switch Off the Dishwasher
1.Switch off t he dishwa she r by pressing t he Pow er butto n.
2.Turn off the water tap.
Open the door carefully.
Hot dishes ar e se nsitive to kno cks . The dishes sho uld be allo wed to cool down arou nd 15 minutes
before removing fr om t he appliance.
Open the di shw asher's doo r, leave it ajar and wait a f ew minutes bef ore re moving the dis hes . In this wa y they
will be cooler and the drying will be improved.
Unloading the dishwasher
It is no rma l that the dish was her is wet inside .
WARNING! WARNING!
It is dangerous to open the door when washing,
because the hot water may scald you.
10
Page 17

7.Maintenance and Cleaning7.Maintenance and Cleaning
Filtering SystemFiltering System
The filter prevent l arger remna nts of food or other obj ect s from getti ng insi de the pump.
The fi lte r system c ons ists of a coa rse filt er, a flat (Main filte r)
and a mic ro f ilter (fine filter).
C
Main filter
Food a nd soi l particles tr app ed by this f ilt er are pulveri zed by a
speci al j et on the spray ar m and w ashed do wn to dr ain .
A
A
B
Fine filter
This f ilt er holds s oil an d food residue s in th e sump area and
preve nts it from being red epo sited on the di she s during a cycle.
Coarse filter
Large r it ems, such as pieces of bone or glass, that c oul d block
the drain are t rapped in th e coars e filter . To remove the items
caugh t by this filter, ge ntl y squeeze th e ta p on the top o f th is
filter and li ft i t out.
B
C
Filter assembly
The filter effic iently remo ves food part icl es from the wash w ater, allowing it to be r ecy cled during th e cycle.
For best performance a nd r esults, the fil ter assembl y mu st be cl eaned re gul arly. For this r eas on, it is a good i dea to
remove the la rge r food particl es t rapping in the fi lter after eac h wa sh cycle by rinsi ng t he filter a nd cup under
running water. To remove the fil ter assembly, pull the cup han dle in the upward dir ection.
Never run th e di shwasher with out the filters in pl ace.
WARNING! WARNING!
OpenOpen
The dishwasher mu st n ever be used with out the filters.
Improper replacement of the fi lter may reduc e th e performance level of the appl ian ce
and damage di she s and utensils .
Step 1: C ontraro tate the filter assembly(A,B and C),
then lift it all up.
C
B
NOTE:NOTE:
Step 2: Lift B and C up from A.
A
C
B
Step 3: Separate B and C.
A
If do it from step1 to step 3, the filter system will be removed; while if do it from Step 3 to Step 1,
the filter system will be installed.
11
Page 18

Notes:
- Inspect the fi lters for bloc kin g after every tim e th e dishwash er h as been used.
- By un scr ewing the coar se f ilter, you can re mov e the filter syst em. Remove a ny foo d re mnants and
clean the fi lters under ru nni ng water.
NOTE:NOTE:
The entire filter assembly should be cleaned once a week.
Cleaning The Filter
To clean the coa rse filter and th e fi ne filter, us e a cle aning brush . Reas semble t he fil ter parts as sh own in the figures
on the la st p age and reinse rt the entire assemb ly in the dishw ash er, positioning in its seat and pr essing down war d.
WARNING! WARNING!
When cleaning the filters, don't knock on them. Otherwise, the fil ters could be
contorted and the performance of dishwasher could be decreased .
Caring for the DishwasherCaring for the Dishwasher
The control pa nel can be cleaned by usi ng a lightl y damp ened cloth. Af ter cl eaning, mak e sure to dry it thor oug hly.
For th e ex terior, use a good applia nce polish w ax.
Never use sh arp objects, scou rin g pads or harsh cl eaners on any p art of the dishwashe r.
Cleaning The Door
To cl ean the edge around the door, you sho uld use only a soft war m,
damp cloth. To avoid penetrati on o f water int o the d oor lock and
electrical components, do not us e a spray clean er of a ny kind.
Never use a s pra y cleaner to clea n th e door pane l as it ma y damage the do or loc k
and electrical co mpo nents.
WARNING! WARNING!
Abrasive agents or som e paper towel sho uld not be used be cau se of the risk of
scratching or le avi ng spots on the st ain less ste el sur face.
Protect Against Fr ee zi n g
please take frost p rot ection m eas ures on t he d ishwasher i n winter. Each t ime after wa shi ng cycles,
please operate as fol lows
1. Cut of f el ectrical pow er to the dishw asher.
2. Turn off the water su ppl y and disconne ct the water in let pi pe from the wat er val ve.
3. Drain water f rom the inlet p ipe and wate r va lve(Use a pan to cat ch the w ater).
4. Reconnect th e wa ter inlet pipe to the wa ter valve.
5. Remove th e fi lter at the botto m of th e tub and use a spo nge to soak up wat er in t he sump.
NOTE:NOTE:
If your di shw asher canno t wo rk because of th e ice, p lease conta ct auth orised serv ice persons .
12
Page 19

Cleaning the Spray Arms
The spray arms c an be easily rem ove d for period ic clea ning
of the nozzles t o prevent po ssi ble clog gin g. Wash them
under running water a nd carefull y re place them in th eir sea ts,
checking that their r ota ry movem ent is in no way impe ded.
Grasp the middle o f the spray a rm, pull it u pwards to re move
it. Wash the a rm u nder a jet of runnin g wa ter and r eplace it
carefully to its s eat . After r eassembly, check that th e spray
arms rotate freely. Otherwise, check that th ey have been
installed correctly.
How to Keep Your Dishwasher in Shape
After Every Wash
After every wash, turn off the wat er supply to th e
appliance and le ave the door sligh tly op en so that
moisture and od ors are not trappe d insi de.
Remove the Plug
Before cleaning or p erforming m ain tenance, al ways
remove the plug f rom the sock et.
No Solvents or Abrasive Cleaning
To clean the ext erior and rubb er par ts of the di shw asher,
do not us e so lvents or abra siv e cleaning pro ducts.
Only use a c lot h with warm soapy wat er.
To remove spo ts o r stains from the sur face of the
interior, use a cl oth dampene d with w ater wit h a litt le
vinegar, o r a cle aning produ ct mad e specif ica lly for
dishwashers.
8.Installation instruction8.Installation instruction
Attention:
The installation of the pipes
and electrical equipments
should be done by qualified
professionals.
When not in use for a long time
It is re com mend that yo u run a w ash cycl e wi th the
dishwasher empty and t hen remove t he plug fro m the
socket, turn off th e water su ppl y and leave the d oor of
the appliance slightly o pen. This wil l help the door
seals to last l onger and pr eve nt odou rs from f orm ing
within the appliance.
Moving the Appliance
If the appli ance must be mo ved , try to keep it in th e
vertical position. If abs olutely neces sar y, it can be
positioned on it s ba ck.
Seals
One of the f actors that cau se odor s to form in the
dishwasher is food t hat remains tra pped in the seal s.
Periodic cleaning with a damp sponge wil l pr event this
from occurring.
Warning
Electrical Shock Hazard
Disconnect electrical power
before installing dishwasher.
Failure to do so can result in
death or electrical shock.
Installation preparationInstallation preparation
The installation position of dishwasher should be near the existing water inlet tap and
drain outlet and power socket.
One side of the cabinet sink should be chosen to facilitate the connection of drain
hoses of the dishwasher.
13
Page 20

Positioning the AppliancePositioning the Appliance
Position the appliance i n the desire d locat ion. The back should r est aga inst the wal l behin d it,
and the si des , along the adj ace nt cabinets or wa ll. The dishw asher is equip ped with water sup ply
and drain ho ses that can be posit ion ed to the ri ght or the left to facil ita te proper inst all ation.
About Power ConnectionAbout Power Connection
WARNING! WARNING!
For personal safety:
Do not use an extension cord or an adapter plug
with this appliance.
Do not cut or remove the earthing under any
circumstances.
Connection from the power cord.
Electrical Requirements
Please look at the ra ting label to k now th e rating volta ge and connect the di shwasher to th e appropria te pow er supply.
Use the re qui red fuse 10 amp , time delay fuse or cir cuit breake r reco mmended and pr ovi de separ ate ci rcuit servi ng
only this ap pli ance.
Electrical Connection
Insure proper ground
exists before use
Ensure the vo lta ge and frequen cy of the power being correspond s to
those on th e ra ting plate. On ly ins ert the plug in to an e lectric al soc ket which is ea rth ed
properly. If the electri cal socket to whic h the a pplianc e must be con nected i s not
appropriate for th e pl ug , replac e the s ocket, rather tha n usin g a adaptor s or th e like as
they could ca use overhea tin g and b urns.
Water ConnectionWater Connection
Cold Water Connection
Connect the cold w ater supply hos e to a threaded 3 /4(inch) co nnector and make su re
that it is f astened tig htl y in plac e. I f the water pipe s ar e new or have not bee n us ed for
an extended period o f time, let t he water run to m ake sure that the wa ter is c lear and
free of impurities. I f this preca uti on is no t taken, there i s a risk that the water i nle t can
get blocked and d amage the ap pli ance.
WARNING! WARNING!
Please note: If t he supplied hos e cloes not fit y our tap, ple ase con tact your lo cal plumbin g
supply center where a dapters are ava ilable f or p urchase .
please close the hy drant after usi ng.
14
Page 21

Connection of drain hosesConnection of drain hoses
Insert the drain hose into a drain pipe with a minimum diameter of 4cm, or let it
run into the sink, making sure to avoid bending or crimping it. The free end of the
hose must be at a height lower than 30 cm and must not be immersed into water to
avoid the backflow of it.
NOTE
The top of the hose must be less than 300mm.
Counter
Front
MAX 3 00mm
Drain pipe
B
15
Page 22

How to Drain Excess Water From Hoses
If the sin k is mor e than 300mm higher than the floor, the exc ess water in hoses cann ot be dr ained directly
into t he sin k. I t will be necessa ry t o drain excess wa ter from hoses int o a bow l or su itable
conta ine r that is held outsi de a nd lower than th e sink.
Water Outlet
Conne ct t he water drain hose . The d rai n hose must be co rre ctly fitted to avoid w ate r leaks.
Ensur e th at the water drain ho se is n ot kinked or squa she d.
Extension Hose
If you need a dr ain hose extensio n, m ake sure to use a sim ila r drain hose.
It mus t be no lo nge r than 4 metres , othe rwise the clea nin g effect of th e dishwasher c oul d be reduced.
Start of dishwasherStart of dishwasher
The following things should be checked before starting the dishwasher.
1. The dishwasher is level and fixed properly.
2. The inlet valve is open.
3. Inlet hose connections are f ully tight ened and no t leaking .
4. The wires are tightly connected.
5. The power is switched on.
6. The inlet and drain hoses are not knotted.
7. All packing and print materials should be taken out of the dishwasher.
Attention:Attention:
After installation, please make sure to keep this manual.
The content of this manual is very helpful to the users.
16
Page 23

9.Troubleshooting Tips9.Troubleshooting Tips
Before Calling for Service Before Calling for Service
Review the charts on the following pages may save you from calling for service.
Problem Possible Causes What To Do
Dishwasher doesn t
start
'
Fuse blown, or the
circuit breaker tripped.
Power supply is not
turned on.
Replace fuse or reset circuit breaker. Remove any other
appliances sharing the same circuit with the dishwasher
Make sure the dishwasher is turned on and the door is
closed securely.
Make sure the power cord is properly plugged into the
wall socket.
Technical
problems
General
problems
Water not pumped
from dishwasher
Suds in the tub
Stained tub interior
White film on
inside surface
Door of dishwasher
not properly closed.
Kink in drain hose
Filter clogged.
Kitchen sink clogged.
Improper detergent
Spilled rinse-aid
Detergent with
colourant was used.
Hard water minerals
Make sure to close the door property and latch it.
Check drain hose.
Check the coarse filter.
(see section titled " Cleaning The Filter ")
Check kitchen sink to make sure it is draining well.
If the problem is the kitchen sink not draining, you may
need a plumber rather than a serviceman for dishwasher.
Use only the special dishwasher detergent to avoid
suds. If this occurred, open the dishwasher and let suds
evaporate. Add 1 gallon of cold water to the tub. Close
and latch the dishwasher, then Start any wash cycle
to drain out the water. Repeat if necessary.
Always wipe up rinse-aid spills immediately.
Make sure that the detergent is the one without
colourant.
To clean the interior, use a damp sponge with
dishwasher detergent and wear rubber gloves.
Never use any other cleaner than dishwasher
detergent for the risk of foaming or suds.
Noise
There are rust
stains on cutlery
Knocking noise
in the wash cabinet
Rattling noise
in the wash cabinet
Knocking noise
in the water pipes
The affected items are
not corrosion resistant.
The spray arm is
knocking against
an item in a basket.
Item of crockery
are loose
in the wash cabinet.
This may be caused
by on-site installation
or the cross-section of
the piping.
17
The items should be corrosion resisitant.
Interrupt the programme, and rearrange the items
which are obstructing the spray arm.
Interrupt the program,
and rearrange the items of crockery.
This has no influence on dishwasher function.
if in doubt, contact a suitably qualified plumber.
Page 24

Problem Possible Causes What To Do
The dishes
are not clean
The dishes were not
loaded correctly.
The program was
not powerful enough.
Not enough detergent
was dispensed.
Items are blocking
the path of spray arms.
See notes in " Loading the Dishwasher Baskets ".
Select a more intensive programme.
See" Wash Cycle Table ".
Use more detergent, or change your detergent.
Rearrange the items so that the sprayer can rotate freely.
Unsatis
-factory
washing
result
Unsatis
-factory
drying
result
Cloudiness
on glassware
Black or gray
marks on dishes
Detergent left in
dispenser cups
The dishes
are not drying
The filter combination
is not clean or
is not correctly fitted.
This may cause
the spray arm jets
get blocked.
Combination of soft
water and too much
detergent.
Aluminum utensils
have rubbed against
dishes.
Dishes block
detergent cups opens.
Improper loading
Too little rinse-aid
Dishes are removed
too soon.
Clean and/or fit the filter combination correctly.
Clean the spray arm jets. See "Cleaning the Spray
Arms".
Use less detergent if you have soft water and select
a shortest cycle to wash the glassware and to get
them clean.
Use a mild abrasive cleaner to eliminate those marks.
Re-loading the dishes properly.
Load the dishwasher as suggested in the directions.
Increase the amount of rinse-aid/Refill the rinse-aid
dispenser.
Do not empty your dishwasher immediately after
washing. Open the door slightly so that the steam can
escape. Begin unloading the dishwasher only once the
dishes are barely warm by touching.
Wrong program
selection
Using cutlery with
a low-quality coating
In short program the rinse temperature is lower.
Choose a program with a high rinse temperature.
Water drainage is more difficult with these items.
Cutlery or dishes of this type are not suitable for
washing in the dishwasher.
Error CodesError Codes
When some malfunctions occur, the appliance will display error codes to warn you:
Codes
The rapid light flicker fleetly
The Rapid and 90Min light flicker fleetly
The Glass light flicker fleetly
If overflow occurs, turn off the main water supply before calling a service.
WARNING! WARNING!
If there is water in the base pan because of an overfill or small leak,
the water should be removed before restarting the dishwasher.
Meanings
Longer inlet time.
Not reaching required
temperature.
Overflow.
Possible Causes
Faucets is not opened, or water intake is restricted,
or water pressure is too low.
Malfunction of heating element .
Some element of dishwasher leaks .
18
Page 25

Technical InformationTechnical Information
Height : 438mm
Width : 550mm
Depth : 500mm
Voltage connected Load : see rating label
Water pressure: 0.04-1.0MPa
Power supply: see rating label
Capacity: 6 Place settings
19
Page 26

ILVE LIMITED WARRANTY
Eurolinx Pty Limited A.B.N. 50 001 473 347 trading
as ILVE (“ILVE”)
Oce: 48-50 Moore Street, Leichhardt N.S.W 2040
Post: Locked Bag 3000, Annandale, N.S.W 2038
P: 1300 MY ILVE (694 583)
WARRANTY REGISTRATION
Your ongoing satisfaction with your ILVE product is
important to us. We ask that you complete the enclosed
Warranty Registration Card and return it to us so that
we have a record of the ILVE products you purchased.
Alternatively you can register on line (see registration
card for details)
PRIVACY
ILVE respects your privacy and is committed to
handling your personal information in accordance with
the National Privacy Principles and the Privacy Act 1988
(Cth). A copy of the ILVE Privacy Policy is available at
www.ilve.com.au. ILVE will not disclose any personal
information set out in the Warranty Registration Card
(“Personal Information”) without your consent unless
required by:
1. law;
2. any ILVE related company;
3. any service provider which provide services to ILVE
or assist ILVE in providing services (including repair
and warranty services) to customers. Our purpose in
collecting the Personal Information is
to keep a record of the ILVE product purchased by you,
in order to provide a better warranty service to you in
the unlikely event that there is a problem with your ILVE
product. ILVE may contact you at any one or more of
the address, email address or telephone numbers set
out in the Warranty Registration Card. Please contact
ILVE on 1300 694 583 should you not wish to be
contacted by ILVE.
WARRANT Y
1. Warranty
ILVE warrants that each ILVE product will remain, for
a period of twenty four (24) months computed from
the date of purchase of the ILVE product, free from
defects arising in the manufacture of the ILVE product
(“Warranty”). Except for consumer guarantees set
out in the Competition and Consumer Act 2010 (Cth)
(“Act”), ILVE does not make any further warranties or
representations in relation to ILVE products.
2. What is not Covered by the Warranty.
The Warranty does not apply if an ILVE product is
defective by a factor other than a defect arising in the
manufacture of the ILVE product, including but not
limited to:
(a) damage through misuse (including failure to
maintain, service or use with proper care), neglect,
accident or ordinary wear and tear (including
deterioration of parts and accessories and glass
breakage);
(b) use for purpose for which the ILVE product was not
sold or designed;
(c) use or installation which is not in accordance with
any specied instructions for use or installation;
(d) use or operation after a defect has occurred or been
discovered;
(e) damage through freight, transportation or handling in
transit (other than when ILVE is responsible);
(f ) damage through exposure to chemicals, dusts,
residues, excessive voltage, heat, atmospheric
conditions or other forces or environmental factors
outside the control or ILVE;
(g) repair, modication or tampering by the purchaser or
any person other than ILVE, an employee of ILVE or an
authorised ILVE service contractor;
(h) use of parts, components or accessories which have
not been supplied or specically approved by ILVE.
(i) damage to surface coatings caused by cleaning or
maintenance using products not recommended in the
ILVE product handbook provided to the purchaser upon
purchase of the ILVE product;
(j) damage to the base of an electric oven due to items
having been placed on the base of the oven cavity or
covering the base, such as aluminium foil (this impedes
the transfer of heat from the element to the oven cavity
and can result in irreparable damage); or
(k) damages, dents or other cosmetic imperfections not
aecting the performance of the ILVE in respect of an
ILVE product purchased as a “factory second” or from
display. The Warranty does not extend to light globes
used in ILVE products.
3. Domestic Use
Each ILVE product is made for domestic use. This
Warranty may not extend to ILVE products used for
commercial purposes; under those circumstances the
warranty period is limited to 3 month.
4. Time for Claim under the Warranty
You must make any claim under this Warranty within
twenty eight (28) days after the occurrence of an event
which gives rise to a claim pursuant to the Warranty, by
booking a service call on the telephone number below.
5. Proof of Purchase
Customers must retain proof of purchase in order to be
eligible to make a warranty claim in respect of an ILVE
product.
Continued over...
Page 27

ILVE LIMITED WARRANTY
6. Claiming under the Warranty
Customers will bear the cost of claiming under this
Warranty unless ILVE determines the expenses are
reasonable, in which case the customer must claim
those expenses by providing written evidence of
each expense to ILVE at the address on the Warranty
Registration Card.
7. Statutory Rights
(a) These terms and conditions do not a ect your
statutory rights.
(b) The limitations on the Warranty set out in this
document do not exclude or limit the application of the
consumer guarantees set out in the Act or any other
equivalent or corresponding legislation in the relevant
jurisdiction where to do so would:
(i) contravene the law of the relevant jurisdiction; or
(ii) cause any part of the Warranty to be void.
(c) ILVE excludes indirect or consequential loss of any
kind (including, without limitation, loss of use of the
ILVE product) and (other than expressly provided for in
these terms and conditions) subject to all terms,
conditions and warranties implied by custom, the
general law, the Act or other statute.
(d) The liability of ILVE to you for a breach of any
express or non-excludable implied term, condition or
warranty is limited at the option of ILVE to:
(i) replacing or repairing the defective part of the ILVE
product;
(ii) paying the cost of replacing or repairing the defective
part of the ILVE product;
(iii) replacing the ILVE product; or
(iv) paying the cost of replacing the ILVE product.
(e) Our goods come with guarantees that cannot be
excluded under the Australian Consumer Law.
You are entitled to a replacement or refund for a major
failure and for compensation for any other reasonably
foreseeable loss or damage. You are also entitled to
have the goods repaired or replaced if the goods fail
to be of acceptable quality and the failure does not
amount to a major failure.
8. Defects
Any part of an ILVE product deemed to be defective and
replaced by ILVE is the property of ILVE. ILVE reserves
the right to inspect and test ILVE products in order to
determine the extent of any defect and the validity of a
claim under the Warranty.
*To locate your closest ILVE authorised service agent
please contact ILVE on 1300 694 583, customercare@
eurolinx.com.au or visit
http://ilve.com.au/support/service/
IMPORTANT!
All warranty service calls must be booked via
the customer care department. The team can
be contacted on 1 300 85 64 11 option 1 or
customercare@eurolinx.com.au
Service is delivered through a network of Service
Agents. If the Appliance is located outside our
normal Service Area of our agents you, t he
Customer will need to bear the cost of travel outside
that area.
If you are unable to provide proof of purchase, the
fault is not covered under warranty or the product
is found to be working to specication you may be
required to bear the full cost of the service visit
08042016
WARRANTY REGISTRATION CARD
Please complete and send to ilve at: REPLY PAID 83617
08042016
Last Name: First Name:
Address:
State: Postcode: Email:
Home Phone: Mobile:
Purchase Date:
MODEL NUMBER
1
2
3
4
/ / (Please attach proof of purchase to validate warranty)
SERIAL NUMBER
(if you cannot locate the serial number please call ILVE on 1300 85 64 11)
LEICHHARDT NSW
2040
Page 28

01052015
NOTES
ILVE.COM.AU
You can no w find u s on:
facebook.com/ILVEappliances
twitter.com/ILVE_appliances
youtube.com/ILVEappliances
livewithilve.com
ILVE Dishwasher Installation and Operating Instructions template pages.indd 7 1/05/2015 9:16 am
Page 29

Australia National Telephone Number 1300 MYILVE (694 583)
New Zealand Telephone Number 0508 458 369
ILVE showrooms are open daily from 9am-5pm and Saturdays 10am-4pm
(WA by appointment only on Saturdays)
ilve.com.au
NSW & ACT (Head Oce)
48-50 Moore Street
Leichhardt
F 02 8569 4699
ILVE Dishwasher Installation and Operating Instructions template pages.indd 8 1/05/2015 9:16 am
VIC, TAS & SA
1211 Toorak Road
Camberwell
F 03 9809 2155
QLD
1/42 Cavendish Road
Coorparoo
F 07 3397 0850
WA & NT
Unit 10/55 Howe Street
Osborne Park
F 08 9201 9188
New Zealand
PO Box 11.160
Sockburn Christchurch
F 03 344 5906
 Loading...