

Page 1
IVDBI458
Page 2
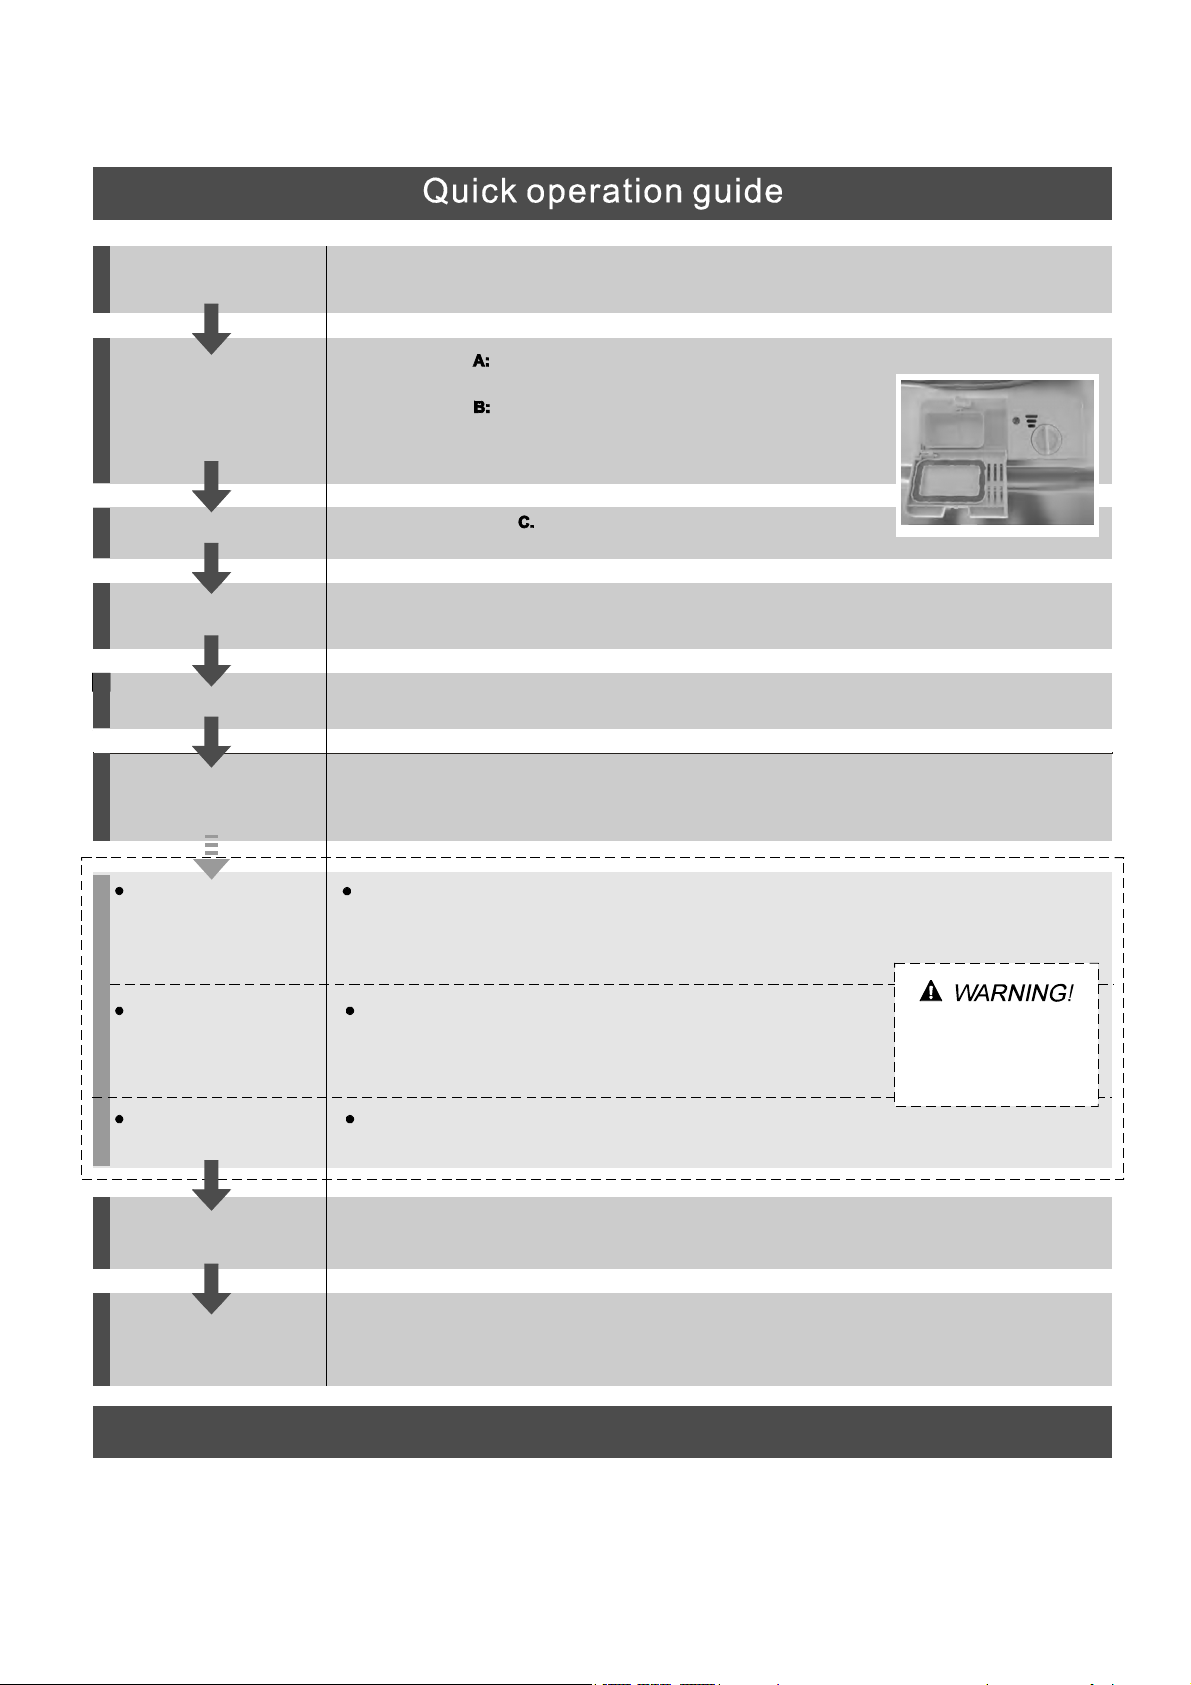
Fordetailed o peratingmethodr eadthe corresponding content onthe instructio n manual.
Switch on the appliance Press the On/Off button to switch on the appliance, Open the door.
Compartment
Fillmain-washdetergent.
Fill the detergent dispenser
Compartment
Fill pre-wash detergent.
(Follow the user instructions!)
C
B
A
Check the rinse aid level
Load the baskets
Select a programme
Running the dishwasher
Changing theprogramme
Add forgotten dishes in the
dishwasher.
Mechanical indicator
Electric indicator on controlpanel (if provided).
Scrapeoff any largeamount of leftover food. Softenremnants ofburnt foodin pans,
thenloadthe baskets. Refer to the dishwasherloadin g instr uctions.
Press the Programme button until the selected programme lights up.
( See the section entitled Operation instructi on )“”
Close the door, turn on the water tap . The machine will start working
after about 10 seconds.
1.A running cycle can only be modified ifit has beenrunning for a short time.O therwisethe detergent
may have already been released and the water already drained. If this is the case, the detergent
dispenser must be refilled.
2. Press the running program button more than 3 second to cancel to cancel the running programme .
3. Select a new programme.
4.The dishwasher willrestart after10second.
1.Open the door a little to stop the dishwasher.
2.After the spray arms stop working, you can open the door completely.
3.Add the forgotten dishes.
4.Close the door, the dishwasher will start running again after 10 seconds.
Open the doo r car efull y.
Hotsteam may escape
when the dooris opened!
If the appliance is switched
off during a wash cycle.
Switch off the appliance
Turn off the water tap,
unload the baskets
If the appliance is switched off during a wash cycle, when switched
on again, please re-select the washing cycle and operate the dishwasher
according to the original Power-on state.
When the working cycle has finished, the buzzer of the dishwasher will sound 8 times, then stop.
Turn off the appliance using the ON/OFF button.
Warning: wait a few minutes (about 15 minutes) before unloading the dishwasher to avoid handling
the dishes and utensils while they are still hot and more susceptible to break.
They will also dry better. Unload the appliance, starting from the lower basket.
Page 3
Dear Customer,
This appliance is intended to be used in household
and similar applications such as:
-staff kitchen areas in shops, officesand other
working environments;
-farm houses;
-by clients in hotels, motels and other residential
type environments;
-bed and breakfast type environments.
Please carefully read this manual before using the
dishwasher, it will help you to use and maintain the
dishwasher properly.
Keep it as a refer in the later days.
Passit on to any subsequentownerof the appliance.
This manual contains sections on safety Instructions,
Operating Instructions, Installation Instructions and
Troubleshooting Tips, etc.
ControlPanel...................................................3
Dishwasher Features............................ ........ ...3.
Attention before or after loading the Dishwasher
Baskets..........................................................6
Loading the upper Basket.................................7
Loading the Lower Basket....................... .......8...
Cutlery Basket........................................... ..8...
Wash Cycle Table...........................................9
Turning on the Appliance................................9
Change the Programme...................... ...........10..
At the end of the Wash Cycle...................... .....10.
Filtering System.............................................11
Caring for the Dishwasher...............................12
To review the section on troubleshooting Tips
will help you to solve some common problems
by yourself .
Ifyoucan not solve the problems by yourself,
pleaseask for the help of professional technicians.
The manufacturer, following a policy of constant
development and updating of the product, may
make modifications without giving prior notice.
Please carefully read the installation instruction
.....................................................................
14
....14Aesthetic panel's dimensions and installation
Tension adjustment of the door spring .16..............
Connection of drain hoses................................... ....17.
Dishwasher installation steps...................... ....18.
Water Connection...................................... .....20.
Before calling for service.................................21
Error codes...................................................22
Technical information.....................................23
Page 4
When using your dishwasher, follow the precautions listed below:
This appliance must be grounded. In the event of a
malfunction or breakdown, grounding will reduce
the risk of anelectric shock by providing a path of
least resistance of electric current. This appliance
is equipped with a cord having an equipmentgrounding conductor and a grounding plug.
The plug must be plugged into an appropriate outlet
that is installed and grounded in accordance with
all local codes and ordinances.
Do not abuse, sit on, or stand on the door or dish
rack of the dishwasher.
Do not touch the heating element during or
immediately after use.
(This instruction is only applicable to machines
with a visual heating element.)
Do not operate your dishwasher unless all
enclosure panels are properly in place. Open
the door very carefully if the dishwasher is
operating, there is a risk of water squirting out.
Do not place any heavy objects the
door when it is open. The appliance could tip
forward.
When load in g it e m s tob e w ashe d:
1) L ocate sharp items sothat they are not likely
todamage thedoorseal;
2 Warni ng: Knives and other u te nsils with
)
sh a rp po i n ts must be loade d in the bas k et
with their pointsdown or p laced in a
horizontalposition.
When us ing your dishwasher,you should
prevent plastic item s from comingint o co ntact
with t he heating element.(This instruction is only
applicable to machi nes with avisual heating
element.)
Check thatthedetergentcomparmentis empty
after completion o f thewash cycle.
Do not wash plastic items unless they are marked
dishwasher safe or the equivalent. For plastic items
n
ot so marked, check the manufacturer's
recommendations.
Use o nly detergent and rinse ad ditives
designed for an automatic dishwasher.
Never use s oap, laundry detergent, or h and
washing detergent inyour dishwasher.Keep
these products out ofthe reach ofchildr en.
on or stand on
Improper connection of the equipment-grounding
conductor can result in the risk of an electric shock.
Check with a qualified electrician or service
representative if you are in doubt whether the
appliance is properly grounded. Do not modify the
plug provided with the appliance; If it does not fit
the outlet. Have a proper outlet installed by a
qualified electrician.
Keep children away from detergent and rinse aid, keep
child away fromthe opendoor of the dishwasher,
ren
there could still be some detergent left inside.
This appliance is notintended for use by persons
(including children with reduced physical, sensory or
mental capabilities, or lack ofexperience and
knowledge ,unless they have been given supervision
or instruction concerning use of the appliance by a
person responsible for their safety.
Children shouldbe supervised to ensure that they do
not play with the appliance.
Dishwasher deterge nts arestrongly alkaline,they
can be e xt rem e ly da ng erous if swallow e d.Avoid
contact with skin and eye s and ke ep children away
from the dishwasherwh en t he door isopen.
The doo r sh ould not beleft open,
since th is could increasethe risk oftrippi ng.
If th e s upply cord isdam aged, it must be replaced
by th e m anu facturer or it s se rvic e ag ent ora
similar ly quali fie d person in o rde r to avoid a
hazard.
Remove the door tothe washingcompartmentwhen
removing an old dishwasher from service or discarding it.
Please d ispose of packing materials properly.
Use the dishwasher only for its intended function.
During installation,thepower supplymust not
beexce ssiv ely ordangerouslybent or flattened.
Do not tamper with controls.
The app liance i s to b e co nnected to t he water
mains u sing new hosesets andthatoldhose-sets
sho ul d n o t b e reuse d .
Themaximum number of place settingsto be
washed i s 8.
Themaximum permissible inletwater pressureis
1Mp a .
Theminimum permissibleinlet waterpressureis
0.04Mpa.
)
Page 5
To getthe best performancefrom yourdishwasher,read alloperatinginstructions
beforeusing it fo rthe first time.
7
2
ON
OFF
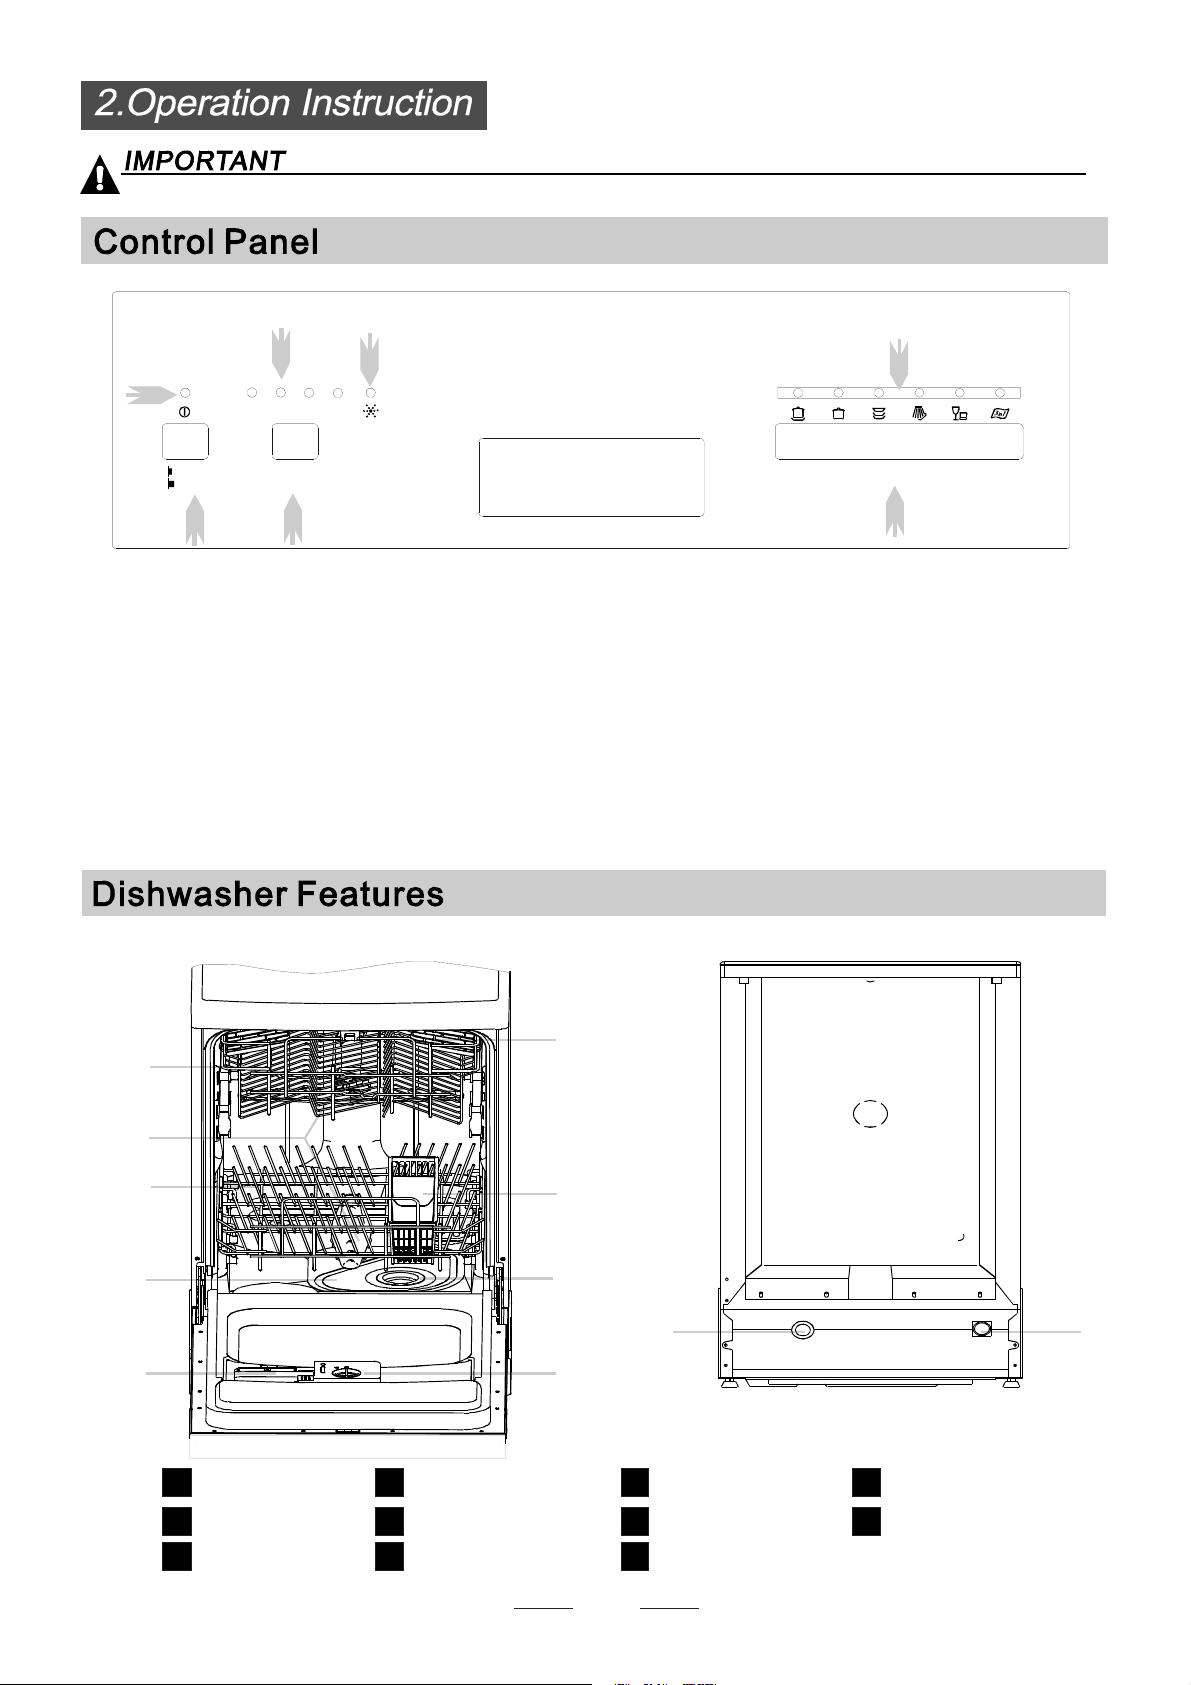
1 ON/OFF Bu tton: To turn on /off the po wer supply.
2 Power Light :Tobe on whenthe ON/OFF Button is
Pressed down.
3 RinseAid Warning Light :To be onwh en the
rinseaiddispenserneeds to berefilled.
4 Program indicat or light .
1
2h 4h 6 h 8h
Delay
6
Front view
3
4
Rapid
Normal
3in1Inten. Heavy Rin se
5
5 Program Button: Toselect washing program
whenpress the button.
6 Delayed Start Button: Press th is bu tton to s et the
delayed hoursforwashing. Thereare4 choices.
7 Delay indicator: different in dicator means d ifferent delay
time.
Back View
6
1
2
3
4
7
8
10 11
5
Upper Baske t
1
Spray A rms
2
Lower Basket
3
MainFilter
4
Detergent D ispe nser
5
Cup Shelf
6
9
Cutlery Basket
7
CoarseFilter
8
Ri ns e Aid Disp ens er
9
2
Drain pipe connector
10
Inletpipeconnector
11
Page 6
Be f o r e u s ing y our di s hwasher fo r t he first time:
A. Fillthe rinse aiddispenser
B. Fill indete rgent
RinseAid Di spenser
Therinse aid isreleased duringthefinalrinse to preventwater fromformingdroplets onyourdishes,whichcan
leave spots and streaks. Italso improvesdrying by allowingwatertorolloff the dishes. Yourdishwasher is
designed to use liquid rinse aids. Th e rinse a id dispenser is located insid e t he d oor next to the deter gent di spen ser.
To fill the dispe nser,open the cap a nd po ur the r inse aid i nto the di spenser until the le vel indicator turns c ompletely
black .Thevolume of therinse aid container isabout110ml.
FunctionofRinseAid
Rinse aid is aut omati call y added during the l ast rinse, ensuri ng thorough rinsi ng, and spot and str eak free drying.
Attent ion!
Only use branded rinse aid for di shwash er. N ever fill the rinse aid di spense r with any other substances
(e.g. Dishwashe r cleaning agen t, liquid detergen t). This would d amag e the ap plia nce.
Wh en to Refill the RinseAid D ispen ser
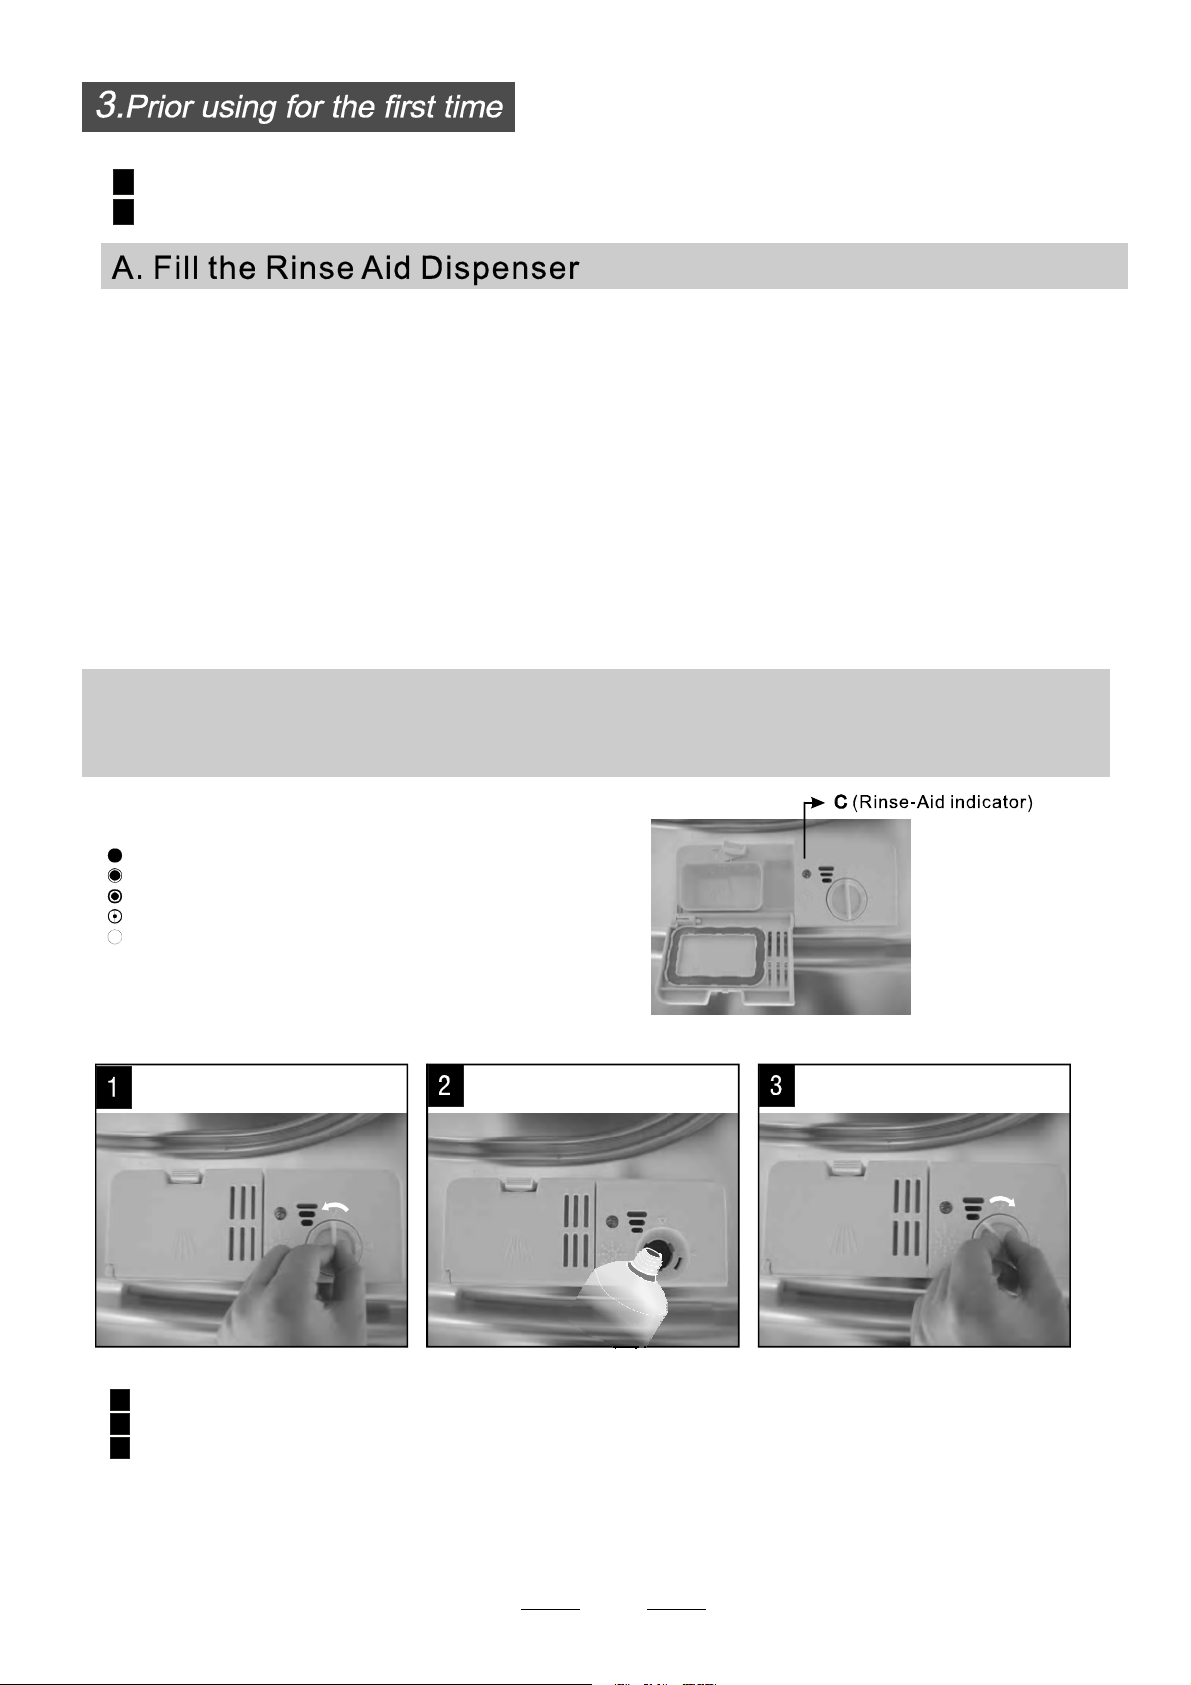
If t h ere i s n o ri nse - aid warn in g l ight i n the con tr ol panel , y ou can j u dg e th e amoun t of rins e-a id by the colo r of the
optical level
indicator "C" locatednexttothecap.When therinse-aid container is full,thewhole indicator willbedark .Asthe
rinse-aid
diminis hes, the s ize of th e dark d ot decreases . Youshould never let the rinse aid get below 1 / 4 fu ll.
Astherinse aid diminishes, thesize of the blackdot
on the rin se aid l evel indicator change s, asil lustrat ed below.
Full
3/4full
1/2full
1/ 4 full - Should refill to eliminatespotting
Empty
RINSEA ID D ISPENSER
To open the di spenser, turnthe cap to the " open" (left) arrow a nd lift it out.
1
Pourtherinseaidintothe dispenser,being carefulnottooverfill.
2
Replacethecapby inserti ngitaligned with "open" arrow and turning it tothe closed(right)arrow.
3
Be caref ul not to ov erfi ll the dispen ser, because th is could cause over sud sing. Wi pe away any spills
witha damp cloth.Don't forgetto replacethecapbefore you close dishwasher door.
Attention!
Clean up any rinse aid spilt duri ng filling with an absorbe nt cloth toavoi d exce ss foaming
during the ne xt wash.
3
Page 7
Cl ean up an y r inse aid spilled while durin g fill i ng with an ab sorbe nt cloth to avoid excessi v e foam ing
during the nex t wash.
Don't f orget to replacethe cap before you clos e dishwasher d oor.
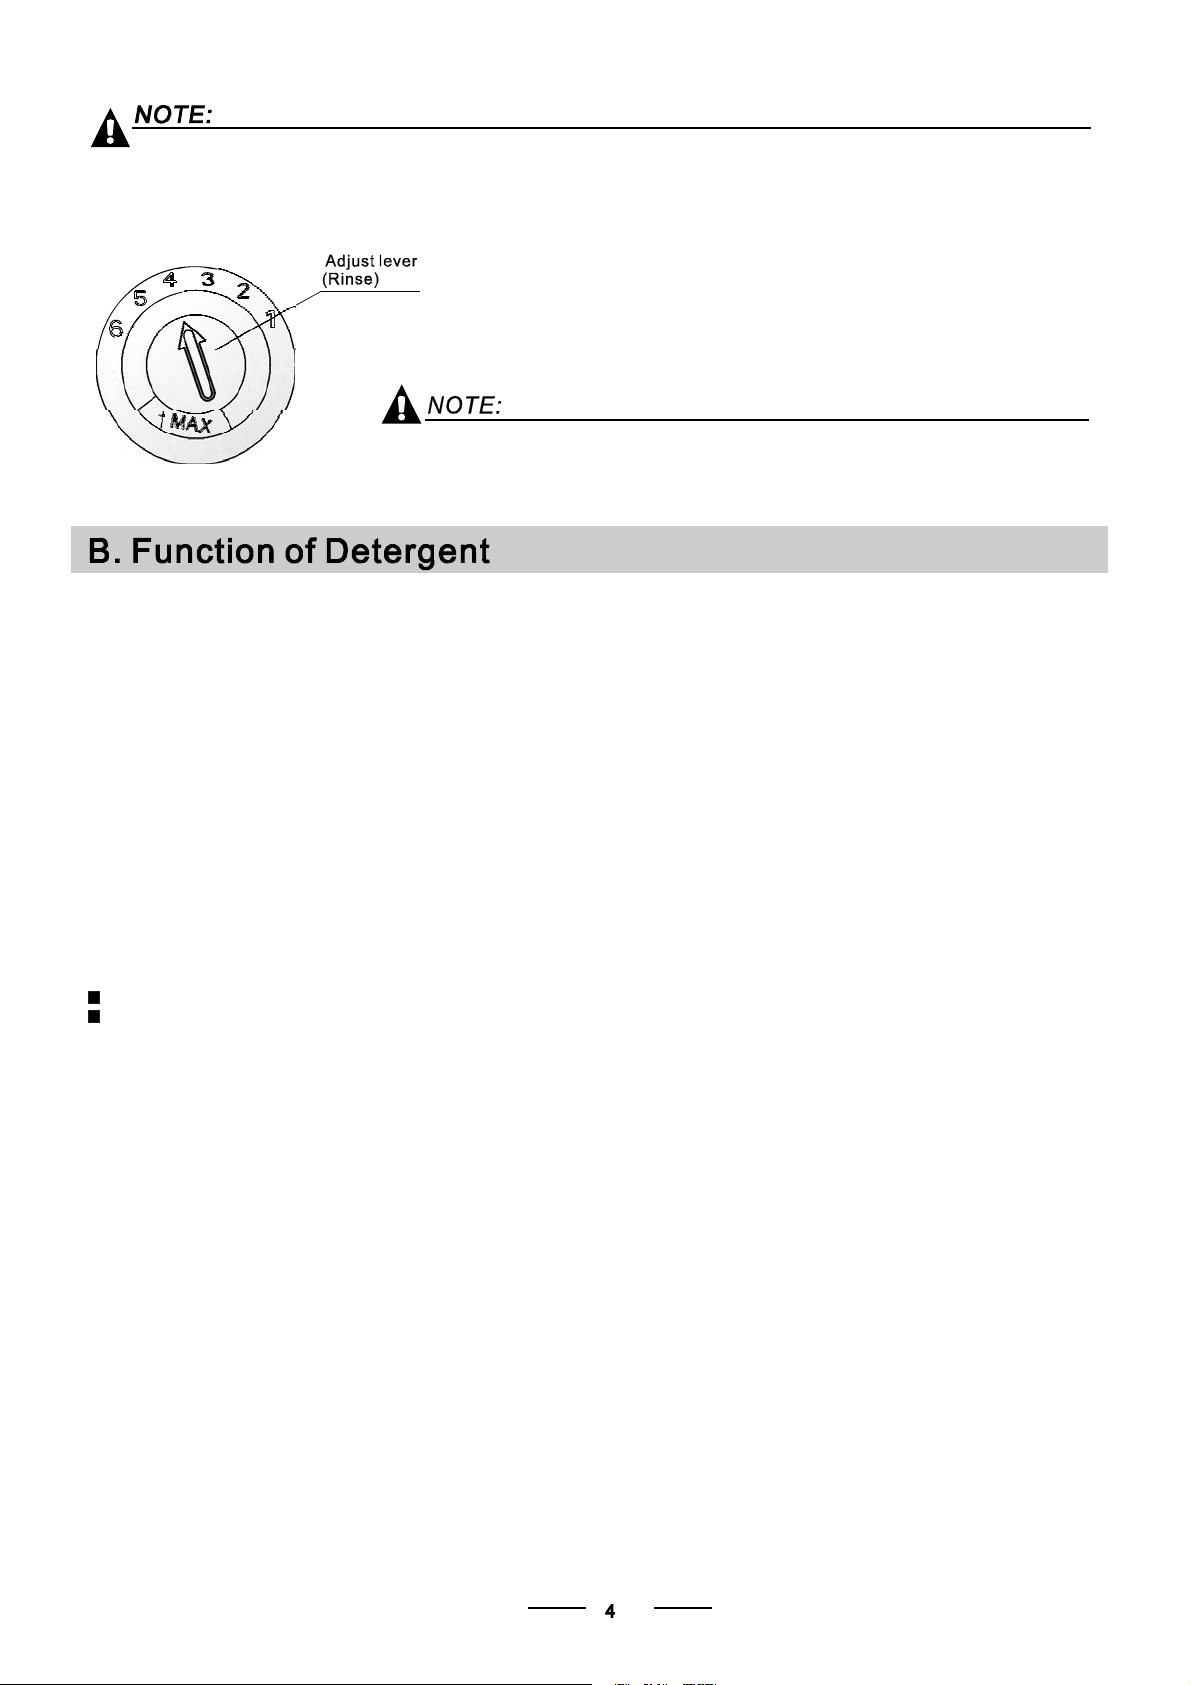
Adjusti ng RinseAid Dispenser
The r inse aid dispenser has si x or four setti ngs.Always start with the d ispens er
set o n "4". I f spots andpoor drying are a proble m, increase the amo unt ofri nse
aid d ispensed by removing thedis penser lid and rotat ing the d ial to "5".If the
dishes a re still notdryi ng properly o r show spots, adjust the dial tot he next
higher lever un til your dishes a re spot-free. The recom mended setting is "4".
(Factoryvalue is "4".)
Increasethe dose if there aredropsofwater or limespotsonthedishes after washing.
Reduce i tifthereare sticky whitishstainson yourdishesora bluish film onglassware o r
knifeblades.
Detergents with its chem ic al ingredients are necessary tore move dirt, crush dirt a n d transport itou t of the dishwasher.
Mosto f the commercial qualitydetergentsare suitable fo rthispurpose.
Deterg ents
There ar e 3 s orts of deter ge nts
1.With phosphate andwithchlorine
2.Withphosphate and wit hout chlorine
3.Withoutphosphate and without chlorine
Normally new pul verise ddet ergent is wi thout phosphate. T hus the w ater softener function of
phosphate is no t given. In this case we recommend to f ill salt inthe salt con tainer even when
the hardness o f water is only 6 dH.If detergents without phosphate are used in the case of hard w ater
often white spo ts ap pear on d ishes and glasses.In this case please add more detergent to reach
better results. D etergents witho ut ch lorine do onlybleach a little. Strongand coloured spots will not
be r emoved completely.In this c ase please choose a program with a higher te mperature.
°
Conc entrated Detergent
Based on their chemi cal compo sitio n, deterge nt s c an be split in two basic types:
conventional, alkaline detergents with c austic components
low alk aline concentrated detergents with n atural enzymes
The use of n ormal washing programs in combina tion with con centrated detergents
reduces pollution and isgood foryo ur dishes; these was hp rograms are specifically m atched
tothe dirt-diss olving properties of the enzyme s of the concentra ted detergent. For th is reason
normal washprograms in whichconcentrateddetergents are used can achieve the same
“”
results that canotherwise onlybeach ievedusing intensive programs.
“”
“”
Dete rgentTab lets
Detergent tablets ofdifferentbrandsdisso lve at different speeds. Forthisreasonsome
detergent tablets cannot d issolve and develop their full cleaning power during s hort
programs.There fore please use long programs when usingdetergent tablets, to
ensure the co mplete removal ofde tergent residuals.
Dete rgent Dis penser
The dispenser mu st be refilled before the start of e ach wash cyclefollowi ng t he instructions
provided inthewashcycletable . Yourdishwasherusesless detergentandrinseaidthan
Conventiona l dishwasher.Generally, onlyone tablespoon of detergent isneeded for
a normal w ash load. M ore heavily soiledit ems need moredetergen t. Always add the
detergent just before starting thedishwash er, otherwis e itcould get damp a nd w ill not
dissolve properly.
Page 8
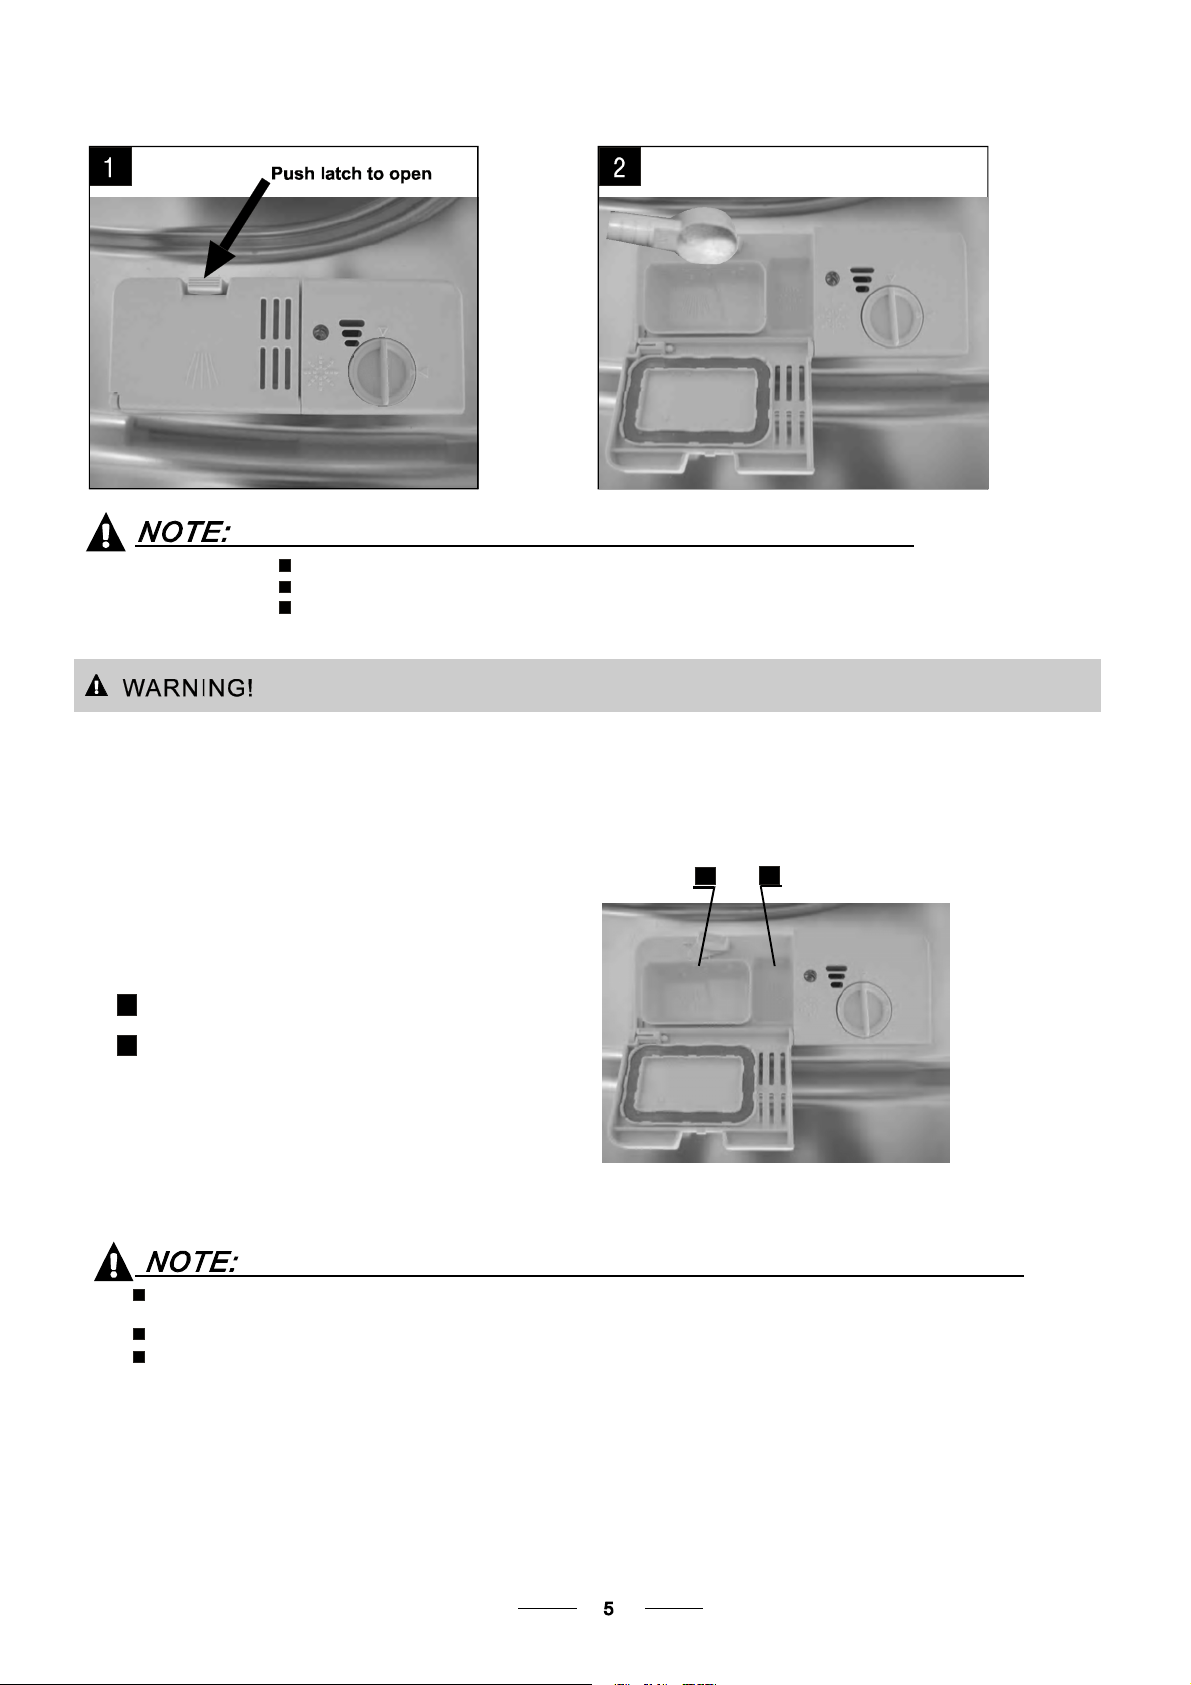
AmountofDetergent to Use
Ifthe lid i s closed: pr ess release button.The lid will sp ring open.
Always add the detergent just b efore starting eachwash cycle.
Only use branded detergent and r inse aid fordishwasher.
Dishwasher detergent iscorrosive! Take care to kee p i t out of reach ofchildren.
Proper U seof Detergent
Us e o nl y dete r gen t speci fi cally ma d e fo r the use in d is hwashers. Ke e p y o ur deter ge nt fresh a n d dry.
Don't put pow dered detergent into thedispenser until y ou're ready to wa sh dishes.
A
B
Fillin Detergent
Fill t he detergent dispenser with deter gent.
The m arking indicates the dosi ng levels , as
illustrated on theright:
The pla ce of main wash cycledeterg ent placed.
A
The pla ce of pre- wash cycle deter gent p laced .
B
Please observethemanufacturersdosingandstorage
Recommendations as stated on the detergent packaging.
Close the lid and press u ntil it loc ks in pla ce.
If th e dishes a re heavily soiled, p lace anaddi tional
detergent dose i n the pre-w ash detergent chamber.This detergent will takeeffect during the pr e-wash phase.
The in formation about the amountof detergent for the sing le program please refer to the Wash Cycle
Table on page 9.
Please aware, tha t according t o the le vel soiling andthe specific hardness of waterdifferences are possible.
Please observe themanufact urer's recommendations on the dete rgent p ackagi ng.
Page 9
Consider buying utensils whichareidentifiedasdishwasher-proof.
Use a milddetergent thatis described as 'kind to dishes'. Ifnecessary, seekfurther
information fromthedetergentmanufacturers.
Forparticular items,select a program withaslow a temperature as possible.
To pr ev ent damage , take g l ass and cutler y out of t he dishwa sher as soon as possible
after theprogram has ended.
Are not suitable
Cutlerywith wooden,hornchinaor
mother-of-pearl handles
Plastic items that are not heat resis tant
Older cutlery w ith glued partsthat are n ot
temperature resistant
Bonded c utler y items or dishes
Pewter or coop er items
Crystal gl ass
Steel items su bject to rust ing
Wooden pl atters
Items madefrom synthetic fibres
(For b est performance ofthe dishwasher, fol low these l oading guidelines.
Features and appear ance of baske ts and cutl ery baskets may vary from yourmod el.)
Scrape off any large a mounts of leftover food.Soften remnants of b urnt food inpans.
It i s not necess ary torinse the dishes under running water.
Place objects inthe dishwasher in fol lowing way:
1.Itemssuch as cups, glasses, pots/pans, etc.a re fa ced downwards.
2.Curveditems, or ones with recesses, should b e loaded a slant so th at w ater can runoff.
3.Allutensils are stacked secu rely and can not tip o ver.
4.Allutensils are placed in the way t hat the spray arms can rot ate freely during wa shing.
Ve ry small itemssho uld n ot bewashe d i n the dishwasher as they could eas ily f all out o f the basket.
Are of limitedsuitability
Some ty pes ofgl asses can b ecome
dull aftera large number of washes
Silver and aluminum par ts have a
tendencyto discolour duringwashing
Glazedpatternsmayfadeif machine
washed frequently
Load h ollow i tems such as cup s, glasses, p ans etc. With the opening facing downwa rds s o that
wat e r c ann o t co lle c t in t he con ta ine r or a de ep ba se.
Dishesanditems of cutlerymust not lie inside one another, or covereachoth er.
Toavoi d d amage to glasses, theymus t not t ouch.
Load large itemsw hich are most difficult toclea n in to the l ower basket.
The u pper basket isdesig ned to hold more delicate and lighter dishware such as glasses , coffee
andteacups
Long bladed k nives stored in an upright position are apotenti al hazard!
Long and/or sharp itemsof cutlery such as carvi ng knives must be positioned
horizon tally in t he upperb asket.
Please do not ove rload your dishwasher. T his is i mportant for g ood results and f or
reasonab le consumption o f energy.
To prevent water dripping fr om the uppe r basket i nto the lower baske t, w e recommend that you
empty the lowe r basket f irst andthe n the upper bask et.
Page 10

The u pper basket is desi gned to holdmore delicate and lighter di shware such asglas ses, coffee
and t ea cups and saucers, as well as plates, small bowls an d shallow pa ns (as l ong as they are
not too di rty).
Position the di shes and co okware so t hat they w ill not be moved by the spray of w ater.
1
1
2
4
1
6
2
1
Cups
1
1
2
Gla ss es
Saucers
3
3
3
1
Wesuggest that you placelarge items and items that are t he most di fficult to clea n i nto the l ower basket
such as : pots, pa ns, lids, serving dishes and bowls, as shownin the f igure below.
It is preferable to place serv ing dishes a nd lids ont he side of theracks in or der to a void blocking the rotati on of the
top spray arm.
Please be reminded that:
Pot s , serv i n g bo w ls, etc, mus t alwa ys be pl ac e d top dow n.
Dee p pots sh oul d be slante d t o al lo w w ater to flow o ut.
The B ottom Basket features folding spikes so that la rger or more pots and pa ns canbe loaded.
6
5
4
7
4
Dinnerplates
4
Soupplates
5
Des ser t dis hes
6
7
Silverw are bas ket
Page 11

Adju sting the Uppe r Bask et
The heig ht ofthe upper basket ca n be adjuste d in order to create more space for l arge utensils
both for the upper/lower basket. The height of the u pper basket can be adjusted by placing the
wheels on different height of the rails. L ong items, serving cutlery, salad servers and knives
should b e pl aced on theshelf so t hat they do not obstruct therotati on o f the s pray arms.
The she lf can be folded b ack or be removed when notrequ ired for use.
Foldin g Spi kes of Lower B asket
For better stacking of po ts andpans,
the spikes can befolded down as
show in the pictu re ri gh t.
Cutlery Basket
Cutleryshould be placed in the cutlery basketwith the handles at the bottom. If the rack has side baskets, the
spoons should be loaded separately into the appropriate slots, especially long utensils should be placed in the
horizontal position at the front of the upper basket as shown in the picture.
Forks
1
Soup spoo ns
2
Dessertspoons
3
Teaspoons
4
Knives
5
Page 12

Inte nsi ve
Heavy
For the heaviest soiled loads,
such as pots,pans,casserole
dishes and dishes that have
been sitting with dried food
on them for a while.
For heavily soiled loads,
such as , plates,glasses
pots
and lightly soiled pans.
standard daily cycle.
Pre 5 )
-wash( 0℃
Pre-wash
Wash (65 ℃)
Rinse
Rinse
Rinse (55 ℃)
Drying
Pre-wash(50℃)
Wash (50 ℃)
Rinse
Rinse (65 ℃)
Drying
5/20 g.
5/20 g.
120
150
1.20
1.0
18
12
Normal
(*AS/NZS 2007.1)
Rinse
Rap id
tandard daily cycle
Sfornormally
soiled loads,such as plates,
glasses,bowls and
soiled pans.
For dishes that need to be
rinsed and dried only.
A shorter wash for lightly
soiled loads that do not
need drying.
For commonly soiled loads,
such as pots, plates,glasses
and lightly soiled pans.
()
normally
Meaning: needtofill rinse intothe Rinse-Ai dDispenser.
Pre-wash
Pre-wash
Wash (55 ℃)
Rinse (50 ℃)
Drying
Wash(65 )
Rinse (50 ℃)
Drying
Wash (40 ℃)
Rinse
Rinse (45 ℃)
Pre-wash(50℃)
Wash(50℃)
Rinse
Rinse(70℃)
Drying
℃
5/20 g.
15 g.
15 g.
3in1
120
60
30
150
0.64
0.6
0.4
1.0
*AS/NZS 2007.1: This programme i s t he test cycle. The informat ion forcom parabilit y t est
in acc ordance withAS/NZS 2007.1 , as follows:
Capacity: 8 settin g
Position Upper basket: upperwheels on r ails
Rinse aidsetting: 6
12.2
9
10
12
Werecommendyouopen thedoor slightly50mm to a ssis tindrying ofthedishes after everywash.
Page 13

1 Drawout the lowerandupperbasket,load the dishesand push themback.
It iscommended to loadthe lower basketf irst,then the upper one (seethe section entitled
Loading the Dishwasher ).
“”
2 Pourin the d etergent(seethe sectionentitled Detergentand Rinse Aid ).
3 Inserttheplug into thesocket.Thepowersupplyis 220-240VAC/50HZ, the specificat ionof the
socket is 10A 250VAC. Make sure thatthewatersupplyis turnedon to full pressure.
4 Close the door, andselect the desired programme by pressing the corresponding button, then the
dishwas her will start towork in 3 second.
Premise:
You canmodify thewashi ng program, When the dishwasher just runs fora shorttime.
1
Otherwise, the detergent may havealreadybeen released,and the appliance may have
already dr ainedthe wash water.If this isthecase,the detergent dispensermust b e
refilled (seethe secti on entitled " Loading the D etergent" ).
2 Press thebuttonof desiredprogram more t han3 seconds untilit'sIndicatoris on ,after
10secondsthemachine will keepworking. E
Ifyou open thedoor during washing, the machine will pause. When y ou close t he d oor ,
the mac hine will keep on working after 10 seconds.
.
The p rogramlightsshow the stateof thedishwasher:
a) All program lights off---------------standby
b) O ne of the pro gram lights on- ------- --pau se
c) One of the prog ram l igh ts bl ink in g- - -- - run
“”
ntitled "Starting aw ash cycle. . . " ).
If allthe lights begin to glimmer, thatindi cates themachi ne is ou t oforde r,please turn
off the mai n po wer and watersu pply before callinga service.
.
Aforgotten dish can be added at any time before thedetergent cup opens.
Open the door a little to stop the washing.
1
After the spray arms stop working, you can open the door
2
completely.
Whenth e working cycle has finished, the buzzero f thedishwashe r will soundfor 8 seco nds, then st op. Turn off
theapplianceusing the ON/OFFbutton, shutoff the watersupplyandopenthe doorofthedishwasher.
Wait for afewminutesbefore unloadi ngthe dishwash ertoavoid handlingthedishes andutensilswhile they
are still hot andm ore susceptible tobreak age. Theywill alsod ry better.
Load the forgotten dis hes.
3
Close the door, the dishwasher will start running again
4
after 10 seconds.
Switch Off the Dishwasher
The buzzer of the dishwasher moos for 8 seconds, only in this case the programme has ended.
1.Switch off the dishwasher by pressing the ON/OFF button.
2.Turn off the water tap!
Openthedoor carefully.
Hot d ishes are sensitive t o knocks. Thedishes should therefore beallow ed t o cooldo wn around 1 5 minutes
bef o re removi ng f rom the appl iance.
Ope n the dishwa she r's door, leave i t ajar a n d wait a fe w m i nut e s befor e removi ng the di sh es. In this w ay they
will becooler and the dryin g w ill b e improved.
Unloadingthedishwasher
It isnormal that t he dishwasher is w et inside.
Empty the lower basketfirst and thentheupper one. Thiswillavoid water drippingfromtheupper Basket onto
the dishes in the lower one.
Itis dangerousto op enthedoor whenwashing,because the hot water may scald you.
Page 14

The filter preventslar ger remnants of foodor other objects f rom getting insideth e pu mp.
Theresidues may block thefilter, inthiscase they mustberemoved.
The fi lter systemconsists of a coarse filter,aflat (Main filter)
An d a micro fil t e r( F i ne fi lte r ) .
1
2
3
2
1
3
Main filter
Foodand soil particlestrap pedin thisfilterare pulverizedby a
special jet onthe lower sprayarm and w ashed down todrain.
Coarse filter
Larger items, such as p i e c es of bo ne s or gl ass, that c ould block
thedrainare trapped in thecoarse filter. To removethe items
caught by t he filter,gently squeeze the tap on th e top ofthis
filterandlift out.
Fine filter
This filterholds soil and foodresiduesin the sumparea a nd
prevents it frombeingredeposit onthedishes duringwash cycle.
Filterassembly
Thefilter efficiently
For best p erformance and results, the f ilter mustbe cleaned regularly. t his reason, it i s a goo dide a t o
remove the la rger food particles tr app ed in the filter aftere ach wash cyc le by rin sing the s emicirc ular filter an d
cup u nder running water.To remove thefil ter device, p ull the c up handle inthe upward d irection.
removes f ood particles from th e washw ater,allowin g it to be rec ycled during the cycl e.
For
Th e d i sh was her must n e ver b e used wi thout th e fil ters .
Improper replacement of thefilter may reduce the perform ance level o f the appliance
anddamagedishes andutensils.
When following this procedure from step1 to step 3, the filter system will be removed;
when following it from Step 3 to Step 1, the filter system will be installed.
Page 15

Remarks:
- Inspec t the filtersfor blocking a fter every time th e dishwasher has been used.
- By unscrewing the coarse fi lter, you can remove the filter system. Remove a ny food re mna nts and
clean the filters underrunning water.
Theentirefilter assemblyshouldbe cleanedoncea week.
Cleaning the Filter
To cle an the coars e filt er and the fin e fil ter, use a c lean i n g brush. Reassem bl e the fi lter p arts as shown in th e figures
on th e last page and reinsert the entire ass emb ly in the dishwasher, positio ning it in i ts seat and pressing dow nwa rds.
Whencleaning thefilters,don't knock onthem. Otherwise, thefiltersco uldbe
contorted and the performance ofthedishwashercould bedecreased.
The cont rol panel c an be cleaned by using a lightly dampened cloth.
After cle aning, make sureto dry it thoroug hly.
For the ext e ri or, us e agood app li ance poli s h w ax .
Neveruse sharp objects, scouring pa ds orhar sh cleaners onany part o f t he dishwasher.
CleaningTheDoor
To clean theedge around the d oor,you should use only a soft wa rm, damp cl oth.
To avoid penetrationo f water in to thedoor lock and el ectrical components, do not
usea spray cleaner ofany kind.
Never u se a spray cleaner to cle an the d oor panel as it may dam age the doorlock
and electrical components.
Abrasive ag ents or somepaper towels should not be used b ecause o f theris k o f
scra tching o r leavin g sp ots on the st ainless steel surf a ce.
Protec tAga inst Freezing
please take frost protect ion measures onthe dishwasher in wi nter. Ev ery fter washingcycle s,
please operate as follow s
1.Cut off theelectrical powertothedishwasher.
2.Turnoff thewater supply and d isconnec t thewater inlet pipe from the water valve.
3.Drainthewater fromthe inletpipe and watervalve. (Use a pan to catchthewater)
4.Reconnect the water inlet pipe t o the wate r valve.
5.Remove the filter at the bottom of thetub and use a sponge t o soak up water in the sump.
:
If your dis hwasher cannot work beca use of
the ice, ple ase contact p rofessio nal service persons.
timea
Cleani ng th e Spra yArms
It is n e ces s ary to c l e an the spray arms regula r l y for hard
waterchemicalswill clog the spray
arm j et s a nd bearin gs. To re move the spray a rms, screw
off the nu t cl o ck wis e to take ou t the
washer on topof thespray arm a nd remove t he arm.
Washthearmsinsoapyandwarmwater
and u se a sof t b r u sh to c l ean the jets. Replace them af t er
rinsing them thoroughly.
Page 16

AfterEveryWash
After every wa sh, turn offthe water supply to the
appliance and leaveth e doorslight ly op en so th at
moisture and odours a re n ot trapped inside.
RemovethePlug
Before cleaning orperfo rming maintenance, always
remove theplug from t he socket.
No Solvents orAb rasiveCleaning
To cleanthe exterior and rubber partsof the dishwasher,
donotusesolventsor abrasive cleaning products.
Only use a clo th with warm so apy wate r.
Tor em ove spots or stains from the surf ace of the
interior, usea cloth dampened with water a n a little
vinegar,or a c leaning product madesp ecifically for
dishw ashers.
WhennotinUseforaLongTime
It isrecommend that yourun a was h cycle with the
dishwasher e mpty and the n r emove the plugfro m the
socket, t urn offthe water supply and leave the door of
the a pp lia n ce slig ht ly op en. This will help th e door
sealstolast l onger and prevent odours fromforming
withinth e appliance.
Moving theApplia nce
If th e appliance must be moved, try to keep it in the
vertical position. If absolutely necessary, it can be
positioned on its back.
Seals
Oneofthefactorsthatcauseodourstoforminthe
dishwasher isfood that remains tr apped in theseals .
Periodic cleaning with adamp sponge will prev ent this
fro m oc cu rr in g.
Electrical Shock Hazard
The installation of the pipes
and electrical equipments
should be done by professionals.
Disconnect electrical power before
installing dishwasher.
Failuretodosocanresultindeathor
electrical shock.
●
Installation preparation
The installation position of dishwasher should be near the existing inlet and drain hoses and
power cord.
One side of the cabinet sink should be chosen to facilitate the connection ofdrainhosesof
the dishwasher.
Note: please check the accompanying installation accessories(hook for aesthetic panel
,screw)
Page 17

【Figure1】
Cabinet dimensions
Less than 5mm
between the top
of dishwasher and
cabinet and the
outerdooraligned
to cabinet.
90 °
820mm
580mm
Electrical, drain
and watersupply
line entrances
Space between cabinet
bottomand floor
450 mm
90 °
80
100
【Figure
2】
Minimum space when
thedoorisopened
Minimum space of 50mm
●
Aesthetic panel's dimensions and installation
1
The aesthetic wooden panel could be processed according to the Figure 3.
418
10~17
5~12
The length of the pa nelshould be within
therangeof 506--580mm,not more
than580mm.
Dishwasher
Cabinet
Door of
dishwasher
【Figure3】
The aesthetic panel should
be processed in accordance
with the illustrated dimensions
(Unit: mm)
38
179 175
442
14
Page 18

2
Install the hook on the aestheticwooden panel and put the hook into the slot of the outer door of
dishwasher(see figure 4a). After positioning of the panel , fix the panel onto the outer door by
screws and bolts(See figure 4b) .
【Figure4a】
Installation of aesthetic panel
Outer door
The hook is lifted from position 1 to the appropriate place,
then pushed right to the position 2 , making the
panel and the outer door align.
22
1
1
【Figure4b】
Installation of aesthetic
wooden panel
1
.Takeawaythecover
.Pinupthescrew
2
. Get back the cover
3
Hookfor aesthetic panel
ST4 screw
Spacer for aesthetic panel
Outer door of
dishwasher
Cover
ST4 screw
Hook for aesthetic panel
Aesthetic p anel
15
Page 19

●
Tension adjustment of the door spring
The door springs are set at the factory to the proper tension for the outer door. If aesthetic
wooden panel are installed, you will have to adjust the door spring tension. Rotate the adjusting
screw to drive the adjustor to strain or relax the steel cable(see figure 5).
Adjust the door spring
tension until the door
remains balance in the
fully-opened position.
relax
【Figure
Tension adjustment
of the door spring
●
Connection of drain hoses
Insert the drain hose into a drain pipe with a minimum diameter of 4cm, or let it
run into the sink, making sure to avoid bending or crimping it. Use the speical
plastic support that comes with the appliance (figure 6).The top of the hosemustbeat
a height between 40 and 100cm. The free end of the hose must not be immersed in
water to avoid the back flow of it. ATTENTION: The special plastic hose supportmustbe
solidly fastened to the wall to prevent the drain hose from moving and allowing water
to spill outside the drain.
5】
【Figure6】
Drain pipe connection
Close the drain hose hook to the counter
Drain hose hook
Front
NOTE
The top of the hose
must be at a height
between
40 and 100cm.
The free end of the
hos e must not be
immer sed in water.
Drain pipe
Counter
A
B
C
φ 40mm
16
Page 20

1 Installthe furnituredoorto theouter doorofthe dishwasherusingthebrackets
provided. Referto the template forpositioningofthe brackets.
2 Adjust the te nsio n o f the do or springs by using anA lle n ke y tu rni ng in a cl ockw ise
motion to ti ghten the left an d right d oor springs. Failure to do this c ould cause
damageto your dishwasher(Illustration 2).
3 Connectthe inlet hose to the cold water supply.
4 Connectthe drain hose. Refer to diagram.(Figure 6)
5 Connectthe power cord.
6 Affixthecondensationstrip undertheworksurface ofcabinet. Pleaseensurethe
condensationstrip is flushwithedgeof work surface.
7 Place the dishwasherinto position.
8 Levelthedishwasher.The rearfeetcanbeadjusted from the front of the
dishwasher byturning the screwsontheleftandright hand sideofthecabinet
(Illustration 6A). To adjustthefrontfeet,use a wrenchandturnthefront feetuntil
thedishwasherislevel(Illustration 6B).
9Thedishwashermust besecured in place.Thereare two ways to dothis:
A.Normalwork surface-secureto the work surfaceby using two woodscrews
ensu ring the di shwas h er w eight is n ot being hi t by the sur fac e (Illustr atio n 7).
B. Ma rble or gran ite work top-secu re the bra cket tothe s ide panel o f the
dishwasher andsecurethedishwasher to thefurniturehousing. Put therubbercap
overthescrew(Illustration8).
2
7
5
SCREW
1
CONE GEA R
6A
6
6B
8
SCREW
【】
Figure7
17
RUBBER
COVER
Page 21

Dishwasher must be level for proper dish rack operation and wash performance.
1
Place on door and rack track inside the tub as shown to check that the
a spirit level
dishwasher is level.
level the dishwasher by adjusting the four leveling legs individually.
2
When level the dishwasher, please pay attention not to let the dishwasher tip over.
3
【Figure 8】
Illustration of feet adjustment
Check
Level
Front
to Back
NOTE:
The maximum adjustment
height of the feet is 60 mm.
Check level
side to side
For personal safety:
WARNING!
Please look at the rating label to know the rating voltage and connect the dishw asher to the appropriate power supply.
Use the required fuse 10 amp, time delay fuse or circuit breaker recommended and provide separate circuit serving
only this appliance.
This appliance must be earthed. In the event
of a malfunction or breakdown, earthing will
reduce the risk of electric shock by providing a
path of least resistance for the electric current. This
appliance is equipped with a cord having an
equipment-earthing conductor and an earthing
plug. The plug must be plugged into an appropriate
outlet that is installed and earthed in accordance
with all local standards and requirements.
DO NOT USE AN EXTENSION CORD OR AN ADAPTER PLUG WITH THIS APPLIANCE.
DO NOT, UNDER ANY CIRCUMSTANCES, CUT OR REMOVE THE EARTHING
CONNECTION FROM THE POWER CORD.
Ensure the voltage and frequency of the power being corresponds to
those on the rating plate. Only insert the plug into an electrical socket which is earthed
properly. If the electrical socket to which the appliance must be connectedisnot
appropriate for the plug , replace the socket, rather than using a adaptors or the like as
they could cause overheating and burns.
Improper connection of the equipment-
grounding conductor can result in the risk
of an electric shock.Check with a qualified
electrician or service representative if you
are in doubt whether the appliance is
properly grounded. Do not modify the plug
providedwith the appliance; If it is not fit
for the outlet. Have aproperoutlet installed
by a qualified electrician.
18
Page 22

Improper connection of the equipment earthing conductor can result in the risk of an
electric shock.
Check with a qualified electrician or service representative if you are in doubt whether the
appliance is properly earthed.
Do not modify the plug provided with the appliance. If the plug does not fit properly to the
outlet, please have a qualified electrician to install a proper outlet.
for personal safety:
DO NOT USE AN EXTENSION CORD OR AN ADAPTER PLUG WITH THIS APPLIANCE.
DO NOT, UNDER ANY CIRCUMSTANCES, CUT OR REMOVE THE
CONNECTION
Connect the c old water supply hose to a thre aded 3/4(inch) connector and make sure
that it is fastened tightly in pl ace.
If thewat er pipes are new or hav e n ot been used for an extended period of time, let the
water run tomake sure thatthe water is clear. This precaution is needed toavoid the
risk o f the water in let t o be bl ocked and d amage thea ppliance .
FROM THE POWER CORD.
EARTHING
Pleaseclose thehydrant afterusing.
Insert the drai nho se into a drain pipe w ith a mini mum diameter o f 4cm, or let itrun into t he sink, making sure to
avoidbendingorcrimping. Use thespecial plastic supportthatcomeswiththe appliance. The top of the hose
must be at aheigh t between 40 and 100cm.The free end of the ho se must not be immersed inw ater.
SINK
DISHWASHER
POWER OUTLET
Inlet pipe connector Drain pipe connector
FRONT VIEW
Min 100 mm
Page 23

How toDrain ExcessWater FromHoses
If th e sink is 1000mm higher from thefloor, theexcess water in hose s c annot be drained d irectly
into thesink. It willbe necessary todrainexcess waterfromhoses into abowl or sui table
container that is held outside andlower than t he sink.
Wat er Ou tle t
Connect the waterdrain hose. Thedr ain hose mu st be corr ectly f itte dt o avoid wate r leaks.
Ensure that thewater drain hose isnot kinked orsq uashed.
Extension Hose
Ifyouneed a drain hose extension, makesuretouseasimilar drain hose.
It mu st b e no lon ger than 4 metres; otherwise the clean ing effect of the dishwasher could be reduced .
Syphon Connection
Thewasteconne ction must be at a height of between 40 cm(minimum)and100cm(maximum)
from the bot t om of th e di sh. T h e wa ter dr ain hose shou l d b e fi xed b y a ho se clip. The free en d of
the h ose mus t n o t be immersed in water.
Thefollowingthingsshouldbecheckedbefore startingthedishwasher.
1
Thedishwasher islevel and fixedproperly
2
The inlet valve i s open
3
Thereisaleakageat theconnectionsof the conducts
4
Thewiresaretightly connected
5
The poweris switchedon
6
The inlet an d drain ho ses are kno tted
7
Allpackingmaterialsandprintingsshouldbe taken out from thedishwasher
After installation, please make sure tokeep this manual.
The content of this manual is very helpful to the users.
Page 24

Fuse blown, or the
circuit breaker triggered
Replace fuse or reset circuit breaker. Remove any other
appliance s sharing the same circu it with the dishwasher
Power supply is not
turned on
Error code:E1;
Water pressure is low
Door of dishwasher
not properly closed.
Kink in drain hose
Filter clogged
Kitchen sink clogged
Improper detergent
Spilled rinse-aid
Make sure the dishwasher is turned on and the door is
closed securely.
Make sure the power cord is properly plugged into the
wall socket.
Check that thewater supply is connected properly and
the water is turned on.
Make sure to close the door properly and latch it.
Check drain hose.
Check coarse the filter
(see section titled )" Cleaning The Filter "
Check thekitchen sink to make sure it is draining well.
If the problem is the kitchen sink not draining ,you may
need a plumber rather than a serviceman for dishwashers.
Use only the special dishwasher detergentto avoid
suds. If this occurs, open the dishwasher and let suds
evaporate.Add 1 gallon of cold water to the tub. Close
and latch the dishwasher, then Start the "soak"wash
cycle to drain out the water . Repeat if necessary.
Always wipe up rinse-aid spills immediately.
Detergent with
colourant was used
Hard water minerals
The affected items are
notcorrosionresistant.
r
Aspayarmis
knocking against
an item in a basket
Items of crockery
are loose in the
wash cabinet
This may be caused
by on-site installation
or the cross-section of
the piping.
Make sure that the detergent is the one without
colourant.
To clean the interior, usea damp sponge with
dishwasher detergent and wear rubber gloves.
Never use any other cleaner than dishwasher
detergent for the r isk of foamingor suds.
The items should be corrosion resistant.
Interrupt the programme, and rearrange the items
which are obstructing the sp ay arm.r
Interrupt the programme,
and rearrange the items of crockery.
This has no influence on the dishwasher function.
if in doubt, contact a suitably qualified plumber.
Page 25

The dishes were not
loaded correctly.
See notes in " Loading the Dishwasher Baskets ".
Theprogrammewas
notpowerful enough.
Not enough detergent
wasdispensed.
Items are blocking
the path of sp ay arms.r
The filter combination
inthebaseofwash
cabinet is not clean or
is not correctly fitted.
This may cause
the sp ay arm jets
r
to get blocked.
Combination of soft
water and too much
detergent.
Aluminum utensils
have rubbed against
dishes.
Dishes block
detergent cups.
Improper loading
Too little rinse-aid
Select a more intensive programme.
See" Wash Cycle Table ."
Use more detergent, or change your detergent.
Rearrange the items so that the sp ay can rotate freely.r
Clean and/or fit the filter combination correctly.
Clean the sp ay arm jets. See "Cleaning the Spray
Arms".
Use less detergent if you have soft water and select
a shortest cycle to wash the glassware and to get
them clean.
Use a mild abrasive cleaner to eliminate those marks.
Re-loadin g the dishes properly.
Load the dishwasher as suggested in the directions.
Increase the amount of rinse-aid/re fil lthe rinse-aid
dispenser.
r
Dishes are removed
too soon
Wrong program
has been selected
Use of cutlery with
a low-quality coating
Longer inlet time.
Overflow.
Do not empty your dishwasher immediately after
washing. Open the door slightly so that the steam can
escape. Begin unloading the dishwasher only once t
he dishes are ba rely warm to the touch. Empty the low
basket first.This prevents water form dropping off
dishes in the upper basket.
In short program the washing temperature is lower .
This also lowers cleaningperformance. Choose
a program with a long washing time.
Water drainage is more difficult with these items.
Cutlery or dishes of this type are not suitable for
washing in the dishwasher.
Faucets is not opened, o r water intake is restricted,
or water pressure is too low.
Some element of dishwasher leaks .
If overflow occurs, turn off the main water supply before calling a service.
If there is water in the base pan because of an overfill or small leak,
the water should be removed before restarting the dishwasher.
Page 26

820
445
540
1145
Height : 820mm(adjustable+60mm)
Width : 445mm
Depth : 540mm
Voltage connected Load : see rating label
Water pressure: 0.04-1.0MPa
Power supply: see rating label
Capacity: 8 Place settings
Page 27

Warranty Card
ilve.com.au
Eurolinx Pty Limited A.B.N. 50 001 473 347
trading as ILVE (“ILVE”)
Ofce:
48-50 Moore Street, Leichhardt N.S.W 2040
Post:
Locked Bag 3000, Annandale, N.S.W 2038
P: 1300 856 411
WARRANTY REGISTRATION
Your ongoing satisfaction with your ILVE product
is important to us. We ask that you complete the
enclosed Warranty Registration Card and return
it to us so that we have a record of the ILVE
product purchased by you.
PRIVACY
ILVE respects your privacy and is committed
to handling your personal information in
accordance with the National Privacy Principles
and the Privacy Act 1988 (Cth). A copy of the
ILVE Privacy Policy is available at www.ilve.
com.au. ILVE will not disclose any personal
information set out in the Warranty Registration
Card (“Personal Information”) without your
consent unless required by:
1. law;
2. any ILVE related company;
3. any service provider which provide services
to ILVE or assist ILVE in providing services
(including repair and warranty services) to
customers. Our purpose in collecting the
Personal Information is
to keep a record of the ILVE product purchased
by you, in order to provide a better warranty
service to you in the unlikely event that there
is a problem with your ILVE product. ILVE may
contact you at any one or more of the address,
email address or telephone numbers set out in
the Warranty Registration Card. Please contact
ILVE on 1300 694 583 should you not wish to be
contacted by ILVE.
WARRANTY
1. Warranty
ILVE warrants that each ILVE product will
remain, for a period of twenty four (24) months
computed from the date of purchase of the
ILVE product, free from defects arising in the
manufacture of the ILVE product (“Warranty”).
Except for consumer guarantees set
out in the Competition and Consumer Act 2010
(Cth) (“Act”), ILVE does not make any further
warranties or representations in relation to ILVE
products.
including but not limited to:
(a) damage through misuse (including failure
to maintain, service or use with proper care),
neglect, accident or ordinary wear and tear
(including deterioration of parts and accessories
and glass breakage);
(b) use for purpose for which the ILVE product
was not sold or designed;
(c) use or installation which is not in accordance
with any specied instructions for use or
installation;
(d) use or operation after a defect has occurred or
been discovered;
(e) damage through freight, transportation or
handling in transit (other than when ILVE is
responsible);
(f) damage through exposure to chemicals, dusts,
residues, excessive voltage, heat, atmospheric
conditions or other forces or environmental
factors outside the control or ILVE;
(g) repair, modication or tampering by the
purchaser or any person other than ILVE, an
employee of ILVE or an authorised ILVE service
contractor*;
(h) use of parts, components or accessories
which have not been supplied or specically
approved by ILVE.
(i) damage to surface coatings caused by cleaning
or maintenance using products not recommended
in the ILVE product handbook provided to the
purchaser upon purchase of the ILVE product;
(j) damage to the base of an electric oven due to
items having been placed on the base of the oven
cavity or covering the base, such as aluminium
foil (this impedes the transfer of heat from the
element to the oven cavity and can result in
irreparable damage); or
(k) damages, dents or other cosmetic
imperfections not affecting the performance of the
ILVE in respect of an ILVE product purchased as a
“factory second” or from display
The Warranty does not extend to light globes
used in ILVE products.
3. Domestic Use
Each ILVE product is made for domestic use. This
Warranty may not extend to ILVE products used
for commercial purposes.
4. Time for Claim under the Warranty
You must make any claim under this Warranty
within twenty eight (28) days after the occurrence
of an event which gives rise to a claim pursuant
to the Warranty, by booking a service call on the
telephone number below.
2. What is not Covered by the Warranty.
The Warranty does not apply if an ILVE product
is defective by a factor other than a defect
arising in the manufacture of the ILVE product,
62 ILVE Operating Manual
Continued over...
Page 28

Warranty Card continued
ilve.com.au
5. Proof of Purchase
Customers must retain proof of purchase in order
to be eligible to make a warranty claim in respect
of an ILVE product.
6. Claiming under the Warranty
Customers will bear the cost of claiming under this
Warranty unless ILVE determines the expenses
are reasonable, in which case the customer
must claim those expenses by providing written
evidence of each expense to ILVE at the address
on the Warranty Registration Card.
7. Statutory Rights
(a) These terms and conditions do not affect your
statutory rights.
(b) The limitations on the Warranty set out in this
document do not exclude or limit the application
of the consumer guarantees set out in the Act or
any other equivalent or corresponding legislation
in the relevant jurisdiction where to do so would:
(i) contravene the law of the relevant jurisdiction;
or
(ii) cause any part of the Warranty to be void.
(c) ILVE excludes indirect or consequential loss
of any kind (including, without limitation, loss of
use of the ILVE product) and (other than expressly
provided for in these terms and conditions)
subject to all terms,
conditions and warranties implied by custom, the
general law, the Act or other statute.
(d) The liability of ILVE to you for a breach of any
express or non-excludable implied term, condition
or warranty is limited at the option of ILVE to:
(i) replacing or repairing the defective part of the
ILVE product;
(ii) paying the cost of replacing or repairing the
defective part of the ILVE product;
(iii) replacing the ILVE product; or
(iv) paying the cost of replacing the ILVE product.
(e) Our goods come with guarantees that cannot
be excluded under the Australian Consumer
Law. You are entitled to a replacement or refund
for a major failure and for compensation for any
other reasonably foreseeable loss or damage.
You are also entitled to have the goods repaired
or replaced if the goods fail to be of acceptable
quality and the failure does not amount to a
major failure.
8. Defects
Any part of an ILVE product deemed to be
defective and replaced by ILVE is the property of
ILVE. ILVE reserves the right to inspect and test
ILVE products in order to determine the extent of
any defect and the validity of a claim under the
Warranty.
*To locate your closest ILVE authorised service
agent please contact ILVE on 1300 856 411 or
visit http://support.ilve.com.au/
ALL SERVICE CALLS MUST BE BOOKED
THROUGH THE ILVE SERVICE AND
WARRANTY DEPARTMENT ON 1300 856 411
01012013
Warranty Card tear off
WARRANTY REGISTRATION CARD
01012013
Last Name: First Name:
Address:
State: Postcode: Email:
Home Phone: Mobile:
Purchase Date: / /
MODEL NUMBER
1
2
3
4
Please complete and send to ILVE at: REPLY PAID 83617
(if you cannot locate the serial number please call ILVE on 1300 85 64 11)
LEICHHARDT NSW 2040
(Please attach proof of purchase to validate warranty)
SERIAL NUMBER
63ILVE Operating Manual
01012013
 Loading...