

Iluv iMM183 Instruction Manual

English
Model : iMM183
Instruction Manual
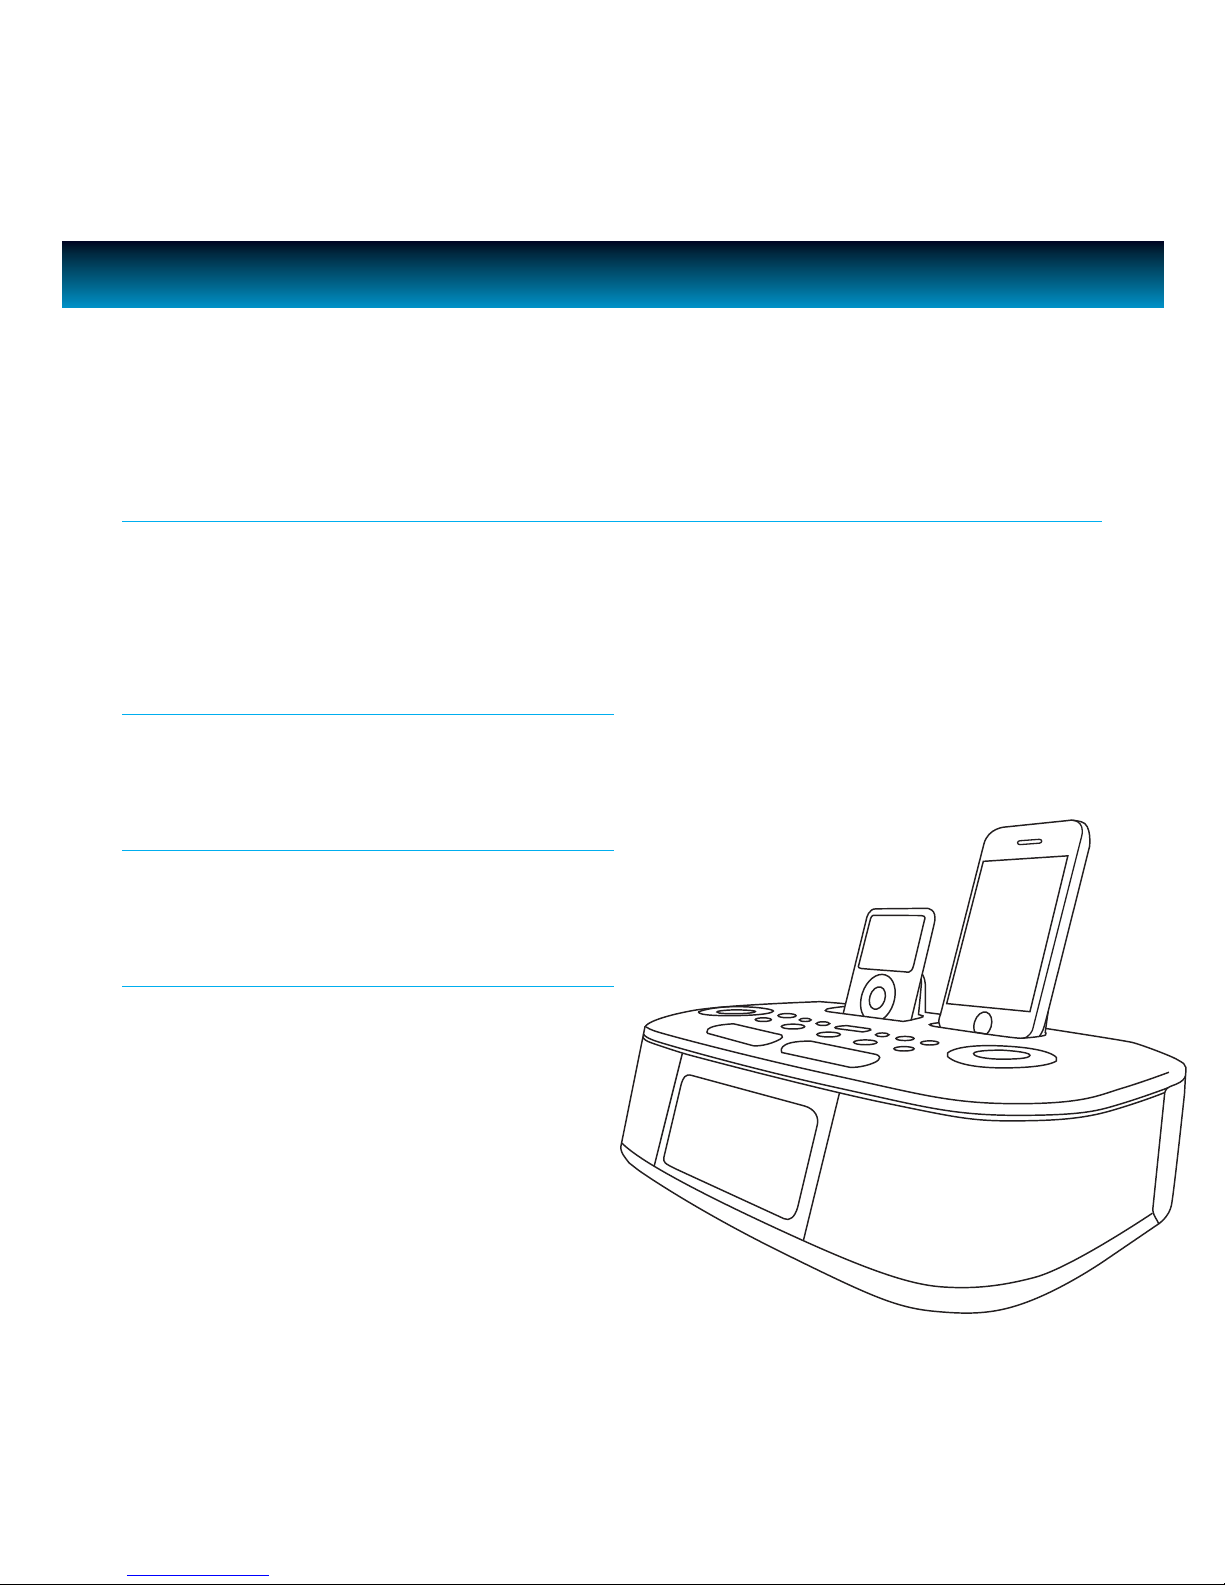
Weather Radio Dual Alarm Clock for Your iPhone® and iPod®
NOAA weather – all 7 channels | S.A.M.E Weather Hazard Alert

INTRODUCTION
Congratulations on your purchase of the new iLuv iMM183 for your iPod and/or iPhone. Designed
specically to work with iPod and/or iPhone, this product is uniquely designed with two docks to provide
performance that brings out the best in your music. Please keep this manual for future reference.
The iMM183 is designed to receive National Weather Service (NWS) broadcasts, by the Department of
Commerce’s National Oceanic and Aerospace Administration (NOAA) which provides information about
weather conditions, forecasts and hazard information 24 hours a day as a public service.
iMM183 receives all seven NOAA channels; it has an automatic alert system; in the event of a special
warning broadcast, the receiver will automatically activate along with a loud tone; a ashing LED
indicator; and an “alert” message on the LCD.
This unit also has an “S.A.M.E Digital Weather/Hazard Alert” feature, providing you with constant
monitoring of your localized NWS broadcast. It allows you to receive only messages for the areas
concerning you.
For up-to-date information on NOAA and weather frequencies used in your area, check the NOAA
National Weather Service website at: www.nws.noaa.gov/nwr.
1 | iLuv
To get weather band channel and S.A.M.E code for your area, call 1-888-697-7263,
or visit www.nws.noaa.gov/nwr/indexnw.htm
INTRODUCTION
• Powerful built-in speakers allow you to hear your music with depth and clarity
• Treble / Bass control
• Large display; easy to read
• Auxiliary line input for any audio devices with 3.5mm jack
• LCD dimmer level control (8 steps)
Features for your iPhone / iPod
• Two iPod docks let you charge up to two iPod* and/or iPhone at once
• Enjoy rich sound from your iPod / iPhone with jAura acoustic speaker technology
• Choose and play any one of two docked iPod / iPhone
• Plays and charges your iPod / iPhone
• Integrated universal dock for your iPod / iPhone
Digital Dual Alarm Clock
• Digital clock display with dual alarm clock
• Wake to iPod / iPhone, FM radio, or buzzer
• Sleep to iPod / iPhone, FM radio
FM Stereo Radio
• FM stereo
• PLL tuning digital tuning technology
• Programmable presets for 6 radio stations
Weather Band Receiver
• All hazard weather alert system
• SAME decode and alert message display
• Store up to 10 alert messages
• LED warning indicator
*Compatible with any iPod with dock connector
(Excluding 1
st
, 2nd, and 3rd generation iPod)
iLuv | 2iMM183 | V10M10_IM_EN_09092009

TABLE OF CONTENTS
Getting Started
Power Source
Protect your Furniture
Installing the Remote Control Battery
Installing the Dock Adapter
Installing the Backup Batteries
Location of Controls on the Main Unit
Location of Controls on the Remote Control
Location of Indications on the LCD Screen
Operational Instructions
Turning the System ON
Turning the System O
Select Source
Radio Tuner
Using the iPod Function
Aux Mode
Adjusting the Volume
Setting the Clock
Using the Time Sync Feature
Sleep Mode
Setting the Treble / Bass
Mute Function
Dimmer Setting
Setting the Alarm
Snooze Function
Using the FM Radio
iPhone and iPod Operation
iPhone Function
Menu and Enter
Repeat
5
5
10
10
10
10
11
11
11
12
13
14
14
14
14
15
16
16
17
18
18
18
5
6
6
7
8
9
3 | iLuv

TABLE OF CONTENTS
Weather Band Operation
Obtaining Weather Channel/County Codes from NOAA
Basic Operation
Programming a Single S.A.M.E. County Code
Programming Multiple S.A.M.E. County Codes
Deleting the County Code
Choosing an Alert (Voice or Siren)
Turning the Alert ON / OFF
Setting the Alert Volume
Selectable Alert Option
Testing the Alert
Reviewing Alerts
Deleting Alerts
LED Indicators
Alert Out Socket
Low Battery indication
No Reception Warning
Maintenance
19
19
20
20
21
21
21
21
22
22
22
23
23
23
23
24
24
Troubleshooting Guide
User Safety Guide
25
27
iLuv | 4iMM183 | V10M10_IM_EN_09092009

GETTING STARTED
Power Source
• This system is designed to operate on AC100V~240V 60/50Hz house current only.
• Connecting this system to any other power source may cause damage to the system and such
damage is not covered by your warranty.
• Main plug is used as the disconnect device, the disconnect device shall remain readily operable.
Note: The system has an AC plug and will only t into matching AC outlets. This is a safety feature to reduce the
possibility of electric shock. If the plug will not t in your AC outlets, you should have the outlet changed by a
qualied, licensed electrician. Do not use an adapter to make the plug t into your outlet. This defeats the safety
feature and could expose you to electric shock.
Protect your Furniture
This model is equipped with non-skid rubber 'feet' to prevent the product from moving when you
operate the controls. These 'feet' are made from non-migrating rubber material specially formulated to avoid leaving any marks or stains on your furniture. However certain types of oil based
furniture polishes, wood preservatives, or cleaning sprays may cause the rubber 'feet' to soften,
and leave marks or a rubber residue on the furniture. To prevent any damage to your furniture we
strongly recommend that you purchase small self-adhesive felt pads, available at hardware stores
and home improvement centers everywhere, and apply these pads to the bottom of the rubber
'feet' before you place the product on ne wooden furniture.
Installing the Remote Control Battery
The remote control battery has been previously installed and ready for operation for the rst time
use. When the remote control stops functioning, replace the battery with a new one. To do so,
locate the battery compartment and follow the steps below:
1. Slide out the battery holder from the remote control case.
2. Insert a “CR2025” 3V lithium battery making certain to follow the correct polarity. Observe the
corresponding symbols (+/-).
3. Secure battery and push the battery holder back into the remote control until it is fully inserted.
5 | iLuv

GETTING STARTED
Installing the Dock Adapter
1. How to insert a dock adaptor
a. Please use dock adaptor that came with your iPhone or iPod.
b. Using the correct dock adaptor ensures the proper t for your iPhone or iPod.
c. Gently push the dock adaptor down into the universal dock.
d. Carefully place your iPhone or iPod into the universal dock. Your iPhone or iPod must not be
in a case or "Skin".
2. How to remove the dock adaptor
• Remove your iPhone or iPod rst, then carefully remove the dock adaptor.
Installing the Backup Batteries
This unit operates on 6 X “AA” batteries (not included) for backup. Please note that batteries are important
because they provide emergency power for the receiver in the event that the AC power fails.
1. Open the Battery Compartment.
2. Insert 6 "AA" size batteries into the Battery Compartment, making sure that the batteries are installed
with the proper polarity (+/-) are maintained.
Important Note: Backup battery is used for Weather band only, if AC power fails and battery operating,
all other iPod, FM, AUX IN functions are unavailable and the MODE button will be invalid.
Notes on battery use:
• To save battery power, please always use AC adaptor for receiver power supply.
• Load new batteries with their polarities (+/-) aligned correctly.
• Do not apply heat to batteries, or internal short circuit may occur.
• If this unit is not to be used for a long period of time, remove all batteries and store them in a cool and dry place.
• Remove spent batteries immediately and dispose of them.
• Do not use old and new batteries together. Also never use an alkaline battery with a magnesium battery.
Backup battery time is approximately 54 hours.
iLuv | 6iMM183 | V10M10_IM_EN_09092009
GETTING STARTED
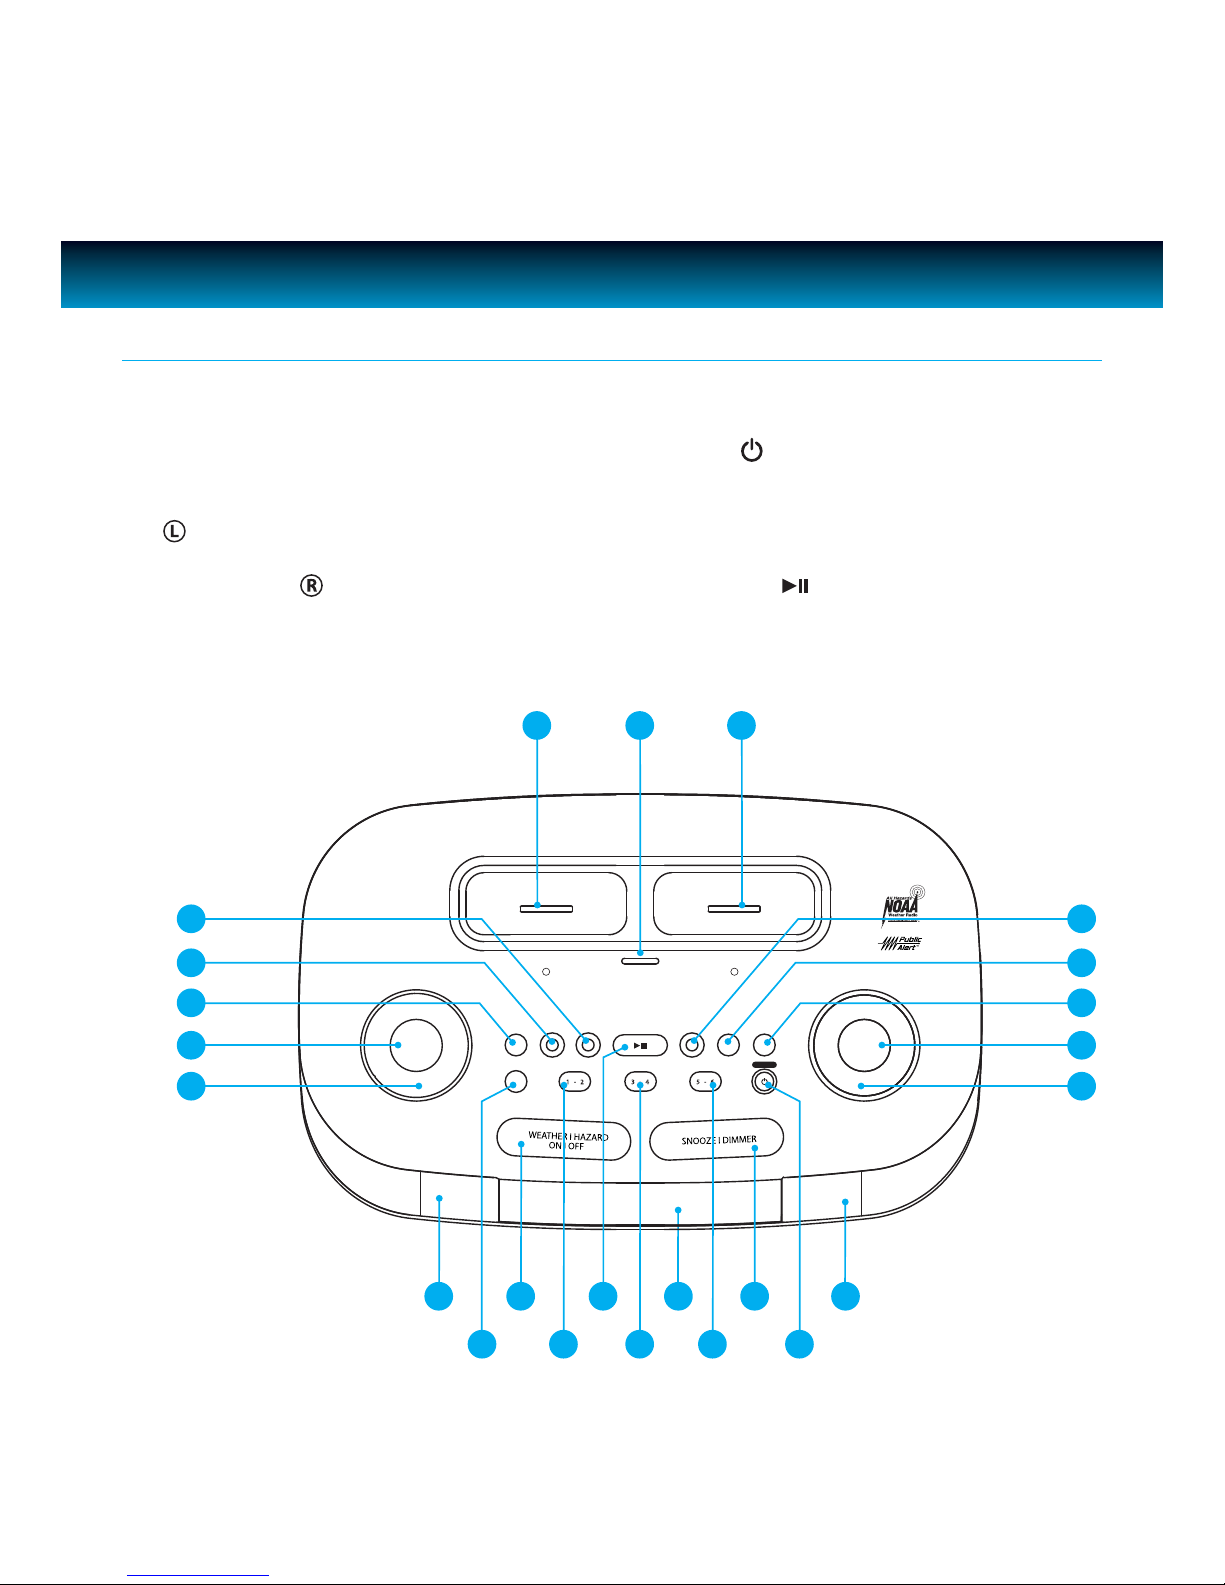
Location of Controls on the Main Unit
1. VOLUME knob
MODE button
2.
3. AL SET button
AL 1 button
4.
5. AL 2 button
6.
7.
8. iPod / iPhone
9.
iPod / iPhone dock
SELECT button
dock
SLEEP button
10. BASS/TREBLE button
SETUP button
11.
ENTER button
12.
5
4
13. SEARCH knob
14. Speakers
POWER
15.
16. SNOOZE/DIMMER button
17. Preset Number (5-6) button
18. LCD display
19. Preset Number (3-4) button
AUTO SCAN
20.
21. Preset Number (1-2) button
WEATHER/HAZARD ON/OFF button
22.
ALERT button
23.
6 7 8
L R
SELECT
AL OFF button
button
9
10
3
2
MODE ENTER
1
VOLUME
7 | iLuv
AL1 AL2 SLEEP BASS/TREBLE SETUPAL SET AUTO SCAN
ALERT
1 - 2
14 16
23 19
21
2022
3 - 4 5 - 6
18
17
POWER
AL OFF
11
12
13
SEARCH
14
15
GETTING STARTED
Location of Controls on the Main Unit – CONTINUED
REMOTE CONTROL
AUX IN DC 10V, 2AALERT OUTEXT. ANTENNA
24. REMOTE CONTROL holder
25. EXT. Antenna jack
26. AUX IN Jack
27. ALERT OUT jack
28. Battery compartment
29. POWER Jack
24 26 2925
27 28
Location of Controls on the Remote Control
AL OFF
MENU
1
SETUP
2
3
SELECT
AUTO
SCAN
AUTO
SCAN
9
10
11
12
13
4
VOL
5
6
7
8
SNOOZE/DIMMER
MODE MUTE
SLEEP
MEMORY
BASS
TREBLE
WEATHER
HAZARD
14
15
16
17
18
19
1. POWER AL OFF Button
2. UP Button
3. SKIP /AUTO SCAN Button
4. VOLUME +/- Button
5. iPod
Select Button
6. SNOOZE/DIMMER Button
7. MODE Button
8. SLEEP Button
9. MENU Button
10. SETUP Button
11. SELECT Button
12. SKIP /AUTO SCAN Button
13. DOWN Button
14. PLAY/PAUSE Button
15. iPod
Select Button
16. MUTE Button
17. BASS TREBLE Button
18. WEATHER/HAZARD Button
19. REPEAT Button
iLuv | 8iMM183 | V10M10_IM_EN_09092009
GETTING STARTED
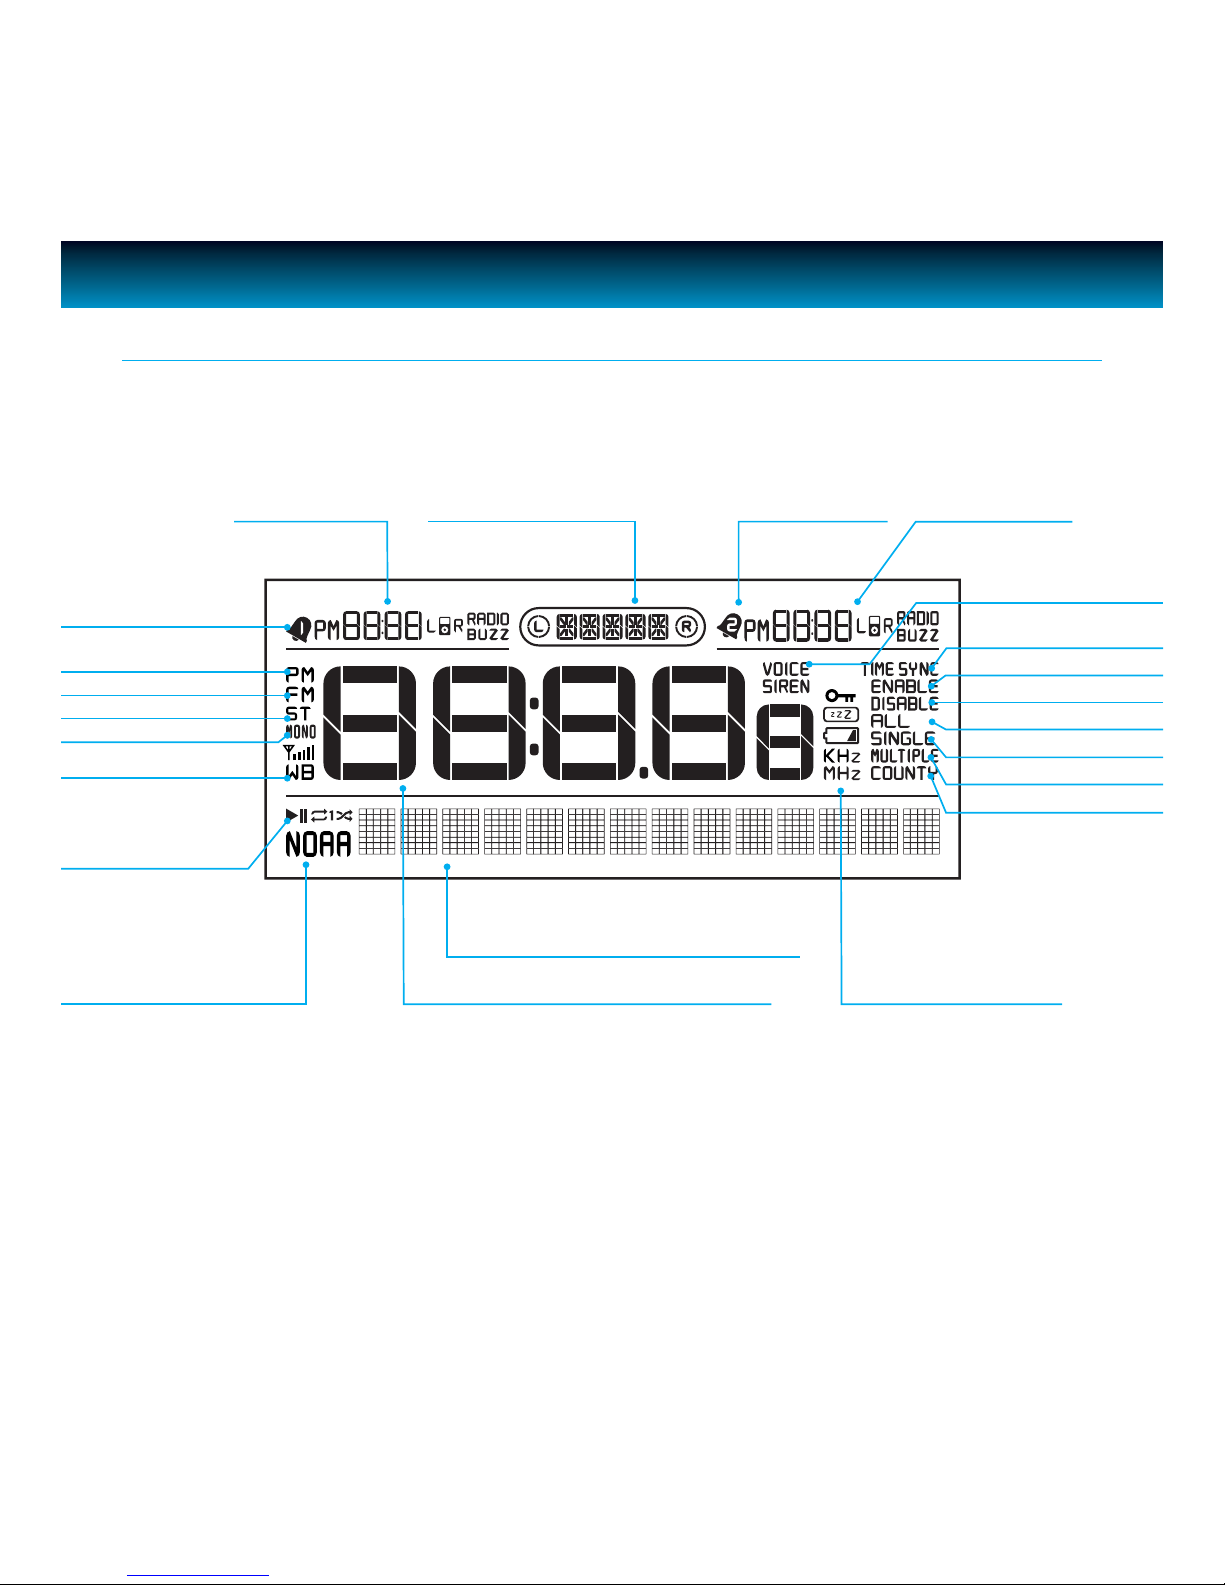
Location of Indications on the LCD Screen
Alarm 1 Armed
PM Indicator
FM Indicator
ST Indicator
MONO Indicator
WB RSSI Indicator
PLAY, PAUSE
REPEAT,
RANDOM Indicator
NOAA Indicator
Alarm 1 Display
FM/iPod/AUX Display
Date/Settings, Volume,
Weather, Bass/Treble, Sleep Display
Clock/Radio Frequency/Time Display
Alarm 2 Armed
Alarm 2 Display
VOICE, SIREN
Indicator
TIME SYNC Indicator
ENABLE Indicator
DISABLE Indicator
ALL Indicator
SINGLE Indicator
MULTIPLE Indicator
COUNTY Indicator
KEY, SLEEP, BATTERY,
KHz, MHz Indicator
9 | iLuv
OPERATIONAL INSTRUCTIONS
Turning the System ON
In standby mode, press POWER /AL OFF Button on the unit or on the remote control.
Turning the System O
In any working mode, press POWER /AL OFF button on the unit or on the remote control.
Be aware that the dim, alarm setting will still be functional at standby mode.
To turn o alarm sound, press the POWER
/AL OFF button on the unit or remote control.
Select Source
Press MODE on main unit or on remote control, to select:
iPod FM AUX iPod…
Radio Tuner
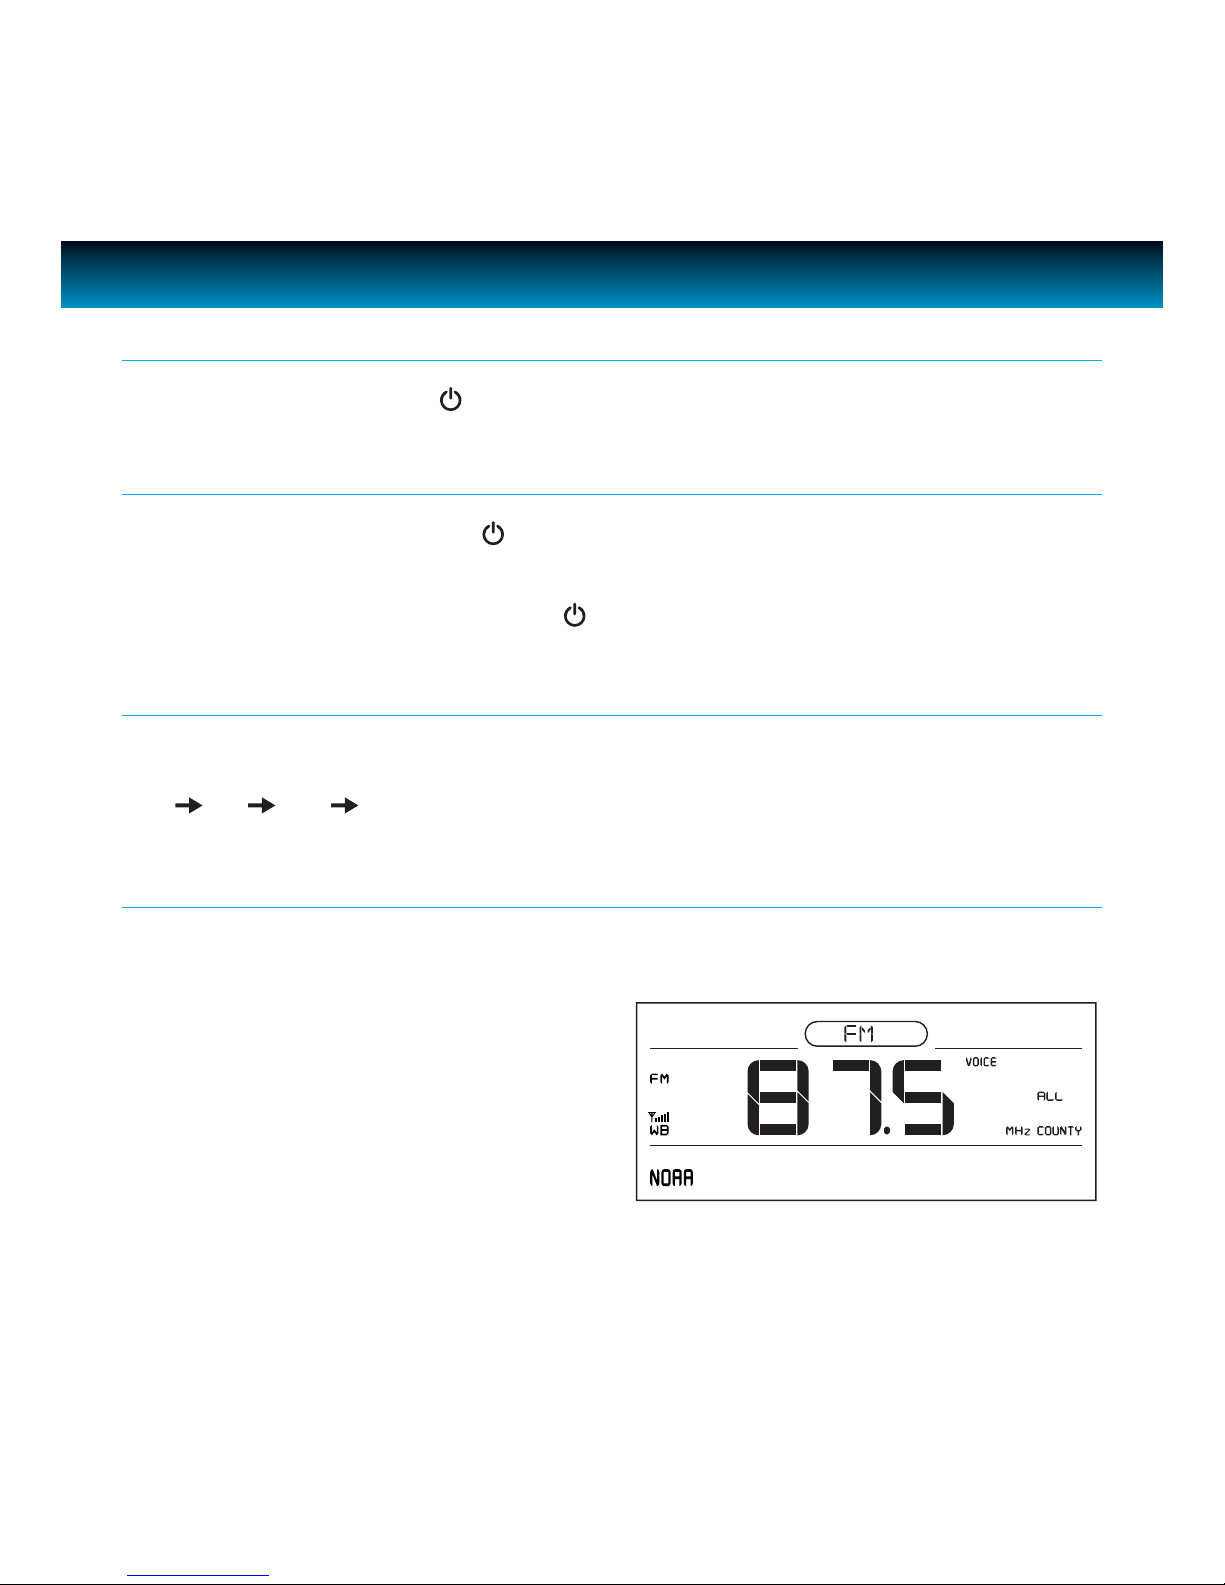
Press MODE on the main unit or remote control, and the "FM" icon will appear on the display.
iMM183 | V10M10_IM_EN_09092009 iLuv | 10
OPERATIONAL INSTRUCTIONS
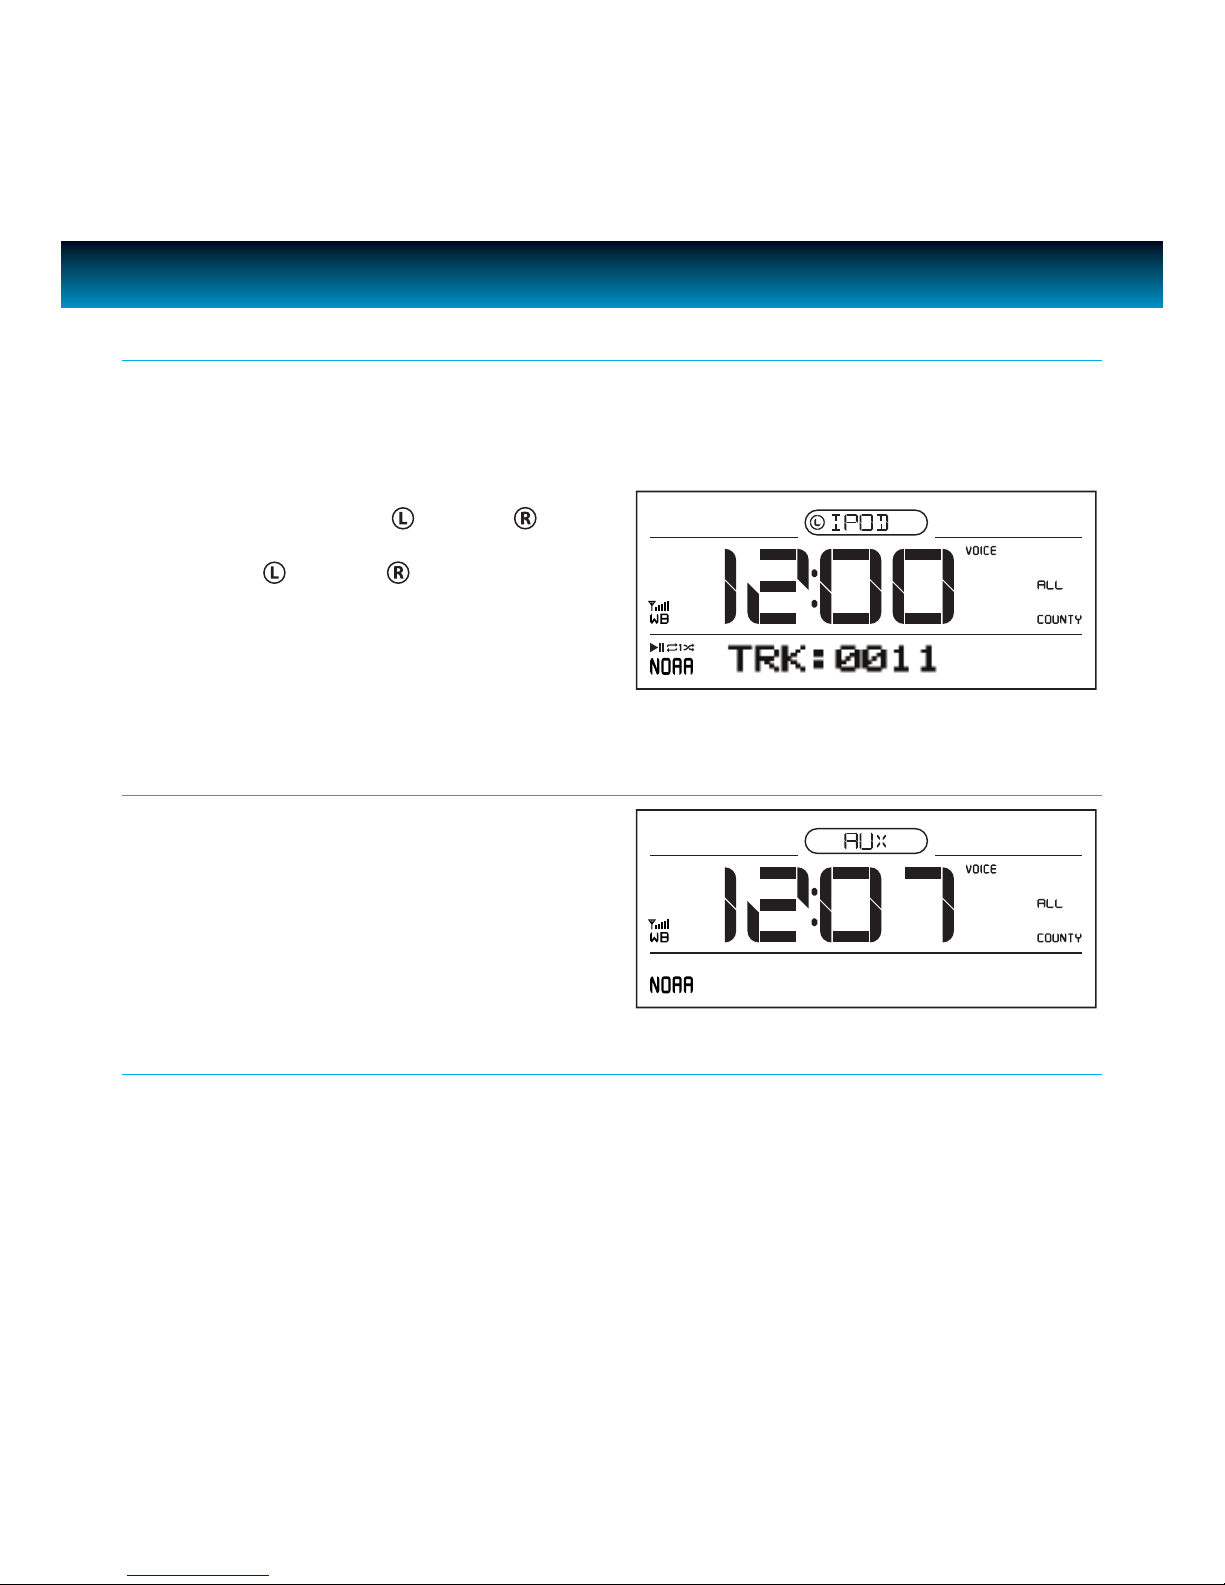
Using the iPod Function
When the iPod mode is selected, the “IPOD” icon will appear on the display. If authentication is
successful, the unit will automatically play after approximately 3 - 5 seconds.
LCD will show the current track number to be played.
Press SELECT to select “ Dock
main unit or remote control. When your selection
is made “iPod
display.
” or “iPod ” will show on the
” or “ Dock
” o n
Aux Mode
When Aux mode is selected, the “AUX” icon
will display. Use this mode to play audio
devices through the 3.5mm AUX IN jack.
Adjusting the Volume
Use the VOLUME knob to adjust the Volume. Display shows “VOLUME: XX” and assigns a numerical
value between 0 and 40 (40 is Max).
For example: “VOLUME: 23” may display current volume level. This volume level setting will be
stored when the unit is power o. When the unit is powered on, the unit will return to this volume
setting.
11 | iLuv
OPERATIONAL INSTRUCTIONS
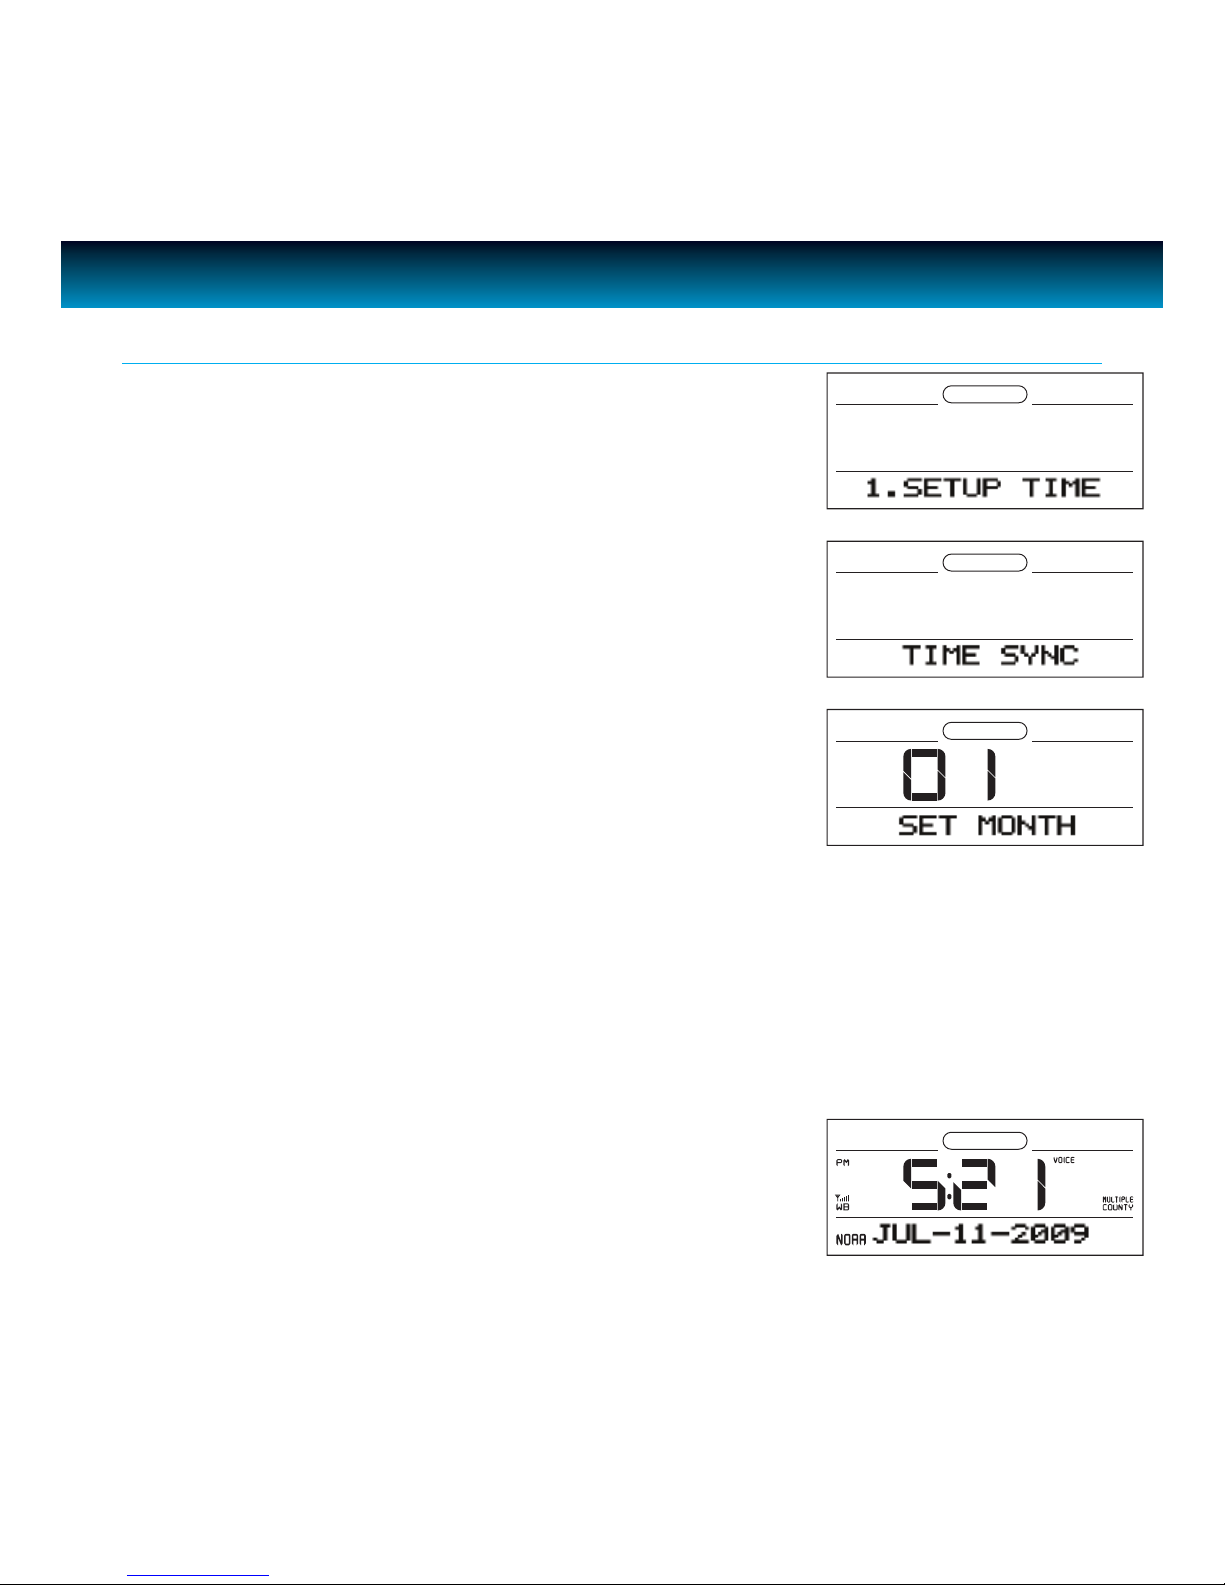
Setting the Clock
The default clock setting is 12:00AM.
• In power OFF (Standby) mode, press
rotate the SEARCH wheel to select "1. SETUP TIME".
• Press
select "MANUAL SET".
• Press ENTER to conrm. "SET MONTH" and a ashing number will
display on the screen. Rotate the
of month.
• Press ENTER to conrm. "SET DATE" and a ashing number will display on the screen. In the same way,
set
ENTER and "TIME SYNC" will display. Rotate the SEARCH wheel to
Day > Year > Hour > Minute.
SETUP on the unit to set the clock,
SEARCH wheel to change the number
• To exit clock setting mode, Press
SETUP. The time and date will display on the screen.
iLuv | 12iMM183 | V10M10_IM_EN_09092009
 Loading...