

Page 1

English
Model : iMM178
Instruction Manual
Vibe Plus
TM
Page 2
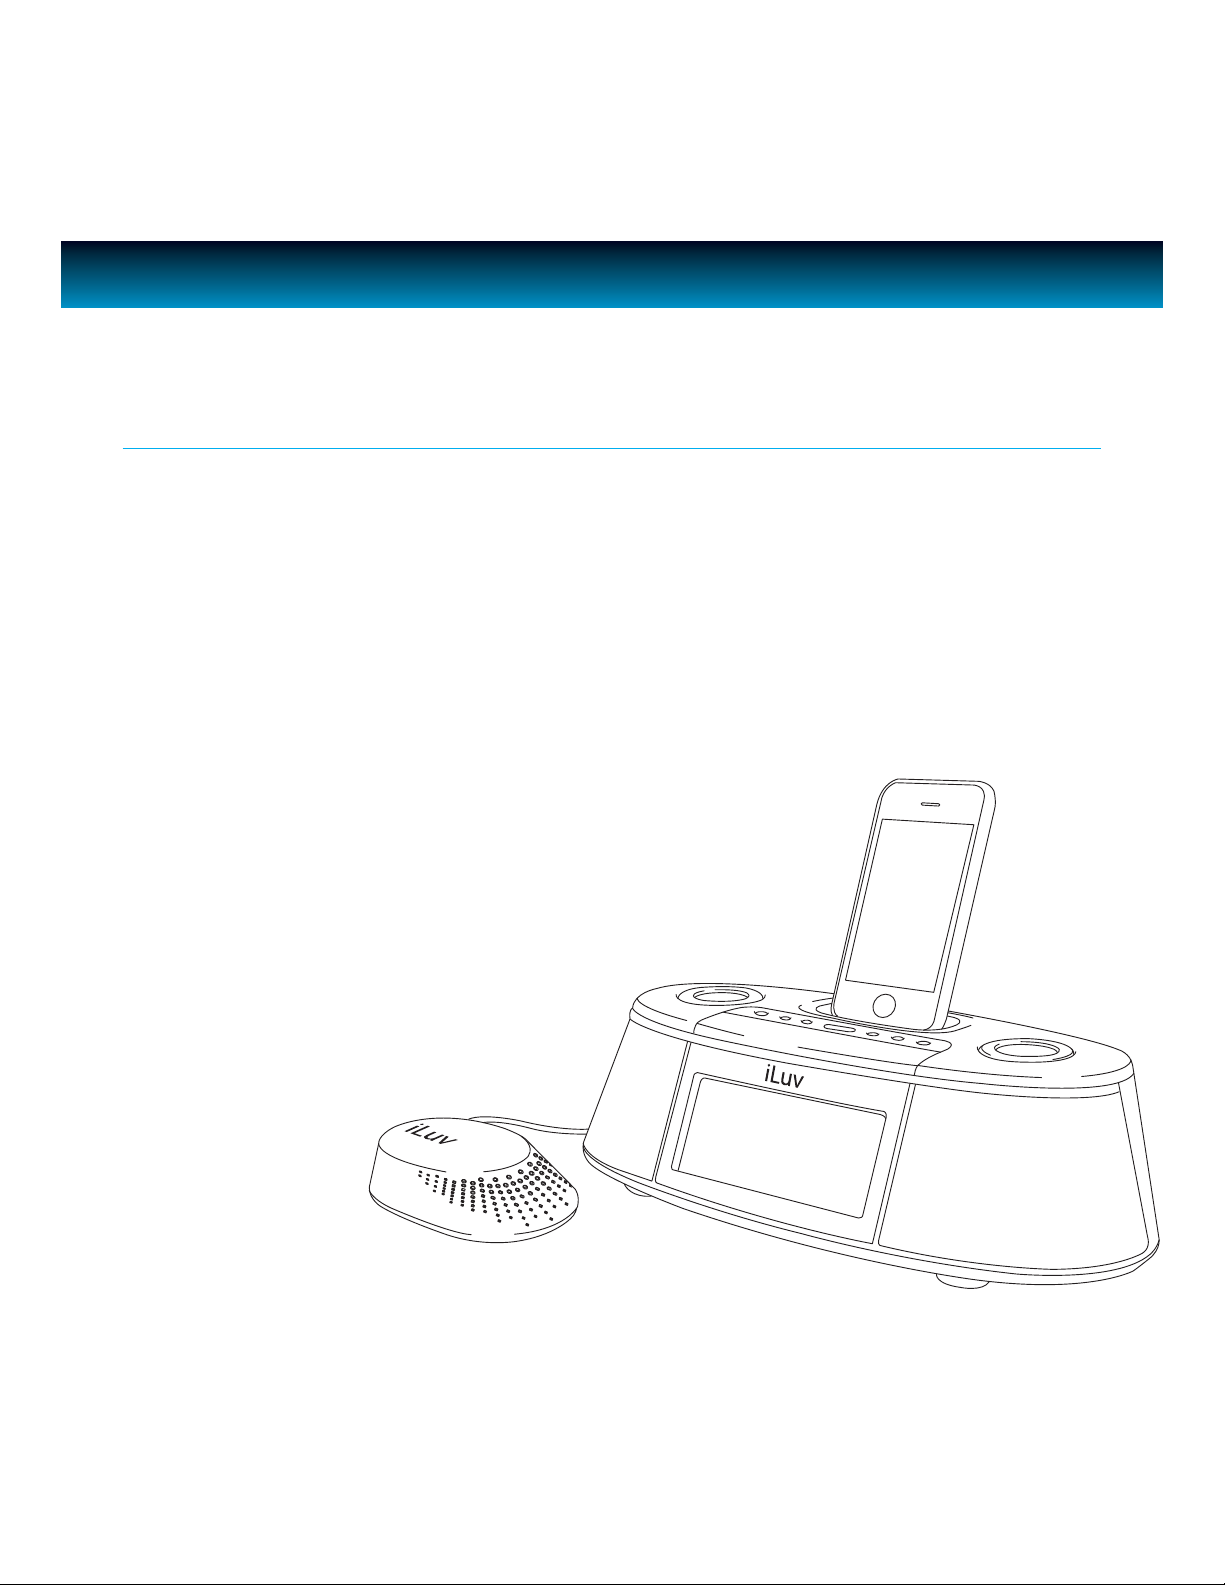
INTRODUCTION
Congratulations on your purchase of the new iMM178 for your iPhone or iPod. Please keep this manual
for future reference.
Desktop Alarm Clock with Bed Shaker for your iPhone or iPod
· Built-in speakers allow you to hear your music with depth and clarity
· Large display; easy to read
· LCD dimmer level control
iPod and iPhone*
·
Enjoy rich sound from your iPhone or iPod
Plays and charges your iPhone or iPod
·
Integrated universal dock for your iPhone or iPod
·
Digital Dual Alarm Clock
·
Digital clock display with dual alarm clock
Bed shaker vibrates a bed or pillow to wake up the heaviest sleepers
·
Wake to iPhone or iPod, FM radio, buzzer, or bed shaker
·
Sleep to iPhone or iPod, FM radio
·
1 | iLuv
Radio
·
FM stereo radio
PLL digital tuning technology
·
Programmable presets
·
for 8 radio stations
Page 3

INTRODUCTION
What’s included
· AC adapter
Bed shaker
·
* iPhone 3GS, iPhone 3G, iPhone, iPod touch 2nd generation, iPod nano 5th generation, iPod nano 4th generation,
iPod touch 1st generation, iPod nano 3rd generation, iPod classic, iPod nano 2nd generation, iPod with video, iPod
nano 1st generation, iPod 4th generation, iPod mini.
iLuv | 2iMM178 | V10M10_IM_EN_01262010
Page 4

TABLE OF CONTENTS
INTRODUCTION
GETTING STARTED
Installing the AC Adapter
Protect your Furniture
Installing a Dock Adapter
Location of Controls on the Main Unit
Power ON/OFF
Back Up battery
Back Up Function
OPERATIONAL INSTRUCTIONS
Setting the Clock
Setting the Alarm
Using the Snooze Function
Using the Sleep Function
Listening to your iPhone or iPod
Using the Shaker Speaker
Listening to the Radio
Charging your iPhone or iPod
Adjusting the Brightness of the LCD Screen
Setting the Bass and Treble
Resetting the Unit
1
4
4
4
5
6
6
6
7
10
12
13
14
15
15
17
17
17
17
3 | iLuv
TROUBLESHOOTING GUIDE
USER SAFETY GUIDE
SPECIFICATIONS
18
19
25
Page 5

GETTING STARTED
Installing the AC Adapter
Locate the AC adapter jack on the back of the unit. Insert the AC adapter cable into the jack, and
plug into the wall outlet.
Protect your Furniture
This model is equipped with foam ‘feet’ to prevent the product from moving when you operate the
controls.
Installing a Dock Adapter
1. How to insert a dock adapter
a. Please use dock adapter that came with your iPod or iPhone
b. Using the correct dock adapter ensures the proper t for your iPod or iPhone.
c. Gently push the dock adapter down into the universal dock.
d. Carefully place your iPod into the universal dock. Your iPhone or iPod must not be in a case or
“Skin”.
2. How to remove the dock adapter
· Remove your iPod or iPhone rst, then carefully remove the dock adapter.
iLuv | 4iMM178 | V10M10_IM_EN_01262010
Page 6
GETTING STARTED
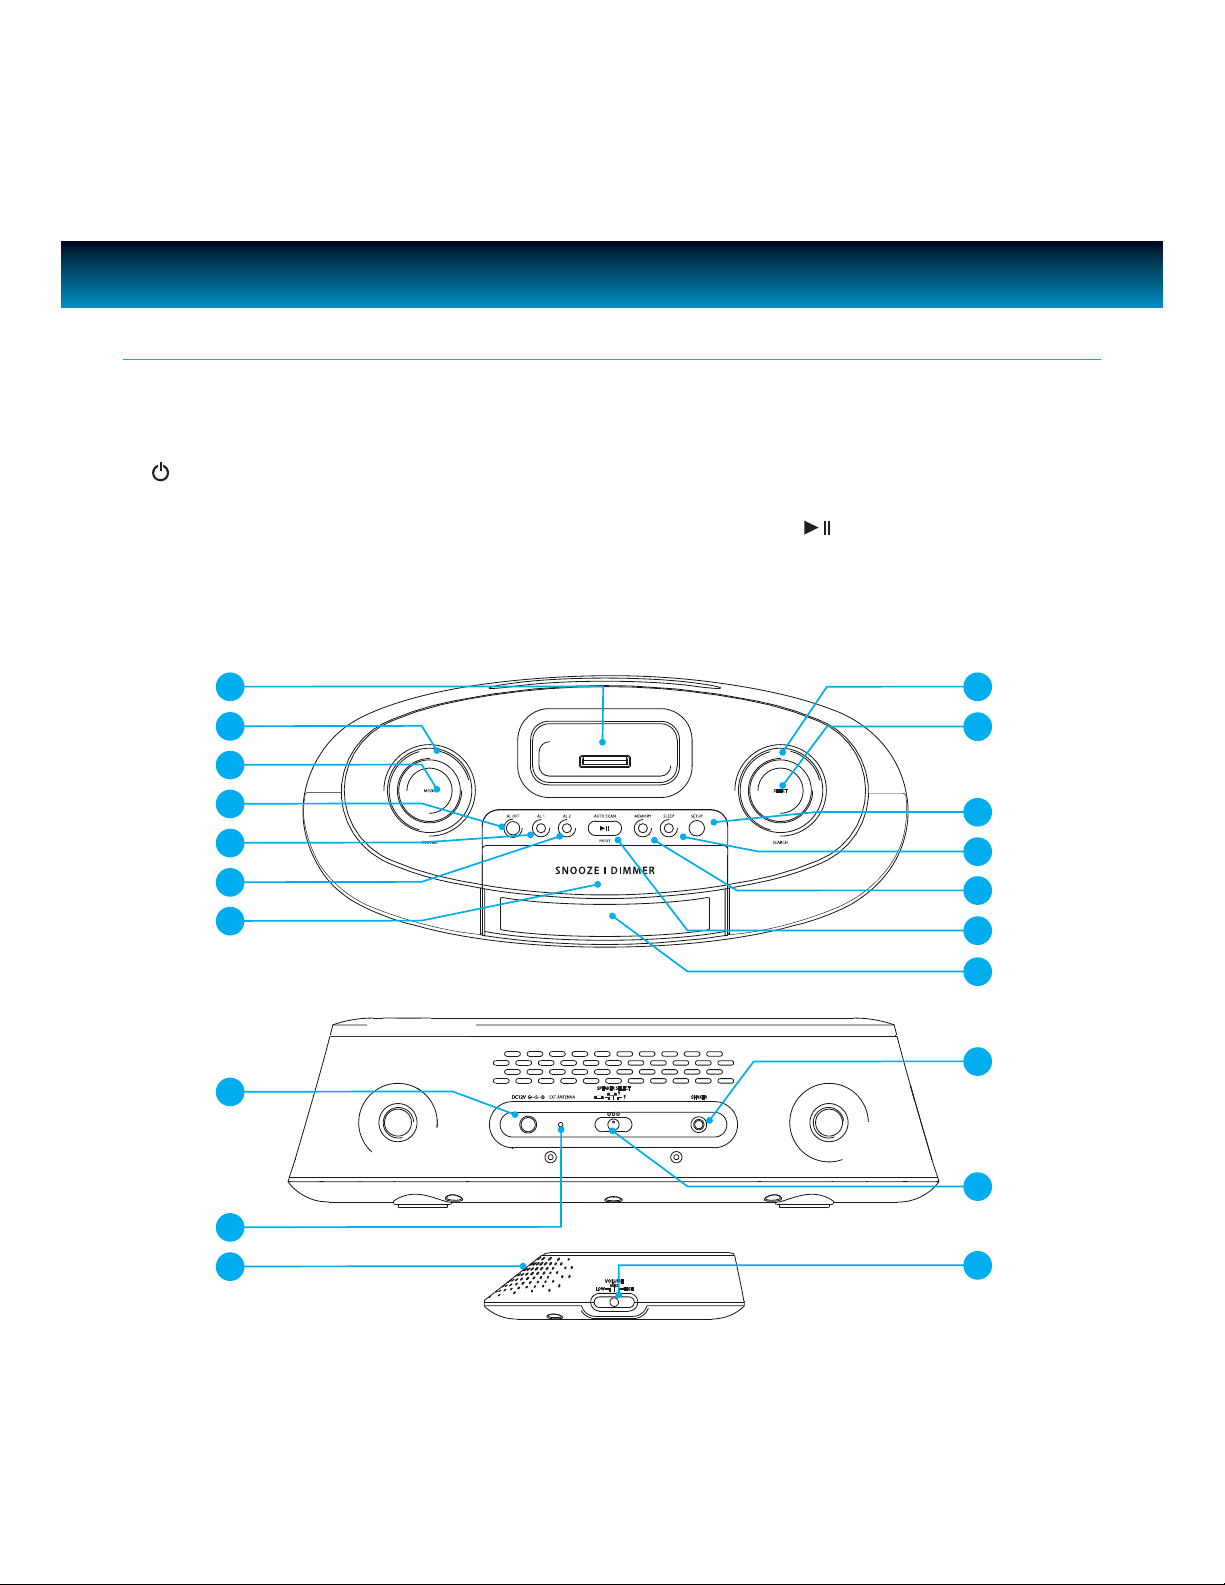
Location of Controls on the Main Unit
1. iPhone/iPod dock
2. VOLUME knob
3. MODE button
4. / AL OFF button
5. Alarm 1 button
6. Alarm 2 button
7. SNOOZE/DIMMER button
8. DC power jack(12V/2A)
9. FM ANT.
10. Speaker (SHAKER)
1
2
3
4
5
6
7
11. SEARCH knob
12. SELECT button
13. SETUP button
14. SLEEP button
15. MEMORY button
16. PLAY/PAUSE /PRESET/ AUTO SCAN button
17. LCD screen
18. BED SHAKER jack
19. SPEAKER SELECTOR switch
20. Volume switch (SHAKER)
11
12
13
14
15
16
17
5 | iLuv
10
18
8
19
9
20
Page 7
GETTING STARTED
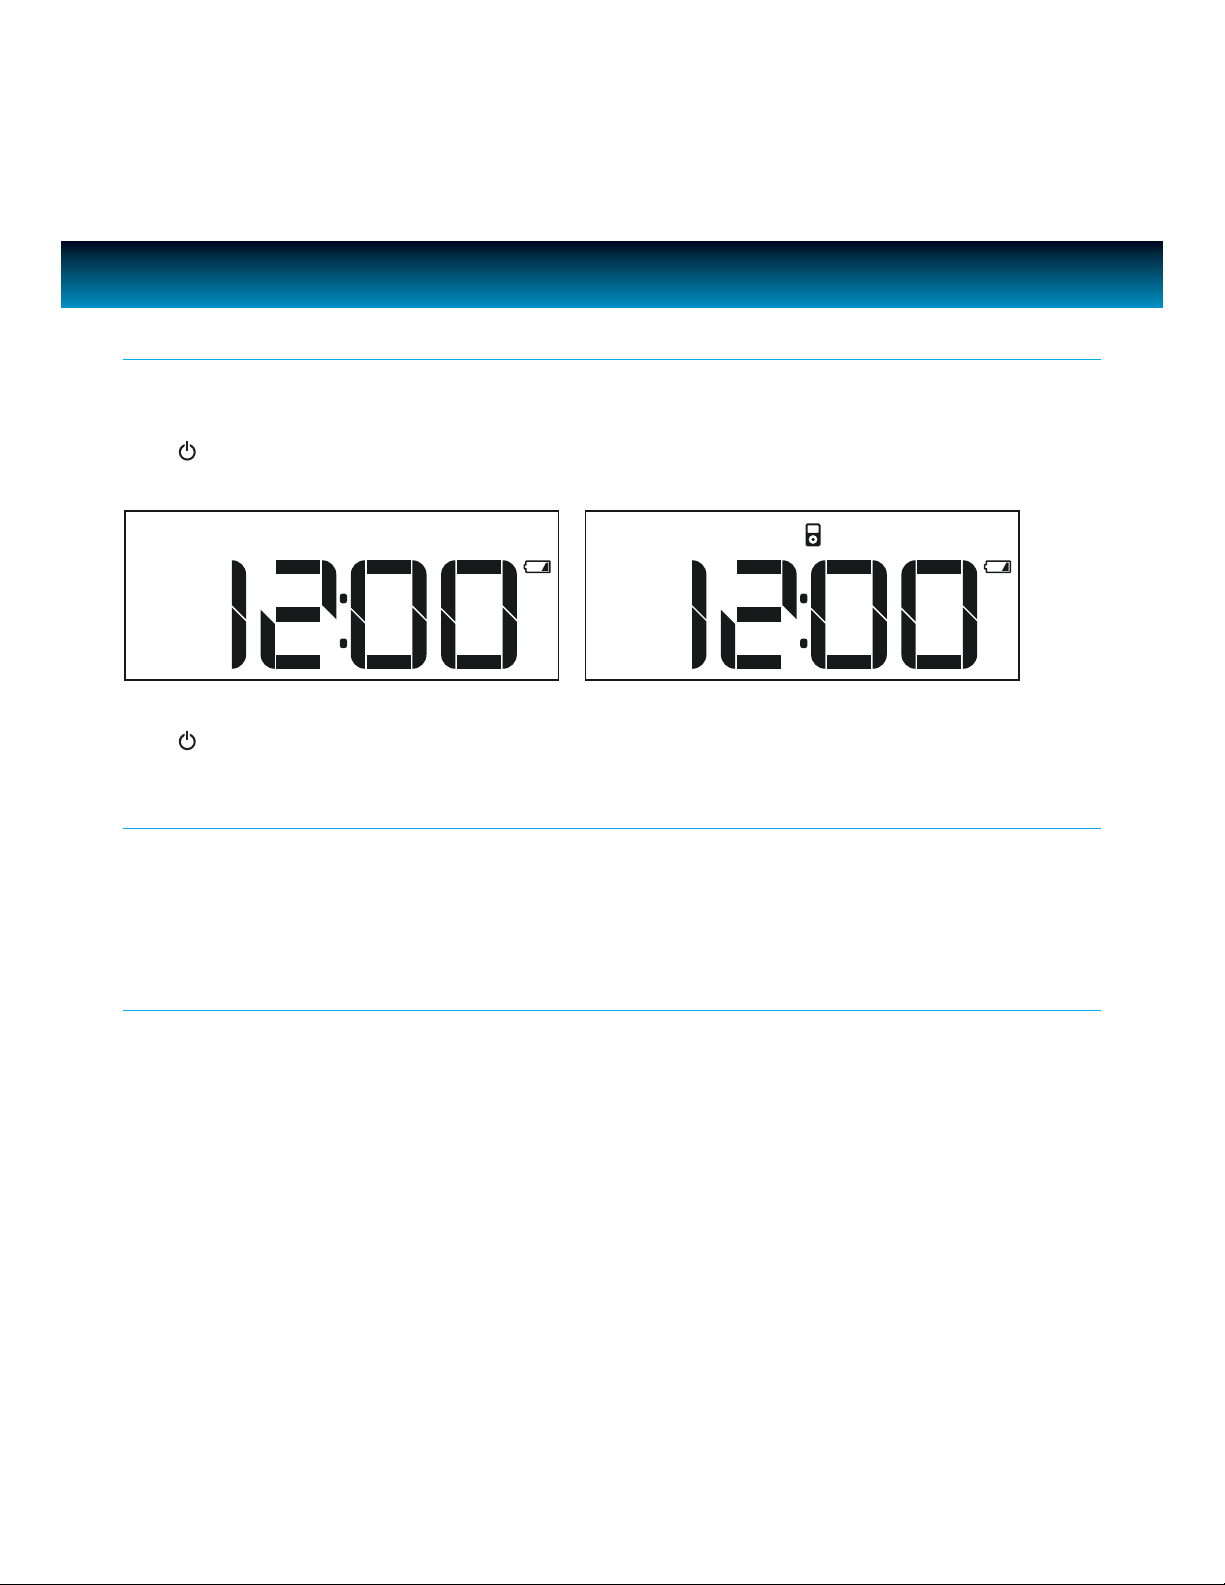
Power
ON
Connect AC power adapter to the unit. Then plug into AC wall outlet. Clock will appear on LCD.
Press /AL OFF to turn on the unit. Power indication LED will light and LCD will display current
playing mode.
OFF
Press /AL OFF to turn o the unit. LCD will display current time only.
Back Up battery
Insert three (3) AAA batteries. When there’s a power outage, clock setting will be maintained. In this
status, the unit will not fully function. When the inserted battery is low, low battery indicator will
display on the LCD.
Back Up Function
If the AC supply is interrupted, the clock display we will make memory function for FM preset even
power is outage will go o and most of settings will be canceled. To back up the clock, insert three
“AAA” size batteries (not supplied) in the battery compartment in the bottom of the unit. The back
up battery does not provide operation of your iPhone or iPod.
Note: Always use Alkaline batteries and remove the batteries when the unit is not to be used for an extended
period of time.
iLuv | 6iMM178 | V10M10_IM_EN_01262010
Page 8

OPERATIONAL INSTRUCTIONS
Setting the Clock
Manual Setting
1. Press
2. Press SELECT. “MANUAL SET” will blink on the LCD screen.
SETUP. “1. TIME SET” will appear on the LCD screen.
1. TIME SET
MANUAL SET
3. Press
SELECT. The year will blink “SET YEAR” will display on
the LCD screen and rotate the SEARCH wheel until current
year displays, and press SELECT to conrm.
4. The month will blink and “SET MONTH” will appear on the
LCD screen and rotate the SEARCH wheel until current
month displays, and press SELECT to conrm.
5. The date will blink and “SET DATE” will appear on the LCD
screen and rotate the SEARCH wheel until current date
displays, and press SELECT to conrm.
6. “12H” or “24H” will blink and “SET FORMAT” will appear on
the LCD screen and rotate the SEARCH wheel to choose
your preferred format, and press SELECT to conrm.
SET YEAR
SET MONTH
SET DATE
SET FORMAT
7 | iLuv
Page 9

OPERATIONAL INSTRUCTIONS
Setting the Clock
7. The hour will blink and “SET HOUR” will appear on the LCD
screen and rotate the SEARCH wheel to the current hour,
and press SELECT to conrm.
8. The minute will blink and “SET MINUTE” will appear on the
LCD screen and rotate the SEARCH wheel to the current
hour, and press SELECT to conrm.
SET HOUR
SET MINUTE
iLuv | 8iMM178 | V10M10_IM_EN_01262010
Page 10

OPERATIONAL INSTRUCTIONS
Setting the Clock
Time Sync
The easiest way to set the clock on the iMM178 is to
synchronize it with the atomic clock function on your iPhone
or iPod. This unit is equipped with a Time Sync function which
automatically sets the date and time by synchronizing it with
your iPhone or iPod, when it is placed in the dock.
1. Press SETUP. “1. TIME SET” will appear on the LCD screen.
2. Press
3. Rotate the
4. Press
5. Connect your iPhone or iPod to dock, “TIME SYNC” icon will
6. When Time Sync is complete, “TIME SYNC” will disappear
7. The date and time are now set.
Notes:
• To synchronize the most accurate time from your iPhone or iPod.
• Time Sync can be activated from any mode (Standby, FM, iPod).
SELECT. “MANUAL” will blink on the LCD screen.
SEARCH wheel until “TIME SYNC” blinks on the
LCD screen.
SELECT again to conrm. The “TIME SYNC” icon will
display on the LCD screen.
begin to blink during the Time Sync process.
from the screen and “TIME UPDATED” will appear for
approximately one (1) second.
The unit will take one minute (max) to read the time.
AUG 27 2010 THU
1. TIME SET
TIME SYNC
TIME SYNC
9 | iLuv
TIME UPDATED
Page 11

OPERATIONAL INSTRUCTIONS
Setting the Alarm
User is able to set two distinct alarms on the unit.
1. Press
SETUP and rotate the SEARCH wheel until
“2. ALARM 1 SET” or “3. ALARM 2 SET” appears on the LCD
screen.
2. Press SELECT and “FREQUENCY” will appear on the screen
3. “5” and “2” will blink in the upper left corner of the display
(5 = weekdays, 2 = weekends).
4. Rotate the
SEARCH wheel to scroll through, “EVERYDAY” (5
+ 2), “WEEKDAYS” (5), or “WEEKENDS” (2). Press SELECT to
conrm frequency, the hour will blink and “SET HOUR” will
appear on the LCD screen.
5. Rotate the SEARCH wheel to change hour, press SELECT to
conrm, the “minute” ashes and “SET MINUTE” displays on
the LCD screen.
2. ALARM 1 SET
FREQUENCY
EVERYDAY
SET HOUR
6. Rotate the SEARCH wheel to change minute, press SELECT
to conrm, the wake to mode ashes and “SET WAKE TO”
displays on the LCD screen.
SET MINUTE
SET WAKE TO
iLuv | 10iMM178 | V10M10_IM_EN_01262010
Page 12

OPERATIONAL INSTRUCTIONS
Setting the Alarm
7. Rotate the SEARCH wheel to change the wake mode (total
of 7 modes: Buzzer, iPod, Radio, Shaker, Buzzer + Shaker,
iPod + Shaker, Radio + Shaker), press SELECT to conrm,
the “SET BUZZ SOUND” displays for one (1) second and
then “Buzz” will blink on the LCD screen.
Note: “SET BUZZ SOUND” option displays only when the “Buzzer” or
“Buzzer + Shaker” wake to mode is selected. The setup menu will
skip this option and go to “SET VOLUME” if other wake to modes
are selected.
8. Rotate the SEARCH wheel to select the buzzer sound.
Press SELECT to conrm. “VOLUME” blinks and “SET
VOLUME” displays on the LCD screen.
· There are total of 7 melody sounds can be selected: Buzz,
Phone ring, Train horn, Rooster, Cuckoo clock, Xylophone,
Horse race.
SET WAKE TO
SET BUZZ SOUND
BUZZ
11 | iLuv
9. Rotate the SEARCH wheel to change alarm volume (1-40),
press SELECT to conrm and exit.
Turning the Alarm ON and OFF
· Press the AL1 or AL2 button to turn on or turn o the alarm
function.
SET VOLUME
2. ALARM 1 SET
AUG 27 2010 THU
Page 13

OPERATIONAL INSTRUCTIONS
Using the Snooze Function
1. Press SETUP in either power ON or power OFF mode and
rotate the SEARCH wheel to select “4. SNOOZE SET”.
2. Press SELECT to enter, the value of snooze time ashes and
“SNOOZE TIME” displays on LCD.
3. Rotate the SEARCH wheel to change the snooze time, press
SELECT to conrm and exit.
· Total 4 snooze time can be selected: 5, 7, 9, 15 minutes.
· The default setting of snooze time is 7 minutes.
4. SNOOZE SET
SNOOZE TIME
iLuv | 12iMM178 | V10M10_IM_EN_01262010
Page 14

OPERATIONAL INSTRUCTIONS
Using the Sleep Function
1. Press SLEEP to activate sleep function and the Sleep icon
[Zzz] will display on LCD, repeat press SLEEP to change the
sleep time:
· 120 min. > 90 min. > 60 min. > 30 min. > 15 min. > o >
120 min…
2. If inactive for ve (5) seconds, the LCD returns to normal
display and [Zzz] icon remains on LCD.
3. In standby mode, if the Sleep function is activated, the unit
will turn on automatically.
SLEEP 120
4. During Sleep play mode, press SLEEP once to check the
remaining time with a ve (5) second temporary display.
AUG 27 2010 THU
Press the SLEEP button twice or more to re-set the sleep
time.
Note: When setting the sleep time in power ON mode, if the sleep time is set to OFF, the unit will not will not
turn OFF tomatically. Repeatedly press SLEEP to set the sleep time to OFF. The sleep function will turn o
and [Zzz] icon will disappear.
13 | iLuv
Page 15

OPERATIONAL INSTRUCTIONS
Using the Sleep Function
IMPORTANT
1. Occasionally, les on your iPod may become corrupted. This may cause erratic
behavior with your iLuv products. Apple recommends visiting their website www.
apple.com to obtain instructions on resetting or restoring your iPod to factory settings.
2. It is imperative to your iPod and the built-in universal dock that you use the correct
dock adapter for your iPod and that the dock adapter ts appropriately into the built-in
universal dock. Ignoring these rules can cause severe damage to your iPod. Please
refer to the section “Installing the Dock Adapter” to install the dock adapter properly
before operating iMM178 with your iPod.
Listening to your iPhone or iPod
Press /AL OFF to Power on the unit.
1. To select iPod mode, press MODE until the “iPod” icon is shown on the top of display.
2. While the iPod mode is on, insert your iPod / iPhone to the universal dock and press /PRESET/
AUTO SCAN to play.
3. Press /PRESET/ AUTO SCAN to control the play and pause functions.
4. Rotate the VOLUME wheel to adjust the volume level of this unit as desired.
iLuv | 14iMM178 | V10M10_IM_EN_01262010
Page 16

OPERATIONAL INSTRUCTIONS
Using the Shaker Speaker
Select sound output
1. Slide SPEAKER SELECT switch to select main speaker / main speaker+ shaker speaker
/shaker speaker .
2. While using shaker speaker, slide volume switch to select HIGH / MID / LOW volume
Settings
: Main unit speaker sounds only
: Both main unit and shaker speakers will sound
: Shaker speaker sounds only.
Notes:
· If SPEAKER SELECT switch set to , but the shaker is not connected to main unit, the main unit speaker will
sound.
· The main unit cannot control shaker speaker volume.
Listening to the Radio
Note: Unwind and extend antenna to its full length. It may be necessary to adjust
the direction of this wire antenna until you nd the position that provides the
best reception for your favorite FM stations.
FM Operations
Turn on the unit, select the FM radio mode by pressing MODE until the “Radio” icon displays,
the FM frequency will display on the LCD screen.
· If there is no operation for three (3) seconds, the LCD will change to time display.
· If FM radio function is operating, unit will change from time display to FM screen.
· If LCD is time display in FM mode, press SELECT to temporarily display the FM frequency for
three (3) seconds, and returns to time display.
15 | iLuv
Page 17

OPERATIONAL INSTRUCTIONS
Listening to the Radio
FM Tuning
Manual tuning
· Rotate the SEARCH wheel to change the frequency with 0.1MHz step for US version, or 0.05MHz
step for EU version. Fast rotate the SEARCH wheel on unit to change the frequency with 1MHz
step.
Auto scanning
· Press and hold /PRESET/AUTO SCAN for two (2) seconds to auto scan up frequency.
· During auto scan, unit speaker mutes. If a FM station is detected, auto scan stops and
broadcast starts.
Presetting FM Stations
1. Choose a desired radio station.
2. Press and hold MEMORY for 2 seconds, “PRESET 1” will blink on the LCD screen.
3. Rotate the SEARCH wheel to select the memory station to be stored (1-8).
4. Press SELECT to store, the “PRESET #” (# is a number between 1-8) will display on LCD.
Accessing Preset Stations
· In FM radio mode, repeatedly press /PRESET/AUTO SCAN to select the stored stations.
· LCD displays the FM Preset screen if a preset station is selected.
iLuv | 16iMM178 | V10M10_IM_EN_01262010
Page 18

OPERATIONAL INSTRUCTIONS
Charging your iPhone or iPod
If your iPhone or iPod is connected to the unit, it will charge automatically.
Adjusting the Brightness of the LCD Screen
Press SNOOZE/DIMMER to adjust the brightness of the display. It will return to normal after three
(3) seconds. Brightness setting ranges from OFF to 9.
Setting the Bass and Treble
1. While unit is in playing, press SETUP.
2. Rotate the SEARCH wheel to select “5. BASS” or “6. TREBLE”.
3. Press SELECT to enter and rotate the SEARCH wheel to change.
4. Press SELECT again to conrm and exit.
Resetting the Unit
17 | iLuv
If the system does not respond, there may have been a power surge that triggered the internal
computer to shut down automatically. If this occurs, disconnect the main power and connect it
again after approximately one minute.
Maintenance
· Place the unit on a level surface away from sources of direct sunlight or excessive heat.
· Protect your furniture when placing your unit on a natural wood and lacquered nish. A cloth or
other protective material should be placed between it and the furniture.
· Clean your unit with a soft cloth moistened only with mild soap and water. Stronger cleaning
agents, such as Benzine, thinner or similar materials can damage the surface of the unit.
Page 19

TROUBLESHOOTING GUIDE
The stereo speaker system (iMM178) does not turn on.
- The AC adapter may not be connected properly. Check the connection.
- The wall outlet may not function. Try another outlet.
Your iPhone or iPod does not t into the built-in universal dock.
- The installed dock adapter is not the correct one. Check whether a correct dock adapter is installed.
- There might be some obstructions on the dock. Check whether there are any obstructions on the connector and
on the dock. If everything is secured, place your iPhone or iPod back into the dock.
It does not recognize your iPhone or iPod when docked.
- Your iPhone or iPod may not be properly docked. Take your iPhone or iPod out of the dock, and remove any
obstructions on the connector from the dock and on your iPhone or iPod. Place your iPhone or iPod back into the
dock.
- Your iPod is frozen or locked up. Check whether your iPhone or iPod operates correctly before placing it back into
the dock. Please refer to the owner’s instruction manual of your iPhone or iPod.
- The software of your iPhone or iPod is outdated. Upgrade the software on your iPhone or iPod. For the details on
how to upgrade the software on your iPhone or iPod, please visit the Apple website: http://www.apple.com.
Your iPhone or iPod is not charged even though it is in the dock.
- Your iPhone or iPod might not be properly docked. Take your iPhone or iPod out of the dock, and remove any
obstructions on the connector from the dock and on your iPhone or iPod. Place your iPhone or iPod back into the
dock.
- Your iPod is frozen or locked up. Check whether your iPhone or iPod operates correctly before placing it back into
the dock. Please refer to the owner’s instruction manual of your iPhone or iPod.
When playing music, the sound gets distorted
- The volume level on the connected device or the iMM178 is set too high. Decrease the volume until the distortion
has disappeared.
- The source sound is distorted. If the original sound source (MP3) on your iPhone or iPod is poor quality, the
distortion and noises are easily noticed with high-power speakers. Try a dierent audio source like a music CD to
test.
iLuv | 18iMM178 | V10M10_IM_EN_01262010
Page 20

THANK YOU FOR YOUR PURCHASE
Visit our website at www.i-Luv.com
© 2010 www.i-Luv.com
iLuv is a registered trademark owned by iLuv Creative Technology. iPod is a trademark of Apple Inc. registered in the US and other countries. iPhone is
a trademark of Apple Inc. All logos and brands are the property of their respective owners. iPod is not included in this package. The specications and
product images or graphics may slightly dier from the actual product. Features and specications are subject to change without prior notication.
© 2010 iLuv Creative Technology All rights reserved. No portion of this printed material or product enclosed herewith including design, shape
or graphics, may be reproduced or transmitted in any form without the expressed written consent of iLuv Creative Technology by any means,
electronic or mechanical, including photocopying, recording or use of an information storage and retrieval system. Any unauthorized distribution or
reproduction of this printed material or product, or any portion thereof, will be prosecuted to the fullest possible extent of the law.
Designed in New York, USA / Printed in China
Page 21

•
I
Warranty information
Page 22

LIMITED
WARRANTY
WHATISCOVERED?
iLuv
Creative
purchaser,
designatedineach
periodoftwo
Union,
and
Canada).
any
warranty
original
operation
with
required,
visit
Technology
purchase.
original
defectsinmaterials,
periods
beginsonthe
a
European
purchasedinother
States
during
withaneworremanufactured
your
installation,
supplied
is
downloadamanual.
("iLuv")
that
its
products
parts,
and
dateofproduct
years
for
products
and
one
year
countries
iLiv
can
service,toreplace
For
and
product.Ifa
our
website,
use
the
Product.
exercise
informationonproper
www.i-Luv.comto
EXCLUSIONS
This
Warranty
does
NOT
alteredorremoved.Itdoes
damage,
antenna
power
cords,
damage
duetopower
improper
voltage
settings,
general
application,
attemptedbyan
damage
returnedtoiLuv.lf
outside
distributoraslistedonour
accidents,
incurred
the
United
OBTAINING
Customers
must
Authorization
www.i-Luv.com
obtainaticket.
the
product's
brief
descriptionofthe
telephone
number,orcustomersinthe
States
and
Canada
Service
Departmentat(866)
problem
appearstobe
materialorworkmanship.
RETURNING
The
product
proofofpurchase,
the
model,
and
to
the
address
packaging
that
include
the
telephone
within
the
customer's
recommend
product
authorized
CRA
because
untilitarrivesatiLuv
your
address
at
accompaniedbythe
strongly
appropriate
the
its
applyifthe
not
damageorloss,
cabinets,
headbands,
line
surges,connectiontoan
source,
the
misuse,
mishandlingorimproper
actsofGod,
unauthorized
while
the
productisbeing
the
product
States,
please
web
WARRANTY
obtainaCustomer
number
(CRA)onour
(EXPRESS
CUSTOMER
Fill
out
the
DateofPurchase,
mustbeaccompanied
distributor
on-line
problem,
may
contact
807
relatedtoa
YOUR
PRODUCT
indicating
amount
paid.
belowinsuitable
meets
UPS
standards.
numberonthe
number
and
the
return
package.
Return
expense,
and
original
insuring
the
customerisresponsible
Ifor
warrants,tothe
willbefree
workmanship
purchase
for
(including
unit,
consult
replacement
cover
useofimproper
service
was
findanauthorized
site:
for
The
Warranty
and
covers
purchasedinthe
products
the
United
the
option,
your
product
equivalent
the
manual
manual
serial
number
cosmetic
damagetoAC
ear-pads,
or
repairs
agent,or
purchased
www.i-Luv.com.
SERVICE
Return
web
site,
SUPPORT)
form
including
its
Model
Number,
and
your
daytime
United
our
Customer
-5946ifthe
defect
in
withadated
the
placeofpurchase,
Send
the
unit,
prepaid,
protective
You
must
outside
box,
and
shipping
shipments
the
return
the
(for
other
shipment
u.s.
returns).
must
as
returns)
proofofpurchase.
all
REPAIRORREPLACEMENTASPROVIDED
THIS
from
the
to
WARRANTYISTHE
CUSTOMER.
INCIDENTALORCONSEQUENTIAL
BREACHOFANY
ON
PROHIBITEDBYAPPLICABLE
WARRANTYOFMERCHANTABILITYORFITNESS
A
LIMITEDTOTHE
Some
exclusionorlimitationofincidental
consequential
an
limitations
gives
have
countrytocountry.
is
iLuv
THIS
PRODUG,
PARTICULAR
states
and
implied
warranty
may
you
specific
other
rights,
EXCLUSIVE
SHALL
NOTBELIABLE
EXPRESSORIMPLIED
EXCEPTTO
PURPOSEONTHIS
DURATIONOFTHIS
countriesdonot
damages,orlimitationsonhow
lasts,sothe
not
applytoyou.
legal
rights
which
vary
INSTRUCTIONSONENVIRONMENT
PROTECTION
Do
not
household
ittoa
collection
and
electronic
product
packing
The
materials
marking.Byrecycling,
formsofre-utilizationofold
an
important
environment.
community
disposal
to
FCC
NOTICE
This
device
a
Operationissubjecttothe
device
Note:
Changesormodifications
approvedbythe
could
void
equipment.
are
be
We
for
or
disposeofthis
means
will
location.
does
the
productinthe
garbageatthe
appliances.
inform
are
contributiontoprotect
Please
administration
endofits
point
for
the
This
the
instructions
about
the
recyclableasmentionedinits
material
appliances,
inquireatyour
for
(USA)
complies
with
Part15of
not
user's
condition
cause
harmful
party
responsible
authoritytooperate
UNDER
REMEDYOFTHE
FOR
ANY
DAMAGES
FOR
WARRANTY
THE
EXTENT
LAW
ANY
IMPLIED
PRODUG
allow
above
This
and
you
from
statetostate
recyclingofelectrical
symbolonthe
for
useorthe
methods
recycling,orother
the
authorized
interference.
not
for
FOR
IS
WARRANTY.
the
or
long
exclusions
warranty
may
also
usual
life
cycle;
bring
for
disposal.
you
make
the
local
the
FCC
Rules.
that
this
expressly
compliance
the
GARANTrA
OQUECOBRE?
iLuv
Creative
comprador
defeitos
materiais,
periodo
designadoemcada
com~a
no
por2anosnaUniao
produtos
comprados
Estado
UnidoseCanada).
durante
0
produto
porumnovooupor
equivalenteaocomprador
informa~aoemrela~aoainstala~
opera~o
or
and
con
encontra
com0produto.Senecessitaummanual
instru~Oes
www.i-Luv.com
L1MITADA
Technology
original,
que
partesemanufaetura
diadacompradoprodutoeprolonga-se
Europeia,eum
noutros
servi~o
de
garantia,desubstituir0seu
suite0manual
substituto,
visiteapagina
para
descarregar0manual.
EXCLUSOES
Esta
garantia
NAo
alteradoouretirado.
danosouperdadeantena,
corrente,
devidoapicosdecorrente,
alimenta~ao
regul~Oes,
manejodeaplicativos,
tentativas
ou
danos
o
produto
favor
visiteanossa
onde
pode
autorizados.
OBTENy\O
Clientes
Return
Devolu~ao
www.i-Luv.com
para
obterumbilhete.
linha
incluindoadatadecompradoproduto,
numerodemodelo,
problemae0seu
para
clientes
entraremcontaeto
Servi~o
problema
manufaetura.
DEVOLU~Ao
o
produto
datadecompra,
modelo
pre-paga,
adequadadeacordo
incluiraseu
a
seu
numerodetelefone
interiordamesma.
cliente
provadecompra
viva
menteemasseguraraenvio
uma
vez
ateasua
au
aos
outras
devolu~Oes).
aplica
Nao
caixa,
fitas,almofadasdeorelha,oudanos
inadequadas,
uso
improprio
de
produzidos
foi
podem
Authorization"
ao
Clienteaotelefone
resu~ar
deve
e0
paraamoradaabaixoeem
ea
devolu~ao
queaclienteeresponsavel
chegadaaiLuv
seus
acidentes,
repara~ao
por
durante
adquirido
for
paginaeInternet
encontrar
uma
DO
SERVI~O
obterumnumerode"Customer
(CRA)
de
Clientenanossa
(EXPRESS
Preencha0formulario
uma
numerodetelefona
nos
Estados
com0nosso
deumdefeitodefabrico
DO
SEU
ser
acompanhadodeuma
indicandoalocaldecompra,
pre~o
pago.
Enviaraunidade,emforma
comosstandardsdeUPS.
numero
CRAnoexteriordaembalagem,
Gastosdeenvio
deve
original.
distribuidores
("iLuv")
garante,
este
produto
produto.Agarantia
parses
rLuv
outro
originalmente.
de
se0numerodeserie
cobre
danosdocabo
conexOesafontes
usa
geral,
pessoal
a
ados
listadedistribuidores
ou
CUSTOMER
breve
UnidosouCanada
866)
ao
esta
por
ano
para
(incluindo
pode
exercer
refeito,
Para
adequada,
instru~oes
Web,
danos
domesticos,
improprio
de
inadequadooumau
actosdeDeus,
nao
autorizado,
devolu~ao
Estados
Unidos,
www.i-Luv.com
DE
GARANTIA
Autoriza~ao
pagina
web,
SUPPORT)
descri~o
do
diurno,
Departamento
B07-5946,
PRODUCTO
embalagem
e
direc~ao
de
retorno
serao
ser
Recomendamos
(para
autorizados
pagos
acompanhada
adequadamente
pelo
produto
devolu~oes
(para
livre
de
a
o~ao,
que
se
for
de
de
a
iLuv.
de
em
a
ou
podem
se
ou
prova
a
Deve
pela
nos
USA)
todas
REPARA(AoOUSUBSmUIy\ODEACORDO
ESTA
GARANTIA~REMEDIO
iLuv
NAo
SERA
INCIDENTEOUDANO
V10LA(AODEQUALQUER
IMPOSTA
PROIBIDA
GARANTIA
AUMPROPOSITO
ESTA
Alguns
limita~oes
ou
limita~oes
de
i
mposta,deesta
expostas
oferece-Ihe
ter
outros
e
pais
INSTRUCOES
RESPONSAVEL
OESTE
PRODUTO,
POR
LEI
IMPOSTA
L1MITADA
PELA
estadoseparses
de
incidentesoudanos
em
rela~aoadura~ao
formaasexciusOes
acima
nao
direitos
direitos,
para
pais.
A
CONSEQUENCIAL
GARANTIA
APLICAVEL.QUALQUER
PELO
MERCADOOUAJUSTADA
PARTICULAR
DURA(AO
nao
se-Ihe
aplicam.
legais
especificosevoce
que
variamdeestado
PROTEC~Ao
AMBIENl'E
Nao
elimine
este
termineaseu
reciclagemdeaparelhos
Este
simbolonoprodulo
instru~oes
metodos
Se
como
por
materia
aparelhos
importante
adminislra~ao
aUlorizados.
AVISODEFCC
Este
aparelho
FCC.0seu
queamesmo
Nota:
aprova~ao
autoridadedousuariodeoperar0aparelho
de
0
de
no
pelo
as
produtonoIixo
ciciodevida;
electricoseelectr6nicos.
auaembalagem
de
elimina~ao.
indicadonaembalagem.
is,auoutras
usados,
paraaambienle.
significa
Os
formas
voce
faz
local
por
centrosderecidagem
(USA)
cum
pre
funcionamento
Altera~Oes
comaParte15das
nao
causa
interferencia
ou
modifica~oes
pelas
partes
responsaveis
EXCLUSIVODOCLlENTE.
POR
EXCEPTO
NESTE
DESTA
permitem
COM
QUALQUER
POR
EXPRESSA
OU
EXTENSAo
PRODUTO
GARANTIA
exciusOes
consequenciais,
de
ou
Esta
ou
uma
garantia
limita~Oes
garantia
pode
para
estado
DO
domestico,
leve-oaurn
informamacerca
materiais
Por
de
re-utiliza~ao
uma
contribui~ao
Por
esta
sujeito
centro
queamanual
sao
reciclaveis
reciclar,
redclar
de
favor
pergunte
regras
a
condi~ao
danosa.
sem
expressa
pode
retirar
quando
de
de
de
a
do
de
a
Page 23

•
I
THANK
Visit
iLuvisatrademarkofiLuv Creative Technology. registered in
The illustrated
product
Designed in
and specifications may differ slightly from
YOU
FOR
YOUR
our
website at www.i-Luv.com
©2010 www.i-Luv.com
New
York, USA I
PURCHASE
Made
the
U.S.
in China
and
that
other
countries.
supplied.
 Loading...