

Page 1

Model : iCM10 / iCM15 / iCM20
Instruction Manual
Mini Webcam for Laptop
English
Page 2
SPY C AM FRE
E
INTRODUCTION
Thank you for purchasing the iCM10 / iCM15 / iCM20. Unpack the unit and make sure all accessories are
put aside so they will not be lost.
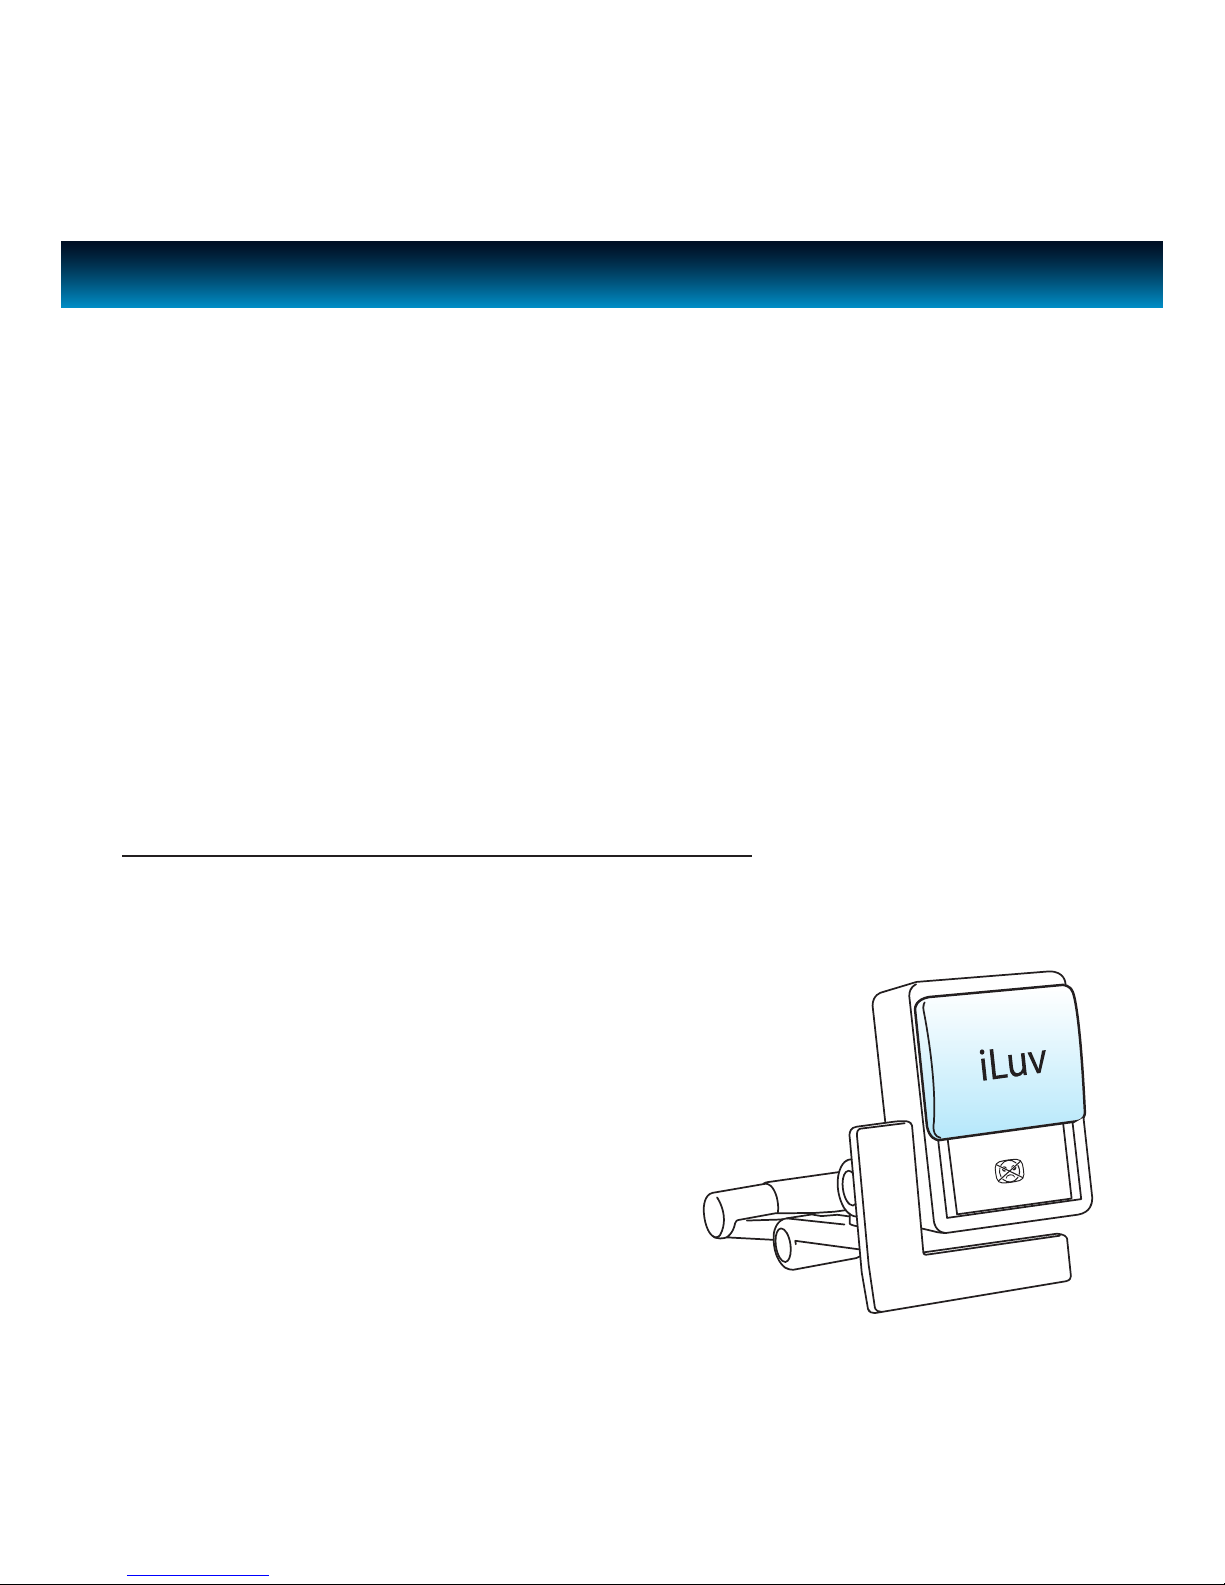
Clip-Style Webcam
· High quality 1.3 megapixel (iCM10/15), 3.0 megapixel (iCM20)sensor resolution webcam for laptop
or desktop
· Universal Laptop clip for easy mount on a laptop
· Ideal for video chatting, recording or taking a snap-shot
· VoIP call / chat with high quality built-in microphone via Skype, Google, MSN, Yahoo, etc.
· Supports USB 2.0
· Sliding lens cover to insure privacy and spy prevention
· Automatic white balance for clear exposure
· A selection of special visual eects for fun and creative video chats
· Automatic face tracking for more free movement by the user
· Plug and play for self installation
In-ear earphones with remote and mic. (included in iCM15 only)
· Built-in mic for private listening and talking
· Control your music from iTunes with in-line remote on recent Mac computers
· Y-adapter cable to use microphone with PC
What’s Included
· Instruction Manual/Software CD
· Y-adapter cable (iCM 15 only)
· In-ear earphones with remote mic (iCM15 only)
· USB cable
· Quick connection Guide
· Warranty Card
iLuv | 1iCM10/15/20 | V10M10_IM_EN_08112010
Page 3

iLuv | 2
INTRODUCTION
GETTING STARTED
Location of Controls
System Requirements
Installation
OPERATIONAL INSTRUCTIONS
Viewing Images
Camera Settings
Light Sources
Audio Source and Settings
Using Internet Messenger Downloads
Maintenance Tips
WEB CHATTING AND SPECIAL EFFECTS GUIDE
Installing the Special Eects Software
Instant Messenger Setting
Using the Special Eects and other Features
TROUBLESHOOTING GUIDE
USER SAFETY GUIDE
SPECIFICATIONS
TABLE OF CONTENTS
1
3
3
4
5
6
9
10
12
12
13
13
14
17
18
24
iCM10/15/20 | V10M10_IM_EN_08112010
Page 4
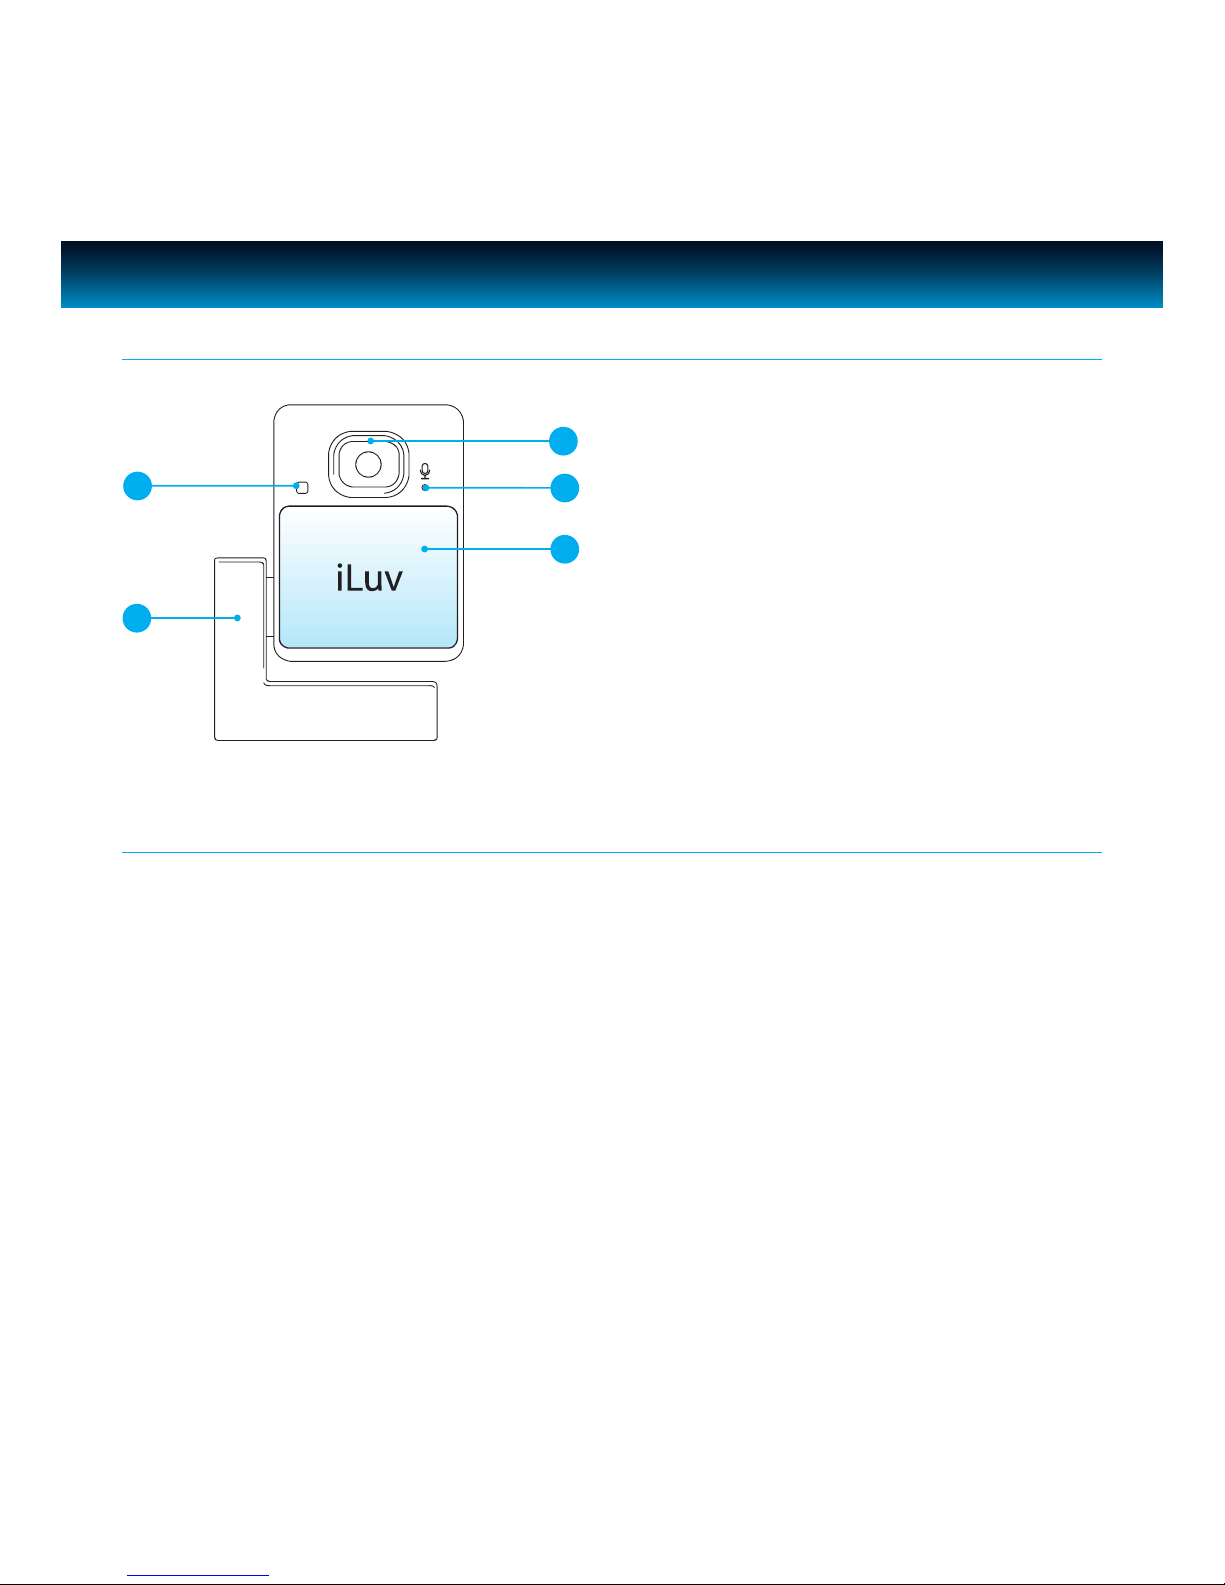
1. LED power indicator
2. Clip for PC or laptop
3. Camera lens
4. Microphone
5. Sliding cover
Location of Controls on the Main Unit
GETTING STARTED
1
3
5
4
2
System Requirements
· Intel Pentium 4 (2.0GHz or higher)
· Microsoft Windows XP / Vista / 7 (32bit, 64bit)
· Mac OS X 10.4 or later
· 1GB RAM
· 160MB hard disk space (260MB recommended)
· CD-ROM drive
· One available USB port (USB 2.0 recommended)
· Internet connection for Web chatting
iLuv | 3iCM10/15/20 | V10M10_IM_EN_08112010
Page 5
iLuv | 4iCM10/15/20 | V10M10_IM_EN_08112010
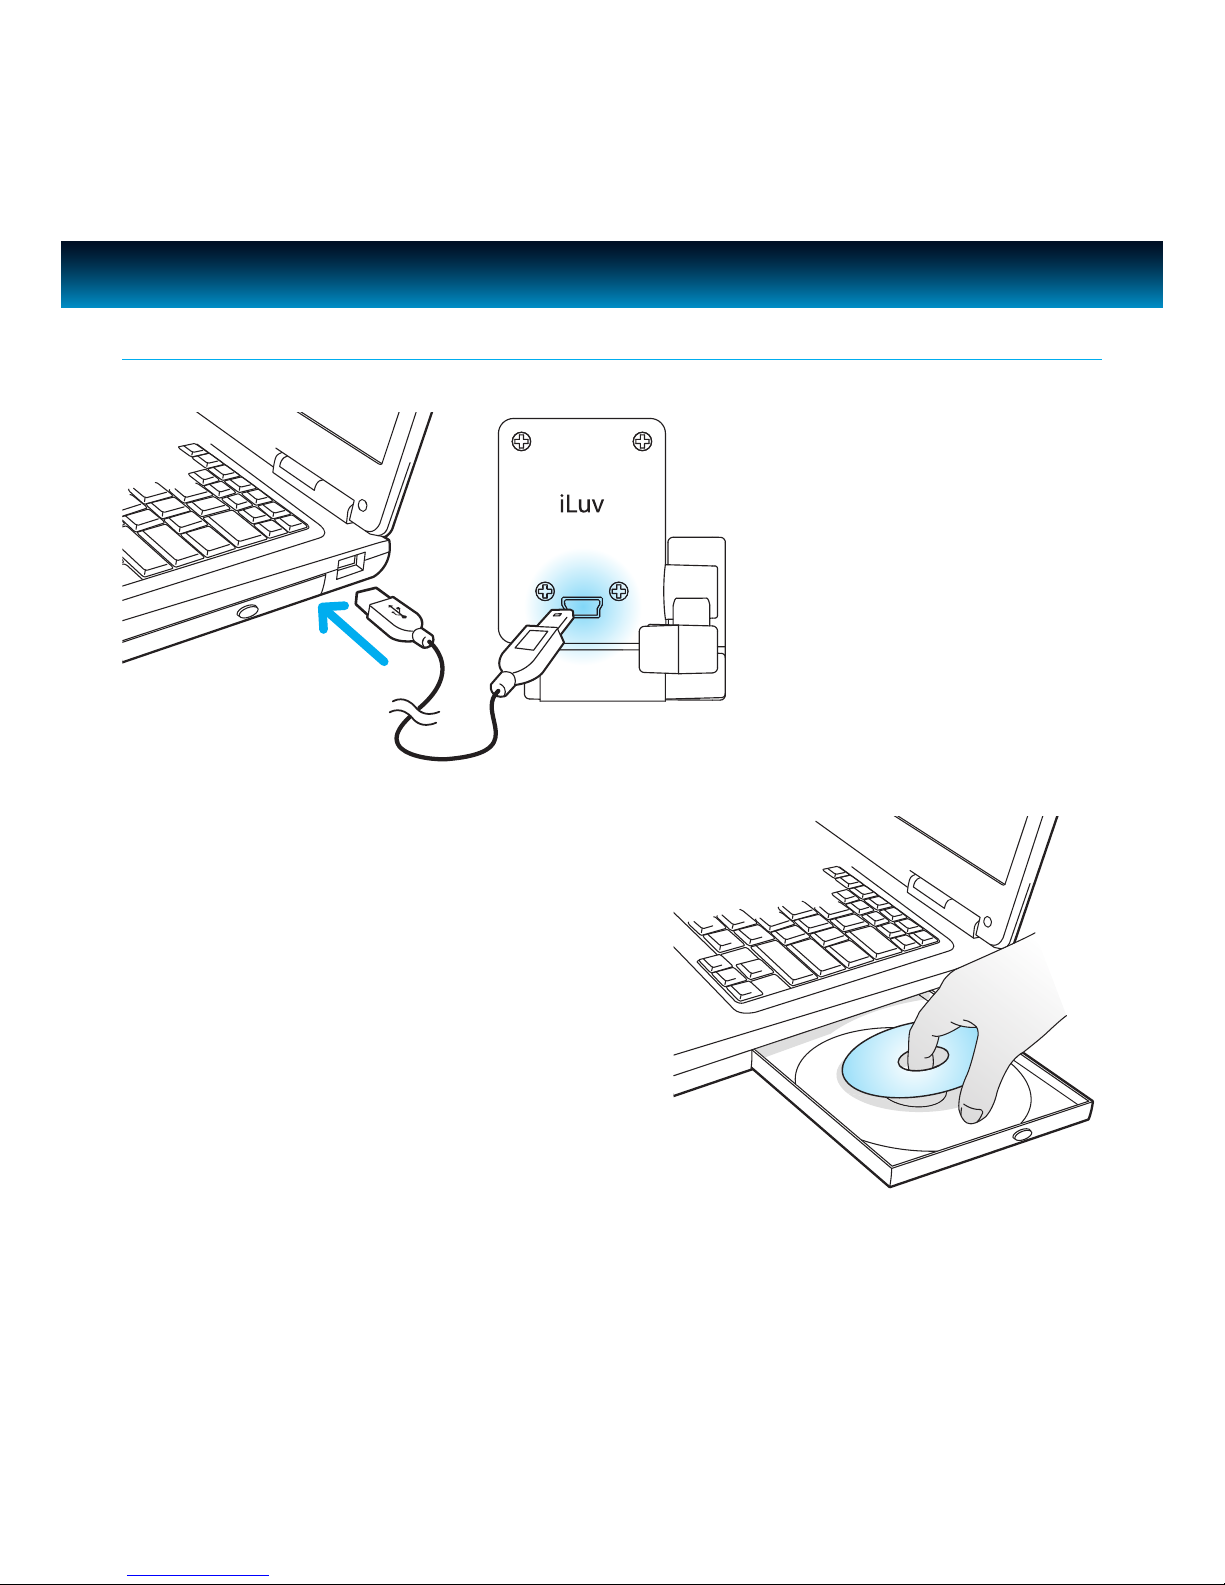
2. Webcam is plug and play, therefore software
installation is only neccessory for use of
ManyCam special eects. Insert the installation
CD into your CD-ROM/DVD-ROM drive and
Install the software according to the screen
prompts. If prompted to do so, restart your
computer after installation.
GETTING STARTED
Installation
1. Plug the Webcam into the
USB port on your PC or
notebook computer. Live
pictures will begin to be shown
in the view window.
Page 6

OPERATIONAL INSTRUCTIONS
After you have installed your USB Web Camera, use the image editing or video software to ensure
everything is properly set up.
For Windows XP / Vista / 7 users:
1. Click on the Start menu button.
2. Click on the All Programs menu item.
3. Click on iCM10, iCM15 or iCM20 Amcap.
4. From the menu bar, choose Capture Start Capture.
Viewing Images
iLuv | 5iCM10/15/20 | V10M10_IM_EN_08112010
Page 7
iLuv | 6iCM10/15/20 | V10M10_IM_EN_08112010
OPERATIONAL INSTRUCTIONS
Video Format
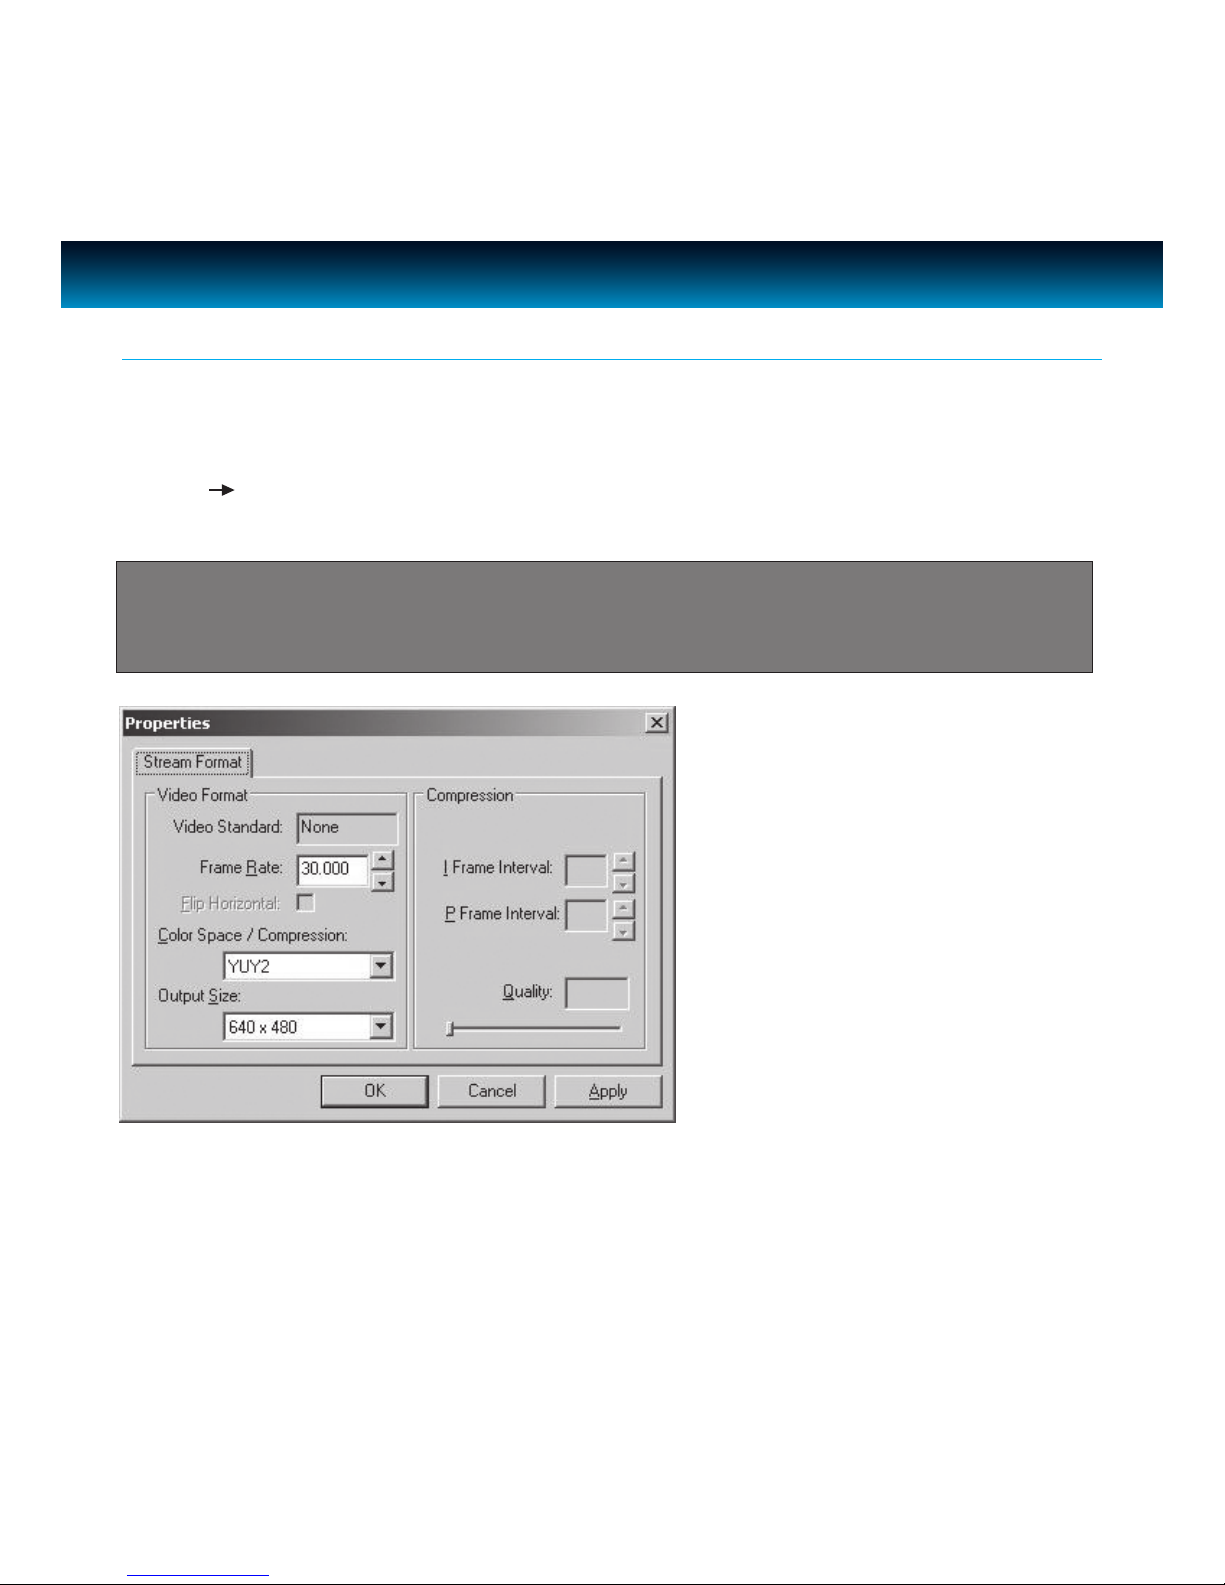
The Video Format dialog box in instant messenger applications allows you to control the size and
color of the image provided by your camera. The following dialog box will appear when you select
Options Video Capture Pin from within Amcap. Please note, other graphic applications should
also have a settings window with similar controls.
Camera Settings
Note: In most cases, in order to change video settings in instant messenger applications, it is
necessary to nd a Webcam Setup under Options in an instant messenger application. Please
refer to the website of your chosen application provider for detailed information.
Items in the above Video Format window are described as:
· Frame Rate – this setting controls the frame rate of the image or video. The higher the frame
rate, the larger the le size.
Page 8

OPERATIONAL INSTRUCTIONS
Special Eects and Frames
This webcam includes special eects software to add creativity to Internet chatting and video
recordings. See the Web Chatting and Special Eects Guide at the end of this manual for detailed
instructions for this feature.
Camera Settings - continued
· Color Space/ Compression – this setting controls how many colors will be shown. The higher
the number, the more colors that can be shown. High pixel depth allows your videos and
images to show realistic colors. Various color formats can be selected, but 24-bit RGB color is
recommended unless your PC can display only 256 colors. As with resolution, the higher the
pixel depth, the more data the video or image will contain.
· Output Size – this setting controls the size of the image or video that will be shown by the
software. Larger images contain more data, so the frame rate might be slower than for smaller
resolutions.
Video Source or Video Settings
The video source dialog box allows you to control the image quality provided by your camera.
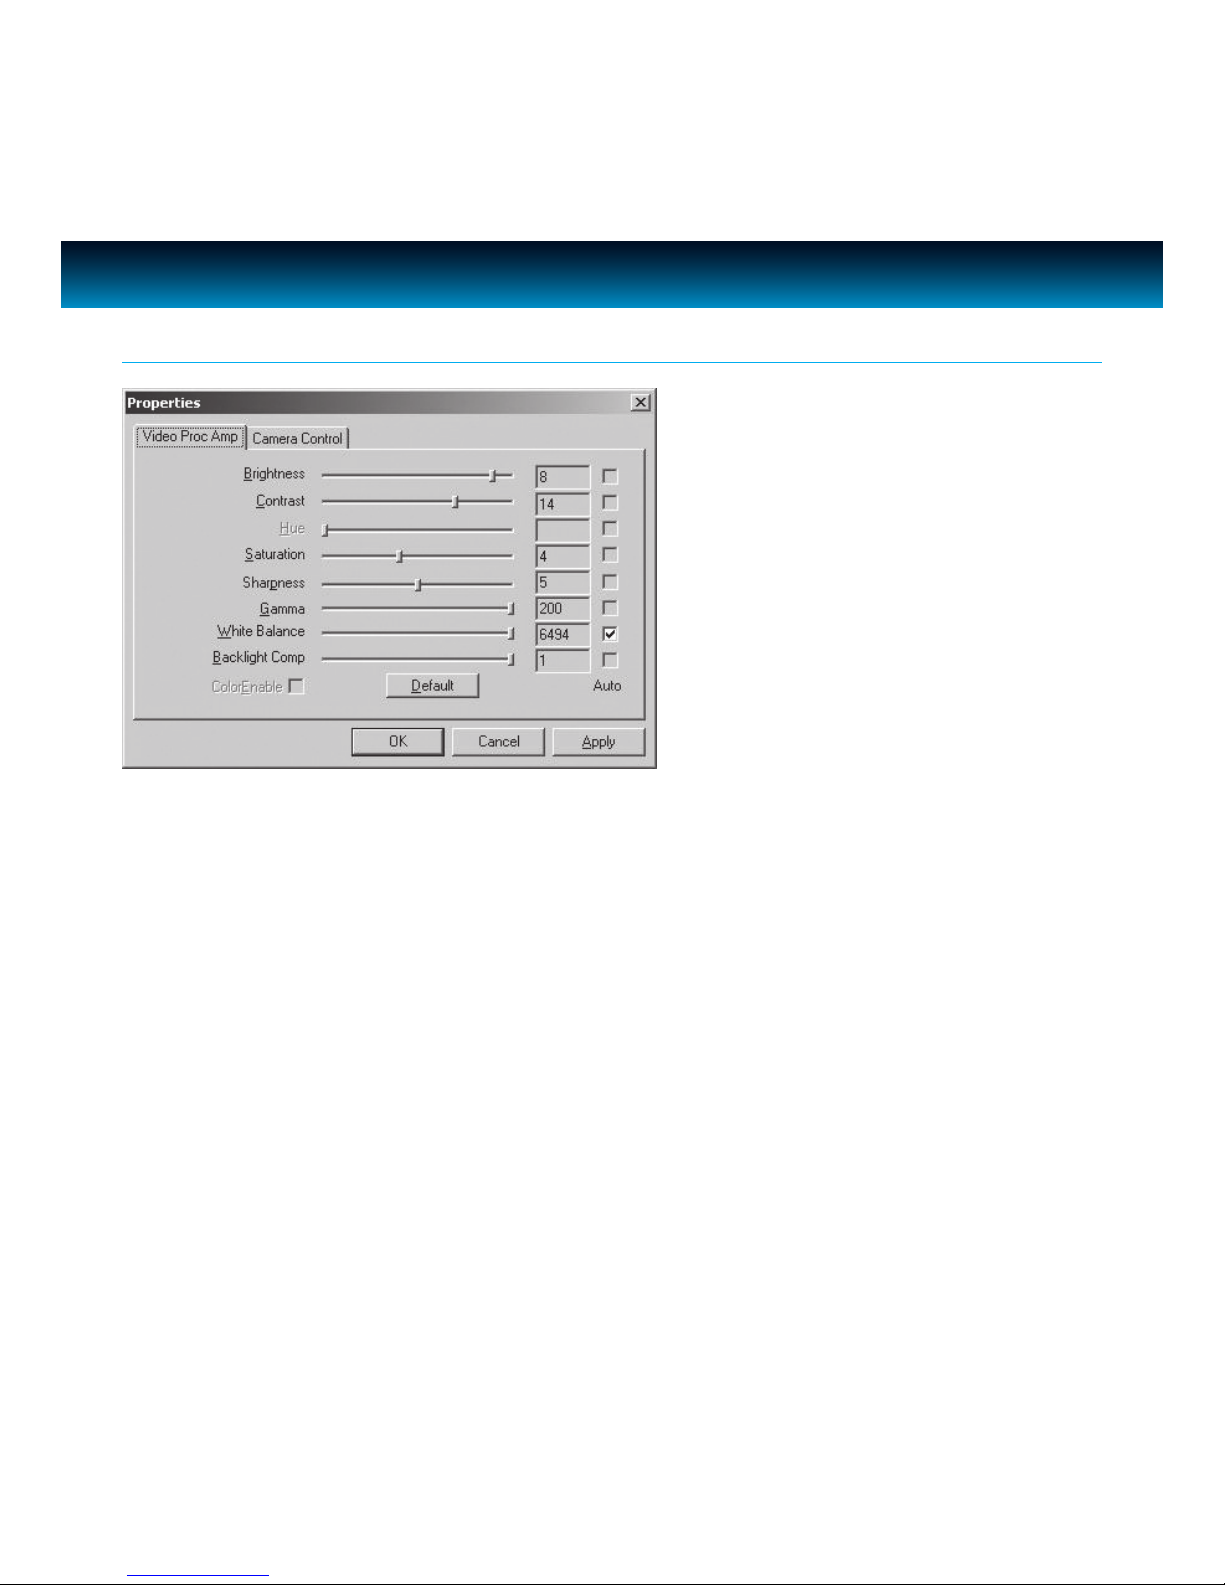
In Amcap, click on Options Video Capture Filter or Properties for the Instant Messenger
application to have a window similar to the one shown below.
iLuv | 7iCM10/15/20 | V10M10_IM_EN_08112010
Page 9
iLuv | 8iCM10/15/20 | V10M10_IM_EN_08112010
OPERATIONAL INSTRUCTIONS
Items in the above Properties window are described as* :
· Brightness – this setting controls how bright an image or video will appear.
· Contrast – this setting adjusts the tonal range of an image by lowering mid-tone values and
increasing values for high and low tones. For example, use contrast to eliminate noise or shading
on black & white and grayscale videos or images or to clean-up color ones.
· Gamma – this setting lets you control the balance of dark and light in the image.
· Hue – this setting allows you to color variations in the image.
· Saturation – this setting controls the richness of colors shown by the camera.
· Sharpness – the higher the sharpness, the sharper the image. The lower the sharpness, the
more blurry an image will be.
· VGA SnapSize – this setting allows you to adjust the size of a snapshot or video.
· Zoom – this setting allows you to zoom in or zoom out the image capture.
Please note that many of the above settings operate the same as those on a normal color TV or
computer monitor.
* Properties may dier depending on computer setting.
Camera Settings - continued
Page 10

OPERATIONAL INSTRUCTIONS
Lighting Settings
Some applications may also allow you to adjust light settings other than those shown above. We
have dened some commonly used terms which may appear in software programs you are using:
Light Sources
· Lighting Modes - Your camera normally operates in normal mode; however, you can switch it to
dark mode when there is too much light or bright mode when light is dim.
· Banding Filter - If you are in a room lit by uorescent lighting, then please check that the
Banding Filter is being used, if present. Depending on the uorescent lighting system used in
your country, you will either choose a lter type of 50 Hz or 60 Hz.
· Color Temperature - The USB Web Camera’s default is normal mode, but you can switch it to
cool when your light source tends to be red or switch it to warm when your light source tends
to be blue.
· Compression Control - Compression control lets you adjust the frame rate. The USB Web
Camera is initially set to use the lowest compression setting, but choosing high compression
mode may help speed up the rate of transmission.
iLuv | 9iCM10/15/20 | V10M10_IM_EN_08112010
Page 11
iLuv | 10iCM10/15/20 | V10M10_IM_EN_08112010
OPERATIONAL INSTRUCTIONS
Audio Source and Settings
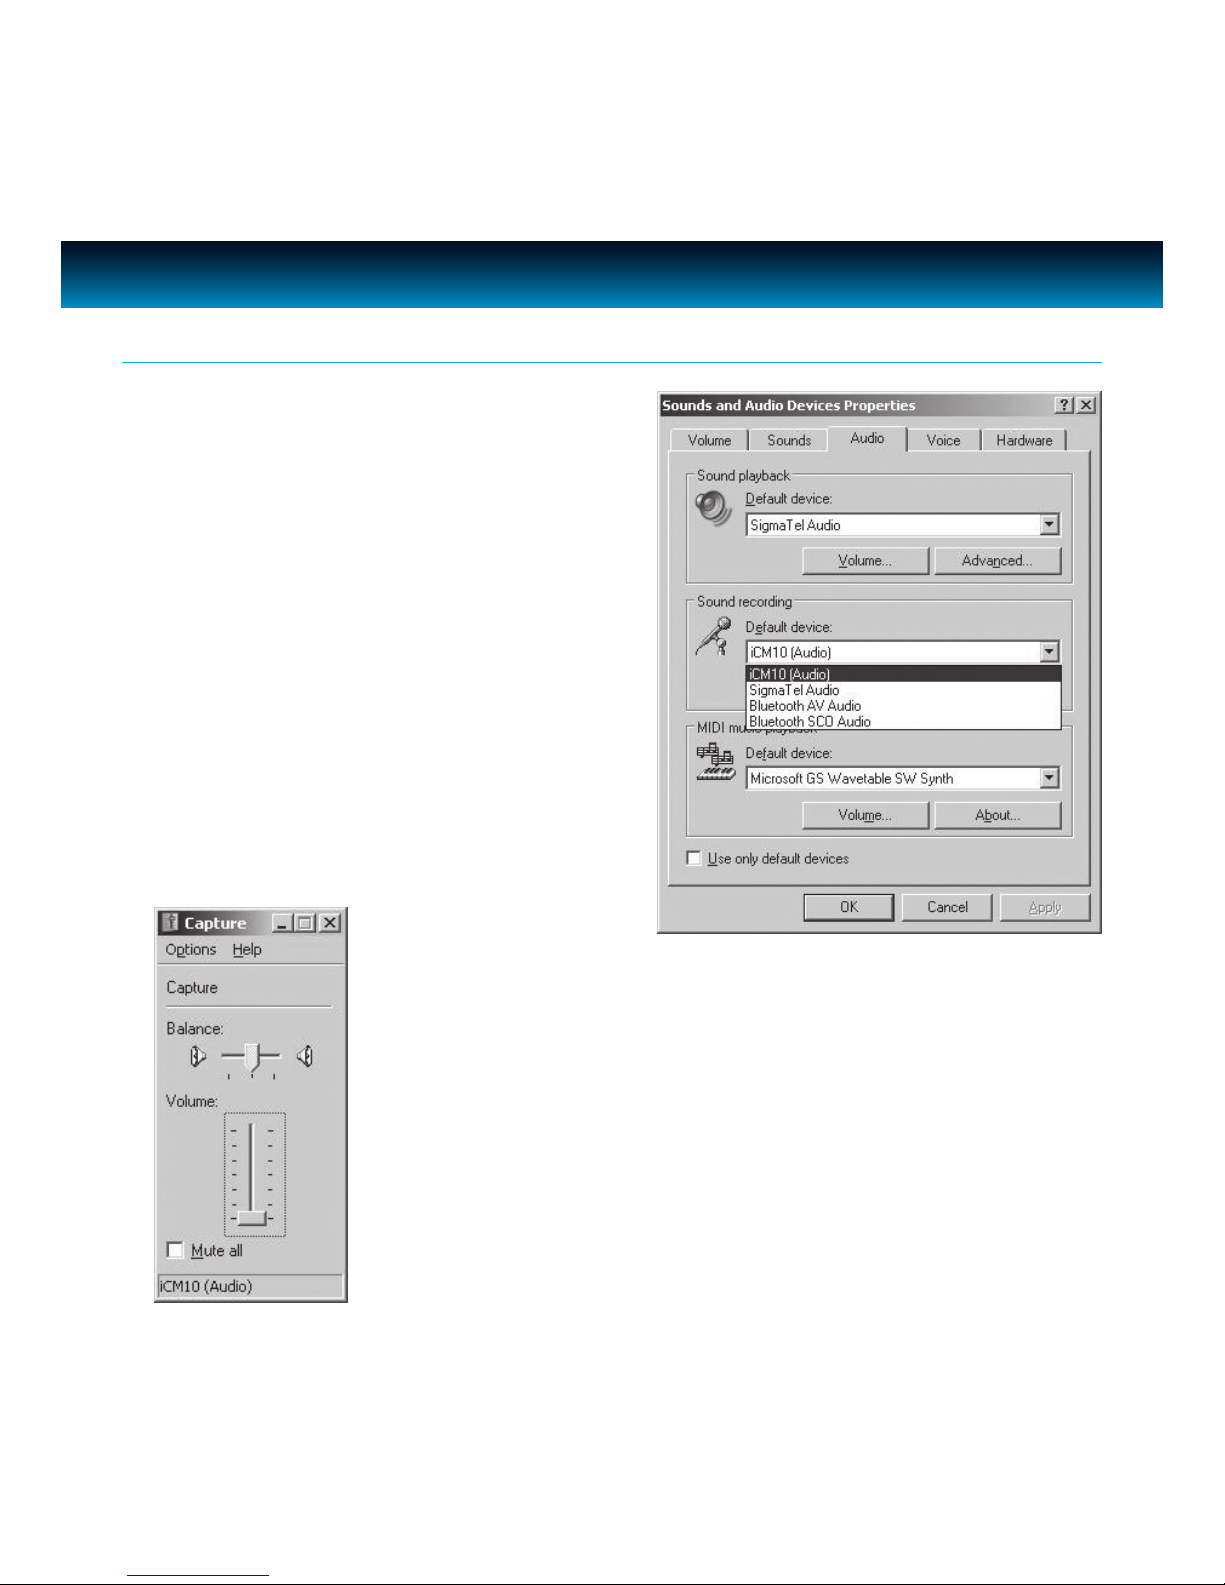
Your camera comes with a built-in microphone
which allows you to talk without additional
microphone. To allow it work with you computer,
follow the settings below:
1. In the Windows ‘Control Panel’, select ‘Sounds
and Audio Devices’ or ‘Sounds and Multimedia’.
Under the ‘Audio’ tab, change the ‘Default
device’ of ‘Sound recording’ to ‘USB Audio
Device’ or display web-camera model number.
2. Choose ‘Volume’ under ‘Sound Recording’, adjust the ‘Volume’ until
the microphone reaches a comfortable sound level.
Page 12
OPERATIONAL INSTRUCTIONS
Audio Source and Settings - continued
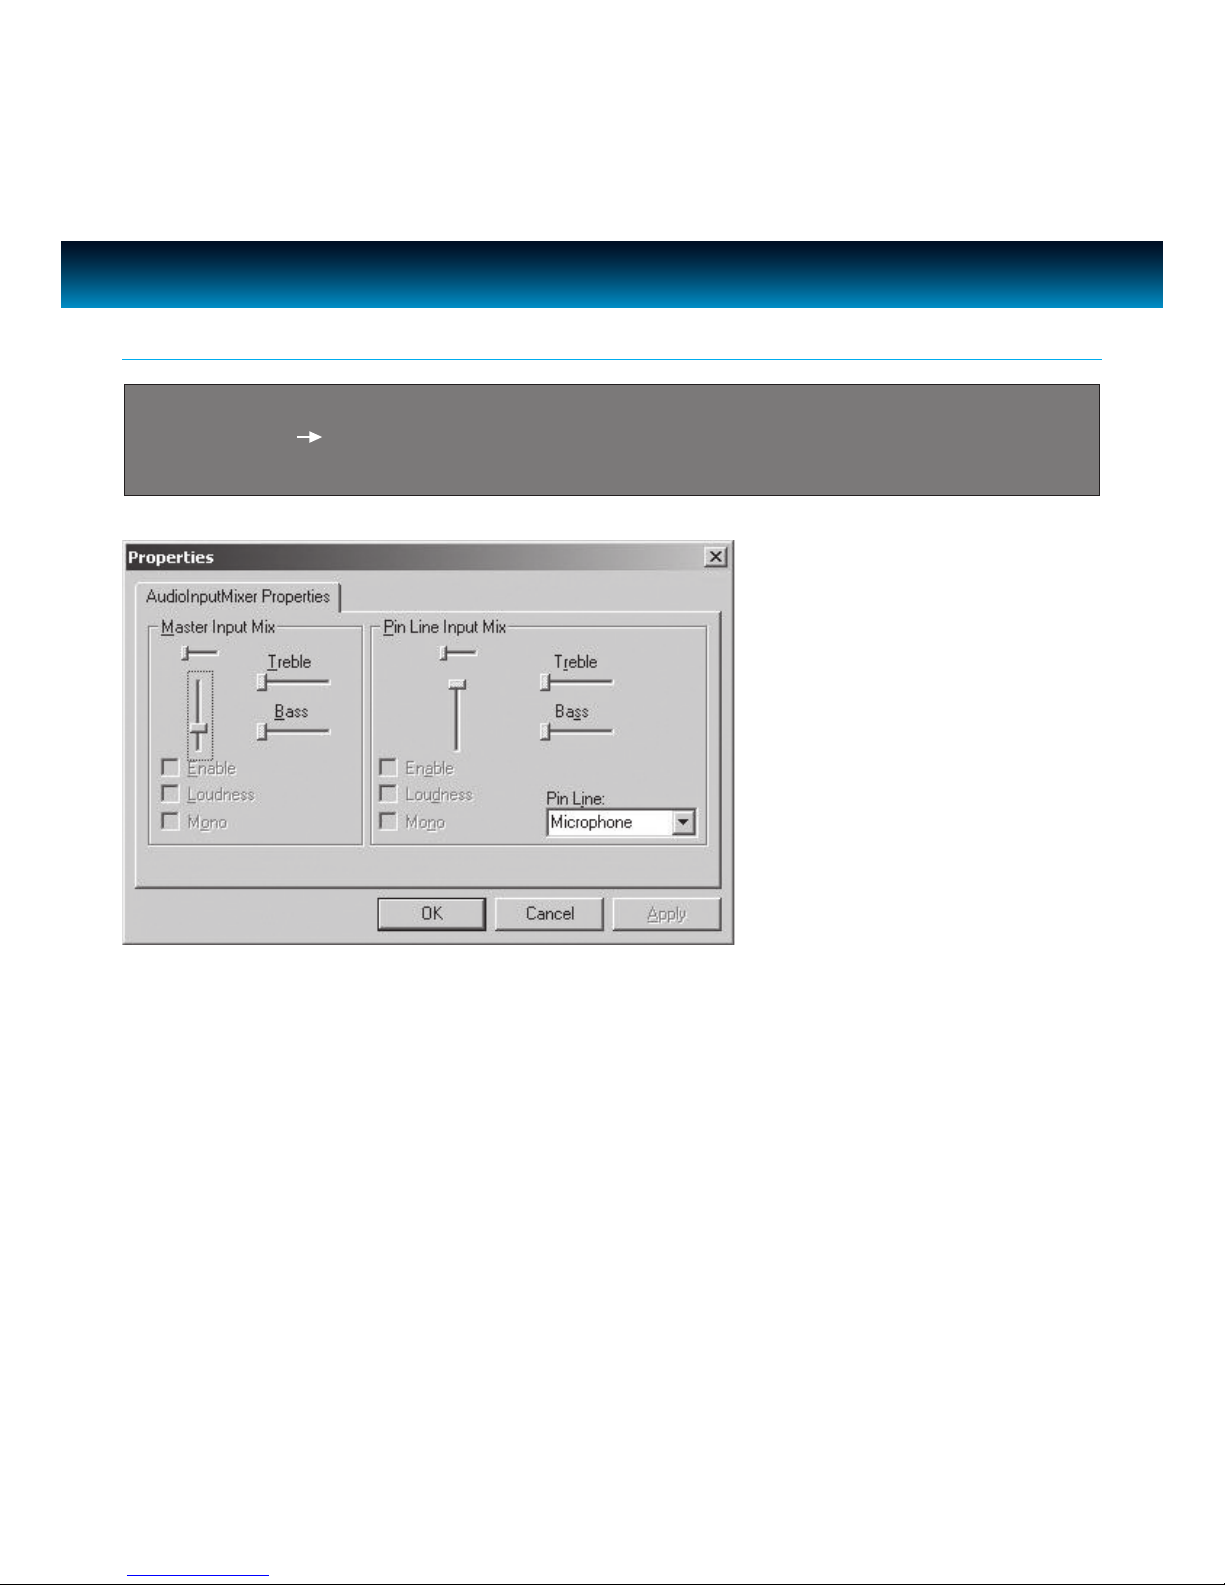
Important: When running with camera software application (Amcap) as the rst time,
go to Options Audio Capture Filter. To increase the audio volume, slide the bar in
‘AudioInputMixer Properties’ page as below. In the ‘Pin Line’ box, select ‘Microphone’.
iLuv | 11iCM10/15/20 | V10M10_IM_EN_08112010
Page 13

iLuv | 12iCM10/15/20 | V10M10_IM_EN_08112010
OPERATIONAL INSTRUCTIONS
Using Internet Messenger Downloads
Maintenance Tips
Internet messenger downloads can be used with the USB Web Camera for live Internet chatting.
Such downloads include Yahoo! Messenger, Windows Live Messenger (MSN Messenger) and Skype
which are widely used.
Instant video messenger downloads allow you to send text messages and have video chats online.
Your message and video is delivered immediately, with the person to whom sent the message
being able to respond immediately as well. A webcam lets you send live images in real-time while
exchanging messages. The recipient can see you on his/her monitor even if he/she does not have a
webcam on his/her computer.
Visit these websites and follow the downloading instructions:
• http://messenger.msn.com
• http://messenger.yahoo.com
• http://www.skype.com
• http://www.aim.com
See the Web Chatting and Special Eects Guide at the end of this manual for detailed download
instructions for this feature, as well as using special eects.
• Lens cleaning: If your lens becomes dirty, wipe lightly with a dry, lint-free cloth.
• Outdoor Use: Your USB Web Camera is not designed for outdoor use and should not be exposed
to the elements without suitable protection. In general, you should not expose it to extreme
temperatures or humidity.
Page 14

Instant Messenger Setting
Each messenger service is dierent and may be subject to various updates. Please use the available
toolbar options for the messenger service you use in order to eectively use this Web cam for
chatting.
iLuv | 13iCM10/15/20 | V10M10_IM_EN_08112010
WEB CHATTING AND SPECIAL EFFECTS GUIDE
Installing the Special Eects Software*
Insert the installation CD into your CD-ROM/DVD-ROM drive. Click on the “ManyCam Software”
button and follow the screen prompts.
* The ManyCam Software is only necessary to enable use of the special eects but not for the
general use of the camera.
Page 15

iLuv | 14iCM10/15/20 | V10M10_IM_EN_08112010
WEB CHATTING AND SPECIAL EFFECTS GUIDE
Using the Special Eects and other Features
For more detailed instructions on the use of the special eects software,
visit: http://www.manycam.com/getstarted
Launch ManyCam
Double-click the ManyCam system tray icon to open the ManyCam Options window.
Here you can choose your web-camera as a source and apply various graphic eects and lters to
the output picture.
How to Remove ManyCam.com Logo from the Output Picture
1. Open the –”Eects” tab of the ManyCam options window.
2. Click the –”Text over video” tab.
3. Uncheck the –”Show ManyCam.com Logo” checkbox.
How to Impose a Static Object on the Output Picture
1. Open the –”Eects” tab of the ManyCam options window.
2. Click the –”Objects” tab.
3. Select the type of object you would like to use.
4. Select an individual object from the list in the bottom part of the window.
5. Place the selected object where you want it to be shown in the video window by Drag and Drop.
How to Change the Background of the Output Picture
1. Open the –”Eects” tab of the ManyCam options window.
2. Click the –”Backgrounds” tab.
3. Select the type of background (static or dynamic) you would like to use.
4. Select an individual background from the list in the bottom part of the window.
Page 16

WEB CHATTING AND SPECIAL EFFECTS GUIDE
Using the Special Eects and other Features - continued
iLuv | 15iCM10/15/20 | V10M10_IM_EN_08112010
How to Apply Graphical Eects to the Output Picture
1. Open the –”Eects” tab of the ManyCam options window.
2. Click the –”Eects” tab.
3. Select the eect type you would like to use.
4. Select an individual eect from the list in the bottom part of the window.
How to Apply Face Accessories
1. Open the –”Eects” tab of the ManyCam options window.
2. Click the –”Face accessories” tab.
3. Select the face accessories type you would like to use.
4. Select an individual item from the list in the bottom part of the window.
How to Impose User Text on the Output Picture
1. Open the –”Eects” tab of the ManyCam options window.
2. Click the –”Text Over Video” tab.
3. Check the –”Enable text” checkbox.
4. Type your text in the eld below.
5. Adjust options like scrolling, font, transparency and background color.
6. Place your text where you want it to be shown in the video window by Drag and Drop.
Page 17

iLuv | 16iCM10/15/20 | V10M10_IM_EN_08112010
Using the Special Eects and other Features - continued
WEB CHATTING AND SPECIAL EFFECTS GUIDE
How to Impose Current Date and Time on the Output Picture
1. Open the –”Eects” tab of the ManyCam options window.
2. Click the –”Date & Time” tab.
3. Check the –”Show clock” checkbox.
4. Adjust options like clock type, time and/or date format, font size and transparency.
5. Place the clock where you want it to be shown in the video window by Drag and Drop.
How to Draw over the Output Picture
1. Open the –”Eects” tab of the ManyCam options window.
2. Click the –”Drawing over video” tab.
3. Draw over the video window.
How to Add a New Eect to ManyCam
1. Open the –”Eects” tab of the ManyCam options window.
2. Click the –”Add New Eect” button.
3. Select a resource le for the new eect.
(use the –”Browse” button or type the path to the le manually)
4. Pick the new eect type (objects, backgrounds or face accessories) and category.
(you can use one of the existing categories or create a new one)
5. Fill the –”Name” and –”Created by” elds.
6. Click –”OK”. The new eect will now appear in the category you have selected.
Page 18

TROUBLESHOOTING GUIDE
If you experience diculties in the use of this unit, please check the following before calling for
Customer Service.
· Make sure that the USB cable is correctly and securely attached.
· Make sure that your video software has been properly installed.
· Make sure your lens is free from obstructions, and that it is pointing in the appropriate direction.
No Image
· Make sure that there is sucient light for the camera. Alternatively, you may wish to adjust the
Brightness or Contrast settings in the software you are using.
· Make sure that there is no strong light source behind the object or person being viewed by the
PC Camera.
· Make sure that the lens is clean.
Dark Pictures
iLuv | 17iCM10/15/20 | V10M10_IM_EN_08112010
Page 19

iLuv | 18iCM10/15/20 | V10M10_IM_EN_08112010
USER SAFETY GUIDE
· TO PREVENT FIRE OR SHOCK HAZARD. DO NOT EXPOSE THIS APPLIANCE TO RAIN OR MOISTURE.
· THIS APPLIANCE SHALL NOT BE EXPOSED TO DRIPPING OR SPLASHING WATER AND THAT NO
OBJECT FILLED WITH LIQUIDS SUCH AS VASES SHALL BE PLACED ON APPARATUS.
WARNING
The lightning ash with an arrowhead symbol within an equilateral
triangle is intended to alert the user of the presence of un-insulated
“dangerous voltage” within the product’s enclosure that may be of sucient
magnitude to constitute a risk of electric shock to people.
CAUTION
RISK OF ELECTRIC
SHOCK DO NOT OPEN
WARNING: To reduce the risk of electric shock, do not remove cover (or back).
No user-serviceable parts inside. Refer servicing to qualied service personnel.
The exclamation point within an equilateral triangle is intended to
alert the user of the presence of important operating and maintenance
(servicing) instruction in the literature accompanying the appliance.
IMPORTANT SAFETY INSTRUCTIONS
1. Read these instructions
2. Keep these instructions
3. Heed all warnings
4. Follow all instrtuctions
5. Do not use this apparatus near water
6. Clean only with dry cloth
7. Do not block any ventilation openings. Install in accordance with the manufacturer’s instructions
8. Do not install near any heat sources such as radiators, heat registers, stoves, or other apparatus
(including ampliers) that produce heat.
Page 20

USER SAFETY GUIDE
9. Do not defeat the safety purpose of the polarized or grounding-type plug. A polarized plug
has two blades with one wider than the other. A grounding type plug has two blades and a
third grounding prong. The wide blade or the third prong are provided for your safety. If the
provided plug does not t into your outlet, consult an electrician for replacement of the
obsolete outlet.
10. Protect the power cord from being walked on or pinched particularly at plugs, convenience
receptacles, and the point where they exit from the apparatus.
11. Only use attachments/accessories specied by the manufacturer.
12. Use only with the cart, stand, tripod, bracket, or table specied by the
manufacturer, or sold with the apparatus. When a cart is used, use
caution when moving the cart/apparatus combination to avoid injury
from tip-over.
13. Unplug this apparatus during lightning storms or when unused for long
periods of time.
14. Refer all servicing to qualied service personnel. Servicing is required when the apparatus has
been damaged in any way, such as power-supply cord or plug is damaged, liquid has been
spilled or objects have fallen into the apparatus, the apparatus has been exposed to rain or
moisture, does not operate normally, or has been dropped.
15. Grounding or Polarization – This product may be equipped with a polarized alternating-current
line plug (a plug having one blade wider than the other). This plug will t into the power outlet
only one way. This is a safety feature. If you are unable to insert the plug fully into the outlet, try
reversing the plug. If the plug should still fail to t, contact your electrician to replace your
obsolete outlet. Do not defeat the safety purpose of the polarized plug.
Alternate Warnings – This product is equipped with a three-wire grounding-type plug, a plug
having a third (grounding) pin. This plug will only t into a grounding-type power outlet. This
is a safety feature. If you are unable to insert the plug into the outlet, contact your electrician to
replace your obsolete outlet. Do not defeat the safety purpose of the grounding-type plug.
IMPORTANT SAFETY INSTRUCTIONS - continued
iLuv | 19iCM10/15/20 | V10M10_IM_EN_08112010
Page 21
iLuv | 20iCM10/15/20 | V10M10_IM_EN_08112010
USER SAFETY GUIDE
IMPORTANT SAFETY INSTRUCTIONS - continued
CLEANING
Always disconnect unit from power supply before attempting to clean it.
Use soft clothmoistened with soapy water, and wipe gently. Do not use
solvents or abrasive materials.
YOU CAN HELP TO PROTECT THE ENVIRONMENT!
Please remember to respect the local regulations: Hand in the non-working
electrical equipment to an appropriate waste disposal center.
FOR USED BATTERIES
Disposed of the used batteries properly. Please follow the local regulations
for the battery disposal.
16. Ventilation – Slots and openings in the cabinet are provided for ventilation and to ensure
reliable operation of the product and to protect it from overheating, and these openings must
not be blocked or covered. The openings should never be blocked by placing the product on
a bed, sofa, rug, or other similar surface. This product should not be placed in a built-in
installation such as a bookcase or rack unless proper ventilation is provided or the
manufacturer’s instructions have been adhered to.
17. The MAINS plug or an appliance coupler is used as the disconnect device, the disconnect
device shall remain readily operable.
Page 22

USER SAFETY GUIDE
This equipment has been tested and found to comply with the limits for a Class B digital device,
pursuant to Part 15 of the FCC Rules. These limits are designed to provide reasonable protection
against harmful interference in a residential installation. This equipment generates, uses, and can
radiate radio frequency energy and, if not installed and used in accordance with the instructions,
may cause harmful interference to radio communications. However, there is no guarantee that
interference will not occur in a particular installation. If this equipment does cause harmful
interference to radio or television reception, which can be determined by turning the equipment
o and on, the user is encouraged to try to correct the interference by one or more of the
following measures:
1. Reorient or relocate the receiving antenna.
2. Increase the separation between the equipment and receiver.
3. Connect the equipment into an outlet on a circuit dierent from that to which the receiver
is connected.
4. Consult the dealer or an experienced radio/TV technician for help.
FCC NOTICE TO A USER IN USA
FCC RULES
This device complies with Part 15 of the FCC Rules. Operation is subject to the
condition that this device does not cause harmful interference.
Note: Do not make changes or modify the device in any way. Changes or modications
not expressly approved by the party responsible for compliance could void the
user’s authority to operate the equipment.
iLuv | 21iCM10/15/20 | V10M10_IM_EN_08112010
Page 23

iLuv | 22iCM10/15/20 | V10M10_IM_EN_08112010
USER SAFETY GUIDE
FCC NOTICE TO A USER IN USA - continued
IMPORTANT NOTES ON HEARING
Your hearing is very important to you and to us, so please take care when operating
this equipment. We strongly recommend you to follow the guideline below in order to
prevent possible damage or loss of hearing.
If you continuously listen to the loud sounds, your hearing will adapt to continuous
loud sounds and will give you the impression that the volume has been reduced.
What seems normal to you may in fact be harmful. To guard against this BEFORE YOUR
HEARING ADAPTS, set the volume at a low level and slowly increase the volume level
until you can hear comfortably and clearly without distortion. Damage to your hearing
is accumulative and is irreversible. Any ringing or discomfort in the ears indicates that
the volume is too loud. Once you have established a comfortable listening level, DO
NOT INCREASE THE VOLUME LEVEL FURTHER.
In the use of headphones, please take more attention. Hearing experts say that
listening to a loud music can damage your hearing, especially when listening to music
with headphones.
Since digital circuitry may cause interference to other radio or television tuners nearby, switch this
unit o when not in use or move it away from the aected radio/television tuner.
NOTE: This digital apparatus does not exceed the Class B limits for radio noise emissions from
digital apparatus as set out in the Radio Interference Regulations of Industry Canada. These
limits are designed to provide reasonable protection against harmful interference in a residential
installation. This equipment generates, uses and can radiate radio frequency energy and, if not
installed and used in accordance with the instructions, may cause harmful interference to radio
communications. However, there is no guarantee that interference will not occur in a particular
installation.
IC NOTICE TO A USER IN CANADA
Page 24

USER SAFETY GUIDE
If this equipment does cause harmful interference to radio or television operation (which can be
determined by turning the equipment o), the user is encouraged to try to correct the interference
by one or more of the following measures:
· Reorient or relocate the receiving antenna.
· Increase the separation between the equipment and receiver.
· Connect the equipment into an outlet on a circuit dierent from that to which the receiver
is connected.
· Consult the dealer or an experienced radio / TV technician for help.
IC NOTICE TO A USER IN CANADA - continued
WARNING!
• The apparatus shall not be exposed to dripping or splashing and that no objects
lled with liquids, such as vases, shall be placed on apparatus.
• Mains plug is used as the disconnect device. It shall remain readily operable and
should not be obstructed during intended use. To be completely disconnected, the
apparatus from supply mains, the mains plug of the apparatus shall be disconnected
from the mains socket outlet completely.
iLuv | 23 iCM10/15/20 | V10M10_IM_EN_08112010
Page 25

iLuv | 24iCM10/15/20 | V10M10_IM_EN_08112010
SPECIFICATIONS
· Image Sensor: CMOS 1.3M pixels (iCM10/15 ) / 3.0 M pixels (iCM20)
· Image Sensor Size: 1/5.5” (iCM10/15) / 1/4” (iCM20)
· 2560×1920(iCM10/15) by software interpolated
· 4000×3000(iCM20) by software interpolated
· Video Frame Rate: up to 30 fps
· USB interface: USB 2.0
· Dimensions (W x H x D): 1.6” x 2.1” x 0.7” (42mm x 55mmx 18mm)
· Unit Weight: 2.1 oz (60 g)
* Features and specications are subject to change without prior notication.
Dimensions and weights are approximate.
Page 26

THANK YOU FOR YOUR PURCHASE
Visit our website at www.i-Luv.com
© 2010 www.i-Luv.com
iLuv is a registered trademark owned by iLuv Creative Technology. MSN and Windows Live are either registered trademarks or trademarks of Microsoft
Corporation in the United States and/or other countries. Skype is a trademark of Skype Limited. Yahoo! is the trademark and/or registered trademark
of Yahoo! Inc. AIM is a registered trademark of AOL LLC. All logos and brands are the property of their respective owners. The specications and
product images or graphics may slightly dier from the actual product. Features and specications are subject to change without prior notication.
© 2010 iLuv Creative Technology All rights reserved. No portion of this printed material or product enclosed herewith including design, shape
or graphics, may be reproduced or transmitted in any form without the expressed written consent of iLuv Creative Technology by any means,
electronic or mechanical, including photocopying, recording or use of an information storage and retrieval system. Any unauthorized distribution or
reproduction of this printed material or product, or any portion thereof, will be prosecuted to the fullest possible extent of the law.
Designed in New York, USA
 Loading...