

Iluv i9300, i9300D Instruction Manual

Model : i9300
Instruction Manual
Mini Audio System for your iPod®
English

GETTING STARTED
Compatibility
General Features
Main Unit Assembly and Disassembly
Speaker Assembly and Disassembly
Wall-mounting Installation
Location of Controls (Front View of Main Unit)
Location of Controls (Rear View of Main Unit)
Antenna Connection
Speaker Connection
AC Power Connection
Location of Controls (Remote Control)
First Time Use of Remote Control
Battery Installation (Remote Control)
OPERATIONAL INSTRUCTIONS
Amplier and Radio Operation
Switching the unit ON
Operating mode selection
Adjusting the volume
Headphone Jack
AM/FM radio operation
Manual station selection
Station search operation
Stereo / Mono
Tuner preset station
Programming AM and FM stations in memory
Changing a program position
Digital Clock and Timer
Setting the digital clock
Setting the timer
Snooze function
Setting the sleep timer
TABLE OF CONTENTS
3
4
5
5
6
7
9
10
10
10
11
13
13
14
14
14
14
15
15
15
15
16
16
16
17
18
18
18
19
19
iLuv | 2i9300 | V10M10_IM_EN_101420081 | iLuv
TABLE OF CONTENTS
OPERATIONAL INSTRUCTIONS - continued
Compact Disc Operation
Safety notes for operation of the CD changer
CD changer operation
Inserting and ejecting the CD
Playing the entire CD
Pause / Stop
Random play
Repeat play
Track selection
Search operation
Track intro-scan
Mute function
Program memory
MP3 Disc Operation
Inserting and ejecting an MP3 disc
Playing the entire MP3 CD
Pause / Stop
Playback in random sequence
Repeat
Title introduction
Programming memory
ID3 TAG (Artist / Title)
Basic Operation with iPod
Installing the dock adapter
Playing the iPod
Pause / Stop
Charging your iPod
CARE AND MAINTENANCE GUIDE
SPECIFICATIONS
20
20
20
21
21
22
22
22
23
23
23
23
23
25
25
25
26
26
26
27
27
28
29
29
29
29
29
30
38

GETTING STARTED
COMPATIBILITY
AUDIO CD 1. Disc Size: 12cm / 8cm
2. Disc Type: CD
MP3 CD 1. File Format: MP3 (MPEG 1/2/2.5 Layer 3)
2. Bit Rate: 32Kbps ~ 320Kbps
DIGITAL 1. Compatible with most iPod models
AUDIO PLAYER with dock connector.
2. iPod is a trademark of Apple Computer, Inc.
DISC ERROR
This compact disc player has built-in error compensation circuits to correct for minor defects in a disc. There
are limits, however, to the amount of correction available. In some cases, the CD player may skip some tracks,
or parts of tracks, on a disc during disc play. This problem may be caused by defects (such as scratches) in
the disc being played, which are too large for the error compensation circuits to handle. If you encounter
this problem, try a new disc before having the unit serviced. If the CD player operates normally, the skipping
problem is probably due to a defective disc.
Note: Only the above types of discs can be played on this unit. Some CD-R, CD-RW discs cannot be played
depending on the condition of the player and the disc.
MP3 (MPEG 1 Audio Layer 3)
MP3, technically referred to as MPEG 1 Audio Layer 3, is one of the popular digital audio encoding
and lossy compression formats. This encoding format was developed to reduce the amount of
data (or audio information) required to represent audio, yet to still reproduce audio as same as the
original uncompressed audio for most listeners.
GETTING STARTED
Thank you for purchasing i9300. Unpack the unit and make sure all the accessories are put aside so
they will not be lost. We recommend that you retain the original carton and packaging materials
for future use, should you transport or ship the unit in the future.
· 2.1 Ch. Speaker system
· 4 MP3 CD / Audio CD playback system with integrated universal dock for your iPod
· Powerful subwoofer and 2-way speakers allow you to enjoy your favorite songs on your iPod with
depth and clarity
· Play and charge your iPod*
· Supports Random, Repeat, Intro, and Program functions
· Programmable memory for 40 audio tracks
· Provides a variety of convenient functions (Mute, Sleep, Timer and more)
· Enjoy AM / FM radio with PLL digital tuning technology
· Programmable presets for 32 radio stations (16 for AM / 16 for FM)
· Real-time clock display with sleep function
· Timer on/o function with snooze capability
· Integrated liquid crystal display (LCD) with white backlight
· Motorized CD door mechanism
· Remote control included
What’s Included
· Main unit with 2-way full range speaker and I subwoofer
· Full-function remote control
· Dock adapters
· Stand & base for desktop
· Instruction manual
* Compatible with most iPod models with dock connector.
GENERAL FEATURES
iLuv | 4i9300 | V10M10_IM_EN_101420083 | iLuv

Main Unit Assembly and Disassembly
GETTING STARTED
Speaker Assembly and Disassembly
CAUTION This product may be used only with iLuv i9300 stand. Use with other stands
may result in instability causing possible injury.
1 2 3
1 2 3
GETTING STARTED
Secure the center unit and speakers on the wall (Solid concrete wall or wooden wall shall be use)
using 8 dowels and 8 screws (supplied) as shown below:
Wall-mounting Installation
iLuv | 6i9300 | V10M10_IM_EN_101420085 | iLuv
GETTING STARTED
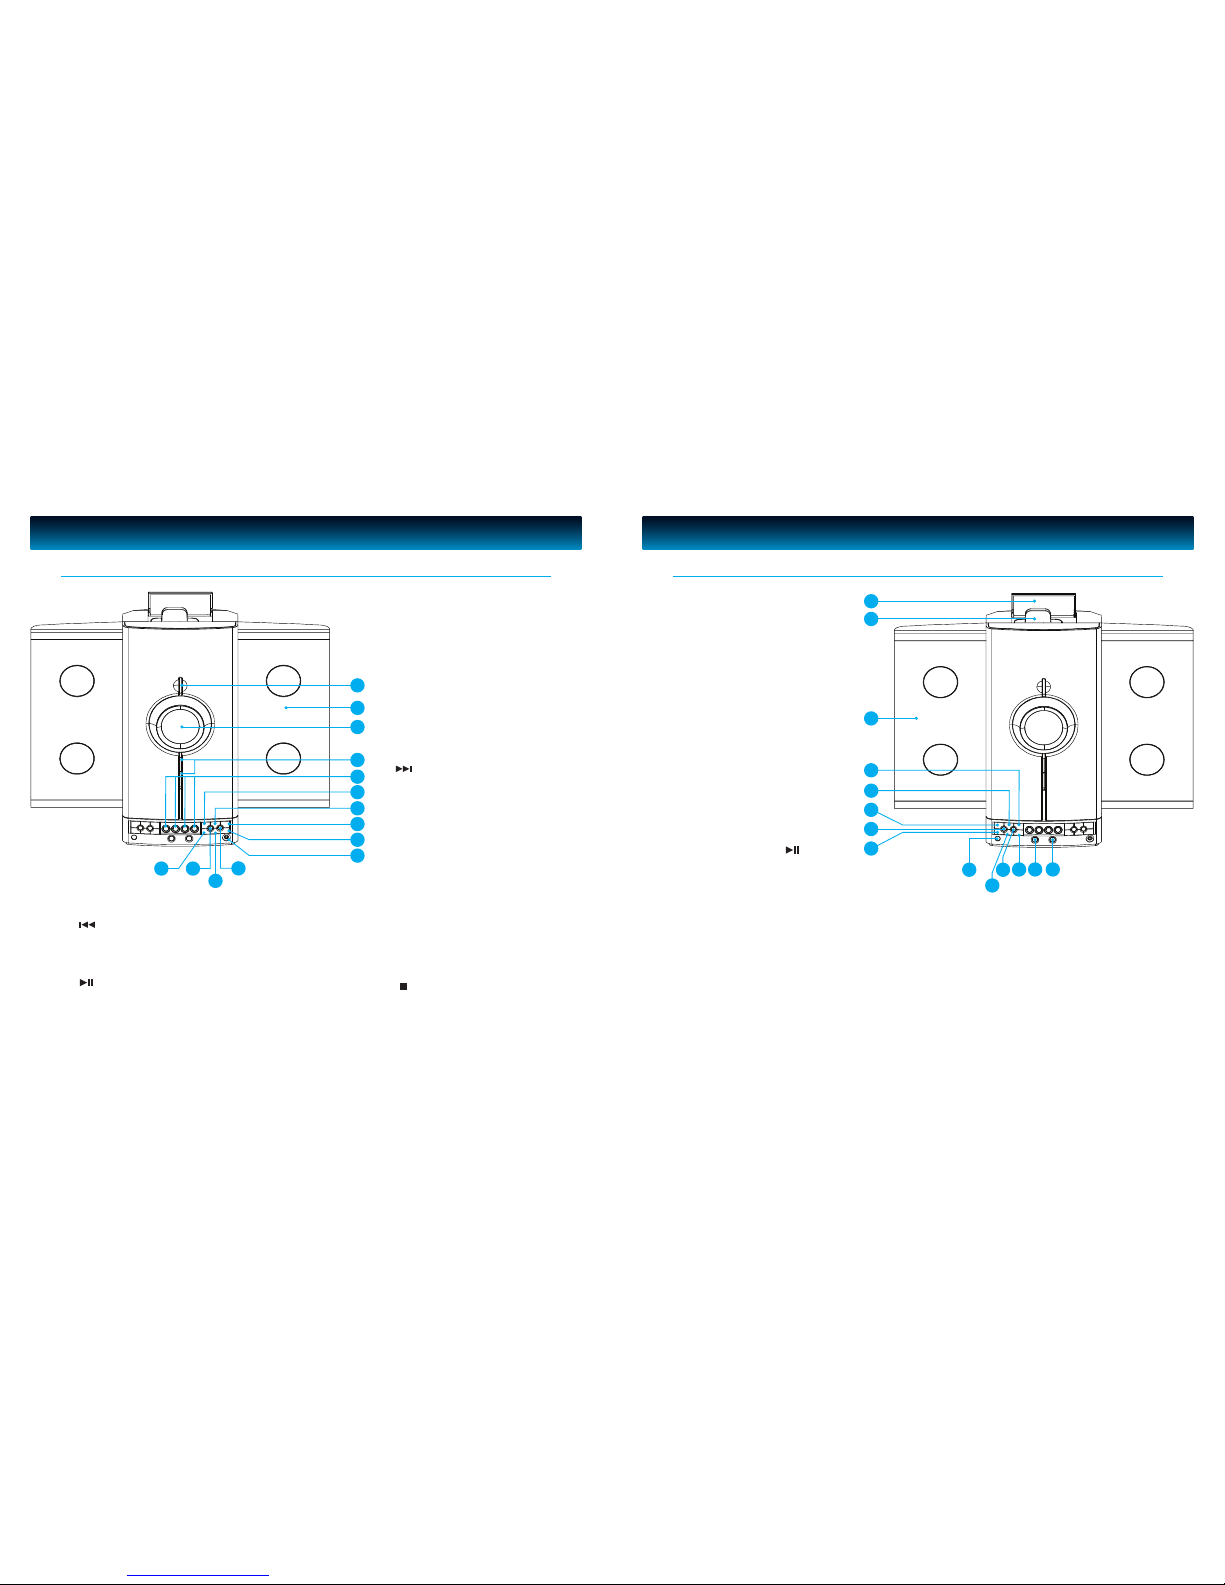
Location of Controls (Front View of Main Unit)
1
2
3
4
5
6
7
8
9
10
11
12
1314
1. POWER Button
Used to turn the system on and o
2. Right CD Door
3. Display
4. VOLUME UP/DOWN Button
5. CD Selection Buttons
Selects a CD to play from one
of the 4 players
6. RANDOM
CD playback in random
sequence
7. TUNING + SKIP/SEARCH
Button
CD forward title selection / CD
forward search operation /
Manual tuning of stations,
station search operation
8. REPEAT/PRESET Button
Press to select the repeat mode
and to preset radio stations
9. DISPLAY MODE Button
Switching to time display
(TIMER ON / OFF)
10. HEADPHONES Jack
Stereo headphone socket:
accepts 3.5mm plug
11. STOP/ST. /MONO Button
Interrupts the CD playback
/ clearing the CD programme,
provides stereo-mono
switching for FM stations
12. TUNING – SKIP/SEARCH Button
CD backward title selection / CD backward search
operation / Manual tuning of stations, station
search operation
13. CD PL AY/PAUSE Button
Initiates CD operation and starts CD playback / pauses CD
playback
14. INTRO Button
Plays 10 seconds of each CD/MP3 track
GETTING STARTED
Location of Controls (Front View of Main Unit) - continued
26
24
22
21
15
18
15. OPEN/CLOSE R Button
Opens and closes the right CD
changer door
16. OPEN/CLOSE L Button
Opens and closes the left CD
changer door
17. MP3 MODE Button
Selects TITLE or ALBUM
(folder) in MP3 mode
18. TIMER Button
Activates the timer
19. FOLDER DOWN Button
Move to the next MP3 folder in
descending order
20. Remote Sensor
Receives infrared signals from
the remote control
21. iPod PLAY/PAUSE Button
Starts iPod playback / Pauses
iPod playback.
22. MEM./CLK ADJ. Button
Supplies memory functions for
tuner station presets, clock
setting, and CD programming
23. BAND Button
Selects the AM, FM, or FM/
Stereo reception bands
24. FOLDER UP Button
Move to the next MP3 folder in
ascending order
25. MUTE Button
Temporarily switches o the audio if desired
26. Left CD Door
27. Dock
28. iPod Dock Cover
16
17
19
20
23
25
28
27
8 | iLuv
iLuv | 8i9300 | V10M10_IM_EN_101420087 | iLuv
GETTING STARTED
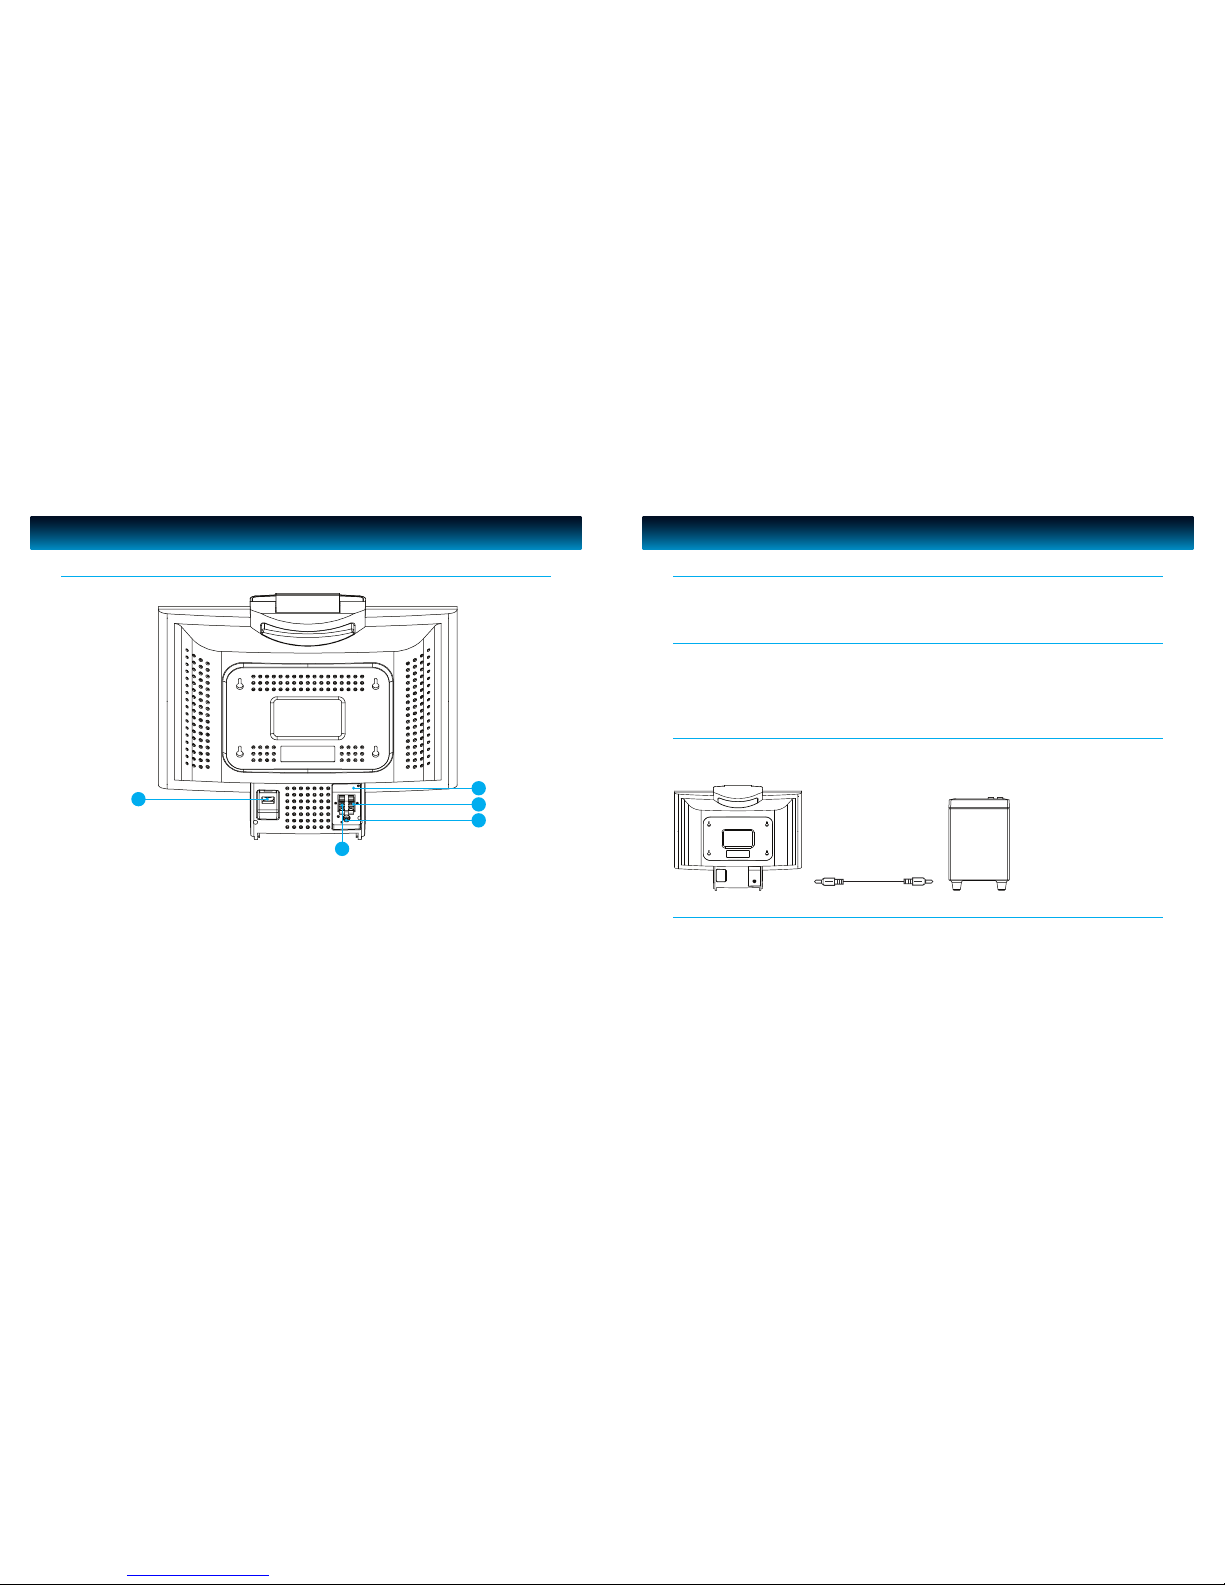
Location of Controls (Rear View of Main Unit)
29. AC
Plug the AC power cord into this socket before plugging it into the wall outlet.
Note: When the system is connected to AC power, parts of the unit may be in operation due to
its stand-by feature. In order to turn the system completely o, remove the AC power
cord from the AC outlet.
30. FM ANT.
FM antenna “pigtail” wire
31. SPEAKERS L
Terminals for the left channel speaker
32. SUBWOOFER Output Jack
Connect an external subwoofer speaker (included)
33. SPEAKERS R
Terminals for the right channel speaker
29
30
31
32
33
GETTING STARTED
You can achieve acceptable reception if you use the supplied FM pigtail antenna. If so, the antenna
should be elongated and not coiled or bunched up. If it hangs freely, it can be quite eective.
Antenna Connection
Insert LEFT speaker’s striped wire into LEFT channel’s speaker block (31) by pressing the RED lever
and inserting the striped wire into the open hole. Do the same with the LEFT speaker’s
non-striped wire and the BLACK lever. Repeat for the RIGHT channel SPEAKER block (33) and the
RIGHT speaker’s wire.
Speaker Connection
This unit includes a subwoofer output jack on the rear panel labeled “SUBWOOFER OUT”. You may
connect an external, powered subwoofer(included) using a single RCA-type cable as shown below.
Subwoofer Connection
Connect the power cable (included in the accessories) rst to the power socket (29) at the unit and
then insert the power plug into the wall outlet. When you disconnect the plug from a socket, do
not pull the cable, always pull the plug.
Note: As soon as the unit has been connected to AC power, parts of the unit are in operation, due
to the standby function. To switch o the unit completely, remove the plug from the AC outlet.
Once the unit is plugged in, its time display (3) starts ashing, refer to “Setting the digital clock”
on Page 18.
AC Power Connection
Cable (included)
Subwoofer
iLuv | 10i9300 | V10M10_IM_EN_101420089 | iLuv
GETTING STARTED
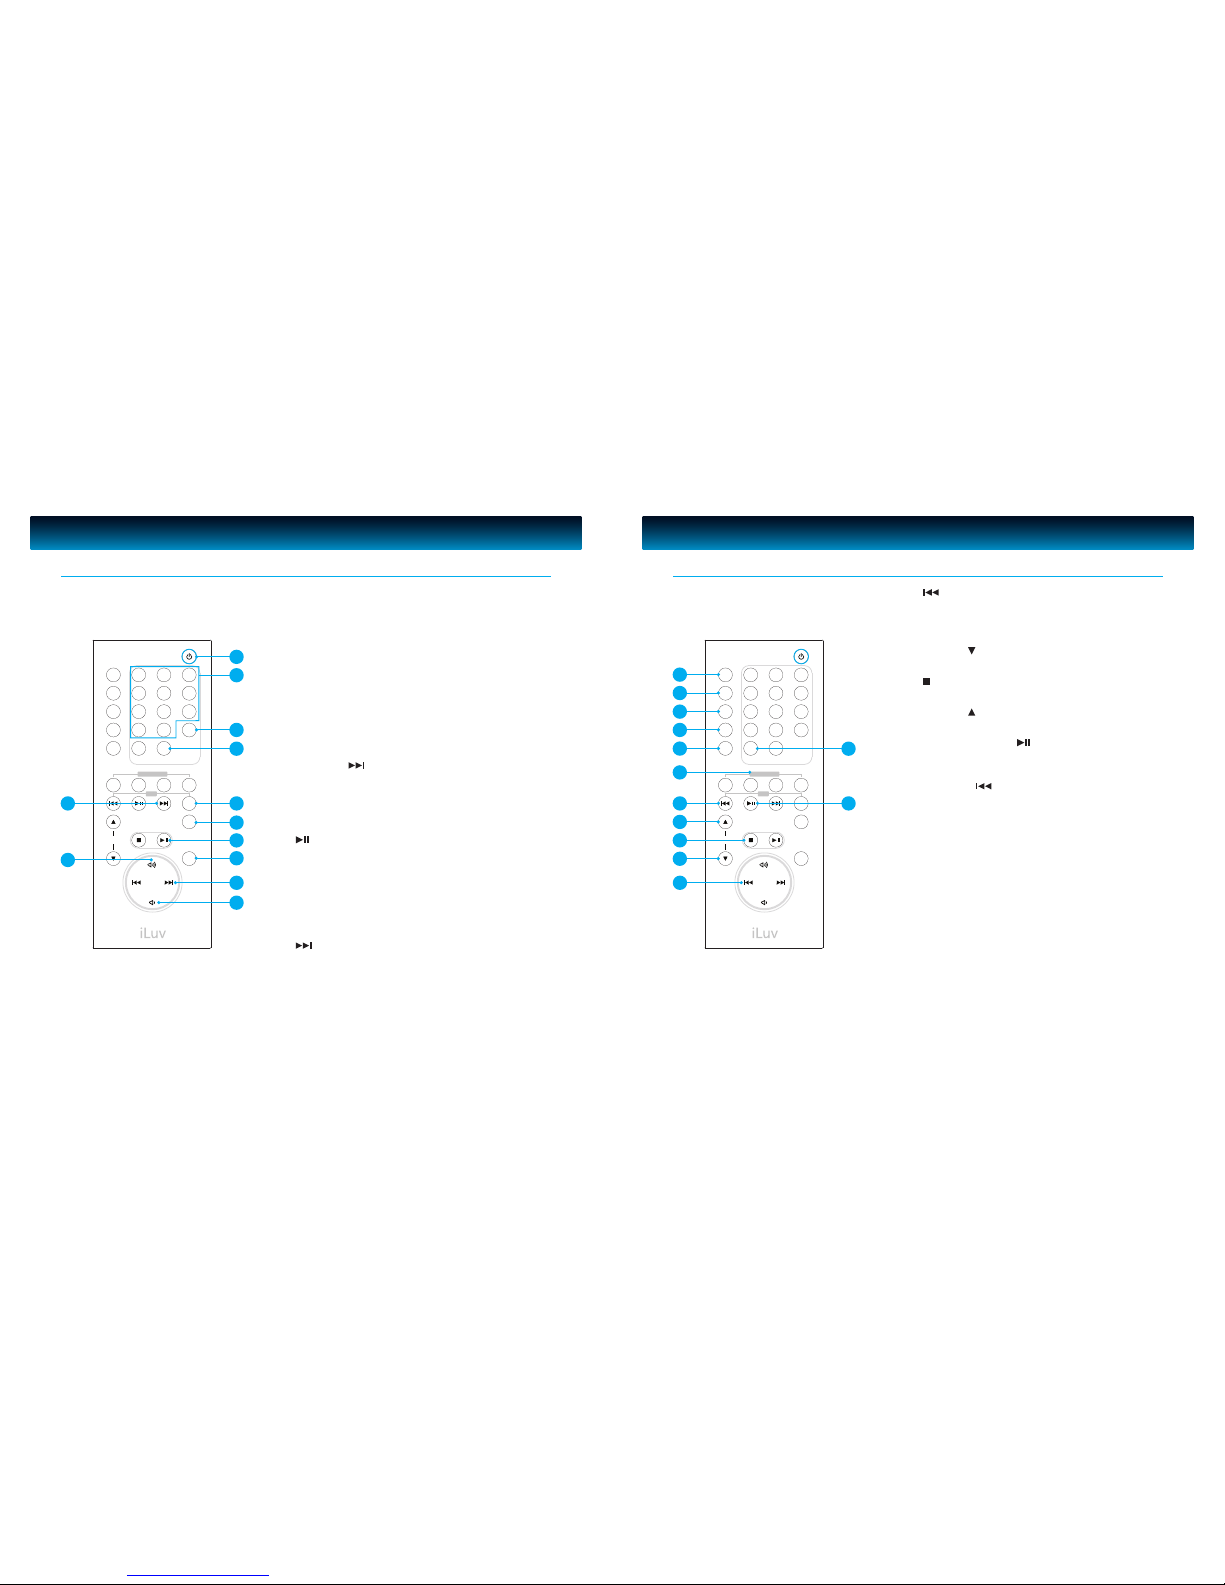
Location of Controls (Remote Control)
34. POWER Button
Used to turn the system on and o
35. 0 - 9, +10 NUMERIC Buttons
Recalls TUNER preset stations / Choose CD tracks
36. REPEAT/PRESET Button
Selects among CD playback repeat functions /
Programs AM and FM radio stations
37. RANDOM Button
Randomizes the playback of CD tracks
38. iPod Button
Selects iPod mode
39. iPod SKIP Button
iPod forward search operation
40. SNOOZE Button
Turns o the unit for 9 minutes, after which the unit
will then resume its previous function
41. CD PLAY/PAUSE Button
Initiates CD operation and starts CD playback /
Pauses CD playback
42. DISPLAY MODE Button
Switching to time display (TIMER ON / OFF)
43. VOLUME + Button
Raises the desired volume (louder)
44. TUNING + SKIP/SEARCH Button
CD forward title selection / CD forward search
operation / Manual tuning of stations, station
search operation
45. VOLUME - Button
Lowers the desired volume
DISC SELECT
iPod
1 2 3 4
iPod
SNOOZE
DISPLAY
MODE
STOP
FOLDER
PLAY/
PAUSE
1 2 3
4 5 6
7
+10 0
8 9
MEMORY RANDOM REPEAT/
PRESET
OPEN/CLOSE
MUTE
TIMER
TUNER/BAND
SLEEP
MP3 MODE
AUX
34
35
36
37
38
40
42
41
44
39
43
45
GETTING STARTED
Location of Controls (Remote Control) - continued
DISC SELECT
iPod
1 2 3 4
iPod
SNOOZE
DISPLAY
MODE
STOP
FOLDER
PLAY/
PAUSE
1 2 3
4 5 6
7
+10 0
8 9
MEMORY RANDOM REPEAT/
PRESET
OPEN/CLOSE
MUTE
TIMER
TUNER/BAND
SLEEP
MP3 MODE
AUX
53
5051
47
46. TUNING – SKIP/SEARCH Button
CD backward title selection / CD backward
search operation / Manual tuning of stations,
station search operation
47. FOLDER Button
Activates the MP3 folders (in descending order)
48. STOP Button
Stops CD playback / Clears the CD program memory
49. FOLDER Button
Activates the MP3 folder (in ascending order)
50. iPod PLAY/PAUSE Button
To start iPod playback/Pauses interruption of
iPod playback
51. iPod SKIP Button
iPod backwards search operation
52. DISC 1 - 4 Button
Selects a CD to play from one of the 4 players
53. MEMORY Button
Supplies memory functions for tuner
station presets
54. MP3 MODE Button
Selects TITLE or ALBUM (folder) in MP3 mode
55. SLEEP Button
Set the automatic switch-o time
56. TUNER/BAND Button
Activates the TUNER and selects the AM, FM, or
FM/Stereo reception bands
57. TIMER Button
Activates the timer
58. MUTE Button
Temporarily silences the audio
48
49
52
54
55
56
57
58
46
iLuv | 12i9300 | V10M10_IM_EN_1014200811 | iLuv
 Loading...