

Page 1

THANK YOU FOR YOUR PURCHASE
©2008 www.i-Luv.com
iLuv is a trademark of jWIN Electronics Corp.
iPod is a trademark of Apple Inc. , registered in the U.S and other countries.
The illustrated product and specifications may differ slightly from that supplied.
Designed in New York, USA / Made in China
5.1 - Channel Slim Desktop iPod / DVD Player
Model : i1277
Instruction Manual
Page 2
Thank you for purchasing the i1277. Unpack the unit and make sure all the accessories are put
aside so they will not be lost. We recommend that you retain the original carton and packaging
materials for future use, should you transport or ship the unit in the future.
+ Read all operating and safety instructions before operating your product.
5.1 - Channel Slim Desktop iPod / DVD Player
INTRODUCTION TABLE OF CONTENTS
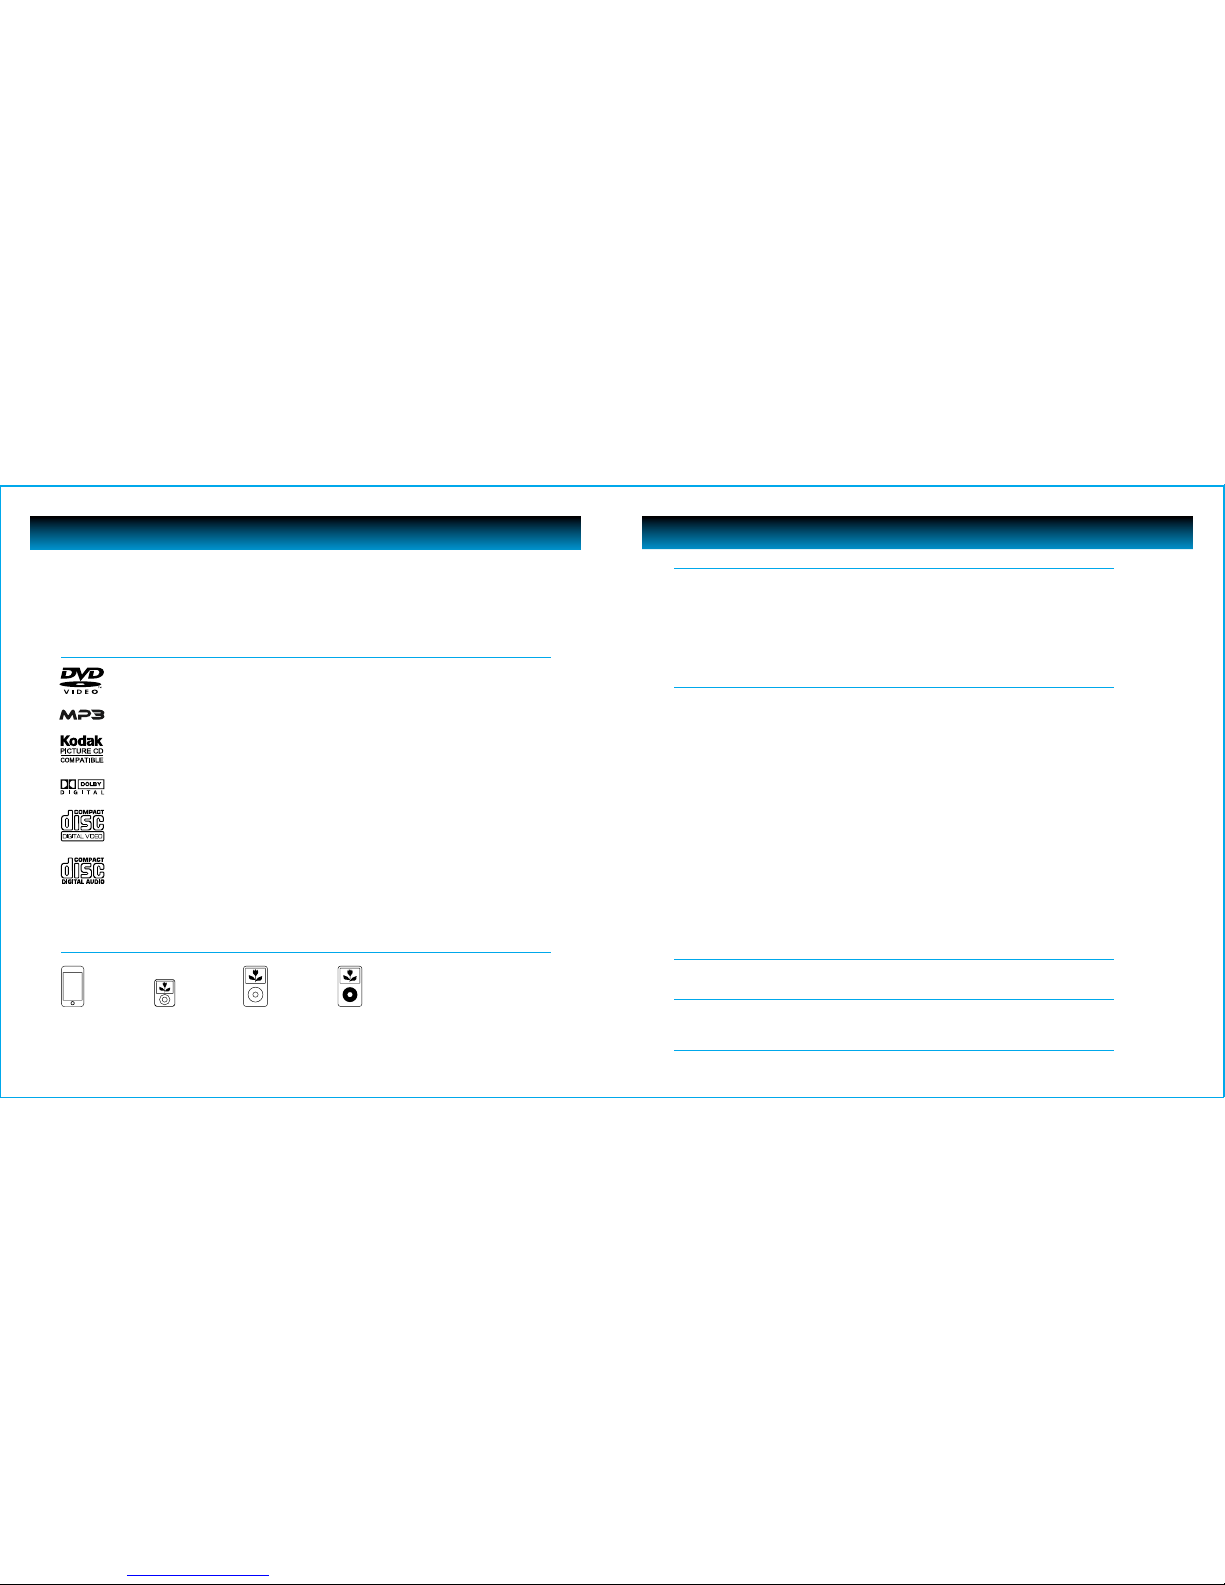
iPod
®
AUDIO AND VIDEO
MP3 CD
Kodak® Picture CD
DOLBY® DIGITAL DECODING
AUDIO AND VIDEO
AUDIO CD
DIGITAL MEDIA PLAYER
iPod models you can use with your i1277
iPod nano
3rd generation
(video)
iPod classic
iPod
5th generation
(video)
iPod touch
Getting Started
Location of Controls on the Main Unit 3
Location of Controls on the Remote Control 5
Preparing the Remote Control for Use 6
Using the Remote Control 6
What’s Included 7
Connecting the Speakers 7
Setting up the Player 8
Connecting the Unit to a TV 8
Connecting External Audio 8
Operational Instructions
Using Your iPod 9
Connecting your iPod to the Dock 9
Playing your iPod Contents on TV 9
Music Menu 9
Video Menu 10
Changing the Settings 10
Changing the Screen Mode 10
Tips for iPod Video Playing 10
System Setup (DVD) 11
Navigating the Setup Menu 12
Language Setup 13
Audio Setup 14
Speaker Setup 14
Dolby Digital Setup 14
Video Setup 15
Basic DVD Operation 16
Menu Play 16
Title Play 17
Sequence Play 17
Program Play 17
Volume Control 18
Mute 18
JPEG / MP3 Playback 18
Troubleshooting Guide
iPod Problems – Possible Solutions 19
DVD Player Problems – Possible Solutions 20
Features and Specifications
Features for your iPod 21
Features for your DVD Player 21
Specifications
21
User Safety Guide
22
1 | iLuv
iLuv | 2
i1277 | V10M10_IM_EN_01223008
Page 3

GETTING STARTED GETTING STARTED
Location of Controls on the Main Unit Location of Controls on the Main Unit-continued
This DVD player has built-in error compensation circuits to correct minor defects in a disc. There are limits,
however, to the amount of correction available. In some cases, the DVD player may skip some tracks, or parts
of tracks, on a disc during disc play. This problem may be caused by defects (such as scratches) on the disc
being played which are too large for the error compensation circuits to handle. If you encounter this problem,
try a new disc before having this unit serviced. If the DVD player operates normally, the skipping problem is
probably due to a defective disc.
Note: Only the above types of discs can be played on this unit. Some CD-R, CD-RW discs cannot be played
depending on the condition of the disc.
7. STOP BUTTON
8. iPod BUTTON
9. DVD BUTTON
10. DISC TRAY
11. REMOTE SENSOR
12. LED SCREEN
1. iPod DOCK
2. POWER BUTTON
3. OPEN / CLOSE BUTTON
4. PREV BUTTON
5. PLAY / PAUSE BUTTON
6. NEXT BUTTON
1. COMPOSITE VIDEO OUTPUT
2. S-VIDEO OUTPUT
3. 5.1-CH AUDIO OUTPUT
(FL, FR, SL, SR, CEN, SW)
4. COMPONENT VIDEO OUTPUT
(Y, Pb, Pr)
5. DIGITAL AUDIO COAXIAL OUTPUT
6. MAIN POWER SWITCH
DIS C ER ROR
3 | iLuv iLuv | 4
DVD OPEN
1
2
3 4 6
5 7
8 9
1211
10
2 5 63 41
i1277 | V10M10_IM_EN_01223008
Page 4
GETTING STARTED GETTING STARTED
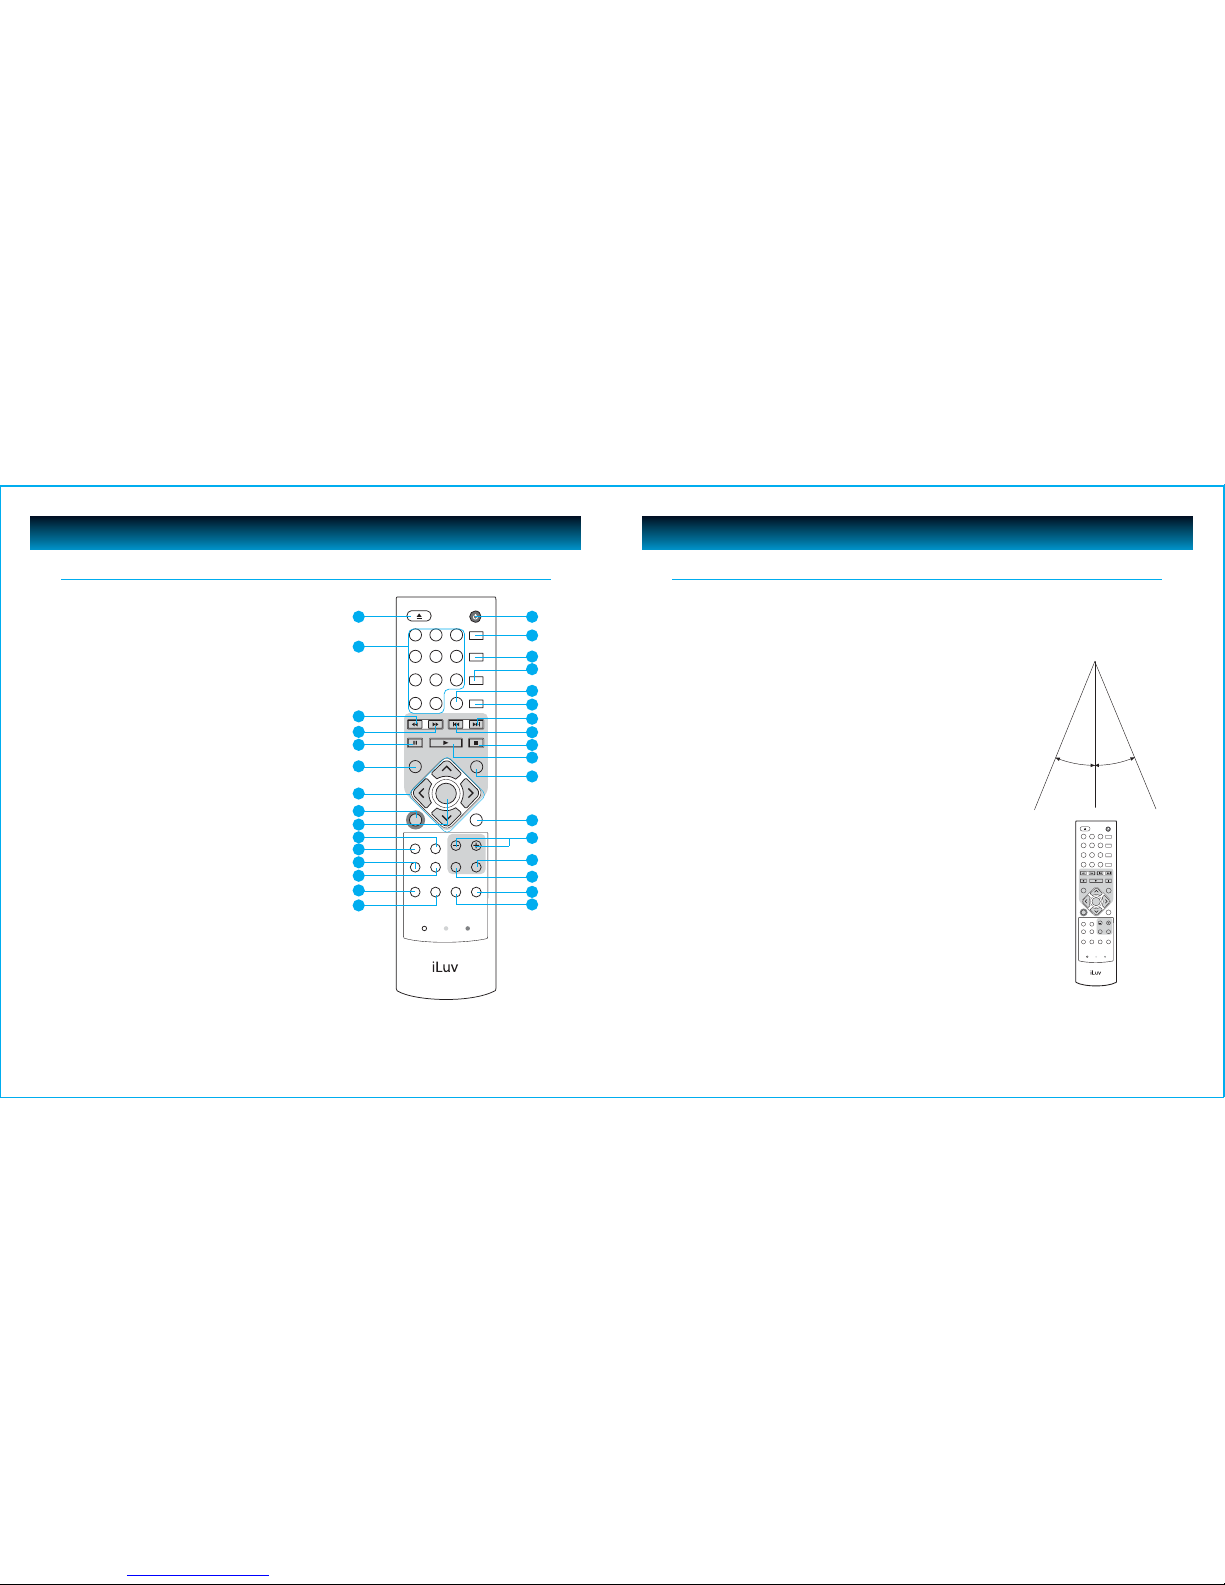
Location of Controls on the Remote Control Preparing the Remote Control for Use
Installing the Batteries
1. Push down and out on the battery Compartment cover to remove it.
2. Insert two AAA batteries into the battery compartment of the remote control, making sure the
polarity (+ and – signs) on the batteries and matches the polarity marked inside the battery
compartment.
3. Replace the battery compartment cover.
Notes:
• Do not mix batteries from different manufacturers, nor old ones with new.
• If the remote control will not be used for an extended period of time, remove the
batteries to
prevent damage-causing corrosion.
• Remove dead batteries immediately to prevent damage-causing corrosion.
• If battery leakage occurs, wipe the battery liquid from the battery compartment,
then replace both batteries. Always replace both batteries at the same time,
using new, fully charged batteries.
• Life expectancy of batteries may vary depending on amount of use.
Using the Remote Control
1. Point the remote control directly at the player's remote sensor.
2. Do not leave the remote control in an extremely hot or humid place.
3. Avoid spilling water or put any liquid on the remote control.
4. Battery life is ~1 year under normal conditions.
5 | iLuv iLuv | 6
IMPORTANT NOTE:
The included remote control both your iPod and DVD player.
* NAVIGATION 3 / 4Buttons = Page Down / Page Up Buttons
30˚ 30˚
i1277 | V10M10_IM_EN_01223008
SLOW
iPod
MODE
PROG P/N DISPLAY
VIDEO
MODE
A-B REPEAT
MENU/BACK iPod/DVD
PAGE
DOWN
PAGE
UP
REV FWD PREV NEXT
PAUSE PLAY STOP
ENTER
ZOOM
SETUP
VOLUME
MUTE RETURN
STANDBY
SUBTITLE
TITLE
GOTO
ANGLE
LANGUAGE
OPEN/
CLOSE
1
7
10+ 0
8 9
243
5 6
DVD DVD & iPod iPod
i1277
1. OPEN / CLOSE BUTTON
2. NUMBER 0 TO 10+ BUTTONS
3. REV BUTTON
4. FWD BUTTON
5. PAUSE BUTTON
6. MENU BUTTON
7. NAVIGATION (3 / 4 / 5 / 6) BUTTONS*
8. iPod MODE BUTTON
9. ENTER BUTTON
10. SLOW BUTTON
11. ZOOM BUTTON
12. A-B BUTTON
13. REPEAT BUTTON
14. PROG BUTTON
15. P/N BUTTON
16. STANDBY BUTTON
17. SUBTITLE BUTTON
18. LANGUAGE BUTTON
19. TITLE BUTTON
20. GOTO BUTTON
21. ANGLE BUTTONS
22. NEXT BUTTON
23. PREV BUTTON
24. STOP BUTTON
25. PLAY BUTTON
26. iPod / DVD BUTTON
27. SETUP BUTTON
28. VOLUME - / + BUTTON
29. RETURN BUTTON
30. MUTE BUTTON
31. DISPLAY BUTTON
32. VIDEO MODE DISPLAY BUTTON
1
2
3
10
11
4
5
6
7
9
12
13
14
15
17
16
18
19
20
21
22
23
24
25
26
27
28
29
31
32
8
30
SLOW
iPod
MODE
PROG P/N DISPLAY
VIDEO
MODE
A-B REPEAT
MENU/BACK iPod/DVD
PAGE
DOWN
PAGE
UP
REV FWD PREV NEXT
PAUSE PLAY STOP
ENTER
ZOOM
SETUP
VOLUME
MUTE RETURN
STANDBY
SUBTITLE
TITLE
GOTO
ANGLE
LANGUAGE
OPEN/
CLOSE
1
7
10+ 0
8 9
243
5 6
DVD DVD & iPod iPod
i1277
Page 5
GETTING STARTED
7 | iLuv iLuv | 8
i1277 | V10M10_IM_EN_01223008
Setting up the Player
It is recommended that you keep the unit unplugged and disconnected from the wall unit while
connecting the unit.
Connecting the Unit to a TV
• Composite Video (iPod and DVD) – Connect the video cable from the Video Out jack
on the back of the player to the Video In jack on your television set.
• S-Video (iPod and DVD) – For better video quality, connect the player to your television set
using an S-Video cable (not included). Connect the cable from the S-Video Out jack on the
back of the player to the S-Video In jack on the television set.
• Y, Pb, Pr (DVD only) – Use a Component cable (not included) to connect the unit to a
television set. Set the [Video] to Interlace YUV. If the television supports Progressive Scan,
set the [Video] to P-Scan Y, Pb, Pr
Connecting External Audio
The back panel of the iPod/DVD player provides:
COAXIAL Out: Connects to an external audio decoder.
Note on iPod connections:
• Video connection: Your iPod does not support component (Y, Pb, Pr) video output,
so always connect to composite video or S-Video for iPod play.
• Audio connection: Your iPod does not support 5.1 channel audio output and digital
audio output, so always connect to audio FR, FL channels for iPod play.
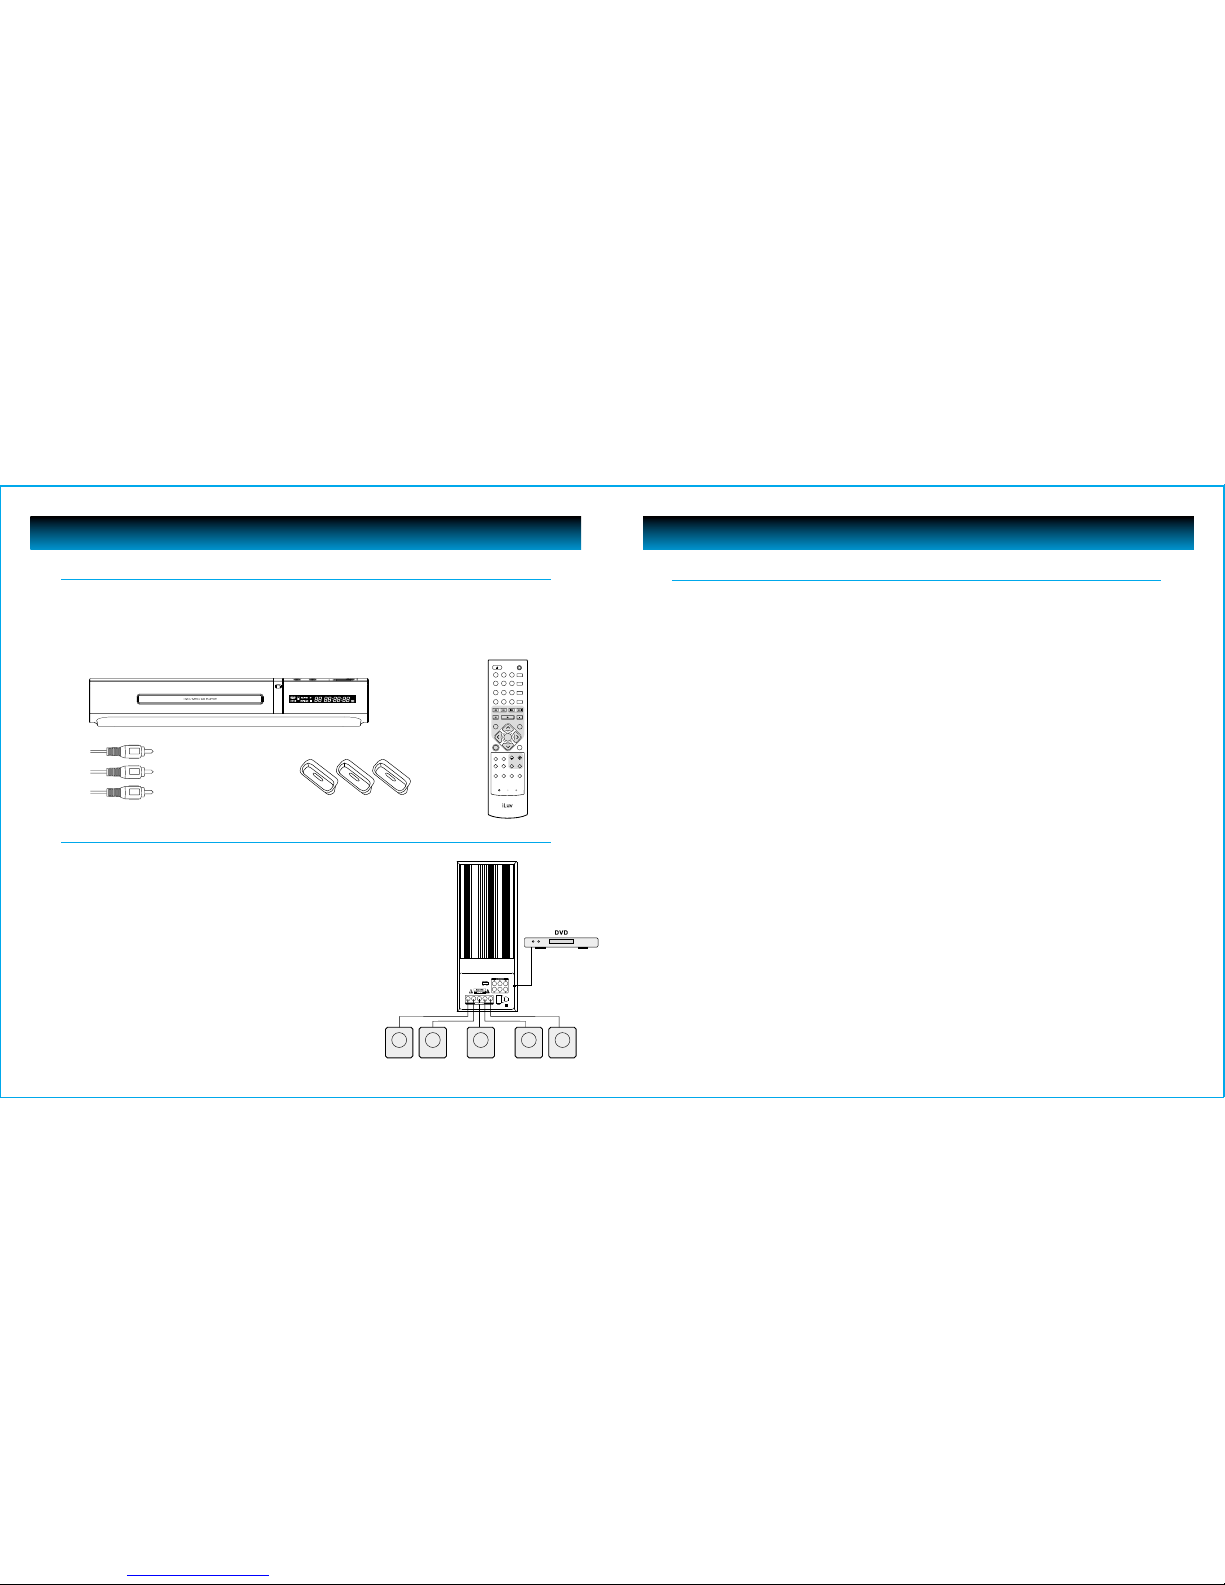
• The i1277 speaker system has a 2.0/5.1CH input selection
switch on rear panel.
• When playing 2.0 channel content, like your iPod, CD, MP3,
VCD and 2.0 channel DVD movies, set this switch to 2.0CH
position, otherwise the subwoofer will not sound.
• When play 5.1 channel DVD movies, set this switch to 5.1CH
position for surround audio effect.
• When set this switch on "2.0CH" position, the SL and SR speaker
no sound.
Before plugging the power cord into the AC outlet, check to make sure all of the connections have
been properly completed. When they have been, carefully plug power cord into outlet. Press the
POWER switch on the rear side to turn on the unit, the power indicator will light up. If unit is in standby
state, press the POWER button on the front panel to power the unit. The display panel will light.
When the unit is initially powered, a brief surge of electricity may cause interference with other
electronic equipment on the same circuit. If this occurs, connect the unit to an outlet on a different
circuit.
What’s Included
Connecting the Speakers
1. Main Unit
2. Remote Control (Battery Included)
3. AV Cable
4. iPod Dock Adapters
5. Instruction Manual
6. Warranty Card
7. QSG (Quick Start Guide)
GETTING STARTED
1. 2.
3. 4.
SLOW
iPod
MODE
PROG P/N DISPLAY
VIDEO
MODE
A-B REPEAT
MENU/BACK iPod/DVD
PAGE
DOWN
PAGE
UP
REV FWD PREV NEXT
PAUSE PLAY STOP
ENTER
ZOOM
SETUP
VOLUME
MUTE RETURN
STANDBY
SUBTITLE
TITLE
GOTO
ANGLE
LANGUAGE
OPEN/
CLOSE
1
7
10+ 0
8 9
243
5 6
DVD DVD & iPod iPod
i1277
Page 6

OPERATIONAL INSTRUCTIONS
9 | iLuv
iLuv | 10
i1277 | V10M10_IM_EN_01223008
Using Your iPod– Continued
Video Menu:
The Video Menu is sorted by Movie, Music Video, TV shows, and Video podcasts.
• Press the ENTER button after selecting the desired videos from the list to start playing the selected Video.
• Press the PAUSE button during playback to pause playback and press the PLAY button to resume play.
• Press the REV or FWD buttons during playback allow you to move quickly forward or backward.
• Press the PREV or NEXT buttons during playback to move to the next or previous chapter/movie.
Note: iPod touch does not support video browsing, you need to change from “iPod” to "iPod Screen" mode by pressing
the iPod MODE button of remote control, using the screen on your iPod touch for for video play.
Changing the Settings:
A variety of options can be changed directly
from the TV on the TV Screen during playback.
Background color can be changed as well as
playback settings like Shuffle, Repeat, Skin,
TV System, and Language.
Changing the Screen Mode:
Press the iPod MODE button while your iPod is searching the contents on the TV to switch to
iPod Screen Mode. At this time, the message on the TV screen will disappear, then contents
can be searched on your iPod screen using the remote control or click wheel of your iPod.
The "iPod Screen" mode is useful for iPod functions not supported by this iPod/DVD player,
such as photo playing, iPod touch video playing, and other features.
• In "iPod Screen" mode, set [TV Out] setting to ON for video playing.
• Press the iPod MODE button again to return to "TV Screen" mode.
Tips for iPod video playing: Before insert your iPod into the dock, you can set your iPod settings
for different movie and TV Aspect ratios (4:3 or 16:9), such as TV Screen, Fit to Screen, and Captions.
OPERATIONAL INSTRUCTIONS
Before playing iPod, always connect the video to TV through composite video or S-Video, and
connect the audio through FR/FL analog audio output. When unit is in iPod play mode, does not
support component video output and 5.1 channel / digital audio output.
Connecting your iPod to the dock:
1. Connect you iPod to the dock,
make sure right dock adapter is installed before
docking your iPod into the machine.
2. Turn on the player, Select your iPod using
the remote control and press the ENTER button
or press the iPod button on the unit.
Note: If your iPod is not inserted to dock,
a "Please insert iPod" message will display on screen.
After inserting your iPod and selecting iPod mode,
unit will verify your iPod and the "Initializing..." message
will appear on the screen. Please wait until the process finishes.
The unit cannot be operated during this time.
Playing your iPod contents on TV:
When your iPod has been properly verified, the following
will be displayed: The supported menu and screen may vary
depending on the type of iPod connected to the dock.
Select the desired menu and press the ENTER button
on the remote control to view the contents on your iPod,
Selected the file and press the ENTER button to play
the selected music or video.
Music Menu:
Music menu is sorted by playlists, Artists, Albums, Songs,
Genres, or Composers. Use the NAVIGATION 5 / 6�buttons
to select a playlist and press ENTER on the remote control
to confirm your selection. When music is playing,
information on the music will be displayed on the TV screen.
Using Your iPod
i1277
Page 7

OPERATIONAL INSTRUCTIONS
11 | iLuv
iLuv | 12
i1277 | V10M10_IM_EN_01223008
TV TYPE
• Choose the aspect ratio according to your TV type. (16:9, 4:3LB or 4:3PS)
DEFAULT
• Choose this option to return the unit to factory settings
Navigating the Setup Menu
TV SYSTEM
• Choose the TV System according to the color specifications of your TV.
VIDEO
• According to the output jack of TV set, you can choose S-VIDEO,
YUV, P-SCAN, YPbPr, or TV RGB
Notes:
Only choose PSCAN if your DVD player is connected to a Progressive Scan TV with
Y,Cb,Cr cables. Choose TV RGB if the SCART socket is used.
OPERATIONAL INSTRUCTIONS
System Setup (DVD)
Press the SETUP button to display the Main menu
• Press the NAVIGATION 3 / 4 buttons to highlight the icon
of the desired page.
• Press the NAVIGATION 5 / 6 buttons to activate that page.
• Press the NAVIGATION 6button to highlight the desired option.
• Press the ENTER button or the NAVIGATION 4 button to select
from the options that appear on the right of the screen.
Page 8

OPERATIONAL INSTRUCTIONS
13 | iLuv
iLuv | 14
i1277 | V10M10_IM_EN_01223008
Audio Setup
Highlight the Audio Out option using the NAVIGATION3/4 /5/ 6
buttons to choose the audio output you prefer. Press the ENTER button to
confirm. There are three output modes.
• SPDIF / OFF
• SPDIF / RAW: Choose this setting if your DVD player is connected to a
power amplifier with Dolby digital decoder and Coaxial cable.
• SPDIF / PCM: Choose this setting if your DVD player is connected to a
2-channel digital stereo amplifier.
Dolby Digital Setup
DYNAMIC RANGE
When Line Out is selected, choose this setting to adjust the line out ratio
for different effects.
Speaker Setup
DOWNMIX
• LT / RT: Choose this setting to obtain a movie-theater sound is
the original video was recorded with Pro Logic Dolby Digital format.
• STEREO: Choose this setting when 5.1-Channel sound is playing.
• 5.1-CH: Choose this option when the player is connected to a
5.1-Channel audio amplifier and a 5.1-Channel disc is playing.
Enjoy Dolby 5.1-Channel Surround Sound.
OPERATIONAL INSTRUCTIONS
SUBTITLE LANGUAGE
• Highlight the Subtitle Lang option and use the NAVIGATION
3/4 /5/ 6buttons to choose the subtitle language you prefer.
• Press the ENTER button to confirm.
• If the disc supports the language chosen, it will display subtitles in
that language
MENU LANGUAGE
• Highlight the Menu Lang option and use the NAVIGATION3/4 /5/ 6
buttons to choose the menu language you prefer.
• Press the ENTER button to confirm.
• If the disc supports the language chosen, the menu will display in
the chosen language. If the disc does NOT support the chosen language,
the default language programmed into the disc will display.
Language Setup
OSD LANGUAGE
• Highlight the OSD Language option and use the
NAVIGATION3 / 4 / 5 / 6buttons to choose the language you prefer
for the on-screen display.
• Press the ENTER button to confirm.
AUDIO LANGUAGE
• Highlight the Audio Lang option and use the NAVIGATION
3/4 /5/ 6buttons to choose the audio language you prefer.
• Press the ENTER button to confirm.
• If the disc supports the language chosen, audio output will be in the
chosen language
Page 9

OPERATIONAL INSTRUCTIONS
15 | iLuv
iLuv | 16
Turn on your TV and your iPod / DVD Player
• Press the POWER button on the remote control or on the player itself.
The iPod/DVD selection interface will display on TV screen.
• Press the NAVIGATION 5/6 buttons to select DVD
• Press the ENTER button to enter to DVD work mode.
Place disc in the player
• Press the OPEN / CLOSE button on the remote control or on the front panel of the player itself.
“OPEN” will display on the screen.
• Carefully place a DVD into the disc tray with the label facing up
(double-sided discs have content on both sides and can be placed in any direction).
• Press the OPEN / CLOSE button again. “CLOSE” will display on the screen.
• The disc will begin playback immediately.
Note: There are some discs which will not play immediately.
When this happens, press the PLAY button or ENTER button to initiate playback.
Play
The contents a disc may vary depending on how it was programmed and what features are offered.
Selections made from the menu will only function if the disc is designed for such operation. The
following play modes are offered.
Menu Play (DVD, SDVD, VCD 2.0)
1. Press the MENU button.
TV screen displays the DVD root menu when there is a disc loaded.
PBC (Play-back-control) is initialized when an SVCD or VCD2.0 disc is loaded.
2. With a DVD loaded, press the NAVIGATION 5/6 buttons to choose the menu item you desire.
3. Press the ENTER or PLAY button to confirm.
4. During DVD playback, press MENU (PBC) button to return to the root menu.
5. During SVCD or VCD playback, when PBC is activated, press the RETURN button to return to the menu.
6. Stop
Press the STOP button once to stop and hold playback.
Press the PLAY button to resume playback from the place where it stopped.
Basic DVD Operation
i1277 | V10M10_IM_EN_01223008
OPERATIONAL INSTRUCTIONS
Video Setup
SCREEN SAVER
The Screen Saver protects your screen from damage and is activated
when the DVD player is in Stop mode, Open, No-disc state, or when
there is a frame frozen for more than 60 seconds.
• ON: Activates the Screen Saver • OFF: Deactivates the Screen Saver
Note:
The default setting is ON
BRIGHTNESS
Use the NAVIGATION5/6 buttons to adjust
the brightness of the screen.
CONTRAST
Use the NAVIGATION5/6 buttons to adjust
the contrast of the screen.
SATURATION
Use the NAVIGATION5/6 buttons to adjust
the saturation of the screen.
Page 10

OPERATIONAL INSTRUCTIONS
17 | iLuv iLuv | 18
Volume Control
Press the VOL + or VOL- buttons to adjust the sound level.
Mute
Press the MUTE button to temporarily mute the speakers. Press the MUTE button again to resume audio.
JPEG / MP3 Playback
When a JPEG or an MP3 disc is loaded, the screen will display as follows:
1. Press the NAVIGATION 5 / 6 buttons to select the file when the cursor appears in the file window.
2. Press the ENTER button to play the current file selected by the cursor.
3. Press the NAVIGATION 3 / 4 buttons to switch between the directory window and the file window.
Note:
The player will not function correctly under the following conditions:
The disc is badly scratched, damaged or dirty.
The disc is not finalized.
The recording format is not supported by the player.
Basic DVD Operation– Continued
Current MP3/JPEG file name.
If a JPEG file is playing, the name
should have a JPEG extension.
Current
directory name
The Playing file is
an MP3 audio file
File Switch Region:
Displays the type of file playing
and the switching.
The Playing file is a JPEG audio file
i1277 | V10M10_IM_EN_01223008
OPERATIONAL INSTRUCTIONS
Basic DVD Operation– Continued
Press the STOP button twice to stop playback completely.
Note: for the protection of the disc, press the STOP button before pressing the OPEN / CLOSE button to eject the disc from
the tray. After removing the disc from the tray, press the OPEN / CLOSE button to close the disc tray.
Title Play (DVDs only)
1. During DVD playback, press the TITLE button to display the DVD title content.
2. Press the NAVIGATION 5 / 6buttons to select the preferred title.
3. Press the ENTER button to confirm.
4. Playback will begin at Chapter 1 of the title chosen.
Sequence Play
1. Press the MENU button once during SVCD or VCD playback (PBC is on) to switch PBC off. The player will
enter sequence mode.
2. Press the MENU button twice to switch PBC on.
3. Press the PLAY button when an SVCD or VCD is in Stop mode, to enter Sequence playback.*
* This function is not available on all discs.
Program Play
The Program Play option allows you to program the order in which you want the chapters to play (up to 16).
Program menu (DVD, MP3, JPEG discs)
Note: If PBC is on, this operation will turn PBC off while chapters or tracks play in programmed order.
According to the highlight, use the NUMERIC buttons to enter the chapters or tracks in the order you want
them to play. Press the PLAY button or use the NAVIGATION3/4 buttons to highlight the “Play” item and
press ENTER. The chapters or tracks will now play in the programmed order.
Note: You can program a maximum of 16 titles, chapters or tracks.
According to the Direction Indicator on the menu, use the NAVIGATION3/4 / 5 / 6buttons to highlight
your desired entry. During Program Playback, press the PROGRAM button to display the programmed
order on the screen. This will also stop the program playback. Press the STOP button or the PLAY button
to resume playback.
Notes: To clear the programmed order, use the NAVIGATION3/4 / 5 / 6buttons to highlight the “Clear” option.
Press the ENTER button to confirm. To modify the programmed order, use the NAVIGATION3/4 / 5 / 6buttons to
highlight the item you wish to modify and enter the number of the new chapter or track using the NUMERIC buttons.
Page 11

TROUBLESHOOTING GUIDE
19 | iLuv
iLuv | 20
No power
• Check to ensure that the power plug is securely in the wall outlet.
• Check to ensure that the “MAIN POWER SWITCH” in the back of unit
No sound and POWER switch is turned on.
• Check the connection between the DVD player and the TV set, amplifier, or any other unit it is connected to.
• Check to ensure the TV and amplifier are in the correct mode.
No picture
• Check the connection between the DVD player and the TV set or any other unit it is connected to.
• Check to make sure TV is turned on.
• Check to make sure TV system or Video mode is correctly set.
Disc does not play
• Check to make sure the disc is loaded correctly label side facing up on disc tray.
• Check that disc is clean from dirt, dust, fingerprints, and smudges.
• Check to ensure disc is with in the guides on the tray.
• Check if parental lock function is on.
• Make sure disc is for use in region
Remote does not work.
• Check batteries; possibly replace.
• Check to ensure there isn't any obstacles between the remote sensor
on the unit's front panel and the remote control.
• Be sure the remote is aimed at the remote sensor.
Divided picture
• Check that disc is clean and has no scratches.
• The unit is controlled by a micro computer, which may need to be reset.
Turn off the unit's power, wait several seconds, then turn back on.
No Color Picture
• Check to see if the connector is damaged.
DVD Problems - Possible Solutions
i1277 | V10M10_IM_EN_01223008
TROUBLESHOOTING GUIDE
Can’t switch to iPod mode
• Wait until the iPod has been initiallized.
• Make sure the iPod is connected securely to the integrated dock.
• Confirm that your iPod has been recharged with a depleted battery.
• Upgrade your iPod firmware to the latest version.
• If the TV screen continues to be frozen for 80 seconds, after inserting your iPod, your iPod has to be
reset. Press and hold Menu and Center buttons of your iPod for about six to ten seconds until the Apple
logo appears on your iPod screen. When your iPod starts to operating normally again, connect it to i1277.
Do not hear any sound from AV Device
• Make sure the AV device is properly connected to i1277.
• Make sure the TV or audio amplifier is connected to the FR/FL jacks of i1277.
Nothing shows when playing a video
• Make sure the TV is propely connected to i1277.
• Make sure the i1277’s video output has been set to S-Video.
• Confirm that the video output on your iPod has been set to ON.
• Make sure i1277 video is connected to TV through composite video or S-video jack.
The iPod buttons on the remote control don’t respond
• Make sure your iPod is connected securely to the integrated dock.
• Reset i1277 by taking your iPod out of the integrated clock and putting it back into the integrated dock.
• Press the iPod/DVD button on the remote control twice to reconnect your iPod.
My iPod is frozen
• Reset your iPod by pressing and holding the Menu and Center (Select) buttons on your iPod to reset.
• Refer to the instruction manual for your iPod itself.
iPod Problems - Possible Solutions
Page 12

USER SAFETY GUIDE
IMPORTANT SAFETY PRECAUTIONS
INSTRUCTIONS ON ENVIRONMENT PROTECTION
Do not dispose of this product in the usual household garbage at the end of its life cycle;
bring it to a collection point for the recycling of electrical and electronic appliances. This
symbol on the product means the instructions for use or the packing will inform about the
methods for disposal. The materials are recyclable as mentioned in its marking. By recycling,
material recycling, or other forms of re-utilization of old appliances, you make an important
contribution to protect the environment. Please inquire at your local community
administration for the authorized disposal location.
The lightning flash with an arrowhead symbol within an equilateral triangle is intended to
alert the user of the presence of un-insulated “dangerous voltage” within the unit’s cabinet
that may be of sufficient magnitude to constitute a risk of electric shock.
The exclamation point within an equilateral triangle is intended to alert the user of the
presence of important operating, maintenance and servicing instruction in the manual
accompanying the unit.
WARNING: To prevent fire or shock hazard, do not expose this appliance to rain or moisture.
CLEANING
Always disconnect unit from power supply before attempting to clean it. Use soft cloth
moistened with soapy water, and wipe gently. Do not use solvents or abrasive materials.
LASER SAFETY
This unit uses laser technology. Only a qualified professional should remove the cover or
attempt to service this device, due to possible eye injury.
CAUTION – CLASS 1 LASER PRODUCT
Use of controls adjust¬ments and/or performance of procedure other than specified
herein may result in hazardous radiation exposure.
DANGER
Invisible laser radiation when open and interlock failed or defeated. Avoid direct exposure
to beam. Caution: hazardous laser radiation when open and interlock defeated.
21 | iLuv
iLuv | 22
CLASS 1
LASER PRODUCT
i1277 | V10M10_IM_EN_01223008
FEATURES AND SPECIFICATIONS
This product incorporates copyright protection technology that is protected by method
claims of certain U.S. patents and other intellectual property rights owned by Macrovision
Corporation and other rights owners. Use of this copyright protection technology must be
authorized by Macrovision Corporation, and is intended for home and other limited viewing
uses only, unless otherwise authorized by the Macrovision Corporation. Reverse engineering
or disassembly is prohibited.
Apparatus claims of US Patent Nos. 4,631.603; 4,819.098; 5,315.448 and 6,516.132; licensed for
limited viewing uses only.
Features for Your iPod
• Watch your favorite iPod videos on your TV
• Play and charge your iPod with i1277
• Provides full control of your iPod with the included remote control
• Navigate your iPod videos or music on your TV screen with convenient OSD (On-Screen Display)
specially designed for your iPod
• Capable of outputting your favorite videos or music from your iPod to your TV through S-Video or AV output
• Integrated dock for your iPod touch, iPod classic (80GB, 160GB), iPod nano 3rd Gen. and iPod with video
(30GB, 60GB, 80GB)
Features for DVD Player
• Watch your favorite DVD videos on your TV
through component video and
coaxial digital audio output
• Front tray type DVD mechanism
• Featured with convenient OSD (On-Screen Display)
• Multiple subtitle, angle, and audio functions
• Slow- and fast-motion playback and zoom operation
• Remote control included
• Playable Media: DVD / VCD / MP3 / Audio CD /
JPEG / Kodak Picture
Specifications
• Power Requirement
AC 100V – 240V , 60Hz / 50Hz
Power consumption: under 15W
• Unit Dimensions (W x H x D):
12.6” x 2.1” x 9.2” inches
• Unit Weight: 2.45 lbs
Specifications are subject to change
without prior notice.
Page 13

USER SAFETY GUIDE
IMPORTANT SAFETY PRECAUTIONS– CONTINUED
NONUSE PERIODS – When the appliance is to be left unused for an extended period of time, unplug from outlet.
OBJECT and LIQUID ENTRY – Care should be taken so that objects do not fall and liquids are not spilled into
the device’s openings.
DAMAGE REQUIRING SERVICE – The appliance should be serviced by qualified service professional when:
a. The power supply cord or plug has been damaged.
b. Objects have fallen into, or liquid has been spilled into the appliance’s apertures.
c. The appliance has been exposed to rain.
d. The appliance has been dropped and suffered damage.
e. The appliance does not appear to operate normally, or exhibits a change in performance.
SERVICING – The user should not attempt to service the appliance beyond what is described in the user's operating
instructions. All other servicing should be referred to qualified service professional.
BATTERY USAGE – To prevent battery leakage, which may result in bodily injury, property damage or damage
to the unit, follow these instructions:
a. Install all batteries correctly according to the polarity (+ -) as marked on the unit.
b. Do not mix old and new batteries, carbon and alkaline, etc.
c. Remove batteries from the unit when the device will not be used for an extended period of time.
LEAD AND MERCURY – This product may contain lead and/or mercury. Disposal of these materials may be regulated
by your local authorities due to environmental considerations. For more detailed disposal or recycling information,
please contact your local authorities or the EIA (Electronic Industries Alliance) – http://www.eiae.org
23 | iLuv
iLuv | 24
i1277 | V10M10_IM_EN_01223008
USER SAFETY GUIDE
IMPORTANT SAFETY PRECAUTIONS
This device complies with Part 15 of the FCC Rules. Operation is subject to the condition that
this device does not cause harmful interference.
Note: Changes or modifications not expressly approved by the party responsible for
compliance could void the user’s authority to operate the equipment.
IMPORTANT SAFETY WARNINGS
1. Before using the player, please ensure that your local AC voltage is suitable for this unit.
2. To prevent fire or electric shock, do not expose the unit to water, rain, or moisture.
3. Never attempt to open the cabinet. Dangerous high voltages are present in the unit.
4. Always refer servicing to a qualified technician.
IMPORTANT SAFETY INSTRUCTIONS
READ INSTRUCTIONS – All the safety and operating instructions should be read before the appliance is operated.
RETAIN INSTRUCTIONS – The safety and operating instructions should be retained in a secure place for future reference.
HEED WARNINGS – All warnings on the appliance and in the operating instructions should be observed.
FOLLOW INSTRUCTIONS – All operating and use instructions should be followed.
WATER AND MOISTURE – The appliance should not be used near water. For example: near a bathtub, kitchen sink,
laundry tub, and/or swimming pool.
VENTILATION – The appliance should be situated so that its location and posi¬tion does not interfere with its proper
ventilation. For example, the appliance should not be situated on a bed, sofa, rug or similar surface that may block the
ventilation openings; or, be placed in a built-in installation, such as a bookcase or cabinet that may impede the flow
of air through the ventilation openings.
HEAT – The appliance should be situated away from heat sources such as radia¬tors, heat registers, stoves, or other
appliances (including amplifiers) that produce heat.
POWER SOURCES – The appliance should be connected to a power supply only of the type described in the operating
instructions or as marked on the appliance itself.
POWER CORD PROTECTION – Power supply cords should be routed so that they are not likely to be walked on or
obstructed by items placed on or against them. Pay particular attention to cords at plugs, convenience receptacles,
and the point at which they connect to the appliance.
CLEANING – The appliance should only be cleaned with a dry cloth.
FCC NOT ICE (USA )
Page 14

Visit our website at www.i-Luv.com
iLuv is a trademark of jWIN Electronics Corp., and all rights for use of this trademark are reserved and protected by law.
All logos and brands are the property of their respective owners. Features and specifications are subject to change
without prior notification. iPod is a trademark of Apple Computer, Inc. iPod is not included with this unit.
©2008 jWIN Electronics Corp., All rights reserved. No portion of this printed material or product enclosed herewith
including design, shape, and graphics may be reproduced or transmitted in any form without the expressed written
consent of jWIN Electronics Corp., by any means electronic or mechanical including photocopying, recording, or use
of an information storage retrieval system. Any unauthorized distribution or reproduction of this printed material,
or any portion thereof, will be prosecuted to the fullest possible extent of the law.
Printed in China
25 | iLuv
iLuv | 26
i1277 | V10M10_IM_EN_01223008
USER SAFETY GUIDE
Since digital circuitry may cause interference to other radio or television tuners nearby,
switch this unit off when not in use or move it away from the affected radio/television tuner.
Note: This digital apparatus does not exceed the Class B limits for radio noise emissions
from digital apparatus as set out in the Radio Interference Regulations of Industry
Canada. These limits are designed to provide reasonable protection against harmful
interference in a residential installation. This equipment generates, uses, and can
radiate radio frequency energy and, if not installed in accordance with these
instructions, may cause harmful interference to radio communications.
However, there is no guarantee that interference will not occur in a particular
installation. If this equipment does cause harmful interference to radio or television
operation (which can be determined by turning the equipment off), the user is
encouraged to try to correct the interference by one of more of the following measures:
• Reorient or relocate the receiving antenna.
• Increase the separation between the equipment and receiver.
• Connect the equipment into an outlet on a circuit different from that to which
the receiver is connected.
Consult the dealer or an experienced radio/TV technician for help.
FCC NOT ICE (Can ada)
 Loading...